Embed Size (px)
Citation preview

Automated Template C: Created by James Nail 2013V2.1
Instructions for using the 6th edition MSU thesis/dissertation word 2007 automated
templates
By
James Nail
Serials Specialist
Thesis and Dissertation Format Review
June 2015

ii
FORWARD
These templates were created as tools to assist authors in meeting the formatting
requirements as set forth in the Standards for Preparing Theses and Dissertations: 6th
edition. These templates make use of some advanced features that are only available in
Word 2007 or newer versions. These templates have been completely rebuilt to include
helpful features that can benefit those starting the writing process. As such, they are
currently in "beta" release, meaning that they have not been fully tested and may have
additional features added in the future. Please provide feedback on any issues that you
have using these templates or instructions so that we can improve upon them.
It is very important that all of the following instructions are read before
using these templates. The user should be aware of Word’s many automated settings in
order to make full use of these templates’ capabilities. Also, it is highly recommended
that the user save often and keep multiple backup copies of their work during the writing
process. One of the best methods for organizing drafts is to save each major revision as
its own file so that previous drafts may still be accessed.
There are five versions of the Word 2007 Automated Template. Each version
handles a specific layout preference for formatting subheadings and table/figure title
numberings.

iii
Template A provides subheading levels that are distinguished by formatting, and it numbers tables/figures sequentially (1, 2, 3…)
throughout the document. This is the closest to being APA without actually being in APA format. Ideal for disciplines in the Humanities.
Template B provides subheading levels that are distinguished by formatting, and it numbers tables/figures sequentially by chapter (1.1, 1.2, 1.3…, 2.1, 2.2, 2.3…). This template provides the best utility in preparing for future reformatting of sections for journal publication. If you are planning to submit parts of your document as journal articles, this would be the best choice. Ideal for Humanities and Soft Sciences.
Template C provides subheadings numbered by chapter (1.1, 1.2, 1.3…)
and distinguished by subsections (1.2.1, 1.2.2…), and it numbers
tables/figures sequentially by chapter (1.1, 1.2, 1.3…, 2.1, 2.2, 2.3…). This template provides the best utility in cross referencing between chapters. This template is ideal for very technical documents such as those typically associated with the Hard Sciences.
All three meet the formatting requirements of MSU. APA styles are not supported by
these templates.
There are two more templates that are available to meet specific departmental
requirements. The College of Education and the Department of Psychology have formal
exceptions to specific formatting requirements on file and Template APA is available to
help affected authors navigate those exceptions. The discipline of Chemistry commonly
makes use of an example style called “Schemes”. Template C with Schemes is
available to help incorporate schemes easily within the template. These last two
templates are reserved only for those who are required by their department to
incorporate the layout that they provide.
If you have any questions concerning these templates, please contact:
James Nail Phone: 662-325-2170 Fax: 662-325-2895
Email: [email protected]

iv
TABLE OF CONTENTS
FORWARD......................................................................................................................... ii
CHAPTER
I. WHAT YOU SHOULD KNOW BEFORE YOU GET STARTED .....................1
1.1 Paragraph Marks ........................................................................................1
1.2 Section Breaks ...........................................................................................1
1.3 Styles .........................................................................................................2
1.3.1 Modifying Styles .................................................................................7
1.3.2 Creating Styles .....................................................................................7
1.4 Quickparts ..................................................................................................8
1.4.1 Quick Parts in All Templates ..............................................................8
1.4.2 Additional Quickparts only in Templates APA, B, C, and C with Schemes .....................................................................................10
1.4.3 Additional Quickparts only in Template C with Schemes ................11
1.4.4 Additional Quickparts Reserved for Repairing Broken Templates ..........................................................................................12
1.5 Replace ....................................................................................................13
II. GETTING STARTED .........................................................................................15
2.1 Preliminary pages ....................................................................................15
2.1.1 Title Page ...........................................................................................15
2.1.1.1 Title ..............................................................................................15
2.1.1.2 Author’s Full Name .....................................................................16
2.1.1.3 Type of Document .......................................................................16
2.1.1.4 Degree ..........................................................................................17
2.1.1.5 Major ...........................................................................................17
2.1.1.6 Department ..................................................................................17
2.1.1.7 Graduation Date ...........................................................................18
2.1.2 Copyright Page ..................................................................................18
2.1.3 Approval Page ...................................................................................18
2.1.4 Abstract ..............................................................................................20
2.1.5 Dedication ..........................................................................................22
2.1.6 Acknowledgements ...........................................................................23
2.1.7 Table of Contents ..............................................................................23
2.1.8 List of Tables .....................................................................................24
v
2.1.9 List of Figures ....................................................................................25
2.1.10 List of Schemes (only for Template C with Schemes) ......................26
2.1.11 Other Preliminary Page .....................................................................26
2.2 Main Body ...............................................................................................27
2.2.1 First Page of a Chapter ......................................................................27
2.2.1.1 Creating New Chapters ................................................................28
2.2.2 Headings ............................................................................................29
2.2.2.1 Additional Instruction for Appendices Headings in Templates C, and C with Schemes ..............................................29
2.2.2.2 Additional Instruction for 3rd Through 5th Level Headings in Template APA .........................................................................29
2.2.3 Inserting Tables .................................................................................30
2.2.3.1 Tables that Span Multiple Pages .................................................31
2.2.4 Inserting Figures ................................................................................33
2.2.4.1 Figures that Span Multiple Pages ................................................34
2.2.5 Inserting Schemes (Template C with Schemes only) ........................35
2.2.5.1 Schemes that Span Multiple Pages ..............................................37
2.2.6 Inserting Equations ............................................................................38
2.2.7 Landscaped pages ..............................................................................39
2.3 References ...............................................................................................41
2.3.1 One Reference Section ......................................................................42
2.3.1.1 EndNote .......................................................................................42
2.3.1.2 Zotaro ..........................................................................................42
2.3.2 Multiple Reference Sections (at the End of Each Chapter) ...............42
2.4 Appendices ..............................................................................................43
2.4.1 Appendix Headings for Templates C and C with Schemes ..............44
2.4.2 Appendix Tables/Figures/Equations for Templates APA, B, C, and C with Schemes ......................................................................45
III. PREPARING TO SUBMIT ................................................................................47
3.1 Finishing touches .....................................................................................47
3.1.1 Last Page ...........................................................................................47
3.1.2 Update the Entire Document .............................................................48
3.2 Converting to .pdf ....................................................................................48
3.2.1 Printing to .pdf ...................................................................................49
3.2.2 Saving as .pdf ....................................................................................49
3.2.3 Rotate Landscape Pages to Portrait Orientation in the .pdf ...............50
3.3 Copying and pasting into the templates ...................................................50
3.4 Final thoughts ..........................................................................................50
APPENDIX
A. VERSION HISTORY .........................................................................................52
A.1 Version 1.0 (05/01/2010) .........................................................................53

vi
A.2 Version 1.1 (08/20/2010) .........................................................................53
A.3 Version 2.0 (beta) (6/1/2012) ..................................................................53
A.4 Version 2.01 (beta) (6/6/2012) ................................................................54
A.5 Version 2.02 (3/5/2012) ...........................................................................54
A.6 Version 2.1 (07/30/2013) .........................................................................54

1
WHAT YOU SHOULD KNOW BEFORE YOU GET STARTED
There are a few tools in Word 2007 that you should know how to use before
starting. It is important that you learn these basic tools and use them throughout the
writing of your document.
1.1 Paragraph Marks
Turning on Paragraph Marks allows you to see hidden text, format marks, and
section/page breaks. This is one of the most useful tools in managing the format of a
document, as it allows for a visual inspection of the format of the document. To activate
the Paragraph Marks, you can simply press Control + Shift + 8, or click on the ¶ icon in
the paragraph section of the Home ribbon. Common symbols are as follows:
¶ = Hard Return (Any instance of pressing the Enter key)
= Soft Return (Any instance of pressing Shift + Enter)
→ = Tab (Any instance of pressing the Tab key)
∙ = Space (Any instance of pressing the Spacebar)
{text} = Field codes (created by using Control+F9)
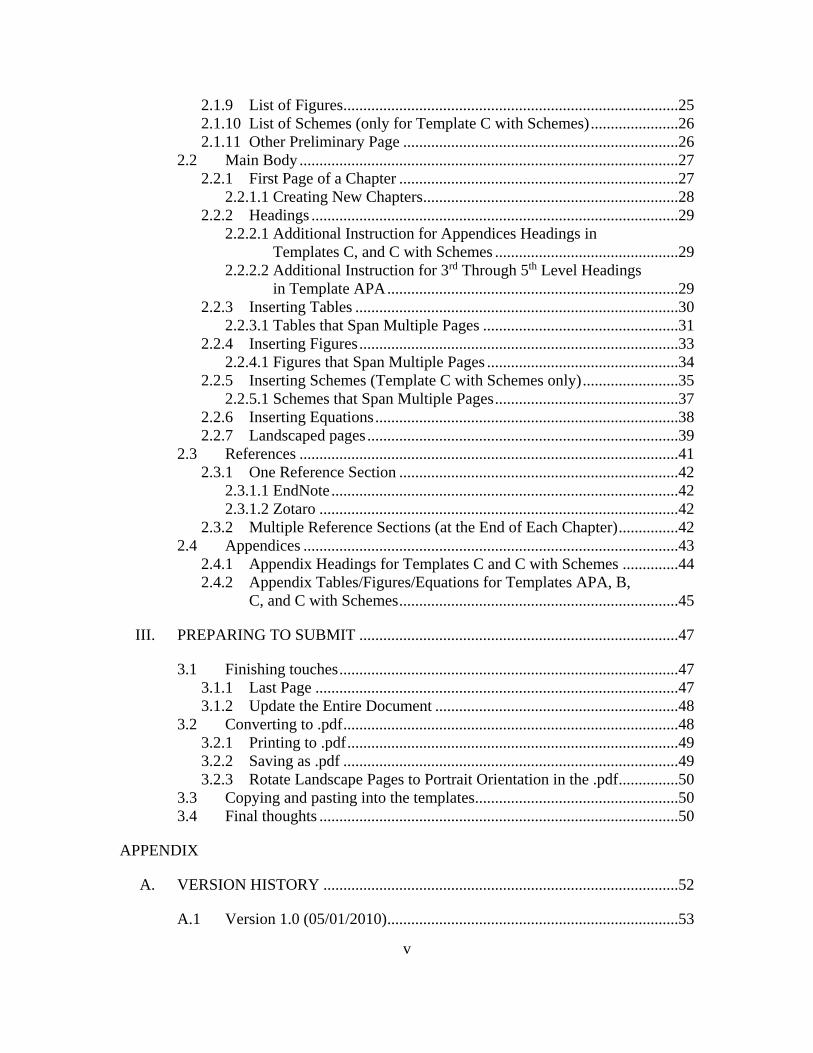
1.2 Section Breaks
Section Breaks allow you to divide your document into multiple sections, each of
which constrains certain formatting (e.g., margins, landscape/portrait layout, and
2
header/footer) to a specific area of the document. For these templates, it is recommended
that only “Section Break: Next Page” be used. To insert a “Section Break: Next Page”,
go to the Page Layout ribbon and click on “Breaks” in the Page Setup section. The fourth
option down is “Section Break: Next Page”.
When inserting a Section Break, the new section will inherit all the properties of
the previous section. So if a page number in the footer was formatted to “Start at 1”, the
new section would also “Start at 1” for the page number in the footer. Keep this in mind
when inserting new sections and check to make sure that you correct/update any format
to the margins, landscape/portrait layout, and header/footer as needed.
1.3 Styles
Styles provide a convenient means to track/organize various formatting
requirements. The style gallery is located on the Home ribbon and can be scrolled
through by clicking on the up/down arrows located on the right of the style gallery.
Authors are welcome to change the style settings as long as they do not conflict with the
requirements in the 6th edition of the Standards. In the templates, the style gallery
displays the styles you will need to use in the creation of your document. Here is what is
in the templates’ style gallery:
Preliminary Page Heading Format used for the following headers: DEDICATION, ACKNOWLEDGEMENTS, LIST OF TABLES, LIST OF FIGURES, OTHER PRELIMINARY PAGE., and REFERENCES.
Chapter Number Format for Chapter numbers. Clicking this style will generate “CHAPTER #” where # is the next available
chapter number.

3
Chapter Title Format for Chapter titles. If needed, use a soft return (Shift + Enter) to control line breaks to conform with the inverted pyramid requirement in the Standards.
Paragraphs This is the template default style for paragraphs. All paragraphs in the document should have this style applied
1st level heading Format for 1st level headings. (Alterations to the default format is allowed for only in Templates A and B)
2nd level heading Format for 2nd level headings. (Alterations to the default format is allowed for only in Templates A and B)
3rd level heading Format for 3rd level headings. (Alterations to the default format is allowed for only in Templates A and B)
4th level heading Format for 4th level headings (very uncommon). (Alterations to the default format is allowed for only in Templates A and B)
5th level heading Format for 5th level headings (rare). (Alterations to the default format is allowed for only in Templates A and B)
Block Quote This is an example style for block quotes
Equation Simple style for lines that will have equations. It sets a center tab stop for equations and a right align tab stop for equation numbers (must enter numbers manually if equation number Quickpart is not used)
Split Paragraph continued This is a companion style for Paragraph to handle the formatting of non-indented paragraphs resulting from an allowable split (such as by an equation or number list)
Bullet List This is an example bullet list style meant to help foster consistent formatting throughout the document. It is permissible to alter this style within the allowable constraints set forth in the Standards.
Numbered List This is an example numbered list style meant to help foster consistent formatting throughout the document. It is permissible to alter this style within the allowable constraints set forth in the Standards.
Table Titles Format for Table titles and numbers.
4
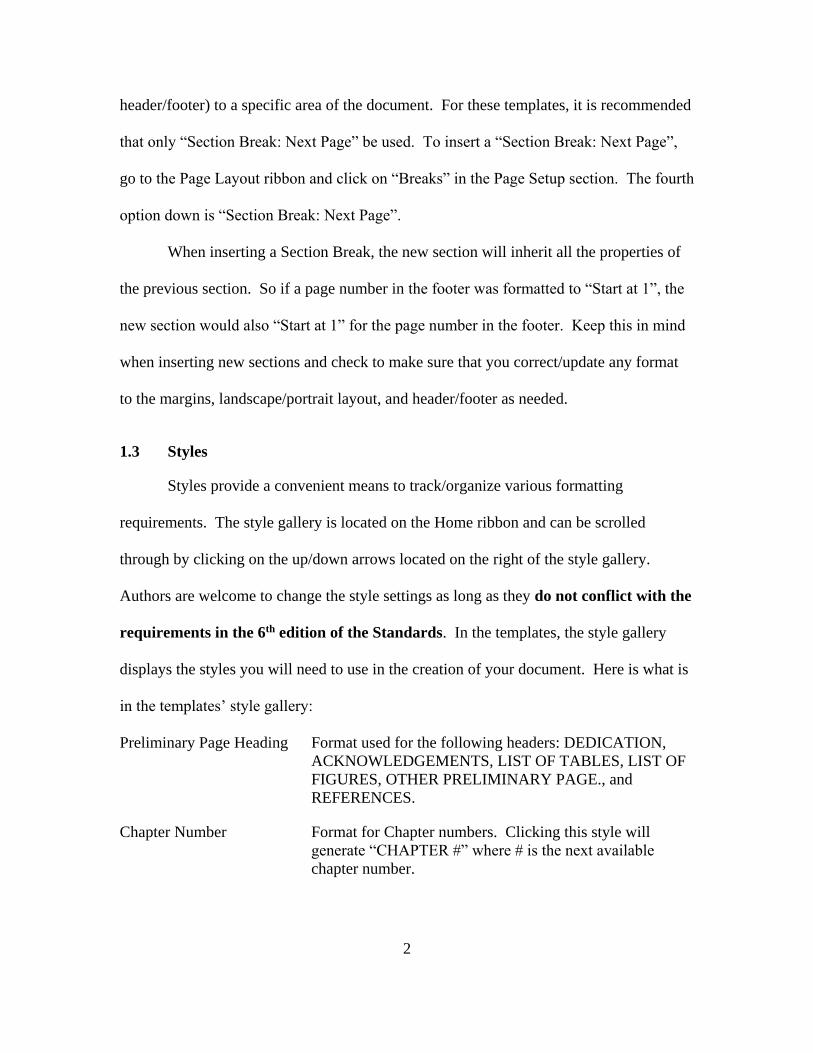
Table Notes Format for descriptive notes for Tables, including line spacing. If you have multiple notes after a given Table, use a soft return (Shift + Enter) to continue to the next line and preserve line spacing.
Table continued Format for continued Table section of Tables that span more than 1 page.
Images This style is for lines that will contain images (such as figures/charts). All such images must be set to "in-line with text" and be of a single image object (jpg, png, eps,gif,...)
Figure Titles Format for Figure titles and numbers.
Figure Notes Format for descriptive notes for Figures, including line spacing. If you have multiple notes after a given Figure, use a soft return (Shift + Enter) to continue to the next line and preserve line spacing.
Figure continued Format for continued Figure section of Figures that span more than 1 page.
Scheme Titles Format for Scheme titles and numbers. (only for Template C with Schemes)
Scheme Notes Format for descriptive notes for Schemes, including line spacing. If you have multiple notes after a given Scheme, use a soft return (Shift + Enter) to continue to the next line and preserve line spacing. (only for Template C with Schemes)
Scheme continued Format for continued Scheme section of Schemes that span more than 1 page. (only for Template C with Schemes)
Bibliography This style is provided to support users of Zotaro with the formatting of their citation lists.
EndNote Bibliography This style is provided to support users of EndNote with the formatting of their citation lists.
Reference entry This style is provided to help promote consistent formatting for reference entries.
Appendix Letter Format for Appendix Letters in the Appendices. Clicking this style will generate “APPENDIX $” where $ is the next
available letter.

5
Appendix Titles Format for Appendix Titles in the Appendices. If needed, use a soft return (Shift + Enter) to control line breaks to conform with the inverted pyramid requirement in the Standards.
Appendix 1st level heading Format for 1st level subheadings in the Appendices (uncommon) (only for Templates B, C, and C with Schemes)
Appendix 2nd level heading Format for 2nd level subheadings in the Appendices (uncommon) (only for Templates B, C, and C with Schemes)
Appendix 3rd level heading Format for 3rd level subheadings in the Appendices (very uncommon) (only for Templates B, C, and C with Schemes)
Appendix 4th level heading Format for 4th level subheadings in the Appendices (rare) (only for Templates B, C, and C with Schemes)
Appendix 5th level heading Format for 5th level subheadings in the Appendices (rare) (only for Templates B, C, and C with Schemes)
Appendix Equation Format for Equation in the Appendices (must enter numbers manually if equation appendix number Quickpart is not used) (only for Templates B, C, and C with Schemes)
Appendix Table Title Format for Table numbers and titles in the Appendices (only for Templates B, C, and C with Schemes)
Appendix Table Notes Format for descriptive notes for Appendix Tables, including line spacing. If you have multiple notes after a given Table, use a soft return (Shift + Enter) to continue to the next line and preserve line spacing. (only for Templates B, C, and C with Schemes)
Appendix Table continued Format for continued appendix Table section of Tables that span more than 1 page. (only for Templates B, C, and C with Schemes)
Appendix Figure Title Format for Figure numbers and titles in the Appendices (only for Templates B, C, and C with Schemes)

6
Appendix Figure Notes Format for descriptive notes for appendix Figures, including line spacing. If you have multiple notes after a given Figure, use a soft return (Shift + Enter) to continue to the next line and preserve line spacing. (only for Templates B, C, and C with Schemes)
Appendix Figure continued Format for continued appendix Figure section of Figures that span more than 1 page. (only for Templates B, C, and C with Schemes)
Appendix Scheme Titles Format for appendix Scheme titles and numbers. (only for Template C with Schemes)
Appendix Scheme Notes Format for descriptive notes for appendix Schemes, including line spacing. If you have multiple notes after a given Scheme, use a soft return (Shift + Enter) to continue to the next line and preserve line spacing. (only for Template C with Schemes)
Appendix Scheme continued Format for continued appendix Scheme section of Schemes that span more than 1 page. (only for Template C with Schemes)
Double Signature Lines This should be used in instances where the approval page exceeds 1 page. This sets up an alternative line that will include two signature lines instead of the single centered line.
Double Signature Entry This should be used in instances where the approval page exceeds 1 page. This sets up centering tabs that will line up with the signature lines provided by the style "Double Signature Lines".
Single Signature Line This is the default style for the standard signature line. Center
Single Signature Entry This is the default style for the standard signature entry. Center
It is important to note that these styles apply to an entire paragraph, which in
Word is defined as the text between two hard returns (¶). Use a soft return (Shift +
Enter) ( ) if you wish to continue a paragraph and force a line break. An example of

7
where this would be used would be in a multi-line Chapter or Appendix title to create an
inverted pyramid layout of the text where it does not naturally occur.
1.3.1 Modifying Styles
Modifying styles is very simple.
First apply the style you wish to modify
Then modify the formatting of the entry that you just applied the style to.
Once you have the formatting set, go to the style pane and you should see the style that you applied still highlighted. Right-click that style and select Update to match selection.
Any other content that has that style applied will have their format updated to
your new settings. NOTE: all of the styles preset in the template are in compliance with
the Standards for Preparing Theses and Dissertations: 6th edition and should only be
altered in such a way as to stay in compliance for the thesis or dissertation submission.
Any alterations done in a separate copy of the document in preparation for journal
publication is unrestricted.
1.3.2 Creating Styles
As previously mentioned using Styles is an effective way to ensure consistency in
formatting. They also assist in quickly reformatting through their ability to be modified
and updated. However, you may have content that was not anticipated for by the
templates. In such cases, it would be beneficial to create new styles.
Simply format an entry the way you want it to appear
Then right-click on the entry and select “Styles”
Then select “Create a Style” and fill out the information in the window that pops up.
8
You will now see your new style listed in the style pane and can use or modify it
at your leisure.
1.4 Quickparts
Quickparts are a convenient way for storing reusable content that can be accessed
quickly by
Typing the name of the quickpart desired
Press F3
You can also manually select a quick part by
Click the Insert tab
On the Insert Ribbon, in the section “text” select “Explore Quick Parts”
Click on the desired quick part to add
For the purposes of these instructions, quickparts that are available will be listed
in a light green box. Following that will be instructions for using the template without
the benefit of quickparts. The list of available quickparts are as follows:
1.4.1 Quick Parts in All Templates
Additional committee chair entry: For use on the Abstract Page. Creates a new
line for additional committee chairs that have differing titles, such as
Director of Thesis and Major Professor. Co-Major Professors should just
be added to one line with the selection “Major Professors”.
Double approval page entry: For use on the Approval Page. Creates two
columnar entries, side by side, including 2 signature lines, 2 content boxes
for committee member name and 2 drop down boxes for committee role.
9
Equation number: Places a new line with the Equation style with a tab,
placeholder box for equations, another tab, then SEQ field code for
equation numbering.
Figure: Creates a line with the images style and a box for loading images, then a
line with the figure title style and a box for typing a figure title, and finally
a line with the figure notes style with a box for inserting figure notes.
Figure continued: Like Figure, but replaces line for figure title with a line that
has a STYLEREF field to the previous figure title line and the word
“(continued)”
Landscape page: Quick method for creating properly formatted landscape page.
Inserts a section break, some blank lines for content, and then another
section break set to landscape orientation with correct margins. It also
places a page number in the “left” margin in the orientation required by
the Standards.
Last page: For use on the very last page of the document. In case of accidental
deletion, this will add the hidden text/bookmark needed so that the
Abstract’s “Pages in Study” field can be updated.
New appendix: For use in creating new appendices after the prebuilt appendix A.
Adds a section break to end the previous appendix, then a line with the
Appendix Letter style and appropriate SEQ fields for equation numbering,
then a line with the style Appendix Title and a box for entering the title.
Then adds another section break and centers the page vertically. Finally it
adds a few blank lines to begin the new appendix’s content.

10
New chapter: For use in creating new chapters after the prebuilt chapter II.
Adds a section break to end the previous chapter, then a line with the
Chapter Title style and appropriate SEQ fields for equation numbering,
then a line with the style Chapter Title and a box for entering the title. A
few extra blank lines are added to begin the new chapter’s content.
New preliminary page: Used to add additional preliminary pages to hold such
content as List of Symbols, List of Terms, List of Abbreviations, etc. Adds
a section break to end the previous preliminary page, then a line with the
Preliminary Page Heading style and a box for entering the new title.
Finally a few blank lines are added to facilitate adding new content.
Single approval page entry: For use on the Approval Page. Creates a centered
entry set including a signature line, a content box for committee member
name and a drop down box for committee role.
Table: Creates a line with the Table Title style and a box for typing the table title,
then an example table to be replaced, then a line set to the table notes style
with a box for inserting table notes.
Table continued: Like Table, but replaces line for table title with a line that has
a STYLEREF field to the previous table title line and the word
“(continued)”
1.4.2 Additional Quickparts only in Templates APA, B, C, and C with Schemes
Equation appendix number: as Equation number, but for numbering based on
appendix letter

11
Figure appendix: As Figure, but for inserting into the appendices to include
Appendix Letter in numbering scheme.
Figure appendix continued: as Figure continued but for use in appendices to
include Appendix Letter in numbering scheme.
Table appendix: as Table, but for inserting into the appendices to include
Appendix Letter in numbering scheme
Table appendix continued: as Table continued but for use in appendices to
include Appendix Letter in numbering scheme
1.4.3 Additional Quickparts only in Template C with Schemes
Scheme: Creates a line with the images style and a box for loading images, then a
line with the Scheme Title style and a box for typing a scheme title, and
finally a line with the scheme notes style with a box for inserting scheme
notes.
Scheme continued: Like Scheme, but replaces line for scheme title with a line
that has a STYLEREF field to the previous scheme title line and the word
“(continued)”
Scheme appendix: As Scheme, but for inserting into the appendices to include
Appendix Letter in numbering scheme.
Scheme appendix continued: as Scheme continued but for use in appendices to
include Appendix Letter in numbering scheme.
12
1.4.4 Additional Quickparts Reserved for Repairing Broken Templates
One of the most common issues encountered using these templates is a failure to
read the instructions before using. This inevitably leads to sections of the template being
deleted resulting in a loss of functionality and undermining many benefits provided in
these templates. The following Quickparts make it possible to completely rebuild the
original content of the template. It is recommended that consultation with the Office of
Thesis and Dissertations be sought before using these quickparts.
Continued preliminary page: This is used to fix page numbering issues after
the initial page “ii”. This inserts a section break with the page number
setting of lower case Roman numerals and “continue from previous”
numbering.
First chapter page number: This is used to set the first page of chapter 1 to start
at “1”. This places a section break with the page number setting of Arabic
numbering and “Start at 1”.
First preliminary page number: This is used to set the first numbered page of
the preliminary section (page after Abstract) to start at “ii”. This places a
section break with the page number setting of lower case Roman numerals
and “Start at ii”.
Rebuild abstract: creates a copy of the original template abstract, including
section break.
Rebuild acknowledgements: creates a copy of the original template
Acknowledgements, including section break.

13
Rebuild appendix a: creates a copy of the original template Appendix A divider
page..
Rebuild approval page: creates a copy of the original template Approval Page,
including section break.
Rebuild chapter 1: creates a copy of the original template Chapter I, including
section break.
Rebuild copyright page: creates a copy of the original template Copyright Page,
including section break.
Rebuild dedication: creates a copy of the original template Dedication,
including section break.
Rebuild list of figures: creates a copy of the original template List of Figures,
including section break.
Rebuild list of schemes: creates a copy of the original template List of Schemes,
including section break.
Rebuild list of tables: creates a copy of the original template List of Tables,
including section break.
Rebuild table of contents: creates a copy of the original template Table of
Contents, including section break.
Rebuild title page: creates a copy of the original template Title Page, including
section break.
1.5 Replace
You will be required to use this tool in the Templates for both the List of Tables
and List of Figures to remove the words “Table” and “Figure” and replace them with a

14
Tab. The Replace tool can be found on the Home Ribbon in the Editing section. This is
a very powerful tool in that you can have it search and replace text, formats, styles,
special characters, and much more.
Care must be taken when using this tool so as not to accidently alter the document
in undesired ways. If this tool is used without first selecting a region of text to alter,
Word will assume that you want the whole document checked, starting at the cursor’s
current position. Also, it is recommended that you only use the “Replace” and “Find
Next” buttons and verify each found instance before replacing text. Do not use “Replace
All” as you may accidentally replace something that you did not want changed. Finally,
when you reach the end of a selected region, Word will ask if you want to continue your
search/replace through the rest of the document. Click “No” to exit the Replace tool.
The “More” button in the Replace tool will show the advanced parameters that
you can set for the search/replace. This is where you can enter format criteria and special
characters (such as Tab).

15
CHAPTER II
GETTING STARTED
Step by step instructions are listed as bullet points. If there is an available quick
part that streamlines the process, it will be listed first in a light green box. Quick parts
are not required to use these templates, as such non-boxed instructions assume the non-
quickpart method for using this template.
2.1 Preliminary pages
2.1.1 Title Page
The Title Page has been preformatted to the Standards. All that will be needed is
for you to enter/change the required information for your document.
2.1.1.1 Title
The Title is set in a control box that makes use of one of Word’s docproperties.
To enter in a title,
click on the current title to highlight the control box
click on the tab of the control box (labeled “Title”) to select all of the text
in the control box
Type in the title of your document in sentence case (meaning only capitalize the first word and any proper nouns or acronyms).
If your title is longer than 1 line, just keep typing without using a Hard Return(pressing Enter)

16
If you have need for the use of italicized characters (such as Latin names in Biological Sciences), you will need to add such formatting after the title is entered.
o To add the required italics, you will need to remove the content control box (as it will only allow 1 text format for its content) by right-clicking on the content control box
o select “Remove Content Control”. This will leave just the text
(and the spacing format) and allow you to now edit specific words’
formatting.
The key advantage to this content control is that once you have entered your title,
it will appear on all appropriate pages that use the title (Approval Page and Abstract). If
you have a multiple lined title that is not displaying in an inverted-pyramid style,
you will need to manually add Soft Returns (Shift + Enter) to force a new line at
locations to achieve the inverted-pyramid style. These line breaks will be carried over
to the Approval Page as well.
2.1.1.2 Author’s Full Name
This is another content control box like the one for Title. Use the same process to
replace the text with your name (as it appears with MSU's records—check Banner). This
information will automatically be added to all other sections requiring the author’s name.
2.1.1.3 Type of Document
The type of document (Thesis/Dissertation) is also a content control box
(specifically a list box). Click on the Type of Document control and select the
appropriate document type (either Thesis or Dissertation).
17
2.1.1.4 Degree
In the line “for the Degree of <Degree>”, Degree is another content control
box(specifically a list box). Click on the Degree control and select an appropriate degree
type or manually type one in if it is not listed(Master of Science, Master of Arts,
Doctorate of Philosophy, etc.—please verify this information with your Major
Professor or Graduate Coordinator)
2.1.1.5 Major
In the line “in <Major>”, Major is another content control box. Use the same
method as in Title to replace the default text with your actual Major (please verify this
information with your Major Professor or Graduate Coordinator).
2.1.1.6 Department
In the line “Department of …(or possibly College of…-see template
instructions).”, Department is another content control box. Use the same method as in
Title to replace the default text with the actual degree granting department (or college if
lacking such a department). When done the line should read "in the Department of <your
department here>" (or "in the College of <your college here>" for those obtaining an
interdisciplinary degree or degree that is sponsored directly by a College rather than a
Department). Check with your Major Professor or Graduate Coordinator to verify
your department’s current name as it is possible for it to have changed since you
started your graduate degree program.
18
2.1.1.7 Graduation Date
Replace the default text (Month Year) with the actual month and year for
graduation. Do not abbreviate the month. The fastest way to do this is to first click on
the word "today" after the calendar appears, then select your graduation date.
Graduation dates can be found in the Academic Calendar.
2.1.2 Copyright Page
The information on this page should be automatically filled in after you complete
the Title page, except for the year. Simply replace the default text (Year) with the year of
graduation. This page is optional. You should discuss with your Major Professor the
possible merits for copyrighting your work and whether or not it is needed. If you wish
to remove the page, first make sure that your paragraph marks are turned on. Highlight
all of the text on the copyright page and delete it. Also make sure that you delete the
“Section Break (Next Page)” to remove the remaining blank page from the document.
2.1.3 Approval Page
The title and name should already be filled out for this page, based on the
information that you entered on the Title Page. If you have used special formatting in
your title (italics, superscripts, etc.), then you will need to follow the same procedure to
enter these formats that you used on the title page (removing the control content box and
altering the needed text).
19
Each entry should only consist of the following information:
1. Professors Name, First Middle Last (must match the Graduate School's list
of Graduate Faculty)
o Click on the entry line for the committee member’s name
o Click the tab “Committee Member” to select the entire entry
o Type (or paste) in the name
o Make sure the Name is in the order of First Middle Last.
2. Role on committee-if applicable. Examples of roles: (Major Professor),
(Minor Professor), (Director of Thesis), (Director of Dissertation),
(Committee Member), (Graduate Coordinator) –only if not a committee
member, (Co-Major Professor) –must have at least two. In the template,
a Role listbox is provided so that you can select the appropriate role.
If a committee member serves multipler roles, example: (Major
Professor/Graduate Coordinator), Simply modify or type that role in.
You are required to provide entries for your Major Professor (or co-Major
Professors, as needed), each member of your graduate committee, your graduate
coordinator (if not already a committee member), and the Dean of your college. The
template generates 8 entries in the required format. If you need less than 8 entries,
simply delete the extra entries between your last committee member and the Dean's entry.
If you need more than 8 entries OR if the entries you need extend onto the second page,
then you will need to create a double entry in place of the first single centerred entry.

20
To do this, click on the signature line of the first entry and apply the style "Double
Signature Lines" and insert one additional tab. This should now display two signature
lines. Now click on the next line for the professor's name and apply the "Double
Signature Entry" style. Insert a tab before the first name and follow the name with
another tab to center the second name. Do the same for the Role line, inserting a tab
before the Role list box and after. Select the Role listbox and copy it. Past it after the
second tab so that it is centered under the second name.
The Dean's entry should be the last entry and only have a line for both name and
"Dean of" current college name.
2.1.4 Abstract
You will need to enter the name of your Major Professor on the appropriate line
after the listing for your Major.
Click on the text “Select Appropriate Title”
Quick Parts shortcut type: “Double approval page entry” then press F3
Creates two columnar entries, side by side, including 2 signature lines, 2 content boxes for committee member name and 2 drop down boxes for committee role.
Place cursor on the first signature line on the page and press Enter
Place cursor on the newly created blank line and type Double approval page entry
Press F3
Insert committee information for each entry space as per a normal entry line.
Repeat as needed (should only be used minimally to allow for all signature lines to fit on one page, do not use unnecessarily)

21
Select one of the listed titles or type an appropriate title for the Chair(s) of your Committee
Click the text “Add the name(s) of the person(s) heading your committee.”
Click on the tab titled “Major Professor” that appears above the box
Type or paste the name(s) of your committee chair(s).
If you have two chairs that hold differing titles:
o Simply copy the first committee chair entry
o After the first committee chair entry, press enter to start a new line
o Paste the copied entry
o Complete the new line as done for the first line
o Delete the remaining blank line (if any)
Finally, replace the default body text with your actual Abstract.
Things to keep in mind when writing the body of the Abstract:
Theses are limited to 150 words, Dissertations are limited to 350 words. (This is a requirement set by Masters Abstracts International and Dissertation Abstracts International and is non-negotiable.). Keywords are not counted as part of the word limit for abstracts.
Quick Parts shortcut type: “Additional committee chair entry” then press F3
Creates a new line for additional committee chairs that have differing titles, such as Director of Thesis and Major Professor. Co-Major Professors should just be added to one line with the selection “Major Professors”.
After the first committee chair entry, press Enter to start a new line
Type “Additional committee chair entry “ then press F3
Complete the new line as done for the first line.
Delete the remaining blank line
22
Avoid using equations or special symbols in the abstract, particularly any that are more complex than simple polynomials. This is recommended due to the nature of ETDs (Electronic Theses and Dissertations) where the abstracts are displayed in HTML and the limitations of the Cataloguing system. Characters that are not found on a standard keyboard should not be used. However, superscripts and subscripts are allowed.
Note: the next section that follows after the abstract must start its page numbering
with the lower-case Roman numeral “ii”. This is setup by default in the Template, but if
you delete the Dedication and Acknowledgements page, then the Table of Contents’ page
number formatting must be set to start at “ii”.
2.1.5 Dedication
This page is optional. Simply replace the default body text. If your abstract was
longer than 1 page, then you will need to reformat the page number in the footer to “Start
at ii”. If you do not wish to have a Dedication page, but will have an Acknowledgements
page, simply change the page heading from “Dedication” to “Acknowledgements” and
delete the following acknowledgements page. This will preserve the page numbering.
Quick Parts shortcut type: “First preliminary page number “ then press F3
This is used to set the first numbered page of the preliminary section (page after Abstract) to start at “ii”. This places a section break with the page number setting of
lower case Roman numerals and “Start at ii”.
Click before the section break of the section that immediately follows the abstract
Type “First preliminary page number “ then press F3
Delete the section break and blank lines(if any) on the new following page

23
2.1.6 Acknowledgements
This page is optional. Simply replace the default body text. If you wish to
remove the Acknowledgements page, but are keeping the Dedication page, simply
remove all of the text on the Acknowledgements page and delete the “Section Break
(Next Page) to remove the blank page. If you wish to remove just the Dedication page or
both the Dedication and Acknowledgements page, then follow the instructions in section
2.1.5.
2.1.7 Table of Contents
The Table of Contents (TOC) is built using Word’s automatic Table of Contents
creator and is formatted to meet the requirements set forth in the MSU Standards.
Nothing will need to be done to this page initially. However, once your document is
complete, you will need to update the TOC. To accomplish this:
right-click on the body of the TOC and select “Update Field”
Initially (and after altering/adding/removing any titles or subheadings) select “Update entire table”
o This will populate your TOC with your chapter titles and subheadings, as well as their page number references.
o The other option, “Update page numbers only”, is useful when
making content changes that may have affected the location of the referenced text in the TOC.
Always update the TOC before submitting to make sure that all listings and page number
references are accurate.
Note: One possible issue that may occur for Templates A and B is the failure
of the TOC to correctly display certain listings with a dot leader and page number.
This will only happen with very short subheadings that are less than 0.5” in length. The

24
reason for this is that each line is set to have a hanging indent of 0.5” from where the first
line of text starts for multi-line headings. If a heading is shorter than 0.5”, then the
automatic Tab after the heading goes to the hanging indent, rather than to the 6” dot
leader tab. To correct these,
either use a longer heading title (or just add some spaces to the heading) in the body of your work
or
Manually adjust the hanging indent (for the affected line) on the top ruler to be shorter than the length of the text for the heading.
Also, Word 2010 adds a dot leader and page number reference for the entries
"CHAPTER" and "APPENDIX". Simply delete the dot leader and page number from
both entries after updating.
2.1.8 List of Tables
The List of Tables (LOT) works the same way as the Table of Contents. When
you have finished your document, simply update the LOT in exactly the same way as the
Table of Contents. Always update the LOT before submitting to make sure that all
listings and page number references are accurate. There is one extra step needed for
the LOT after updating: You must use the Replace tool to remove the word “Table”
from each entry and replace it with a Tab.
select the entire List of Tables
click on Replace (from the Home Ribbon)
In the “Find what: “ text box type “Table “ (be sure to add one space at the
end of the word)
In the “Replace with:” text box insert the special character for Tab or type “^t”
25
Click “Find Next” and “Replace” any entry of the word “Table”. Do not press “Replace All”, as this may have unintended consequences.
If you do not have any tables in your document, you can just delete this section (It
is recommended that you wait until after your defense, in case an addition of tables is
requested). Simply remove all the text from the page and delete the “Section Break (Next
Page)” to remove the blank page.
2.1.9 List of Figures
The List of Figures (LOF) works the same way as the Table of Contents. When
you have finished your document, simply update the LOF in exactly the same way as the
Table of Contents. Always update the LOF before submitting to make sure that all
listings and page number references are accurate. There is one extra step needed for
the LOF after updating: You must use the Replace tool to remove the word
“Figure” from each entry and replace it with a Tab.
select the entire List of Figures
click on Replace (from the Home Ribbon)
In the “Find what: “ text box type “Figure “ (be sure to add one space at
the end of the word)
In the “Replace with:” text box insert the special character for Tab or type “^t”
Click “Find Next” and “Replace” any entry of the word “Figure”. Do not press “Replace All”, as this may have unintended consequences.
If you do not have any figures in your document, you can just delete this section.
(It is recommended that you wait until after your defense, in case an addition of figures is
requested) Just remove all the text from the page and delete the “Section Break (Next
Page)” to remove the blank page.

26
2.1.10 List of Schemes (only for Template C with Schemes)
The List of Schemes (LOS) works the same way as the Table of Contents. When
you have finished your document, simply update the LOS in exactly the same way as the
Table of Contents. Always update the LOS before submitting to make sure that all
listings and page number references are accurate. There is one extra step needed for
the LOS after updating: You must use the Replace tool to remove the word
“Scheme” from each entry and replace it with a Tab.
select the entire List of Schemes
click on Replace (from the Home Ribbon)
In the “Find what: “ text box type “Scheme “ (be sure to add one space at
the end of the word)
In the “Replace with:” text box insert the special character for Tab or type “^t”
Click “Find Next” and “Replace” any entry of the word “Scheme”. Do not press “Replace All”, as this may have unintended consequences.
If you do not have any Schemes in your document, you should not be using
Template C with Schemes.
2.1.11 Other Preliminary Page
You may have need for more preliminary pages such as List of Symbols, List of
Terms, List of Acronyms, etc.

27
This will need to be added manually if needed.
Click just before the section break on the current last preliminary section (usually List of Figures)
Insert a “Section Break (Next Page)”
On the first line of the new section, select the style “Preliminary Page
Heading” and type your title for this section in ALL CAPS
Insert content for your new preliminary page
2.2 Main Body
2.2.1 First Page of a Chapter
The first two chapters are pre-generated in the Templates. Note: DO NOT
DELETE “{TC "CHAPTER" \f C \l "1" \n}” after CHAPTER I as this is what tells
the Table of Contents to place the word “CHAPTER” after the preliminary page
entries. Simply alter the Chapter titles and begin filling in the body.
Quick Parts shortcut type: “New preliminary page” then press F3
Used to add additional preliminary pages to hold such content as List of Symbols, List of Terms, List of Abbreviations, etc. Adds a section break to end the previous preliminary page, then a line with the Preliminary Page Heading style and a box for entering the new title. Finally a few blank lines are added to facilitate adding new content.
Click just before the section break on the current last preliminary section (usually List of Figures)
type: “New preliminary page” then press F3
Click on the placeholder title box
Click the tab on the box titled “Additional preliminary page”
Type (in ALL CAPS) a title for your new preliminary page
Insert content for your new preliminary page

28
2.2.1.1 Creating New Chapters
When you need to create a new chapter (beyond chapter II),
Click on a blank line after any content in the latest chapter
Insert a “Section Break (Next Page)”.
On the first line of the new section click on the style “Chapter Number”.
This will insert the word “CHAPTER” and the next chapter number at the
top of the page, already formatted
On the next line select the style “Chapter Titles”
Type (in ALL CAPS) a title for your new Chapter (Use Shift+Enter to force new lines so that multiple line titles are in inverted pyramid format where each line is shorter than its preceding line)
Insert content for your new chapter
Quick Parts shortcut type: “New chapter” then press F3
For use in creating new chapters after the prebuilt chapter II. Adds a section break to end the previous chapter, then a line with the Chapter Title style and appropriate SEQ fields for equation numbering, then a line with the style Chapter Title and a box for entering the title. A few extra blank lines are added to begin the new chapter’s
content.
Click on a blank line after any content in the latest chapter
type: “New chapter” then press F3
Click on the placeholder title box
Click the tab on the box titled “Chapter Title”
Type (in ALL CAPS) a title for your new Chapter (Use Shift+Enter to force new lines so that multiple line titles are in inverted pyramid format where each line is shorter than its preceding line)
Insert content for your new chapter

29
2.2.2 Headings
When you are ready to have a heading, simply type the title for the heading and
then apply the appropriate heading level style to it (1st through 5th level heading). This
will automatically space your subheadings appropriately, so you will not need to add any
blank lines manually. Note: heading levels may not be “skipped”. Headings are like
outline levels, so if you use a 3rd level heading, then there must exists prior a 2nd level
heading to which it relates (and a 1st level heading for which the 2nd relates).
2.2.2.1 Additional Instruction for Appendices Headings in Templates C, and C with Schemes
In the appendices, you will need to use the Appendix heading styles so that the
appendix letter is included in heading numbering.
2.2.2.2 Additional Instruction for 3rd Through 5th Level Headings in Template APA
APA formatting has 3rd through 5th level headings as part of a paragraph.
Type out the heading and associated paragraph
Set the paragraph’s style to “Heading in Paragraph” (this sets up any
required spacing)
Select the part of the paragraph that is to become the heading
Once highlighted, click on the appropriate heading style (3rd, 4th, or 5th)
Headings should now be formatted to APA requirements and will be picked up by the
Table of Contents when updated.

30
2.2.3 Inserting Tables
Create your table title by selecting the “Table Titles” style. The “Table
Titles” style will automatically have the correct spacing above and below
the title.
It is highly recommended that you create short, concise titles and put all detailed descriptions in a note section below the table.
Quick Parts shortcut type: “Table” then press F3
Creates a line with the Table Title style and a box for typing the table title, then an example table to be replaced, then a line set to the table notes style with a box for inserting table notes.
When ready to insert table content, on a blank line type “Table” then press F3
Click on the placeholder table title text
Click the tab on the box “Table title”
Type the title of your table (short, concise—all detailed caption, notes, references, legend information, etc should be placed in the notes section below the table)
Click on the place holder table (A square with crossed lines should appear at the top left corner of the table)
Click on the box that appears on the top left corner of the table to select the entire table
Insert or paste your table (the place holder table will be moved to the bottom)
Also, Word automatically puts extra spacing on the left and right side of a table, which means that full width tables (6”) will extend into the margins. To correct for this, either reduce the table’s width to 5.9” and center
the table, or go into the Table Properties>Options and change the 0.08 in the “Left” and “Right” text boxes to
0.
Click in the placeholder table again to reveal the selection box at the top left corner of the placeholder table (not your table)
Click on that box and press Control X to cut (or right click and select “Cut”). This will remove the placeholder table, leaving your table.
Click on the placeholder note text
Click the tab on the box “Notes”
o Place all detailed caption, notes, references, legend information, etc here. Use Shift+Enter to force new lines as needed.
o If there are no desired notes, press delete to remove the placeholder text, but leave the blank line to ensure required spacing.

31
o For Template APA, press Shift+Enter before typing the title for your table.
o For all other Templates, type the title for your table
On the next line, insert your table. Your tables should always be set for “In line with text” for optimum control.
Also, Word automatically puts extra spacing on the left and right side of a table, which
means that full width tables (6”) will extend into the margins. To correct for this, either
reduce the table’s width to 5.9” and center the table, or go into the Table
Properties>Options and change the 0.08 in the “Left” and “Right” text boxes to 0.
use the Style “Notes” on the next line down from the table (The template will automatically select the Notes style after you hit enter at the end of a line with the Table Title style). This will automatically set up the spacing for after the table.
o Place all detailed caption, notes, references, legend information, etc here. Use Shift+Enter to force new lines as needed.
o Leave blank if notes are not desired and press Enter to continue with your document (Do not delete this line).
2.2.3.1 Tables that Span Multiple Pages
First, only tables that are longer than one page in length may be split. Smaller
tables must be moved to avoid splitting, which may leave a large amount of blank space,
which is allowable in this circumstance.

32
If you have a table that spans multiple pages, then each page after the first must
have “Table # (Continued)” above that page’s section of the table.
To break a table at the top of a page
o Click on the first row of the table
o Go to the Table Layout Ribbon
o Click “Split Table”.
Type the word “Table “ with the correct table number and the word
“(Continued)” at the top of the new page
Set this line to the Table continued Style
Place notes at the end of the table section as described in section 2.2.3.
Quick Parts shortcut type: “Table continued” then press F3
Creates a line with the Table Title style and a box for typing the table title, then an example table to be replaced, then a line set to the table notes style with a box for inserting table notes.
Works as the quick part “Table” in section 2.2.3 except there is no title. Instead “Table # (continued)” will appear instead of the title.
The table number referenced can be updated by:
o Press Control +A to select the entire document
o Right click and select “Update Field”
o Click through the various dialog boxes to update the entire document
It is generally preferable for notes on a lengthy table to appear on the last page of the table
33
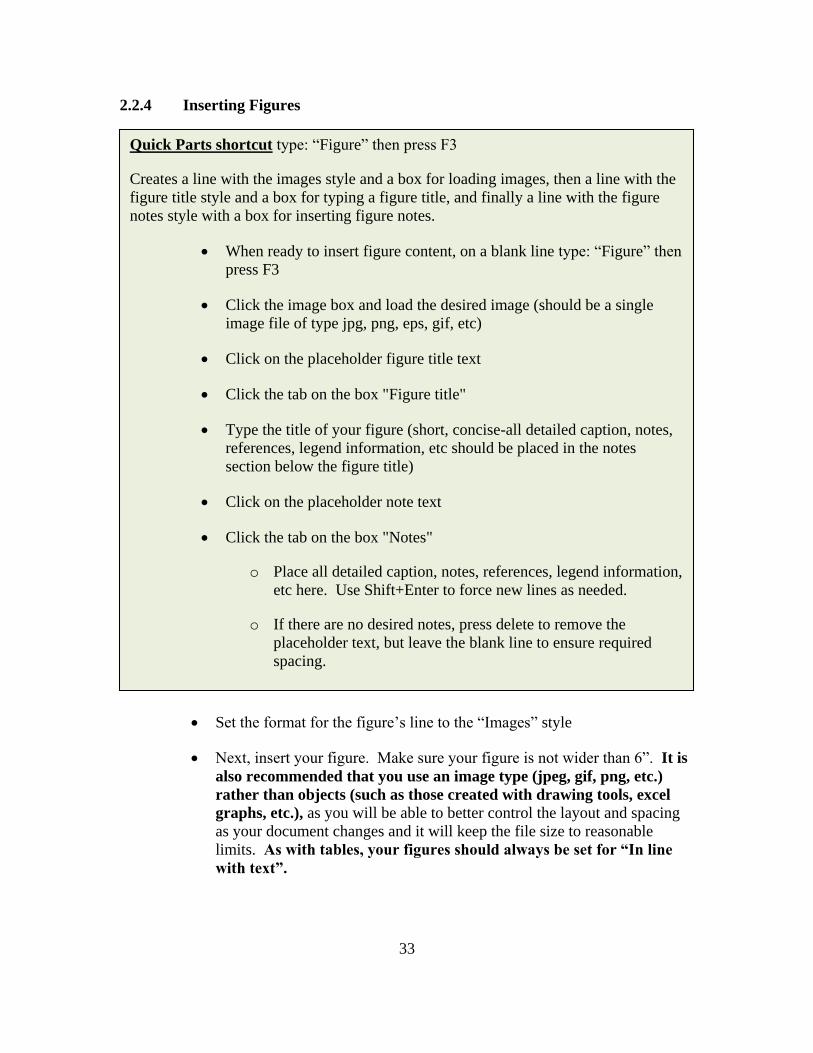
2.2.4 Inserting Figures
Set the format for the figure’s line to the “Images” style
Next, insert your figure. Make sure your figure is not wider than 6”. It is also recommended that you use an image type (jpeg, gif, png, etc.) rather than objects (such as those created with drawing tools, excel graphs, etc.), as you will be able to better control the layout and spacing as your document changes and it will keep the file size to reasonable limits. As with tables, your figures should always be set for “In line
with text”.
Quick Parts shortcut type: “Figure” then press F3
Creates a line with the images style and a box for loading images, then a line with the figure title style and a box for typing a figure title, and finally a line with the figure notes style with a box for inserting figure notes.
When ready to insert figure content, on a blank line type: “Figure” then
press F3
Click the image box and load the desired image (should be a single image file of type jpg, png, eps, gif, etc)
Click on the placeholder figure title text
Click the tab on the box "Figure title"
Type the title of your figure (short, concise-all detailed caption, notes, references, legend information, etc should be placed in the notes section below the figure title)
Click on the placeholder note text
Click the tab on the box "Notes"
o Place all detailed caption, notes, references, legend information, etc here. Use Shift+Enter to force new lines as needed.
o If there are no desired notes, press delete to remove the placeholder text, but leave the blank line to ensure required spacing.

34
Create your figure title by selecting the “Figure Titles” style. The “Figure
Titles” style will automatically have the correct spacing above and below
the title.
It is highly recommended that you create short, concise titles and put all detailed descriptions in a note section below the figure title.
Use the Style “Notes” on the next line down from the figure title (The template will automatically select the Notes style after you hit enter at the end of a line with the Figure Title style). This will automatically set up the spacing for after the table.
o Place all detailed caption, notes, references, legend information, etc here. Use Shift+Enter to force new lines as needed.
o Leave blank if notes are not desired and press Enter to continue with your document (Do not delete this line).
2.2.4.1 Figures that Span Multiple Pages
First, only figures that are longer than one page in length may be split. Smaller
figures must be moved to avoid splitting, which may leave a large amount of blank space,
which is allowable in this circumstance.
Quick Parts shortcut type: “Figure continued” then press F3
Like Figure, but replaces line for figure title with a line that has a STYLEREF field to the previous figure title line and the word “(continued)”
Works as the quick part “Figure” in section 2.2.4 except there is no title. Instead “Figure # (continued)” will appear instead of the title.
The figure number referenced can be updated by:
o Press Control +A to select the entire document
o Right click and select “Update Field”
o Click through the various dialog boxes to update the entire document
It is generally preferable for notes on a lengthy figure to appear on the last page of the figure
35
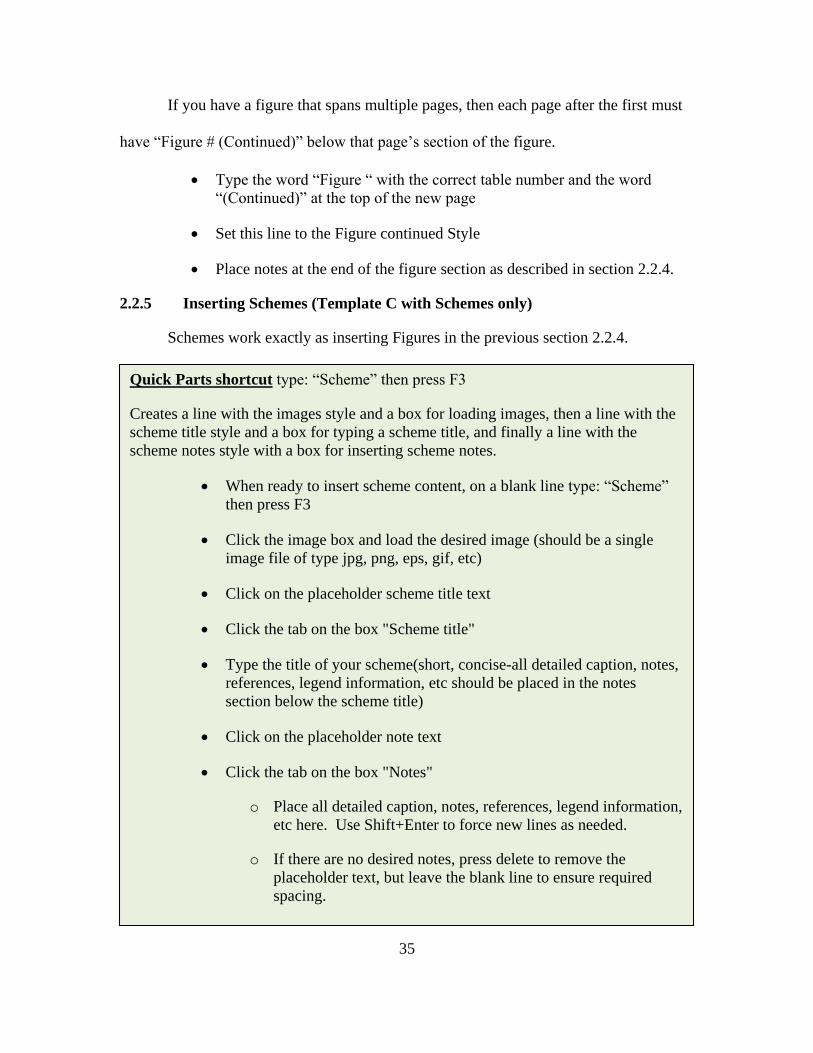
If you have a figure that spans multiple pages, then each page after the first must
have “Figure # (Continued)” below that page’s section of the figure.
Type the word “Figure “ with the correct table number and the word
“(Continued)” at the top of the new page
Set this line to the Figure continued Style
Place notes at the end of the figure section as described in section 2.2.4.
2.2.5 Inserting Schemes (Template C with Schemes only)
Schemes work exactly as inserting Figures in the previous section 2.2.4.
Quick Parts shortcut type: “Scheme” then press F3
Creates a line with the images style and a box for loading images, then a line with the scheme title style and a box for typing a scheme title, and finally a line with the scheme notes style with a box for inserting scheme notes.
When ready to insert scheme content, on a blank line type: “Scheme”
then press F3
Click the image box and load the desired image (should be a single image file of type jpg, png, eps, gif, etc)
Click on the placeholder scheme title text
Click the tab on the box "Scheme title"
Type the title of your scheme(short, concise-all detailed caption, notes, references, legend information, etc should be placed in the notes section below the scheme title)
Click on the placeholder note text
Click the tab on the box "Notes"
o Place all detailed caption, notes, references, legend information, etc here. Use Shift+Enter to force new lines as needed.
o If there are no desired notes, press delete to remove the placeholder text, but leave the blank line to ensure required spacing.

36
Set the format for the scheme’s line to the “Images” style
Next, insert your scheme. Make sure your scheme is not wider than 6”. It is also recommended that you use an image type (jpeg, gif, png, etc.) rather than objects (such as those created with drawing tools, excel graphs, etc.), as you will be able to better control the layout and spacing as your document changes and it will keep the file size to reasonable limits. As with tables, your schemes should always be set for “In line
with text”.
Create your scheme title by selecting the “Scheme Titles” style. The “Scheme Titles” style will automatically have the correct spacing above and below the title.
It is highly recommended that you create short, concise titles and put all detailed descriptions in a note section below the scheme title.
Use the Style “Notes” on the next line down from the scheme title (The template will automatically select the Notes style after you hit enter at the end of a line with the Scheme Title style). This will automatically set up the spacing for after the table.
o Place all detailed caption, notes, references, legend information, etc here. Use Shift+Enter to force new lines as needed.
o Leave blank if notes are not desired and press Enter to continue with your document (Do not delete this line).
37
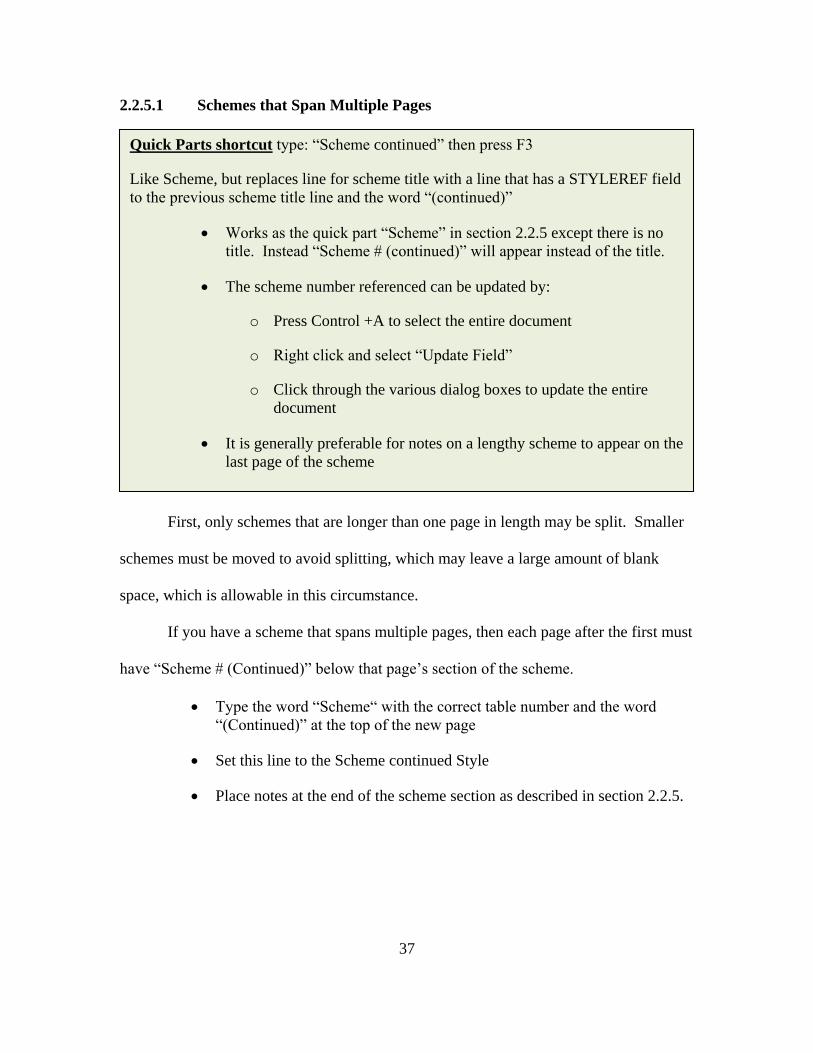
2.2.5.1 Schemes that Span Multiple Pages
First, only schemes that are longer than one page in length may be split. Smaller
schemes must be moved to avoid splitting, which may leave a large amount of blank
space, which is allowable in this circumstance.
If you have a scheme that spans multiple pages, then each page after the first must
have “Scheme # (Continued)” below that page’s section of the scheme.
Type the word “Scheme“ with the correct table number and the word
“(Continued)” at the top of the new page
Set this line to the Scheme continued Style
Place notes at the end of the scheme section as described in section 2.2.5.
Quick Parts shortcut type: “Scheme continued” then press F3
Like Scheme, but replaces line for scheme title with a line that has a STYLEREF field to the previous scheme title line and the word “(continued)”
Works as the quick part “Scheme” in section 2.2.5 except there is no title. Instead “Scheme # (continued)” will appear instead of the title.
The scheme number referenced can be updated by:
o Press Control +A to select the entire document
o Right click and select “Update Field”
o Click through the various dialog boxes to update the entire document
It is generally preferable for notes on a lengthy scheme to appear on the last page of the scheme
38
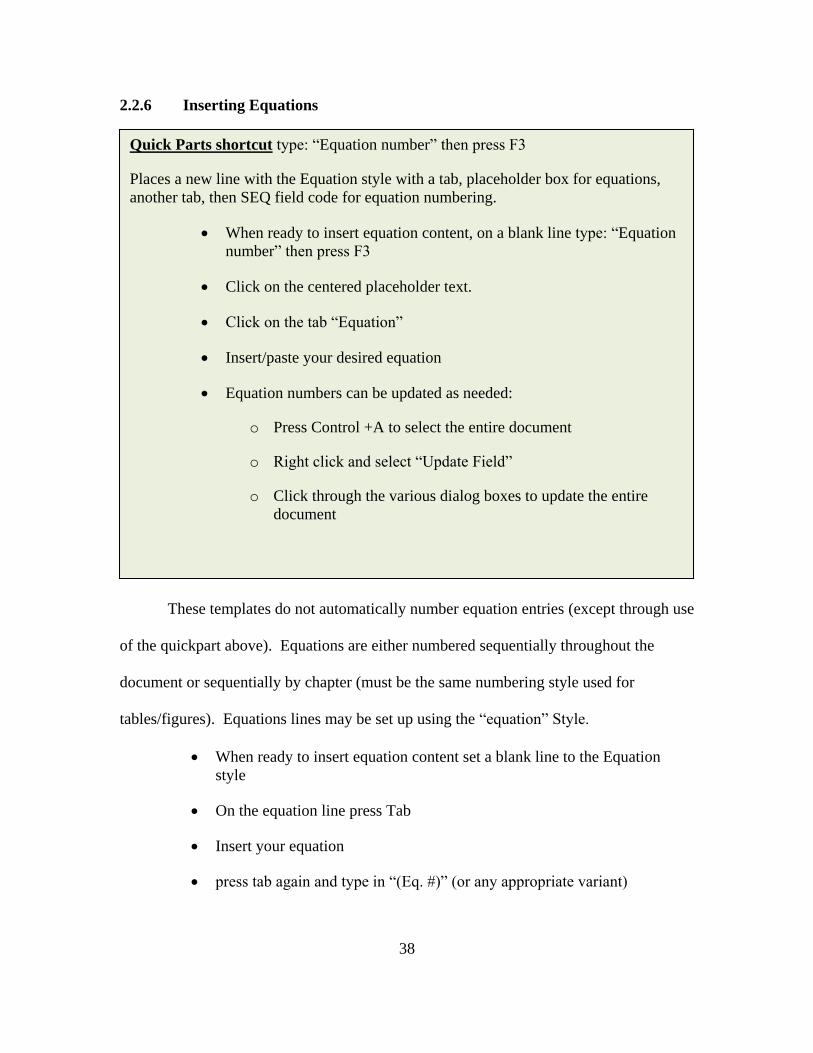
2.2.6 Inserting Equations
These templates do not automatically number equation entries (except through use
of the quickpart above). Equations are either numbered sequentially throughout the
document or sequentially by chapter (must be the same numbering style used for
tables/figures). Equations lines may be set up using the “equation” Style.
When ready to insert equation content set a blank line to the Equation style
On the equation line press Tab
Insert your equation
press tab again and type in “(Eq. #)” (or any appropriate variant)
Quick Parts shortcut type: “Equation number” then press F3
Places a new line with the Equation style with a tab, placeholder box for equations, another tab, then SEQ field code for equation numbering.
When ready to insert equation content, on a blank line type: “Equation number” then press F3
Click on the centered placeholder text.
Click on the tab “Equation”
Insert/paste your desired equation
Equation numbers can be updated as needed:
o Press Control +A to select the entire document
o Right click and select “Update Field”
o Click through the various dialog boxes to update the entire document

39
For multiple line equations, it is best to make the long equation into a single
image (following the requirements for lining up equivalency signs in multi-line equations
as specified in the Standards) and place that image after the first Tab.
Any desired sub numbering (ie. a., b., c., etc) should be part of the equation
object, not the main numbering of the equation. Ie. “(3a) (3b) (3c) etc” is not allowed. A,
b, and c would all be parts of one main number, (3), and found by their respective
constituent parts within the overall numbered equation group.
2.2.7 Landscaped pages
A video tutorial is available at http://www.youtube.com/watch?v=SYZi8T_bVpU.
This video will show you have to create a correctly formatted landscaped page number
from scratch. However, this template will provide the correctly formatted page number
to help save a few steps in the process.
Quick Parts shortcut type: “Landscape page” then press F3
Inserts a section break, some blank lines for content, and then another section break set to landscape orientation with correct margins. It also places a page number in the “left” margin in the orientation required by the Standards.
When ready for a landscape page section, type: “Landscape page” then
press F3
Place any desired table/figure content into the newly generated landscape page section.
For multiple consecutive landscape pages, just use one landscape section and use regular page breaks (Control+Enter) to start new pages as needed.
(Note that landscaped pages will need to be rotated in the final .pdf to match the portrait pages):

40
Use the following steps to create landscaped pages and have the page numbers
display correctly (Note that landscaped pages will need to be rotated in the final .pdf to
match the portrait pages):
1. Isolate the landscaped pages from the rest of the document by going into
the header and footer and removing the “Link to previous” in both the
section containing the landscaped pages AND the section immediately
after the landscaped pages (This will keep any changes to the
header/footer from affecting the entire document.). You will need to click
in the footer to remove the Link, and then click in the header to remove
the Link there.
2. Once isolated, go back to the footer in the landscaped section and delete
the current page number and set the margins to the following: Top 1.25”
Left 1.2” (this will guarantee that there is nothing overlapping the page
number), Right 1.25" and Bottom 1”
3. While in the footer of the landscaped section, insert a new page number by
clicking on the “Page Number” option on the ribbon, then move your
mouse over “Page Margins” and select “Landscape Page Number” in the
plain number section.
The Landscaped page number is now done. Follow the above 3 steps for all new
landscaped sections. Note: If you have multiple landscaped pages in a row, keep them
within the same section to avoid having to add the page number needlessly. Simply place
your content within the two section breaks for as many pages as you need.
41
If you would like to add the template’s landscaped page number for use in other
word documents, do the following advanced option: saving the new page number style in
the Building Blocks for future use:
1. Go into the header/footer of a landscaped section and highlight the text
box of the page number.
2. In the “Page Layout” tab, select “Watermark” and click “Save selection to
watermark gallery”
3. In the “Create New Building Block” window enter the following
Name: Landscaped Page Number
Gallery: Page Numbers (Margin)
Category: Plain Number
Description: Page number for landscaped pages. 1” from
“bottom” and centered by margins.
Save in: Normal.dotx
Options: Insert content only
The style is now saved to the base template file that Word uses. It will now be
available for future use when new files are opened. The newly saved page number will
be found just like any other page number (page number->Page margins-> Plain number -
>Landscaped Page number)
2.3 References
The only format requirements are that each entry is single-spaced, that there is 1
blank line between each entry, and that the referencing style used is consistent. The
"Reference entry" style is available for use to help make formatting consistent.

42
2.3.1 One Reference Section
The References page is pre-formatted. Change the title from “References” if
desired. Finally, replace default text with your actual references. The only format
requirements are that each entry is single-spaced, that there is 1 blank line between each
entry, and that the referencing style used is consistent.
2.3.1.1 EndNote
Users of EndNote’s Cite While you Write will notice that EndNote places their
bibliography at the end of the entire document instead of the place required by MSU.
Simply highlight the entire Bibliography generated by EndNote
Press Control+X to cut (or right-click and select cut)
Navigate to the provided Reference section in the template
Use Paste-Special (Formatted Text) to past EndNote’s linked Bibliography
2.3.1.2 Zotaro
Users of Zotaro should be able to drag and drop their Bibliography into the
provided Reference section.
2.3.2 Multiple Reference Sections (at the End of Each Chapter)
If you are required to place references at the end of each chapter, then remove the
default reference section provided (deleting all text and the “Section Break (Next
Page)”). Start your reference sections on new pages at the end of each chapter and use
the “1st level subheading” style for your reference heading.
For most automated citation software, you should only need to make one change
in Word so that bibliographies are created at the end of each chapter.

43
Click on the references tab
On the references ribbon, to the right of the word “Footnotes” in the
Footnotes section, click the small pop out box (bottom right corner of this section)
In the Footnotes and Endnotes window, click “Endnotes” and select “End
of Section”
2.4 Appendices
There is a pre-generated appendix in the Templates. Note: DO NOT DELETE
“{TC "APPENDIX" \f C \l "1" \n}” after APPENDIX A as this is what tells the Table of
Contents to place the word “APPENDIX” after the main body entries. Change the titles
accordingly (similar to chapter titles).
To create a new Appendix Cover Page
Quick Parts shortcut type: “New appendix” then press F3
For use in creating new appendices after the prebuilt appendix A. Adds a section break to end the previous appendix, then a line with the Appendix Letter style and appropriate SEQ fields for equation numbering, then a line with the style Appendix Title and a box for entering the title. Then adds another section break and centers the page vertically. Finally it adds a few blank lines to begin the new appendix’s content.
Click on a blank line after any content in the latest appendix
type: “New appendix” then press F3
Click on the placeholder title box
Click the tab on the box titled “Appendix Title”
Type (in ALL CAPS) a title for your new Appendix (Use Shift+Enter to force new lines so that multiple line titles are in inverted pyramid format where each line is shorter than its preceding line)
Insert content for your new appendix after the divider page’s section
break
44
Create a Section Break (Next Page) at the end of the previous Appendix section.
Create two(2) blank lines (using Hard Returns)
Insert another Section Break (Next Page).
Go back to the first line created on the previous blank page and select the style “Appendix Numbers”. This will place the word “APPENDIX” and
the next available letter.
On the second (last) line, set the style for Appendix Titles.
Type in your title, following the same guidelines for chapter titles.
Go to the page layout Ribbon, and select Margins->Custom Margins.
click on the “Layout” tab in the newly opened Page Setup window
Set the “Vertical alignment” to “Center”.
You are now free to continue on to the next blank page and fill out the new appendix
section.
2.4.1 Appendix Headings for Templates C and C with Schemes
In the appendices, you will need to use the Appendix heading styles so that the
appendix letter is included in heading numbering.
Use “Appendix 1st level heading” style instead of “1st level heading”
Use “Appendix 2nd level heading” style instead of “2nd level heading”
Use “Appendix 3rd level heading” style instead of “3rd level heading”
Use “Appendix 4th level heading” style instead of “4th level heading”
Use “Appendix 5th level heading” style instead of “5th level heading”
45
2.4.2 Appendix Tables/Figures/Equations for Templates APA, B, C, and C with Schemes
In the appendices, you will need to use the Appendix Table/Figure/Equation
styles so that the appendix letter is included in numbering. Other than the specific style
used for formatting, inserting Tables/Figures/Equations in the appendices works as
previously described in the chapter.
Use “Appendix Equation” style instead of “Equation”
Use “Appendix Table Title” style instead of “Table Title”
Use “Appendix Table Notes” style instead of “Table Notes”
Use “Appendix Table continued” style instead of “Table continued”
Use “Appendix Figure Title” style instead of “Figure Title”
Use “Appendix Figure Notes” style instead of “Figure Notes”
Use “Appendix Figure continued” style instead of “Figure continued”
Quick Parts shortcut
Instead of “Table” type “Table appendix” and press F3(see 2.2.3)
Instead of “Table continued” type “Table appendix continued” and
press F3 (see 2.2.3.1)
Instead of “Figure” type “Figure appendix” and press F3(see 2.2.4)
Instead of “Figure continued” type “Figure appendix continued” and
press F3(see 2.2.4.1)
Instead of “Scheme” type “Scheme appendix” and press F3(see 2.2.5)
Instead of “Scheme continued” type “Scheme appendix continued” and
press F3(see 2.2.5.1)
Instead of “Equation number” type “Equation appendix number” and
press F3(see 2.2.6)

46
Use “Appendix Scheme Title” style instead of “Scheme Title”
Use “Appendix Scheme Notes” style instead of “Scheme Notes”
Use “Appendix Scheme continued” style instead of “Scheme continued”

47
CHAPTER III
PREPARING TO SUBMIT
3.1 Finishing touches
First, scroll through your document and make sure that the page numbering is
consistent and does not restart or skip values.
3.1.1 Last Page
With paragraph marks turned on, you should see the text “Hidden test to allow
template to find last page in document” on the last page of your document. If this is
missing, use the following quick part on the last page of your document:
The alternative is to manually type in the last page number found in the document by
“Pages in Study” in the abstract.
Quick Parts shortcut type: “Last page” then press F3
For use on the very last page of the document. In case of accidental deletion, this will add the hidden text/bookmark needed so that the Abstract’s “Pages in Study” field can
be updated.
Click on the last line of your document (if it contains content, create a new line after the content)
type: “Last page” then press F3
Now update your entire document as described in the next section.

48
3.1.2 Update the Entire Document
The Table of Contents (TOC), List of Tables (LOT), and List of Figures (LOF)
should be updated after all content has been entered. The TOC may need to be updated
twice if either the TOC or the LOT is greater than 1 page. Basically, the TOC generates
its page number references based on the current position of headings in the document. So
while, initially, a LOT may be on page “v” on the first update, it may get moved further
down by a number of pages equal to the extra pages beyond the first that the final
updated TOC becomes. Once the size of the TOC, LOT, and LOF is established through
the first updated, it should be a simple matter of just updating the page numbers.
The fastest way of updating is:
Press Control +A to select the entire document
Right click and select “Update Field”
Click through the various dialog boxes to update the entire document
After updating go through the document to make sure there are no broken links. Such
will have the text “ERROR! Bookmark not found!”. Update the document again after
repairing any such links.
Do not forget to clean up the list of tables/figures/schemes as described in
2.1.8(List of Tables), 2.1.9(List of Figures), and 2.1.10(List of Schemes).
3.2 Converting to .pdf
There are many methods available for .pdf conversion; however, this document
will only cover the process through the use of Adobe Acrobat Professional (available on
all computer stations at the Computer Commons in the Mitchell Memorial Library).
49
3.2.1 Printing to .pdf
The first method, printing to .pdf, is the fastest method. First, select “Adobe
PDF” as your printer when you go to print your document. You will be prompted to
create a file name for the document. The end result is a .pdf that looks exactly the same
as if you had printed the document to paper.
3.2.2 Saving as .pdf
The second method makes use of the features in this template to create clickable
entries in the Table of Contest, List of Tables, and List of Figures, as well as creating
bookmarks for all heading entries. To make use of this,
select the File tab
Click on “Save As”.
Choose a location to save your file
Give your document a short, simple filename that does not include any special characters or spaces
In the “Save as type” box, select “PDF (*.pdf)”
Click “Save”
This will take a little longer than just printing to .pdf, as it is creating the various
hyperlinks and bookmarks. Once again, you will be prompted to create a filename for
your document.
Bonus: before clicking “Save”,
click “Options”
Place a check beside “Create Bookmarks Using” and select “Headings”
Click “Save”

50
Your resulting .pdf will now have pre-generated bookmarks to all of your headings.
3.2.3 Rotate Landscape Pages to Portrait Orientation in the .pdf
For either method, you will need to go through your newly created .pdf and
manually rotate any landscaped pages you may have. In Adobe Professional, press
Control + Shift + r. Make certain that the direction is set for “Counterclockwise 90
degrees” and that the bottom options box is set to “Landscape Pages”. Click “OK”, then
save your .pdf.
Always visually inspect your .pdf before submitting and make sure there
were not conversion issues (like figures/equations not displaying, wrong page size,
etc)
Congratulations, you are ready for submission.
3.3 Copying and pasting into the templates
It is very likely that you may have already written the majority of your work
before using these templates. In such cases, I highly recommend that you turn on your
paragraph marks, copy/paste small sections of your document at a time, and that all
template style requirements are correctly applied. You may also need to restore any
other special formatting (italics, numbered lists, bullet lists, etc.). I assure you that this
extra effort is worth it in the long run when it comes to the format review process.
3.4 Final thoughts
These templates are not infallible and can be “broken” if you are not careful.
However, these templates do allow for most errors to be easily fixed. If you are having

51
trouble with any of these templates, please contact the Office of Thesis and Dissertation
Format Review.

52
VERSION HISTORY

53
Below is the version history, detailing what has changed between releases of these
templates. The purpose of this section is to allow the user to determine the necessity of
updating to a newer version should one be released since they have started using an older
version. In most cases, older versions may be manually adjusted to match newer versions
if deemed necessary. Also, unless there is a serious bug reported, new versions will only
be released early in a semester.
A.1 Version 1.0 (05/01/2010)
Initial release of templates A, B, C, and instructions.
A.2 Version 1.1 (08/20/2010)
Fixed instructions (sections 2.1.8 and 2.1.9) to include selecting the entire table before using Replace.
Removed the datepicker content controls from the Title Page, Copyright Page, and Abstract Page in all three templates (A, B, and C) due to a bug in Adobe Acrobat Professional that does not successfully keep the formatting when converting from Word to .pdf using PdfMaker. Instructions for these pages have been updated to reflect the change. This feature will be added back should Adobe correct the issue in a later patch/version.
Added new style “Bullet text”. This style creates a bullet list using the
“exactly 26 pt” spacing of the “Basic Text double spaced” style to keep
spacing consistent.
Added new style “Numbered list”. This style creates a numbered list
using the “exactly 26 pt” spacing of the “Basic Text double spaced” style
to keep spacing consistent.
Added new style “Equations”. This style is set to be Right aligned and
adds 1 blank line above the line to match spacing in the document.
A.3 Version 2.0 (beta) (6/1/2012)
Rebuilt templates to be compliant with the 6th edition of the Standards for Preparing Theses and Dissertations. This template is not backwards compatible with previous versions of the template.

54
A.4 Version 2.01 (beta) (6/6/2012)
Fixed missing link to Major and Degree fields.
Changed Notes style to be single spaced and have two blank lines after.
Changed Appendix Number style to be based on Font style and to automatically go to the Appendix Title style after pressing Enter.
Changed Appendix Title style to automatically go to the Paragraph style after pressing Enter.
Updated instructions for inserting figures to include the need for a manual blank line after figure titles.
A.5 Version 2.02 (3/5/2012)
Removed “<” and “>” from sample text as it was confusing some users
Changed sample text on signature page from “Academic Title” to
“Academic rank of Department” to more accurately reflect the required
information
Edited the default table style so that newly generated tables do not have 0.08” added to the left and right side.
Updated instructions for filling out the approval page
Added a Landscape Page Number to the page number gallery to circumvent an issue with Office 2013. Also altered instructions to make use of this new page number.
A.6 Version 2.1 (07/30/2013)
Changed Approval Page layout to new Graduate School's requirements and added 4 new styles: Single Signature Line Center, Single Signature Entry Center, Double Signature Lines, Double Signature Entries. Also updated instructions for completing the Approval page.
Modified Table and Figure Title styles so that the Notes style automatically follows
Modified Preliminary Page and Reference Page style to be based off of a default heading so that these entries will appear in the navigation pane.

55
A.1 Version 3.0 (06/09/2015) (complete rebuild)
Added more content control boxes to help guide formatting
Added many Quickparts to allow users to quickly generate needed items by simply typing the associated keyword and pressing F3
Added Styles “Bibliography” and “EndNote Bibliography” to assist users
who utilize Zotaro or EndNote in formatting to MSU’s standards.
Modified heading styles so that a full 5 levels of headings, both in the body and appendices will populate the Table of Contents
Added explicit table/figure/scheme/equation styles for titles, notes, and continued sections to assist in future reformatting content for journal publications
Created numbering method using SEQ field codes to facilitate equation numbering.
Added a last page Quickpart to insert hidden text and a STYLEREF field code in the abstract to locate that text and populate the “pages in study”
line with the last page number in the document when updated.
Created a Landscape page Quickpart to facilitate the easy creation of formatted landscaped pages.
All headings should now appear in the Navigation pane when they are created. These can be converted into bookmarks in the final pdf if the document is saved as pdf and the option “create bookmarks based on
headings” is selected in the save options.
Updated instructions with relevant content, organized bullet points, and special boxes to point out preferred quick parts


![Rock the [nail product]Vote! · 2019-02-05 · favorite polish/nail color 1. OPI Products: Nail Lacquer 2. Essie: Nail Lacquer collection 3. China Glaze: Nail Lacquer 4. CND: Nail](https://img.dokumen.tips/doc/110x75/5f1ec1d9d40da55eed45b4f4/rock-the-nail-productvote-2019-02-05-favorite-polishnail-color-1-opi-products.jpg)