Embed Size (px)
Citation preview

Automated construction using interlocking blocksDevin Balkcom, Dartmouth College
1 Executive summaryMain objective. The main objective of this project is to develop theory, techniques, and mechan-ical designs needed for robots to rapidly build structures from blocks that geometrically interlock,without the need for fasteners or cement. The work is motivated by the desire to quickly assemblestructurally strong buildings, furniture, and devices, in such a way that the structure may later bedisassembled and the parts re-used. This approach to robotic assembly has particular promise forconstruction in extreme environments, where traditional construction methods may not be practi-cal, and where human assistance is unavailable.
Significance. 3D printing has drawn attention to the power to design arbitrary geometric struc-tures and share them electronically. Bricks, among the oldest and most reliable of all constructiontechnologies, depend on water-based cement or fasteners that are hard to work with in hostile en-vironments. Space settlements impose new requirements: the ability to construct structures usingreliable techniques that do not depend on specialized raw material or delicate machinery. Theproposed approach promises the possibility of simple, reliable, modular construction with robots.
Main results. This report presents a design for interlocking blocks and an algorithm that allowsthese blocks to be assembled into desired shapes. During and after assembly, the structure is kine-matically interlocked if a small number of blocks are immobilized relative to other blocks. Thereare two types of blocks: cubes and double-height posts, each with a particular set of connectingjoint pairs. Layouts for shapes involving thousands of blocks have been planned automatically,and shapes with several hundred blocks have been built by hand. As a proof of concept, a robotwas used to assemble sixteen blocks; see Figure 1.
(a) Robotic assembly of a layer with 4 squaresusing a 4-DoF robot arm.
(b) Overhead view of the assembled structure.Numbers indicate assembly order.
Figure 1: Assembling 16 blocks using a 4-DoF robot arm.
1

(a) Stanford Bunny assembledin simulation.
(b) Chair model after automaticlayout.
(c) Chair assembled by hand.
Figure 2: Models assembled in simulation and by hand.
2 Main resultsThe implementation of a robotic system for assembly requires study of several related problems.First, the component blocks must be designed. Second, algorithms must be designed that allowthe automatic layout of blocks to create shapes of the desired geometry; some example geometriesare shown in Figure 2. Third, the system must be implemented and tested on real robots. The nextsections describe main results in each of these directions.
The main idea of the approach to building interlocking structures is that individual pairs ofblocks slide easily together or apart, but that this free motion is removed by other blocks assembledlater. Figure 4 shows the basic idea of how this works for four blocks, and will be discussed indetail below. First, however, we will discuss a simple, important component of the design: shapesof joint pairs that allow two blocks to be connected.
2.1 Design of joint pairs that allow error removal during assemblyA block is a rigid body that has joints allowing assembly with other blocks. The design of the jointpairs has several main objectives: 1) the joints should be easy to connect using simple motion, 2)the joints should limit motion to be in certain directions after connection, and 3) the joints shouldallow for and correct error during the connection.
Standard joint pairs used in carpentry allow for simple assembly motion, and limit motion inspecified directions. Figure 3 shows three different joint pairs that we use to connect blocks in thesystem we describe in this report. These joint pairs can be classified by the direction(s) of motionpermitted after assembly.
A mortise and tenon joint pair (Figure 3a) allows blocks to be disassembled only in the non-penetrating normal direction of the contact surface. A dovetail joint pair (Figure 3b) allows blockmotion only in a particular tangential direction. The third joint pair we use in the current designis a two-way joint (Figure 3c), which allows motions of associated blocks in both normal andtangential directions. The dovetail and mortise and tenon joints fully constrain rotational motion,but the two-way joint permits one rotational degree of freedom.
Humans are masters of manipulation, and can sense and correct errors during the assembly
2

(a) Mortise and tenon joints (b) Dovetail joints (c) Two-way joints
(d) Tenon joint design. (e) Dovetail joint design.
Figure 3: Three different joint pairs and detailed design.
process. LEGO toys, for example, are designed in such a way that the pegs and holes are veryclose in size. This closeness in size allows LEGO blocks to hold fairly tightly together usingfriction, which is further enhanced by normal forces applied due to the deformation of the thinflexible plastic walls of the LEGO. Humans do not find it difficult to position two LEGOs so thatthe holes and pegs match up, and can then push the blocks together, sensing and correcting ifanything goes wrong.
Robots, however, find the fine manipulation required for peg-in-hole problems a challenge – thisis particularly true for stronger large-scale robots that may work with larger, more massive blocks.In addition to assembly error, joint designers must take into account manufacturing error. LE-GOs are precisely manufactured out of plastic using injection molding with high-precision molds.Blocks manufactured for space settlements may be built out of many different types of material,some of which may not be suitable for high-precision fabrication.
Our approach to removing error during assembly has three components. First, simple slopedelements are added to the joint pairs, as shown in Figure 3d and 3e. This chamfered design iscommon in mechanical joint designs, although our degree of slope is larger than is perhaps typicalto allow for greater assembly and fabrication error. Second, some mechanical tolerance is usedin the joint designs: the sockets portion of the joint pair is made loose enough to allow for error.Tolerance is also a standard component of mechanical design, but we leave larger tolerance than istypical, relying on the error-correcting nature of a grid of blocks to create a firm structure. Finally,some compliance is needed during assembly. Chamfered edges are of no help if the robot rigidlyjams the two blocks together. We added some flexible material to the robot gripper; this materialflexes to allow error to be removed during insertion.
Designing joints and robot arms for reliable assembly with a minimum of error is an ongoingpart of the research task, and will be discussed in Section 6 on future work and next steps.
3 Simple interlocking structuresJoints connect pairs of blocks, as shown in the top-down view in Figure 4a. To create an inter-locking puzzle-like design without relying on friction, glue, or connectors, the main idea is to usesequences of joints in different directions, arranged in a circular pattern, so that later blocks pre-vent earlier blocks from moving. Figures 4b and 4c show the simplest interlocking puzzle, from a
3
2
1
(a) Tenon joint.
1
2 3
(b) Tenon joint.
1
2 3
4
(c) Dovetail joint assembled from top down.
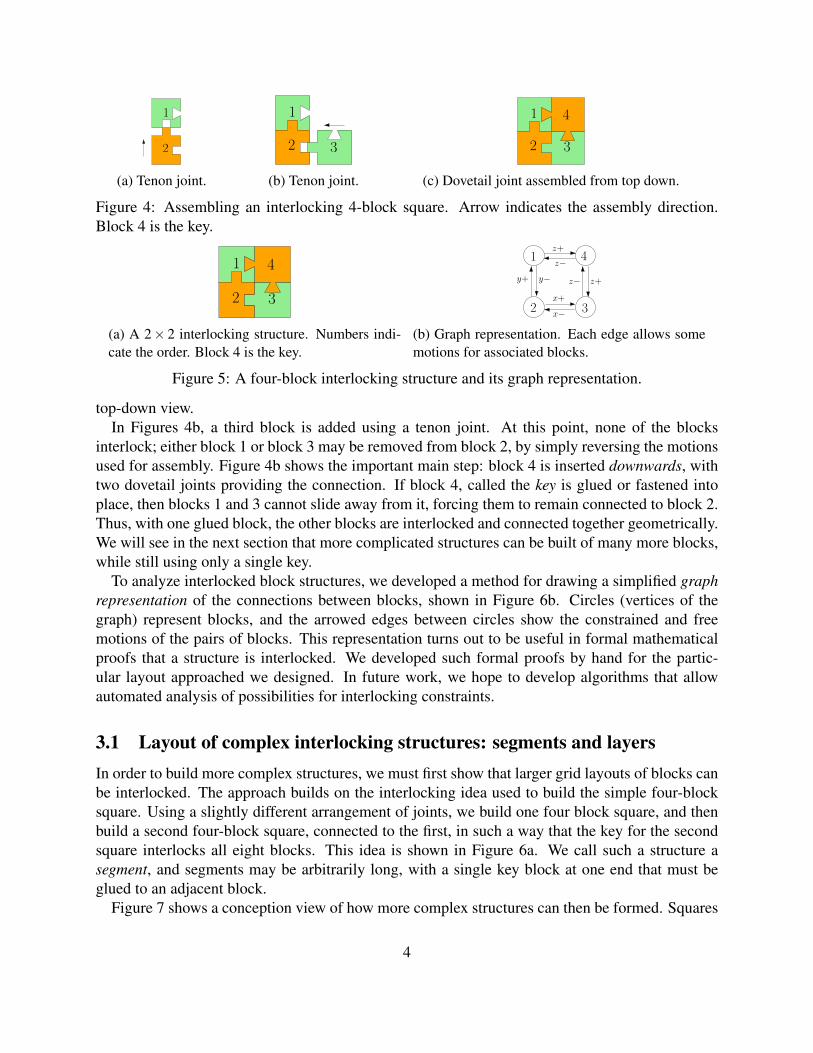
Figure 4: Assembling an interlocking 4-block square. Arrow indicates the assembly direction.Block 4 is the key.
1
2 3
4
(a) A 2× 2 interlocking structure. Numbers indi-cate the order. Block 4 is the key.
1
2 3
4z+
z+
x+
y−z−
y+ z−
x−
(b) Graph representation. Each edge allows somemotions for associated blocks.
Figure 5: A four-block interlocking structure and its graph representation.
top-down view.In Figures 4b, a third block is added using a tenon joint. At this point, none of the blocks
interlock; either block 1 or block 3 may be removed from block 2, by simply reversing the motionsused for assembly. Figure 4b shows the important main step: block 4 is inserted downwards, withtwo dovetail joints providing the connection. If block 4, called the key is glued or fastened intoplace, then blocks 1 and 3 cannot slide away from it, forcing them to remain connected to block 2.Thus, with one glued block, the other blocks are interlocked and connected together geometrically.We will see in the next section that more complicated structures can be built of many more blocks,while still using only a single key.
To analyze interlocked block structures, we developed a method for drawing a simplified graphrepresentation of the connections between blocks, shown in Figure 6b. Circles (vertices of thegraph) represent blocks, and the arrowed edges between circles show the constrained and freemotions of the pairs of blocks. This representation turns out to be useful in formal mathematicalproofs that a structure is interlocked. We developed such formal proofs by hand for the partic-ular layout approached we designed. In future work, we hope to develop algorithms that allowautomated analysis of possibilities for interlocking constraints.
3.1 Layout of complex interlocking structures: segments and layersIn order to build more complex structures, we must first show that larger grid layouts of blocks canbe interlocked. The approach builds on the interlocking idea used to build the simple four-blocksquare. Using a slightly different arrangement of joints, we build one four block square, and thenbuild a second four-block square, connected to the first, in such a way that the key for the secondsquare interlocks all eight blocks. This idea is shown in Figure 6a. We call such a structure asegment, and segments may be arbitrarily long, with a single key block at one end that must beglued to an adjacent block.
Figure 7 shows a conception view of how more complex structures can then be formed. Squares
4

A B
KA KB
(a) Two interlocking substructures connected by adovetail joint and a mortise & tenon joint.
A B
KA KB
x+
z−
x+
x+
z+
x-x-
x-
(b) Forming a larger interlocked structurefrom two interlocked structures.
Figure 6: Any interlocking substructure can be viewed as two nodes in the graph, which simplifiesthe graph representation.
Figure 7: Building an interlocking 3D structure. Blocks interlock to form a square; squares forman interlocking segment; segments form a layer; layers interlock to form the structure. The keysare marked red.
form segments, and sequences of segments can be chained together to make planar grids that areinterlocked by a single key, a layer. Layers can then be sequenced to form a 3D lattice structure,still with a single key that must be glued in place.
3.2 Block designAlthough Figure 7 shows roughly how a 3D interlocked rigid puzzle may be built, there are twodetails to discuss further: an automated algorithm that lays out interesting shapes more complexthan simple grids, and the arrangement of joints on individual blocks.
One primary challenge is that joints must be connected in different directions to build lattices. Ifnot designed carefully, many different block shapes, with different connections on different faces,might be needed. In fact, in our early designs, 30 different types of blocks were needed; this limitedthe re-usability of blocks, and made the fabrication and design processes very complex. However,by taking advantage of the fact that blocks may be placed in various orientations, the number ofblocks needed may be reduced.
Figure 8 shows the two types of blocks we eventually settled on: the cube and the post, fromdifferent views. Figures 9 through 12 show how these particular blocks may be assembled to formsquares, segments, and lattices. Posts are twice as tall as cubes, and form connections betweenadjacent layers, adding to the stability and rigidity of the final structure.
Figure 8: Different views of cube and post blocks.
5

C1D C2D C3D C4D
C5N C6E C7S C8W
(a) Cube orientations and assembly directions.
P1W P1N P2N P2E
P3S P3E P4W P4S
(b) Post orientations and assembly directions.
Figure 9: Different ways to assembly cube and post blocks and corresponding notations.
(a) Slide in aC8W block.
(b) Drop in aC3D block.
(c) Assemble aP1W block.
(d) Top view ofthe square.
1
2
3
4
(e) Sa square.
1 2
3 4
(f) Sb square.
Figure 10: Assembly process of a square, and two designs for a square.
0
4 6
0
1 3
2
0 05 7
4 6 8 9
0
1 3
2
5 0
7
8
9
Sa Sa Sa
Sa Sa Sb
(a) Two Yl+X+ segments.
0 50 2
0 014
13 15 17
0
10 12
11
1 3 4 6
16
0 7
98
18
(b) A layer built by two Yl+X+ segments.
Figure 11: A simple segment and an example layer built by connecting two segments.
0 0 01
2 3
4
5
6
7 8
AX− AX−
(a) A Yr+X+ segment.
000 1
23
4
5
6
78
BX+BX+
(b) A Yl+X− segment.
0 0 0 0 0
1 3
2
12 11 9 8
7104
5 6
12
313
Yl+X+ Yl+X−
(c) A pair of segments with keys in the middle.
Figure 12: Construction of two x-mirrored segments. Arrows indicate construction direction.Numbers indicate assembly order.
6

Yl−X+
Yl+X+
0 0 0
0 0 0 0
1
2
3 64
5 7
8 9 10
11
12
13
14 15
(a) A Yl−X+ segment built after a Yl+X+ seg-ment. Some positions are left empty.
1
20
Yl+X+
Yl−X+ Yl−X+
(b) A longer lower segment. The lower segmentis broken into two segments.
Figure 13: Two special cases of building adjacent segments. Green blocks are posts, and red blocksare keys of each segment. Numbers indicates the assembly order.
1 1
3 3
2 2 4 4
Figure 14: Special cases where two segments with posts in different sides are finished before thesegment in the middle. Red blocks are keys of two segments (Yr+X and Yr−X types). Numbersindicates the assembly order.
3.3 Automated layout algorithm
Algorithm 1 Algorithm overview1: function CONSTRUCTVOXELMODEL(M)2: M′← split every voxel into eight dimension-1 cubes.3: for each layer Li of M′ from bottom to top do4: Lay out any missing posts.5: if Li is an even layer then6: Set all segment types to Xl−Y+. (Section ??)7: else8: Determine the key to each layer component. (Section ??)9: Order segments in each layer component. (Section ??)
10: Determine the key(s) to each segment. (Section ??)11: Determine the type of each segment. (Section ??)12: Find special cases.13: Modify Li and Li+1 if necessary. (Section ??)14: Assemble blocks, potentially in parallel. (Section ??)
To construct more complicated structures of the type shown in Figure 2c, shorter segments canbe built in such a way that each layer of the lattice has approximately the same cross-sectionas the desired shape. We developed a complete automated layout algorithm, and have formallymathematically proven that this algorithm can create any desired shape, so long as there are nottoo many holes in the shape. Figures 13a and 13a, and Algorithm 1 show some details of thealgorithm, which are presented in more detail in our formal academic paper [4].
The resulting lattice may have more than a single key. The chair shown in Figure 2c has a single
7

key at the top of the chair back, but if the structure would have four keys if the algorithm were runon an upside-down model of the chair, one at the end of each chair leg. The bunny rabbit modelhas two keys: one at the top of each ear, corresponding to disconnected layers with no layer abovethem.
3.4 Experiments with assembly of structuresWe algorithmically designed plans to assemble several models including a Stanford bunny and achair model, and animated the results in software. Figure 2 shows these examples. The Stanfordbunny model has 7337 blocks while the chair model has 472 blocks. The assemblies of bothmodels are done in sequential order. The rendered animation of chair assembly can be found in [2]
We also 3D printed 406 blocks and assembled into a similar chair based on the rendered anima-tion. The assembled chair is a simplified version of the chair in the simulation; two layers wereomitted to save material and assembly time. Four legs of the chair are relatively loose compare toother parts, because each pair of layers in the legs are connected by only one post and a mortiseand tenon joint.
For robotic assembly, we used a 4-DoF Adept robot arm to assemble both a one-layer structurewith 4 squares ( Figure 1a) and a two-layer structure with 6 squares. A closer look at the one-layerstructure is shown in Figure 1b. This interlocking layer has two Yl−X+ segments. Assembly ordersare marked with numbers. The recorded assembly can be found in [1] and [3]. The assembly shownin Figure 1a was recorded without human interruption. The joint designs show good toleranceduring construction.
4 Obstacles or changes of direction during the projectThe described results largely followed the outline of work described n the proposal. Although therewere many obstacles, ranging from the reduction of the number of block types from 30 down to 2,to the fabrication of a robot gripper that could compliantly place blocks, reasonable first solutionswere possible in all cases, allowing in the end some simple proofs of concept both in simulationand in physical reality. We had hoped to build somewhat larger structures using the robot arm,but the construction of the chair model by hand, and smaller models by robot, were important firststeps.
Although the development of the block structures and layout algorithm were not without chal-lenge, perhaps the most significant challenges we faced were in the robotic assembly of the struc-tures. The 3D-printed blocks were subject to significant manufacturing error, and did not at firstconnect well even by hand. This difficulty led to a much more complete approach to designingjoint geometry, as described above, and highlighted how important this step will be in order todevelop practical large-scale implementations.
8

5 Potential impact and opportunities for implementation of theresults
We are very excited about the interlocking block approach, and think it has great potential. Theoverall concept, the particular block designs, and the layout algorithms have great potential impactin the robotics research community in several ways. First, research in modular robotics studieshow individual robots may connect together to form larger structures. Although the present sys-tem is composed of passive blocks to allow larger-scale construction, the geometrically stronginterlocking structure is promising for active robots.
Second, the work represents a type of mediated self-assembly. Proteins in the human body self-assemble to form larger structures, and self-assembly has long been a goal of robotics research.Unfortunately, at human scale, attractive forces are weak compared to gravity, and self-assemblyat human scales has been largely ineffective. The present work adds robot arms that take somesimple motions to create structures that almost self-assemble.
On the practical side, the work done immediately has promise for assembly in extreme environ-ments close to home. We are particularly excited about the possibility of underwater construction,as a transitional application leading ultimately to space settlements. Underwater, binders such ascement are challenging, make layout of traditional bricks problematic, especially with robots. Geo-metrically interlocking structures, with joints and lattice structures that remove error automatically,may be much easier to assemble underwater. We are currently making plans to use underwaterrobots to construct larger-scale structures, using additional properties such as buoyancy to allowsmaller scale robots to work with blocks of interesting size.
6 Conclusion and next stepsWe developed a complete system for robotic assembly using interlocking blocks. This required de-signing the block shapes, including both the arrangement of joints on the blocks to allow interlock,and the shapes of the connectors to allow smooth insertion even with manufacturing and manip-ulation error. We also designed an algorithm to lay out blocks in patterns that allow constructionof arbitrary geometric shapes. We used this algorithm to design shapes with many thousands ofblocks in simulation, and to build a model of a chair with hundreds of blocks by hand. We designedand built a robot hand that allowed compliant assembly of blocks, and programmed it to assemblestructures with about sixteen blocks.
There are several critical next steps. We would like to further improve the design of joints, andformally study how error may be removed during the assembly process. We also intend to studyhow lattice-type structures of blocks average or constrain error throughout the lattice, perhapsallowing greater tolerances on individual block connections. Initial results are promising; we havebuilt a simple model of the geometry of block connections, and developed a mathematical linear-programming optimization model that shows how a collection of loosely-connected blocks mayflex and bend when a force is applied. We would like to build larger-scale structures using robots.One particularly interesting direction for implementation on robots is underwater construction;
9

the world beneath the water’s surface both provides a good testing grounds for space settlementconstruction, and itself provides extraordinarily opportunities.
7 AcknowledgementsThis project received seed funding from the Dubai Future Foundation through the Guaana.comopen research platform. Much of the work described in this report was carried out by Ph.D. studentYinan Zhang, whose work was supported by the funding provided. The authors are grateful toHaopeng Zhang and Geoffrey Hsuan-Chieh Huang, who helped build 3d models of blocks, builtrobot grippers and recorded videos. The authors also thank Jeremy Betz for very useful insightson the geometry of various joints. Thanks also to Emily Whiting, as well as members of theDartmouth Robotics Lab, for useful feedback and insights throughout.
References[1] Yinan Zhang. One-layer structure robotic assembly experiment with two kinds of blocks. (2.5x speed).
https://youtu.be/1_lbVyPcLOI. Youtube. 2018. URL: https://youtu.be/1_lbVyPcLOI.
[2] Yinan Zhang. Robotic Assembly of Interlocking Blocks - WAFR 2018. https://youtu.be/lV2xIA_Q8SI. Youtube. 2018. URL: https://youtu.be/lV2xIA_Q8SI.
[3] Yinan Zhang. Two-layer structure robotic assembly experiment with two kinds of blocks. (2.5x speed).https://youtu.be/ZjFFZzrl69s. Youtube. 2018. URL: https://youtu.be/ZjFFZzrl69s.
[4] Yinan Zhang and Devin Balkcom. “Interlocking block assembly”. In: Algorithmic Foundation ofRobotics (WAFR). Dec. 2018.
10

![Compressive Strength of Interlocking Concrete Pavement ... · The infiltration behaviour of interlocking concrete blocks used in car parking was studied by Luis al. [7] ... Adding](https://img.dokumen.tips/doc/110x75/5fae253bea25f647142d1e62/compressive-strength-of-interlocking-concrete-pavement-the-infiltration-behaviour.jpg)