Embed Size (px)
Citation preview

Autodesk Simulation Mechanical – One Model, 60
Tips, 90 Minutes to Success!!! James Herzing – Simulation Evangelist - Autodesk
SM1755 – Autodesk Simulation Mechanical – One Model, 60 Tips, 90 Minutes to
Success!!!
Learning Objectives At the end of this class, you will be able to:
Manipulate you Simulation Mechanical interface like a pro!
Optimize your Linear Static Stress and MES analyses!
Create photo realistic results images!
Never call technical support again!!!!!!
About the Speaker
James Herzing
James Herzing has been using the Autodesk Simulation software for nearly 9 years, working in various
positions that deal with customer issues, and trying to ensure their success. Currently, he works as part
of the Industry Strategy and Marketing division as a member of the Go-to-Market team. He graduated
from the Pennsylvania State University in 2004 with a BS in Mechanical Engineering and a minor in
Engineering Mechanics. He has presented in 9 Autodesk University classes, and is hosting or assisting
in 5 sessions at this year’s Autodesk University.
Autodesk Simulation Mechanical – One Model, 60 Tips, 90 Minutes to Success!!!
2
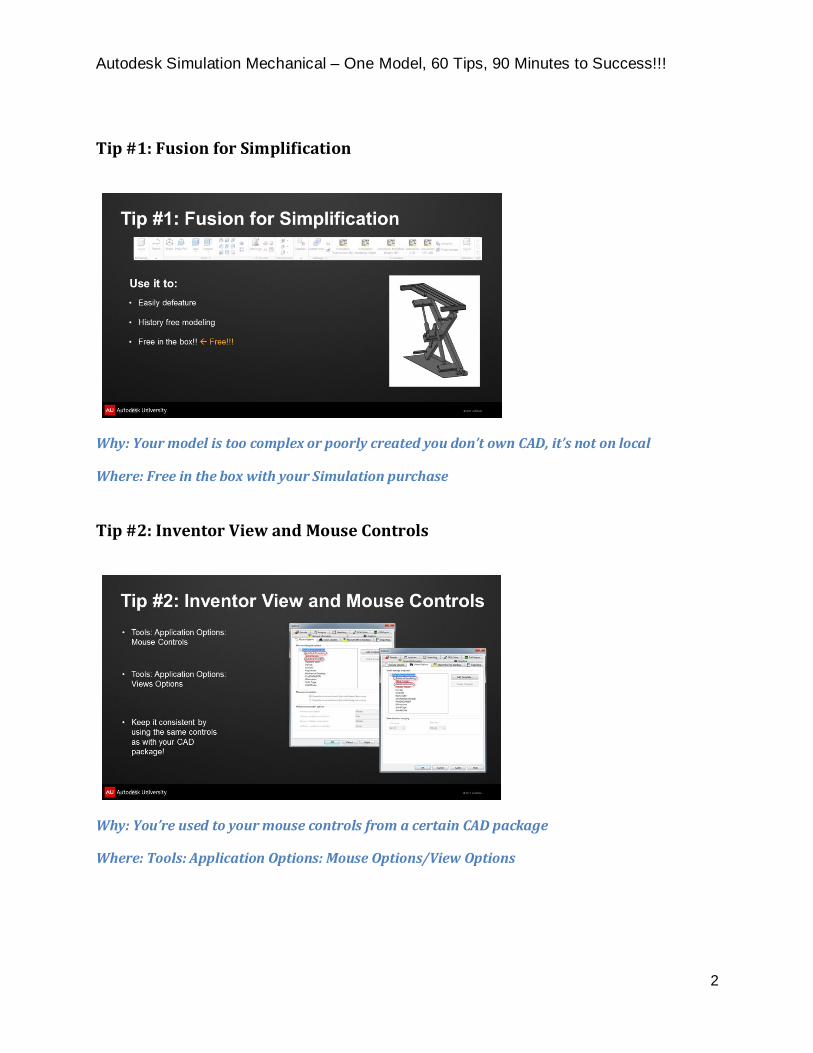
Tip #1: Fusion for Simplification
Why: Your model is too complex or poorly created you don’t own CAD, it’s not on local
Where: Free in the box with your Simulation purchase
Tip #2: Inventor View and Mouse Controls
Why: You’re used to your mouse controls from a certain CAD package
Where: Tools: Application Options: Mouse Options/View Options

Autodesk Simulation Mechanical – One Model, 60 Tips, 90 Minutes to Success!!!
3
Tip #3: Absolute Mesh Size
Why: You need to ensure elements through the thickness of a part, consistent mesh
Where: Mesh: 3D Mesh Settings: Options, set Type to Absolute Mesh Size
Tip #4: Set Retries to Zero
Why: Quickly determine which parts have geometry problems or need a finer mesh
Where: Mesh: 3D Mesh Settings: Options
Autodesk Simulation Mechanical – One Model, 60 Tips, 90 Minutes to Success!!!
4
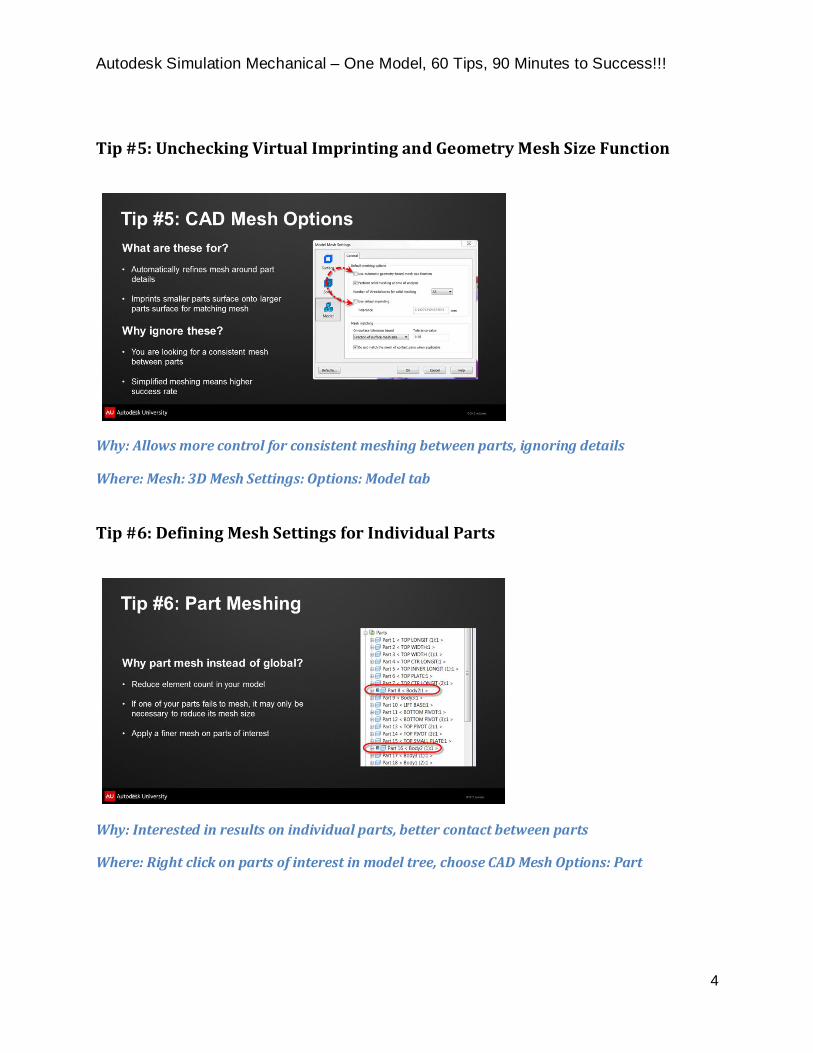
Tip #5: Unchecking Virtual Imprinting and Geometry Mesh Size Function
Why: Allows more control for consistent meshing between parts, ignoring details
Where: Mesh: 3D Mesh Settings: Options: Model tab
Tip #6: Defining Mesh Settings for Individual Parts
Why: Interested in results on individual parts, better contact between parts
Where: Right click on parts of interest in model tree, choose CAD Mesh Options: Part

Autodesk Simulation Mechanical – One Model, 60 Tips, 90 Minutes to Success!!!
5
Tip #7: When to Use Refinement Points
Why: Control your element count, optimize mesh for contact, better results near detail areas
Where: Vertice select: Right click: Add: Refinement Point (or Mesh tab: Refinement panel)
Tip #8: Determine Geometry Errors and Contact Quality
Why: Your mesh may not be good enough for quality contact between parts
Where: Draw Tab: Design Panel: Layer Control
Autodesk Simulation Mechanical – One Model, 60 Tips, 90 Minutes to Success!!!
6
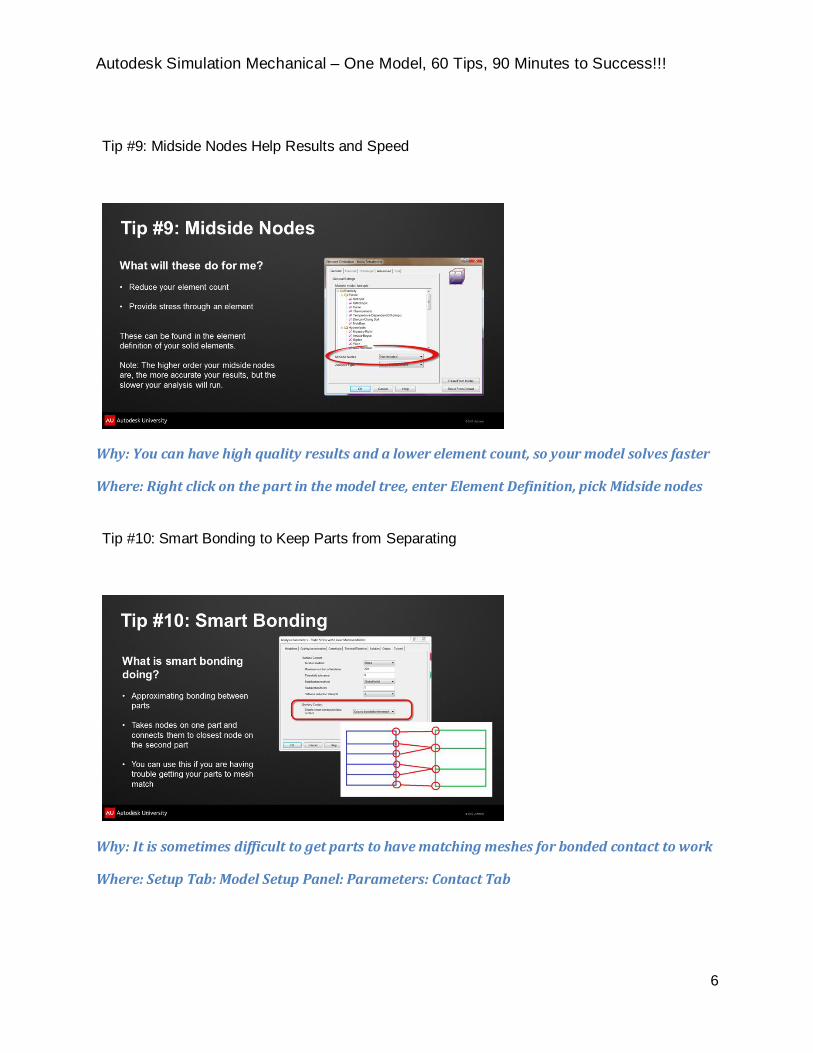
Tip #9: Midside Nodes Help Results and Speed
Why: You can have high quality results and a lower element count, so your model solves faster
Where: Right click on the part in the model tree, enter Element Definition, pick Midside nodes
Tip #10: Smart Bonding to Keep Parts from Separating
Why: It is sometimes difficult to get parts to have matching meshes for bonded contact to work
Where: Setup Tab: Model Setup Panel: Parameters: Contact Tab

Autodesk Simulation Mechanical – One Model, 60 Tips, 90 Minutes to Success!!!
7
Tip #11: Creating Your Own Material Library
Why: You verify the properties for each material, the whole company can use, unique materials
Where: Tools Tab: Options Panel: Manage Material Library
Tip #12: Minimize Your Model Tree
Why: It is easier to select and edit multiple parts in your assembly
Where: On your keyboard… hold down Control, Shift and M at the same time

Autodesk Simulation Mechanical – One Model, 60 Tips, 90 Minutes to Success!!!
8
Tip #13: Save Time by Copying Part Properties
Why: You do not need to enter the various dialog menus repeatedly
Where: Select a part in the model tree, right click, copy desired attributes
Tip #14: Defining Linear Contact for Accurate Analyses
Why: Default bonded contact does not always accurately represent the real world situation
Where: Choose 2 parts, surfaces or contact groups, right click and pick proper contact

Autodesk Simulation Mechanical – One Model, 60 Tips, 90 Minutes to Success!!!
9
Tip #15: Adjusting the Ribbon Bar
Why: Sometimes you drag the panels to the wrong spot or close them accidently
Where: Click on the fly out menu on panel, or right click in the gray ribbon area
Tip #16: Unpinning the Model Tree for More Room
Why: This gives you more room to work on large models and a better canvas for images
Where: Top right corner of the model tree, looks like a pin

Autodesk Simulation Mechanical – One Model, 60 Tips, 90 Minutes to Success!!!
10
Tip #17: Working without Using the Ribbon is Possible
Why: Faster way to choose your commands, customize your menu for most used buttons
Where: The top of the screen above the ribbon, and right side
Tip #18: Graphics Options for Clear Display
Why: Remove ruler from screen, remove gradient for clear pictures
Where: Tools: Application Options: Graphics tab

Autodesk Simulation Mechanical – One Model, 60 Tips, 90 Minutes to Success!!!
11
Tip #19: Test Your Analysis with a Fast Gravity Run
Why: Instead of running an analysis that takes a long time and may fail, test with a simple run
Where: Set up your model mesh, properties and BC, and only apply gravity to see if it works
Tip #20: Applying a Remote Force
Why: Create loads for your model without the need for creating additional CAD geometry
Where: Setup Tab: Loads Panel: Remote Force (also through right click options)

Autodesk Simulation Mechanical – One Model, 60 Tips, 90 Minutes to Success!!!
12
Tip #21: Automatic Line Element Creation
Why: Automatically create line elements where joint browser fails, to apply masses, connection
Where: Draw Tab: Design Panel: Contact Elements
Tip #22: Use Lumped Masses Instead of CAD Geometry
Why: Save on elements and modeling time while keeping necessary mass
Where: Setup: Loads: Nodal Weight

Autodesk Simulation Mechanical – One Model, 60 Tips, 90 Minutes to Success!!!
13
Tip #23: Where to Find Mass Participation and How Much You Need
Why: If you don’t have enough mass participation, your linear dynamics results are no good
Where: Report tab: Log File, find mass participation (aim for at least 80%)
Tip #24: How to Schedule Your Analysis for Different Times
Why: Don’t use up your processing while you need to do work, schedule it for later
Where: Tools: Application Options: Analysis Tab

Autodesk Simulation Mechanical – One Model, 60 Tips, 90 Minutes to Success!!!
14
Tip #25: Connecting with Multiple Lines for Accurate Results
Why: If you only use 1 line, you get hot spots. Spider webbing removes those and is accurate
Where: Use contact element creator or draw lines to connect items together
Tip #26: Modifying the Legend for Clearer Results, Viewing High Stress Elements
Why: You can get a better understanding on results, and see areas of failure
Where: Results Contour: Settings Tab: Legend Properties

Autodesk Simulation Mechanical – One Model, 60 Tips, 90 Minutes to Success!!!
15
Tip #27: Determine Stress through Thickness of Parts
Why: Verify stress in your part through thicknesses to avoid failure
Where: Select nodes in the results, right click and choose Path Plots
Tip #28: Mirror Plane for Symmetry Models
Why: You can see an image of your full model when only part is modeled
Where: Results model tree, right click on proper mirror plane and choose Activate

Autodesk Simulation Mechanical – One Model, 60 Tips, 90 Minutes to Success!!!
16
Tip #29: Factor of Safety for Your Model
Why: Determines how close to failure your part is
Where: Results Contour: Stress: Safety Factor (choose values for FoS to be based on)
Tip #30: Fatigue Analysis
Why: Yielding is not the only way parts fail, repeated loading and unloading causes failure
Where: Analysis Tab: Analysis Panel: Fatigue Analysis

Autodesk Simulation Mechanical – One Model, 60 Tips, 90 Minutes to Success!!!
17
Tip #31: Photo Realistic Images with Autodesk Showcase Interoperability
Why: Because you want fancier looking images to show your customers
Where: Results Contours: Captures panel: Export to Showcase
Tip #32: Design Optimization and Autodesk Labs
Why: Find Autodesk’s newest tools on Labs, and optimize your part thickness and weight
Where: www.labs.autodesk.com ; Setup: Model Setup: Parametric Study

Autodesk Simulation Mechanical – One Model, 60 Tips, 90 Minutes to Success!!!
18
Tip #33: Simulation CFD and Simulation Mechanical Interoperability (Hydra)
Why: Map results from Simulation CFD to determine stress values in Simulation Mechanical
Where: www.labs.autodesk.com; Setup: Model Setup: Parameters: Thermal tab
Tip #34: Accessing the Various Resources for Help
Why: You can learn everything about the software from the forums, wiki, tutorials, etc.
Where: Getting Started: Help panel
Autodesk Simulation Mechanical – One Model, 60 Tips, 90 Minutes to Success!!!
19
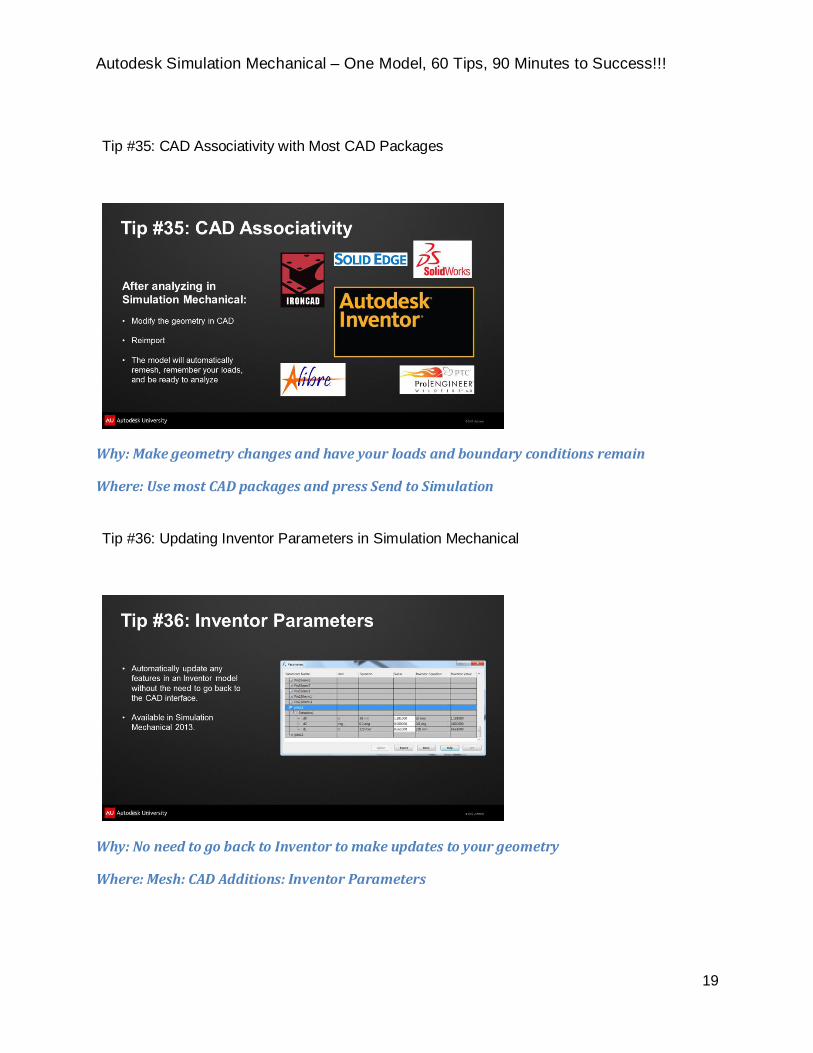
Tip #35: CAD Associativity with Most CAD Packages
Why: Make geometry changes and have your loads and boundary conditions remain
Where: Use most CAD packages and press Send to Simulation
Tip #36: Updating Inventor Parameters in Simulation Mechanical
Why: No need to go back to Inventor to make updates to your geometry
Where: Mesh: CAD Additions: Inventor Parameters
Autodesk Simulation Mechanical – One Model, 60 Tips, 90 Minutes to Success!!!
20
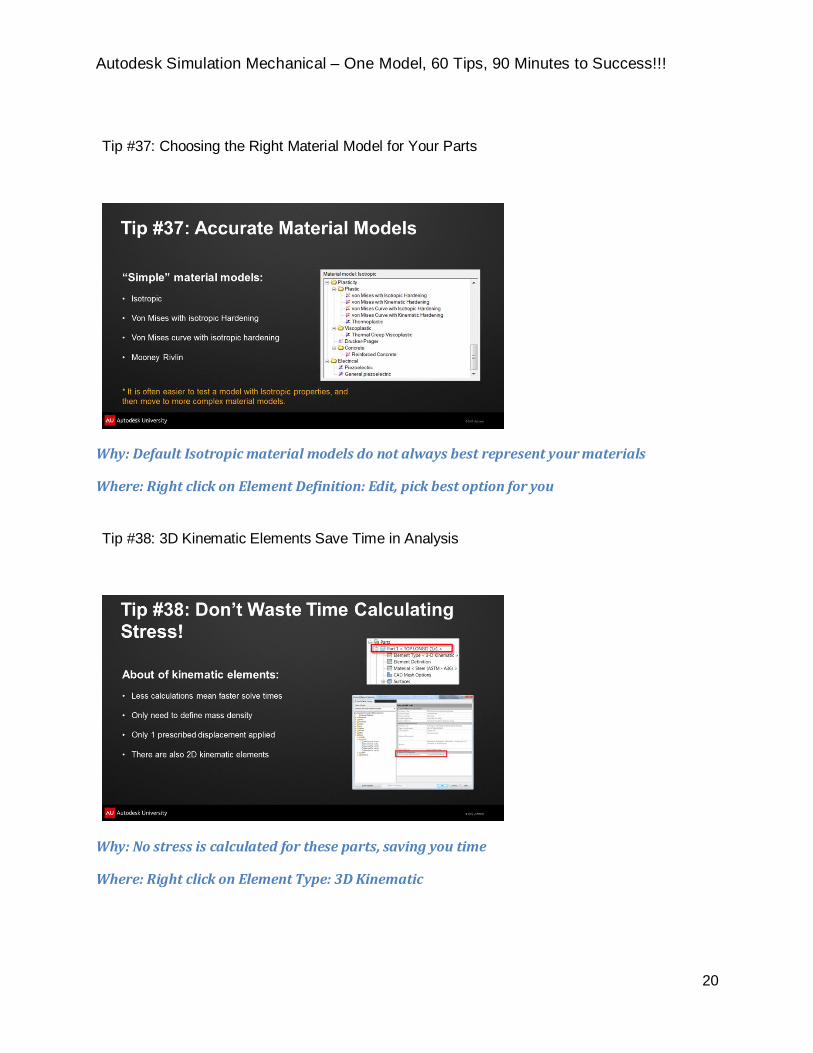
Tip #37: Choosing the Right Material Model for Your Parts
Why: Default Isotropic material models do not always best represent your materials
Where: Right click on Element Definition: Edit, pick best option for you
Tip #38: 3D Kinematic Elements Save Time in Analysis
Why: No stress is calculated for these parts, saving you time
Where: Right click on Element Type: 3D Kinematic

Autodesk Simulation Mechanical – One Model, 60 Tips, 90 Minutes to Success!!!
21
Tip #39: Simplify Models with the Bolt Wizard
Why: Saves elements and analysis time from contact, simplifies your model
Where: Mesh: CAD Additions: Bolt
Tip #40: Using Joints in Your Models
Why: Create pin or universal joints instead of CAD Geometry
Where: Mesh: CAD Additions: Joint

Autodesk Simulation Mechanical – One Model, 60 Tips, 90 Minutes to Success!!!
22
Tip #41: Line Elements to Simplify Complex Models
Why: Removes a large amount of detail from CAD while providing an accurate solution
Where: Right click on the Element Type and choose which line element you want
Tip #42: Selection Groups for Easy Contact Definition
Why: Defining selection groups is faster and easier than defining 1 contact pair at a time
Where: Select desired surfaces on your model, choose Selection Groups: Create New Group

Autodesk Simulation Mechanical – One Model, 60 Tips, 90 Minutes to Success!!!
23
Tip #43: Turn Updating to “Never” when Contact Pairs won’t Change
Why: This will drastically improve the time contact models take to analyze
Where: Right click: General Surface-to-Surface Contact: Updating
Tip #44: Apply Friction in Your Contact Models
Why: Friction is a more accurate representation of your model
Where: In the Contact menu, click under Parameters in the table

Autodesk Simulation Mechanical – One Model, 60 Tips, 90 Minutes to Success!!!
24
Tip #45: Manually Define Contact Stiffness for Faster Analyses
Why: Automatic contact stiff ness can be slow to converge on the proper solution
Where: From the screen for friction (above), Advanced button: General tab
Tip #46: Define Interaction and Initial Distances for Contact Elements
Why: Limits the number of elements created and duration they are accounted for, faster solve
Where: From screen above, click on the Geometry Tab

Autodesk Simulation Mechanical – One Model, 60 Tips, 90 Minutes to Success!!!
25
Tip #47: Take Advantage of Prescribed Displacements
Why: They are the most stable, easy to analyze loads in MES
Where: Setup: Constraint panel: Prescribed Displacement
Tip #48: Apply Boundary Conditions to Remove Degrees of Freedom
Why: The more DoF that you remove from your analysis, the faster it will solve
Where: Setup: Constraint panel: General Constraint

Autodesk Simulation Mechanical – One Model, 60 Tips, 90 Minutes to Success!!!
26
Tip #49: Use Zones for Your MES Analyses
Why: You can use more time steps of areas of difficult convergence, and less in other areas
Where: Setup: Model Setup tab: Parameters: Event tab
Tip #50: Use Updated Lagrangian for High Strain Parts
Why: This option changes settings to help converge more quickly when strain is high
Where: Right click on part with high strain in tree: Edit: Element Definition: Advanced tab

Autodesk Simulation Mechanical – One Model, 60 Tips, 90 Minutes to Success!!!
27
Tip #51: How to Determine Weight and Center of Gravity for Your Model
Why: Verify the accuracy of your CAD geometry and material properties, determine tipping
Where: Analysis tab: Analysis panel: Weight and Center of Gravity
Tip #52: Use Remote Submission to Free Your Machine
Why: You can run your analyses on another machine while doing work on yours
Where: Tools: Application Options: Analysis: Configure Remote Execution

Autodesk Simulation Mechanical – One Model, 60 Tips, 90 Minutes to Success!!!
28
Tip #53: Autodesk Simulation Mechanical 360 – Cloud Analysis
Why: Frees your machine, unlimited solving in parallel, powerful machines, pay as you go
Where: You can download the trial today, or contact your sales rep!
Tip #54: Von Mises Precision to Verify Mesh Quality and Accuracy
Why: You can verify the quality of your mesh and see hot spots in your results
Where: Results Contours: Stress: von Mises Precision

Autodesk Simulation Mechanical – One Model, 60 Tips, 90 Minutes to Success!!!
29
Tip #55: Modify Your Legend Options for Clearer Results Interpretation
Why: You don’t need 7 digits in your displacement results, save on clutter
Where: Results Contours: Settings panel: Legend Options
Tip #56: Applying and Manipulating Slice Planes
Why: More easily review results without parts blocking your view, rotate planes as necessary
Where: Results Options: View Settings panel: Slice Planes

Autodesk Simulation Mechanical – One Model, 60 Tips, 90 Minutes to Success!!!
30
Tip #57: Automatically Create a Report of Your Findings
Why: Easily capture analysis information such as loads, materials, elements and results
Where: Reports tab: Report: Setup Panel: Configure
Tip #58: Apply Custom Logos to Your Report
Why: Advertise your company instead of the Autodesk logo
Where: In the Configure menu, check box next to logo and watermark, browse to image

Autodesk Simulation Mechanical – One Model, 60 Tips, 90 Minutes to Success!!!
31
Tip #59: Display Your Results in an Inventor Publisher Document
Why: Your stress and displacement results can be part of your Publisher presentation
Where: Results Contours: Save to file: .fbx file to be opened in Publisher
Tip #60: Watch Simulation TV for Help with All Your Simulation Needs!
Why: Updated with multiple videos weekly covering all Autodesk Simulation solutions
Where: www.simsquad.com – look for the Simulation TV link on the page!!