Embed Size (px)
Citation preview
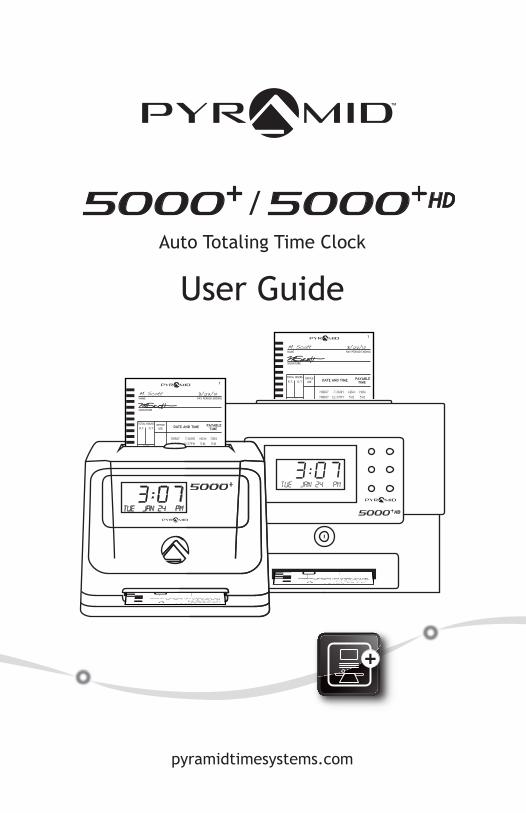
/Auto Totaling Time Clock
User Guide
pyramidtimesystems.com
PAY PERIOD ENDINGNAME
SIGNATURE
TOTAL HOURS OFFICEUSER.T. O.T.
RATE
AMOUNT
EARNINGS
DEDUCTIONS
BALANCE
DATE AND TIME PAYABLETIME
pyramidtimesystems.com
Form 44100-10 Rev. K© 2001 PYRAMID TIME SYSTEMS, LLC
IMPORTANT: Duplicate card numbers must NOT be used within the same pay period
M. Scott 3/07/12
1
PAY PERIOD ENDINGNAME
SIGNATURE
TOTAL HOURS OFFICEUSER.T. O.T.
RATE
AMOUNT
EARNINGS
DEDUCTIONS
BALANCE
DATE AND TIME PAYABLETIME
IMPORTANT: Duplicate card numbers must NOT be used within the same pay period
M. Scott 3/07/12
1

AUTO TOTALING TIME CLOCK INSTRUCTIONSModel 5000+/5000+HD
Copyright Information© 2012 Pyramid Time Systems, LLC. All rights reserved.Reproduction, adaptation or translation without prior written permission is prohibited, except as allowed under the copyright laws.
The information contained herein is subject to change without notice.The only warranties for Pyramid Time Systems products are set forth in the express warranty statements accompanying such products. Nothing herein should be construed as constituting an additional warranty. Pyramid Time Systems shall not be liable for technical or editorial errors or omissions contained herein.
AUTO TOTALING TIME CLOCK INSTRUCTIONSModel 5000+/5000+HD
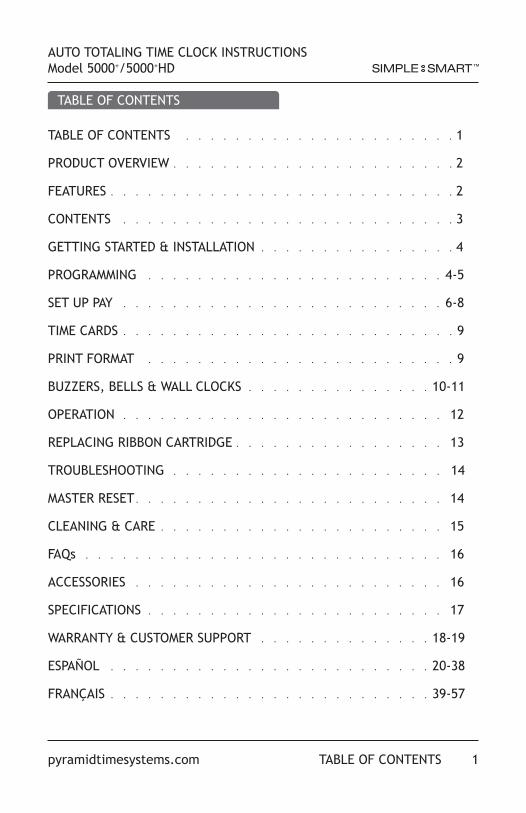
TABLE OF CONTENTS
TABLE OF CONTENTS . . . . . . . . . . . . . . . . . . . . . . 1
PRODUCT OVERVIEW . . . . . . . . . . . . . . . . . . . . . . . 2
FEATURES . . . . . . . . . . . . . . . . . . . . . . . . . . . . 2
CONTENTS . . . . . . . . . . . . . . . . . . . . . . . . . . . 3
GETTING STARTED & INSTALLATION . . . . . . . . . . . . . . . . 4
PROGRAMMING . . . . . . . . . . . . . . . . . . . . . . . . 4-5
SET UP PAY . . . . . . . . . . . . . . . . . . . . . . . . . . 6-8
TIME CARDS . . . . . . . . . . . . . . . . . . . . . . . . . . . 9
PRINT FORMAT . . . . . . . . . . . . . . . . . . . . . . . . . 9
BUZZERS, BELLS & WALL CLOCKS . . . . . . . . . . . . . . . 10-11
OPERATION . . . . . . . . . . . . . . . . . . . . . . . . . . 12
REPLACING RIBBON CARTRIDGE . . . . . . . . . . . . . . . . . 13
TROUBLESHOOTING . . . . . . . . . . . . . . . . . . . . . . 14
MASTER RESET . . . . . . . . . . . . . . . . . . . . . . . . . 14
CLEANING & CARE . . . . . . . . . . . . . . . . . . . . . . . 15
FAQs . . . . . . . . . . . . . . . . . . . . . . . . . . . . . 16
ACCESSORIES . . . . . . . . . . . . . . . . . . . . . . . . . 16
SPECIFICATIONS . . . . . . . . . . . . . . . . . . . . . . . . 17
WARRANTY & CUSTOMER SUPPORT . . . . . . . . . . . . . . 18-19
ESPAÑOL . . . . . . . . . . . . . . . . . . . . . . . . . . 20-38
FRANÇAIS . . . . . . . . . . . . . . . . . . . . . . . . . . 39-57
1pyramidtimesystems.com TABLE OF CONTENTS
AUTO TOTALING TIME CLOCK INSTRUCTIONSModel 5000+/5000+HD
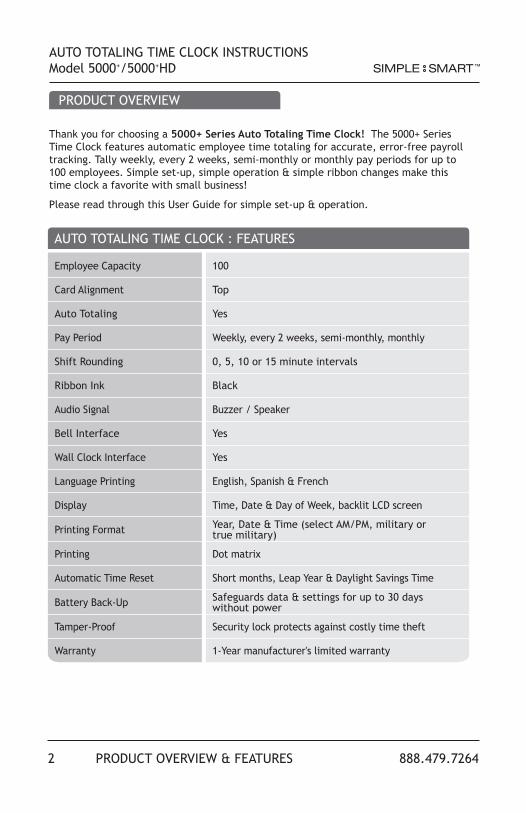
Thank you for choosing a 5000+ Series Auto Totaling Time Clock! The 5000+ Series Time Clock features automatic employee time totaling for accurate, error-free payroll tracking. Tally weekly, every 2 weeks, semi-monthly or monthly pay periods for up to 100 employees. Simple set-up, simple operation & simple ribbon changes make this time clock a favorite with small business! Please read through this User Guide for simple set-up & operation.
PRODUCT OVERVIEW
AUTO TOTALING TIME CLOCK : FEATURES
Employee Capacity 100
Card Alignment Top
Auto Totaling Yes
Pay Period Weekly, every 2 weeks, semi-monthly, monthly
Shift Rounding 0, 5, 10 or 15 minute intervals
Ribbon Ink Black
Audio Signal Buzzer / Speaker
Bell Interface Yes
Wall Clock Interface Yes
Language Printing English, Spanish & French
Display Time, Date & Day of Week, backlit LCD screen
Printing Format Year, Date & Time (select AM/PM, military or true military)
Printing Dot matrix
Automatic Time Reset Short months, Leap Year & Daylight Savings Time
Battery Back-Up Safeguards data & settings for up to 30 days without power
Tamper-Proof Security lock protects against costly time theft
Warranty 1-Year manufacturer's limited warranty
2 PRODUCT OVERVIEW & FEATURES 888.479.7264
3pyramidtimesystems.com
AUTO TOTALING TIME CLOCK INSTRUCTIONSModel 5000+/5000+HD
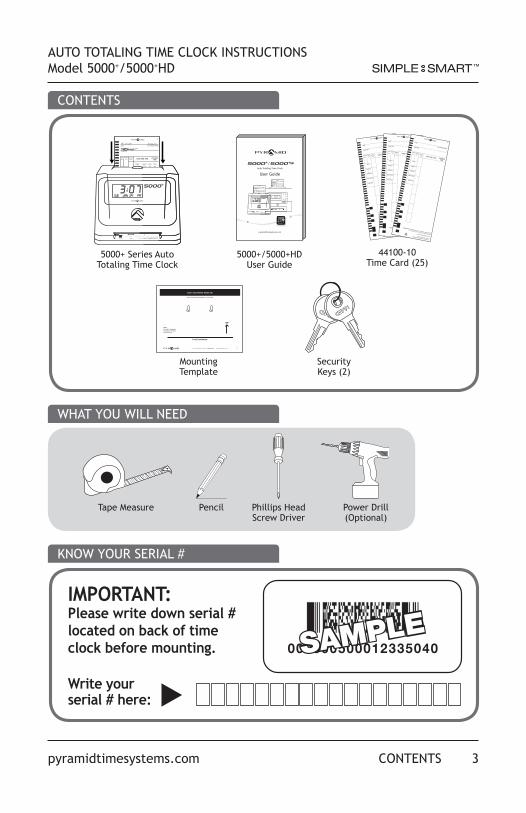
CONTENTS
WHAT YOU WILL NEED
KNOW YOUR SERIAL #
CONTENTS
PAY PERIOD ENDINGNAME
SIGNATURE
TOTAL HOURS OFFICEUSER.T. O.T.
RATE
DATE AND TIME PAYABLETIME
M. Scott 3/07/12
1
CH751 CH751
5000+ Series Auto Totaling Time Clock
44100-10Time Card (25)
Mounting Template
5000+/5000+HD User Guide
Security Keys (2)
Tape Measure Pencil Phillips HeadScrew Driver
Power Drill(Optional)
IMPORTANT: Please write down serial # located on back of time clock before mounting.
Write your serial # here:
s
SAMPLE
For more information contact us at 888.479.7264 pyramidtimesystems.com 4249
8 R
ev. A
NOTE:Bracket is designedfor single or doubleelectrical box.
Level Line Marker
UP
5000+ MOUNTING TEMPLATE
Screw Guide Template Below Is Actual Size
++
PAY PERIOD ENDING
NAME
SIGNATURE
TOTAL HOURS OFFICE
USER.T. O.T.
RATE
AMOUNT
EARNINGS
DEDUCTIONS
BALANCE
DATE AND TIMEPAYABLE
TIME
pyramidtimesystems.com
Form 44100-10 Rev. K
© 2001 PYRAMID TIME SYSTEMS� LLC
IMPORTANT� D�p�icate card ��m�ers m�st NOT
�e �sed � it�i� t�e same pay period
1
PAY PERIOD ENDINGNAME
SIGNATURE
TOTAL HOURS OFFICEUSER.T. O.T.
RATE
AMOUNT
EARNINGS
DEDUCTIONS
BALANCE
DATE AND TIME PAYABLETIME
pyramidtimesystems.com
Form 44100-10 Rev. K© 2001 PYRAMID TIME SYSTEMS� LLC
IMPORTANT� D�p�icate card ��m�ers m�st NOT �e �sed � it�i� t�e same pay period
1
PAY PERIOD ENDING
NAME
SIGNATURE
TOTAL HOURSOFFICEUSE
R.T. O.T.
RATE
AMOUNT
EARNINGS
DEDUCTIONS
BALANCE
DATE AND TIME PAYABLETIME
pyramidtimesystems.comForm 44100-10 Rev. K
© 2001 PYRAMID TIME SYSTEMS� LLC
IMPORTANT� D�p�icate card ��m�ers m�st NOT
�e �sed � it�i� t�e same pay period
1

4 INSTALLATION & PROGRAMMING 888.479.7264
AUTO TOTALING TIME CLOCK INSTRUCTIONSModel 5000+/5000+HD
DESKTOP SET UP
WALL MOUNTING
PROGRAMMING
Remove time clock from carton & place on a flat, level surface.
Plug unit into AC wall outlet.
Select a location convenient to employees clocking IN & OUT. Be sure power outlet is within 5 feet of mounting location.
Use masking tape to hold mounting template on wall, making certain template is positioned so bottom of time clock is approximately 45 inches from floor.
Drill holes using template as a guide.
Remove template from wall & install #10 screws, leaving approximately 3/16 inch of screws exposed. For sheetrock walls, use plastic anchors.
Hang time clock on wall, aligning keyholes on the rear with screw heads. Press downward on time clock until it lowers onto screws. If mounting 5000+HD Time Clock, unlock & remove top/front cover, & tighten wall screws to fasten.
Plug unit into AC wall outlet.
Use key to unlock & remove top/front cover. Locate programming buttons labeled SELECT, s(UP) & t(DOWN).
Press SELECT until desired feature is displayed (see chart on page 5).
Press s(UP) or t(DOWN) to scroll through feature options.
Press SELECT to save option setting & move to next feature.
2
2
3
4
5
6
1
1
2
3
4
1
Model 5000+
Model 5000+HD
5pyramidtimesystems.com PROGRAMMING
AUTO TOTALING TIME CLOCK INSTRUCTIONSModel 5000+/5000+HD
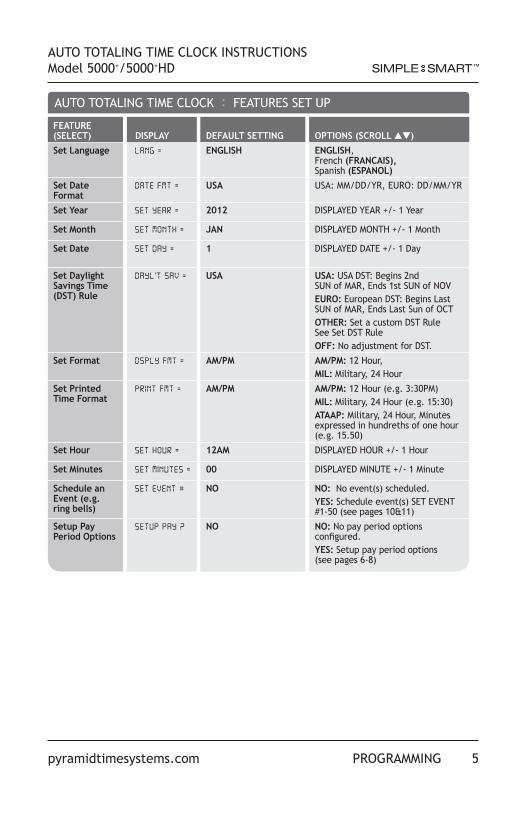
AUTO TOTALING TIME CLOCK : FEATURES SET UP
FEATURE (SELECT)
DISPLAY
DEFAULT SETTING
OPTIONS (SCROLL st)
Set Language ENGLISH ENGLISH, French (FRANCAIS), Spanish (ESPANOL)
Set Date Format
USA USA: MM/DD/YR, EURO: DD/MM/YR
Set Year 2012 DISPLAYED YEAR +/- 1 Year
Set Month JAN DISPLAYED MONTH +/- 1 Month
Set Date 1 DISPLAYED DATE +/- 1 Day
Set Daylight Savings Time (DST) Rule
USA USA: USA DST: Begins 2nd SUN of MAR, Ends 1st SUN of NOVEURO: European DST: Begins Last SUN of MAR, Ends Last Sun of OCTOTHER: Set a custom DST Rule See Set DST RuleOFF: No adjustment for DST.
Set Format AM/PM AM/PM: 12 Hour, MIL: Military, 24 Hour
Set Printed Time Format
AM/PM AM/PM: 12 Hour (e.g. 3:30PM) MIL: Military, 24 Hour (e.g. 15:30)ATAAP: Military, 24 Hour, Minutes expressed in hundreths of one hour (e.g. 15.50)
Set Hour 12AM DISPLAYED HOUR +/- 1 Hour
Set Minutes 00 DISPLAYED MINUTE +/- 1 Minute
Schedule an Event (e.g. ring bells)
NO NO: No event(s) scheduled.YES: Schedule event(s) SET EVENT #1-50 (see pages 10&11)
Setup Pay Period Options
NO NO: No pay period options configured.YES: Setup pay period options (see pages 6-8)
AUTO TOTALING TIME CLOCK INSTRUCTIONSModel 5000+/5000+HD
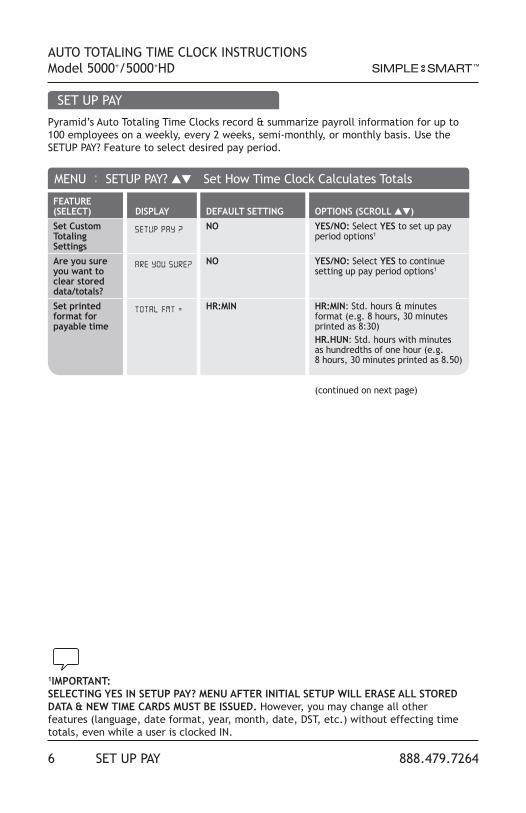
SET UP PAY
Pyramid’s Auto Totaling Time Clocks record & summarize payroll information for up to 100 employees on a weekly, every 2 weeks, semi-monthly, or monthly basis. Use the SETUP PAY? Feature to select desired pay period.
MENU : SETUP PAY? st Set How Time Clock Calculates Totals
FEATURE (SELECT)
DISPLAY
DEFAULT SETTING
OPTIONS (SCROLL st)
Set Custom Totaling Settings
NO YES/NO: Select YES to set up pay period options1
Are you sure you want to clear stored data/totals?
NO YES/NO: Select YES to continue setting up pay period options1
Set printed format for payable time
HR:MIN HR:MIN: Std. hours & minutes format (e.g. 8 hours, 30 minutes printed as 8:30) HR.HUN: Std. hours with minutes as hundredths of one hour (e.g. 8 hours, 30 minutes printed as 8.50)
(continued on next page)
1IMPORTANT:SELECTING YES IN SETUP PAY? MENU AFTER INITIAL SETUP WILL ERASE ALL STORED DATA & NEW TIME CARDS MUST BE ISSUED. However, you may change all other features (language, date format, year, month, date, DST, etc.) without effecting time totals, even while a user is clocked IN.
6 SET UP PAY 888.479.7264
AUTO TOTALING TIME CLOCK INSTRUCTIONSModel 5000+/5000+HD
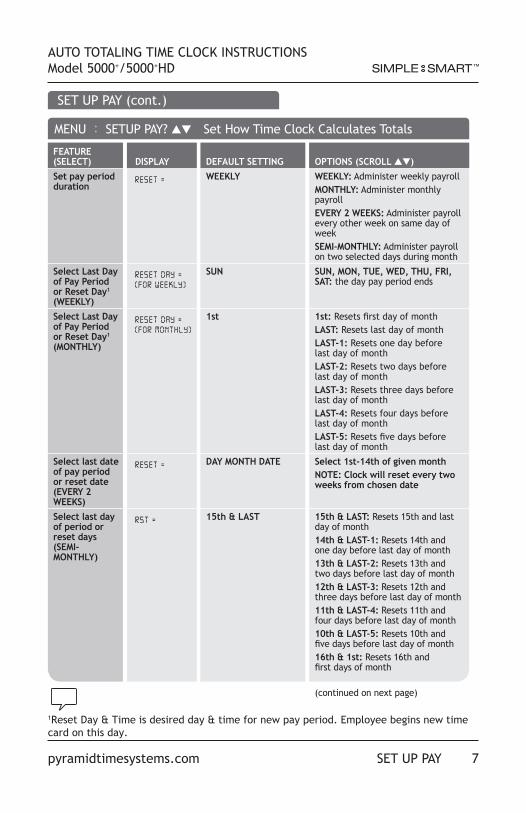
MENU : SETUP PAY? st Set How Time Clock Calculates Totals
FEATURE (SELECT)
DISPLAY
DEFAULT SETTING
OPTIONS (SCROLL st)
Set pay period duration
WEEKLY WEEKLY: Administer weekly payrollMONTHLY: Administer monthly payrollEVERY 2 WEEKS: Administer payroll every other week on same day of weekSEMI-MONTHLY: Administer payroll on two selected days during month
Select Last Day of Pay Period or Reset Day1 (WEEKLY)
SUN SUN, MON, TUE, WED, THU, FRI, SAT: the day pay period ends
Select Last Day of Pay Period or Reset Day1 (MONTHLY)
1st 1st: Resets first day of monthLAST: Resets last day of monthLAST-1: Resets one day before last day of monthLAST-2: Resets two days before last day of monthLAST-3: Resets three days before last day of monthLAST-4: Resets four days before last day of monthLAST-5: Resets five days before last day of month
Select last date of pay period or reset date (EVERY 2 WEEKS)
DAY MONTH DATE Select 1st-14th of given monthNOTE: Clock will reset every two weeks from chosen date
Select last day of period or reset days (SEMI- MONTHLY)
15th & LAST 15th & LAST: Resets 15th and last day of month14th & LAST-1: Resets 14th and one day before last day of month13th & LAST-2: Resets 13th and two days before last day of month12th & LAST-3: Resets 12th and three days before last day of month11th & LAST-4: Resets 11th and four days before last day of month10th & LAST-5: Resets 10th and five days before last day of month16th & 1st: Resets 16th and first days of month
(continued on next page)
SET UP PAY (cont.)
1Reset Day & Time is desired day & time for new pay period. Employee begins new time card on this day.
7pyramidtimesystems.com SET UP PAY
8 SET UP PAY 888.479.7264
AUTO TOTALING TIME CLOCK INSTRUCTIONSModel 5000+/5000+HD
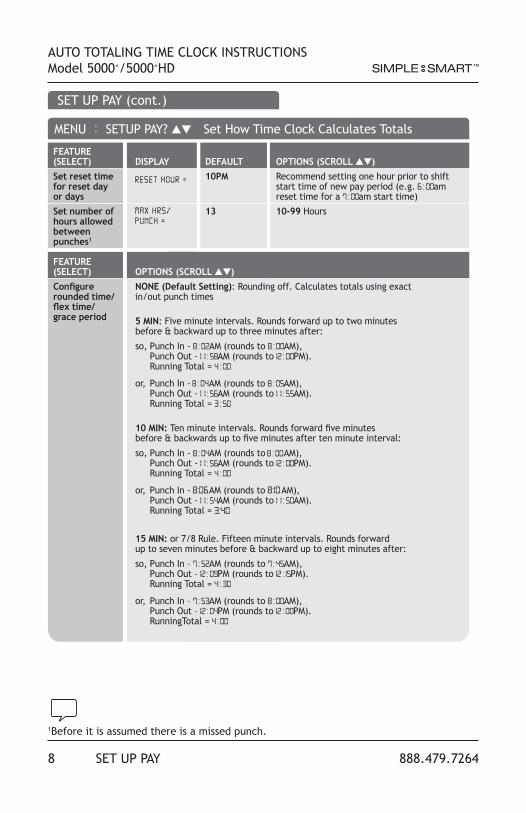
SET UP PAY (cont.)
1Before it is assumed there is a missed punch.
MENU : SETUP PAY? st Set How Time Clock Calculates Totals
FEATURE (SELECT)
DISPLAY
DEFAULT
OPTIONS (SCROLL st)
Set reset time for reset day or days
10PM Recommend setting one hour prior to shift start time of new pay period (e.g. am reset time for a am start time)
Set number of hours allowed between punches1
13 10-99 Hours
FEATURE (SELECT) OPTIONS (SCROLL st)Configure rounded time/flex time/ grace period
NONE (Default Setting): Rounding off. Calculates totals using exact in/out punch times
5 MIN: Five minute intervals. Rounds forward up to two minutes before & backward up to three minutes after:
so, Punch In - AM (rounds to AM), Punch Out - AM (rounds to PM). Running Total =
or, Punch In - AM (rounds to AM), Punch Out - AM (rounds to AM). Running Total =
10 MIN: Ten minute intervals. Rounds forward five minutes before & backwards up to five minutes after ten minute interval:
so, Punch In - AM (rounds to AM), Punch Out - AM (rounds to PM). Running Total =
or, Punch In - AM (rounds to AM), Punch Out - AM (rounds to AM). Running Total =
15 MIN: or 7/8 Rule. Fifteen minute intervals. Rounds forward up to seven minutes before & backward up to eight minutes after:
so, Punch In – AM (rounds to AM), Punch Out – PM (rounds to PM). Running Total =
or, Punch In – AM (rounds to AM), Punch Out – PM (rounds to PM). RunningTotal =

9pyramidtimesystems.com TIME CARD & PRINT FORMAT
AUTO TOTALING TIME CLOCK INSTRUCTIONSModel 5000+/5000+HD
TIME CARDS
TIME CARD PRINT FORMAT
000 0 000000
11
2
3
4
Use one number per person per period. Do not duplicate numbers during a pay period.
Use clean, straight cards to avoid read/ID errors.
Locate the revision # at bottom of card. Use Pyramid Rev. I or higher cards. Contact technical support if you have lower revision cards.
Use only time card #44100-10 which includes official Pyramid Time Systems Trademark. Using time cards other than Pyramid item #44100-10 voids the warranty.
The same time card (#44100-10) is used for weekly, monthly, every 2 weeks & semi-monthly pay periods. However, the print format will differ as follows:
WEEKLY:Up to a maximum 28 punches per period, typically (but not necessarily), 4 punches a day over 7 days.
PUNCH IN MAY 9 8:00AM *IN* WED Prints Month, Date, Punch In Time, “IN”, Day of Week
PUNCH OUT MAY 9 12:00PM 4:00 4:00 Prints Month, Date, Punch Out Time, Elapsed Time since last “IN” Punch (HRS:MINS), Running Total (HRS:MINS)
MONTHLY, EVERY 2 WEEKS, SEMI-MONTHLY:Up to a maximum 64 punches per period, typically (but not necessarily), one in/one out punch per line over 32 lines.
PUNCH IN 9 8:00A Prints Date, Punch In Time
PUNCH OUT 9 8:00a 12:00p 4:00 4:00 Prints Punch Out Time, Elapsed Time since last IN Punch (HRS:MIN), & Running Total (HRS:MINS) to the right of existing Punch In Time
FEATURE (SELECT)
DISPLAY
DEFAULT
OPTIONS (SCROLL st)
Set reset time for reset day or days
10PM Recommend setting one hour prior to shift start time of new pay period (e.g. am reset time for a am start time)
Set number of hours allowed between punches1
13 10-99 Hours
FEATURE (SELECT) OPTIONS (SCROLL st)Configure rounded time/flex time/ grace period
NONE (Default Setting): Rounding off. Calculates totals using exact in/out punch times
5 MIN: Five minute intervals. Rounds forward up to two minutes before & backward up to three minutes after:
so, Punch In - AM (rounds to AM), Punch Out - AM (rounds to PM). Running Total =
or, Punch In - AM (rounds to AM), Punch Out - AM (rounds to AM). Running Total =
10 MIN: Ten minute intervals. Rounds forward five minutes before & backwards up to five minutes after ten minute interval:
so, Punch In - AM (rounds to AM), Punch Out - AM (rounds to PM). Running Total =
or, Punch In - AM (rounds to AM), Punch Out - AM (rounds to AM). Running Total =
15 MIN: or 7/8 Rule. Fifteen minute intervals. Rounds forward up to seven minutes before & backward up to eight minutes after:
so, Punch In – AM (rounds to AM), Punch Out – PM (rounds to PM). Running Total =
or, Punch In – AM (rounds to AM), Punch Out – PM (rounds to PM). RunningTotal =
Time Card #44100-10

10 BUZZERS, BELLS & WALL CLOCKS 888.479.7264
AUTO TOTALING TIME CLOCK INSTRUCTIONSModel 5000+/5000+HD
SET EVENT USING BUZZER/BELLS
CONNECTING EXTERNAL BELLS
1
1
2
3
4
5
2
3
Locate volume dial inside front cover to left of display.
Turn dial clockwise to increase volume & counterclockwise to decrease. NOTE: Buzzer is intended for use in quiet settings.
Sound the buzzer by scheduling an event (See Event Menu on page 11).
The time clock has an internal buzzer & bell ringer interface option to alert workers (or students) of start times, breaks, lunch and dismissal times. The internal buzzer will also sound when the time clock sends a BCD signal to ring a bell.
Add up to 15 bells and/or horns & schedule up to 50 events using Pyramid Time System’s TimeTrax™ Model 5300 Bell Ringer (sold separately).
Locate RJ-45 jack at back (5000+) or side (5000+HD) of time clock & connect cable.
Connect other end of cable to TimeTrax™ 5300 Bell Ringer.
Connect 5300 transformer to receptacle labeled POWER.
Wire bells and/or horns in parallel to labeled terminals on the 5300. See TimeTrax™ 5300 Instructions for detailed installation instructions.
Sound bell or horn by scheduling an event (see page 11).
11pyramidtimesystems.com BUZZERS, BELLS & WALL CLOCKS
AUTO TOTALING TIME CLOCK INSTRUCTIONSModel 5000+/5000+HD
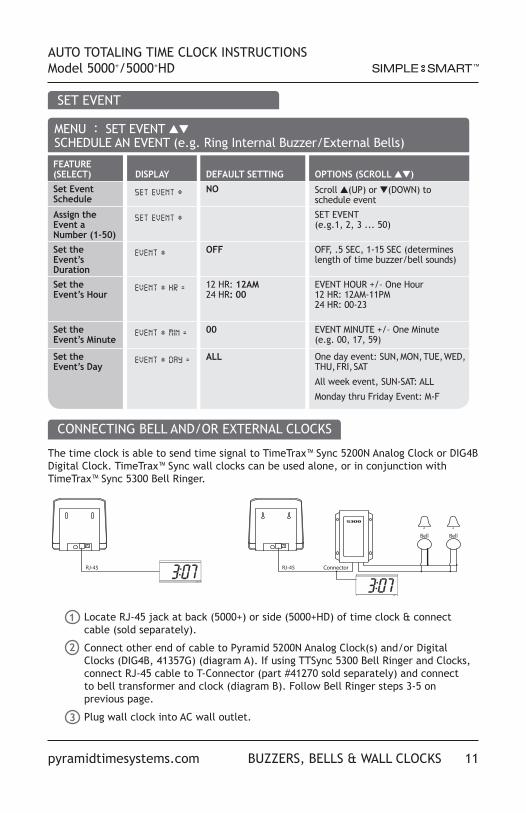
SET EVENT
CONNECTING BELL AND/OR EXTERNAL CLOCKS
1
2
3
The time clock is able to send time signal to TimeTrax™ Sync 5200N Analog Clock or DIG4B Digital Clock. TimeTrax™ Sync wall clocks can be used alone, or in conjunction with TimeTrax™ Sync 5300 Bell Ringer.
Connector
Locate RJ-45 jack at back (5000+) or side (5000+HD) of time clock & connect cable (sold separately).
Connect other end of cable to Pyramid 5200N Analog Clock(s) and/or Digital Clocks (DIG4B, 41357G) (diagram A). If using TTSync 5300 Bell Ringer and Clocks, connect RJ-45 cable to T-Connector (part #41270 sold separately) and connect to bell transformer and clock (diagram B). Follow Bell Ringer steps 3-5 on previous page.
Plug wall clock into AC wall outlet.
MENU : SET EVENT st SCHEDULE AN EVENT (e.g. Ring Internal Buzzer/External Bells)
FEATURE (SELECT)
DISPLAY
DEFAULT SETTING
OPTIONS (SCROLL st)
Set Event Schedule
NO Scroll s(UP) or t(DOWN) to schedule event
Assign the Event a Number (1-50)
SET EVENT (e.g.1, 2, 3 ... 50)
Set the Event’s Duration
OFF OFF, .5 SEC, 1-15 SEC (determines length of time buzzer/bell sounds)
Set the Event’s Hour
12 HR: 12AM 24 HR: 00
EVENT HOUR +/– One Hour12 HR: 12AM-11PM24 HR: 00-23
Set the Event’s Minute
00 EVENT MINUTE +/– One Minute(e.g. 00, 17, 59)
Set the Event’s Day
ALL One day event: SUN, MON, TUE, WED,
THU, FRI, SAT
All week event, SUN-SAT: ALL
Monday thru Friday Event: M-F
12 OPERATION 888.479.7264
AUTO TOTALING TIME CLOCK INSTRUCTIONSModel 5000+/5000+HD
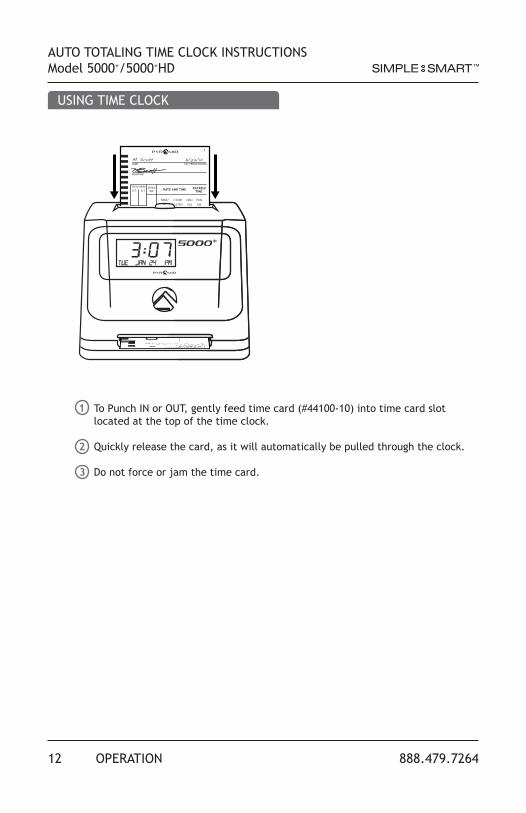
USING TIME CLOCK
1
2
3
PAY PERIOD ENDINGNAME
SIGNATURE
TOTAL HOURS OFFICEUSER.T. O.T.
RATE
DATE AND TIME PAYABLETIME
M. Scott 3/07/12
1
To Punch IN or OUT, gently feed time card (#44100-10) into time card slot located at the top of the time clock.
Quickly release the card, as it will automatically be pulled through the clock.
Do not force or jam the time card.
13pyramidtimesystems.com REPLACING RIBBON CARTRIDGE
AUTO TOTALING TIME CLOCK INSTRUCTIONSModel 5000+/5000+HD
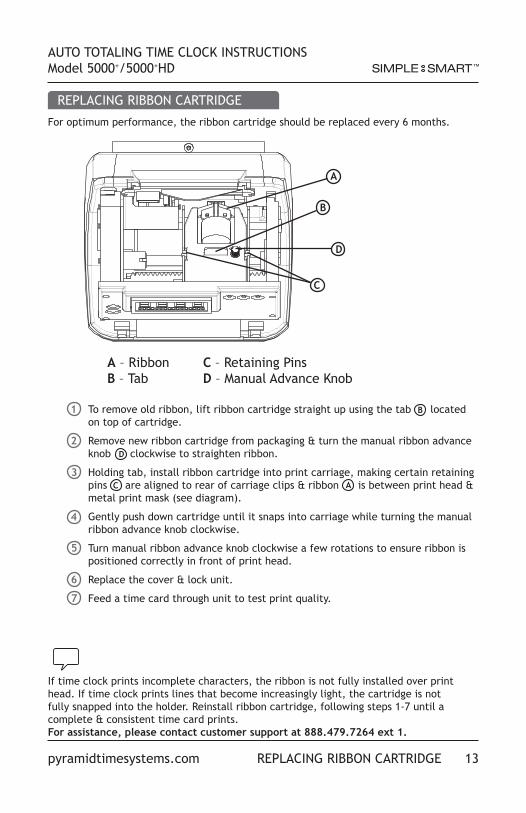
REPLACING RIBBON CARTRIDGE
A
B
D
C
For optimum performance, the ribbon cartridge should be replaced every 6 months.
A – Ribbon C – Retaining PinsB – Tab D – Manual Advance Knob
1
2
3
4
5
6
7
To remove old ribbon, lift ribbon cartridge straight up using the tab located on top of cartridge.
Remove new ribbon cartridge from packaging & turn the manual ribbon advance knob clockwise to straighten ribbon.
Holding tab, install ribbon cartridge into print carriage, making certain retaining pins are aligned to rear of carriage clips & ribbon is between print head & metal print mask (see diagram).
Gently push down cartridge until it snaps into carriage while turning the manual ribbon advance knob clockwise.
Turn manual ribbon advance knob clockwise a few rotations to ensure ribbon is positioned correctly in front of print head.
Replace the cover & lock unit.
Feed a time card through unit to test print quality.
If time clock prints incomplete characters, the ribbon is not fully installed over print head. If time clock prints lines that become increasingly light, the cartridge is not fully snapped into the holder. Reinstall ribbon cartridge, following steps 1-7 until a complete & consistent time card prints. For assistance, please contact customer support at 888.479.7264 ext 1.
B
A
D
C

14 TROUBLESHOOTING 888.479.7264
AUTO TOTALING TIME CLOCK INSTRUCTIONSModel 5000+/5000+HD
TROUBLESHOOTING
TRY AGAIN MESSAGEIn the event the time clock displays “ ”, re-feed the time card. If “ ” persists, please check list for possible causes:
5000+/5000+HD : TRY AGAIN MESSAGE
POSSIBLE CAUSES ACTIONTime card inserted too hard into time clock
Re-Feed Card
Time card held too long Re-Feed CardTime card inserted into time clock on an angle
Re-Feed Card
Time card is wet or swollen Use new Time CardBar code read error Use only Pyramid Time Cards
Ensure time card bar code isn’t covered or damaged
IMPAIRED PRINTINGIn the event the time clock printing is impaired, please check list for possible causes:
MASTER RESETErases time clock’s memory & restores default factory settings:
5000+/5000+HD : IMPAIRED PRINTING
SYMPTOM PROBABLE CAUSE ACTIONTime card feeds with no printing
Ribbon not installed properly
Time card bar code covered or damaged
Check that ribbon cartridge is properly installed
Use new time card
Overlapping punches or large space between punches
SETUP PAY options changed with-out issuing new time cards or you said YES to SETUP PAY & ARE YOU SURE? without issuing new card
Duplicate card numbers used in same pay period
Pay period may be set up incorrectly
Total hours between In & Out Punch exceeds MAXHRS/Punch setting
Adjust totaled hours manually at end of pay period
Perform MASTER RESET
Check pay period setup
1
2
3
4
5
6
Unplug time clock.
Press & hold s(UP) button while plugging unit back in.
Release s(UP) button when PTR5000 VER displays.
TIME NOT SET flashes on display screen.
Re-program time clock.
Distribute new time cards.
15pyramidtimesystems.com CLEANING & CARE
AUTO TOTALING TIME CLOCK INSTRUCTIONSModel 5000+/5000+HD
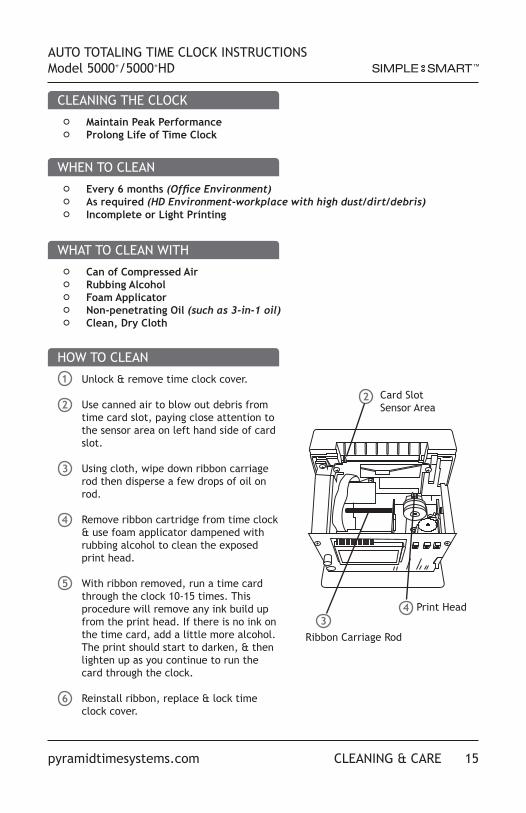
CLEANING THE CLOCK
WHEN TO CLEAN
WHAT TO CLEAN WITH
HOW TO CLEAN
◦ Maintain Peak Performance
◦ Prolong Life of Time Clock
◦ Every 6 months (Office Environment)
◦ As required (HD Environment-workplace with high dust/dirt/debris)
◦ Incomplete or Light Printing
◦ Can of Compressed Air
◦ Rubbing Alcohol
◦ Foam Applicator
◦ Non-penetrating Oil (such as 3-in-1 oil)
◦ Clean, Dry Cloth
Unlock & remove time clock cover.
Use canned air to blow out debris from time card slot, paying close attention to the sensor area on left hand side of card slot.
Using cloth, wipe down ribbon carriage rod then disperse a few drops of oil on rod.
Remove ribbon cartridge from time clock & use foam applicator dampened with rubbing alcohol to clean the exposed print head.
With ribbon removed, run a time card through the clock 10-15 times. This procedure will remove any ink build up from the print head. If there is no ink on the time card, add a little more alcohol. The print should start to darken, & then lighten up as you continue to run the card through the clock.
Reinstall ribbon, replace & lock time clock cover.
1
22
3
3
4
4
5
6
Card Slot Sensor Area
Ribbon Carriage Rod
Print Head
16 FAQ's & ACCESSORIES 888.479.7264
AUTO TOTALING TIME CLOCK INSTRUCTIONSModel 5000+/5000+HD
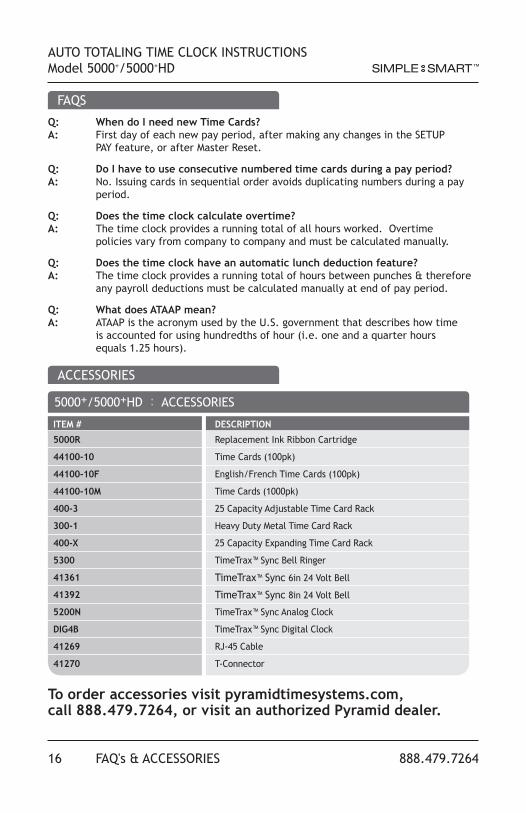
FAQS
ACCESSORIES
5000+/5000+HD : ACCESSORIES
Q: When do I need new Time Cards? A: First day of each new pay period, after making any changes in the SETUP PAY feature, or after Master Reset.
Q: Do I have to use consecutive numbered time cards during a pay period? A: No. Issuing cards in sequential order avoids duplicating numbers during a pay period.
Q: Does the time clock calculate overtime? A: The time clock provides a running total of all hours worked. Overtime policies vary from company to company and must be calculated manually.
Q: Does the time clock have an automatic lunch deduction feature? A: The time clock provides a running total of hours between punches & therefore any payroll deductions must be calculated manually at end of pay period.
Q: What does ATAAP mean? A: ATAAP is the acronym used by the U.S. government that describes how time is accounted for using hundredths of hour (i.e. one and a quarter hours equals 1.25 hours).
To order accessories visit pyramidtimesystems.com, call 888.479.7264, or visit an authorized Pyramid dealer.
ITEM # DESCRIPTION
5000R Replacement Ink Ribbon Cartridge
44100-10 Time Cards (100pk)
44100-10F English/French Time Cards (100pk)
44100-10M Time Cards (1000pk)
400-3 25 Capacity Adjustable Time Card Rack
300-1 Heavy Duty Metal Time Card Rack
400-X 25 Capacity Expanding Time Card Rack
5300 TimeTrax™ Sync Bell Ringer
41361 TimeTrax™ Sync 6in 24 Volt Bell
41392 TimeTrax™ Sync 8in 24 Volt Bell
5200N TimeTrax™ Sync Analog Clock
DIG4B TimeTrax™ Sync Digital Clock
41269 RJ-45 Cable
41270 T-Connector
17pyramidtimesystems.com SPECIFICATIONS
AUTO TOTALING TIME CLOCK INSTRUCTIONSModel 5000+/5000+HD
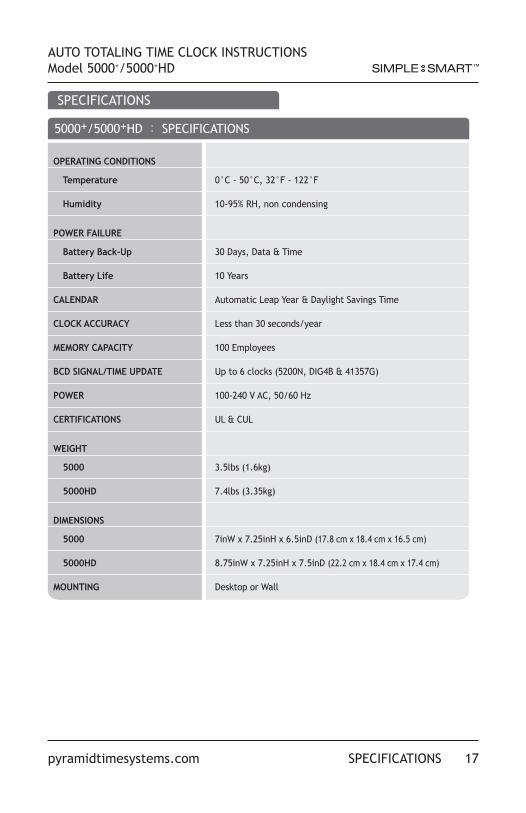
SPECIFICATIONS
5000+/5000+HD : SPECIFICATIONS
OPERATING CONDITIONS
Temperature 0°C - 50°C, 32°F - 122°F
Humidity 10-95% RH, non condensing
POWER FAILURE
Battery Back-Up 30 Days, Data & Time
Battery Life 10 Years
CALENDAR Automatic Leap Year & Daylight Savings Time
CLOCK ACCURACY Less than 30 seconds/year
MEMORY CAPACITY 100 Employees
BCD SIGNAL/TIME UPDATE Up to 6 clocks (5200N, DIG4B & 41357G)
POWER 100-240 V AC, 50/60 Hz
CERTIFICATIONS UL & CUL
WEIGHT
5000 3.5lbs (1.6kg)
5000HD 7.4lbs (3.35kg)
DIMENSIONS
5000 7inW x 7.25inH x 6.5inD (17.8 cm x 18.4 cm x 16.5 cm)
5000HD 8.75inW x 7.25inH x 7.5inD (22.2 cm x 18.4 cm x 17.4 cm)
MOUNTING Desktop or Wall
18 WARRANTY 888.479.7264
AUTO TOTALING TIME CLOCK INSTRUCTIONSModel 5000+/5000+HD
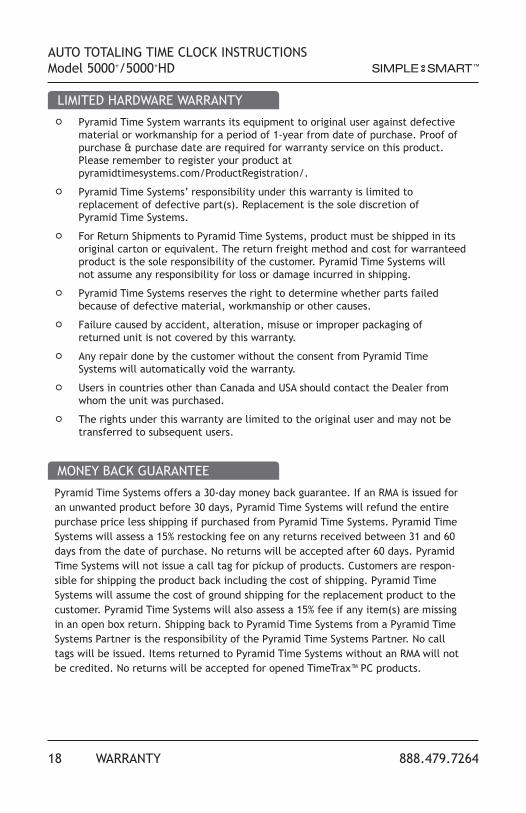
LIMITED HARDWARE WARRANTY
MONEY BACK GUARANTEE
◦ Pyramid Time System warrants its equipment to original user against defective material or workmanship for a period of 1-year from date of purchase. Proof of purchase & purchase date are required for warranty service on this product. Please remember to register your product at pyramidtimesystems.com/ProductRegistration/.
◦ Pyramid Time Systems’ responsibility under this warranty is limited to replacement of defective part(s). Replacement is the sole discretion of Pyramid Time Systems.
◦ For Return Shipments to Pyramid Time Systems, product must be shipped in its original carton or equivalent. The return freight method and cost for warranteed product is the sole responsibility of the customer. Pyramid Time Systems will not assume any responsibility for loss or damage incurred in shipping.
◦ Pyramid Time Systems reserves the right to determine whether parts failed because of defective material, workmanship or other causes.
◦ Failure caused by accident, alteration, misuse or improper packaging of returned unit is not covered by this warranty.
◦ Any repair done by the customer without the consent from Pyramid Time Systems will automatically void the warranty.
◦ Users in countries other than Canada and USA should contact the Dealer from whom the unit was purchased.
◦ The rights under this warranty are limited to the original user and may not be transferred to subsequent users.
Pyramid Time Systems offers a 30-day money back guarantee. If an RMA is issued for an unwanted product before 30 days, Pyramid Time Systems will refund the entire purchase price less shipping if purchased from Pyramid Time Systems. Pyramid Time Systems will assess a 15% restocking fee on any returns received between 31 and 60 days from the date of purchase. No returns will be accepted after 60 days. Pyramid Time Systems will not issue a call tag for pickup of products. Customers are respon-sible for shipping the product back including the cost of shipping. Pyramid Time Systems will assume the cost of ground shipping for the replacement product to the customer. Pyramid Time Systems will also assess a 15% fee if any item(s) are missing in an open box return. Shipping back to Pyramid Time Systems from a Pyramid Time Systems Partner is the responsibility of the Pyramid Time Systems Partner. No call tags will be issued. Items returned to Pyramid Time Systems without an RMA will not be credited. No returns will be accepted for opened TimeTrax™ PC products.
19pyramidtimesystems.com CUSTOMER SUPPORT
AUTO TOTALING TIME CLOCK INSTRUCTIONSModel 5000+/5000+HD
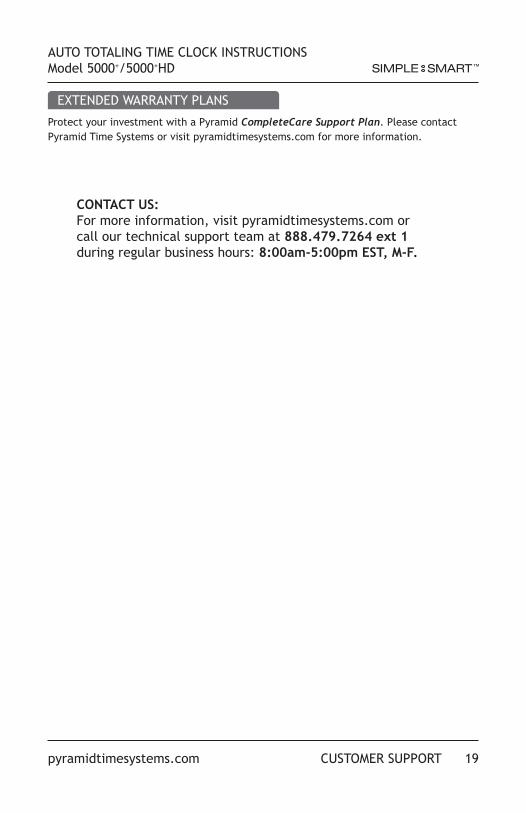
EXTENDED WARRANTY PLANS
Protect your investment with a Pyramid CompleteCare Support Plan. Please contact Pyramid Time Systems or visit pyramidtimesystems.com for more information.
CONTACT US:For more information, visit pyramidtimesystems.com or call our technical support team at 888.479.7264 ext 1 during regular business hours: 8:00am-5:00pm EST, M-F.
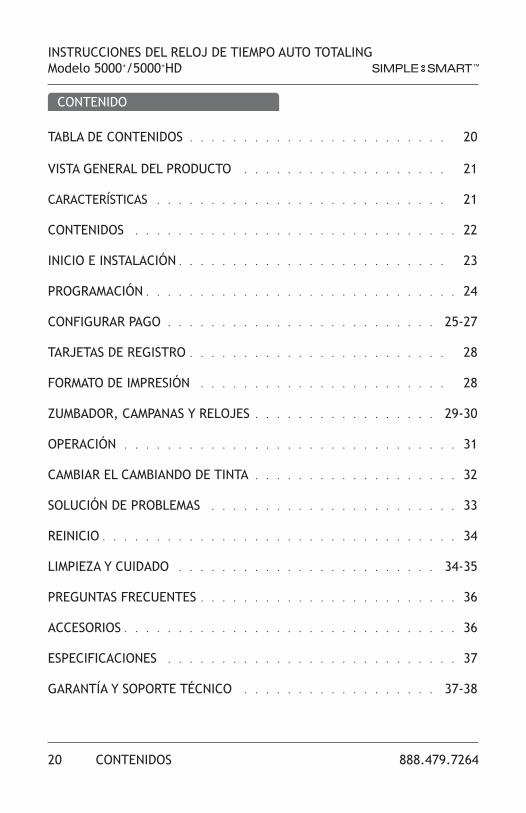
20 CONTENIDOS 888.479.7264
INSTRUCCIONES DEL RELOJ DE TIEMPO AUTO TOTALINGModelo 5000+/5000+HD
CONTENIDO
TABLA DE CONTENIDOS . . . . . . . . . . . . . . . . . . . . . . . . 20
VISTA GENERAL DEL PRODUCTO . . . . . . . . . . . . . . . . . . . 21
CARACTERÍSTICAS . . . . . . . . . . . . . . . . . . . . . . . . . . . 21
CONTENIDOS . . . . . . . . . . . . . . . . . . . . . . . . . . . . . . 22
INICIO E INSTALACIÓN . . . . . . . . . . . . . . . . . . . . . . . . . 23
PROGRAMACIÓN . . . . . . . . . . . . . . . . . . . . . . . . . . . . . 24
CONFIGURAR PAGO . . . . . . . . . . . . . . . . . . . . . . . . . 25-27
TARJETAS DE REGISTRO . . . . . . . . . . . . . . . . . . . . . . . . 28
FORMATO DE IMPRESIÓN . . . . . . . . . . . . . . . . . . . . . . . 28
ZUMBADOR, CAMPANAS Y RELOJES . . . . . . . . . . . . . . . . . 29-30
OPERACIÓN . . . . . . . . . . . . . . . . . . . . . . . . . . . . . . . 31
CAMBIAR EL CAMBIANDO DE TINTA . . . . . . . . . . . . . . . . . . . 32
SOLUCIÓN DE PROBLEMAS . . . . . . . . . . . . . . . . . . . . . . . 33
REINICIO . . . . . . . . . . . . . . . . . . . . . . . . . . . . . . . . . 34
LIMPIEZA Y CUIDADO . . . . . . . . . . . . . . . . . . . . . . . . 34-35
PREGUNTAS FRECUENTES . . . . . . . . . . . . . . . . . . . . . . . . 36
ACCESORIOS . . . . . . . . . . . . . . . . . . . . . . . . . . . . . . . 36
ESPECIFICACIONES . . . . . . . . . . . . . . . . . . . . . . . . . . . 37
GARANTÍA Y SOPORTE TÉCNICO . . . . . . . . . . . . . . . . . . 37-38


![6LHPHQV ±SR]LRP F] ühome.agh.edu.pl/flaga_st/m/Kurs-czesc-01.pdf · 2017-04-23 · 0.625 Hzclock: 0.5 clock: e ofclock memory byte 00.0 (clock 10Hz) (clock 5Hz) (clock 2. (cl (clock](https://img.dokumen.tips/doc/110x75/5e792c30ca7263576743b389/6lhphqv-srlrp-f-homeagheduplflagastmkurs-czesc-01pdf-2017-04-23.jpg)