Embed Size (px)
Citation preview
Attendance Management v1.3 Page 1
O
ATTENDANCE MANAGEMENT REFERENCE MANUAL
V1.0 June 2015

Attendance Management v1.3 Page 2
Contents
1.0 Attendance in MyEducation BC ................................................................................. 4
2.0 Daily Attendance ....................................................................................................... 5
2.1 Taking Attendance – Office ....................................................................................... 5
2.1.1 Daily Office Side Tab .................................................................................................................... 5
2.1.2 Daily Roster Side Tab..................................................................................................................10
2.1.3 Daily Batch Side Tab ...................................................................................................................14
3.0 Twice Daily Attendance ........................................................................................... 15
3.1 Taking Attendance – Office ..................................................................................... 16
3.1.1 Daily Office Side Tab ..................................................................................................................16
3.1.2 Daily Roster Side Tab..................................................................................................................22
3.1.3 Daily Batch Side Tab ...................................................................................................................25
4.0 Class Attendance .................................................................................................... 25
4.1 Taking Attendance – Office ..................................................................................... 25
4.1.1 Class Office Side Tab ..................................................................................................................25
5.0 APPENDIX 1: Taking Attendance - Teacher ........................................................... 32
5.1 Taking Daily Attendance – Teacher ........................................................................ 32
5.2 Taking Twice Daily Attendance (Elementary) – Teacher ......................................... 34
5.3 Taking Class Attendance – Teacher ....................................................................... 37
6.0 APPENDIX 2: Combined Class Attendance ............................................................ 39
7.0 APPENDIX 3: Attendance Reports .......................................................................... 42
7.1 Daily Attendance Reports ........................................................................................ 42
7.1.1 Daily Attendance Post Verification ............................................................................................42
7.1.2 Attendance Classroom/Homeroom Input .................................................................................43
7.1.3 Attendance Bulletin ...................................................................................................................44
7.1.4 Absence Letter ...........................................................................................................................46
7.1.5 Principal’s Attendance ...............................................................................................................47
7.1.6 Other Daily Attendance Reports ................................................................................................48
7.2 Class Attendance Reports ....................................................................................... 49
7.2.1 Class Absence Letter ..................................................................................................................49

Attendance Management v1.3 Page 3
7.2.2 Class Attendance Post Verification ............................................................................................50
7.2.3 Class Attendance Post History ...................................................................................................50
7.2.4 Other Class Attendance Reports ................................................................................................51
7.3 Positive Attendance Reports ................................................................................... 52

Attendance Management v1.3 Page 4
1.0 Attendance in MyEducation BC Attendance in MyEducation BC is set up to record arrivals, departures and absences of students. MyEducation BC is set up to record one attendance record per student per day or per class. If there are multiple attendance instances for a student in a single attendance period, they will all be added to the same record. There are two parts to an attendance record:
1. The actual record – this stores the date, the code and whether the late, dismissed, or excused checkboxes were selected.
2. The arrival and departure times – these are for information purposes only. They do not affect membership statistics.
You can enter attendance in the District or School view, or teachers can enter student attendance during a homeroom or classroom period within the Staff view. There are two main ways of taking Attendance in MyEducation BC:
• Daily Attendance • Class Attendance
Schools may choose to take either form of attendance, or both depending on their requirements. Daily Attendance takers have the option of recording attendance once per day, or twice per day, depending on their school’s preferences. Most attendance is “Negative Attendance”: Students are assumed present unless marked otherwise by a teacher or office person. There is also the ability to take “Positive Attendance”; traditionally taken by StrongStart schools among others, students are presumed absent unless marked as otherwise by a Teacher. Positive Attendance is only taken as a form of Class Attendance; however a Daily Record can be created by converting these values, which will be discussed in the corresponding sections of this document.
Negative Attendance is taken at all schools. Positive Attendance is only taken at StrongStart Centres.

Attendance Management v1.3 Page 5
2.0 Daily Attendance Daily Attendance is a single Attendance record for a student in a day. You have the option of specifying the portion of the day that the student is absent (i.e., 0.25 days, 0.50 days, etc.) or leaving the student absent for the entire day.
2.1 Taking Attendance – Office Office staff can take Daily Attendance in a number of different ways, depending on your needs and preferences. There are three Daily Attendance side tabs that the office staff can use in the School view: Daily Office, Daily Roster and Daily Batch. Each side tab will give you a different way to take attendance for your school.
2.1.1 Daily Office Side Tab
The Daily Office side tab allows you to enter attendance for students as they enter or are dismissed from school after the initial attendance period. You can also use the Daily Office side tab to enter attendance for multiple students by section, selection, or homeroom. From the Attendance top tab, click the Daily Office side tab. This will be the default view your office staff will have when they click the Attendance top tab. Here, you will be able to see all Daily Attendance records already taken for your school, and take new Attendance records or update existing records for today and all past and future dates.
2.1.1.1 Entering an Absence from the Daily Office Side Tab
To Enter an Absence:
1. Fill in the student’s name, last name first, or Pupil # in the appropriate field at the top. Ensure that the Code is set to A for Absent.
a. If you do not put in the full name, the system will select the student that matches as much of the name as you put in. If there are multiple students who could match, it will show them all. If no student matches, it will bring up a list of all students and select the one closest to what you entered.

Attendance Management v1.3 Page 6
b. If you leave the box blank and click the Add button, it will pop up a list of all active students in your school.
2. If you wish to put in a Reason for the absence, click the Show popup checkbox, and click the Add button.
a. If you did not check the Show popup box, your student will appear in the list of students on this page with an A in the Attendance code column.
b. If you did check the box, a popup will appear where you can fill in additional information about the Absence.
3. If you need to modify the Absence after you have entered it – i.e., you need to enter in a Reason, or change an Absence to a Late, see Section 3.1.1.6 Modifying Attendance Records from the Daily Office side tab.
2.1.1.2 Entering a Late from the Daily Office Side Tab
To Enter a Late:
1. Fill in the student’s name, last name first, or Pupil # in the appropriate field at the top. Ensure that the Code is set to L for Late.
a. If you do not put in the full name, the system will select the student that matches as much of the name as you put in. If there are multiple students who could match, it will show them all. If no student matches, it will bring up a list of all students and select the one closest to what you entered.
b. If you leave the box blank and click the Add button, it will pop up a list of all active students in your school.
2. If you wish to put in a Reason for the late, or modify the Arrival time, click the Show popup checkbox, and click the Add button.
a. If you did not check the Show popup box, your student will appear in the list of students on this page with an L in the Attendance code column.
b. If you did check the box, a popup will appear where you can fill in additional information about the Late.
c. When the popup appears, you can modify the Time In field to represent when the student has arrived. By default, the system will use the Current Time when you first clicked the button.
3. If you need to modify the Late after you have entered it – i.e., you need to enter in a Reason, or change the Arrival time, see Section 3.1.1.6 Modifying Attendance Records from the Daily Office side tab.
2.1.1.3 Entering Dismissals from the Daily Office Side Tab
Dismissals are used when a student leaves the class before the time when all other students are dismissed from class. They may be used when a student leaves in the middle of the session to go to an appointment, leaves school early due to illness, or can be used when a student has to go to the office for a set length of time.

Attendance Management v1.3 Page 7
Dismissals will automatically populate the Departure time with the Current Time when you first clicked the button. You can modify this time when it is first entered, or change it after the fact. If the student returns to the school, you can then add an Arrival time for their return. To Enter a Dismissal:
1. Fill in the student’s name, last name first, or Pupil # in the appropriate field at the top. Ensure that the Code is set to D for Dismissed.
a. If you do not put in the full name, the system will select the student that matches as much of the name as you put in. If there are multiple students who could match, it will show them all. If no student matches, it will bring up a list of all students and select the one closest to what you entered.
b. If you leave the box blank and click the Add button, it will pop up a list of all active students in your school.
2. If you wish to put in a Reason for the Dismissal, or modify the Departure time, click the Show popup checkbox, and click the Add button.
a. If you did not check the Show popup box, your student will appear in the list of students on this page with a D in the Attendance code column.
b. If you did check the box, a popup will appear where you can fill in additional information about the Late.
c. When the popup appears, you can modify the Time In field to represent when the student has arrived. By default, the system will use the Current Time when you first clicked the button.
3. If you need to modify the Dismissal after you have entered it – i.e., you need to add a return time, or change the Departure time, see Section 3.1.1.6 Modifying Attendance Records from the Daily Office side tab.
2.1.1.4 Entering Attendance Records for Multiple Dates
MyEducation BC allows you to record Attendance records for multiple dates at the same time. This is especially useful when a student will be away on family vacation or has a serious injury requiring hospitalization. Similar to entering an Absence, Late or Dismissal above, you will fill in the student’s name, last name first, or Pupil # in the appropriate field at the top. Set your Attendance code and ensure that the Show popup box is checked. As above, if you do not enter in a name in the Name/ID field, or only a partial name, it will follow the same behaviour as mentioned above. When you click the Add button, and get the Attendance Record details popup, click the blue, hyperlinked Multiple Dates >> link to be able to enter the Start and End dates the student will be Absent (or Late, AUTH, etc.). You may then fill in any additional information about the Student over this period, such as whether it is an Excused absence and what Reason is given.

Attendance Management v1.3 Page 8
These dates are inclusive, so they will record the Attendance Codes you have selected on those dates and all in-session dates in between.
2.1.1.5 Entering Attendance Records for Multiple Students at the Same Time
MyEducation BC allows you to record Attendance records for multiple students at the same time. Especially useful when a family that has multiple students in school will be away on vacation, or a class is on a field trip. You can record the Attendance records for a single day, or for multiple days as well. Similar to entering an Absence, Late or Dismissal above, you will fill in the student’s name, last name first, or Pupil # in the appropriate field at the top. Set your Attendance code and ensure that the Show popup box is checked. As above, if you do not enter in a name in the Name/ID field, or only a partial name, it will follow the same behaviour as mentioned above. Click the Multi-Add button to get the Attendance Record details popup. Here you can determine how to select the grouping of students you wish to assign the Attendance record to; you have 5 options:
1. Section. You can assign the Attendance code(s) to the roster of a single Section in your school’s schedule.
2. Homeroom. You can assign the Attendance code(s) to all the students who are assigned to a Homeroom.
3. Query. If you have saved a Query, for instance querying any student who has a Grade Level of “12”, you can use this list of students to assign the Attendance code(s).
4. Snapshot. Similar to the Query, if you have saved a Snapshot of a group of students, you can select it here for assigning the Attendance code(s).
5. Selection. Clicking this will bring up a popup menu with a list of all Active students at your school. You can check the boxes beside each student’s name that you wish to include.
On the right side of the popup is what to do when the system encounters duplicate records. For example, you are assigning a Field Trip to a Section of students; however, one of them has already called in Sick for the day. You will set the Duplicate Records choice to Skip in this instance, so that it will not overwrite the existing Absent record for your ill student.

Attendance Management v1.3 Page 9
If you had already assigned a Field Trip for tomorrow, and the parent of a group of students then calls in to report that they will not attend school as they have to go to a funeral, you can choose Replace. This will change the existing “Field Trip” absence to be “Illness” for all students in the group you have chosen who were supposed to go on the Field Trip but are sick and cannot attend. If you wish to assign these codes to all the students selected over multiple dates, click the blue, hyperlinked Multiple Dates >> link to be able to enter the Start and End dates the students will be Absent (or Late, AUTH, etc.). You may then fill in any additional information about the Students over this period, such as whether it is an Excused absence and what Reason is given.
2.1.1.6 Modifying Attendance Records from the Daily Office Side Tab
Once attendance has been taken for a student, it is possible that you may wish to change the record somewhat, add information to the record or delete it entirely. This can all be done from the Daily Office side tab. On your list of students that currently have Attendance Records assigned to them, click the blue, hyperlinked name of the student whose record you wish to modify. This will bring up the details for the Attendance record. Here, you can uncheck a box, add in a reason, change the Portion absent or add a comment, etc. Remember that if you are removing an Absence while adding another code, you will want to adjust the Portion Absent pull-down as the student will no longer be absent. If you wish to add or remove an arrival or departure time, you will do this in the Arrivals & Departures section of the Attendance record details. To delete an existing record, check the box beside the Arrival or Departure you wish to remove, and click the Delete button. To add an arrival or departure, click the Add button and fill in the information. If you wish to modify the time for the existing Arrival or Departure, click the blue, hyperlinked name and adjust the Type, Time and whether it is Excused in the popup window. If a student has been marked Absent and later they come in merely Late, you can change the record quickly by using the Quick Change buttons on the main list of students. Click the L button and adjust the information in the popup window.

Attendance Management v1.3 Page 10
If you wish to clear the record for a student entirely, you can simply click the P Quick Change button in their corresponding row, and this will clear ALL information you have added for that day’s Attendance Record, making them Present for the day.
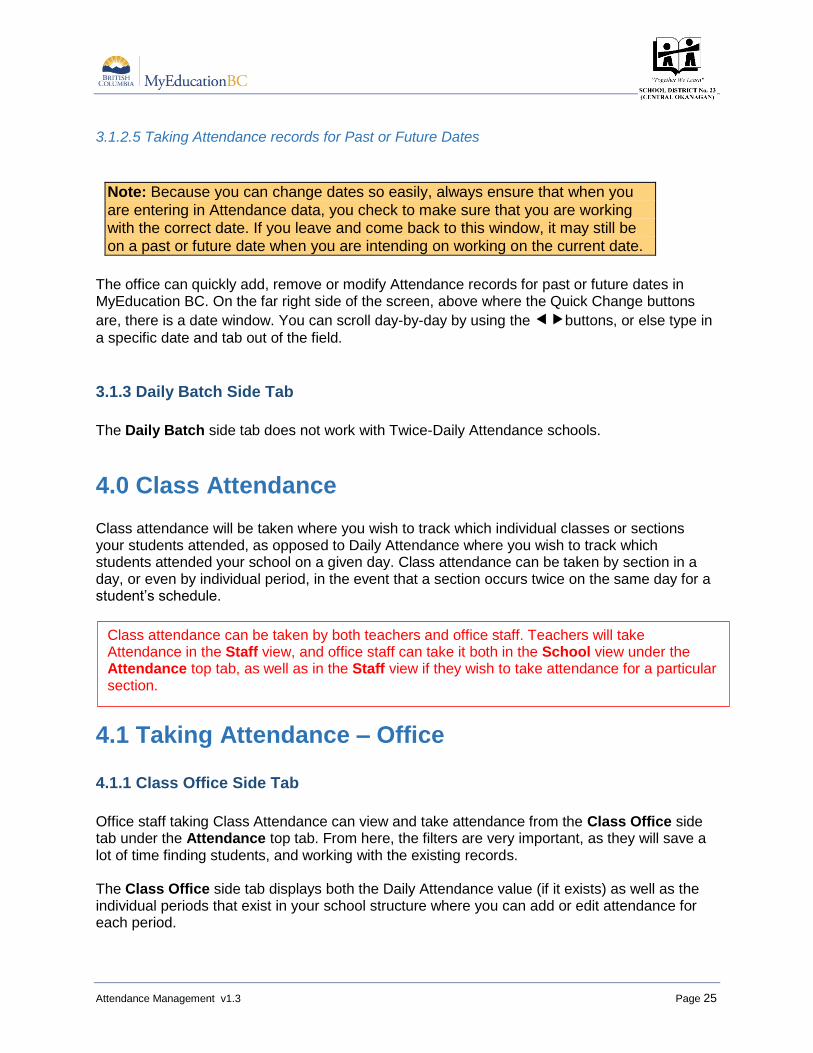
2.1.1.7 Taking Attendance Records for Past or Future Dates
Note: Because you can change dates so easily, always ensure that when you
are entering in Attendance data, you check to make sure that you are working with the correct date. If you leave and come back to this window, it may still be
on a past or future date when you are intending on working on the current date.
The office can quickly add, remove or modify Attendance records for past or future dates in MyEducation BC. On the far right side of the screen, above where the Quick Change buttons
are, there is a date window. You can scroll day-by-day by using the buttons, or else type in
a specific date and tab out of the field.
2.1.2 Daily Roster Side Tab
Use the Daily Roster side tab to enter attendance for students by homeroom or classroom input period. This is most appropriate if you distribute Attendance Homeroom Input sheets to all homerooms or classroom input periods. Teachers mark attendance on the sheets and deliver them to the office, where you input them into MyEducation BC. Click the name of the room that has the class you wish to enter attendance for.

Attendance Management v1.3 Page 11
From here, the view will be similar to how a teacher will see and take Daily Attendance. You can see the roster of students in your attendance class, and have the Quick Change buttons on the right to quickly change their Attendance status. Once you have entered in your attendance for the class, you must click the Save button located at either the top or bottom on the left. You will know that your attendance has not been saved when the students have been highlighted in light grey, and there is an asterisk beside the Attendance code. These will both disappear once the Save button has been pressed.

Attendance Management v1.3 Page 12
Note: You cannot take attendance for multiple dates at the same time from the Daily Roster side tab. You can do this only from the Daily Office side
tab.
2.1.2.1 Entering an Absence from the Daily Roster Side Tab
1. Click the A button on the row that contains the student in your class that you wish to
take Attendance for. 2. If you have configured your school to have popups for this view, you will see the popup
where you can fill more information about this Absence record. If you have not, it will simply show you an A* in the Attendance column. If the popup is set to appear, you can fill in information for Reasons, Comments and Portion Absent.
3. If you make a mistake and wish to start over, click the P button to clear any information for this student’s attendance for the day.
4. When you are sure that the Attendance is how you want it, click the Save button.
2.1.2.2 Entering a Late from the Daily Roster Side Tab
1. Click the L button on the row that contains the student in your class that you wish to take Attendance for.
2. If you have configured your school to have popups for this view, you will see the popup where you can fill more information about this Late record. If you have not, it will simply show you an L* in the Attendance column. If the popup is set to appear, you can fill in information for Reasons, Comments and you can modify what time the student arrived, if necessary. By default, MyEducation BC will use the Current Time when you clicked the L button.
3. If you make a mistake and wish to start over, click the P button to clear any information for this student’s attendance for the day.
4. When you are sure that the Attendance is how you want it, click the Save button.
2.1.2.3 Entering Dismissals from the Daily Roster Side Tab
1. Click the D button on the row that contains the student in your class that you wish to take Attendance for.
2. If you have configured your school to have popups for this view, you will see the popup where you can fill more information about this Dismissal record. If you have not, it will simply show you a D* in the Attendance column. If the popup is set to appear, you can fill in information for Reasons, Comments and you can modify what time the student was dismissed, if necessary. By default, MyEducation BC will use the Current Time when you clicked the D button.
3. If you make a mistake and wish to start over, click the P button to clear any information for this student’s attendance for the day.
4. When you are sure that the Attendance is how you want it, click the Save button.

Attendance Management v1.3 Page 13
2.1.2.4 Modifying Attendance records from the Daily Roster Side Tab
Once attendance has been taken for a student, it is possible that you may wish to change the record somewhat, add information to the record or delete it entirely. This can all be done from the Daily Roster side tab. On your list of students that currently have Attendance Records assigned to them, click the blue, hyperlinked Edit beside the Attendance Code for the student whose record you wish to modify. This will bring up the details for the Attendance record. Here, you can uncheck a box, add in a reason, change the Portion absent or add a comment, etc. Remember that if you are removing an Absence while adding another code, you will want to adjust the Portion Absent pull-down as the student will no longer be absent. If you wish to add or remove an arrival or departure time, you will do this in the Arrivals & Departures section of the Attendance record details. To delete an existing record, check the box beside the Arrival or Departure you wish to remove, and click the Delete button. To add an arrival or departure, click the Add button and fill in the information. If you wish to modify the time for the existing Arrival or Departure, click the blue, hyperlinked name and adjust the Type, Time and whether it is Excused in the popup window. If a student has been marked Absent and later they come in merely Late, you can change the record quickly by using the Quick Change buttons on the main list of students. Click the L button and adjust the information in the popup window. If you wish to clear the record for a student entirely, you can simply click the P Quick Change button in their corresponding row, and this will clear ALL information you have added for that day’s Attendance Record, making them Present for the day.
2.1.2.5 Taking Attendance Records for Past or Future Dates
Note: Because you can change dates so easily, always ensure that when you
are entering in Attendance data, you check to make sure that you are working with the correct date. If you leave and come back to this window, it may still be
on a past or future date when you are intending on working on the current date.
The office can quickly add, remove or modify Attendance records for past or future dates in MyEducation BC. On the far right side of the screen, above where the Quick Change buttons
are, there is a date window. You can scroll day-by-day by using the buttons, or else type in
a specific date and tab out of the field.

Attendance Management v1.3 Page 14
2.1.3 Daily Batch Side Tab
The Daily Batch side tab is useful to quickly enter in students that may have similar Attendance codes and reasons (if applicable). For example, first thing in the day when you are listening to your office voice mail, you may want to quickly input all the students whose parents are calling in sick for them. Or later during the day, you can set the value to Late if there is a lineup of students who are tardy.
The Daily Batch is a two-step process: You add all the information for the students, which you can modify if you wish, but the records are not set until you click the Post button. Another difference with the Daily Batch side tab is that there is no pop-up when you enter in the information. If you enter in a Late or Dismissal, the time will be set as the Current Time when you clicked the button, and you will have to adjust it after, before you Post the information. Once you click the Post button, you will get a popup window asking whether you want to Skip or Replace Duplicate Records. Skip is used if you do not wish it to overwrite the existing Attendance record for your student that may already have an existing one. Replace will be used if you want this Attendance record to overwrite any previously entered Attendance record for the student. You can also decide what will happen after attendance is posted: do you Clear the list, Clear only the list of what has been posted, or leave the list as-is.
Note: You cannot take attendance for multiple dates or multiple students
(i.e., by class roster or snapshot) at the same time from the Daily Roster
side tab. You can do this only from the Daily Office side tab.

Attendance Management v1.3 Page 15
2.1.3.1 Entering an Absence, Late or Dismissal in the Daily Batch Side Tab
Fill in the student’s name, last name first, or Pupil # in the Name/ID field at the top. Check that the appropriate box is checked whether you want to do Absences, Lates or Dismissals. If these are to be excused, you can check the box and fill in a reason that will apply to all that you add here. When you are ready, click the Add button to add the students to the list.
1. If you do not put in the full name, the system will select the student that matches as much of the name as you put in. If there are multiple students who could match, it will show them all. If no student matches, it will bring up a list of all students and select the one closest to what you entered.
2. If you leave the box blank and click the Add button, it will pop up a list of all active students in your school.
2.1.3.2 Modifying Attendance Records from the Daily Batch Side Tab
Before Posting the attendance you have added in the Daily Batch side tab, you have the ability to edit the attendance information for each student that you have added to the batch list. To access the details on a student’s attendance record for that day, click the blue, hyperlinked name of the student to bring up the Attendance Details screen. Here, you can uncheck a box, add in a reason, change the Portion absent, adjust the time in or out, or add a comment, etc. Remember that if you are removing an Absence while adding another code, you will want to adjust the Portion Absent pull-down as the student will no longer be absent.
2.1.3.3 Taking Attendance Records for Past or Future Dates
Note: Because you can change dates so easily, always ensure that when you
are entering in Attendance data, you check to make sure that you are working
with the correct date. If you leave and come back to this window, it may still be on a past or future date when you are intending on working on the current date.
The office can quickly add, remove or modify Attendance records for past or future dates in MyEducation BC: Right below the Name/ID field, there is a date window. You can type in a specific date and tab out of the field to change dates either forward or backward.
3.0 Twice Daily Attendance Daily Attendance is a set of two Attendance records for a student in a day; the most common use of Twice Daily Attendance is to record AM/PM Attendance. These terms are used interchangeably in MyEducation BC to refer to Daily Attendance that is taken twice in a given day, usually first thing in the morning, and again the first thing after the lunch break.

Attendance Management v1.3 Page 16
3.1 Taking Attendance – Office Office staff can take Daily Attendance in a number of different ways, depending on your needs and preferences. There are three Daily Attendance side tabs that the office staff can use in the School view: Daily Office, Daily Roster and Daily Batch. Each side tab will give you a different way to take attendance for your school.
3.1.1 Daily Office Side Tab
The Daily Office side tab allows you to enter attendance for students as they enter or are dismissed from school after the initial attendance period. You can also use the Daily Office side tab to enter attendance for multiple students by section, selection, or homeroom. From the Attendance top tab, click the Daily Office side tab. This will be the default view your office staff will have when they click the Attendance top tab. Here, you will be able to see all Daily Attendance records already taken for your school, and take new Attendance records or update existing records for today and all past and future dates.
The default view for the Daily Office side tab only has a single set of Attendance codes and reasons. To get both sets of codes and reasons you will need to change your Field Set from the Default to Twice Daily Attendance.
It is recommended that you manage your Field Sets and move the Twice Daily Attendance one to the top, so that it will always appear whenever you click this side tab.

Attendance Management v1.3 Page 17
3.1.1.1 Entering an Absence from the Daily Office Side Tab
To Enter an Absence:
1. Determine whether this will be an AM absence, PM absence or full day (AM and PM). a. The pull-down menu will be at the top by the Add button. If you do not see this
field, check your school settings to make sure that the Second Daily Attendance checkbox is set.
b. If you do not remember to change this for your student, you can change it in the
popup or after attendance has been taken. 2. Fill in the student’s name, last name first, or Pupil # in the appropriate field at the top.
Ensure that the Code is set to A for Absent. a. If you do not put in the full name, the system will select the student that matches
as much of the name as you put in. If there are multiple students who could match, it will show them all. If no student matches, it will bring up a list of all students and select the one closest to what you entered.
b. If you leave the box blank and click the Add button, it will pop up a list of all active students in your school.
3. If you wish to put in a Reason for the absence, click the Show popup checkbox, and click the Add button.
a. If you did not check the Show popup box, your student will appear in the list of students on this page with an A in the Attendance code column.
b. If you did check the box, a popup will appear where you can fill in additional information about the Absence.
4. If you need to modify the Absence after you have entered it – i.e., you need to enter in a Reason, or change an Absence to a Late, see Section 3.1.1.6 Modifying Attendance Records from the Daily Office side tab.
3.1.1.2 Entering a Late from the Daily Office Side Tab
To Enter a Late:
1. Fill in the student’s name, last name first, or Pupil # in the appropriate field at the top. Ensure that the Code is set to L for Late.
a. If you do not put in the full name, the system will select the student that matches as much of the name as you put in. If there are multiple students who could match, it will show them all. If no student matches, it will bring up a list of all students and select the one closest to what you entered.
b. If you leave the box blank and click the Add button, it will pop up a list of all active students in your school.
2. If you wish to put in a Reason for the late, or modify the Arrival time, click the Show popup checkbox, and click the Add button.
a. If you did not check the Show popup box, your student will appear in the list of students on this page with an L in the Attendance code column.

Attendance Management v1.3 Page 18
b. If you did check the box, a popup will appear where you can fill in additional information about the Late.
c. When the popup appears, you can modify the Time In field to represent when the student has arrived. By default, the system will use the Current Time when you first clicked the button.
3. If you need to modify the Late after you have entered it – i.e., you need to enter in a Reason, or change the Arrival time, see Section 3.1.1.6 Modifying Attendance Records from the Daily Office side tab.
3.1.1.3 Entering Dismissals from the Daily Office Side Tab
Dismissals are used when a student leaves the class before the time when all students are leaving. They may be used when a student leaves in the middle of the session to go to an appointment, leaves school early due to illness, or can be used when a student has to go to the office for a set length of time. Dismissals will automatically populate the Departure time with the Current Time when you first clicked the button. You can modify this time when it is first entered, or change it after the fact. If the student returns to the school, you can then add an Arrival time for their return. To Enter a Dismissal:
1. Fill in the student’s name, last name first, or Pupil # in the appropriate field at the top. Ensure that the Code is set to D for Dismissed.
a. If you do not put in the full name, the system will select the student that matches as much of the name as you put in. If there are multiple students who could match, it will show them all. If no student matches, it will bring up a list of all students and select the one closest to what you entered.
b. If you leave the box blank and click the Add button, it will pop up a list of all active students in your school.
2. If you wish to put in a Reason for the Dismissal, or modify the Departure time, click the Show popup checkbox, and click the Add button.
a. If you did not check the Show popup box, your student will appear in the list of students on this page with a D in the Attendance code column.
b. If you did check the box, a popup will appear where you can fill in additional information about the Late.
c. When the popup appears, you can modify the Time In field to represent when the student has arrived. By default, the system will use the Current Time when you first clicked the button.
3. If you need to modify the Dismissal after you have entered it – i.e., you need to add a return time, or change the Departure time, see Section 3.1.1.6 Modifying Attendance Records from the Daily Office side tab.

Attendance Management v1.3 Page 19
3.1.1.4 Entering Attendance records for Multiple Dates
MyEducation BC allows you to record Attendance records for multiple dates at the same time. This is especially useful when a student will be away on family vacation or has a serious injury requiring hospitalization. Similar to entering an Absence, Late or Dismissal above, you will fill in the student’s name, last name first, or Pupil # in the appropriate field at the top. Set your Attendance code and ensure that the Show popup box is checked. As above, if you do not enter in a name in the Name/ID field, or only a partial name, it will follow the same behaviour as mentioned above. When you click the Add button, and get the Attendance Record details popup, click the blue, hyperlinked Multiple Dates >> link to be able to enter the Start and End dates the student will be Absent (or Late, AUTH, etc.) You may then fill in any additional information about the Student over this period, such as whether it is an Excused absence and what Reason is given.
These dates are inclusive, so they will record the Attendance Codes you have selected on those dates and all in-session dates in between.
3.1.1.5 Entering Attendance Records for Multiple Students at the Same Time
MyEducation BC allows you to record Attendance records for multiple students at the same time. Especially useful when a family that has multiple students in school will be away on vacation, or a class is on a field trip. You can record the Attendance records for a single day, or for multiple days as well. Similar to entering an Absence, Late or Dismissal above, you will fill in the student’s name, last name first, or Pupil # in the appropriate field at the top. Set your Attendance code and ensure that the Show popup box is checked. As above, if you do not enter in a name in the Name/ID field, or only a partial name, it will follow the same behaviour as mentioned above. Click the Multi-Add button to get the Attendance Record details popup. Here you can determine how to select the grouping of students you wish to assign the Attendance record to; you have 5 options:

Attendance Management v1.3 Page 20
1. Section. You can assign the Attendance code(s) to the roster of a single Section in your
school’s schedule.
2. Homeroom. You can assign the Attendance code(s) to all the students who are
assigned to a Homeroom.
3. Query. If you have saved a Query, for instance querying any student who has a Grade
Level of “12”, you can use this list of students to assign the Attendance code(s).
4. Snapshot. Similar to the Query, if you have saved a Snapshot of a group of students,
you can select it here for assigning the Attendance code(s).
5. Selection. Clicking this will bring up a popup menu with a list of all Active students at
your school. You can check the boxes beside each student’s name that you wish to
include.
On the right side of the popup is what to do when the system encounters duplicate records. For example, you are assigning a Field Trip to a Section of students, however one of them has already called in Sick for the day. You will set the Duplicate Records choice to Skip in this instance, so that it will not overwrite the existing Absent record for your ill student. If you had already assigned a Field Trip for tomorrow, and the parent of a group of students then calls in to report that they will not attend school as they have to go to a funeral, you can choose Replace. This will change the existing “Field Trip” absence to be “Illness” for all students in the group you have chosen who were supposed to go on the Field Trip but are sick and cannot attend. If you wish to assign these codes to all the students selected over multiple dates, click the blue, hyperlinked Multiple Dates >> link to be able to enter the Start and End dates the students will be Absent (or Late, AUTH, etc.) You may then fill in any additional information about the students over this period, such as whether it is an Excused absence and what Reason is given.

Attendance Management v1.3 Page 21
3.1.1.6 Modifying Attendance Records from the Daily Office Side Tab
Once attendance has been taken for a student, it is possible that you may wish to change the record somewhat, add information to the record or delete it entirely. This can all be done from the Daily Office side tab. On your list of students that currently have Attendance Records assigned to them, click the blue, hyperlinked name of the student whose record you wish to modify. This will bring up the details for the Attendance record. Here, you can uncheck a box, add in a reason, change the Portion absent or add a comment, etc. Remember that if you are removing an Absence while adding another code, you will want to adjust the Portion Absent pull-down as the student will no longer be absent. If you wish to add or remove an arrival or departure time, you will do this in the Arrivals & Departures section of the Attendance record details. To delete an existing record, check the box beside the Arrival or Departure you wish to remove, and click the Delete button. To add an arrival or departure, click the Add button and fill in the information. If you wish to modify the time for the existing Arrival or Departure, click the blue, hyperlinked name and adjust the Type, Time and whether it is Excused in the popup window. If a student has been marked Absent and later they come in merely Late, you can change the record quickly by using the Quick Change buttons on the main list of students. Click the L button and adjust the information in the popup window. If you wish to clear the record for a student entirely, you can simply click the P Quick Change button in their corresponding row, and this will clear ALL information you have added for that day’s Attendance Record, making them Present for the day.
3.1.1.7 Taking Attendance records for Past or Future Dates
Note: Because you can change dates so easily, always ensure that when you
are entering in Attendance data, you check to make sure that you are working
with the correct date. If you leave and come back to this window, it may still be on a past or future date when you are intending on working on the current date.
The office can quickly add, remove or modify Attendance records for past or future dates in MyEducation BC. On the far right side of the screen, above where the Quick Change buttons
are, there is a date window. You can scroll day-by-day by using the buttons, or else type in
a specific date and tab out of the field.

Attendance Management v1.3 Page 22
3.1.2 Daily Roster Side Tab
Use the Daily Roster side tab to enter attendance for students by homeroom or classroom input period. This is most appropriate if you distribute Attendance Homeroom Input sheets to all homerooms or classroom input periods. Teachers mark attendance on the sheets and deliver them to the office, where you input them into MyEducation BC. Choose whether you are looking to take attendance for the AM or PM portion of the day by using the pull-down menu at the top of the section. Then, click the name of the room that has the class you wish to enter attendance for.
From here, the view will be similar to how a teacher will see and take Daily Attendance. You can see the roster of students in your attendance class, and have the Quick Change buttons on the right to quickly change their Attendance status. When you click a button, it will pop up. If no pop up appears Once you have entered in your attendance for the class, you must click the Save button located at either the top or bottom on the left. You will know that your attendance has not been saved when the students have been highlighted in light grey, and there is an asterisk beside the Attendance code. These will both disappear once the Save button has been pressed.

Attendance Management v1.3 Page 23
Note: You cannot take attendance for multiple dates at the same time from the Daily Roster side tab. You can do this only from the Daily Office side tab.
3.1.2.1 Entering an Absence from the Daily Roster Side Tab
1. Click the A button on the row that contains the student in your class that you wish to
take Attendance for. 2. If you have configured your school to have popups for this view, you will see the popup
where you can fill more information about this Absence record. If you have not, it will simply show you an A* in the Attendance column. If the popup is set to appear, you can fill in information for Reasons, Comments and Portion Absent.
3. If you make a mistake and wish to start over, click the P button to clear any information for this student’s attendance for the day.
4. When you are sure that the Attendance is how you want it, click the Save button.
3.1.2.2 Entering a Late from the Daily Roster Side Tab
1. Click the L button on the row that contains the student in your class that you wish to take
Attendance for. 2. If you have configured your school to have popups for this view, you will see the popup
where you can fill more information about this Late record. If you have not, it will simply show you an L* in the Attendance column. If the popup is set to appear, you can fill in information for Reasons, Comments and you can modify what time the student arrived, if necessary. By default, MyEducation BC will use the Current Time when you clicked the L button.
3. If you make a mistake and wish to start over, click the P button to clear any information for this student’s attendance for the day.
4. When you are sure that the Attendance is how you want it, click the Save button.

Attendance Management v1.3 Page 24
3.1.2.3 Entering Dismissals from the Daily Roster Side Tab
1. Click the D button on the row that contains the student in your class that you wish to take Attendance for.
2. If you have configured your school to have popups for this view, you will see the popup where you can fill more information about this Dismissal record. If you have not, it will simply show you a D* in the Attendance column. If the popup is set to appear, you can fill in information for Reasons, Comments and you can modify what time the student was dismissed, if necessary. By default, MyEducation BC will use the Current Time when you clicked the D button.
3. If you make a mistake and wish to start over, click the P button to clear any information for this student’s attendance for the day.
4. When you are sure that the Attendance is how you want it, click the Save button.
3.1.2.4 Modifying Attendance Records from the Daily Roster Side Tab
Once attendance has been taken for a student, it is possible that you may wish to change the record somewhat, add information to the record or delete it entirely. This can all be done from the Daily Roster side tab. On your list of students that currently have Attendance Records assigned to them, click the blue, hyperlinked edit beside the Attendance Code for the student whose record you wish to modify. This will bring up the details for the Attendance record. Here, you can uncheck a box, add in a reason, change the Portion absent or add a comment, etc. Remember that if you are removing an Absence while adding another code, you will want to adjust the Portion Absent pull-down as the student will no longer be absent. If you wish to add or remove an arrival or departure time, you will do this in the Arrivals & Departures section of the Attendance record details. To delete an existing record, check the box beside the Arrival or Departure you wish to remove, and click the Delete button. To add an arrival or departure, click the Add button and fill in the information. If you wish to modify the time for the existing Arrival or Departure, click the blue, hyperlinked name and adjust the Type, Time and whether it is Excused in the popup window. If a student has been marked Absent and later they come in merely Late, you can change the record quickly by using the Quick Change buttons on the main list of students. Click the L button and adjust the information in the popup window. If you wish to clear the record for a student entirely, you can simply click the P Quick Change button in their corresponding row, and this will clear ALL information you have added for that day’s Attendance Record, making them Present for the day.
Attendance Management v1.3 Page 25
3.1.2.5 Taking Attendance records for Past or Future Dates
Note: Because you can change dates so easily, always ensure that when you
are entering in Attendance data, you check to make sure that you are working with the correct date. If you leave and come back to this window, it may still be
on a past or future date when you are intending on working on the current date.
The office can quickly add, remove or modify Attendance records for past or future dates in MyEducation BC. On the far right side of the screen, above where the Quick Change buttons
are, there is a date window. You can scroll day-by-day by using the buttons, or else type in
a specific date and tab out of the field.
3.1.3 Daily Batch Side Tab
The Daily Batch side tab does not work with Twice-Daily Attendance schools.
4.0 Class Attendance Class attendance will be taken where you wish to track which individual classes or sections your students attended, as opposed to Daily Attendance where you wish to track which students attended your school on a given day. Class attendance can be taken by section in a day, or even by individual period, in the event that a section occurs twice on the same day for a student’s schedule.
4.1 Taking Attendance – Office
4.1.1 Class Office Side Tab
Office staff taking Class Attendance can view and take attendance from the Class Office side tab under the Attendance top tab. From here, the filters are very important, as they will save a lot of time finding students, and working with the existing records. The Class Office side tab displays both the Daily Attendance value (if it exists) as well as the individual periods that exist in your school structure where you can add or edit attendance for each period.
Class attendance can be taken by both teachers and office staff. Teachers will take Attendance in the Staff view, and office staff can take it both in the School view under the Attendance top tab, as well as in the Staff view if they wish to take attendance for a particular section.

Attendance Management v1.3 Page 26
4.1.1.1 Class Office Filters
The default filter will be All Records. This will show you every student in the school, regardless whether they have an existing attendance record or not. This is useful when you will be adding a new attendance record for a student on the given day. If you are looking to filter the list to only students that already have Attendance records assigned, you will use one of the other filters. The Attendance Activity filter will narrow the list of students to those that have any attendance records assigned to them on the given date, regardless whether they are Daily Attendance or Class Attendance records. This filter is useful when looking just to work with the Attendance Records for a day; perhaps to modify existing ones or to remove the record for a student. The Class Cut filter will display students that have Absent records assigned in one or more classes during the day, but their Daily record is empty. This was designed for schools that take both Daily and Class attendance, and use them to reconcile against each other. This can also be useful for schools using the “Class to Daily Attendance Procedure”, to ensure that this procedure was run. The Attendance Discrepancy filter will display all students who have a Daily Attendance value of Absent, but have no Absent records for any of their classes. As soon as a student has a single Absent record assigned to one of their classes, they will no longer appear in this filter. That is, it does not consider that they may have an Absent Portion value of 1.000 but have only been marked as missing one class.
4.1.1.2 Taking Class Attendance in the Class Office Side Tab
Note: If you have rotated your school’s schedule using a Bell Schedule in your school structure, students displayed in the Class Office side tab will appear in a
flat schedule order. If you have rotated those using Rotations during the Build process, they will appear according to the rotated order.
Office staff can take Class Attendance easily in a few different ways using the Class Office side tab. If an Office staff has given a student an existing Daily Attendance record by using the Daily Office, Daily Roster or Daily Batch side tabs, these values can be quickly “pushed out” to all their classes prior to the sections even meeting that day. For example, a Student’s parent calls in to the office to notify the school that their child is absent that day due to Illness. The Office Clerical responsible for attendance can use the Daily Office side tab to record the Attendance for that student and others that have need Attendance records entered. From the Class Office side tab, they can then change the filter to Attendance Activity to see what students have records already. Find the student whose information you wish to “copy” to their Class Attendance records. In the Daily Code column, there will be their Daily Attendance value, followed by two “greater than” symbols, like so: >>. Click that symbol and it will copy the A code to each of the student’s classes. When the teacher logs in, it will show that student as being absent both in their Daily code, and in the Class Attendance for that section.

Attendance Management v1.3 Page 27
MyEducation BC does not have the logic built in to figure out portion absent converted to class attendance. That is, if someone has a Daily Attendance record of Absent, where the portion absent is 0.25, it will not push this information out to only one class in the schedule, as it will not know which class to copy the information to. You will need to manually edit the information in this instance.
The other way to take Class Attendance from this view is to click on the ellipsis in the appropriate class in the schedule. This will bring up a popup for that period which indicates what class the student should be in, and you can then assign the attendance codes and reasons for the student in that class.

Attendance Management v1.3 Page 28
Attendance Management v1.3 Page 29
Any changes you make in this screen will be visible to the teacher when they go to their Attendance view for this particular class. The third way will be for the Office staff to change to the Staff view and use the Select Teacher on the Settings Bar to view that teacher’s class and take attendance against that section’s entire roster. This will be useful if you have a teacher who fills out an attendance sheet and hands it into the office for them to enter into the MyEducation BC system. Once they have selected the appropriate teacher, they can follow the same steps as outlined in 5.0 Appendix 1 – Taking Attendance – Teacher.
4.1.1.3 Entering Class Attendance Records for Multiple Students at the Same Time
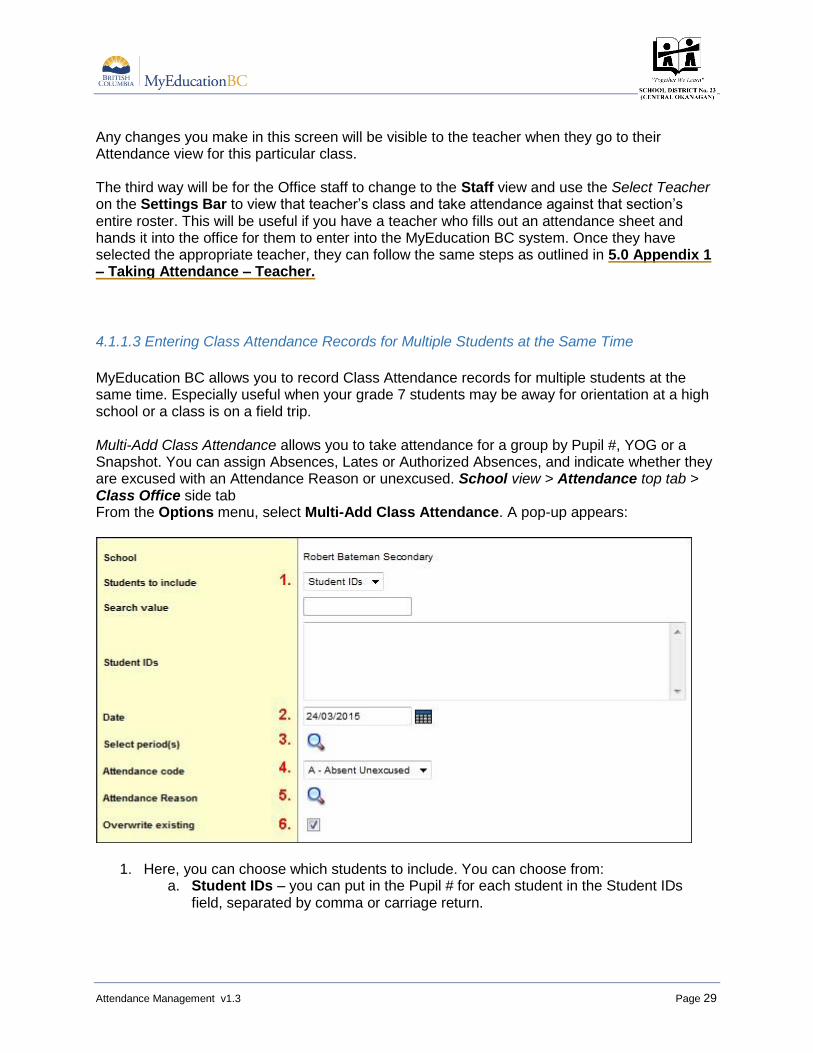
MyEducation BC allows you to record Class Attendance records for multiple students at the same time. Especially useful when your grade 7 students may be away for orientation at a high school or a class is on a field trip. Multi-Add Class Attendance allows you to take attendance for a group by Pupil #, YOG or a Snapshot. You can assign Absences, Lates or Authorized Absences, and indicate whether they are excused with an Attendance Reason or unexcused. School view > Attendance top tab > Class Office side tab From the Options menu, select Multi-Add Class Attendance. A pop-up appears:
1. Here, you can choose which students to include. You can choose from: a. Student IDs – you can put in the Pupil # for each student in the Student IDs
field, separated by comma or carriage return.

Attendance Management v1.3 Page 30
b. Snapshot – Once a snapshot has been created under the Student top tab, you can select this option. In the Search Value field, type in the exact name of the saved Snapshot – spelling must be exact.
c. YOG – You can enter in a specific Year of Graduation, and it will select every student who matches that criterion.
2. Enter in the date you wish to use for recording the attendance. By default, it will choose the current date.
3. Select which period(s) you wish to mark for the attendance. You can choose only one or multiple periods.
4. For the Attendance Code field, you can choose from the following: a. A – Absent Unexcused b. AE – Absent Excused c. L – Late Unexcused d. LE – Late Excused e. AUTH – Authorized Absence
5. You may choose to identify an Attendance Reason. This is not a required field, but can be used to quickly add the same attendance reason to all of the attendance records you are creating.
6. Overwrite Existing will default checked; this means that if there is an existing Attendance Record for a student identified above, it will remove it and replace it with what you are assigning using this procedure. If you do not wish to do that, uncheck this box.
Click Run to record these absences. A confirmation pop-up will appear indicating how many records were updated. For example, if you were marking 10 students absent for 2 periods, it would be updating 20 records.
4.1.1.4 Modifying Class Attendance in the Class Office Side Tab
Once a student has an Attendance Record attached to them for a given date, you may need to modify the existing record by changing some information or deleting the record entirely. The Class Office side tab allows you to modify both Daily and Class Attendance for a student quickly and easily. To modify an existing Daily Attendance record, click the blue, hyperlinked Attendance Code in the Daily Code column that you wish to edit. This will bring a popup with the details of the attendance record; you can then adjust Dates, Attendance Codes, Portion Absent, Reasons or set Arrival/Departure dates. If you simply want to delete the existing record, click the Delete button at the bottom of the popup window. To modify an existing Class Attendance record, click the blue, hyperlinked Attendance Code in the specific period you wish to modify. This will bring a popup with the details of the attendance record; you can then adjust Dates, Attendance Codes and/or Reasons. If you simply want to delete the existing record, click the Delete button at the bottom of the popup window.
4.1.1.5 Taking Attendance Records for Past or Future Dates
Note: Because you can change dates so easily, always ensure that when you
are entering in Attendance data, you check to make sure that you are working

Attendance Management v1.3 Page 31
with the correct date. If you leave and come back to this window, it may still be
on a past or future date when you are intending on working on the current date.
The office can quickly add, remove or modify Attendance records for past or future dates in MyEducation BC. On the far right side of the screen, above where the school periods are, there
is a date window. You can scroll day-by-day by using the buttons, or else type in a specific
date and tab out of the field. From there, you will take attendance as normal.

Attendance Management v1.3 Page 32
5.0 APPENDIX 1: Taking Attendance - Teacher
5.1 Taking Daily Attendance – Teacher
Teachers are different from Office Staff, as they access MyEducation only from the Staff view, and can enter and view Daily Attendance using the Attendance top tab. If you have set up the Classroom Input Type to Period in your school’s Daily Attendance settings, you can also use the Teacher Classes widget on the Pages tab to quickly access your Attendance.
Teacher Classes widget – Input Type: Homeroom Teacher Classes widget – Input Type: Period
5.1.1 Entering in an Absence, Late or Dismissal as a Teacher
To take Daily Attendance, either click the Attendance icon if your school is set up with a Classroom Input Type of Period, or else click the Attendance top tab, and the Daily side tab. Here you should see the roster of students assigned to you with a list of Quick Change buttons on the right, and their Attendance codes to the left of those. In the event the Office staff has entered in attendance for any of those students, it will be reflected in this column. When you click a button, it will pop up if you have the School Classroom Input Buttons set up in the School top tab, Setup side tab, Preferences leaf. The default will be to not pop up, as most schools have the Office fill out that information.
Once you have entered in your attendance for the class, you must click the Post button located at either the top or bottom on the left. You will know that your attendance has not been saved when the students have been highlighted in light grey, and there is an asterisk beside the Attendance code. These will both disappear once the Post button has been pressed.

Attendance Management v1.3 Page 33
Once the Post button has been pressed, you will see a verification notice that attendance has been posted. If this message does not appear, it is possible that the Post was interrupted, and you may need to click the Post button again.
The Staff view is set up to only have two Attendance buttons: Absent and Late. Most schools are set up for a student to go to the office first when being dismissed early from class, so they will record the departure and return for the student. If you wish to add the Dismissal button, you can do so in your School setup.
5.1.2 Modifying Attendance Records from the Daily Office Side Tab
Once the attendance has been posted, or before it the attendance was done by someone at the Office level, you can edit the existing attendance by clicking the blue, hyperlinked edit in the Attendance column. This will bring up a popup with the details for the Attendance record. Here, you can uncheck a box, add in a reason, change the Portion Absent or add a comment, etc. Remember that if you are removing an Absence while adding another code, you will want to adjust the Portion Absent pull-down as the student will no longer be absent. If you wish to add or remove an arrival or departure time, you will do this in the Arrivals & Departures section of the Attendance record details. To delete an existing record, check the box beside the Arrival or Departure you wish to remove, and click the Delete button. To add an arrival or departure, click the Add button and fill in the information. If you wish to modify the time for the existing Arrival or Departure, click the blue, hyperlinked name and adjust the Type, Time and whether it is Excused in the popup window. If a student has been marked Absent and later they come in merely Late, you can change the record quickly by using the Quick Change buttons on the main list of students. Click the L button and adjust the information in the popup window.

Attendance Management v1.3 Page 34
If you wish to clear the record for a student entirely, you can simply click the P Quick Change button in their corresponding row, and this will clear ALL information you have added for that day’s Attendance Record, making them Present for the day.
5.1.3 Taking Attendance records for Past or Future Dates
Note: Because you can change dates so easily, always ensure that when you
are entering in Attendance data, you check to make sure that you are working
with the correct date. If you leave and come back to this window, it may still be on a past or future date when you are intending on working on the current date.
You can control whether Teachers can take or modify attendance for dates in the past or future. (School top tab, Setup side tab, Preferences leaf, and Category = Daily Attendance)
If you have checked the Daily attendance for past dates box, your teachers will be able to go forward or backward in time to the number of days set in the Previous day limit field. On the far right side of the screen, above where the Quick Change buttons are, there is a date window.
You can scroll day-by-day by using the buttons, or else type in a specific date and tab out
of the field. If you have not checked the Past Dates box, your teachers will only be able to take attendance for the current day they are logged into MyEducation BC.
5.2 Taking Twice Daily Attendance (Elementary) –
Teacher
Teachers are different from Office Staff, as they access MyEducation BC only from the Staff view, and can enter and view Daily Attendance using the Attendance top tab. If you have set up the Classroom Input Type to Period in your school's Daily Attendance settings, you can also use the Teacher Classes widget on the Pages tab to quickly access Daily Attendance.

Attendance Management v1.3 Page 35
Teacher Classes widget – Input Type: Homeroom Teacher Classes widget – Input Type: Period
5.2.1 Entering in an Absence, Late or Dismissal as a Teacher To take Daily Attendance, either click the Attendance icon if your school is set up with a Classroom Input Type of Period, or else click the Attendance top tab, and the Daily side tab. Here you should see the roster of students assigned to you with a list of Quick Change buttons on the right, and their Attendance codes to the left of those. In the event the Office staff has entered in attendance for any of those students, it will be reflected in this column. There is a pull-down menu on the far right that will indicate whether you are taking AM or PM attendance for this roster. When you click a button, it will pop up if the School Classroom Input Buttons have been set up by the office. The default will be to not pop up, as most schools have the Office fill out that information. Once you have entered in your attendance for the class, you must click the Post button located at either the top or bottom on the left. You will know that your attendance has not been saved when the students have been highlighted in light grey, and there is an asterisk beside the Attendance code. These will both disappear once the Post button has been pressed.

Attendance Management v1.3 Page 36
Once the Post button has been pressed, you will see a verification notice that attendance has been posted. If this message does not appear, it is possible that the Post was interrupted, and you may need to click the Post button again.
The Staff view is set up to only have two Attendance buttons: Absent and Late. Most schools are set up for a student to go to the office first when being dismissed early from class, so they will record the departure and return for the student. If you wish to add the Dismissal button, you can do so in your School setup.
5.2.2 Modifying Attendance Records from the Daily Office Side Tab Once the attendance has been posted, or before it the attendance was done by someone at the Office level, you can edit the existing attendance by clicking the blue, hyperlinked edit in the Attendance column. This will bring up a popup with the details for the Attendance record. Here, you can uncheck a box, add in a reason, change the Portion absent or add a comment, etc. Remember that if you are removing an Absence while adding another code, you will want to adjust the Portion Absent pull-down as the student will no longer be absent. If you wish to add or remove an arrival or departure time, you will do this in the Arrivals & Departures section of the Attendance record details. To delete an existing record, check the box beside the Arrival or Departure you wish to remove, and click the Delete button. To add an arrival or departure, click the Add button and fill in the information. If you wish to modify the time for the existing Arrival or Departure, click the blue, hyperlinked name and adjust the Type, Time and whether it is Excused in the popup window. If a student has been marked Absent and later they come in merely Late, you can change the record quickly by using the Quick Change buttons on the main list of students. Click the L button and adjust the information in the popup window. If you wish to clear the record for a student entirely, you can simply click the P Quick Change button in their corresponding row, and this will clear ALL information you have added for that day’s Attendance Record, making them Present for the day.
5.2.3 Taking Attendance records for Past or Future Dates
Note: Because you can change dates so easily, always ensure that when you
are entering in Attendance data, you check to make sure that you are working
with the correct date. If you leave and come back to this window, it may still be on a past or future date when you are intending on working on the current date.
You can control whether Teachers can take or modify attendance for dates in the past or future through the School Setup. If you have checked the Daily attendance for past dates box, your

Attendance Management v1.3 Page 37
teachers will be able to go forward or backward in time to the number of days set in the Previous day limit field. On the far right side of the screen, above where the Quick Change
buttons are, there is a date window. You can scroll day-by-day by using the buttons, or
else type in a specific date and tab out of the field. If you have not checked the Past Dates box, your teachers will only be able to take attendance for the current day they are logged into MyEducation BC.
5.3 Taking Class Attendance – Teacher Teachers are different from Office Staff, as they access MyEducation BC only from the Staff view, and can enter and view Class Attendance using the Attendance top tab. You can also use the Teacher Classes widget on the Pages tab to quickly access your Class Attendance.
If you are not on the Pages top tab, you can still access your attendance from the Attendance top tab, which will default to the Class side tab if you have removed the Daily side tab in your preferences. Click the blue, hyperlinked name of the class you wish to take attendance for:
This will bring up the roster for your class. You will then be able to enter or modify your attendance from this screen.
5.3.1 Entering in an Absence, Late or Dismissal as a Teacher Here you should see the roster of students assigned to you with a list of Quick Change buttons on the right, and their Attendance codes to the left of those. In the event the Office staff has entered in attendance for any of those students, it will be reflected in this column. There is an indicator at top left that indicates which period you are taking attendance for, just below the course code and name of the section.
Attendance Management v1.3 Page 38
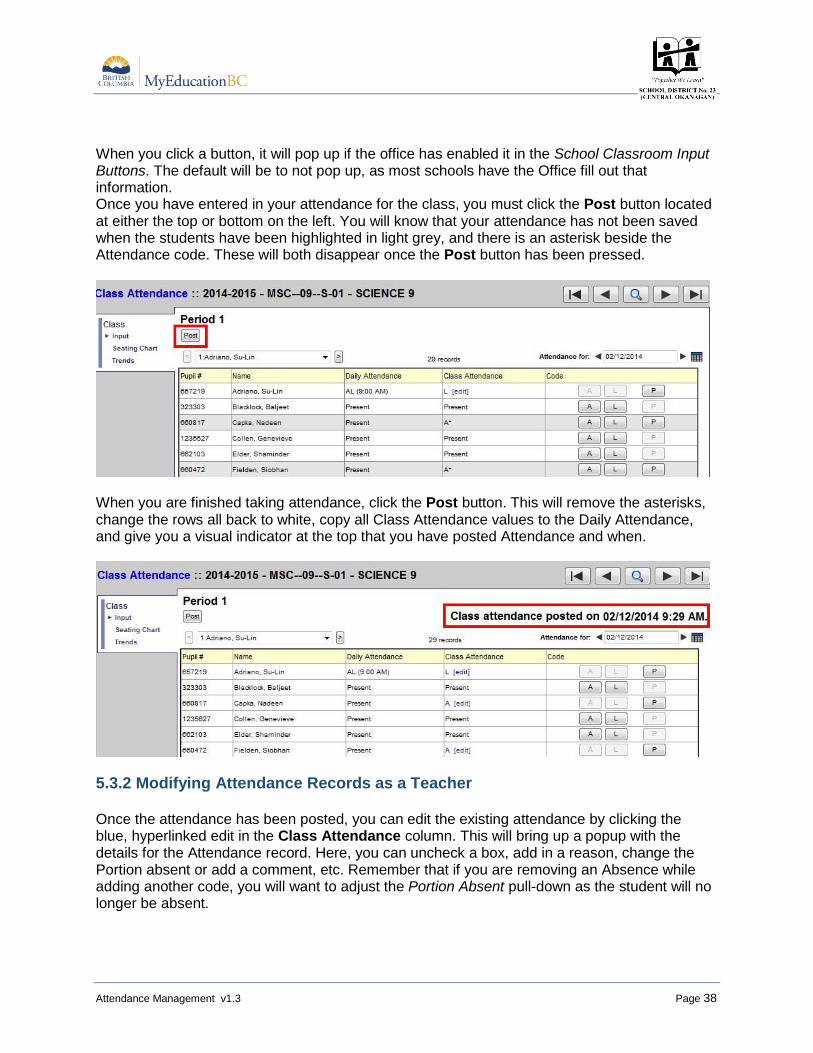
When you click a button, it will pop up if the office has enabled it in the School Classroom Input Buttons. The default will be to not pop up, as most schools have the Office fill out that information. Once you have entered in your attendance for the class, you must click the Post button located at either the top or bottom on the left. You will know that your attendance has not been saved when the students have been highlighted in light grey, and there is an asterisk beside the Attendance code. These will both disappear once the Post button has been pressed.
When you are finished taking attendance, click the Post button. This will remove the asterisks, change the rows all back to white, copy all Class Attendance values to the Daily Attendance, and give you a visual indicator at the top that you have posted Attendance and when.
5.3.2 Modifying Attendance Records as a Teacher Once the attendance has been posted, you can edit the existing attendance by clicking the blue, hyperlinked edit in the Class Attendance column. This will bring up a popup with the details for the Attendance record. Here, you can uncheck a box, add in a reason, change the Portion absent or add a comment, etc. Remember that if you are removing an Absence while adding another code, you will want to adjust the Portion Absent pull-down as the student will no longer be absent.

Attendance Management v1.3 Page 39
If a student has been marked Absent and later they come in merely Late, you can change the record quickly by using the Quick Change buttons on the main list of students. Click the L button and adjust the information in the popup window. If you wish to clear the record for a student entirely, you can simply click the P Quick Change button in their corresponding row, and this will clear ALL information you have added for that day’s Attendance Record, making them Present for the day.
5.3.3 Taking Attendance Records for Past or Future Dates
Note: Because you can change dates so easily, always ensure that when you
are entering in Attendance data, you check to make sure that you are working
with the correct date. If you leave and come back to this window, it may still be on a past or future date when you are intending on working on the current date.
You can control whether Teachers can take or modify attendance for dates in the past or future through the School Setup. If you have checked the Allow date change box, your teachers will be able to go forward or backward in time. On the far right side of the screen, above where the
Quick Change buttons are, there is a date window. You can scroll day-by-day by using the buttons, or else type in a specific date and tab out of the field. If you have not checked the Allow date change box, your teachers and Office staff will only be able to take attendance for the current day they are logged into MyEducation BC.
6.0 APPENDIX 2: Combined Class Attendance
If your school holds classes that consist of multiple sections meeting at the same time in the same room, you can build them as one class. For example, assume Automotive 11 and 12 meet during period 3 in room 101. The teacher(s) responsible for this multi-section class can take attendance for all students in the room on one page in the Staff view.
Note: To learn more about creating combined classes, see the “Master – Classes” section of the Managing the Master Schedule document.
Once your combined classes have been created, and the teacher assigned, you can now take Class attendance for the entire roster of this classroom at the same time.
To see your combined roster for your combined sections:

Attendance Management v1.3 Page 40
1. Login to your teacher account. Alternately, if you are a school level user
with the correct permissions, you can go to the Staff view, and using Select Teacher in the Settings menu, choose the teacher with the
combined classes that you wish to use to take attendance.
2. From the Staff view, you may select one of the sections from the Teacher
Classes widget on the Pages tab, or you can select any of the sections in
the combined class from the Attendance top tab > Class side tab.
3. This will bring you to the attendance page for this section. In the top right corner, there is a checkbox for Show all students in class.
4. When this is checked, you will see a complete roster for all sections
combined into the single class for attendance.

Attendance Management v1.3 Page 41
5. Take your Class Attendance as normal, and click the Post button when
you are finished.
6. You will get a Post Verification message at the top and bottom of your
Attendance rosters for both the combined classes (when the checkbox is
checked)
As well as each individual section roster (when the checkbox is not checked).

Attendance Management v1.3 Page 42
7.0 APPENDIX 3: Attendance Reports MyEducation BC comes with several stock reports that will be useful daily or during a school year. Reports will be visible in various locations throughout MyEducation, although the majority will be found under the Attendance top tab. This summary is not meant to be an exhaustive list of all Attendance Reports, but rather some highlights of the range of reports available to you, in addition to details on the more commonly used reports in the system.
7.1 Daily Attendance Reports
7.1.1 Daily Attendance Post Verification
The Daily Attendance Post Verification report will let the office know which teachers have posted their Daily Attendance, and which teachers still need to post this. This report can be run several times during the day, after the teachers have been reminded to post, to confirm that they have indeed sent in their Daily Attendance. If the teacher insists that they have posted the attendance and they do still appear on this list, confirm that they can see the confirmation date and time on their class roster under the Attendance top tab:
You have the choice when running the report of whether to show only those that have not posted daily attendance, or all teachers including what time attendance was posted. This report can be found in the following locations:
School view o Attendance top tab >
Daily Office side tab. o Attendance
top tab > Daily Roster side tab.
o Attendance top tab > Daily History side tab.
SAMPLE:

Attendance Management v1.3 Page 43
7.1.2 Attendance Classroom/Homeroom Input
The Attendance Classroom Input and Attendance Homeroom Input are two types of class roster lists that you can give a teacher who will be taking attendance manually for their class, and handing them into the office to be entered into the system. You will use the Attendance Classroom Input report if you have set your Daily Attendance preferences to use Period for the Classroom Input Type and you will use the Attendance Homeroom Input report if you have set your Daily Attendance preferences to use Homeroom for the Classroom Input Type.
These reports can be found in the following locations:
• School view o Attendance top tab >
Daily Office side tab. o Attendance top
tab > Daily Roster side tab.
o Attendance top tab > Daily History side tab.
• Staff view o Attendance top tab > Daily
side tab. o Attendance top tab > Class
side tab.

Attendance Management v1.3 Page 44
SAMPLE 1:
7.1.3 Attendance Bulletin The Attendance Bulletin report lists all students recorded as absent that day. You may wish to run the Daily Attendance Post Verification report first to ensure that all teachers/office staff have posted their attendance first, however the report can be run multiple times as your daily attendance comes in. The report will display names of students along with their Year of Graduation, Homeroom, Attendance codes applied and time (if applicable). There is a summary at the bottom that will list all Absences, Lates and Dismissals, both Excused and Unexcused. This report can be found in the following locations: SAMPLE 2:
7.1.3 Attendance Bulletin
The Attendance Bulletin report lists all students recorded as absent that day. You may wish to run the Daily Attendance Post Verification report first to ensure that all teachers/office staff have posted their attendance first, however the report can be run multiple times as your daily attendance comes in. The report will display names of students along with their Year of Graduation, Homeroom, Attendance codes applied and time (if applicable). There is a summary at the bottom that will list all Absences, Lates and Dismissals, both Excused and Unexcused.
This report can be found in the following locations:

Attendance Management v1.3 Page 45
• School view o Attendance top tab >
Daily Office side tab. o Attendance top
tab > Daily Roster side tab.
o Attendance top tab > Daily History side tab.
• Staff view o Attendance top tab > Daily
side tab.
SAMPLE:

Attendance Management v1.3 Page 46
7.1.4 Absence Letter
The Absence Letter report identifies students with five or more absences and prepares letters to send to parents. This report is not customizable by number of absences etc.; it is hard-coded into the system. Parameters that can be changed include date range and whether to exclude excused absences or students that have had previous absence letters sent home.
This report can be found in the following locations:
School view o Attendance top tab > Daily
Office side tab. o Attendance top tab >
Daily Roster side tab. o Attendance top tab
> Daily History side tab.
o Student top tab
SAMPLE:

Attendance Management v1.3 Page 47
7.1.5 Principal’s Attendance
The Principal’s Attendance report can be configured in many ways to customize results across a school. This can be useful if you have a business rule that states that 2 unexcused lates or 3 unexcused absences results in a detention, for example, and can use this report to narrow your field to just those students.
This report can be found in the following locations:
School view o Attendance top tab > Daily
Office side tab. o Attendance top tab >
Daily Roster side tab. o Attendance top tab
> Daily History side tab.
o Attendance top tab > Daily Summary side tab.
SAMPLES:

Attendance Management v1.3 Page 48
7.1.6 Other Daily Attendance Reports
Attendance Call Sheet o Gives a list of all students with Attendance
records for a given day, along with their highest priority contact and their phone number.
This report can be found in the following locations:
School view
Attendance top tab > Daily Office side tab.
Attendance top tab > Daily Roster side tab.
Attendance top tab > Daily History side tab.
Attendance History o Gives an Attendance Summary between two
dates for a given student or students.
This report can be found in the following locations:
School view
Student top tab
Student top tab > Attendance side tab.
Consecutive Absence List o Lists students with multiple
consecutive absences by class period.
This report can be found in the following locations:
School view
Attendance top tab > Daily Office side tab.
Attendance top tab > Daily Roster side tab.
Attendance top tab > Daily History side tab.
Staff view
Attendance top tab > Daily side tab.

MyEducation BC – Attendance Management
Attendance Management Reference Manual v 1.0 Page 49
7.2 Class Attendance Reports 7.2.1 Class Absence Letter
The Class Absence Letter report identifies students with five or more absences in a given section of a class, and prepares letters to send to parents. This report is customizable by number of absences, date range, period number, excused or not and attendance reason. You can run this report for Absences, Lates or both. This report can be found in the following locations:
School view o Attendance top tab >
Class Office side tab. o Attendance top
tab > Class History side tab.
o Student top tab
SAMPLE:

MyEducation BC – Attendance Management
Attendance Management Reference Manual v 1.0 Page 50
7.2.2 Class Attendance Post Verification
The Class Attendance Post Verification report will let the office know which teachers have posted their Class Attendance, and which teachers still need to post this. This report can be run several times during the day, after the teachers have been reminded to post, to confirm that they have indeed sent in their Daily Attendance. If the teacher insists that they have posted the attendance and they do still appear on this list, confirm that they can see the confirmation date and time on their class roster under the Attendance top tab:
You have the choice when running the report of whether to show only those that have not posted class attendance, or all teachers including what time attendance was posted.
This report can be found in the following locations:
School view o Attendance top tab > Class
Office side tab. o Attendance top tab >
Class History side tab.
7.2.3 Class Attendance Post History
Run the Class Attendance Post History report to view class attendance posts for the section you specify, within the date range you specify. This is helpful if your school wants to view the class attendance post history over a specific date range.
This report can be found in the following locations:
SAMPLE:

MyEducation BC – Attendance Management
Attendance Management Reference Manual v 1.0 Page 51
School view o Attendance top tab >
Class Office side tab.
o Attendance top tab > Class History side tab.
SAMPLE:
7.2.4 Other Class Attendance Reports
• Class Attendance Summary
o Gives a list of all students’ Attendance counts for a given date range.
This report can be found in the following locations:
Staff view
Attendance top tab > Class side tab.
Gradebook top tab > Scores side tab.
• Class Attendance History o Gives an Attendance breakdown for all
students in a single section of a class. Records are sorted by date.
This report can be found in the following locations:
Staff view
Attendance top tab > Class side tab.
Gradebook top tab > Scores side tab.

MyEducation BC – Attendance Management
Attendance Management Reference Manual v 1.0 Page 52
7.3 Positive Attendance Reports
Positive attendance is done using Class Attendance, so you will be using the same reports as found in section 7.2 – Class Attendance Reports. Because Positive Attendance uses a procedure to call all students Absent when the teacher first logs in, all teachers (or the office) must post attendance for all classes for that day, or else the information will be incorrect.
Use the Class Attendance Post Verification report to ensure all classes have had their attendance posted for the day before running any other Class Attendance report to ensure all of your attendance information is correct.