Embed Size (px)
Citation preview

STATE OF CALIFORNIA — NATURAL RESOURCES AGENCY Gavin Newsom, Governor
“The Department of Forestry and Fire Protection serves and safeguards the people and protects the property and resources of California.”
Attachment 16
Date: August 22, 2019
To: State Board of Fire Services
From: Joe Bunn, Jim Eastman, and Rick Lum, Fire Service Training Specialist III SUBJECT/AGENDA ACTION ITEM: Rope Rescue Awareness/Operations and Rope Rescue Technician FSTEP Courses
Recommended Actions: Informational/Comment Only
Background Information: This document is intended to provide information for all State Fire Training (SFT) stakeholders on new curriculum titled Rope Rescue Awareness/Operations (2019) and Rope Rescue Technician (2019). Historically, LARRO (low angle rescue), Rescue Systems 1 and Rescue Systems 2 has been delivered through SFT’s curriculum under the Fire Service Training and Education Program (FSTEP). Stakeholders including FEMA, Office of Emergency Services (OES), FIRESCOPE, SFT representatives, and local emergency rescue response resources were consulted to discuss updating rescue curriculum and coming into alignment with the National Fire Protection Association (NFPA) standards. It was identified to keep FEMA, OES - State Agency Task Forces, FIRESCOPE, SFT representatives, and local emergency rescue resources able to deploy while meeting the minimum standards as identified in NFPA, state and federal guidelines. It is intended to maintain the professional development of all Instructors desiring to teach and deliver SFT course curriculum. The Cadre is recommending maintaining the essential requirements and to introduce additional qualifications for new instructors with the delivery of these courses. Therefore, a cadre of experienced subject matter experts with extensive technical expertise in the area of special operations were selected from various agencies and backgrounds with the mission to create the content for these two new certification courses.

2
Cadre Leadership:
Joe Bunn, Fire Service Training Specialist III, Deputy Chief (ret) US&R CA-TF8, Jim Eastman, Fire Service Training Specialist III, Deputy Chief (ret), Rick Lum, Fire Captain, Laura Garwood Meehan, Cadre Editor, Sacramento State.
Cadre Membership: Paul Gonzales, Fire Engineer, San Jose Fire Department, Billy Milligan, Firefighter, City of Riverside Fire Department, Kevin Frye, Fire Captain, Los Angeles County Fire Department, Richard Wayne Chapman, Rescue Specialist, CMC, Orange County Fire Authority (ret), Brian Sippel, Fire Captain, Sacramento Fire Department, Aide Barbat, Battalion Chief, San Diego Fire and Rescue, Jeff Hakola, Fire Engineer, City of Merced Fire Department, Darius Luttrop, Fire Captain, San Francisco Fire Department, Ryan Primosch, Apparatus Operator, City of Los Angeles Fire Department, Greg Belk, Battalion Chief, CAL FIRE, Seth Whisnand, Fire Engineer, Kern County Fire Department. Several of the cadre members are State Fire Training Registered Instructors and all have extensive operational experience with special operations incidents involving technical rope rescue. The development of the material required two multi-day sessions for these curriculums. Because these are courses leading to certification the development of a Certification Training Standards (CTS) were required for both curriculums. Terminal Learning Objectives (TLO) were established from the authority from the below. The majority of the TLO’s and the supporting Enabling Learning Objectives (ELO) were developed from the authority of standards NFPA 1670: Standard on Operations and Training for Technical Search and Rescue Incidents (2017), and NFPA 1006: Standard for Technical Rescue Personnel Professional Qualifications (2017.) Additionally, NFPA Standards were considered such as 1500, 1521,1561 with observance to ICS 420-1, Field Operations Guide, ICS-SF-SAR-020-, Technical Rope Rescue standards recommended for Training, Skills and Equipment List (current edition) and several others references aided as supporting documents when creating the Course Plans.
The breakdown of the Certification courses is as follows:
Rope Rescue Awareness/Operations
Activity Type Time (Hours :Minutes)
Didactic 11.30 Hours: Minutes
Activities and Testing 29:30 Hours: Minutes
Course Hour Totals 40:00 Hours: Minutes
Rope Rescue Technician
Activity Type Time (Hours :Minutes)
Didactic 07:45 Hours: Minutes
Activities and Testing 32:15 Hours: Minutes
Course Hour Totals 40:00 Hours: Minutes
3
Analysis/Summary of Issue: Following is an analysis of the new FSTEP courses. 1. Neither the old legacy SFT Fire Officer or Chief Officer courses, nor the NFPA Fire
Officer I-IV standards addressed the specific hazards and risks faced by an initial incident commander at the scene of a technical rescue incident nor any technical rescue operations or otherwise. The only curriculum developed in regard to command and control of special operations is the SFT course, Incident Management of Special Operations, which was created to provide awareness level training for incident commanders in recognizing and managing the initial actions of the technical rescue incident safely. This course is highly recommended for any new to special operations and may have the responsibility of command and control. Any career or volunteer fire service officer will benefit greatly from the design and content of that course as it relates to technical rescue operations.
2. These curriculums require training sites that assist in simulating live scenarios for different levels of technical rescue. The curriculums material ranges from low angle to high angle and everything between including but not limited to the use of ladders. The training sites chosen by the AHJ need to meet the requirements of the course plans. It is incumbent on the instructors to insure the requirements are met prior to facilitating this course.
3. Planning and Logistics are a huge piece to this course. The training site or sites must be thought out with safety as the most important element. In addition, complete equipment caches should be on site or sites for each discipline of the courses. The number of instructors to students with activities in technical rescue operations is always extremely high risk, so eliminating those risk elements lowers the overall risk during these courses during instruction.
4. The instructors for these courses need an extensive background in technical rescue as it relates to the low and high angle environment. The rollouts are essential to the success of these courses during this transition to National Standards.
5. The core content utilizes the authority NFPA 1006, 1670 standards, as well as 1500, 1521 and 1561 as supporting documents.

[Short Course Title]
[Month Year] Page 1 of 45
Rope Rescue Operations Course Plan
Course Details
Certification: Rescue Technician
CTS Guide: Rope Rescue Operations
Description: This course provides information on low-angle and high-angle rescue, familiarizing participants with operation of simple, complex, and compound rope rescue systems in the the low- and high-angle environment.
Designed For: All fire service and allied emergency response personnel
Prerequisites: ICS-100: Introduction to the Incident Command System ICS-200: ICS for Single Resources and Initial Action Incidents
IS-700: National Incident Management System, An Introduction IS-800: National Response Framework, An Introduction
Standard: Attend entire course. Complete all activities and any formative tests. Complete all summative tests with a minimum score of 80%.
Hours: Lecture: 11:30
Activities: 28:30
Testing: 1:00
Hours (Total): 40:00
Maximum Class Size: 24
Instructor Level: Primary
Instructor/Student Ratio: 24:1 lecture, 12:1 low-angle activities, 6:1 high-angle activities
Restrictions: Training site meets site requirements and equipment standards
SFT Designation: CFSTES

[Short Course Title]
[Month Year] Page 2 of 45
Required Resources
Instructor Resources To teach this course, instructors need one or more of the following:
• Rope Rescue Manual, current edition, CMC Rescue, Inc., ISBN: 978-009845878-5 (applies to 2017 edition) (available as hard copy, online, or as an app)
• The Essential Technical Rescue Field Operations Guide (DRR), current edition, by Tom Pendley, Desert Rescue Research, ISBN: 978-0-692-90153-3 (applies to 2017 edition) (available as hard copy, and app, or online)
• Fundamentals of Technical Rescue, Jones and Bartlett, current edition, ISBN: 978-0-7637-3837-2 (applies to 2010 edition)
• Fire Service Technical Search and Rescue, current edition, International Fire Service Training Association, ISBN: 978-087939580-3 (applies to 2015 edition)
To teach this course, instructors may use the following:
• Fundamentals of Technical Rescue Toolkit, Jones and Bartlett, current edition, ISBN: 978-0763776954 (applies to 2011 edition)
Online Instructor Resources The following instructor resources are available online at http://osfm.fire.ca.gov/training/instructorscorner.php:
• Rope Operational Checklist • California Code of Regulations, Title 8, Section 1670 Personal Fall Protection (dir.ca.gov) • California Code of Regulations, Title 8, Section 3270.1 Use of Rope Access Equipment
(dir.ca.gov) •
Student Resources To participate in this course, students need:
• Any textbooks selected by the instructor • Helmet, gloves, eye protection, and any other safety equipment required by the AHJ • Student materials such as paper, pens, pencils
To participate in this course, students may need:
• Knee pads Facilities and Equipment The following facilities and equipment are required to deliver this course:

[Short Course Title]
[Month Year] Page 3 of 45
• Side openings to accommodate simultaneous operations of ladder systems. • High and low anchor points appropriately placed for use with each operation • Open field area to accommodate simultaneous operations, ladder "A" frame, ladder gin,
and pickets • Area to lower a student one story through an opening using an interior leaning ladder
(minimum 8 feet) • Structure, 30 feet minimum height with working roof that is of sound and safe
engineering design • Topside working area, 50 feet long x 12 feet wide with a connected slope area, minimum
30 feet long x 10 feet wide at a 30–60° angle; area supports two (2) squads or maximum of twenty-four (24) students
• Area to demonstrate and practice skills (rescue knots, rescue/victim packaging, anchors, and rope systems)
• Open field sloping area • All high angle evolutions performed in an environment in which the load is
predominately supported by the rope rescue system • A minimum vertical distance of 10 to 20 feet • A minimum required ascending distance of 10 to 20 feet • An obstacle to negotiate while ascending and descending • An obstacle to negotiate during lowering and raising operations
Equipment List: Note: All equipment must be NFPA compliant or purpose-designed (i.e., prusiks).
Item Size
Description Number Notes Anchor plate 6 Apparatus, fire (large) Large Optional Backboard, long Optional Descent control device 8 Carabiner (locking) 80 Commercial Class III harness (variety of sizes) Small 12 Commercial victim seat harness 2 Commercial victim chest harness 2 Cord 8mm x 33' Optional
Edge protection Enough
Edge protection can be manufactured (rope rollers, etc) or improvised (split fire hose, etc). There shall be adequate amounts of edge protection available for

[Short Course Title]
[Month Year] Page 4 of 45
concurrent running scenarios.
Edge roller Enough Personal descent device 8
Ascenders 4
While Gibbs Ascenders™ are acceptable, handled ascenders are preferred.
Ladder 24' Enough Ladder 14' Enough Litter tender straps Optional Litter wheel Optional
Load-releasing device 6
Commercial or field assembled (with webbing or cordelette) complete with General Use carabiners. These carabiners are in addition to the amounts specified under the carabiner and prusik categories.
Kernmantle rope 150' 6 Kernmantle rope 20’ 4 Picket, steel 1"x4' 12 Prusik loop Short 20 Prusik loop Long 20 Pulley: standard 2" or 4" 8 Pulley: prusik minding 2" or 4" 8 All 16 can be prusik minding Pulley: double 2" or 4" 2 Pulley: knot passing 1 Rescue litter 2
Rescue litter pre-rig with 4 prusiks and 6 carabiners 2
Commercial or field assembled complete with general use carabiners and prusiks, if field assembled these carabiners and prusiks are in addition to the amounts specified under the carabiner and prusik categories.
Rescue mannequin Optional Sledge hammer 8–10 lb. 2 Spider straps Optional Tie rope 15' 24

[Short Course Title]
[Month Year] Page 5 of 45
Webbing, blue tubular 1"x15' 24 Webbing, green tubular 1"x5' 12 Webbing, orange tubular 1"x20' 24 Webbing, yellow tubular 1"x12' 12 Pick off strap 2
Etriers 2
Can be commercial or field assembled from one inch tubular webbing.
Mini MA system Optional Swivels Optional

[Short Course Title]
[Month Year] Page 6 of 45
Unit 1: Introduction
Topic 1-1: Orientation and Administration Terminal Learning Objective
At the end of this topic, a student will be able to identify facility and classroom requirements and identify course objectives, events, requirements, assignments, activities, resources, evaluation methods, and participation requirements in the course syllabus.
Enabling Learning Objectives 1. Identify facility requirements
• Restroom locations • Food locations • Smoking locations • Emergency procedures
2. Identify classroom requirements • Start and end times • Breaks • Electronic device policies • Special needs and accommodations • Other requirements as applicable
3. Review course syllabus • Course objectives • Calendar of events • Course requirements • Student evaluation process • Assignments • Activities • Required student resources • Class participation requirements
Discussion Questions 1. What is a formative test? What is a summative test?
Activities 1. To be determined by the instructor.
Topic 1-2: Rescue Technician Certification Process Terminal Learning Objective
At the end of this topic, a student will be able to identify different levels in the Rescue Technician certification track, the courses and requirements for [Level #] certification, and be able to describe the capstone task book and testing process.
Enabling Learning Objectives 1. Identify the different levels of certification in the Rescue Technician certification track

[Short Course Title]
[Month Year] Page 7 of 45
• Rope Rescue Operations • Rope Rescue Technician • Structural Collapse Specialist I • Structural Collapse Specialist II
2. Identify the courses required for Rope Rescue Operations • Rope Rescue Operations • ICS-100: Introduction to the Incident Command System • ICS-200: ICS for Single Resources and Initial Action Incidents • IS-700: National Incident Management System, An Introduction • IS-800: National Response Framework, An Introduction
3. Identify any other requirements for Rope Rescue Operations 4. Describe the capstone task book process
• Complete all prerequisites and course work • Submit application and fees to request capstone task book • Complete all job performance requirements included in the task book • Must have identified evaluator verify individual task completion via signature • Must have Fire Chief or authorized representative verify task book completion via
signature • Must be employed by a California Fire Agency in the position prior to submitting
completed task book to State Fire Training 5. Describe the capstone testing process
• Complete course work • Schedule online capstone test • Schedule skills evaluation test
Discussion Questions 1. How many levels are there in the Rescue Technician certification track? What are they?
Activities 1. To be determined by the instructor.
Unit 2: Rope Rescue Awareness
Topic 2-1: Recognizing the Need for Support Resources Terminal Learning Objective
At the end of this topic, given a specific type of rescue incident, the student will be able to recognize the need for support resources, so that a resource cache is managed, scene lighting is provided for the tasks to be undertaken, environmental concerns are managed, personnel rehabilitation is facilitated, and the support operation facilitates rescue operational objectives.
Enabling Learning Objectives 1. Identify equipment organization and tracking methods 2. Identify lighting resource type(s)

[Short Course Title]
[Month Year] Page 8 of 45
3. Identify shelter and thermal control options 4. Identify rehab criteria 5. Track equipment inventory 6. Identify lighting resources and structures for shelter and thermal protection 7. Identify rehab areas 8. Describe managing personnel rotations
Discussion Questions 9. What support resources are available in your AHJ? 10. What is your AHJ’s rehab policy?
Activities 1. To be determined by the instructor.
Instructor Notes 1. None
CTS Guide Reference: CTS 1-2
Topic 2-2: Recognizing Incident Hazards and Initiating Isolation Procedures Terminal Learning Objective
At the end of this topic, given scene control barriers, personal protective equipment (PPE), requisite equipment, and available specialized resources, the student will be able to recognize incident hazards and initiate isolation procedures, so that all hazards are identified, resource application fits the operational requirements, hazard isolation is considered, risks to rescuers and victims are minimized, and rescue time constraints are taken into account.
Enabling Learning Objectives 1. Identify resource capabilities and limitations 2. Describe types and nature of incident hazards 3. Describe equipment types and their use 4. Describe isolation terminology, methods, equipment, and implementation 5. Identify operational requirement concerns 6. Describe common types of rescuer and victim risk 7. Describe risk/benefit analysis methods and practices 8. Identify types of technical references 9. Identify resource capabilities and limitations 10. Identify incident hazards 11. Describe how to assess victim viability (risk/benefit) 12. Describe technical references 13. Place scene control barriers 14. Operate control and mitigation equipment
Discussion Questions 1. What electronic references do you use in your AHJ? 2. What are common hazards found in your environment?

[Short Course Title]
[Month Year] Page 9 of 45
3. What national and state typed resources do you have in and around your AHJ? 4. What are your limitations operating at the awareness level?
Activities 1. To be determined by the instructor.
Instructor Notes 2. National and state typed resources might include NIMS and FIRESCOPE.
CTS Guide Reference: CTS 1-3
Topic 2-3: Recognizing Needed Resources for a Rescue Incident Terminal Learning Objective
At the end of this topic, given incident information, a means of communication, resources, tactical worksheets, personnel accountability protocol, applicable references, and standard operating procedures, the student will be able to recognize needed resources for a rescue incident, so that references are utilized, personnel are accounted for, necessary resources are deployed to achieve desired objectives, incident actions are documented, rescue efforts are coordinated, the command structure is established, task assignments are communicated and monitored, and actions are consistent with applicable regulations.
Enabling Learning Objectives 1. Describe incident management system 2. Describe tactical worksheet application and purposes 3. Describe accountability protocols 4. Describe resource types and deployment methods 5. Describe documentation methods and requirements 6. Describe availability, capabilities, and limitations of rescuers and other resources 7. Identify communication problems and needs 8. Identify communications requirements, methods, and means 9. Describe types of tasks and assignment responsibilities 10. Describe policies and procedures of the agency 11. Identify technical references related to the type of rescue incident 12. Describe the implementation of an incident management system 13. Describe how to complete tactical worksheets 14. Evaluate incident information 15. Match resources to operational needs 16. Operate communications equipment 17. Describe the management of incident communications 18. Communicate in a manner so that objectives are met
Discussion Questions 1. What are the applicable regulations? 2. What information should be included on a tactical worksheet? 3. What are some kinds of communication equipment used in your AHJ?

[Short Course Title]
[Month Year] Page 10 of 45
Activities 1. Instructor must create an activity directing students to fill out the AHJ’s tactical
worksheet. Instructor Notes
1. This activity can be done at a different point in the course. 2. The activity will help reinforce the personnel accountability process and resource
tracking. CTS Guide Reference: CTS 1-4
Topic 2-4: Initiating a Discipline-Specific Search Terminal Learning Objective
At the end of this topic, given hazard-specific PPE, equipment pertinent to search mission, an incident location, and victim investigative information, the student will be able to initiate a discipline-specific search, so that search parameters are established, the victim profile is established, the entry and exit of all people either involved in the search or already within the search area are questioned and the information is updated and relayed to command, the personnel assignments match their expertise, all victims are located as quickly as possible, applicable technical rescue concerns are managed, risks to searchers are minimized, and all searchers are accounted for.
Enabling Learning Objectives 1. Describe local policies and procedures 2. Describe how to operate in the site-specific search environment 3. Determine the potential for entering, maneuvering in, and exiting the search
environment 4. Provide for and perform self-escape/self-rescue
Discussion Questions 1. What questions would you ask an on-scene witnesses and reporting parties? 2. What equipment is pertinent to the search mission? 3. What types of PPE might be applicable to different types of hazards? 4. What are the components of the nationally recognized search marking system?
Activities 1. To be determined by instructor
Instructor Notes 1. None
CTS Guide Reference: CTS 1-5
Topic 2-5: Performing Ground Support Operations for Helicopter Activities Terminal Learning Objective
At the end of this topic, given a rescue scenario/incident, helicopter, operational plans, PPE, requisite equipment, and available specialized resources, the student will be able to perform ground support operations for helicopter activities, so that rescue personnel are aware of the operational characteristics of the aircraft and demonstrate operational proficiency in

[Short Course Title]
[Month Year] Page 11 of 45
establishing and securing landing zones and communicating with aircraft personnel until the assignment is complete.
Enabling Learning Objectives 1. Identify ground support operations relating to helicopter use and deployment 2. Identify operation plans for helicopter service activities 3. Describe type-specific PPE 4. Describe aircraft familiarization and hazard areas specific to helicopters 5. Describe scene control and landing zone requirements 6. Identify aircraft safety systems 7. Describe communications protocols 8. Provide ground support operations 9. Review standard operating procedures for helicopter operations 10. Use PPE 11. Establish and control landing zones 12. Communicate with aircrews
Discussion Questions 1. What are the hazard areas for different types of helicopters? 2. What helicopter resources are available in your AHJ? 3. What are the landing zone requirements for different helicopter types? 4. How do you communicate with aircrews on the ground and in the air?
Activities 1. To be determined by instructor
Instructor Notes 1. The instructor should refer to the current version of the IRPG.
CTS Guide Reference: CTS 1-6
Topic 2-6: Initiating Triage of Victims Terminal Learning Objective
At the end of this topic, given triage tags and local protocol, the student will be able to initiate triage of victims, so that rescue versus recovery factors are assessed, triage decisions reflect resource capabilities, severity of injuries is determined, and victim care and rescue priorities are established in accordance with local protocol.
Enabling Learning Objectives 1. Describe types and systems of triage according to local protocol 2. Identify resource availability 3. Identify methods to determine injury severity 4. Describe ways to manage resources 5. Describe prioritization requirements 6. Use triage materials, techniques, and resources 7. Categorize victims correctly
Discussion Questions 1. What are the resources available to perform triage?

[Short Course Title]
[Month Year] Page 12 of 45
2. Do you have a standard for triage in your AHJ? Activities
1. To be determined by the instructor Instructor Notes
1. None CTS Guide Reference: CTS 1-7
Topic 2-7: Assisting a Team in Operation of the Haul Line Terminal Learning Objective
At the end of this topic, given rescue personnel, an established rope rescue system, a load to be moved, and an anchor system, the student will be able to assist a team in operation of the haul line of a rope mechanical advantage system raising operation, so that the movement is controlled; a reset is accomplished; the load can be held in place when needed; commands are followed in direction of the operation; and potential problems are identified, communicated, and managed.
Enabling Learning Objectives 1. Describe principles of mechanical advantage 2. Describe operation of a haul line in a raising operation 3. Identify personnel assignments 4. Describe operational commands 5. Follow operational commands 6. Identify safety concerns during raising operations
Discussion Questions 1. What are your roles and responsibilities as a awareness level member?
Activities 1. To be determined by the instructor
Instructor Notes 1. None
CTS Guide Reference: CTS 1-8 Unit 3: Rope Rescue Operations

[Short Course Title]
[Month Year] Page 13 of 45
Topic 3-1: Sizing Up a Rescue Incident Terminal Learning Objective
At the end of this topic, given background information and applicable reference materials, the student will be able to perform size up of a rescue incident, so that the type of rescue is determined, the number of victims is identified, the last reported location of all victims is established, witnesses and reporting parties are identified and interviewed, resource needs are assessed, search parameters are identified, and information required to develop an incident action plan is obtained.
Enabling Learning Objectives 1. Assess types of reference materials and their uses 2. Describe availability and capability of the resources 3. Describe elements of an action plan and related information 4. Describe relationship of size-up to the incident management system 5. Describe information-gathering techniques and how that information is used in the size-
up process 6. Explain technical rescue reference materials 7. Describe search parameters 8. Use information-gathering sources
Discussion Questions 1. What are some applicable reference materials? 2. What are the components of an IAP? 3. What are common search techniques?
Activities 1. To be determined by the instructor.
Instructor Notes 1. The instructor must review a Training Action Plan (TAP) and walk the students through
the components. CTS Guide Reference: CTS 2-1
Topic 3-2 Inspecting and Maintaining PPE Terminal Learning Objective
At the end of this topic, given clothing or equipment for the protection of the rescuers, cleaning and sanitation supplies, maintenance logs or records, and such tools and resources as are indicated by the manufacturer’s guidelines for assembly or disassembly of components during repair or maintenance, the students will be able to inspect and maintain hazard-specific PPEso that damage, defects, and wear are identified and reported or repaired, equipment functions as designed, and preventive maintenance has been performed and documented consistent with the manufacturer’s recommendations.
Enabling Learning Objectives 1. Describe functions, construction, and operation of PPE 2. Describe use of record keeping systems of the AHJ

[Short Course Title]
[Month Year] Page 14 of 45
3. Describe requirements and procedures for cleaning, sanitizing, and infectious disease control
4. Describe maintenance procedures and use of provided assembly and disassembly tools 5. Describe manufacturer and department recommendations 6. Describe preuse inspection procedures 7. Describe ways to determine operational readiness. 8. Identify wear and damage indicators for PPE 9. Evaluate operational readiness of PPE 10. Complete logs and records 11. Use cleaning equipment, supplies, and reference materials 12. Select and use tools specific to the task
Discussion Questions 1. What are your AHJ’s PPE inspection guidelines? 2. What type of equipment logs do you use? 3. Where are your AHJ’s maintenance logs and records kept?
Activities 1. Have students make an equipment inspection and fill out an inspection log.
Instructor Notes 1. Show an example of a equipment log.
CTS Guide Reference: CTS 2-2
Topic 3-3 Inspecting and Maintaining Rescue Equipment Terminal Learning Objective
At the end of this topic, given maintenance logs and records, tools, and resources as indicated by the manufacturer’s guidelines, equipment replacement protocol, and organizational standard operating procedure, the student will be able to inspect and maintain rescue equipment, so that the operational status of equipment is verified and documented, all components are checked for operation, deficiencies are repaired or reported as indicated by standard operating procedure, and items subject to replacement protocol are correctly disposed of and changed.
Enabling Learning Objectives 1. Describe functions and operations of rescue equipment 2. Describe selection and use of maintenance tools 3. Describe replacement protocol and procedures 4. Describe criteria for placing equipment out of service 5. Describe organizational standard operating procedures 6. Identify wear and damage indicators for rescue equipment 7. Evaluate operation readiness of equipment 8. Complete logs and records 9. Describe use of recordkeeping systems 10. Describe manufacturer and organizational care and maintenance requirements

[Short Course Title]
[Month Year] Page 15 of 45
Discussion Questions 1. What are retirement or replacement criteria? 2. What does your AHJ use for proper cleaning of the equipment? 3. What are your AHJ’s preuse inspection procedures?
Activities 1. To be determined by the instructor.
Instructor Notes 1. Consider showing equipment with normal and excessive wear and out-of-service
equipment. CTS Guide Reference: CTS 2-3
Topic 3-4 Demonstrating Knots, Bends, and Hitches Terminal Learning Objective
At the end of this topic, given ropes, webbing, and a list of knots used by the agency, the students will be able to demonstrate knots, bends, and hitches, so that the knots are dressed, recognizable, and backed up as required.
Enabling Learning Objectives 1. Describe knot efficiency 2. Describe knot utilization 3. Describe rope construction 4. Identify rope terminology 5. Tie representative knots, bends, and hitches for the following purposes:
• End-of-line loop • Midline loop • Securing rope around desired objects • Joining rope or webbing ends together • Gripping rope
Discussion Questions 1. What is the difference between a knot, a bend, and a hitch? 2. What are the names of the parts of a rope?
Activities 3. The instructor must create an activity directing students to tie all of the knots, bends,
and hitches listed in the instructor notes. Instructor Notes CTS Guide Reference: CTS 2-4
Topic 3-5 Constructing a Single-Point Anchor System Terminal Learning Objective
At the end of this topic, given life safety rope and other auxiliary rope rescue equipment, the student will be able to construct a single-point anchor system, so that the chosen anchor system fits the incident needs, meets or exceeds the expected load, and does not interfere with rescue operations; an efficient anchor point is chosen; the need for redundant anchor

[Short Course Title]
[Month Year] Page 16 of 45
points is assessed and used as required; the anchor system is inspected and loaded prior to being placed into service; and the integrity of the system is maintained throughout the operation.
Enabling Learning Objectives 1. Describe application of knots 2. Describe rigging systems and principles 3. Describe system safety check procedures 4. Describe rope and webbing construction 5. Describe rope rescue equipment applications and limitations 6. Select equipment 7. Tie knots, bends, and hitches as required by the AHJ 8. Evaluate anchor points for required strength, location, and surface contour 9. Perform a system safety check
Discussion Questions 1. What criteria are we looking for when considering anchor selection? 2. What are the differences in the regulations between fall restraint versus fall protection?
Activities 1. The instructor must create an activity directing students to construct a single-point
anchor system and determine or estimate the expected load. Instructor Notes
1. Reference: California Code of Regulations, Title 8, Section 1670 Personal Fall Protection 2. Reference: California Code of Regulations, Title 8, Section 3270.1 Use of Rope Access
Equipment 3. The instructor must cover pickets.
CTS Guide Reference: CTS 2-5
Topic 3-6: Constructing a Multiple-Point Anchor System Terminal Learning Objective
At the end of this topic, given life safety rope and other auxiliary rope rescue equipment, the student will be able to construct a multiple-point anchor system, so that the chosen anchor system fits the incident needs, the system strength meets or exceeds the expected load and does not interfere with rescue operations, equipment is visually inspected prior to being put in service, the nearest anchor point that will support the load is chosen, the anchor system is system safety checked prior to being placed into service, the integrity of the system is maintained throughout the operation, and weight will be distributed between more than one anchor point.
Enabling Learning Objectives 1. Describe the relationship of angles to forces created in the rigging of multiple-point
anchor systems 2. Describe safety issues in choosing anchor points

[Short Course Title]
[Month Year] Page 17 of 45
3. Describe system safety check methods that allow for visual and physical assessment of system components
4. Describe methods to evaluate the system during operations 5. Describe integrity concerns 6. Describe weight distribution issues and methods 7. Describe knots, bends, and hitches and their applications 8. Describe selection and inspection criteria for hardware and software 9. Describe formulas needed to calculate safety factors for load distribution 10. Describe concepts of static loads versus dynamic loads 11. Determine incident needs as related to choosing anchor systems 12. Select effective knots 13. Determine expected loads 14. Evaluate incident operations as related to interference concerns and setup 15. Choose anchor points 16. Perform a system safety check 17. Evaluate system components for compromised integrity
Discussion Questions 1. What criteria are we looking for when considering anchor selection? 2. What impact do the angles have on the forces created?
Activities 1. The instructor should create an activity directing students to construct a multiple-point
anchor system. Instructor Notes
1. The instructor must discuss how these tasks will be performed in a variety of environments, including environments with less equipment (e.g., rapid extraction module support [REMS]).
2. Reference: California Code of Regulations, Title 8, Section 1670 Personal Fall Protection 3. Reference: California Code of Regulations, Title 8, Section 3270.1 Use of Rope Access
Equipment CTS Guide Reference: CTS 2-6
Topic 3-7: Conducting a System Safety Check Terminal Learning Objective
At the end of this topic, given a rope-rescue system and rescue personnel, the student will be able to conduct a system safety check, so that a physical/visual check of the system is made to ensure proper rigging, a load test is performed prior to life-loading the system, and verbal confirmation of these actions is announced and acknowledged before life-loading the rope-rescue system.
Enabling Learning Objectives 1. Describe system safety check procedures

[Short Course Title]
[Month Year] Page 18 of 45
2. Explain construction and operation of rope rescue systems and their individual components
3. Describe equipment inspection criteria 4. Identify signs of equipment damage 5. Describe principles of rigging 6. Describe equipment replacement criteria 7. Apply and use PPE 8. Inspect rope rescue system components for damage 9. Assess a rope rescue system for configuration 10. Secure equipment components 11. Inspect all rigging 12. Perform a system safety check
Discussion Questions 1. What are the key components of a system safety check? 2. Who does your AHJ recognize as authorized to perform a system safety check?
Activities 1. The instructor must create an activity directing students to conduct a system safety
check. Instructor Notes
1. The instructor must use an operational checklist, including one specific to the AHJ, covering at a minimum the items on the checklist provided in the instructor resources for training exercises.
2. The instructor may choose to combine constructing, operating, and performing a safety check on a system in one activity.
CTS Guide Reference: CTS 2-7
Topic 3-8: Placing Edge Protection Terminal Learning Objective
At the end of this topic, given life safety rope or webbing traversing a sharp or abrasive edge, edge protection, and other auxiliary rope rescue equipment, the students will be able to place edge protection, so that the rope or webbing is protected from abrasion or cutting, the rescuer is safe from falling while placing the edge protection, the edge protection is secure, and the rope or webbing is securely placed on the edge protection.
Enabling Learning Objectives 1. Explain materials and devices that can be used to protect ropes or webbing from sharp
or abrasive edges 2. Describe fall prevention or protection measures 3. Identify dangers associated with sharp or abrasive edges 4. Describe methods for negotiation of sharp or abrasive edges 5. Select protective devices for rope and webbing 6. Provide personnel fall prevention or protection while working near edges

[Short Course Title]
[Month Year] Page 19 of 45
7. Secure edge protection 8. Secure ropes or webbing in a specific location
Discussion Questions 1. What are the different types of edge protection available in your AHJ? 2. What methods does your AHJ use to secure edge protection? 3. What hazards are associated with not using edge protection?
Activities 1. To be determined by the instructor.
Instructor Notes 1. The instructor must address both the low-angle and high-angle environment. 2. The instructor must bring in different types of edge protection to show the students. 3. The instructor can create a standalone activity or build edge protection into a system.
CTS Guide Reference: CTS 2-8 Topic 3-9: Constructing a Belay System Terminal Learning Objective
At the end of this topic, given life safety rope, anchor systems, PPE, and rope rescue equipment, the student will be able to construct a belay system, so that the system is capable of arresting a fall, a fall will not result in system failure, the system is not loaded unless actuated, actuation of the system will not injure or otherwise incapacitate the belayer, the belayer is not rigged into the equipment components of the system, and the system is suitable to the site and is connected to an anchor system and the load.
Enabling Learning Objectives 1. Describe principles of belay systems 2. Describe capabilities and limitations of various belay devices 3. Describe application of knots, bends, and hitches; rigging principles; and system safety
check procedures 4. Construct a belay system 5. Tie knots, bends, and hitches 6. Perform rigging 7. Don and use task-specific PPE 8. Perform a system safety check
Discussion Questions 1. What are the differences between a slack (e.g., tandem prusik ) belay and a tensioned
(e.g., TTRS) belay? 2. What are some examples of belays used in your AHJ?
Activities 1. The instructor must create an activity directing students to construct a slack (e.g.,
tandem prusik) belay or a tensioned (e.g., TTRS) belay. Instructor Notes
2. The instructor should refer to NFPA 1006 Technical Rescue Personnel Professional Qualifications (2017), A.5.2.9, which discusses two-tension rope systems (TTRS).

[Short Course Title]
[Month Year] Page 20 of 45
CTS Guide Reference: CTS 2-9
Topic 3-10: Operating a Belay System Terminal Learning Objective
At the end of this topic, given an operating lowering or raising mechanical advantage system, a specified minimum travel distance for the load, a belay system, and a load, the student will be able to operate a belay system during a lowering or raising operation, so that the potential fall factor is minimized, the belay device system is not actuated during operation of the primary rope rescue system, the belay system is prepared for actuation at all times during the operation, the belayer is attentive at all times during the operation, the load’s position is continually monitored, and the belayer moves rope through the belay device as designed.
Enabling Learning Objectives 1. Describe application and use of belay devices 2. Describe proper operation of belay systems in conjunction with lowering and raising
operations 3. Describe operational commands 4. Operate a belay system 5. Tie approved knots, bends, and hitches 6. Assess system effectiveness 7. Perform a system safety check 8. Communicate belay system status
Discussion Questions 1. What commands does your AHJ use in the operation of a belay system? 2. How do you effectively minimize the fall factor? 3. Why is it important to stay attentive while belaying?
Activities 1. The instructor must create an activity directing students to operate a belay system.
Instructor Notes 1. The instructor must address both the low-angle and high-angle environment. 2. The instructor may choose to combine operating a belay as part of a system into one
activity. CTS Guide Reference: CTS 2-10
Topic 3-11: Belaying a Falling Load Terminal Learning Objective
At the end of this topic, given a belay system and a dropped load, the student will be able to belay a falling load in a high-angle environment, so that the belay line is not taut until the load is falling, the belay device is actuated when the load falls, the fall is arrested in a manner that minimizes the force transmitted to the load, the belayer utilizes the belay

[Short Course Title]
[Month Year] Page 21 of 45
system as designed, and the belayer is not injured or otherwise incapacitated during actuation of the belay system.
Enabling Learning Objectives 1. Describe application and use of belay devices 2. Describe effective emergency operation of belay devices to arrest falls 3. Describe use of PPE 4. Describe operating procedures 5. Operate a belay system 6. Tie approved knots, bends, and hitches 7. Use task-specific PPE 8. Recognize and arrest a falling load
Discussion Questions 1. What is the proper action in response to a belay line actuation? 2. What are your AHJ’s policies for recovering from a line failure?
Activities 1. The instructor must create an activity simulating an unexpected jerk of the belay system
as outlined in NFPA 1006, A.5.2.11. Instructor Notes
1. The instructor may simulate one line of a TTRS failing so that the students transfer the load to the other line.
CTS Guide Reference: CTS 2-11
Topic 3-12: Constructing a Fixed Rope System Terminal Learning Objective
At the end of this topic, given an anchor system, a life safety rope, and rope rescue equipment, the student will be able to construct a fixed rope system, so that the system constructed can accommodate the load, is efficient, and is connected to an anchor system and the load, and a system safety check is performed and the results meet the incident requirements for descending or ascending operations.
Enabling Learning Objectives 1. Explain rigging principles 2. Select effective knots, bends, and hitches 3. Calculate expected loads 4. Use rigging principles 5. Evaluate interference concerns as related to the incident operations and setup 6. Perform a system safety check 7. Evaluate system components for compromised integrity
Discussion Questions 1. What are your AHJ’s protocols for constructing a fixed rope system? 2. What is a contingency anchor?
[Short Course Title]
[Month Year] Page 22 of 45
Activities 1. The instructor must create an activity directing students to construct a fixed rope system
using a contingency anchor. Instructor Notes
1. The instructor must address both the low-angle and high-angle environment. CTS Guide Reference: CTS 2-12
Topic 3-13: Ascending a Fixed Rope Terminal Learning Objective
At the end of this topic, given an anchored fixed rope system, a specified minimum distance for the rescuer, a system to allow ascent of a fixed rope, a structure, a belay system, a life safety harness worn by the person ascending, and PPE, the student will be able to ascend a fixed rope in a low-angle and a high-angle environment, so that the person ascending is secured to the fixed rope in a manner that will not allow him or her to fall; the person ascending is attached to the rope by means of an ascent control device(s) with at least two points of contact; injury to the person ascending is minimized; the person ascending can stop at any point on the fixed rope and rest suspended by his or her harness; the system will not be stressed to the point of failure; the person ascending can convert his or her ascending system to a descending system; obstacles are negotiated; the system is suitable for the site; and the objective is reached.
Enabling Learning Objectives 1. Identify task-specific selection criteria for life safety harnesses and systems for ascending
a fixed rope 2. Describe PPE selection criteria 3. Describe design and intended purpose of ascent control devices utilized 4. Explain rigging principles 5. Describe techniques for ascending in low- and high-angle environments 6. Describe converting ascending systems to descending systems 7. Describe common hazards posed by harness use 8. Select and use harness, a system for ascending a fixed rope, and PPE for common
environments 9. Attach the rescuer to the rope rescue system 10. Configure ascent control devices to form a system for ascending a fixed rope 11. Make connections to the ascending system 12. Maneuver around existing environment and system-specific obstacles 13. Convert the ascending system to a descending system while suspended from the fixed
rope 14. Evaluate surroundings for potential hazards
Discussion Questions 1. What ascending system(s) do(es) your AHJ use?

[Short Course Title]
[Month Year] Page 23 of 45
2. What methods are used in your AHJ to convert the ascending system to a descending system?
Activities 1. The instructor must create an activity directing students to ascend a minimuim required
distance and negotiate obstacles in a low-angle and a high-angle environment. Instructor Notes
1. The instructor must use contingency anchors on all fixed ropes. 2. The descension from this initial ascension does not meet the next standard. Students
must complete a separate descension as part of the next topic (Topic 3-14). CTS Guide Reference: CTS 2-13
Topic 3-14: Descending a Fixed Rope Terminal Learning Objective
At the end of this topic, given an anchored fixed-rope system, a specified minimum travel distance for the rescuer, a system to allow descent of a fixed rope, a belay system, a life safety harness worn by the person descending, and PPE, the student will be able to descend a fixed rope in a low-angle and a high-angle environment, so that the person descending is attached to the fixed rope in a manner that will not allow him or her to fall; the person descending is attached to the rope by means of a descent control device; the speed of descent is controlled; injury to the person descending is minimized; the person descending can stop at any point on the fixed rope and rest suspended by his or her harness; the system will not be stressed to the point of failure; the system is suitable for the site; and the objective is reached.
Enabling Learning Objectives 1. Identify task-specific selection criteria for life safety harnesses and systems for
descending a fixed rope 2. Describe PPE selection criteria 3. Describe the design, intended purpose, and operation of descent control devices utilized 4. Describe safe rigging principles and techniques for low- and high-angle environments 5. Identify common hazards posed by harness use 6. Select and use harness, a system for descending a fixed rope, and PPE for common
environments 7. Attach the rescuer to the rope rescue system 8. Make attachment of the descent control device to the rope and life safety harness 9. Operate the descent control device 10. Maneuver around existing environment and system-specific obstacles 11. Evaluate surroundings for potential hazards
Discussion Questions 1. What descending system(s) do(es) your AHJ use? 2. What is the difference between an autostop descender and a manual descender?

[Short Course Title]
[Month Year] Page 24 of 45
Activities 1. The instructor must create an activity directing students to descend a minimuim
required distance and negotiate obstacles in a low-angle and a high-angle environment. Instructor Notes
1. The instructor must use contingency anchors on all fixed ropes. CTS Guide Reference: CTS 2-14
Topic 3-15: Escaping from a Malfunctioning Device Terminal Learning Objective
At the end of this topic, given an anchored fixed-rope system with a simulated malfunctioning descent control device, a system to allow escape from the malfunctioning device, a belay system, a life safety harness worn by the person descending, and PPE, the student will be able to demonstrate the ability to escape from a jammed or malfunctioning device during a fixed rope descent in a high-angle environment, so that the person descending is attached to the fixed rope in a manner that will not allow him or her to fall; the person descending is attached to the rope by means of a descent control device; the means for escape will allow the rescuer to escape either upward or downward from the malfunctioning descent control device; injury potential to the rescuer is minimized; the system will not be stressed to the point of failure; the system is suitable for the site; and the objective is reached.
Enabling Learning Objectives 1. Identify task-specific selection criteria for escape equipment and methods used for
escape from a malfunctioning descent control device 2. Identify PPE selection criteria 3. Describe the design, intended purpose, and operation of escape systems utilized 4. Explain rigging principles 5. Describe techniques for escaping a jammed device in high-angle environments 6. Describe common hazards posed by malfunctioning descent control devices 7. Select and use harness, a system for escaping a malfunctioning descent control device,
and PPE for common environments 8. Attach the rescuer to the rope rescue system 9. Make attachment of the descent control device to the rope and life safety harness 10. Attach and operate the escape system to remove the rescuer from the malfunctioning
descent control device while maintaining patent attachment to the fixed rope and belay 11. Use the escape system to maneuver upward or downward from the malfunctioning
descent control device 12. Evaluate surroundings for potential hazards
Discussion Questions 1. What is a possible cause of a jammed device? 2. What additional equipment is needed for self-rescue in this scenario?

[Short Course Title]
[Month Year] Page 25 of 45
Activities 1. The instructor must create an activity directing students to escape from a jammed or
malfunctioning device. Instructor Notes
1. The activity in this topic may be combined with other activities, such as descending. CTS Guide Reference: CTS 2-15
Topic 3-16: Constructing a Lowering System Terminal Learning Objective
At the end of this topic, given an anchor system, life safety rope(s), a descent control device, and auxiliary rope rescue equipment, the student will be able to construct a lowering system, so that the system can accommodate the load, is efficient, is capable of controlling the descent, is capable of holding the load in place or lowering with minimal effort over the required distance, and is connected to an anchor system and the load.
Enabling Learning Objectives 1. Describe capabilities and limitations of various descent control devices 2. Identify capabilities and limitations of various lowering systems 3. Describe application of knots, bends, and hitches; rigging principles; and system safety
check procedures 4. Tie knots, bends, and hitches 5. Perform rigging 6. Attach to descent control device, anchor system, and load 7. Perform a system safety check
Discussion Questions 1. What different descent-control devices are used in your AHJ? 2. What considerations could be made for a raising system?
Activities 1. The instructor must create an activity directing students to construct a lowering system.
Instructor Notes 1. None
CTS Guide Reference: CTS 2-16
Topic 3-17: Operating and Directing a Lowering and a Raising System Terminal Learning Objective
At the end of this topic, given rescue personnel, an established lowering system, a specified minimum travel distance for the load, and a load to be moved, the student will be able to operate and direct a lowering and a raising system in a low-angle and a high-angle environment, so that the movement is controlled, a knot is passed, the load can be held in place when needed, the system is converted to a raise, operating methods do not stress the

[Short Course Title]
[Month Year] Page 26 of 45
system to the point of failure, rope commands are used to direct the operation, and potential problems are identified, communicated, and managed.
Enabling Learning Objectives 1. Describe application and use of descent control devices 2. Describe capabilities and limitations of various lowering systems in a low- and high-angle
environment 3. Identify knot, bend, and hitch selection 4. Describe operation of lowering systems in a low- and high-angle environment 5. Describe operation of raising systems in a low- and high-angle environment 6. Identify personnel assignments 7. Identify operational commands 8. Operate a lowering and a raising system 9. Convert a lowering operation to a raising operation 10. Pass a knot in a lowering and a raising operation 11. Direct the operation 12. Use operational commands 13. Analyze system efficiency 14. Manage movement of the load in a low- and high-angle environment 15. Identify safety concerns in a low- and high-angle environment 16. Perform a system safety check
Discussion Questions 1. What are methods for passing a knot? 2. What must be taken into account when performing a lowering or raising operation?
Activities 1. The instructor must create an activity directing students to perform and direct a
lowering and raising operation in a low-angle and a high-angle environment. Instructor Notes
1. The instructor must discuss how these operations will be performed in a variety of environments, including environments with less equipment (e.g., rapid extraction module support[REMS]).
CTS Guide Reference: CTS 2-17
Topic 3-18: Constructing a Simple Rope Mechanical Advantage System Terminal Learning Objective
At the end of this topic, given life safety rope, carabiners, pulleys, rope grab devices, and auxiliary rope rescue equipment, the student will be able to construct a simple rope mechanical advantage system, so that the system constructed can accommodate the load, is efficient, and is connected to an anchor system and the load.
Enabling Learning Objectives 1. Describe principles of mechanical advantage

[Short Course Title]
[Month Year] Page 27 of 45
2. Identify capabilities and limitations of various simple rope mechanical advantage systems
3. Describe application of knots, bends, and hitches 4. Describe rigging principles 5. Describe system safety check procedures 6. Select rope and equipment 7. Tie knots, bends, and hitches 8. Choose and rig systems 9. Attach the mechanical advantage system to the anchor system and load 10. Perform a system safety check
Discussion Questions 1. Define a simple rope mechanical advantage system. 2. What is a common type of simple rope mechanical advantage system?
Activities 1. The instructor must create an activity directing students to construct a simple rope
mechanical advantage system. Instructor Notes
1. Have the students explain how to quantify a simple rope mechanical advantage system CTS Guide Reference: CTS 2-18
Topic 3-19: Operating and Directing a Team in Operating a Simple Rope Mechanical Advantage System Terminal Learning Objective
At the end of this topic, given rescue personnel, an established rope rescue system incorporating a simple rope mechanical advantage system, a specified minimum travel distance for the load, a load to be moved, and an anchor system, the student will be able to operate and direct a team in the operation of a simple rope mechanical advantage system in a low-angle and a high-angle raising operation, so that the movement is controlled, a reset is accomplished, the load can be held in place when needed, operating methods do not stress the system to the point of failure, commands are used to direct the operation, and potential problems are identified, communicated, and managed.
Enabling Learning Objectives 1. Describe principles of mechanical advantage 2. Identify capabilities and limitations of various simple rope mechanical advantage
systems and low-angle and high-angle raising operations 3. Describe knot, bend, and hitch selection 4. Describe correct operation of simple rope mechanical advantage systems 5. Identify personnel assignments 6. Identify operational commands 7. Operate the simple rope mechanical advantage system 8. Direct personnel
[Short Course Title]
[Month Year] Page 28 of 45
9. Use operational commands 10. Analyze system efficiency 11. Identify safety concerns 12. Perform a system safety check
Discussion Questions 1. What are the advantages and disadvantages of simple mechanical advantage systems? 2. What are operational commands used for directing simple mechanical advantage system
operations? Activities
1. The instructor must create an activity directing students to operate and direct a team in the operation of a simple rope mechanical advantage system in a low-angle and a high-angle raising operation.
Instructor Notes 1. None
CTS Guide Reference: CTS 2-19
Topic 3-20: Constructing a Compound Rope Mechanical Advantage System Terminal Learning Objective
At the end of this topic, given a load, an anchor system, life safety rope, carabiners, pulleys, rope grab devices, and rope rescue equipment, the student will be able to construct a compound rope mechanical advantage system, so that the system constructed accommodates the load and reduces the force required to lift the load, operational interference is factored and minimized, the system is efficient, a system safety check is completed, and the system is connected to an anchor system and the load.
Enabling Learning Objectives 1. Describe incident needs as related to choosing compound rope systems 2. Describe elements of efficient design for compound rope systems 3. Describe knot, bend, and hitch selection 4. Describe methods for reducing excessive force to system components 5. Describe evaluation of incident operations as related to interference concerns and
setups 6. Describe rope commands 7. Explain rigging principles 8. Identify system safety check procedures 9. Describe methods of evaluating system components for compromised integrity 10. Determine incident needs as related to choosing compound rope systems 11. Tie knots, bends, and hitches 12. Calculate expected loads 13. Evaluate incident operations as related to interference concerns and setups 14. Perform a system safety check 15. Evaluate system components for compromised integrity

[Short Course Title]
[Month Year] Page 29 of 45
Discussion Questions 1. Define a compound rope mechanical advantage system. 2. What is a common type of compound rope mechanical advantage system?
Activities 1. The instructor must create an activity directing students to construct a compound rope
mechanical advantage system. Instructor Notes
1. Have the students explain how to quantify a compound rope mechanical advantage system.
CTS Guide Reference: CTS 2-20
Topic 3-21: Constructing a Complex Rope Mechanical Advantage System Terminal Learning Objective
At the end of this topic, given a load, an anchor system, life safety rope, carabiners, pulleys, rope grab devices, and rope rescue equipment, the student will be able to construct a complex rope mechanical advantage system, so that the system constructed accommodates the load and reduces the force required to lift the load, operational interference is factored and minimized, the system is efficient, a system safety check is completed, and the system is connected to an anchor system and the load.
Enabling Learning Objectives 1. Describe incident needs as related to choosing complex rope systems 2. Describe elements of efficient design for complex rope systems 3. Describe knot, bend, and hitch selection 4. Describe methods for reducing excessive force to system components 5. Describe evaluation of incident operations as related to interference concerns and
setups 6. Describe rope commands 7. Explain rigging principles 8. Identify system safety check procedures 9. Describe methods of evaluating system components for compromised integrity 10. Determine incident needs as related to choosing complex rope systems 11. Tie knots, bends, and hitches 12. Calculate expected loads 13. Evaluate incident operations as related to interference concerns and setups 14. Perform a system safety check 15. Evaluate system components for compromised integrity
Discussion Questions 1. Define a complex rope mechanical advantage system. 2. What is a common type of complex rope mechanical advantage system?
[Short Course Title]
[Month Year] Page 30 of 45
Activities 1. The instructor must create an activity directing students to construct a complex rope
mechanical advantage system. Instructor Notes
1. Have the students explain how to quantify a complex rope mechanical advantage system CTS Guide Reference: CTS 2-21
Topic 3-22: Operating and Directing the Operation of a Compound Rope Mechanical Advantage System Terminal Learning Objective
At the end of this topic, given a rope rescue system incorporating a compound rope mechanical advantage system and a load to be moved, and a specified minimum travel distance for the load, the student will be able to operate and direct the operation of a compound rope mechanical advantage system in a low-angle and a high-angle environment, so that a system safety check is performed; a reset is accomplished and the movement is controlled; the load can be held in place when needed; operating methods do not stress the system to the point of failure; operational commands are clearly communicated; and potential problems are identified, communicated, and managed.
Enabling Learning Objectives 1. Identify methods to determine incident needs 2. Describe types of interference concerns 3. Describe rope commands 4. Describe system safety check protocols 5. Describe procedures for continued evaluation of system components for compromised
integrity 6. Identify common personnel assignments and duties 7. Describe methods for controlling a load’s movement 8. Identify system stress issues during operations 9. Describe management methods for common problems 10. Determine incident needs 11. Evaluate incident operations as related to interference concerns 12. Complete a system safety check 13. Continually evaluate system components for compromised integrity 14. Operate the compound rope mechanical advantage syste 15. Direct personnel 16. Communicate commands 17. Analyze system efficiency 18. Manage load movement 19. Identify concerns

[Short Course Title]
[Month Year] Page 31 of 45
Discussion Questions 1. What are the advantages and disadvantages of compound mechanical advantage
systems? 2. What are operational commands used for directing compound mechanical advantage
system operations? Activities
1. The instructor must create an activity directing students to operate and direct a team in the operation of a compound rope mechanical advantage system in a low-angle and a high-angle raising operation.
Instructor Notes 1. None
CTS Guide Reference: CTS 2-22 Topic 3-23: Operating and Directing the Operation of a Complex Rope Mechanical Advantage System Terminal Learning Objective
At the end of this topic, given a rope rescue system incorporating a complex rope mechanical advantage system and a load to be moved, and a specified minimum travel distance for the load, the student will be able to direct the operation of a complex rope mechanical advantage system in a low-angle and a high-angle environment, so that a system safety check is performed; a reset is accomplished and the movement is controlled; the load can be held in place when needed; operating methods do not stress the system to the point of failure; operational commands are clearly communicated; and potential problems are identified, communicated, and managed.
Enabling Learning Objectives 1. Identify methods to determine incident needs 2. Describe types of interference concerns 3. Describe rope commands 4. Describe system safety check protocols 5. Describe procedures for continued evaluation of system components for compromised
integrity 6. Identify common personnel assignments and duties 7. Describe methods for controlling a load’s movement 8. Identify system stress issues during operations 9. Describe management methods for common problems 10. Determine incident needs 11. Evaluate incident operations as related to interference concerns 12. Complete a system safety check 13. Continually evaluate system components for compromised integrity 14. Operate a complex rope mechanical advantage system 15. Direct personnel 16. Communicate commands

[Short Course Title]
[Month Year] Page 32 of 45
17. Analyze system efficiency 18. Manage load movement 19. Identify concerns
Discussion Questions 1. What are the advantages and disadvantages of complex mechanical advantage systems? 2. What are operational commands used for directing complex mechanical advantage
system operations? Activities
1. The instructor must create an activity directing students to operate and direct a team in the operation of a complex rope mechanical advantage system in a low-angle and a high-angle raising operation.
Instructor Notes 1. None
CTS Guide Reference: CTS 2-23
[Short Course Title]
[Month Year] Page 33 of 45
Topic 3-24 Negotiating an Edge While Attached to a Rope Rescue System Terminal Learning Objective
At the end of this topic, given a rope rescue system, a specified minimum travel distance for the rescuer, life safety harnesses, an edge to negotiate during the lower and raise, and specialized equipment necessary for the environment, the student will be able to negotiate an edge while attached to a rope rescue system during a low-angle and a high-angle lowering and raising operation, so that risk to the rescuer is minimized, the means of attachment to the rope rescue system is secure, and all projections and edges are negotiated while minimizing risks to the rescuer or equipment.
Enabling Learning Objectives 1. Describe techniques and practices for negotiating existing projections and edges along
the travel path while suspended from operating rope-based lowering and raising mechanical advantage systems and common hazards imposed by those projections and edges
2. Select and use harness and PPE for common environments 3. Attach the rescuer to the rope rescue system 4. Maneuver across existing projections and an edge along the travel path 5. Evaluate surroundings for potential hazards
Discussion Questions 1. What are some ways your AHJ negotiates an edge? 2. What are some different types of edges that may need to be negotiated?
Activities 1. The instructor must create an activity directing students to negotiate an edge while
attached to a rope rescue system. Instructor Notes
1. None CTS Guide Reference: CTS 2-24

[Short Course Title]
[Month Year] Page 34 of 45
Topic 3-25: Accessing, Assessing, Stabilizing, Packaging, and Transferring Victims Terminal Learning Objective
At the end of this topic, given diagnostic and packaging equipment and an actual or simulated EMS agency, the student will be able to access, assess, stabilize, package, and transfer victims, so that rescuers and victim are protected from hazards, the victim’s injuries or illnesses are managed, and the victim is delivered to the appropriate EMS provider with information regarding the history of the rescue activity and victim’s condition.
Enabling Learning Objectives 1. Describe victim and scene assessment methods 2. Explain victim treatment, immobilization, and packaging methods 3. Describe medical information management and communication methods 4. Use victim immobilization, packaging, and treatment methods 5. Provide victim transfer reports, both verbally and in written format
Discussion Questions 1. What packaging equipment and methods does your AHJ use? 2. What information should be passed on to the EMS provider?
Activities 1. The instructor must create an activity directing students to package victims.
Instructor Notes 1. The instructor should cover both ambulatory and nonambulatory victim packaging. 2. The instructor should cover victim packaging for a litter and various other victim
packaging devices. CTS Guide Reference: CTS 2-25

[Short Course Title]
[Month Year] Page 35 of 45
Topic 3-26: Operating and Directing a Litter-Lowering and Litter-Raising System in a Low-Angle Environment Terminal Learning Objective
At the end of this topic, given rescue personnel, (a) litter tender(s), an established lowering/mechanical advantage system, a specified minimum travel distance for the load, and a victim packaged in a litter to be moved, the student will be able to operate and direct a litter-lowering and litter-raising system in a low-angle environment, so that the litter is attached to the lowering/raising and belay systems; movement is controlled; litter tender(s) are used to manage the litter during the lower and raise; the litter can be held in place when needed; operating methods do not stress the system to the point of failure; rope commands are used to direct the operation; and potential problems are identified, communicated, and managed.
Enabling Learning Objectives 1. Describe the application and use of lowering and mechanical advantage system in the
low-angle environment 2. Describe the capabilities and limitations of various lowering and mechanical advantage
systems in a low-angle environment 3. Describe litter-tender functions and limitations in the low-angle environment 4. Describe the management of a litter in a low-angle environment during raises and
lowers 5. Identify personnel assignments 6. Identify operational commands 7. Operate a litter-lowering and litter-raising system 8. Direct operation 9. Use operational commands 10. Analyze system efficiency 11. Manage movement of the litter in a low-angle environment 12. Identify safety concerns in a low-angle litter operation 13. Perform a system safety check
Discussion Questions 1. What type of litter rig does your AHJ use? 2. What is the configuration for a low-angle litter bridle?
Activities 1. The instructor must create an activity directing students to operate and direct a litter-
lowering and litter-raising system in a low-angle environment. Instructor Notes
1. The instructor must discuss how these operations will be performed in a variety of environments, including environments with less equipment (e.g., rapid extraction module support[REMS]).

[Short Course Title]
[Month Year] Page 36 of 45
CTS Guide Reference: CTS 2-26
Topic 3-27: Operating as a Litter Tender Terminal Learning Objective
At the end of this topic, given a rope rescue system, a specified minimum travel distance for the litter tender, life safety harnesses, litters, bridles, and specialized equipment necessary for the environment, the student will be able to operate as a litter tender in a low-angle lowering or raising operation, so that risks to victims and rescuers are minimized, the means of attachment to the rope rescue system is secure, and the terrain is negotiated while minimizing risks to equipment or persons.
Enabling Learning Objectives 1. Identify task-specific selection criteria for life safety harnesses 2. Describe PPE selection criteria 3. Describe variations in litter design and intended purpose 4. Describe low-angle litter attachment principles 5. Describe techniques and practices for low-angle environments 6. Identify common hazards imposed by the terrain 7. Select and use harness and PPE for common environments 8. Attach the rescuer to the rope rescue system 9. Maneuver across the terrain 10. Manage the litter while suspended from the rope rescue system 11. Evaluate surroundings for potential hazards
Discussion Questions 1. What are the various methods for attaching litter tenders to the system? Which does
your AHJ use? Activities
1. The instructor must create an activity in which students serve on a three- and a four-person evolution.
Instructor Notes 1. The instructor should reinforce safe lifting techniques, communication, and coordination
of a litter team. CTS Guide Reference: CTS 2-27
Topic 3-28: Directing a Litter-Lowering or Litter-Raising Operation in a High-Angle Environment Terminal Learning Objective
At the end of this topic, given rescue personnel, an established lowering/mechanical advantage system, a specified minimum travel distance for the load, a victim packaged in a litter to be moved, and a means for negotiating edges and projections along the travel path, the student will be able to direct a litter-lowering or litter-raising operation in a high-angle

[Short Course Title]
[Month Year] Page 37 of 45
environment, so that the litter is attached to the lowering/raising and belay systems, an edge is negotiated during a lower and a raise; tag lines are used to manage the litter during the lower and raise; the litter can be held in place when needed; operating methods do not stress the system to the point of failure; rope commands are used to direct the operation; and potential problems are identified, communicated, and managed.
Enabling Learning Objectives 1. Describe application and use of lowering and mechanical advantage system in the high-
angle environment 2. Describe capabilities and limitations of various lowering and mechanical advantage
systems in a high-angle environment 3. Describe the use of tag lines for management of litter position during high-angle lowers
and raises 4. Describe litter positioning options (vertical and horizontal) 5. Identify personnel assignments 6. Identify operational commands 7. Direct operation 8. Use operational commands 9. Analyze system efficiency 10. Manage movement of the litter in a high-angle environment 11. Identify safety concerns in a high-angle environment 12. Perform a system safety check
Discussion Questions 1. What type of litter rig does your AHJ use? 2. What is the configuration for a high-angle litter bridle? 3. What are differences between the high-angle bridle setup and a low-angle bridle setup?
Activities 1. The instructor must create an activity directing students to operate and direct a litter-
lowering and litter-raising system in a high-angle environment. Instructor Notes
1. The instructor must discuss how these operations will be performed in a variety of environments, including environments with less equipment (e.g., rapid extraction module support[REMS]).
CTS Guide Reference: CTS 2-28
Topic 3-29: Selecting, Constructing, and Using Travel Restrictions Terminal Learning Objective
At the end of this topic, given life-safety rope and other auxiliary rope rescue equipment and an anchor system that meets the incident needs, the student will be able to select, construct, and use travel restriction for rescuers in a low-angle and a high-angle environment, so that the rescuer is restricted from falling.

[Short Course Title]
[Month Year] Page 38 of 45
Enabling Learning Objectives 1. Select an anchor 2. Construct an adjustable travel restriction system 3. Attach a rescuer to a travel restriction system 4. Use travel restriction in a low-angle and a high-angle environment
Discussion Questions 1. What are the considerations for a travel restriction system? 2. What are the components of a travel restriction system?
Activities 1. The instructor must create an activity directing students to select, construct, and use
travel restrictions in a low-angle and high-angle environment. Instructor Notes
1. Reference: California Code of Regulations, Title 8, Section 1670 Personal Fall Protection 2. Reference: California Code of Regulations, Title 8, Section 3270.1 Use of Rope Access
Equipment CTS Guide Reference: CTS 2-29
Topic 3-30: Constructing and Operating Ladder Rescue Systems Terminal Learning Objective At the end of this topic, given fire service ladders and rope rescue equipment, the student will be able to construct and operate systems to move patients from a low place to a high place, a high place to a low place, and across uneven terrain, so that the hazards are mitigated, the obstacles are negotiated, and the risks to the patient are minimized. Enabling Learning Objectives
1. Describe the components and operational functions of the seven ladder systems • Moving ladder slide • Ladder slide • Exterior leaning ladder • Interior leaning ladder • Cantilever ladder • Ladder gin • Ladder A frame
2. Describe the components and operational functions of the mechanical advantage system used in a ladder rescue system
3. Explain safety considerations for ladder rescue systems 4. Construct and operate ladder rescue systems
Discussion Questions 1. What are the different types of fire service ladders? 2. What are hazards associated with ladder rescue systems?

[Short Course Title]
[Month Year] Page 39 of 45
Activities 1. The instructor must create an activity directing students to construct all ladder systems
listed in ELO 1 and operate systems to move patients from a low place to a high place, a high place to a low place, and across uneven terrain.
Instructor Notes 1. None
CTS Guide Reference: CTS 2-30
Topic 3-31: Terminating a Technical Rescue Operation Terminal Learning Objective
At the end of this topic, given an incident scenario, assigned resources, and site safety data, the student will be able to terminate a technical rescue operation, so that rescuer risk and site safety are managed, scene security is maintained and custody transferred to a responsible party, personnel and resources are returned to a state of readiness, recordkeeping and documentation occur, and postevent analysis is conducted.
Enabling Learning Objectives 1. Identify incident command functions and resources 2. Describe hazard identification and risk management strategies 3. Describe logistics and resource management 4. Describe personnel accountability systems 5. Describe AHJ-specific procedures or protocols related to personnel rehab 6. Recognize hazards 7. Analyze risk 8. Use site control equipment and methods 9. Use data collection and management systems 10. Use asset and personnel tracking systems
Discussion Questions 1. What are the considerations for a personnel accountability report (PAR)? 2. What are the components of an after-action review? 3. What are hazards associated with terminating an incident, including equipment
breakdown and decontamination? Activities
1. The instructor must create an activity directing students to conduct a PAR, clean up, and take inventory.
Instructor Notes 1. The instructor should cover all relevant documentation.
CTS Guide Reference: CTS 2-31

[Short Course Title]
[Month Year] Page 40 of 45
Time Table
Segment Lecture Time
Activity Time
Total Unit Time
Unit 1: Introduction Topic 1-1: Orientation and Administration
Lecture 0:30 Activity 1-1: To be determined by instructor
0:00
Topic 1-2: [Certification Track] Certification Process
Lecture 0:30 Activity 1-2: To be determined by instructor
0:00
Unit 1 Totals 1:00 0:00 1:00 Unit 2: Rope Rescue Awareness Topic 2-1: Recognizing the Need for Support Resources
Lecture 0:15 Activity 2-1: To be determined by instructor
0:00
Topic 2-2: Recognizing Incident Hazards and Initiating Isolation Procedures
Lecture 0:15 Activity 2-2: To be determined by instructor
0:00
Topic 2-3: Recognizing Needed Resources for a Rescue Incident
Lecture 0:15 Activity 2-3: Recognizing Needed Resources for a Rescue Incident
0:15
Topic 2-4: Initiating a Discipline-Specific Search Lecture 0:15 Activity 2-4: To be determined by instructor
0:00
Topic 2-5: Performing Ground Support Operations for Helicopter Activities
Lecture 0:15

[Short Course Title]
[Month Year] Page 41 of 45
Segment Lecture Time
Activity Time
Total Unit Time
Activity 2-5: To be determined by instructor
0:00
Topic 2-6: Initiating Triage of Victims Lecture 0:15 Activity 2-6: To be determined by instructor
0:00
Topic 2-7: Assisting a Team in Operation of the Haul Line
Lecture 0:00 Activity 2-7: To be determined by instructor
0:15
Unit 2 Totals 1:30 0:30 2:00 Unit 3: Rope Rescue Operations Topic 3-1: Sizing Up a Rescue Incident
Lecture 0:15 Activity 3-1: To be determined by instructor
0:00
Topic 3-2: Inspecting and Maintaining PPE Lecture 0:15 Activity 3-2: Inspecting and Maintaining PPE
0:30
Topic 3-3: Inspecting and Maintaining Rescue Equipment
Lecture 0:30 Activity 3-3: To be determined by instructor
0:00
Topic 3-4: Demonstrating Knots, Bends, and Hitches
Lecture 0:15 Activity 3-4: Demonstrating Knots, Bends, and Hitches
0:45
Topic 3-5: Constructing a Single-Point Anchor System
Lecture 0:15 Activity 3-5: Constructing a Single-Point Anchor System
0:30
Topic 3-6: Constructing a Multiple-Point Anchor System
Lecture 0:15

[Short Course Title]
[Month Year] Page 42 of 45
Segment Lecture Time
Activity Time
Total Unit Time
Activity 3-6: Constructing a Multiple-Point Anchor System
0:30
Topic 3-7: Conducting a System Safety Check Lecture 0:15 Activity 3-7: Conducting a System Safety Check
0:15
Topic 3-8: Placing Edge Protection Lecture 0:15 Activity 3-8: To be determined by instructor
0:15
Topic 3-9: Constructing a Belay System Lecture 0:15 Activity 3-9: Constructing a Belay System 0:45
Topic 3-10: Operating a Belay System Lecture 0:15 Activity 3-10: Operating a Belay System 0:45
Topic 3-11: Belaying a Falling Load Lecture 0:15 Activity 3-11: Belaying a Falling Load 0:45
Topic 3-12: Constructing a Fixed Rope System Lecture 0:15 Activity 3-12: Constructing a Fixed Rope System
0:30
Topic 3-13: Ascending a Fixed Rope Lecture 0:15 Activity 3-13: Ascending a Fixed Rope 3:45
Topic 3-14: Descending a Fixed Rope Lecture 0:15 Activity 3-14: Descending a Fixed Rope 2:15
Topic 3-15: Escaping from a Malfunctioning Device
Lecture 0:15 Activity 3-15: Escaping from a Malfunctioning Device
0:30
Topic 3-16: Constructing a Lowering System Lecture 0:15

[Short Course Title]
[Month Year] Page 43 of 45
Segment Lecture Time
Activity Time
Total Unit Time
Activity 3-16: Constructing a Lowering System
0:30
Topic 3-17: Operating and Directing a Lowering and a Raising System
Lecture 0:15 Activity 3-17: Operating and Directing a Lowering and a Raising System
0:45
Topic 3-18: Constructing a Simple Rope Mechanical Advantage System
Lecture 0:15 Activity 3-18: Constructing a Simple Rope Mechanical Advantage System
0:30
Topic 3-19: Operating and Directing a Team in Operating a Simple Rope Mechanical Advantage System
Lecture 0:15 Activity 3-19: Operating and Directing a Team in Operating a Simple Rope Mechanical Advantage System
0:30
Topic 3-20: Constructing a Compound Rope Mechanical Advantage System
Lecture 0:15 Activity 3-20: Constructing a Compound Rope Mechanical Advantage System
0:30
Topic 3-21: Constructing a Complex Rope Mechanical Advantage System
Lecture 0:15 Activity 3-21: Constructing a Complex Rope Mechanical Advantage System
0:30
Topic 3-22: Operating and Directing the Operation of a Compound Rope Mechanical Advantage System
Lecture 0:15 Activity 3-22: Operating and Directing the Operation of a Compound Rope Mechanical Advantage System
0:30
Topic 3-23: Operating and Directing the Operation of a Complex Rope Mechanical Advantage System

[Short Course Title]
[Month Year] Page 44 of 45
Segment Lecture Time
Activity Time
Total Unit Time
Lecture 0:15 Activity 3-23: Operating and Directing the Operation of a Complex Rope Mechanical Advantage System
0:30
Topic 3-24: Negotiating an Edge While Attached to a Rope Rescue System
Lecture 0:30 Activity 3-24: Negotiating an Edge While Attached to a Rope Rescue System
1:30
Topic 3-25: Accessing, Assessing, Stabilizing, Packaging, and Transferring Victims
Lecture 0:30 Activity 3-25: Accessing, Assessing, Stabilizing, Packaging, and Transferring Victims
1:30
Topic 3-26: Operating and Directing a Litter-Lowering and Litter-Raising System in a Low-Angle Environment
Lecture 0:15 Activity 3-26: Operating and Directing a Litter-Lowering and Litter-Raising System in a Low-Angle Environment
0:45
Topic 3-27: Operating as a Litter Tender Lecture 0:30 Activity 3-27: Operating as a Litter Tender 1:30
Topic 3-28: Directing a Litter-Lowering or Litter-Raising Operation in a High-Angle Environment
Lecture 0:15 Activity 3-28: Directing a Litter-Lowering or Litter-Raising Operation in a High-Angle Environment
0:45
Topic 3-29: Selecting, Constructing, and Using Travel Restrictions
Lecture 0:15 Activity 3-29: Selecting, Constructing, and Using Travel Restrictions
0:45
Topic 3-30: Constructing and Operating Ladder Rescue Systems

[Short Course Title]
[Month Year] Page 45 of 45
Segment Lecture Time
Activity Time
Total Unit Time
Lecture 1:00 Activity 3-30: Constructing and Operating Ladder Rescue Systems
5:00
Topic 3-31: Terminating a Technical Rescue Operation
Lecture 0:15 Activity 3-31: Terminating a Technical Rescue Operation
0:15
Unit 3 Totals 9:00 28:00 36:00 Lecture, Activity, and Unit Totals: 11:30 28:30 39:00
Course Totals
Total Lecture Time (LT) 11:30 Total Activity Time (AT) 28:30 Total Testing Time (TT) 1:00 Total Course Time 40:00
[Short Course Title]
[Month Year] Page 1 of 21
Rope Rescue Technician Course Plan
Course Details
Certification: Rescue Technician
CTS Guide: Rescue Technician
Description: This course provides information on high-angle rescue, familiarizing participants with operation of simple, complex, and compound rope rescue systems in the high-angle environment.
Designed For: All fire service and allied emergency response personnel
Prerequisites: Rope Rescue Operations
Standard: Attend entire course. Complete all activities and any formative tests. Complete all summative tests with a minimum score of 80%.
Hours: Lecture: 7:45
Activities: 31:15
Testing: 1:00
Hours (Total): 40:00
Maximum Class Size: 24
Instructor Level: Primary
Instructor/Student Ratio: 24:1 lecture, 6:1 high-angle activities
Restrictions: Training site meets site requirements and equipment standards
SFT Designation: CFSTES

[Short Course Title]
[Month Year] Page 2 of 21
Required Resources
Instructor Resources To teach this course, instructors need:
• Manuals for artificial high-directionals • Rope Rescue Manual, current edition, CMC Rescue, Inc., ISBN: 978-009845878-5
(applies to 2017 edition) (available as hard copy, online, or as an app) • The Essential Technical Rescue Field Operations Guide (DRR), current edition, by Tom
Pendley, Desert Rescue Research, ISBN: 978-0-692-90153-3 (applies to 2017 edition) (available as hard copy, and app, or online)
• NFPA 1670, 1006, 1983, 1858
Online Instructor Resources The following instructor resources are available online at http://osfm.fire.ca.gov/training/instructorscorner.php:
• Operational checklist • California Code of Regulations, Title 8, Section 1670 Personal Fall Protection (dir.ca.gov) • California Code of Regulations, Title 8, Section 3270.1 Use of Rope Access Equipment
(dir.ca.gov) • Skills list
Student Resources To participate in this course, students need:
• Any textbooks selected by the instructor • Helmet, gloves, eye protection, and any other safety equipment required by the AHJ • Student materials such as paper, pens, pencils
To participate in this course, students may need:
• Knee pads Facilities and Equipment The following facilities are required to deliver this course:
• Structure, 20 feet minimum height with working roof that is of sound and safe engineering design
• Area to demonstrate and practice skills (rescue knots, rescue/victim packaging, anchors, and rope systems)

[Short Course Title]
[Month Year] Page 3 of 21
• All high angle evolutions performed in an environment in which the load is predominately supported by the rope rescue system
• A minimum vertical distance of 10 to 20 feet • A minimum required ascending distance of 10 to 20 feet • A minimum horizontal travel distance of 20 feet and vertical height of 20 feet measured
from the ground to loaded midspan is required for horizontal load movement activities • An obstacle to negotiate while ascending and descending • An obstacle to negotiate during lowering and raising operations • An edge problem to be negotiated during the litter tender activities
The following equipment is required to deliver this course: Note: All equipment must be NFPA compliant or purpose-designed (i.e., prusiks). Given changing technologies, instructor may choose to bring and demonstrate additional equipment or update these items with equipment that meets the same requirements.
Item Size
Description Number Notes Anchor plate 6
Anchor straps Optional Apparatus, fire (large) Large Optional
Backboard, long Optional Descent control device used by the AHJ 8
Carabiner (locking) 80 Commercial Class III harness (variety of
sizes)
12 Commercial victim seat harness 2
Commercial victim chest harness 2 Cord 8mm x 33' Optional
Edge protection
Based on Facility Needs
Edge protection can be manufactured (rope rollers, etc) or improvised (split fire hose, etc). There shall be adequate amounts of edge protection available for concurrent running scenarios.
Edge roller Optional
Ascenders 4
While Gibbs Ascenders™ are acceptable, handled ascenders are preferred.
Ladder 24'
Based on Facility
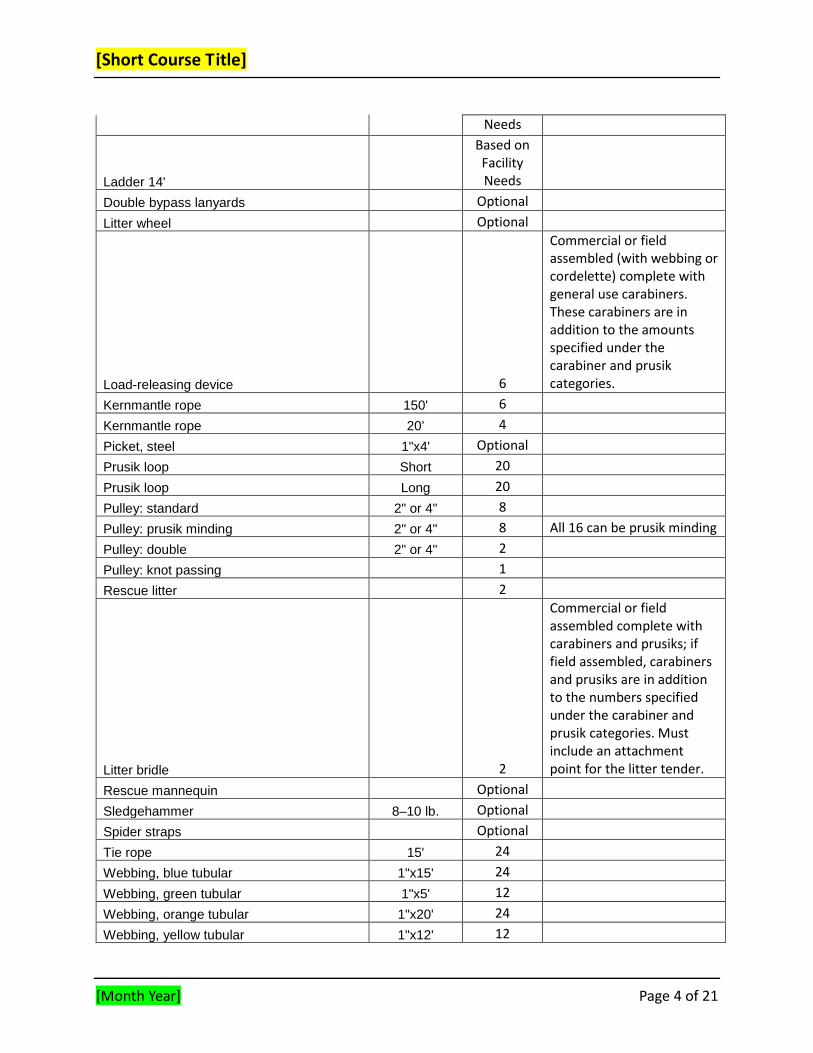
[Short Course Title]
[Month Year] Page 4 of 21
Needs
Ladder 14'
Based on Facility Needs
Double bypass lanyards Optional Litter wheel Optional
Load-releasing device 6
Commercial or field assembled (with webbing or cordelette) complete with general use carabiners. These carabiners are in addition to the amounts specified under the carabiner and prusik categories.
Kernmantle rope 150' 6 Kernmantle rope 20’ 4
Picket, steel 1"x4' Optional Prusik loop Short 20
Prusik loop Long 20 Pulley: standard 2" or 4" 8 Pulley: prusik minding 2" or 4" 8 All 16 can be prusik minding
Pulley: double 2" or 4" 2 Pulley: knot passing 1 Rescue litter 2
Litter bridle 2
Commercial or field assembled complete with carabiners and prusiks; if field assembled, carabiners and prusiks are in addition to the numbers specified under the carabiner and prusik categories. Must include an attachment point for the litter tender.
Rescue mannequin Optional Sledgehammer 8–10 lb. Optional
Spider straps Optional Tie rope 15' 24
Webbing, blue tubular 1"x15' 24 Webbing, green tubular 1"x5' 12 Webbing, orange tubular 1"x20' 24 Webbing, yellow tubular 1"x12' 12

[Short Course Title]
[Month Year] Page 5 of 21
Pick off strap 2
Etriers 2
Can be commercial or field assembled from one-inch tubular webbing.
Mini MA system Optional
Artificial high-directional 1
Can be a commercial or improvised high-directional made of 4x4 lumber. One artificial high-directional per station.
Swivels Optional

[Short Course Title]
[Month Year] Page 6 of 21
Unit 1: Introduction
Topic 1-1: Orientation and Administration Terminal Learning Objective
At the end of this topic, a student will be able to identify facility and classroom requirements and identify course objectives, events, requirements, assignments, activities, resources, evaluation methods, and participation requirements in the course syllabus.
Enabling Learning Objectives 1. Identify facility requirements
• Restroom locations • Food locations • Smoking locations • Emergency procedures
2. Identify classroom requirements • Start and end times • Breaks • Electronic device policies • Special needs and accommodations • Other requirements as applicable
3. Review course syllabus • Course objectives • Calendar of events • Course requirements • Student evaluation process • Assignments • Activities • Required student resources • Class participation requirements
Discussion Questions 1. What is a formative test? What is a summative test?
Activities 1. To be determined by the instructor.
Topic 1-2: Rescue Technician Certification Process Terminal Learning Objective
At the end of this topic, a student will be able to identify different levels in the Rescue Technician certification track, the courses and requirements for [Level #] certification, and be able to describe the capstone task book and testing process.
Enabling Learning Objectives 1. Identify the different levels of certification in the Rescue Technician certification track

[Short Course Title]
[Month Year] Page 7 of 21
• Rope Rescue Operations • Rope Rescue Technician • Structural Collapse Specialist I • Structural Collapse Specialist II
1. Identify the courses required for Rope Rescue Technician • Rope Rescue Operations
2. Identify any other requirements for Rope Rescue Operations 3. Describe the capstone task book process
• Complete all prerequisites and course work • Submit application and fees to request capstone task book • Complete all job performance requirements included in the task book • Must have identified evaluator verify individual task completion via signature • Must have Fire Chief or authorized representative verify task book completion via
signature • Must be employed by a California Fire Agency in the position prior to submitting
completed task book to State Fire Training 4. Describe the capstone testing process
• Complete course work • Schedule online capstone test • Schedule skills evaluation test
Discussion Questions 1. How many levels are there in the Rescue Technician certification track? What are they?
Activities 1. To be determined by the instructor.
Unit 2: Rope Rescue Technician
Topic 2-1: Evaluating a Scenario and Constructing Tensioned Anchor Systems Terminal Learning Objective
At the end of this topic, given a variety of scenarios, a rope rescue system, and a variety of materials from within the AHJ, a student will be able to evaluate the needs of the scenario and construct a variety of tensioned anchor systems.
Enabling Learning Objectives 1. Describe system safety factors, critical angles, and force multipliers for a variety of
tensioned anchor systems, such as: • Pretensioned back ties • Front ties • Focused floating anchors
2. Describe types of and uses for a variety of tensioned anchor systems 3. Construct a variety of tensioned anchors

[Short Course Title]
[Month Year] Page 8 of 21
Discussion Questions 1. What is the purpose of a focused floating anchor? 2. When might you need to use a pretensioned back tie? 3. Why would a back tie be pretensioned?
Activities 1. The instructor must create an activity directing students to construct a variety of
tensioned anchor systems and asses the safety factors, critical angles, and force multipliers.
Instructor Notes 1. The instructor should heavily emphasize anchor angles.
CTS Guide Reference: CTS 3-9
Topic 2-2: Ascending a Fixed Rope Terminal Learning Objective
At the end of this topic, given an anchored fixed rope system, a specified minimum distance for the rescuer, a system to allow ascent of a fixed rope, a structure, a belay system, a life safety harness worn by the person ascending, and PPE, the student will be able to ascend a fixed rope in a high-angle environment, so that the person ascending is secured to the fixed rope in a manner that will not allow him or her to fall; the person ascending is attached to the rope by means of an ascent control device(s) with at least two points of contact; injury to the person ascending is minimized; the person ascending can stop at any point on the fixed rope and rest suspended by his or her harness; the system will not be stressed to the point of failure; the person ascending can convert his or her ascending system to a descending system; obstacles are negotiated; the system is suitable for the site; and the objective is reached.
Enabling Learning Objectives 1. Identify task-specific selection criteria for life safety harnesses and systems for ascending
a fixed rope 2. Describe PPE selection criteria 3. Describe design and intended purpose of ascent control devices utilized 4. Explain rigging principles 5. Describe techniques for ascending in high-angle environments 6. Describe converting ascending systems to descending systems 7. Describe common hazards posed by harness use 8. Select and use harness, a system for ascending a fixed rope, and PPE for common
environments 9. Attach the rescuer to the rope rescue system 10. Configure ascent control devices to form a system for ascending a fixed rope 11. Make connections to the ascending system 12. Maneuver around existing environment and system-specific obstacles 13. Convert the ascending system to a descending system while suspended from the fixed
rope

[Short Course Title]
[Month Year] Page 9 of 21
14. Evaluate surroundings for potential hazards Discussion Questions
1. What ascending system(s) do(es) your AHJ use? 2. What methods are used in your AHJ to convert the ascending system to a descending
system? Activities
1. The instructor must create an activity directing students to ascend a minimuim required distance and negotiate obstacles in a high-angle environment.
Instructor Notes 1. The instructor must use contingency anchors on all fixed ropes. 2. The descent from this initial ascension does not meet the next standard. Students must
complete a separate descent as part of the next topic (Topic 2-3). CTS Guide Reference: CTS 2-13
Topic 2-3: Descending a Fixed Rope Terminal Learning Objective
At the end of this topic, given an anchored fixed-rope system, a specified minimum travel distance for the rescuer, a system to allow descent of a fixed rope, a belay system, a life safety harness worn by the person descending, and PPE, the student will be able to descend a fixed rope in a high-angle environment, so that the person descending is attached to the fixed rope in a manner that will not allow him or her to fall; the person descending is attached to the rope by means of a descent control device; the speed of descent is controlled; injury to the person descending is minimized; the person descending can stop at any point on the fixed rope and rest suspended by his or her harness; the system will not be stressed to the point of failure; the system is suitable for the site; and the objective is reached.
Enabling Learning Objectives 1. Identify task-specific selection criteria for life safety harnesses and systems for
descending a fixed rope 2. Describe PPE selection criteria 3. Describe the design, intended purpose, and operation of descent control devices utilized 4. Describe safe rigging principles and techniques for high-angle environments 5. Identify common hazards posed by harness use 6. Select and use harness, a system for descending a fixed rope, and PPE for common
environments 7. Attach the rescuer to the rope rescue system 8. Make attachment of the descent control device to the rope and life safety harness 9. Operate the descent control device 10. Maneuver around existing environment and system-specific obstacles 11. Evaluate surroundings for potential hazards

[Short Course Title]
[Month Year] Page 10 of 21
Discussion Questions 1. What descending system(s) do(es) your AHJ use? 2. What is the difference between an autostop descender and a manual descender?
Activities 1. The instructor must create an activity directing students to descend a minimum required
distance and negotiate obstacles in a high-angle environment. Instructor Notes
1. The instructor must use contingency anchors on all fixed ropes. 2. If the students have covered this topic at the operations level, it need not be retaught.
CTS Guide Reference: CTS 2-14
Topic 2-4: Escaping from a Malfunctioning Device Terminal Learning Objective
At the end of this topic, given an anchored fixed-rope system with a simulated malfunctioning descent control device, a system to allow escape from the malfunctioning device, a belay system, a life safety harness worn by the person descending, and PPE, the student will be able to demonstrate the ability to escape from a jammed or malfunctioning device during a fixed rope descent in a high-angle environment, so that the person descending is attached to the fixed rope in a manner that will not allow him or her to fall; the person descending is attached to the rope by means of a descent control device; the means for escape will allow the rescuer to escape either upward or downward from the malfunctioning descent control device; injury potential to the rescuer is minimized; the system will not be stressed to the point of failure; the system is suitable for the site; and the objective is reached.
Enabling Learning Objectives 1. Identify task-specific selection criteria for escape equipment and methods used for
escape from a malfunctioning descent control device 2. Identify PPE selection criteria 3. Describe the design, intended purpose, and operation of escape systems utilized 4. Explain rigging principles 5. Describe techniques for escaping a jammed device in high-angle environments 6. Describe common hazards posed by malfunctioning descent control devices 7. Select and use harness, a system for escaping a malfunctioning descent control device,
and PPE for common environments 8. Attach the rescuer to the rope rescue system 9. Make attachment of the descent control device to the rope and life safety harness 10. Attach and operate the escape system to remove the rescuer from the malfunctioning
descent control device while maintaining patent attachment to the fixed rope and belay 11. Use the escape system to maneuver upward or downward from the malfunctioning
descent control device 12. Evaluate surroundings for potential hazards

[Short Course Title]
[Month Year] Page 11 of 21
Discussion Questions 1. What is a possible cause of a jammed device? 2. What additional equipment is needed for self-rescue in this scenario?
Activities 1. The instructor must create an activity directing students to escape from a jammed or
malfunctioning device. Instructor Notes
1. The activity in this topic may be combined with other activities, such as descending. CTS Guide Reference: CTS 2-15
Topic 2-5: Evaluating a Scenario and Constructing and Employing a High-Directional Terminal Learning Objective
At the end of this topic, given a variety of scenarios, a rope rescue system, and a variety of materials from within the AHJ, a student will be able to evaluate the needs of the scenario and construct and employ a natural, structural, or artificial high-directional.
Enabling Learning Objectives 1. Describe types of and uses for high-directionals 2. Describe forces associated with high-directionals 3. Identify the type of high-directional needed for different scenarios 4. Construct and use a high-directional
Discussion Questions 1. What tools and materials could be used to construct a high-directional? 2. What is a resultant?
Activities 1. The instructor must create an activity directing students to construct a high-directional.
Instructor Notes 1. Refer to Rescue Techniques in the CMC Rope Rescue Manual. 2. Refer to the DRR section entitled Artificial High-Directional. 3. Refer to manuals for artificial high-directionals. 4. The instructor may choose to have a static display of a high-directional prior to the
activity, have the students deconstruct it, and then have them reconstruct their own. CTS Guide Reference: CTS 3-10
Topic 2-6 Directing a Team in Operating a Rope Rescue System to Remove a Stranded Victim Terminal Learning Objective
At the end of this topic, given a victim stranded on or clinging to a feature and a means of removal of the victim to the ground or other safe area, a student will be able to direct a team in the operation of a rope rescue system to remove a victim stranded on or clinging to a natural or manmade feature in a high-angle environment, so that risks to victims and rescuers are minimized, injury to the victim is minimized, the means of attachment to the

[Short Course Title]
[Month Year] Page 12 of 21
rope rescue system is maintained, and the victim is removed and brought to a safe area for transfer to EMS.
Enabling Learning Objectives 1. Describe system safety check protocol 2. Describe techniques and systems for safe transfer of stranded victims from a natural or
manmade feature 3. Describe various techniques for handling stranded victims without inducing a fall 4. Reduce hazards for rescuers and victims 5. Determine condition of the stranded victim 6. Select and construct systems for rapid removal of stranded victims from natural or
manmade features 7. Manage operation of the selected system 8. Determine specialized equipment needs for victim movement
Discussion Questions 1. What are the differences between a team-based and a rescuer-based pickoff? 2. Why would you choose one or the other? 3. What victim packaging options are used by your AHJ?
Activities 1. The instructor must create an activity having students perform a pickoff of a stranded or
clinging victim. Instructor Notes
1. None CTS Guide Reference: CTS 3-1
Topic 2-7: Directing a Team in Operating a Rope Rescue System to Remove a Suspended Victim Terminal Learning Objective
At the end of this topic, given a victim suspended by a harness attached to anchored rope or webbing, systems for removal of the victim from the rope or webbing, and a means of removal of the victim to the ground or other safe area, a student will be able to direct a team in the operation of a rope rescue system to remove a victim suspended from rope or webbing in a high-angle environment, so that risks to victims and rescuers are minimized, injury to the victim is minimized, the means of attachment to the rope rescue system is maintained, the victim is removed from the rope or webbing, and the victim is brought to a safe area for transfer to EMS.
Enabling Learning Objectives 1. Describe system safety check protocol 2. Describe techniques and systems for safe transfer of suspended victims from an existing
anchored rope or webbing to a rope rescue system 3. Identify various techniques for handling suspended victims 4. Describe principles of suspension-induced injuries

[Short Course Title]
[Month Year] Page 13 of 21
5. Reduce hazards for rescuers and victims 6. Determine condition of the suspended victim 7. Select and construct systems for rapid removal of victims from lanyards or rope or
webbing 8. Manage operation of the selected system 9. Determine specialized equipment needs for victim movement
Discussion Questions 1. What is suspension trauma? 2. What are the differences between a team-based and a rescuer-based pickoff? 3. Why would you choose one or the other?
Activities 1. The instructor must create an activity having students perform a pickoff of a suspended
victim. Instructor Notes
1. For safety reasons, do not leave a live simulated victim suspended for five minutes or longer.
CTS Guide Reference: CTS 3-2
Topic 2-8: Performing the Transfer and Movement of a Suspended Victim While Suspended Terminal Learning Objective
At the end of this topic, given a rope rescue system, a specified minimum travel distance for the victim, victim transfer systems, and specialized equipment necessary for the environment, while suspended from a rope rescue system a student will be able to perform the transfer and movement of a victim suspended from rope or webbing in a high-angle environment to a separate rope rescue lowering or raising system, so that risks to victims and rescuers are minimized; undesirable victim movement during the transfer is minimized; the means of attachment to the rope rescue system is maintained; the victim is removed from the static line and lowered or raised to a stable surface; victim positioning is managed to reduce adverse effects associated with suspension-induced injuries; selected specialized equipment facilitates efficient victim movement; and the victim can be transported to the local EMS provider.
Enabling Learning Objectives 1. Describe system safety check protocol 2. Identify task-specific selection criteria for victim transfer systems 3. Describe various physical and psychological victim management techniques 4. Select PPE 5. Identify design characteristics and intended purpose of various transfer systems 6. Describe rigging principles 7. Describe causes and effects of suspension-induced injuries 8. Identify methods to minimize common environmental hazards created in high-angle
environments

[Short Course Title]
[Month Year] Page 14 of 21
9. Reduce hazards for rescuers and victims 10. Choose victim transfer systems, select and use PPE 11. Perform a transfer of the victim from a static line to the lowering or raising system 12. Determine specialized equipment needs for victim movement
Discussion Questions 1. How can you transfer a victim to the rescue system without shockloading? 2. What are different methods of victim transfer?
Activities 1. The instructor must create an activity having students perform a transfer of and move a
suspended victim. Instructor Notes
1. This topic may be combined with the prior topic, Directing a Team in Operating a Rope Rescue System to Remove a Suspended Victim.
CTS Guide Reference: CTS 3-3
Topic 2-9: Performing the Activities of a Litter Tender in a High-Angle Operation Terminal Learning Objective
At the end of this topic, given a rope rescue system, a specified minimum travel distance for the litter and litter tender, life safety harnesses, litters, bridles, and specialized equipment necessary for the environment, a student will be able to perform the activities of a litter tender in a high-angle lowering or raising operation, so that risks to victims and rescuers are minimized, the means of attachment to the rope rescue system is secure, and the travel path is negotiated while minimizing risks to equipment or persons.
Enabling Learning Objectives 1. Describe system safety check protocol 2. Identify task-specific selection criteria for life safety harnesses 3. Select PPE 4. Describe variations in litter design and intended purpose 5. Describe high-angle litter attachment principles 6. Describe techniques and practices for high-angle environments 7. Describe common hazards imposed by the various structures and terrain 8. Select and use rescuer harness and PPE for common environments 9. Attach the life safety harness to the rope rescue system 10. Maneuver the litter past obstacles or natural structural features 11. Manage the litter while attached to the rope rescue system 12. Demonstrate tender’s vertical positioning independent of litter during transit 13. Evaluate surroundings for potential hazards
Discussion Questions 1. What methods can the litter tender use to attach to the litter? 2. Why might a litter tender be required?

[Short Course Title]
[Month Year] Page 15 of 21
Activities 1. The instructor must create an activity directing students to tend the litter, including
having them position themselves above and below the litter. Instructor Notes
1. The intent for ELO 11 is to ensure students demonstrate positioning themselves above and below the litter to negotiate obstacles or perform a litter scoop.
CTS Guide Reference: CTS 3-4
Topic 2-10: Participating as a Member of a Team in Constructing a Horizontal Rope Rescue System Terminal Learning Objective
At the end of this topic, given rescue personnel, life safety rope, rope rescue equipment, and a suitable anchor capable of supporting the load, a student will be able to participate as a member of a team in the construction of a rope rescue system intended to move a suspended rescue load along a horizontal path to avoid an obstacle, so that personnel assignments are made and clearly communicated; the system constructed can accommodate the load; tension applied within the system will not exceed the rated capacity of any of its components’ parts; a system safety check is performed; movement of the load is efficient; and loads can be held in place or moved with minimal effort over the required distance
Enabling Learning Objectives 1. Determine incident needs as related to operation of a system 2. Describe capabilities and limitations of various systems (including capacity ratings) 3. Describe methods for limiting excessive force to system components 4. Evaluate incident site as related to hazards and obstacle negotiation 5. Describe rigging principles 6. Describe system safety check protocol 7. Identify common personnel assignments and duties 8. Identify common and critical operational commands 9. Identify common problems and ways to minimize these problems during construction 10. Determine incident needs as related to construction of a system 11. Evaluate an incident site as related to hazards and setup 12. Identify the obstacles or voids to be negotiated 13. Select a system for defined task 14. Perform system safety checks 15. Use rigging principles that will limit excessive force to system components 16. Communicate with personnel
Discussion Questions 1. What are the different systems used for horizontal movement? 2. What does your AHJ use?
Activities 1. To be determined by instructor.

[Short Course Title]
[Month Year] Page 16 of 21
Instructor Notes 1. This topic is intended to include, but is not restricted to, systems such as high lines, two-
rope offsets, deflection, tracking, and guiding lines. 2. Activity 2-11 covers this topic and the next.
CTS Guide Reference: CTS 3-5
Topic 2-11: Directing a Team in Operating a Rope Rescue System to Move a Suspended Load Horizontally Terminal Learning Objective
At the end of this topic, given rescue personnel, an established system, a target for the load, a load to be moved, and PPE, a student will be able to direct a team in the operation of a rope system to move a suspended rescue load along a horizontal path, so that the movement is controlled; the load is held in place when needed; operating methods do not stress the system to the point of failure; personnel assignments are made; tasks are communicated; and potential problems are identified, communicated, and managed.
Enabling Learning Objectives 1. Determine incident needs as related to the operation of a system 2. Describe capabilities and limitations of various systems 3. Evaluate incident site as related to hazards and obstacle negotiation 4. Describe system safety check protocol 5. Describe procedures to evaluate system components for compromised integrity 6. Identify common personnel assignments and duties 7. Identify common and critical operational commands 8. Identify common problems and ways to minimize or manage those problems 9. Describe ways to increase the efficiency of load movement 10. Determine incident needs 11. Select personnel 12. Communicate with personnel 13. Evaluate system components for compromised integrity 14. Perform a system safety check 15. Manage movement of the load 16. Evaluate for any potential problems
Discussion Questions 1. What are some communication challenges in operating horizontal rope rescue systems? 2. How can forces change during the operation of a horizontal rope rescue system?
Activities 1. The instructor must create an activity directing students to construct a rope rescue
system and move a suspended rescue load along a horizontal path. Instructor Notes
1. The activity for this topic and the prior topic are combined into one. 2. The instructor must consider additional safety measures while operating a horizontal
rope rescue system. Refer to instructor resources.

[Short Course Title]
[Month Year] Page 17 of 21
CTS Guide Reference: CTS 1-6
Topic 2-12: Climbing and Traversing Using Climbing Aids Terminal Learning Objective
At the end of this topic, given a specified minimum travel distance, the equipment used by the agency and a task that reflects the anticipated rescue environment, a student will be able to climb and traverse natural features or manmade structures that require the use of climbing aids, positioning equipment, or fall prevention systems to prevent the fall or unwanted movement of the rescuer, so that the objective is achieved, the rescuer can perform the required task, and fall prevention is maintained.
Enabling Learning Objectives 1. Describe system safety check protocol 2. Describe application and limitations of climbing, positioning, and fall prevention
systems, including horizontal lifelines 3. Describe the fall factor for and risks associated with different systems used by the AHJ 4. Describe equipment used by the AHJ 5. Perform system safety checks 6. Climb vertical or near-vertical paths using the surfaces provided by the environment or
climbing aids used by the agency 7. Transition horizontally between structural elements and the rescue system 8. Use positioning equipment to support the weight of the rescuer in a vertical or near-
vertical environment permitting the rescuer to perform a task Discussion Questions
1. What climbing aids does your AHJ use? 2. What are some methods to reduce impact force during protected climbing?
Activities 1. The instructor must create an activity directing students to climb and traverse natural
features or manmade structures that require the use of climbing aids, positioning equipment, or fall prevention systems.
Instructor Notes 1. The line that students are climbing on must have the ability to lower the students to a
safe location in the event of an emergency. 2. Refer to NFPA 1006 (2017) 4.3.3 for information on ELO #7.
CTS Guide Reference: CTS 3-7
Topic 2-13: Interacting with a Person in Emotional or Psychological Crisis Terminal Learning Objective
At the end of this topic, given an environment consistent with the mission of the agency, the policies and procedures of the organization, and a person in a crisis scenario, a student will be able to interact with a person at height who is in an emotional or psychological crisis, so that the condition is recognized and communicated to the team, the rescuer is prevented from harm, and the actions of the rescuer do not escalate the incident.

[Short Course Title]
[Month Year] Page 18 of 21
Enabling Learning Objectives 1. Describe system safety check protocol 2. Describe indicators of a person in emotional crisis 3. Identify typical triggers that can cause individuals to become agitated or anxious 4. Describe methods of interacting to prevent harm to the rescuer and the subject 5. Identify best practices to deescalate incidents involving persons in crisis 6. Describe crisis-intervention resources of the AHJ 7. Perform system safety checks 8. Methods of approach that minimize the risk to the rescuer from subjects whose
psychological or emotional state is unknown 9. Interview techniques that provide insight to the motives and state of mind of the subject 10. Communicating and interacting with the subject in a manner that does not escalate the
incident Discussion Questions
1. What are your AHJ’s protocols for managing emotional or psychological crises? 2. What are some local or national resources for dealing with emotional or psychological
crises? Activities
1. To be determined by the instructor. Instructor Notes
1. Focus on minimizing risk to responders and the AHJ’s resources and protocols. 2. This is a good time to discuss fall factors and ensuring your system is appropriate for the
situation. 3. Instructor may refer to:
• National Alliance of Mental Illness “How to Help Someone in Crisis”: https://www.nami.org/Blogs/NAMI-Blog/September-2017/How-to-Help-Someone-in-Crisis
• Suicide Prevention Resource Center: https://www.sprc.org/settings/first-responders • SAMHSA “Psychological First Aid for First Responders”:
https://store.samhsa.gov/system/files/nmh05-0210.pdf CTS Guide Reference: CTS 3-8

[Short Course Title]
[Month Year] Page 19 of 21
Time Table
Segment Lecture Time
Activity Time
Total Unit Time
Unit 1: Introduction Topic 1-1: Orientation and Administration
Lecture 0:30 Activity 1-1: To be determined by instructor
0:00
Topic 1-2: Rescue Technician Certification Process
Lecture 0:30 Activity 1-2: To be determined by instructor
0:00
Unit 1 Totals 1:00 0:00 1:00 Unit 2: [Unit Title] Topic 2-1: Evaluating a Scenario and Constructing Tensioned Anchor Systems
Lecture 0:15 Activity 2-1: Constructing and Assessing Tensioned Anchor Systems
1:45
Topic 2-2: Ascending a Fixed Rope Lecture 0:15 Activity 2-2: Ascending a Fixed Rope 3:45
Topic 2-3: Descending a Fixed Rope Lecture 0:15 Activity 2-3: Descending a Fixed Rope 2:15
Topic 2-4: Escaping from a Malfunctioning Device
Lecture 0:15 Activity 2-4: Escaping from a Malfunctioning Device
2:45
Topic 2-5: Evaluating a Scenario and Constructing and Employing a High-Directional
Lecture 1:00 Activity 2-5: Constructing a High-Directional
3:00
Topic 2-6: Directing a Team in Operating a Rope Rescue System to Remove a Stranded Victim

[Short Course Title]
[Month Year] Page 20 of 21
Segment Lecture Time
Activity Time
Total Unit Time
Lecture 0:15 Activity 2-6: Performing a Pickoff of a Stranded Victim
2:00
Topic 2-7: Directing a Team in Operating a Rope Rescue System to Remove a Suspended Victim
Lecture 0:15 Activity 2-7: Performing a Pickoff of a Suspended Victim
2:00
Topic 2-8: Performing the Transfer and Movement of a Suspended Victim While Suspended
Lecture 0:15 Activity 2-8: Transferring and Moving a Suspended Victim
1:15
Topic 2-9: Performing the Activities of a Litter Tender in a High-Angle Operation
Lecture 0:30 Activity 2-9: Tending the Litter 3:30
Topic 2-10: Participating as a Member of a Team in Constructing a Horizontal Rope Rescue System
Lecture 1:00 Activity 2-10: To be determined by instructor.
0:00
Topic 2-11: Directing a Team in Operating a Rope Rescue System to Move a Suspended Load Horizontally
Lecture 1:00 Activity 2-11: Constructing a System and Moving a Suspended Load
6:00
Topic 2-12: Climbing, Ascending, Descending, and Traversing Using Climbing Aids
Lecture 1:00 Activity 2-12: Climbing, Ascending, Descending, and Traversing Using Climbing Aids
3:00
Topic 2-13: Interacting with a Person in Emotional or Psychological Crisis
Lecture 0:30

[Short Course Title]
[Month Year] Page 21 of 21
Segment Lecture Time
Activity Time
Total Unit Time
Activity 2-13: To be determined by instructor
0:00
Unit 3 Totals 6:45 31:15 38:00 Lecture, Activity, and Unit Totals: 7:45 31:15 39:00
Course Totals
Total Lecture Time (LT) 7:45 Total Activity Time (AT) 31:15 Total Testing Time (TT) 1:00 Total Course Time 40:00