Embed Size (px)
Citation preview
YOUR SUPPLIER
ADVANCED TRAILER SPARESPTY LTD
Unit 4/71 Beenleigh RoadCoopers Plains Qld 4108
PO Box 762Archerfield Qld 4108
Phone: 07 3345 7144Fax: 07 3345 4021
OWNERS MANUAL
ADVANCED TRAILER SPARESPTY LTD
Unit 4/71 Beenleigh RoadCoopers Plains Qld 4108
PO Box 762Archerfield Qld 4108
Phone: 07 3345 7144Fax: 07 3345 4021
WINCH OPERATION MANUAL
24
NOTES
WINCH OPERATION MANUAL
CONTENTS
Before Use 3
Fitting Instructions – PTO 4
Fitting Instructions – PTO CABLE 6
Fitting Instructions – WINCH FRAME 7
Fitting Instructions – DRIVE LINE 8
Fitting Instructions – WINCH ROPE 9
Operating Instructions 10
Maintenance 13
Safety Tips 14
T8000 Winch Parts List 16
T8000 Winch Diagram 17
Worm Brake Parts List 18
Worm Brake Option Diagram 19
T8000 Driveline Parts List xx
T8000 Driveline Diagram xx
PTO Parts List xx
PTO Option Diagram xx
1

WINCH OPERATION MANUAL
23
PTO 6BDT
W4358
W167
W47W660W144W48
A2002
W4363W4367W174
W84
W84
W1428W174
A2001
W668
W1430W174
W305 W430
W174W1428
W805W154
W4367
W213/40
W4364
W4368
W4360
W84W4363
W4361
W4362
W174
W4366W174
W4365
W4363
WINCH OPERATION MANUAL
WARNING
BEFORE OPERATION
Make sure to FILL the Worm Box with oil until the oil reaches the sidebung.
OIL TYPE: 80W90 OR 80W145OIL LEVEL TO BE CHECKED EVERY 10,000 KLMOIL TO BE CHANGED AT 12 MONTH INTERVALS
IMPORTANT
This winch is manufactured in compliance with the AustralianStandards of the Hoist and Crane Code 1418, and therefore musthave the DLI tag attached in plain view on the winch, frame or bar.
WARNING (DO NOT USE FOR THE MOVING OF PEOPLE)
NOTICE
ROPE REPLACEMENT
In the event of the rope being damaged, please refer to the DLI tagfor the contact phone number of your supplier.Ref. part number W94-50METAS1418
2

WINCH OPERATION MANUAL
22
T8000 DRIVELINE PARTS LIST
WINCH OPERATION MANUAL
FITTING INSTRUCTIONSTOYOTA HZJ 79R
P.T.O.
6 or 8 of the hexagonal head bolts used for retaining the PTO coverplate may be reused to mount the PTO onto the transfer base.
The PTO should be fitted as follows:
1. Remove the speedo cable support bracket and replace the bolt.
2. Fit the small key into the keyway on the output shaft of PTO andcheck the backlash already present in the PTO by holding theidler gear and rotating the output shaft.
3. Undo the bolts holding the PTO cover plate and remove thecover. A small amount of oil may seep out as the cover isremoved.
4. Put the PTO in the engaged position – (selector rod pushed intothe housing) and offer the PTO up to the opening. Hold it inposition with two of the cover bolts. Use one top and one bottombolt position. Do NOT tighten the bolts, but screw on justsufficiently to hold the PTO gear against the gearbox gear.
5. Check the gap width (if any) between the transfer case housingand the PTO housing.
6. Use gaskets supplied and select gasket combinations to equal orbe over the calculated thickness.
7. Remove the PTO from the transfer case. Fill PTO with 300mls oftransmission oil, add the appropriate gaskets. Refit onto thetransfer case.
8. When the PTO is mounted place the slider universal jointassembly onto the PTO output shaft (the smaller keyed yoke fitsonto the PTO) and check the backlash between the PTO and thetransfer case by rotating the universal joint assembly. Note thatthere are two backlash settings that will be sensed.
3

WINCH OPERATION MANUAL
21
WINCH OPERATION MANUAL
9. Move the selector lever to the disengaged position and back tothe engaged position a number of times to ensure that the PTOis not too tightly in mesh with the transfer case.
FITTING INSTRUCTIONS
P.T.O CONTROL CABLE
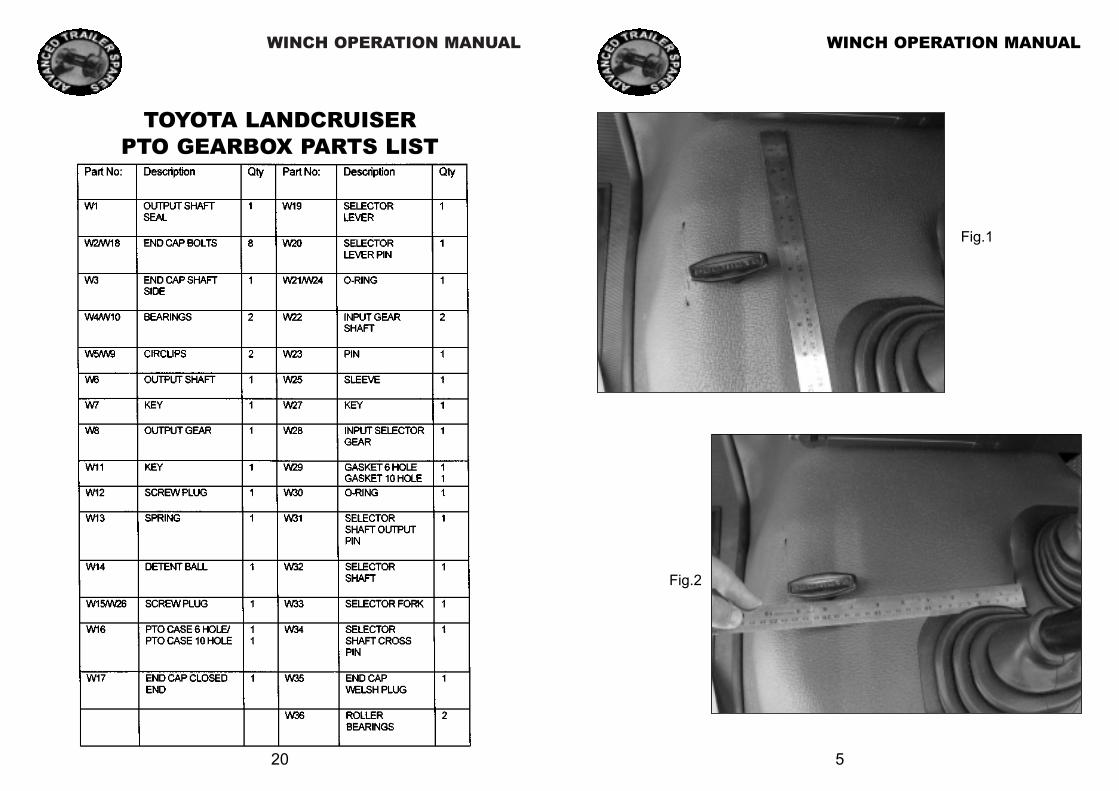
1. Drill a 1/2” hole approximately 6 inches to the rear of the airconditioning duct (between the transfer case lever and shift lever)see Fig.1 and 8” from the side of transfer shift boot cover to the leftpassenger side see Fig.2. Insert the cable and lock in placethrough the floor. Lock other end of cable into clamp on PTO.
2. REFER TO FIG 1 & FIG 2 (see over)
3. With the PTO lever (under the vehicle) in the disengagedposition (rearwards) and the engaging knob on the control fullydepressed, lock the cable to the selector lever of the PTO.
4. To check the correct positioning of the PTO Cable, depress thehandle fully and turn the universal by hand. If correctly adjustedthe Universal should rotate freely.
4
WINCH OPERATION MANUAL
20
TOYOTA LANDCRUISER PTO GEARBOX PARTS LIST
WINCH OPERATION MANUAL
5
Fig.1
Fig.2

WINCH OPERATION MANUAL
WORM BRAKE OPTION
19
W10
9
W73
5
W73
4
W48
W89
W14
9
W72
6
W72
4
W72
3
W72
2
W72
1
W72
0
W40
W71
8
W71
9W
717
W71
1
W84
W32
0
WO
RM
BR
AK
E O
PT
ION
WINCH OPERATION MANUAL
FITTING INSTRUCTIONSTOYOTA WINCH FRAME
1. Remove 4 only 10 mm bolts securing the bumper bar mountingbrackets to the chassis. Remove bumper bar.
2. Fit the winch and frame onto the chassis.
3. Securing frame by 2 only 1/2” UNF X 5’’ long bolts, nuts andwashers through the top of the chassis rail. (drill out hole with 1/2”drill for clearance)
4. Secure the sides of the winch frame to the chassis rails with M10x 30m long bolts and harden washers supplied to existing capturednuts.
6
M10x30
1/2”x5”

WINCH OPERATION MANUAL
WORM BRAKE PARTS LIST
18
WINCH OPERATION MANUAL
FITTING INSTRUCTIONSDRIVE LINE
1. Fit the rear slider uni Joint and shaft assembly to the output shaft on the power take off unit. Refer Figure 3 & Figure 4.
2. Slide shaft back into uni so that bearing bracket can be fitted to existing captured nuts in chassis. Use 8mm X 30mm bolts and washers supplied. Remove bolt holding breather pipe rear of engine mount and secure bracket A.
3. Remove front splash guard and remove tow bracket on passenger side. Slide mid-shaft onto rear shaft at bracket A. Position bearing bracket B, to captured nuts in chassis using 8mm X 30mm bolts supplied. Position bracket between the
7
FRONTREAR Fig.3
BREATHER PIPEBRACKET
BRACKET B BRACKET A

WINCH OPERATION MANUAL
17
W65
W55
W56
W58
W60
W59
W65
W64
W93
W65
W70
W77
W75
W76
W65
W88
W87
W81
W88
W73
W32
0
W22
22
W75
W79
W80
W76
W78
W86
W89
W67
W85 W65
W72
W68
W62 W
61
W57
W66
W16
49
W69
W71
W4
41
B
WINCH OPERATION MANUAL
front of engine mount and back of cross member suspension strut. Connect front shaft between bracket B and mod shaft, mounted on winch frame. ** NOTE: prior to fitting front shaft, reposition power steering pipes to allow clearance.
4. Adjust driveline to ensure adequate clearance. Secure all brackets and bolts, ensure grub screws and bearing retaining screws are tight, adjust chain assembly and lock into position. Grease all yokes, slider and chain assembly.
8
FRONT
UP
Fig.4
OUTPUT SHAFT PTO
BRACKET A
REAR SHAFT
FRONT SHAFTMID SHAFT
BRACKET B
SLIDER UNI
MOD SHAFT
WINCH OPERATION MANUAL
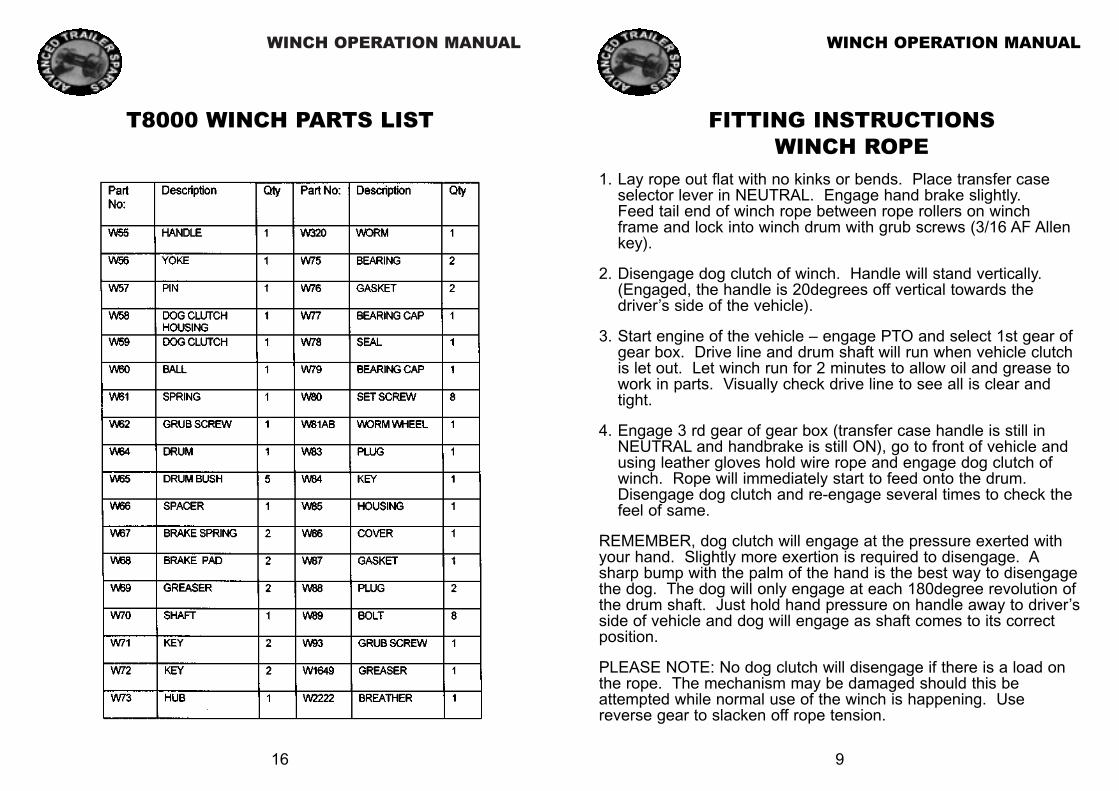
T8000 WINCH PARTS LIST
16
WINCH OPERATION MANUAL
FITTING INSTRUCTIONSWINCH ROPE
1. Lay rope out flat with no kinks or bends. Place transfer case selector lever in NEUTRAL. Engage hand brake slightly. Feed tail end of winch rope between rope rollers on winch frame and lock into winch drum with grub screws (3/16 AF Allen key).
2. Disengage dog clutch of winch. Handle will stand vertically. (Engaged, the handle is 20degrees off vertical towards the driver’s side of the vehicle).
3. Start engine of the vehicle – engage PTO and select 1st gear of gear box. Drive line and drum shaft will run when vehicle clutch is let out. Let winch run for 2 minutes to allow oil and grease to work in parts. Visually check drive line to see all is clear and tight.
4. Engage 3 rd gear of gear box (transfer case handle is still in NEUTRAL and handbrake is still ON), go to front of vehicle and using leather gloves hold wire rope and engage dog clutch of winch. Rope will immediately start to feed onto the drum. Disengage dog clutch and re-engage several times to check the feel of same.
REMEMBER, dog clutch will engage at the pressure exerted withyour hand. Slightly more exertion is required to disengage. Asharp bump with the palm of the hand is the best way to disengagethe dog. The dog will only engage at each 180degree revolution ofthe drum shaft. Just hold hand pressure on handle away to driver’sside of vehicle and dog will engage as shaft comes to its correctposition.
PLEASE NOTE: No dog clutch will disengage if there is a load onthe rope. The mechanism may be damaged should this beattempted while normal use of the winch is happening. Usereverse gear to slacken off rope tension.
9

WINCH OPERATION MANUAL
floor carpet or other heavy material over the cable about 5-6metres from the hook. This will slow any snap-back shouldthe cable break and may save someone from serious injury.
◆ EVEN SPOOLING of the cable is not critical to the winch’soperations. Do not worry about an even layer whilewinching, unless you get a bunching-up at one end of thedrum. You can re-spool after the job is done.
◆ ANCHOR POINTS should be located as near as possible tothe extended centre line to the front of the vehicle.
◆ ALWAYS CARRY extra cable hardware and a suitableanchor for use in open areas.
◆ A MINIMUM of 6 wraps of the cable around the drum isrequired to hold the rated load.
◆ A SNATCH BLOCK should be used to reduce the stress onthe cable and winch in high load situations.
◆ VEHICLE POWER can be used to assist the winch, but donot over take the winch cable.
◆ STAY OUT of and away from the vehicle while winching inhazardous areas.
◆ SLINGS SHOULD always be used around the anchor point.NEVER loop the winch rope around onto itself as this willcause irrepairable damage.
◆ ALWAYS LOCATE sling as near as possible to ground levelas this gives maximum load bearing capacity.
◆ NEVER USE a sling on a living tree. Use a suitable fabricstrap. Wire rope slings will ringbark the tree and cause it todie.
15
WINCH OPERATION MANUAL
5. Now wind rope as evenly and tightly as possible.
Be careful not to get your hands caught. If this should occur, quickly disengage dog clutch, either by hitting the handle toward the centre of the vehicle or by the person in the cab instantly depressing the vehicle’s clutch.
6. When the end of the rope is approximately 12” away from the rope roller guide. (1) Depress the vehicle’s clutch peddle (2) Disengage PTO by pressing down on the PTO control knob so that the drive line shaft will no longer turn. (3) Disengaged the dog clutch.
7. Wind the drum by hand until the thimble at the end of the rope ispast the rollers.NOTE :Damage will be caused to your winch frame, should you accidentally engage your PTO .Tie the shackle after it has been secured to the thimble of the rope, to the top roller by a zip tie.
10

WINCH OPERATION MANUAL
SAFETY TIPS
As with all machinery, there is potential danger in winchingoperations, but there is very little to be afraid of if the basic dangersare recognised and reasonable care is taken.
The following safety tips will help ensure that you can use yourwinch successfully every time. REMEMBER never operate outsidethe ratings recommended on the DLI TAG.
◆ ALWAYS FIT DOG CLUTCH LOCK PIN WHEN ENGAGING or DISENGAGE the dog clutch. Failure to do so may result in your vehicle and/or winch being heavily damaged.
◆ KEEP CLEAR of the winch cable at all times during pulling. Ensure that everyone remains at a safe distance to either side of the cable.
◆ DO NOT STEP over or near a winch cable under tension unless you are protected by an adequate shield.
◆ USE GLOVES or a heavy rag to protect your hands from burns when handling a winch cable.
◆ DO NOT guide by hand a winch cable which is undertension.
◆ PLACE BLOCKS under the wheels of vehicle if on a slope.
◆ DO NOT USE winch cable as a tow rope or move the vehicleto pull a load on the winch. The cable is sure to break.
◆ REPLACE DAMAGED CABLES IMMEDIATELY.
◆ WHEN PULLING a heavy load where there is even theremotest chance of cable failure, place a tarpaulin, blanket,
14
WINCH OPERATION MANUAL
OPERATING INSTRUCTIONS
WE SUGGEST YOU ADOPT THE FOLLOWING WINCHPROCEDURE
1. Switch vehicle engine OFF
2. Go to front of vehicle and check that the winch dog clutch handleis in the vertical position (disengaged). Draw winch rope off drum and using the shackle supplied, fix end of rope to anchor point.
DO NOT run your winch rope around the anchor point and shackle the end of the winch rope back onto the rope You will ruin your winch rope almost immediately, You should wrap a sling to the shackle and the end of the winch rope.
3. Go back to the winch and turn the drum by hand till the dog clutch engages. REMEMBER the clutch will only engage at each 180 degree turn of the drum. Ensure that the dog clutch is fully engaged.
4. Look along where your winch rope is laying to check that the rope will not foul or catch etc, when winching is to start.
5. Go back to the cabin of the vehicle, sit in the driver’s seat and place the vehicle transfer case lever in to NEUTRAL position.
6. Start vehicle engine, depress vehicle clutch, and engage low gear in main gear box.
7. Engage winch PTO lever. It may be necessary to ease the vehicle clutch out a fraction to allow for alignment of engaging mechanism (as in non-synchromesh gear boxes).
8. By releasing the vehicle clutch in cabin, winch rope will now windonto the drum. Take up the slack slowly and carefully.
9. For even rope winding onto drum, vehicle should be gently steered from side to side, observing that the rope lies as evenly
11

WINCH OPERATION MANUAL
MAINTENANCE
A winch, like other types of machinery, needs to have regularmaintenance if it is to perform properly, give lasting value andprovide safe winching. Good maintenance consists of a dailyinspection and periodic servicing.
Each day or prior to each use, due to dusty and wet conditionsthe following should be inspected and adjusted if necessary:
◆ Check all drive line components for alignment and tightmounting.
◆ Check the cable for excessive wear or broken strands.
◆ Check the dog clutch to make sure it is fully engaging whenshifted in. Check safety lock pin is operational.
◆ Once a week or after every 10hrs of operation, the followingtasks should be performed for proper maintenance of yourwinch:
◆ Lube all bushing which are equipped with grease nippleswith a good quality lithium-based grease, Adjust chain drive ifloose and grease.
◆ Grease drive line and shear pin, check seals at winch andpto for any damage if so replace.
◆ Inspect the oil level in the winch gearbox and add lubricant ifnecessary. (ie 80W90)
◆ Inspect cable for broken strands or other damage. If so,replace.
◆ Every 12 months, the wormbox should be drained and filledwith new, clean gear lubricant.
The T8000 winch kit is in our opinion, one of the finest vehiclewinches produced. With care and correct maintenance it willgive you years of trouble free service.
13
WINCH OPERATION MANUAL
as practical. Sharp crossovers must be avoided if possible as these will damage your rope.
10.The renowned T8000 mechanical winch will hold all loads (up tothe breaking point of either the wire rope or shear pin ), even with the vehicle clutch depressed – so winching may be stopped at any time with safety; even up or down the steepest gradients.
Remember, however, when attempting winching operations whichmay be dangerous…..
Ensure that your winch dog clutch is fully engaged and DOGCLUTCH LOCK PIN IN PLACE . That your winch is in first classworking order and has been maintained properly. We stronglyrecommend that you have our Heavy Duty Snatch Block in yourvehicle. To lessen the load on both your winch and the winch ropeyou should always use the Snatch Block (2 part line halves theload), when attempting winch recovery, steep gradients or boggedbeyond your chassis, or any other severe winching operations.
AFTER WINCHING HAS FINISHED
Wind rope onto the drum. NOTE check for any damage,
If damage is visible replace rope before use.
Disengage winch dog clutch (handle vertical)
Zip tie your winch rope to top horizontal roller or any other place you prefer, and most important DISENGAGE your PTO lever IMMEDIATELY when you return to the vehicle cabin.
We recommend that the dog clutch of your winch be disengagedwhen travelling (to avoid serious damage should the PTO be accidentally engaged in the cabin).
Care should be taken to ensure that the rope will not unravel from the drum when travelling along rough roads.
12