Embed Size (px)
Citation preview

SOFT
WA
RE
PART NUMBER
313473304VERSION NUMBER
5.4
ASMApplication Storage Manager TM
DATA MANAGER GETTING STARTED GUIDE For Windows
PROD
UCT
TYPE
EDITION NUMBER
2


Application StorageManager™ (ASM)
Data ManagerGetting Started Guide
Version 5.4
Second Edition
PN 313473304

Second EditionStorageTek Proprietary
Information contained in this publication is subject to change without notice. Comments concerning the contents of this publication should be directed to:
Global Learning SolutionsStorage Technology CorporationOne StorageTek DriveLouisville, CO 80028-3256USA
Limitations on Warranties and Liability
Storage Technology Corporation cannot accept any responsibility for your use of the information in this document or for your use in any associated software program. You are responsible for backing up your data. You should be careful to ensure that your use of the information complies with all applicable laws, rules, and regulations of the jurisdictions in which it is used.
Warning: No part or portion of this document may be reproduced in any manner or in any form without the written permission of Storage Technology Corporation.
Restricted Rights
Use, duplication, or disclosure by the U.S. Government is subject to restrictions as set forth in subparagraph (c) (1) and (2) of the Commercial Computer Software - Restricted Rights at FAR 52.227-19 (June 1987), as applicable.
Export Destination Control Statement
These commodities, technology or software were exported from the United States in accordance with the Export Administration Regulations. Diversion contrary to U.S. law is prohibited.
Second Edition (August 2003)
StorageTek, the StorageTek logo, Application Storage Manager (ASM), and Email Content Manager (ECM) are trademarks or registered trademarks of Storage Technology Corporation. Other products and names mentioned herein are for identification purposes only and may be trademarks of their respective companies.
©2003 by Storage Technology Corporation. All rights reserved.
Information Control The information in this document, including any associated software program, may not be reproduced, disclosed or distributed in any manner without the written consent of Storage Technology Corporation.
Should this publication be found, please return it to StorageTek, One StorageTek Drive, Louisville, CO 80028-5214, USA. Postage is guaranteed.

PN 313473304 Second Edition iStorageTek Proprietary
Table of Contents
List of Tables . . . . . . . . . . . . . . . . . . . . . . . . . . . . . . . . . . . . . . . . . . . . . . . . . . . . . .v
Preface . . . . . . . . . . . . . . . . . . . . . . . . . . . . . . . . . . . . . . . . . . . . . . . . . . . . . . . . . .viiChapter Summary . . . . . . . . . . . . . . . . . . . . . . . . . . . . . . . . . . . . . . . . . . . . . . . . . . . . . viiiRelated Documentation . . . . . . . . . . . . . . . . . . . . . . . . . . . . . . . . . . . . . . . . . . . . . . . . . .ixOnline Help . . . . . . . . . . . . . . . . . . . . . . . . . . . . . . . . . . . . . . . . . . . . . . . . . . . . . . . . . . .ixDocumentation Conventions . . . . . . . . . . . . . . . . . . . . . . . . . . . . . . . . . . . . . . . . . . . . . . x
1: Introduction . . . . . . . . . . . . . . . . . . . . . . . . . . . . . . . . . . . . . . . . . . . . . . . . . . . . .1An ASM Glossary . . . . . . . . . . . . . . . . . . . . . . . . . . . . . . . . . . . . . . . . . . . . . . . . . . . . . . . 2ASM Components . . . . . . . . . . . . . . . . . . . . . . . . . . . . . . . . . . . . . . . . . . . . . . . . . . . . . . 7
Data Manager . . . . . . . . . . . . . . . . . . . . . . . . . . . . . . . . . . . . . . . . . . . . . . . . . . . . . . 7MediaStor . . . . . . . . . . . . . . . . . . . . . . . . . . . . . . . . . . . . . . . . . . . . . . . . . . . . . . . . . 10ASM License Server . . . . . . . . . . . . . . . . . . . . . . . . . . . . . . . . . . . . . . . . . . . . . . . . 10Command Line Utilities . . . . . . . . . . . . . . . . . . . . . . . . . . . . . . . . . . . . . . . . . . . . . . 10
ASM’s Distributed Storage Model . . . . . . . . . . . . . . . . . . . . . . . . . . . . . . . . . . . . . . . . . 10Data Manager Concepts . . . . . . . . . . . . . . . . . . . . . . . . . . . . . . . . . . . . . . . . . . . . . . . . 12
Storage Media and Media Services . . . . . . . . . . . . . . . . . . . . . . . . . . . . . . . . . . . . . 12Extended Drives . . . . . . . . . . . . . . . . . . . . . . . . . . . . . . . . . . . . . . . . . . . . . . . . . . . . 14Data Manager System Management . . . . . . . . . . . . . . . . . . . . . . . . . . . . . . . . . . . . 18
2: Planning Your Data Manager System . . . . . . . . . . . . . . . . . . . . . . . . . . . . . . .21System Requirements . . . . . . . . . . . . . . . . . . . . . . . . . . . . . . . . . . . . . . . . . . . . . . . . . . 22
Operating System Requirements . . . . . . . . . . . . . . . . . . . . . . . . . . . . . . . . . . . . . . . 22Data Manager Computer Specifications . . . . . . . . . . . . . . . . . . . . . . . . . . . . . . . . . . 23Planning Your Extended Drive(s) . . . . . . . . . . . . . . . . . . . . . . . . . . . . . . . . . . . . . . . 23Sizing Your Extended Drive . . . . . . . . . . . . . . . . . . . . . . . . . . . . . . . . . . . . . . . . . . . 24
Client Connectivity . . . . . . . . . . . . . . . . . . . . . . . . . . . . . . . . . . . . . . . . . . . . . . . . . . . . . 27File Stream Support . . . . . . . . . . . . . . . . . . . . . . . . . . . . . . . . . . . . . . . . . . . . . . . . . 27Client File System Support . . . . . . . . . . . . . . . . . . . . . . . . . . . . . . . . . . . . . . . . . . . . 28
Storage Media Considerations . . . . . . . . . . . . . . . . . . . . . . . . . . . . . . . . . . . . . . . . . . . . 28Types of Media . . . . . . . . . . . . . . . . . . . . . . . . . . . . . . . . . . . . . . . . . . . . . . . . . . . . . 29Types of Media File Systems . . . . . . . . . . . . . . . . . . . . . . . . . . . . . . . . . . . . . . . . . . 33Media Transaction Logging . . . . . . . . . . . . . . . . . . . . . . . . . . . . . . . . . . . . . . . . . . . 38Flushing Transactions to Media . . . . . . . . . . . . . . . . . . . . . . . . . . . . . . . . . . . . . . . . 40
Windows NT/2000 Security . . . . . . . . . . . . . . . . . . . . . . . . . . . . . . . . . . . . . . . . . . . . . . 41Checking Administrative Group Membership . . . . . . . . . . . . . . . . . . . . . . . . . . . . . . 42

Table of Contents
ii Second Edition PN 313473304StorageTek Proprietary
Adding Users to Administration Groups . . . . . . . . . . . . . . . . . . . . . . . . . . . . . . . . . . 43Removing Users from Administration Groups . . . . . . . . . . . . . . . . . . . . . . . . . . . . . 44
Maximizing Data Manager Performance . . . . . . . . . . . . . . . . . . . . . . . . . . . . . . . . . . . . 44Recommended Upgrades for Optimization . . . . . . . . . . . . . . . . . . . . . . . . . . . . . . . 44Ensuring Data Security . . . . . . . . . . . . . . . . . . . . . . . . . . . . . . . . . . . . . . . . . . . . . . 46
3: Installing Data Manager . . . . . . . . . . . . . . . . . . . . . . . . . . . . . . . . . . . . . . . . . .51Before Running the Setup Wizard . . . . . . . . . . . . . . . . . . . . . . . . . . . . . . . . . . . . . . . . . 51
Licensing . . . . . . . . . . . . . . . . . . . . . . . . . . . . . . . . . . . . . . . . . . . . . . . . . . . . . . . . . 51Checking System Components . . . . . . . . . . . . . . . . . . . . . . . . . . . . . . . . . . . . . . . . 52Creating a Service Account . . . . . . . . . . . . . . . . . . . . . . . . . . . . . . . . . . . . . . . . . . . 52Clustering . . . . . . . . . . . . . . . . . . . . . . . . . . . . . . . . . . . . . . . . . . . . . . . . . . . . . . . . . 52Upgrading from Previous Versions of ASM . . . . . . . . . . . . . . . . . . . . . . . . . . . . . . . 52
Running the Setup Wizard . . . . . . . . . . . . . . . . . . . . . . . . . . . . . . . . . . . . . . . . . . . . . . . 53Starting the Administrator the First Time . . . . . . . . . . . . . . . . . . . . . . . . . . . . . . . . . . . . 59Configuring Data Manager . . . . . . . . . . . . . . . . . . . . . . . . . . . . . . . . . . . . . . . . . . . . . . . 65Licensing Data Manager . . . . . . . . . . . . . . . . . . . . . . . . . . . . . . . . . . . . . . . . . . . . . . . . 66
4: Working in the Administrator . . . . . . . . . . . . . . . . . . . . . . . . . . . . . . . . . . . . .71Starting the Administrator . . . . . . . . . . . . . . . . . . . . . . . . . . . . . . . . . . . . . . . . . . . . . . . . 71The Administrator Window . . . . . . . . . . . . . . . . . . . . . . . . . . . . . . . . . . . . . . . . . . . . . . . 73
The Tree View: Exploring Data Manager . . . . . . . . . . . . . . . . . . . . . . . . . . . . . . . . . 73The Contents View: Node Details . . . . . . . . . . . . . . . . . . . . . . . . . . . . . . . . . . . . . . 74The Description View: Item Details . . . . . . . . . . . . . . . . . . . . . . . . . . . . . . . . . . . . . 74Menu Bar . . . . . . . . . . . . . . . . . . . . . . . . . . . . . . . . . . . . . . . . . . . . . . . . . . . . . . . . . 75Computer Drop-Down List . . . . . . . . . . . . . . . . . . . . . . . . . . . . . . . . . . . . . . . . . . . . 75Toolbar . . . . . . . . . . . . . . . . . . . . . . . . . . . . . . . . . . . . . . . . . . . . . . . . . . . . . . . . . . . 75Status Bar . . . . . . . . . . . . . . . . . . . . . . . . . . . . . . . . . . . . . . . . . . . . . . . . . . . . . . . . . 77
Refreshing the Administrator Window . . . . . . . . . . . . . . . . . . . . . . . . . . . . . . . . . . . . . . 77Configuring Auto Refresh Frequency . . . . . . . . . . . . . . . . . . . . . . . . . . . . . . . . . . . . 78
Searching in the Administrator . . . . . . . . . . . . . . . . . . . . . . . . . . . . . . . . . . . . . . . . . . . . 78
5: Setting Up Media Services . . . . . . . . . . . . . . . . . . . . . . . . . . . . . . . . . . . . . . . .81ASM MediaStor . . . . . . . . . . . . . . . . . . . . . . . . . . . . . . . . . . . . . . . . . . . . . . . . . . . . . . . 82
Adding a MediaStor Media Service . . . . . . . . . . . . . . . . . . . . . . . . . . . . . . . . . . . . . 83Viewing MediaStor Media Service Properties . . . . . . . . . . . . . . . . . . . . . . . . . . . . . 86Allocating/Deallocating MediaStor Media for an Extended Drive . . . . . . . . . . . . . . . 88
Network Attached Storage . . . . . . . . . . . . . . . . . . . . . . . . . . . . . . . . . . . . . . . . . . . . . . . 90Adding a NAS Media Service . . . . . . . . . . . . . . . . . . . . . . . . . . . . . . . . . . . . . . . . . . 92Viewing NAS Media Service Properties . . . . . . . . . . . . . . . . . . . . . . . . . . . . . . . . . . 93Adding a Piece of NAS Media . . . . . . . . . . . . . . . . . . . . . . . . . . . . . . . . . . . . . . . . . 95Allocating/Deallocating NAS Media for an Extended Drive . . . . . . . . . . . . . . . . . . . 98
Tivoli Storage Manager . . . . . . . . . . . . . . . . . . . . . . . . . . . . . . . . . . . . . . . . . . . . . . . . 100
PN 313473304 Second Edition iiiStorageTek Proprietary
Preparing TSM for Use with Data Manager . . . . . . . . . . . . . . . . . . . . . . . . . . . . . . 101Adding a TSM Media Service . . . . . . . . . . . . . . . . . . . . . . . . . . . . . . . . . . . . . . . . . 102Viewing TSM Media Service Properties . . . . . . . . . . . . . . . . . . . . . . . . . . . . . . . . . 105Adding a Piece of Virtual TSM Media . . . . . . . . . . . . . . . . . . . . . . . . . . . . . . . . . . 106Allocating/Deallocating TSM Media for an Extended Drive . . . . . . . . . . . . . . . . . . 108
EMC Centera . . . . . . . . . . . . . . . . . . . . . . . . . . . . . . . . . . . . . . . . . . . . . . . . . . . . . . . . 110Adding an EMC Centera Media Service . . . . . . . . . . . . . . . . . . . . . . . . . . . . . . . . 111Viewing EMC Centera Media Service Properties . . . . . . . . . . . . . . . . . . . . . . . . . . 114Adding a Piece of Virtual EMC Media . . . . . . . . . . . . . . . . . . . . . . . . . . . . . . . . . . 117Setting the Retention Period for the EMC Media Service . . . . . . . . . . . . . . . . . . . 118Allocating/Deallocating EMC Media for an Extended Drive . . . . . . . . . . . . . . . . . . 120
StorageTek’s ACSLS . . . . . . . . . . . . . . . . . . . . . . . . . . . . . . . . . . . . . . . . . . . . . . . . . . 122An ACSLS Glossary . . . . . . . . . . . . . . . . . . . . . . . . . . . . . . . . . . . . . . . . . . . . . . . . 124Preparing ACSLS for Use with Data Manager . . . . . . . . . . . . . . . . . . . . . . . . . . . . 125Adding an ACSLS Media Service . . . . . . . . . . . . . . . . . . . . . . . . . . . . . . . . . . . . . 129Viewing ACSLS Media Service Properties . . . . . . . . . . . . . . . . . . . . . . . . . . . . . . . 133Adding a Drive to the ACSLS Media Service . . . . . . . . . . . . . . . . . . . . . . . . . . . . . 134Editing ACSLS Drive Configuration . . . . . . . . . . . . . . . . . . . . . . . . . . . . . . . . . . . . 137
Setting a Media Service Online or Offline . . . . . . . . . . . . . . . . . . . . . . . . . . . . . . . . . . 138
6: Setting Up File Migration . . . . . . . . . . . . . . . . . . . . . . . . . . . . . . . . . . . . . . . .141Extended Drives . . . . . . . . . . . . . . . . . . . . . . . . . . . . . . . . . . . . . . . . . . . . . . . . . . . . . . 142
Creating an Extended Drive . . . . . . . . . . . . . . . . . . . . . . . . . . . . . . . . . . . . . . . . . . 142Assigning Media to Extended Drives . . . . . . . . . . . . . . . . . . . . . . . . . . . . . . . . . . . 149
Media Folders . . . . . . . . . . . . . . . . . . . . . . . . . . . . . . . . . . . . . . . . . . . . . . . . . . . . . . . 150Before Creating Media Folders . . . . . . . . . . . . . . . . . . . . . . . . . . . . . . . . . . . . . . . 151Creating Media Folders . . . . . . . . . . . . . . . . . . . . . . . . . . . . . . . . . . . . . . . . . . . . . 153Adding Media to a Media Folder . . . . . . . . . . . . . . . . . . . . . . . . . . . . . . . . . . . . . . 157
Move Groups . . . . . . . . . . . . . . . . . . . . . . . . . . . . . . . . . . . . . . . . . . . . . . . . . . . . . . . . 160Creating Move Groups . . . . . . . . . . . . . . . . . . . . . . . . . . . . . . . . . . . . . . . . . . . . . . 161
Move Rules . . . . . . . . . . . . . . . . . . . . . . . . . . . . . . . . . . . . . . . . . . . . . . . . . . . . . . . . . 166Creating Move Rules . . . . . . . . . . . . . . . . . . . . . . . . . . . . . . . . . . . . . . . . . . . . . . . 168
Scheduling Drive Scans . . . . . . . . . . . . . . . . . . . . . . . . . . . . . . . . . . . . . . . . . . . . . . . . 176Scheduling Movement of Files . . . . . . . . . . . . . . . . . . . . . . . . . . . . . . . . . . . . . . . . . . . 179
A: Clustering . . . . . . . . . . . . . . . . . . . . . . . . . . . . . . . . . . . . . . . . . . . . . . . . . . . .183Clustering Terms . . . . . . . . . . . . . . . . . . . . . . . . . . . . . . . . . . . . . . . . . . . . . . . . . . . . . 185Cluster Administrator Concepts . . . . . . . . . . . . . . . . . . . . . . . . . . . . . . . . . . . . . . . . . . 186
Resource Groups . . . . . . . . . . . . . . . . . . . . . . . . . . . . . . . . . . . . . . . . . . . . . . . . . . 187Resources . . . . . . . . . . . . . . . . . . . . . . . . . . . . . . . . . . . . . . . . . . . . . . . . . . . . . . . 189
Active/Passive Clustering . . . . . . . . . . . . . . . . . . . . . . . . . . . . . . . . . . . . . . . . . . . . . . . 193Before You Install . . . . . . . . . . . . . . . . . . . . . . . . . . . . . . . . . . . . . . . . . . . . . . . . . . 193

Table of Contents
iv Second Edition PN 313473304StorageTek Proprietary
Running the Installation . . . . . . . . . . . . . . . . . . . . . . . . . . . . . . . . . . . . . . . . . . . . . 198Managing ASM Storage Products . . . . . . . . . . . . . . . . . . . . . . . . . . . . . . . . . . . . . 200
Active/Active Clustering . . . . . . . . . . . . . . . . . . . . . . . . . . . . . . . . . . . . . . . . . . . . . . . . 203Before You Install . . . . . . . . . . . . . . . . . . . . . . . . . . . . . . . . . . . . . . . . . . . . . . . . . . 204Running the Installation . . . . . . . . . . . . . . . . . . . . . . . . . . . . . . . . . . . . . . . . . . . . . 218Managing ASM Storage Products . . . . . . . . . . . . . . . . . . . . . . . . . . . . . . . . . . . . . 219
B: Setting up ASM with Co-StandbyServer . . . . . . . . . . . . . . . . . . . . . . . . . . . .223Basic Installation . . . . . . . . . . . . . . . . . . . . . . . . . . . . . . . . . . . . . . . . . . . . . . . . . . . . . 223Clustering the ASM Application Resource . . . . . . . . . . . . . . . . . . . . . . . . . . . . . . . . . . 225Clustering the Register WINS Service Resource . . . . . . . . . . . . . . . . . . . . . . . . . . . . . 227Troubleshooting After a Fail-over . . . . . . . . . . . . . . . . . . . . . . . . . . . . . . . . . . . . . . . . . 229
Index . . . . . . . . . . . . . . . . . . . . . . . . . . . . . . . . . . . . . . . . . . . . . . . . . . . . . . . . . . .233

PN 313473304 Second Edition vStorageTek Proprietary
List of Tables
Chapter Summary . . . . . . . . . . . . . . . . . . . . . . . . . . . . . . . . . . . . . . . . . . . . . . . . . . . . . . . . viiiDocumentation Conventions . . . . . . . . . . . . . . . . . . . . . . . . . . . . . . . . . . . . . . . . . . . . . . . . . xASM Glossary . . . . . . . . . . . . . . . . . . . . . . . . . . . . . . . . . . . . . . . . . . . . . . . . . . . . . . . . . . . . 2Currently Supported Media Types . . . . . . . . . . . . . . . . . . . . . . . . . . . . . . . . . . . . . . . . . . . . 12Storage Media and Media Services Information . . . . . . . . . . . . . . . . . . . . . . . . . . . . . . . . . 14Minimum Configurations . . . . . . . . . . . . . . . . . . . . . . . . . . . . . . . . . . . . . . . . . . . . . . . . . . . 23Space Requirements . . . . . . . . . . . . . . . . . . . . . . . . . . . . . . . . . . . . . . . . . . . . . . . . . . . . . . 25Currently Supported Media Types . . . . . . . . . . . . . . . . . . . . . . . . . . . . . . . . . . . . . . . . . . . . 29Data Manager File System Support by Media Type . . . . . . . . . . . . . . . . . . . . . . . . . . . . . . 34Extended Drive Operations Allowed . . . . . . . . . . . . . . . . . . . . . . . . . . . . . . . . . . . . . . . . . . 39Transactions Generated . . . . . . . . . . . . . . . . . . . . . . . . . . . . . . . . . . . . . . . . . . . . . . . . . . . . 39Administrator Toolbar Buttons . . . . . . . . . . . . . . . . . . . . . . . . . . . . . . . . . . . . . . . . . . . . . . . 76ACSLS Glossary . . . . . . . . . . . . . . . . . . . . . . . . . . . . . . . . . . . . . . . . . . . . . . . . . . . . . . . . 124Windows on the Sun Computer . . . . . . . . . . . . . . . . . . . . . . . . . . . . . . . . . . . . . . . . . . . . . 126Changer Configuration Prompts . . . . . . . . . . . . . . . . . . . . . . . . . . . . . . . . . . . . . . . . . . . . 127Changer Configuration Questions . . . . . . . . . . . . . . . . . . . . . . . . . . . . . . . . . . . . . . . . . . . 127Placeholders in the Command to Assign Media . . . . . . . . . . . . . . . . . . . . . . . . . . . . . . . . 129Placeholders in the Device Name Format . . . . . . . . . . . . . . . . . . . . . . . . . . . . . . . . . . . . . 135Extended Drive Settings Page Defaults . . . . . . . . . . . . . . . . . . . . . . . . . . . . . . . . . . . . . . . 145Extended Drive Options Page Defaults . . . . . . . . . . . . . . . . . . . . . . . . . . . . . . . . . . . . . . . 147Add Media to Media Folders Wizard -- Media Restore Page Options . . . . . . . . . . . . . . . . 156Add Media to Media Folders Wizard -- Media Restore Page Options . . . . . . . . . . . . . . . . 159Move Group Wizard – Option Page Defaults . . . . . . . . . . . . . . . . . . . . . . . . . . . . . . . . . . . 164Move Rule Wizard -- Settings Page Options . . . . . . . . . . . . . . . . . . . . . . . . . . . . . . . . . . . 175Drive Scan Scheduling Options . . . . . . . . . . . . . . . . . . . . . . . . . . . . . . . . . . . . . . . . . . . . . 178Clustering Glossary . . . . . . . . . . . . . . . . . . . . . . . . . . . . . . . . . . . . . . . . . . . . . . . . . . . . . . 185Resource Groups After Cluster Server Installation . . . . . . . . . . . . . . . . . . . . . . . . . . . . . . 188Resource Groups Before Active/Active Data Manager Installation . . . . . . . . . . . . . . . . . . 189Resources After Cluster Server Installation . . . . . . . . . . . . . . . . . . . . . . . . . . . . . . . . . . . . 189Resources Before an Active/Passive Installation . . . . . . . . . . . . . . . . . . . . . . . . . . . . . . . . 191Resources Before Active/Active Installation . . . . . . . . . . . . . . . . . . . . . . . . . . . . . . . . . . . 192

List of Tables
vi Second Edition PN 313473304StorageTek Proprietary
ASM Data Manager Getting Started Guide viiStorageTek Proprietary
Preface
Thank you for purchasing the Application Storage Manager™(ASM), the most flexible storage management system for Microsoft® Windows® NT/2000. ASM allows you to extend the capacity of NTFS volumes by automating migration of files to storage media. ASM uses separate media services to manage media in storage devices, so that all drive, library, and media specific issues are handled and optimized by the media service (like ASM MediaStor). This allows Data Manager to focus specifically on the management of files, allowing clients to simply save and retrieve files to and from any extended NTFS volume.
Data Manager allows you to make large amounts of data storage available on an NTFS volume without adding to the physical capacity of the hard disk where the volume is located. Data Manager can be used to represent the contents of multiple pieces of media as folders on a single volume, keeping track of the exact location of all files on media. CD-ROM, magneto-optical, WORM, DVD, Network Attached Storage (NAS), EMC Centera™ (EMC), Tivoli® Storage Manager (TSM), WORM-tape and tape media can all be managed easily and effectively, using a variety of file systems.
Data Manager adds value to the NTFS file system and enhances Windows native capabilities by providing file migration services. Because of the design of Data Manager, file migration can be added without losing any Windows features. Windows NT/2000 still manages all issues like security, long file name support, and network connectivity.
Data Manager provides a rule-based system for file storage management. Rather than simply migrating all files to media without distinction between files, Data Manager allows you to set criteria that govern which files will be stored where. Using the rules you create, Data Manager manages file storage locations in the background, moving files to media and purging their data to make space on the extended drive. To the end user, however, all files appear to be located on the drive extended by Data Manager.
Data Manager provides comprehensive file management capabilities, a single point of administration, and scheduling features to optimize system performance. Time-consuming processes that compete for system resources – such as media restore, media compaction, and file movement to media – can be set to occur at convenient times. Data Manager also monitors system warnings and errors, and can be configured to send alerts to specific users or computers.
This Getting Started Guide provides detailed instructions on how to plan for, install, and configure your Data Manager system.

Preface
viii Second EditionStorageTek Proprietary
■ Chapter SummaryThe following table summarizes each chapter of this document:
Table 1. Chapter Summary
Chapter DescriptionChapter 1: Introduction on page 1
This chapter provides a brief overview of the system, including its concepts and components.
Chapter 2: Planning Your Data Manager System on page 21
This chapter contains planning recommendations, system requirements, hardware specification worksheets, and storage media and other considerations for your Data Manager system.
Chapter 3: Installing Data Manager on page 51
This chapter contains instructions for installing the Data Manager software and starting it for the first time. It also provides an overview of the steps required to configure Data Manager to begin file migration.
Chapter 4: Working in the Administrator on page 71
This chapter describes the Administrator interface and basic Data Manager functionality.
Chapter 5: Setting Up Media Services on page 81
This chapter describes the media services available for use with ASM and how to configure them so that storage media is available for Data Manager to begin writing files to it.
Chapter 6: Setting Up File Migration on page 141
This chapter describes the basic steps required to begin migrating files to media. These include configuring extended drives, media folders, move groups and move rules. It also provides instructions for scheduling file migration.
Clustering on page 183 This appendix provides information and procedures for setting up your ASM system in a clustered environment.
Setting up ASM with Co-StandbyServer on page 223
This appendix provides information and procedures for setting up your ASM system in a Co-StandbyServer™ environment.
Related Documentation
ASM Data Manager Getting Started Guide ixStorageTek Proprietary
■ Related DocumentationRefer to the following additional documentation:
• ASM Data Manager System Guide
• ASM MediaStor System Guide if using ASM MediaStor as a media service
• ASM Upgrade Guide if upgrading from a previous version of ASM.
• StorageTek ACSLS™ documentation if using ACSLS as a media service
• Tivoli Storage Manager documentation if using TSM as a media service
• EMC Centera documentation if using EMC as a media service
• Microsoft Cluster Server documentation if using ASM in a clustered environment
• Windows 2000 documentation if you plan to install ASM on a Windows 2000 server while using the Windows 2000 Server Active Directory service on your network
• ASM Co-StandbyServer User’s Guide if using ASM in a Co-StandbyServer environment
■ Online HelpHelp is available online from any Data Manager dialog box. For a description of the dialog box, press the <F1> key. A Help window appears, outlining the dialog box parameters and fields.
A knowledge base help file with error descriptions, tech notes, software notes, fixed/known bugs is available on the Storagetek support website at http://www.support.storagetek.com. All ASM guides, including this one, are available in PDF format on the installation CD.

Preface
x Second EditionStorageTek Proprietary
■ Documentation ConventionsConsistent formatting is used throughout all ASM guides to represent certain information.
Table 2. Documentation Conventions
This Cue Representsmonospaced text Characters that must be typed on your screen exactly
as they appear in this document.
<ALL CAPITALS> Keys on your keyboard used in combination or sequence. For example <ALT>+B means to hold down the <ALT> key while pressing B, and <ALT>, F, X means to press and release each of the keys in order: first <ALT>, then F, then X.
ALL CAPITALS Directory names, filenames, and acronyms.
italics References to manual titles, chapter titles, and section headings; placeholders; and emphasis.
Note Explanatory note between two lines.
Additional information needed as you follow the step-by-step operations in this manual.

ASM Data Manager Getting Started Guide 1StorageTek Proprietary
1Introduction
ASM is a storage management system that provides support for multiple media types, flexible data organization, and rules-based file migration. Data Manager accomplishes this through an easy-to-navigate interface, and transparent communication with storage locations and device management software.
Data Manager allows you to extend the storage capabilities of NTFS volumes by using Data Manager file migration services to move files from the NTFS volume to other, less-expensive storage media. For example, users on your network may typically save data to a drive on your Windows NT/2000 file server. As long as the drive is an NTFS volume, you can significantly expand file storage capabilities without changing anything from the user point of view by extending that drive with Data Manager. File data on a drive extended by Data Manager can be moved to media through a media service (for example, to tape in a library managed by ASM MediaStor) without affecting the file listing seen by the end user.
You are the architect of the Data Manager system. Data Manager allows you to leverage your existing hardware configuration or create a new one. The powerful features of Data Manager, combined with an easy-to-use graphical user interface, allow you to fine-tune a file storage strategy for any type of application requirement.
Because Data Manager supports several media services, media types and file systems, you can select a storage configuration most suited to your available resources and your storage needs. You can design move rules that control the transfer of files to media using detailed criteria such as file age, file size, file type, and file attributes. You can choose which folders on the extended drive will contain Data Manager files and what media will be used to hold files moved under a particular move rule. You can then purge file data that has already been moved to media in order to maintain available space on the extended drive.
Before designing a storage strategy, you should be comfortable with Data Manager terminology and concepts. In addition, many of the issues discussed in this guide should be carefully planned before implementing an Data Manager storage strategy. Take the time to read all sections, as this will help you attain the best performance, functionality, and organization for your storage solution.
This chapter identifies the key terminology and concepts that are vital for you to understand. Included are descriptions of ASM modules, conceptual and

Introduction
2 Second EditionStorageTek Proprietary
practical definitions, and guidelines for planning and implementing your Data Manager storage strategy. For more information, see the following sections:
• "An ASM Glossary, " which follows
• “ASM Components” on page 7
• “ASM’s Distributed Storage Model” on page 10
• “Data Manager Concepts” on page 12
■ An ASM GlossaryTo make it easier for you to follow the discussion of the ASM architecture in this chapter, here are brief descriptions of key terms used. You can either read this glossary first or refer to it as needed while you read about ASM.
Table 1. ASM Glossary
Term DefinitionACSLS A device management software product that runs on a
UNIX platform. Data Manager can use an ACSLS installation as a media service. ACSLS has the ability to manage retrieval of media in some StorageTek tape libraries.
Active Server A cluster server that is always running and processing user requests.
Cluster A processing environment consisting of two or more server computers and other resources that act as a single system and enable high availability.
Compaction The process of reclaiming used storage media by eliminating wasted space taken up by outdated copies of files or files marked for deletion. Compacting media copies all active (non-deleted and current versions of) files from media back to the extended drive, and then removes the media from the media folder so that it can be reformatted and used again. The files that are copied to the extended drive are ultimately moved back to media based on the move rules for the media folder.
Data Management
Control of the location of file data for Data Manager files. Data Manager can manage the contents of a file separately from the file tag for that file. The file tag for an Data Manager file is always displayed on the extended drive. In the background, transparent to the user, Data Manager controls the location of the file data for each file it manages.

An ASM Glossary
ASM Data Manager Getting Started Guide 3StorageTek Proprietary
De-migration The process of leaving migrated files on the extended drive and marking them as not migrated when you remove a piece of media from its media folder. This allows the files to be written to another piece of media.
Direct Read A way of marking files that have been migrated to media so that they are opened directly from the media when requested rather than being copied back to the extended drive.
Drive A hardware device through which media can be read or written to.
EMC Centera A line of disk-based storage devices deployed on a Redundant array of Independent Nodes (RAIN). EMC Centera devices use unique, permanent content addresses to store and retrieve data. Data Manager can use an EMC Centera installation as a media service.
Extended Drives An NTFS volume (hard drive) or partitioned part of a hard drive for which Data Manager provides file migration services by moving files to media and fetching files from media according to the parameters you set.
Fail-over The act of transferring functions from one server in a cluster to another server in the cluster when the first server fails.
Fetch The process of retrieving file data from storage media when a user requests the file. Specifically, a fetch is moving the file data from the media back to the extended drive.
File Data The contents of a file.
File Migration The movement of files and file data from one type of media (a hard drive) to other types of media (removable media, such as optical or tape media, or logical media, such as a network share or NAS device).
File Retention See Retention
File Share Resource
An entity defined in Cluster Administrator that represents a standard shared directory offered to users by the cluster.
File System Software that provides an interface for saving and retrieving files on storage media. File systems control all aspects of media management, including directory/file structures, data layout, and data transfer.
Table 1. ASM Glossary (Continued)
Term Definition

Introduction
4 Second EditionStorageTek Proprietary
File Tag The identifying information for a file. The file tag includes such information as file location, file attributes, file size, and file age.
Finalization The process of “closing” a piece of DVD-R media when you are finished writing to it. Finalizing DVD-R media makes the media read-only, effectively closing the media from receiving any more data. Finalization also stabilizes the media, better protecting the data written to it. Finalized DVD-R media can be removed from the ASM system and read on a computer with the Windows XP operating system.
Hard Drive A computer hardware drive with non-removable media. Often, large hard drives are partitioned into multiple drives or “volumes.” These multiple volumes are also sometimes referred to as “hard drives” or just “drives.”
Hardware Device A device that contains drives where media can be accessed.
Jukebox/ Library A hardware device containing one or more removable media drives, shelves for pieces of media, and a mechanism for moving pieces of media between the shelves and the drives. The terms “jukebox” and “library” are interchangeable. In most instances in this manual, the term “library” is used to refer to libraries or jukeboxes.
Logical Cluster Name
The network identifier of a clustered environment. Because a cluster functions as a single element, users access the logical cluster name via the network, rather than any of the individual servers in the cluster itself.
Logical Media A piece of media that is defined by its location on a piece (or pieces) of media rather than by the physical constraints of the media itself. For example, a network share that shares a single folder to the network could be treated as a piece of media in Data Manager. In contrast, a RAID device, which has multiple drives, could also be treated as a single piece of media if the entire device was shared as a single network share.
Managed Files Files for which Data Manager has moved the file’s data to media. Even if a file is saved to a media folder on an extended drive, Data Manager does not assume responsibility for management of the file data until it has moved the file’s data to external storage media.
Table 1. ASM Glossary (Continued)
Term Definition
An ASM Glossary
ASM Data Manager Getting Started Guide 5StorageTek Proprietary
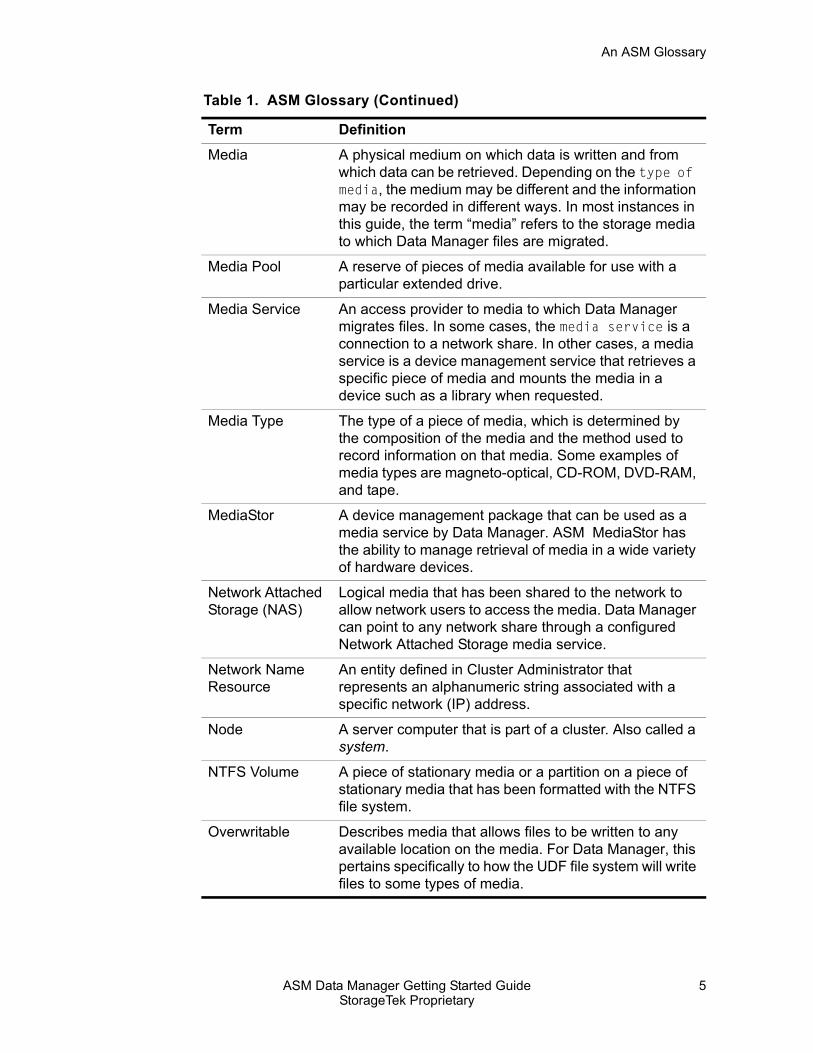
Media A physical medium on which data is written and from which data can be retrieved. Depending on the type of media, the medium may be different and the information may be recorded in different ways. In most instances in this guide, the term “media” refers to the storage media to which Data Manager files are migrated.
Media Pool A reserve of pieces of media available for use with a particular extended drive.
Media Service An access provider to media to which Data Manager migrates files. In some cases, the media service is a connection to a network share. In other cases, a media service is a device management service that retrieves a specific piece of media and mounts the media in a device such as a library when requested.
Media Type The type of a piece of media, which is determined by the composition of the media and the method used to record information on that media. Some examples of media types are magneto-optical, CD-ROM, DVD-RAM, and tape.
MediaStor A device management package that can be used as a media service by Data Manager. ASM MediaStor has the ability to manage retrieval of media in a wide variety of hardware devices.
Network Attached Storage (NAS)
Logical media that has been shared to the network to allow network users to access the media. Data Manager can point to any network share through a configured Network Attached Storage media service.
Network Name Resource
An entity defined in Cluster Administrator that represents an alphanumeric string associated with a specific network (IP) address.
Node A server computer that is part of a cluster. Also called a system.
NTFS Volume A piece of stationary media or a partition on a piece of stationary media that has been formatted with the NTFS file system.
Overwritable Describes media that allows files to be written to any available location on the media. For Data Manager, this pertains specifically to how the UDF file system will write files to some types of media.
Table 1. ASM Glossary (Continued)
Term Definition

Introduction
6 Second EditionStorageTek Proprietary
Passive Server A cluster server that is idle and does not process user requests until an active node fails.
Physical Disk Resource
An entity defined in Cluster Administrator that represents a fiber- or SCSI-attached disk used for storage.
Removable Media Drive
A drive where different pieces can be inserted and removed as needed, such as a CD-ROM drive.
Removable Media Media that must be mounted in a drive before it can be accessed. Removable media can be inserted and removed as needed to allow for access to multiple pieces of media.
Retention The act of restricting modification to and/or deletion of files. Retention is available for the EMC media service and for WORM-NAS media. Data Manager only enforces retention after files have been moved to media.
Retention Period The period of time (number of days) for which retention is enforced. The retention period is calculated from the time the file is migrated to media. Retention period configuration is only available for the EMC media service.
Resource A physical or logical entity defined in Cluster Administrator and managed by a cluster node.
Resource Group A logical collection of resources, defined in Cluster Administrator, that fails over from one node to another in a cluster. Note that resource groups fail over, not individual resources.
Sequential Describes media that requires files to be written in sequential order (one right after another) on the media. For Data Manager, this pertains specifically to how the UDF file system will write files to some types of media.
Stationary Drive A drive where the same piece of media is always mounted, such as the hard drive on your computer.
Stationary Media Media that is always mounted in a drive and cannot be removed without removing the entire drive.
System A server computer that is part of a cluster. Also called a node.
Table 1. ASM Glossary (Continued)
Term Definition
ASM Components
ASM Data Manager Getting Started Guide 7StorageTek Proprietary
■ ASM ComponentsASM is comprised of several components, and each have specific functionality within the system. For more information, see the following sections:
• "Data Manager, " which follows
• “MediaStor” on page 10
• “ASM License Server” on page 10
• “Command Line Utilities” on page 10
Data ManagerThe ASM Data Manager component consists of the following modules:
• "Data Manager Setup, " which follows
• “Data Manager Administrator” on page 8
• “Data Manager Remote Administrator Setup” on page 8
• “Data Manager Remote Administrator” on page 9
• “Explorer Add-ons” on page 9
• “Online Help” on page 9
Data Manager SetupThe Data Manager Setup module is used to install ASM Data Manager and to upgrade from previous versions of ASM Data Manager. The Data Manager Setup module installs the Data Manager Administrator, Online Help, and Explorer Add-ons. The module remains in the Storagetek ASM program group, where it can be used to modify registration and license information. If necessary, the module can also be used to uninstall Data Manager. For more information on running Data Manager Setup, see “Running the Setup Wizard” on page 53. For more information on upgrading ASM, refer to the ASM Upgrade Guide.
Tivoli Storage Manager (TSM)
A storage product that Data Manager can use as a media service. Similar to NAS, TSM uses “virtual” media.
Virtual Server A group defined in Microsoft’s Cluster Administrator in an active/active cluster environment that contains the elements that are to transfer over to an active node when the other active node fails.
Table 1. ASM Glossary (Continued)
Term Definition
Introduction
8 Second EditionStorageTek Proprietary
Data Manager AdministratorThe Data Manager Administrator allows you to view and configure the underlying structure of the Data Manager system, providing a single interface for managing one or more Data Manager computers and the extended drives on those computers. Through this module, you can manage all major aspects of the Data Manager system, such as:
• Media services connectivity (connections to the device management software that manages the hardware devices that contain the storage media)
• Drive saver and timeslice settings (for drives in the storage devices managed by the media services)
• Functionality of extended drives (the NTFS volumes for which Data Manager provides data management services)
• File migration (creation and management of move groups, and move and purge rules used to migrate files from the extended drive to storage media)
The Administrator has an intuitive “tree” view where extended drives and the configuration items for those extended drives are grouped as sub-trees for ease of use.
All aspects of extended drive functionality can be configured through the Administrator. You can assign pieces of media to media folders on an extended drive and then define rules to control the management of files in the media folder. You can set up schedules to control when events, such as file migration and processing of media management tasks, occur. You can configure alerts to send messages alerting a particular user or set of users to Data Manager errors or warnings relating to the extended drive. In addition, you can view event, warning, and error logs and run reports on various aspects of Data Manager system functionality. Use of the Administrator is covered throughout this guide and in the ASM Data Manager System Guide.
Data Manager Remote Administrator SetupThe Data Manager Remote Administrator Setup module is used to install the ASM Data Manager Remote Administrator and to upgrade from previous versions of the ASM Data Manager Remote Administrator. The Data Manager Remote Administrator Setup module installs the Data Manager Administrator interface and Online Help only.
The module remains in the Storagetek ASM Administrator program group where it can be used to modify registration information.
If necessary, the module can also be used to uninstall the Data Manager Remote Administrator. For more information on running Data Manager Remote Administrator Setup, refer to the Remotely Administering Data Manager chapter in the ASM Data Manager System Guide.

ASM Components
ASM Data Manager Getting Started Guide 9StorageTek Proprietary
Data Manager Remote AdministratorRegardless of whether you are running a full installation of Data Manager or only the Remote Administrator, the Administrator interface for Data Manager can be used to configure any Data Manager computer visible on the network (provided security settings allow access and the computer is the same version as or higher than the Remote Administrator).
Because enterprise (remote) administration capability is automatically installed when you install Data Manager, you can remotely administer any Data Manager computer from any other Data Manager computer. Data Manager (full installation) needs only to be installed on computers containing the NTFS volumes that Data Manager will use as extended drives.
For more information on remote administration, refer to the Remotely Administering Data Manager chapter in the ASM Data Manager System Guide.
Explorer Add-onsData Manager’s Explorer Add-ons utility allows you to perform file and folder management functions from Windows Explorer on a client workstation. When you right-click on a file or folder in the Explorer window on the client workstation, an ASM (Explorer Add-ons) option appears on the shortcut menu.
You can use Explorer Add-ons to view file properties, such as the actual file size, the file status (for example, fetched or purged), and the Data Manager attributes for the file. You can even view file properties on many files within a media folder at once.
You can also run file reports, enable or disable direct read, and purge files using the Explorer Add-ons.
For more information on Explorer Add-ons, refer to the Using Explorer Add-ons appendix of the ASM Data Manager System Guide.
Online HelpData Manager contains context-sensitive help links that provide instructional help and examples. The online help is automatically installed with Data Manager and with the Data Manager Remote Administrator. Press the <F1> key at any time to get help on the currently displayed dialog box, window or wizard page.
There is also a knowledgebase help file with error descriptions, tech notes, software notes, and fixed/known bugs available on the Storagetek website at http://www.support.storagetek.com. You can also access the knowledgebase from the Storagetek ASM program group in the Start menu.
Introduction
10 Second EditionStorageTek Proprietary
MediaStorASM MediaStor is a flexible storage hardware management system for Windows NT/2000. MediaStor provides comprehensive drive and library management capabilities for the retrieval, mounting, and dismounting of removable media in a variety of hardware devices. MediaStor allows you to make multiple types of media and media available to external applications like ASM Data Manager. MediaStor is one of five media services that Data Manager can use to access storage media.
For more information on installing and configuring MediaStor, refer to the ASM MediaStor System Guide. For information on configuring a MediaStor media service in Data Manager, see “ASM MediaStor” on page 82.
ASM License ServerLicensing information for your ASM system is managed on the ASM License Server. The License Server is the program through which the licenses for your ASM products are registered and maintained. The ASM License Server program is included on the ASM CD and can be installed on an ASM computer or on a separate computer, as long as that computer is visible to the ASM computer through the network.
Use the Edit product license information option in the setup wizard (accessed through the Storagetek ASM and Storagetek MediaStor program groups) to point to the License Server computer once your licensing information has been registered in the License Server. For information on using the License Server, refer to the License Server System Guide.
Command Line UtilitiesASM includes several utilities that allow you to perform device management independently. These utilities are located in the \LEGATO\DISKXTENDER\BIN\ directory, and are run from the command prompt.
■ ASM’s Distributed Storage ModelASM Data Manager is one component of a distributed storage system. Within this system, Data Manager is responsible for managing the movement of data from NTFS volumes to a pool of storage media. Once a media service has provided access to media, Data Manager communicates directly with the media to read and write data and perform media tasks.
• Various media services can be responsible for providing access to media pools. Five types of media services are available for use with Data Manager:
ASM’s Distributed Storage Model
ASM Data Manager Getting Started Guide 11StorageTek Proprietary
• ASM MediaStor
• Network Attached Storage (NAS)
• Tivoli Storage Manager (TSM)
• StorageTek’s Automated Cartridge System Library Software (ACSLS)
• EMC Centera (EMC)
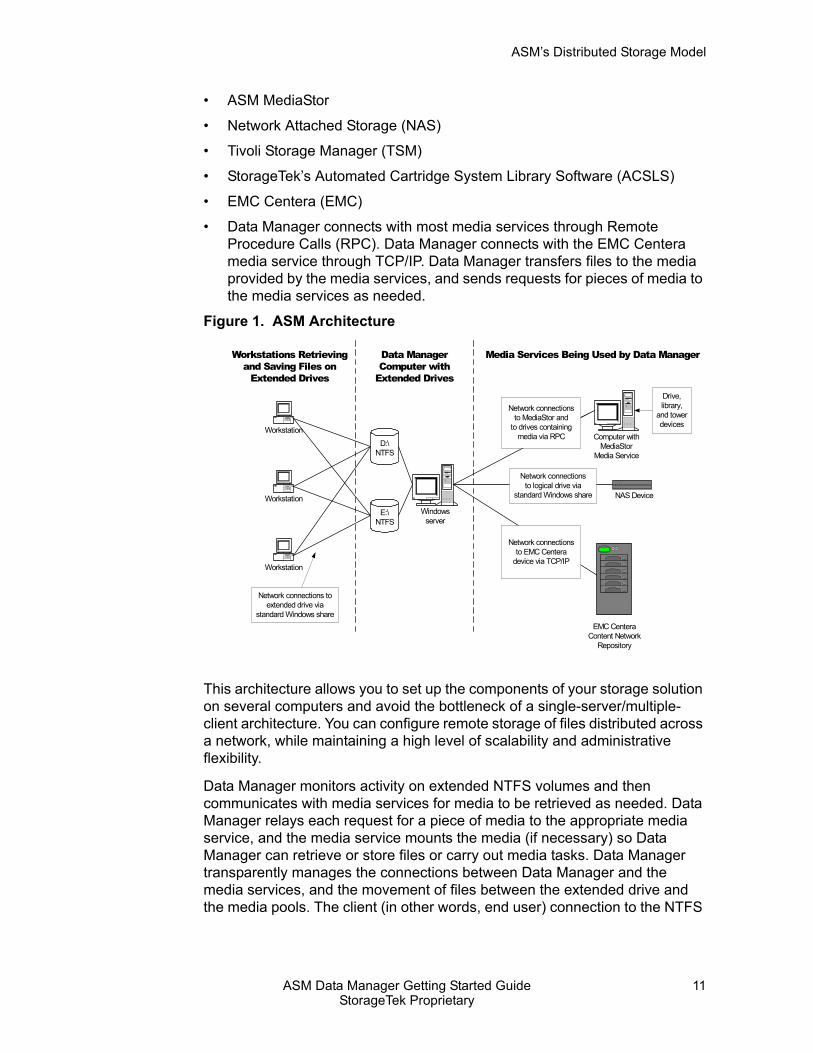
• Data Manager connects with most media services through Remote Procedure Calls (RPC). Data Manager connects with the EMC Centera media service through TCP/IP. Data Manager transfers files to the media provided by the media services, and sends requests for pieces of media to the media services as needed.
Figure 1. ASM Architecture
This architecture allows you to set up the components of your storage solution on several computers and avoid the bottleneck of a single-server/multiple-client architecture. You can configure remote storage of files distributed across a network, while maintaining a high level of scalability and administrative flexibility.
Data Manager monitors activity on extended NTFS volumes and then communicates with media services for media to be retrieved as needed. Data Manager relays each request for a piece of media to the appropriate media service, and the media service mounts the media (if necessary) so Data Manager can retrieve or store files or carry out media tasks. Data Manager transparently manages the connections between Data Manager and the media services, and the movement of files between the extended drive and the media pools. The client (in other words, end user) connection to the NTFS
Windowsserver
Media Services Being Used by Data ManagerData ManagerComputer with
Extended Drives
Workstations Retrievingand Saving Files on
Extended Drives
POWERFAULT DATA ALARM
NAS Device
D:\NTFS
Workstation
Workstation
Workstation
E:\NTFS
Network connectionsto logical drive via
standard Windows share
Computer withMediaStor
Media Service
Drive,library,
and towerdevices
Network connectionsto MediaStor and
to drives containingmedia via RPC
Network connections toextended drive via
standard Windows share
Network connectionsto EMC Centera
device via TCP/IP
EMC CenteraContent Network
Repository

Introduction
12 Second EditionStorageTek Proprietary
volume is managed entirely by Windows NT/2000; Data Manager is not involved in client connectivity at all.
This configuration allows you as the administrator to “extend” the capacity of hard drives on your network servers, seamlessly to the end user. The end user saves files to and retrieves files from the NTFS volume, unaware that the volume has been extended by Data Manager. Because clients connect to Windows NT/2000 rather than Data Manager, the extensive connectivity offered by Windows NT/2000 remains in effect. Any client that can connect to a Windows NT/2000 server can access files on an extended drive.
■ Data Manager ConceptsThe following concepts are integral to understanding ASM Data Manager:
• "Storage Media and Media Services, " which follows
• “Extended Drives” on page 14
• “Data Manager System Management” on page 18
Storage Media and Media ServicesData Manager supports many types of high-capacity storage media for the migration of files. The functionality accessible through a media service depends on the type of media used in the device for that media service. The following table defines all media types Data Manager currently supports:
Table 2. Currently Supported Media Types
Media Type Support TypeCD-ROM Read OnlyDVD-R Read/WriteDVD-RAM Read/WriteDVD-ROM Read OnlyEMC Centera (EMC) Read/WriteMagneto-Optical Read/Write
NAS (Network attached storage available through network shares)
Read/Write
Tape (DLT, AIT 9840, Magstar, 8mm DAT) Read/WriteTivoli Storage Manager (TSM) Read/WriteWORM Read/WriteWORM-Tape Read/Write

Data Manager Concepts
ASM Data Manager Getting Started Guide 13StorageTek Proprietary
Data Manager manages all functions relating to the transfer of information to and from media. The only role a media service plays is to provide access to the media so that Data Manager can work with it. For some media services (like MediaStor) this means placing requested media into a drive. In other cases (like EMC or NAS) this means simply providing access to a place where the data is written. Regardless of the media service used, however, Data Manager performs all movement and fetching of files and all media tasks through direct communication with the media.
There are five types of media services available for ASM file storage:
• ASM MediaStor
• Network Attached Storage (NAS)
• Tivoli Storage Manager (TSM)
• StorageTek’s Automated Cartridge System Library Software (ACSLS)
• EMC Centera (EMC)
• Data Manager does not support ACSLS as a media service when you install Data Manager in a clustered environment. If you are installing Data Manager in an active/active cluster environment, you can use MediaStor (in addition to or instead of NAS, EMC, or TSM) as a media service; however, MediaStor itself runs only in active/passive mode. For more information on installing Data Manager in a clustered environment, see “Clustering” on page 183.”
When Data Manager needs a piece of media, it sends a request to the appropriate media service for that media. If the media service uses NAS, EMC, or TSM (all of which use “virtual” media), the media is already available and Data Manager can proceed with whatever function needs to be performed.
If the media service involves a device management product, the media service causes the device being managed to retrieve the media, or prompts the administrator of the media service to insert the appropriate piece of media. For example, if MediaStor is being used to manage an optical library, MediaStor causes the picker arm of the library to retrieve the correct piece of media and insert that media in a drive where the media can be read or written to. Once the media is in the drive, Data Manager can write files to the media, fetch files from the media, or carry out media tasks such as formatting or labeling the media.
Introduction
14 Second EditionStorageTek Proprietary
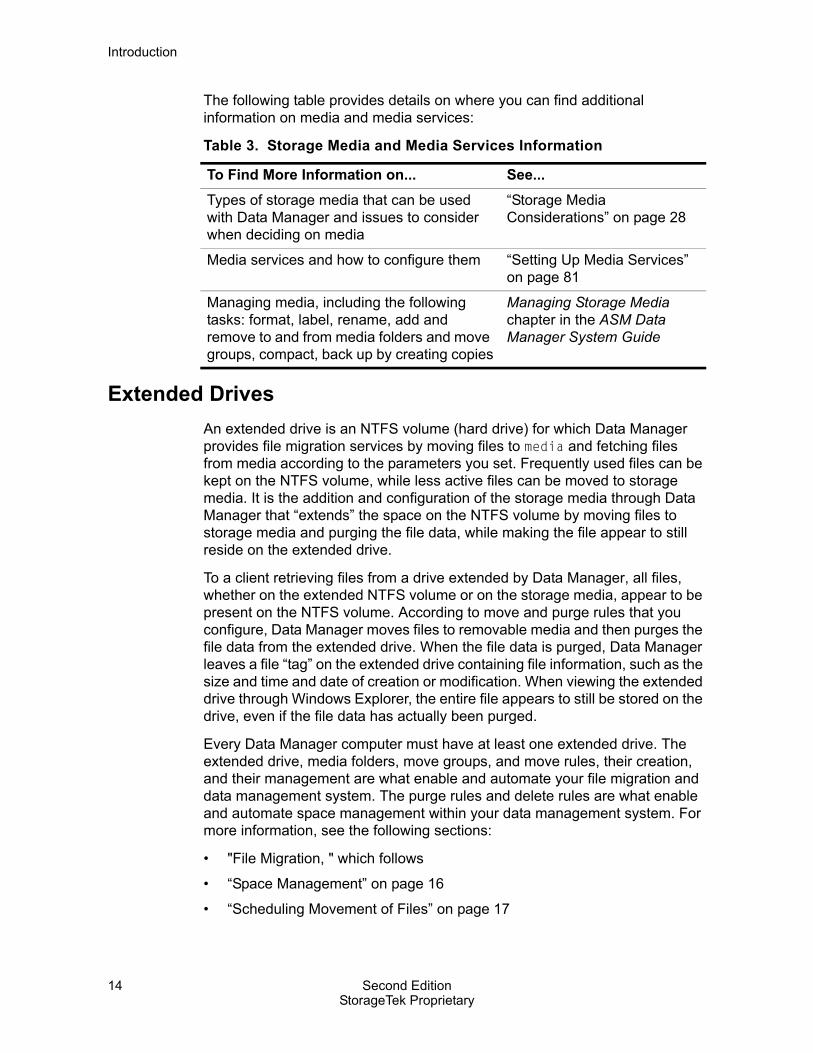
The following table provides details on where you can find additional information on media and media services:
Extended DrivesAn extended drive is an NTFS volume (hard drive) for which Data Manager provides file migration services by moving files to media and fetching files from media according to the parameters you set. Frequently used files can be kept on the NTFS volume, while less active files can be moved to storage media. It is the addition and configuration of the storage media through Data Manager that “extends” the space on the NTFS volume by moving files to storage media and purging the file data, while making the file appear to still reside on the extended drive.
To a client retrieving files from a drive extended by Data Manager, all files, whether on the extended NTFS volume or on the storage media, appear to be present on the NTFS volume. According to move and purge rules that you configure, Data Manager moves files to removable media and then purges the file data from the extended drive. When the file data is purged, Data Manager leaves a file “tag” on the extended drive containing file information, such as the size and time and date of creation or modification. When viewing the extended drive through Windows Explorer, the entire file appears to still be stored on the drive, even if the file data has actually been purged.
Every Data Manager computer must have at least one extended drive. The extended drive, media folders, move groups, and move rules, their creation, and their management are what enable and automate your file migration and data management system. The purge rules and delete rules are what enable and automate space management within your data management system. For more information, see the following sections:
• "File Migration, " which follows
• “Space Management” on page 16
• “Scheduling Movement of Files” on page 17
Table 3. Storage Media and Media Services Information
To Find More Information on... See...Types of storage media that can be used with Data Manager and issues to consider when deciding on media
“Storage Media Considerations” on page 28
Media services and how to configure them “Setting Up Media Services” on page 81
Managing media, including the following tasks: format, label, rename, add and remove to and from media folders and move groups, compact, back up by creating copies
Managing Storage Media chapter in the ASM Data Manager System Guide

Data Manager Concepts
ASM Data Manager Getting Started Guide 15StorageTek Proprietary
File MigrationData Manager uses a file migration system to allow you to manage large stores of data and files. The term “file migration” refers to the function of moving files from a local hard drive to one or more pieces of storage media. You can also retrieve, or “fetch”, those files for use when requested.
Data Manager automates the migration of files to media using a rule-based system. Rather than just migrating all files to media without distinction between files, you can select which files should be moved to what types and pieces of media. Data Manager tracks each file and each piece of media so that when a client requests file data that has been moved to media, Data Manager can find the file and retrieve it for the client.
The first step in enabling file migration to media by Data Manager is creating an extended drive. After an extended drive has been created and media has been added to the extended drive, you can create media folders to organize files on the drive. Move groups are specific groupings of media within a media folder, and move rules are designed to allow you to configure, very specifically, what files in a media folder are moved to what move group. For more information, see the following section:
• "Media Folders, " which follows
• “Move Groups” on page 15
• “Move Rules” on page 16
Media FoldersExtended drives contain media folders to logically group the media to which files on the extended drive are migrated. Media folders provide a virtual directory structure for media. The media folder is a directory that defines a point in the directory tree (from the root of the extended drive) where the media’s files are located. In order to be used by Data Manager, all media must be assigned to a media folder. This folder is created as a physical folder (or subfolder) on the extended drive, and can be viewed as such through Windows Explorer.
What you are doing when you create a media folder is creating an association between the real folder on the hard drive volume and the pieces of storage media you add to the folder in Data Manager. You can create a media folder in Data Manager using a folder that already exists on the extended drive, or create a new folder on the drive.
For more information on creating media folders and adding media to them, see “Media Folders” on page 150.
Move GroupsA move group is a subset of the media in a media folder. When you configure file migration, you select target media for each move group and a target move

Introduction
16 Second EditionStorageTek Proprietary
group for each move rule. Selecting a move group specifies that only media in that move group will be used to store files moved under that rule. This can be useful if segregation of data is necessary. You must create a move group before you can create move rules for the move group. For more information on creating move groups, see “Creating Move Groups” on page 161.
Move RulesMove rules contain the instructions that Data Manager follows when choosing which files to move to a particular piece or group of media.
There are two types of move rules. When you create an inclusive move rule, you specify which files should be moved and which target move group of media will be used to store them. You can also create an exclusive move rule, however, if you want to specify certain files that you do not want Data Manager to move to media.
You must create at least one inclusive move rule in order for files to be moved to media. For more information on creating move rules, see “Move Rules” on page 166.
Space ManagementOne of the main reasons to use a file migration system to manage your data and files is to manage data storage space. After file data is moved to storage media, that data can be removed from the local storage space, freeing up that space for additional files. The key is to maintain as much local storage space as possible while still making files easily available. Ultimately, your data management system is also a space management system.
Data Manager allows you to move files to media for storage while making the files appear to remain on the hard drive. Those files appear to remain on the hard drive because Data Manager uses a “file tag” to identify the file after the file data is removed. Removing file data while leaving the file tag behind is called a purge.
Purged files are still accessible, and to a client workstation, appear to be saved on the extended drive volume. When the client requests the files, Data Manager goes to the media where the files are stored and retrieves the file data, displaying it for the client.
In some instances, you may also want to delete files completely when they are no longer of use. Data Manager allows you to set up delete rules for files that set specific criteria for what files are to be deleted from both the extended drive and the storage media.
Purge rules (and the purge after move setting in move rules) and delete rules are what enable and automate space management within your data management system. For more information, see "Purge Rules, " which follows, and “Delete Rules” on page 17.

Data Manager Concepts
ASM Data Manager Getting Started Guide 17StorageTek Proprietary
Purge RulesPurge rules regulate the reclamation of file space on the extended drive.
As with move rules, there are two types of purge rules. An inclusive purge rule allows you to specify which migrated files should be purged from the extended drive and when, while an exclusive purge rule allows you to specify which moved files you do not want Data Manager to purge.
Purge rules allow you to choose whether to purge files during extended drive scans or to purge files only when extended drive disk space is needed. For more information on configuring purge rules, refer to the Managing the Extended Drive chapter of the ASM Data Manager System Guide.
Delete RulesDelete rules can be added to permanently delete files from the extended drive and from media. An inclusive delete rule defines a specific folder, file type, and file age that a file must match before it is deleted. An exclusive delete rule allows you to specify files that you do not want Data Manager to delete.
Delete rules are processed during extended drive scans. When inclusive delete rules are processed, all files matching the rules are automatically and permanently deleted from the extended drive and from the storage media containing those files.
Note: Once files are deleted using a delete rule, Data Manager can no longer access those files. Whether the files are physically deleted on the media is determined by the properties of the media itself (WORM, magneto-optical, tape).
For more information on configuring delete rules, refer to the Managing the Extended Drive chapter of the ASM Data Manager System Guide
Scheduling Movement of FilesThe final steps in setting up file migration are scheduling drive scans and the movement of files to media.
Drive scans must be performed periodically in order to write files to the move list, and consequently to move the files to storage media making them able to be purged from the extended drive. During a drive scan, Data Manager inventories all of the files on an extended drive and checks each file against the move rules for the drive, adding eligible files to the move list. Besides writing files to the move list, drive scans are required to qualify files against delete rules and purge rules with configured age delays, subsequently purging file data and/or deleting files as necessary.
If you configure a time delay in your inclusive move rules, you must periodically scan the extended drive to be sure that files initially excluded from the move list because of age are added to the list after they reach the correct age.

Introduction
18 Second EditionStorageTek Proprietary
In addition, file-sharing issues or sharing violations can prevent files from being added to the move list when appropriate. Data Manager must have full access to a file in order to obtain information required for the move list. If the file is open or otherwise being accessed by a program or user, Data Manager cannot add it to the move list.
Regular drive scans are required to be sure that all appropriate files are written to the move list when they qualify, and as such, are being written out to storage media. For more information on scheduling drive scans, see “Scheduling Drive Scans” on page 176.
When files qualify for movement under the configured move rules, they are written to the move list, either immediately upon being saved to the extended drive or during a drive scan. The move list is not processed, and therefore the files are not moved to media, however, until the Move files to media schedule is active. For more information on scheduling the movement of files to media, see “Scheduling Movement of Files” on page 179.
Data Manager System ManagementOnce you set up Data Manager to most effectively manage your file system migration, it requires little maintenance. There are some options that you may want to evaluate and modify either when you are setting up Data Manager or as your system grows. For more information, see the following :
• "Data Manager as a Service, " which follows
• “Logs and Reports” on page 18
• “Backup and Recovery” on page 19
Data Manager as a ServiceData Manager functions as a Windows NT/2000 service rather than as a user-mode application. As a Windows service, you can start, pause, and stop Data Manager, as well as configure it for various startup settings.
You can also control settings such as how long Data Manager waits after media becomes inactive before it automatically spins down the media, the minimum amount of time Data Manager keeps media in a drive after it has been mounted, and the amount of time media must remain mounted after Data Manager has fetched data from that media.
For more information on managing the Data Manager service and its options, refer to the Managing the Data Manager Computer chapter of the ASM Data Manager System Guide.
Logs and ReportsData Manager has built-in utilities for monitoring events, errors, and warnings on the extended drive. The logs provide a quick look at Data Manager activities, and allow you to monitor all aspects of extended drive events. Logs

Data Manager Concepts
ASM Data Manager Getting Started Guide 19StorageTek Proprietary
can help identify and solve potential problems during runtime that might otherwise become critical problems if ignored. For more information on viewing logs, refer to the Managing the Data Manager Computer chapter of the ASM Data Manager System Guide.
Data Manager also contains a reporting feature that can be used to track system statistics. You can create various reports of system activities, including extended drive information, media information, media services, and Data Manager settings in the Windows NT/2000 registry. In addition, the reporting function allows you to create and save custom layouts for your reports, and to choose the layout you want when the report is run. For details on running reports, refer to the Running Data Manager Reports chapter of the ASM Data Manager System Guide.
Backup and RecoveryData Manager allows you to create backup files for both the data on your extended drive and your Data Manager configuration so that you can easily restore them in the event of system failure. You can also create copies of your media as backups and promote those copies if the original media becomes unusable. For more information on backup and recovery, refer to the Data Manager Backup and Recovery chapter of the ASM Data Manager System Guide.
In addition, if you use a clustered environment to manage fault-tolerance for your system, Data Manager can be installed and run in a clustered environment, allowing for automatic fail-safe of your Data Manager system. For more information, see “Clustering” on page 183.

Introduction
20 Second EditionStorageTek Proprietary

ASM Data Manager Getting Started Guide 21StorageTek Proprietary
2Planning Your Data Manager System
Before installing ASM Data Manager, you will want to consider the overall storage needs for the system. Should you buy several Data Manager licenses to allow for extended drives on several different machines, or will it be more efficient to centralize your Data Manager files on one computer? What type of storage media will you use?
You should decide before installation how many Data Manager computers and extended drives to use, and how to organize the data on each drive. You can also plan in anticipation of the traffic patterns on the Data Manager system: how and when will files be moved? How long do you want to keep files? To how many files will you want immediate access? When will the system be used most? When will it be used least?
Some issues to consider include:
• The number of Data Manager computers to use
• The total volume of files in your Data Manager system
• The optimal distribution of data in your Data Manager system
• What type(s) of storage media to use
• When files should be moved to media
• What/how many files should be available for immediate access
• Data Manager traffic patterns
Some organizations have existing file storage systems, and may have already decided on an optimum arrangement for file servers. There is no need, in implementing Data Manager, to modify your chosen arrangement. Simply install Data Manager on each of the file servers, and Data Manager will extend your existing hard drives with long-term storage on the media services for Data Manager.
If an existing file server already has multiple hard drives, extending a new file server might provide more efficient client access. Data Manager could be installed on the new file server, and file organization planned.
Additional Data Manager computers can be added to a Data Manager system as file storage needs on a network increase. Data Manager scalability allows you to start, for example, with Data Manager and its media service installed on a single machine (preferably with two hard drives). The Data Manager system

Planning Your Data Manager System
22 Second EditionStorageTek Proprietary
can later be expanded as needed by adding new hard drives and other Data Manager computers.
For more information on planning your Data Manager system, see the following sections:
• "System Requirements, " which follows
• “Client Connectivity” on page 27
• “Storage Media Considerations” on page 28
• “Windows NT/2000 Security” on page 41
• “Maximizing Data Manager Performance” on page 44
■ System RequirementsBefore you install ASM Data Manager, be sure that your hardware and operating system meet the Data Manager system requirements and that they meet your long-term file storage needs. For more information, see the following sections:
• "Operating System Requirements, " which follows
• “Data Manager Computer Specifications” on page 23
• “Planning Your Extended Drive(s)” on page 23
• “Sizing Your Extended Drive” on page 24
Operating System RequirementsBecause Data Manager functions as a Windows service, we recommend using the following operating systems:
• Windows NT 4.0 Server with Service Pack 6a, or
• Windows 2000 with Service Pack 2 or 3
If you are using a different operating system on the server on which you plan to install Data Manager, you must upgrade the operating system before installing Data Manager. Consult your Windows NT/2000 documentation for information on installing the operating system.
In addition, if you plan to install Data Manager in a clustered environment, be sure to check your operating system requirements, and make sure the hardware in your cluster meets or exceeds the minimum specifications noted by the operating system documentation. For more information on using Data Manager with Microsoft Cluster Server, see “Clustering” on page 183.

System Requirements
ASM Data Manager Getting Started Guide 23StorageTek Proprietary
If you are installing Data Manager on Windows 2000 Server in an Active Directory service environment, be advised that Data Manager only supports certain configurations.
For information on the latest Windows service packs and hot fixes certified for use with Data Manager, contact your technical support representative. For information on operating system issues that may affect performance on your Data Manager system, consult the Knowledge Base accessible through the Storagetek website at http://www.support.storagetek.com.
Data Manager Computer SpecificationsData Manager computers should have the following minimum configurations (based on the total number of files that will be stored on the computer):
If you plan to install Data Manager in an active/active cluster environment, carefully consider your size requirements. If both servers are in use and one server fails, the other server must be capable of handling the workload of both servers. For more information on clustering, see “Clustering” on page 183.
Planning Your Extended Drive(s)The drives extended by Data Manager must be located on the machine where Data Manager is installed, and must be NTFS volumes. The extended drive volume should be separate from the volume where the system files are stored.
If you want to create multiple extended drives on a single physical hard drive, you can use Windows NT disk administration or Windows 2000 computer management utilities to partition the drive into multiple NTFS volumes. For more information on partitioning the drive, refer to your Windows documentation.
Data Manager and the media services it uses can be located on the same computer or on separate computers, as long as the computer’s specifications are acceptable for use with Data Manager.
Table 4. Minimum Configurations
Number of Files
Minimum Configuration for Windows NT
Minimum Configuration for Windows 2000
<500,000 200-MHz Pentium processor, 128 MB of RAM
200-MHz Pentium processor, 256 MB of RAM
<1,000,000 300-MHz Pentium processor, 128 MB of RAM
300-MHz Pentium processor, 256 MB of RAM
<10,000,000 400-MHz Pentium processor, 256 MB of RAM
400-MHz Pentium processor, 256 MB of RAM
>10,000,000 450-MHz Pentium II processor, 512 MB of RAM
450-MHz Pentium II processor, 512 MB of RAM

Planning Your Data Manager System
24 Second EditionStorageTek Proprietary
Data Manager offers extended drives, media folders, move groups and move and purge rules to provide the most flexible data organization available. You should take into consideration the goals of the entire storage solution when making the decisions about multiple extended drives and/or multiple media folders.
To determine what size NTFS volume you will need for your extended drive, follow the steps in "Sizing Your Extended Drive, " which follows.
Sizing Your Extended DriveThe general rule for an extended drive is that more is better. NTFS volumes should be selected based on system activity and required response time. The larger the extended drive, the faster the system performance since there is a greater chance that any file requested will already be on the drive. For many systems with large volumes of data, extended drives should be sized to accommodate, at a minimum, an entire day’s processing for the clients connecting to the drive. This allows you to work at full speed during the day, with Data Manager performing system intensive file migration and other media tasks at night.
Each extended drive, whether associated one-on-one with a Data Manager computer, or one of multiple extended drives on a given Data Manager computer, must be sized separately. Calculating extended drive size helps you determine the hardware requirements for your Data Manager system. If you determine that you require a very large amount of space to store your Data Manager files, you might consider distributing the files over more than one Data Manager computer. We recommend limiting the number of files on a single extended drive to 20-25 million. Reasons for this recommendation include the length of time it would take to run an extended drive scan or check disk function, and the stability of the Master File Table that NTFS uses as part of the system’s file tracking.
In addition, if you are planning to use DVD-R as your storage media, be advised that Data Manager will not purge file data that has been moved to DVD-R media until that piece of media is finalized. This is designed to reduce the risk of data loss or corruption for files moved to DVD-R media. This also means that you will have to allow for additional extended drive space to hold those files until they can be purged.
As a guideline for calculating necessary space, 1,000,000 files require 1.5 GB of hard drive space. This guideline should be used only for an estimate of
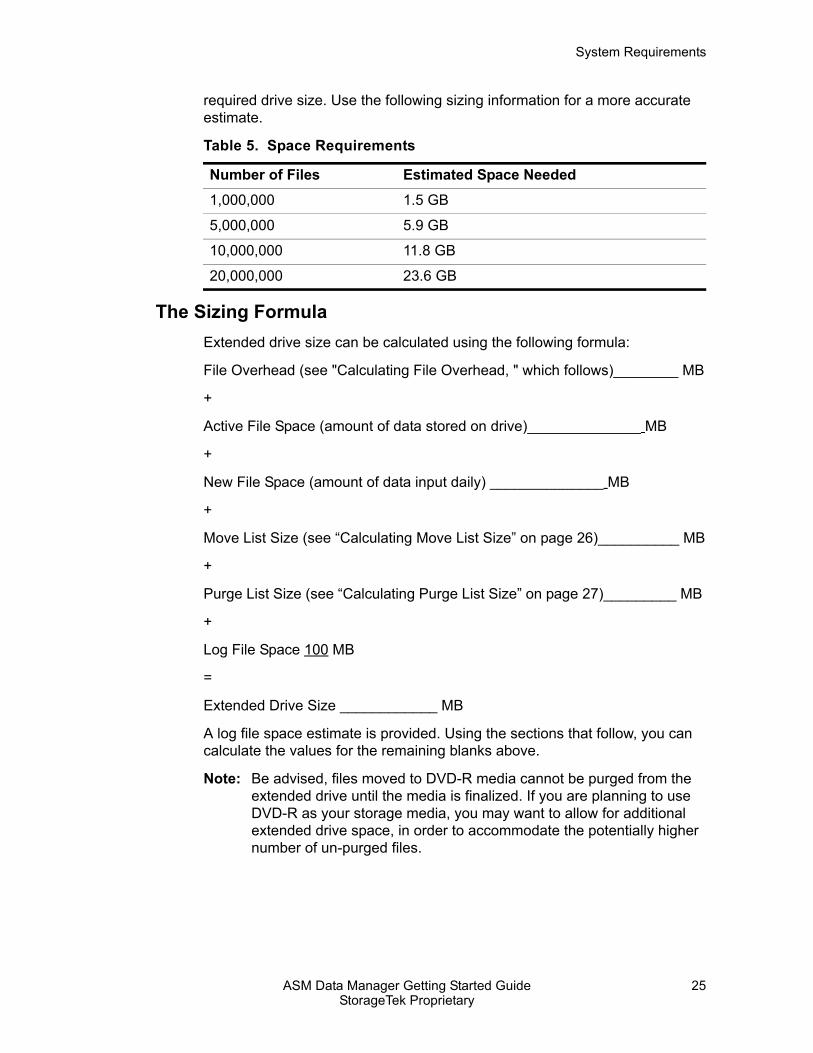
System Requirements
ASM Data Manager Getting Started Guide 25StorageTek Proprietary
required drive size. Use the following sizing information for a more accurate estimate.
The Sizing FormulaExtended drive size can be calculated using the following formula:
File Overhead (see "Calculating File Overhead, " which follows)________ MB
+
Active File Space (amount of data stored on drive)______________ MB
+
New File Space (amount of data input daily) ______________ MB
+
Move List Size (see “Calculating Move List Size” on page 26)__________ MB
+
Purge List Size (see “Calculating Purge List Size” on page 27)_________ MB
+
Log File Space 100 MB
=
Extended Drive Size ____________ MB
A log file space estimate is provided. Using the sections that follow, you can calculate the values for the remaining blanks above.
Note: Be advised, files moved to DVD-R media cannot be purged from the extended drive until the media is finalized. If you are planning to use DVD-R as your storage media, you may want to allow for additional extended drive space, in order to accommodate the potentially higher number of un-purged files.
Table 5. Space Requirements
Number of Files Estimated Space Needed1,000,000 1.5 GB
5,000,000 5.9 GB
10,000,000 11.8 GB
20,000,000 23.6 GB
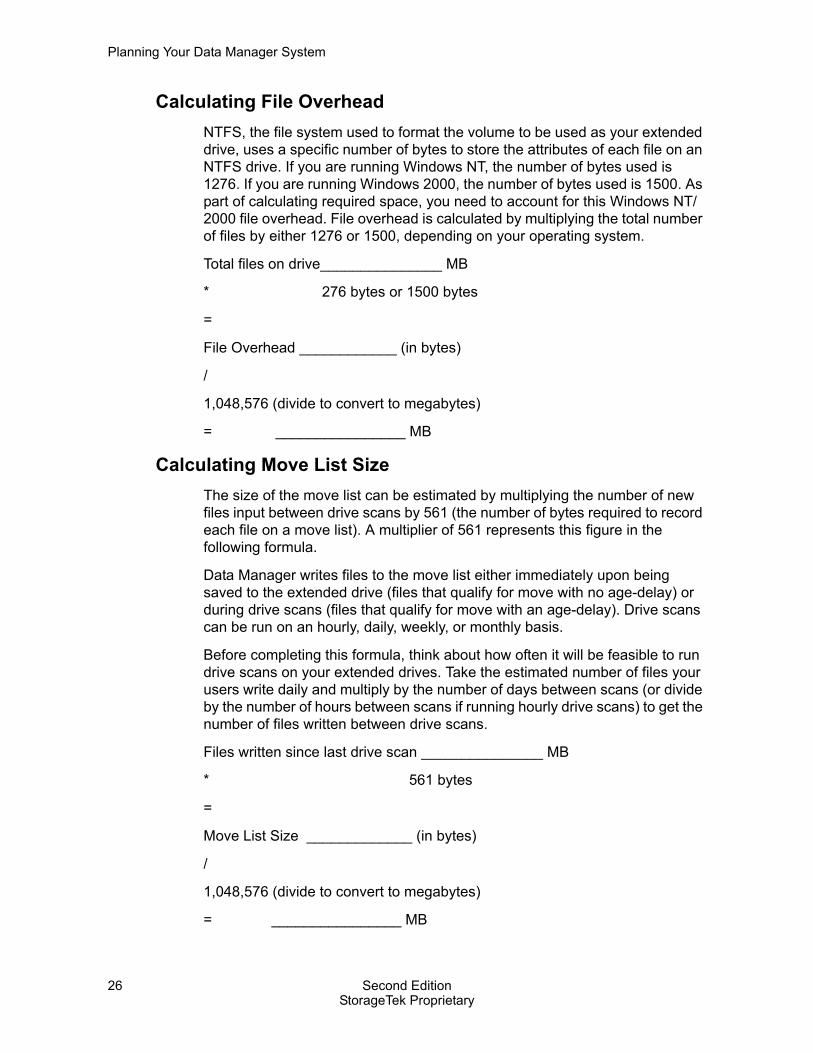
Planning Your Data Manager System
26 Second EditionStorageTek Proprietary
Calculating File OverheadNTFS, the file system used to format the volume to be used as your extended drive, uses a specific number of bytes to store the attributes of each file on an NTFS drive. If you are running Windows NT, the number of bytes used is 1276. If you are running Windows 2000, the number of bytes used is 1500. As part of calculating required space, you need to account for this Windows NT/2000 file overhead. File overhead is calculated by multiplying the total number of files by either 1276 or 1500, depending on your operating system.
Total files on drive_______________ MB
* 276 bytes or 1500 bytes
=
File Overhead ____________ (in bytes)
/
1,048,576 (divide to convert to megabytes)
= ________________ MB
Calculating Move List SizeThe size of the move list can be estimated by multiplying the number of new files input between drive scans by 561 (the number of bytes required to record each file on a move list). A multiplier of 561 represents this figure in the following formula.
Data Manager writes files to the move list either immediately upon being saved to the extended drive (files that qualify for move with no age-delay) or during drive scans (files that qualify for move with an age-delay). Drive scans can be run on an hourly, daily, weekly, or monthly basis.
Before completing this formula, think about how often it will be feasible to run drive scans on your extended drives. Take the estimated number of files your users write daily and multiply by the number of days between scans (or divide by the number of hours between scans if running hourly drive scans) to get the number of files written between drive scans.
Files written since last drive scan _______________ MB
* 561 bytes
=
Move List Size _____________ (in bytes)
/
1,048,576 (divide to convert to megabytes)
= ________________ MB

Client Connectivity
ASM Data Manager Getting Started Guide 27StorageTek Proprietary
Calculating Purge List SizeThe size of the purge list can be estimated by multiplying the number of retrieved files by 561 (the number of bytes required to record the file on the list). A multiplier of 561 represents this figure in the following formula:
Files written since last drive scan _______________ MB
* 561 bytes
=
Purge List Size _____________ (in bytes)
/
1,048,576 (divide to convert to megabytes)
= ________________ MB
■ Client ConnectivityThe extended drive is a partitioned volume that resides on a computer using Windows NT or Windows 2000 as the operating system. The volume is shared through a network so that it is visible and accessible to other users. The client computers that save and retrieve files to and from the shared drive can use virtually any operating system to read and write the extended drive files. For more information, see "File Stream Support, " which follows, and “Client File System Support” on page 28.
File Stream SupportBecause NTFS supports file streams, many applications now take advantage of file streams to store their data. In addition, the NFS file system uses file streams to store private data.
Support for file streams ensures that ASM Data Manager can protect all application data in files (not just the primary data). File streams are moved and fetched along with the primary file data. In addition, file streams can be restored from storage media (along with primary file data) for disaster recovery purposes.
Note: Data Manager does not support direct read of files with streams. You can set the direct read attribute for these files, however, when the file is requested, it is fetched to the extended drive instead of being read directly from the media, and the direct read attribute is removed.
File stream properties can be viewed through the Explorer Add-ons, if the file selected contains file streams. For more information on the

Planning Your Data Manager System
28 Second EditionStorageTek Proprietary
Explorer Add-ons, refer to Appendix B: Using Explorer Add-ons in the ASM Data Manager System Guide.
Client File System SupportBecause Data Manager uses the extended NTFS volume to store files before migration, and is capable of migrating file streams, all clients that can connect to an NTFS drive can store and access Data Manager files on an extended drive.
NTFS (Native Transport File System)Clients using Windows NTFS can read and write files on Data Manager extended drives. Windows NT/2000 uses NTFS or FAT as file systems.
FAT (File Allocation Table) Data Manager supports FAT as a read-only file system. Operating systems that use FAT as a file system include Windows 3.x, Windows 95, Windows 98, Windows NT, and Windows 2000.
NFS (New File System)UNIX and LINUX applications have NFS as a file system. Because Data Manager protects file stream data, client connectivity drivers for NFS can be used to connect to Data Manager extended drives.
■ Storage Media ConsiderationsStorage media is an integral part of your ASM Data Manager file management system. The type of storage media you use determines how your media, and therefore your files, must be managed.
Data Manager supports many types of high-capacity storage media for the migration of files. The functionality accessible through a media service depends on the type of media used in the device for that media service. You need to evaluate the following when considering what media service, and therefore what media, is best suited to your Data Manager system:
• "Types of Media, " which follows
• “Types of Media File Systems” on page 33
• “Media Transaction Logging” on page 38
• “Flushing Transactions to Media” on page 40
For more information on media services, see “Setting Up Media Services” on page 81.

Storage Media Considerations
ASM Data Manager Getting Started Guide 29StorageTek Proprietary
Types of MediaData Manager supports many high-capacity storage media types. Once added to the Data Manager system, these media are the storage to which your Data Manager files are migrated. The functionality accessible through a media service depends on the type of media used in the device for that media service. The following table defines all media types currently supported:
Note: Data Manager does not currently support CD-R, CD-RW or DVD-RW media.
CD-ROM MediaCD-ROM stands for Compact Disc – Read Only Memory. As its name indicates, CD-ROM media is read only and cannot be written to. The data is stamped onto the CD by the vendor and cannot be erased. CD-ROM can use
Table 6. Currently Supported Media Types
Media Type Support Type
For More Information, See...
CD-ROM Read Only "CD-ROM Media, " which follows
DVD-R Read/Write “DVD-R Media” on page 30
DVD-RAM Read/Write “DVD-RAM Media” on page 30
DVD-ROM Read Only “DVD-ROM Media” on page 30
EMC (EMC Centera media, available through the EMC Centera media service)
Read/Write “EMC Centera Media” on page 31
Magneto-optical Read/Write “Magneto-Optical Media” on page 31
NAS (network attached storage available through network shares)
Read/Write “NAS Media” on page 31
Tape (DLT, AIT, 9840, Magstar, 8mm DAT)
Read/Write “Tape Media” on page 32
TSM (Tivoli Storage Manager media available through the TSM media service)
Read/Write “Tivoli Storage Manager Media” on page 32
WORM Read/Write “WORM Media” on page 33
WORM-Tape Read/Write “WORM-Tape Media” on page 33

Planning Your Data Manager System
30 Second EditionStorageTek Proprietary
the ISO-9660, High Sierra or Joliet file systems. Each of these are most effectively recognized and readable through Data Manager using the NTFS file system; however, CSS, the ASM CD file system, can also read CD-ROM media.
DVD-R MediaDVD-R (DVD - Recordable) media is both readable and writable; however, you can write data to it only once (although in multiple sessions). Once DVD-R media is full, you can finalize the media, at which point it becomes read-only. Because of the potential instability of DVD-R media before it is finalized, DVD-R media is treated differently in Data Manager than other media; files written to DVD-R cannot be purged from the extended drive until the media is finalized. For more information on finalizing media, see the Managing Storage Media chapter of the ASM Data Manager System Guide.
Note: Depending on the type of DVD-R media you are using, as well as the type of drive you are using to read from and write to the media, a piece of media may appear full before all of the space on the media has been used. This is because there is a limit on the number of write calibrations that can be performed on a piece of media. If the maximum number of write calibrations is reached, Data Manager can no longer write files to the piece of media - even if free space remains on the media.
DVD-RAM MediaDVD-RAM is a rewritable, high-density optical disc media. DVD originally stood for Digital Versatile Disc or Digital Video Disc, but is now simply referred to as DVD. RAM, or Random Access Memory, refers to the way data is written to and read from the disk. RAM media can be written to and read from randomly, as opposed to sequentially, accessing files and space wherever necessary.
DVD-ROM MediaDVD-ROM stands for DVD – Read Only Memory. As its name indicates, DVD-ROM media is read only and cannot be written to. Like CD-ROM, DVD-ROM media is pre-manufactured, meaning the data is stamped onto the media and cannot be erased. Most manufactured DVD-ROMs use the ISO-9660 file system format, which, like CD-ROM is recognized by ASM using the NTFS file system. Be advised however, that the ASM interface will identify DVD-ROM media as CD-ROM, because the file system drivers cannot distinguish between the two types of media, and only recognize the ISO-9660 file system format.

Storage Media Considerations
ASM Data Manager Getting Started Guide 31StorageTek Proprietary
Magneto-Optical MediaOptical media refers to removable media that is written to by lasers. Magneto-optical media (also often called erasable-optical) are optical disks that can be written to, erased, and loaded with new data.
EMC Centera MediaEMC Centera (EMC) media is media that is created through the EMC Centera media service in Data Manager. The EMC media service provides access to an EMC Centera Content Network Repository, which is a line of disk-based storage devices deployed on a Redundant Array of Independent Nodes (RAIN).
In Data Manager, EMC media is “virtual”, meaning that a piece of media defined in Data Manager does not specifically correspond to a physical piece of media (like a tape cartridge). Instead, the virtual media is designed to simulate divisions of the larger repository, allowing you to take advantage of the flexible file migration features available in Data Manager (media folders, move groups, and move, purge and delete rules). Each piece of virtual media contains more than 256 GB of space, and can hold up to 65,000 files.
For more information on configuring an EMC media service in Data Manager, see “EMC Centera” on page 110.
NAS MediaNetwork Attached Storage (NAS) is a type of media that is directly accessible through the network as opposed to being accessed through a removable media device. NAS media is considered “virtual” media, and represents a connection to a share on the network. That share can be located on a NAS device or a RAID, or it could even be a shared media folder on another Data Manager extended drive.
You can create NAS media to correspond to any network share, including a network share resident on the local Data Manager computer, as long as the share is not on the local extended drive.
For more information on different kinds of NAS devices, see the discussions that follow. For more information on configuring the NAS media service in Data Manager, see “Network Attached Storage” on page 90.
RAID DevicesA RAID or Redundant Array of Independent Disks is a device that contains a group of disks. In some cases part of the physical storage capacity is used to store redundant information about data stored on the remainder of the storage capacity. The redundant information allows for regeneration of data in the event that one of the member disks or the access path to it fails. In other cases, the disks are set to all run independently, allowing for much faster read/write speeds.

Planning Your Data Manager System
32 Second EditionStorageTek Proprietary
NAS DevicesNAS (Network Attached Storage) devices are storage devices that contain several high-capacity magnetic drives and manage storage of data to those drives in a way that is seamless to the user. NAS devices use an operating system (like Windows) to function as the file system control that tracks the location of files within the NAS device.
Some NAS devices allow you to configure one or more volumes as WORM volumes, meaning that once data is written to the volume, it cannot be modified or deleted (like any other kind of WORM media).
Tape MediaTape media are electromagnetic data storage devices that are typically both readable and writable; however, you can write data to each sector on a piece of tape only once unless you reformat the media in order to reuse it. Tape media are read by tape drives that mount, write to and read from the tape. Tape media is often encased in a tape cartridge that protects the magnetic tape itself and makes it easily portable.
Data Manager supports the following types of tape media: 8mm DAT, AIT, 9840, Magstar, and DLT. Tape media is accessible to Data Manager through either the Data Manager MediaStor or ASM ACSLS media services. For more information, see “ASM MediaStor” on page 82 or “StorageTek’s ACSLS” on page 122.
Tivoli Storage Manager MediaTivoli Storage Manager (TSM) media is media that is created through the TSM media service in Data Manager. The TSM media service provides a repository for Data Manager files, which TSM can subsequently move to other storage devices managed by the TSM server.
In Data Manager, TSM media is “virtual”, meaning that a piece of media in Data Manager does not necessarily correspond to a physical piece of media in the TSM system (like a tape cartridge). Instead, the virtual media is designed to simulate divisions of the larger repository, allowing you to take advantage of the flexible file migration features available in Data Manager (media folders, move groups, and move, purge, and delete rules). Data Manager manages TSM media similarly to NAS media, particularly with respect to the functional restrictions for formatting, labeling, and copying. The TSM server manages the actual physical removable media, so that tasks like formatting, labeling, and copying media are therefore done through TSM rather than through Data Manager.
For more information on configuring a TSM media service in Data Manager, see “Tivoli Storage Manager” on page 100.

Storage Media Considerations
ASM Data Manager Getting Started Guide 33StorageTek Proprietary
WORM MediaWORM stands for Write Once Read Many. WORM is an optical disk technology that allows you to write data to a disk only once, but read that data back as often as needed. Once written to, WORM media acts just like CD-ROM media in that the data on the media is permanent.
WORM-Tape MediaWORM-tape media are identical to tape media, in that they are electromagnetic data storage devices that are typically both readable and writable. However, you can write to a piece of WORM-tape only once (Write Once Read Many), and unlike standard tape, the media cannot be reformatted for reuse. Once written to, WORM-tape media acts just like CD-ROM media in that the data on the media is permanent and cannot be altered. WORM-tape media are supported by drives that have firmware loaded that support WORM media. Please contact the specific vendor to verify that they support WORM media in their drives, and to acquire the firmware version that supports the WORM media.
Types of Media File SystemsWhen a piece of media is formatted, a file system must be selected for that piece of media: either a Windows Native file system, an ASM file system, or a Universal Disk Format (UDF) file system. A file system is software that provides an interface for saving and retrieving files on storage media. File systems control all aspects of media management, including directory/file structures, data layout, and data transfer. Media can be formatted for file systems that are supported by both the media itself and the device (used by the media service) in which the media resides.
Windows NT/2000 installs the Windows Native file system drivers, and ASM MediaStor installs the ASM and UDF file system drivers. There are three Windows Native file systems (NTFS, CDFS, and FAT), three ASM file systems (OSS, TSS, and CSS), and two types of UDF file systems (overwritable and sequential).
Note: The Tivoli Storage Manager (TSM) and EMC Centera (EMC) media services use their own file systems. Since Data Manager cannot format TSM or EMC media, those file systems are not discussed here.

Planning Your Data Manager System
34 Second EditionStorageTek Proprietary
The following table lists Data Manager file system support by media type:
Note: The Data Manager interface only refers to “ASM File System”, “UDF”, and “NTFS” where media file systems are noted. The media type determines which file system is applied.
Each file system has benefits and limitations relating to the features and performance of the media to which it is applied. In most cases, you do not have a choice as to which file system to use: WORM, WORM-tape, and tape can only use an ASM file system; and DVD-R can only use the UDF file system. For magneto-optical and DVD-RAM media, however, you must choose a file system that best suits your needs. There are two factors to consider: media portability and media performance.
Media portability refers to the ability to read and write to media on Windows devices outside of Data Manager. If, for example, media used to archive files through Data Manager will be distributed to locations that do not have a Data Manager installation, media portability is a concern and should be considered when determining what file system and type of storage media you will use.
Media performance refers to the speed with which Data Manager can write to and read from storage media.
As a general rule, if portability of optical media is a concern, choose Windows Native file systems. Windows Native file systems are overwritable, meaning
Table 7. Data Manager File System Support by Media Type
Media Type Supported File SystemsCD-ROM CDFS (Windows Native file system, read-only)
CSS (ASM file system, read-only)
DVD-R UDF file system (sequential)
DVD-RAM OSS (ASM file system)
UDF file system (overwritable)
DVD-ROM CDFS (Windows Native file system, read-only)
Magneto-optical OSS (ASM file system)
UDF file system (overwritable)
NTFS (Windows Native file system)
FAT (Windows Native file system, read-only)
NAS NTFS (Windows Native file system)
Tape TSS (ASM file system)
WORM OSS (ASM file system)
WORM-Tape TSS (ASM file system)

Storage Media Considerations
ASM Data Manager Getting Started Guide 35StorageTek Proprietary
that files are written to any available location on the media. While these file systems may have a performance disadvantage for optical media in comparison to ASM file systems, they are 100% portable (media written in these formats can be read on any Windows system, with or without Data Manager).
ASM file systems are optimized for Data Manager media performance. Unlike Windows Native file systems, which are more generic and feature-rich, ASM “storage subsystems” implement the minimum set of features required to store and retrieve data. For example, ASM file systems are sequential, meaning that files are written in sequential order on the media. As a result, runtime overhead is very low and data is contiguously organized, enhancing overall performance. If portability of storage media is not a concern, choose ASM file systems to provide the best overall system performance.
Data Manager supports UDF file systems in order to support the use of DVD-R media. Although you can format magneto-optical media using UDF, it does not provide a performance advantage over OSS or a portability advantage over NTFS. (FAT for magneto-optical media should only be selected in order to provide access to files on media that has already been formatted using FAT.) Similarly, for DVD-RAM media, UDF does not provide a performance advantage over OSS, and media using UDF is only portable to the few systems that support the UDF 2.01 specification, such as Windows XP.
Note: For optical media, FAT and NTFS are not recommended unless media portability is essential. Windows Native file systems are not designed for use with optical media.
For more information on file systems, see the following sections:
• "Windows Native File Systems, " which follows
• “ASM File Systems” on page 36
• “UDF File Systems” on page 38
Windows Native File SystemsWindows Native file systems are provided with Windows NT/2000 and are loaded onto the system at the time of the operating system installation. These are feature-rich file systems meant for hard drives, but may be desirable for storage media if you have portability concerns.
Data Manager supports three Windows Native file systems:• "NTFS - New Technology File System, " which follows
• “FAT - File Allocation Table” on page 36
• “CDFS - CD-ROM File System” on page 36

Planning Your Data Manager System
36 Second EditionStorageTek Proprietary
NTFS - New Technology File SystemThis file system is supported only by Windows and provides an optimized file system for large volume media. It is specially designed to provide fast access and management of very large volumes of information (gigabytes or even terabytes) and is used primarily for magnetic disks (like hard drives).
NAS media must use NTFS, and you can choose NTFS for magneto-optical media.
FAT - File Allocation TableThis file system is supported by many different operating systems, including DOS, Windows 95/98, and Windows NT/2000. It is an older file system that was designed for small-volume (less than 4 GB) management, and is not widely used in Windows NT/2000 server environments.
FAT is not recommended for optical storage management. It is based on older file system technology and does not handle large volume sizes that today’s media capacities require. In addition, the data storage strategy is prone to fragmentation and, over time, deteriorates Data Manager read/write performance.
The FAT file system is supported by Data Manager as a read-only file system. This means that Data Manager cannot write (migrate files) to media formatted using FAT.
You can use the FAT file system with magneto-optical media; however, you should only use FAT if you want to provide access to files on media that has already been formatted using FAT.
CDFS - CD-ROM File SystemThis file system reads two types of CD-ROM and DVD-ROM formats: ISO-9660, High Sierra and Joliet. These formats are supported by many different operating systems, and are supported natively by Windows. Most manufactured DVD-ROM media uses the ISO-9660 format, and is readable by Data Manager using this Windows native file system.
ASM File SystemsASM file systems are installed with Data Manager MediaStor and are optimized for Data Manager media performance. Unlike Windows Native file systems, which are more generic and feature-rich, ASM “storage subsystems” implement the minimum set of features required to store and retrieve data. For example, ASM file systems are sequential, meaning that files are written in sequential order on the media. As a result, runtime overhead is very low and data is contiguously organized, enhancing overall performance.

Storage Media Considerations
ASM Data Manager Getting Started Guide 37StorageTek Proprietary
There are three ASM file systems:• "OSS - Optical Storage Subsystem, " which follows
• “TSS - Tape Storage Subsystem” on page 37
• “CSS - CD-ROM Storage Subsystem” on page 37
OSS - Optical Storage SubsystemThe OSS file system supports WORM, DVD-RAM, and magneto-optical media. Files are stored contiguously from the beginning to the end of each piece of media, with single-seek read and write access. This file system provides the best overall read/write performance of all optical file systems supported by Data Manager.
OSS-formatted media requires Data Manager for reading and writing. This type of media may be moved from one Data Manager system to another, but cannot be read without Data Manager.
When a delete command is issued, files residing on OSS-formatted media are not deleted; only the file tags on the extended drive are actually deleted. Deleted file space cannot be reclaimed until the media is compacted (all files with file tags on the extended drive are moved back to the extended drive) and the media is reformatted. In addition, files that reside on media but whose file tags are deleted from the extended drive are restored to the extended drive when media is restored to a media folder, or a file restore media task is run on the media.
If WORM media support is required, the OSS file system must be used, as it is the only one supported by Data Manager for that type of media.
TSS - Tape Storage SubsystemTSS is the only file system provided for tape and WORM-tape media management. Specifically, Data Manager supports Digital Audio Tape (DAT) and Digital Linear Tape (DLT). Files are stored contiguously from the beginning to the end of each tape, as with all tape file systems.
TSS-formatted media requires Data Manager for reading and writing. This type of media may be moved from one Data Manager service to another, but cannot be read without Data Manager.
CSS - CD-ROM Storage SubsystemThis file system supports CD-ROM media and is provided to allow use of certain devices that cannot use the CDFS file system, which is a Windows Native file system. It is recommended that you try to use the CDFS file system for a device and then use CSS if CDFS will not work with the device.

Planning Your Data Manager System
38 Second EditionStorageTek Proprietary
UDF File SystemsData Manager’ UDF implementation meets the specifications (version 2.01) laid out for the UDF (Universal Disk Format) file system by the Optical Storage Technology Association (OSTA), a nonprofit international trade association. For more information on OSTA, refer to the OSTA website, http://www.osta.org.
Support for the UDF file system was added to Data Manager in order to support the use of DVD-R media, but you can also use UDF with magneto-optical and DVD-RAM media.
UDF is intended to allow file interchange between different operating systems; however, only a few operating systems, such as Windows XP, currently support the 2.01 specification and can read media using UDF.
There are two types of UDF file systems: overwritable and sequential. For more information, see the discussions that follow.
OverwritableThe overwritable UDF file system allows you to read files from and write files to DVD-RAM and magneto-optical. Files are written to any available location on the media.
SequentialThe sequential UDF file system supports DVD-R media. Files are written in sequential order on the media, and you can write files to media only once, although you can write files in multiple sessions. Once the media is full, you can finalize the media, which makes the media unavailable for any more file writes. In addition, finalizing DVD-R media allows it to be read in a Windows XP environment.
Once media is finalized, it functions as read-only media, and you can no longer write files to it.
Media Transaction LoggingSome transactions can be performed on files on the extended drive but will not be performed on the corresponding files on media. For example, a file from CD-ROM can be deleted from the extended drive, but will not be deleted from the CD-ROM media. If that piece of media is restored to Data Manager at any time, the deleted file will be restored because it remains on the media.
Transaction logging is dependent on the type of media and the file system selected for the media. For each media type, the following tables specify what

Storage Media Considerations
ASM Data Manager Getting Started Guide 39StorageTek Proprietary
operations can be performed on the extended drive for files moved to media and which transactions are updated on the media.
Transactions are only generated when the operation can be performed on the physical media. For example, you can delete files on UDF overwritable, and
Table 8. Extended Drive Operations Allowed
DELETE RENAME FILE
RENAME DIR
SET ATTRIBUTES
CSS YES NO NO YES
EMC YES NO NO YES
NAS (Standard) YES YES YES YES
NAS (Aggregate) YES NO NO YES
NAS (WORM) NO NO NO NO
OSS-WORM YES NO NO YES
OSS-RW YES YES NO YES
TSS YES NO NO YES
TSM YES YES YES YES
UDF overwritable YES YES NO YES
UDF sequential YES NO NO YES
Table 9. Transactions Generated
DELETE RENAME FILE
RENAME DIR
SET ATTRIBUTES
CSS NO NO NO NO
EMC YES NO NO NO
NAS (Standard) YES YES YES YES
NAS (Aggregate) YES NO NO YES
NAS (WORM) NO NO NO NO
OSS-WORM NO NO NO NO
OSS-RW NO YES NO YES
TSS NO NO NO NO
TSM YES YES YES YES
UDF overwritable YES YES NO YES
UDF sequential NO NO NO NO

Planning Your Data Manager System
40 Second EditionStorageTek Proprietary
therefore, a transaction is generated; however, you cannot delete files on CSS, so no transaction is generated.
If a directory is renamed, a transaction is logged so the media can be updated to reflect the directory structure of the extended drive. The handling of these transactions varies depending on the media’s file system.
NTFS file systems support directory rename transactions. The transactions are performed on the media the next time it is mounted or when the media maintenance schedule is active. Rename transactions for empty directories are ignored. If the media is restored, the files appear in their original directories.
UDF file systems and ASM optical and tape file systems do not support directory rename transactions. When the transactions are performed, a warning appears to notify you that the transaction is not supported.
Flushing Transactions to MediaWhen changes are made to file attributes on the extended drive, the piece of media where that file is stored is not always immediately mounted to change the file on the media. Instead, Data Manager logs the change to the file in a transaction log for the piece of media, and saves that information until the next time the media is mounted. The transaction log is an area reserved on the Data Manager computer’s hard drive to automatically record all changes that are made. When the media is mounted, Data Manager “flushes” the transaction logs out to media, carrying out the logged transactions. The file changes are then reflected on the media.
Note: Certain types of transactions are possible on the extended drive but not possible on certain types of media. For more details on transaction logging, see the Media Transaction Logging section above.
For currently mounted media in a library drive, Data Manager always flushes transaction logs to media before responding to fetch requests, moving files, or processing media tasks. Transaction logs for media mounted in a standalone drive or tower are flushed automatically every minute (or immediately when a media rename occurs).
In libraries, Data Manager can use the library robotics to mount and dismount media without requiring manual insertion and removal of media by the administrator. For this reason, Data Manager mounts media in a library specifically to flush transaction logs to the media and keep the media updated. Data Manager uses the following rules for dismounting media currently in a library drive and mounting media on shelves in a library to transfer logged information to the media:
• For media currently mounted in the drive for fetch, transactions are flushed when the drive becomes available after the timeslice setting expires. The timeslice setting is configured on the Options tab of the Service Properties

Windows NT/2000 Security
ASM Data Manager Getting Started Guide 41StorageTek Proprietary
dialog box. For more information, refer to the Managing the Data Manager Computer chapter of the ASM Data Manager System Guide.
• For media currently mounted in the drive for move, transactions are flushed when there is nothing left to move (or when the Move files to media schedule is inactive). The Move files to media schedule is configured from the Settings tab of the Extended Drive Properties dialog box. For more information, see “Scheduling Movement of Files” on page 179.
• For media mounted for media tasks, transactions are flushed when there are no tasks left to process (or when the Process scheduled media tasks schedule is inactive). The Process scheduled media tasks schedule is also configured from the Settings tab of the Extended Drive Properties dialog box. For more information, refer to the Managing the Extended Drive chapter of the ASM Data Manager System Guide.
• For media mounted for copy, transactions are flushed when there are no copies left to update (or when the Update copy media schedule is inactive). The Update copy media schedule is also configured from the Settings tab of the Extended Drive Properties dialog box. For more information, refer to the Managing the Extended Drive chapter of the ASM Data Manager System Guide.
■ Windows NT/2000 SecurityThe user account that ASM Data Manager uses to log on as a service must be a member of both the local Administrators group and the local DXAdministrators group, and must also have the log on as a service privilege. Since Data Manager uses the account entered during installation to log on the Data Manager service, this privilege is added to that account during installation. In addition, to manage the Data Manager service, the user logged into the Data Manager computer must also be a member of both groups (though the log on as a service privilege is not necessary).
Note: If you are installing Data Manager on Windows 2000 Server in an Active Directory service environment, be advised that only certain configurations are supported in an Active Directory service environment.
In order to prevent unauthorized users from connecting to Data Manager computers, Data Manager creates a local DXAdministrators group on the Data Manager computer when it is installed. Data Manager then automatically adds all members of the Data Manager computer’s local Administrators group to the DXAdministrators group.
When users log into the Data Manager computer, Data Manager checks the user group(s) to which they belong. Users who are only members of the DXAdministrators group can perform all functions in Data Manager except for managing the service. In order to manage the Data Manager service (start,
Planning Your Data Manager System
42 Second EditionStorageTek Proprietary
pause, and stop the service, and configure service startup settings), a user must be a member of both the local Administrators group and a member of the DXAdministrators group.
You can verify whether a user is a member of local Administrators group or the DXAdministrators group in a few steps. Because Data Manager automatically adds all local administrators to the DXAdministrators group when you install Data Manager, no re-configuration of user rights may be necessary. However, in the event you need to either restrict administrator access to the Data Manager service, or you need to add or remove administrators from the local Administrators or DXAdministrators group, you can do so through Windows.
For more information, see the following sections:
• "Checking Administrative Group Membership, " which follows
• “Adding Users to Administration Groups” on page 43
• “Removing Users from Administration Groups” on page 44
Note: If you are running Data Manager in a clustered environment, changes or additions to the Administrators and the DXAdministrators group must be configured on each of the servers in the cluster.
Checking Administrative Group MembershipOnly local Administrators have the necessary rights to view the membership of user groups. Before attempting the procedures below, be sure you are logged into the Data Manager computer as a local domain Administrator.
To access the Administrators and DXAdministrators groups and users:
1. You have the following choices:
• If Windows NT is the operating system on the Data Manager computer, open the Windows NT Computer Manager. From the Start menu, select Programs, Administrative Tools, and then User Manager. If you are not already logged into the local domain, select Select Domain from the User menu and browse to or type in the local computer name.
• If Windows 2000 is the operating system on the Data Manager computer, open the Windows 2000 User Manager. From the Start menu, select Programs, Administrative Tools, and then Computer Management.
The groups for the local domain are listed in the Groups list. The DXAdministrators group was automatically added to this list when Data Manager was installed. In addition, all members of the local Administrators group were added to the DXAdministrators group during install.
2. Double-click the Administrators or DXAdministrators group name (or highlight the name in the list and select Properties from the User menu).

Windows NT/2000 Security
ASM Data Manager Getting Started Guide 43StorageTek Proprietary
The Local Group Properties dialog box for the group appears. The Members list for the group lists all of the users and groups that are members of the selected group.
For the DXAdministrators group, users must be listed here, or they must be members of a group listed here, to perform certain functions in Data Manager. Users who should have rights to manage the Data Manager service must be listed (or be members of groups that are listed) in both the DXAdministrators group and the Administrators group.
Adding Users to Administration GroupsOnly local Administrators have the necessary rights to change the membership of user groups. Before attempting the procedures below, be sure you are logged into the Data Manager computer as a local domain Administrator.
To add a user to the Administrators or DXAdministrators group:
1. You have the following choices:
• If Windows NT is the operating system on the Data Manager computer, open the Windows NT Computer Manager. From the Start menu, select Programs, Administrative Tools, and then User Manager. If you are not already logged into the local domain, select Select Domain from the User menu and browse to or type in the local computer name.
• If Windows 2000 is the operating system on the Data Manager computer, open the Windows 2000 User Manager. From the Start menu, select Programs, Administrative Tools, and then Computer Management.
The groups for the local domain are listed in the Groups list.
2. Double-click the Administrators or DXAdministrators group name (or highlight the name in the list and select Properties from the User menu). The Local Group Properties dialog box for the group appears.
3. In the Local Group Properties dialog box for the group, click Add. The Add Users and Groups dialog box appears.
4. Select the appropriate domain from the drop-down list of domains.
5. From the Names list, select the user name.
6. Click Add. The user is added to the list at the bottom of the window.
7. When all users you want to add to the group are listed, click OK. The users are added to the Members list for the selected group.

Planning Your Data Manager System
44 Second EditionStorageTek Proprietary
Removing Users from Administration GroupsOnly local Administrators have the necessary rights to change the membership of user groups. Before attempting the procedures below, be sure you are logged into the Data Manager computer as a local domain Administrator.
To remove a user or group from the Administrators or DXAdministrators group:
1. You have the following choices:
• If Windows NT is the operating system on the Data Manager computer, open the Windows NT Computer Manager. From the Start menu, select Programs, Administrative Tools, and then User Manager. If you are not already logged into the local domain, select Select Domain from the User menu and browse to or type in the local computer name.
• If Windows 2000 is the operating system on the Data Manager computer, open the Windows 2000 User Manager. From the Start menu, select Programs, Administrative Tools, and then Computer Management.
The groups for the local domain are listed in the Groups list.
2. Double-click the Administrators or DXAdministrators group name (or highlight the name in the list and select Properties from the User menu). The Local Group Properties dialog box for the group appears.
3. In the Local Group Properties dialog box for the group, highlight the user or group you want to remove and click Remove. The user or group is removed from the Members list for the selected group.
■ Maximizing Data Manager PerformanceThere are several ways to configure your ASM Data Manager system to maximize performance and ensure data security. For more information, see the following sections:
• "Recommended Upgrades for Optimization, " which follows
• “Ensuring Data Security” on page 46
Recommended Upgrades for OptimizationThe system resources on the Data Manager computer should be taken into consideration when planning an Data Manager system. The size and number of hard drives, amount of available RAM, processing power, and network cabling and configuration can all affect the performance of the Data Manager

Maximizing Data Manager Performance
ASM Data Manager Getting Started Guide 45StorageTek Proprietary
system. Although not required, implementation of the following methods will help you achieve greater system efficiency:
• "Dedicated Data Manager Computers, " which follows
• “Two Hard Drives on the Data Manager Computer” on page 45
• “Faster Than Minimum CPU” on page 45
• “As Much RAM as Possible” on page 45
• “Multiple-processor Machines” on page 46
• “Fast Network Topology” on page 46
• “Space for Expansion” on page 46
Dedicated Data Manager ComputersIf many other processes are running on the same machine as Data Manager, performance may decrease. System resources may become overloaded if other programs are running on the same computer, particularly if the Data Manager computer is running the media service as well. Therefore, you may want to consider installing Data Manager on a machine dedicated only to Data Manager.
We recommend that the Data Manager computer not be a Primary Domain Controller (PDC) or a Backup Domain Controller (BDC) for your network. While Data Manager can run on a PDC or BDC, for performance reasons it is not recommended.
Two Hard Drives on the Data Manager ComputerIf you do decide to install Data Manager on the same computer where you install your media service, two hard drives – one containing Windows NT/2000 program files and the media service software and one for use as an extended drive by Data Manager – will maximize performance. Data can be written to one drive, while system processes use the other drive. Dedicating one drive for data storage provides better read/write performance, especially in a system where large amounts of data is being saved to Data Manager (for example, in a heavy scanning environment). If possible, avoid extending a system drive.
Faster Than Minimum CPUIn order to optimize the performance of Data Manager, we recommend that the Data Manager computer have a faster than minimum CPU to improve processing speed.
As Much RAM as PossibleThe more memory on the Data Manager computer, the faster Windows NT/2000 and Data Manager will perform and the faster data access will be.

Planning Your Data Manager System
46 Second EditionStorageTek Proprietary
Multiple-processor MachinesData Manager fully supports the use of multiple-processor machines. Using a multiple-processor machine for the Data Manager computer improves Data Manager performance, because multiple tasks can be performed at the same time with each processor carrying out a separate task concurrently.
Fast Network TopologyBecause Data Manager automatically handles the network connections for communication with media services, no optimization of the Data Manager connection is necessary. However, network topology and Windows NT/2000 configuration can affect throughput between network Data Manager computers and their media services, and between Data Manager computers and their clients.
In cases where network Data Manager computers are installed, network cabling designed for high volume throughput, such as Fast Ethernet or fiber optic, can improve file transfer speeds between Data Manager and its media services.
Space for ExpansionWe recommend that you have sufficient space planned on the NTFS volume being used as your extended drive, or have additional NTFS volumes available to be extended, in order to accommodate future expansion of the Data Manager system. (For information, see “Sizing Your Extended Drive” on page 24.)
Ensuring Data Security To ensure that all the data in your Data Manager system is safeguarded against system failure (including Windows NT/2000 failure), certain data security measures are recommended. Some of these recommendations are discussed briefly in the following sections:
• "Running Regular Drive Scans, " which follows
• “Backing up the Extended Drive” on page 47
• “Using Repair Disk to Back up the Data Manager Registry” on page 47
• “Windows NT/2000 Partitioning” on page 48
• “Disk Redundancy for Data Manager Computers” on page 48
• “Installing Data Manager in a Clustered Environment” on page 48
Running Regular Drive ScansExtended drive scans inventory the contents of the extended drive and determine what files are to be moved, purged and deleted based on

Maximizing Data Manager Performance
ASM Data Manager Getting Started Guide 47StorageTek Proprietary
configured move, purge and delete rules. There are four primary functions of drive scans:
• The first is to write files that qualify for move rules with an age delay to the move list. Files that qualify for movement to media based on move rules with no age delay are typically written to the move list as soon as they are saved to the extended drive.
• The second is to write files that qualify for purge rules with an age delay to the purge list. Files that qualify for purge rules with no age delay are typically written to the purge list as soon as they are moved to media.
• The third is to identify and then to purge files that qualify for purge rules configured with the Force files to purge during extended drive scans option selected.
• The fourth is to identify and then to delete files that qualify for deletion based on delete rules.
Regular drive scans are required to be sure that all appropriate files are written to the move list when they qualify, and as such, are being written out to storage media (in coordination with your Move files to media schedule). Data Manager allows you to force drive scans at any time, and to set a regular schedule for drive scans. Because drive scans for very large extended drives can be time-consuming, you may want to schedule your drive scans to occur during times of low extended drive and system traffic. For more information on scheduling drive scans, see “Scheduling Drive Scans” on page 176. For information on forcing drive scans, refer to the Managing the Extended Drive chapter of the ASM Data Manager System Guide.
Backing up the Extended DriveIt is recommended that you periodically back up your extended drive to preserve any file data on the drive that has not yet been moved out to media. Because Data Manager is very specific about the information it uses to locate and retrieve files, the Data Manager meta-data export utility is designed to ensure that all required information is saved during an export. For this reason, we recommend scheduling regular exports through the meta-data export utility. For more information, refer to the Data Manager Backup and Recovery chapter in the ASM Data Manager System Guide.
Using Repair Disk to Back up the Data Manager RegistryThe Repair Disk feature backs up the Data Manager registry settings for the Data Manager computer. This provides a way to recover Data Manager settings without reconfiguring them in the event of a system failure on the Data Manager computer. As with any repair disk backup, you should save the backup of the Data Manager registry settings on a separate volume from the system files, and ideally on a separate computer.
Note: For “virtual” media such as Tivoli Storage Manager (TSM) and EMC Centera (EMC), the repair disk backup is especially critical because

Planning Your Data Manager System
48 Second EditionStorageTek Proprietary
“virtual” media is defined through Data Manager configuration. In the event of system failure, you must restore that configuration to access (and restore, if necessary) files on the media.
For more information on backing up the Data Manager registry settings, refer to the Data Manager Backup and Recovery chapter in the ASM Data Manager System Guide.
Windows NT/2000 PartitioningWhen you extend a drive, it should always be a separate drive from the drive where the computer’s system files are located. If the computer on which you plan to install Data Manager contains only one drive, you may wish to partition that drive to create a separate NTFS volume using Windows NT/2000. This allows you to extend the partition that does not contain the system files, separating system files from data to be migrated. For more information on partitioning a drive, refer to your Windows documentation.
Disk Redundancy for Data Manager ComputersDisk redundancy (for example, RAID arrays or disk mirroring) is recommended for Data Manager drives if Data Manager functionality and data are mission-critical. Use of disk redundancy significantly reduces disaster recovery time for a Data Manager system. With a redundant system, you will be able to recover data while the system is still running, giving you uninterrupted service.
Installing Data Manager in a Clustered EnvironmentClustering is the process of connecting two or more computers together in such a way that they behave like a single computer, and so that they share a single storage device.
In a cluster configuration, each computer automatically updates the other computer with registry information so it can intervene when needed. If one of the servers stops functioning, the other server assumes the workload of the failed server. The act of transferring functions to another server in the cluster is called fail-over. Fail-over ensures continuous availability of critical applications and data located on the cluster.
A typical clustered environment consists of two servers and a RAID array. The server computers that are part of the cluster are called nodes or systems, and can be either active or passive. An active node is always running and processing user requests. A passive node, however, is idle and does not process user requests until an active node fails.
Cluster configurations can be either active/active or active/passive.
• In an active/passive configuration, applications and services running on the active node transfer over to the passive node when the active node

Maximizing Data Manager Performance
ASM Data Manager Getting Started Guide 49StorageTek Proprietary
fails. The active node is also called the primary node, while the passive node is called the secondary node.
• In an active/active configuration, applications and services can be running on both of the active nodes and transfer over to one node if the other fails. The applications and services that were originally running on the failed node are then restored to the node when it comes back online.
Note: Careful consideration of size requirements is necessary when planning an active/active cluster environment; if both servers are in use and one server fails, the other server must be capable of handling the workload of both servers.
Because the cluster is designed to function as a single computer, users and programs do not access individual nodes when connecting to the cluster. Instead, they access a “logical cluster name”, which represents the “single computer” that all of the individual components within the cluster have formed to create.
ASM Data Manager can run on either an active/passive or an active/active cluster environment where Microsoft Cluster Server is installed. Be advised, however, that ASM components are only supprted on two-node clusters.
Data Manager supports clustering only in fail-over scenarios; it does not support load balancing between the cluster nodes.
For detailed information on installing and configuring Data Manager in a clustered environment, see “Clustering” on page 183.
Data Manager Support for Active/Passive ClusteringIn an active/passive cluster, Data Manager runs as a single service on the active, or primary, node. When the primary node fails, the service is transferred to the secondary node, which is then considered the primary node because it becomes active. All Data Manager functionality is available on the primary node and completely transfers in the case of a fail-over.
In an active/passive cluster environment, Data Manager supports the use of ASM MediaStor, Network Attached Storage (NAS), EMC Centera (EMC), and Tivoli Storage Manager (TSM) as media services.
Data Manager Support for Active/Active ClusteringIn an active/active cluster, Data Manager is installed and runs as a service on each node in the cluster. When a fail-over occurs, the remaining active node assumes control of the extended drive on the failed node, and the extended drive for the failed node appears in the tree view of the Data Manager Administrator.
Note: The Data Manager service on the remaining active node is stopped and restarted before it assumes control of the extended drive on the

Planning Your Data Manager System
50 Second EditionStorageTek Proprietary
failed node. This causes momentary downtime of the Data Manager system.
Data Manager supports the use of NAS, EMC, and TSM as media services in an active/active cluster environment. Data Manager also supports MediaStor as a media service in an active/active cluster environment; however, MediaStor itself can run only in an active/passive cluster environment.

ASM Data Manager Getting Started Guide 51StorageTek Proprietary
3Installing Data Manager
Installing ASM Data Manager is an easy process, with system prompts that guide you through every step of the installation process. After Data Manager is installed, and you open the Administrator for the first time, you will be able add the basic components necessary to get your ASM system up and running. You may create them at this time or choose to do it later.
For more information, see the following sections:
• "Before Running the Setup Wizard, " which follows
• “Running the Setup Wizard” on page 53
• “Starting the Administrator the First Time” on page 59
• “Configuring Data Manager” on page 65
• “Licensing Data Manager” on page 66
■ Before Running the Setup WizardBefore you run the setup wizard to install ASM Data Manager, there are several issues you may need to consider, depending on your specific configuration. For more information, see the following sections:
• "Licensing, " which follows
• “Checking System Components” on page 52
• “Creating a Service Account” on page 52
• “Clustering” on page 52
• “Upgrading from Previous Versions of ASM” on page 52
LicensingDuring the installation of Data Manager, you will be prompted to select whether you are installing a licensed version of Data Manager or a 30-day evaluation version. ASM software product licenses are managed through the ASM License Server, which is a separate product and installed separately from ASM, although the License Server software is included on the ASM CD. For information on installing and configuring your license server, refer to the License Server System Guide.

Installing Data Manager
52 Second EditionStorageTek Proprietary
Checking System ComponentsBefore installing Data Manager, certain system components should be checked, such as the hardware connections, media services and network configuration. This helps ensure the program installation and setup will run smoothly, and minimizes the time it will take you to get your system up and running.
Creating a Service AccountIf you do not already have a service account that you would like Data Manager to use to log on as a service, you should create the service account before installing Data Manager. The account must be a member of the Administrators group on the machine on which you are installing Data Manager. For more information, see “Windows NT/2000 Security” on page 41.
Before running the installation, you should log on to the computer using this service account, so that you can specify the account during setup as required. Because the service account that Data Manager uses to log on the service requires the Log on as a service privilege, this privilege is automatically added to the account specified during setup. Creating the service account ahead of time, and entering that account during setup eliminates the need to add that privilege separately.
Note: If you are installing Data Manager on Windows 2000 Server in an Active Directory service environment, the ASM service accounts require additional configuration to ensure that they have the security privileges necessary to move, store, and retrieve files over the network. Also, be advised that only certain configurations are supported in an Active Directory service environment. For more information, refer to the ASM Knowledge Base.
ClusteringIf you are planning to run Data Manager in a clustered environment, you must obtain a cluster-enabled license and follow the instructions located in “Clustering” on page 183 to set up Microsoft Cluster Administrator and install Data Manager.
Upgrading from Previous Versions of ASMIf you are converting your system from a different or previous version of ASM, you may need to take additional steps to convert your system before installing Data Manager. For more information, refer to the ASM Upgrade Guide.
Note: If you want to upgrade the type of media that you are using with your ASM system (in other words, change from one type of media to another), you must do so using the compaction feature. For more

Running the Setup Wizard
ASM Data Manager Getting Started Guide 53StorageTek Proprietary
information and detailed instructions, refer to the Moving Files from One Media Type to Another chapter in the ASM Upgrade Guide.
Note: If you are upgrading from ASM version 5.4, and you are using EMC Centera as a media service, be advised that you will need to run a File Restore task on all of your EMC media after upgrade, in order to have retention for those files enforced on the extended drive. See the Managing Storage Media chapter of the ASM Data Manager System Guide for more information on the File Restore task. If you need to upgrade from ASM Data Manager for EMC Centera v1.0, you must compact all of your media, uninstall, and then reinstall Data Manager (there is no direct upgrade from this version). See the ASM Data Manager System Guide for instructions on compacting media and uninstalling Data Manager.
■ Running the Setup WizardThe ASM Data Manager setup wizard leads you through the steps to install Data Manager.
For your convenience, the setup wizard allows you to install Data Manager on multiple computers at once, provided those computers are visible on your network and you are a member of the local Administrators group for each of those machines.
To take advantage of this feature, you may want to determine which computers are to have Data Manager installed on them (and configure the appropriate rights if necessary) before you run the installation wizard, enabling you to only run the installation once rather than multiple times. To configure the appropriate rights, see “Windows NT/2000 Security” on page 41.
Note: If you are converting your system from a different or previous version of ASM, refer to the ASM Upgrade Guide to follow the correct steps to convert your system Before installing Data Manager.
To run the Data Manager setup wizard:
1. Exit all applications on the computer(s) on which you want to install Data Manager. If other software is running, the setup wizard may not be able to write to all necessary files.
2. Insert the ASM setup CD-ROM into the drive. From the Windows Start menu, select Run. The Run dialog box appears.
3. You can either browse to the file or type the path in the Open text box:
D:\DX2000.XXX\DISKXTENDER\SETUP.EXE
(In this path, D represents the drive holding the setup CD-ROM and XXX represents the ASM version number.)

Installing Data Manager
54 Second EditionStorageTek Proprietary
4. Once the file/path appears in the Open text box, click OK. Data Manager setup is initiated, and the setup wizard appears, starting with the ASM Installation page. The ASM Installation page briefly describes the installation process.
5. Click Next. The Installation Options page appears.
Figure 2. Data Manager Setup -- Installation Options Page
6. Select Install new product. Click Next. The License Agreement page appears.
Figure 3. Data Manager Setup -- License Agreement Page
7. You must accept the terms of the license agreement before you can proceed with the installation. Scrolling to the bottom of the agreement allows you to enable the Accept terms of agreement check box. Check the box and click Next. The Registration page appears.

Running the Setup Wizard
ASM Data Manager Getting Started Guide 55StorageTek Proprietary
Figure 4. Data Manager Setup -- Registration Page
8. Enter the customer name and organization name and then click Next. The Service Account page appears.
Figure 5. Data Manager Setup -- Service Account Page
9. Enter and confirm the password for the account that you want to use as the Data Manager service account. For more information on the Data Manager service account, see “Creating a Service Account” on page 52.
10. Click Next. The Product License page appears.

Installing Data Manager
56 Second EditionStorageTek Proprietary
Figure 6. Data Manager Setup -- Product License Page
11. You have two choices:
• Select the Install a 30-day evaluation license option to install Data Manager without using License Server. This allows you to use Data Manager for 30 days. After the 30-day evaluation period, you can use the Setup option in the Storagetek ASM Program group to update your license. For more information, see “Licensing Data Manager” on page 66.
• Select the Install a licensed copy of the software option if you have installed and configured the License Server already. Type in the name of the computer where License Server is installed, or use the Browse button to find the License Server computer on the network. If you click Browse, the Available License Servers dialog box appears.
Figure 7. Available License Servers Dialog Box

Running the Setup Wizard
ASM Data Manager Getting Started Guide 57StorageTek Proprietary
The Available License Servers dialog box lists all network computers where License Server is installed and indicates whether a Data Manager license is configured on that License Server. Highlight the License Server computer to be used to license this installation of Data Manager and click OK. The Product License page returns, displaying the selected License Server computer in the License Server Computer Name text box.
12. When you finish selecting a licensing option, click Next. The Target Computers page appears.
Figure 8. Data Manager Setup -- Target Computers Page

Installing Data Manager
58 Second EditionStorageTek Proprietary
13. You have the following choices:
• To install Data Manager only on the computer listed in the Target Computers list, click Next. The Summary page appears.
• To install Data Manager on other computers in addition to the one listed in the Target Computers list, click Add. The Browse Computers dialog box appears.
Figure 9. Browse Computers Dialog Box
14. In the Browse Computers dialog box you have two choices:
• Under Available Computers, navigate to and select the computer on which you want to install Data Manager and then click Add to add the computer to the Selected Computers list.
• In the Computer Name text box, type in the name or the IP address of the computer on which you want to install Data Manager and then click Add to add the computer to the Selected Computers list.
Repeat this step for each additional computer on which you want to install Data Manager. When you finish, click OK. You are returned to the Target Computers page. When the Target Computers list is complete, click Next. The Summary page appears.
15. Verify the accuracy of the information in the summary.
16. If all information is correct, click Finish. The setup wizard copies all program files into the C:\PROGRAM FILES\LEGATO\ system directory, and adds Data Manager configuration entries and the program group to the system configuration of every target computer selected. A dialog box displays the status of the operation.
Starting the Administrator the First Time
ASM Data Manager Getting Started Guide 59StorageTek Proprietary
17. You have the following choices:
• If you installed Data Manager on one or more remote computers (in addition to or instead of the local computer), the ASM Setup Result dialog box appears, listing the installation results for each computer you specified.
Figure 10. ASM Setup Result Dialog Box Take note of any computers where a Reboot is required (or computers on which the installation failed) and then click OK.
• If you installed Data Manager on the local computer, a message appears, indicating that the Data Manager installation has been successfully completed.
Figure 11. Start the Administrator? Message Click Start to close the setup wizard and start Data Manager, or click Exit to close the setup wizard without starting Data Manager.
■ Starting the Administrator the First TimeThe first time you start the Administrator, if you installed ASM Data Manager to any target computers (other than the local computer), Data Manager automatically registers those computers in the Administrator. All registered computers are listed in the Computer drop-down list and in the tree view, regardless of whether they successfully connect. If connected successfully, each registered computer appears with configured extended drives listed below the computer name. If no extended drives have been configured to those computers, the computer is listed with a status of (connected, no extended drives).
Until you configure a media service and add an extended drive to your ASM system, Data Manager cannot begin file migration. The following sections show you how to configure a media service and add an extended drive.
Note: If you are converting your ASM system from version 3.2 to ASM, please refer to the Converting from ASM 3.2 chapter of the ASM Data Manager Upgrade Guide, and use those instructions for opening the Administrator for the first time and configuring Data Manager elements.
Note: If you plan to use Data Manager in a Co-StandbyServer environment, follow the steps in “Setting up ASM with Co-StandbyServer” on page 223 before setting up your Data Manager extended drive(s) and media service(s).

Installing Data Manager
60 Second EditionStorageTek Proprietary
To open and configure the Administrator:
1. You have two options for starting the Administrator:
• Immediately after Data Manager installation, when the Installation Complete message appears, asking if you would like to start ASM, click Start.
• From the Windows Start menu, select Programs, Storagetek ASM, and then Administrator.
2. In the tree view of the Administrator, highlight the Data Manager computer for which you want to configure a media service, and then select Configure Media Services from the Service menu. The media service wizard appears. See “Setting Up Media Services” on page 81 for more information on configuring a media service.
3. When you have completed configuring a media service, a message appears asking whether you want to create an extended drive.
Figure 12. Create Extended Drive? Message
4. Click Yes. The New Extended Drive wizard appears starting with the Introduction page. The New Extended Drive page lists the steps that must be performed after an extended drive has been created in order to begin file migration
5. Click Next. The Select Drive page appears.

Starting the Administrator the First Time
ASM Data Manager Getting Started Guide 61StorageTek Proprietary
Figure 13. New Extended Drive Wizard -- Select Drive Page
The Select Drive page lists all partitioned drives on the computer where Data Manager is installed, along with the file system and status of each drive. Only drives listed with a status of OK can be extended.
6. Select the NTFS volume you want to extend.
7. Click Next. If your media service contains media, the Allocate Media to Extended Drive page appears. Otherwise continue to the next step and the Settings page.

Installing Data Manager
62 Second EditionStorageTek Proprietary
Figure 14. New Extended Drive Wizard -- Allocate Media to Extended Drive Page
8. Select the media you want to allocate to this extended drive and then click Next. The Settings page appears.
Figure 15. New Extended Drive Wizard -- Settings Page
The Settings page allows you to schedule media activities and drive scans, as well as scheduling and configuring meta-data exports. You can change the default extended drive settings either now or after you finish creating the extended drive. For more information on the default extended drive settings, see “Creating an Extended Drive” on page 142.
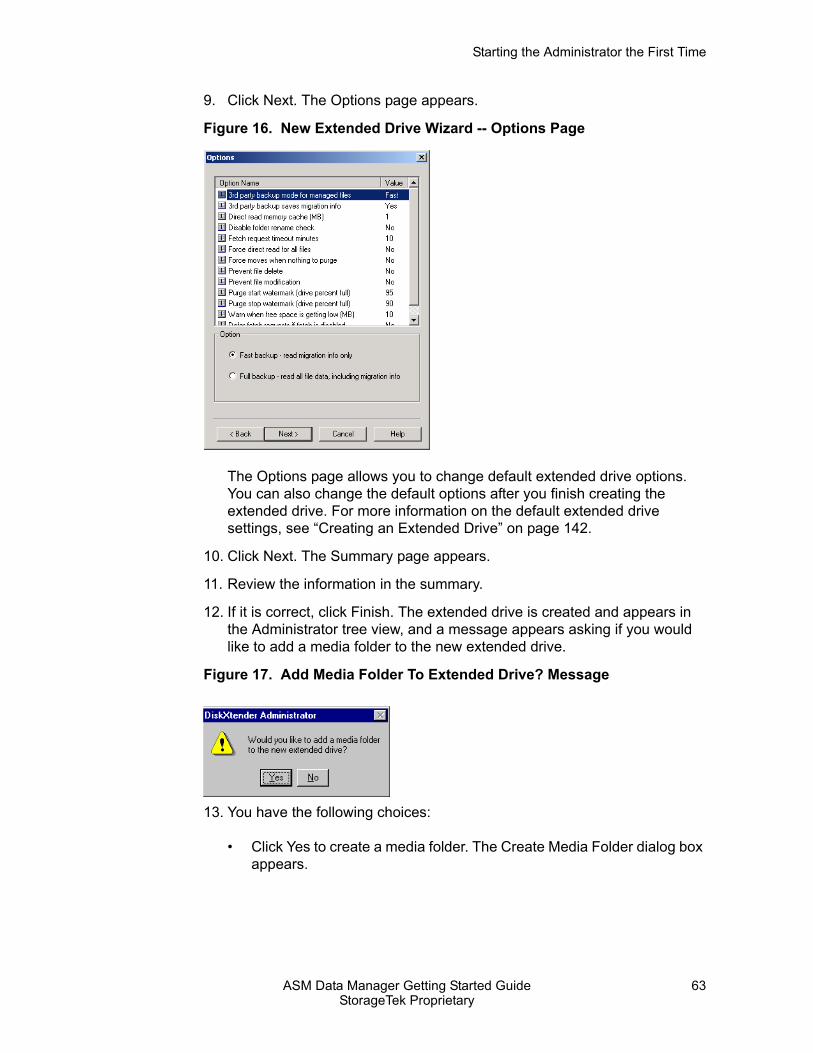
Starting the Administrator the First Time
ASM Data Manager Getting Started Guide 63StorageTek Proprietary
9. Click Next. The Options page appears.
Figure 16. New Extended Drive Wizard -- Options Page
The Options page allows you to change default extended drive options. You can also change the default options after you finish creating the extended drive. For more information on the default extended drive settings, see “Creating an Extended Drive” on page 142.
10. Click Next. The Summary page appears.
11. Review the information in the summary.
12. If it is correct, click Finish. The extended drive is created and appears in the Administrator tree view, and a message appears asking if you would like to add a media folder to the new extended drive.
Figure 17. Add Media Folder To Extended Drive? Message
13. You have the following choices:
• Click Yes to create a media folder. The Create Media Folder dialog box appears.

Installing Data Manager
64 Second EditionStorageTek Proprietary
Figure 18. Create Media Folder Dialog Box
• Click No to return to the Administrator without creating a media folder.
14. If you choose to create a media folder, you have the following choices:
• Create a new folder on the extended drive by typing the media folder name in the Enter Folder Name text box. To create a single media folder that encompasses the entire extended drive, type a backward slash ( \ ) in the Enter Folder Name text box.
• Use a folder that already exists on the extended drive as a media folder by clicking Browse and selecting the folder from the Select Folder dialog box. The folder name appears in the Enter Folder Name text box.
For more information on creating media folders and their components, see “Media Folders” on page 150.
15. Click OK. The Administrator window appears with a tree showing the extended drive you created. Within that tree is a node containing the media folder you added to the extended drive.
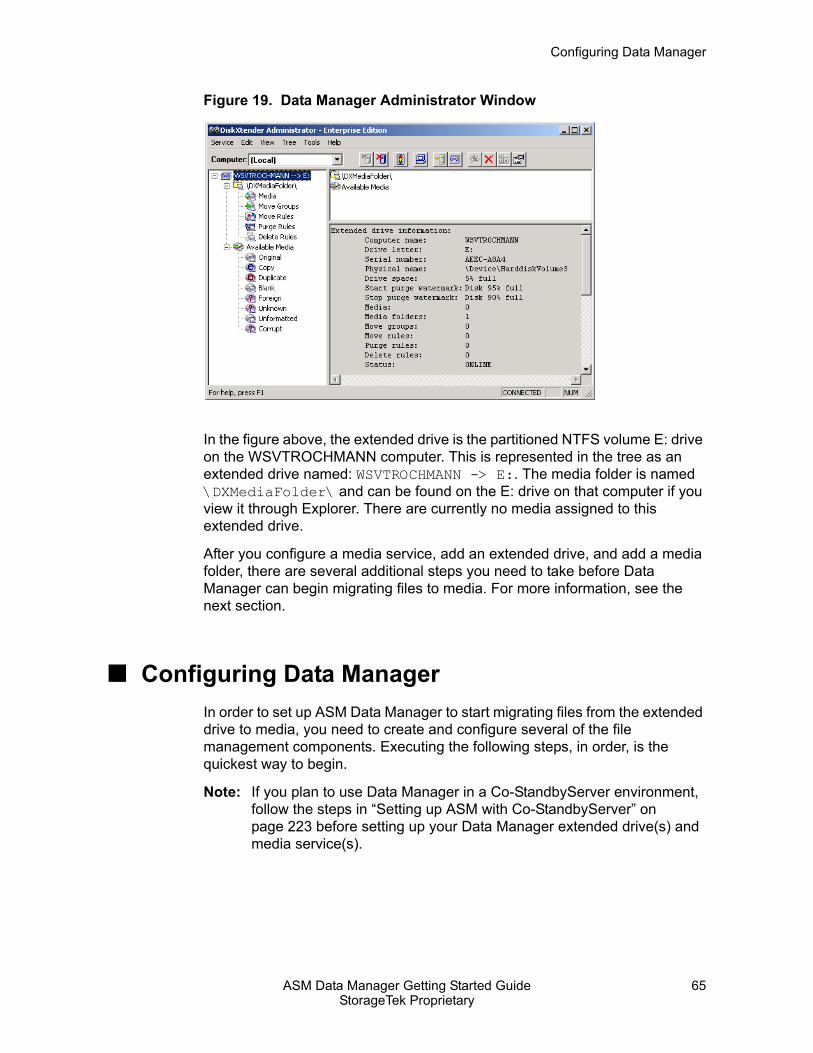
Configuring Data Manager
ASM Data Manager Getting Started Guide 65StorageTek Proprietary
Figure 19. Data Manager Administrator Window
In the figure above, the extended drive is the partitioned NTFS volume E: drive on the WSVTROCHMANN computer. This is represented in the tree as an extended drive named: WSVTROCHMANN -> E:. The media folder is named \DXMediaFolder\ and can be found on the E: drive on that computer if you view it through Explorer. There are currently no media assigned to this extended drive.
After you configure a media service, add an extended drive, and add a media folder, there are several additional steps you need to take before Data Manager can begin migrating files to media. For more information, see the next section.
■ Configuring Data ManagerIn order to set up ASM Data Manager to start migrating files from the extended drive to media, you need to create and configure several of the file management components. Executing the following steps, in order, is the quickest way to begin.
Note: If you plan to use Data Manager in a Co-StandbyServer environment, follow the steps in “Setting up ASM with Co-StandbyServer” on page 223 before setting up your Data Manager extended drive(s) and media service(s).

Installing Data Manager
66 Second EditionStorageTek Proprietary
To configure Data Manager for the migration of files to media:
1. If you have not already done so, configure one or more media services, and if necessary, add media to the media service. See Chapter 5: Setting Up Media Services on page 81 for more information.
2. If you have not already done so, create and configure an extended drive. For instructions, see “Extended Drives” on page 142.
3. Allocate media to the extended drive. For instructions, see “Assigning Media to Extended Drives” on page 149.
4. If you have not already done so, create a media folder. For instructions, see “Media Folders” on page 150.
5. Add media to the media folder. For instructions, see “Adding Media to a Media Folder” on page 157.
6. Create a move group. For instructions, see “Move Groups” on page 160.
7. Add media to the move group. For instructions, see “Move Groups” on page 160.
8. Create one or more move rules. For instructions, see “Move Rules” on page 166.
9. Set up a regular drive scan schedule. For instructions, see “Scheduling Drive Scans” on page 176.
10. Set up the Move files to media activity schedule. For instructions, see “Scheduling Movement of Files” on page 179.
Completing the above steps tells Data Manager what files it is supposed to move, when it is supposed to move them, and to what media. In addition, scheduling regular drive scans ensures that all files that are supposed to be moved are written to the move list when they qualify, and that complete file synchronization for the move list is maintained by regularly checking the extended drive for files that should be moved to media.
■ Licensing Data ManagerIf you installed an evaluation copy of Data Manager and you are ready to upgrade to a fully licensed copy, or if you need to change your license (for example, to add hardware to your system), you can update your license information through the Data Manager setup wizard.
Before you update the license information, be sure you have installed and configured the ASM License Server, including adding the new license to License Server. For instructions, refer to the License Server System Guide.

Licensing Data Manager
ASM Data Manager Getting Started Guide 67StorageTek Proprietary
To update the Data Manager license:
1. From the Windows Start menu, select Programs, Storagetek ASM, and then Setup. The setup wizard appears, starting with the Welcome page.
2. Click Next. The Installation Options page appears.
Figure 20. Data Manager License Update -- Installation Options Page
3. Select Edit product license information and then click Next. The Product License page appears.
Figure 21. Data Manager License Update -- Product License Page
4. Select the Install a licensed copy of the software option. Type in the name of the computer where License Server is installed, or use the Browse button to find the License Server computer on the network. If you click Browse, the Available License Servers dialog box appears.
Figure 22. Available License Servers Dialog Box The Available License Servers dialog box lists all network computers where License Server is installed and indicates whether a Data Manager license is configured on that License Server. Highlight the License Server computer to be used to license this installation of Data Manager and click

Installing Data Manager
68 Second EditionStorageTek Proprietary
OK. The Product License page returns, displaying the selected License Server computer in the License Server Computer Name text box.
5. When you finish identifying a License Server computer, click Next. The Target Computers page appears.
Figure 23. Data Manager License Update -- Target Computers Page
6. You have the following choices:
• To update the Data Manager license only on the computer listed in the Target Computers list, click Next. The Summary page appears.
• To update the Data Manager license on other computers in addition to the one listed in the Target Computers list, click Add. The Browse Computers dialog box appears.
Figure 24. Browse Computers Dialog Box
7. In the Browse Computers dialog box you have two choices:

Licensing Data Manager
ASM Data Manager Getting Started Guide 69StorageTek Proprietary
• Under Available Computers, navigate to and select the computer on which you want to update the Data Manager license and then click Add to add the computer to the Selected Computers list.
• In the Computer Name text box, type in the name or the IP address of the computer on which you want to update the Data Manager license and then click Add to add the computer to the Selected Computers list.
Repeat this step for each additional computer on which you want to update the Data Manager license. When you finish, click OK. You are returned to the Target Computers page. When the Target Computers list is complete, click Next. The Summary page appears.
8. Verify the accuracy of the information in the summary.
9. If all information is correct, click Finish. The Data Manager license is updated on the selected computer(s), and a message appears, indicating that the wizard has been successfully completed. Click Start to close the setup wizard and start Data Manager, or click Exit to close the setup wizard without starting Data Manager.

Installing Data Manager
70 Second EditionStorageTek Proprietary

ASM Data Manager Getting Started Guide 71StorageTek Proprietary
4Working in the Administrator
Because ASM Data Manager is a Windows-based package, the same navigational standards apply to all of its components. The Administrator provides a user-friendly interface that allows you to easily create and configure Data Manager components as well as manage Data Manager computer and extended drive properties on one or more Data Manager machines.
The Administrator has an intuitive “tree” view that displays the underlying structure of the Data Manager system. Each extended drive appears as a primary tree node, and the configuration items for those extended drives are grouped as sub-trees for ease of use.
The Administrator can be run on the same computer where Data Manager is installed or from a remote workstation using the Remote Administrator. For more information on remote administration, refer to the Remotely Administering Data Manager chapter in the ASM Data Manager System Guide.
This chapter explains the basic layout of the Administrator, as well as its general functionality. Included are explanations of window features and methods for carrying out system operations. For more information, see the following sections:
• "Starting the Administrator, " which follows
• “The Administrator Window” on page 73
• “Refreshing the Administrator Window” on page 77
• “Searching in the Administrator” on page 78
For detailed information on specific functional settings, refer to the ASM Data Manager System Guide.
■ Starting the AdministratorStarting the Administrator allows you access to extended drives and their associated media and media information. You can connect to local or remote ASM Data Manager computers through the Administrator and extend drives on those computers. Using the Administrator, you can manage Data Manager file organization and directory structure, manage media, and set event schedules on multiple Data Manager computers.

Working in the Administrator
72 Second EditionStorageTek Proprietary
Upon successful connection to one or more Data Manager computer(s), the Administrator displays all configured Data Manager components in a tree-like structure. The tree structure contains a primary extended drive node with two secondary nodes for each extended drive: media folders and Available Media.
Note: The extended drive and media folder nodes do not appear until extended drives and media folders are created. Media does not appear until you configure a media service and allocate media to the Data Manager extended drive. For more information, see “Starting the Administrator the First Time” on page 59.
To open the Administrator:
• From the Windows Start menu, select Programs, Storagetek ASM, and then Administrator. The Administrator window appears.
Figure 25. Data Manager Administrator Window
When the Administrator opens, it automatically connects to all registered Data Manager computers. If this is a full installation of Data Manager (as opposed to a Remote Administrator installation) the local computer is automatically registered, and therefore automatically appears in the Administrator. In addition, if you installed Data Manager on multiple target computers, Data Manager automatically registers and attempts to connect to all target computers identified during Data Manager install. Once these connections have been made, the Administrator displays information relevant to each connected Data Manager service.
If you want to administer the Data Manager service on computer(s) other than those currently connected, you must register the Data Manager computers through the Administrator. For more information on registering Data Manager computers, refer to the Remotely Administering Data Manager chapter in the ASM Data Manager System Guide.

The Administrator Window
ASM Data Manager Getting Started Guide 73StorageTek Proprietary
■ The Administrator WindowThe main portion of the Administrator window is for navigation and information display, and is split into three panes:
• The left pane of the window, or the tree view, contains the tree-like structure from which most commands are performed. For more information, see "The Tree View: Exploring Data Manager, " which follows.
• The top right pane, or the contents view, displays the contents of the item currently selected in the tree. For more information, see “The Contents View: Node Details” on page 74.
• The bottom right pane, or the description view, displays a description or detailed properties of the item selected. For more information, see “The Description View: Item Details” on page 74.
Split bars separate the panes of the Administrator window. These split bars can be moved to change the size of each pane.
To move the split bar:
• Drag the bar to its new location.
The Administrator window also contains several additional components that allow you to navigate through and configure ASM Data Manager:
• The menu bar contains the menu commands and can be found at the top of the window. For more information, see “Menu Bar” on page 75.
• The Computer drop-down list, which allows you to switch between registered Data Manager computers, can be found just below the menu bar on the left. For more information, see “Computer Drop-Down List” on page 75.
• The toolbar, containing toolbar buttons that allow you to perform frequently used functions, can be found just below the menu bar to the right of the Computer drop-down list. For more information, see “Toolbar” on page 75.
• The status bar, which displays information about the selected command or toolbar button, can be found at the bottom of the window. For more information, see “.Administrator Toolbar” on page 75.
The Tree View: Exploring Data ManagerThe left pane of the Administrator window contains a tree showing all extended drives configured for registered Data Manager computers. Under each extended drive, the available media and the media folders created for each extended drive are listed. Under each media folder, the move groups, and move, purge, and delete rules for the media folder appear.
Commands for managing Data Manager functionality can be accessed from the tree. When you right-click on a tree node, a shortcut menu containing
Working in the Administrator
74 Second EditionStorageTek Proprietary
commands for performing Data Manager functions appears. The shortcut menu items vary depending on what item you select in the tree view.
Each node in the tree indicates whether it is expandable; that is, whether it contains items beneath it. A plus sign (+) marks a node that is expandable. Once a node has been expanded, the plus sign changes to a minus sign (-), indicating that it has been expanded and can now be collapsed.
To expand a node:
• You have the following choices:
• Click the plus sign to the left of the node.
• Double-click the item.
• Select the item, and then choose Expand from the Tree menu.
To collapse a node:
• You have the following choices:
• Click the minus sign to the left of the node.
• Double-click the item.
• Select the item, and then choose Collapse from the Tree menu.
If a node appears with neither sign, that means it currently contains no items within it. For example, if the Blank node of the Available media tree does not have a plus (+) or minus (-) sign in front of it, there are no blank media available for that extended drive.
The Contents View: Node DetailsThe top right pane of the Administrator window contains the contents of the node currently selected in the tree on the left. These contents include the same information displayed underneath the node in the tree when the node is expanded. For example, selecting the Original node of the Available Media tree lists all available formatted and labeled media in the contents view. The same information is listed underneath the Original node when that node is expanded. You can select an item either in the tree view or in this contents view to make the appropriate commands available.
The Description View: Item DetailsThe bottom right pane of the Administrator window contains details about the item currently selected in the tree on the left. This section provides helpful information about the current configuration and settings. For example, if a move rule is selected, the description view shows the following information about the move rule: whether the rule is an include rule or exclude rule, the folder to which the rule applies, the file name or type to which the rule applies, the file size to which the rule applies, whether the rule applies to

The Administrator Window
ASM Data Manager Getting Started Guide 75StorageTek Proprietary
subdirectories of the folder, whether the rule applies only to files with certain file attributes, the age files must be to meet the move rule, and other settings you can view and modify through the Move Rule Properties dialog box.
Menu BarThe menu bar contains a list of options with commands for carrying out functions in the Administrator. Although functions are easily performed using shortcut mouse clicks, all functions can be performed through the menu commands as well. When you select a node in the tree view, the Edit menu changes to contain the same commands available on the shortcut menu for that node.
Computer Drop-Down ListThe Computer drop-down list displays the name of the currently active computer. You can activate a different Data Manager computer in the Administrator by either selecting the computer from the Computer drop-down list or highlighting the computer in the tree view of the Administrator.
In order for a computer to appear in the Computer drop-down list, the computer must be registered through the Administrator. For additional information on registering Data Manager computers to add them to this list box, refer to the Remotely Administering Data Manager chapter in the ASM Data Manager System Guide.
ToolbarThe Data Manager toolbar is located directly beneath the menu bar, to the right of the Computer drop-down list. The toolbar contains buttons that provide quick access to many of the Administrator commands and features.
To identify the function of a button, point to the button with the mouse. The button’s function appears in the status bar at the bottom of the window, and as a pop-up tool-tip when the mouse is held over the button.
The toolbar button is grayed out if it is not available for the item you have selected in the Administrator.
To show or hide the toolbar:
• From the View menu, select Toolbar. A check mark beside the command indicates that the toolbar is displayed
Figure 26. .Administrator Toolbar

Working in the Administrator
76 Second EditionStorageTek Proprietary
Table 10. Administrator Toolbar Buttons
Button Name Menu Option FunctionConnect to Service
From the Service menu, select Connect.
Connects to the selected Data Manager computer. For more information, refer to the Remotely Administering Data Manager chapter in the ASM Data Manager System Guide.
Disconnect from Service
From the Service menu, select Disconnect.
Disconnects from the currently active Data Manager computer. For more information, refer to the Remotely Administering Data Manager chapter in the ASM Data Manager System Guide.
Service Manager
From the Tools menu, select Service Manager.
Opens the Service Manager so that you can manage the Data Manager service. For more information, refer to the Managing the Data Manager Computer chapter in the ASM Data Manager System Guide.
Register Computer
From the Service menu, select Register.
Displays the Register Computers dialog box, which allows you to register Data Manager computers. For more information, refer to the Remotely Administering Data Manager chapter in the ASM Data Manager System Guide.
Configure Media Services
From the Service menu, select Configure Media Services.
Opens the Configure Media Services dialog box, which allows you to add, delete, and configure media services. See “Setting Up Media Services” on page 81 for more information.

Refreshing the Administrator Window
ASM Data Manager Getting Started Guide 77StorageTek Proprietary
Status BarThe status bar is located at the bottom of the Administrator window and displays information about the selected command or toolbar button. Translations of certain commands or important messages to the user appear on the status bar.
To show or hide the status bar:
• From the View menu, select Status Bar. A check mark beside the command indicates that the status bar is displayed.
■ Refreshing the Administrator WindowRefreshing updates the contents of the display window and repaints everything in the Administrator window. The window is refreshed when each of the following occurs:
New Extended Drive
From the Service menu, select New Extended Drive.
Opens the New Extended Drive Wizard, which allows you to create an extended drive. For more information, see “Creating an Extended Drive” on page 142.
New From the Edit menu, select New.
Displays a dialog box that allows you to create a new object. The dialog box that appears is determined by the current selection.
Delete From the Edit menu, select Delete.
Deletes or removes the selected object.
Rename From the Edit menu, select Rename.
Allows you to rename the selected piece of media. Note that this option is available only for certain media types.
Properties From the Edit menu, select Properties.
Displays the Properties dialog box for the selected object.
Table 10. Administrator Toolbar Buttons (Continued)
Button Name Menu Option Function

Working in the Administrator
78 Second EditionStorageTek Proprietary
• A command is performed.
• A node in the tree is expanded or collapsed.
• You press <F5> or select Refresh from the Tree menu. (This is considered a forced refresh.)
• The time specified for automatic refresh frequency has expired.
Configuring Auto Refresh FrequencyYou can configure the frequency of the automatic refresh of the Administrator. The default refresh rate is 5 seconds.
To enable or disable auto refresh:
• From the Tree menu, select Auto Refresh.
To change the auto refresh frequency:
1. From the Tree menu, select Auto Refresh Frequency. The Auto Refresh Frequency dialog box appears.
Figure 27. Auto Refresh Frequency Dialog Box
2. In the Frequency text box, enter the appropriate number of seconds between refreshes and then click OK.
■ Searching in the Administrator As multiple components (extended drives, media folders, media) and multiple ASM Data Manager computers (for remote administration) are added to the system, the extended drives tree may become so large as to become difficult to locate a specific node of the tree. The Find command in the Tree menu can be used to quickly locate occurrences of text within the extended drives tree. This can be especially useful for finding a specific media folder or pieces of media.
The Administrator searches from the currently highlighted position in the tree to either the end or to the beginning of the tree, depending on the direction you choose. To search the entire tree, select an item either at the top or bottom of the tree before beginning the search and select the Up or Down direction as appropriate.
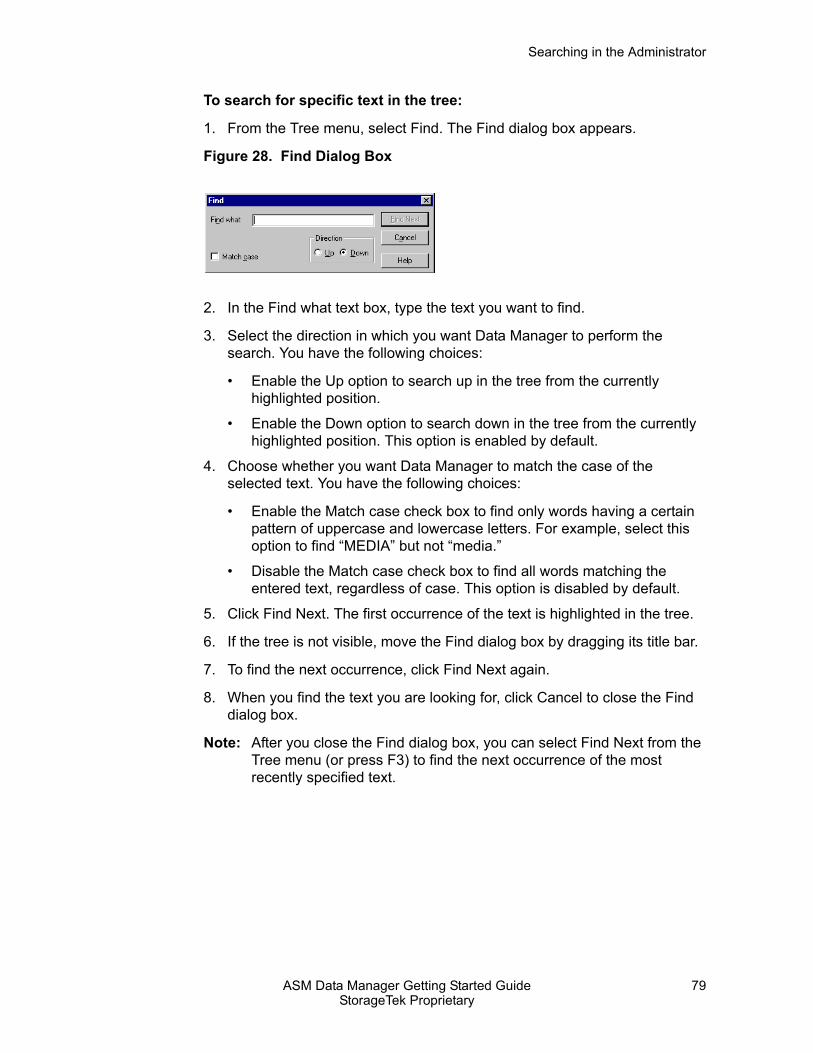
Searching in the Administrator
ASM Data Manager Getting Started Guide 79StorageTek Proprietary
To search for specific text in the tree:
1. From the Tree menu, select Find. The Find dialog box appears.
Figure 28. Find Dialog Box
2. In the Find what text box, type the text you want to find.
3. Select the direction in which you want Data Manager to perform the search. You have the following choices:
• Enable the Up option to search up in the tree from the currently highlighted position.
• Enable the Down option to search down in the tree from the currently highlighted position. This option is enabled by default.
4. Choose whether you want Data Manager to match the case of the selected text. You have the following choices:
• Enable the Match case check box to find only words having a certain pattern of uppercase and lowercase letters. For example, select this option to find “MEDIA” but not “media.”
• Disable the Match case check box to find all words matching the entered text, regardless of case. This option is disabled by default.
5. Click Find Next. The first occurrence of the text is highlighted in the tree.
6. If the tree is not visible, move the Find dialog box by dragging its title bar.
7. To find the next occurrence, click Find Next again.
8. When you find the text you are looking for, click Cancel to close the Find dialog box.
Note: After you close the Find dialog box, you can select Find Next from the Tree menu (or press F3) to find the next occurrence of the most recently specified text.

Working in the Administrator
80 Second EditionStorageTek Proprietary

ASM Data Manager Getting Started Guide 81StorageTek Proprietary
5Setting Up Media Services
When file migration takes place, files saved on the ASM Data Manager extended drive are moved to storage media. Storage media is made accessible to Data Manager through media services. These media services control the workings of the hardware devices used to access the media. The only role they play is to place pieces of media in a location where Data Manager can access them. This leaves Data Manager free to focus entirely on file read/write responsibilities. Data Manager performs all movement and fetching of files and all media tasks through direct communication with the media.
There are five types of media services available for Data Manager file storage:
• ASM MediaStor
• Network Attached Storage (NAS)
• Tivoli® Storage Manager (TSM)
• EMC Centera (EMC)
• StorageTek’s Automated Cartridge System Library Software (ACSLS)
Note: Data Manager does not support ACSLS as a media service when you install Data Manager in a clustered environment. If you are configuring an active/active cluster environment, you can use MediaStor (in addition to or instead of NAS, EMC, or TSM) as a media service; however, MediaStor itself runs only in active/passive mode. For more information on installing Data Manager in a clustered environment, see “Clustering” on page 183.
When Data Manager needs a piece of media, it sends a request to the appropriate media service for that media. If the media service uses NAS, EMC, or TSM (all of which use “virtual” media), the media is already available and Data Manager can proceed with the function that needs to be performed.
If the media service involves a device management product, the media service causes the device being managed to retrieve the media or prompts the media service administrator to insert the appropriate piece of media. For example, if MediaStor is being used to manage an optical library, MediaStor causes the picker arm of the library to retrieve the correct piece of media and insert that media into a drive where the media can be read from or written to. Once the media is in the drive, Data Manager can write files to the media, fetch files from the media, or carry out media tasks such as formatting or labeling.
In order to have storage media available for file migration, you must configure at least one media service for your Data Manager system, including adding

Setting Up Media Services
82 Second EditionStorageTek Proprietary
the media to Data Manager through the media service. For information on storage media itself, see “Storage Media Considerations” on page 28.
Data Manager and the media services it uses can be located on the same computer or on separate computers, as long as the computer’s specifications are acceptable for use with Data Manager. For more information on minimum requirements, see “System Requirements” on page 22.
Determining what media service(s) you plan to use with Data Manager is an important part of planning and setting up your Data Manager system. This chapter describes each media service in detail and provides step-by-step instructions for configuring each of them to use with your Data Manager system, including how to make your storage media available to Data Manager through the media service.
Note: If you plan to use Data Manager in a Co-StandbyServer environment, follow the steps in “Setting up ASM with Co-StandbyServer” on page 223 before setting up your Data Manager media service(s).
For more information, see the following sections:
• "ASM MediaStor, " which follows
• “Network Attached Storage” on page 90
• “Tivoli Storage Manager” on page 100
• “EMC Centera” on page 110
• “StorageTek’s ACSLS” on page 122
The procedures for adding, viewing properties, and adding media for each of the media services listed above are contained within the specific media service section. However, the procedure to set the media service offline and online is the same regardless of the media service you choose. For instructions, see “Setting a Media Service Online or Offline” on page 138.
■ ASM MediaStorASM MediaStor is a device management product that works on a Windows NT/2000 platform to manage the retrieval, mounting, and dismounting of removable media in a variety of hardware devices. MediaStor includes an easy-to-navigate administrative interface that lets you manage several devices on the same computer if needed.
Note: If you are installing Data Manager in an active/active cluster environment, you can use MediaStor as a media service; however, MediaStor itself runs only in active/passive mode. For more information on installing Data Manager in a clustered environment, see “Clustering” on page 183.

ASM MediaStor
ASM Data Manager Getting Started Guide 83StorageTek Proprietary
Figure 29. Data Manager with MediaStor
To use MediaStor as an ASM Data Manager media service, you install MediaStor on the computer where the hardware device you want to use for extended storage is attached. You then add the device to MediaStor and add media to the device. For more information, refer to the ASM MediaStor System Guide.
Once you install and configure MediaStor and install Data Manager, you then configure a media service connection through Data Manager that points to the MediaStor service. To assign specific pieces of media to an extended drive, you can allocate them through Data Manager, or assign them to an Application media pool for that extended drive through MediaStor. For instructions, see “Allocating/Deallocating MediaStor Media for an Extended Drive” on page 88.
For more information on configuring a MediaStor media service, see the following sections:
• "Adding a MediaStor Media Service, " which follows
• “Viewing MediaStor Media Service Properties” on page 86
• “Allocating/Deallocating MediaStor Media for an Extended Drive” on page 88
Note: The procedure to set the media service offline and online is the same regardless of the media service you choose. For instructions, see “Setting a Media Service Online or Offline” on page 138.
Adding a MediaStor Media ServiceData Manager can be configured to point to any computer where MediaStor is installed. The Data Manager system then uses the media in the MediaStor media service for allocation to Data Manager extended drives, assignment to media folders, and then for file migration.You may choose to install MediaStor
Computer withDX2000 Data Manager
installed andtwo extended drives
Computer withDX2000 MediaStor
installed andconnections to drive,
library, and towerdevices
Network connections toMediaStor and to drives in
attached devices via RemoteProcedure Call (RPC)
D:\NTFS
E:\NTFS
installed and twoASM ASM
extended drives

Setting Up Media Services
84 Second EditionStorageTek Proprietary
on the same computer where Data Manager is installed or install MediaStor on a different computer and point to it through the network.
Data Manager requires that you install MediaStor on the appropriate computer before trying to add MediaStor as a media service through Data Manager. In addition, we recommend that you add media to the media service before configuration in Data Manager. This makes the MediaStor media available for allocation to the Data Manager extended drive as soon as the media service is configured. Refer to the ASM MediaStor System Guide for detailed information on installing and setting up the MediaStor media service.
To configure a MediaStor media service:
1. From the Data Manager Administrator’s Service menu, select Configure Media Services. The Configure Media Services dialog box appears.
Figure 30. Configure Media Services Dialog Box
2. Click Add to add a media service. The media service wizard appears, starting with the Select Media Service Type page.

ASM MediaStor
ASM Data Manager Getting Started Guide 85StorageTek Proprietary
Figure 31. Media Service Wizard -- Select Media Service Type Page
3. Select the Storagetek MediaStor option and click Next. The Select Computer page appears.
Figure 32. Media Service Wizard -- Select Computer Page
The Select Computer page allows you to specify the computer on which MediaStor has been installed and to which you want to connect. If MediaStor is installed on the local computer, the local computer appears in the Computer Name text box by default.
4. In the Computer Name text box, enter the computer name of the MediaStor computer you want to use. You can type in the path to the computer or you can browse for the computer by clicking Browse.
Note: If you are connecting to a MediaStor service that is installed in a clustered environment, be sure to enter or browse to the logical cluster name for the cluster on which MediaStor is installed.

Setting Up Media Services
86 Second EditionStorageTek Proprietary
5. When the MediaStor computer appears in the Computer Name text box, click Next. The Summary page appears.
6. On the Summary page, review the information you have provided through the media service wizard.
7. If the information is correct, click Finish. A progress message appears. Once the media service is created, the Configure Media Services dialog box appears, showing the media service you just created (along with any others you may have created previously).
From the Configure Media Services dialog box, you can add another media service, view the properties of the selected media service, and set the media service online and offline. For information, see the sections that follow.
Note: The procedure for setting a media service online or offline is the same regardless of the media service you choose. For instructions, see “Setting a Media Service Online or Offline” on page 138.
8. When you are finished configuring media services, click Close.
Viewing MediaStor Media Service PropertiesOnce you have created a MediaStor media service, you can view the properties of the media service and allocate media to Data Manager extended drives.
To view configured MediaStor media service properties:
1. From the Data Manager Administrator’s Service menu, select Configure Media Services. The Configure Media Services dialog box appears.
2. Select the MediaStor media service whose properties you want to view and click Properties, or double-click the media service. The Media Service Properties dialog box appears, with the Select Computer tab active by default.

ASM MediaStor
ASM Data Manager Getting Started Guide 87StorageTek Proprietary
Figure 33. MediaStor Media Service Properties Dialog Box – Select Computer Tab
The Select Computer tab displays the Computer Name of the machine providing the MediaStor media service. This value cannot be changed. If you want a different computer to provide the MediaStor media service, you must add a new MediaStor media service pointing to the different computer and delete the old MediaStor media service (if applicable).
3. Click the Media List tab to activate it.
Figure 34. MediaStor Media Service Properties Dialog Box – Media List Tab
The Media List tab lists all available media in the media service, along with media type and to what (if any) extended drive (application pool) that media is currently allocated. If you want to allocate or deallocate MediaStor media for an extended drive, see "Allocating/Deallocating MediaStor Media for an Extended Drive, " which follows.

Setting Up Media Services
88 Second EditionStorageTek Proprietary
4. After you are finished viewing or changing the MediaStor media service properties, click OK. The Configure Media Services dialog box reappears. If you are finished, click Close to return to the Administrator.
Allocating/Deallocating MediaStor Media for an Extended Drive
The Media Service Properties dialog box allows you to allocate and deallocate MediaStor media for an extended drive. To allocate MediaStor media, the media service must be online. To deallocate MediaStor media, the media service should be online. If you attempt to deallocate media while the media service is offline, the changes may not take effect.
If you want to change which extended drive the media is allocated to, you must deallocate the media, then allocate it to a different extended drive.
Note: You can also allocate MediaStor media on the MediaStor server. In MediaStor, media is allocated to the Available Media pool for the extended drive through the MediaStor interface. Once you have allocated media for the extended drive Application Pool, the corresponding change appears in the Data Manager Administrator. For more information, refer to your ASM MediaStor System Guide.
To allocate/deallocate MediaStor media for an extended drive:
1. From the Data Manager Administrator’s Service menu, select Configure Media Services. The Configure Media Services dialog box appears.
2. Make sure that the MediaStor media service is online. If the media service is not online, choose it and then click Set Online.
3. Select the MediaStor media service and click Properties, or double-click the media service. The Media Service Properties dialog box appears, with the Select Computer tab active by default.
4. Click the Media List tab to activate it.

ASM MediaStor
ASM Data Manager Getting Started Guide 89StorageTek Proprietary
Figure 35. MediaStor Media Service Properties Dialog Box – Media List Tab
Media that is not yet allocated to an extended drive appears with no entry in the Application Pool column.
5. You have the following choices:
• If the media is allocated to an extended drive and you want to deallocate it, double-click the media or highlight the media and click Deallocate. The entry for the extended drive is cleared from the Application Pool column for the media.
• If the media is not yet allocated to an extended drive and you want to do so, double-click the media you want to allocate or highlight the media and click Allocate. The Select Extended Drive dialog box appears listing all available extended drives.
Figure 36. Select Extended Drive Dialog Box
Select the extended drive to which you want to allocate the selected media and click OK. The Media List tab of the Media Service Properties dialog box reappears, listing the media with an entry for the selected extended drive in the Application Pool column.
6. Click OK to save your changes and close the Media Service Properties dialog box. The Configure Media Services dialog box appears.

Setting Up Media Services
90 Second EditionStorageTek Proprietary
7. Click Close to return to the Administrator window. Allocated media appears in the appropriate node of the Available Media tree for the extended drive. Deallocated media does not appear in the Available Media tree.
■ Network Attached StorageASM Data Manager lets you define pieces of “virtual” media to be controlled by a media service. These virtual pieces of media can be located on any storage device attached to your local network. Virtual pieces of media are logical devices defined by how they are shared to the network. These logical devices can be a share to a server’s hard drive or shares on any network appliance that provides share-level access to storage.
The primary benefit to using a NAS media service is that it allows for file migration and storage in a single consolidated location. In addition, file retrieval from NAS is generally much faster than with other media types. Use of a NAS media service ensures that files that have been purged of their file data on the Data Manager extended drive can be fetched almost instantaneously when needed.
The NAS media service also allows you to set up options for your NAS media, in the event you are using a system designed for aggregation of files (multi-tiered HSM or hierarchical storage management environment), or using WORM volumes on a NAS device (typically NetApp devices). Selecting the appropriate option for your NAS media instructs Data Manager to apply restrictions to the files moved to that media.
Note: If you are using a NetApp device, but will be using Data Manager to write to non-WORM volumes on the device, be sure to configure those non-WORM volumes for “mixed mode” or NTFS. Data Manager cannot write streamed files to a UNIX volume.
NAS options are configured when the media is created. There are three options to choose from:
• Standard NAS: This is the selection you should make if your NAS media is a typical NAS share. Data Manager will treat this media the same way it treats any read/write NTFS media, allowing file modifications and deletes, and renames of files and directories on the extended drive and subsequently passing those changes on to the media.
• NAS Aggregation: This option is designed for a system where files are migrated from one Data Manager extended drive to another Data Manager extended drive, and then from the second extended drive to tape. This option tells Data Manager to restrict renames of files and directories. While typically NAS media allows for such changes, tape media does not, and therefore renames are restricted on the second extended drive. Enforcing

Network Attached Storage
ASM Data Manager Getting Started Guide 91StorageTek Proprietary
the same restrictions on the first extended drive (through this option) reduces the possibility of creating orphaned file tags on the first extended drive.
Note: The second extended drive can write to media other than tape, however Aggregate NAS media only restricts renames, operationally imitating only
• WORM NAS: Some NAS devices can be configured to contain WORM volumes, meaning that once files are written to the volume, they cannot be altered or deleted. Setting the WORM NAS option for NAS media on a WORM configured volume instructs Data Manager to restrict all changes to files on the extended drive, once they have been migrated. Files cannot be modified, renamed, or deleted (as with any WORM media).
Each Data Manager installation can have only one NAS media service, though you can create as many pieces (and types) of NAS media for that media service as you want. The NAS media service can use a RAID device, a NAS device, or a network share as media. You can create a piece of NAS media for any network share, including a network share resident on the Data Manager computer, as long as the share is not on the local extended drive. For more information on NAS media types, see “NAS Media” on page 31.
Figure 37. Data Manager with NAS
For more information on configuring a NAS media service, see the following sections:
• "Adding a NAS Media Service, " which follows
• “Adding a Piece of NAS Media” on page 95
• “Allocating/Deallocating NAS Media for an Extended Drive” on page 98
Note: The procedure to set the media service offline and online is the same regardless of the media service you choose. For instructions, see “Setting a Media Service Online or Offline” on page 138.
Computer withDX2000 Data Manager
installed andtwo extended drives
Network connectionto logical drive viastandard NT share
Disk array(NAS media
service)
D:\NTFS
E:\NTFS ASM

Setting Up Media Services
92 Second EditionStorageTek Proprietary
Adding a NAS Media ServiceThe media service wizard allows you to configure one NAS media service for each Data Manager computer, but allows you to use multiple network shares as pieces of NAS media for that service.
To use network shares as pieces of NAS media, you first need to configure the NAS media service and then edit the media service properties to create the media. Allocation and deallocation of the created media to each extended drive is done through the NAS media service properties as well.
To configure a NAS media service:
1. From the Data Manager Administrator’s Service menu, select Configure Media Services. The Configure Media Services dialog box appears.
Figure 38. Configure Media Services Dialog Box
2. Click Add to add a media service. The media service wizard appears, starting with the Select Media Service Type page.

Network Attached Storage
ASM Data Manager Getting Started Guide 93StorageTek Proprietary
Figure 39. Media Service Wizard -- Select Media Service Type Page
3. Select the Network Attached Storage option and click Next. The Summary page appears.
4. On the Summary page, click Finish.
5. Once the media service is created, you will receive a message asking if you want to create the media for the NAS media service now. You have the following choices:
• Click Yes to create your virtual NAS media now. The NAS media service properties dialog box appears. For more information on creating NAS media, see "Adding a Piece of NAS Media, " which follows.
• Click No to create your virtual NAS media later. The Configure Media Services dialog box appears, showing the media service you just created (along with any others you may have created previously).
From the Configure Media Services dialog box, you can add another media service, view the properties of the selected media service, and set the media service offline and online. For more information on the remaining functions, see the sections that follow.
Note: The procedure for setting a media service online or offline is the same regardless of the media service you choose. For instructions, see “Setting a Media Service Online or Offline” on page 138.
6. When you are finished configuring media services, click Close.
Viewing NAS Media Service PropertiesThe NAS Media Service Properties dialog box allows you to create “virtual” media for the NAS media service and assign it to the extended drive. This

Setting Up Media Services
94 Second EditionStorageTek Proprietary
virtual media represents NAS storage and acts as the media to which Data Manager will migrate files.
To view NAS media service properties:
1. From the Data Manager Administrator’s Service menu, select Configure Media Services. The Configure Media Services dialog box appears.
2. Select the NAS media service that you want to edit and click Properties, or double-click the media service. The Media Service Properties dialog box appears, containing only the Media List tab.
Figure 40. NAS Media Service Properties Dialog Box – Media List Tab
The Media List tab allows you to create “virtual” media for the NAS media service. This virtual media represents NAS storage and acts as the media to which Data Manager migrates files.
3. In the Media List tab, you have the following choices:
• Create a new piece of NAS media. For more information, see "Adding a Piece of Virtual TSM Media, " which follows.
• Allocate and deallocate a piece of NAS media for an extended drive. For more information, see “Allocating/Deallocating TSM Media for an Extended Drive” on page 108.
• Delete a piece of virtual NAS media. For more information, refer to the Managing Storage Media chapter of the ASM Data Manager System Guide.
4. When you are finished making changes to the NAS media service for Data Manager, click OK. The Configure Media Services dialog box reappears.
5. When you are finished making changes to all of the media services for Data Manager, click Close.

Network Attached Storage
ASM Data Manager Getting Started Guide 95StorageTek Proprietary
Adding a Piece of NAS MediaYou can use a shared network folder as a piece of “virtual” NAS media in Data Manager, including folders on the Data Manager computer, as long as the folder does not reside on the local Data Manager extended drive.
If you create your NAS media before creating your extended drive, you will have an opportunity to allocate that media to the extended drive when the extended drive is created.
When creating your NAS media, you will need to determine what options you want to configure for the media.You have the following options:
• If your NAS media is a normal network share, select Standard NAS. This tells Data Manager to treat the media as any normal read/write NTFS media, and provides for no specific restrictions on files.
• If your NAS media is a share on another Data Manger extended drive, as part of a multi-tiered hierarchical storage management (HSM) system, select NAS Aggregation. This tells Data Manager to restrict renames of files and directories on the extended drive of files moved to this media. These functions are already disallowed on the second (NAS shared) extended drive (if that drive is writing to tape). Enforcing similar restrictions on the first Data Manager extended drive will keep the files and file tags on each drive in sync with one another.
• If your NAS media is a share on a WORM configured volume on a NAS device (typically a NetApp device), select WORM NAS. This tells Data Manager to restrict any modifications or deletions on the extended drive of the files moved to this media. This is done because the files cannot be modified or deleted on the media, and enforcing similar restrictions on the extended drive ensures the files and file tags are in sync with the information on the media.
Note: NAS options can only be set on media creation, and cannot be altered later. If you select the wrong option for your NAS media, you will need to delete the media and recreate it.
Note: Since extended drive file restrictions for Aggregate NAS and WORM NAS media are not enforced until the files are moved to media, we strongly recommend that the Age page of your move rules be configured to move files of any age. You may also want to consider an aggressive setting for your Move files to media schedule, to ensure that all qualifying files are moved as soon as is possible. These actions can reduce the possibility for accidental deletion or modification of files. For more information on configuring the Age page of your move rules, see “Configuring the Move Rule Wizard Age Page” on page 172. For more information on the Move files to media schedule, see “Scheduling Movement of Files” on page 179.

Setting Up Media Services
96 Second EditionStorageTek Proprietary
Before you add the NAS media in Data Manager, make sure that the network shares you intend to use as media are visible to the Data Manager computer. The shares also should not be shared for direct access by users. If a user saves a file or deletes a file directly on the NAS share instead of through the extended drive, the files and file tags on the extended drive will not be synchronized with the files on media. Only the account that Data Manager uses to log on as a service should have access to the shares.
In addition, the NAS media service must be online to create NAS media.
Note: If you change the account that Data Manager uses to log on as a service, you will also need to change the access permissions to any network shares being used as NAS media.
To create a piece of NAS media:
1. From the Data Manager Administrator’s Service menu, select Configure Media Services. The Configure Media Services dialog box appears, containing the NAS media service you configured previously.
2. Make sure that the NAS media service is online. If the media service is not online, choose it and click Set Online.
3. Select the NAS media service and click Properties, or double-click the media service. The Media Service Properties dialog box appears.
Note: This is the dialog box that appears when you click Yes on the message asking you if you would like to create your media after creating the media service. Continue with the steps below to create your NAS media.
Figure 41. NAS Media Service Properties Dialog Box
4. Click Create. The Create NAS Media dialog box appears.

Network Attached Storage
ASM Data Manager Getting Started Guide 97StorageTek Proprietary
Figure 42. Create NAS Media Dialog Box -- Select Network Path Tab
5. In the Network Path text box on the Select Network Path tab, enter the path to the network share you want to use. You can type in the path to the folder or you can browse for the folder by clicking Browse.
6. Click the Enter Media Information tab to activate it.
Figure 43. Create NAS Media Dialog Box – Enter Media Information Tab
The Enter Media Information tab allows you to provide identification and descriptive information about the piece of NAS media you are creating. This information allows you to recognize the media later.
7. In the Media Name text box, type a name for the media. The name can be up to 32 characters. This is the name that will identify the media in the Administrator.
8. In the Media Description text box, type a description for the media. The description can be up to 128 characters.

Setting Up Media Services
98 Second EditionStorageTek Proprietary
9. In the Media Location text box, type the location for the network share. The location description can be up to 128 characters.
10. Click the NAS Options tab to activate it.
11. Select the NAS type for the media you are creating. You have the following options:
• Standard NAS - select this option if the media you are creating should allow all file modifications and deletions as appropriate.
• NAS Aggregation - select this option if the media you are creating is a share on a Data Manager extended drive, as a part of a multi-tiered storage environment, and as such must restrict file and directory renaming.
• WORM NAS - select this option if the media you are creating is a share on a WORM configured volume on a NAS device, and as such will not allow any file modifications, renames or deletions.
12. When you are finished, click OK. The Media Service Properties dialog box reappears, listing the new NAS media.
13. Repeat steps 4 through 12 for any additional pieces of NAS media you wish to add to the NAS media service.
14. If you have created an extended drive for your system, you should allocate your media now. For more information, see "Allocating/Deallocating NAS Media for an Extended Drive, " which follows.
Note: Media will not appear in the Administrator until it is allocated to an extended drive.
15. When you finish, click OK to close the Media Service Properties dialog box. The Configure Media Services dialog box appears.
16. Click Close to return to the Administrator window.
Allocating/Deallocating NAS Media for an Extended DriveThe Media Service Properties dialog box allows you to allocate and deallocate NAS media for Data Manager extended drives. To allocate NAS media, the media service must be online.
If you want to change which extended drive the media is allocated to, you must deallocate the media, then allocate it to a different extended drive.
To allocate/deallocate NAS media to an extended drive:
1. From the Data Manager Administrator’s Service menu, select Configure Media Services. The Configure Media Services dialog box appears.
2. Make sure that the NAS media service is online. If the media service is not online, choose it and click Set Online.

Network Attached Storage
ASM Data Manager Getting Started Guide 99StorageTek Proprietary
3. Select the NAS media service and click Properties, or double-click the media service. The Media Service Properties dialog box appears.
Figure 44. NAS Media Service Properties Dialog Box with Media
Media that is not yet allocated to an extended drive appears with no entry in the Application Pool column.
4. You have the following choices:
• To deallocate a piece of media, double-click the media or select the media and click Deallocate. The extended drive is removed from the Application Pool column for the media in the Media Service Properties dialog box.
• To allocate a piece of media, double-click the media you want to allocate or select the media and click Allocate. The Select Extended Drive dialog box appears listing available extended drives.
Figure 45. Select Extended Drive Dialog Box
Select the extended drive to which you want to allocate the selected NAS media and click OK. The Media Service Properties dialog box reappears, listing the media with an entry for the selected extended drive in the Application Pool column.
5. Click OK to save your changes and close the Media Service Properties dialog box. The Configure Media Services dialog box appears.

Setting Up Media Services
100 Second EditionStorageTek Proprietary
6. Click Close to return to the Administrator window. Allocated media appears in the appropriate node of the Available Media tree for the extended drive. Media that is not allocated does not appear in the Available Media tree.
■ Tivoli Storage ManagerIf you already use or plan to use Tivoli Storage Manager Server (TSM) 4.2 or higher as a data storage or data backup system, ASM Data Manager allows you to configure your TSM system as a media service so that you can migrate files from Data Manager to a TSM server. This method utilizes the storage devices supported and managed by the TSM server.
Figure 46. Data Manager with Tivoli Storage Manager
In order to use Tivoli Storage Manager as an Data Manager media service, you must first have TSM Backup/Archive Client 4.2 or higher set up and configured appropriately on the same computer where Data Manager is installed.
Note: TSM 4.2 and higher provides UNICODE support. If you have upgraded from earlier versions of TSM (prior to 4.2) and Data Manager (prior to 5.4), and currently have media in your system that was created before the upgrades, you can continue to migrate files to the media as long as the file names do not contain UNICODE characters. Files named with UNICODE characters must be migrated to media created in TSM 4.2 or higher and Data Manager 5.4 or higher.
When you configure a TSM media service, you create “virtual” media that represents TSM and acts as the media to which Data Manager migrates files. You can then assign that media to the appropriate extended drive, making that virtual media available to Data Manager for file migration. TSM media, as seen through Data Manager, is managed similarly to NAS media, particularly with respect to the functional restrictions for labeling, compacting, and copying. TSM media can be managed similarly to NAS media through the Data Manager interface; however, the TSM server is managing the actual physical removable media, and tasks like labeling, compacting, migration, and copy media are done through TSM rather than through Data Manager.
Computer withDX2000 Data Manager
and Tivoli StorageManager
Backup/Archive Clientinstalled, and
two extended drives
Tivoli Storage ManagerServer (running on anyTivoli-supported hostplatform) with TSM-
managedhard drive(s) used for
magnetic storage
Drive,library, and
tower devices
SCSIconnection
Networkconnectionsvia RemoteProcedureCall (RPC)
D:\NTFS
E:\NTFS ASM

Tivoli Storage Manager
ASM Data Manager Getting Started Guide 101StorageTek Proprietary
For more information on configuring a TSM media service, see the following sections:
• "Preparing TSM for Use with Data Manager, " which follows
• “Adding a TSM Media Service” on page 102
• “Viewing TSM Media Service Properties” on page 105
• “Adding a Piece of Virtual TSM Media” on page 106
• “Allocating/Deallocating TSM Media for an Extended Drive” on page 108
Note: The procedure to set the media service offline and online is the same regardless of the media service you choose. For instructions, see “Setting a Media Service Online or Offline” on page 138.
Preparing TSM for Use with Data ManagerIn order to use Tivoli Storage Manager as a media service, you must first have TSM Server version 4.2 or higher installed and configured. In addition, TSM Backup/Archive Client 4.2 or higher should be installed and configured appropriately on the same computer where Data Manager is installed. You must then copy the DSM.OPT file from the BACLIENT directory where Tivoli is installed to the DISKXTENDER\BIN directory on the Data Manager computer. In addition, some minor edits must be made to the DSM.OPT file copied to the DISKXTENDER\BIN directory.
Note: One of the necessary configurations for the Tivoli Client includes setting the Allow Backup Delete option for the client node to “Yes.” Otherwise you will receive an error when you attempt to create the TSM media service in Data Manager (or when trying to set the service online if the setting is changed after the service is created).
Note: If you are using Data Manager in a clustered environment, the steps to prepare Tivoli Storage Manager for use with Data Manager are somewhat different. For instructions, see “Clustering” on page 183.
To prepare Tivoli Storage Manager for use with Data Manager:
1. Copy the DSM.OPT file from the BACLIENT directory where Tivoli is installed to the DISKXTENDER\BIN directory.
2. Edit the copied DSM.OPT file and change the following information in that file:
• tcpserveraddress - Type in the IP address of the TSM Server computer.
• nodename – Type in the name of the machine where the TSM client is installed. If the client is installed on the same computer as Data Manager (which it should be) it will be the name of the local computer.
• passwordaccess – Type in the word prompt.

Setting Up Media Services
102 Second EditionStorageTek Proprietary
You can refer to the following example:
*==================================================
* tcp/ip
*==================================================
commmethod TCPIP
tcpport 1500
tcpserveraddress xx.x.xx.xxx
nodename DX-DXSERVER
passwordaccess prompt
3. For each additional TSM Server computer you want to use, copy (using different filenames) each server’s DSM.OPT file into the DISKXTENDER\BIN directory. Repeat step 2 with each option file.
After completing these preliminary steps, you may configure the Tivoli Storage Manager media service in Data Manager.
Note: If the tcpserveraddress information in the DSM.OPT file on the TSM server changes, the change must also be made to the DSM.OPT file on the Data Manager computer (meaning this information in these files must be identical for both). Differences impact Data Manager’s ability to migrate and fetch files from the TSM Server.
Adding a TSM Media ServiceAfter you have prepared the .OPT file for TSM and then stopped and restarted the Data Manager service, you can add the TSM media service.
Note: If you are connecting to more than one TSM Server computer, you must create one TSM media service for each TSM Server computer, and point to the differently named DSM.OPT files as indicated in step 3 above.
To configure a Tivoli Storage Manager media service:
1. From the Data Manager Administrator’s Service menu, select Configure Media Services. The Configure Media Services dialog box appears.

Tivoli Storage Manager
ASM Data Manager Getting Started Guide 103StorageTek Proprietary
Figure 47. Configure Media Services Dialog Box
2. Click Add. The media service wizard appears, starting with the Select Media Service Type page.
Figure 48. Media Service Wizard -- Select Media Service Type Page
3. Select the Tivoli Storage Manager option and click Next. The TSM Information page appears.

Setting Up Media Services
104 Second EditionStorageTek Proprietary
Figure 49. Media Service Wizard -- TSM Information Page
4. In the Options File text box, specify the options file that identifies the TSM Server computer that you want to use with this TSM media service. You have the following choices:
• If you want to use the default options file, DISKXTENDER\BIN\DSM.OPT, leave the text box blank.
• If you want to use a different options file in the DISKXTENDER\BIN directory, type the file name.
5. In the Client Password text box, type in a client password. This is the password the Data Manager service uses to log in to the Tivoli Storage Manager node defined in the DSM.OPT file.
6. Click Next. The Summary page appears.
7. Review the information in the summary.
8. If the information in the summary is correct, click Finish.
9. Once the media service is created, you will receive a message asking if you want to create the media for the TSM media service now. You have the following choices:
• Click Yes to create your virtual TSM media now. The TSM Media Service Properties dialog box appears. For more information on creating TSM media, see “Adding a Piece of Virtual TSM Media” on page 106.
• Click No to create your virtual TSM media later. The Configure Media Services dialog box appears, showing the media service you just created (along with any others you may have created previously).
From the Configure Media Services dialog box, you can add another media service, view the properties of the selected media service, and set
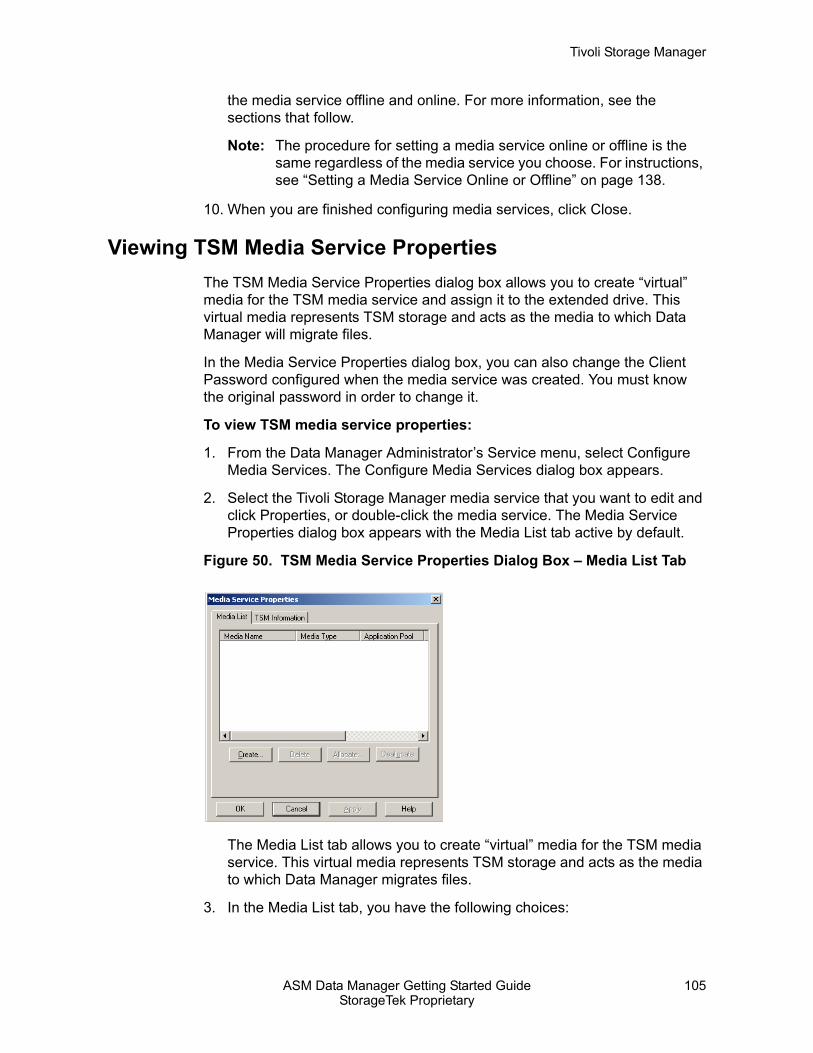
Tivoli Storage Manager
ASM Data Manager Getting Started Guide 105StorageTek Proprietary
the media service offline and online. For more information, see the sections that follow.
Note: The procedure for setting a media service online or offline is the same regardless of the media service you choose. For instructions, see “Setting a Media Service Online or Offline” on page 138.
10. When you are finished configuring media services, click Close.
Viewing TSM Media Service PropertiesThe TSM Media Service Properties dialog box allows you to create “virtual” media for the TSM media service and assign it to the extended drive. This virtual media represents TSM storage and acts as the media to which Data Manager will migrate files.
In the Media Service Properties dialog box, you can also change the Client Password configured when the media service was created. You must know the original password in order to change it.
To view TSM media service properties:
1. From the Data Manager Administrator’s Service menu, select Configure Media Services. The Configure Media Services dialog box appears.
2. Select the Tivoli Storage Manager media service that you want to edit and click Properties, or double-click the media service. The Media Service Properties dialog box appears with the Media List tab active by default.
Figure 50. TSM Media Service Properties Dialog Box – Media List Tab
The Media List tab allows you to create “virtual” media for the TSM media service. This virtual media represents TSM storage and acts as the media to which Data Manager migrates files.
3. In the Media List tab, you have the following choices:

Setting Up Media Services
106 Second EditionStorageTek Proprietary
• Create a new piece of virtual TSM media. For more information, see "Adding a Piece of Virtual TSM Media, " which follows.
• Allocate and deallocate a piece of virtual TSM media for an extended drive. For more information, see “Allocating/Deallocating TSM Media for an Extended Drive” on page 108.
• Delete a piece of virtual TSM media. For more information, refer to the Managing Storage Media chapter of the ASM Data Manager System Guide.
4. To change the Client Password, click the TSM Information tab.
Figure 51. TSM Media Service Properties Dialog Box – TSM Information Tab
5. In the TSM Information tab, enter the current and new password information.
6. When you are finished making changes to the TSM media service for Data Manager, click OK. The Configure Media Services dialog box reappears.
7. When you are finished making changes to all of the media services for Data Manager, click Close.
Adding a Piece of Virtual TSM MediaThe Media List tab of the Media Service Properties dialog box allows you to add a piece of virtual TSM media so that you can begin migrating files to it.
To create a piece of virtual TSM media:
1. From the Data Manager Administrator’s Service menu, select Configure Media Services. The Configure Media Services dialog box appears.
2. Make sure that the TSM media service is online. If the media service is not online, choose it and click Set Online.

Tivoli Storage Manager
ASM Data Manager Getting Started Guide 107StorageTek Proprietary
3. Select the TSM media service and click Properties, or double-click the media service. The Media Service Properties dialog box appears.
Note: This is the dialog box that appears when you click Yes on the message asking you if you would like to create your media after creating the media service. Continue with the steps below to create your TSM media.
Figure 52. TSM Media Service Properties Dialog Box – Media List Tab
4. On the Media List tab, click Create. The Create TSM Media dialog box appears.
Figure 53. Create TSM Media Dialog Box
5. In the Name and Description text boxes, enter a name and a description for the virtual piece of media. The name is what appears in the extended drive tree as the name of the media.
6. Select a management class from the Management Class drop-down list box. The management class you select associates the media with a policy domain, policy set, and migration destination on the Tivoli Storage Manager server.
Note: For more information on the use of management classes in Tivoli Storage Manager, refer to your TSM documentation.

Setting Up Media Services
108 Second EditionStorageTek Proprietary
7. Click OK. The Media Service Properties dialog box appears.
8. Repeat steps 4 through 7 for any additional pieces of TSM media you wish to add to the TSM media service.
9. If you have created an extended drive for your system, you should allocate your media now. For more information, see "Allocating/Deallocating TSM Media for an Extended Drive, " which follows.
Note: Media will not appear in the Administrator until it is allocated to an extended drive.
10. When you finish, click OK to close the Media Service Properties dialog box. The Configure Media Services dialog box appears.
11. Click Close to return to the Administrator window.
Allocating/Deallocating TSM Media for an Extended DriveThe Media Service Properties dialog box allows you to allocate TSM media to an extended drive. To allocate TSM media, the media service must be online.
If you want to change which extended drive the media is allocated to, you must deallocate the media, then allocate it to a different extended drive. For instructions on deallocating media, refer to the Managing Storage Media chapter of the ASM Data Manager Getting Started Guide.
To allocate virtual TSM media to an extended drive:
1. From the Data Manager Administrator’s Service menu, select Configure Media Services. The Configure Media Services dialog box appears.
2. Make sure that the TSM media service is online. If the media service is not online, choose it and click Set Online.
3. Select the TSM media service and click Properties, or double-click the media service. The Media Service Properties dialog box appears.
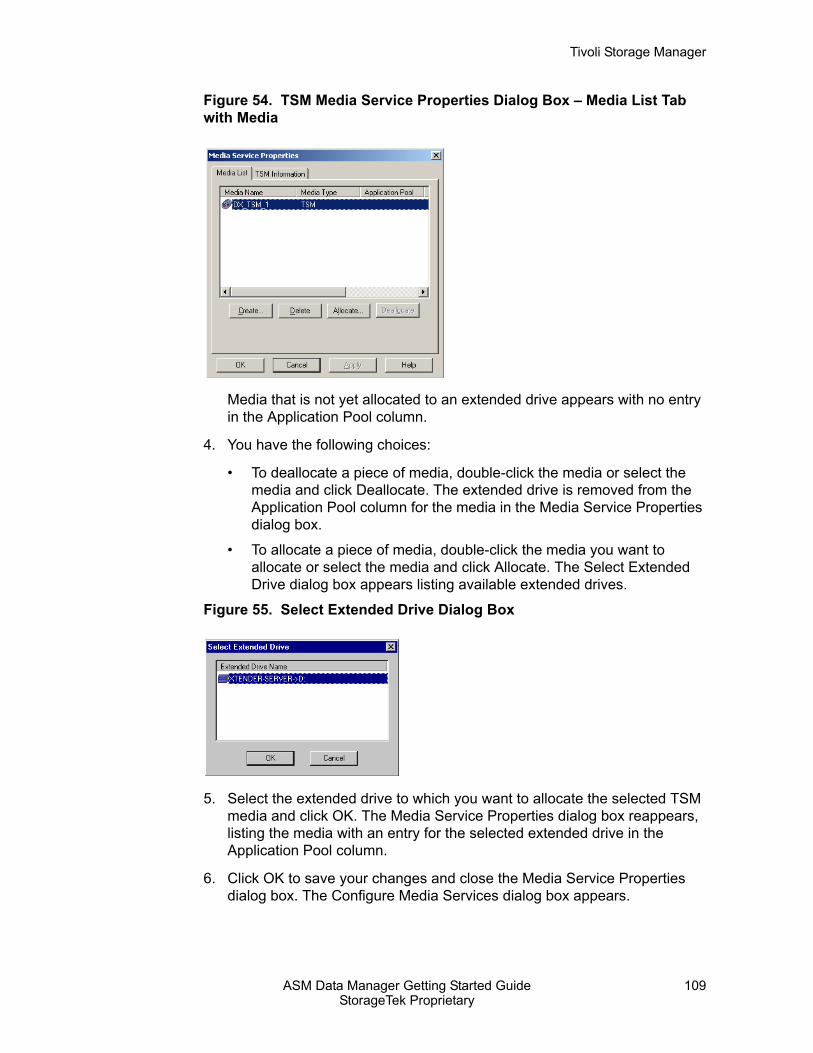
Tivoli Storage Manager
ASM Data Manager Getting Started Guide 109StorageTek Proprietary
Figure 54. TSM Media Service Properties Dialog Box – Media List Tab with Media
Media that is not yet allocated to an extended drive appears with no entry in the Application Pool column.
4. You have the following choices:
• To deallocate a piece of media, double-click the media or select the media and click Deallocate. The extended drive is removed from the Application Pool column for the media in the Media Service Properties dialog box.
• To allocate a piece of media, double-click the media you want to allocate or select the media and click Allocate. The Select Extended Drive dialog box appears listing available extended drives.
Figure 55. Select Extended Drive Dialog Box
5. Select the extended drive to which you want to allocate the selected TSM media and click OK. The Media Service Properties dialog box reappears, listing the media with an entry for the selected extended drive in the Application Pool column.
6. Click OK to save your changes and close the Media Service Properties dialog box. The Configure Media Services dialog box appears.
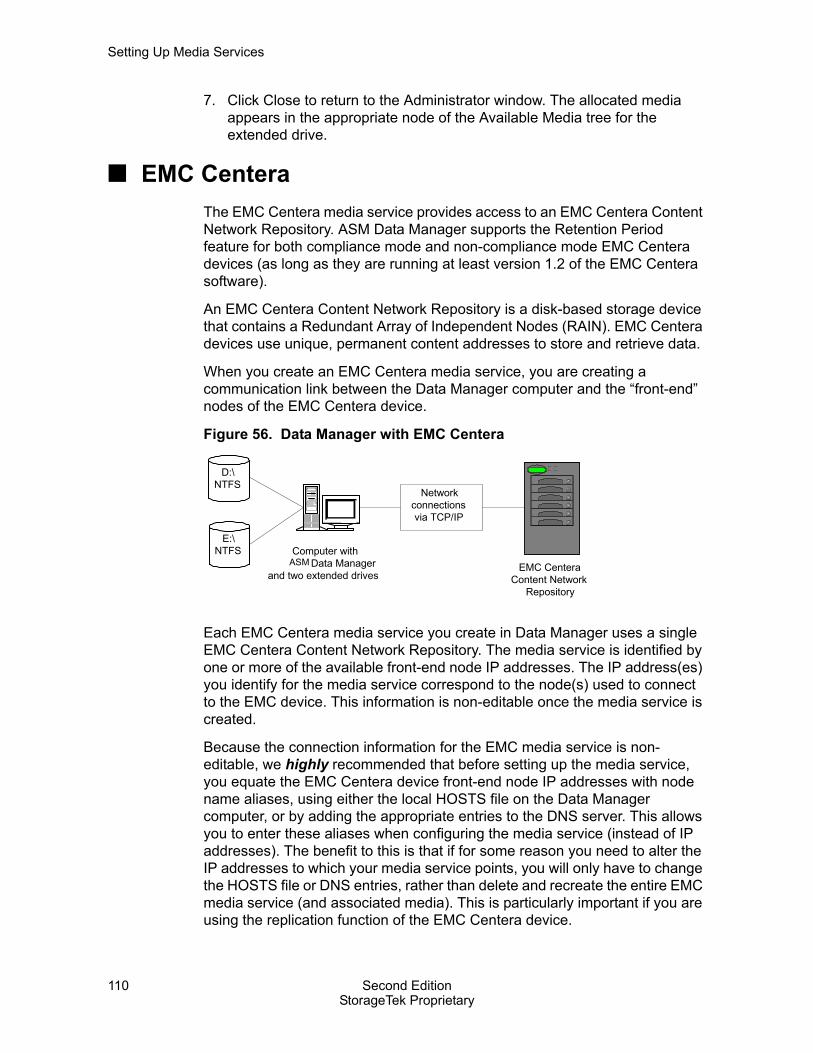
Setting Up Media Services
110 Second EditionStorageTek Proprietary
7. Click Close to return to the Administrator window. The allocated media appears in the appropriate node of the Available Media tree for the extended drive.
■ EMC CenteraThe EMC Centera media service provides access to an EMC Centera Content Network Repository. ASM Data Manager supports the Retention Period feature for both compliance mode and non-compliance mode EMC Centera devices (as long as they are running at least version 1.2 of the EMC Centera software).
An EMC Centera Content Network Repository is a disk-based storage device that contains a Redundant Array of Independent Nodes (RAIN). EMC Centera devices use unique, permanent content addresses to store and retrieve data.
When you create an EMC Centera media service, you are creating a communication link between the Data Manager computer and the “front-end” nodes of the EMC Centera device.
Figure 56. Data Manager with EMC Centera
Each EMC Centera media service you create in Data Manager uses a single EMC Centera Content Network Repository. The media service is identified by one or more of the available front-end node IP addresses. The IP address(es) you identify for the media service correspond to the node(s) used to connect to the EMC device. This information is non-editable once the media service is created.
Because the connection information for the EMC media service is non-editable, we highly recommended that before setting up the media service, you equate the EMC Centera device front-end node IP addresses with node name aliases, using either the local HOSTS file on the Data Manager computer, or by adding the appropriate entries to the DNS server. This allows you to enter these aliases when configuring the media service (instead of IP addresses). The benefit to this is that if for some reason you need to alter the IP addresses to which your media service points, you will only have to change the HOSTS file or DNS entries, rather than delete and recreate the entire EMC media service (and associated media). This is particularly important if you are using the replication function of the EMC Centera device.
Computer withDX2000 Data Manager
and two extended drives
Networkconnectionsvia TCP/IP
D:\NTFS
E:\NTFS
EMC CenteraContent Network
Repository
ASM

EMC Centera
ASM Data Manager Getting Started Guide 111StorageTek Proprietary
You can enter one or multiple aliases/IP addresses for your EMC media service when you create it, however you cannot add or remove aliases/IP addresses after you create the media service. Because of this we recommend that you enter all of the front-end node aliases/IP addresses when you create the media service, in order to provide Data Manager with as many connection points to the EMC device as possible. If you enter only a single alias/IP address, when the Data Manager service connects to the EMC device, it retrieves the other front-end node information and will use that to maintain connectivity to the device (in the event the original connection is broken).
However, Data Manager only maintains this additional information as long as the service is active. If the Data Manager service stops and restarts, it uses the originally configured connection information to reconnect to the EMC Centera device. Entering all available aliases/IP addresses helps ensure connectivity to the EMC Centera device.
After creating the EMC media service, you must create “virtual” media, which represent space on the EMC Centera device and act as the media to which Data Manager migrates files. You can then assign that media to the appropriate extended drive, making that virtual media available to Data Manager for file migration. You can create as many pieces of virtual media as you need to, in order to segregate file activity through Data Manager. Each piece of virtual media contains approximately 256 GB of space, and can contain up to 65,000 files.
For each EMC media service, you can set a retention period for files written to the EMC media created for that service. A retention period defines the number of days a file must be kept before it can be deleted. By default, the retention period for EMC media services is zero days (meaning no retention).
For more information on configuring an EMC Centera media service, see the following sections:
• "Adding an EMC Centera Media Service, " which follows
• “Viewing EMC Centera Media Service Properties” on page 114
• “Adding a Piece of Virtual EMC Media” on page 117
• “Setting the Retention Period for the EMC Media Service” on page 118
• “Allocating/Deallocating EMC Media for an Extended Drive” on page 120
• “Setting a Media Service Online or Offline” on page 138
Adding an EMC Centera Media ServiceAfter you have configured the EMC Centera device as described in the EMC documentation, and connected it to a network connection where it is accessible to the Data Manager computer, you can add the EMC Centera media service in Data Manager. You can create one EMC Centera media service for each EMC Centera device.

Setting Up Media Services
112 Second EditionStorageTek Proprietary
To create an EMC Centera media service in Data Manager, you need the IP address(es) for one or more front-end node(s) in the Centera device. The IP address(es) identifies which node(s) are used to establish a connection to the EMC device.
It is highly recommended that before setting up the media service, you equate the front-end node IP addresses with node name aliases, using either the local HOSTS file on the Data Manager computer, or by adding the appropriate entries to the DNS server. This allows you to use these aliases instead of IP addresses when configuring the media service.
Once the media service is created, the IP address information is non-editable. Creating node name associations for the IP addresses allows you to change the connection points Data Manager uses for the EMC Centera device without having to delete and recreate the media service
In addition, you cannot add or remove aliases/IP addresses after the EMC media service is created. For this reason, we recommend that you enter all of the front-end node aliases/IP addresses when creating the media service, in order to provide Data Manager with as many connection points to the EMC device as possible. Configuring the service using multiple IP addresses ensures connectivity, in the event one of the node connections is not available.
To configure an EMC Centera media service:
1. From the Service menu, select Configure Media Services. The Configure Media Services dialog box appears.
Figure 57. Configure Media Services Dialog Box
2. Click Add. The media service wizard appears, starting with the Select Media Service Type page.

EMC Centera
ASM Data Manager Getting Started Guide 113StorageTek Proprietary
Figure 58. Media Service Wizard -- Select Media Service Type Page
3. Select the EMC Centera option, and then click Next. The EMC Information page appears.
Figure 59. Media Service Wizard -- EMC Information Page
4. In the Pool Address text box, enter the alias or IP address for one or more front-end nodes in the EMC Centera device. To enter more than one alias/IP address, separate the entries with a comma, as shown in the following example:
EMCNodeName1, EMCNodeName1, EMCNodeName3
or
11.2.3.44, 22.3.4.55, 33.4.5.66

Setting Up Media Services
114 Second EditionStorageTek Proprietary
(where the node names have been equated to the EMC Centera device’s front-end node IP addresses in either the local HOSTS file or on the DNS server)
5. Click Next. The Summary page appears.
6. Review the information in the summary.
7. If the information in the summary is correct, click Finish.
8. Once the media service is created, you will receive a message asking if you want to create the media for the EMC media service now. You have the following choices:
• Click Yes to create your virtual EMC media now. The EMC Media Service Properties dialog box appears. For more information, see “Adding a Piece of Virtual EMC Media” on page 117.
• Click No to create your virtual EMC media later. The Configure Media Services dialog box appears, showing the media service you just created (along with any others you may have created previously).
From the Configure Media Services dialog box, you can add another media service, view the properties of the selected media service, and set the media service offline and online. For more information, see the sections that follow.
Viewing EMC Centera Media Service PropertiesThe EMC Centera Media Service Properties dialog box allows you to create “virtual” media for the EMC Centera media service and assign it to the extended drive. This virtual media represents EMC Centera storage and acts as the media to which Data Manager migrates files.
The Retention Period tab in the EMC Centera Media Service Properties dialog box allows you to set the retention period for the media service. The retention period determines the number of days a file will be kept before it can be deleted. Be advised that retention periods are only applied to files after they have been moved to media, and that the retention period set for the media service applies to all files moved to any media created for the media service.
Note: Data Manager will not automatically delete files once their retention period has expired. The retention period simply sets a time-restriction during which files cannot be deleted.
To view EMC Centera media service properties:
1. From the Service menu, select Configure Media Services. The Configure Media Services dialog box appears.
2. Select the EMC Centera media service that you want to edit and click Properties, double-click the media service. The Media Service Properties dialog box appears.

EMC Centera
ASM Data Manager Getting Started Guide 115StorageTek Proprietary
Figure 60. EMC Centera Media Service Properties Dialog Box – Media List Tab
The Media List tab allows you to create “virtual” media for the EMC Centera media service. This virtual media represents EMC Centera storage and acts as the media to which Data Manager migrates files.
3. In the Media List tab, you have the following choices:
• Create a new piece of virtual EMC media. For more information, see "Adding a Piece of Virtual EMC Media, " which follows.
• Allocate or deallocate a piece of virtual EMC media for an extended drive. For more information, see “Allocating/Deallocating EMC Media for an Extended Drive” on page 120.
• Delete a piece of virtual EMC media. For more information, refer to the Managing Storage Media chapter of the ASM Data Manager System Guide.
4. To view the IP address(es)/node names you entered when creating the EMC Centera media service, as well as the software version of the EMC Centera device, click the EMC Information tab.

Setting Up Media Services
116 Second EditionStorageTek Proprietary
Figure 61. EMC Centera Media Service Properties Dialog Box – EMC Information Tab
5. To view or edit the retention period set for the EMC media service, click the Retention Period tab. For more information, see “Setting the Retention Period for the EMC Media Service” on page 118.
Figure 62. EMC Centera Media Service Properties Dialog Box – Retention Period Tab
6. When you are finished making changes to the EMC Centera media service for Data Manager, click OK. The Configure Media Services dialog box reappears.
7. When you are finished making changes to all of the media services for Data Manager, click Close.

EMC Centera
ASM Data Manager Getting Started Guide 117StorageTek Proprietary
Adding a Piece of Virtual EMC MediaThe Media List tab of the Media Service Properties dialog box allows you to create a piece of virtual EMC media so that you can begin migrating files to the EMC Centera device. Each piece of virtual media contains approximately 256 GB of space, and can contain up to 65,000 files.
Note: While the number of media you will want to create may vary by system setup and media use, we do recommend creating several pieces of virtual media, in order to allow for multiple pieces of media to receive files simultaneously. You will also want to set the Media fill method option for your move groups to Random. For more information on configuring move group options, see “Configuring the Move Group Wizard Options Page” on page 164.
To create a piece of virtual EMC media:
1. From the Data Manager Administrator’s Service menu, select Configure Media Services. The Configure Media Services dialog box appears.
2. Make sure that the EMC Centera media service is online. If the media service is not online, choose it and then click Set Online.
3. Select the EMC Centera media service and click Properties, or double-click the media service. The Media Service Properties dialog box appears.
Note: This is the dialog box that appears when you click Yes on the message asking you if you would like to create your media after creating the media service. Continue with the steps below to create your EMC media.
Figure 63. EMC Centera Media Service Properties Dialog Box – Media List Tab
4. On the Media List tab, click Create. The Create EMC Media dialog box appears.

Setting Up Media Services
118 Second EditionStorageTek Proprietary
Figure 64. Create EMC Media Dialog Box
5. In the Name and Description text boxes, enter a name and a description for the virtual piece of media. The name is what appears in the extended drive tree as the name of the media.
6. Click OK. The Media Service Properties dialog box appears.
7. Repeat steps 4 through 6 for any additional pieces of EMC media you wish to add to the EMC media service.
8. If you have created an extended drive for your system, you should allocate your media now. For more information, see “Allocating/Deallocating EMC Media for an Extended Drive” on page 120.
Note: Media will not appear in the Administrator until it is allocated to an extended drive.
9. When you finish, click OK to close the Media Service Properties dialog box. The Configure Media Services dialog box appears.
10. Click Close to return to the Administrator window.
Setting the Retention Period for the EMC Media ServiceThe Retention Period tab of the Media Service Properties dialog box allows you to set the retention period for the EMC media service, as long as the EMC Centera device is running at least version 1.2 EMC software. The retention period you set will apply to all files moved to any media created for this media service.
You can set the retention period through the media service properties. Be advised, however, that any changes made to the retention period will only apply to newly migrated files. Files that have already been migrated will continue to posses the retention period that was in effect when they were migrated. Changes to retention are not “back-applied” to files already moved to media.
The retention period determines how long files that have been written to EMC media are kept, or “retained” before they can be deleted. When the media service is created, the default retention period is zero days.

EMC Centera
ASM Data Manager Getting Started Guide 119StorageTek Proprietary
Be advised that Data Manager does enforce retention of files until they have been moved to media. For this reason, we suggest the following actions:
• Since the default retention period is “0” days, and because any changes to the retention period setting do not apply to files that have already been moved, if you need to set a retention period, you should do so immediately after creating the media service.
• Since retention is not enforced until files are moved to media, we strongly recommend that the Age page of your move rules be configured to move files of any age (no age-delay set). For more information on configuring the Age page of your move rules, see “Configuring the Move Rule Wizard Age Page” on page 172.
• You should consider an aggressive setting for your Move files to media schedule (as long as your network resources allow it), to ensure that all qualifying files are moved as soon as possible. For more information on the Move files to media schedule, see “Scheduling Movement of Files” on page 179.
These three actions can reduce the possibility of accidental deletion or modification of files that need to be retained.
In addition, because retention is not enforced until files are moved, retention periods are calculated from the time the files are migrated (not from creation time).
Note: Data Manager will not automatically delete files once their retention period has expired. The retention period simply sets a time-restriction during which files cannot be deleted from the EMC media.
To edit the retention period for the EMC media service:
1. From the Data Manager Administrator’s Service menu, select Configure Media Services. The Configure Media Services dialog box appears.
2. Make sure that the EMC Centera media service is offline. If the media service is not offline, choose it and then click Set Offline.
3. Select the EMC Centera media service and click Properties, or double-click the media service. The Media Service Properties dialog box appears.
4. Click the Retention Period tab to activate it.

Setting Up Media Services
120 Second EditionStorageTek Proprietary
Figure 65. EMC Centera Media Service Properties Dialog Box – Retention Period Tab
5. In the Days text box, enter the number of days you want to force files to be retained after they are migrated. This means that any files written to the media created for this media service cannot be deleted or modified until the amount of time entered has expired.
Note: Changes to the Retention Period will only apply to files that are migrated after the change is made. Files already moved to media will retain the retention period that was in effect at the time they were moved.
Note: Files saved to the extended drive but not yet moved to media are not subject to retention, and therefore can be modified or deleted. This is important to remember when configuring the Age page of your move rules, and the Move files to media activity. For more information on Age restrictions for move rules, see “Configuring the Move Rule Wizard Age Page” on page 172. For more information on setting the Move files to media activity, see “Scheduling Movement of Files” on page 179.
6. When you are finished making changes to the EMC Centera media service, click OK. The Configure Media Services dialog box reappears.
7. If the EMC media service is still offline, choose it and click Set Online.
8. When you are finished making changes to all of the media services for Data Manager, click Close.
Allocating/Deallocating EMC Media for an Extended DriveThe Media Service Properties dialog box allows you to allocate EMC media to an extended drive. To allocate EMC media, the media service must be online.

EMC Centera
ASM Data Manager Getting Started Guide 121StorageTek Proprietary
If you want to change which extended drive the media is allocated to, you must deallocate the media, then allocate it to a different extended drive.
To allocate virtual EMC media to an extended drive:
1. From the Service menu, select Configure Media Services. The Configure Media Services dialog box appears.
2. Make sure that the EMC media service is online. If the media service is not online, choose it and then click Set Online.
3. Select the EMC media service and click Properties, or double-click the media service. The Media Service Properties dialog box appears.
Figure 66. EMC Centera Media Service Properties Dialog Box – Media List Tab with Media
Media that is not yet allocated to an extended drive appears with no entry in the Application Pool column.
4. You have the following choices:
• To deallocate a piece of media, double-click the media or select the media and click Deallocate. The extended drive is removed from the Application Pool column for the media in the Media Service Properties dialog box.
• To allocate a piece of media, double-click the media you want to allocate or select the media and click Allocate. The Select Extended Drive dialog box appears listing available extended drives.

Setting Up Media Services
122 Second EditionStorageTek Proprietary
Figure 67. Select Extended Drive Dialog Box
5. Select the extended drive for which you want to allocate or deallocate the selected EMC media and click OK. The Media Service Properties dialog box reappears, listing the media with an entry for the selected extended drive in the Application Pool column.
6. Click OK to save your changes and close the Media Service Properties dialog box. The Configure Media Services dialog box appears.
7. Click Close to return to the Administrator window. All allocated EMC media appears in the Original node of the Available Media tree for the extended drive.
■ StorageTek’s ACSLSASM Data Manager can use StorageTek’s Automated Cartridge System Library Software (ACSLS) media services for access to tape media within StorageTek tape libraries. Data Manager supports the use of ACSLS versions 5.3.2, 5.4, 6.0.0 and 6.1.1. For more information on tape media, see “Tape Media” on page 32.
ACSLS is a UNIX-based device management product that manages StorageTek tape libraries and provides device sharing between applications. Organizations that have already invested in ACSLS can use Data Manager to migrate files from Windows NT/2000 computers to tape media managed by the ACSLS server.
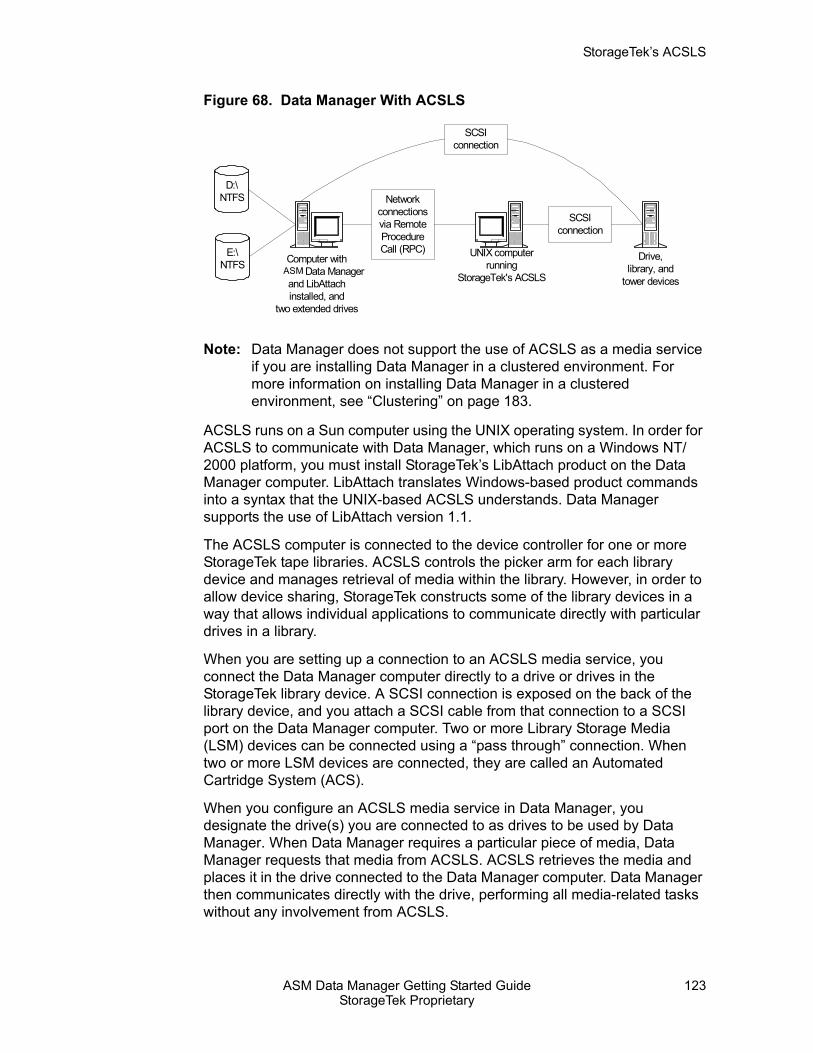
StorageTek’s ACSLS
ASM Data Manager Getting Started Guide 123StorageTek Proprietary
Figure 68. Data Manager With ACSLS
Note: Data Manager does not support the use of ACSLS as a media service if you are installing Data Manager in a clustered environment. For more information on installing Data Manager in a clustered environment, see “Clustering” on page 183.
ACSLS runs on a Sun computer using the UNIX operating system. In order for ACSLS to communicate with Data Manager, which runs on a Windows NT/2000 platform, you must install StorageTek’s LibAttach product on the Data Manager computer. LibAttach translates Windows-based product commands into a syntax that the UNIX-based ACSLS understands. Data Manager supports the use of LibAttach version 1.1.
The ACSLS computer is connected to the device controller for one or more StorageTek tape libraries. ACSLS controls the picker arm for each library device and manages retrieval of media within the library. However, in order to allow device sharing, StorageTek constructs some of the library devices in a way that allows individual applications to communicate directly with particular drives in a library.
When you are setting up a connection to an ACSLS media service, you connect the Data Manager computer directly to a drive or drives in the StorageTek library device. A SCSI connection is exposed on the back of the library device, and you attach a SCSI cable from that connection to a SCSI port on the Data Manager computer. Two or more Library Storage Media (LSM) devices can be connected using a “pass through” connection. When two or more LSM devices are connected, they are called an Automated Cartridge System (ACS).
When you configure an ACSLS media service in Data Manager, you designate the drive(s) you are connected to as drives to be used by Data Manager. When Data Manager requires a particular piece of media, Data Manager requests that media from ACSLS. ACSLS retrieves the media and places it in the drive connected to the Data Manager computer. Data Manager then communicates directly with the drive, performing all media-related tasks without any involvement from ACSLS.
Computer withDX2000 Data Manager
and LibAttachinstalled, and
two extended drives
UNIX computerrunning
StorageTek's ACSLS
D:\NTFS
Drive,library, and
tower devices
SCSIconnection
Networkconnectionsvia RemoteProcedureCall (RPC)
SCSIconnection
E:\NTFS ASM

Setting Up Media Services
124 Second EditionStorageTek Proprietary
Once you physically connect a drive in a StorageTek library to an Data Manager computer, the Data Manager computer controls that drive. Other computers cannot access that drive. However, other computers could be connected to other drives in the StorageTek library; these direct connections allow multiple computers to share the tape library’s storage capabilities, and yet insure that each computer always has access to a drive.
Data Manager can be configured to point to any computer where StorageTek’s ACSLS program is used to manage a StorageTek library or libraries. Because ACSLS is designed for a UNIX operating system, you must install StorageTek’s LibAttach product on the Data Manager computer before you can configure the ACSLS media service.
For more information, see the following sections:
• "An ACSLS Glossary, " which follows
• “Preparing ACSLS for Use with Data Manager” on page 125
• “Adding an ACSLS Media Service” on page 129
• “Viewing ACSLS Media Service Properties” on page 133
• “Adding a Drive to the ACSLS Media Service” on page 134
• “Editing ACSLS Drive Configuration” on page 137
Note: The procedure to set the media service offline and online is the same regardless of the media service you choose. For instructions, see “Setting a Media Service Online or Offline” on page 138.
An ACSLS GlossaryThe following table contains brief descriptions of key terms used throughout the discussion on ACSLS:
Table 11. ACSLS Glossary
Term DefinitionACS (Automated Cartridge System)
One or more LSM devices attached together that act as one device. LSM devices are attached using a pass-through cable.
Drive The device used to write data to media. Drives are connected to the library using a SCSI connection. The drives that Data Manager uses as media are also connected to the Data Manager computer using a SCSI connection.
LSM (Library Storage Media)
A single device that contains drives, shelves, and a transport mechanism

StorageTek’s ACSLS
ASM Data Manager Getting Started Guide 125StorageTek Proprietary
Preparing ACSLS for Use with Data ManagerThere are several steps you must take to prepare your ACSLS system before you can use it with Data Manager.
Be advised that the steps in the following procedure assume you have installed and configured ACSLS as described in the StorageTek ACSLS documentation, including access control privileges. All steps in this guide should be performed in addition to standard ACSLS configuration.
Note: If you are using ACSLS version 6.1.1, see the Release Notes that accompanied ASM Data Manager version 5.40.102 for instructions pertaining to setting access control privileges, and other information specific to ACSLS version 6.1.1.
If you are using ACSLS prior to version 6.1.1, we strongly recommend that you not rename or edit the users.SAMPLE.allow or internet.SAMPLE.addresses files, which are located in the /export/home/ACSSS/data/external/access_control/ directory, unless instructed to do so by a technical support representative. Changing the settings in these files for these versions can interfere with allocation of media to Data Manager extended drives, causing the media to appear as if it is allocated to all extended drives.
To prepare ACSLS for use with Data Manager:
1. Physically connect the Data Manager computer and the library drives using SCSI cables.
2. Power on the libraries. The system will not recognize the libraries if they are not initialized before the Sun computer comes online.
3. Start the Sun computer. When you log on to the Sun computer, three windows should appear, as described in the following table:
Panel The area inside the LSM where drives and shelves are mounted
Shelf Houses the media when it is not mounted in a drive
Table 11. ACSLS Glossary (Continued)
Term Definition

Setting Up Media Services
126 Second EditionStorageTek Proprietary
If the ACSSS Console does not appear automatically, right-click the background, select Programs, and then select Console to open it.
4. On the Sun computer, configure the changer or changers. For instructions, see "Configuring the Changers, " which follows.
5. On the Sun computer, assign media to an extended drive. For instructions, see “Assigning ACSLS Media to an Extended Drive” on page 128.
These sections provide only brief instructions on setting up ACSLS for the purpose of configuring an ACSLS media service on the Data Manager computer. For more information on configuring ACSLS, refer to the documentation provided with your copy of ACSLS.
Configuring the ChangersThis section describes how to configure the changer or changers for use with Data Manager. All commands described in this procedure are entered in the ACSSS Console on the Sun computer where ACSLS is installed.
To configure the changers:
1. If the ACS Service is running, you must terminate it before adding or modifying a changer. To stop the ACS Service, type kill.acsss and press <RETURN>.
2. Once the service has stopped, type acsss_config and press <RETURN>. A menu appears with the following six options.
1. Set CSI tuning variables
2. Set event logging variables
3. Set general product behavior variables
4. Set access control variables
5. Rebuild Access Control Information.
Table 12. Windows on the Sun Computer
Window Name DescriptionThe ACSSS Console UNIX commands are entered in the ACSSS
Console. The commands are entered at the command prompt, which is similar to a DOS prompt.
The ACSSS Command Processor Window
Processes ACSLS commands and displays the results.
The Event Log Tail Window
Displays information about the processes generated in the UNIX command window.
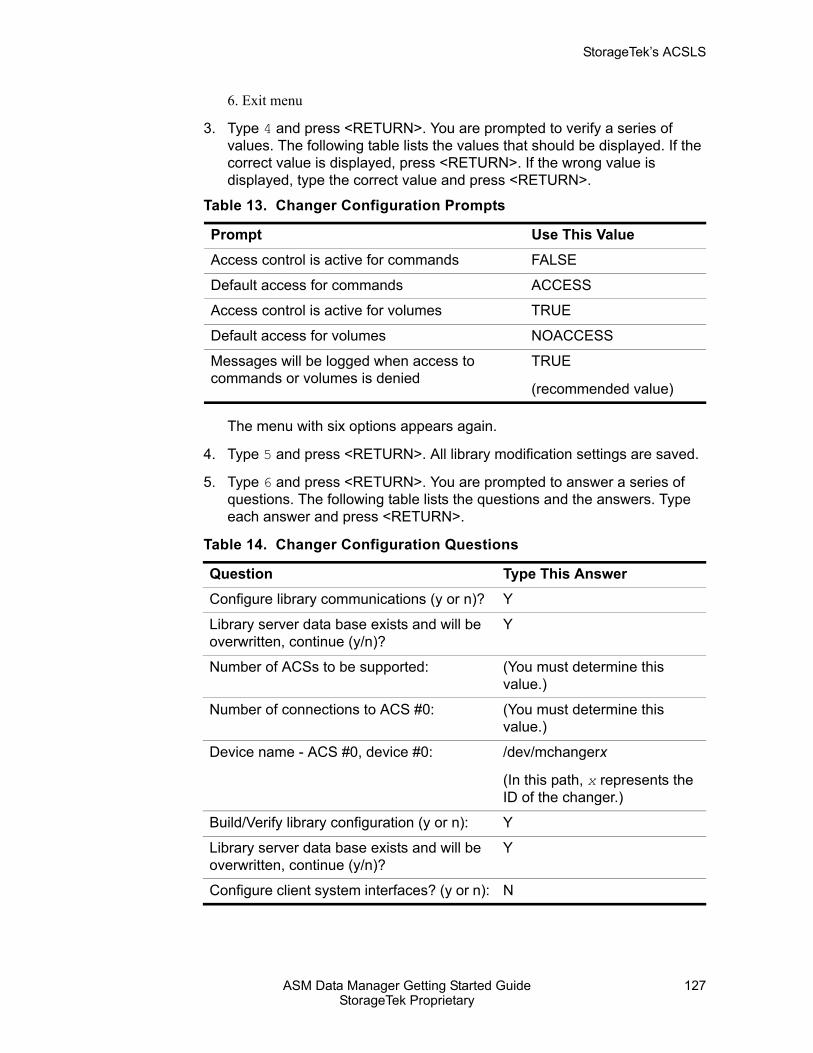
StorageTek’s ACSLS
ASM Data Manager Getting Started Guide 127StorageTek Proprietary
6. Exit menu
3. Type 4 and press <RETURN>. You are prompted to verify a series of values. The following table lists the values that should be displayed. If the correct value is displayed, press <RETURN>. If the wrong value is displayed, type the correct value and press <RETURN>.
The menu with six options appears again.
4. Type 5 and press <RETURN>. All library modification settings are saved.
5. Type 6 and press <RETURN>. You are prompted to answer a series of questions. The following table lists the questions and the answers. Type each answer and press <RETURN>.
Table 13. Changer Configuration Prompts
Prompt Use This ValueAccess control is active for commands FALSE
Default access for commands ACCESS
Access control is active for volumes TRUE
Default access for volumes NOACCESS
Messages will be logged when access to commands or volumes is denied
TRUE
(recommended value)
Table 14. Changer Configuration Questions
Question Type This AnswerConfigure library communications (y or n)? Y
Library server data base exists and will be overwritten, continue (y/n)?
Y
Number of ACSs to be supported: (You must determine this value.)
Number of connections to ACS #0: (You must determine this value.)
Device name - ACS #0, device #0: /dev/mchangerx
(In this path, x represents the ID of the changer.)
Build/Verify library configuration (y or n): Y
Library server data base exists and will be overwritten, continue (y/n)?
Y
Configure client system interfaces? (y or n): N

Setting Up Media Services
128 Second EditionStorageTek Proprietary
The following message appears: “Prepare for database backup...Insert database backup tape. [Hit RETURN to continue]”
6. You have the following choices:
• Press <RETURN> to back up the database.
• Press <CONTROL>+<C> to exit from the tape backup prompt.
7. Restart the ACS Service. To start the ACS Service, type rc.acsss and press <RETURN>. In a moment, the following message appears in the Event Log Tail window: “Server system running”.
Assigning ACSLS Media to an Extended DriveThis section describes how to assign media to an owner, such as a Data Manager extended drive. All commands described in this procedure are entered on the Sun computer where ACSLS is installed.
To assign media to an extended drive:
1. In the ACSSS Console, change to the appropriate directory. Type the following command and press <RETURN>:
cd /export/home/ACSSS/data/external/volrpt
2. In the ACSSS Console, request owner information to find available media. Type the following command and press <RETURN>:
volrpt –f owner_id.volrpt –a x
The placeholder x represents the ACS ID. A list showing the owner of each media appears. Refer to the following example:
VOLUME REPORT UTILITY
2000-10-05 11:06:52
TOTAL VOLUMES: 2 SEQUENCE: sort by volume identifier
Volume Volume Owner
Label: Status: ID:
000182 VOLUME_HOME SYSTEM
004022 VOLUME_HOME DX_BENCH_E
In this example, the media with volume label 000182 is currently unassigned. The media with volume label 004022 is currently assigned to DX_BENCH_E (the extended drive E on the computer BENCH).
3. In the ACSSS Command Processor Window, assign the media. Type the following command and press <RETURN>:

StorageTek’s ACSLS
ASM Data Manager Getting Started Guide 129StorageTek Proprietary
set owner “DX_MachineName_ExtDriveLetter” VOL MediaRange
The following table indicates what each placeholder in this format represents:
The following example assigns the media numbered from 060945 to 060948 to extended drive G on the DX29 computer:
set owner “DX_DX29_G” VOL 060945-060948
When the new assignment is completed, the following message appears in the ACSSS Command Processor Window: “Set: set completed, Success.”
Once you have assigned ownership for a piece of media to your extended drive through ACSLS and once that media has been added to the ACSLS media service, the media appears in the appropriate node of the Available Media tree for your extended drive.
Adding an ACSLS Media ServiceThis section describes how to use the media service wizard to create an ACSLS media service.
Note: Before adding an ACSLS media service, make sure that StorageTek’s LibAttach is installed on the Data Manager computer. LibAttach allows Data Manager to communicate with ACSLS, which is a UNIX program. LibAttach translates Windows-based product commands into a format that the UNIX-based ACSLS program understands.To configure an ACSLS media service:
1. From the Data Manager Administrator’s Service menu, select Configure Media Services. The Configure Media Services dialog box appears.
Table 15. Placeholders in the Command to Assign Media
Placeholder RepresentsMachineName The computer name that contains the extended drive
ExtDriveLetter The drive letter of the extended drive
MediaRange The range of numbers for the media that you want to extend
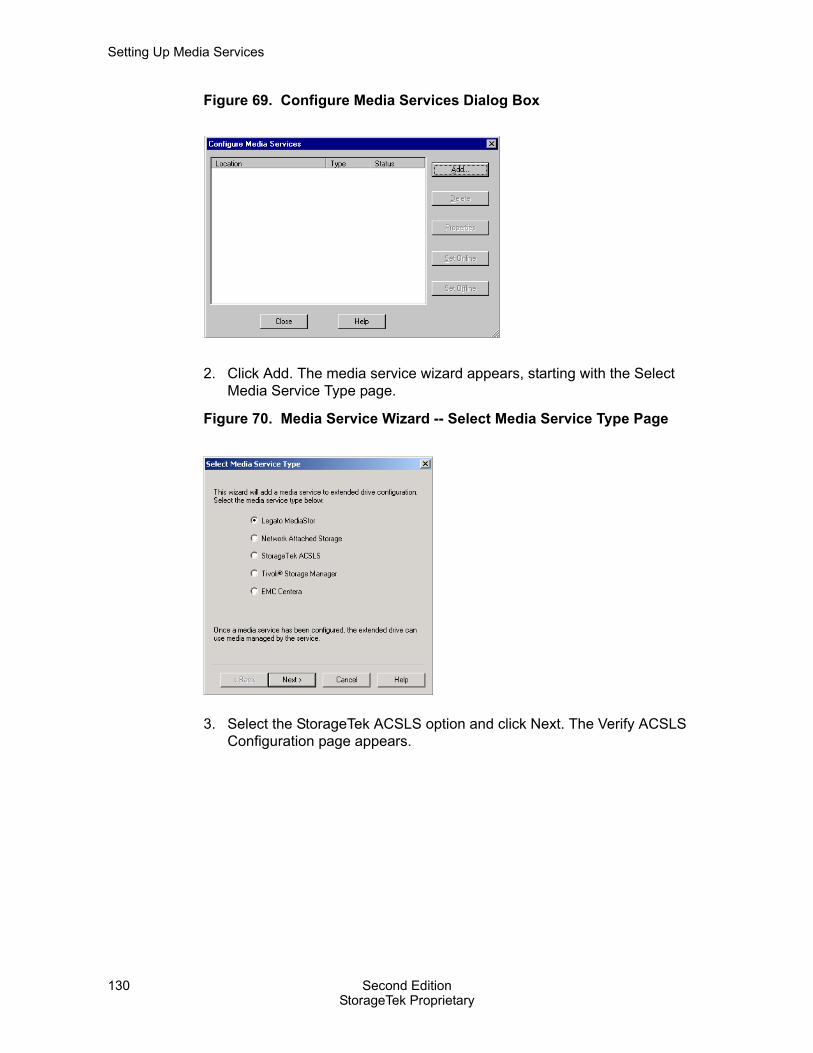
Setting Up Media Services
130 Second EditionStorageTek Proprietary
Figure 69. Configure Media Services Dialog Box
2. Click Add. The media service wizard appears, starting with the Select Media Service Type page.
Figure 70. Media Service Wizard -- Select Media Service Type Page
3. Select the StorageTek ACSLS option and click Next. The Verify ACSLS Configuration page appears.

StorageTek’s ACSLS
ASM Data Manager Getting Started Guide 131StorageTek Proprietary
Figure 71. Media Service Wizard -- Verify ACSLS Configuration Page
4. On the ACSLS server, verify the settings described on the Verify ACSLS Configuration page. (For instructions, see “Configuring the Changers” on page 126.)
5. When all ACSLS server settings are correct, click Next. The Configure ACSLS Drives page appears.
Figure 72. Media Service Wizard -- Configure ACSLS Drives Page
The Configure ACSLS Drives page allows you to add the StorageTek library drives set up in ACSLS to your Data Manager system.
6. Click Add to add an ACSLS drive. The ACSLS Drive Properties dialog box appears.

Setting Up Media Services
132 Second EditionStorageTek Proprietary
Figure 73. ACSLS Drives Properties Dialog Box
The ACSLS Drive Properties dialog box allows you to enter the SCSI address appropriate for the library drives configured in ACSLS for use by Data Manager.
7. Enter the Device Name and SCSI address that corresponds with the ACSLS library drive. For instructions on gathering this information, see “Requesting Drive Information” on page 134 and “Finding the Device Name Using the Windows Registry” on page 135.
8. Click OK. The Configure ACSLS Drives Page reappears with the drive listed.
9. Repeat steps 6 through 8 for each drive that should be added to the ACSLS media service for Data Manager.
10. Click Next. The Summary page appears.
11. Review the information in the Summary page.
12. If the information in the summary page is correct, click Finish. A progress message appears. Once the media service is created, the Configure Media Services dialog box appears, showing the media service you just created (along with any others you may have created previously).
From the Configure Media Services dialog box, you can make changes to an existing ACSLS drive, add another drive, remove a drive from the ACSLS media service, and add another media service. For instructions on removing a drive, refer to the Managing Storage Media chapter of the ASM Data Manager System Guide. For instructions on the remaining tasks, see the sections that follow.
In order to use the ACSLS media service, you must add drives for Data Manager to use as media. If you have not yet created an extended drive for your Data Manager service, consider waiting to configure your ACSLS media service properties until you create the extended drive. For instructions on creating an extended drive, see “Creating an Extended Drive” on page 142. For instructions on configuring ACSLS media service properties, see the sections that follow.
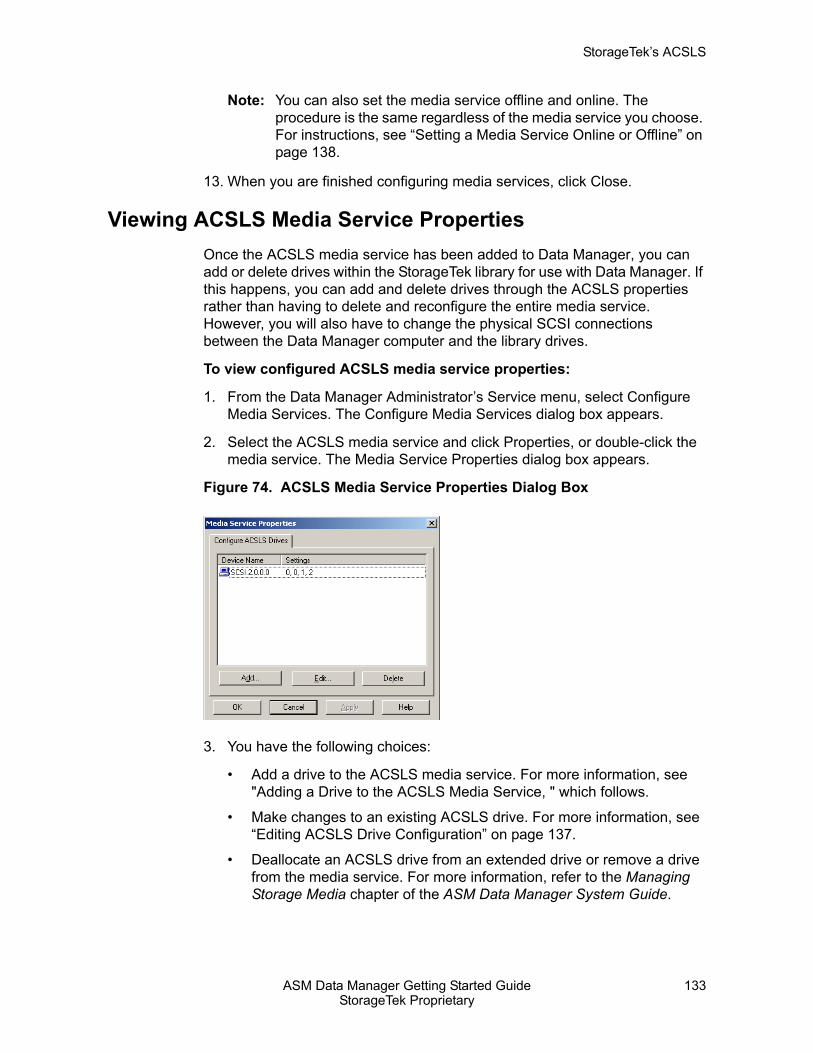
StorageTek’s ACSLS
ASM Data Manager Getting Started Guide 133StorageTek Proprietary
Note: You can also set the media service offline and online. The procedure is the same regardless of the media service you choose. For instructions, see “Setting a Media Service Online or Offline” on page 138.
13. When you are finished configuring media services, click Close.
Viewing ACSLS Media Service PropertiesOnce the ACSLS media service has been added to Data Manager, you can add or delete drives within the StorageTek library for use with Data Manager. If this happens, you can add and delete drives through the ACSLS properties rather than having to delete and reconfigure the entire media service. However, you will also have to change the physical SCSI connections between the Data Manager computer and the library drives.
To view configured ACSLS media service properties:
1. From the Data Manager Administrator’s Service menu, select Configure Media Services. The Configure Media Services dialog box appears.
2. Select the ACSLS media service and click Properties, or double-click the media service. The Media Service Properties dialog box appears.
Figure 74. ACSLS Media Service Properties Dialog Box
3. You have the following choices:
• Add a drive to the ACSLS media service. For more information, see "Adding a Drive to the ACSLS Media Service, " which follows.
• Make changes to an existing ACSLS drive. For more information, see “Editing ACSLS Drive Configuration” on page 137.
• Deallocate an ACSLS drive from an extended drive or remove a drive from the media service. For more information, refer to the Managing Storage Media chapter of the ASM Data Manager System Guide.

Setting Up Media Services
134 Second EditionStorageTek Proprietary
Note: To add or edit a drive, the media service must be offline. To set the media service offline, select the media service from the Configure Media Services dialog box and click Set Offline.
4. When you are finished configuring the ACSLS media service, click OK. If the ACSLS media service had been set offline while you made changes to the media service properties, a message appears asking whether you want to set the service back online.
5. Click Yes. The Configure Media Services dialog box reappears.
6. When you are finished making changes to the media services for Data Manager, click Close. The Configure Media Services dialog box closes and you are returned to the Administrator.
Adding a Drive to the ACSLS Media ServiceTo make a drive in a tape library available so that Data Manager can begin writing files to it, you must add the drive to the ACSLS media service in Data Manager.
To add a drive to the ACSLS media service:
1. On the Sun computer, request drive information, including the drive name. For instructions, see "Requesting Drive Information, " which follows.
2. On the Data Manager computer, use the drive name to determine the SCSI device name in the Windows registry. For instructions, see “Finding the Device Name Using the Windows Registry” on page 135.
3. On the Data Manager computer, use the drive information and device name to add a drive to the ACSLS media service. For instructions, see “Adding the Drive in Data Manager” on page 136.
Requesting Drive InformationThis section describes how to request drive information, which you need to add media to the ACSLS media service.
To request drive information:
• In the ACSSS Command Processor Window, type the following command and press <RETURN>:
query drive all
All drives currently in the system are listed, as in the following example:
2000-10-04 16:07:54
Identifier State Status Volume Type
0, 0, 1, 0 online available 9840

StorageTek’s ACSLS
ASM Data Manager Getting Started Guide 135StorageTek Proprietary
0, 0, 1, 1 online available 9840
0, 0, 1, 2 online available DLT7000
0, 0, 1, 3 online available DLT7000
The drive information that you should look for is in bold in this example. The numbers listed in the Identifier column represent the ACS, LSM, panel, and drive, in that order. The value in the Type column represents the drive name. You need this information in order to add media to the ACSLS media service in Data Manager.
Finding the Device Name Using the Windows RegistryThis section describes how to determine the device name, which you need to add media to the ACSLS media service.
To determine the device name:
1. From the Windows Start menu on the Data Manager computer, select Run. The Run dialog box appears.
2. In the Open text box, type regedit and click OK. The Registry Editor appears.
3. Navigate to HKEY_LOCAL_MACHINE\HARDWARE\ DEVICEMAP\SCSI. Select the Scsi key.
4. From the Edit menu, select Find. The Find dialog box appears.
5. In the Find What text box, type the drive name that you requested on the Sun computer (for example, 9840) and then click Find Next. For instructions on finding the drive name, see “Requesting Drive Information” on page 134.
6. Use one of the paths that you find to construct the device name in the following format:
SCSI.Port.Bus.Target.LogicalUnit
The following table indicates what each placeholder in this format represents:
Table 16. Placeholders in the Device Name Format
Placeholder RepresentsPort In the path that was found, the value at the end of the
Scsi Port key name
Bus In the path that was found, the value at the end of the Scsi Bus key name

Setting Up Media Services
136 Second EditionStorageTek Proprietary
For example, to construct the device name for a drive 9840, you might find the value 9840 in the following registry path:
HKEY_LOCAL_MACHINE\HARDWARE\DEVICEMAP\Scsi\Scsi Port 2\Scsi Bus 0\Target Id 2\Logical Unit Id 0
The device name that you would construct from this path would be SCSI.2.0.2.0. This is the device name that you enter in the Device Name text box of the ACSLS Drive Properties dialog box in Data Manager(see the section below).
Adding the Drive in Data ManagerThe Media Service Properties dialog box allows you to add a drive to the ACSLS media service.
To add a drive to the ACSLS media service:
1. From the Data Manager Administrator’s Service menu, select Configure Media Services. The Configure Media Services dialog box appears.
2. Set the ACSLS media service offline by selecting the media service and clicking Set Offline.
3. Select the ACSLS media service and click Properties, double-click the media service. The Media Service Properties dialog box appears.
Figure 75. ACSLS Media Service Properties Dialog Box
4. Click Add. The ACSLS Drive Properties dialog box appears.
Target In the path that was found, the value at the end of the Target Id key name
LogicalUnit In the path that was found, the value at the end of the Logical Unit Id key name
Table 16. Placeholders in the Device Name Format (Continued)
Placeholder Represents
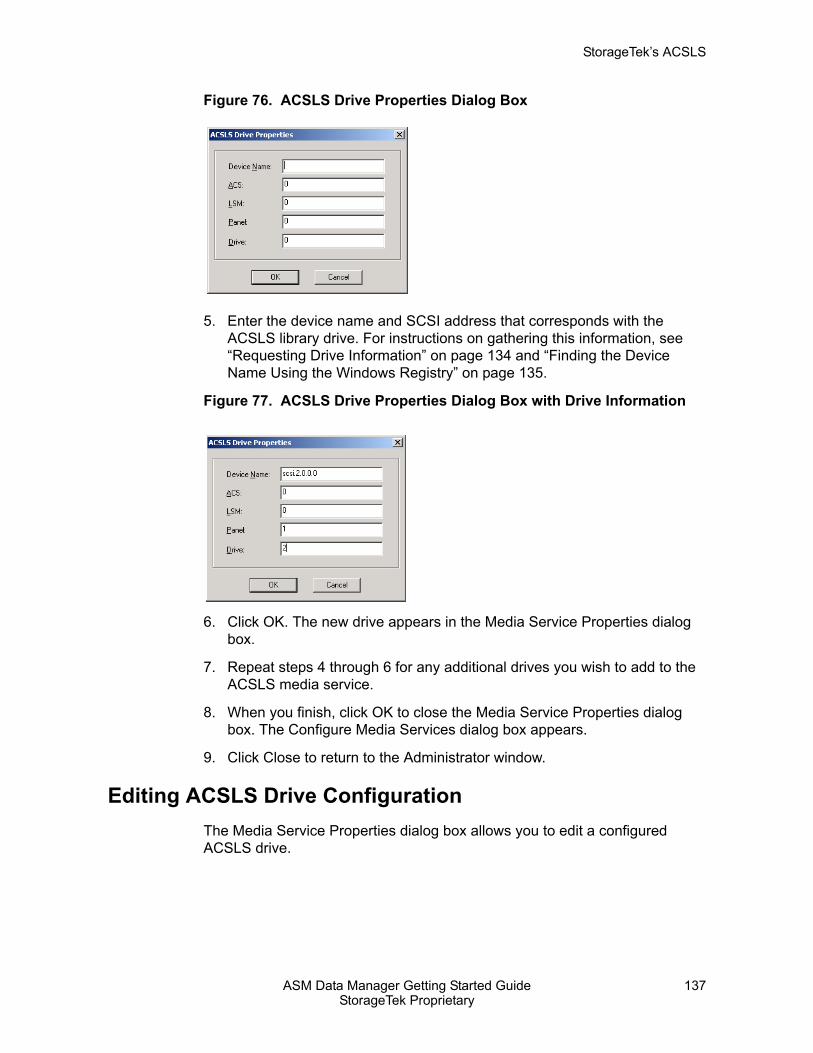
StorageTek’s ACSLS
ASM Data Manager Getting Started Guide 137StorageTek Proprietary
Figure 76. ACSLS Drive Properties Dialog Box
5. Enter the device name and SCSI address that corresponds with the ACSLS library drive. For instructions on gathering this information, see “Requesting Drive Information” on page 134 and “Finding the Device Name Using the Windows Registry” on page 135.
Figure 77. ACSLS Drive Properties Dialog Box with Drive Information
6. Click OK. The new drive appears in the Media Service Properties dialog box.
7. Repeat steps 4 through 6 for any additional drives you wish to add to the ACSLS media service.
8. When you finish, click OK to close the Media Service Properties dialog box. The Configure Media Services dialog box appears.
9. Click Close to return to the Administrator window.
Editing ACSLS Drive ConfigurationThe Media Service Properties dialog box allows you to edit a configured ACSLS drive.

Setting Up Media Services
138 Second EditionStorageTek Proprietary
To edit a drive configuration:
1. From the Data Manager Administrator’s Service menu, select Configure Media Services. The Configure Media Services dialog box appears.
2. Set the ACSLS media service offline by selecting the media service and clicking Set Offline.
3. Select the ACSLS media service and click Properties, or double-click the media service. The Media Service Properties dialog box appears.
4. Select a drive and click Edit. The ACSLS Drive Properties dialog box appears containing the drive SCSI configuration.
Figure 78. ACSLS Drive Properties Dialog Box
5. Edit the drive information. For instructions on gathering this information, see “Requesting Drive Information” on page 134 and “Finding the Device Name Using the Windows Registry” on page 135.
6. Click OK. The new information appears for that drive in the Media Service Properties dialog box.
7. Repeat steps 4 through 6 for any additional drives you wish to edit.
8. When you finish, click OK to close the Media Service Properties dialog box. The Configure Media Services dialog box appears.
9. Click Close to return to the Administrator window.
■ Setting a Media Service Online or OfflineThe Configure Media Services dialog box allows you to set a media service online or offline. Setting a media service offline makes the storage media for that media service unavailable for read/write requests from ASM Data Manager.
Note: The procedure for setting a media service online or offline is the same regardless of the media service you have configured.

Setting a Media Service Online or Offline
ASM Data Manager Getting Started Guide 139StorageTek Proprietary
To set a configured media service online or offline:
1. From the Service menu in the Data Manager Administrator, select Configure Media Services. The Configure Media Services dialog box appears.
Figure 79. Configure Media Services Dialog Box
2. Select the media service that you want to set online or offline.
3. You have the following choices:
• To set the service online, click Set Online.
• To set the service offline, click Set Offline.
Note: If you receive an error when you try to set the TSM media service online, be sure that the Tivoli Client is configured so that the Allow Backup Delete option for the client node is set to “Yes”. The error may occur if the setting is changed after the TSM media service is created.
4. Click Yes on the confirmation message that appears. The new status appears in the Configure Media Services dialog box.
5. Click Close to close the Configure Media Services dialog box and return to the Administrator window.

Setting Up Media Services
140 Second EditionStorageTek Proprietary
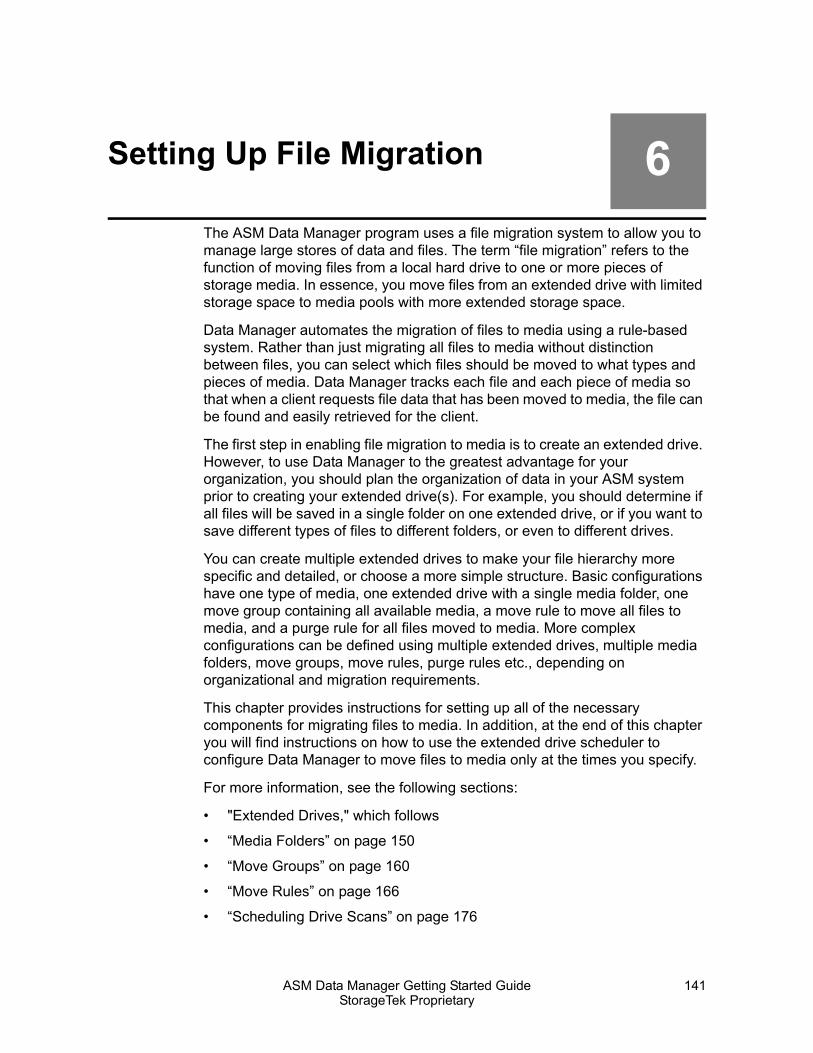
ASM Data Manager Getting Started Guide 141StorageTek Proprietary
6Setting Up File Migration
The ASM Data Manager program uses a file migration system to allow you to manage large stores of data and files. The term “file migration” refers to the function of moving files from a local hard drive to one or more pieces of storage media. In essence, you move files from an extended drive with limited storage space to media pools with more extended storage space.
Data Manager automates the migration of files to media using a rule-based system. Rather than just migrating all files to media without distinction between files, you can select which files should be moved to what types and pieces of media. Data Manager tracks each file and each piece of media so that when a client requests file data that has been moved to media, the file can be found and easily retrieved for the client.
The first step in enabling file migration to media is to create an extended drive. However, to use Data Manager to the greatest advantage for your organization, you should plan the organization of data in your ASM system prior to creating your extended drive(s). For example, you should determine if all files will be saved in a single folder on one extended drive, or if you want to save different types of files to different folders, or even to different drives.
You can create multiple extended drives to make your file hierarchy more specific and detailed, or choose a more simple structure. Basic configurations have one type of media, one extended drive with a single media folder, one move group containing all available media, a move rule to move all files to media, and a purge rule for all files moved to media. More complex configurations can be defined using multiple extended drives, multiple media folders, move groups, move rules, purge rules etc., depending on organizational and migration requirements.
This chapter provides instructions for setting up all of the necessary components for migrating files to media. In addition, at the end of this chapter you will find instructions on how to use the extended drive scheduler to configure Data Manager to move files to media only at the times you specify.
For more information, see the following sections:
• "Extended Drives," which follows
• “Media Folders” on page 150
• “Move Groups” on page 160
• “Move Rules” on page 166
• “Scheduling Drive Scans” on page 176

Setting Up File Migration
142 Second EditionStorageTek Proprietary
• “Scheduling Movement of Files” on page 179
Because many users prefer to keep the default settings through the setup process, the instructions included in this chapter for creating your extended drives, media folders, move groups, and move rules do not cover configuration options in detail. This chapter provides enough information to enable you to get Data Manager up and running, and to start moving files to media. In addition, this chapter lists descriptions of the default settings for each of the file migration components.
However, if you would like to change default settings to customize your system during the setup process, you can do so. For information on configuring and changing the default properties and options for your move groups and your move rules, see “Move Groups” on page 160 and “Move Rules” on page 166. Because of the extensive nature and importance of properly configured extended drive settings, information on changing and managing extended drive properties occupies its own chapter. Please refer to the Managing the Extended Drive chapter of the ASM Data Manager System Guide for detailed information and procedures, as well as for a detailed discussion of purge rules and delete rules.
■ Extended DrivesAn extended drive is an NTFS volume whose storage capacity is “extended” by Data Manager’ file migration services. Data Manager allows you to “extend” an NTFS-formatted hard drive on the Data Manager computer by moving files to other storage media while making the files appear to remain on the hard drive.
The first step in enabling file migration to media is to create an extended drive. Once the Data Manager software is installed on a computer, any NTFS-formatted hard drives on that computer can be extended. The extended drive must reside on the same computer where Data Manager is installed.
For instructions on creating your extended drive in Data Manager and assigning media to it, see the following sections:
• "Creating an Extended Drive," which follows
• “Assigning Media to Extended Drives” on page 149
Creating an Extended DriveSince each component necessary for file migration is associated with an extended drive, you have to create an extended drive before you can create any of the other components. Even if you have already added your media services, that media is not available for file migration until it is assigned to an extended drive.
Extended Drives
ASM Data Manager Getting Started Guide 143StorageTek Proprietary
As with most components in Data Manager, there is a wizard function to help you create your extended drive. The extended drive wizard takes you step-by-step through the process of creating a new extended drive.
Note: If you plan to use Data Manager in a Co-StandbyServer environment, follow the steps in “Setting up ASM with Co-StandbyServer” on page 223 before setting up your Data Manager extended drive(s) and media service(s).
To create a new extended drive:
1. From the Administrator’s Service menu, select New Extended Drive, or click the New Extended Drive button on the toolbar.
Figure 80. New Extended Drive Toolbar Button
The New Extended Drive wizard appears, starting with the Introduction page. The Introduction page lists the steps that must be performed after an extended drive has been created in order to begin file migration.
2. Click Next. The Select Drive page appears.
Figure 81. New Extended Drive Wizard -- Select Drive Page
The Select Drive page lists all partitioned drives on the Data Manager computer, along with the file system and status of each drive. Only drives listed with a status of OK can be extended.
3. From the Select Drive page, select the NTFS volume you want to extend and click Next. One of the following occurs:
• If you have added media to a configured media service, the Allocate Media To Extended Drive page appears.

Setting Up File Migration
144 Second EditionStorageTek Proprietary
Figure 82. New Extended Drive Wizard -- Allocate Media To Extended Drive Page
The Allocate Media To Extended Drive page lists all available media and allows you to assign that media to the extended drive you are creating. Select the media you want to assign to the extended drive. If you do not want to assign media at this time, do not highlight any media. Then click Next. The Settings page appears.
• If you have not added media to a configured media service, the Settings page appears.

Extended Drives
ASM Data Manager Getting Started Guide 145StorageTek Proprietary
Figure 83. New Extended Drive Wizard -- Settings Page
The Settings page allows you to schedule and configure media activities, drive scans, and meta-data exports. You can configure these schedules now or later. The table below contains the default configuration for each of these settings.\
Table 17. Extended Drive Settings Page Defaults
Option Default SettingSchedule Contains four media activities for scheduling: Move files to
media, Process scheduled media tasks, Update copy media and Allow fetches from media. Default schedules for the first three run every day from 8 p.m. to 9 a.m. The Allow fetches from media schedule is active 24/7 by default. For detailed information, refer to the Managing Storage Media chapter of the ASM Data Manager System Guide.

Setting Up File Migration
146 Second EditionStorageTek Proprietary
4. Click Next. The Options page appears.
Figure 84. New Extended Drive Wizard -- Options Page
Drive Scan Sets the extended drive scan schedule. Drive scans are disabled by default. Regular drive scans are required to write files to the move list for migration, to qualify files against purge and delete rules, and to ensure complete synchronization of all files due to be moved to media. Scheduling drive scans for “off-hours” times makes running them regularly more convenient, and decreases the likelihood of a file not being written to the move list due to a file-sharing violation, most often caused by a user or other program having the file open. For detailed information, see “Scheduling Drive Scans” on page 176.
Meta-Data Export
Sets specifications and scheduling for incremental and full exports of file meta-data. The export schedule is disabled by default. We strongly recommend setting a regular export schedule in order to ensure that your ASM-managed files are backed up regularly to another location. For detailed information, refer to the Data Manager Backup and Recovery chapter of the ASM Data Manager System Guide.
Table 17. Extended Drive Settings Page Defaults
Option Default Setting

Extended Drives
ASM Data Manager Getting Started Guide 147StorageTek Proprietary
The Options page allows you to configure various file migration options for the files on your extended drive. The table below lists the default configurations for these options.
Table 18. Extended Drive Options Page Defaults
Option Default Setting3rd party backup mode for managed files
Sets whether to back up only Data Manager file tags or all file data for managed files when running a third-party system backup. (This setting is not related to the Data Manager meta-data export function.)
3rd party backup saves file migration info
Sets whether to include extended attribute information for managed files in the third-party system backup image. This option is only available if the 3rd party back mode for managed files option is set to Full. (This setting is not related to the Data Manager meta-data export function.)
Direct read memory cache
Sets the amount of system memory to be allocated for caching of direct read file data. Default is 1 MB.
Disable folder rename check
Manages whether users can rename media folders on the extended drive if not supported by the associated storage media. Renaming prevented (for applicable media) by default.
Fetch request timeout minutes
Configures the number of minutes Data Manager will wait after a fetch request has been made before canceling the request if it has not been fulfilled.
Force direct read for all files
Allows setting direct read for all files moved to media. Direct read for only files marked is default.
Force moves when nothing to purge
Activates processing of move list when used space on extended drive exceeds the purge start watermark and no files are written to purge list. Forced moves are disabled by default.
Prevent file delete Prevents deletion of files when files cannot be deleted from associated storage media (write-once media). File deletion not prevented by default.
Prevent file modification
Prevents modification of files when files cannot be modified on associated storage media (write-once media). File modification not prevented by default.
Purge start watermark (drive percent full)
Activates processing of the purge list when used space on the extended drive exceeds the specified percentage. Default is to start purging files when the extended drive is 95 percent full.

Setting Up File Migration
148 Second EditionStorageTek Proprietary
You can configure these options now or later using the Properties option for the extended drive. Because management of the extended drive is critical to optimal performance of your ASM system, we have devoted an entire chapter to configuration of these options and other administrative tasks for the extended drive. For detailed information, refer to the Managing the Extended Drive chapter of the ASM Data Manager System Guide.
5. Click Next. The Summary page appears. The Summary page lists the settings you provided through the wizard.
6. Review the information in the Summary page. If the information is correct, click Finish. After the extended drive has been created, a message prompting you to create a media folder for the extended drive appears.
Figure 85. Create Media Folder Message
7. You have the following choices:
• Click Yes to proceed and create a media folder.
Purge stop watermark (drive percent full)
Sets the percentage of space on the extended drive that must be filled (used) before purge list processing stops. Default is to stop purging files when the extended drive reaches only 90 percent full. Option is only available if purge start watermark option is enabled.
Warn when free space is getting low (MB)
Allows Data Manager to warn you when extended drive free space is getting low. By default, this option is set to send a warning when extended drive free space reaches 10MB or less.
Defer fetch requests if fetch is disabled
Allows Data Manager to defer rather than reject requests for files made when the Allow fetches from media schedule is inactive. Fetch requests are rejected by default.
Table 18. Extended Drive Options Page Defaults (Continued)
Option Default Setting

Extended Drives
ASM Data Manager Getting Started Guide 149StorageTek Proprietary
• Click No to return to the Administrator without creating a media folder. You can create a media folder at any time.
For instructions, see “Creating Media Folders” on page 153.
Assigning Media to Extended DrivesIf you configured your media services after creating your extended drive, or if you did not assign media through the New Extended Drive Wizard, you must now assign the media in the media service to the Available Media pool for the extended drive to make it available for use.
To allocate media to an extended drive:
1. In the tree of the extended drive to which you want to allocate media, right-click the Available Media node. From the shortcut menu, select Allocate media. The media allocation wizard appears, starting with the Media Service List page.
Figure 86. Media Allocation Wizard – Media Service List Page
2. From the list of media services, select the media service containing the media you want to allocate and then click Next. The Media List page appears.

Setting Up File Migration
150 Second EditionStorageTek Proprietary
Figure 87. Media Allocation Wizard – Media List Page
3. From the list of media, select the media you want to allocate to the extended drive and then click Next. The Summary page appears.
4. Review the information that you have provided to the wizard.
5. If the information is correct, click Finish. After the media is allocated, it appears in the appropriate node of the Available Media tree for the selected extended drive. Media appearing in the Original node of the extended drive tree can be assigned to media folders. For information, see “Adding Media to a Media Folder” on page 157.
■ Media FoldersAfter an extended drive has been created and media has been added to the extended drive, you can create media folders to organize files on the drive. The Data Manager extended drive is an actual physical volume on the computer on which Data Manager is installed. Media folders created in Data Manager are actual physical folders on that drive. Through Windows Explorer, each media folder created through Data Manager looks like a normal folder you might create through Explorer. The media folder appears as part of the drive’s directory structure.
Media folders are called such because within Data Manager you assign media to a folder so that files saved in the folder on the extended drive can be moved to that media. What you are doing when you create a media folder is creating an association between the real folder on the hard drive volume and the pieces of storage media you add to the folder through Data Manager.
You can create a media folder by using a folder that already exists on the extended drive, or create a new folder on the extended drive. You can also assign media to the media folders at the time you create them, or add media to the folders later.

Media Folders
ASM Data Manager Getting Started Guide 151StorageTek Proprietary
Once a media folder has been created, it appears in both the Data Manager Administrator and in Windows Explorer. In Explorer, it appears as a folder on the drive. In the Administrator, the media folder appears as a node in the tree under the extended drive. Under the media folder in the Administrator you will see additional nodes representing the Data Manager components that can be created for each media folder to enable file migration and space management.
Media must be added to the media folder in Data Manager before files in that folder can be written to media. Original media, which appears in the Available Media list, can be added to any folder in an extended drive. Once added to a media folder, a piece of media is reserved for that media folder’s files. No two media folders can share the same piece of media.
For more information, see the following sections:
• "Before Creating Media Folders," which follows
• “Creating Media Folders” on page 153
• “Adding Media to a Media Folder” on page 157
Before Creating Media FoldersBefore creating your media folders you may want to decide how you want your extended drive directories structured, particularly if you plan to have multiple media folders on your extended drive, and especially if you plan to have multiple levels of media folders (directories with one or more sub-directories).
If you plan to use multi-level directory structures for your Data Manager files, you will also have to determine if you want to migrate the files for each folder and subfolder separately to different pieces and/or types of media, or if you will move all of a given directory’s files and subfolders to media without distinction between files or the media to which they are written.
Establishing how you will want directories, files and subfolders migrated to media will tell you how many media folders you will need to create, and how you will ultimately set up your media, move groups, and move rules for those media folders.
For more information, see the following sections:
• "Planning Extended Drive Directory Structure for File Migration," which follows
• “Planning Media Directory Structure for File Migration” on page 152
Planning Extended Drive Directory Structure for File MigrationIf you want to create rules that only apply to files in folders farther down the directory tree than the root, you will need to create additional media folders. This allows you to create move, purge, and delete rules separately for those specific folders.
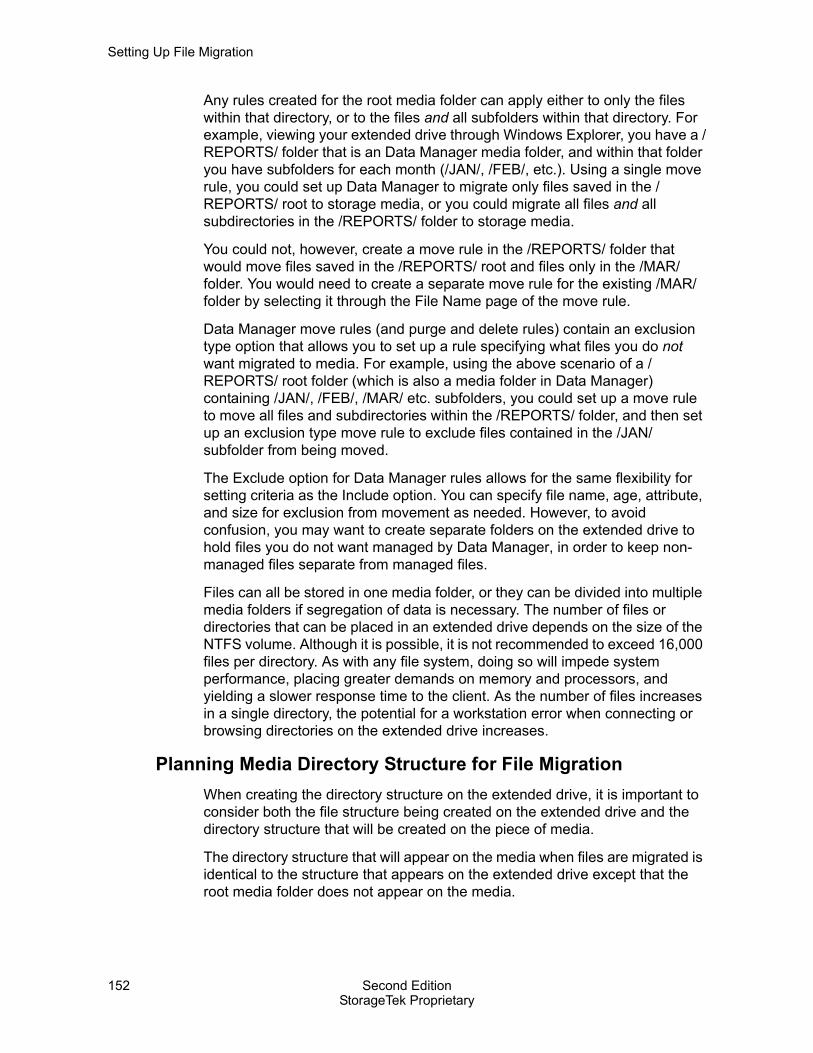
Setting Up File Migration
152 Second EditionStorageTek Proprietary
Any rules created for the root media folder can apply either to only the files within that directory, or to the files and all subfolders within that directory. For example, viewing your extended drive through Windows Explorer, you have a /REPORTS/ folder that is an Data Manager media folder, and within that folder you have subfolders for each month (/JAN/, /FEB/, etc.). Using a single move rule, you could set up Data Manager to migrate only files saved in the /REPORTS/ root to storage media, or you could migrate all files and all subdirectories in the /REPORTS/ folder to storage media.
You could not, however, create a move rule in the /REPORTS/ folder that would move files saved in the /REPORTS/ root and files only in the /MAR/ folder. You would need to create a separate move rule for the existing /MAR/ folder by selecting it through the File Name page of the move rule.
Data Manager move rules (and purge and delete rules) contain an exclusion type option that allows you to set up a rule specifying what files you do not want migrated to media. For example, using the above scenario of a /REPORTS/ root folder (which is also a media folder in Data Manager) containing /JAN/, /FEB/, /MAR/ etc. subfolders, you could set up a move rule to move all files and subdirectories within the /REPORTS/ folder, and then set up an exclusion type move rule to exclude files contained in the /JAN/ subfolder from being moved.
The Exclude option for Data Manager rules allows for the same flexibility for setting criteria as the Include option. You can specify file name, age, attribute, and size for exclusion from movement as needed. However, to avoid confusion, you may want to create separate folders on the extended drive to hold files you do not want managed by Data Manager, in order to keep non-managed files separate from managed files.
Files can all be stored in one media folder, or they can be divided into multiple media folders if segregation of data is necessary. The number of files or directories that can be placed in an extended drive depends on the size of the NTFS volume. Although it is possible, it is not recommended to exceed 16,000 files per directory. As with any file system, doing so will impede system performance, placing greater demands on memory and processors, and yielding a slower response time to the client. As the number of files increases in a single directory, the potential for a workstation error when connecting or browsing directories on the extended drive increases.
Planning Media Directory Structure for File MigrationWhen creating the directory structure on the extended drive, it is important to consider both the file structure being created on the extended drive and the directory structure that will be created on the piece of media.
The directory structure that will appear on the media when files are migrated is identical to the structure that appears on the extended drive except that the root media folder does not appear on the media.

Media Folders
ASM Data Manager Getting Started Guide 153StorageTek Proprietary
For example, you create a media folder /REPORTS/ on the extended drive. Within that media folder, there are subfolders (that are not specifically configured as Data Manager media folders) for each month (/JAN/, /FEB/, /MAR/, etc.). The move rule you have established for the /REPORTS/ media folder migrates all files and subfolders to media. On the extended drive, your directory structure and files would look like this:
• E:\REPORTS\YEAREND.DOC
• E:\REPORTS\JAN\ACCOUNTS.DOC
• E:\REPORTS\FEB\ACCOUNTS.DOC
• E:\REPORTS\MAR\ACCOUNTS.DOC
However, on the media, the directory structure and files would look like this:
• YEAREND.DOC
• \JAN\ACCOUNTS.DOC
• \FEB\ACCOUNTS.DOC
• \MAR\ACCOUNTS.DOC
Notice that the root media folder name is not migrated to the media. It is for this reason that a given piece of media can only be assigned to one instead of multiple media folders. It is also for this reason that we recommend you label your media in a way that corresponds with the media folder to which it is or will be assigned. For more information on labeling media, see the Managing Storage Media chapter in the ASM Data Manager System Guide.
Note: Keeping track of what folder’s files have been migrated to what media is particularly important if media is removed and then re-added to media folders. When media is added to a media folder, any existing files on that media are restored to the media folder on the extended drive (making those files available if necessary). If the media contains files with names that duplicate the names of files already resident in the media folder, the resident files are overwritten if the duplicate files on the media are newer. This is why organizing the directory structure for both your extended drive and your media is important to consider before creating the media folders and adding media to them.
Creating Media FoldersCreating a media folder in Data Manager creates an association between a physical directory on the extended drive and the media to which the files saved in that directory should be moved. In addition, in the Data Manager interface, creating a media folder activates the options for creating the media folder components (such as move groups and move rules) that ultimately allow migration of files from the folder to storage media.
You have the option of creating media folders and adding media to them separately or creating media folders while adding media to the media folder.

Setting Up File Migration
154 Second EditionStorageTek Proprietary
To choose the second option, you must have at least one piece of media in the Original node of the extended drive.
To create a media folder without media:
1. Right-click an extended drive. From the shortcut menu that appears, select Create Media Folder. The Create Media Folder dialog box appears.
Figure 88. Create Media Folder Dialog Box
2. You have the following choices:
• To create a new folder on the extended drive, type the media folder name in the Enter Folder Name text box. Media folder names can be up to 64 characters.
• To use a folder that already exists on the extended drive as a media folder, click Browse. The Select Folder page appears. Select the folder and click OK. The folder name appears in the Enter Folder Name text box.
3. Click OK. The media folder is added to the extended drive tree under the extended drive.
To create a media folder with media:
1. Right-click an extended drive and select Add Media to Media Folders from the shortcut menu that appears. The Select Media To Add page appears, listing all Original media available for assignment to media folders.

Media Folders
ASM Data Manager Getting Started Guide 155StorageTek Proprietary
Figure 89. Add Media to Media Folders Wizard -- Select Media To Add Page
2. You have three choices:
• To create a media folder (or folders) with the same name as the media, select the media and click Add. The media folder name appears to the right of the media.
Note: If you select two pieces of media that have the same name (regardless of capitalization), only one media folder, with that name, is created and both pieces of media are assigned to that folder.
• To create a media folder with a different name than the media, type the name of the folder in the Media Folder text box, select the media you want added to that folder, and click Add. The media folder name appears to the right of the media.
• To add the media to an existing folder, type the name of the folder in the Media Folder text box, select the media you want added to that folder, and click Add. The media folder name appears to the right of the media.
3. Click Next to continue. The Media Restore page appears.

Setting Up File Migration
156 Second EditionStorageTek Proprietary
Figure 90. Add Media to Media Folders Wizard -- Media Restore Page
The Media Restore page options are only active if the media you are adding to the media folders contain files that must be restored to the extended drive.
4. If available, configure the restore options for restoring files to the media folder on the extended drive. Those options are as follows:
For more information on restoring files from media, see “File Restore” on page 157.
5. When you finish configuring Media Restore options, click Next. The Summary page appears.
6. Review the information in the summary and click Finish. The media folders are created and appear in the tree view in the Administrator and through
Table 19. Add Media to Media Folders Wizard -- Media Restore Page Options
Option DescriptionLog Duplicates
Enable this option to keep a count of files on the media that duplicate files already on the extended drive when restoring.
Direct Read Enable this option to apply the direct read attribute to all restored files. Direct read means that when accessed by a client, the file is read directly from media rather than fetched to the extended drive and read from there.
Process ASAP
Enable this option to restore the media immediately, rather than as a scheduled file restore media task (according to the Process scheduled media tasks schedule).

Media Folders
ASM Data Manager Getting Started Guide 157StorageTek Proprietary
Windows Explorer on the extended drive. The selected media appears in the Media node underneath the media folder in the Administrator.
Adding Media to a Media FolderAdding media to a media folder makes that media available for addition to move groups in that folder and ultimately for storage of files saved to that folder on the extended drive. You can add both previously unused media and media with existing files to a media folder. When media with existing files is added to a media folder those files must be restored in order to make them accessible to clients. For more information, see "File Restore," which follows.
File RestoreWhen media is added to a media folder in Data Manager, file tags for any files already existing on the media are copied to that folder on the extended drive. This is called “file restore”.
File restore makes files on media available for access through Data Manager by placing tags on the extended drive that point to the files on the media. File tags contain information about the file including name, file size, age, and other attributes that define the file. The file tag allows the file to appear as if the file is resident on the extended drive, but the file data remains on the media.
When files and directories are restored to the extended drive, file tags and directory structures are created in the media folder on the extended drive. File data is moved to the hard drive when a client requests the file, unless the direct read option is selected. If the restored files are marked for direct read, upon request from a client, the file data is read directly from the media rather than fetched to the extended drive.
Note: Due to the potential instability of non-finalized DVD-R media, when you restore non-finalized DVD-R media, all file data (not just the file tags) is written back to the extended drive. This means that you may need to allow for additional extended drive space to hold those files until they can be purged (after the media is finalized).
Adding Media to Existing Media FoldersAdding media to media folders is done through a wizard. The Add Media to Media Folders Wizard allows you to add media to an existing media folder, or to create a media folder and add the media simultaneously. For instructions on creating media folders and adding media simultaneously, see “Creating Media Folders” on page 153.
To add media to existing media folders:
1. You have the following choices:
• Drag the media from the Original node under the extended drive's Available Media node to a media folder (or to the Media node under

Setting Up File Migration
158 Second EditionStorageTek Proprietary
the media folder). A message appears, prompting you to confirm the addition of the media to the media folder. Click Yes. Since you have already selected the media to add, the Add Media to Media Folders Wizard appears, starting with the Media Restore page. Skip to step 4 to continue.
• Right-click the Media node under a media folder and select Add Media from the shortcut menu. The Add Media to Media Folders Wizard appears, starting with the Select Media to Add page.
Figure 91. Add Media to Media Folders Wizard -- Select Media To Add Page
The Select Media to Add page lists all available media that can be assigned. Notice that the Media Folder text box at the bottom is grayed out but contains the media folder you selected in the Administrator for adding media.
2. Double-click a piece of media, or select one or more pieces of media and click Add. The media folder appears to the right of the selected media in the Media list.
3. When the media folder appears to the right of every piece of media you want to add to the media folder, click Next. The Media Restore page appears.

Media Folders
ASM Data Manager Getting Started Guide 159StorageTek Proprietary
Figure 92. Add Media to Media Folders Wizard -- Media Restore Page
Media restore options are only active if the media you are adding to the media folder contains files. For details on what the media restore function does, see “File Restore” on page 157.
4. Set the appropriate restore options for any media that currently contains files. Those options are as follows:
Note: The Process scheduled media tasks schedule is accessed through the Settings tab of the extended drive properties. For more information on configuring this schedule, refer to the Managing Storage Media chapter in the ASM Data Manager System Guide.
Table 20. Add Media to Media Folders Wizard -- Media Restore Page Options
Option DescriptionLog Duplicates
Enable this option to keep a count of files on the media that duplicate files already on the extended drive when restoring.
Direct Read Enable this option to apply the direct read attribute to all restored files. Direct read means that when accessed by a client, the file is read directly from media rather than fetched to the extended drive and read from there.
Process ASAP
Enable this option to restore the media immediately, rather than as a scheduled file restore media task (according to the Process scheduled media tasks schedule).

Setting Up File Migration
160 Second EditionStorageTek Proprietary
5. Once restore options have been set, click Next. The Summary page appears. The Summary page displays the media that will be added to the media folder and the media restore options selected, if applicable.
6. Review the information in the Summary page. If the Summary page information is correct click Finish. The media is added to the media folder.
Once you have created your media folders and added media to them, you can create move groups to subdivide the media in the media folders. For instructions, see “Creating Move Groups” on page 161.
■ Move GroupsMove groups are specific groupings of media within a media folder. To use media assigned to a media folder for file migration, that media must be assigned to a move group within that media folder. Assigning media to different move groups in a media folder allows you to subdivide media within a media folder for separate uses.
By assigning media to move groups, you can control what files will be written to what media. This can be useful if segregation of data is necessary. For example, if you wish to separate files from different months onto different pieces of media within a media folder, you can create a move group for each month. Separate media can be assigned to each move group so files for different months are not stored on the same media.
For example, there might be a media folder, \ACCOUNTS\, with several pieces of media in the folder. One set of the media could be assigned to a move group called January, and another set of the media could be assigned to a move group called February. By targeting different move groups, you could create move rules that move the file \ACCOUNTS\JAN\REPORT.DAT to one set of media and write the file \ACCOUNTS\FEB\REPORT.DAT to another set. A move rule for \ACCOUNTS\JAN\*.* could target the January move group, and one for \ACCOUNTS\FEB\*.* could target the February move group.
Because media is first assigned to a media folder, only the move groups created for that media folder can use that media folder’s assigned media. For example, if you create a media folder \JAN\ and assign media to it, only move groups created for the \JAN\ media folder can use the media assigned to that media folder.
Note: Move groups can contain only writable media. CD-ROM and finalized DVD-R media, for example, cannot be assigned to a move group because it is read-only.

Move Groups
ASM Data Manager Getting Started Guide 161StorageTek Proprietary
Creating Move GroupsThe Move Group Wizard leads you step-by-step through the move group creation process. You can configure the move group at the time you create it, or you can access and change these configurations later through the Move Group Properties dialog box. The options on each tab of the Move Group Properties dialog box are identical to the corresponding page of the Move Group Wizard. For detailed information on changing move group properties, refer to the Managing File Migration chapter in the ASM Data Manager System Guide.
See the following sections for detailed instructions for each page of the Move Group Wizard:
• "Starting the Move Group Wizard," which follows
• “Configuring the Move Group Wizard Media Page” on page 162
• “Configuring the Move Group Wizard Options Page” on page 164
• “Configuring the Move Group Wizard Automation Page” on page 165
• “Completing the Move Group Wizard” on page 166
Starting the Move Group WizardThis section describes how to start the Move Group Wizard and how to configure the New Move Group page.
To start the Move Group Wizard:
1. Right-click the Move Groups node under the media folder in which you want to create the move group and select New from the shortcut menu. The Move Group wizard appears, starting with the New Move Group page.
Figure 93. Move Group Wizard -- New Move Group Page
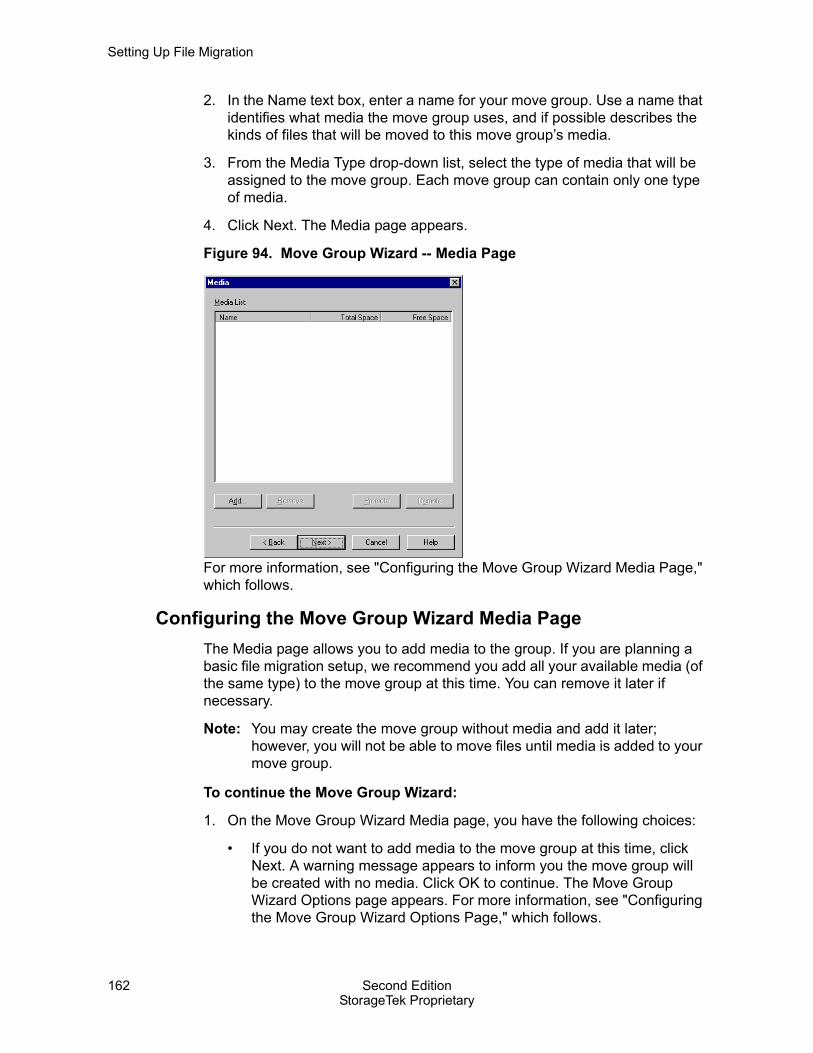
Setting Up File Migration
162 Second EditionStorageTek Proprietary
2. In the Name text box, enter a name for your move group. Use a name that identifies what media the move group uses, and if possible describes the kinds of files that will be moved to this move group’s media.
3. From the Media Type drop-down list, select the type of media that will be assigned to the move group. Each move group can contain only one type of media.
4. Click Next. The Media page appears.
Figure 94. Move Group Wizard -- Media Page
For more information, see "Configuring the Move Group Wizard Media Page," which follows.
Configuring the Move Group Wizard Media PageThe Media page allows you to add media to the group. If you are planning a basic file migration setup, we recommend you add all your available media (of the same type) to the move group at this time. You can remove it later if necessary.
Note: You may create the move group without media and add it later; however, you will not be able to move files until media is added to your move group.
To continue the Move Group Wizard:
1. On the Move Group Wizard Media page, you have the following choices:
• If you do not want to add media to the move group at this time, click Next. A warning message appears to inform you the move group will be created with no media. Click OK to continue. The Move Group Wizard Options page appears. For more information, see "Configuring the Move Group Wizard Options Page," which follows.

Move Groups
ASM Data Manager Getting Started Guide 163StorageTek Proprietary
• If you want to add media to the move group, click Add. The Select Move Group Media dialog box appears.
Figure 95. Select Move Group Media Dialog Box
The Select Move Group Media dialog box lists all media assigned to the media folder and corresponding to the media type selected in the New Move Group page of the wizard.
2. Select the media you want to add to the move group and click OK. The Media page appears with the media listed.
3. Click Next. The Move Group Wizard Options page appears.
Figure 96. Move Group Wizard -- Options Page

Setting Up File Migration
164 Second EditionStorageTek Proprietary
For more information, see "Configuring the Move Group Wizard Options Page," which follows.
Configuring the Move Group Wizard Options PageThe Move Group Wizard Options page allows you to configure various options for your move group and its media.
To continue the Move Group Wizard:
1. Configure the options as appropriate (or leave the default settings). The table below lists the default settings for each option:
Table 21. Move Group Wizard – Option Page Defaults
Option Default SettingLibrary mount – minimum free space on media
Sets the minimum amount of free space that must be on a piece of library media in order for the media to be mounted for file migration. Default is 32 KB.
Library mount - minimum number of files
Sets the minimum number of files due to be migrated before library media will be mounted. Default is 1.
Maximum media simultaneously receiving files
(Only available if Random media fill method is selected.) Sets the maximum number of the group’s media that will be mounted at one time for migration of files. Default is 1.
Maximum write errors before media write disabled
Allows for disabling media writes if a specified number of write errors occurs for a piece of media. Default disables writing after 10 errors occur.
Media fill method Sets media fill method. Choices are Random (any available media is written to) or Sequential (media is written to in the order in which it appears in the move group). Default is Sequential fill.
Remove media when free space falls below (MB)
Allows a piece of media to be removed from a move group when the amount of free space on the media falls below a specified number of megabytes. Default is enabled with a value of 1 MB.
Warn when group space falls below (MB)
Instructs Data Manager to send a warning alert when the amount of free space for all media in the move group falls below a specified number of megabytes. Default does not send a warning.

Move Groups
ASM Data Manager Getting Started Guide 165StorageTek Proprietary
You can change these settings later, if necessary. For detailed information on managing the properties and options for your move groups, refer to the Managing File Migration chapter in the ASM Data Manager System Guide.
2. Click Next. The Automation page appears.
Figure 97. Move Group Wizard -- Automation Page
For more information, see "Configuring the Move Group Wizard Automation Page," which follows.
Configuring the Move Group Wizard Automation PageThe Automation page allows you to configure automatic labeling and addition of blank media to the move group. You can also set automatic media compaction to occur.
Note: If your move group media type does not allow automatic labeling of media (for example, NAS media) these options are grayed out.
Cached moves file watermark
Sets the number of files that Data Manager queues before it flushes the queued file data to the move group media. Default is 100 files. Setting must be between 1 and 1000 files.
Cached moves data watermark (MB)
Sets the total cumulative size limit (in megabytes) of files that Data Manager queues before it flushes the queued file data to the move group media. Default is 10 MB. Setting must be between 1 and 1048576 MB (1 terabyte).
Table 21. Move Group Wizard – Option Page Defaults (Continued)
Option Default Setting

Setting Up File Migration
166 Second EditionStorageTek Proprietary
To continue the Move Group Wizard:
1. Configure the media labeling and compaction options as appropriate (or leave the default settings). You can change these settings later, if necessary. For detailed information on managing the properties and options for your move groups, refer to the Managing File Migration chapter in the ASM Data Manager System Guide.
2. Click Next. The Summary page appears. For more information, see "Completing the Move Group Wizard," which follows.
Completing the Move Group WizardThe Summary page lists all the move group configuration information you provided through the wizard.
To complete the Move Group Wizard:
1. Review the information in the Summary page.
2. If the information in the Summary page is correct, click Finish. The move group is created and appears in the Move Group node of the media folder.
When you finish creating your move groups, you can create move rules. Move rules determine what files are written to the media in selected move groups. For instructions, see "Move Rules," which follows.
■ Move RulesMove rules are designed to allow you to configure, very specifically, what files in a media folder are moved to what media. A move rule contains the instructions that Data Manager follows when choosing which files to move to a particular piece or group of media. In addition, move rules contain an exclusion type option that allows you to identify files in the media folder that should not be moved to media. At least one inclusion type move rule must exist before files can be migrated to media.
When you create a move rule, you identify a particular directory (media folder or subdirectory of a media folder) that contains the files to be moved. You can then further restrict the set of files to be moved by specifying file extension, file size, and file attributes. In addition, settings for file age or time-delay from a selected action on a file can be configured to control when a file becomes eligible for movement to media.
Each move rule must point to a move group as the target location for file migration. You create a move group to establish a group of media to which to move files. You may create the move groups separately before creating the move rules, or you can create the move group from within the Move Rule Wizard.

Move Rules
ASM Data Manager Getting Started Guide 167StorageTek Proprietary
There are a number of things you should consider when determining which options to set for your move rules.
For example, if you are using optical media, you may want to set up an age restriction from last write time in your move rule because of the way files are written to optical media. This limits the number of times frequently changing files are written and rewritten to the media.
On the other hand, if you are using EMC media for which you have configured retention, or NAS media for which you have configured Aggregation or WORM options, you will not want to have an age delay for your move rule. This is because Data Manager cannot enforce restrictions for these files until they are moved to media. Setting an age delay for your move rules in this case will create an extended period of time during which files that need to be retained could accidentally be deleted or modified.
You can also configure specific move rules to target very large files for move and immediate purge, in order to efficiently clear space from the extended drive. In addition, if your move group contains EMC or NAS media, you may want to also set the direct read option for those files, because file retrieval from NAS or EMC is typically faster than with other kinds of media. When a client requests a file that is marked for direct read, the file is read directly from the media rather than being fetched to the extended drive first, helping you maintain extended drive space.
The exclusion option for your move rules makes it easy to set up Data Manager to move all files in a folder except for a specified file type or attribute or size. By combining inclusion and exclusion type move rules, you can be very specific about what files within a media folder are moved to media.
For example, you may decide that you want to move all the files in a media folder except for executable files. You can configure one move rule to include all files, and then configure a second move rule to exclude all “*.exe” files.
If your media folder has multiple sub-directories that contain files you don’t want moved to media, you can also set an inclusion move rule to move all files and subdirectories in a media folder, and then set an exclusion move rule to exclude all files (or specific files) in a subdirectory.
Note: When files qualify for both an inclusion move rule and an exclusion move rule, the exclusion move rule takes precedence, and the files are excluded from migration.
When a file is written to a media folder on the extended drive, Data Manager checks the file against the criteria of the move rules for that folder. If files qualify for move based on the options configured in the move rule(s), they are added to the move list, either during a drive scan (if an age restriction is set) or at the time the file is saved to the media folder on the extended drive. The move list for each extended drive is constructed based on the move rules you create.

Setting Up File Migration
168 Second EditionStorageTek Proprietary
The contents of the move list dictate what files are moved to media. The move list is processed and files are moved to media whenever the Move files to media schedule is active. For more information on scheduling the Move files to media activity, see “Scheduling Movement of Files” on page 179. For information on scheduling drive scans, see “Scheduling Drive Scans” on page 176.
Creating Move RulesThe Move Rule Wizard leads you step-by-step through the move rule creation process. You can configure the move rule at the time you create it, or you can access and change these configurations later in the Move Rule Properties dialog box. The options on each tab of the Move Rule Properties dialog box are identical to the corresponding page of the Move Rule Wizard. For detailed information on changing move rule properties, refer to the Managing File Migration chapter in the ASM Data Manager System Guide.
See the following sections for detailed instructions for each page of the Move Rule Wizard:
• "Starting the Move Rule Wizard," which follows
• “Configuring the Move Rule Wizard File Name Page” on page 169
• “Configuring the Move Rule Wizard Size Page” on page 171
• “Configuring the Move Rule Wizard Attributes Page” on page 171
• “Configuring the Move Rule Wizard Age Page” on page 172
• “Configuring the Move Rule Wizard Settings Page” on page 174
• “Completing the Move Rule Wizard” on page 175
Starting the Move Rule WizardThis section describes how to start the Move Rule Wizard and configure the Rule Type page.
To start the Move Rule Wizard:
1. Right-click the Move Rules node under the media folder in which you want to create the move rule and then select New from the shortcut menu. The Move Rule Wizard appears, starting with the Rule Type page.

Move Rules
ASM Data Manager Getting Started Guide 169StorageTek Proprietary
Figure 98. Move Rule Wizard - Rule Type Page
The Rule Type page allows you to select whether the criteria configured in the rule you are creating will qualify or exclude files from movement to media. For example, you may decide that you want to move all the files in a media folder except for text files. You can configure one move rule to include all files, and then configure a second move rule to exclude all “*.txt” files.
2. Select the appropriate rule type for this move rule. You have the following choices:
• Select the Include option if you want to create a move rule that specifies which files should be moved to media.
• Select the Exclude option if you want to create a move rule that specifies which files should not be moved to media.
Note: When files qualify for both an inclusion move rule and an exclusion move rule, the exclusion move rule takes precedence, and the files are excluded from migration.
3. Click Next. The File Name page appears. For more information, see "Configuring the Move Rule Wizard File Name Page," which follows.
Configuring the Move Rule Wizard File Name PageThe File Name page allows you to define the location and extension for the files to be moved or excluded from movement to media.

Setting Up File Migration
170 Second EditionStorageTek Proprietary
Figure 99. Move Rule Wizard -- File Name Page
To continue the Move Rule Wizard:
1. Select the folder containing the files for which you want to configure this move rule. The active media folder is listed by default. If you want to apply the rule to only the files in a subfolder of the media folder, click Browse. The Select Folder dialog box appears.
Figure 100. Select Folder Dialog Box
Select the subfolder to use for the move rule and click OK.
Note: You cannot specify more than one selected subfolder of the media folder in a single move rule. You can specify either one or all subfolders only. To apply a move rule to files in a different subfolder, create a second move rule.
2. Enable or disable the Include subfolders option to specify whether the rule applies to all subfolders of the folder listed in the Folder text box.
3. In the File Name text box, enter the file specification to determine which files are to be moved or excluded using this move rule. For example, entering *.DOC applies this move rule to all files in the specified folder with a DOC file extension.

Move Rules
ASM Data Manager Getting Started Guide 171StorageTek Proprietary
Note: You can configure only one file extension per move rule. To move or exclude files of a different extension in the same folder, create a second move rule. For more information on using wildcards to designate specific file names for move or exclusion, refer to the Managing File Migration chapter of the ASM Data Manager System Guide.
4. Click Next. The Size page appears. For more information, see "Configuring the Move Rule Wizard Size Page," which follows.
Configuring the Move Rule Wizard Size PageThe Size page allows you to configure a specific size range for the files to be affected by the move rule, or to qualify files of any size.
Figure 101. Move Rule Wizard -- Size Page
To continue the Move Rule Wizard:
1. You have the following choices:
• To qualify files of all sizes, select Apply rule to files of any size.
• To configure a file size range for qualification for the move rule, select the Apply rule to files with the following sizes option. Then enable one or both of the check boxes and enter the size qualification(s) you would like to use.
2. Click Next. The Attributes page appears. For more information, see "Configuring the Move Rule Wizard Attributes Page," which follows.
Configuring the Move Rule Wizard Attributes PageThe Attributes page allows you to qualify files with any attribute for move or exclusion, or you can select to apply the rule only to files with specified attributes.

Setting Up File Migration
172 Second EditionStorageTek Proprietary
Figure 102. Move Rule Wizard -- Attributes Page
To continue the Move Rule Wizard:
1. You have the following choices:
• To move or exclude files regardless of attributes, select Apply rule to files with any attribute.
• To apply the rule only to files with particular attributes, select Apply rule to files with the following attributes. Then enable the options for any attributes a file should have if you want the file to qualify for this rule.
Note: When selecting attributes, be advised that files possessing any of the checked attributes will qualify for the rule (as opposed to files needing to posses all of the checked attributes to qualify, or files needing to posses only the checked attributes to qualify).
Note: If you have extended a system drive, or if you have application files on an extended drive, be sure to configure an exclude rule that excludes all files with the System attribute, to prevent operating system or application file purge. Extending a system drive with Data Manager is not recommended and may cause severe operating system damage. Attributes for existing files can be viewed through Windows Explorer.
2. Click Next. The Age page appears. For more information, see "Configuring the Move Rule Wizard Age Page," which follows.
Configuring the Move Rule Wizard Age PageThe Age page allows you to qualify files of any age against this move rule or to qualify only files of a particular age.

Move Rules
ASM Data Manager Getting Started Guide 173StorageTek Proprietary
Figure 103. Move Rule Wizard -- Age Page
Note: Remember that if you configure age delays, you must run regular drive scans in order to write qualifying files to the move list. Regular drive scans ensure that all appropriate files are written to the move list, and thereby moved to media when the Move files to media schedule is active. For information on scheduling drive scans, see “Scheduling Drive Scans” on page 176. For more information on scheduling the Move files to media activity, see “Scheduling Movement of Files” on page 179.
Note: If you have retention set for your EMC media, or Aggregation or WORM options set for your NAS media, keep in mind that restrictions for files do not go into effect until the files are moved to media. Configuring an age-delay in your move rules creates an extended period of time during which files can be deleted from or modified on the extended drive with no copies retained (because the files have not yet been moved to media).
To continue the Move Rule Wizard:
1. You have the following choices:
• To qualify files regardless of age, select Apply rule to files of any age.
• To qualify only files older than a particular age, enable the Apply rule to files of age greater than option, and then enter the number of days that must elapse before a file qualifies. Set the date from which that file age is calculated by selecting one of the following options from the Since drop-down list: Create time, Last write time, Last access time.
2. Click Next. The Settings page appears. For more information, see "Configuring the Move Rule Wizard Settings Page," which follows.
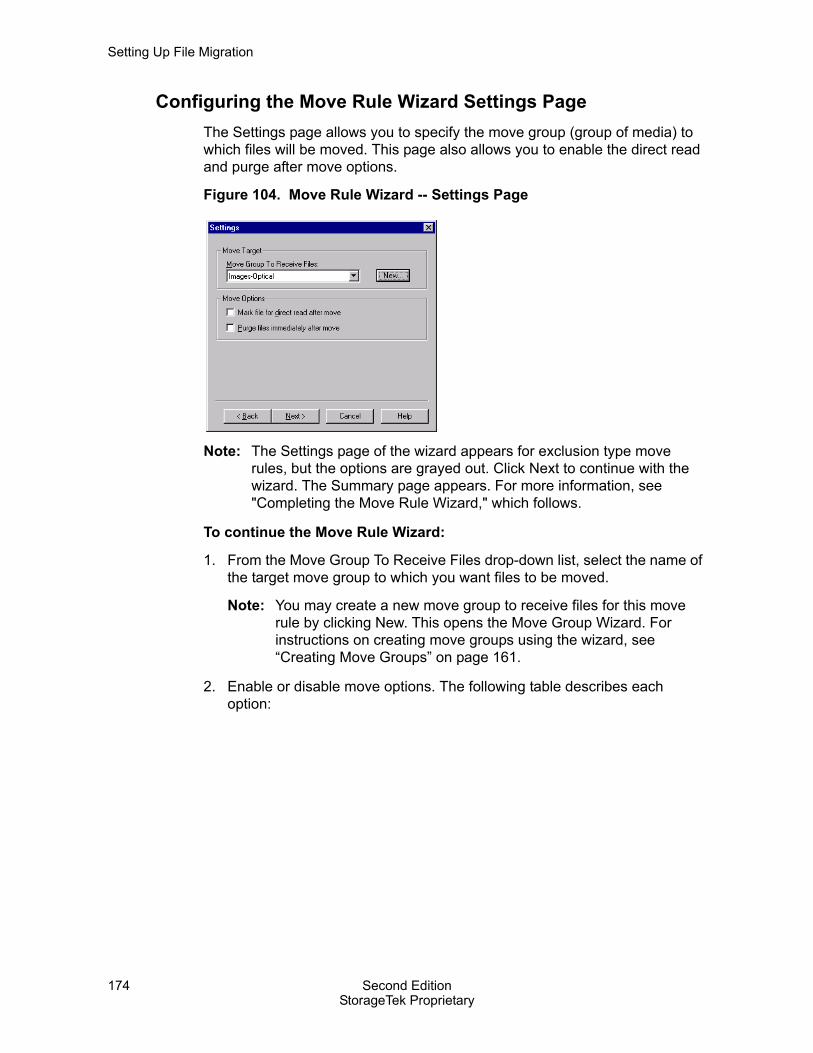
Setting Up File Migration
174 Second EditionStorageTek Proprietary
Configuring the Move Rule Wizard Settings PageThe Settings page allows you to specify the move group (group of media) to which files will be moved. This page also allows you to enable the direct read and purge after move options.
Figure 104. Move Rule Wizard -- Settings Page
Note: The Settings page of the wizard appears for exclusion type move rules, but the options are grayed out. Click Next to continue with the wizard. The Summary page appears. For more information, see "Completing the Move Rule Wizard," which follows.
To continue the Move Rule Wizard:
1. From the Move Group To Receive Files drop-down list, select the name of the target move group to which you want files to be moved.
Note: You may create a new move group to receive files for this move rule by clicking New. This opens the Move Group Wizard. For instructions on creating move groups using the wizard, see “Creating Move Groups” on page 161.
2. Enable or disable move options. The following table describes each option:

Move Rules
ASM Data Manager Getting Started Guide 175StorageTek Proprietary
Note: Be advised that if you enable either the Purge files immediately after move or Mark files for direct read setting, files qualifying for this move rule are purged, and are not subject to any exclusion type purge rules you may configure.
Note: Files written to DVD-R media cannot be purged until the media is finalized. Therefore, if your move rule points to a move group that contains DVD-R media, these options are not available.
Note: Purge rules for files can be configured separately if purging after move is not appropriate for all files that qualify for this move rule. For details on creating separate purge rules, refer to the Managing the Extended Drive chapter of the ASM Data Manager System Guide.
3. Click Next. The Summary page appears. For more information, see "Completing the Move Rule Wizard," which follows.
Completing the Move Rule WizardThe Summary page allows you to review the information that you have provided through the wizard.
To complete the Move Rule Wizard:
1. Review the information in the Summary page.
2. If the information in the summary is correct, click Finish. The move rule is created and appears in the Move Rules node for the media folder.
Note: Remember that you must run regular drive scans in order to write qualifying files to the move list. Regular drive scans ensure that all appropriate files are written to the move list, and thereby moved to
Table 22. Move Rule Wizard -- Settings Page Options
Option DescriptionMark file for direct read after move
Enabling this option sets the direct read attribute for all files moved to media under this move rule (and purges those files). The direct read attribute means that when requested by a client, a file is read directly from the media rather than being fetched to the extended drive first and read from there.
Purge files immediately after move
Enable this option to immediately purge file data for all files moved to media under this rule. Purging files removes file data from the extended drive while leaving behind a file tag containing the file attributes. If the direct read option (defined above) is checked, this option is automatically checked and grayed out.
Setting Up File Migration
176 Second EditionStorageTek Proprietary
media when the Move files to media schedule is active. For information on scheduling drive scans, see "Scheduling Drive Scans," which follows. For more information on scheduling the Move files to media activity, see “Scheduling Movement of Files” on page 179.
■ Scheduling Drive ScansDrive scans must be performed periodically in order to write files to the move list, and to qualify files against purge and delete rules, and consequently to move the files to storage media and to purge (and/or delete) the data from the extended drive. During a drive scan, Data Manager inventories all of the files on an extended drive and checks each file against the migration rules for the drive, adding eligible files to the move and purge lists, or purging and deleting files as appropriate.
Every file in a Data Manager media folder is checked when an extended drive scan occurs. If you configure an age restriction in your move rules, you must periodically scan the extended drive to be sure that files initially excluded from the move list because of age are added to the list after they reach the correct age.
In addition, file-sharing issues or sharing violations can prevent files from being added to the move list when appropriate. Data Manager must have full access to a file in order to obtain information required for the move list. If the file is open or otherwise being accessed by a program or user, Data Manager cannot add it to the move list.
It is for this reason that proper configuration of your drive scan schedule is a critical part of making sure files are moved to media and later purged from the extended drive when appropriate. The drive scan schedule is disabled by default. Setting a drive scan schedule makes it easy to be sure extended drive scans are run regularly, and allows you to run them during low system-traffic times.
Note: If there is more than one extended drive in your ASM system, you must schedule drive scans separately for each extended drive.
To schedule a drive scan:
1. Right-click on the extended drive for which you want to schedule drive scans and then select Properties from the shortcut menu. The Extended Drive Properties dialog box appears.
2. Click the Settings tab.

Scheduling Drive Scans
ASM Data Manager Getting Started Guide 177StorageTek Proprietary
Figure 105. Extended Drive Properties – Settings Tab
3. Click Drive Scan. The Drive Scan dialog box appears.
Figure 106. Drive Scan Dialog Box
Drive scans can be scheduled to occur once, hourly, daily, weekly, or monthly. When each different drive scan scheduling option is selected, the appropriate configuration boxes appear on the right side of the Drive Scan dialog box, as shown in the following example.

Setting Up File Migration
178 Second EditionStorageTek Proprietary
Figure 107. Weekly Drive Scan Options
For detailed information on each of the drive scan scheduling options, see the table below:
Table 23. Drive Scan Scheduling Options
Scheduling Option
Drive Scan Frequency Settings to Configure
Disable Never None
Once Once on the specified date and time.
Note that the default values when this option is enabled are today’s date and 12 a.m. Since this time occurs in the past, you need to change the defaults for the drive scan to run.
Also note that after a one-time drive scan is processed, the drive scan schedule is disabled, meaning drive scans will not occur again unless forced or scheduled.
Date
Time
Hourly On an hourly basis (within a 24-hour range) at the time you specify.
Hourly rate
Time
Daily Every x days at the specified time, where x is a number between 1 and 365.
Daily frequency
Time

Scheduling Movement of Files
ASM Data Manager Getting Started Guide 179StorageTek Proprietary
4. When you finish selecting a drive scan schedule option, click OK. The Settings tab appears.
5. Click OK to close the Extended Drive Properties dialog box.
■ Scheduling Movement of FilesWhen files qualify for movement under the configured move rules, they are written to the move list, either immediately upon being saved to the extended drive or during a drive scan. The move list is not processed, however, until the Move files to media schedule is active. Note that scheduling the movement of files during inactive times ensures that the activity does not compete with network clients or media devices for system drive or library resources.
When you schedule the Move files to media activity, you can also schedule three other media activities:
• The Process scheduled media tasks activity processes pending media tasks.
• The Update copy media activity updates all media copies assigned to the extended drive.
• The Allow fetches from media activity allows processing of user requests for files that have been moved to media and purged from the extended drive (including files marked for direct read).
For more information on media tasks, copy media, refer to the Managing Storage Media chapter in the ASM Data Manager System Guide. For more information on fetches from media, refer to the Managing File Migration chapter in the ASM Data Manager System Guide.
Note: If there is more than one extended drive in your ASM system, you must schedule media activities separately for each extended drive.
Weekly Every x weeks on the specified day(s) (Monday through Sunday) and time, where x is a number between 1 and 52.
Weekly frequency
Time
Day(s) of the week
Monthly Every x months on the specified date (1st through 31st) and time, where x is a number between 1 and 12.
Monthly frequency
Time
Day of the month
Table 23. Drive Scan Scheduling Options (Continued)
Scheduling Option
Drive Scan Frequency Settings to Configure
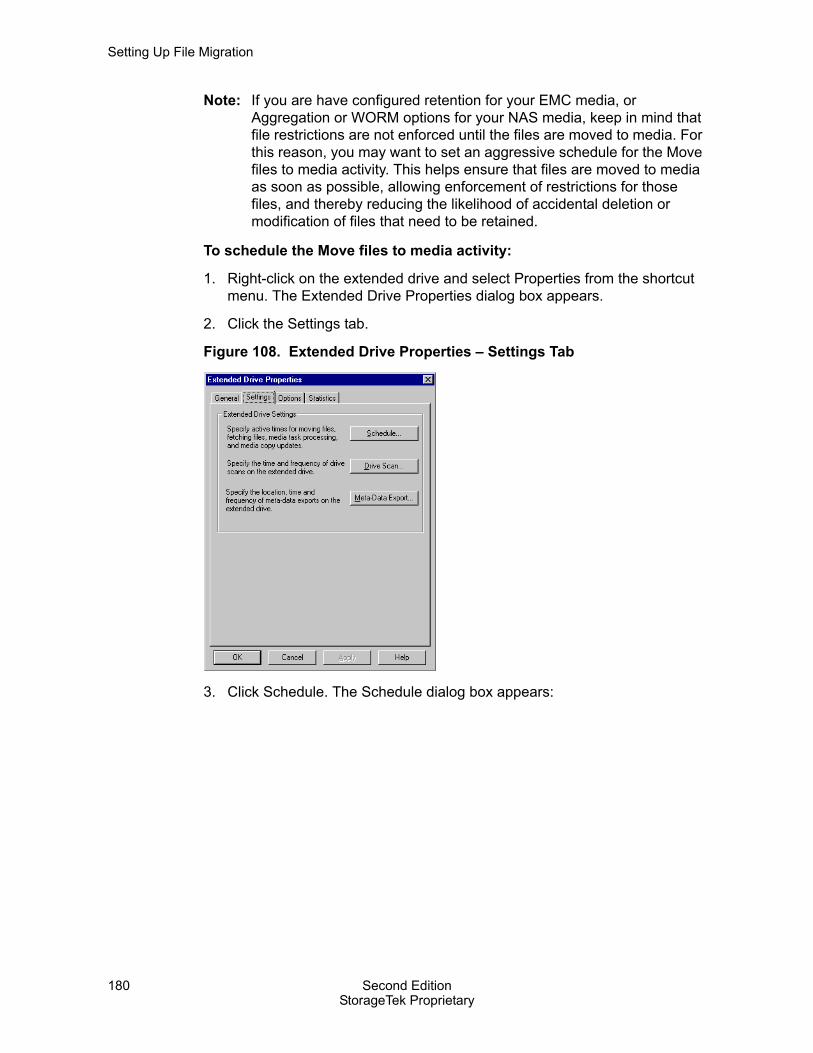
Setting Up File Migration
180 Second EditionStorageTek Proprietary
Note: If you are have configured retention for your EMC media, or Aggregation or WORM options for your NAS media, keep in mind that file restrictions are not enforced until the files are moved to media. For this reason, you may want to set an aggressive schedule for the Move files to media activity. This helps ensure that files are moved to media as soon as possible, allowing enforcement of restrictions for those files, and thereby reducing the likelihood of accidental deletion or modification of files that need to be retained.
To schedule the Move files to media activity:
1. Right-click on the extended drive and select Properties from the shortcut menu. The Extended Drive Properties dialog box appears.
2. Click the Settings tab.
Figure 108. Extended Drive Properties – Settings Tab
3. Click Schedule. The Schedule dialog box appears:

Scheduling Movement of Files
ASM Data Manager Getting Started Guide 181StorageTek Proprietary
Figure 109. Extended Drive Schedule Dialog Box
A dark red line represents the Move files to media activity. When that line appears across a box, during the corresponding time(s), the move list is processed and files on the list are moved to media.
The schedule grid contains columns for each hour of the day and rows for each day of the week, creating cells that each represent one hour. For example, the blacked out cell in the figure above represents 5 p.m. to 6 p.m. on Sunday, and the Move files to media activity will run from 8 p.m. to 6 a.m. every day of the week.
4. Select the area of the grid that corresponds to the time period during which you would like to schedule or clear a media activity.
5. You have the following choices:
• To set an activity for the selected blocks, check the appropriate option(s) in the Activities section of the Schedule dialog box and click Set.
• To clear an activity for all selected blocks, uncheck the appropriate option(s) in the Activities section of the Schedule dialog box and click Set.
• To clear all activities for all selected blocks, click Clear.
Note: Any time that the Allow fetches from media schedule is not active, client requests for purged files will not be honored (including direct reads). By changing the schedule for this activity, you may accidentally prevent clients from having access to purged files. We recommend that you leave the default setting for fetches (always active) in place, unless your organization requires a time-based restriction of access to purged files.

Setting Up File Migration
182 Second EditionStorageTek Proprietary
6. After you make changes to the schedule, review the media activity schedule carefully to make sure that in setting a schedule for one activity, you have not accidentally cleared scheduled times for another activity.
7. When your changes to the media activity schedule are complete, click OK to save changes and close the Schedule dialog box. The Settings tab appears.
8. Click OK to close the Extended Drive Properties dialog box.

ASM Data Manager Getting Started Guide 183StorageTek Proprietary
AClustering
Clustering is the process of connecting two or more computers together in such a way that they behave like a single computer, and so that they share a storage device.
In a cluster configuration, each computer automatically updates the other computer with registry information so it can intervene when needed. If one of the servers stops functioning, the other server assumes the workload of the failed server.
The act of transferring functions to another server in the cluster is called fail-over. Fail-over ensures continuous availability of the critical applications and data located on the cluster.
A typical clustered environment consists of two servers and a RAID array. The figure below shows a basic clustered environment.
Figure 110. Example of Clustered Architecture
The server computers that are part of the cluster are called nodes and can be either active or passive. An active node is always running and processing user requests. A passive node is idle and does not process user requests until an active node fails.
Applications and services can run in either active/active or active/passive mode on a cluster.
• In an active/passive configuration, applications and services running on the active node transfer over to the passive node when the active node fails. The active node is also called the primary node, while the passive node is called the secondary node.
Servercomputer name:Cluster_Srv_2
Servercomputer name:Cluster_Srv_1
Special cluster adapteror fiber bridge withfiber SCSI switch
Registry andprogram info sharedso that servers are
identical
Library
Shared RAID
Name seen onnetwork:
DX_Cluster
Workstation
Workstation
Workstation
Workstation
Workstation
Workstations writingfiles to DX_Cluster
Cluster
Clustering
184 Second EditionStorageTek Proprietary
• In an active/active configuration, applications and services can be running on both of the active nodes, but will transfer over to one node if the other fails. The applications and services that were originally running on the failed node are then restored to the node when it comes back online.
Note: Careful consideration of size requirements is necessary when planning an active/active cluster environment; if both servers are in use and one server fails, the other server must be capable of handling the workload of both servers.
Because the cluster is designed to function as a single computer, users and programs do not access individual nodes when connecting to the cluster. Instead, they access a logical cluster name, which represents the “single computer” that all of the individual components within the cluster have formed to create.
The following ASM storage products can run in active/passive mode in a cluster environment where Microsoft Cluster Server is installed:
• Data Manager 5.2 or higher
• ASM MediaStor 5.2 or higher
• ASM License Server 5.2 or higher
Data Manager 5.3 or higher can run in active/active mode in a cluster environment where Microsoft Cluster Server is installed.
Note: ASM components (Data Manager and MediaStor) are only supported on two-node clusters.
For more information, see the following sections:
• "Clustering Terms, " which follows
• “Cluster Administrator Concepts” on page 186
• “Active/Passive Clustering” on page 193
• “Active/Active Clustering” on page 203

Clustering Terms
ASM Data Manager Getting Started Guide 185StorageTek Proprietary
■ Clustering TermsThe following table contains commonly used cluster environment terms.
Table 24. Clustering Glossary
Term DefinitionActive Server A cluster server that is always running and
processing user requests.
Cluster A processing environment consisting of two or more servers connected together in such a way that they act as a single computer, and so that the server computers can share a single storage device. ASM components are only supported on two-node clusters.
Dependency A relationship between two resources that prevents a resource from starting if the dependent resource has not yet started. Dependencies can only be assigned between resources that are assigned to the same resource group.
Fail-over The act of transferring functions from one server in the cluster to another server in the cluster when the first server fails.
File Share Resource An entity defined in Cluster Administrator that represents a standard shared directory offered to users by the cluster.
Generic Service Resource
An entity defined in Cluster Administrator that represents a service that is installed on all cluster servers.
IP Address Resource An entity defined in Cluster Administrator that represents a 32-bit number that identifies the sender and receiver of information sent in packets across the Internet.
Logical Cluster Name The network identifier of a clustered environment. Because a cluster functions as a single element, users access the logical cluster name via the network rather than accessing any of the individual servers in the cluster itself.
Network Name Resource
An entity defined in Cluster Administrator that represents an alphanumeric string associated with a specific network (IP) address.
Node Server computer that is part of a cluster.

Clustering
186 Second EditionStorageTek Proprietary
■ Cluster Administrator ConceptsWhen you install Microsoft Cluster Server, several resources and resource groups are automatically created and appear in the Microsoft Cluster Server Administrator (Cluster Administrator). Before you install ASM storage products in a cluster, you must reconfigure some of these default resource settings and create new resources and resource groups.
Resources are physical or logical entities defined in Cluster Administrator and managed by a cluster node. You can define different types of resources, depending on the entity you want to be managed by a cluster node, such as physical disk resources, IP address resources, network name resources, file share resources, and generic service resources. Some resources are automatically created by Cluster Administrator as necessary.
A resource group is a logical collection of resources, defined in Cluster Administrator, that fails over from one node to another in a cluster. Note that resource groups fail over, and not individual resources.
Each resource group is assigned to a node in the cluster. The node to which a resource group is assigned is the node on which the resources in that group are available. When a node in the cluster fails, the resource groups on that node fail over to another node in the cluster. When the original node comes back online in an active/active configuration, the resource groups that originally resided on that node return to the node. In an active/passive configuration, the resource groups remain assigned to the node to which they
Passive Server A cluster server that is idle and does not process user requests until an active node fails.
Physical Disk Resource
An entity defined in Cluster Administrator that represents a fiber- or SCSI-attached disk used for storage.
Resource A physical or logical entity defined in Cluster Administrator and managed by a cluster node.
Resource Group A logical collection of resources, defined in Cluster Administrator, that fails over from one node to another in a cluster. Note that resource groups fail over, not individual resources.
Virtual Server A collection of resources, defined in Cluster Administrator, that represents the logical equivalent of a file or application server.
Table 24. Clustering Glossary
Term Definition

Cluster Administrator Concepts
ASM Data Manager Getting Started Guide 187StorageTek Proprietary
failed over, until that node fails, and they are transferred to the original node (or another available node in the cluster).
In some cases, you must also set up dependencies for the resources you create. Dependencies are relationships between resources that prevent a resource from starting if the dependent resource has not yet started. For example, if the physical disk resource for the Data Manager extended drive is not online (meaning that the extended drive is not available), then you do not want the Data Manager service resource to start.
Dependencies can only be assigned between resources that are assigned to the same resource group. You can assign dependencies while creating the resources.
In addition, Cluster Administrator automatically assigns dependencies for some resources. For example, when the IP address and network name resources are created for the cluster (when you install Microsoft Cluster Server), the IP address resource is assigned as a dependency of the network name resource.
A virtual server, like a resource group, is a collection of resources defined in Cluster Administrator; however, a virtual server represents the logical equivalent of a file or application server. If you want Data Manager to run in active/active mode, you install Data Manager on the virtual servers, and client workstations write files to file shares on the virtual server. You do not need to create virtual servers if you want Data Manager (or any other ASM storage products) to run in active/passive mode.
Note: Data Manager, in an active/active environment, can only be installed on one virtual server per physical node. In addition, ASM components are only supported on two-node clusters.
For more information on the cluster entities required for ASM storage product installation in a cluster, see the following sections:
• "Resource Groups, " which follows
• “Resources” on page 189
(Virtual servers are discussed in context in both of the sections listed above.)
For additional detailed information on resources, resource groups, and virtual servers, refer to Microsoft’s cluster documentation.
Resource GroupsIf the ASM storage products you are installing will run in active/passive mode, you do not need to create additional resource groups; you should use the default resource group, Cluster Group, which is created when you installed Microsoft Cluster Server.

Clustering
188 Second EditionStorageTek Proprietary
The resource groups you need to create before installing Data Manager in active/active mode are actually created automatically when you create virtual servers for each node in the cluster.
The following table lists the resource groups that should appear automatically in Cluster Administrator after you install Microsoft Cluster Server and before you do any additional configuration for ASM storage products, as well as the resources that are assigned to each group.
Note that the number of Disk Group resource groups that appear depends on the number of physical disks attached to the cluster when you install Microsoft Cluster Server. The installation automatically adds each disk as a resource (represented in this section by Disk “X”, “Y”, and “Z” but named in your cluster according to the assigned drive letters), and creates an individual resource group for each disk that is not designated as the quorum drive. (The quorum drive, which stores cluster checkpoint and log files, must be a separate drive on the cluster. You cannot use different partitions on a single drive as separate physical disks from the quorum drive.)
Note: If you are installing ASM storage products on a cluster server running Windows NT, Cluster Server also creates a separate Disk Group resource group for the disk designated as the quorum drive.
The table below lists the resource groups that should appear in Cluster Administrator after you finish configuring the resources and resource groups for an active/active Data Manager installation (but before the install), as well as the resources that are assigned to the group, and the node to which the group should be assigned.
Table 25. Resource Groups After Cluster Server Installation
Name Assigned Resources
Cluster Group Cluster NameCluster IP AddressDisk “X”Time Service (if Windows NT)
Disk Group 1 Disk “Y”
Disk Group 2 Disk “Z”

Cluster Administrator Concepts
ASM Data Manager Getting Started Guide 189StorageTek Proprietary
Note that the VS1 and VS2 resource groups are representative of the resource groups that are automatically created when you create the virtual servers. Similar to the Disk Group resource groups, the number of virtual servers that appear depends on the number of virtual servers you create. You can name the virtual server resource groups as you like; however, we recommend that you keep each descriptive of the virtual server with which it is associated.
ResourcesWhen you install Microsoft Cluster Administrator, the system automatically creates resources for the cluster’s IP address, network name, and the physical disks assigned to the cluster. It also sets up an initial dependency.
Table 26. Resource Groups Before Active/Active Data Manager Installation
Name Assigned Resources Assigned Node
Cluster Group Cluster NameCluster IP AddressDisk “X”
Node 1
Disk Group 1 None Node 1
Disk Group 2 None Node 1
VS1 VS1 IP AddressVS1 NameDisk “Y”File Share 1
Node 1
VS2 VS2 IP AddressVS2 NameDisk “Z”File Share 2
Node 2
Table 27. Resources After Cluster Server Installation
Name Type Resource Group
Dependencies
Cluster IP Address
IP address Cluster Group None
Cluster Name Network name Cluster Group Cluster IP Address

Clustering
190 Second EditionStorageTek Proprietary
Note that the physical disk resources, represented in the table above by Disk “X”, Disk “Y”, and Disk “Z”, should be named according to the drive letters in the cluster. Remember that the number of physical disk resources that appear depends on the number of physical disks attached to the cluster when you install Microsoft Cluster Server. The installation automatically adds each disk as a resource and creates an individual resource group for each disk that is not designated as the quorum drive. (The quorum drive, which stores cluster checkpoint and log files, must be a separate drive on the cluster. You cannot use different partitions on a single drive as separate physical disks from the quorum drive.)
Note: Remember that if you are installing ASM storage products on a cluster server running Windows NT, Cluster Server also creates a Time Service resource and a separate Disk Group resource group for the disk designated as the quorum drive.
You should leave the Cluster IP Address resource and Cluster Name resource in the Cluster Group resource group since they are required for the successful functioning of the cluster. If your cluster server is running Windows NT, you should also leave the Time Service resource in the Cluster Group. If your cluster server is running Windows 2000, you should also leave the physical disk resource for the quorum drive (Disk “X” in the table) in the Cluster Group.
For details on the resources required for active/passive and active/active installations, see the following sections:
• "Resources for an Active/Passive Installation, " which follows
• “Resources for an Active/Active Installation” on page 191
Resources for an Active/Passive InstallationIf you are installing Data Manager in active/passive mode, you should also leave the physical disk resources for the other drives (Disk “Y” and Disk “Z” in the table) in their respective Disk Group resource groups. In addition, you will need to manually create a file share resource for the file share to which users will save and retrieve files you want Data Manager to manage.
Disk “X” (quorum drive)
Physical disk Cluster Group None
Disk “Y” Physical disk Disk Group 1 None
Disk “Z” Physical disk Disk Group 2 None
Time Service (Windows NT)
Time service Cluster Group None
Table 27. Resources After Cluster Server Installation
Name Type Resource Group
Dependencies

Cluster Administrator Concepts
ASM Data Manager Getting Started Guide 191StorageTek Proprietary
Note: If you are installing ASM MediaStor or License Server, you do not need to create or change the resources or their assigned resource groups or dependencies. You only need to reconfigure resources and resource groups if you are installing Data Manager.
The following table lists the resources that should appear in Cluster Administrator before you install Data Manager in active/passive mode.
Note: If you are installing ASM storage products on a cluster server running Windows NT, Disk “X” is assigned to its own Disk Group resource group.
After you install each ASM storage product (including Data Manager, MediaStor, and License Server) in active/passive mode, a generic service resource is automatically created for each product and assigned to the Cluster Group resource group. You do not need to configure these resources.
Resources for an Active/Active InstallationIf you are installing Data Manager in active/active mode, you must assign the physical disk resources for the other drives in the cluster to a virtual server resource group after you create the virtual servers. In an active/active configuration, those physical disk resources represent the drives you plan to extend with Data Manager. (In an active/passive configuration, you can extend any drive in the cluster, including a partition on the quorum drive.)
Table 28. Resources Before an Active/Passive Installation
Name Type Resource Group
Dependencies
Cluster IP Address
IP address Cluster Group None
Cluster Name Network name Cluster Group Cluster IP Address
Disk “X” (quorum drive)
Physical disk Cluster Group None
Disk “Y” Physical disk Disk Group 1 None
Disk “Z” Physical disk Disk Group 2 None
File Share 1 File share Cluster Group Disk “X” (or whichever physical disk resource represents the Data Manager extended drive)
Time Service (Windows NT)
Time service Cluster Group None

Clustering
192 Second EditionStorageTek Proprietary
You also need to manually create file share resources - one for each extended drive share in the active/active installation - to which users will save and retrieve files you want each Data Manager installation to manage.
Virtual server IP address and network name resources (VS1 IP Address, VS1 Name, VS2 IP Address, and VS2 Name, respectively, in the table below) are created automatically when you create each virtual server and are named according to the virtual server name.
The following table lists the resources that should appear in Cluster Administrator before you install Data Manager in active/active mode:
When you install Data Manager in active/active mode, a generic service resource for each service is created and assigned to the virtual server resource group for the virtual server on which the service is installed. The resources are named ASM-VS1, ASM-VS2, where VS1 and VS2 represent the name of the virtual server on which the service is installed.
Table 29. Resources Before Active/Active Installation
Name Type Resource Group
Dependencies
Cluster IP Address
IP address Cluster Group None
Cluster Name Network name Cluster Group Cluster IP Address
Disk “X” (quorum drive)
Physical disk Cluster Group None
Disk “Y” Physical disk VS1 None
Disk “Z” Physical disk VS2 None
VS1 IP Address IP address VS1 None
VS1 Name Network name VS1 VS1 IP Address
VS2 IP Address IP address VS2 None
VS2 Name Network name VS2 VS2 IP Address
File Share 1 File share VS1 Disk “Y”VS1 IP AddressVS1 Name
File Share 2 File share VS2 Disk “Z”VS2 IP AddressVS2 Name

Active/Passive Clustering
ASM Data Manager Getting Started Guide 193StorageTek Proprietary
■ Active/Passive ClusteringThe following ASM storage products can run in active/passive mode in a cluster environment where Microsoft Cluster Server is installed:
• ASM Data Manager 5.2 or higher
• ASM MediaStor 5.2 or higher
• ASM License Server 5.2 or higher
Be advised that ASM components are only supported on two-node clusters.
Note: ASM storage products support clustering only in fail-over scenarios; they do not support load balancing between the cluster nodes.
When running in active/passive mode in a cluster, ASM storage products each run as a single service on the active, or primary, node. When the primary node fails, the service is transferred to the secondary node, which is then considered the primary node because it becomes active. All ASM storage product functionality is available on the primary node and completely transfers in the case of a fail-over.
Note: If the Extended Drive Serial Number Wizard appears after a fail-over, click Cancel to exit the wizard without changing the extended drive serial number. For more information, see “Appearance of Extended Drive Serial Number Wizard” on page 202.
For more information on installing and managing ASM storage products in active/passive mode on a cluster, see the following sections:
• "Before You Install, " which follows
• “Running the Installation” on page 198
• “Managing ASM Storage Products” on page 200
Before You InstallBefore you install any ASM storage products in active/passive mode on a cluster, verify that the cluster environment you intend to set up will meet the product’s cluster installation requirements. You should also review the Storageteks’ recommendations for optimizing your cluster environment. For more information, see the following sections:
• "Minimum Requirements, " which follows
• “Recommendations” on page 194
• “Setting up Cluster Administrator” on page 195

Clustering
194 Second EditionStorageTek Proprietary
Minimum RequirementsBe sure that your system meets or exceeds the following minimum requirements when installing ASM storage products on a cluster:
• "Operating System, " which follows
• “Hardware” on page 194
• “Media Services” on page 194
• “Licensing” on page 194
Operating SystemCluster installation for ASM storage products running in active/passive mode is supported on Windows NT Enterprise Edition 4.0 with Service Pack 6a or Windows 2000 Advanced Server Edition with Service Pack 2 or 3, using Microsoft’s Cluster Server.
Note: If you use Windows 2000 Advanced Server Edition, you need to configure the disks in the RAID device as basic disks, not as dynamic disks.
HardwareBe sure to check your operating system and Microsoft Cluster Server requirements, and make sure the hardware in your cluster meets or exceeds the minimum specifications noted by the operating system and Microsoft cluster documentation.
Media ServicesWhen running in active/passive mode on a cluster, ASM Data Manager supports ASM MediaStor, Network Attached Storage (NAS), EMC Centera (EMC), and Tivoli Storage Manager (TSM) as media services.
When using TSM as a media service, be sure to enter the logical cluster name in the DSM.OPT file as the nodename. For detailed instructions on configuring a TSM media service in Data Manager, see “Tivoli Storage Manager” on page 100.
LicensingYou must obtain cluster-enabled ASM licenses. When purchasing the licenses, be sure to inform your sales representative that you intend to use the products in a clustered environment.
RecommendationsIn order to ensure the best data integrity in the case of a fail-over, we recommend that you retain the default setting (enabled) for the Use write verify option in ASM Data Manager. The write verify command sends data to

Active/Passive Clustering
ASM Data Manager Getting Started Guide 195StorageTek Proprietary
the device buffer, writing the data to the media and then reading the data from the media to compare it to the data in the buffer. This verifies that the media properly accepted the file data and that no error occurred during migration.
The Use write verify option can be found on the Options tab of the Service Properties dialog box in the Data Manager Administrator.
Setting up Cluster AdministratorYou should attach all hardware and install Microsoft Cluster Server before you install ASM products. For more information, refer to Microsoft’s cluster documentation.
In addition, if you are installing Data Manager in active/passive mode, you must create a file share resource for each file share to which users will save and retrieve files you want Data Manager to manage. A file share resource allows clients to continue to write files to and retrieve files from the Data Manager extended drive(s) after a fail-over. For more information on resources, see “Cluster Administrator Concepts” on page 186.
To create a file share resource:
1. In Cluster Administrator, open the File menu, select New, and then choose Resource. The New Resource Wizard appears.
Figure 111. New Resource Wizard
2. In the Name text box, enter a name for the resource.
3. In the Description text box, enter a description for the resource (optional).
4. From the Resource type drop-down list, choose File Share.
5. From the Group drop-down list, be sure that the default Cluster Group resource group is selected.
6. Click Next. The Possible Owners page appears.

Clustering
196 Second EditionStorageTek Proprietary
Figure 112. New Resource Wizard – Possible Owners Page
All of the servers in the cluster are listed in the Possible owners list.
7. If you do not want a specific cluster server to have access to the resource (share for the extended drive), select the server and click the Remove button. We recommend that you leave the default setting of all servers as possible owners. This allows all cluster servers to access the extended drive in the event of a fail-over.
8. When you finish, click Next to continue. The Dependencies page appears.
Figure 113. New Resource Wizard – Dependencies Page
9. Select the physical disk resource associated with the drive you plan to extend in Data Manager, and click Add to add it as a dependency.
10. Click Next. The File Share Parameters page appears.

Active/Passive Clustering
ASM Data Manager Getting Started Guide 197StorageTek Proprietary
Figure 114. New Resource Wizard – File Share Parameters Page
11. Enter a name for the share in the Share name text box. This is the share name that users see when saving files to and retrieving files from the Data Manager extended drive. The name appears on the network in the following format:
\\logical_cluster_name\file_share_name12.Enter the network path to the share in the Path text box.
13. If you want to enter a comment about the share resource, enter it in the Comment text box.
14. Select a User Limit. You have the following choices:
• Leave the default setting of Maximum allowed if you want to allow the maximum number of users to access the share. We recommend you leave the default setting.
• Select Allow ___ users if you want to restrict the maximum number of users that can access the share. Then enter the maximum number in the spin box.
15. Click Finish. A confirmation message appears to notify you that the resource was successfully created.
16. Click OK.
17. To set the resource online, right-click the resource and select Bring Online from the shortcut menu.
When you finish creating the file share resource, the Cluster Group resource group should contain the following resources:
• The cluster’s IP address resource
• The cluster’s network name resource

Clustering
198 Second EditionStorageTek Proprietary
• A physical disk resource for the quorum drive (unless the server is running Windows NT, in which case the quorum drive resource is in its own disk group resource group)
• A file share resource for the extended drive share
If there are Disk Group resources for additional physical disks in the cluster, they should each still contain the physical disk resource for which they were created.
Running the InstallationIf you are planning to run ASM Data Manager, ASM MediaStor, or ASM License Server in active/passive mode in a cluster, you should install the software in the following order:
• License Server
• Data Manager
• MediaStor
You should also run the setup wizard(s) directly on the primary node (the server node currently in control). Then, during the install, select the logical cluster name as the target computer for install.
Note: You can also install remote administrators for Data Manager, MediaStor, and License Server on the primary node. If you do install remote administrators, however, you must register each computer you want to remotely administer on both the primary node and the secondary node once the installation is replicated to the secondary node.
To install and configure ASM products in active/passive mode in a cluster:
1. Insert the setup CD-ROM into the drive on the primary node. Then, when running the setup wizard, the logical cluster name (and not the primary node name) should appear in the Target Computers list for install. If it does not appear, you must click Add and browse for or enter the logical cluster name as the target computer for installing the program.
Note: Be advised that the installation program can detect whether the computer is the current primary node. If you run the Data Manager installation on a machine other than the primary node of the cluster and you select the logical cluster name on the Target Computers page, an error message appears. If you run the installation for MediaStor and License Server on a machine other than the primary node, an error message appears when you initialize the installation.

Active/Passive Clustering
ASM Data Manager Getting Started Guide 199StorageTek Proprietary
Once the installation is complete on the primary node, it is automatically replicated to the secondary node. You do not need to actively perform any installation of ASM products on the secondary node.
In addition, for each ASM product you install, resources are automatically created and assigned to the default cluster resource group in Cluster Administrator. You do not need to actively configure these resources. For more information on resources and resource groups, see “Cluster Administrator Concepts” on page 186.
If Data Manager, MediaStor, and License Server are all installed on the primary node, Data Manager and MediaStor may not be able to auto-detect the License Server. If this occurs, you must manually type in or browse for the logical cluster name in order to identify the License Server computer in the setup wizard.
For detailed instructions on installing Data Manager, see Chapter 3: Installing Data Manager on page 51 . For detailed instructions on installing MediaStor and License Server, refer to the ASM MediaStor System Guide and the License Server System Guide, respectively.
When you finish installing ASM storage products, the Cluster Group resource group should contain the following resources:
• The cluster’s IP address resource
• The cluster’s network name resource
• A physical disk resource for the quorum drive (unless the server is running Windows NT, in which case the quorum drive resource is in its own disk group resource group)
• A file share resource for the extended drive share
• A time service resource (if the server is running Windows NT)
• A generic service resource for each ASM storage product you installed
If there are Disk Group resources for additional physical disks in the cluster, they should each still contain the physical disk resource for which they were created.
2. Configure Data Manager and MediaStor as necessary. When adding an extended drive, you can select any drive in the cluster, including a partition on the quorum drive. For detailed instructions on configuring Data Manager, see the appropriate chapters of this Getting Started Guide. For detailed instructions on configuring MediaStor, refer to the MediaStor System Guide.
The configurations automatically replicate from the primary node to the secondary node when the primary node fails over.
Note: You must configure the hardware devices in MediaStor before the media in the devices can be made available to Data Manager.

Clustering
200 Second EditionStorageTek Proprietary
When you add hardware in MediaStor, be sure to reboot both servers in the cluster to be sure that the hardware is recognized. Additionally, if you add a library to MediaStor and the initial inventory of the library fails after the first several pieces of media, set the library offline and then online again. Then run a full inventory, forcing a hardware reset, so that the library can properly inventory.
Managing ASM Storage ProductsAlthough managing ASM Data Manager, ASM MediaStor or ASM License Server is primarily the same in a clustered environment as it is in a non-clustered environment, there are a few differences. Review the following sections to ensure optimal performance of ASM storage products in a clustered environment:
• "Managing ASM Services in a Cluster, " which follows describes how services (for ASM products that run as a service) should be managed in a clustered environment.
• “Changing ASM Product Configuration in a Cluster” on page 201 describes how configuration changes that are made to ASM storage products are handled in a clustered environment.
• “Changing Group Membership” on page 201 describes requirements for changing membership in Windows NT/2000 groups for ASM storage products in a clustered environment.
• “Upgrading ASM Products in a Cluster” on page 201 provides some tips for upgrading ASM storage products in a clustered environment.
• “Uninstalling ASM Products in a Cluster” on page 201 describes the general procedure for removing ASM storage products running in active/passive mode from a clustered environment.
• “Troubleshooting” on page 201 describes how to resolve errors that may occur when running ASM storage products in a clustered environment.
Managing ASM Services in a ClusterASM services, including the ASM Data Manager service, the ASM MediaStor service, and the License Server service, should only be stopped, paused, or started using the Cluster Administrator.
You should not manage services through either the application’s Service Manager or the Windows Services feature. If you stop the service in the Administrator or through the Windows Services feature, the system interprets this as a service failure and fails over to the other node in the cluster.

Active/Passive Clustering
ASM Data Manager Getting Started Guide 201StorageTek Proprietary
Changing ASM Product Configuration in a ClusterAny ASM product configuration changes that are made on the primary node automatically replicate to the secondary node when a fail-over occurs. This includes changes to the extended drive(s), media services, and media.
Changing Group MembershipChanges or additions to the Administrators or Users groups for the ASM products must be configured on each of the servers in the cluster.
In ASM Data Manager, this includes the DXAdministrators and DXUsers groups. In ASM MediaStor, this includes the MSAdministrators and MSUsers groups.
Upgrading ASM Products in a ClusterIf you want to upgrade ASM products running in active/passive mode to a newer version, you must run the setup wizard for the upgrade on both nodes in the cluster.
If you are upgrading ASM Data Manager, however, you must delete the ASM service resource before running the upgrade. You do not need to delete the service resources of other ASM products you may be upgrading.
Once you upgrade the first node, shut it down. Next, run the upgrade on the remaining node and shut it down. Finally, restart the server that should serve as the primary node, and then restart the remaining node.
Storagetek does not support conversion of your cluster environment from active/passive to active/active or vice versa. To change from active/passive cluster configuration to active/active or vice versa, you must uninstall Data Manager and reconfigure both Cluster Administrator and Data Manager. For instructions on configuring Cluster Administrator and Data Manager for an active/active environment, see “Active/Active Clustering” on page 203.
Uninstalling ASM Products in a ClusterIf you are planning to remove ASM Data Manager, ASM MediaStor, or ASM License Server from a cluster (and the products are running in active/passive mode), you should run the setup wizard(s) to remove the product(s) directly on the primary node. Then, during the removal, select the logical cluster name as the target computer for removal.
TroubleshootingFor assistance troubleshooting ASM products in a cluster, try the suggestions below or contact your technical support representative.

Clustering
202 Second EditionStorageTek Proprietary
Failed Library InventoryIf you add a library to ASM MediaStor in a cluster and the initial inventory of the library fails after the first several pieces of media, set the library offline and then online again. Then run a full inventory, forcing a hardware reset, so that the library can properly inventory.
Error from File Writes to Media During a Fail-overIf a fail-over occurs while files are being written to media in a library in a cluster, you may receive an error message from your library. If you receive an error, you can clear the error by setting your library offline and then online again.
Checking the Library After a Fail-overStoragetek recommends that in the event of a fail-over, you check MediaStor on the newly active node in order to verify that the service has failed over successfully and that the library is online. If the active node cannot access the library and users continue to write files to the extended drive, the drive may fill up because files cannot be migrated to the library.
Appearance of Extended Drive Serial Number WizardIf the Extended Drive Serial Number Wizard appears after a fail-over, click Cancel to exit the wizard without changing the extended drive serial number. The wizard appears because the ASM Data Manager service attempts to start before the physical disk resource for the extended drive is online.
For more information on resources, see “Cluster Administrator Concepts” on page 186. For more information on the Extended Drive Serial Number Wizard, refer to the Data Manager Backup and Recovery chapter of the ASM Data Manager System Guide.
To prevent the wizard from appearing, the physical disk resource must be a dependency of the service resource for Data Manager. This dependency is added automatically in ASM 5.3 and higher but may be a problem in earlier versions.
To add a dependency to the service resource:
1. In Cluster Administrator, right-click the ASM service resource, which appears in the Cluster Group resource group, and then select Set Offline.
2. Right-click the resource again and choose Properties. The Resource Properties dialog box appears.
3. Click the Dependencies tab.
4. Click the Modify button. The Modify Dependencies dialog box appears.

Active/Active Clustering
ASM Data Manager Getting Started Guide 203StorageTek Proprietary
5. Select the physical disk resource for the Data Manager extended drive and click the ---> button to move the resource to the Dependencies list.
6. Click OK. The Properties dialog box reappears.
7. Click OK again to close the Properties dialog box.
8. Right-click the resource and choose Set Online to set the resource back online.
■ Active/Active ClusteringASM Data Manager 5.3 or higher can run in active/active mode in a cluster where Microsoft Cluster Server is installed.
Be advised that ASM Data Manager, in an active/active cluster, can only be installed on one virtual server per physical node. In addition, ASM components are only supported on two-node clusters.
Note: Data Manager supports clustering only in fail-over scenarios; it does not support load balancing between the cluster nodes.
When Data Manager is installed in active/active mode, it runs as a service on each node in the cluster. When a fail-over occurs, the remaining active node assumes control of the Data Manager extended drive on the failed node, and the Data Manager extended drive for the failed node appears in the tree view of the Data Manager Administrator for the remaining active node.
Note: There may be a slight delay in access to the Data Manager extended drive that was on the failed node while it transfers over to the remaining active node.
The remaining active node does not, however, assume control of the additional Data Manager service. For this reason, you cannot perform the following functions on behalf of the failed Data Manager service:
• Create an extended drive
• Delete an extended drive
• Allocate media to an extended drive
• Deallocate media from an extended drive
• Add a media service
• Modify a media service, including adding and removing media
• Delete a media service
Note: You can edit the properties of the extended drive.
When the failed node comes back online, the Data Manager extended drive that originally resided on the node is returned to the node.

Clustering
204 Second EditionStorageTek Proprietary
Note: The Data Manager services on both nodes are automatically stopped and restarted before the previously failed node reassumes control of its Data Manager extended drive. This causes momentary downtime of the Data Manager system. In addition, on the node that remained active, you must reconnect to the Data Manager computer in the Administrators. To do so, click the Connect toolbar button.
When running in active/active mode on a cluster, Data Manager supports the use of Network Attached Storage (NAS), EMC Centera (EMC), and Tivoli Storage Manager (TSM) as media services. Data Manager also supports ASM MediaStor as a media service; however, MediaStor itself can run only in active/passive mode.
In addition, if you want to install the License Server that administers the licenses for Data Manager in the cluster, License Server runs only in active/passive mode.
Similarly, if you want to install Data Manager, MediaStor, and License Server in the cluster, Data Manager can run in active/active mode, and MediaStor and License Server run in active/passive mode. In addition, MediaStor must be installed in the cluster; you cannot install Data Manager in active/active mode in the cluster and connect to a MediaStor media service outside the cluster.
For more information on installing and managing Data Manager in active/active mode in a cluster, see the following sections:
• "Before You Install, " which follows
• “Running the Installation” on page 218
• “Managing ASM Storage Products” on page 219
Before You InstallBefore you install any ASM storage products in active/active mode in a cluster, verify that the cluster environment you intend to set up will meet cluster installation requirements for ASM storage products. You should also review Storagetek’s recommendations for optimizing your cluster environment. For more information, see "Minimum Requirements, " which follows, and “Recommendations” on page 205.
You also need to configure Microsoft Cluster Administrator. For more information, see “Setting up Cluster Administrator” on page 206.
Minimum RequirementsBe sure that your system meets or exceeds the following minimum requirements when installing ASM storage products in a cluster:
• "Operating System, " which follows
• “Hardware” on page 205

Active/Active Clustering
ASM Data Manager Getting Started Guide 205StorageTek Proprietary
• “Media Services” on page 205
• “Licensing” on page 205
Operating SystemCluster installation for ASM storage products running in active/active mode is supported on Windows 2000 Advanced Server Edition with Service Pack 2 or 3, using Microsoft’s Cluster Server.
HardwareBe sure to check your operating system and Microsoft Cluster Server requirements, and make sure the hardware in your cluster meets or exceeds the minimum specifications noted by the operating system and Microsoft cluster documentation.
Careful consideration of size requirements is especially necessary when planning an active/active cluster environment; if both servers are in use and one server fails, the other server must be capable of handling the workload of both servers.
Also, be sure to configure the disks in the RAID device as basic disks, not as dynamic disks.
Media ServicesWhen running in active/active mode on a cluster, ASM Data Manager supports the use of Network Attached Storage (NAS), EMC Centera (EMC), and Tivoli Storage Manager (TSM) as media services. Data Manager also supports ASM MediaStor; however, MediaStor itself can run only in active/passive mode.
LicensingYou must obtain cluster-enabled ASM licenses. When purchasing the licenses, be sure to inform your sales representative that you intend to use the products in a clustered environment.
RecommendationsIn order to ensure the best data integrity in the case of a fail-over, we recommend that you retain the default setting (enabled) for the Use write verify option. The write verify command sends data to the device buffer, writing the data to the media and then reading the data from the media to compare it to the data in the buffer. This verifies that the media properly accepted the file data and that no error occurred during migration.
The Use write verify option can be found on the Options tab of the Service Properties dialog box in the ASM Data Manager Administrator.

Clustering
206 Second EditionStorageTek Proprietary
Setting up Cluster AdministratorYou should attach all hardware and install Microsoft Cluster Server before you install Data Manager. For more information on installing Microsoft Cluster Server, refer to Microsoft’s cluster documentation.
In addition, you must create virtual servers and file share resources, and reassign the physical disk resources to the virtual server resource groups. For more information on resources, resource groups, and virtual servers, see “Cluster Administrator Concepts” on page 186.
To prepare Cluster Administrator before you install ASM storage products in active/active mode in a cluster:
1. Create virtual servers for each node in the cluster. For more information, see "Creating Virtual Servers, " which follows.
2. Assign the physical disk resources (for each drive you want to extend in Data Manager) to each virtual server resource group. For more information, see “Assigning Physical Disk Resources to the Virtual Servers” on page 213.
3. Create a file share resource for each extended drive share. For more information, see “Creating Resources for the Extended Drive Shares” on page 213.
4. Assign each virtual server to the appropriate node. For more information, see “Assigning Virtual Servers to Nodes” on page 216.
5. If you are using Tivoli Storage Manager as a media service, prepare the DSM.OPT files. For more information, see “Preparing TSM for Use with Data Manager” on page 217.
Once you finish configuring the virtual servers and resources, Cluster Administrator should appear as follows:

Active/Active Clustering
ASM Data Manager Getting Started Guide 207StorageTek Proprietary
Figure 115. Cluster Administrator with Virtual Servers and Resources Configured Before ASM Installation
Creating Virtual ServersBefore you install Data Manager in active/active mode in a cluster, you need to create virtual servers for each server in the cluster.
Note: During the process of creating a virtual server, you need to assign an IP address to the virtual server. We recommend you have this information ready before starting the Cluster Application Wizard.
To create a virtual server:
1. In Cluster Administrator, open the File menu and then select Configure Application. The Cluster Application Wizard appears, starting with the Welcome page.
2. Read the Welcome page, then click Next to continue. The Select or Create a Virtual Server page appears.

Clustering
208 Second EditionStorageTek Proprietary
Figure 116. Cluster Application Wizard – Select or Create a Virtual Server Page Figure 117.
3. Be sure that the Create a new virtual server option is selected, then click Next. The Resource Group for the Virtual Server page appears.
Figure 118. Cluster Application Wizard – Resource Group for the Virtual Server Page
4. Be sure that the Create a new resource group option is selected, then click Next. The Resource Group Name page appears.

Active/Active Clustering
ASM Data Manager Getting Started Guide 209StorageTek Proprietary
Figure 119. Cluster Application Wizard – Resource Group Name Page
5. In the Name text box, enter a name for the virtual server’s resource group. We recommend that you make this name descriptive of the virtual server; in fact, you can use the same name for this resource group as you intend to use for the virtual server itself.
6. In the Description text box, enter a description for the resource group (optional).
7. Click Next. The Virtual Server Access Information page appears with the resource group name listed in the Network name text box.
Figure 120. Cluster Application Wizard – Virtual Server Access Information Page
8. If you want to give the virtual server a different name than the resource group you are creating, enter the name you want to use in the Network name text box. Note that the name you enter is the name that identifies the virtual server on the network.
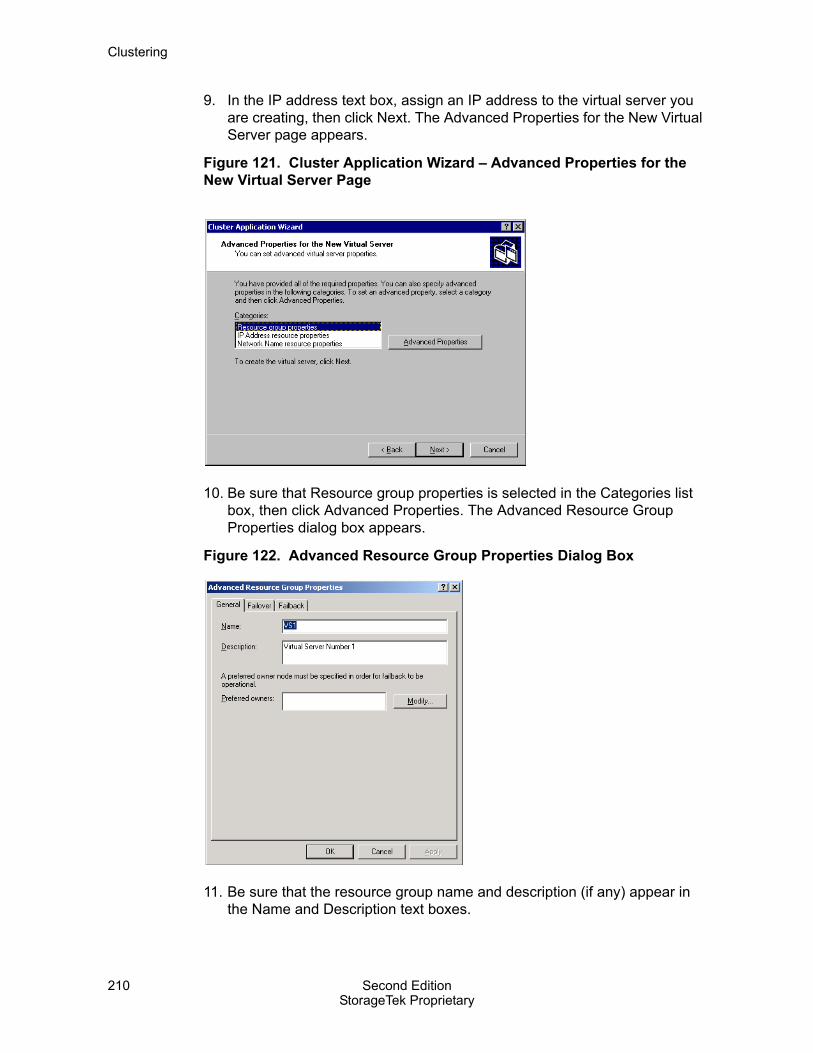
Clustering
210 Second EditionStorageTek Proprietary
9. In the IP address text box, assign an IP address to the virtual server you are creating, then click Next. The Advanced Properties for the New Virtual Server page appears.
Figure 121. Cluster Application Wizard – Advanced Properties for the New Virtual Server Page
10. Be sure that Resource group properties is selected in the Categories list box, then click Advanced Properties. The Advanced Resource Group Properties dialog box appears.
Figure 122. Advanced Resource Group Properties Dialog Box
11. Be sure that the resource group name and description (if any) appear in the Name and Description text boxes.

Active/Active Clustering
ASM Data Manager Getting Started Guide 211StorageTek Proprietary
12. Click Modify. The Modify Preferred Owners dialog box appears with all available cluster servers listed in the Available nodes list.
Figure 123. Modify Preferred Owners Dialog Box
13. Select the server you want to assign as the preferred owner of the virtual server and then click the ---> button. The server appears in the Preferred owners list.
Note: The preferred owner is the cluster node (server) that processes client requests made to this virtual server as long as the node remains online.
14. Click OK to save your changes and return to the Advanced Resource Group Properties dialog box.
15. Click the Failback tab.
Figure 124. Advanced Resource Group Properties Dialog Box – Failback Tab
16. Choose Allow failback.

Clustering
212 Second EditionStorageTek Proprietary
17. Choose whether failback should occur immediately or during a specified window of time. You have the following choices:
• Select Immediately to fail back immediately when the failed server comes back up after a fail-over. We recommend you use this option.
• Choose the Failback between option to fail back during a specified window of time, and then enter the desired values in the text boxes.
18. Click OK to save your changes and close the Advanced Resource Group Properties dialog box.
19. Click Next on the Advanced Properties for the New Virtual Server page of the Cluster Application Wizard. The Create Application Cluster Resource page appears.
Figure 125. Cluster Application Wizard – Create Application Cluster Resource Page
20. Choose No, I’ll create a cluster resource for my application later, then click Next. The summary page appears.
21. Click Finish to complete the wizard. The virtual server resource group you created appears in the tree view of Cluster Administrator, and an IP address resource and network name resource for the virtual server are assigned to the new resource group.
22. To set the virtual server online, right-click the virtual server and select Bring Online from the shortcut menu.
23. Repeat this procedure for each server in the cluster.
When you finish creating virtual servers, each virtual server resource group should contain an IP address resource and a network name resource, both of which were created automatically.

Active/Active Clustering
ASM Data Manager Getting Started Guide 213StorageTek Proprietary
In addition, the Cluster Group resource group should contain an IP address resource, a network name resource, and a physical disk resource for the quorum drive, and there should be Disk Group resource groups for each additional physical disk resource in the cluster.
Assigning Physical Disk Resources to the Virtual ServersWhen you installed Microsoft Cluster Server, the physical disk resources for the drives you want to use as extended drives in Data Manager were automatically created and assigned to their own resource groups (Disk Group #, where # is the number in which the drive is ordered).
You must reassign the resources from the default resource group to the resource group you created for each virtual server.
To assign a physical disk resource to a virtual server resource group:
1. In Cluster Administrator, right-click the physical disk resource for the drive you want to use as the extended drive for the Data Manager installation on the first virtual server. A shortcut menu appears.
2. Choose Change Group, and then select the resource group name for the first virtual server. The resource is reassigned.
3. Repeat the steps above for the remaining physical disk resource(s), assigning each to an individual virtual server.
When you finish reassigning the physical disk resources, each virtual server resource group should contain the following resources:
• The corresponding virtual server’s IP address resource
• The corresponding virtual server’s network name resource
• A physical disk resource for the drive you plan to extend after you install Data Manager on the virtual server
In addition, the Cluster Group resource group should contain an IP address resource, a network name resource, and a physical disk resource for the quorum drive, and the Disk Group resource groups for each additional physical disk resource in the cluster should be empty.
Creating Resources for the Extended Drive SharesTo allow clients to continue to write files to and retrieve files from an extended drive after a fail-over, you must create a resource in Cluster Administrator for the network share on the extended drive to which the clients connect.

Clustering
214 Second EditionStorageTek Proprietary
To create a file share resource:
1. In Cluster Administrator, open the File menu, select New, and then choose Resource. The New Resource Wizard appears.
Figure 126. New Resource Wizard
2. In the Name text box, enter a name for the resource.
3. In the Description text box, enter a description for the resource (optional).
4. From the Resource type drop-down list, choose File Share.
5. From the Group drop-down list, select the virtual server resource group to which the file share resource should belong.
6. Click Next. The Possible Owners page appears.
Figure 127. New Resource Wizard – Possible Owners Page
All of the servers in the cluster are listed in the Possible owners list.

Active/Active Clustering
ASM Data Manager Getting Started Guide 215StorageTek Proprietary
7. If you do not want a specific cluster server to have access to the resource (share for the extended drive), select the server and click the Remove button. We recommend that you leave the default setting of all servers as possible owners. This allows all cluster servers to access the extended drive in the event of a fail-over.
8. When you finish, click Next to continue. The Dependencies page appears.
Figure 128. New Resource Wizard – Dependencies Page
9. Select the physical disk, IP address, and network name resources associated with the virtual server resource group, and click Add to add them as dependencies.
10. Click Next. The File Share Parameters page appears.
Figure 129. New Resource Wizard – File Share Parameters Page
11. Enter a name for the share in the Share name text box. This is the share name that users see when saving files to and retrieving files from the Data

Clustering
216 Second EditionStorageTek Proprietary
Manager extended drive. The name appears on the network in the following format:
\\logical_cluster_name\file_share_name
12. Enter the network path to the share in the Path text box.
13. If you want to enter a comment about the share resource, enter it in the Comment text box.
14. Select a User Limit. You have the following choices:
• Leave the default setting of Maximum allowed if you want to allow the maximum number of users to access the share. We recommend you leave the default setting.
• Select Allow ___ users if you want to restrict the maximum number of users that can access the share. Then enter the maximum number in the spin box.
15. Click Finish. A confirmation message appears to notify you that the resource was successfully created.
16. Click OK.
17. To set the resource online, right-click the resource and select Bring Online from the shortcut menu.
18. Repeat this procedure for any remaining shares you want to create for drives to be extended in Data Manager.
When you finish creating the file share resource, each virtual server resource group should contain the following resources:
• The corresponding virtual server’s IP address resource
• The corresponding virtual server’s network name resource
• A physical disk resource for the drive you intend to extend when you install Data Manager on the virtual server
• A file share resource for each extended drive share
In addition, the Cluster Group resource group should contain an IP address resource, a network name resource, and a physical disk resource for the quorum drive, and the Disk Group resource groups for each additional physical disk resource in the cluster should be empty.
Assigning Virtual Servers to NodesThe final step in preparing Cluster Administrator for ASM storage products to run in active/active mode is to be sure that each virtual server is assigned to a different cluster node. Since virtual servers are automatically assigned to the first node in the cluster when you create them, you only need to reassign the second node.

Active/Active Clustering
ASM Data Manager Getting Started Guide 217StorageTek Proprietary
To assign a virtual server to a different node:
• Right-click the virtual server you want to reassign and then select Move Group from the shortcut menu. The virtual server is reassigned to another node in the cluster.
Preparing TSM for Use with Data ManagerIn order to use Tivoli Storage Manager (TSM) as a media service in Data Manager, you must install and configure TSM and prepare the DSM.OPT files.
Note: Be sure that both nodes of the cluster are up (not failed over) when you are installing TSM and creating the media service in Data Manager.
To prepare TSM for use with Data Manager:
1. Install and configure TSM Backup/Archive Client 4.1 or higher on both cluster nodes where you intend to install Data Manager.
2. On the first node, rename the DSM.OPT file to DSM1.OPT in the BACLIENT directory where Tivoli is installed. Then copy the DSM1.OPT file to the DISKXTENDER\BIN directory.
3. On the second node, rename the DSM.OPT file to DSM2.OPT in the BACLIENT directory where Tivoli is installed. Then copy the DSM2.OPT file to the DISKXTENDER\BIN directory.
4. Edit both copied DSM.OPT files (DSM1.OPT on the first node and DSM2.OPT on the second node) and change the following information in that file:
• tcpserveraddress - Type in the IP address of the TSM Server computer.
• nodename – Type in the virtual server name that owns the node on which TSM is installed.
• passwordaccess – Type in the word prompt.
You can refer to the following example:
*==================================================
* tcp/ip
*==================================================
commmethod TCPIP
tcpport 1500
tcpserveraddress xx.x.xx.xxx
nodename VS1
passwordaccess prompt

Clustering
218 Second EditionStorageTek Proprietary
5. Install and configure Data Manager. For instructions, see "Running the Installation, " which follows.
When adding the TSM media service in Data Manager on the first node, be sure to enter the name of the .OPT file on the first node in the media service wizard. Then, when adding the TSM media service in Data Manager on the second node, be sure to enter the name of the .OPT file on the second node in the media service wizard.
Once each media service is created, the .OPT files are copied to each node in the cluster (for example, DSM1.OPT is copied from the first node to the second node, and DSM2.OPT is copied from the second node to the first node) so that both DSM1.OPT and DSM2.OPT reside in the DISKXTENDER\BIN directory on each node.
Note: One of the necessary configurations for the Tivoli Client includes setting the Allow Backup Delete option for the client node to “Yes.” Otherwise you will receive an error when you attempt to create the TSM media service in Data Manager (or when trying to set the service online if the setting is changed after the service is created).
Running the InstallationIf you are planning to run Data Manager in active/active mode in a cluster, you must install (and license) the products on each node in the cluster. Note that although the products must be installed on each node, you must run the setup wizards only once, and the setup wizards allow you to install simultaneously to both machines.
You can run the setup wizards from either server, but the current owner of each virtual server must be the preferred owner for that virtual server. For more information on assigning preferred owners, see the instructions for creating virtual servers on page 207.
When you are choosing the computers on which you want to install Data Manager (the Target Computers page of the setup wizards), you must select the virtual server names. Since the logical cluster name appears automatically as the target computer for install, this means you must delete the logical cluster name and add the virtual server names manually.
Note: You can also install the remote administrator on the cluster nodes. Select the node names as the target computers for install; not the virtual server names. If you do install a remote administrator, you must register each computer you want to remotely administer on both nodes once the installation is complete.
When you finish installing Data Manager, each virtual server resource group should contain the following resources:
• The corresponding virtual server’s IP address resource

Active/Active Clustering
ASM Data Manager Getting Started Guide 219StorageTek Proprietary
• The corresponding virtual server’s network name resource
• A physical disk resource for each drive you plan to extend through Data Manager
• A file share resource for the extended drive
• A generic service resource for each of the Data Manager services
When you finish the install and begin configuring Data Manager, select the physical disk of each virtual server as the extended drive in Data Manager. The extended drives for both nodes are represented as shares on the network. These shares should be mapped on client workstations using the logical cluster name and the share name (for example, \\ClusterName\Share1, where ClusterName is the logical cluster name and Share1 is the name of the share for the extended drive) so that the share path can remain the same in the event of a fail-over.
For detailed instructions on running the Data Manager setup wizard and configuring Data Manager to begin file migration, see “Running the Setup Wizard” on page 53 and “Setting Up File Migration” on page 141.
Managing ASM Storage ProductsAlthough managing Data Manager in active/active mode in a cluster is primarily the same as it is in a non-clustered environment, there are a few differences. Review the following sections to ensure optimal performance of ASM storage products in a clustered environment:
• "Managing ASM Services in a Cluster, " which follows describes how services (for ASM products that run as a service) should be managed in a clustered environment.
• “Changing ASM Product Configuration in a Cluster” on page 201 describes how configuration changes that are made to ASM storage products are handled in a cluster. It also contains a list of features that are unavailable during a fail-over.
• “Uninstalling ASM Products in a Cluster” on page 201 provides some tips for upgrading ASM storage products in a cluster.
• “Uninstalling ASM Products in a Cluster” on page 201 describes the general procedure for removing ASM storage products running in active/active mode in a cluster.
• “Troubleshooting” on page 220 describes how to resolve errors that may occur when running ASM storage products in active/active mode in a cluster.
Managing ASM Services in a ClusterASM services, including the Data Manager, should only be stopped, paused, or started using the Cluster Administrator. You should not manage the

Clustering
220 Second EditionStorageTek Proprietary
services through either the application’s Service Manager or the Windows Services feature. If you stop a service in the Administrator or through the Windows Services feature, the system interprets this as a service failure and fails over to the other node in the cluster.
Changing ASM Product Configuration in a ClusterWhen Data Manager is installed in active/active mode in a cluster, it runs as a service on each node in the cluster, with separate extended drives and configurations. When a fail-over occurs, the remaining active node assumes control of the extended drive on the failed node. It does not, however, assume control of the additional service. For this reason, you cannot perform the following functions on behalf of the failed Data Manager service:
• Create an extended drive
• Delete an extended drive
• Allocate media to an extended drive
• Deallocate media from an extended drive
• Add a media service
• Modify a media service, including adding and removing media
• Delete a media service
Note: You can edit the properties of the extended drive.
Upgrading ASM Products in a ClusterStoragetek does not support conversion of products running in your cluster environment from active/passive to active/active or vice versa. To change from active/passive to active/active or vice versa, you must uninstall Data Manager and reconfigure.
Uninstalling ASM Products in a ClusterWhen removing Data Manager (running in active/active mode) from a cluster, you can run the setup wizards to remove the products from any server, but you must select the virtual server names as the target computers for removal.
TroubleshootingFor assistance troubleshooting ASM products in a cluster, try the suggestions below or contact your technical support representative.
Failed Library InventoryIf you add a library to ASM MediaStor in a cluster and the initial inventory of the library fails after the first several pieces of media, set the library offline and then online again. Then run a full inventory, forcing a hardware reset, so that the library can properly inventory.

Active/Active Clustering
ASM Data Manager Getting Started Guide 221StorageTek Proprietary
Error from File Writes to Media During a Fail-overIf a fail-over occurs while files are being written to media in a library in a cluster, you may receive an error message from your library. If you receive an error, you can clear the error by setting your library offline and then online again.
Checking the Library After a Fail-overStoragetek recommends that in the event of a fail-over, you check MediaStor on the active node in order to verify that the service has failed over successfully and that the library is online. If the active node cannot access the library and users continue to write files to the extended drive, the drive may fill up because files cannot be migrated to the library.

Clustering
222 Second EditionStorageTek Proprietary

ASM Data Manager Getting Started Guide 223StorageTek Proprietary
BSetting up ASM with Co-StandbyServer
In order to set up Data Manager so that it can run in a Co-StandbyServer environment, follow the steps listed below.
To set up Data Manager with Co-StandbyServer:
1. Perform the basic installation and configuration steps described in "Basic Installation, " which follows.
2. Cluster the ASM application resource. For more information, see “Clustering the ASM Application Resource” on page 225.
3. Open the Data Manager Administrator on both the primary and standby servers and verify that the service is configured for manual startup. Then leave the service running on the primary server, and stop the service on the standby server. For instructions on configuring service startup settings, refer to the Managing the Data Manager Computer chapter of the ASM Data Manager System Guide.
4. Cluster the WINS Server Workstation Service application resource. For more information, see “Clustering the Register WINS Service Resource” on page 227.
5. Follow the steps in this guide to configure the media service(s), extended drive(s), and other file migration component(s).
In addition, we recommend that you force a fail-over soon after installing and configuring Data Manager and Co-StandbyServer so that you can ensure the Data Manager computers are able to transfer gracefully. The first time the primary server fails over to the standby server, the Data Manager service on the standby server may have trouble connecting. If this occurs, follow the steps in “Troubleshooting After a Fail-over” on page 229 to connect.
Note: This procedure is valid only for servers running the Windows NT 4.0 operating system.
■ Basic InstallationThe basic steps for installing and configuring Data Manager and Co-StandbyServer include installing the Data Manager and Co-StandbyServer programs, doing basic configuration of Co-StandbyServer, and adding the application resource script files to Co-StandbyServer.

Setting up ASM with Co-StandbyServer
224 Second EditionStorageTek Proprietary
To perform the basic installation steps:
1. Install Data Manager version 5.2 or higher on both the primary server and the standby server. For instructions, see “Installing Data Manager” on page 51. Do not open Data Manager to set up extended drive(s) or media service(s).
2. Install the Co-StandbyServer patch for Data Manager as described in the patch installation instructions.
Note: If you have already installed Co-StandbyServer, you can install Data Manager afterward. Be sure you have configured Co-StandbyServer as described in step 2 of this procedure before you continue to step 3.
3. Install Co-StandbyServer and the Co-StandbyServer Management Console, and then open the Management Console to configure the following items:
• Cluster each volume you intend to configure as a Data Manager extended drive. (The extended drive volumes must be separate volumes from the volume used by the cluster for registry backups, which is typically the D drive.)
• Configure two network cards, one for use as an internal link between the two servers and the other for communication with the public network. Disable the WINS Client for the internal link network card. For more information, see the following figure.
Figure 130. Network Dialog Box - Bindings Tab
• Create an IP address resource for the cluster.
For instructions, refer to the Co-StandbyServer User’s Guide.

Clustering the ASM Application Resource
ASM Data Manager Getting Started Guide 225StorageTek Proprietary
4. In a temporary directory, unzip the ASM_CSSScripts.zip file containing the configuration files, which is provided on the installation CD or which you downloaded from the Storagetek CRC site. When you unzip the file, two directories appear: one containing configuration files for the primary server, (\PrimaryServer) and one containing configuration files for the standby server (\StandbyServer).
5. Copy the contents of the \PrimaryServer directory to the c:\Costandby\ directory on the primary server.
6. Copy the contents of the \StandbyServer directory to the c:\Costandby\ directory on the standby server.
7. In the Co-StandbyServer Management Console, click the Scan Resource toolbar button to scan the resource.
The Management Console should appear as follows:
Figure 131. Co-StandbyServer Management Console with Application Resources
Note that an ASM application resource and a Register WINS Workstation Service application resource have been added to the primary server (right pane).
■ Clustering the ASM Application ResourceThe next step in configuring Data Manager in Co-StandbyServer is to cluster the ASM application resource.

Setting up ASM with Co-StandbyServer
226 Second EditionStorageTek Proprietary
To cluster the ASM application resource:
1. Under the Application node for the primary server (top right pane of the Management Console), right-click the ASM application resource and then select Cluster As from the shortcut menu that appears. The Add Cluster Application Wizard appears.
Figure 132. Add Cluster Application Wizard
2. Verify that the clustered drive listed in the right pane is correct. The clustered drive stores important registry information.
3. Double-click the Server Name Primary item in the right pane. The Server Name Primary dialog box appears.
Figure 133. Server Name Primary Dialog Box
4. Enter the primary server’s failover group name and then click OK to return to the Cluster Application Wizard.
5. Click Next. A similar page appears.

Clustering the Register WINS Service Resource
ASM Data Manager Getting Started Guide 227StorageTek Proprietary
Figure 134. Cluster Application Wizard - Confirmation Page
6. Click Next. The default failover group page appears.
Figure 135. Add Cluster Application Wizard - Default Failover Group Page
7. Be sure that the primary server failover group name is selected, and then click Finish to complete the wizard.
■ Clustering the Register WINS Service ResourceThe final step in configuring Data Manager in Co-StandbyServer is to cluster the Register WINS Server Workstation Service application resource.
To cluster the Register WINS Server Workstation Service resource:
1. Under the Application node for the primary server (top right pane of the Management Console), right-click the Register WINS Workstation Service

Setting up ASM with Co-StandbyServer
228 Second EditionStorageTek Proprietary
application resource and then select Cluster As from the shortcut menu that appears. The Add Cluster Application Wizard appears.
Figure 136. Add Cluster Application Wizard
2. Double-click Server Name – Primary in the right pane and then enter the failover group name for the primary server. Click OK.
3. Double-click Server Name – Standby in the right pane and then enter the failover group name for the standby server. Click OK.
4. Double-click Wins Server IP Address in the right pane and then enter the IP address of the WINS server. (Contact your network administrator if you do not know the WINS server’s IP address.) Click OK.
5. Double-click Clustered IP Address on Primary Machine in the right pane and then enter the IP address for the cluster. Click OK.
6. Click Next. A similar page appears.
Figure 137. Add Cluster Application Wizard - Confirmation Page
7. Click Next. The default failover group page appears.

Troubleshooting After a Fail-over
ASM Data Manager Getting Started Guide 229StorageTek Proprietary
Figure 138. Add Cluster Application Wizard - Default Failover Group Page
8. Be sure that the failover group for the primary server is selected, and then click Finish. The final configuration should appear as follows in the Co-StandbyServer Management Console:
Figure 139. Final Co-StandbyServer Management Console
■ Troubleshooting After a Fail-overThe first time the primary server fails over to the standby server, the Data Manager service on the standby server may have trouble connecting. If this occurs, follow the steps below to connect.
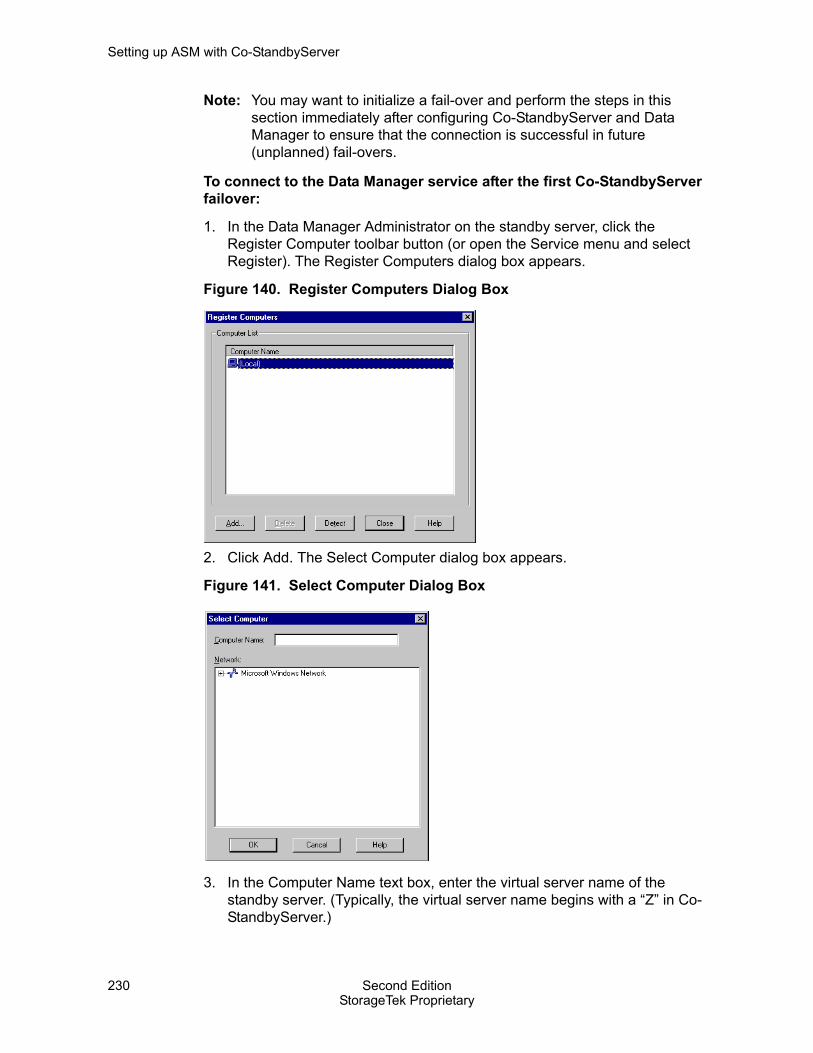
Setting up ASM with Co-StandbyServer
230 Second EditionStorageTek Proprietary
Note: You may want to initialize a fail-over and perform the steps in this section immediately after configuring Co-StandbyServer and Data Manager to ensure that the connection is successful in future (unplanned) fail-overs.
To connect to the Data Manager service after the first Co-StandbyServer failover:
1. In the Data Manager Administrator on the standby server, click the Register Computer toolbar button (or open the Service menu and select Register). The Register Computers dialog box appears.
Figure 140. Register Computers Dialog Box
2. Click Add. The Select Computer dialog box appears.
Figure 141. Select Computer Dialog Box
3. In the Computer Name text box, enter the virtual server name of the standby server. (Typically, the virtual server name begins with a “Z” in Co-StandbyServer.)
Troubleshooting After a Fail-over
ASM Data Manager Getting Started Guide 231StorageTek Proprietary
4. Click OK.
5. Click Close in the Register Computers dialog box. Data Manager recognizes the standby server’s virtual server name, changes it to the primary server’s name, and connects.
In future fail-overs, the standby server should be able to recognize the Data Manager and connect without problems.

Setting up ASM with Co-StandbyServer
232 Second EditionStorageTek Proprietary

PN 313473304 Second Edition 233StorageTek Proprietary
Index
Numerics8mm DAT tape, 299840 tape, 29
AACS (Automated Cartridge System), 124ACSLS, 2
ACSSS Command Processor Window,126
ACSSS Console, 126adding a drive, 131, 134, 136adding in Data Manager, 129assigning media to Data Manager, 128configuring changers, 126editing drive configuration, 137editing properties, 133Event Log Tail Window, 126finding the device name, 135glossary, 124hardware configuration, 123LibAttach, 123, 129preparing for use with Data Manager,
125requesting drive information, 134setting online or offline, 138viewing properties, 133
ACSSS Command Processor Window, 126ACSSS Console, 126Active Directory Service, 41active/active cluster, 48, 49active/passive cluster, 48, 49Administrator, 71
automatically refreshing, 78components, 73computer drop-down list, 75configuring, 59contents view, 74
description view, 74extended drive tree, 73menu bar, 75navigating, 71refreshing, 77remote, 9searching, 78starting, 71starting for the first time, 59status bar, 77toolbar, 75tree view, 73window, 64, 72, 73
Administratorsadding users, 42, 43removing users, 44
AIT tape, 29allocating
ACSLS media, 128EMC media, 120media to an extended drive, 61, 143,
149MediaStor media, 88NAS media, 98TSM media, 108
allowing fetches from media, 179, 181architecture, DX2000, 10ASM, 51
architecture, 10glossary, 2MediaStor, definition, 5
ASM License Server, 10, 51, 55auto refresh frequency, 78
Bbackup, 19
3rd-party, 147Data Manager configuration, 47

Index
234 Second Edition PN 313473304StorageTek Proprietary
extended drive, 47meta-data, 47scheduling, 146
buttons, toolbar, 75
Ccached moves
data watermark, 165file watermark, 165
calculatingfile overhead, 26move list size, 26purge list size, 27sizing formula, 25
CDFS media support, 33, 36CD-R, 29CD-ROM, 29
file system support, 36, 37supported file systems, 34
CD-RW, 29changers, configuring for ACSLS, 126client connectivity, 27clustering, 2, 48, 52
active/active, 49active/passive, 49
command line utilities, 10compaction, 2
automatic, 165components
checking before installation, 52Data Manager, 7
computer drop-down list, 75computer specifications, 23contents view, 74copy media, updating, 179CPU recommendations, 45CSS file system support, 33, 37
Ddata management, 2Data Manager
Administrator, 8, 71command line utilities, 10components, 7concepts, 12configuration backup, 47
configuring, 65connectivity, 27DXAdministrators, 41Explorer Add-ons, 9installing, 51, 53knowledgebase, 9licensing, 51, 66online help, 9Remote Administrator, 9security, 41service, 18setup, 7starting for the first time, 59system management, 18system planning, 21upgrading, 52
Data Manager System Guide, 142, 199data security, 46deallocating
EMC media, 120MediaStor media, 88NAS media, 98TSM media, 108
deferring fetch requestsif fetch is disabled, 148
definitions, 2delete rules, 17de-migration
defined, 3description view, 74direct read, 157, 167
defined, 3during file restore, 156, 159enabling in move rules, 174, 175forcing for all files, 147memory cache, 147
directories, extended drive, 150planning, 151
directories, mediaplanning, 152
disablingfolder rename check, 147
disaster recoverydisk redundancy, 48meta-data export, 47registry backup, 47
disclaimer, ivdisk redundancy, 48

PN 313473304 Second Edition 235StorageTek Proprietary
DLT tape, 29drive, 3, 124drive scans, 46, 173
disabling, 178running once, 178scheduling, 17, 146, 176scheduling daily, 178scheduling hourly, 178scheduling monthly, 179scheduling weekly, 179
DSM.OPT file, 101duplicate files
logging during file restore, 156duplicates, logging during file restore, 159DVD-R, 29, 30
supported file systems, 34DVD-RAM, 29, 30
supported file systems, 34DVD-ROM, 30DVD-RW, 29DXAdministrators, 41
adding users to, 42, 43removing users from, 44
EEMC Centera (EMC), 31, 110
adding a media service, 111adding media, 117allocating media, 120deallocating media, 120editing properties, 114media, 31retention period, 118viewing properties, 114
erasable optical, 29, 31supported file systems, 34
errorsmaximum before media writes disabled,
164viewing logs, 18
evaluation license, 56Event Log Tail Window, 126event scheduling, 179excluding files from move, 166, 167expanding Data Manager, 46Explorer Add-ons, 9extended drive, 14
3rd party backup mode for managedfiles, 147
3rd party backup saves migration info,147
allocating ACSLS media to, 128allocating EMC media to, 120allocating media to, 61, 143, 149allocating MediaStor media to, 88allocating NAS media to, 98allocating TSM media to, 108calculating size, 25components, 73creating, 60, 142deallocating EMC media from, 120deallocating MediaStor media from, 88deallocating NAS media from, 98deallocating TSM media from, 108defer fetch requests if fetch is disabled,
148definition, 3direct read memory cache, 147directory structure, 151disable folder rename check, 147drive scans, 46, 173, 176fetch request timeout minutes, 147file migration, 142folders, media, 150force direct read for all files, 147force moves when nothing to purge, 147meta-data export, 47, 146operations allowed, 38options, 63, 146prevent file delete, 147prevent file modification, 147purge stop watermark, 148scheduling, 145scheduling drive scans, 146size recommendation, 24warn when free space is getting low, 148
Ffail-over in a cluster, 48FAT
client support, 28media support, 33, 36
fetch, 3allowing, 179, 181

Index
236 Second Edition PN 313473304StorageTek Proprietary
deferring if disabled, 148timeout minutes, 147
file data, 3file management, 4file migration, 15, 141
configuring, 65definition, 3forcing when nothing to purge, 147media folders, 150planning extended drive directory struc-
ture, 151planning media directory structure, 152scheduling, 17, 179
file restore, 155, 157, 158enabling direct read, 156, 159logging duplicates, 156, 159processing ASAP, 156, 159
file sharing violations, 176file stream support, 27file systems
benefits and limitations, 34CDFS, 36client support, 28CSS, 37definition, 3FAT, client, 28FAT, media, 36NFS, client, 28NTFS, client, 28NTFS, media, 36OSS, 37OTG, 36portability vs. performance, 34supported, 33transactions allowed, 38TSS, 37UDF, 38UDF overwritable, 38UDF sequential, 38Windows Native, 35
file tag, 4, 157files
preventing deletion, 147preventing modification, 147
fill method, 164finalization
defined, 4find, 78
flushing transactions to media, 40from a library, 40
folder rename check, disabling, 147forcing
moves when nothing to purge, 147free space
removing media when low, 164warning when low for extended drive,
148warning when low for move group, 164
Gglossary of terms, 2
Hhard drive, 4
multiple, 23recommendations, 45sizing, 24
hardware, 4requirements, 22
helpData Manager, 9knowledgebase, 9
Iinstallation
before running setup, 51checking components beforehand, 52creating a service account, 52Data Manager, 53Data Manager setup module, 7licensing, 51on a cluster, 48, 52overview, 51running the wizard, 53to multiple computers, 57upgrading, 52
Jjukebox
definition, 4flushing transactions, 40

PN 313473304 Second Edition 237StorageTek Proprietary
Kknowledgebase, 9
Llabeling media
automatically, 165liability, ivLibAttach, 123, 129library
definition, 4flushing transactions, 40
library mountmaximum number of media, 164minimum free space on media, 164minimum number of files, 164
license, 51adding through Data Manager, 66agreement for Data Manager, 54evaluation, 56updating, 66
License Server, 10, 55log files and reports, 18logging duplicates during file restore, 156,159logical cluster name, 4, 49logical media, 4LSM (Library Storage Media), 124
Mmagneto-optical, 29, 31
supported file systems, 34Magstar tape, 29managed files, 4marking files for direct read after move, 175maximizing performance, 44maximum write errors before writes disabled,164media, 12, 28
adding EMC, 117adding NAS, 95adding to a media folder, 157adding to move groups, 162adding TSM, 106allocating ACSLS media, 128allocating EMC media, 120
allocating MediaStor media, 88allocating NAS media, 98allocating to an extended drive, 61, 143,
149allocating TSM media, 108allowing fetches, 179, 181automatic compaction, 165automatic labeling, 165CD-R, 29CD-ROM, 29CD-RW, 29deallocating EMC media, 120deallocating MediaStor media, 88deallocating NAS media, 98deallocating TSM media, 108definition, 5DVD-R, 29, 30DVD-RAM, 29, 30DVD-ROM, 30DVD-RW, 29EMC, 31file restore, 155, 157, 158file structure, 152file systems, 33fill method, 164flushing transactions, 40groups, 160magneto-optical, 29, 31maximum number to mount, 164maximum write errors before writes dis-
abled, 164migrating files to, 141minimum free space before mount, 164minimum number of files before mount,
164NAS, 29, 31, 32NAS devices, 32planning directory structure, 152portability vs. performance, 34processing tasks, 179RAID devices, 31removing when free space falls below,
164scheduling activities, 145setting retention period for EMC, 118supported file systems, 33supported types, 29tape, 29, 32

Index
238 Second Edition PN 313473304StorageTek Proprietary
transaction logging, 38transactions allowed, 38updating copies, 179WORM, 33WORM NAS, 32WORM NAS devices, 32WORM-Tape, 33
media folders, 15adding media to, 157before creating, 151creating, 63, 153creating with media, 154creating without media, 154file migration, 150
media pool, 5media services, 13
definition, 5EMC Centera (EMC), 110EMC Centera, adding, 111NAS, adding, 92overview, 12, 81setting online or offline, 138setting up, 81StorageTek’s ACSLS, adding, 129supported, 81Tivoli Storage Manager (TSM), 100TSM media services, 217TSM, adding, 102
media type, 5MediaStor
allocating media, 88deallocating media, 88definition, 5editing properties, 86setting online or offline, 138viewing properties, 86
MediaStor System Guide, 199memory
cache for direct read, 147recommendations, 45requirements, 23
menu bar, 75migration, 141
forcing when nothing to purge, 147modules, Data Manager, 7monitoring Data Manager, 18move caching
data watermark, 165
file watermark, 165move files to media activity, 179move groups, 15, 160, 166
adding media to, 162automation, 165cached moves data watermark, 165cached moves file watermark, 165creating, 161creating while creating move rules, 174library mount, maximum number of me-
dia, 164library mount, minimum free space on
media, 164library mount, minimum number of files
option, 164maximum write errors before media write
disabled, 164media fill method, 164options, 164remove media when free space falls be-
low, 164supported media, 160warn when group free space falls below,
164move list, 46, 176
calculating size, 26processing, 179when files are written, 167
move rules, 16, 166age, 172assigning to move groups, 174attributes, 171before you create, 167creating, 168creating move groups in, 174exclusion type, 166, 167file name, 169file size, 171precedence, 169rule type, 168settings, 173
NNAS
adding a media service, 92adding media, 95allocating media, 98

PN 313473304 Second Edition 239StorageTek Proprietary
deallocating media, 98definition, 5devices, 32media, 29, 31RAID devices, 31setting direct read, 167setting online or offline, 138supported file systems, 34
Network Attached Storage (NAS), 31editing properties, 93viewing properties, 93
NFS file system support, 28NTFS
client support, 28extending a volume, 60, 142media support, 33, 36volume partitioning, 48volume, definition, 5
Oonline help, ix, 9
knowledgebase, 9opening
Data Manager, 71operating system requirements, 22optical media, 31
supported file systems, 34optimizing performance, 44OSS file system support, 33, 37OTG file systems, 33, 36overwritable
definition, 5UDF file system, 33, 38
Ppanel, 125partition, Windows, 48performance
maximizing, 44storage media, 34
planningData Manager installation, 21, 51extended drive directory structure, 151media directory structure, 152media folder creation, 151move rule creation, 167
portability of storage media, 34preventing
file delete, 147file modification, 147
privileges, security, 41processing scheduled media tasks, 179processor
recommendations, 46requirements, 23
purgefiles immediately after move, 174, 175rules, 17, 175stop watermark, 148
purge list, 46, 176calculating size, 27
RRAID devices, support for, 31RAM
recommendations, 45requirements, 23
random media fill method, 164recommended upgrades, 44
dedicated computers, 45expansion space, 46fast network topology, 46faster CPU, 45multiple processors, 46RAM, 45two hard drives, 45
recovery after system failure, 19refreshing, 77
automatically, 78registration
Data Manager, 54Remote Administrator, 9
setup, 8removable media, 6removable media drive, 6reports and log files, 18requirements
security, 41system, 22
restoring files from media, 155, 157, 158enabling direct read, 156, 159logging duplicates, 156, 159processing ASAP, 156, 159

Index
240 Second Edition PN 313473304StorageTek Proprietary
retention period for EMC Centera, 118rules
delete, 17move, 16, 166purge, 17, 175
Sscheduling
drive scans, 17, 46, 176file migration, 17, 179file restore, 156, 159
searching, 78security
data, 46Windows, 41
sequentialdefinition, 6media fill method, 164UDF file system, 33, 38
serviceaccount, 55creating an account, 52Data Manager, 18management, 18
setupData Manager, 7, 53licensing, 66Remote Administrator, 8
sharing violations, 176shelf, 125Shell Xtensions Wizard, 9space management, 16
expansion, 46starting
Data Manager, 71stationary drive, 6stationary media, 6status bar, 77storage media. See mediaStorageTek’s ACSLS
ACSSS Command Processor Window,126
ACSSS Console, 126adding a drive, 131, 134, 136adding a media service, 129allocating media, 128configuring changers, 126
editing drive configuration, 137editing properties, 133Event Log Tail Window, 126finding the device name, 135glossary, 124hardware configuration, 123LibAttach, 123, 129preparing for use with Data Manager,
125requesting drive information, 134setting online or offline, 138viewing properties, 133
supported file systems, 33supported media types, 29system backup and recovery, 19system files, 172system management, 18system requirements, 22
computer specifications, 23considerations, 21hard drive sizing, 24hard drives, 23operating system, 22optimized performance, 44
Ttape, 29, 32
8mm DAT, 299840, 29AIT, 29DLT, 29file system support, 34, 37Magstar, 29
Tivoli Storage Manager (TSM), 7, 100adding a media service, 102adding media, 106allocating media, 108client password, 104, 106deallocating media, 108DSM.OPT, 101editing properties, 105management class, 107preparing for use with Data Manager,
101requirements, 100, 101setting online or offline, 138viewing properties, 105
PN 313473304 Second Edition 241StorageTek Proprietary
toolbar, 75hiding, 75showing, 75
transaction logging, 38tree view, 73troubleshooting, logs and reports, 18TSS file system support, 33, 37
UUDF file system support, 33, 38upgrades, 44
dedicated computers, 45expansion space, 46fast network topology, 46faster CPU, 45multiple processors, 46RAM, 45two hard drives, 45
upgrading from previous versions, 52user rights, 41
adding, 42, 43removing, 44
Wwarning
when extended drive space is low, 148when move group space is low, 164
warranties, ivwatermark
data for cached moves, 165files for cached moves, 165purge stop, 148
Windowsnative file systems, 33, 35partitioning, 48security, 41
Windows 2000 installation, 41wizard
Add Media to Media Folders, 154, 157Data Manager Setup, 53Extended Drive, 60, 142Move Group, 161Move Rule, 168Shell Xtensions, 9
WORM, 33supported file systems, 34
WORM NASdevices, 32
WORM-tape, 33supported file systems, 34

Index
242 Second Edition PN 313473304StorageTek Proprietary

Reader’s Comment Form
■ Contact Us Submit your questions, comments, and suggestions to StorageTek’s Global Learning Solutions. We appreciate your correspondence and are committed to responding to you.
Publication Information Publication Name:
Publication Part Number:
Questions and Comments:
Note: Staples can cause problems with automated mail sorting equipment. Please use pressure sensitive or other gummed tape to seal this form. If you would like a reply, please supply your name and address on the reverse side of this form.
Thank you for your cooperation. No postage stamp is required if mailed in the U.S.A.
e

NO POSTAGENECESSARYIF MAILED
IN THEUNITED STATES
FOLD HERE AND TAPE DO NOT STAPLE FOLD HERE AND TAPE
BUSINESS REPLY CARDFIRST CLASS PERMIT NO. 2 LOUISVILLE, CO U.S.A.
POSTAGE WILL BE PAID BY ADDRESSEE
GLOBAL LEARNING SOLUTIONS MS 3256 STORAGE TECHNOLOGY CORPORATION ONE STORAGETEK DRIVE LOUISVILLE CO 80028-9989 USA
If you would like a reply, please print:
Your Name:__________________________________________________________
Company Name:______________________________ Department:_____________
Street Address:_______________________________________________________
City:________________________________________________________________
State:_______________________________________ Zip Code:_______________
Storage Technology Corporation One StorageTek Drive Louisville, CO 80028-3256 USA
TO COMPLY WITH POSTAL REGULMATIONS, FOLD EXACTLY ON DOTTED LINES AND TAPE (DO NOT


ABOUT STORAGETEK® StorageTek® (NYSE:STK), a $2 billion world-wide company with headquarters in Louisville, Colo., delivers a broad range of storage solutions for digitized data. StorageTek solutions are easy to manage and allow universal access to data across servers, media types and storage networks. StorageTek is the innovator and global leader in virtual storage solutions for tape automation, disk storage systems and storage networking. Because of StorageTek, customers can manage and leverage their digital assets as their businesses grow, and can maximize IT productivity to ensure enterprise-class business continuity.
NEED MORE INFORMATION?
www.storagetek.com
WORLD HEADQUARTERSStorage Technology CorporationOne StorageTek DriveLouisville, Colorado 80028 USAPhone: 1.800.525.0369