Embed Size (px)
DESCRIPTION
ASAv 9.4 Quick Start Guide
Citation preview

Cisco Adaptive Security Virtual Appliance (ASAv) Quick Start GuideVersion 9.4Published: March 23, 2015
Cisco Systems, Inc. www.cisco.com

THE SPECIFICATIONS AND INFORMATION REGARDING THE PRODUCTS IN THIS MANUAL ARE SUBJECT TO CHANGE WITHOUT NOTICE. ALL STATEMENTS, INFORMATION, AND RECOMMENDATIONS IN THIS MANUAL ARE BELIEVED TO BE ACCURATE BUT ARE PRESENTED WITHOUT WARRANTY OF ANY KIND, EXPRESS OR IMPLIED. USERS MUST TAKE FULL RESPONSIBILITY FOR THEIR APPLICATION OF ANY PRODUCTS.THE SOFTWARE LICENSE AND LIMITED WARRANTY FOR THE ACCOMPANYING PRODUCT ARE SET FORTH IN THE INFORMATION PACKET THAT SHIPPED WITH THE PRODUCT AND ARE INCORPORATED HEREIN BY THIS REFERENCE. IF YOU ARE UNABLE TO LOCATE THE SOFTWARE LICENSE OR LIMITED WARRANTY, CONTACT YOUR CISCO REPRESENTATIVE FOR A COPY.The Cisco implementation of TCP header compression is an adaptation of a program developed by the University of California, Berkeley (UCB) as part of UCB’s public domain version of the UNIX operating system. All rights reserved. Copyright © 1981, Regents of the University of California. NOTWITHSTANDING ANY OTHER WARRANTY HEREIN, ALL DOCUMENT FILES AND SOFTWARE OF THESE SUPPLIERS ARE PROVIDED “AS IS” WITH ALL FAULTS. CISCO AND THE ABOVE-NAMED SUPPLIERS DISCLAIM ALL WARRANTIES, EXPRESSED OR IMPLIED, INCLUDING, WITHOUT LIMITATION, THOSE OF MERCHANTABILITY, FITNESS FOR A PARTICULAR PURPOSE AND NONINFRINGEMENT OR ARISING FROM A COURSE OF DEALING, USAGE, OR TRADE PRACTICE.IN NO EVENT SHALL CISCO OR ITS SUPPLIERS BE LIABLE FOR ANY INDIRECT, SPECIAL, CONSEQUENTIAL, OR INCIDENTAL DAMAGES, INCLUDING, WITHOUT LIMITATION, LOST PROFITS OR LOSS OR DAMAGE TO DATA ARISING OUT OF THE USE OR INABILITY TO USE THIS MANUAL, EVEN IF CISCO OR ITS SUPPLIERS HAVE BEEN ADVISED OF THE POSSIBILITY OF SUCH DAMAGES.Any Internet Protocol (IP) addresses and phone numbers used in this document are not intended to be actual addresses and phone numbers. Any examples, command display output, network topology diagrams, and other figures included in the document are shown for illustrative purposes only. Any use of actual IP addresses or phone numbers in illustrative content is unintentional and coincidental.All printed copies and duplicate soft copies are considered un-Controlled copies and the original on-line version should be referred to for latest version.Cisco has more than 200 offices worldwide. Addresses, phone numbers, and fax numbers are listed on the Cisco website at www.cisco.com/go/offices.Cisco and the Cisco logo are trademarks or registered trademarks of Cisco and/or its affiliates in the U.S. and other countries. To view a list of Cisco trademarks,go to this URL: www.cisco.com/go/trademarks. Third-party trademarks mentioned are the property of their respective owners. The use of the word partner doesnot imply a partnership relationship between Cisco and any other company. (1110R)
© 2015 Cisco Systems, Inc. All rights reserved.
2

Introduction to the Cisco ASAvThe Cisco Adaptive Security Virtual Appliance (ASAv) brings full firewall functionality to virtualized environments to secure data center traffic and multi-tenant environments.
You can manage and monitor the ASAv using ASDM or CLI. Other management options may be available.
Prerequisites for the ASAv, page 3
Guidelines for the ASAv, page 3
Licensing for the ASAv, page 3
ASAv Interfaces and Virtual NICs, page 4
Prerequisites for the ASAvFor hypervisor support, see Cisco ASA Compatibility.
Guidelines for the ASAvContext Mode Guidelines
Supported in single context mode only. Does not support multiple context mode.
Failover Guidelines
For failover deployments, make sure that the standby unit has the same model license; for example, both units should be ASAv30s.
Unsupported ASA Features
The ASAv does not support the following ASA features:
Clustering
Multiple context mode
Active/Active failover
EtherChannels
Shared AnyConnect Premium Licenses
Licensing for the ASAvThe ASAv uses Cisco Smart Software Licensing. For detailed information, see Smart Software Licensing for the ASAv.
3
Cisco Systems, Inc. www.cisco.com

Introduction to the Cisco ASAv
ASAv Interfaces and Virtual NICs
Note: You must install a smart license on the ASAv. Until you install a license, throughput is limited to 100 Kbps so you can perform preliminary connectivity tests. A smart license is required for regular operation.
ASAv Interfaces and Virtual NICsAs a guest on a virtualized platform, the ASAv utilizes the network interfaces of the underlying physical platform. Each ASAv interface maps to a virtual NIC (vNIC).
ASAv Interfaces, page 4
Supported vNICs, page 4
ASAv InterfacesThe ASAv includes the following Gigabit Ethernet interfaces:
Management 0/0
GigabitEthernet 0/0 through 0/8. Note that the GigabitEthernet 0/8 is used for the failover link when you deploy the ASAv as part of a failover pair.
Supported vNICsThe ASAv supports the following vNICs:
Model License Requirement
ASAv10 Standard license
See the following specifications:
1 Gbps Throughput
1 vCPU
2 GB RAM
vCPU Frequency Limit of 5000 MHz
100,000 concurrent firewall connections
ASAv30 Standard license
See the following specifications:
2 Gbps Throughput
4 vCPUs
8 GB RAM
vCPU Frequency Limit of 20000 MHz
500,000 concurrent firewall connections
Note: If you choose to deploy 2 or 3 vCPUs, then see the following values:
2 vCPUs—4 GB RAM, vCPU Frequency Limit of 10000 MHz, 250,000 concurrent firewall connections.
3 vCPUs—4 GB RAM, vCPU Frequency Limit of 15000 MHz, 350,000 concurrent firewall connections.
4

Introduction to the Cisco ASAv
ASAv Interfaces and Virtual NICs
vNIC Type Hypervisor Support ASAv Version Notes
VMware KVM
VMXNET3 Yes No 9.2(1) and later When using VMXNET3, you need to disable Large Receive Offload (LRO) to avoid poor TCP performance. See the following VMware support articles:
http://kb.vmware.com/selfservice/microsites/search.do?cmd=displayKC&externalId=1027511
http://kb.vmware.com/selfservice/microsites/search.do?cmd=displayKC&externalId=2055140
e1000 Yes Yes 9.2(1) and later VMware default.
Virtio No Yes 9.3(2.200) and later KVM default.
5

Introduction to the Cisco ASAv
ASAv Interfaces and Virtual NICs
6

Deploy the ASAv Using VMwareYou can deploy the ASAv using VMware.
VMware Feature Support for the ASAv, page 7
Prerequisites for the ASAv and VMware, page 8
Guidelines for the ASAv and VMware, page 8
Deploy the ASAv Using VMware, page 9
Access the ASAv Console, page 13
Upgrade the Throughput License, page 15
VMware Feature Support for the ASAvThe following table lists the VMware feature support for the ASAv.
Table 1 VMware Feature Support for the ASAv
Feature Description Support (Yes/No)
Comment
Cold clone The VM is powered off during cloning. Yes —
DRS Used for dynamic resource scheduling and distributed power management.
Yes —
Hot add The VM is running during an addition. Yes —
Hot clone The VM is running during cloning. No —
Hot removal The VM is running during removal. Yes —
Snapshot The VM freezes for a few seconds. Yes Use with care. You may lose traffic. Failover may occur.
Suspend and resume
The VM is suspended, then resumed. Yes —
vCloud Director Allows automated deployment of VMs. No —
VM migration The VM is powered off during migration. Yes —
vMotion Used for live migration of VMs. Yes —
VMware FT Used for HA on VMs. No Use ASAv failover for ASAv VM failures.
VMware HA Used for ESX and server failures. Yes Use ASAv failover for ASAv VM failures.
7
Cisco Systems, Inc. www.cisco.com

Deploy the ASAv Using VMware
Prerequisites for the ASAv and VMware
Prerequisites for the ASAv and VMware
VMware System Requirements
See the Cisco ASA compatibility.
Security Policy for a vSphere Standard Switch
For a vSphere switch, you can edit Layer 2 security policies and apply security policy exceptions for port groups used by the ASAv interfaces. See the following default settings:
Promiscuous Mode: Reject
MAC Address Changes: Accept
Forged Transmits: Accept
You may need to modify these settings for the following ASAv configurations.
See the vSphere documentation for more information.
Guidelines for the ASAv and VMware
Failover Guidelines
For failover deployments, make sure that the standby unit has the same model license; for example, both units should be ASAv30s.
IPv6 Guidelines
You cannot specify IPv6 addresses for the management interface when you first deploy the ASAv OVA file using the VMware vSphere Web Client; you can later add IPv6 addressing using ASDM or the CLI.
VMware HA with VM heartbeats
Used for VM failures. No Use ASAv failover for ASAv VM failures.
VMware vSphere Standalone Windows Client
Used to deploy VMs. Yes —
VMware vSphere Web Client
Used to deploy VMs. Yes —
Table 1 VMware Feature Support for the ASAv (continued)
Feature Description Support (Yes/No)
Comment
Table 2 Port Group Security Policy Exceptions
Security Exception Routed Firewall Mode Transparent Firewall Mode
No Failover Failover No Failover Failover
Promiscuous Mode <Any> <Any> Accept Accept
MAC Address Changes <Any> Accept <Any> Accept
Forged Transmits <Any> Accept Accept Accept
8

Deploy the ASAv Using VMware
Deploy the ASAv Using VMware
Additional Guidelines and Limitations
The ASAv OVA deployment does not support localization (installing the components in non-English mode). Be sure that the VMware vCenter and the LDAP servers in your environment are installed in an ASCII-compatible mode.
You must set your keyboard to United States English before installing the ASAv and for using the VM console.
The memory allocated to the ASAv is sized specifically for the Throughput Level. Do not change the memory setting or any vCPU hardware settings in the Edit Settings dialog box unless you are requesting a license for a different Throughput Level. Under-provisioning can affect performance, and over-provisioning causes the ASAv to warn you that it will reload; after a waiting period (24 hours for 100-125% over-provisioning; 1 hour for 125% and up), the ASAv will reload.
Note: If you need to change the memory or vCPU hardware settings, use only the values documented in Licensing for the ASAv, page 3. Do not use the VMware-recommended memory configuration minimum, default, and maximum values.
Use the ASAv show vm and show cpu commands or the ASDM Home > Device Dashboard > Device Information > Virtual Resources tab or the Monitoring > Properties > System Resources Graphs > CPU pane to view the resource allocation and any resources that are over- or under-provisioned.
During ASAv deployment, if you have a host cluster, you can either provision storage locally (on a specific host) or on a shared host. However, if you try to vMotion the ASAv to another host, using any kind of storage (SAN or local) causes an interruption in connectivity.
If you are running ESXi 5.0:
— The vSphere Web Client is not supported for ASAv OVA deployment; use the vSphere client instead.
— Deployment fields might be duplicated; fill out the first instance of any given field and ignore the duplicated fields.
Deploy the ASAv Using VMwareThis section describes how to deploy the ASAv using the VMware vSphere Web Client.
1. Access the vSphere Web Client and Install the Client Integration Plug-In, page 9
2. Deploy the ASAv Using the VMware vSphere Web Client, page 10
Access the vSphere Web Client and Install the Client Integration Plug-InThis section describes how to access the vSphere Web Client. This section also describes how to install the Client Integration Plug-In, which is required for ASAv console access. Some Web Client features (including the plug-in) are not supported on the Macintosh. See the VMware website for complete client support information.
You can also choose to use the standalone vSphere Client, but this guide only describes the Web Client.
Procedure
1. Launch the VMware vSphere Web Client from your browser:
https://vCenter_server:port/vsphere-client/
By default, the port is 9443.
2. (One time only) Install the Client Integration Plug-in so that you can access the ASAv console.
a. In the login screen, download the plug-in by clicking Download the Client Integration Plug-in.
9

Deploy the ASAv Using VMware
Deploy the ASAv Using VMware
b. Close your browser and then install the plug-in using the installer.
c. After the plug-in installs, reconnect to the vSphere Web Client.
3. Enter your username and password, and click Login, or check the Use Windows session authentication check box (Windows only).
Deploy the ASAv Using the VMware vSphere Web ClientTo deploy the ASAv, use the VMware vSphere Web Client (or the vSphere Client) and a template file in the open virtualization format (OVF); note that for the ASAv, the OVF package is provided as a single open virtual appliance (OVA) file. You use the Deploy OVF Template wizard in the vSphere Web Client to deploy the Cisco package for the ASAv. The wizard parses the ASAv OVA file, creates the virtual machine on which you will run the ASAv, and installs the package.
Most of the wizard steps are standard for VMware. For additional information about the Deploy OVF Template, see the VMware vSphere Web Client online help.
Before You Begin
You must have at least one network configured in vSphere (for management) before you deploy the ASAv.
Procedure
1. Download the ASAv OVA file from Cisco.com, and save it to your PC:
http://www.cisco.com/go/asa-software
Note: A Cisco.com login and Cisco service contract are required.
2. In the vSphere Web Client Navigator pane, click vCenter.
3. Click Hosts and Clusters.
10

Deploy the ASAv Using VMware
Deploy the ASAv Using VMware
4. Right-click the data center, cluster, or host where you want to deploy the ASAv, and choose Deploy OVF Template.
The Deploy OVF Template wizard appears.
5. Follow the wizard screens as directed.
6. In the Setup networks screen, map a network to each ASAv interface that you want to use.
The networks may not be in alphabetical order. If it is too difficult to find your networks, you can change the networks later from the Edit Settings dialog box. After you deploy, right-click the ASAv instance, and choose Edit Settings to access the Edit Settings dialog box. However that screen does not show the ASAv interface IDs (only Network Adapter IDs). See the following concordance of Network Adapter IDs and ASAv interface IDs:
You do not need to use all ASAv interfaces; however, the vSphere Web Client requires you to assign a network to all interfaces. For interfaces you do not intend to use, you can simply leave the interface disabled within the ASAv configuration. After you deploy the ASAv, you can optionally return to the vSphere Web Client to delete the extra interfaces from the Edit Settings dialog box. For more information, see the vSphere Web Client online help.
Note: For failover/HA deployments, GigabitEthernet 0/8 is pre-configured as the failover interface.
7. If your network uses an HTTP proxy for Internet access, you must configure the proxy address for smart licensing in the Smart Call Home Settings area. This proxy is also used for Smart Call Home in general.
8. For failover/HA deployments, in the Customize template screen:
— Specify the standby management IP address.
When you configure your interfaces, you must specify an active IP address and a standby IP address on the same network. When the primary unit fails over, the secondary unit assumes the IP addresses and MAC addresses of the primary unit and begins passing traffic. The unit that is now in a standby state takes over the standby IP addresses and MAC addresses. Because network devices see no change in the MAC to IP address pairing, no ARP entries change or time out anywhere on the network.
— Configure the failover link settings in the HA Connection Settings area.
The two units in a failover pair constantly communicate over a failover link to determine the operating status of each unit. GigabitEthernet 0/8 is pre-configured as the failover link. Enter the active and standby IP addresses for the link on the same network.
9. After you complete the wizard, the vSphere Web Client processes the VM; you can see the “Initialize OVF deployment” status in the Global Information area Recent Tasks pane.
Network Adapter ID ASAv Interface ID
Network Adapter 1 Management0/0
Network Adapter 2 GigabitEthernet0/0
Network Adapter 3 GigabitEthernet0/1
Network Adapter 4 GigabitEthernet0/2
Network Adapter 5 GigabitEthernet0/3
Network Adapter 6 GigabitEthernet0/4
Network Adapter 7 GigabitEthernet0/5
Network Adapter 8 GigabitEthernet0/6
Network Adapter 9 GigabitEthernet0/7
Network Adapter 10 GigabitEthernet0/8
11

Deploy the ASAv Using VMware
Deploy the ASAv Using VMware
When it is finished, you see the Deploy OVF Template completion status.
The ASAv VM instance then appears under the specified data center in the Inventory.
12

Deploy the ASAv Using VMware
Access the ASAv Console
10. If the ASAv VM is not yet running, click Power on the virtual machine.
Wait for the ASAv to boot up before you try to connect with ASDM or to the console. When the ASAv starts up for the first time, it reads parameters provided through the OVA file and adds them to the ASAv system configuration. It then automatically restarts the boot process until it is up and running. This double boot process only occurs when you first deploy the ASAv. To view bootup messages, access the ASAv console by clicking the Console tab.
11. For failover/HA deployments, repeat this procedure to add the secondary unit. See the following guidelines:
— Set the same throughput level as the primary unit.
— Enter the exact same IP address settings as for the primary unit. The bootstrap configurations on both units are identical except for the parameter identifying a unit as primary or secondary.
Note: To successfully register the ASAv with the Cisco Licensing Authority, the ASAv requires Internet access. You might need to perform additional configuration after deployment to achieve Internet access and successful license registration.
Access the ASAv ConsoleIn some cases with ASDM, you may need to use the CLI for troubleshooting. By default, you can access the built-in VMware vSphere console. Alternatively, you can configure a network serial console, which has better capabilities, including copy and paste.
Use the VMware vSphere Console, page 14
Configure a Network Serial Console Port, page 15
13

Deploy the ASAv Using VMware
Access the ASAv Console
Use the VMware vSphere ConsoleFor initial configuration or troubleshooting, access the CLI from the virtual console provided through the VMware vSphere Web Client. You can later configure CLI remote access for Telnet or SSH.
Before You Begin
For the vSphere Web Client, install the Client Integration Plug-In, which is required for ASAv console access.
Procedure
1. In the VMware vSphere Web Client, right-click the ASAv instance in the Inventory, and choose Open Console. Or you can click Launch Console on the Summary tab.
2. Click in the console and press Enter. Note: Press Ctrl + Alt to release the cursor.
If the ASAv is still starting up, you see bootup messages.
When the ASAv starts up for the first time, it reads parameters provided through the OVA file and adds them to the ASAv system configuration. It then automatically restarts the boot process until it is up and running. This double boot process only occurs when you first deploy the ASAv.
Note: Until you install a license, throughput is limited to 100 Kbps so that you can perform preliminary connectivity tests. A license is required for regular operation. You also see the following messages repeated on the console until you install a license:
Warning: ASAv platform license state is Unlicensed.Install ASAv platform license for full functionality.
You see the following prompt:
ciscoasa>
This prompt indicates that you are in user EXEC mode. Only basic commands are available from user EXEC mode.
3. Access privileged EXEC mode:
ciscoasa> enable
The following prompt appears:
Password:
4. Press the Enter key to continue. By default, the password is blank. If you previously set an enable password, enter it instead of pressing Enter.
The prompt changes to:
ciscoasa#
All non-configuration commands are available in privileged EXEC mode. You can also enter configuration mode from privileged EXEC mode.
To exit privileged mode, enter the disable, exit, or quit command.
5. Access global configuration mode:
ciscoasa# configure terminal
The prompt changes to the following:
ciscoasa(config)#
You can begin to configure the ASAv from global configuration mode. To exit global configuration mode, enter the exit, quit, or end command.
14

Deploy the ASAv Using VMware
Upgrade the Throughput License
Configure a Network Serial Console PortFor a better console experience, you can configure a network serial port singly or attached to a virtual serial port concentrator (vSPC) for console access. See the VMware vSphere documentation for details about each method. On the ASAv, you must send the console output to a serial port instead of to the virtual console. This section describes how to enable the serial port console.
Procedure
1. Configure a network serial port in VMware vSphere. See the VMware vSphere documentation.
2. On the ASAv, create a file called “use_ttyS0” in the root directory of disk0. This file does not need to have any contents; it just needs to exist at this location:
disk0:/use_ttyS0
— From ASDM, you can upload an empty text file by that name using the Tools > File Management dialog box.
— At the vSphere console, you can copy an existing file (any file) in the file system to the new name. For example:
ciscoasa(config)# cd coredumpinfociscoasa(config)# copy coredump.cfg disk0:/use_ttyS0
3. Reload the ASAv.
— From ASDM, choose Tools > System Reload.
— At the vSphere console, enter reload.
The ASAv stops sending to the vSphere console, and instead sends to the serial console.
4. Telnet to the vSphere host IP address and the port number you specified when you added the serial port; or Telnet to the vSPC IP address and port.
Upgrade the Throughput LicenseThe ASAv uses a throughput license, which affects the number of vCPUs you can use.
If you want to increase (or decrease) the number of vCPUs for your ASAv, you can request a new license, apply the new license, and change the VM properties in VMware to match the new values.
Note: The assigned vCPUs must match the allowed vCPUs for the ASAv Throughput license. The vCPU frequency limit and RAM must also be sized correctly for the vCPUs. When upgrading or downgrading, be sure to follow this procedure and reconcile the license and vCPUs immediately. The ASAv does not operate properly when there is a persistent mismatch.
Procedure
1. Request a new license.
2. Apply the new license. For failover pairs, apply new licenses to both units.
3. Do one of the following, depending on if you use failover or not:
— Failover—In the vSphere Web Client, power off the standby ASAv. For example, click the ASAv and then click Power Off the virtual machine, or right-click the ASAv and choose Shut Down Guest OS.
— No Failover—In the vSphere Web Client, power off the ASAv. For example, click the ASAv and then click Power Off the virtual machine, or right-click the ASAv and choose Shut Down Guest OS.
4. Click the ASAv and then click Edit Virtual machine settings (or right-click the ASAv and choose Edit Settings).
15

Deploy the ASAv Using VMware
Upgrade the Throughput License
The Edit Settings dialog box appears.
5. Refer to the CPU/frequency/memory requirement in Licensing for the ASAv, page 3 to determine the correct values for the new vCPU license.
6. On the Virtual Hardware tab, for the CPU, choose the new value from the drop-down list. You must also click the expand arrow to change the value for the vCPU frequency Limit.
7. For the Memory, enter the new value for the RAM.
8. Click OK.
9. Power on the ASAv. For example, click Power On the Virtual Machine.
10. For failover pairs:
a. Open a console to the active unit or Launch ASDM on the active unit.
b. After the standby unit finishes starting up, failover to the standby unit:
- ASDM: Choose Monitoring > Properties > Failover > Status, and clicking Make Standby.
- CLI:
ciscoasa# no failover active
c. Repeat Steps 3 through 9 for the active unit.
Related Topics
Apply the ASAv License (9.3(1)), page 24
Licensing for the ASAv, page 3
16

Deploy the ASAv Using KVMYou can deploy the ASAv using the Kernel-based Virtual Machine (KVM).
About ASAv Deployment Using KVM, page 21
Prerequisites for the ASAv and KVM, page 22
Prepare the Day 0 Configuration File, page 22
Prepare the Virtual Bridge XML Files, page 23
Launch the ASAv, page 25
About ASAv Deployment Using KVMFigure 1 on page -21 shows a sample network topology with ASAv and KVM. The procedures described in this chapter are based on the sample topology. You requirements will dictate the exact procedures you need. The ASAv acts as the firewall between the inside and outside networks. A separate management network is also configured.
Figure 1 Sample ASAv Deployment Using KVM
192.168.1.3eth0
10.1.1.3eth0
10.1.1.2g0/0
KVM
Linux
eth010.15.2.30Linux Host
198.51.100.2g0/1
198.51.100.3eth0
3730
11
ASAv
192.168.1.2m0/0
Linux GuestInside
Linux GuestOutside
Linux GuestMgmt
virbr2 virbr1 virbr3
OutsideNetwork
MgmtNetwork
InsideNetwork
10.1.1.10 192.168.1.10 198.51.100.10
21
Cisco Systems, Inc. www.cisco.com

Deploy the ASAv Using KVM
Prerequisites for the ASAv and KVM
Prerequisites for the ASAv and KVM Download the ASAv qcow2 file from Cisco.com and put it on your Linux host:
Note: A Cisco.com login and Cisco service contract are required.
For the purpose of the sample deployment in this document, we are assuming you are using Ubuntu 14.04 LTS. Install the following packages on top of the Ubuntu 14.04 LTS host:
— qemu-kvm
— libvirt-bin
— bridge-utils
— virt-manager
— virtinst
— virsh tools
— genisoimage
Performance is affected by the host and its configuration. You can maximize the throughput of the ASAv on KVM by tuning your host. For generic host-tuning concepts, see Network Function Virtualization Packet Processing Performance of Virtualized Platforms with Linux and Intel Architecture.
Useful optimizations for Ubuntu 14.04 include the following:
— macvtap—High performance Linux bridge; you can use macvtap instead of a Linux bridge. Note that you must configure specific settings to use macvtap instead of the Linux bridge.
— Transparent Huge Pages—Increases memory page size and is on by default in Ubuntu 14.04.
— Hyperthread disabled—Reduces two vCPUs to one single core.
— txqueuelength—Increases the default txqueuelength to 4000 packets and reduces drop rate.
— pinning—Pins qemu and vhost processes to specific CPU cores; under certain conditions, pinning is a significant boost to performance.
For information on optimizing a RHEL-based distribution, see Red Hat Enterprise Linux6 Virtualization Tuning and Optimization Guide.
For KVM system requirements, see Cisco ASA Compatibility:
Prepare the Day 0 Configuration FileYou can prepare a default configuration file before you launch the ASAv. This file is a text file that contains the ASAv configuration that will be available when the ASAv is launched. This default configuration is placed into a text file named “day0-config” in a working directory you chose. At the minimum, the Day 0 configuration file must contain commands that will activate the management interface and set up the SSH server for public key authentication, but it can also contain a complete ASA configuration.
If you want to automatically license the ASAv during initial deployment, you can place the Smart Licensing Identity (ID) Token that you downloaded from the Cisco Smart Software Manager in a text file in the same directory.
Procedure
1. Enter the CLI configuration for the ASAv in a text file called “day0-config”. Add interface configurations for the three interfaces and any other configuration you want.
Example:
interface management0/0nameif management
22
Deploy the ASAv Using KVM
Prepare the Virtual Bridge XML Files
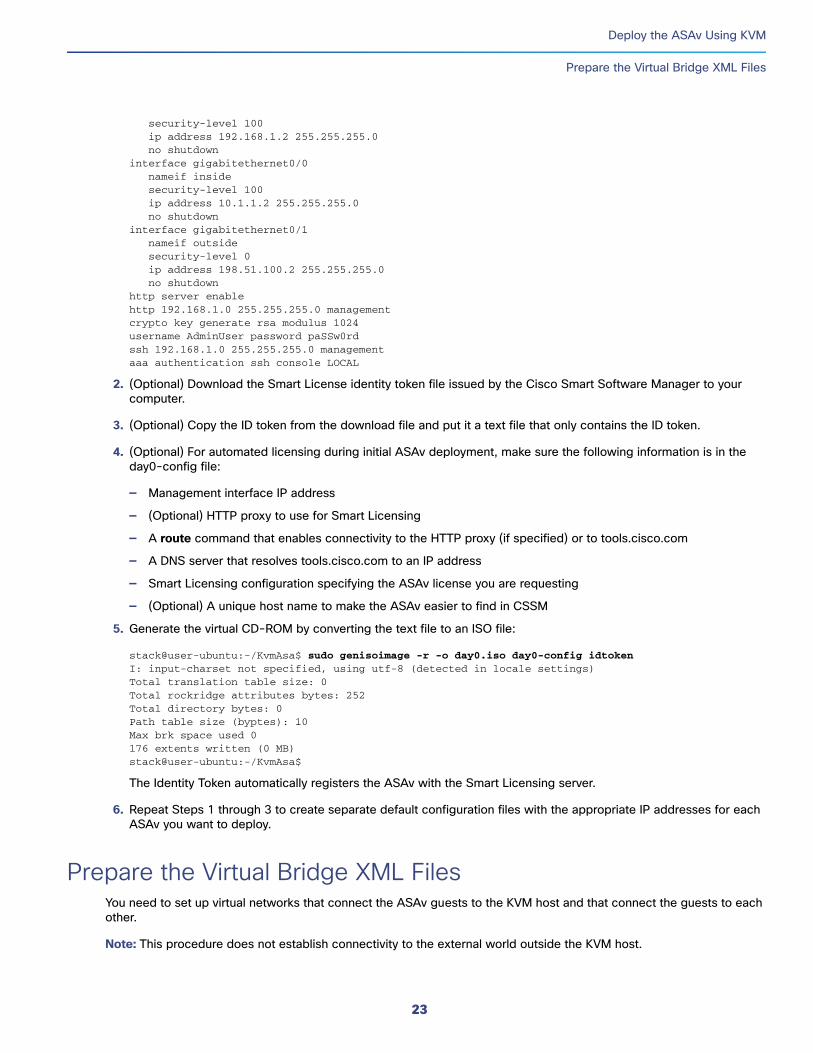
security-level 100 ip address 192.168.1.2 255.255.255.0 no shutdowninterface gigabitethernet0/0 nameif inside security-level 100 ip address 10.1.1.2 255.255.255.0 no shutdowninterface gigabitethernet0/1 nameif outside security-level 0 ip address 198.51.100.2 255.255.255.0 no shutdownhttp server enablehttp 192.168.1.0 255.255.255.0 managementcrypto key generate rsa modulus 1024username AdminUser password paSSw0rdssh 192.168.1.0 255.255.255.0 managementaaa authentication ssh console LOCAL
2. (Optional) Download the Smart License identity token file issued by the Cisco Smart Software Manager to your computer.
3. (Optional) Copy the ID token from the download file and put it a text file that only contains the ID token.
4. (Optional) For automated licensing during initial ASAv deployment, make sure the following information is in the day0-config file:
— Management interface IP address
— (Optional) HTTP proxy to use for Smart Licensing
— A route command that enables connectivity to the HTTP proxy (if specified) or to tools.cisco.com
— A DNS server that resolves tools.cisco.com to an IP address
— Smart Licensing configuration specifying the ASAv license you are requesting
— (Optional) A unique host name to make the ASAv easier to find in CSSM
5. Generate the virtual CD-ROM by converting the text file to an ISO file:
stack@user-ubuntu:-/KvmAsa$ sudo genisoimage -r -o day0.iso day0-config idtokenI: input-charset not specified, using utf-8 (detected in locale settings)Total translation table size: 0Total rockridge attributes bytes: 252Total directory bytes: 0Path table size (byptes): 10Max brk space used 0176 extents written (0 MB)stack@user-ubuntu:-/KvmAsa$
The Identity Token automatically registers the ASAv with the Smart Licensing server.
6. Repeat Steps 1 through 3 to create separate default configuration files with the appropriate IP addresses for each ASAv you want to deploy.
Prepare the Virtual Bridge XML FilesYou need to set up virtual networks that connect the ASAv guests to the KVM host and that connect the guests to each other.
Note: This procedure does not establish connectivity to the external world outside the KVM host.
23

Deploy the ASAv Using KVM
Prepare the Virtual Bridge XML Files
Prepare the virtual bridge XML files on the KVM host. For the sample virtual network topology described in Prepare the Day 0 Configuration File, page 22, you need the following three virtual bridge files: virbr1.xml, virbr2.xml, and virbr3.xml (you must use these three filenames; for example, virbr0 is not allowed because it already exists). Each file has the information needed to set up the virtual bridges. You must give the virtual bridge a name and a unique MAC address. Providing an IP address is optional.
Procedure
1. Create three virtual networks bridge XML files:
virbr1.xml:
<network> <name>virbr1</name> <bridge name='virbr1' stp='on' delay='0' /> <mac address='52:54:00:05:6e:00' /> <ip address='192.168.1.10' netmask='255.255.255.0' /></network>
virbr2.xml:
<network> <name>virbr2</name> <bridge name='virbr2' stp='on' delay='0' /> <mac address='52:54:00:05:6e:01' /> <ip address='10.1.1.10' netmask='255.255.255.0' /></network>
virbr3.xml:
<network> <name>virbr3</name> <bridge name='virbr3' stp='on' delay='0' /> <mac address='52:54:00:05:6e:02' /> <ip address='198.51.100.10' netmask='255.255.255.0' /></network>
2. Create a script that contains the following (in our example, we will name the script virt_network_setup.sh):
virsh net-create virbr1.xmlvirsh net-create virbr2.xmlvirsh net-create virbr3.xml
3. Run this script to setup the virtual network. The script brings the virtual networks up. The networks stay up as long as the KVM host is running.
stack@user-ubuntu:-/KvmAsa$ virt_network_setup.sh
Note: If you reload the Linux host, you must re-run the virt_network_setup.sh script. It does not persist over reboots.
4. Verify that the virtual networks were created:
stack@user-ubuntu:-/KvmAsa$ brctl showbridge name bridge id STP enabled Interfacesvirbr0 8000.0000000000000 yes virbr1 8000.5254000056eed yes virb1-nicvirbr2 8000.5254000056eee yes virb2-nicvirbr3 8000.5254000056eec yes virb3-nicstack@user-ubuntu:-/KvmAsa$
5. Display the IP address assigned to the virbr1 bridge. This is the IP address that you assigned in the XML file.
stack@user-ubuntu:-/KvmAsa$ ip address show virbr1S: virbr1: <NO-CARRIER,BROADCAST,MULTICAST,UP> mtu 1500 qdisc noqueue state DOWN link/ether 52:54:00:05:6e:00 brd ff:ff:ff:ff:ff:ff inet 192.168.1.10/24 brd 192.168.1.255 scope global virbr1 valid_lft forever preferred_lft forever
24
Deploy the ASAv Using KVM
Launch the ASAv
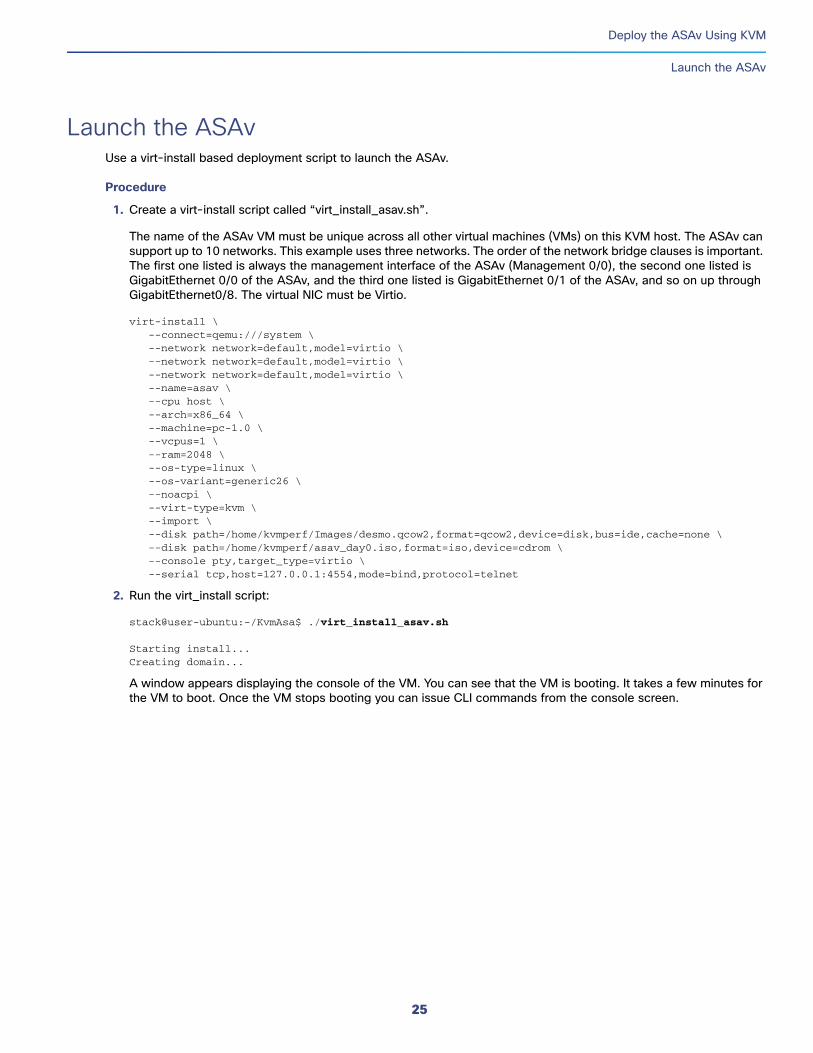
Launch the ASAvUse a virt-install based deployment script to launch the ASAv.
Procedure
1. Create a virt-install script called “virt_install_asav.sh”.
The name of the ASAv VM must be unique across all other virtual machines (VMs) on this KVM host. The ASAv can support up to 10 networks. This example uses three networks. The order of the network bridge clauses is important. The first one listed is always the management interface of the ASAv (Management 0/0), the second one listed is GigabitEthernet 0/0 of the ASAv, and the third one listed is GigabitEthernet 0/1 of the ASAv, and so on up through GigabitEthernet0/8. The virtual NIC must be Virtio.
virt-install \ --connect=qemu:///system \ --network network=default,model=virtio \ --network network=default,model=virtio \ --network network=default,model=virtio \ --name=asav \ --cpu host \ --arch=x86_64 \ --machine=pc-1.0 \ --vcpus=1 \ --ram=2048 \ --os-type=linux \ --os-variant=generic26 \ --noacpi \ --virt-type=kvm \ --import \ --disk path=/home/kvmperf/Images/desmo.qcow2,format=qcow2,device=disk,bus=ide,cache=none \ --disk path=/home/kvmperf/asav_day0.iso,format=iso,device=cdrom \ --console pty,target_type=virtio \ --serial tcp,host=127.0.0.1:4554,mode=bind,protocol=telnet
2. Run the virt_install script:
stack@user-ubuntu:-/KvmAsa$ ./virt_install_asav.sh
Starting install...Creating domain...
A window appears displaying the console of the VM. You can see that the VM is booting. It takes a few minutes for the VM to boot. Once the VM stops booting you can issue CLI commands from the console screen.
25

Deploy the ASAv Using KVM
Launch the ASAv
26

Configure the ASAvThe ASAv deployment pre-configures ASDM access. From the client IP address you specified during deployment, you can connect to the ASAv management IP address with a web browser. This chapter also describes how to allow other clients to access ASDM and also how to allow CLI access (SSH or Telnet). Other essential configuration tasks covered in this chapter include the license installation and common configuration tasks provided by wizards in ASDM.
Start ASDM, page 31
ASDM License Procedure, page 32
Perform Initial Configuration Using ASDM, page 32
Advanced Configuration, page 33
Start ASDMProcedure
1. On the PC that you specified as the ASDM client, enter the following URL:
https://asa_ip_address/admin
The ASDM launch page appears with the following buttons:
— Install ASDM Launcher and Run ASDM
— Run ASDM
— Run Startup Wizard
2. To download the Launcher:
a. Click Install ASDM Launcher and Run ASDM.
b. Leave the username and password fields empty (for a new installation), and click OK. With no HTTPS authentication configured, you can gain access to ASDM with no username and the enable password, which is blank by default. Note: If you enabled HTTPS authentication, enter your username and associated password.
c. Save the installer to your PC, and then start the installer. The ASDM-IDM Launcher opens automatically after installation is complete.
d. Enter the management IP address, leave the username and password blank (for a new installation), and then click OK. Note: If you enabled HTTPS authentication, enter your username and associated password.
3. To use Java Web Start:
a. Click Run ASDM or Run Startup Wizard.
b. Save the shortcut to your PC when prompted. You can optionally open it instead of saving it.
c. Start Java Web Start from the shortcut.
d. Accept any certificates according to the dialog boxes that appear. The Cisco ASDM-IDM Launcher appears.
31
Cisco Systems, Inc. www.cisco.com

Configure the ASAv
ASDM License Procedure
e. Leave the username and password blank (for a new installation), and then click OK. Note: If you enabled HTTPS authentication, enter your username and associated password.
ASDM License ProcedureProcedure
1. View the serial number by clicking the License tab on the main ASDM page and then clicking More Licenses.
2. From the Configuration > Device Management > Licensing > Activation Key pane, write down the serial number.
3. Obtain a Product Authorization Key, which you can purchase from your Cisco account representative. You need to purchase a separate Product Authorization Key for each feature license. For the ASAv, the only required feature license is for vCPUs (1 to 4), but you can purchase other feature keys as well.
4. Request an activation key from Cisco.com for the serial number according to the ASA licensing guide. Be sure to request a CPU license that matches the number of CPUs you specified when you deployed the ASAv.
5. After you receive the activation key from Cisco, on the Configuration > Device Management > Licensing > Activation Key pane, paste the key into the New Activation Key field.
6. Click Update Activation Key.
ASDM shows a status dialog box while it verifies the key.
When the key update is complete, you see the following dialog box:
7. Click Yes to restart ASDM.
Perform Initial Configuration Using ASDMYou can perform initial configuration using the following ASDM wizards and procedures. For CLI configuration, see the CLI configuration guides.
Run the Startup Wizard, page 33
(Optional) Allow Access to Public Servers Behind the ASAv, page 33
(Optional) Run VPN Wizards, page 33
32

Configure the ASAv
Advanced Configuration
(Optional) Run Other Wizards in ASDM, page 33
Run the Startup WizardRun the Startup Wizard (choose Wizards > Startup Wizard) so that you can customize the security policy to suit your deployment. Using the startup wizard, you can set the following:
(Optional) Allow Access to Public Servers Behind the ASAvThe Configuration > Firewall > Public Servers pane automatically configures the security policy to make an inside server accessible from the Internet. As a business owner, you might have internal network services, such as a web and FTP server, that need to be available to an outside user. You can place these services on a separate network behind the ASAv, called a demilitarized zone (DMZ). By placing the public servers on the DMZ, any attacks launched against the public servers do not affect your inside networks.
(Optional) Run VPN WizardsYou can configure VPN using the following wizards (Wizards > VPN Wizards):
Site-to-Site VPN Wizard—Creates an IPsec site-to-site tunnel between two ASAvs.
AnyConnect VPN Wizard—Configures SSL VPN remote access for the Cisco AnyConnect VPN client. AnyConnect provides secure SSL connections to the ASA for remote users with full VPN tunneling to corporate resources. The ASA policy can be configured to download the AnyConnect client to remote users when they initially connect via a browser. With AnyConnect 3.0 and later, the client can run either the SSL or IPsec IKEv2 VPN protocol.
Clientless SSL VPN Wizard—Configures clientless SSL VPN remote access for a browser. Clientless, browser-based SSL VPN lets users establish a secure, remote-access VPN tunnel to the ASA using a web browser. After authentication, users access a portal page and can access specific, supported internal resources. The network administrator provides access to resources by users on a group basis. ACLs can be applied to restrict or allow access to specific corporate resources.
IPsec (IKEv1 or IKEv2) Remote Access VPN Wizard—Configures IPsec VPN remote access for the Cisco IPsec client.
(Optional) Run Other Wizards in ASDM High Availability and Scalability Wizard—Configure failover or VPN load balancing.
Packet Capture Wizard—Configure and run packet capture. The wizard will run one packet capture on each of the ingress and egress interfaces. After capturing packets, you can save the packet captures to your PC for examination and replay in the packet analyzer.
Advanced ConfigurationTo continue configuring your ASAv, see Navigating the Cisco ASA Series Documentation.
Hostname
Domain name
Administrative passwords
Interfaces
IP addresses
Static routes
DHCP server
Network address translation rules
and more...
33

Configure the ASAv
Advanced Configuration
34