Embed Size (px)
Citation preview

Asahi Pentax MX posted 2-29-'04
This camera manual library is for reference and historical purposes, all rights reserved.
This page is copyright© by , M. Butkus, NJ. This page may not be sold or distributed without the expressed permission of the producer
I have no connection with any camera company
On-line camera manual library This is the full text and images from the manual. This may take 3 full minutes for all images to appear.
If they do not all appear. Try clicking the browser "refresh" or "reload button" or right click on the image, choose "view image" then go back. It should now appear. To print, try printing only 3 or 4 pages at a time.
If you find this manual useful, how about a donation of $3 to: M. Butkus, 29 Lake Ave., High Bridge, NJ 08829-1701
and send your e-mail address so I can thank you. Most other places would charge you $7.50 for a electronic copy or $18.00 for a hard to read Xerox copy.
This will allow me to continue to buy new manuals and pay their shipping costs. It'll make you feel better, won't it? If you use Pay Pal, use the link below. Use the above address for a check, M.O. or cash.
Back to main camera manual page
SMC Pentax lenses and Pentax accessories are engineered and produced meticulously to precise Asahi Pentax specifications. Lenses and accessories from other manufacturers are not produced to these precise specifications and, therefore, may cause difficulties with - or actual damage to - a Pentax camera. Asahi Pentax cannot assume any responsibility for difficulties resulting from the use of any other brand of lenses or accessories with an Asahi Pentax camera. CONTENTS
Nomenclature 2 Specifications 4 Lens Mounting 6 Inserting Batteries 7 Basic Operating Instructions 8 Film Loading and Winding 10 Setting ASA Film Speed 11 Setting the Shutter Speed Dial 12 Composing and Focusing 13 Exposure Measurement 14
Meter Coupling Range 22 Helpful Hints on Exposure Problems 23 Dual Control Exposure System 23 Shutter Button Lock 24 Manual Shutter Operation 25 Self-timer 26 Infra-red Photography 27 Multiple Exposure 28 Interchangeable Focusing Screens 29 Using Screw-mount Takumar Lenses 30
Holding the Camera 15 Unloading Film 16 Flash Synchronization 18 Depth-of-Field Preview Lever and Scale 20 Depth-of-Field Table: SMC Pentax-M 50mm f/1.4 Lens 21
Open-aperture and Stop-down Metering Lenses 32 Resistance to Temperature Extremes and Changes 33 Camera Maintenance 34 Warranty Policy 36
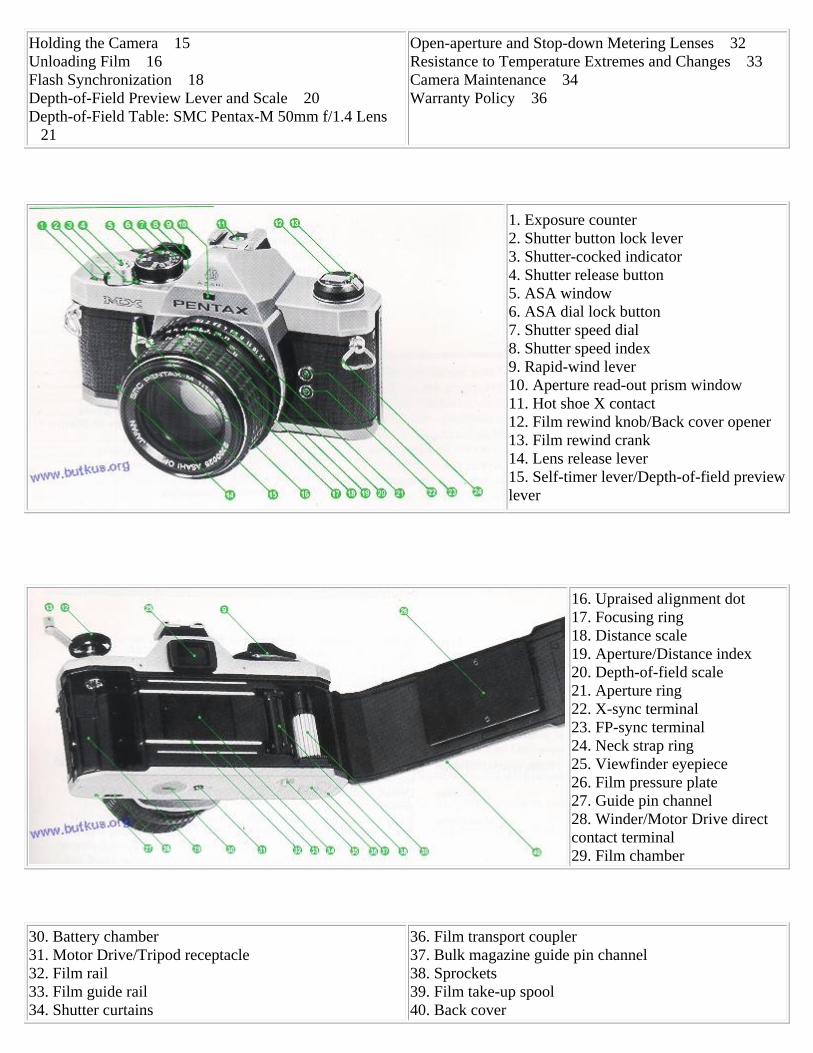
1. Exposure counter 2. Shutter button lock lever 3. Shutter-cocked indicator 4. Shutter release button 5. ASA window 6. ASA dial lock button 7. Shutter speed dial 8. Shutter speed index 9. Rapid-wind lever 10. Aperture read-out prism window 11. Hot shoe X contact 12. Film rewind knob/Back cover opener 13. Film rewind crank 14. Lens release lever 15. Self-timer lever/Depth-of-field preview lever
16. Upraised alignment dot 17. Focusing ring 18. Distance scale 19. Aperture/Distance index 20. Depth-of-field scale 21. Aperture ring 22. X-sync terminal 23. FP-sync terminal 24. Neck strap ring 25. Viewfinder eyepiece 26. Film pressure plate 27. Guide pin channel 28. Winder/Motor Drive direct contact terminal 29. Film chamber
30. Battery chamber 31. Motor Drive/Tripod receptacle 32. Film rail 33. Film guide rail 34. Shutter curtains
36. Film transport coupler 37. Bulk magazine guide pin channel 38. Sprockets 39. Film take-up spool 40. Back cover
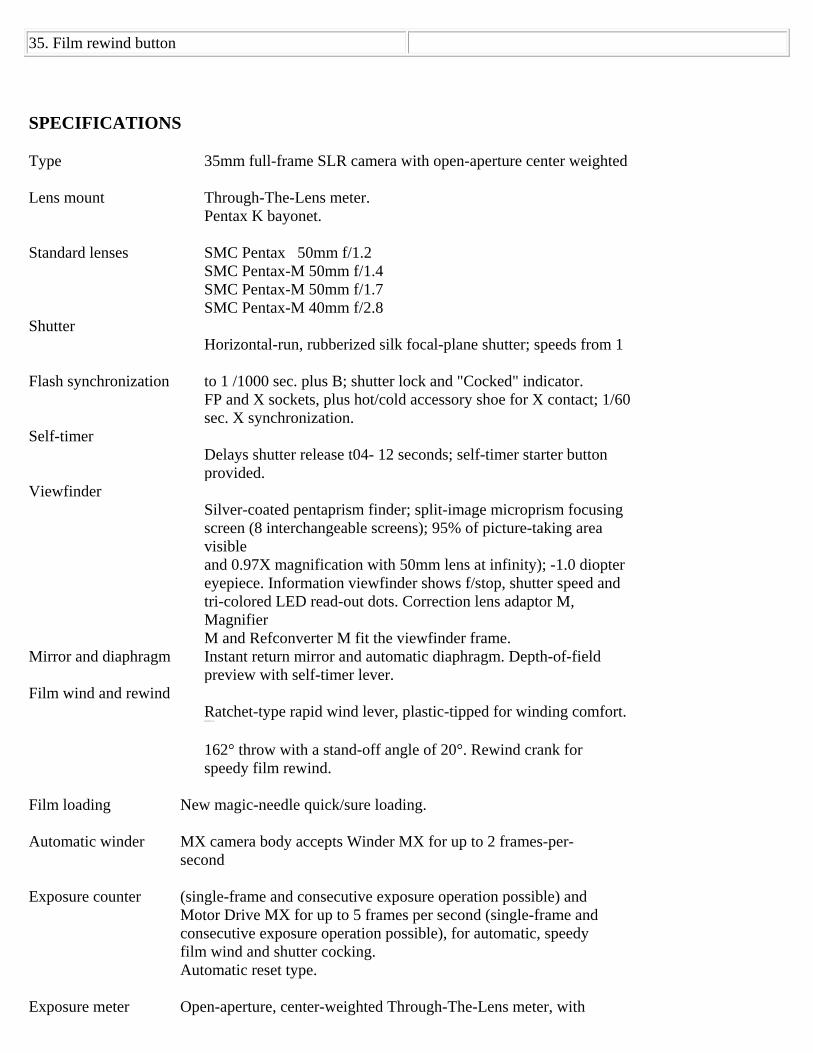
35. Film rewind button
SPECIFICATIONS
Type
35mm full-frame SLR camera with open-aperture center weighted
Lens mount
Through-The-Lens meter. Pentax K bayonet.
Standard lenses
SMC Pentax 50mm f/1.2 SMC Pentax-M 50mm f/1.4 SMC Pentax-M 50mm f/1.7 SMC Pentax-M 40mm f/2.8
Shutter
Horizontal-run, rubberized silk focal-plane shutter; speeds from 1
Flash synchronization
to 1 /1000 sec. plus B; shutter lock and "Cocked" indicator. FP and X sockets, plus hot/cold accessory shoe for X contact; 1/60 sec. X synchronization.
Self-timer
Delays shutter release t04- 12 seconds; self-timer starter button provided.
Viewfinder
Silver-coated pentaprism finder; split-image microprism focusing screen (8 interchangeable screens); 95% of picture-taking area visible and 0.97X magnification with 50mm lens at infinity); -1.0 diopter eyepiece. Information viewfinder shows f/stop, shutter speed and tri-colored LED read-out dots. Correction lens adaptor M, Magnifier M and Refconverter M fit the viewfinder frame.
Mirror and diaphragm
Instant return mirror and automatic diaphragm. Depth-of-field preview with self-timer lever.
Film wind and rewind
Ratchet-type rapid wind lever, plastic-tipped for winding comfort. www.4butkus.org
162° throw with a stand-off angle of 20°. Rewind crank for speedy film rewind.
Film loading
New magic-needle quick/sure loading.
Automatic winder
MX camera body accepts Winder MX for up to 2 frames-per-second
Exposure counter
(single-frame and consecutive exposure operation possible) and Motor Drive MX for up to 5 frames per second (single-frame and consecutive exposure operation possible), for automatic, speedy film wind and shutter cocking. Automatic reset type.
Exposure meter Open-aperture, center-weighted Through-The-Lens meter, with
Power source
GPD cells for fast light response, with tri-colored LED exposure read-out, rapid wind lever and shutter release button acting as meter switch. Exposure range: EV1 - 19 (ASA100, f/1.4), Film speed range: ASA25. 1600. Two 1.5V silver oxide batteries (G13); LED's double as battery check lamp.
Back cover
Standard back with memo holder, interchangeable with Magazine
Body size
Back MX, Dial Data MX for data recording on film. 135.5mm x 82.5mm x 49.5mm.
Body weight
495 grams.
LENS MOUNTING INSERTING BATTERIES
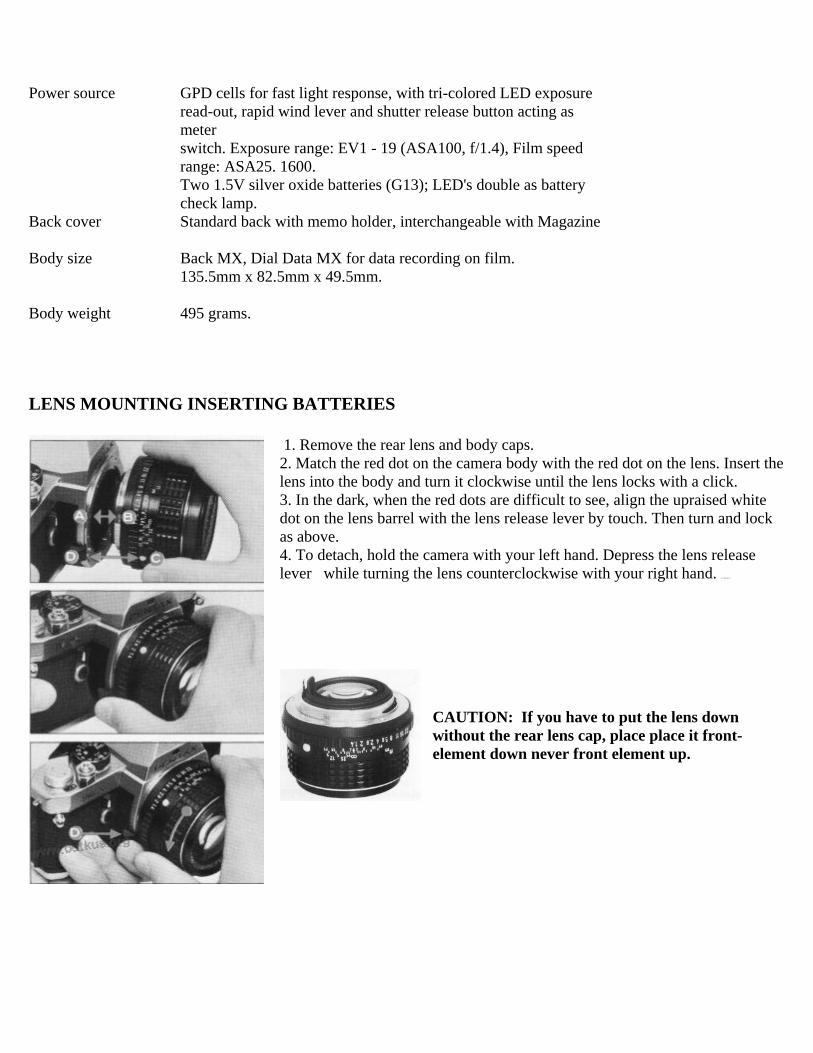
1. Remove the rear lens and body caps. 2. Match the red dot on the camera body with the red dot on the lens. Insert the lens into the body and turn it clockwise until the lens locks with a click. 3. In the dark, when the red dots are difficult to see, align the upraised white dot on the lens barrel with the lens release lever by touch. Then turn and lock as above. 4. To detach, hold the camera with your left hand. Depress the lens release lever while turning the lens counterclockwise with your right hand. www.4butkus.org
CAUTION: If you have to put the lens down without the rear lens cap, place place it front-element down never front element up.
BATTERIES
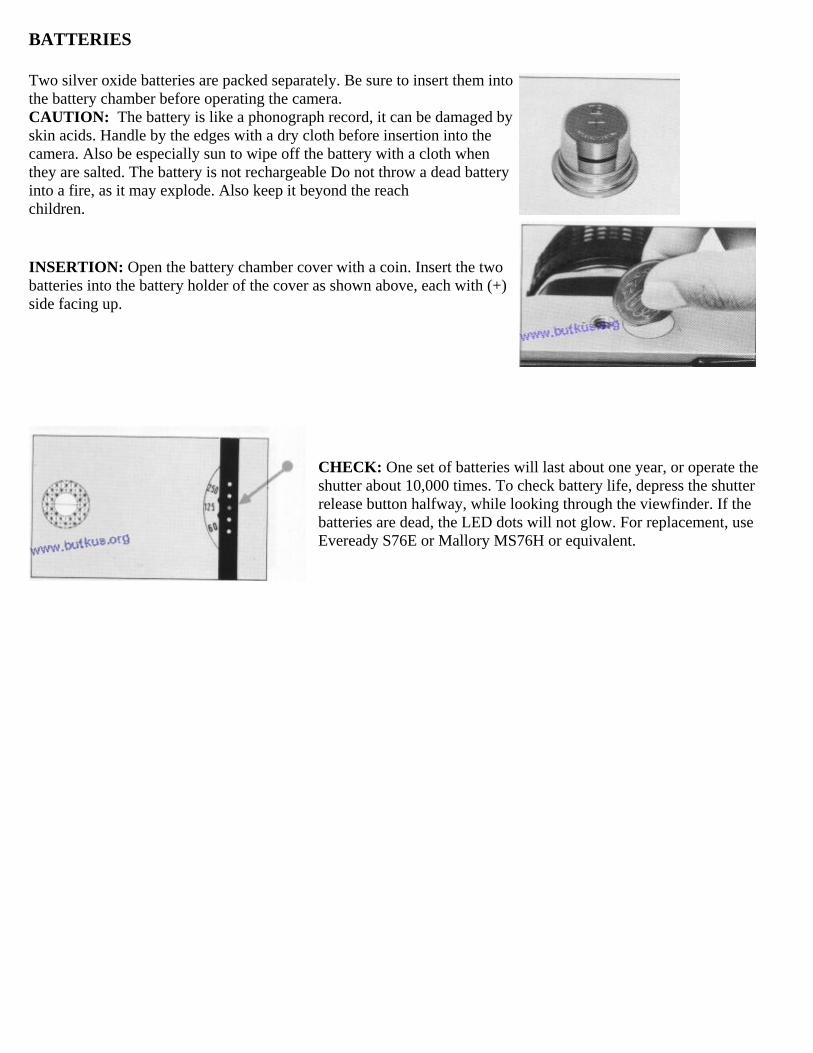
Two silver oxide batteries are packed separately. Be sure to insert them into the battery chamber before operating the camera. CAUTION: The battery is like a phonograph record, it can be damaged by skin acids. Handle by the edges with a dry cloth before insertion into the camera. Also be especially sun to wipe off the battery with a cloth when they are salted. The battery is not rechargeable Do not throw a dead battery into a fire, as it may explode. Also keep it beyond the reach children.
INSERTION: Open the battery chamber cover with a coin. Insert the two batteries into the battery holder of the cover as shown above, each with (+) side facing up.
CHECK: One set of batteries will last about one year, or operate the shutter about 10,000 times. To check battery life, depress the shutter release button halfway, while looking through the viewfinder. If the batteries are dead, the LED dots will not glow. For replacement, use Eveready S76E or Mallory MS76H or equivalent.
BASIC OPERATING INSTRUCTIONS
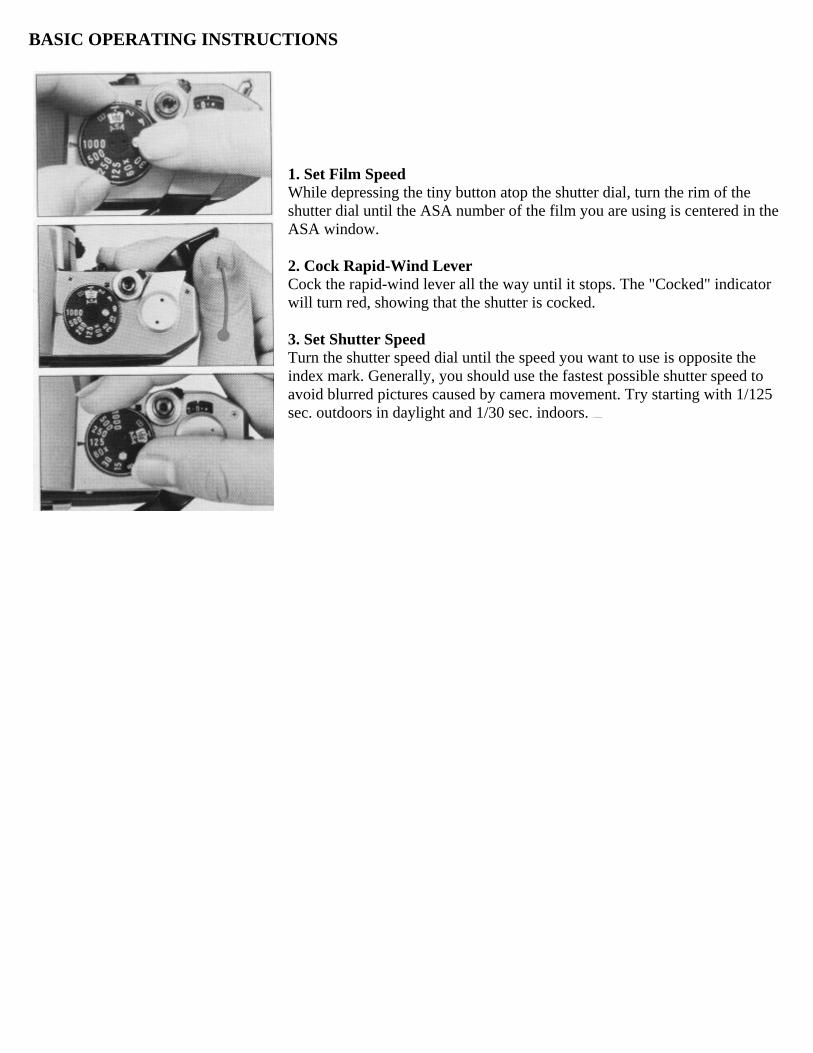
1. Set Film Speed While depressing the tiny button atop the shutter dial, turn the rim of the shutter dial until the ASA number of the film you are using is centered in the ASA window. 2. Cock Rapid-Wind Lever Cock the rapid-wind lever all the way until it stops. The "Cocked" indicator will turn red, showing that the shutter is cocked. 3. Set Shutter Speed Turn the shutter speed dial until the speed you want to use is opposite the index mark. Generally, you should use the fastest possible shutter speed to avoid blurred pictures caused by camera movement. Try starting with 1/125 sec. outdoors in daylight and 1/30 sec. indoors. www.4butkus.org
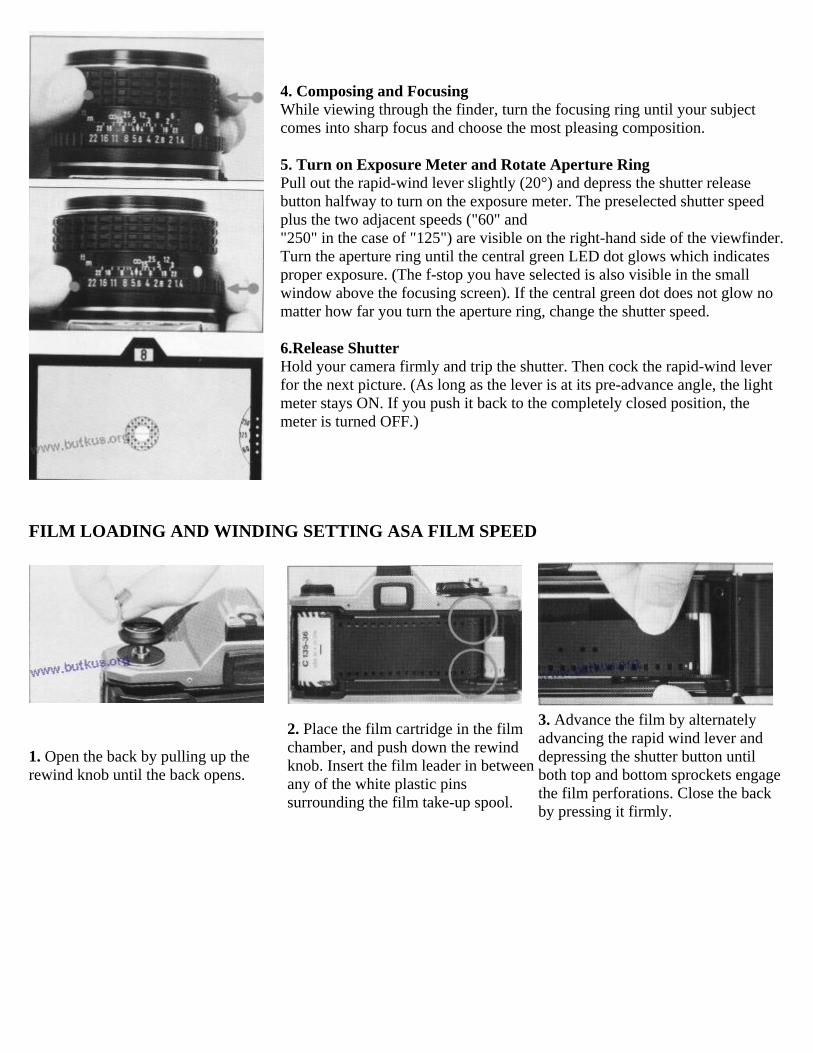
4. Composing and Focusing While viewing through the finder, turn the focusing ring until your subject comes into sharp focus and choose the most pleasing composition. 5. Turn on Exposure Meter and Rotate Aperture Ring Pull out the rapid-wind lever slightly (20°) and depress the shutter release button halfway to turn on the exposure meter. The preselected shutter speed plus the two adjacent speeds ("60" and "250" in the case of "125") are visible on the right-hand side of the viewfinder. Turn the aperture ring until the central green LED dot glows which indicates proper exposure. (The f-stop you have selected is also visible in the small window above the focusing screen). If the central green dot does not glow no matter how far you turn the aperture ring, change the shutter speed. 6.Release Shutter Hold your camera firmly and trip the shutter. Then cock the rapid-wind lever for the next picture. (As long as the lever is at its pre-advance angle, the light meter stays ON. If you push it back to the completely closed position, the meter is turned OFF.)
FILM LOADING AND WINDING SETTING ASA FILM SPEED
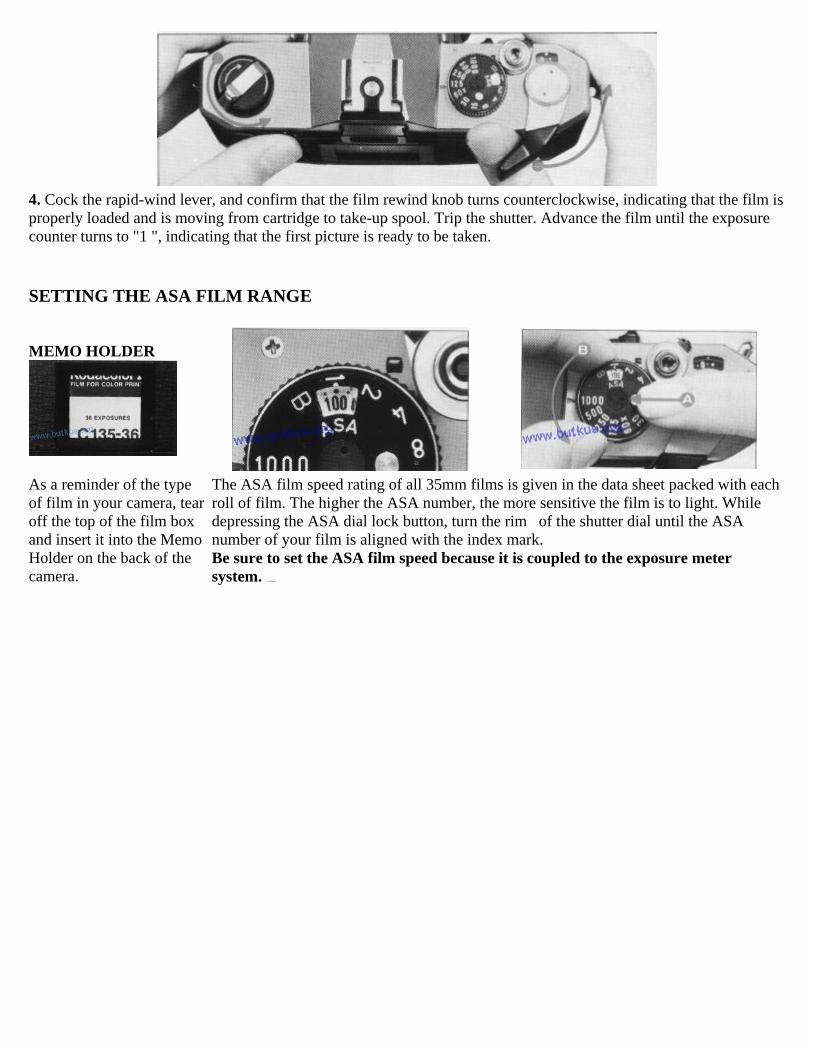
1. Open the back by pulling up the rewind knob until the back opens.
2. Place the film cartridge in the film chamber, and push down the rewind knob. Insert the film leader in between any of the white plastic pins surrounding the film take-up spool.
3. Advance the film by alternately advancing the rapid wind lever and depressing the shutter button until both top and bottom sprockets engage the film perforations. Close the back by pressing it firmly.
4. Cock the rapid-wind lever, and confirm that the film rewind knob turns counterclockwise, indicating that the film is properly loaded and is moving from cartridge to take-up spool. Trip the shutter. Advance the film until the exposure counter turns to "1 ", indicating that the first picture is ready to be taken.
SETTING THE ASA FILM RANGE
MEMO HOLDER
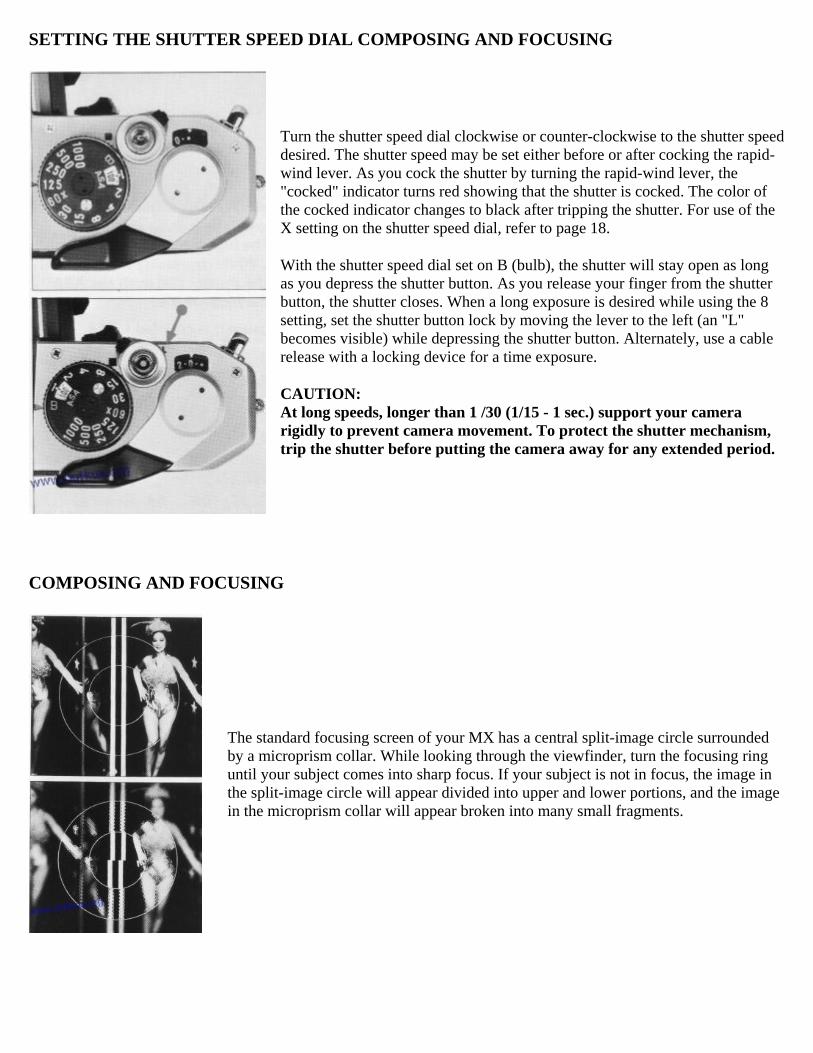
As a reminder of the type of film in your camera, tear off the top of the film box and insert it into the Memo Holder on the back of the camera.
The ASA film speed rating of all 35mm films is given in the data sheet packed with each roll of film. The higher the ASA number, the more sensitive the film is to light. While depressing the ASA dial lock button, turn the rim of the shutter dial until the ASA number of your film is aligned with the index mark. Be sure to set the ASA film speed because it is coupled to the exposure meter system. www.4butkus.org
SETTING THE SHUTTER SPEED DIAL COMPOSING AND FOCUSING
Turn the shutter speed dial clockwise or counter-clockwise to the shutter speed desired. The shutter speed may be set either before or after cocking the rapid-wind lever. As you cock the shutter by turning the rapid-wind lever, the "cocked" indicator turns red showing that the shutter is cocked. The color of the cocked indicator changes to black after tripping the shutter. For use of the X setting on the shutter speed dial, refer to page 18.
With the shutter speed dial set on B (bulb), the shutter will stay open as long as you depress the shutter button. As you release your finger from the shutter button, the shutter closes. When a long exposure is desired while using the 8 setting, set the shutter button lock by moving the lever to the left (an "L" becomes visible) while depressing the shutter button. Alternately, use a cable release with a locking device for a time exposure.
CAUTION: At long speeds, longer than 1 /30 (1/15 - 1 sec.) support your camera rigidly to prevent camera movement. To protect the shutter mechanism, trip the shutter before putting the camera away for any extended period.
COMPOSING AND FOCUSING
The standard focusing screen of your MX has a central split-image circle surrounded by a microprism collar. While looking through the viewfinder, turn the focusing ring until your subject comes into sharp focus. If your subject is not in focus, the image in the split-image circle will appear divided into upper and lower portions, and the image in the microprism collar will appear broken into many small fragments.
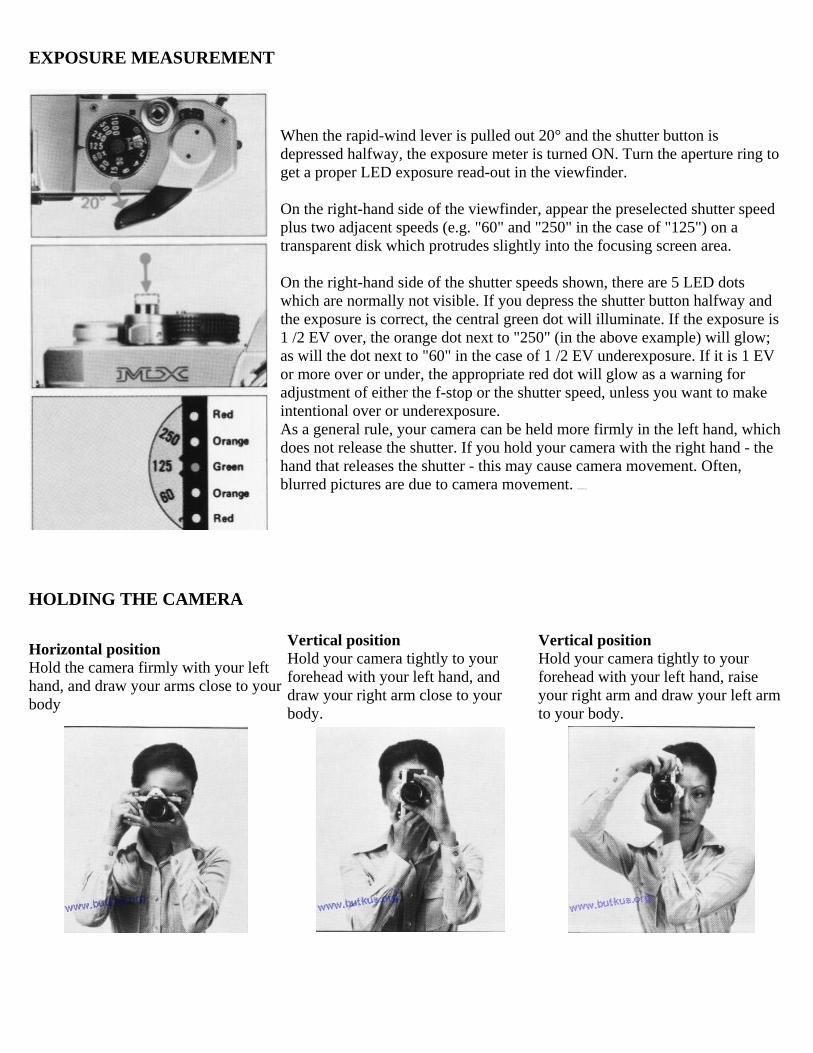
EXPOSURE MEASUREMENT
When the rapid-wind lever is pulled out 20° and the shutter button is depressed halfway, the exposure meter is turned ON. Turn the aperture ring to get a proper LED exposure read-out in the viewfinder. On the right-hand side of the viewfinder, appear the preselected shutter speed plus two adjacent speeds (e.g. "60" and "250" in the case of "125") on a transparent disk which protrudes slightly into the focusing screen area. On the right-hand side of the shutter speeds shown, there are 5 LED dots which are normally not visible. If you depress the shutter button halfway and the exposure is correct, the central green dot will illuminate. If the exposure is 1 /2 EV over, the orange dot next to "250" (in the above example) will glow; as will the dot next to "60" in the case of 1 /2 EV underexposure. If it is 1 EV or more over or under, the appropriate red dot will glow as a warning for adjustment of either the f-stop or the shutter speed, unless you want to make intentional over or underexposure. As a general rule, your camera can be held more firmly in the left hand, which does not release the shutter. If you hold your camera with the right hand - the hand that releases the shutter - this may cause camera movement. Often, blurred pictures are due to camera movement. www.4butkus.org
HOLDING THE CAMERA
Horizontal position Hold the camera firmly with your left hand, and draw your arms close to your body
Vertical position Hold your camera tightly to your forehead with your left hand, and draw your right arm close to your body.
Vertical position Hold your camera tightly to your forehead with your left hand, raise your right arm and draw your left arm to your body.
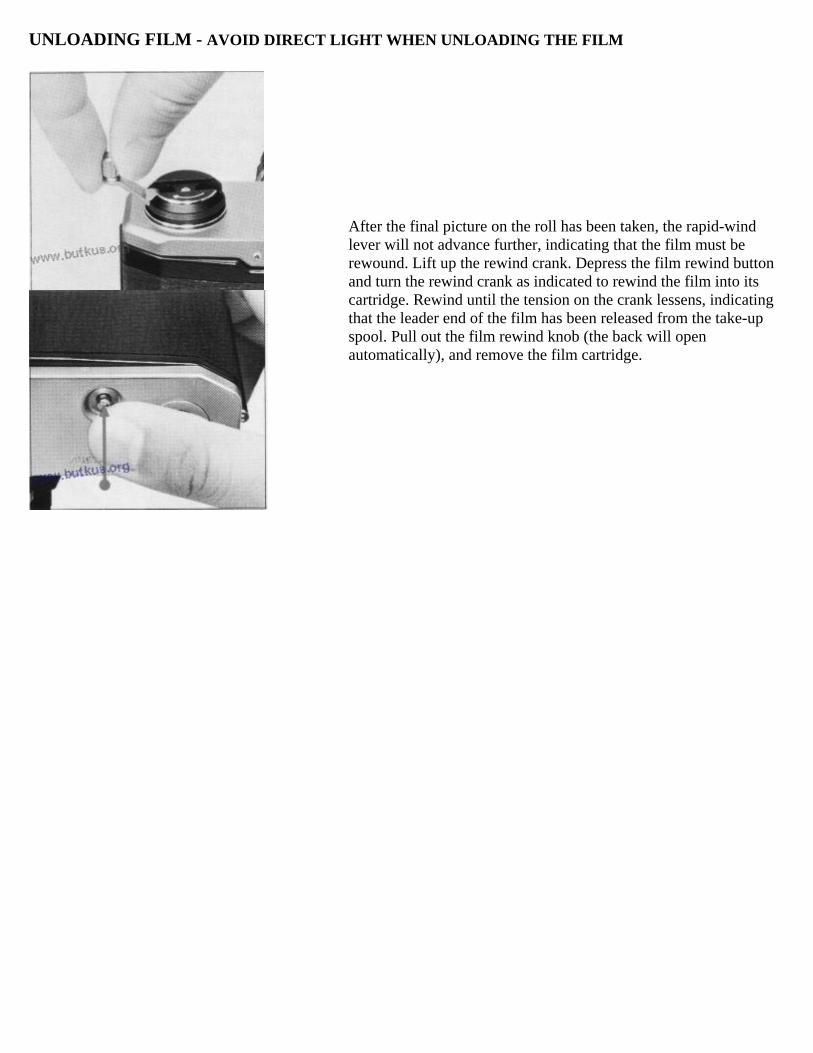
UNLOADING FILM - AVOID DIRECT LIGHT WHEN UNLOADING THE FILM
After the final picture on the roll has been taken, the rapid-wind lever will not advance further, indicating that the film must be rewound. Lift up the rewind crank. Depress the film rewind button and turn the rewind crank as indicated to rewind the film into its cartridge. Rewind until the tension on the crank lessens, indicating that the leader end of the film has been released from the take-up spool. Pull out the film rewind knob (the back will open automatically), and remove the film cartridge.

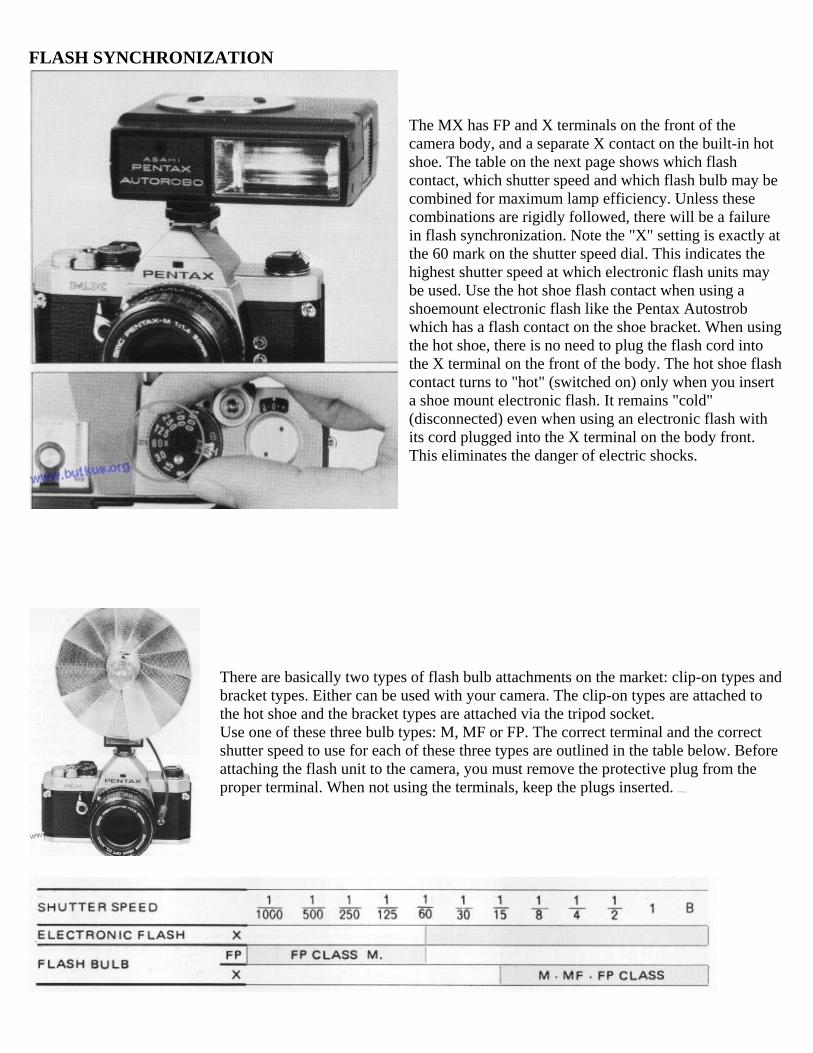
FLASH SYNCHRONIZATION
The MX has FP and X terminals on the front of the camera body, and a separate X contact on the built-in hot shoe. The table on the next page shows which flash contact, which shutter speed and which flash bulb may be combined for maximum lamp efficiency. Unless these combinations are rigidly followed, there will be a failure in flash synchronization. Note the "X" setting is exactly at the 60 mark on the shutter speed dial. This indicates the highest shutter speed at which electronic flash units may be used. Use the hot shoe flash contact when using a shoemount electronic flash like the Pentax Autostrob which has a flash contact on the shoe bracket. When using the hot shoe, there is no need to plug the flash cord into the X terminal on the front of the body. The hot shoe flash contact turns to "hot" (switched on) only when you insert a shoe mount electronic flash. It remains "cold" (disconnected) even when using an electronic flash with its cord plugged into the X terminal on the body front. This eliminates the danger of electric shocks.
There are basically two types of flash bulb attachments on the market: clip-on types and bracket types. Either can be used with your camera. The clip-on types are attached to the hot shoe and the bracket types are attached via the tripod socket. Use one of these three bulb types: M, MF or FP. The correct terminal and the correct shutter speed to use for each of these three types are outlined in the table below. Before attaching the flash unit to the camera, you must remove the protective plug from the proper terminal. When not using the terminals, keep the plugs inserted. www.4butkus.org
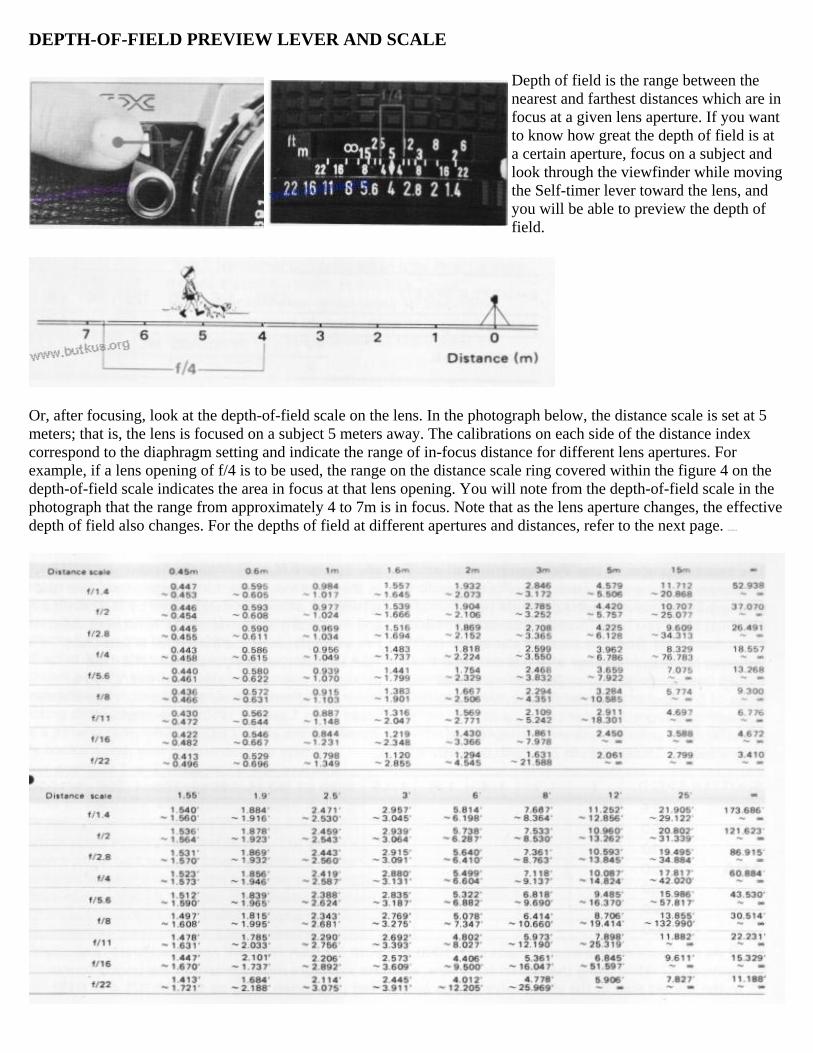
DEPTH-OF-FIELD PREVIEW LEVER AND SCALE
Depth of field is the range between the nearest and farthest distances which are in focus at a given lens aperture. If you want to know how great the depth of field is at a certain aperture, focus on a subject and look through the viewfinder while moving the Self-timer lever toward the lens, and you will be able to preview the depth of field.
Or, after focusing, look at the depth-of-field scale on the lens. In the photograph below, the distance scale is set at 5 meters; that is, the lens is focused on a subject 5 meters away. The calibrations on each side of the distance index correspond to the diaphragm setting and indicate the range of in-focus distance for different lens apertures. For example, if a lens opening of f/4 is to be used, the range on the distance scale ring covered within the figure 4 on the depth-of-field scale indicates the area in focus at that lens opening. You will note from the depth-of-field scale in the photograph that the range from approximately 4 to 7m is in focus. Note that as the lens aperture changes, the effective depth of field also changes. For the depths of field at different apertures and distances, refer to the next page. www.4butkus.org
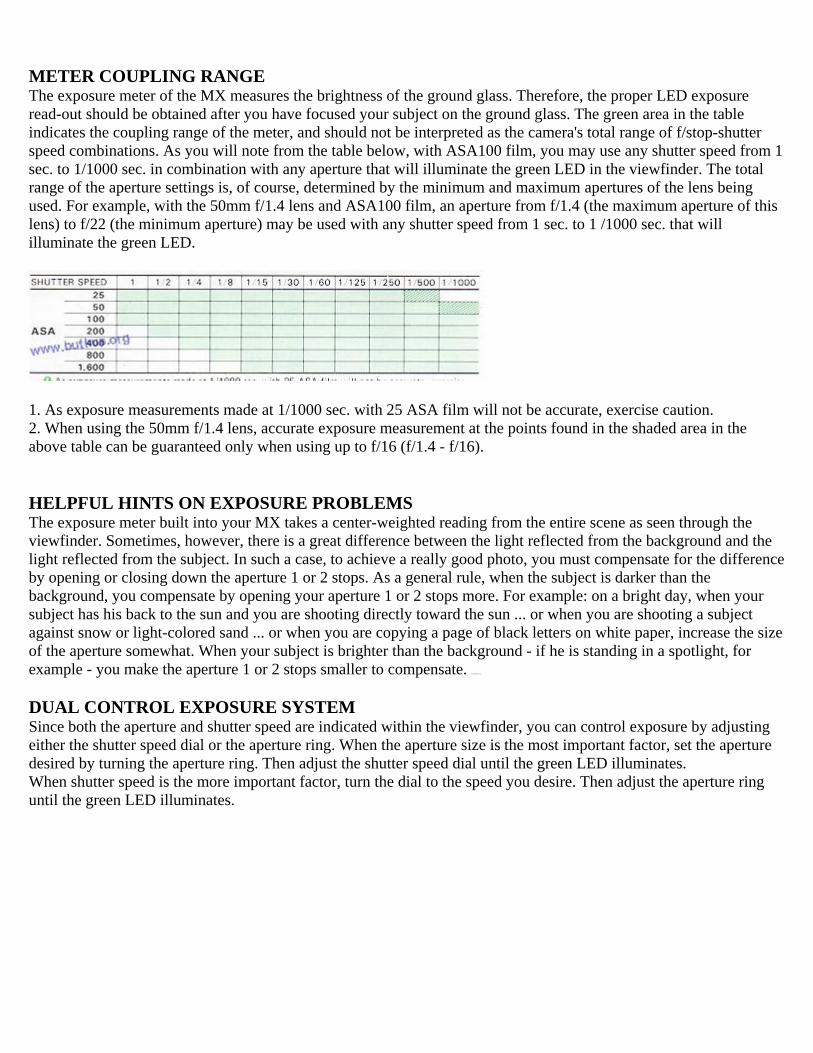
METER COUPLING RANGE The exposure meter of the MX measures the brightness of the ground glass. Therefore, the proper LED exposure read-out should be obtained after you have focused your subject on the ground glass. The green area in the table indicates the coupling range of the meter, and should not be interpreted as the camera's total range of f/stop-shutter speed combinations. As you will note from the table below, with ASA100 film, you may use any shutter speed from 1 sec. to 1/1000 sec. in combination with any aperture that will illuminate the green LED in the viewfinder. The total range of the aperture settings is, of course, determined by the minimum and maximum apertures of the lens being used. For example, with the 50mm f/1.4 lens and ASA100 film, an aperture from f/1.4 (the maximum aperture of this lens) to f/22 (the minimum aperture) may be used with any shutter speed from 1 sec. to 1 /1000 sec. that will illuminate the green LED.
1. As exposure measurements made at 1/1000 sec. with 25 ASA film will not be accurate, exercise caution. 2. When using the 50mm f/1.4 lens, accurate exposure measurement at the points found in the shaded area in the above table can be guaranteed only when using up to f/16 (f/1.4 - f/16).
HELPFUL HINTS ON EXPOSURE PROBLEMS The exposure meter built into your MX takes a center-weighted reading from the entire scene as seen through the viewfinder. Sometimes, however, there is a great difference between the light reflected from the background and the light reflected from the subject. In such a case, to achieve a really good photo, you must compensate for the difference by opening or closing down the aperture 1 or 2 stops. As a general rule, when the subject is darker than the background, you compensate by opening your aperture 1 or 2 stops more. For example: on a bright day, when your subject has his back to the sun and you are shooting directly toward the sun ... or when you are shooting a subject against snow or light-colored sand ... or when you are copying a page of black letters on white paper, increase the size of the aperture somewhat. When your subject is brighter than the background - if he is standing in a spotlight, for example - you make the aperture 1 or 2 stops smaller to compensate. www.4butkus.org DUAL CONTROL EXPOSURE SYSTEM Since both the aperture and shutter speed are indicated within the viewfinder, you can control exposure by adjusting either the shutter speed dial or the aperture ring. When the aperture size is the most important factor, set the aperture desired by turning the aperture ring. Then adjust the shutter speed dial until the green LED illuminates. When shutter speed is the more important factor, turn the dial to the speed you desire. Then adjust the aperture ring until the green LED illuminates.
SHUTTER BUTTON LOCK
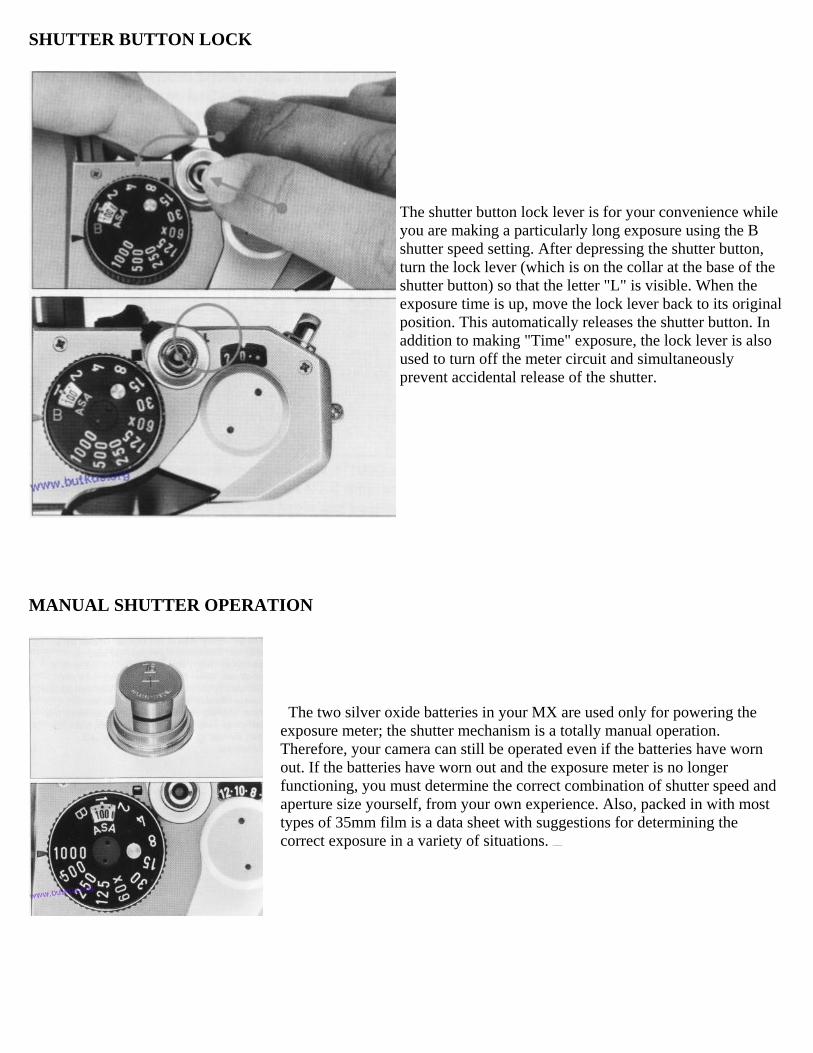
The shutter button lock lever is for your convenience while you are making a particularly long exposure using the B shutter speed setting. After depressing the shutter button, turn the lock lever (which is on the collar at the base of the shutter button) so that the letter "L" is visible. When the exposure time is up, move the lock lever back to its original position. This automatically releases the shutter button. In addition to making "Time" exposure, the lock lever is also used to turn off the meter circuit and simultaneously prevent accidental release of the shutter.
MANUAL SHUTTER OPERATION
The two silver oxide batteries in your MX are used only for powering the exposure meter; the shutter mechanism is a totally manual operation. Therefore, your camera can still be operated even if the batteries have worn out. If the batteries have worn out and the exposure meter is no longer functioning, you must determine the correct combination of shutter speed and aperture size yourself, from your own experience. Also, packed in with most types of 35mm film is a data sheet with suggestions for determining the correct exposure in a variety of situations. www.4butkus.org
SELF-TIMER
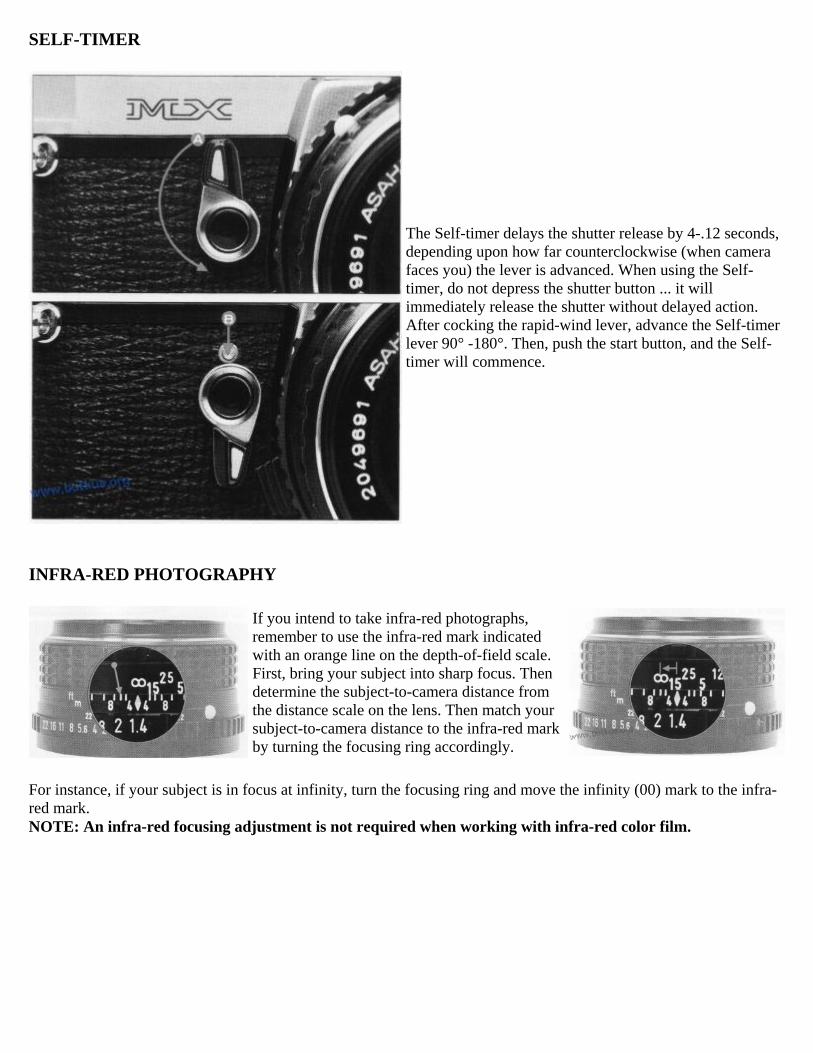
The Self-timer delays the shutter release by 4-.12 seconds, depending upon how far counterclockwise (when camera faces you) the lever is advanced. When using the Self-timer, do not depress the shutter button ... it will immediately release the shutter without delayed action. After cocking the rapid-wind lever, advance the Self-timer lever 90° -180°. Then, push the start button, and the Self-timer will commence.
INFRA-RED PHOTOGRAPHY
If you intend to take infra-red photographs, remember to use the infra-red mark indicated with an orange line on the depth-of-field scale. First, bring your subject into sharp focus. Then determine the subject-to-camera distance from the distance scale on the lens. Then match your subject-to-camera distance to the infra-red mark by turning the focusing ring accordingly.
For instance, if your subject is in focus at infinity, turn the focusing ring and move the infinity (00) mark to the infra-red mark. NOTE: An infra-red focusing adjustment is not required when working with infra-red color film.
MULTIPLE EXPOSURE
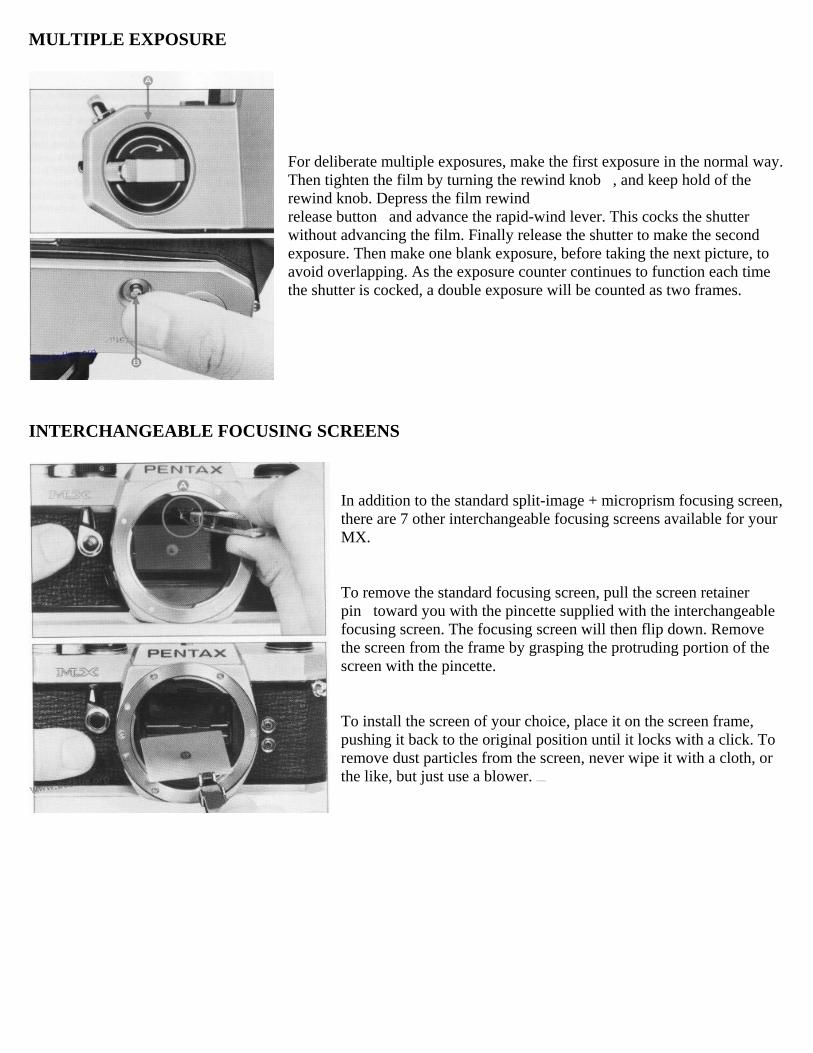
For deliberate multiple exposures, make the first exposure in the normal way. Then tighten the film by turning the rewind knob , and keep hold of the rewind knob. Depress the film rewind release button and advance the rapid-wind lever. This cocks the shutter without advancing the film. Finally release the shutter to make the second exposure. Then make one blank exposure, before taking the next picture, to avoid overlapping. As the exposure counter continues to function each time the shutter is cocked, a double exposure will be counted as two frames.
INTERCHANGEABLE FOCUSING SCREENS
In addition to the standard split-image + microprism focusing screen, there are 7 other interchangeable focusing screens available for your MX.
To remove the standard focusing screen, pull the screen retainer pin toward you with the pincette supplied with the interchangeable focusing screen. The focusing screen will then flip down. Remove the screen from the frame by grasping the protruding portion of the screen with the pincette.
To install the screen of your choice, place it on the screen frame, pushing it back to the original position until it locks with a click. To remove dust particles from the screen, never wipe it with a cloth, or the like, but just use a blower. www.4butkus.org
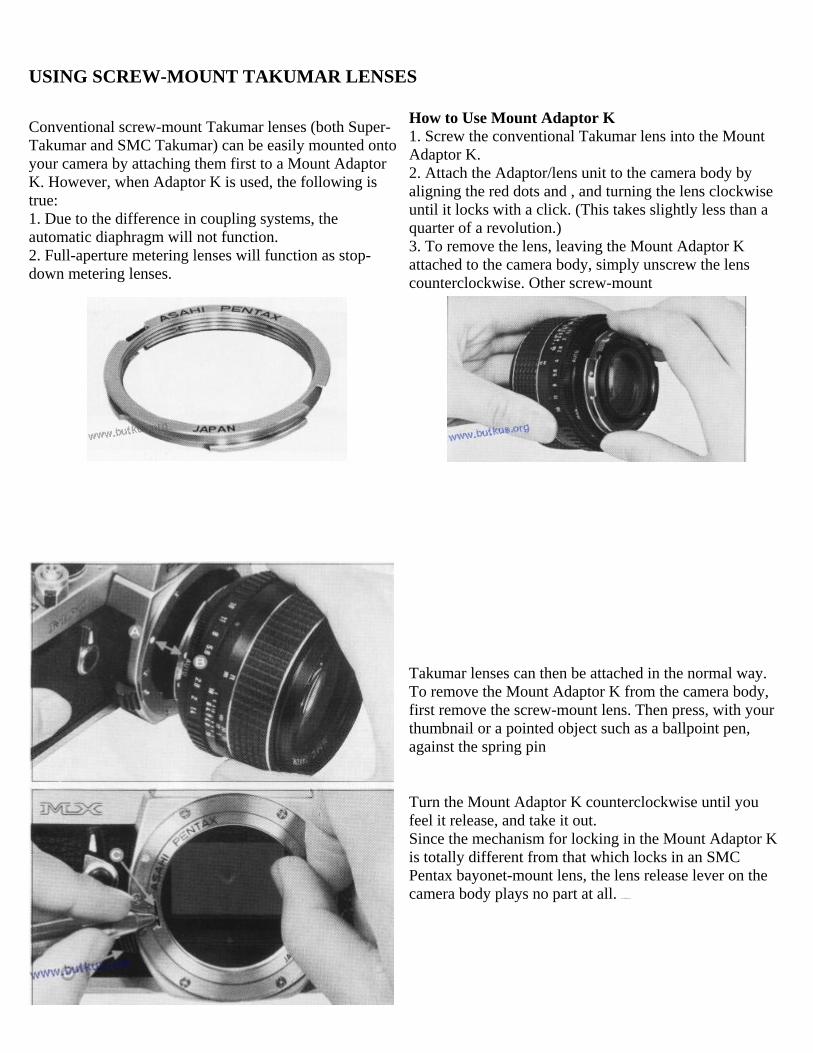
USING SCREW-MOUNT TAKUMAR LENSES
Conventional screw-mount Takumar lenses (both Super-Takumar and SMC Takumar) can be easily mounted onto your camera by attaching them first to a Mount Adaptor K. However, when Adaptor K is used, the following is true: 1. Due to the difference in coupling systems, the automatic diaphragm will not function. 2. Full-aperture metering lenses will function as stop-down metering lenses.
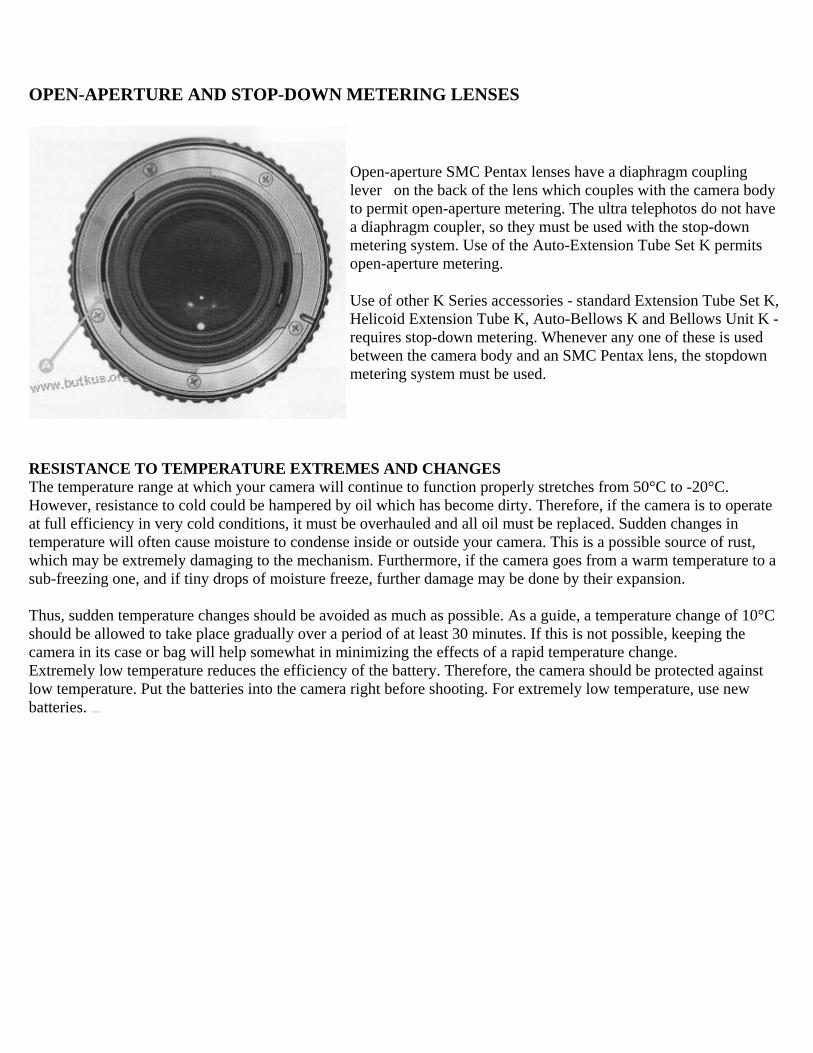
How to Use Mount Adaptor K 1. Screw the conventional Takumar lens into the Mount Adaptor K. 2. Attach the Adaptor/lens unit to the camera body by aligning the red dots and , and turning the lens clockwise until it locks with a click. (This takes slightly less than a quarter of a revolution.) 3. To remove the lens, leaving the Mount Adaptor K attached to the camera body, simply unscrew the lens counterclockwise. Other screw-mount
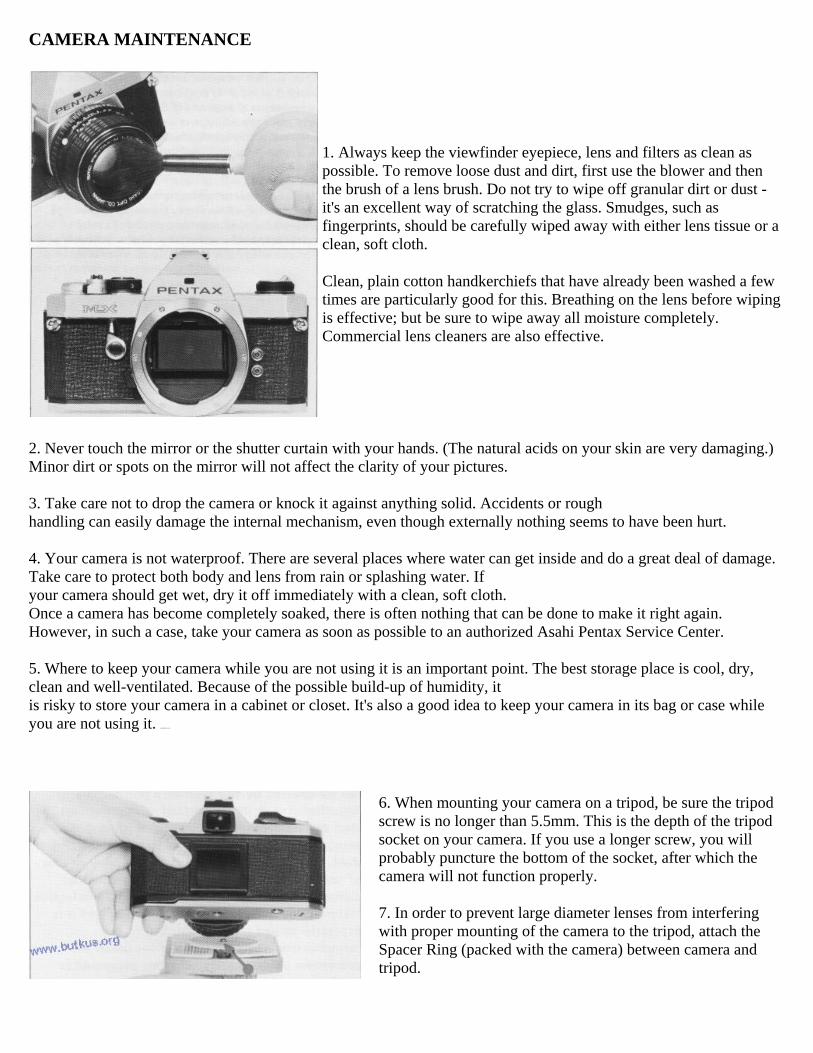
Takumar lenses can then be attached in the normal way. To remove the Mount Adaptor K from the camera body, first remove the screw-mount lens. Then press, with your thumbnail or a pointed object such as a ballpoint pen, against the spring pin
Turn the Mount Adaptor K counterclockwise until you feel it release, and take it out. Since the mechanism for locking in the Mount Adaptor K is totally different from that which locks in an SMC Pentax bayonet-mount lens, the lens release lever on the camera body plays no part at all. www.4butkus.org
OPEN-APERTURE AND STOP-DOWN METERING LENSES
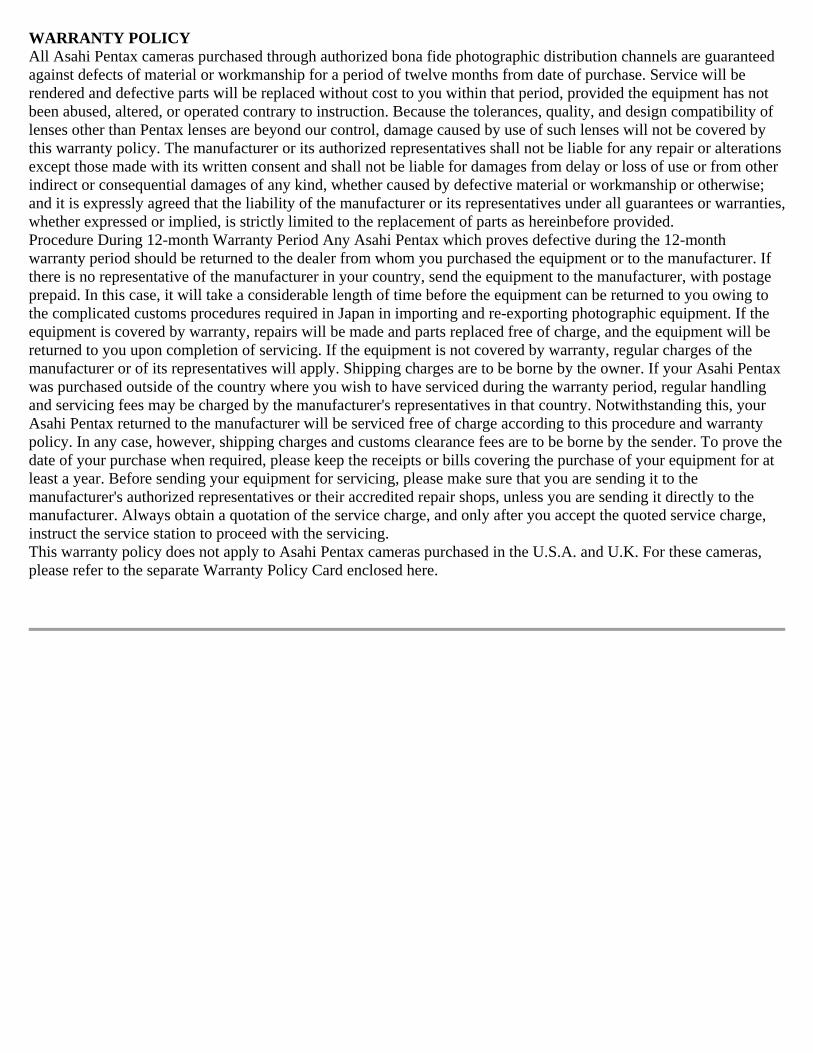
Open-aperture SMC Pentax lenses have a diaphragm coupling lever on the back of the lens which couples with the camera body to permit open-aperture metering. The ultra telephotos do not have a diaphragm coupler, so they must be used with the stop-down metering system. Use of the Auto-Extension Tube Set K permits open-aperture metering.
Use of other K Series accessories - standard Extension Tube Set K, Helicoid Extension Tube K, Auto-Bellows K and Bellows Unit K - requires stop-down metering. Whenever any one of these is used between the camera body and an SMC Pentax lens, the stopdown metering system must be used.
RESISTANCE TO TEMPERATURE EXTREMES AND CHANGES The temperature range at which your camera will continue to function properly stretches from 50°C to -20°C. However, resistance to cold could be hampered by oil which has become dirty. Therefore, if the camera is to operate at full efficiency in very cold conditions, it must be overhauled and all oil must be replaced. Sudden changes in temperature will often cause moisture to condense inside or outside your camera. This is a possible source of rust, which may be extremely damaging to the mechanism. Furthermore, if the camera goes from a warm temperature to a sub-freezing one, and if tiny drops of moisture freeze, further damage may be done by their expansion. Thus, sudden temperature changes should be avoided as much as possible. As a guide, a temperature change of 10°C should be allowed to take place gradually over a period of at least 30 minutes. If this is not possible, keeping the camera in its case or bag will help somewhat in minimizing the effects of a rapid temperature change. Extremely low temperature reduces the efficiency of the battery. Therefore, the camera should be protected against low temperature. Put the batteries into the camera right before shooting. For extremely low temperature, use new batteries. www.4butkus.org
CAMERA MAINTENANCE
1. Always keep the viewfinder eyepiece, lens and filters as clean as possible. To remove loose dust and dirt, first use the blower and then the brush of a lens brush. Do not try to wipe off granular dirt or dust - it's an excellent way of scratching the glass. Smudges, such as fingerprints, should be carefully wiped away with either lens tissue or a clean, soft cloth.
Clean, plain cotton handkerchiefs that have already been washed a few times are particularly good for this. Breathing on the lens before wiping is effective; but be sure to wipe away all moisture completely. Commercial lens cleaners are also effective.
2. Never touch the mirror or the shutter curtain with your hands. (The natural acids on your skin are very damaging.) Minor dirt or spots on the mirror will not affect the clarity of your pictures. 3. Take care not to drop the camera or knock it against anything solid. Accidents or rough handling can easily damage the internal mechanism, even though externally nothing seems to have been hurt. 4. Your camera is not waterproof. There are several places where water can get inside and do a great deal of damage. Take care to protect both body and lens from rain or splashing water. If your camera should get wet, dry it off immediately with a clean, soft cloth. Once a camera has become completely soaked, there is often nothing that can be done to make it right again. However, in such a case, take your camera as soon as possible to an authorized Asahi Pentax Service Center. 5. Where to keep your camera while you are not using it is an important point. The best storage place is cool, dry, clean and well-ventilated. Because of the possible build-up of humidity, it is risky to store your camera in a cabinet or closet. It's also a good idea to keep your camera in its bag or case while you are not using it. www.4butkus.org
6. When mounting your camera on a tripod, be sure the tripod screw is no longer than 5.5mm. This is the depth of the tripod socket on your camera. If you use a longer screw, you will probably puncture the bottom of the socket, after which the camera will not function properly. 7. In order to prevent large diameter lenses from interfering with proper mounting of the camera to the tripod, attach the Spacer Ring (packed with the camera) between camera and tripod.
WARRANTY POLICY All Asahi Pentax cameras purchased through authorized bona fide photographic distribution channels are guaranteed against defects of material or workmanship for a period of twelve months from date of purchase. Service will be rendered and defective parts will be replaced without cost to you within that period, provided the equipment has not been abused, altered, or operated contrary to instruction. Because the tolerances, quality, and design compatibility of lenses other than Pentax lenses are beyond our control, damage caused by use of such lenses will not be covered by this warranty policy. The manufacturer or its authorized representatives shall not be liable for any repair or alterations except those made with its written consent and shall not be liable for damages from delay or loss of use or from other indirect or consequential damages of any kind, whether caused by defective material or workmanship or otherwise; and it is expressly agreed that the liability of the manufacturer or its representatives under all guarantees or warranties, whether expressed or implied, is strictly limited to the replacement of parts as hereinbefore provided. Procedure During 12-month Warranty Period Any Asahi Pentax which proves defective during the 12-month warranty period should be returned to the dealer from whom you purchased the equipment or to the manufacturer. If there is no representative of the manufacturer in your country, send the equipment to the manufacturer, with postage prepaid. In this case, it will take a considerable length of time before the equipment can be returned to you owing to the complicated customs procedures required in Japan in importing and re-exporting photographic equipment. If the equipment is covered by warranty, repairs will be made and parts replaced free of charge, and the equipment will be returned to you upon completion of servicing. If the equipment is not covered by warranty, regular charges of the manufacturer or of its representatives will apply. Shipping charges are to be borne by the owner. If your Asahi Pentax was purchased outside of the country where you wish to have serviced during the warranty period, regular handling and servicing fees may be charged by the manufacturer's representatives in that country. Notwithstanding this, your Asahi Pentax returned to the manufacturer will be serviced free of charge according to this procedure and warranty policy. In any case, however, shipping charges and customs clearance fees are to be borne by the sender. To prove the date of your purchase when required, please keep the receipts or bills covering the purchase of your equipment for at least a year. Before sending your equipment for servicing, please make sure that you are sending it to the manufacturer's authorized representatives or their accredited repair shops, unless you are sending it directly to the manufacturer. Always obtain a quotation of the service charge, and only after you accept the quoted service charge, instruct the service station to proceed with the servicing. This warranty policy does not apply to Asahi Pentax cameras purchased in the U.S.A. and U.K. For these cameras, please refer to the separate Warranty Policy Card enclosed here.