Embed Size (px)
Citation preview

Aren Payroll
Version 7.0
Standard Kenya Edition
User Guide
Aren Software Ltd

Copyright c©Aren Software Limited, 2017
All rights reserved. No part of this manual may be reproduced, stored in a retrieval sys-tem, or transmitted in any form or by any means, electronic, mechanical, photocopying,recording, or otherwise, without prior written permission of Aren Software Limited.
Produced by Aren Software Ltd, P.O. Box 10083 Nairobi 00100, Kenya. Phone 0722 861553,0733 861553.

Contents
1 Introduction 1
About Aren Payroll . . . . . . . . . . . . . . . . . . . 1
Getting Started . . . . . . . . . . . . . . . . . . . . . 1
Moving On . . . . . . . . . . . . . . . . . . . . . . . 4
2 Setting Up 7
Setting up the System . . . . . . . . . . . . . . . . . 7
Working with Organisations . . . . . . . . . . . . . . 11
Setting up an Organisation . . . . . . . . . . . . . . . 12
3 Data Files 19
Employee Master File . . . . . . . . . . . . . . . . . 19
Payroll Transactions File . . . . . . . . . . . . . . . . 20
4 Reports 25
Monthly Payroll Reports . . . . . . . . . . . . . . . . 26
Quarterly Payroll Reports . . . . . . . . . . . . . . . 29
Annual Payroll Reports . . . . . . . . . . . . . . . . 30
Other Reports . . . . . . . . . . . . . . . . . . . . . . 30
Report Files . . . . . . . . . . . . . . . . . . . . . . . 30
5 Procedures 33
Backing Up . . . . . . . . . . . . . . . . . . . . . . . 33
Restoring from Backup . . . . . . . . . . . . . . . . . 34
Creating a Bank Transfer File . . . . . . . . . . . . . 34
Saving iTax Files . . . . . . . . . . . . . . . . . . . . 35
Terminating an Employee . . . . . . . . . . . . . . . 36
Closing the Month . . . . . . . . . . . . . . . . . . . 37

iv Contents
A Importing Data 39
File Format . . . . . . . . . . . . . . . . . . . . . . . 39
How to Import . . . . . . . . . . . . . . . . . . . . . 40
B Emailing Payslips 41
Entering Email Addresses . . . . . . . . . . . . . . . 41
Setting Up Email Account . . . . . . . . . . . . . . . 41
Sending Payslips . . . . . . . . . . . . . . . . . . . . 43
How to Open Payslips . . . . . . . . . . . . . . . . . 44
C Formulae 47
Loans . . . . . . . . . . . . . . . . . . . . . . . . . . 47

1 Introduction
About Aren Payroll
Aren Payroll is a payroll program that runs in the MicrosoftWindows environment. It enables you to set up a databasecontaining pay details of the employees in your organisation.Data entry is interactive with income tax, loan payments, pen-sion fund balances and other calculated amounts updated anddisplayed as you work.
The system produces several payroll reports such as payslips,payroll summary, payroll control account, cash and chequelists as well as monthly and annual tax returns. All reportsare formatted for A4 paper so there is no need to buy specialstationery.
Access to the system requires a username and a password.There is one permanent user who has unrestricted access tothe entire system. Other users can be added at any time andassigned access to those functions they need to use.
The program can be con�gured to suit the needs of your organ-isation. For example, you can de�ne an unlimited number ofpayments and deductions. You can also update the tables usedfor calculating statutory deductions should the need arise.
Aren Payroll supports multiple organisations which is conve-nient if you need to run the payroll of more than one organi-sation on a single computer. A separate licence is required foreach organisation.
Getting Started
To use Aren Payroll you must �rst install it and con�gure itto suit your needs. The rest of this section shows you how tobegin this process.
Installation
To install Aren Payroll:
1. Insert the installation CD in the CD drive.

2 1 Introduction
Figure 1.1: Setup Wizard
2. Run the program setup.exe on the installation CD.
3. Follow the on-screen instructions that appear during theinstallation process (�gure 1.1).
The installation process copies the �les required by Aren Pay-roll to the folder you specify on the hard disk of your com-puter. It will also add Aren Payroll and its Help �le to theStart menu.
Creating a Data Folder
1. Once the installation process is complete, run Aren Pay-roll by selecting it from the Start menu (�gure 1.2).
Figure 1.2: Start dialog box

Getting Started 3
2. In the Start dialog box that appears, click on Data Folderto open the Data Folders dialog box (�gure 1.3).
Figure 1.3: Data Folders dialog box
3. Click on Create in the Data Folders dialog to create anew data folder in which to store Aren Payroll data.
You can locate your data folder anywhere you want onyour computer or on a shared folder on another com-puter. Make sure you have unrestricted access to whicheverlocation you choose, otherwise the software may not workproperly.
4. Close the Data Folders dialog to return to the Start di-alog.
5. Within the Start dialog, click on Login to open the Logindialog box.
Logging In
1. In the Login dialog box enter the username supervisor(�gure 1.4).
2. You will be prompted to enter a password for use insubsequent logins (�gure 1.5). Enter a password of yourchoice.
3. The New Organisation dialog box is displayed next (�g-ure 1.6). Type in the name of your organisation and themonth from which you want to start entering data.

4 1 Introduction
Figure 1.4: Login dialog box
Figure 1.5: Set Password dialog box
Figure 1.6: New Organisation dialog box
4. Close the New Organisation dialog box to begin usingAren Payroll.
Moving On
Before entering employee data you need to �nish setting upthe program. Section 2 explains how to do this. To enteremployee data refer to Section 3 which describes the employeedata �les in Aren Payroll.
After entering employee data you can view the reports de-scribed in Section 4. With the exception of the muster rolland payroll variance, all reports can be printed out on A4paper. Use the muster roll to export payroll data to a text

Moving On 5
�le.
To close the current pay period and start a new one, run themonth end procedure described in Section 5. That sectionalso describes how to back up and restore data and createbank transfer �les.

6 1 Introduction

2 Setting Up
Before entering details about employees, use the Organisationand System menus to con�gure the program. The Organi-sation menu options apply only to the organisation that youare currently working with whereas those of the System menuapply to all organisations that you de�ne.
Setting up the System
Users
Aren Payroll supports an unlimited number of users. There isalways at least one user, supervisor. The supervisor has accessto all functions including adding and deleting other users andassigning such users access to program functions. By restrict-ing users to only those parts of the program they need for theirwork, it is possible to enforce separation of duties.
If you wish to add new users at this stage, do the following:
1. Select Users from the System Menu. This displays theUsers dialog box (�gure 2.1).
Figure 2.1: Users dialog box
2. Click on the Add button which brings up the User Iden-tity dialog box (�gure 2.2).
3. In the User Identity dialog enter the username. Enterand con�rm the password if you wish. If you do not

8 2 Setting Up
Figure 2.2: User Identity dialog box
enter a password at this stage, the user will be requiredto enter one when logging in for the �rst time. You mayalso enter the user's real name to help you identify himor her in future.
4. Close the User Identity dialog and choose Rights fromthe Users dialog box. This displays the User Rights di-alog box (�gure 2.3).
Figure 2.3: User Rights dialog box
5. Use this dialog box to specify the functions that youwould like the user to have access to.
6. Close the User Rights dialog box. You can add moreusers by repeating the procedure above.
7. Click on Close in the Users dialog box.
Banks
Aren Payroll comes with a comprehensive list of banks andtheir branches. You will need this list for employees paid by

Setting up the System 9
bank transfer rather than in cash or by cheque. The list isshared by all organisations that you create. To review or mod-ify it, select Banks from the System menu which will bring upthe Bank and Branches dialog box (�gure 2.4).
Figure 2.4: Banks and Branches dialog box
Statutory Deductions Parameters
PAYE and NHIF are calculated using brackets and rates thatare stored as tables. To view and update these tables selectIncome Tax > PAYE Rates or NHIF Rates from the Systemmenu (�gure 2.5). Refer to the current P7 booklet from theKenya Revenue Authority (KRA) for an up-to-date PAYE ta-ble.
Figure 2.5: PAYE Rates dialog box
The calculation of PAYE depends on a number of other pa-

10 2 Setting Up
rameters e.g. personal relief, insurance relief and allowablepension fund contribution. Update these parameters by se-lecting System > Income Tax > Other Parameters to openthe Income Tax Parameters dialog box (�gure 2.6). This dia-log also allows you to edit the parameters used for calculatingfringe bene�t tax.
Figure 2.6: PAYE Parameters dialog box
Mandatory NSSF contributions are a percentage of pension-able pay and are divided into two tiers. To enter this per-centage and the limits of pensionable pay for each tier, selectNSSF Rate from the System menu. This opens the NSSF Ratedialog box (�gure 2.7) where you can also edit the maximumvoluntary contribution.
Figure 2.7: NSSF Rates dialog box

Working with Organisations 11
Working with Organisations
A single installation of Aren Payroll can support up to 99di�erent organisations. Each organisation requires a separatelicence. The name of the organisation that is currently openis displayed in the title bar of the main window.
Adding a new Organisation
To add a new organisation select Add from the Organisationmenu. Use the New Organisation dialog box that follows (�g-ure 2.8) to enter the name of the organisation and the monthfrom which you want to start entering data. On closing thedialog box, the previous organisation is closed and the newone opened.
Figure 2.8: New Organisation dialog box
Opening another Organisation
To open a di�erent organisation select Open from the Organi-sation menu. This will bring up the Open Organisation dialogbox (�gure 2.9) provided there are other organisations de�ned.Select the organisation you want to open from the dialog box.
Deleting an Organisation
You can delete any organisation that is currently not open.Deleting an organisation causes all its data �les and folders tobe deleted. It is strongly recommended that you back up theorganisation's data �les before deleting it (see Section 5).
To delete an organisation:

12 2 Setting Up
Figure 2.9: Open Organisation dialog box
1. Select Delete from the Organisation menu. To minimisethe risk of accidentally deleting an organisation you willbe required to enter your password (�gure 2.10).
Figure 2.10: First Delete Organisation dialog box
2. Next, a list of all organisations in the system, exclud-ing the one that is open, will be displayed (�gure 2.11).Select the one you want to delete. Note that it is not pos-sible to delete the organisation that is currently open.
3. In the two message boxes that follow, con�rm that youwant to delete the selected organisation and destroy itsdata �les.
4. Aren Payroll will then delete the organisation. A dia-log box con�rming that the deletion is complete will bedisplayed.
Setting up an Organisation
To con�gure the organisation that is currently open, proceedas follows:

Setting up an Organisation 13
Figure 2.11: Second Delete Organisation dialog box
Basic Organisation Information
Open the Basic Organisation Info dialog box (�gure 2.12) fromthe Organisation menu and enter the organisation's addressand telephone number.
Figure 2.12: Basic Organisation Info dialog box
Also, con�rm that you want to start entering payroll detailsin the month and year shown in the dialog box. Once yourun the �rst month end procedure you will not be able to editeither of them.
Licensing
Select Licence from the Organisation menu to open the Licencedialog box (�gure 2.13). Type in the licence number supplied

14 2 Setting Up
by your dealer. If you do not have a licence number, contactyour dealer or Aren Software Ltd.
Figure 2.13: Licence dialog box
Payroll Info
Open the Payroll Info dialog box (�gure 2.14) by selectingPayroll Info from the Organisation menu. Enter the bank,branch and account number for the organisation's salary ac-count. Also enter the organisation's PIN, NSSF, NHIF andHELB numbers.
Figure 2.14: Payroll Info dialog box
In this dialog box, the Standard File Interchange (SFI) SenderID applies to those who submit their payroll to the bank inelectronic form. Leave this �eld blank if you do not alreadyhave an SFI Sender ID.

Setting up an Organisation 15
Jobs
To set up the jobs available in the organisation, open the Jobsdialog box (�gure 2.15) by selecting Jobs from the Organisa-tion menu.
Figure 2.15: Jobs dialog box
.
Administrative Units
Set up the administrative units (departments, sections, etc) inyour organisation. To do this select Units from the Organisa-tion menu.
Stations
Set up the stations (branches) in your organisation. To do thisselect Stations from the Organisation menu.
Pay Groups
Pay Groups allow you to �lter payment reports according tohow employees in your organisation are paid. For example,the bank transfer report could be �ltered by bank branch orpay date.
To set up pay groups, select Pay Groups from the Organisationmenu.
Co-operatives and Pension Funds
Create co-operative societies that employees in the organisa-tion belong to by selecting Co-operatives from the Organisa-tion menu.

16 2 Setting Up
Similarly, set up pension funds by selecting Pension Fundsfrom the Organisation menu.
Insurance Companies
If you need to deduct and remit insurance premiums, set upthe insurance companies involved by selecting Organisation >Insurance Companies.
Employee Pro�les
An employee pro�le de�nes attributes that are common to agroup of employees. These attributes are pay frequency, basicpay type (i.e., salary, daily rate or hourly rate), standard work-ing hours (per day and per pay period) and whether overtimeis payable.
To create a pro�le, select Pro�les from the Organization menuto open the Pro�les dialog box (�gure 2.16). If there is anemployee pro�le marked as default, all new employees addedto the payroll will be assigned this pro�le.
Figure 2.16: Pro�les dialog box
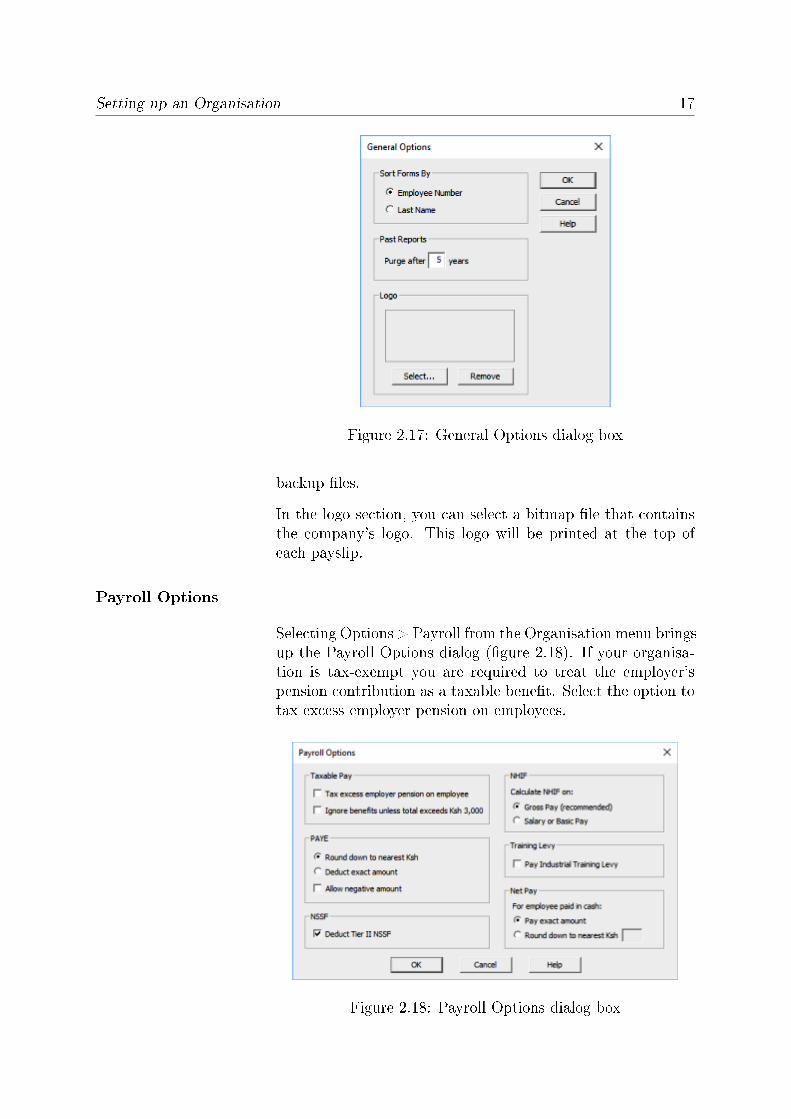
General Options
Selecting Options > General from the Organisation menu opensthe General Options dialog (�gure 2.17). This dialog allowsyou to choose the sort order for employee data entry forms.
You can also specify when to purge old reports. Deleting oldreports saves space on the hard disk and reduces the size of
Setting up an Organisation 17
Figure 2.17: General Options dialog box
backup �les.
In the logo section, you can select a bitmap �le that containsthe company's logo. This logo will be printed at the top ofeach payslip.
Payroll Options
Selecting Options > Payroll from the Organisation menu bringsup the Payroll Options dialog (�gure 2.18). If your organisa-tion is tax-exempt you are required to treat the employer'spension contribution as a taxable bene�t. Select the option totax excess employer pension on employees.
Figure 2.18: Payroll Options dialog box

18 2 Setting Up
KRA's online tax administration system, iTax, does not taxbene�ts unless they total to more than Ksh 3,000. By default,Aren Payroll taxes all non-cash bene�ts regardless of theirtotal. For it to work like iTax you must check the optionIgnore bene�ts unless total exceeds Ksh 3,000.
By default, PAYE is rounded down to the nearest shilling.However, for compatibility with the iTax system, you shouldselect the option to deduct the exact amount of PAYE.
If your organisation has opted out of tier II NSSF contribu-tions, uncheck the option to deduct tier II NSSF. This optionis enabled by default.
You can choose to have NHIF calculated on the �xed monthlysalary or on the gross pay earned in a given month. The formeroption is included for backward compatibility and you shouldalways compute NHIF on gross pay.
If your organisation pays industrial training levy for its em-ployees, check the option to pay industrial training levy. Areport will be generated each month for this purpose.
Finally, you have the option to round down net pay for em-ployees paid in cash by an amount that you specify. The excessamount is carried forward to the next month.

3 Data Files
Data for each employee is stored in two database �les, the em-ployee master �le and the payroll transactions �le. This datais used to create the various report �les from which reports areprinted.
Employee Master File
The employee master �le stores static information about eachemployee. It is accessed by selecting Employee from the Filemenu (�gure 3.1). This brings up a data entry form in whichyou enter details about each employee.
Figure 3.1: Employee Master File form
You can add and delete employee records using the Add, Deleteand Terminate commands in the Record menu.
• The Delete command simply deletes an employee record.It is only available if no month end procedure has beenrun since the current employee was added.
• The Terminate command transfers an employee recordfrom the employee master �le to the leavers report �le.This transfer takes place in the month end procedurethat follows the termination date speci�ed by the user.

20 3 Data Files
For easy access the data entry form is divided into elevenpages, i.e., Personal Details, Employment Details, Payment,Basic Pay, Overtime, Housing, PAYE, NSSF & NHIF, Co-operatives, Pension Funds and Options.
Most of the �elds in this �le are optional. However, EmployeeNumber, Last Name, Other Names, Job Title, AdministrativeUnit and Station are mandatory. If an employee is paid bybank transfer, then Bank, Branch and Account Number arealso mandatory. The optional �elds are also used in variousreports and should therefore not be left blank.
Payroll Transactions File
The payroll transactions �le stores earnings, deductions, ben-e�ts, lump sums payments and refunds for each employee forthe current month.
Earnings (or monthly cash earnings) are those cash paymentsthat relate to the current month e.g. basic pay or leave al-lowance.
Bene�ts are private expenses of an employee that are paid bythe employer e.g. school fees, house rent or telephone bills.These non-cash bene�ts are considered as income for tax pur-poses.
Deductions are those amounts deducted from an employee'spay by the employer. Some of these are called statutory de-ductions because the law requires the employer to deduct themfrom the employee's pay. The statutory deductions are PAYE,NSSF, NHIF and tax on lump sum payments.
Lump sum payments are those cash payments that do notrelate to the current month alone. Some like gratuity andbonuses have accrued over past months while others like ter-minal bene�ts may relate to past or future months. We makethe distinction between lump sum payments and monthly cashearnings because the two are treated di�erently when calcu-lating income tax.
Refunds are payments made to an employee, e.g. travelling orsubsistence allowances, for business expenses incurred whileon duty. These payments are not income and are thereforenot taxable.
The payroll transactions �le is accessed by selecting Payrollfrom the File menu. This displays a data entry form (�gure
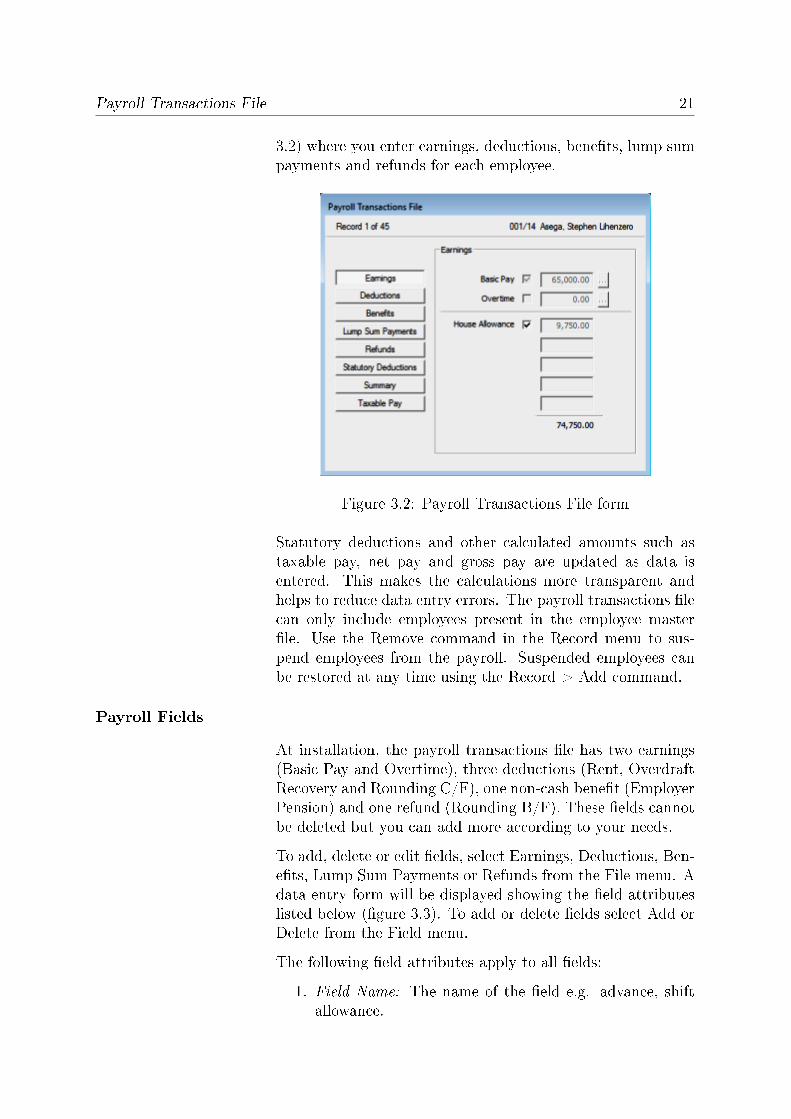
Payroll Transactions File 21
3.2) where you enter earnings, deductions, bene�ts, lump sumpayments and refunds for each employee.
Figure 3.2: Payroll Transactions File form
Statutory deductions and other calculated amounts such astaxable pay, net pay and gross pay are updated as data isentered. This makes the calculations more transparent andhelps to reduce data entry errors. The payroll transactions �lecan only include employees present in the employee master�le. Use the Remove command in the Record menu to sus-pend employees from the payroll. Suspended employees canbe restored at any time using the Record > Add command.
Payroll Fields
At installation, the payroll transactions �le has two earnings(Basic Pay and Overtime), three deductions (Rent, OverdraftRecovery and Rounding C/F), one non-cash bene�t (EmployerPension) and one refund (Rounding B/F). These �elds cannotbe deleted but you can add more according to your needs.
To add, delete or edit �elds, select Earnings, Deductions, Ben-e�ts, Lump Sum Payments or Refunds from the File menu. Adata entry form will be displayed showing the �eld attributeslisted below (�gure 3.3). To add or delete �elds select Add orDelete from the Field menu.
The following �eld attributes apply to all �elds:
1. Field Name: The name of the �eld e.g. advance, shiftallowance.

22 3 Data Files
Figure 3.3: Deductions form
2. Type: This is used to indicate permanent �elds (e.g. ba-sic pay and rent). It is also used to specify �elds thatare calculated in a unique way (e.g. hourly pay anddaily pay) and those that are associated with a balancethat is updated and displayed by the system (e.g. loanrepayments and co-operative contributions). The typeadvance is used to indicate advance payments so thatappropriate reports can be generated.
3. Amount: This attribute speci�es how the amount paidto or deducted from each employee is arrived at. It maybe keyed in, a percentage of salary, a function of the timeworked (basic pay, overtime, hourly pay and daily pay)or amortised (loan repayments).
4. Static: Static �elds retain their value when the monthend procedure is run, whereas non-static �elds are resetto their lower limit. This is only important for �elds thatare keyed in. It saves you the trouble of having to keyin the amount earned or deducted each time the monthend procedure is run.
5. Taxable/Pre-tax deduction: For earnings the taxable at-tribute speci�es whether or not the payment is subjectto PAYE. Unless prior permission has been given by theKRA, all income (i.e. earnings, non-cash bene�ts andlump sum payments) must be taxed. Refunds are nottaxable as they are not a form of income.
The pre-tax deduction attribute indicates those deduc-tions to be subtracted from gross income when calcu-lating PAYE. In Kenya the only pre-tax deductions aremortgage interest payments and contributions to regis-tered pension/provident funds and to registered home

Payroll Transactions File 23
ownership saving plans (HOSPs).
6. Pensionable: NSSF is calculated on the total pension-able earnings. Uncheck the pensionable option to ex-clude any earning from this calculation.
Depending on the selection for Type and Amount attributesthe following additional attributes may be available:
1. Co-operative: The name of the co-operative associatedwith the �eld (�gure 3.4).
Figure 3.4: Co-operative dialog box
2. Pension Fund: The name of the pension fund and otherdetails pertaining to the current �eld (�gure 3.5).
Figure 3.5: Pension Fund Parameters dialog box
3. Insurance: The name of the insurance company associ-ated with the �eld.
4. Limits: The upper and lower limits that the amountpaid or deducted should be restricted to (�gure 3.6).
5. Percentage: The percentage of monthly salary that shouldbe paid or deducted (�gure 3.7).
6. Hourly Rate: The hourly rate to use for earnings thatare of the type Hourly Pay (�gure 3.8).

24 3 Data Files
Figure 3.6: Limits dialog box
Figure 3.7: Percentage of Salary dialog box
Figure 3.8: Hourly Rate dialog box
7. Daily Rate: The daily rate to use for earnings that areof the type Daily Pay.

4 Reports
Aren Payroll produces numerous reports as described below.These reports can be viewed on the screen and printed out.You can choose to print the entire report, a range of pages, orjust the page that you are currently viewing. Internal reportscan be sorted by either employee number or name.
You can view and print reports for current as well as pastmonths and years. You can also �lter most reports by ad-ministrative unit, station, pay group, bank, co-operative orpension fund.
Reports may be printed on any printer connected to your com-puter either directly or through a local area network. Becauseall reports are formatted for A4 paper, the printer must be setto print on A4.
1. To open a report select it from the Report menu and thenfollow the on-screen instructions. For example, selectingReport > Payslips opens the Open Payslips dialog box(�gure 4.1).
Figure 4.1: Open Payslips dialog box
2. To print the open report select Print from the File menuwhich brings up the Print dialog box (�gure 4.2). Use theSetup button in this dialog box to con�gure the printeryou want to use.
3. Choose Close from the File menu to close the report.

26 4 Reports
Figure 4.2: Print dialog box
Nominal Rolls
1. Employees Roll: List of employees who are currently ac-tive. It shows their job title, administrative unit andstation.
2. Joiners Roll: List of employees who joined the organi-sation recently. It shows their job title, administrativeunit, station and start date.
3. Leavers Roll: List of employees who left in a given year.It shows their �nal job title and administrative unit, thedate they left and the reason for leaving.
Monthly Payroll Reports
The monthly payroll reports relate to a single month. Reportsfor the current month are updated as you update the employeemaster �le and the payroll transactions �le. Reports for pre-vious months can be viewed and printed out, but they cannotbe modi�ed in any way.
Overview Reports
1. Payroll Summary: Summarises earnings and deductionsfor all employees.
2. Payroll Control Account: T-account listing total earn-ings, deductions and net pay for all employees in theorganisation.
3. Muster Roll: List of employees showing all earnings,lump sum payments, refunds and deductions for the month.

Monthly Payroll Reports 27
Records in this report can be grouped by administrativeunit or station.
4. Payroll Variance: List of employees showing the di�er-ences in the payments and deductions made in any twopay periods. It is essentially the di�erence between themuster rolls for the two pay periods.
5. Gross Pay By Unit: List of administrative units showingthe sta� count and total gross pay for each.
6. Gross Pay By Station: List of stations showing the sta�count and total gross pay for each.
The muster roll and payroll variance can be viewed on thescreen or saved to a text �le but they cannot be printed out.
Detail Reports
1. Earning Report: List showing, for a particular earning,how much each employee was paid.
2. Deduction Report: List showing, for a particular non-statutory deduction, how much each employee was de-ducted. Depending on the type of deduction selected, aloan or HELB report may be printed instead.
3. Loan Report: List of employees repaying a speci�c co-operative or company loan. It shows the opening andclosing balances and a breakdown of the repayment amountinto interest and principal components.
4. HELB Report: List showing the HELB Repayment Sched-ule in the format required by HELB (Higher EducationLoans Board).
5. Bene�t Report: List showing, for a particular non-cashbene�t, how much each employee received.
6. Lump Sum Report: List showing, for a particular lumpsum payment, how much each employee received.
7. Refund Report: List showing, for a particular refund,how much each employee received.
Payments to Employees
1. Payslips: Slip giving a breakdown of the earnings anddeductions of each employee separately (�gure 4.3). Theemployer's pension contribution and the pension fundbalance can be shown in the payslip if required. When

28 4 Reports
the balance is shown, it includes the employer's portiononly if the option to print the employer contribution hasbeen selected.
Figure 4.3: Payslips
2. Cash List: List of employees paid in cash showing theiremployee number, name, net pay or advance paymentand a cash analysis of the payment amount.
3. Cheque List: List of employees paid by cheque showingtheir employee number, name and net pay or advancepayment.
4. Bank Transfer Report: List of employees who are paidby bank transfer showing their name, ID number, bank,branch, account number and payment amount. The pay-ment amount may be the net pay, an advance payment,a bank loan repayment or a HOSP contribution.
5. Coinage Summary Report: List showing the number ofcoins and notes of each denomination that are requiredfor workers who are paid in cash. This information isthe same as the totals in the cash list but formatted sothat it can be used when withdrawing the cash from abank.
Statutory Returns
1. PAYE Report: List of employees showing their PAYEdeductions.
2. NSSF Report: List of employees showing NSSF number,ID number and the combined employer and employee

Quarterly Payroll Reports 29
tier I and tier II contributions. Voluntary contributionsare also shown.
The NSSF return �le is available under the Proceduremenu (Procedure > NSSF return). This generates a text�le which should be opened with Microsoft Excel andsaved again as an Excel �le.
3. NHIF Report: List of employees showing NHIF number,ID number, date of birth and NHIF deduction.
To generate the NHIF return �le, select Procedure >NHIF Return. This saves a text �le that should be con-verted into a Microsoft Excel spreadsheet.
4. Industrial Training Levy Report: List showing the in-dustrial training levy payable to the National IndustrialTraining Authority for each employee in the payroll.
5. Lump Sums Tax Report: List showing tax payable onlump sum payments for each employee.
6. Fringe Bene�t Tax Report: List showing tax payable onthe fringe bene�t arising from company loans issued atan interest rate below the KRA prescribed market inter-est rate.
Other Returns
1. Co-operative Report: List of members of a particular co-operative society showing membership number, monthlycontribution and any other payroll deductions to be paidto that co-operative.
2. Pension Report: List of members of a particular pensionfund showing membership number and employer and em-ployee contributions to that pension fund.
3. Insurance Company Return: List of employee premiumdeductions to be paid to a particular insurance company.
Quarterly Payroll Reports
These are payroll reports relating to a particular quarter ofthe year.
1. P10D: Quarterly tax return. It lists each employee'squarterly taxable income and the tax deducted.

30 4 Reports
Annual Payroll Reports
Annual payroll reports relate to a calendar year and are avail-able throughout the year. For the current year, the informa-tion displayed relates to the months that have elapsed so far.The reports are:
1. Payroll Control Account.
2. Muster Roll.
3. Annual Pay Sheet: A report that, for each employee,gives a summary of payments, deductions and bene�tsfor a whole year.
4. P9A: KRA form titled Tax Deduction Card. Each P9Agives a breakdown of the income of an employee for eachmonth of the year and shows the amount of tax deducted.
5. P10: KRA form titled Employer's Covering Certi�cate.It shows the tax deducted by the employer for eachmonth of the year.
6. P10A: KRA form titled Supporting List for End of YearCerti�cate. It lists the annual income and total tax de-ducted from each employee.
7. NSSF Statement: A report that shows the standard andvoluntary monthly contributions to NSSF for a singleemployee for a calendar year.
8. NHIF Statement: A report that shows an employee'smonthly NHIF deductions for a calendar year.
The P9A, P10 and P10A have been approved by the KRA(approval reference number CIT/1037/2/98/20).
Other Reports
1. Bank Codes: A listing of banks, bank branches and theirsort codes drawn from the banks �les.
2. Audit Trail: List that shows the date and time of eachlogin, backup, month end procedure and any other majorevent. It also shows the user responsible for each event.This report is only available to the supervisor.
Report Files
Almost all reports are printed from report �les, not directlyfrom the employee data �les. Brie�y, the report �les are:

Report Files 31
1. Active employees report �le
2. Annual leavers report �les
3. Monthly payroll report �les
4. Annual payroll report �les
Report �les are updated automatically by Aren Payroll. Usethe General Options dialog box (Organisation > Options >General) to specify how long to keep these �les for.

32 4 Reports
5 Procedures
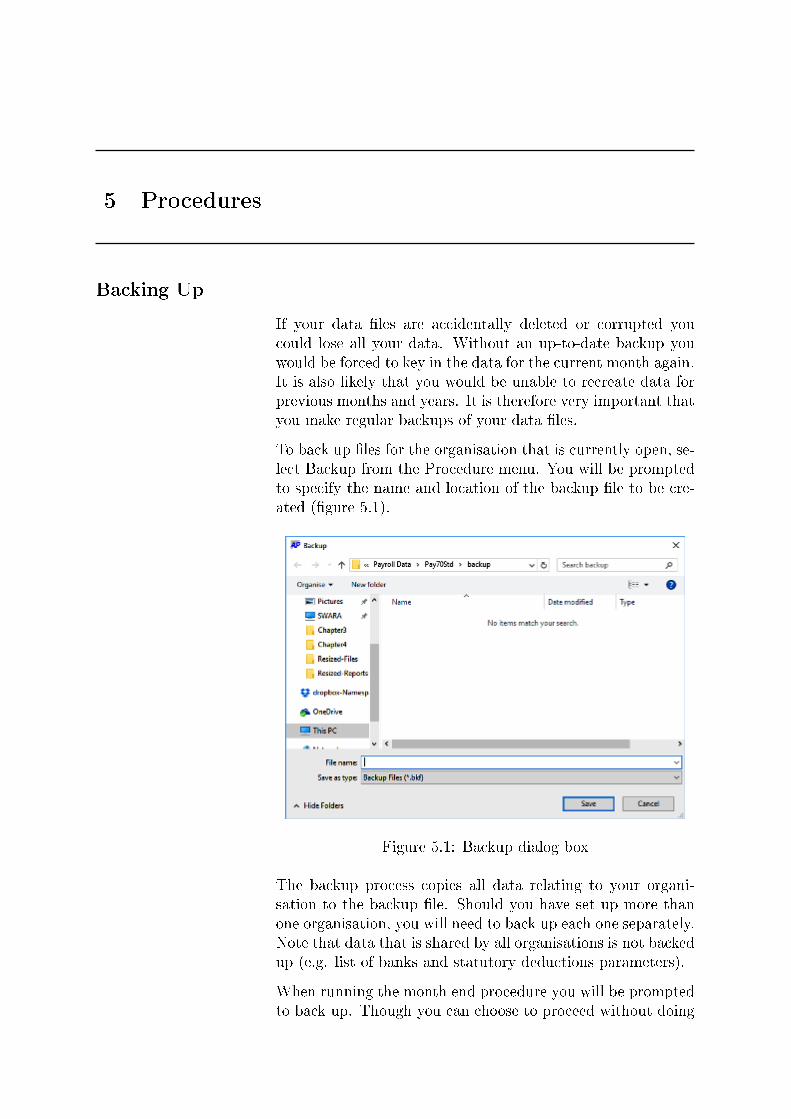
Backing Up
If your data �les are accidentally deleted or corrupted youcould lose all your data. Without an up-to-date backup youwould be forced to key in the data for the current month again.It is also likely that you would be unable to recreate data forprevious months and years. It is therefore very important thatyou make regular backups of your data �les.
To back up �les for the organisation that is currently open, se-lect Backup from the Procedure menu. You will be promptedto specify the name and location of the backup �le to be cre-ated (�gure 5.1).
Figure 5.1: Backup dialog box
The backup process copies all data relating to your organi-sation to the backup �le. Should you have set up more thanone organisation, you will need to back up each one separately.Note that data that is shared by all organisations is not backedup (e.g. list of banks and statutory deductions parameters).
When running the month end procedure you will be promptedto back up. Though you can choose to proceed without doing

34 5 Procedures
so, it is recommended that you back up �rst. To encourageregular back ups Aren Payroll prompts you to back up eachtime you exit.
Restoring from Backup
In the event that your data �les are corrupted or deleted youwill need to recover them from a backup �le. You can also usebackup �les to revert to an earlier month. This is especiallyuseful if you accidentally run the month end procedure.
To restore an organisation's �les from backup, select Restorefrom the Procedure menu then follow the on-screen instruc-tions (�gure 5.2).
Figure 5.2: Restore dialog box
Creating a Bank Transfer File
A bank transfer �le is an electronic version of the bank transferreport. It is used by banks to process payments for employeespaid by bank transfer in place of the printed bank transferreport. Aren Payroll can create bank transfer �les for numer-ous banks including Barclays, Co-operative, Equity, KCB andStandard Chartered.
1. To create a bank transfer �le select Bank Transfer Filefrom the Procedure menu. The Save Bank Transfer Filedialog box appears (�gure 5.3).
2. Specify the format of the bank transfer �le to createand the name of the payment �eld (usually net pay).Depending on the �le format, you may be able to specifythe date you want the bank transfer e�ected.

Saving iTax Files 35
Figure 5.3: Save Bank Transfer File dialog box
3. After closing the Save Bank Transfer File dialog box, astandard Save As dialog box appears. Use this dialog tospecify the name and location of the �le to be created.
For further details on bank transfer �les please contact yourbank.
Saving iTax Files
iTax �les are text �les containing tax details about employeesin the payroll. These �les help you to �ll out the iTax spread-sheet (P10_Return.xlsm) that is used for �ling tax returnson the KRA website. Two formats are available�EmployeeDetails and Fringe Bene�t Tax. In the iTax spreadsheet,data in these two formats should be imported into the tabsB_Employee_Dtls and J_FBT_Dtls, respectively.
1. To save the Employee Details �le, select iTax File >Employee Details from the Procedure menu.
2. In the Save Employee Details File dialog that is displayed(�gure 5.4), select the month and year you want.
3. By default only employees who have paid PAYE in theselected month will be included in the �le. If you wishto include those with zero PAYE as well, click on Nextand select the option Include all employees.
4. After closing the Save iTax Employee Details File dialogbox, a new dialog box appears. Use this dialog to specifythe name and location of the �le to be created.
5. To save the Fringe Bene�t Tax �le, select Procedure> iTax File > Fringe Bene�t Tax and then proceed asabove.
36 5 Procedures
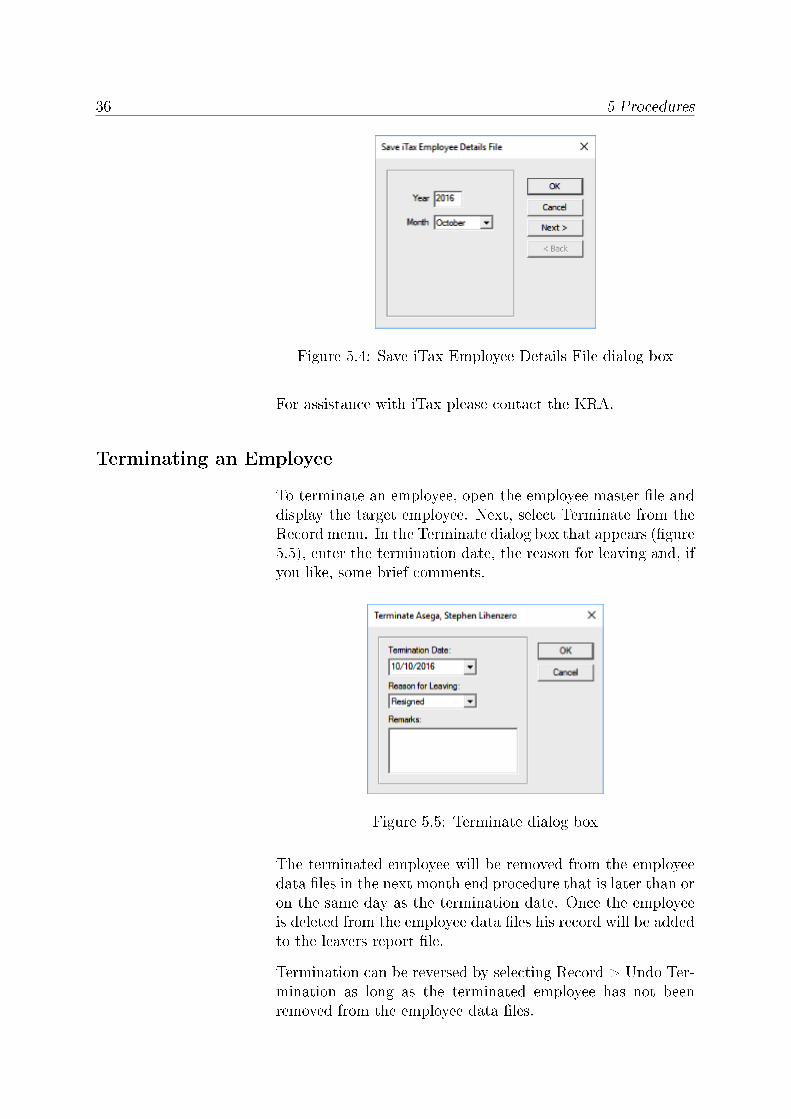
Figure 5.4: Save iTax Employee Details File dialog box
For assistance with iTax please contact the KRA.
Terminating an Employee
To terminate an employee, open the employee master �le anddisplay the target employee. Next, select Terminate from theRecord menu. In the Terminate dialog box that appears (�gure5.5), enter the termination date, the reason for leaving and, ifyou like, some brief comments.
Figure 5.5: Terminate dialog box
The terminated employee will be removed from the employeedata �les in the next month end procedure that is later than oron the same day as the termination date. Once the employeeis deleted from the employee data �les his record will be addedto the leavers report �le.
Termination can be reversed by selecting Record > Undo Ter-mination as long as the terminated employee has not beenremoved from the employee data �les.

Closing the Month 37
Closing the Month
The month end procedure is used to close data entry for thecurrent month and begin a new one. It applies only to theorganisation that is currently open. It does the following:
1. Saves all payroll information for the current month tothe monthly and annual report �les.
2. Transfers terminated employees from the employee mas-ter �le to the leavers report �le.
3. Deletes the current payroll transactions �le and createsa new one for the coming month.
4. Deletes any report �les that have exceeded the maximumage set in the General Options dialog box.
5. Advances the pay period by one month.
6. If the new month is January, it creates statutory deduc-tion �les for the new year.
The month end procedure should only be run after all reportsfor the current month have been veri�ed since, once it is run,reports for that month cannot be changed.
To run the procedure:
1. Select Month End from the Procedure menu. This op-tion is only available if you have licensed the organisa-tion.
2. After reading the dialog box that appears (�gure 5.6),con�rm that you want to close the month by enteringyour password.
Figure 5.6: Month End Procedure dialog box
3. You will now be prompted to back up your data and arestrongly encouraged to do so.

38 5 Procedures
4. Once the back up is complete, the month end proce-dure will automatically follow. Eventually, a messagebox con�rming its completion will appear.

Appendix A Importing Data
Keying in new employees into the payroll can be very timeconsuming especially if there are many of them. As an al-ternative, you can import employee data into the employeemaster �le from a text �le.
The easiest way to create the input text �le is to capture em-ployee data in a spreadsheet and then save the spreadsheet asa text �le.
File Format
The format of the input text �le is as follows:
1. Plain text with data items separated by the tab character(i.e. a tab-separated text �le).
2. The �rst row of data is a header with the data items Em-ployee Number, Last Name, Other Names, ID Number,Job Title, Admin Unit, Station, Pay Rate, PIN, NSSFNumber and NHIF Number.
3. From row two onwards, each row has data for a singleemployee, i.e. employee number, last name, other names,ID number, job title, administrative unit, station, payrate, PIN, NSSF number and NHIF number.
Note that:
1. The �rst row (�le header) is ignored. It is only includedfor the convenience of the person preparing the input�le.
2. A row will not be imported if the employee numbermatches that of a record already in the employee master�le.
3. A row will also be skipped if any of the following dataitems is blank: employee number, last name, other names,job title, administrative unit, station.
4. Data will be imported into several �les�employee mas-ter, payroll transactions, jobs, adminstrative units andstations.
40 Appendix A Importing Data
5. Where a default pro�le has been de�ned, it will be ap-plied to each record added to the employee master �le.
How to Import
1. Back up your data just in case you need to undo thechanges you are about to make (Procedure > Backup).
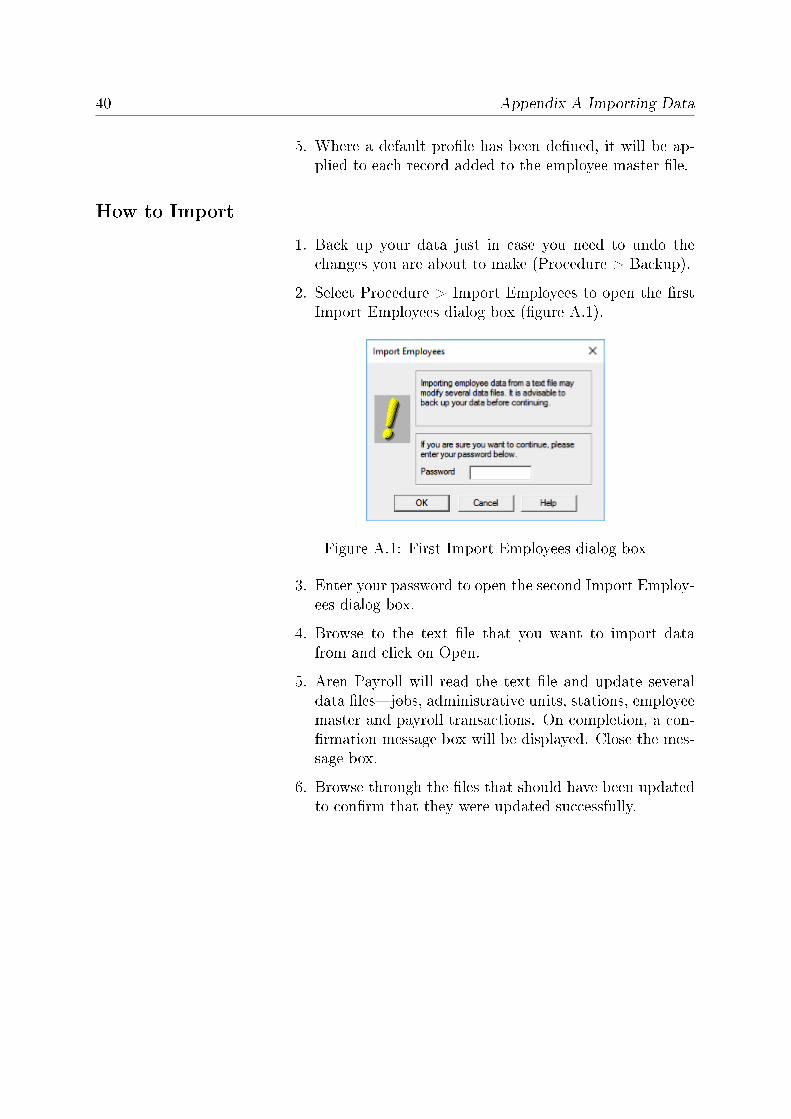
2. Select Procedure > Import Employees to open the �rstImport Employees dialog box (�gure A.1).
Figure A.1: First Import Employees dialog box
3. Enter your password to open the second Import Employ-ees dialog box.
4. Browse to the text �le that you want to import datafrom and click on Open.
5. Aren Payroll will read the text �le and update severaldata �les�jobs, administrative units, stations, employeemaster and payroll transactions. On completion, a con-�rmation message box will be displayed. Close the mes-sage box.
6. Browse through the �les that should have been updatedto con�rm that they were updated successfully.

Appendix B Emailing Payslips
Aren Payroll can email payslips to each of the employees in thepayroll. This provides an alternative to printing individualpayslips for each employee. Payslips are sent as password-protected PDF �les.
Entering Email Addresses
Start by capturing the email addresses to send employee payslipsto.
1. Open the employee master �le (File > Employee) andselect the options tab (�gure B.1).
Figure B.1: Employee Master File form
2. For the each employee, enter the address to email payslipsto.
3. Close the employee master �le.
Setting Up Email Account
In order to send email, you need to set up your email account.For this you require details of the outgoing mail server, also

42 Appendix B Emailing Payslips
known as the SMTP server. Consult your IT department ifnecessary or check the settings in the email software you use.
1. Select System > Email Account to open the Email Ac-count dialog box (�gure B.2).
Figure B.2: Email Account dialog box
2. Email Address: Enter your email address, say [email protected] or [email protected].
3. SMTP Server: Enter the name of the outgoing mailserver, e.g. mail.demorestraurant.co.ke or smtp.gmail-.com. You can also enter the server's IP address, e.g.192.168.0.23.
4. SMTP Port: The SMTP port is a unique number thatthe mail server has set aside for outgoing mail. The mostcommon values are 25, 465 and 587. If your server usesa secure (encrypted) connection, e.g. smtp.gmail.com orsmtp.mail.yahoo.com, try port 465 or 587. If it does not,enter 25.
5. Timeout: This is length of time the software should waitfor a response from the mail server before giving up.
6. Use secure connection: Check this option if the mailserver uses a secure connection.

Sending Payslips 43
7. Authentication: You may select none (no account nameor password required), plain or login (requires accountname and password).
8. Account Name and Password: Enter the login name andpassword for the mail server if you have selected login orplain authentication.
9. Copy all emails to self: Check this option if you want toreceive a copy of all the payslips you send.
10. Close the Email Account dialog box.
Sending Payslips
Now you are ready to email payslips to employees.
1. Select Procedure > Email Payslips to open the EmailPayslips dialog box (�gure B.3).
Figure B.3: First Email Payslips dialog box
2. Choose the pay period that you want then click OK. Thisopens another dialog box with the same title (�gure B.4).
3. Click on Send to send the email that is open. You canenter or modify the recipient's email address under SendTo.
4. Click on Send All to send all the payslips. Payslips with-out an email address will be skipped. On completion, amessage box showing the number of messages sent willbe displayed.
5. Close the Email Payslips dialog box when you are through.

44 Appendix B Emailing Payslips
Figure B.4: Second Email Payslips dialog box
How to Open Payslips
Once a payslip is sent, the recipient will need a password toopen it. Each payslip has two passwords:
1. Owner Password: The last four digits of the organi-sation's PIN. For instance, if the organisation's PIN isP012345678Q, the owner password will be 5678. Shouldthe organisation's PIN be blank, the default password isowner.
2. User Password: The last four digits of the employee'sPIN. Where the employee's PIN is missing, the defaultpassword is user. This is the password that employeesshould use.
You can modify the message that is sent to employees to in-clude help on the password they will use to open the payslip.
1. Go to Procedure > Email Payslips to open the EmailPayslips dialog box.
2. Click on Options to open the Electronic Payslip Optionsdialog box (�gure B.5).
3. Check the option Include password help.
4. Close the Electronic Payslip Options dialog box.
5. Close the Email Payslip dialog box.

How to Open Payslips 45
Figure B.5: Electronic Payslips Options dialog box

46 Appendix B Emailing Payslips
Appendix C Formulae
Loans
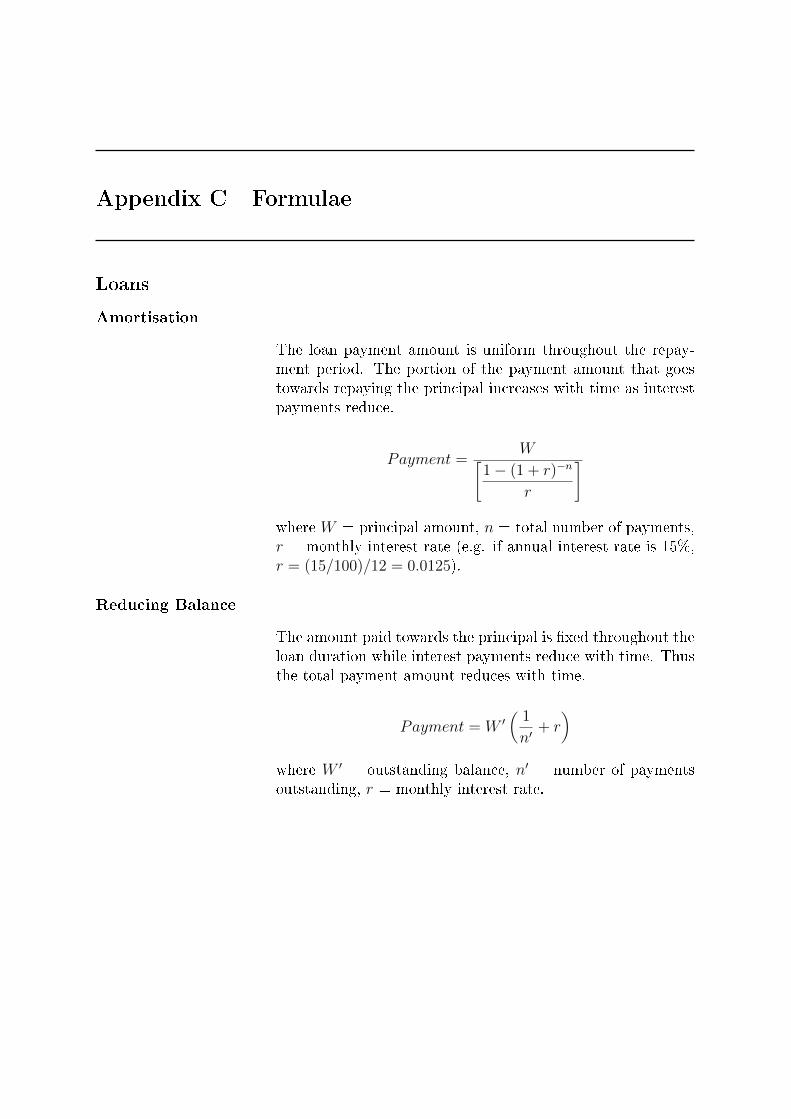
Amortisation
The loan payment amount is uniform throughout the repay-ment period. The portion of the payment amount that goestowards repaying the principal increases with time as interestpayments reduce.
Payment =W[
1− (1 + r)−n
r
]
where W = principal amount, n = total number of payments,r = monthly interest rate (e.g. if annual interest rate is 15%,r = (15/100)/12 = 0.0125).
Reducing Balance
The amount paid towards the principal is �xed throughout theloan duration while interest payments reduce with time. Thusthe total payment amount reduces with time.
Payment = W ′(1
n′+ r
)
where W ′ = outstanding balance, n′ = number of paymentsoutstanding, r = monthly interest rate.