Embed Size (px)
Citation preview

6-10-2010
1
Geert LangereisOctober 4, 2010
Workshop Arduino
Arduino Workshop
Geert Langereis
HG2.52
Geert LangereisOctober 4, 2010
Workshop Arduino
Arduino Workshop• Background on
microcontrollers• Writing a program• Connecting hardware
Action:• Installing the software• Making a LED blink• Read a button• Send text to computer

6-10-2010
2
Geert LangereisOctober 4, 2010
Workshop Arduino
“Microcontrollers are not scary”
Geert LangereisOctober 4, 2010
Intelligent products
Workshop Arduino
6-10-2010
3
Geert LangereisOctober 4, 2010
Arduino Workshop
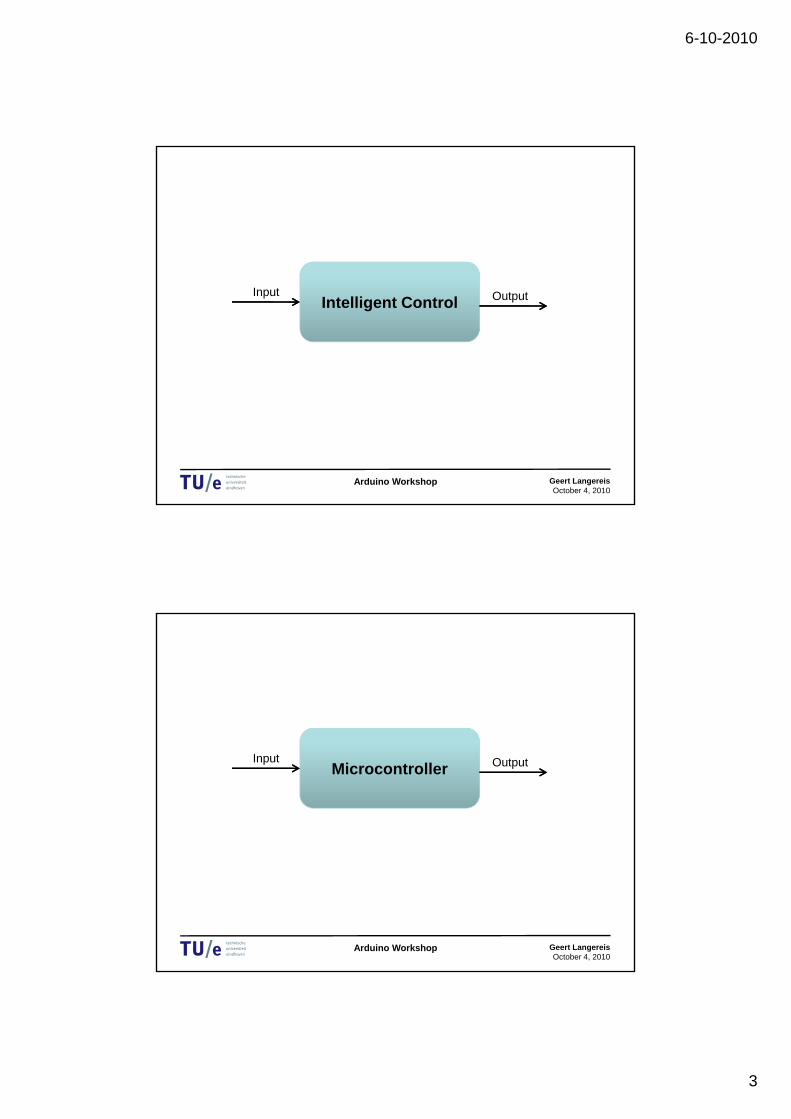
Intelligent ControlInput Output
Geert LangereisOctober 4, 2010
Arduino Workshop
MicrocontrollerInput Output

6-10-2010
4
Geert LangereisOctober 4, 2010
Why microcontrollers for ID?
• They enable you to turn your concepts into working prototypes
• Can be developed everywhere in your career at low cost
• You can re-use blocks of code and hardware, or re-use work of others
Arduino Workshop
Geert LangereisOctober 4, 2010
Arduino Workshop
Arduino Uno
Arduino BT (Bluetooth)
Arduino NanoArduino Pro Mini
Arduino Lilypad

6-10-2010
5
Geert LangereisOctober 4, 2010
Arduino Workshop
Atmel AVRMicrocontroller
Digital input and output pins
Power out
Reset button
Analog input pins
USB connector
Power in
Clock“ heartbeat”
Geert LangereisOctober 4, 2010
Arduino Workshop
Two microcontrollers supported by e-Atelier
Arduino
Microchip PIC

6-10-2010
6
Geert LangereisOctober 4, 2010
Two microcontrollers supported by e-Atelier
Arduino
• €24,50
• Programming in Arduino Programming Environment (C language) or AVR-Studio
• Easy to start with
• “Phidgets” available
• Huge community
• Slow and less flexible
• Software development on Mac OS-X and Windows
Microchip PIC
• €25,-
• Programming in MP-Lab (C language)
• More complex
• Fast and flexible
• Windows only software development
Arduino Workshop
Geert LangereisOctober 4, 2010
The development system
Arduino Workshop
MicrocontrollerInput Output

6-10-2010
7
Geert LangereisOctober 4, 2010
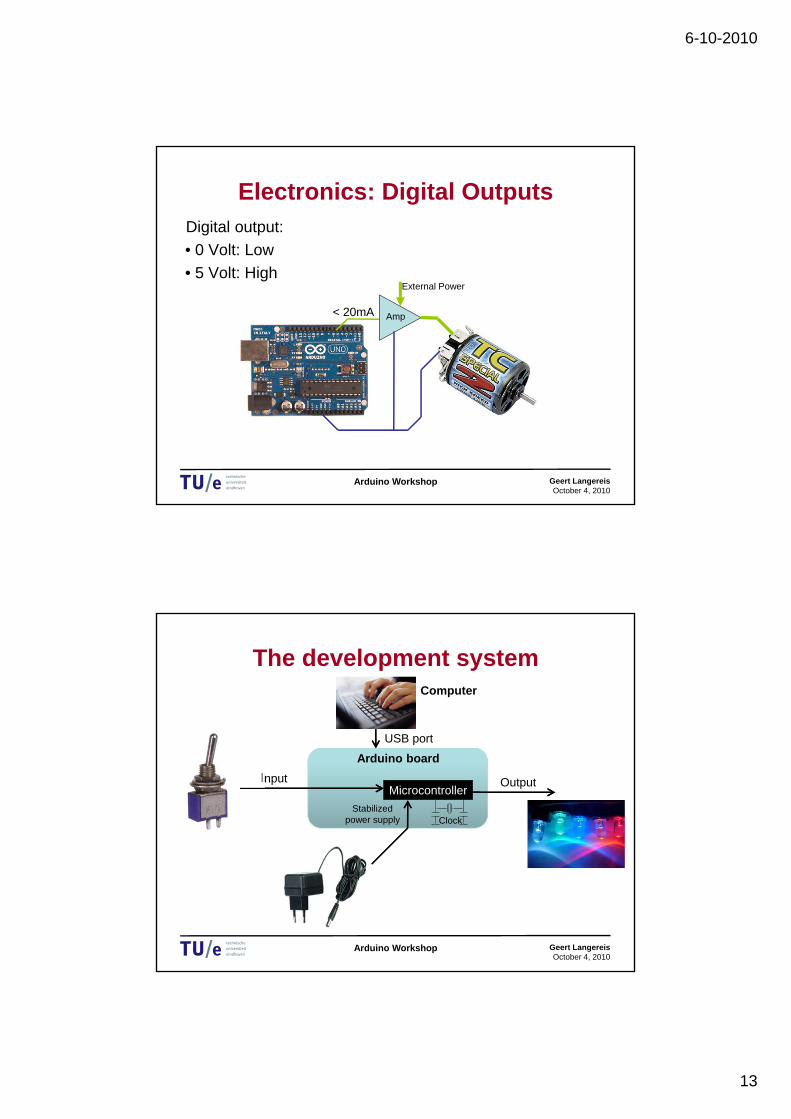
The development system
Arduino Workshop
Input OutputMicrocontroller
Arduino board
Stabilizedpower supply Clock
Geert LangereisOctober 4, 2010
The development system
Arduino Workshop
Input OutputMicrocontroller
Arduino board
Stabilizedpower supply Clock

6-10-2010
8
Geert LangereisOctober 4, 2010
The development system
Arduino Workshop
Input OutputMicrocontroller
Arduino board
Stabilizedpower supply Clock
Computer
USB port
Geert LangereisOctober 4, 2010
The development system
Arduino Workshop
Input OutputMicrocontroller
Arduino board
Stabilizedpower supply Clock
Computer
USB port

6-10-2010
9
Geert LangereisOctober 4, 2010
The development system
Arduino Workshop
Input OutputMicrocontroller
Arduino board
Stabilizedpower supply Clock
Computer
USB port
Electronics
Programming
Controller
Geert LangereisOctober 4, 2010
A microcontroller . . Is a processor with
• Low power
• Low cost
• Dedicated for a single task
• On-board program memory
• On-board data memory
• I/O pins
• Analog and digital out
• Timer/counter circuits
• Bus protocols (serial bus, USB, I2C, SPI, …)
Arduino Workshop

6-10-2010
10
Geert LangereisOctober 4, 2010
RegistersRegisters are memory locations in the microcontroller which give you access to all the functions.
Example: If you write a logical “1” to register “PORTB0”, the output pin “B0” goes high (=5 Volt)
This connects the software world to electronics and hardware
Arduino Workshop
Geert LangereisOctober 4, 2010
Electronics: Digital InputsDigital input:
• 0 Volt: Low
• 5 Volt: High
• 2.5 Volt or floating? : undefined
Arduino Workshop

6-10-2010
11
Geert LangereisOctober 4, 2010
Electronics: Digital Inputs
Arduino Workshop
External pull up internal pull uppinMode(13, INPUT); pinMode(13, INPUT);digitalWrite(13, LOW); digitalWrite(13, HIGH);int a = digitalRead(13); int a = digitalRead(13);
5VArduino
GND
100K
1K
switch
Arduino
GND
20K1K
switch
5V
Geert LangereisOctober 4, 2010
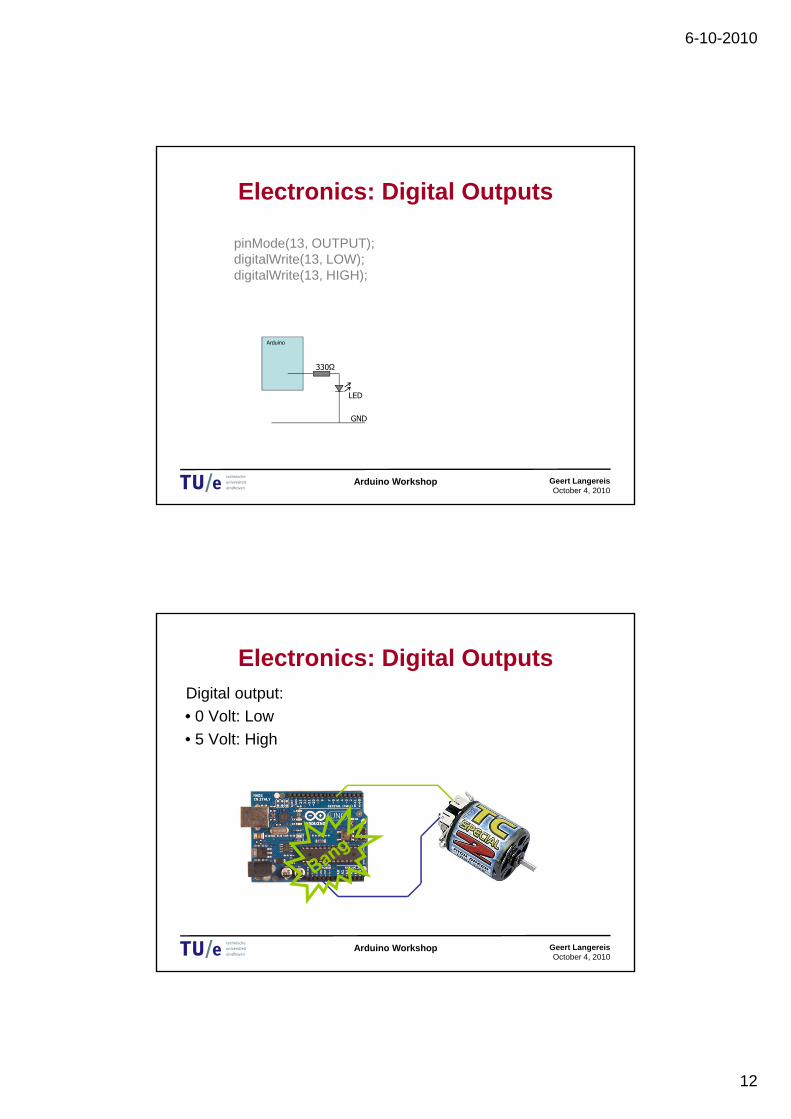
Electronics: Digital OutputsDigital output:
• 0 Volt: Low
• 5 Volt: High
• 2.5 Volt? You can use Pulse-Width Modulation “PWM”
Arduino Workshop
6-10-2010
12
Geert LangereisOctober 4, 2010
Electronics: Digital Outputs
Arduino Workshop
pinMode(13, OUTPUT);digitalWrite(13, LOW);digitalWrite(13, HIGH);
Arduino
GND
330Ω
LED
Geert LangereisOctober 4, 2010
Electronics: Digital Outputs
Arduino Workshop
Digital output:
• 0 Volt: Low
• 5 Volt: High
6-10-2010
13
Geert LangereisOctober 4, 2010
Electronics: Digital Outputs
Arduino Workshop
Digital output:
• 0 Volt: Low
• 5 Volt: High
Amp
External Power
< 20mA
Geert LangereisOctober 4, 2010
The development system
Arduino Workshop
Input OutputMicrocontroller
Arduino board
Stabilizedpower supply Clock
Computer
USB port
6-10-2010
14
Geert LangereisOctober 4, 2010
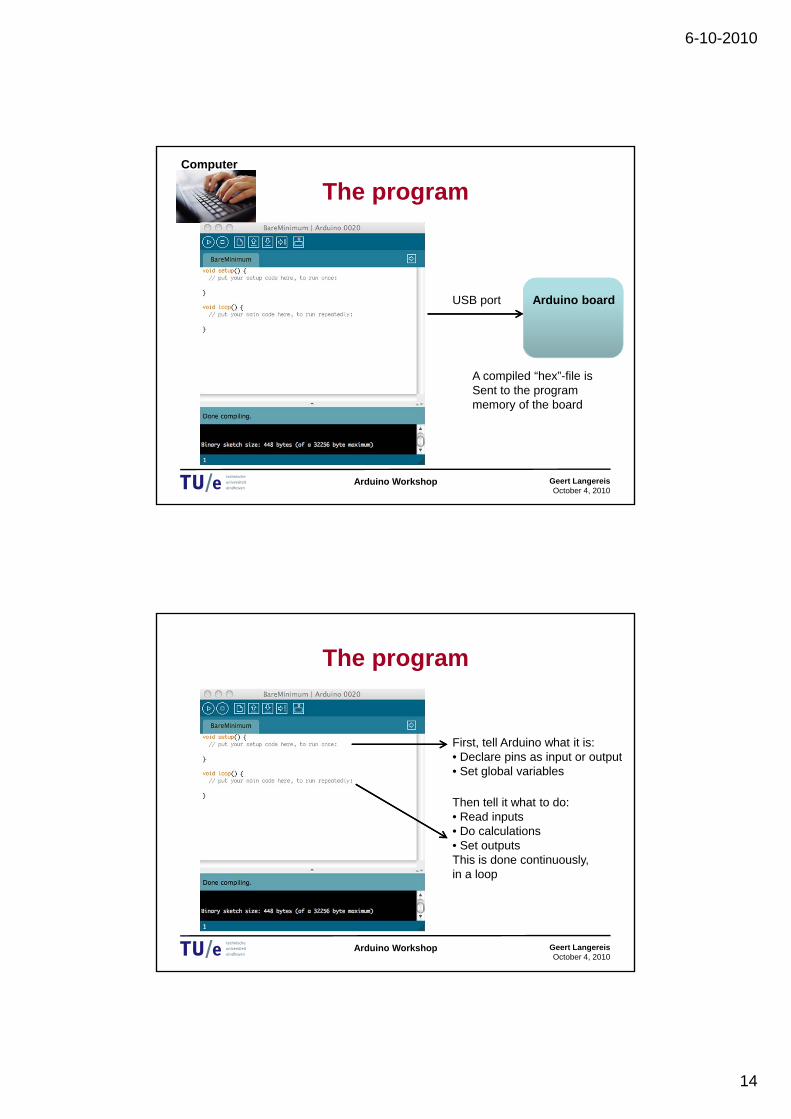
The program
Arduino Workshop
Arduino board
Computer
USB port
A compiled “hex”-file isSent to the programmemory of the board
Geert LangereisOctober 4, 2010
The program
Arduino Workshop
First, tell Arduino what it is:• Declare pins as input or output• Set global variables
Then tell it what to do:• Read inputs• Do calculations• Set outputs This is done continuously,in a loop

6-10-2010
15
Geert LangereisOctober 4, 2010
The program
Arduino Workshop
/* Configuration:First, tell Arduino what it is */
void setup() // initialize the digital pin as an output.// Pin 13 has an LED connected on most Arduino boards:pinMode(13, OUTPUT);
/* Then loop:Tell Arduino what to do */
void loop() digitalWrite(13, HIGH); // set the LED ondelay(1000); // wait for a seconddigitalWrite(13, LOW); // set the LED offdelay(1000); // wait for a second
Geert LangereisOctober 4, 2010
Compiling and uploading code
Arduino Workshop
1. Type code in text window2. Push ‘upload’ button3. Check if TX and RX Leds are
blinking rapidly4. If the ‘Done uploading’
message displays, the Arduino is ready.
1
2
3
4

6-10-2010
16
Geert LangereisOctober 4, 2010
www.arduino.cc
Arduino Workshop
Everything you need is www.arduino.cc• Installation• Download• Help• Forum• Tutorials• Hardware examples• Software examples• Reference
Geert LangereisOctober 4, 2010
Installation 1: The Environment
Arduino Workshop

6-10-2010
17
Geert LangereisOctober 4, 2010
Installation 1: The environment
Arduino Workshop
Geert LangereisOctober 4, 2010
Installation 2: The COM port
Arduino Workshop
A “Virtual COM port” is needed to communicate with the board.
For the Arduino UNO: plug in the Arduino• On Mac OS-X, the VCP driver is installed automatically• On Windows, you have to point to the .inf file in the “drivers” directory of the Arduino software
For the Arduino Duemilanove, you have to point to the FTDI install directory which is in the “drivers” directory as well
http://arduino.cc/en/Guide/Windowshttp://arduino.cc/en/Guide/MacOSX

6-10-2010
18
Geert LangereisOctober 4, 2010
The Arduino Programming Environment
Arduino Workshop
Compile and upload
Verify (Compile)
Open Sketch
Save Sketch
Geert LangereisOctober 4, 2010
Settings
• Let the Arduino programming environment know which board you have– “Tools” menu “Board”
• Let the Arduino programming environment know to which port the bard is connected– “Tools” menu “Serial port”
Arduino Workshop

6-10-2010
19
Geert LangereisOctober 4, 2010
Blink
Arduino Workshop
/* comment */
void setup() // initialize the digital pin as an output.// Pin 13 has an LED connected on most Arduino boards:pinMode(13, OUTPUT);
void loop() digitalWrite(13, HIGH); // set the LED ondelay(1000); // wait for a seconddigitalWrite(13, LOW); // set the LED offdelay(1000); // wait for a second
Geert LangereisOctober 4, 2010
Blink with button
• The period of “Blink” is 2 x 1000ms = 2 sec
• Now we want: if we push a button, the period should become 0.5 sec
• To do:– Make a button
– Read a button
– Change the “1000” in “delay” depending on the button
Arduino Workshop

6-10-2010
20
Geert LangereisOctober 4, 2010
Blink and read button
Arduino Workshop
/* comment */
void setup() // initialize the digital pin as an output.// Pin 13 has an LED connected on most Arduino boards:pinMode(13, OUTPUT);pinMode(12, INPUT);digitalWrite(12, HIGH); // activate pull-up resistor
void loop() digitalWrite(13, HIGH); // set the LED ondelay(1000); // wait for a seconddigitalWrite(13, LOW); // set the LED offdelay(1000); // wait for a second
Geert LangereisOctober 4, 2010
Some hardware for Blink with button
Arduino Workshop
LED Switch

6-10-2010
21
Geert LangereisOctober 4, 2010
Arduino Workshop
void setup() // initialize the digital pin as an output.// Pin 13 has an LED connected on most Arduino boards:pinMode(13, OUTPUT);pinMode(12, INPUT);digitalWrite(12, HIGH); // activate pull-up resistor
void loop() if (digitalRead(12) == HIGH)
// Do somethingelse
// Do something elsedigitalWrite(13, HIGH); // set the LED ondelay(1000); // wait for a seconddigitalWrite(13, LOW); // set the LED offdelay(1000); // wait for a second
Geert LangereisOctober 4, 2010
Arduino Workshop
int wait = 1000;
void setup() // initialize the digital pin as an output.// Pin 13 has an LED connected on most Arduino boards:pinMode(13, OUTPUT);pinMode(12, INPUT);digitalWrite(12, HIGH); // activate pull-up resistor
void loop() if (digitalRead(12) == HIGH)
// Do somethingelse
// Do something elsedigitalWrite(13, HIGH); // set the LED ondelay(wait); // wait for a seconddigitalWrite(13, LOW); // set the LED offdelay(wait); // wait for a second
6-10-2010
22
Geert LangereisOctober 4, 2010
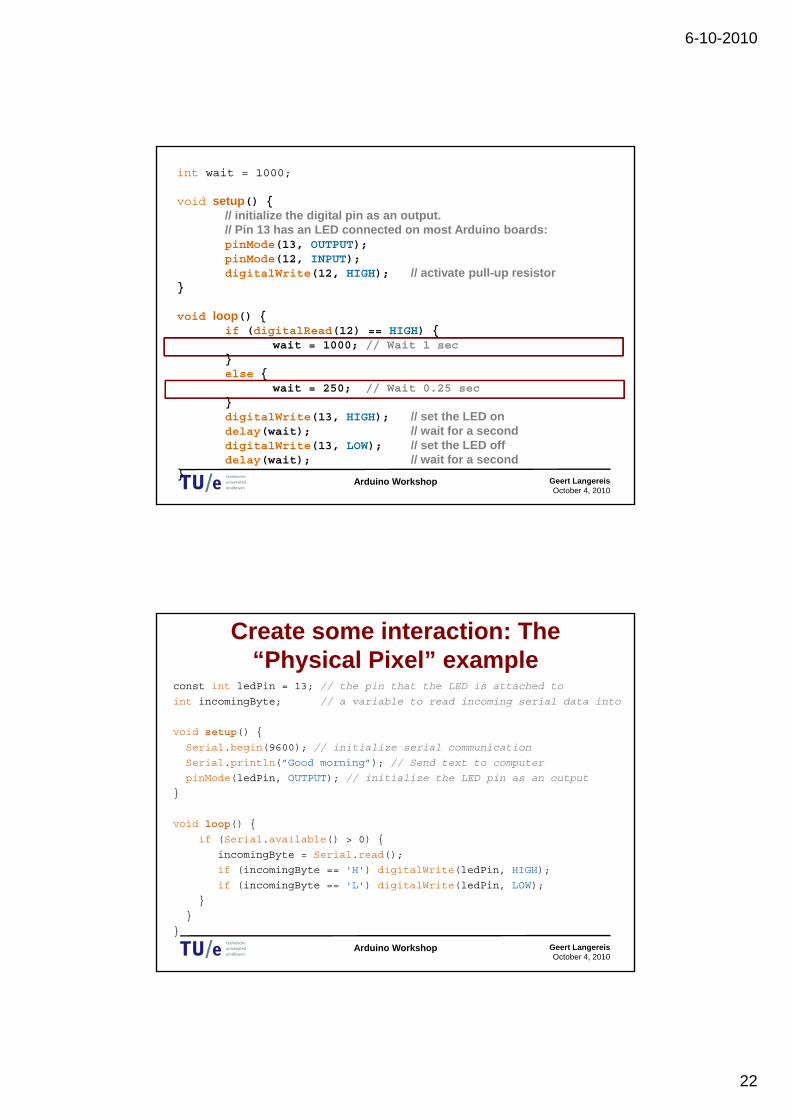
Arduino Workshop
int wait = 1000;
void setup() // initialize the digital pin as an output.// Pin 13 has an LED connected on most Arduino boards:pinMode(13, OUTPUT);pinMode(12, INPUT);digitalWrite(12, HIGH); // activate pull-up resistor
void loop() if (digitalRead(12) == HIGH)
wait = 1000; // Wait 1 secelse
wait = 250; // Wait 0.25 secdigitalWrite(13, HIGH); // set the LED ondelay(wait); // wait for a seconddigitalWrite(13, LOW); // set the LED offdelay(wait); // wait for a second
Geert LangereisOctober 4, 2010
Create some interaction: The “Physical Pixel” example
const int ledPin = 13; // the pin that the LED is attached to
int incomingByte; // a variable to read incoming serial data into
void setup()
Serial.begin(9600); // initialize serial communication
Serial.println(”Good morning”); // Send text to computer
pinMode(ledPin, OUTPUT); // initialize the LED pin as an output
void loop()
if (Serial.available() > 0)
incomingByte = Serial.read();
if (incomingByte == 'H') digitalWrite(ledPin, HIGH);
if (incomingByte == 'L') digitalWrite(ledPin, LOW);
Arduino Workshop

6-10-2010
23
Geert LangereisOctober 4, 2010
How to proceed?• Play with more pre-installed Sketches (all descriptions
on http://arduino.cc/en/Tutorial/HomePage)
• Find new functions in the reference (http://arduino.cc/en/Reference/HomePage)
• DG233 “Introducing Microcontrollers – Arduino and Beyond”
• Don’t be scared by “Making things talk”: the book is about connecting to the internet and less to interfacing with electronics
Arduino Workshop