Embed Size (px)
Citation preview

Arctic Survivor PFD User Manual
Arctic Survivor PFD User Manual | East Quarry Appley Lane North, Appley Bridge, Wigan, WN6 9AE, UK
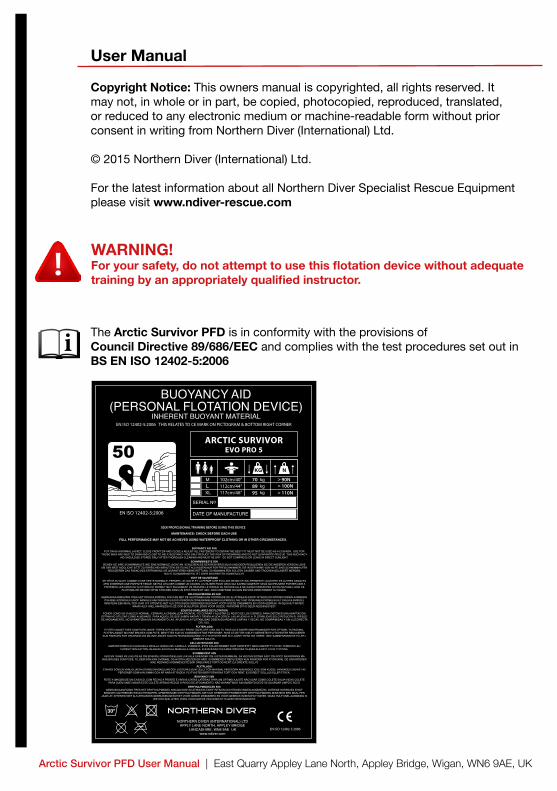
User Manual
Copyright Notice: This owners manual is copyrighted, all rights reserved. It may not, in whole or in part, be copied, photocopied, reproduced, translated, or reduced to any electronic medium or machine-readable form without prior consent in writing from Northern Diver (International) Ltd.
© 2015 Northern Diver (International) Ltd.
For the latest information about all Northern Diver Specialist Rescue Equipment please visit www.ndiver-rescue.com
WARNING!For your safety, do not attempt to use this flotation device without adequate training by an appropriately qualified instructor.
The Arctic Survivor PFD is in conformity with the provisions of Council Directive 89/686/EEC and complies with the test procedures set out in BS EN ISO 12402-5:2006
i
ARCTIC SURVIVOREVO PRO 5
EN ISO 12402-5:2006
EN ISO 12402-5:2006 THIS RELATES TO CE MARK ON PICTOGRAM & BOTTOM RIGHT CORNER
EN ISO 12402-5:2006
SEEK PROFESSIONAL TRAINING BEFORE USING THIS DEVICE
L102cm/40”112cm/44”117cm/46”
90N100N110N
708995

Specialist Rescue Equipment | Northern Diver | +44 (0) 1257 25 69 34 | [email protected] 3
Introduction
This manual is intended for users of the Arctic Survivor PFD.
The PFD consists of the following:- PFD jacket- Crotch straps- Webbing band with fix-loc buckle- Cow’s Tail- Karabiner- Removable reflective strip (located on the back of the PFD)
Sizes:
It is vital that your PFD is correctly adjusted to fit you properly. An incorrectly fitted PFD or fastening will impair performance and may lead to the PFD slipping or moving when worn in the water. Do not try to repair any damage to the PFD yourself - This could potentially cause more damage and render the PFD irreparable and void the warranty.
Always return the PFD to Northern Diver for repairs or servicing. Check your PFD for signs of wear or abrasion prior to each use. Ensure that all belts are securely attached. Check the straps, webbing and stitching for any signs of damage. If any damage is found, do not use your PFD. Return your PFD to Northern Diver for inspection.
Return to:FOA Rescue Dept.Northern Diver International LtdEast QuarryAppley Lane NorthAppley BridgeWiganWN6 9AEUK
L102cm/40”112cm/44”117cm/46”
90N100N110N
708995

Arctic Survivor PFD User Manual | East Quarry Appley Lane North, Appley Bridge, Wigan, WN6 9AE, UK
4
RESCUE 800DB USER’S MANUAL
5>>
PuTTinG on Your PfdTo ensure correct fitting please perform the following steps:Prior to putting on, ensure all straps, including the shoulder straps, are extended to their maximum length. Starting from the bottom and working upwards, lock the three positive buckles into place.
Next, tighten the top horizontal strap. Place one hand on the buckle and pull the strap with the other hand.
Next, you will need to tighten the two horizontal straps on each side of the jacket. Starting from the bottom, place your hand on each of the yellow straps and simultaneously pull each one forward. (see Diagram 3)
Next, locate the webbing on both shoulders and simultaneously pull each one forward.
Having followed these steps, the PFD should now fit close to the body.
Attach the crotch strap buckles into place and pull until it is comfortable.
Finally, take the fix lock buckle with the yellow toggle which is located underneath top horizontal positive buckle, and thread the webbing through the stainless steel retainer.
Pull it tight and then thread the webbing through the fix lock buckle and close.
Putting On Your PFD
To ensure the correct fitting please perform the following steps:
4
RESCUE 800DB USER’S MANUAL
5>>
PuTTinG on Your PfdTo ensure correct fitting please perform the following steps:Prior to putting on, ensure all straps, including the shoulder straps, are extended to their maximum length. Starting from the bottom and working upwards, lock the three positive buckles into place.
Next, tighten the top horizontal strap. Place one hand on the buckle and pull the strap with the other hand.
Next, you will need to tighten the two horizontal straps on each side of the jacket. Starting from the bottom, place your hand on each of the yellow straps and simultaneously pull each one forward. (see Diagram 3)
Next, locate the webbing on both shoulders and simultaneously pull each one forward.
Having followed these steps, the PFD should now fit close to the body.
Attach the crotch strap buckles into place and pull until it is comfortable.
Finally, take the fix lock buckle with the yellow toggle which is located underneath top horizontal positive buckle, and thread the webbing through the stainless steel retainer.
Pull it tight and then thread the webbing through the fix lock buckle and close. 4
RESCUE 800DB USER’S MANUAL
5>>
PuTTinG on Your PfdTo ensure correct fitting please perform the following steps:Prior to putting on, ensure all straps, including the shoulder straps, are extended to their maximum length. Starting from the bottom and working upwards, lock the three positive buckles into place.
Next, tighten the top horizontal strap. Place one hand on the buckle and pull the strap with the other hand.
Next, you will need to tighten the two horizontal straps on each side of the jacket. Starting from the bottom, place your hand on each of the yellow straps and simultaneously pull each one forward. (see Diagram 3)
Next, locate the webbing on both shoulders and simultaneously pull each one forward.
Having followed these steps, the PFD should now fit close to the body.
Attach the crotch strap buckles into place and pull until it is comfortable.
Finally, take the fix lock buckle with the yellow toggle which is located underneath top horizontal positive buckle, and thread the webbing through the stainless steel retainer.
Pull it tight and then thread the webbing through the fix lock buckle and close.
Prior to putting on, ensure all straps, including the shoulder straps, are extended to their maximum length.
Starting from the bottom and working upwards, lock the three positive buckles into place.
Next, you will need to tighten the two horizontal straps on each side of the jacket.
Starting from the bottom, place your hand on each of the yellow straps and simultaneously pull each one forward (Diagram 3).
Next, tighten the top horizontal strap.
Place one hand on the buckle and pull the strap with the other hand.
Next, locate the webbing on both shoulders and simultaneously pull each one forward.
Having followed these steps, the PFD should now fit close to the body.
Attach the crotch strap buckles into place and pull until it is comfortable.

Specialist Rescue Equipment | Northern Diver | +44 (0) 1257 25 69 34 | [email protected] 5
4
RESCUE 800DB USER’S MANUAL
5>>
PuTTinG on Your PfdTo ensure correct fitting please perform the following steps:Prior to putting on, ensure all straps, including the shoulder straps, are extended to their maximum length. Starting from the bottom and working upwards, lock the three positive buckles into place.
Next, tighten the top horizontal strap. Place one hand on the buckle and pull the strap with the other hand.
Next, you will need to tighten the two horizontal straps on each side of the jacket. Starting from the bottom, place your hand on each of the yellow straps and simultaneously pull each one forward. (see Diagram 3)
Next, locate the webbing on both shoulders and simultaneously pull each one forward.
Having followed these steps, the PFD should now fit close to the body.
Attach the crotch strap buckles into place and pull until it is comfortable.
Finally, take the fix lock buckle with the yellow toggle which is located underneath top horizontal positive buckle, and thread the webbing through the stainless steel retainer.
Pull it tight and then thread the webbing through the fix lock buckle and close.
Finally, take the fix-loc buckle with the yellow toggle, which is located underneath top horizontal positive buckle, and thread the webbing through the stainless steel retainer.
4
RESCUE 800DB USER’S MANUAL
5>>
PuTTinG on Your PfdTo ensure correct fitting please perform the following steps:Prior to putting on, ensure all straps, including the shoulder straps, are extended to their maximum length. Starting from the bottom and working upwards, lock the three positive buckles into place.
Next, tighten the top horizontal strap. Place one hand on the buckle and pull the strap with the other hand.
Next, you will need to tighten the two horizontal straps on each side of the jacket. Starting from the bottom, place your hand on each of the yellow straps and simultaneously pull each one forward. (see Diagram 3)
Next, locate the webbing on both shoulders and simultaneously pull each one forward.
Having followed these steps, the PFD should now fit close to the body.
Attach the crotch strap buckles into place and pull until it is comfortable.
Finally, take the fix lock buckle with the yellow toggle which is located underneath top horizontal positive buckle, and thread the webbing through the stainless steel retainer.
Pull it tight and then thread the webbing through the fix lock buckle and close.
Pull it tight and then thread the webbing through the fix-loc buckle and close.
Removing Your PFD
To remove your PFD, reverse the procedures for putting on.
If the jacket is only for your personal use you can leave all webbings set to the adjusted lengths.
In an emergency entrapment situation, you will note that the three positive horizontal buckles are designed for one-handed release.
WARNING!Pulling the yellow toggle on the fix-loc buckle will release the Cow’s Tail.

Arctic Survivor PFD User Manual | East Quarry Appley Lane North, Appley Bridge, Wigan, WN6 9AE, UK
Pre-fitting The Cow’s Tail
The Cow’s Tail is supplied fitted to every PFD purchased from Northern Diver. However should you need to re-fit the Cow’s Tail, please proceed as follows:
6
RESCUE 800DB USER’S MANUAL
7>>
remoVinG Your PfdTo remove your PFD, reverse the procedures for putting on. If the jacket is only for your personal use you can leave all webbings set to the adjusted lengths. In an emergency entrapment situation, you will note that the three positive horizontal buckles are designed for one handed release. WarninGPulling the yellow toggle on the fix lock buckle will release the Cow’s Tail. Pre-fiTTinG The coW’s Tail The Cow’s Tail is supplied fitted to every PFD purchased from Northern Diver. However should you need to re-fit the Cow’s Tail, please proceed as follows:
1 - Release the fix lock buckle with the yellow toggle.2 - Unthread the webbing through the stainless steel retainer.3 - Unthread the webbing through all the loops.You will now have separated the webbing band with the fix lock buckle. To replace the webbing band with the fix lock buckle and Cow’s Tail please proceed as follows: 1 - To ensure that the cow’s tail is fitted in the correct position, you will need to thread the webbing band with the fix lock buckle into the loops provided. 2 - Once the fourth loop on the back of the PFD is threaded, place the D-ring through the webbing.
3 - Continue to thread the webbing band with the fix lock buckle through the next four loops.
If this is correctly fitted, you will see that the D-ring fits between the two webbing loops.
When the Cow’s Tail is not being used, it can be ‘parked’ as shown. This permits the buckle to be opened and the strap and Cow’s Tail released should an entanglement occur.
As with all PFDs using Cow’s Tails, and although an unliklely occurence, it may be possible for the Cow’s Tail or strap to become entangled in such a way that it cannot be released easily. Adequate training and experience in the use of a Cow’s Tail tethered PFD is essential.
for servicing and repairs contact:Northern Diver (International) LtdAppley Lane NorthAppley BridgeLancashireWN6 9AE
Tel: 01257 254444Fax: 01257 251234
email: [email protected]
To replace the webbing band with the fix-loc buckle and Cow’s Tail please proceed as follows:
1 - To ensure that the Cow’s Tail is fitted in the correct position, you will need to thread the webbing band with the fix-loc buckle into the loops provided.
2 - Once the fourth loop on the back of the PFD is threaded, place the D-ring through the webbing.
3 - Continue to thread the webbing band with the fix-loc buckle through the next four loops. If this is correctly fitted, you will see that the D-ring fits between the two webbing loops.
1 - Release the fix-loc buckle with the yellow toggle.
2 - Unthread the webbing through the stainless steel retainer.
3 - Unthread the webbing through all the loops.
You will now have separated the webbing band with the fix-loc buckle.
6
RESCUE 800DB USER’S MANUAL
7>>
remoVinG Your PfdTo remove your PFD, reverse the procedures for putting on. If the jacket is only for your personal use you can leave all webbings set to the adjusted lengths. In an emergency entrapment situation, you will note that the three positive horizontal buckles are designed for one handed release. WarninGPulling the yellow toggle on the fix lock buckle will release the Cow’s Tail. Pre-fiTTinG The coW’s Tail The Cow’s Tail is supplied fitted to every PFD purchased from Northern Diver. However should you need to re-fit the Cow’s Tail, please proceed as follows:
1 - Release the fix lock buckle with the yellow toggle.2 - Unthread the webbing through the stainless steel retainer.3 - Unthread the webbing through all the loops.You will now have separated the webbing band with the fix lock buckle. To replace the webbing band with the fix lock buckle and Cow’s Tail please proceed as follows: 1 - To ensure that the cow’s tail is fitted in the correct position, you will need to thread the webbing band with the fix lock buckle into the loops provided. 2 - Once the fourth loop on the back of the PFD is threaded, place the D-ring through the webbing.
3 - Continue to thread the webbing band with the fix lock buckle through the next four loops.
If this is correctly fitted, you will see that the D-ring fits between the two webbing loops.
When the Cow’s Tail is not being used, it can be ‘parked’ as shown. This permits the buckle to be opened and the strap and Cow’s Tail released should an entanglement occur.
As with all PFDs using Cow’s Tails, and although an unliklely occurence, it may be possible for the Cow’s Tail or strap to become entangled in such a way that it cannot be released easily. Adequate training and experience in the use of a Cow’s Tail tethered PFD is essential.
for servicing and repairs contact:Northern Diver (International) LtdAppley Lane NorthAppley BridgeLancashireWN6 9AE
Tel: 01257 254444Fax: 01257 251234
email: [email protected]
When the Cow’s Tail is not being used, it can be ‘parked’ as shown.
This permits the buckle to be opened and the strap and Cow’s Tail released should an entanglement occur.
As with all PFDs using Cow’s Tails, and although an unlikely occurrence, it may be possible for the Cow’s Tail or strap to become entangled in such a way that it cannot be released easily.
Adequate training and experience in the use of a Cow’s Tail tethered PFD is essential.

Specialist Rescue Equipment | Northern Diver | +44 (0) 1257 25 69 34 | [email protected] 7
Servicing, Repairs & Warranty
Visual check: every 6 months.Annual service: recommended but not compulsory.Seams: lifetime guarantee
For servicing and repairs of you PFD please contact:
Craig McColl - Rescue Equipment Specialist
Tel: +44 (0) 1257 25 69 34, email: [email protected]
Write to: FOA Rescue Dept. Northern Diver international Ltd, East Quarry, Appley Lane North, Appley Bridge, Wigan, WN6 9AE
Your Arctic Survivor PFD has a 12months warranty. Terms & conditions may apply contact us for further details.
PFD Accessories
Available to buy online at www.ndiver-rescue.com or call Craig McColl to place your order with us.
One size.
PFD Crotch Strap
Encapsulated PanelsAvailable in any colour. Logo can be applied at customers request.
Orange only.
Peeless Whistle
One size.
Cow’s Tail & Karabiner
Wash Instructions

Northern Diver East Quarry Appley Lane North, Appley Bridge, Wigan, WN6 9AE, UK
vvwww.ndiver-rescue.com
Specialist Rescue Equipment | [email protected] | +44 (0) 1257 25 69 34