Embed Size (px)
Citation preview

LabVIEW TM
Real-Time Module User Manual
Real-Time Module User Manual
April 2003 EditionPart Number 322154D-01
Support
Worldwide Technical Support and Product Information
ni.com
National Instruments Corporate Headquarters
11500 North Mopac Expressway Austin, Texas 78759-3504 USA Tel: 512 683 0100
Worldwide Offices
Australia 02 612 9672 8846, Austria 43 0 662 45 79 90 0, Belgium 32 0 2 757 00 20, Brazil 55 11 3262 3599, Canada (Calgary) 403 274 9391, Canada (Montreal) 514 288 5722, Canada (Ottawa) 613 233 5949, Canada (Québec) 514 694 8521, Canada (Toronto) 905 785 0085, Canada (Vancouver) 514 685 7530, China 86 21 6555 7838, Czech Republic 420 2 2423 5774, Denmark 45 45 76 26 00, Finland 385 0 9 725 725 11, France 33 0 1 48 14 24 24, Germany 49 0 89 741 31 30, Greece 30 2 10 42 96 427, India 91 80 51190000, Israel 972 0 3 6393737, Italy 39 02 413091, Japan 81 3 5472 2970, Korea 82 02 3451 3400, Malaysia 603 9131 0918, Mexico 001 800 010 0793, Netherlands 31 0 348 433 466, New Zealand 64 09 914 0488, Norway 47 0 32 27 73 00, Poland 48 0 22 3390 150, Portugal 351 210 311 210, Russia 7 095 238 7139, Singapore 65 6226 5886, Slovenia 386 3 425 4200, South Africa 27 0 11 805 8197, Spain 34 91 640 0085, Sweden 46 0 8 587 895 00, Switzerland 41 56 200 51 51, Taiwan 886 2 2528 7227, Thailand 662 992 7519, United Kingdom 44 0 1635 523545
For further support information, refer to the Technical Support and Professional Services appendix. To comment on the documentation, send email to [email protected].
© 1999–2003 National Instruments Corporation. All rights reserved.

Important Information
WarrantyThe media on which you receive National Instruments software are warranted not to fail to execute programming instructions, due to defects in materials and workmanship, for a period of 90 days from date of shipment, as evidenced by receipts or other documentation. National Instruments will, at its option, repair or replace software media that do not execute programming instructions if National Instruments receives notice of such defects during the warranty period. National Instruments does not warrant that the operation of the software shall be uninterrupted or error free.
A Return Material Authorization (RMA) number must be obtained from the factory and clearly marked on the outside of the package before any equipment will be accepted for warranty work. National Instruments will pay the shipping costs of returning to the owner parts which are covered by warranty.
National Instruments believes that the information in this document is accurate. The document has been carefully reviewed for technical accuracy. In the event that technical or typographical errors exist, National Instruments reserves the right to make changes to subsequent editions of this document without prior notice to holders of this edition. The reader should consult National Instruments if errors are suspected. In no event shall National Instruments be liable for any damages arising out of or related to this document or the information contained in it.
EXCEPT AS SPECIFIED HEREIN, NATIONAL INSTRUMENTS MAKES NO WARRANTIES, EXPRESS OR IMPLIED, AND SPECIFICALLY DISCLAIMS ANY WARRANTY OF MERCHANTABILITY OR FITNESS FOR A PARTICULAR PURPOSE. CUSTOMER’S RIGHT TO RECOVER DAMAGES CAUSED BY FAULT OR NEGLIGENCE ON THE PART OF NATIONAL INSTRUMENTS SHALL BE LIMITED TO THE AMOUNT THERETOFORE PAID BY THE CUSTOMER. NATIONAL INSTRUMENTS WILL NOT BE LIABLE FOR DAMAGES RESULTING FROM LOSS OF DATA, PROFITS, USE OF PRODUCTS, OR INCIDENTAL OR CONSEQUENTIAL DAMAGES, EVEN IF ADVISED OF THE POSSIBILITY THEREOF. This limitation of the liability of National Instruments will apply regardless of the form of action, whether in contract or tort, including negligence. Any action against National Instruments must be brought within one year after the cause of action accrues. National Instruments shall not be liable for any delay in performance due to causes beyond its reasonable control. The warranty provided herein does not cover damages, defects, malfunctions, or service failures caused by owner’s failure to follow the National Instruments installation, operation, or maintenance instructions; owner’s modification of the product; owner’s abuse, misuse, or negligent acts; and power failure or surges, fire, flood, accident, actions of third parties, or other events outside reasonable control.
CopyrightUnder the copyright laws, this publication may not be reproduced or transmitted in any form, electronic or mechanical, including photocopying, recording, storing in an information retrieval system, or translating, in whole or in part, without the prior written consent of National Instruments Corporation.
TrademarksDAQ-STC™, DataSocket™, FieldPoint™, IVI™, LabVIEW™, National Instruments™, NI™, NI Developer Zone™, NI-CAN™, ni.com™, NI-DAQ™, NI-IMAQ™, NI-Motion™, NI-VISA™, RTSI™, SCXI™, and TestStand™ are trademarks of National Instruments Corporation.
Product and company names mentioned herein are trademarks or trade names of their respective companies.
PatentsFor patents covering National Instruments products, refer to the appropriate location: Help»Patents in your software, the patents.txt file on your CD, or ni.com/patents.
WARNING REGARDING USE OF NATIONAL INSTRUMENTS PRODUCTS(1) NATIONAL INSTRUMENTS PRODUCTS ARE NOT DESIGNED WITH COMPONENTS AND TESTING FOR A LEVEL OF RELIABILITY SUITABLE FOR USE IN OR IN CONNECTION WITH SURGICAL IMPLANTS OR AS CRITICAL COMPONENTS IN ANY LIFE SUPPORT SYSTEMS WHOSE FAILURE TO PERFORM CAN REASONABLY BE EXPECTED TO CAUSE SIGNIFICANT INJURY TO A HUMAN.
(2) IN ANY APPLICATION, INCLUDING THE ABOVE, RELIABILITY OF OPERATION OF THE SOFTWARE PRODUCTS CAN BE IMPAIRED BY ADVERSE FACTORS, INCLUDING BUT NOT LIMITED TO FLUCTUATIONS IN ELECTRICAL POWER SUPPLY, COMPUTER HARDWARE MALFUNCTIONS, COMPUTER OPERATING SYSTEM SOFTWARE FITNESS, FITNESS OF COMPILERS AND DEVELOPMENT SOFTWARE USED TO DEVELOP AN APPLICATION, INSTALLATION ERRORS, SOFTWARE AND HARDWARE COMPATIBILITY PROBLEMS, MALFUNCTIONS OR FAILURES OF ELECTRONIC MONITORING OR CONTROL DEVICES, TRANSIENT FAILURES OF ELECTRONIC SYSTEMS (HARDWARE AND/OR SOFTWARE), UNANTICIPATED USES OR MISUSES, OR ERRORS ON THE PART OF THE USER OR APPLICATIONS DESIGNER (ADVERSE FACTORS SUCH AS THESE ARE HEREAFTER COLLECTIVELY TERMED “SYSTEM FAILURES”). ANY APPLICATION WHERE A SYSTEM FAILURE WOULD CREATE A RISK OF HARM TO PROPERTY OR PERSONS (INCLUDING THE RISK OF BODILY INJURY AND DEATH) SHOULD NOT BE RELIANT SOLELY UPON ONE FORM OF ELECTRONIC SYSTEM DUE TO THE RISK OF SYSTEM FAILURE. TO AVOID DAMAGE, INJURY, OR DEATH, THE USER OR APPLICATION DESIGNER MUST TAKE REASONABLY PRUDENT STEPS TO PROTECT AGAINST SYSTEM FAILURES, INCLUDING BUT NOT LIMITED TO BACK-UP OR SHUT DOWN MECHANISMS. BECAUSE EACH END-USER SYSTEM IS CUSTOMIZED AND DIFFERS FROM NATIONAL INSTRUMENTS' TESTING PLATFORMS AND BECAUSE A USER OR APPLICATION DESIGNER MAY USE NATIONAL INSTRUMENTS PRODUCTS IN COMBINATION WITH OTHER PRODUCTS IN A MANNER NOT EVALUATED OR CONTEMPLATED BY NATIONAL INSTRUMENTS, THE USER OR APPLICATION DESIGNER IS ULTIMATELY RESPONSIBLE FOR VERIFYING AND VALIDATING THE SUITABILITY OF NATIONAL INSTRUMENTS PRODUCTS WHENEVER NATIONAL INSTRUMENTS PRODUCTS ARE INCORPORATED IN A SYSTEM OR APPLICATION, INCLUDING, WITHOUT LIMITATION, THE APPROPRIATE DESIGN, PROCESS AND SAFETY LEVEL OF SUCH SYSTEM OR APPLICATION.

© National Instruments Corporation v Real-Time Module User Manual
Contents
About This ManualConventions ................................................................................................................... ixRelated Documentation..................................................................................................x
Chapter 1Introduction
Real-Time System Components ....................................................................................1-1Host Computer.................................................................................................1-1LabVIEW ........................................................................................................1-1RT Engine........................................................................................................1-2RT Target.........................................................................................................1-2
RT Series Plug-In Devices ................................................................1-2Networked RT Series Devices ..........................................................1-3
Communicating with RT Target VIs .............................................................................1-3Front Panel Communication............................................................................1-4Network Communication ................................................................................1-5
Real-Time Module and Express VI Considerations ......................................................1-6Unsupported LabVIEW Features...................................................................................1-7
Modifying Front Panel Objects of RT Target VIs...........................................1-7Using OS-Specific Technologies in RT Target VIs ........................................1-7
Chapter 2Installing and Configuring the Real-Time Module and RT Targets
Installing the Real-Time Module ...................................................................................2-1Installing and Configuring RT Series Plug-In Devices .................................................2-2
RT Series PCI Plug-In Devices .......................................................................2-2RT Series PXI Plug-In Devices.......................................................................2-2Configuring RT Series Plug-In Devices..........................................................2-3
Configuring Networked RT Series Devices ..................................................................2-4Booting into the Real-Time Operating System.................................2-4Configuring Network Settings ..........................................................2-5Downloading Software .....................................................................2-6
Setting the System Time of RT Targets.........................................................................2-7

Contents
Real-Time Module User Manual vi ni.com
Chapter 3Real-Time Module Environment
Targeting LabVIEW to an RT Target ........................................................................... 3-1Downloading VIs to an RT Target ................................................................................ 3-3Closing a Front Panel Connection without Closing VIs ............................................... 3-4Connecting to VIs Running on an RT Target................................................................ 3-4Configuring Options of Networked RT Targets............................................................ 3-5
Setting Access Permissions for an RT Target................................................. 3-5Setting Options for RT Target Start-up Applications ..................................... 3-8
Chapter 4Building Deterministic Applications
Programming for Determinism...................................................................................... 4-1Overview of Multithreaded Applications ....................................................... 4-1Creating Multithreaded Applications in LabVIEW ........................................ 4-2
Scheduling Threads .......................................................................... 4-2Assigning Priorities .......................................................................... 4-2Assigning VIs to Execution Systems................................................ 4-3
Dividing Tasks to CreateDeterministic Multithreaded Applications ................................................... 4-4
Cooperatively Yielding Time-Critical VI Execution...................................... 4-5Passing Data between VIs ............................................................................................. 4-5
Global Variables ............................................................................................. 4-5Functional Global Variables ........................................................................... 4-6Real-Time FIFO VIs ....................................................................................... 4-7
Creating a User Interface for RT Target VIs................................................................. 4-8Exploring Communication Methods ............................................................................. 4-9
Shared Memory............................................................................................... 4-10TCP ................................................................................................................. 4-10UDP................................................................................................................. 4-11DataSocket ...................................................................................................... 4-11VI Server ......................................................................................................... 4-12SMTP .............................................................................................................. 4-13Serial ............................................................................................................... 4-13CAN ................................................................................................................ 4-14
Using Remote Panels with RT Target VIs .................................................................... 4-14Enabling Remote Panel Connections to RT Target VIs ................................. 4-14Regaining Control of RT Target VIs
from Remote Panel Connections.................................................................. 4-15Minimizing Memory Usage by the RT Target Web Server............................ 4-16

Contents
© National Instruments Corporation vii Real-Time Module User Manual
Chapter 5Creating Deterministic Control Applications
Overview of Control Applications.................................................................................5-1Implementing a Deterministic Control Application ......................................................5-2Timing Control Loops ...................................................................................................5-3
Timing Control Loops Using Software ...........................................................5-3Timing Control Loops Using Hardware..........................................................5-5
AI SingleScan VI ..............................................................................5-5Counter Control VI ...........................................................................5-6
Acquiring Measurement Data ........................................................................................5-7Using DAQ Devices to Acquire Measurement Data.......................................5-8Using FieldPoint Devices to Acquire Measurement Data...............................5-9
Processing Measurement Data.......................................................................................5-10Outputting Compensation Data .....................................................................................5-11
Using NI-DAQ VIs to Output Control Data....................................................5-11Using FieldPoint VIs to Output Control Data .................................................5-14
Using Watchdogs in Applications .................................................................................5-14Inactivity Watchdog ........................................................................................5-15Network Watchdog..........................................................................................5-15
Chapter 6Optimizing Applications
Avoiding Shared Resources...........................................................................................6-1Memory Allocations and Preallocating Arrays ...............................................6-1Casting Data to Proper Data Types .................................................................6-3Reducing the Use of Global Variables ............................................................6-3
Avoiding Contiguous Memory Conflicts ......................................................................6-3Avoiding SubVI Overhead ............................................................................................6-5Setting VI Properties......................................................................................................6-5Disabling the Disk Cache ..............................................................................................6-5Setting BIOS Options ....................................................................................................6-6Mass Compiling VIs ......................................................................................................6-6

Contents
Real-Time Module User Manual viii ni.com
Chapter 7Deploying Applications
Building Stand-Alone Applications .............................................................................. 7-1Creating an Application Installer .................................................................... 7-1Configuring Target Settings............................................................................ 7-2Saving Stand-Alone Applications................................................................... 7-2
Selecting a Target after Launch........................................................ 7-3Quitting LabVIEW after Launch ...................................................... 7-3
Launching Stand-Alone Applications ........................................................................... 7-3Launching Applications Automatically on Start-up ....................................... 7-4Launching Applications Automatically
Using Command Line Arguments ............................................................... 7-4Connecting to Applications Running on RT Targets .................................................... 7-5
Chapter 8Debugging Deterministic Applications
Verifying Correct Application Behavior ....................................................................... 8-1Using the LabVIEW Debugging Tools........................................................... 8-1Using the Profile Window............................................................................... 8-1
Verifying Correct Timing Behavior .............................................................................. 8-2Using the Tick Count (ms) Function............................................................... 8-2Using the Pentium Time Stamp Counter ........................................................ 8-2Using an Oscilloscope..................................................................................... 8-3Using Software Drivers................................................................................... 8-3
Using and Defining Error Codes ................................................................................... 8-3Defining Custom Error Codes......................................................................... 8-3Setting Custom Error File INI Tokens ............................................................ 8-4
Appendix AConfiguring and Testing Device Drivers
Appendix BTechnical Support and Professional Services
Glossary
Index

© National Instruments Corporation ix Real-Time Module User Manual
About This Manual
This manual contains installation information and configuration instructions for the LabVIEW Real-Time Module and RT Series hardware. This manual also contains real-time programming techniques to help you build a deterministic application using the Real-Time Module.
ConventionsThe following conventions appear in this manual:
» The » symbol leads you through nested menu items and dialog box options to a final action. The sequence File»Page Setup»Options directs you to pull down the File menu, select the Page Setup item, and select Options from the last dialog box.
This icon denotes a note, which alerts you to important information.
bold Bold text denotes items that you must select or click in the software, such as menu items and dialog box options. Bold text also denotes parameter names.
italic Italic text denotes variables, emphasis, a cross reference, or an introduction to a key concept. This font also denotes text that is a placeholder for a word or value that you must supply.
monospace Text in this font denotes text or characters that you should enter from the keyboard, sections of code, programming examples, and syntax examples. This font is also used for the proper names of disk drives, paths, directories, programs, subprograms, subroutines, device names, functions, operations, variables, filenames and extensions, and code excerpts.
Platform Text in this font denotes a specific platform and indicates that the text following it applies only to that platform.

About This Manual
Real-Time Module User Manual x ni.com
Related DocumentationThe following documents contain information that you might find helpful as you read this manual:
• RT Series hardware documentation
• Getting Started with the LabVIEW Real-Time Module
• LabVIEW Real-Time Module Release Notes
• LabVIEW Help, available by selecting Help»VI, Function, & How-To Help
• Getting Started with LabVIEW
• LabVIEW User Manual
• LabVIEW Application Builder User Guide

© National Instruments Corporation 1-1 Real-Time Module User Manual
1Introduction
Most LabVIEW applications run on a general-purpose operating system (OS) like Windows, Linux, Solaris, or Mac OS. Some applications require deterministic real-time performance that general-purpose operating systems cannot guarantee. The LabVIEW Real-Time Module and RT Series hardware extend the capabilities of LabVIEW to address the need for deterministic real-time performance.
The Real-Time Module combines LabVIEW graphical programming with the power of RT Series hardware, enabling you to build deterministic real-time systems. You develop VIs in LabVIEW and embed the VIs on RT targets. The RT target runs VIs without a user interface and offers a stable platform for real-time VIs.
Real-Time System ComponentsA real-time system consists of software and hardware components. The software components include LabVIEW, the RT Engine, and VIs built using LabVIEW. The hardware components of a real-time system include a host computer and an RT target. The following section describes the different components of a real-time system.
Host ComputerThe host computer is the computer where you develop the VIs for the real-time system. The host computer can be a PC, Mac, or a PXI controller with a Windows operating system.
LabVIEWYou develop VIs with LabVIEW on the host computer. The Real-Time Module extends the capabilities of LabVIEW to allow you to select an RT target to run VIs.

Chapter 1 Introduction
Real-Time Module User Manual 1-2 ni.com
RT EngineThe RT Engine is a version of LabVIEW that runs on the RT target. The RT Engine runs the VIs you download to the targets from LabVIEW on the host computer. The RT Engine provides deterministic real-time performance for the following reasons:
• The RT Engine is designed for real-time performance.
• The RT Engine runs on a real-time operating system (RTOS), which ensures that the LabVIEW execution system and other operating system services adhere to real-time operation. Refer to Chapter 4, Building Deterministic Applications, for information about the LabVIEW execution system.
• The RT Engine runs on RT Series hardware. Other applications or device drivers commonly found on the host computer do not run on RT targets. The absence of additional applications or devices means that a third-party application or driver does not impede the execution of VIs.
• RT Series hardware uses no virtual memory, which eliminates a major source of unpredictability in deterministic systems.
RT TargetAn RT target refers to RT Series hardware that runs the RT Engine and VIs you create using LabVIEW. There are two types of RT targets: RT Series plug-in devices and networked RT Series devices.
RT Series Plug-In DevicesThe RT Series plug-in devices are plug-in PCI/PXI devices with embedded processors. Each plug-in device contains a processor board and data acquisition daughterboard. The processor board contains a microprocessor that runs LabVIEW VIs.
This manual does not contain information about the data acquisition daughterboard of plug-in devices. Refer to the appropriate plug-in device documentation for information about the data acquisition daughterboard for plug-in devices.

Chapter 1 Introduction
© National Instruments Corporation 1-3 Real-Time Module User Manual
Networked RT Series DevicesA networked RT Series device is a networked hardware platform with an embedded processor that runs LabVIEW VIs. You can use a separate host computer to communicate with and control VIs on the networked RT Series device through an Ethernet connection, but the device is independent of the host computer. Some examples of networked RT Series devices include the following:
• RT Series PXI Controllers—A networked device that installs in an NI PXI chassis and communicates with NI PXI modules installed in the chassis. You can write VIs that use all the input/output (I/O) capabilities of the PXI modules, SCXI, and other signal conditioning devices installed in a PXI chassis. The RT Engine also supports features of the RT Series PXI controller. For example, you can use the GPIB and serial ports onboard the NI PXI-8176 controller for instrument control. Refer to the National Instruments Web site at ni.com/info and enter the info code RT0001 for information about the features supported by the RT Engine on specific networked devices.
• RT Series FieldPoint Modules—A networked device ideal for distributed real-time I/O applications.
• 7041 RT Series Plug-In Devices—A hybrid between a traditional plug-in device and a networked device that communicates through shared memory or communicates through a network connection.
This manual does not contain hardware-related information about specific networked devices. Refer to the appropriate device documentation for information about the device.
Communicating with RT Target VIsThe RT Engine on the RT target does not provide a user interface for applications. You can use one of two communication protocols, Front Panel Communication or Network Communication, to provide a user interface for RT target VIs.

Chapter 1 Introduction
Real-Time Module User Manual 1-4 ni.com
Front Panel CommunicationWith Front Panel Communication, LabVIEW and the RT Engine execute different parts of the same VI, as shown in Figure 1-1. LabVIEW on the host computer displays the front panel of the VI while the RT Engine executes the block diagram.
Figure 1-1. Front Panel Communication Protocol
Use Front Panel Communication between LabVIEW on the host computer and the RT Engine to control and test VIs running on an RT target. After downloading and running the VIs, keep LabVIEW on the host computer open to display and interact with the front panel of the VI.
You also can use Front Panel Communication to debug VIs while they run on the RT target. You can use LabVIEW debugging tools—such as probes, execution highlighting, breakpoints, and single stepping—to locate errors on the block diagram code. Refer to Chapter 8, Debugging Deterministic Applications, for information about debugging applications.
Front Panel Communication is a good communication method typically used during development because it is a quick method for monitoring and interfacing with VIs running on an RT target. Use Network Communication to increase the efficiency of the communication between a host computer and the RT Engine.
LabVIEW
RT Engine
Host Computer
RT Target
Network Communication

Chapter 1 Introduction
© National Instruments Corporation 1-5 Real-Time Module User Manual
Network CommunicationWith Network Communication, a host VI runs on the host computer and communicates with the VI running on the RT target using specific network communication programmatic controls such as TCP, VI Server, and in the case of non-networked RT Series plug-in devices, shared memory reads and writes. You might use Network Communication for the following reasons:
• You want to run another VI on the host computer, but you cannot use LabVIEW for any other task when you target an RT target.
• You want to control information sent back and forth. You can customize communication code to specify which front panel objects get updated and when. You also can control which components are visible on the front panel because some controls and indicators might be more important than others.
• You want to control timing and sequencing of the data transfer.
• You want to perform additional data processing or logging.
In Figure 1-2, the RT target VI is similar to the VI in Figure 1-1 that runs on the RT target using Front Panel Communication to update the front panel controls and indicators. However, the RT target VI in Figure 1-2 uses Real-Time FIFO VIs to pass data to a communication VI. The communication VI then communicates with a host computer VI using network communication methods to update controls and indicators. Refer to Chapter 4, Building Deterministic Applications, for information about methods of communication available in LabVIEW.

Chapter 1 Introduction
Real-Time Module User Manual 1-6 ni.com
Figure 1-2. Network Communication Protocol
Real-Time Module and Express VI Considerations LabVIEW Express VIs increase LabVIEW ease of use and improve productivity with interactive dialog boxes that minimize programming for measurement applications. Express VIs do require additional performance overhead during execution, therefore do not use Express VIs in time-critical or processor-intensive applications. Instead, develop real-time applications with standard LabVIEW VIs. Refer to the Getting Started with LabVIEW manual for information about LabVIEW Express VIs.
LabVIEW shows an Express VI-oriented palette view by default. Complete the following steps to switch to the Advanced LabVIEW palette view.
1. Select Tools»Options from LabVIEW.
2. Select Controls/Functions Palettes from the Options dialog box pull-down menu.
LabVIEW
RT Engine
Host Computer
RT Target
Network Communication
VI Communication

Chapter 1 Introduction
© National Instruments Corporation 1-7 Real-Time Module User Manual
3. Select Advanced from the Palette View pull-down menu.
4. Click the OK button.
Unsupported LabVIEW FeaturesSome LabVIEW features are unavailable when you target a specific RT target. For example, there is no media storage device on some RT Series plug-in devices. Therefore, when you target LabVIEW to a plug-in device, the RT Engine might not support disk file I/O.
Note If you attempt to download and run on an RT target a VI that has unsupported functionality, the VI still executes. However, the unsupported functions do not work and return standard LabVIEW error codes.
Modifying Front Panel Objects of RT Target VIsWhen a VI or stand-alone application runs on an RT target and there is no front panel connection with host LabVIEW, you cannot execute VIs that modify a front panel. For example, you cannot change or read the properties of front panel objects with property nodes because there is no front panel.
You must establish a front panel connection with the RT target or open a remote front panel connection to read any front panel properties or for any front panel property node changes to reflect on the front panel objects.
The following features do not work on an RT target with no front panel connection:
• Front panel property nodes and control references
• Dialog VIs
• VI Server front panel functions
Using OS-Specific Technologies in RT Target VIsVIs on the RT target cannot use VIs that leverage Windows only technology.
The following features do not work on an RT target:
• ActiveX VIs
• .NET VIs
• VIs that use NI-IVI drivers

Chapter 1 Introduction
Real-Time Module User Manual 1-8 ni.com
• Windows Registry Access VIs
• TestStand VIs (ActiveX-based)
• Report Generation Toolkit VIs
• Call Library Nodes that access an operating system API other than Pharlap
• Graphics and Sound VIs
• Database Connectivity Toolset
• XML DOM Parser and G Web Server for CGI Support

© National Instruments Corporation 2-1 Real-Time Module User Manual
2Installing and Configuring the Real-Time Module and RT Targets
This chapter explains installation and configuration of the LabVIEW Real-Time Module and RT Series hardware.
Installing the Real-Time ModuleComplete the following steps to install the Real-Time Module on the host computer.
(Mac OS) Refer to the LabVIEW Real-Time Module for Mac OS X User Manual Addendum for installation and configuration instructions.
(Windows 2000/NT/XP) You must log in to the host computer as an administrator or as a user with administrator privileges.
1. Verify that LabVIEW has been installed on the host computer.
2. Insert the LabVIEW Real-Time Module CD into the CD-ROM drive. The Real-Time Module installation program runs automatically.
3. Follow the instructions that appear on the screen.
Complete the following steps to install device drivers for NI hardware that you want to use with the Real-Time Module.
1. Insert the National Instruments Device Driver CD into the CD-ROM drive. The device driver installation program runs automatically.
2. Follow the instructions that appear on the screen to install the hardware device drivers that you need.

Chapter 2 Installing and Configuring the Real-Time Module and RT Targets
Real-Time Module User Manual 2-2 ni.com
Installing and Configuring RT Series Plug-In DevicesYou can install an RT Series plug-in device in any available PCI or PXI expansion slot in the computer or PXI chassis. This section contains general installation instructions. Refer to the computer user manual or technical reference manual for specific instructions and warnings about installing hardware.
Note You must install the Real-Time Module software, Traditional NI-DAQ 7.0 from the National Instruments Device Driver CD, and PCI-7041 and PCI/PXI-7030 support from the National Instruments Device Driver CD before you install an RT Series plug-in device.
RT Series PCI Plug-In DevicesComplete the following steps to install an RT Series PCI plug-in device.
1. Power off and unplug the computer.
2. Remove the cover to the computer and make sure there are no lighted LEDs on the motherboard. If any are lit, wait until they turn off before continuing the installation.
3. Remove the expansion slot cover on the back panel of the computer.
4. Insert the plug-in device into a 5 V PCI slot. Gently rock the board to ease it into place. Do not force the board into place.
5. Screw the mounting bracket of the plug-in device to the back panel rail of the computer.
6. Visually verify the installation. Make sure the board is not touching other boards or components and is fully inserted in the slot.
7. Replace the cover, plug in, and power on the computer.
8. Refer to the Configuring RT Series Plug-In Devices section for information about configuring the PCI device.
RT Series PXI Plug-In DevicesComplete the following steps to install the RT Series PXI plug-in device.
1. Power off and unplug the PXI chassis.
2. Choose two adjacent unused PXI slots in the system.
3. Remove the filler panels for the slots you have chosen.
4. Insert the RT Series plug-in device into the 5 V PXI slots. Use the injector/ejector handle to fully insert the board into the chassis.

Chapter 2 Installing and Configuring the Real-Time Module and RT Targets
© National Instruments Corporation 2-3 Real-Time Module User Manual
5. Screw the front panel of the RT Series plug-in device to the front panel mounting rail of the system.
6. Plug in and power on the PXI chassis.
7. Refer to the Configuring RT Series Plug-In Devices section for information about configuring the PXI device.
Configuring RT Series Plug-In DevicesComplete the following steps to configure an RT Series plug-in device using Measurement & Automation Explorer (MAX).
1. Launch MAX and expand the My System, Devices and Interfaces, and Traditional NI-DAQ Devices categories. MAX detects the plug-in devices you have installed. The NI PCI/PXI-7030 Series plug-in device appears in the Traditional NI-DAQ Devices category listed by device number. The NI PCI-7041 Series plug-in device appears in the Devices and Interfaces category listed by device name.
In Figure 2-1, an NI PCI/PXI-7030 Series plug-in device appears with a device number of 1. The data acquisition daughterboard of the NI PCI/PXI-7030 Series plug-in device appears under the processor board with a device number of 2. An NI PCI-7041 Series plug-in device appears with a device name of RT::0.
Figure 2-1. Measurement & Automation Explorer

Chapter 2 Installing and Configuring the Real-Time Module and RT Targets
Real-Time Module User Manual 2-4 ni.com
2. Note the device number or name. Also note the device number of the data acquisition daughterboard. MAX always assigns a device number of 1 to the daughterboard of the NI PCI-7041 Series device.
You need the device number or name of the RT Series plug-in device to download and run LabVIEW VIs. You can use MAX to change device numbers or names and other configuration settings for the devices. You must reset the device for changes to take effect. Refer to the MAX Remote Systems Help, available by selecting Help»Help Topics»Remote Systems from MAX, for information about testing the resources of RT Series plug-in devices.
3. Select Tools»Traditional NI-DAQ Configuration»Save Configuration As and specify a filename to save the configuration information.
4. Close MAX.
The NI PCI-7041 Series plug-in device requires you to install software on the device. Refer to the Downloading Software section for information about installing software on the device.
Configuring Networked RT Series DevicesYou must configure the network settings and install software for networked RT Series devices. Use MAX to configure the network settings of networked RT Series devices and then to install software on the device.
RT Series controllers must boot into the Real-Time Operating System (RTOS) before you attempt to configure the network settings. Some RT Series PXI controllers require a boot disk to boot into the RTOS. Skip to the Configuring Network Settings section if you do not require a PXI boot disk to boot into the RTOS.
Note This section contains general instructions to configure the network settings and software of networked RT Series devices. Refer to the device documentation for specific hardware installation instructions.
Booting into the Real-Time Operating SystemYou must boot RT Series controllers into the RTOS before you can configure the network settings of the controller. Some RT Series PXI controllers do not have the RTOS pre-installed. However, you can use a floppy disk to boot into the RTOS on a PXI controller that does not have the RTOS installed.

Chapter 2 Installing and Configuring the Real-Time Module and RT Targets
© National Instruments Corporation 2-5 Real-Time Module User Manual
Complete the following steps to create a boot disk from the host computer.
1. Place a floppy disk in the host computer disk drive.
2. Launch MAX on the host computer.
3. Select Tools»RT PXI Disk Utilities»Create PXI Boot Disk to open the PXI Boot Disk dialog box.
4. Click the Yes button to make the boot disk and follow the instructions that appear on the screen.
5. Remove the floppy disk and label the disk LabVIEW Real-Time PXI Boot Disk.
6. Insert the boot disk into the disk drive of the PXI controller and power on or reset the controller to boot into the RTOS.
Configuring Network SettingsComplete the following steps to configure the network settings of networked RT Series devices.
1. In MAX, click the Remote Systems category to expand the Remote Systems list. This displays all detected networked RT Series devices on the local subnet.
2. Select a device to configure. Unconfigured devices appear with a 0.0.0.0 device name. The right pane of the MAX window displays the network and software settings of the device.
3. Enter a device name in the Name text box located in the Device Identification section. The default device name is the IP address of the device.
4. Enter the network parameters you want to assign to the device. You can choose to assign a static IP address or have the device retrieve an IP address automatically from a Dynamic Host Configuration Protocol (DHCP) server.
A DHCP server allocates an IP address to the device when the device starts up. Select Obtain IP address from DHCP server in the IP Settings section to obtain an IP address automatically from the DHCP server. Use DHCP if a static IP address is not available. Consult the network administrator for more information about using a DHCP server.
Chapter 2 Installing and Configuring the Real-Time Module and RT Targets
Real-Time Module User Manual 2-6 ni.com
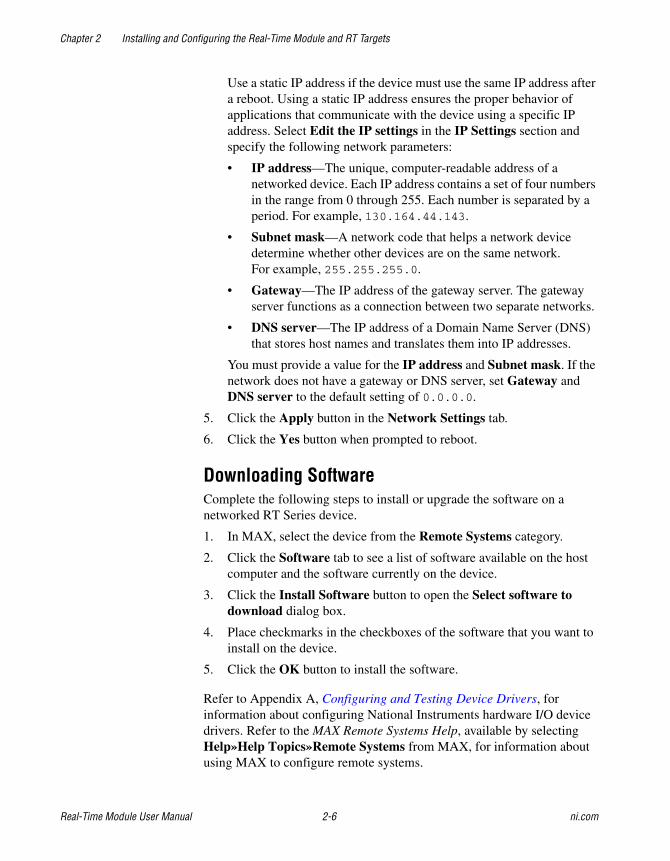
Use a static IP address if the device must use the same IP address after a reboot. Using a static IP address ensures the proper behavior of applications that communicate with the device using a specific IP address. Select Edit the IP settings in the IP Settings section and specify the following network parameters:
• IP address—The unique, computer-readable address of a networked device. Each IP address contains a set of four numbers in the range from 0 through 255. Each number is separated by a period. For example, 130.164.44.143.
• Subnet mask—A network code that helps a network device determine whether other devices are on the same network. For example, 255.255.255.0.
• Gateway—The IP address of the gateway server. The gateway server functions as a connection between two separate networks.
• DNS server—The IP address of a Domain Name Server (DNS) that stores host names and translates them into IP addresses.
You must provide a value for the IP address and Subnet mask. If the network does not have a gateway or DNS server, set Gateway and DNS server to the default setting of 0.0.0.0.
5. Click the Apply button in the Network Settings tab.
6. Click the Yes button when prompted to reboot.
Downloading SoftwareComplete the following steps to install or upgrade the software on a networked RT Series device.
1. In MAX, select the device from the Remote Systems category.
2. Click the Software tab to see a list of software available on the host computer and the software currently on the device.
3. Click the Install Software button to open the Select software to download dialog box.
4. Place checkmarks in the checkboxes of the software that you want to install on the device.
5. Click the OK button to install the software.
Refer to Appendix A, Configuring and Testing Device Drivers, for information about configuring National Instruments hardware I/O device drivers. Refer to the MAX Remote Systems Help, available by selecting Help»Help Topics»Remote Systems from MAX, for information about using MAX to configure remote systems.

Chapter 2 Installing and Configuring the Real-Time Module and RT Targets
© National Instruments Corporation 2-7 Real-Time Module User Manual
Setting the System Time of RT TargetsEach type of RT target obtains the system time differently on start-up.
• RT Series plug-in devices—The RT Engine on the plug-in device obtains the system time from the host computer when you reset the device.
• FieldPoint 20xx Series network modules—The RT Engine on the device obtains the time from a time server at each power up to set the internal clock. If a time server is not available, use the RT Set Date and Time VI to programmatically set the system date and time. Refer to the National Instruments Web site at ni.com/info and enter the info code RT003 for information about setting local time and time zone considerations for RT targets.
Note If you use the RT Set Date and Time VI to set the system time, set the IP address for the Time Server entry, located on the Servers tab of the System Configuration dialog box for the FieldPoint module, to 0.0.0.0.
• Networked RT Series PXI devices—The RT Engine on the device obtains the system date and time from the BIOS once at boot up. Use the RT Set Date and Time VI to programmatically set the system date and time. Refer to the National Instruments Web site at ni.com/info and enter the info code RT003 for information about setting local time and time zone considerations for RT targets.

© National Instruments Corporation 3-1 Real-Time Module User Manual
3Real-Time Module Environment
This chapter describes the basic functionality of the LabVIEW Real-Time Module such as targeting and downloading VIs to an RT target. This chapter also describes the available options for networked RT Series devices.
Targeting LabVIEW to an RT TargetWhen you first launch LabVIEW after installing the Real-Time Module, the default execution target is the host computer operating system, as shown in Figure 3-1.
Figure 3-1. LabVIEW Dialog Box

Chapter 3 Real-Time Module Environment
Real-Time Module User Manual 3-2 ni.com
You can target LabVIEW to an RT target or the host computer to open a front panel communication connection. When you select an execution target other than the host computer, LabVIEW downloads any LabVIEW VIs you subsequently run to the selected execution target.
Complete the following steps to target LabVIEW to an execution target.
1. Start LabVIEW. Previously targeted execution targets appear in the Execution Target pull-down menu in the LabVIEW dialog box.
2. If you are using a previously targeted device, select the execution target from the Execution Target pull-down menu and skip the remaining steps.
3. If you are connecting to a networked device and have not targeted the device previously, select Select Target with Options from the Execution Target pull-down menu to open the Select Execution Target dialog box.
4. Select RT Engine on Network from the target list to enter a new networked device as shown in Figure 3-2.
Figure 3-2. Select Execution Target Dialog Box
5. Enter the IP address and password set for the networked device in Measurement & Automation Explorer (MAX). Leave the password field blank if the networked device does not have a password specified in MAX.
Note If you have not configured the hardware in MAX, click the Configure button to open MAX. Refer to Chapter 2, Installing and Configuring the Real-Time Module and RT Targets, for configuration instructions.

Chapter 3 Real-Time Module Environment
© National Instruments Corporation 3-3 Real-Time Module User Manual
If the IP address of the host computer appears in the RT Target: Access list of the RT target, you do not need to enter the password. Refer to the Setting Access Permissions for an RT Target section for information about the RT Target: Access network options.
6. Click the OK button.
Downloading VIs to an RT TargetWhen you select an RT target in the Select Execution Target dialog box, LabVIEW establishes a front panel communication connection with the RT target. You can download a VI and its associated subVIs to an RT target by clicking the Run button. The RT Engine on the RT target then runs the downloaded VI.
When a downloaded VI runs on the RT target, LabVIEW switches from edit to run mode. In run mode, you cannot edit VIs. You must switch back to edit mode to make changes to the VI. Select Operate»Change to Edit Mode to switch to edit mode. Switching an RT target VI to edit mode removes the VI from memory on the target.
Note When you edit a VI or convert a VI from a different version of LabVIEW, you must save the VI on the host computer before you can download and run it on the RT target.
You also can download LabVIEW VIs without running them by selecting Operate»Download Application while targeted to an RT target.
To see which VIs have been downloaded to the RT target, select Browse»Show VI Hierarchy while targeted to an RT target. The VI hierarchy appears with a pin in the upper left corner of each VI.
When the pin is in the vertical position, as shown to the left, the VI has been downloaded.
When the pin is in the horizontal position, as shown to the left, the VI has not been downloaded.
Chapter 3 Real-Time Module Environment
Real-Time Module User Manual 3-4 ni.com
Closing a Front Panel Connection without Closing VIsYou can select Operate»Switch Execution Target and then select another execution target to close the networking connection to the RT target without closing VIs.
You also can exit LabVIEW on the host computer without closing the VIs on the RT target. Select File»Exit without closing RT Engine VIs to close LabVIEW on the host computer. The VIs running on the RT target continue running. VIs downloaded but not running remain loaded in memory on the RT target.
If you select File»Exit, LabVIEW opens a dialog box that asks if you want to exit LabVIEW without closing RT Engine VIs. If you click the Yes button, LabVIEW exits without closing the VIs on the RT target. If you click the Close all RT Engine VIs button, LabVIEW closes all the VIs running on the RT target, unloads the VIs from memory, and closes LabVIEW.
Connecting to VIs Running on an RT TargetWhen you target LabVIEW to an RT target to open a front panel communication connection, LabVIEW detects VIs currently running on the RT target. LabVIEW attempts to open the local copy of the VIs to show the front panel.
Note When connecting to an RT Series plug-in device, if you place a checkmark in the Reset checkbox on the Select Execution Target dialog box, LabVIEW clears all VIs in memory on the target.
If the local copy of the VIs have been moved or modified since you downloaded them to the RT target, LabVIEW displays the Changed or Missing VIs dialog box, shown in Figure 3-3.
Chapter 3 Real-Time Module Environment
© National Instruments Corporation 3-5 Real-Time Module User Manual
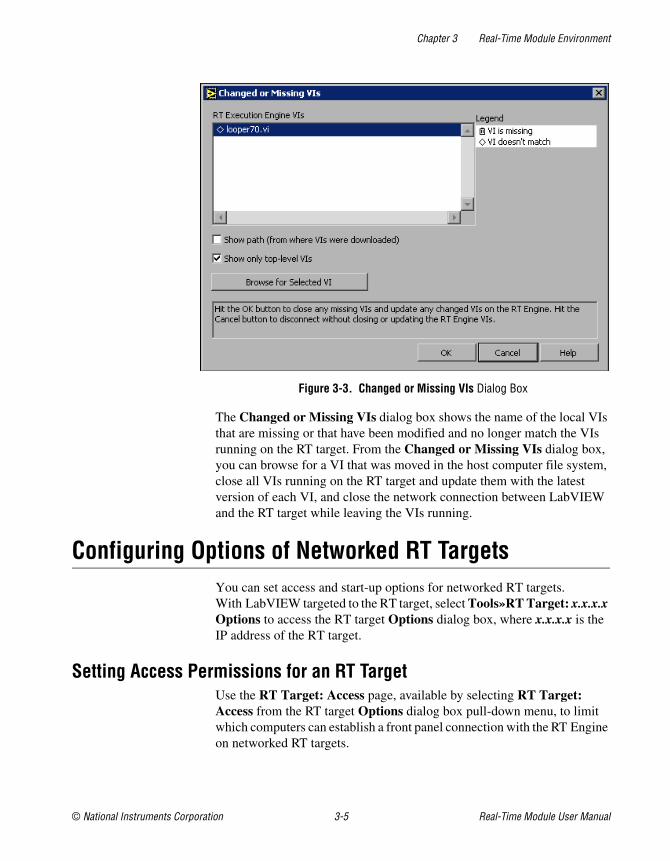
Figure 3-3. Changed or Missing VIs Dialog Box
The Changed or Missing VIs dialog box shows the name of the local VIs that are missing or that have been modified and no longer match the VIs running on the RT target. From the Changed or Missing VIs dialog box, you can browse for a VI that was moved in the host computer file system, close all VIs running on the RT target and update them with the latest version of each VI, and close the network connection between LabVIEW and the RT target while leaving the VIs running.
Configuring Options of Networked RT TargetsYou can set access and start-up options for networked RT targets. With LabVIEW targeted to the RT target, select Tools»RT Target: x.x.x.x Options to access the RT target Options dialog box, where x.x.x.x is the IP address of the RT target.
Setting Access Permissions for an RT TargetUse the RT Target: Access page, available by selecting RT Target: Access from the RT target Options dialog box pull-down menu, to limit which computers can establish a front panel connection with the RT Engine on networked RT targets.

Chapter 3 Real-Time Module Environment
Real-Time Module User Manual 3-6 ni.com
To access the RT target, the IP address of the host computer must match an entry that allows access in the RT Target Access List and you must provide the correct password for the RT target. You can allow or deny access to computers by adding entries in the RT Target Access List.
Complete the following steps to add entries to the RT Target Access List.
1. From the RT Target: Access page, enter the computer IP address or domain name entry of the computer.
Note If the RT target does not have access to a Domain Name Server (DNS), do not use domain name entries in the RT Target Access List. Requests to resolve the domain name fail and affect the performance of VIs running on the RT target.
2. Select the Allow Access or Deny Access radio button and click the Add button.
When you try to target LabVIEW to an RT target, the RT Engine on the RT target compares the host computer IP address to the entries in the RT Target Access List to determine accessibility. You define the RT Target Access List entries to indicate whether a host computer is permitted or denied access. Permissions are granted to list entries in descending order, meaning that any entry in the list supersedes a previous list entry. For example, in Figure 3-4, a.test.site.com and b.test.site.com can access the RT target even though a previous list entry indicates by the * wildcard that all addresses ending in .test.site.com are denied access. A checkmark next to a list entry denotes that access is permitted, while an X denotes that access is denied. If no entry matches the host computer address, access is denied unless you supply a password. Place frequently matched entries toward the bottom of the RT Target Access List to improve system performance.

Chapter 3 Real-Time Module Environment
© National Instruments Corporation 3-7 Real-Time Module User Manual
Figure 3-4. RT Target: Access Page
Table 3-1 shows examples of RT Target Access List entries and provides an explanation of matching entries.
Table 3-1. Example RT Target Access List Entries
Access String Matches
* All hosts
test.site.com The host whose domain name is test.site.com
*.site.com All hosts whose domain names end with .site.com
130.164.123.123 The host with the IP address 130.164.123.123
130.164.123.* All hosts whose IP addresses start with 130.164.123

Chapter 3 Real-Time Module Environment
Real-Time Module User Manual 3-8 ni.com
To specify an Internet host address, enter its domain name or IP address. Use the * wildcard when specifying Internet host addresses. For example, you can specify all hosts within the domain site.com with the following entry:
*.site.com
You can specify all hosts in the subnet whose first two numbers are 130.164 with the following entry:
130.164.*
The * entry is the default RT Target Access List entry and matches all addresses.
Setting Options for RT Target Start-up ApplicationsUse the RT Target: Miscellaneous page, available by selecting RT Target: Miscellaneous from the RT target Options dialog box pull-down menu, to set RT target start-up application options.
Figure 3-5. RT Target: Miscellaneous Page
Place a checkmark in the Launch Application at Boot-up checkbox, shown in Figure 3-5, to launch the application specified in the Application Path text box when you boot up a networked RT target with a media storage device. The path specified in the Application Path text box also determines the path and application name that appear when you target

Chapter 3 Real-Time Module Environment
© National Instruments Corporation 3-9 Real-Time Module User Manual
LabVIEW to the RT target and create an embedded stand-alone application. You first must create a stand-alone application before you select this option. Refer to the Building Stand-Alone Applications section of Chapter 7, Deploying Applications, for information about using the LabVIEW Application Builder to create start-up applications.
By changing the entry in the Application Path text box to another filename, you can create multiple stand-alone applications on the RT target using the LabVIEW Application Builder. After building an application using the Application Builder and embedding it on the RT target, you can change the entry in the Application Path text box and build another application. However, if you select Launch Application at Boot-up, only the application you specify in the Application Path launches at start-up.
Use Downloaded VI Path to specify the default path on the RT target for VIs. The RT Engine uses the path specified in Downloaded VI Path for operations that require the VI path. For example, the Current VI’s Path function returns the path of the current VI. When you run a VI that contains the Current VI’s Path function on the RT target, the function returns the path specified in the Downloaded VI Path text box, appended with the name of the VI.
Note Application Path and Downloaded VI Path refer to the file system on the RT target.

© National Instruments Corporation 4-1 Real-Time Module User Manual
4Building Deterministic Applications
This chapter explains how to build deterministic applications using the LabVIEW Real-Time Module.
Programming for DeterminismThe first thing to consider when implementing a real-time system with LabVIEW is whether you need determinism. Determinism is the characteristic of a system that describes how consistently it responds to external events or performs operations within a given time limit. If you intend to build deterministic applications, use the programming techniques in this chapter to achieve high levels of determinism in VIs.
Overview of Multithreaded ApplicationsMost computers have only one processor, so tasks execute one at a time. Multitasking is achieved by running one application for a short amount of time and then having other applications run. As long as the amount of processor time allocated for each application is small enough, computers appear to have multiple applications running simultaneously.
Multithreading is when you apply the concept of multitasking to a single application by breaking it into smaller tasks that execute for short amounts of time in different execution system threads. A thread is a completely independent flow of execution for an application within the execution system. Multithreaded applications maximize the efficiency of the processor because the processor does not sit idle if there are other threads ready to run. Any application that reads and writes from a file, performs I/O, or polls the user interface for activity can benefit from multithreading simply because you can use the processor to run other tasks during these activities.

Chapter 4 Building Deterministic Applications
Real-Time Module User Manual 4-2 ni.com
Creating Multithreaded Applications in LabVIEWTo create a multithreaded application in LabVIEW, you must separate time-critical tasks from non-time-critical tasks. You then can build VIs to complete each task. You prioritize the VIs and then categorize them into one of the available execution systems to control the amount of processor resources each VI receives. LabVIEW assigns each VI to an execution system thread according to the VI priority. The threads execute on the processor accordingly.
Scheduling ThreadsThe Real-Time Operating System (RTOS) on RT targets uses a combination of round robin and preemptive scheduling to execute threads in the execution system. Round robin scheduling applies to threads of equal priority. Equal shares of processor time are allocated between equal priority threads. For example, each normal priority thread is allotted 10 ms to run. The processor executes all the tasks it can in 10 ms and whatever is incomplete at the end of that period must wait to complete during the next allocation of time. Conversely, preemptive scheduling means that any higher priority thread that needs to execute immediately pauses execution of all lower priority threads and begins to execute. A time-critical priority thread is the highest priority and preempts all priorities.
Assigning PrioritiesYou can select from the following VI priorities, listed in order from lowest to highest, to assign VIs to an execution system thread:
• background priority (lowest)
• normal priority
• above normal priority
• high priority
• time-critical priority (highest)
Threads of higher priority preempt threads of lower priority. Normal priority is the default thread priority for all VIs created in LabVIEW. The time-critical priority preempts all thread priorities. A time-critical priority thread does not relinquish processor resources until it has completed or until it cooperatively relinquishes the processor resources. You must ensure that the time-critical thread does not monopolize the processor resources. Because time-critical priority threads cannot preempt each other, create only one time-critical thread in an application to guarantee deterministic behavior.

Chapter 4 Building Deterministic Applications
© National Instruments Corporation 4-3 Real-Time Module User Manual
In addition to the five priority levels listed above, you can set VIs to subroutine priority. VIs set for subroutine priority do not share execution time with other VIs. When a VI runs at the subroutine priority level, it effectively takes control of the thread in which it is running, and it runs in the same thread as its caller. No other VI can run in that thread until the subroutine VI finishes running, even if the other VI is at the subroutine priority level.
Assigning VIs to Execution SystemsLabVIEW has the following six execution systems to categorize VIs:
• user interface
• standard
• instrument I/O
• data acquisition
• other 1
• other 2
The names of the execution systems are suggestions for the type of VIs to place within the execution system. By default, all VIs run in the standard execution system at normal priority. The user interface execution system handles all user interface tasks. Instrument I/O and data acquisition task VIs can be assigned to other execution systems, but you can use the labels to understand the organization. In addition to the six execution systems, you also can assign VIs to the same as caller execution system. The same as caller category is not a true execution system because it runs subVIs in the same execution system as the VI that called the subVI.
Every execution system except user interface has a thread queue. For example, if you have three threads assigned to an execution system, at any time, one thread might run and the other two wait in the queue. Assuming all threads have the same priority, one of the threads runs for a certain amount of time. The thread then moves to the end of the queue, and the next thread runs. When a thread completes, the execution system removes it from the queue.
The execution systems are not responsible for managing the user interface. If a thread in one of the queues needs to update the user interface, the execution system passes responsibility to the user interface execution system, which updates the user interface.

Chapter 4 Building Deterministic Applications
Real-Time Module User Manual 4-4 ni.com
Dividing Tasks to Create Deterministic Multithreaded ApplicationsDeterministic control applications depend on time-critical tasks to complete on time, every time. Therefore, time-critical tasks need enough processor resources to ensure their completion. Separate time-critical tasks from all other tasks in the application and place them in a separate VI so you can ensure they receive enough processor resources. For example, if a control application processes measurement data at regular intervals and stores the data on disk, you must handle the timing and control of the data acquisition in a time-critical VI. However, storing the data on disk is inherently a non-deterministic task because file I/O operations have unpredictable response times that depend on the hardware and the availability of the hardware resource. Place file I/O operations in the normal priority VI.
The time-critical priority VI receives the processor resources necessary to complete the task and does not relinquish control of the processor until it cooperatively yields to the normal priority VI or until it completes the task. The normal priority VI then runs until preempted by the time-critical VI. The process repeats until all tasks complete.
If the application contains two normal priority VIs in addition to the time-critical VI, the timing of the application changes. For example, if the application also requires updates to a LabVIEW front panel, you must create a separate normal priority VI for network communication. The network communication VI can receive data from other VIs in the application using different communication methods. The communication VI then can execute the non-deterministic network communication code to update the front panel. When the application runs, the time-critical VI uses the processor resources until the task completes or until it cooperatively relinquishes control. The two normal priority VIs then round robin the control of the processor resources in equal amounts of time until the tasks complete or until preempted by the time-critical VI again for control of the processor resources.
After separating all deterministic tasks from non-deterministic tasks in the application into different VIs, assign the VIs to an execution system and prioritize them accordingly.
Complete the following steps to set the execution system and priority of a VI.
1. Select File»VI Properties to open the VI Properties dialog box.
2. Select Execution from the Category pull-down menu.

Chapter 4 Building Deterministic Applications
© National Instruments Corporation 4-5 Real-Time Module User Manual
3. Select the priority from the Priority pull-down menu.
4. Select the execution system from the Preferred Execution System pull-down menu.
You then can use the different VIs as subVIs to build the final deterministic application in one VI.
Cooperatively Yielding Time-Critical VI ExecutionBecause of the preemptive nature of time-critical VIs, they can monopolize processor resources. A time-critical VI might use all of the processor resources, not allowing lower priority VIs in the application to execute. You must build time-critical VIs that periodically yield, or sleep, to allow lower priority tasks to execute without affecting the determinism of the time-critical code. By timing control loops, you can yield time-critical VIs and cooperatively relinquish processor resources. Refer to the Timing Control Loops section of Chapter 5, Creating Deterministic Control Applications, for information about the methods available for timing time-critical VIs to relinquish processor resources.
Passing Data between VIs After dividing tasks in an application into separate VIs of varying priorities, you might need to communicate between the different VIs. Use global variables, functional global variables, and the Real-Time FIFO VIs to send and receive data between VIs in an application.
Global VariablesUse global variables to access and pass small amounts of data between VIs, such as from a time-critical VI to a lower priority VI.
Global variables are a lossy form of communication, meaning the data in a global variable can be overwritten before actually being read. Tasks in a lower priority thread might not have enough processor time to read the data before other tasks in a different thread overwrite the data.
A global variable is a shared resource that you must use carefully in a time-critical VI. If you use a global variable to pass data out of a time-critical VI, you must ensure that a lower priority VI reads the data and unlocks the global before the time-critical VI attempts to write to the global again. Refer to Chapter 6, Optimizing Applications, for information about shared resources.

Chapter 4 Building Deterministic Applications
Real-Time Module User Manual 4-6 ni.com
Using a global variable is a good way to pass small amounts of data, such as scalar data, between VIs. For larger amounts of data, use functional global variables or the Real-Time FIFO VIs. Refer to the LabVIEW User Manual for information about creating and using global variables.
Functional Global VariablesUse functional global variables like global variables to pass data between VIs. A functional global variable is a subVI set to subroutine priority. The subVI contains a While Loop with a nested Case structure for read and write access, as shown in Figure 4-1. The While Loop contains uninitialized shift registers that store data. A functional global variable receives an action input that specifies which task the VI performs, as shown in Figure 4-1 by the Mode input parameter. Any subsequent calls to the functional global variable can access the most recent data. Functional global variables resemble queues because you can add more shift registers to store a longer history of values. You also can add more than one set of shift registers to pass more than one set of data.
Figure 4-1. Functional Global Variable
Unlike global variables, you can implement functional global variables such that they are not a shared resource. If you right-click on a subVI set to subroutine priority and select Skip Subroutine Call If Busy from the shortcut menu, the execution system skips the call if the subroutine is currently running in another thread. This helps in time-critical VIs where the execution system safely skips the subroutine subVI without waiting. If you skip the execution of a subVI, all outputs of the subVI become the

Chapter 4 Building Deterministic Applications
© National Instruments Corporation 4-7 Real-Time Module User Manual
default value for that data type, not the default value for the indicator on the subVI front panel. For example, numeric outputs are zero, string and array outputs are empty, and Boolean parameters are FALSE. If you want to detect if a subroutine executes, make an output Boolean return TRUE if it executes successfully and FALSE if it did not. Skip functional global variables in time-critical VIs, but not in lower priority VIs. In lower priority VIs, you can wait to receive non-default values.
Functional global variables can be a lossy form of communication that lose data if a VI overwrites the shift register data before you read the data.
Refer to the examples\Real-Time\RT Communication.llb for examples of using Functional Global Variables to communicate between VIs that run on an RT Target.
Real-Time FIFO VIsUse the Real-Time FIFO VIs to transfer data between VIs in an application. An RT FIFO acts like a fixed queue, where the first value in is the first value out. Use the RTFIFOWrite VI to add data to an RT FIFO. Next, reference the RT FIFO in another VI. Use the RTFIFORead VI to read the data from the referenced RT FIFO.
RT FIFOs and LabVIEW queues both transfer data from one VI to another. However, unlike a LabVIEW queue, an RT FIFO ensures deterministic behavior by imposing a size restriction. You must define the number and size of the RT FIFO elements before the data enters the time-critical VI. Both a reader and writer can access the data in an RT FIFO at the same time, allowing RT FIFOs to work safely from within a time-critical VI.
Because of the fixed-size restriction, an RT FIFO can be a lossy communication method. Writing data to an RT FIFO when the FIFO is full overwrites the oldest element. You must read data stored in an RT FIFO before the FIFO is full to ensure the transfer of every element without losing data. Check the overwrite output of the RTFIFOWrite VI to ensure that data is not overwritten. If the RT FIFO overwrites data, the overwrite output returns a TRUE value. Refer to the LabVIEW Help, available by selecting Help»VI, Function, & How-To Help, for VI reference information about the Real-Time FIFO VIs. Refer to the examples\Real-Time\RT Communication.llb for examples of using the Real-Time FIFO VIs to communicate between VIs that run on an RT target.

Chapter 4 Building Deterministic Applications
Real-Time Module User Manual 4-8 ni.com
Creating a User Interface for RT Target VIsUse the RT Communication Wizard to create a user interface for time-critical VIs running on an RT target. The RT Communication Wizard creates the following three user interface VIs:
• Host VI—Provides a user interface that runs on the host computer.
• Time-Critical VI—Contains the time-critical tasks.
• Normal Priority VI—Contains all non-deterministic network communication tasks used to update the host VI front panel with data received from the time-critical VI. The normal priority VI also calls the time-critical VI.
Complete the following steps to create the user interface VIs.
1. Select Tools»RT Communication Wizard to open the RT Communication Wizard.
2. Select a VI by entering the path or by clicking the Browse button and navigating to the location of the VI.
3. Select the front panel communication method from the available choices—TCP, User Datagram Protocol (UDP), DataSocket, or Logos.
4. Enter the IP address of the RT target in the IP address of RT target listbox. You also can select an RT target IP address from the pull-down menu.
5. Enter the TCP port to use for communication in the TCP Port text box. If you use the UDP protocol, you must specify the UDP send and receive ports in the UDP Send Port and UDP Receive Port text boxes.
6. Click the Next button.
The RT Communication Wizard returns a list of controls and indicators present in the time-critical VI. The RT Communication Wizard replaces front panel controls and indicators in the time-critical VI with RT FIFOs. Also, the RT Communication Wizard places RT FIFOs in a new normal priority VI. The RT FIFOs in the normal priority VI and time-critical VI send and receive front panel data. RT FIFOs are deterministic and do not affect the timing of the time-critical code. The RT Communication Wizard displays the old control or indicator name and the new RT FIFO name for all controls and indicators.

Chapter 4 Building Deterministic Applications
© National Instruments Corporation 4-9 Real-Time Module User Manual
7. Enter the number of elements in each RT FIFO in the Length text box and click the Next button. You must ensure that you set Length large enough to contain the data written to an RT FIFO to prevent the loss of data from overflow.
Note Remove the checkmark from the control or indicator Select checkbox to leave the control or indicator in place without converting it to an RT FIFO.
If the time-critical VI contains a control or indicator of type 1D array, you must set the array length for each RT FIFO element. If you have no controls or indicators of type 1D array, skip step 8.
8. Enter the length of the array that will be contained in each element of the RT FIFO in the Array Length text box and click the Next button.
The RT Communication Wizard creates three VIs and provides a different name for each VI.
9. Verify the VI names and directory in which to save the VIs and click the Finish button. The original VI is not changed.
The RT Communication Wizard generates the three VIs and creates front panel code for the time-critical VI using the specified communication method in the normal priority VI. However, if you want more than one communication method to handle the front panel communication code or you want to vary the order in which the network communication VI sends and receives data, use network communication methods to create a network communication VI. Refer to the Exploring Communication Methods section for information about the network communication methods you can use in LabVIEW.
Exploring Communication MethodsYou can use high-level software protocols to communicate between host LabVIEW VIs and RT target VIs. Each protocol has its advantages and disadvantages. You can choose any method based on the communication need. The following list classifies the different communication methods:
• Shared Memory Communication—Used for communication between LabVIEW and RT Series plug-in devices only.
• Network Communication—Used for communication over Ethernet networks.
– TCP
– UDP

Chapter 4 Building Deterministic Applications
Real-Time Module User Manual 4-10 ni.com
– DataSocket
– VI Server
– SMTP (send only)
• Bus Communication—Used for communication over different bus communication ports.
– Serial
– CAN
Shared MemoryShared memory is the physical medium through which the host computer and RT Series plug-in device communicate.
In operating systems like Windows, two processes or applications can communicate with each other using the shared memory mechanism the operating system provides. Similarly, RT target VIs and LabVIEW VIs can communicate using shared memory VIs to read and write to the shared memory locations on the RT Series plug-in device.
The Real-Time Shared Memory VIs have very low timing overhead and are not a shared resource, so they are the only communication method you can place in a time-critical VI. However, the size of the shared memory is limited to 1 KB for 7030 Series plug-in device and 512 KB for the 7041 Series plug-in devices. If you need to transfer several megabytes of data, you must divide the data into smaller portions and then transfer them. In doing so, you must make sure that data in the shared memory is not overwritten before it is read. Refer to the LabVIEW Help, available by selecting Help»VI, Function, & How-To Help, for information about the Real-Time Shared Memory VIs.
TCPTCP is an industry-standard protocol for communicating over networks. Host LabVIEW VIs can communicate with RT target VIs using the LabVIEW TCP functions. Refer to the LabVIEW Help, available by selecting Help»VI, Function, & How-To Help, for information about the TCP functions.

Chapter 4 Building Deterministic Applications
© National Instruments Corporation 4-11 Real-Time Module User Manual
The Real-Time Module extends the capabilities of the existing TCP functions to enable communication with networked RT Series devices and to allow communication across shared memory with RT Series plug-in devices. However, TCP is non-deterministic, and using TCP communication inside a time-critical VI adds jitter to the application. Jitter is the amount of time that a loop cycle time varies from the desired time.
UDPUDP is a network transmission protocol for transferring data between two locations on a network. UDP is not a connection-based protocol, so the transmitting and receiving computers do not establish a network connection. Because there is no network connection, there is little overhead when transmitting data. However, UDP is non-deterministic, and using UDP communication inside a time-critical VI adds jitter to the application.
When using UDP to send data, the receiving computer must have a read port open before the transmitting computer sends the data. Use the UDP Open function to open a write port and specify the IP address and port of the receiving computer. The data transfer occurs in byte streams of varying lengths called datagrams. Datagrams arrive at the listening port and the receiving computer buffers and then reads the data.
It is possible to do bi-directional data transfers with UDP. With bi-directional data transfers, both computers specify a read and write port and transmit data back and forth using the specified ports. You can use bi-directional UDP data transfers to send and receive data from the network communication VI on the RT target.
UDP has the ability to perform fast data transmissions with minimal jitter. However, UDP cannot guarantee that all datagrams arrive at the receiving computer. Because UDP is not connection based, the arrival of datagrams cannot be verified. To prevent this, you must read data stored in the receiving computer’s data buffer fast enough to prevent overflow and loss of data. Refer to the LabVIEW Help, available by selecting Help»VI, Function, & How-To Help, for information about using the UDP functions to exchange data with devices on a remote UDP port.
DataSocketDataSocket is an Internet programming technology to share live data between VIs and other computers. A DataSocket Server running on a host computer acts as a data repository. Data placed on the DataSocket Server becomes available for clients to access.

Chapter 4 Building Deterministic Applications
Real-Time Module User Manual 4-12 ni.com
Note You can bind a DataSocket connection to a front panel object and control the object from a client connection. However, this feature is not supported by VIs on an RT target because there is no front panel.
One advantage of using DataSocket is that multiple clients can access data on the DataSocket Server. A LabVIEW VI can use the DataSocket Write VI to post data to the DataSocket Server. Any number of VIs on different RT targets can use the DataSocket Read VI to retrieve the data. RT target VIs can post data, such as status information, to the DataSocket Server for the host computer VI to read.
DataSocket is non-deterministic and using DataSocket functions inside a time-critical VI adds jitter to the application. Refer to the LabVIEW User Manual for information about DataSocket technology. Refer to the LabVIEW Help, available by selecting Help»VI, Function, & How-To Help, for information about the DataSocket VIs and functions.
VI ServerUse the VI Server to monitor and control VIs on a remote RT target. Using VI Server technology, a LabVIEW VI can invoke RT target VIs. The LabVIEW VI can pass parameter values to and from the RT target VIs, creating a distributed application.
A host VI can invoke only VIs in memory on the RT target. The host VI cannot dynamically download LabVIEW VIs to the RT target for use with the VI Server. Refer to the Downloading VIs to an RT Target section of Chapter 3, Real-Time Module Environment, for information about downloading VIs without running them.
One advantage to using the VI Server for communication is that it allows you to access the functionality of TCP while working within the framework of LabVIEW. However, VI Server is non-deterministic and using VI Server communication inside a time-critical VI adds jitter to the application. Refer to the LabVIEW User Manual for information about using the VI Server.

Chapter 4 Building Deterministic Applications
© National Instruments Corporation 4-13 Real-Time Module User Manual
Table 4-1 lists the characteristics of the different network communication methods.
SMTPUse the SMTP VIs to send data from a VI running on the RT target to VIs running on another computer. The SMTP VIs can send electronic mail, including attached data and files, using the Simple Mail Transfer Protocol (SMTP). You cannot use the SMTP VIs to receive information. SMTP is non-deterministic, and using SMTP communication inside a time-critical VI adds jitter to the application. Refer to the LabVIEW User Manual for information about emailing data from a VI.
SerialSerial communication is the transmission of data between two locations through the serial ports. The VISA functions provide serial communication support in LabVIEW for communication between RT targets with serial devices and serial instruments or computers that have a serial connection. Serial communication is ideal when transfer data rates are low or for transmitting data over long distances. You must install NI-Serial RT on the RT target from MAX. (Mac OS) Install using the Remote System Explorer. Serial is non-deterministic, and using serial communication inside a time-critical VI adds jitter to the application. Refer to the LabVIEW Help, available by selecting Help»VI, Function, & How-To Help, for information about using the VISA functions for serial communication.
Table 4-1. Characteristics of Network Communication Protocols
Protocol Speed Loss
TCP Fast Lossless
UDP Very Fast Lossy
DataSocket Fast Lossy*
VI Server Slow Lossless**
*Data can be overwritten if items are not read from the DataSocket Server before the next write.
**Not for large data transfers. Mostly used for monitoring or controlling one shot runs of remote VIs. VI Server is primarily suited for remote control of VIs.

Chapter 4 Building Deterministic Applications
Real-Time Module User Manual 4-14 ni.com
CANController Area Network (CAN) is a deterministic, multi-drop communication bus standardized as ISO 11898. Using CAN, you can transfer up to 8 data bytes per frame at a rate of up to 1 Mbit per second. You can network multiple RT systems using NI-CAN interface cards and NI-CAN driver software. You cannot use CAN communication with the RT Series plug-in devices. You must install NI-CAN RT on the RT target from MAX. (Mac OS) Install using the Remote System Explorer. Refer to the NI-CAN Hardware and Software Manual for information about using NI-CAN hardware and software with LabVIEW.
Using Remote Panels with RT Target VIsUse remote panels to view or remotely control an RT target VI from a remote LabVIEW client or Web browser. Only one user may control a VI at any specific time, but several users at different locations can view the VI front panel simultaneously.
Enabling Remote Panel Connections to RT Target VIsThe RT target Web Server must be enabled to allow remote panel control of an RT target VI or to view the front panel of an RT target VI remotely using a Web browser.
Complete the following steps to enable the RT target Web Server and add VIs to the Web server Visible VIs list.
1. Target LabVIEW to the RT target.
2. Select Tools»RT Target: x.x.x.x Options and select Web Server: Configuration from the pull-down menu.
3. Place a checkmark in the Enable Web Server checkbox to enable the Web Server.
4. Enter the Web Server root directory in the Root Directory text box. The Web Server root directory is the top directory in a Web Server file system.
5. Select Web Server: Visible VIs from the pull-down menu.
6. Add to the Visible VIs list the VIs that you want to be accessible on the Web. Click the OK button to close the Options dialog box.
7. Download the VIs to the RT target. Refer to the Downloading VIs to an RT Target section of Chapter 3, Real-Time Module Environment, for information about downloading VIs to an RT target.

Chapter 4 Building Deterministic Applications
© National Instruments Corporation 4-15 Real-Time Module User Manual
With the RT target Web Server enabled, you can create HTML files to allow Web browser access to RT target VIs in the Visible VIs list.
Complete the following steps to create HTML files of VIs and make them available to Web browsers from the RT target Web Server.
1. Open in host LabVIEW the VIs you want to publish.
2. Select Tools»Web Publishing Tool to open the Web Publishing Tool dialog box and create an HTML file that embeds the VI.
3. Click the Save to Disk button to create the HTML file.
4. Using the FTP client in MAX, transfer the HTML file to the RT target directory that you specified as the Web Server root directory.
(Mac OS) Use the FTP client of the Remote System Explorer.
Refer to Chapter 18, Networking in LabVIEW, of the LabVIEW User Manual for information about publishing VIs on the Web using the Web Publishing Tool and viewing and controlling front panels remotely.
Regaining Control of RT Target VIs from Remote Panel ConnectionsIf a remote panel connection assumes control of an RT target VI while you have a front panel connection to the RT target, LabVIEW alerts you that control was transferred to a remote client. Also, if a remote panel connection has control of a VI running on an RT target and you open a front panel connection to the target from the host computer, LabVIEW alerts you that a remote connection exists and has control of the VI.
You can regain control of an RT target VI from host LabVIEW by opening a front panel connection to the target and clicking the RT Target information banner located on the lower-left corner of the VI front panel and selecting Regain Control. The remote user receives a message that the server has regained control of the VI. The host computer regains and locks control of the VI, not allowing remote connections to regain control. You can unlock control of the VI by clicking the RT Target information banner and selecting Unlock Control. You can switch control of a VI to a user that requested control while the VI was locked by clicking the RT Target information banner and selecting Switch Controller. If more than one remote connection requested control of the VI, the first connection in the queue assumes control.

Chapter 4 Building Deterministic Applications
Real-Time Module User Manual 4-16 ni.com
Minimizing Memory Usage by the RT Target Web ServerTo minimize memory usage when you enable the Web Server on the RT target, include only the VIs you want to access on the Visible VIs list. Also, disable the Web Server or remove all VIs on the Visible VIs list to avoid losing memory when the Web Server is not in use.

© National Instruments Corporation 5-1 Real-Time Module User Manual
5Creating Deterministic Control Applications
This chapter explains how to create control applications using the LabVIEW Real-Time Module. This chapter also explains how to use the NI-Watchdog VIs to monitor a control system for critical failures or events.
Overview of Control ApplicationsIn a typical control application, the process variable is a system variable that you want to control. Sensors measure the process variable in the dynamic system and provide the data to the control application. The set point is the value, or command value, you want for the process variable. A comparator determines if a difference exists between the process variable and the set point. If a difference exists and it is deemed large enough, the compensator processes the data and determines the desired actuator output to drive the system appropriately. Figure 5-1 illustrates a typical control system.
Figure 5-1. Typical Control System
For example, in a temperature measurement system, if the actual temperature is 100 °C and the temperature set point is 120 °C, the compensator needs to take some action to raise the temperature.
CompensatorSet PointActuatorOutput
System(Plant)
ProcessVariable
Measurement
Comparator
+ –

Chapter 5 Creating Deterministic Control Applications
Real-Time Module User Manual 5-2 ni.com
One actuator output might be to drive a heater at 62 percent of its maximum output capacity. The increased heater actuator output causes the system to become warmer, which results in an increased temperature. This kind of system is called a closed-loop control system because the process of reading sensors and calculating the actuator output you want repeats continuously at a fixed loop rate.
Implementing a Deterministic Control ApplicationYou can use the Real-Time Module, RT Series hardware, and National Instruments I/O hardware to create deterministic control applications to monitor a system. RT Series hardware can handle the process variable measurement and actuator compensation sections of a control system. A LabVIEW application can retrieve sensor measurement data from the hardware, compare set point and process variable data values, use control algorithms to processes the data, and output compensation data to the system compensation hardware. Figure 5-2 shows the LabVIEW implementation of a control system. Timing the control loop is not represented in Figure 5-2. However, the timing of the control loop is important to the success of the control system.
Figure 5-2. Typical LabVIEW Control Application
When you develop a deterministic control application, you must consider memory management, time-critical versus normal priority code, and communication. Refer to Chapter 4, Building Deterministic Applications, for information about deterministic programming techniques.
Building a deterministic control application includes the following steps.
1. Time the control loop.
2. Acquire the measurement data.
3. Process the measurement data.
4. Output the compensation data.
SoftwareProcessing
ActuatorOutput
SensorInput
Data AcquisitionDevice
RT Target VI Data AcquisitionDevice

Chapter 5 Creating Deterministic Control Applications
© National Instruments Corporation 5-3 Real-Time Module User Manual
Timing Control LoopsBecause of the preemptive nature of the Real-Time Operating System (RTOS) RT Series devices use, a time-critical application thread can monopolize the processor on the device. A thread might use all processor resources and not allow lower-priority threads in the application to execute. The time-critical task must periodically yield processor resources to the lower-priority tasks so they can execute. By properly separating the time-critical task from lower priority tasks, you can reduce application jitter. Refer to Chapter 4, Building Deterministic Applications, for information about building deterministic VIs that reduce application jitter.
You can use a software method or hardware methods to time control loops. The software method is available for RT Series FieldPoint modules, RT Series PXI controllers, and RT Series plug-in devices. The hardware method is available only for RT Series plug-in devices and RT Series PXI controllers.
Timing Control Loops Using SoftwareThe Wait Until Next ms Multiple function causes a thread to sleep until the operating system millisecond timer value equals a multiple of the millisecond multiple input. For example, if the Wait Until Next ms Multiple function executes with a millisecond multiple input of 10 ms and the operating system millisecond timer value is 112 ms, the VI pauses until the millisecond timer value equals 120 ms because 120 ms is the first multiple of 10 ms after the Wait Until Next ms Multiple function executes.
Use the Wait Until Next ms Multiple function to synchronize a loop with the operating system millisecond timer value multiple. A loop has a period of millisecond multiple if the Wait Until Next ms Multiple function executes in parallel with other code in the same loop. However, the loop does not have the period of millisecond multiple if the code takes longer to execute than the millisecond multiple.
Avoid placing the Wait Until Next ms Multiple function in parallel with other code because doing so can result in incorrect timing in a control system. Instead, use sequence structures to control when the Wait Until Next ms Multiple function executes using data flow. Figure 5-3 shows the

Chapter 5 Creating Deterministic Control Applications
Real-Time Module User Manual 5-4 ni.com
ideal timing of a control system. The example control system reads an analog input, writes an analog output, and waits in a synchronized cycle that repeats.
Figure 5-3. Ideal Timing of a Control System
The block diagram in Figure 5-4 uses a loop with the Wait Until Next ms Multiple function to create a control system.
Figure 5-4. Parallel Implementation of a Control System
Because of the dataflow properties of LabVIEW programming, the Wait Until Next ms Multiple function can execute before, after, or between the execution of the analog input and output. The behavior of the loop differs depending on when the Wait Until Next ms Multiple function executes. If the Wait Until Next ms Multiple function executes first, the analog input precedes the analog output. The control system timing matches the ideal timing shown in Figure 5-3. However, when the Wait Until Next ms Multiple function does not execute first, the loop sleeps until the function executes. Because a portion of the loop sleeps, the entire loop sleeps, and the analog output waits until the loop returns from sleep to execute, which produces results that do not match the ideal timing. Figure 5-5 shows the incorrect results.
Wait AI AO Wait AI AO Wait

Chapter 5 Creating Deterministic Control Applications
© National Instruments Corporation 5-5 Real-Time Module User Manual
Figure 5-5. Incorrect Timing of a Control System
You can use a Flat Sequence structure to force a specific execution sequence, as shown in Figure 5-6. In the block diagram in Figure 5-6, the Wait Until Next ms Multiple function precedes the analog input and the system implementation produces results that match the ideal timing.
Figure 5-6. Flat Sequence Implementation of a Control System
Timing Control Loops Using HardwareWith the Wait Until Next ms Multiple function, you can achieve loop rates of 1 kHz at best. However, the AI SingleScan VI allows the analog input hardware scan clock of NI E Series data acquisition devices to control when a thread sleeps and wakes up. Because the timing is controlled through hardware, applications using the AI SingleScan VI can achieve a sleep resolution much finer than 1 ms and dramatically reduce jitter.
AI SingleScan VIThe AI SingleScan VI can continuously acquire one analog data point from each channel in the scan list using hardware timing. When you configure an NI E Series data acquisition device for non-buffered input at a certain scan rate, the hardware scan clock controls the timing of analog-to-digital (A/D) conversions. Each time the scan clock pulses, the data acquisition device performs an A/D conversion for every channel in the scan list and generates an interrupt that the AI SingleScan VI handles. The data
Wait AO AI Wait AO AI WaitAI

Chapter 5 Creating Deterministic Control Applications
Real-Time Module User Manual 5-6 ni.com
acquisition device stores the scan data in the device hardware FIFO buffer. When the AI SingleScan VI detects the interrupt, the VI that calls the AI SingleScan VI wakes up and acquires the data from the hardware FIFO buffer. The remaining code executes and the cycle repeats.
Using the AI SingleScan VI is the preferred timing mechanism for controlling single-point acquisition loop rates. The AI SingleScan VI allows for the maximum amount of sleep time and produces the least amount of jitter. Even if you do not use the acquired analog data, the AI SingleScan VI provides an effective method for timing control loops.
Counter Control VIUse the Counter Control VI to provide hardware timing for a control loop if you do not have analog hardware for data acquisition, if you need to perform a buffered data acquisition, or if you use the AI scan clock for other timing tasks.
You can use an external source or an internal source to configure a counter for pulse train generation. You then can use the pulse train to time the control loop. Refer to the Data Acquisition VIs for Traditional NI-DAQ Help for information about configuring the pulse specifications for counter control.
You can use the Counter Control VI and set the control code input to wait, available only for data acquisition devices with DAQ-STC counters, to asynchronously wait for a hardware event and time a control loop. To use the Counter Control VI with the control code input set to wait, you must provide a timeout value in case expected source pulses do not occur.
Place the Counter Control VI in the control loop to wait for a pulse train wake up edge. A wake up edge is a source pulse edge that causes the Counter Control VI to wake up. Wake up edges occur every
active source edges, where n = 0, 1, 2, and so on. When the Counter Control VI runs, it waits until one active source edge, or wake up edge, before the active source edge where the output pulse occurs. For example, if PS1 = 5 and PS2 = 5, the Counter Control VI wakes up at the fourth active source edge, which is one source edge before the output pulse occurs, as shown in Figure 5-7. Regardless of the output polarity, the Counter Control VI wakes up one active source edge before the output pulse.
n PS1 PS2+( ) PS1 1–+

Chapter 5 Creating Deterministic Control Applications
© National Instruments Corporation 5-7 Real-Time Module User Manual
Figure 5-7. Example Time Sequence
If one or multiple wake up edges occur before the next time the Counter Control VI runs, the VI does not wait or sleep until the next wake up edge but returns immediately. In other words, a wake up edge sets a wake up flag, and the Counter Control VI waits for and clears the flag. If the Counter Control VI is in a time-critical VI, lower priority VIs do not have a chance to run.
Acquiring Measurement DataUse the AI Sample Channel VI to acquire a single point of data from a single channel of a data acquisition device. The block diagram in Figure 5-8 illustrates an acquisition loop timed using the Wait Until Next ms Multiple function and implements a single-point data acquisition using the AI Sample Channel VI.
1 2 3 4 5 6 7 8 9 10
Source
Output
Counter control withwait control code wakes upProgram

Chapter 5 Creating Deterministic Control Applications
Real-Time Module User Manual 5-8 ni.com
Figure 5-8. Acquiring Single Points of Data from a Single Channel
The software-timed implementation of the data acquisition has obvious limitations. First, the acquisition cannot be faster than 1 kHz because the Wait Until Next ms Multiple function is bounded by the resolution of the OS system clock. Second, the acquisition is subject to software jitter. We can increase the loop rate and decrease jitter by using hardware timing methods.
Using DAQ Devices to Acquire Measurement DataThe block diagram in Figure 5-9 uses the AI SingleScan VI to acquire one analog data point from each channel in the scan list of a data acquisition device.
Figure 5-9. AI SingleScan VI Data Acquisition
Chapter 5 Creating Deterministic Control Applications
© National Instruments Corporation 5-9 Real-Time Module User Manual
During each call to the AI SingleScan VI, the loop sleeps while waiting for the hardware clock of the E Series data acquisition device to complete the A/D conversions of scan data from all required channels. The data acquisition device places the scanned data in the hardware FIFO buffer of the device. When the acquisition and data conversion completes, the AI SingleScan VI wakes up and retrieves the data.
Because the AI SingleScan VI uses hardware timing to control the acquisition, the application loop rates can increase dramatically over software timing with less jitter. The AI SingleScan VI dictates how fast the acquisition loop can execute. The data remaining output of the AI SingleScan VI returns a numeric value to provide information about data in the hardware FIFO buffer. If data remaining is 0, the loop executes fast enough to retrieve every scan from the FIFO buffer. If data remaining is 1 or greater, the loop does not execute fast enough to retrieve every data point, and the loop rate is not deterministic. Always check the value of data remaining to ensure that the application executes in real-time.
The value of data remaining might become skewed during the first loop iterations with fast hardware loop rates because the processor might initially execute the loop at rates slower than the data acquisition due to caching effects. After multiple calls to the AI SingleScan VI, the processor cache saves the VI, and the loop executes at a maximum speed. Use the AI SingleScan VI opcode input to retrieve the oldest scan data or the newest scan data from the hardware FIFO buffer. Retrieving the newest scan data erases all older scan data from the buffer. Therefore, by obtaining the newest data during the first few iterations of the acquisition loop, you can ensure that the data remaining output always equals 0. After the loop executes at a consistent speed, you can read the oldest scan data from the buffer and use the data remaining output to detect if the loop runs in real time.
Using FieldPoint Devices to Acquire Measurement Data The block diagram in Figure 5-10 shows an example of a FieldPoint implementation of a data acquisition loop. The example uses the FieldPoint Read VI to acquire measurement data. Refer to examples/FieldPoint/Getting Started for examples of using FieldPoint VIs to acquire measurement data in a control loop. You can modify the example VIs to acquire data by changing the tag configuration, which allows you to switch from one FieldPoint module to another without changing the code.

Chapter 5 Creating Deterministic Control Applications
Real-Time Module User Manual 5-10 ni.com
Figure 5-10. Acquiring Data Using FieldPoint
Processing Measurement DataThere are many data processing algorithms to consider when creating a control application. You can create custom control algorithms using LabVIEW. You also can use VIs, such as the LabVIEW PID Control Toolset VIs, to process control application data.
The LabVIEW PID Control Toolset, which is included with the Real-Time Module, offers several libraries that you can use to develop a control application. The most commonly used control algorithm is the Proportional-Integral-Derivative (PID), but the toolset also includes tools for fuzzy logic and advanced control algorithms. Fuzzy logic is a method of rule-based decision making used for expert systems and process control to emulate the process of human decision making.The LabVIEW PID Control Toolset Advanced Control VIs include VIs for complex control applications and for hardware-in-the-loop (HIL) applications.
Using the PID VIs, you can develop the following control applications:
• Proportional; proportional-integral; proportional-derivative; and proportional-integral-derivative algorithms
• Gain-scheduled PID
• PID autotuning
• Error-squared PID
• Lead-lag compensation

Chapter 5 Creating Deterministic Control Applications
© National Instruments Corporation 5-11 Real-Time Module User Manual
• Set point profile generation
• Multiloop cascade control
• Feed forward control
• Override (minimum/maximum selector) control
• Ratio/bias control
Refer to the LabVIEW PID Control Toolset User Manual for information about using the LabVIEW PID Control Toolset. Refer to the National Instruments Web site at ni.com/info and enter the info code rtcontrol for information about the control toolsets the Real-Time Module supports.
Outputting Compensation Data
Using NI-DAQ VIs to Output Control DataYou can use the AO Update Channel VI to write a specified value to an output channel if you do not need to carefully control the timing of the update event, and if you do not have high speed requirements for the control loop.
You also can time analog output events and synchronize the events to the analog input clock. Using Real-Time System Integration (RTSI), you can share a common clock for A/D and D/A conversions to ensure that both occur simultaneously. When you use E Series plug-in devices, a shared clock can be the output of a counter routed over RTSI to the update clock and scan clock. Also, the shared clock can be the output of a the scan clock routed to the update clock, or the update clock routed to the scan clock, and so on. However, the drawback is that outputs are always one loop cycle behind the inputs, as shown in Figure 5-11.
Figure 5-11. Shared Clock Implementation
Input(first point)
Input(second point)
Processing
Delay
Time
Output (irrelevant) Output (response to first point)
Shared Clock

Chapter 5 Creating Deterministic Control Applications
Real-Time Module User Manual 5-12 ni.com
The time delay between analog input and output is exact, predictable, and subject only to the hardware jitter of the scan clock, which is on the order of nanoseconds.
In Figure 5-11, the output occurs as soon as the processing completes, meaning that the software dictates the timing of the output. However, you can improve the consistency of the delays between the input and output events using hardware timing. Use hardware timing and a clock to guarantee that inputs and outputs occur at regular intervals with minimal jitter.
To minimize the time between an input and its corresponding output, consider staggering the scan clock (A/D) and update clock (D/A) as shown in Figure 5-12. Using one clock, you can stagger A/D and D/A conversions by initiating an input on the rising edge of the clock and initiating an output on the falling edge of the same clock. Adjusting the clock duty cycle enables you to vary the time between inputs and outputs until you achieve an optimized loop cycle time.
Figure 5-12. Divided Process Routine Implementation
In some cases, you can divide the processing routine into a pre-processing and post-processing section. Dividing the processing routine establishes a smaller response time between inputs and outputs by shifting some of the processing elsewhere, as shown in Figure 5-12.
The block diagram in Figure 5-13 uses the AO SingleUpdate VI to perform an output only operation that writes the new output value to the output register of the device, DAC 0, which is hardware timed and driven by the AI Scan Start signal. The AI Scan Start clock must trigger the D/A conversion for the value to output. Refer to the One Channel PID Control VI in the examples/Real-Time/RT Control.llb for an example of outputting data from a PID loop.
Input Input
Post-Processing
Delay + Pre-Processing
Time
Output OutputShared Clock
(staggered in/out)
Post-Processing

Chapter 5 Creating Deterministic Control Applications
© National Instruments Corporation 5-13 Real-Time Module User Manual
Figure 5-13. One Channel PID Output

Chapter 5 Creating Deterministic Control Applications
Real-Time Module User Manual 5-14 ni.com
Using FieldPoint VIs to Output Control DataThe block diagram in Figure 5-14 uses FieldPoint VIs to perform a synchronous write to a specified channel.
Figure 5-14. One Channel PID Output Using FieldPoint
Using Watchdogs in ApplicationsIn control applications, it might be necessary to respond to a failure or system event quickly. If a critical component of a motion control system fails, keeping the system motor running might risk the safety of both the equipment and operators. While shutting down the equipment quickly might be the best solution, not every failure must be handled in the same manner. When a network connection between an RT target data-logging VI and a host computer VI fails, the application should continue running and logging data to disk until you reestablish the network connection.
Watchdog utilities monitor for specific system events and failures. These utilities can be either software or hardware, where available. The watchdog waits until a specific event occurs and executes a preconfigured action. There are two implementations of the watchdog, the inactivity watchdog and the network watchdog. The inactivity watchdog uses a continuously incrementing counter that executes an expiration action when

Chapter 5 Creating Deterministic Control Applications
© National Instruments Corporation 5-15 Real-Time Module User Manual
it reaches some preconfigured terminal count. The network watchdog checks the system for network disturbances and responds to a connection failure.
Inactivity WatchdogSome RT Series devices have hardware watchdogs that you can configure programmatically to respond to system inactivity. The hardware watchdog has a timeout period that you can configure. The watchdog uses a built-in counter to count up to the defined timeout. When the watchdog reaches the timeout value, it executes the preconfigured expiration action. To prevent the watchdog from timing out, the application can reset the watchdog count. The monitoring of the application is called whacking the dog, which essentially resets the counter of the hardware watchdog. The application can reset the count while it runs. If the application stops running, the watchdog counts up to its timeout value and then carries out the expiration action. Available expiration actions include setting a trigger, generating an occurrence that another application can respond to, and rebooting the RT Series device.
When hardware capability is unavailable, you can configure a counter or timer device to behave like the built-in PXI watchdog counter. You also can toggle a hardware digital line. By monitoring this count value from a separate application, you can respond to inactivity in the necessary way. If you use software watchdogs, inactivity can reset the device, set an occurrence in software, and activate a PXI backplane trigger.
Network WatchdogSome RT Series hardware, such as the FP-20xx, have a built-in network monitor. If you enable the network watchdog and the FieldPoint network module loses communication with all hosts or clients over the network, the module sets output channels to predefined values corresponding to the watchdog state. You can configure these watchdogs to output a certain value when a network failure is detected.
If no built-in network watchdog is available, you can create one programmatically. For example, if TCP is the communication protocol between the host machine and embedded real-time applications, you can monitor for network disconnect errors and timeouts. In these situations, you might want to change the behavior of the system. For example, you might want to log to a file until the network connection is reestablished.

Chapter 5 Creating Deterministic Control Applications
Real-Time Module User Manual 5-16 ni.com
Many real-time applications separate time-critical tasks into a separate VI, and communicate between VIs using protocols such as the Real-Time FIFO VIs. You can use the API of the Real-Time FIFO VIs to detect a failure in the communication path or in one of the participants. For example, you can check if the RT FIFO is unexpectedly empty or if you are overwriting data. Appropriate expiration actions for this kind of failure include shutting down entirely until you can reestablish communication, returning to a known state, and continuing as usual.
Refer to the examples\Real-Time\RT Watchdog (PXI).llb for examples of using the NI-Watchdog VIs to configure watchdogs for RT Series devices. Refer to the LabVIEW Help for information about the NI-Watchdog VIs.

© National Instruments Corporation 6-1 Real-Time Module User Manual
6Optimizing Applications
This chapter explains techniques that can improve the determinism of applications.
Avoiding Shared ResourcesIn LabVIEW, there are resources that two or more VIs might need to share. These shared resources include global variables, non-reentrant subVIs, the LabVIEW Memory Manager, queues, semaphores, single-threaded DLLs, and so on. If a VI uses a shared resource, the VI acquires an operating system mutex around the resource to protect the resource from access by other VIs. A mutex locks the resource so that other VIs may not access the resource. If a time-critical priority VI preempts a lower priority VI and attempts to use a locked resource, the time-critical VI must wait because the shared resource is not available. The lower priority VI becomes more important than the time-critical VI because it must finish its work and release the shared resource before the time-critical VI can proceed. This scenario is a priority inversion.
Priority inversions induce jitter. Avoid or minimize jitter in a time-critical VI to ensure determinism. Do not use shared resources in time-critical VIs. The amount of jitter induced by a shared resource depends on the type of shared resource involved. For instance, when accessing a global variable, a VI can finish a read or write operation on a global within a consistent length of time or with very little variance in time. Because reading and writing to a global variable is bound in time, you can account for the jitter induced by sharing global variables.
Memory Allocations and Preallocating ArraysWhen a VI allocates memory, the VI accesses the LabVIEW Memory Manager. The LabVIEW Memory Manager allocates memory for data storage. The LabVIEW Memory Manager is a shared resource and might be locked by a mutex up to several milliseconds. Avoid allocating memory within time-critical VI control loops.
If you are using arrays in time-critical VI control loops, you can reduce jitter by preallocating arrays before entering the loop.

Chapter 6 Optimizing Applications
Real-Time Module User Manual 6-2 ni.com
The block diagram in Figure 6-1 builds an array within the control loop. Jitter affects the loop because the Build Array function inside the loop uses the LabVIEW Memory Manager.
Figure 6-1. Memory Allocation in Control Loop
The block diagram in Figure 6-2 uses the Initialize Array function outside the loop and the Replace Array Subset function inside the loop to create the array. No memory allocations use the LabVIEW Memory Manager because the array has been preallocated.
Figure 6-2. Preallocated Array
You must ensure that no memory management occurs inside of time-critical VI control loops.

Chapter 6 Optimizing Applications
© National Instruments Corporation 6-3 Real-Time Module User Manual
Casting Data to Proper Data TypesCast data to the proper data type in time-critical and non-time-critical VIs. Every time LabVIEW performs a type conversion, either implicitly or explicitly, LabVIEW makes a copy of the data buffer in memory to retain the new data type after the conversion. The LabVIEW Memory Manager must allocate memory for the copy, which might affect the determinism of time-critical VIs. Also, creating copies of the data buffer takes up memory resources on an RT target. Refer to the LabVIEW User Manual for more information about casting data types.
Use the smallest data type possible when casting the data type. If you must convert the data type of an array, do the conversion before you build the array. Also, keep in mind that a function output reuses an input buffer only if the output and the input have the same data type representation. Arrays must have the same structure and number of elements for function outputs to reuse the input buffer.
Reducing the Use of Global VariablesLabVIEW creates an extra copy in memory of every global variable you use in a VI. Reduce the number of global variables to improve the efficiency and performance of VIs. Creating copies of the global variable takes up memory resources on an RT target.
Avoiding Contiguous Memory ConflictsLabVIEW handles many of the memory details that you normally deal with in a conventional, text-based language. For example, functions that generate data must allocate storage for the data. When that data is no longer needed, LabVIEW deallocates the associated memory. When you add new information to an array or a string, LabVIEW allocates new memory to accommodate the new array or string. However, running out of memory in LabVIEW is usually not a concern.
You must design memory conscious VIs for RT targets. Always preallocate space for arrays equal to the largest array size that you might encounter.
When you reboot or reset an RT target, the Real-Time Operating System (RTOS) and the RT Engine load into memory as shown in diagram 1 of Figure 6-3.

Chapter 6 Optimizing Applications
Real-Time Module User Manual 6-4 ni.com
Figure 6-3. Memory Diagrams of an RT Target
The RT Engine uses available memory for running RT target VIs and storing data. In diagram 2 of Figure 6-3, ArrayMaker.vi creates Array 1. All elements in Array 1 must be contiguous in memory.
The RTOS reuses the same memory addresses if you stop a VI and then run it again with arrays of the same size or smaller. In diagram 3 of Figure 6-3, ArrayMaker.vi creates Array 2. The RTOS creates Array 2 in the reserved memory space previously occupied by Array 1. Array 2 is small enough to fit in the reserved memory space that was allocated to Array 1. The extra contiguous memory used for Array 1 remains in the reserved memory space, as shown in diagram 3 of Figure 6-3.
When ArrayMaker.vi runs for a third time with a larger array or if another VI generates a larger array, the RT Engine must find a large enough contiguous space. In diagram 4 of Figure 6-3, ArrayMaker.vi must create Array 3, larger than the previous arrays, in the available memory.
Even when ArrayMaker.vi stops running, the RT Engine continues to run. Previously reserved memory is not available. If ArrayMaker.vi runs a fourth time and attempts to create an array larger than Array 3, the operation fails. There is no contiguous memory area large enough to create
Real-TimeOperatingSystem(RTOS)
RT Engine
Real-TimeOperatingSystem(RTOS)
RT Engine
ArrayMaker.vi
Array 1
Real-TimeOperatingSystem(RTOS)
RT Engine
ArrayMaker.vi
Array 2
Real-TimeOperatingSystem(RTOS)
RT Engine
ArrayMaker.vi
Array 3
1 2 3 4

Chapter 6 Optimizing Applications
© National Instruments Corporation 6-5 Real-Time Module User Manual
the array because of the memory fragmentation. You can preserve memory space by preallocating array space equal to the largest use case.
Avoiding SubVI OverheadWhen you call a subVI, there is a certain amount of overhead associated with the call. Although the overhead is small compared to I/O operations, it adds up if you call a subVI multiple times in a loop. Instead, embed the loop in the subVI.
You also can convert subVIs into subroutines by changing the VI priority. The LabVIEW execution system minimizes the overhead to call subroutines. Subroutines are short, frequently executed tasks and are generally most appropriate when used with VIs that do not require user interaction. Subroutines cannot display front panel data and do not multitask with other VIs. Also, avoid using timing or dialog box functions in subroutines. Refer to the Chapter 4, Building Deterministic Applications, for information about setting VI priorities.
Setting VI PropertiesTo reduce memory requirements and increase performance of VIs, disable nonessential options in the VI Properties dialog box available by selecting File»VI Properties. Select Execution from the Category pull-down menu and remove checkmarks from the Allow debugging and Auto handle menus at launch checkboxes. By disabling these options, VIs use less memory, compile quicker, and perform better overall.
Disabling the Disk CacheThe Real-Time Module provides a disk cache when writing data to the hard disk of RT targets with a media storage device. The disk cache is efficient for writing small amounts of data, much less than 512 bytes.
When writing amounts of data much greater than 512 bytes, disable the disk caching feature for better performance. To disable the disk caching feature, you must change the RTTarget.DiskCache.Enable token in the RT target ni-rt.ini file from the default value of TRUE to FALSE.
When you disable the disk cache feature for RT Series PXI controllers, you must perform writes to the disk in multiples of 512 bytes because the hard drives of the controllers have 512 byte sectors.

Chapter 6 Optimizing Applications
Real-Time Module User Manual 6-6 ni.com
Setting BIOS OptionsAnother way to improve performance of VIs running on RT Series PXI controllers is to disable USB hardware in the BIOS of the controller. Make the following BIOS settings changes:
Integrated Peripherals
USB Keyboard = DISABLED
Additionally, for NI PXI-8170 controllers, make the following BIOS settings changes:
PnP/PCI Configuration
Assign IRQ for USB = DISABLED
These changes can reduce or even eliminate jitter caused by USB device interrupts.
Mass Compiling VIsMass compiling a VI is another way to improve performance. Mass compiling a VI compiles the top-level VI and also recompiles and re-links all the subVIs and functions on the block diagram with the top-level VI.

© National Instruments Corporation 7-1 Real-Time Module User Manual
7Deploying Applications
This chapter explains how to use the LabVIEW Application Builder to create stand-alone executables of LabVIEW Real-Time Module VIs.
Building Stand-Alone ApplicationsUse the Application Builder, included with the Real-Time Module Professional Development System, to create stand-alone Real-Time Module applications. Stand-alone applications do not require you to run them from within a LabVIEW environment.
In LabVIEW, select Tools»Build Application or Shared Library (DLL) to launch the LabVIEW Application Builder. Refer to the LabVIEW Application Builder User Guide for information about using the Application Builder to build a stand-alone application.
Creating an Application Installer In addition to building applications, the Application Builder can create an installer for a stand-alone application. Select the Installer Settings tab in the Build Application or Shared Library (DLL) dialog box to access the installer options. Click the Advanced button to open the Advanced Installer Settings dialog box. Place a checkmark in the LabVIEW Run-Time Engine and the LabVIEW RT Support checkboxes to add the LabVIEW Run-Time Engine and support for RT Series hardware to the application installer. You can use the LabVIEW Run-Time Engine to target the application to an RT target from a computer that does not have the Real-Time Module installed.
When you install a stand-alone application on an RT target without a media storage device, such as an NI PCI-7030 plug-in device, you also must install the following components from the National Instruments Device Driver CD:
• Measurement & Automation Explorer (MAX) 3.0
• PCI-7041 and PCI/PXI-7030 support
• Traditional NI-DAQ 7.0

Chapter 7 Deploying Applications
Real-Time Module User Manual 7-2 ni.com
For targets with a media storage device, such as an RT Series PXI controller, RT Series FieldPoint module, or NI PCI-7041 plug-in device, you must install the following components from the National Instruments Device Driver CD:
• MAX 3.0
• PCI-7041 and PCI/PXI-7030 support (for PCI-7041)
• FieldPoint 4.0 support (for FieldPoint)
• Necessary I/O hardware drivers
Note RT targets with media storage devices must already have a version of the RT Engine installed that matches the version of LabVIEW used to build the stand-alone application.
Configuring Target SettingsOn the Target tab, the Application Builder determines the target file name, destination directory, and support file directory from the Application Path setting in the Network Options dialog box, available by selecting Tools»RT Target: x.x.x.x Options, where x.x.x.x is the IP address of the RT target, and then selecting RT Target: Miscellaneous from the pull-down menu. You cannot change the application name, destination directory, or support file directory settings in the Application Builder after you target a networked device.
If you select Small target file with external file for subVIs in the Build Options section, you cannot change the LLB for other files path because this path is determined from the Application Path setting in the Network Options dialog box. Refer to the LabVIEW Help, available by selecting Help»VI, Function, & How-To Help from LabVIEW, for more information about build options.
Saving Stand-Alone ApplicationsThe Application Builder stores the stand-alone application on the host computer or on the media storage device of an RT target. You can target LabVIEW to an RT target with a media storage device before opening the Application Builder to store the application on the RT target.
Because some RT targets have no media storage device, you cannot permanently store stand-alone applications on the target. You must launch the applications on the host computer and target them to an RT target. When power to the target is lost, the application on the RT target also is lost. Refer to the Launching Stand-Alone Applications section for information about launching stand-alone applications using command line arguments.

Chapter 7 Deploying Applications
© National Instruments Corporation 7-3 Real-Time Module User Manual
Selecting a Target after LaunchWhen you run a stand-alone application built with the Application Builder, the Select Execution Target dialog box appears. You can select any RT target for the application. If you do not want to select the RT target each time you run the application, remove the checkmark from the Show LabVIEW Real-Time target selection dialog when launched checkbox in the Application Settings tab of the Application Builder to make the application run automatically on the host computer. You also can use command line arguments with the applications you build to specify the RT target. Refer to the Launching Applications Automatically Using Command Line Arguments section for information about command line arguments.
Quitting LabVIEW after LaunchIf you design a stand-alone application to run on an RT target, you might want the host computer to disconnect from the RT target after you download and run the application. Place a checkmark in the Quit LabVIEW Real-Time host application after downloading checkbox in the Application Settings tab of the Application Builder to have LabVIEW disconnect after launching the application on the RT target. Selecting the Quit LabVIEW Real-Time host application after downloading option is equivalent to selecting File»Exit without closing RT Engine VIs in LabVIEW after downloading and running a VI on an RT target.
Some RT targets have media storage devices where you can save stand-alone applications. For example, the RT Series PXI controller has a hard disk drive, and the FieldPoint 20xx network module has flash. You then can automatically launch stand-alone applications each time you reboot the RT target. Refer to the Launching Stand-Alone Applications section for information about launching applications from the media storage device of the host computer or RT target automatically.
Launching Stand-Alone ApplicationsYou can configure RT targets to launch stand-alone applications on start-up differently depending on the RT target. If the RT target has a media storage device, you can embed the application directly on the target and then launch it automatically on start-up. If the RT target does not have a media storage device, you can still launch the application from the host computer on startup using command line arguments.

Chapter 7 Deploying Applications
Real-Time Module User Manual 7-4 ni.com
Launching Applications Automatically on Start-upThe RT Engine can launch embedded, stand-alone applications each time you boot the RT target.
Complete the following steps to launch an embedded, stand-alone application when the RT target starts up.
1. Target LabVIEW to the networked RT target. Refer to the Targeting LabVIEW to an RT Target section of Chapter 3, Real-Time Module Environment, for information about targeting LabVIEW.
2. Select Tools»RT Target: x.x.x.x Options, where x.x.x.x is the IP address of the device.
3. Select RT Target: Miscellaneous from the pull-down menu.
4. Place a checkmark in the Launch Application at Boot-up checkbox.
Launching Applications Automatically Using Command Line ArgumentsUse command line arguments to disable the Select Execution Target dialog box and explicitly specify a target for the application. Use command line arguments in a batch file or shortcut from the operating system startup folder to automatically launch stand-alone applications when the host computer starts up.
To disable the Select Execution Target dialog box, specify the RT target in a command line argument using –target. For example,
c:\mybuiltapp_rtengine.exe -target DAQ::3
You also can target the host computer and automatically launch a host computer application on start-up. For example,
c:\mybuiltapp_host.exe -target host
To disconnect the host computer from the RT target after downloading the application, leaving the embedded application running, use -quithost. For example, the following command automatically downloads and runs mybuiltapp_rtengine.exe on data acquisition device 1 and closes LabVIEW on the host computer.
c:\mybuiltapp_rtengine.exe -target DAQ::1 -quithost
Note If the host computer requires a login before entering the operating system, the application starts only after the login completes.

Chapter 7 Deploying Applications
© National Instruments Corporation 7-5 Real-Time Module User Manual
You also can reset a specified plug-in device using -reset. For example,
c:\mybuiltapp_rtengine.exe -target DAQ::3 -reset
This command automatically resets the plug-in device specified by -target before downloading the application. Refer to the LabVIEW Help for information about LabVIEW command-line arguments.
Connecting to Applications Running on RT TargetsYou cannot open a Front Panel Communication connection to a stand-alone application running on an RT target. Use a remote panel connection to connect to the application, or use the RT Communication Wizard to create VIs to provide a user interface on a host computer. Refer to Chapter 4, Building Deterministic Applications, for information about using remote panels and the RT Communication Wizard.

© National Instruments Corporation 8-1 Real-Time Module User Manual
8Debugging Deterministic Applications
Building deterministic LabVIEW applications requires programming techniques different from typical LabVIEW programming. With deterministic applications, there are two levels of debugging to verify—application behavior and timing behavior.
Verifying Correct Application BehaviorYou first must ensure that the application behaves as expected. Use the LabVIEW debugging tools to detect errors and step through the flow of execution to locate the error source. Finally, use the Profile window to test the execution timing and memory usage of an application.
Using the LabVIEW Debugging ToolsUse the LabVIEW debugging tools, such as execution highlighting and single-stepping, while the host computer is targeted to an RT target to step through LabVIEW code. The only feature not supported by the Real-Time Module is the Call Chain ring, which appears in the toolbar of a subVI block diagram window while single-stepping. The debugging tools are useful for determining the source of errors in an application. Refer to the LabVIEW User Manual for information about the LabVIEW debugging tools.
Note Do not use the LabVIEW debugging tools to debug execution timing because all of the tools affect the timing of an application.
Using the Profile WindowThe Profile window is a powerful tool for statistically analyzing how an application uses execution time and memory. The Profile window displays information that can identify the specific VIs or parts of VIs you need to optimize. For example, if you notice that a particular subVI takes a long time to execute, you can improve the performance of that VI. The Profile window displays the performance information for all VIs in memory in an

Chapter 8 Debugging Deterministic Applications
Real-Time Module User Manual 8-2 ni.com
interactive tabular format. From the Profile window, you can select the type of information to gather and sort the information by category. You also can monitor subVI performance within different VIs. Select Tools»Advanced»Profile VIs to display the Profile window.
Note You must target LabVIEW to an RT target while running the profiler.
You must place a checkmark in the Profile Memory Usage checkbox before starting a profiling session. Collecting information about VI memory use adds a significant amount of overhead to VI execution, which affects the accuracy of any timing statistics gathered during the profiling session. Therefore, perform memory profiling separate from time profiling.
Many of the options in the Profile window become available only after you begin a profiling session. During a profiling session, you can take a snapshot of the available data and save it to an ASCII spreadsheet file. The timing measurements accumulate each time you run a VI. Refer to the LabVIEW Performance and Memory Management Application Note for information about using the Profile window.
Verifying Correct Timing BehaviorTiming is crucial in a deterministic application. Use one of the following methods to verify the timing behavior of an application.
Using the Tick Count (ms) FunctionThe Tick Count (ms) function can be used to measure the time it takes to perform N iterations of a specified operation and calculate the average time in seconds per operation as well as average operations per second. Refer to the Benchmarking Shell VI located in the examples/Real-Time/RT Tutorial.llb for an example using Tick Count (ms) to benchmark code. Refer to the NI Developer Zone at ni.com/zone for information about using the Tick Count (ms) function to verify timing behavior.
Using the Pentium Time Stamp CounterOn Pentium processor-based RT targets, you can obtain a time stamp using the Read Time Stamp Counter (RDTSC) assembly instruction. You can make an RDTSC assembly call to read the Time Stamp Counter register from the Pentium processor for every loop iteration. Refer to the NI Developer Zone at ni.com/zone for information about using Pentium Time Stamp Counter to verify timing behavior.

Chapter 8 Debugging Deterministic Applications
© National Instruments Corporation 8-3 Real-Time Module User Manual
Using an OscilloscopeThe Tick Count (ms) function and the Pentium Time Stamp Counter allow you to examine the relative timing of sections of LabVIEW VIs and to measure the software jitter in the VIs. Sometimes you might need to measure the jitter of the whole system at the hardware level, especially when you use hardware timing and the software jitter is masked out at the system level. Use external tools such as an oscilloscope to study the relationship between input and output signals and to measure loop rates and jitter levels.
Using Software DriversSometimes you can use software drivers to make sure that the application is capable of keeping up with the desired loop rate. For example, you can use NI-DAQ functions to time loops and determine whether the loop rate is keeping real-time. The AI SingleScan VI has an output, data remaining, that returns a 1 or greater when there is data present in the data FIFO. The data remaining output is 0 when there is no data in the data FIFO. Monitor the value inside a loop to determine whether the loop is deterministic.
Using and Defining Error CodesUse error handling to debug and manage errors in VIs. The LabVIEW error handler VIs return error codes when an error occurs in a VI. Error codes reveal the specific problem the VI encountered. When you configure an RT target, LabVIEW automatically copies the error code files used by the error handler VIs to the target.
Defining Custom Error CodesUse custom error codes with networked RT targets that have media storage devices. Create error files using the Error Code File Editor by selecting Tools»Advanced»Edit Error Codes. If you use custom errors with LabVIEW, you must place the error files in the c:\ni-rt\system\user.lib\errors directory on the networked RT target. Use the FTP client in Measurement & Automation Explorer (MAX) to transfer the error file to the networked device.

Chapter 8 Debugging Deterministic Applications
Real-Time Module User Manual 8-4 ni.com
Setting Custom Error File INI TokensYou can set two error handling configuration tokens in the ni-rt.ini file that specify the way LabVIEW searches for custom error files. Add RTDownloadErrors=TRUE to the ni-rt.ini file to search for error files on the RT target. If the RT Engine does not find any local error files, the RT Engine requests available error files from the host computer if a front panel connection exists. The host computer searches for available error files and transfers the parsed error data back to the RT target.
Add RTDownloadErrorList to the ni-rt.ini file equal to a list of available files on the host computer, such as
RTDownloadErrorList="LabVIEW-error.txt;Anlys-error.txt"
Adding this token to the ni-rt.ini file causes the RT target to search for the LabVIEW-error.txt and Anlys-error.txt files on the host computer, parse them, and transfer the error data back to the RT target.

© National Instruments Corporation A-1 Real-Time Module User Manual
AConfiguring and Testing Device Drivers
This appendix explains the configuration and testing of device drivers for National Instruments I/O hardware.
Configuring and Testing NI Device DriversRefer to the National Instruments Web site at ni.com/info and enter the info code RT0001 for information about the device drivers supported by the RT Engine on a specific RT target.
Refer to the following documents for information about the configuration and testing of device drivers for National Instruments I/O hardware.
NI-DAQ Refer to the National Instruments Web site at ni.com/info and enter the info code RTDRVS for information about configuring and testing the NI-DAQ driver.
NI-Motion Refer to the National Instruments Web site at ni.com/info and enter the info code RTDRVS for information about configuring and testing the NI-Motion driver.
NI-IMAQ Refer to the NI-IMAQ User Manual for information about configuring NI-IMAQ for use with the Real-Time Module.
NI-Serial Refer to the Serial Hardware and Software for Windows User Manual for information about configuring NI-Serial for use with the Real-Time Module.
Appendix A Configuring and Testing Device Drivers
Real-Time Module User Manual A-2 ni.com
NI-VISA Refer to the National Instruments Web site at ni.com/info and enter the info code RTDRVS for information about configuring and testing the NI-VISA driver.
NI-CAN Refer to the NI-CAN Hardware and Software Manual for information about configuring NI-CAN for use with the Real-Time Module.
FieldPoint Refer to the FP-2000/2010 User Manual for information about configuring FieldPoint for use with the Real-Time Module.
Creating Device Drivers for Third-Party PXI DevicesEach I/O device requires driver software that is specific to the operating system. Refer to the National Instruments Web site at ni.com/info and enter the info code RTDRVS for information about creating or modifying a device driver for the use with the Real-Time Module.

© National Instruments Corporation B-1 Real-Time Module User Manual
BTechnical Support and Professional Services
Visit the following sections of the National Instruments Web site at ni.com for technical support and professional services:
• Support—Online technical support resources include the following:
– Self-Help Resources—For immediate answers and solutions, visit our extensive library of technical support resources available in English, Japanese, and Spanish at ni.com/support. These resources are available for most products at no cost to registered users and include software drivers and updates, a KnowledgeBase, product manuals, step-by-step troubleshooting wizards, conformity documentation, example code, tutorials and application notes, instrument drivers, discussion forums, a measurement glossary, and so on.
– Assisted Support Options—Contact NI engineers and other measurement and automation professionals by visiting ni.com/support. Our online system helps you define your question and connects you to the experts by phone, discussion forum, or email.
• Training—Visit ni.com/custed for self-paced tutorials, videos, and interactive CDs. You also can register for instructor-led, hands-on courses at locations around the world.
• System Integration—If you have time constraints, limited in-house technical resources, or other project challenges, NI Alliance Program members can help. To learn more, call your local NI office or visit ni.com/alliance.
If you searched ni.com and could not find the answers you need, contact your local office or NI corporate headquarters. Phone numbers for our worldwide offices are listed at the front of this manual. You also can visit the Worldwide Offices section of ni.com/niglobal to access the branch office Web sites, which provide up-to-date contact information, support phone numbers, email addresses, and current events.

© National Instruments Corporation G-1 Real-Time Module User Manual
Glossary
Symbol Prefix Value
m milli 10–3
k kilo 103
M mega 106
G giga 109
A
address Character code that identifies a specific location or series of locations in memory.
application A collection of VIs that together accomplish the real-time system task.
D
DAQ See data acquisition (DAQ).
data acquisition (DAQ) (1) Acquiring and measuring analog or digital electrical signals from sensors, transducers, and test probes or fixtures.(2) Generating analog or digital electrical signals.
DataSocket An Internet programming technology to share live data between VIs and other computers.
determinism Characteristic of a system that describes how consistently it can respond to external events or perform operations within a given time limit.
device An instrument or controller you can access as a single entity that controls or monitors real-world I/O points. A device often is connected to a host computer through some type of communication network.
driver Software unique to the device or type of device, and includes the set of commands the device accepts.

Glossary
Real-Time Module User Manual G-2 ni.com
E
embedded application A stand-alone application built using the LabVIEW Application Builder and embedded as the start-up application on an RT target.
execution target The target on which to run a LabVIEW VI. Can be either an RT target or the host computer.
F
FIFO First-in-first-out memory buffer. The first data stored is the first data sent to the acceptor.
Front Panel Communication
A protocol for communication between LabVIEW on the host computer and the RT Engine on an RT target typically used during development.
functional global variable
Is a subVI set to subroutine priority used to pass data between several VIs on a block diagram.
G
global variable Accesses and passes data between several VIs on a block diagram.
H
host computer The computer on which you develop VIs using LabVIEW and download them to an RT target.
Hz Hertz—The number of scans read or updates written per second.
I
I/O Input/Output—The transfer of data to/from a computer system involving communications channels, operator interface devices, and/or data acquisition and control interfaces.
INI A file used to set application configuration options.

Glossary
© National Instruments Corporation G-3 Real-Time Module User Manual
J
jitter The amount of time that the loop cycle time varies from the desired time.
L
Logos A mechanism for interprocess communication.
M
Measurement & Automation Explorer (MAX)
A graphical user interface for configuring National Instruments hardware and software.
media storage device A device capable of storing data.
multitasking When a computer runs applications for a short amount of time to give the impression of multiple applications running simultaneously.
multithreading Running tasks of an application for a short amount of time to give the impression of multiple tasks running simultaneously.
mutex An operating system lock around a resource to protect the resource from access by other VIs.
N
Network Communication
A protocol for communication between a host VI and a VI running on the RT target using specific network communication programmatic controls.
networked device A hardware platform with an embedded processor that you can control using a separate host computer through an Ethernet connection.
NI-DAQ Driver software included with all NI measurement devices. NI-DAQ is an extensive library of VIs and functions you can call from an application development environment (ADE), such as LabVIEW, to program all the features of an NI measurement device, such as configuring, acquiring and generating data from, and sending data to the device.

Glossary
Real-Time Module User Manual G-4 ni.com
O
operating system Base-level software that controls a computer, runs programs, interacts with users, and communicates with installed hardware or peripheral devices.
P
PCI Peripheral Component Interconnect—a high-performance expansion bus architecture originally developed by Intel to replace ISA and EISA. It is achieving widespread acceptance as a standard for PCs and workstations; it offers a theoretical maximum transfer rate of 132 Mbytes/s.
plug-in device Plug-in NI PCI/PXI RT Series devices with embedded processors. Each plug-in device contains a processor board and data acquisition daughterboard.
preemptive scheduling Execution system scheduling of threads in which higher priority threads execute before all other threads.
priorities Assigned to VIs to classify execution sequence in the execution system. Higher priority threads execute first, while threads with a lower priority wait.
Property Node Sets or finds the properties of a VI or application.
Proportional Integral Derivative (PID)Control
Combination of proportional, integral, and derivative control actions. Refers to a control method in which the controller output is proportional to the error, its time history, and the rate at which it is changing. The error is the difference between the observed and desired values of a variable that is under control action.
protocol The exact sequence of bits, characters, and control codes used to transfer data between computers and peripherals through a communications channel, such as the GPIB bus.
PXI PCI eXtensions for Instrumentation. A modular, computer-based instrumentation platform.
Glossary
© National Instruments Corporation G-5 Real-Time Module User Manual
R
real-time A property of an event or system in which data is processed as it is acquired instead of being accumulated and processed at a later time.
Real-Time Operating System (RTOS)
Uses a combination of round robin and preemptive scheduling to execute threads in the execution system.
remote panel Allows you to operate a front panel on a machine that is separate from where the VI resides and executes using a LabVIEW client or Web browser.
round robin scheduling Scheduling that attempts to share the processor in equal amounts of time among all ready tasks of the same priority.
RT Engine A version of LabVIEW that runs on the RT target.
RT target RT Series hardware that runs VIs downloaded from and built in LabVIEW.
run-time engine Runs LabVIEW executables built using the LabVIEW Application Builder on computers without LabVIEW.
S
shared memory Memory that can be sequentially accessed by more than one controller or processor but not simultaneously accessed. Also known as dual-mode memory.
shift register Optional mechanism in loop structures to pass the value of a variable from one iteration of a loop to a subsequent iteration. Shift registers are similar to static variables in text-based programming languages.
soft reboot Restarting a computer without cycling the power, usually through the operating system.
subVI VI used on the block diagram of another VI. Comparable to a subroutine.
synchronous (1) Hardware—A property of an event that is synchronized to a reference clock; (2) Software—A property of a function that begins an operation and returns only when the operation is complete.

Glossary
Real-Time Module User Manual G-6 ni.com
T
target See RT target.
TCP Transmission Control Protocol. A standard format for transmitting data in packets from one computer to another.
thread A completely independent flow of control in an application.
Traditional NI-DAQ An upgrade to the earlier version of NI-DAQ. Traditional NI-DAQ has the same VIs and functions and works the same way as NI-DAQ 6.9.x. You can use both Traditional NI-DAQ and NI-DAQmx on the same computer, which is not possible with NI-DAQ 6.9.x.
U
UDP User Datagram Protocol.
V
VI Virtual Instrument—(1) A combination of hardware and/or software elements, typically used with a PC, that has the functionality of a classic stand-alone instrument; (2) A LabVIEW software module (VI), which consists of a front panel user interface and a block diagram program.
VI Server Mechanism for controlling VIs and LabVIEW applications programmatically, locally and remotely.
Virtual Instrument Software Architecture (VISA)
Single interface library for controlling GPIB, VXI, RS-232, and other types of instruments.
© National Instruments Corporation I-1 Real-Time Module User Manual
Index
Aaccess permissions for RT target, setting, 3-5
example RT target access list entries (table), 3-7
RT Target: Access page (figure), 3-7acquiring measurement data. See measurement
dataAI Sample Channel VI
acquiring measurement data, 5-7AI SingleScan VI
acquiring measurement data, 5-8timing control loops, 5-5
AO Single Update VIoutputting measurement data, 5-12
AO Update Channel VIoutputting measurement data, 5-11
Application Builder, 7-1See also stand-alone applications
applications. See deterministic applications; deterministic control applications; stand-alone applications
arrays, preallocating, 6-1
Bbios options, setting, 6-6
CCAN (Controller Area Network), 4-14casting data to proper data types, 6-3command line arguments for launching
stand-alone applications, 7-4communicating with RT target VIs, 1-3
Front Panel Communication, 1-4Network Communication, 1-5
communication methods, 4-9CAN, 4-14DataSocket, 4-11serial, 4-13shared memory, 4-10SMTP, 4-13TCP, 4-10UDP, 4-11VI Server, 4-12
compensation data, outputting, 5-11FieldPoint VIs, 5-14NI-DAQ VIs, 5-11
configurationcounter for pulse train generation, 5-6networked RT Series devices, 2-4
booting into Real-Time Operating System, 2-4
downloading software, 2-6network settings, 2-5
networked RT target options, 3-5RT target start-up applications, 3-8setting access permissions, 3-5
plug-in devices, 2-3contiguous memory conflicts, avoiding, 6-3control applications
See also deterministic control applicationsoverview, 5-1typical control system (figure), 5-1
Controller Area Network (CAN), 4-14conventions used in manual, ixCounter Control VI, 5-6counters
See also timing behavior verification; timing control loops
configuring for pulse train generation, 5-6Pentium time stamp counter, 8-2Tick Count (ms) function, 8-2

Index
Real-Time Module User Manual I-2 ni.com
custom error codes, defining, 8-3custom error file INI tokens, setting, 8-4
Ddata types, casting data to, 6-3DataSocket communication method, 4-11debugging deterministic applications, 8-1
application behavior verification, 8-1LabVIEW debugging tools, 1-4, 8-1Profile window, 8-1
error codesdefining custom error codes, 8-3setting custom error file INI
tokens, 8-4timing behavior verification, 8-2
oscilloscope, 8-3Pentium time stamp counter, 8-2software drivers, 8-3Tick Count (ms) function, 8-2
deploying applications. See stand-alone applications
deterministic applications, 4-1See also deterministic control
applicationscommunication methods with, 4-9
CAN, 4-14DataSocket, 4-11serial, 4-13shared memory, 4-10SMTP, 4-13TCP, 4-10UDP, 4-11VI Server, 4-12
debugging, 8-1application behavior verification, 8-1
LabVIEW debugging tools, 8-1Profile window, 8-1
error codesdefining custom error codes, 8-3
setting custom error file INI tokens, 8-4
timing behavior verification, 8-2oscilloscope, 8-3Pentium time stamp counter, 8-2software drivers, 8-3Tick Count (ms) function, 8-2
dividing tasks, 4-4multithreaded applications, 4-1
dividing tasks for deterministic applications, 4-4
execution systems for categorizing VIs, 4-3
overview, 4-1VI priorities, 4-2
optimizing, 6-1avoiding contiguous memory
conflicts, 6-3avoiding shared resources, 6-1avoiding subVI overhead, 6-5casting data to proper data types, 6-3disabling disk cache, 6-5mass compiling VIs, 6-6memory allocations and
preallocating arrays, 6-1reducing global variable use, 6-3setting bios options, 6-6setting VI properties, 6-5
passing data between VIs, 4-5functional global variables, 4-6 global variables, 4-5Real-Time FIFO VIs, 4-7
user interface for RT target VIs, 4-8yielding time-critical VI execution, 4-5
deterministic control applications, 5-1acquiring measurement data, 5-7
AI Sample Channel VI, 5-7DAQ devices, 5-8FieldPoint devices, 5-9Wait Until Next ms Multiple
function, 5-7

Index
© National Instruments Corporation I-3 Real-Time Module User Manual
implementing, 5-2outputting compensation data, 5-11
FieldPoint VIs, 5-14NI-DAQ VIs, 5-11
overview, 5-1processing measurement data, 5-10timing control loops, 5-3
hardware methods, 5-5overview, 5-3software method, 5-3
typical LabVIEW control application (figure), 5-2
typical steps for building, 5-2watchdogs, 5-14
inactivity watchdog, 5-15network watchdog, 5-15
device driversconfiguring and testing, A-1creating for third-party PXI devices, A-2
disk cache, disabling, 6-5documentation
conventions used in manual, ixrelated documentation, x
downloadingsoftware on networked RT Series
devices, 2-6VIs to RT target, 3-3
Eerror codes in debugging
defining custom error codes, 8-3setting custom error file INI tokens, 8-4
Express VIs, 1-6
FFieldPoint Modules, RT Series
acquiring measurement data, 5-9definition, 1-3
FieldPoint VIsacquiring measurement data, 5-9outputting compensation data, 5-14
Flat Sequence structure, 5-5front panel
closing front panel connection without closing VIs, 3-4
modification of RT target VI front panels not supported, 1-7
Front Panel Communicationprotocol, 1-4purpose and use, 1-4
functional global variables, 4-6
Gglobal variables
functional, 4-6overview, 4-5reducing use of, 6-3
Hhardware
counter for time-critical VIs, 5-5timing control loops with, 5-5
AI SingleScan VI, 5-5Counter Control VI, 5-6
host computer, 1-1
Iinactivity watchdog, 5-15Initialize Array function, 6-2installation
Real-Time Module, 2-1RT Series plug-in devices, 2-2
PCI plug-in devices, 2-2PXI plug-in devices, 2-2

Index
Real-Time Module User Manual I-4 ni.com
JJitter, 4-11
priority inversion-induced, 6-1reducing with preallocation arrays, 6-2
LLabVIEW debugging tools, 1-4, 8-1LabVIEW Memory Manager, 6-1LabVIEW PID Control Toolset VIs, 5-10LabVIEW Real-Time Module. See Real-Time
ModuleLabVIEW software
See also RT Enginequitting after launching stand-alone
applications, 7-3real-time system component, 1-1targeting LabVIEW to RT target, 3-1unsupported features with
RT target VIs, 1-7modifying front panel objects, 1-7using OS-specific technologies, 1-7
launching stand-alone applications, 7-3automatically on start-up, 7-4automatically using command line
arguments, 7-4
Mmanual. See documentationmass compiling of VIs, 6-6Measurement & Automation Explorer
(MAX), 2-3measurement data
acquiring, 5-7AI Sample Channel VI, 5-7DAQ devices, 5-8FieldPoint devices, 5-9Wait Until Next ms Multiple
function, 5-7processing, 5-10
memoryallocation and preallocating arrays, 6-1avoiding contiguous memory
conflicts, 6-3minimizing usage by RT target Web
Server, 4-16multithreaded applications, 4-1
cooperative yielding of time-critical VIs, 4-5
definition, 4-1dividing tasks for deterministic
applications, 4-4execution systems for categorizing
VIs, 4-3overview, 4-1round robin scheduling, 4-2VI priorities, 4-2
mutex, definition of, 6-1
NNetwork Communication, 1-5network watchdog, 5-15networked RT Series devices
configuring, 2-4booting into Real-Time Operating
System, 2-4downloading software, 2-6network settings, 2-5
examples, 1-3overview, 1-3
Ooperating system mutex, 6-1oscilloscope, timing behavior verification, 8-3outputting compensation data, 5-11
FieldPoint VIs, 5-14NI-DAQ VIs, 5-11

Index
© National Instruments Corporation I-5 Real-Time Module User Manual
Ppassing data between VIs, 4-5
functional global variables, 4-6global variables, 4-5Real-Time FIFO VIs, 4-7
PCI plug-in devices, installing, 2-2Pentium time stamp counter, 8-2PID Control Toolset. See LabVIEW PID
Control Toolsetplug-in devices, RT series.
See also PXI controllers, RT Series7041 RT Series plug-in devices, 1-3configuring, 2-3creating PXI device drivers, A-2installing, 2-2overview, 1-2
preallocating arrays, 6-1preemptive scheduling, 4-2priority inversion-induced jitter, 6-1professional services and technical
support, B-1Profile window, 8-1programming. See deterministic applications;
deterministic control applications; stand-alone applications
Proportional-Integral-Derivative (PID) algorithm, 5-10
pulse train generation, configuring counter for, 5-6
PXI controllers, RT Seriesbooting into Real-Time Operating
System, 2-4overview, 1-3
PXI plug-in devices, RT Seriescreating PXI device drivers, A-2installing, 2-2
RRead Time Stamp Counter (RDTSC)
assembly instructions, 8-2
real-time system components, 1-1host computer, 1-1LabVIEW software, 1-1RT engine, 1-2RT targets, 1-2
Real-Time FIFO VIs, 4-7Real-Time Module
See also RT Engineclosing front panel connection without
closing VIs, 3-4configuring networked RT target
options, 3-5RT target start-up applications, 3-8setting access permissions, 3-5
connecting to VIs running on RT target, 3-4
disabling disk cache, 6-5downloading VIs to RT target, 3-3Express VIs, 1-6installing, 2-1targeting LabVIEW to RT target, 3-1
Real-Time Operating System (RTOS)booting into, 2-4memory usage, 6-3
Remote Panels and RT target VIs, 4-14enabling connections to
RT target VIs, 4-14minimizing memory usage by RT target
Web Server, 4-16regaining control of RT Engine VIs, 4-15
Replace Array Subset function, 6-2round robin scheduling, 4-2RT Communication Wizard, 4-8RT Engine
See also Real-Time Moduledescription, 1-2launching stand-alone applications
automatically on start-up, 7-4memory usage, 6-4regaining control of RT target VIs, 4-15
RT Series FieldPoint Modules, 1-3, 5-9

Index
Real-Time Module User Manual I-6 ni.com
RT Series networked devices. See networked RT series devices
RT Series plug-in devices. See plug-in devices, RT series
RT Series PXI controllers. See PXI controllers, RT Series
RT target(s)See also RT target VIsconfiguring networked RT target
options, 3-5RT target start-up applications, 3-8setting access permissions, 3-5
connecting to target using crossover cable, B-5
connecting to VIs running on RT target, 3-4
definition, 1-2downloading VIs to RT target, 3-3memory diagrams (figure), 6-4networked RT Series devices
configuring, 2-4booting into Real-Time
Operating System, 2-4downloading software, 2-6network settings, 2-5
examples, 1-3overview, 1-3
RT series plug-in devicesconfiguring, 2-3creating PXI device drivers, A-2installing, 2-2overview, 1-2problems with connecting, B-3
setting system time, 2-7stand-alone applications
configuring settings for, 7-2connecting to applications running
on targets, 7-5launching stand-alone
applications, 7-3selecting target after launching, 7-3
targeting LabVIEW to RT target, 3-1RT target VIs
communicating with, 1-3Front Panel Communication, 1-4Network Communication, 1-5
creating using interface for, 4-8enabling Remote Panel connections, 4-14Network Communication protocol, 1-5regaining control from Remote Panel
connections, 4-15unsupported LabVIEW features, 1-7
modifying front panel objects, 1-7using OS-specific technologies, 1-7
RT target Web Server, minimizing memory usage by, 4-16
RTFIFO Read VI, 4-7RTOS. See Real-Time Operating System
(RTOS)
Ssaving stand-alone applications, 7-2serial communication method, 4-12shared memory communication method, 4-10shared resources, avoiding, 6-1
casting data to proper data types, 6-3memory allocations and preallocating
arrays, 6-1reducing global variable use, 6-3
Skip Subroutine Call If Busy, 4-6SMTP communication method, 4-12software
See also LabVIEW softwaretiming control loops, 5-3
software driversdownloading for networked RT Series
devices, 2-6for timing behavior verification, 8-3
stand-alone applications, 7-1configuring target settings, 7-2

Index
© National Instruments Corporation I-7 Real-Time Module User Manual
connecting to applications running on RT targets, 7-5
creating application installer, 7-1installing on RT target
with media storage device, 7-2without media storage device, 7-1
launching, 7-3automatically on start-up, 7-4automatically using command line
arguments, 7-4quitting LabVIEW after launch, 7-3saving, 7-2selecting target after launch, 7-3
start-up applicationssetting options for, 3-8
subVI overhead, avoiding, 6-5system time, setting for RT targets, 2-7
Ttargets. See RT target(s)TCP communication method, 4-10technical support and professional
services, B-1Thread
See also multithreaded applicationsdefinition, 4-1
Tick Count (ms) function, 8-2time, system, obtaining for RT targets, 2-7time-critical VIs
cooperative yielding, 4-5functional global variables, 4-6memory allocation and preallocating
arrays, 6-1multithreaded applications, 4-4
timing behavior verification, 8-2oscilloscope, 8-3Pentium time stamp counter, 8-2software drivers, 8-3Tick Count (ms) function, 8-2
timing control loops, 5-3hardware method, 5-5
AI SingleScan VI, 5-5Counter Control VI, 5-6
overview, 5-3software method, 5-3
Flat Sequence structure implementation (figure), 5-5
ideal timing (figure), 5-4incorrect timing (figure), 5-5parallel implementation (figure), 5-4Wait Until Next ms Multiple
function, 5-3
UUDP communication method, 4-11user interface, creating for RT target VIs, 4-8
VVI Server communication method, 4-12VIs
See also RT target VIs; time-critical VIsChanged or Missing VIs dialog box, 3-5closing front panel connection without
closing VIs, 3-4connecting to VIs running on
RT target, 3-4downloading to RT target, 3-3execution systems for categorizing, 4-3Express VIs, 1-6improving performance
avoiding subVI overhead, 6-5mass compiling, 6-6setting VI properties, 6-5
Network Communication protocol, 1-5outputting compensation data
FieldPoint VIs, 5-14NI-DAQ VIs, 5-11

Index
Real-Time Module User Manual I-8 ni.com
passing data between VIs, 4-5functional global variables, 4-6global variables, 4-5Real-Time FIFO VIs, 4-7
PID Control Toolset VIs, 5-10priorities
normal, 4-2setting execution system and
priority, 4-4subroutine, 4-2types of, 4-2
Real-Time FIFO VIs, 4-7
WWait Until Next ms Multiple function, 5-3watchdogs in deterministic control
applications, 5-14inactivity watchdog, 5-15
network watchdog, 5-15