Embed Size (px)
Citation preview
® All Rights Reserved to AppSec Labs 2014
AppUse - Android Pentest Platform Unified
Standalone Environment
AppUse is designed to be a weaponized environment for Android application
penetration testing. It is a unique, free, and rich platform aimed for mobile
application security testing in the Android environment.
https://appsec-labs.com
Last updated September 2014
Information in this document is subject to change without notice. Companies, names, and data used in
examples herein are fictitious unless otherwise noted. No part of this document may be reproduced or
transmitted in any form or by any means, electronic or mechanical, for any purpose, without the
express written permission of AppSec Labs.
® All Rights Reserved to AppSec Labs 2014
Contents
AppUse - Overview .................................................................................................... 3
AppUse - OS ............................................................................................................. 5
Credentials ........................................................................................................ 5
Terminal and Command Line Tools....................................................................... 5
Development Tools ............................................................................................ 6
AppUse Directory Structure ................................................................................. 7
AppUse - Dashboard ................................................................................................ 10
Overview......................................................................................................... 10
Structure: ........................................................................................................ 11
General ........................................................................................................... 11
Home ............................................................................................................. 13
Android Device ................................................................................................ 13
Tools .............................................................................................................. 16
Reversing ........................................................................................................ 18
Application Data .............................................................................................. 20
ReFrameworker ............................................................................................... 21
Vulnerable Apps ............................................................................................... 21
AppUse - Runtime Modifications and Inspection via AppSec ReFrameworker ................. 22
How it works – an overview............................................................................... 22
The hooks ....................................................................................................... 25
Configuration examples .................................................................................... 27
® All Rights Reserved to AppSec Labs 2014
AppUse - Overview
AppUse (Android Pentest Platform Unified Standalone Environment) is designed to be a
weaponized environment for Android application penetration testing. It is an OS for Android
application pentesters that contains a custom Android ROM, loaded with hooks which were
placed at the right places inside the runtime for easy application control, observation, and
manipulation.
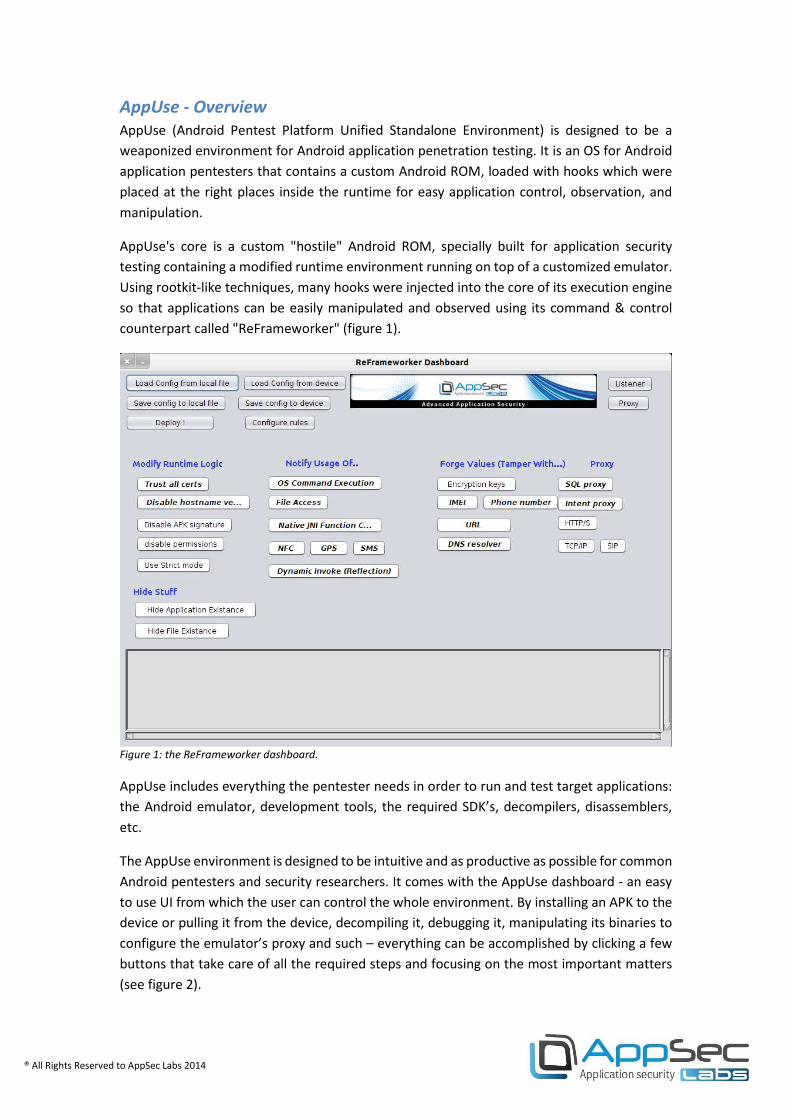
AppUse's core is a custom "hostile" Android ROM, specially built for application security
testing containing a modified runtime environment running on top of a customized emulator.
Using rootkit-like techniques, many hooks were injected into the core of its execution engine
so that applications can be easily manipulated and observed using its command & control
counterpart called "ReFrameworker" (figure 1).
Figure 1: the ReFrameworker dashboard.
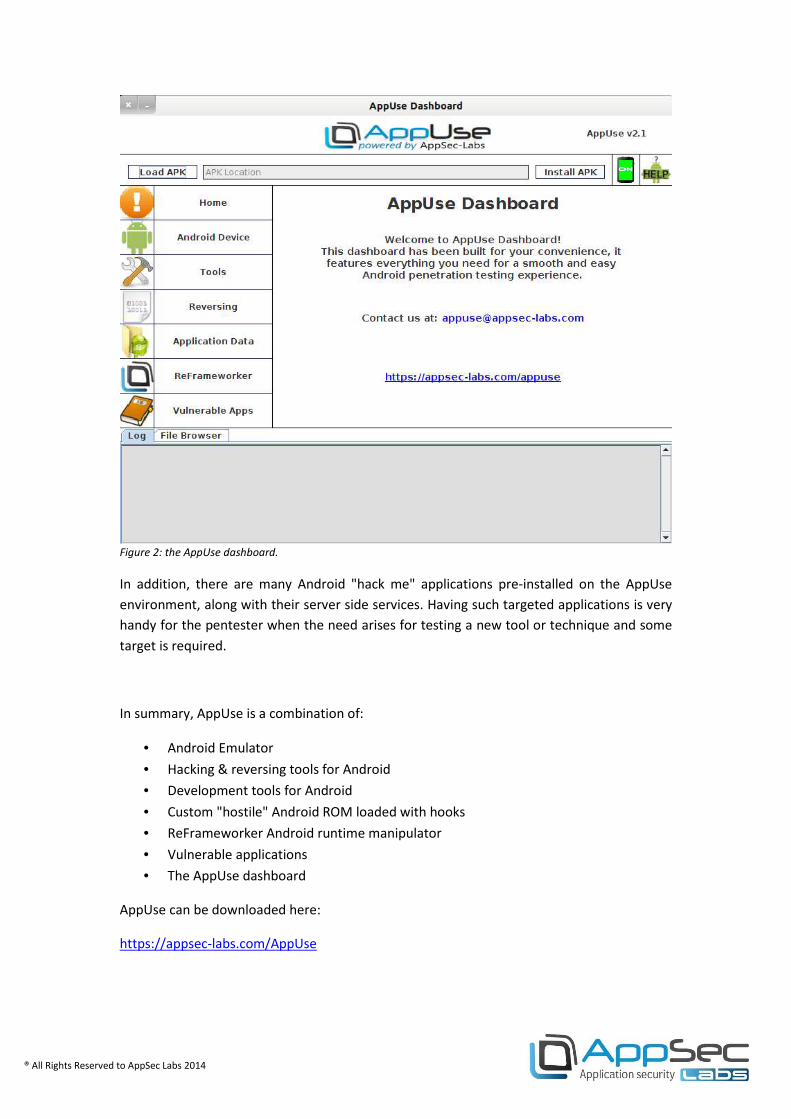
AppUse includes everything the pentester needs in order to run and test target applications:
the Android emulator, development tools, the required SDK’s, decompilers, disassemblers,
etc.
The AppUse environment is designed to be intuitive and as productive as possible for common
Android pentesters and security researchers. It comes with the AppUse dashboard - an easy
to use UI from which the user can control the whole environment. By installing an APK to the
device or pulling it from the device, decompiling it, debugging it, manipulating its binaries to
configure the emulator’s proxy and such – everything can be accomplished by clicking a few
buttons that take care of all the required steps and focusing on the most important matters
(see figure 2).
® All Rights Reserved to AppSec Labs 2014
Figure 2: the AppUse dashboard.
In addition, there are many Android "hack me" applications pre-installed on the AppUse
environment, along with their server side services. Having such targeted applications is very
handy for the pentester when the need arises for testing a new tool or technique and some
target is required.
In summary, AppUse is a combination of:
• Android Emulator
• Hacking & reversing tools for Android
• Development tools for Android
• Custom "hostile" Android ROM loaded with hooks
• ReFrameworker Android runtime manipulator
• Vulnerable applications
• The AppUse dashboard
AppUse can be downloaded here:
https://appsec-labs.com/AppUse
® All Rights Reserved to AppSec Labs 2014
AppUse - OS
The AppUse OS is based on Linux Ubuntu which has been perfectly equipped with common
attack tools embedded that can save time and increase efficiency.
Credentials
Although AppUse will automatically log you in to root, you may find these data useful while
interacting with the system.
Type Username Password
Operating System Root 1
Emulator [none] 1234
Terminal and Command Line Tools
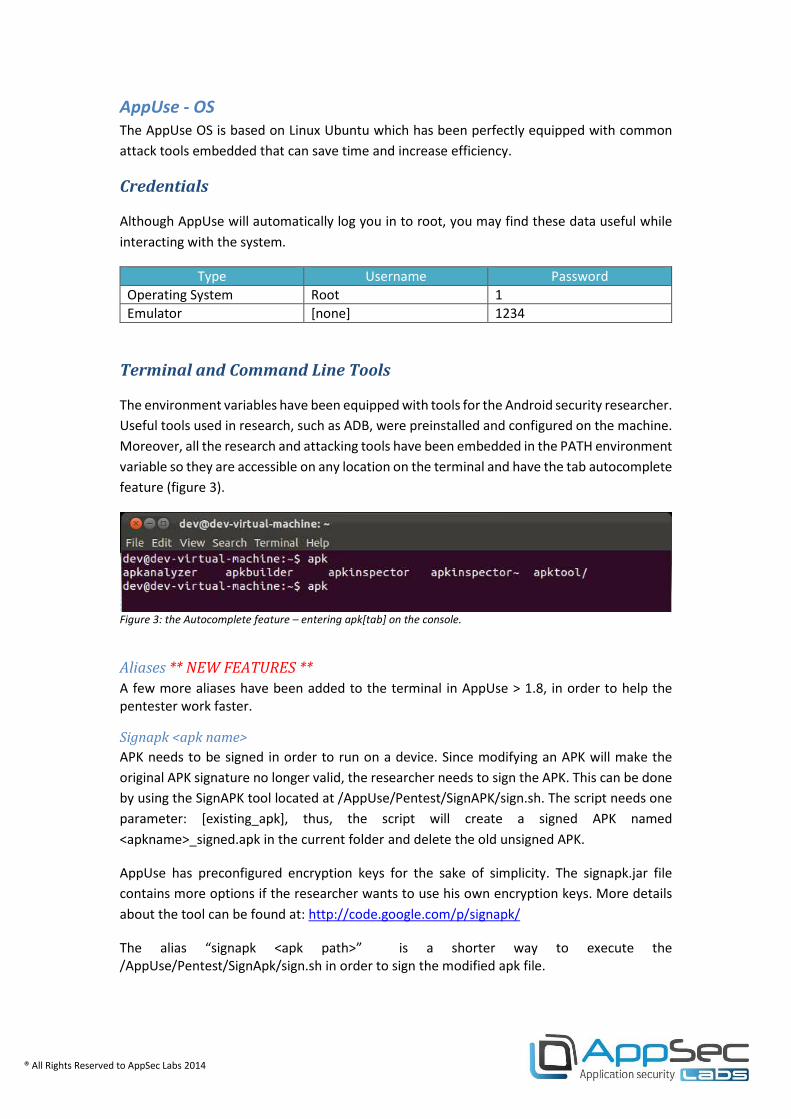
The environment variables have been equipped with tools for the Android security researcher.
Useful tools used in research, such as ADB, were preinstalled and configured on the machine.
Moreover, all the research and attacking tools have been embedded in the PATH environment
variable so they are accessible on any location on the terminal and have the tab autocomplete
feature (figure 3).
Figure 3: the Autocomplete feature – entering apk[tab] on the console.
Aliases ** NEW FEATURES **
A few more aliases have been added to the terminal in AppUse > 1.8, in order to help the
pentester work faster.
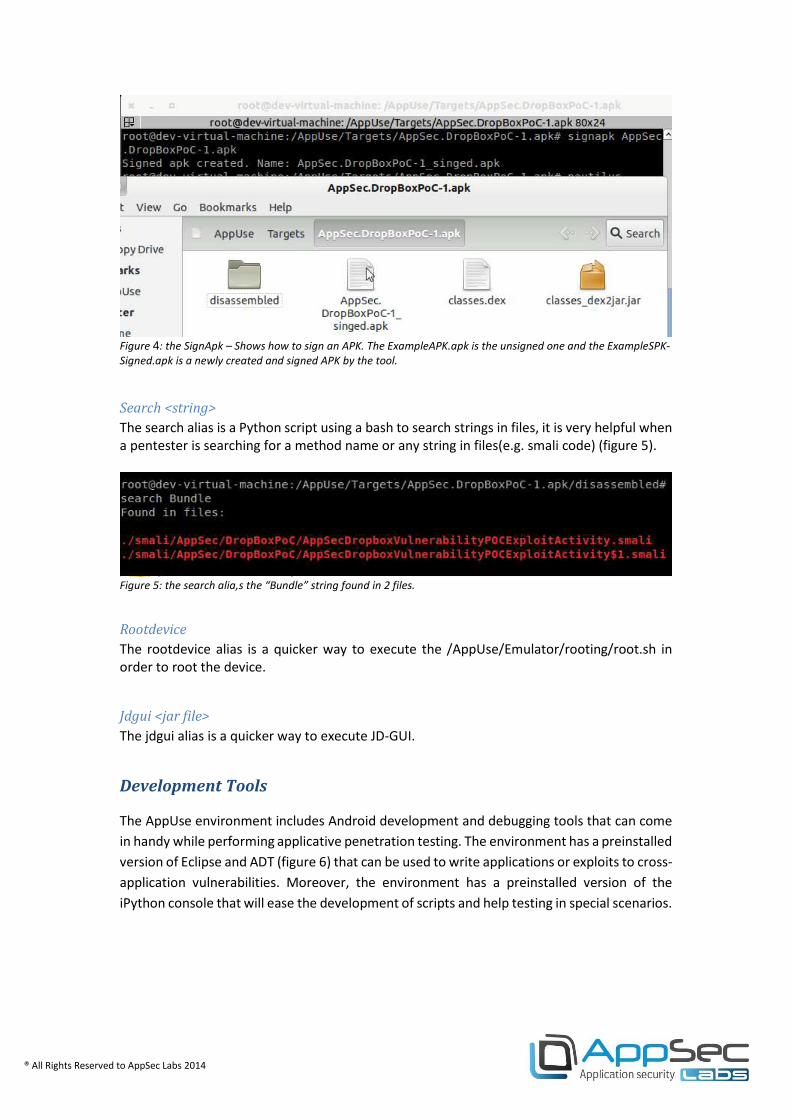
Signapk <apk name>
APK needs to be signed in order to run on a device. Since modifying an APK will make the
original APK signature no longer valid, the researcher needs to sign the APK. This can be done
by using the SignAPK tool located at /AppUse/Pentest/SignAPK/sign.sh. The script needs one
parameter: [existing_apk], thus, the script will create a signed APK named
<apkname>_signed.apk in the current folder and delete the old unsigned APK.
AppUse has preconfigured encryption keys for the sake of simplicity. The signapk.jar file
contains more options if the researcher wants to use his own encryption keys. More details
about the tool can be found at: http://code.google.com/p/signapk/
The alias “signapk <apk path>” is a shorter way to execute the
/AppUse/Pentest/SignApk/sign.sh in order to sign the modified apk file.
® All Rights Reserved to AppSec Labs 2014
Figure 4: the SignApk – Shows how to sign an APK. The ExampleAPK.apk is the unsigned one and the ExampleSPK-
Signed.apk is a newly created and signed APK by the tool.
Search <string>
The search alias is a Python script using a bash to search strings in files, it is very helpful when
a pentester is searching for a method name or any string in files(e.g. smali code) (figure 5).
Figure 5: the search alia,s the “Bundle” string found in 2 files.
Rootdevice
The rootdevice alias is a quicker way to execute the /AppUse/Emulator/rooting/root.sh in
order to root the device.
Jdgui <jar file>
The jdgui alias is a quicker way to execute JD-GUI.
Development Tools
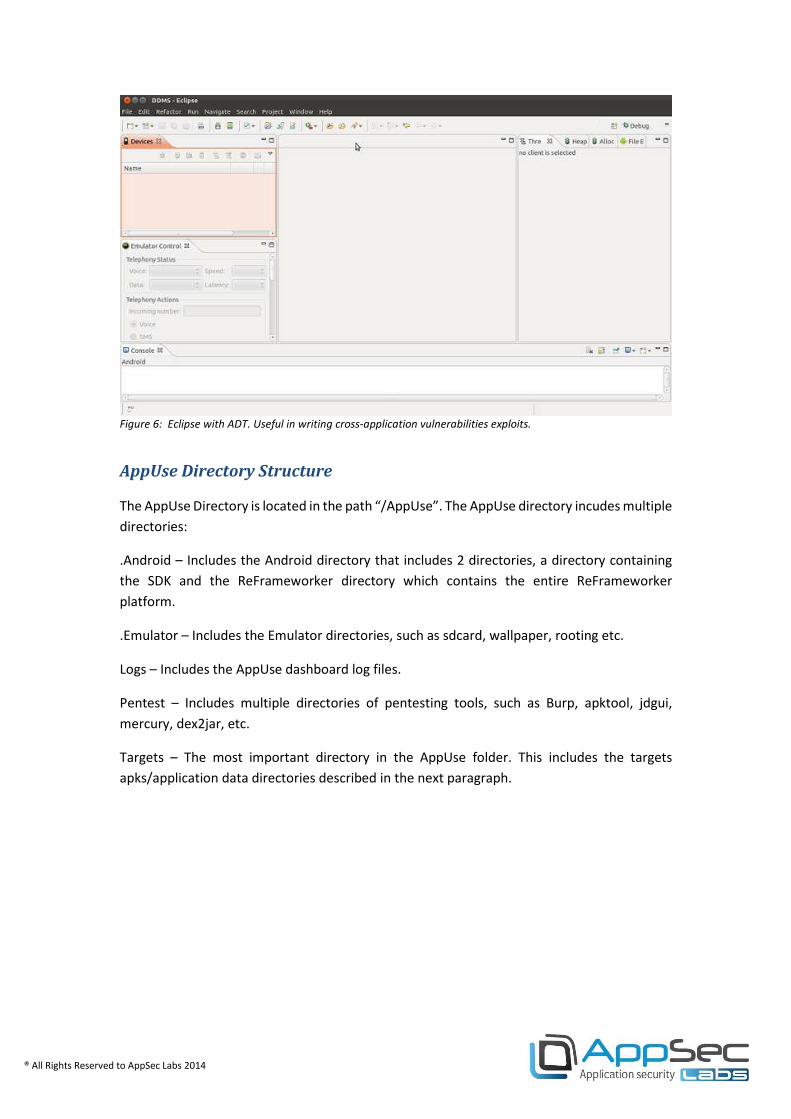
The AppUse environment includes Android development and debugging tools that can come
in handy while performing applicative penetration testing. The environment has a preinstalled
version of Eclipse and ADT (figure 6) that can be used to write applications or exploits to cross-
application vulnerabilities. Moreover, the environment has a preinstalled version of the
iPython console that will ease the development of scripts and help testing in special scenarios.
® All Rights Reserved to AppSec Labs 2014
Figure 6: Eclipse with ADT. Useful in writing cross-application vulnerabilities exploits.
AppUse Directory Structure
The AppUse Directory is located in the path “/AppUse”. The AppUse directory incudes multiple
directories:
.Android – Includes the Android directory that includes 2 directories, a directory containing
the SDK and the ReFrameworker directory which contains the entire ReFrameworker
platform.
.Emulator – Includes the Emulator directories, such as sdcard, wallpaper, rooting etc.
Logs – Includes the AppUse dashboard log files.
Pentest – Includes multiple directories of pentesting tools, such as Burp, apktool, jdgui,
mercury, dex2jar, etc.
Targets – The most important directory in the AppUse folder. This includes the targets
apks/application data directories described in the next paragraph.
® All Rights Reserved to AppSec Labs 2014
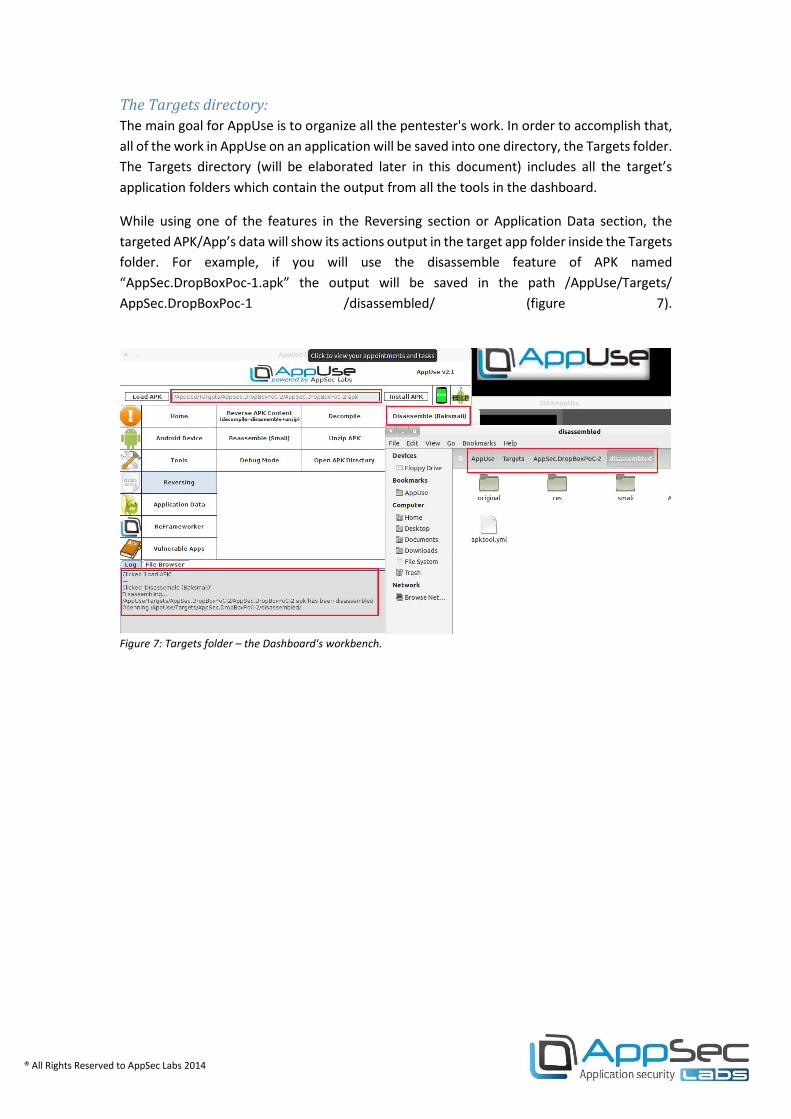
The Targets directory:
The main goal for AppUse is to organize all the pentester's work. In order to accomplish that,
all of the work in AppUse on an application will be saved into one directory, the Targets folder.
The Targets directory (will be elaborated later in this document) includes all the target’s
application folders which contain the output from all the tools in the dashboard.
While using one of the features in the Reversing section or Application Data section, the
targeted APK/App’s data will show its actions output in the target app folder inside the Targets
folder. For example, if you will use the disassemble feature of APK named
“AppSec.DropBoxPoc-1.apk” the output will be saved in the path /AppUse/Targets/
AppSec.DropBoxPoc-1 /disassembled/ (figure 7).
Figure 7: Targets folder – the Dashboard's workbench.
® All Rights Reserved to AppSec Labs 2014
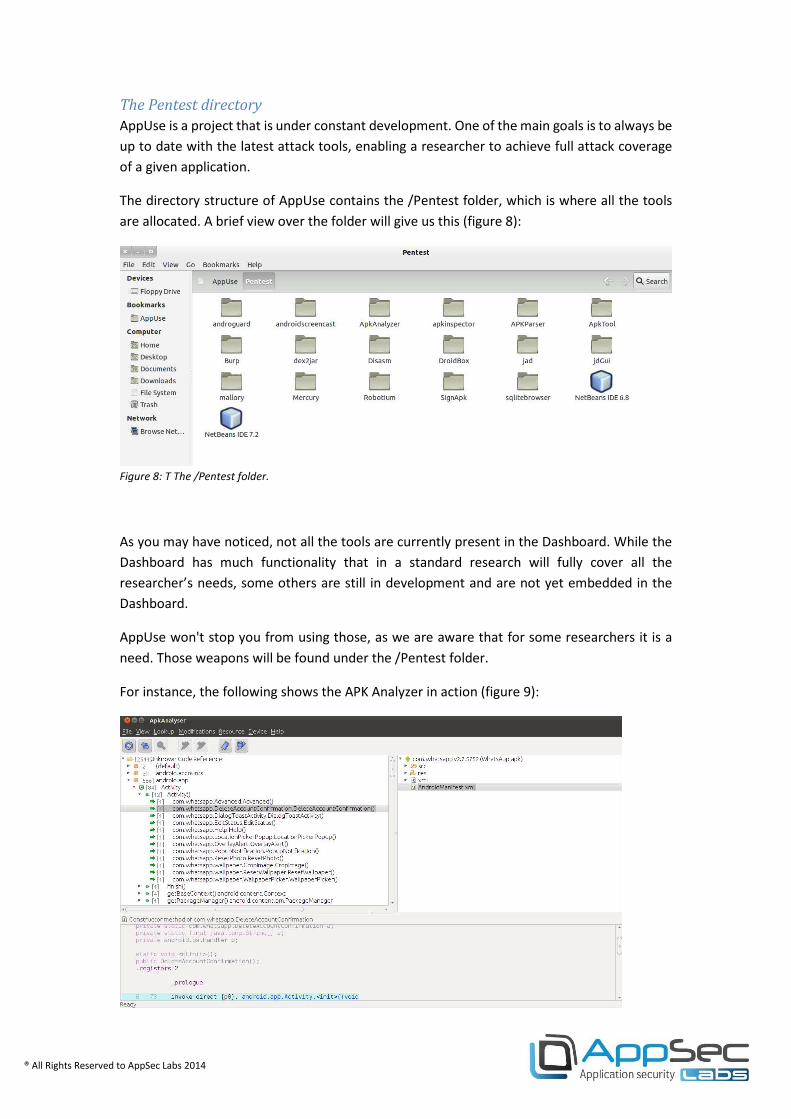
The Pentest directory
AppUse is a project that is under constant development. One of the main goals is to always be
up to date with the latest attack tools, enabling a researcher to achieve full attack coverage
of a given application.
The directory structure of AppUse contains the /Pentest folder, which is where all the tools
are allocated. A brief view over the folder will give us this (figure 8):
Figure 8: T The /Pentest folder.
As you may have noticed, not all the tools are currently present in the Dashboard. While the
Dashboard has much functionality that in a standard research will fully cover all the
researcher’s needs, some others are still in development and are not yet embedded in the
Dashboard.
AppUse won't stop you from using those, as we are aware that for some researchers it is a
need. Those weapons will be found under the /Pentest folder.
For instance, the following shows the APK Analyzer in action (figure 9):
® All Rights Reserved to AppSec Labs 2014
Figure 9: The ApkAnalyzer tool.
Of course more tools are available, such as Robotium, DroidBox and SQLite Browser. This
folder is constantly updated and new weapons are added all the time.
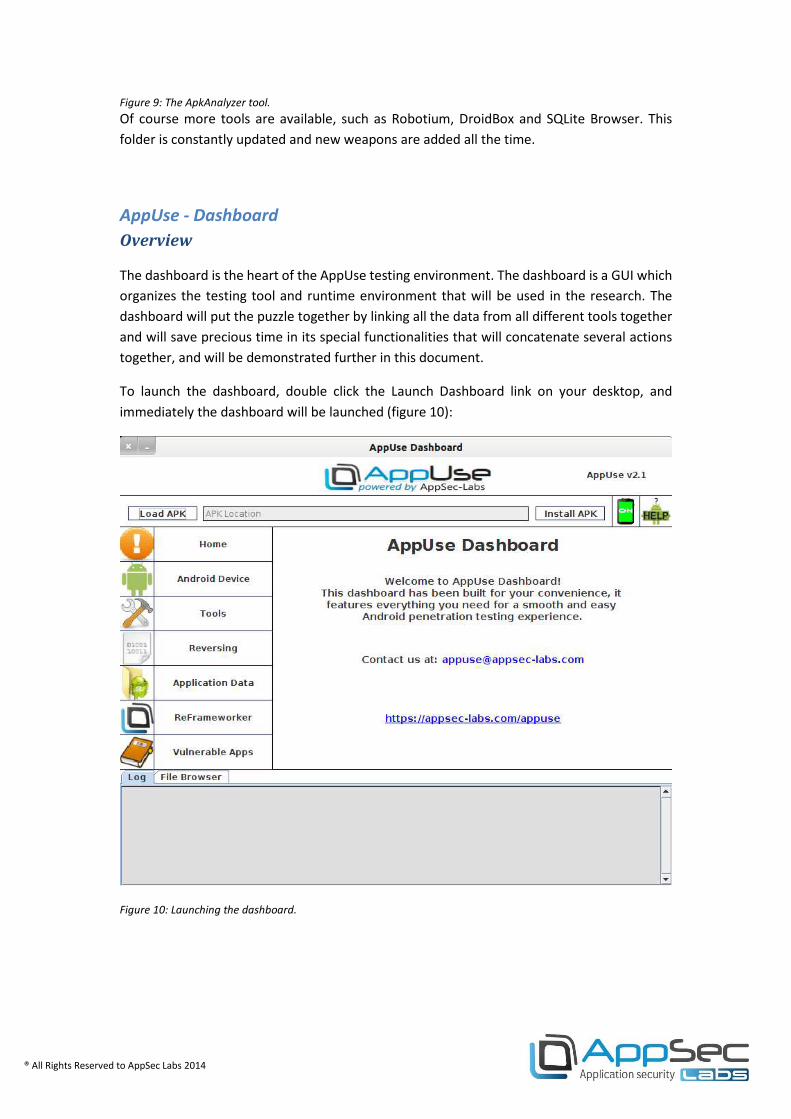
AppUse - Dashboard
Overview
The dashboard is the heart of the AppUse testing environment. The dashboard is a GUI which
organizes the testing tool and runtime environment that will be used in the research. The
dashboard will put the puzzle together by linking all the data from all different tools together
and will save precious time in its special functionalities that will concatenate several actions
together, and will be demonstrated further in this document.
To launch the dashboard, double click the Launch Dashboard link on your desktop, and
immediately the dashboard will be launched (figure 10):
Figure 10: Launching the dashboard.
® All Rights Reserved to AppSec Labs 2014
Structure:
The dashboard is divided into 7 sections; each one is aimed to a specific purpose.
General
In the dashboard, the APK is the king. The AppUse dashboard is meant to allow researchers
be able to start working with one-click actions. In order to achieve this goal, the dashboard is
designed to operate on an APK and will use it while invoking its other actions.
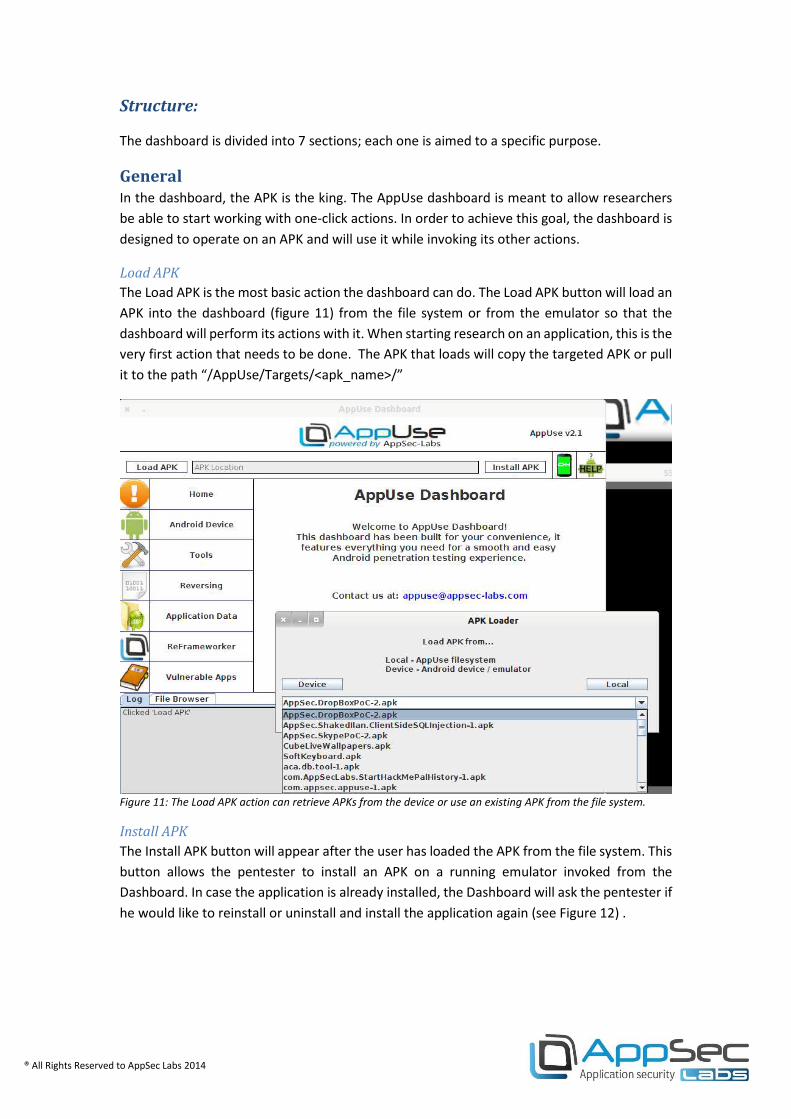
Load APK
The Load APK is the most basic action the dashboard can do. The Load APK button will load an
APK into the dashboard (figure 11) from the file system or from the emulator so that the
dashboard will perform its actions with it. When starting research on an application, this is the
very first action that needs to be done. The APK that loads will copy the targeted APK or pull
it to the path “/AppUse/Targets/<apk_name>/”
Figure 11: The Load APK action can retrieve APKs from the device or use an existing APK from the file system.
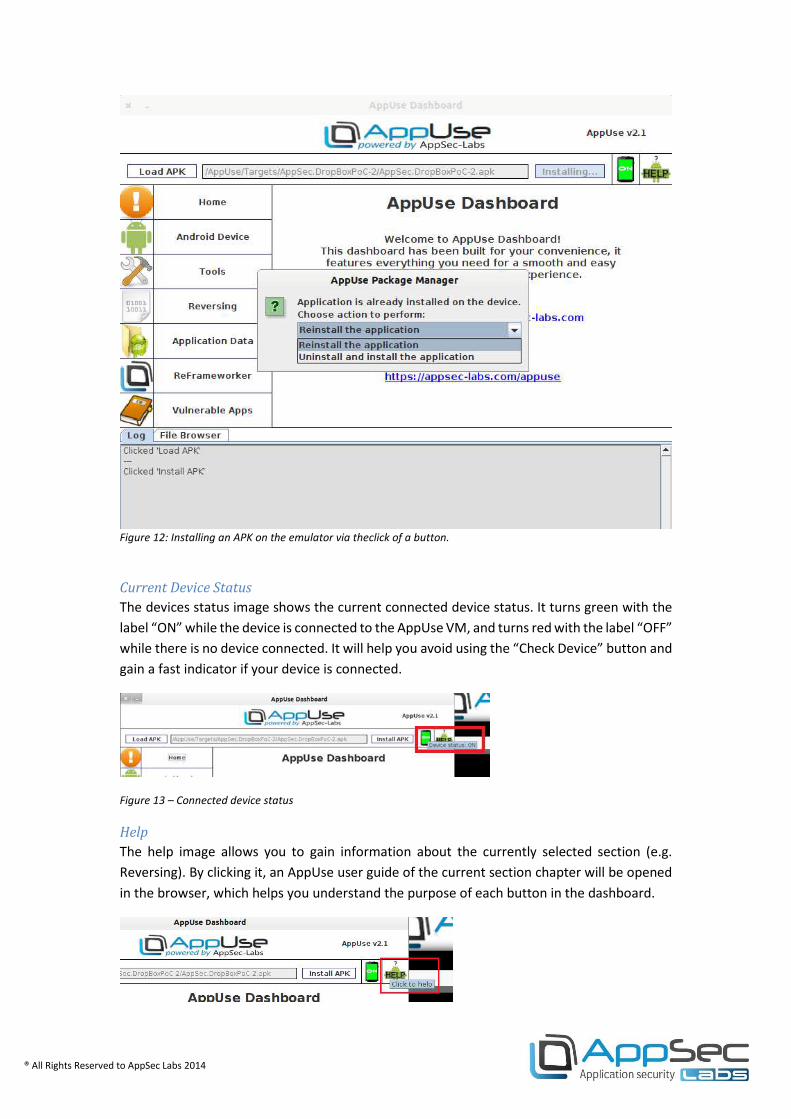
Install APK
The Install APK button will appear after the user has loaded the APK from the file system. This
button allows the pentester to install an APK on a running emulator invoked from the
Dashboard. In case the application is already installed, the Dashboard will ask the pentester if
he would like to reinstall or uninstall and install the application again (see Figure 12) .
® All Rights Reserved to AppSec Labs 2014
Figure 12: Installing an APK on the emulator via theclick of a button.
Current Device Status
The devices status image shows the current connected device status. It turns green with the
label “ON” while the device is connected to the AppUse VM, and turns red with the label “OFF”
while there is no device connected. It will help you avoid using the “Check Device” button and
gain a fast indicator if your device is connected.
Figure 13 – Connected device status
Help
The help image allows you to gain information about the currently selected section (e.g.
Reversing). By clicking it, an AppUse user guide of the current section chapter will be opened
in the browser, which helps you understand the purpose of each button in the dashboard.
® All Rights Reserved to AppSec Labs 2014
Home
The home section was implemented in order to contact us ([email protected]) for
any AppUse-related issue. We will be glad to receive ideas of new features, requests to add
you to our mailing list, bugs, etc.
Android Device
The Android sections are implemented in order to perform actions on the emulator device.
Here it is possible to perform the following actions in one click:
Launch Emulator
The Launch Emulator button was implemented in order to turn on the AppUse Emulator.
Restart ADB
The Restart ADB button was implemented in order to restart the ADB server so AppUse can
recognize the device, in case the ADB server is not up and is intended to prevent bugs. In
AppUse 1.8 an automatic mechanism was implemented to check if the server is down and
restart the ADB in order to prevent bugs and optimize the pentester’s work.
Install Burp Certificate ** NEW FEATURE **
The “Install Burp Cretificate” button will allow AppUse install the Burp certificate in the
emulator in order to ease you install the burp certificate. In the next verison, it will install it
for any device connected to AppUse VM.
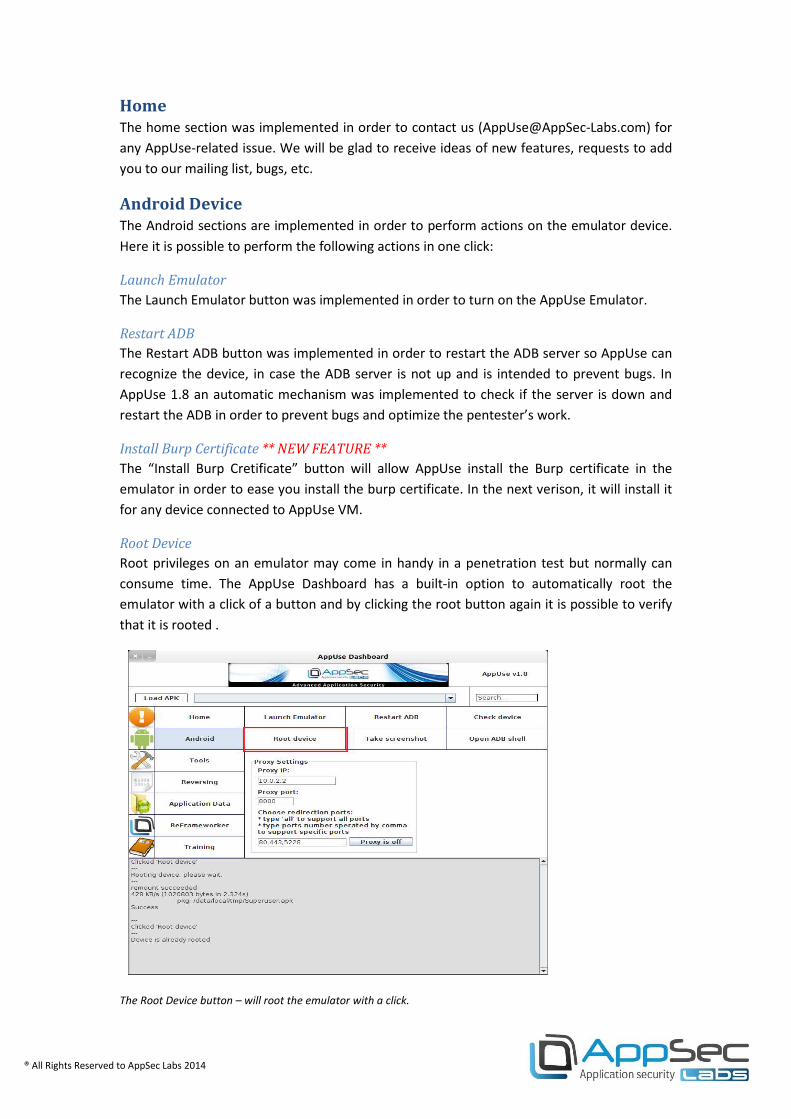
Root Device
Root privileges on an emulator may come in handy in a penetration test but normally can
consume time. The AppUse Dashboard has a built-in option to automatically root the
emulator with a click of a button and by clicking the root button again it is possible to verify
that it is rooted .
The Root Device button – will root the emulator with a click.
® All Rights Reserved to AppSec Labs 2014
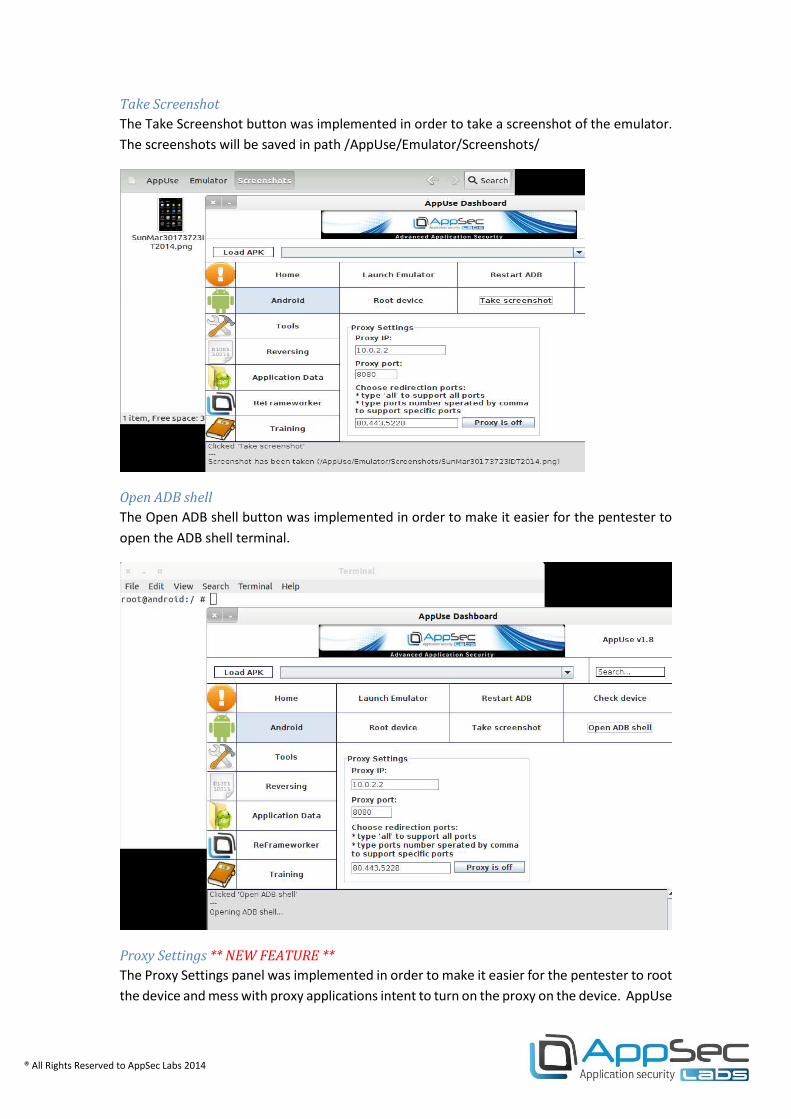
Take Screenshot
The Take Screenshot button was implemented in order to take a screenshot of the emulator.
The screenshots will be saved in path /AppUse/Emulator/Screenshots/
Open ADB shell
The Open ADB shell button was implemented in order to make it easier for the pentester to
open the ADB shell terminal.
Proxy Settings ** NEW FEATURE **
The Proxy Settings panel was implemented in order to make it easier for the pentester to root
the device and mess with proxy applications intent to turn on the proxy on the device. AppUse
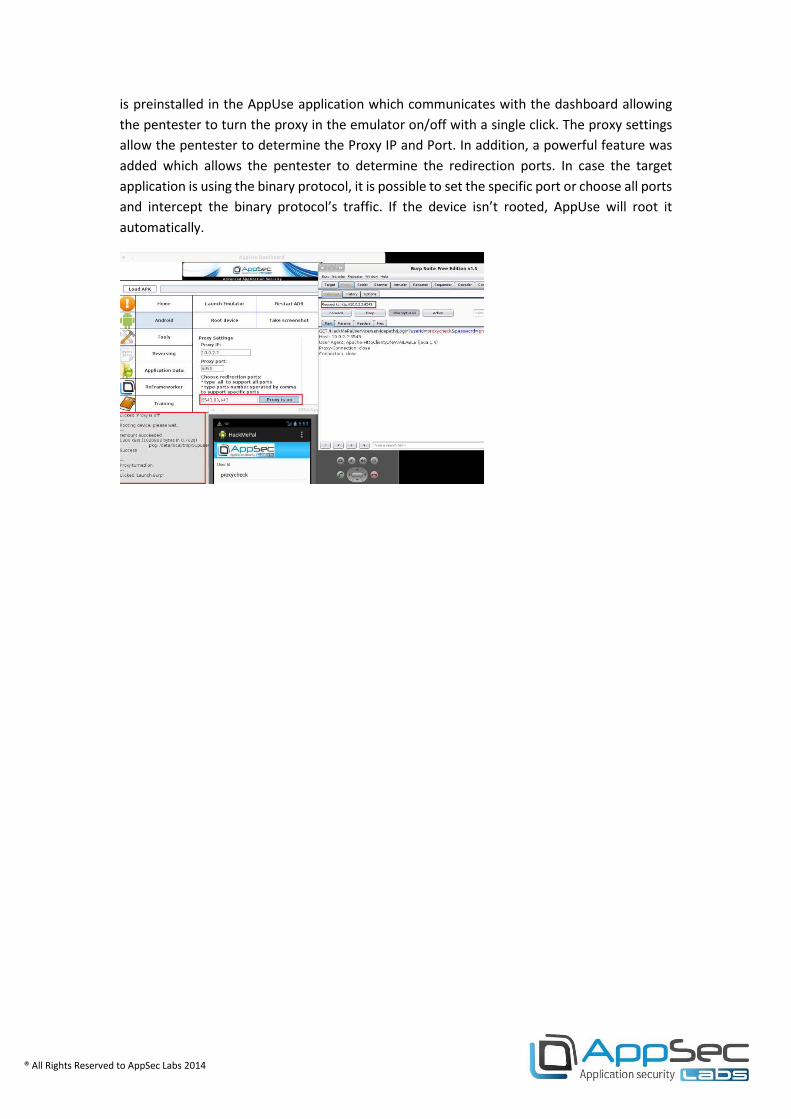
® All Rights Reserved to AppSec Labs 2014
is preinstalled in the AppUse application which communicates with the dashboard allowing
the pentester to turn the proxy in the emulator on/off with a single click. The proxy settings
allow the pentester to determine the Proxy IP and Port. In addition, a powerful feature was
added which allows the pentester to determine the redirection ports. In case the target
application is using the binary protocol, it is possible to set the specific port or choose all ports
and intercept the binary protocol’s traffic. If the device isn’t rooted, AppUse will root it
automatically.
® All Rights Reserved to AppSec Labs 2014
Tools
The Tools section is implemented in order to give the pentester fast access to useful tools that
are used in tests. It is possible to perform the following actions with one click:
Launch Burp
The Launch Burp button will launch Burp proxy.
Launch Firefox
The Launch Firefox button will launch Firefox browser.
Launch Wireshark
AppUse comes with the Wireshark sniffer preinstalled and launchable from the dashboard.
Wireshark is the world's foremost network protocol analyzer. It lets you capture and
interactively browse the traffic running on a computer network from all protocols and
network layers. Wireshark enables the pentester to deeply inspect all the traffic on the device
without the limitation of HTTP-based protocols. The Launch Wireshark button will launch
Wireshark.
Launch Eclipse
The Launch Eclipse button will launch Eclipse IDE.
Launch NetBeans
The Launch NetBeans button will launch NetBeans 8.0 which allows you to debug applications.
Launch IDA
The Launch IDA button will launch IDA, which allows you to perform reverse engineering of
binary files (e.g. so files).
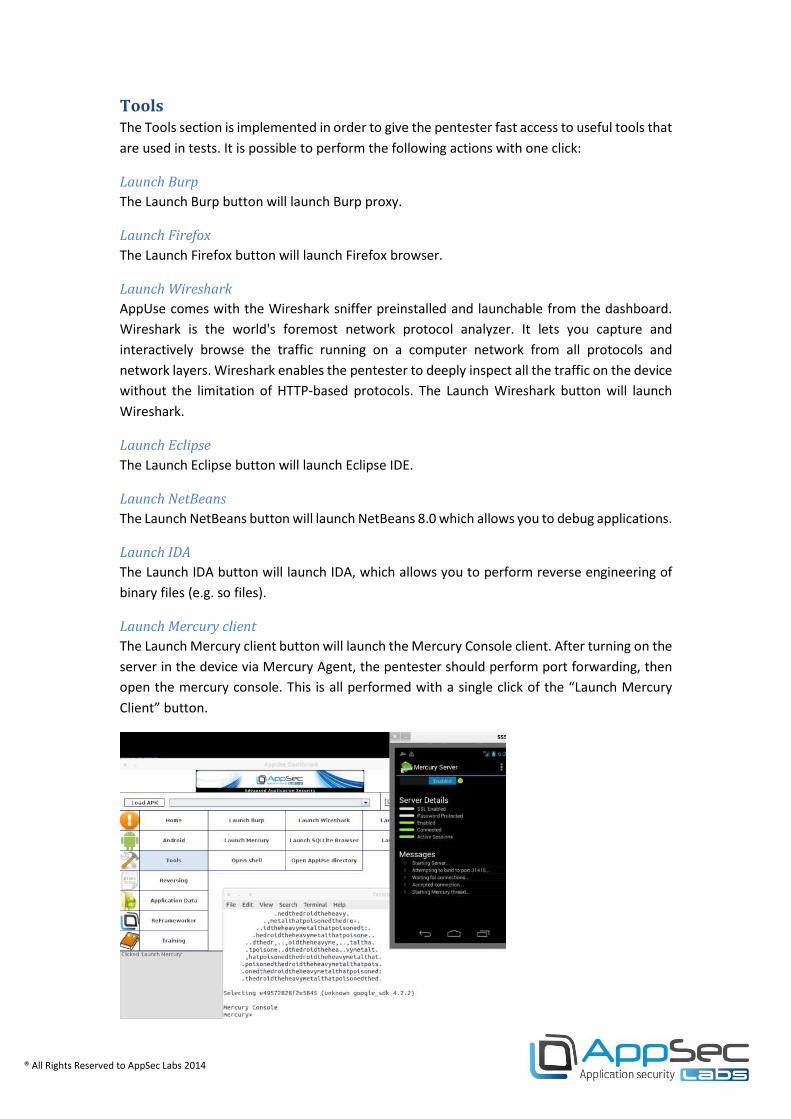
Launch Mercury client
The Launch Mercury client button will launch the Mercury Console client. After turning on the
server in the device via Mercury Agent, the pentester should perform port forwarding, then
open the mercury console. This is all performed with a single click of the “Launch Mercury
Client” button.
® All Rights Reserved to AppSec Labs 2014
Launch SQLLite Browser
The Launch SQLLite Browser button will launch the SQLLite Browser, in order to edit or view
database files.
Launch JD-GUI
The Launch JD-GUI button will launch the JD-GUI, in order to view source code of JAR files.
Open Terminal
The Open Terminal button will launch the shell, in order to perform actions in the system.
Download APK from Google Play
The Download APK from Google Play button will download an application from Google Play,
because there is no Google Play application in the emulator.
Open AppUse Directory
The Open AppUse Directory button will launch the AppUse directory, in order to view files and
perform actions on it.
® All Rights Reserved to AppSec Labs 2014
Reversing
AppUse includes the most advanced tools used to decode and reverse engineer APK's. Once
an APK is loaded to the dashboard all the tools are preconfigured to use it and all the tools
and frameworks leverage the pentester to reach full coverage.
The Reversing section is implemented in order to help the pentester in performing reversing
actions like pulling APK from the device, decompiling it, disassembling it, assembling it,
converting the APK to debug mode, etc. This section will make the pentester work much
faster. It is possible to perform the following actions with one click:
Reverse APK Content
The Reverse APK Content button was implemented in order to combine the 3 actions:
decompile, disassemble and unzip the targeted APK.
Decompile (JD-GUI)
JD-GUI is a framework aimed to disassemble .jar files. Once a .dex file had been converted to
.jar, the JD-GUI framework is ready to disassemble the code. The pentester, by using JD-GUI,
will be able to audit the application code to find hidden secrets and logic.
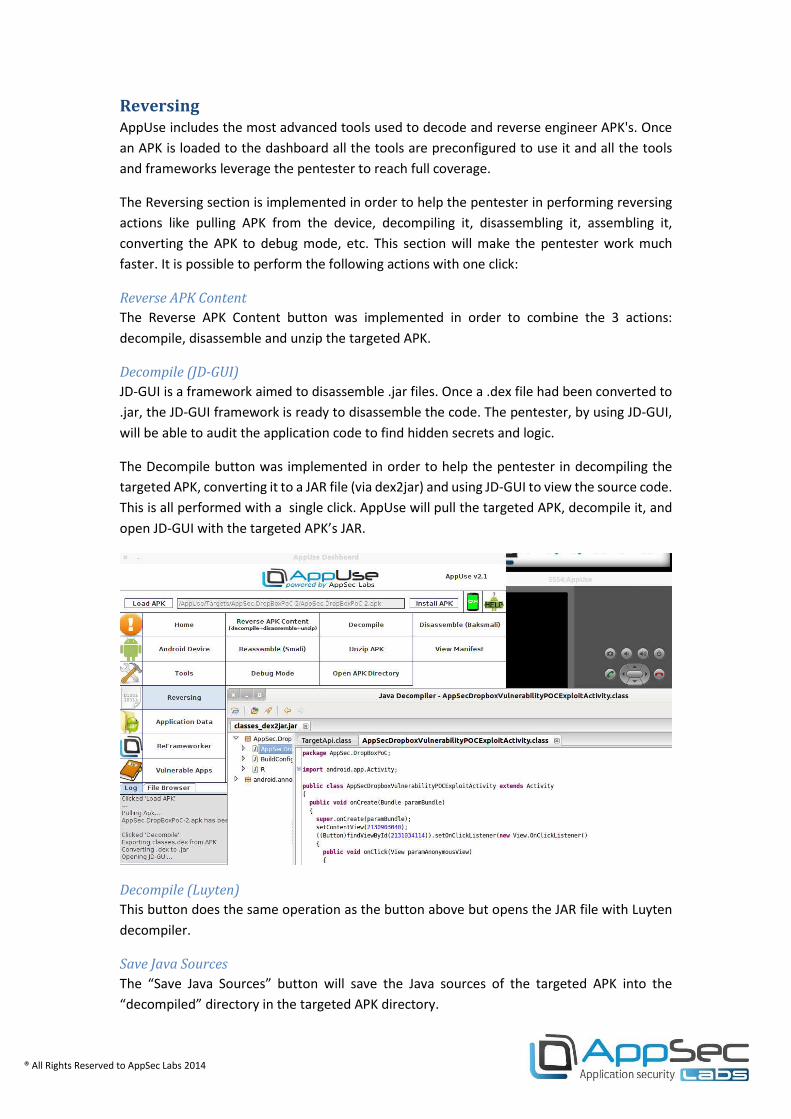
The Decompile button was implemented in order to help the pentester in decompiling the
targeted APK, converting it to a JAR file (via dex2jar) and using JD-GUI to view the source code.
This is all performed with a single click. AppUse will pull the targeted APK, decompile it, and
open JD-GUI with the targeted APK’s JAR.
Decompile (Luyten)
This button does the same operation as the button above but opens the JAR file with Luyten
decompiler.
Save Java Sources
The “Save Java Sources” button will save the Java sources of the targeted APK into the
“decompiled” directory in the targeted APK directory.

® All Rights Reserved to AppSec Labs 2014
Dissemble (Baksmali)
APK's are encoded zip archives. Upon opening an APK, there is a predetermined file and
directory structure that lets the pentester learn what is hidden under the hood. Among the
rest, a pentester can learn about the code behind the application, the resources it uses, the
permissions it asks for, open broadcast receivers, and more…
Baksmali is a tool used to disassemble an APK's Dalvik byte code. Using baksmali, a researcher
can view the Dalvik assembly of the application and modify it with a human-readable format.
The Baksmali Dissasemble button was implemented in order to help the pentester pull the
APK and disassemble the targeted APK via multiple commands. This is all done with a single
click.
Once baksmali has been used on an APK, the /AppUse/Targets/<Targeted
APK>/Dissasembled/folder will contain all of its Dalvik assembly code in a human-readable
format. The assembly can then be modified and provide added instructions for the pentester.
Reassemble(smali)
Baksmali gives the researcher the power to have human-readable dalvik assembly code and
have the chance to edit it with any text editor he wishes. Smali is a tool to complete the puzzle
to reassemble the code again.
With Smali, the researcher can perform changes in the application's assembly code and
recompile it to a new .dex file. Once the new .dex file will be applied to an APK, the changed
code will be patched and once the APK will be installed the changes in the code will be applied
in runtime. Using this feature can take security researches to a whole new level.
The Smali Assemble button was implemented in order to assemble the disassembled folder
via the “Baksmali Dissasemble”. After the pentester modifies the Smali code, he will want to
convert it to anAPK file and install it. This is all done with a single click on the Smali assemble
button. AppUse will assemble the “Dissassembled” directory and creates a signed APK.
® All Rights Reserved to AppSec Labs 2014
View Manifest ** New Feature **
The View Manifest button will open the targeted APK manifest. It will extract the APK manifest
and open it in Firefox.
Debug Mode ** New Feature **
The Debug Mode button will debug the targeted APK, by changing it automatically into debug
mode. With a single click, the application will disassemble the targeted APK, modify its
manifest, assemble it, and sign it.
Open Target Directory
The Open Target Directory button opens the targeted application’s directory, in order to view
files and perform actions on it.
Application Data
The Application Data section is implemented in order to access the targeted application’s files.
The “Load APK” button is replaced with “Load Data” button, loads the application’s data
directories into the list, and the user can use the filter to filter the directory names. The
pentester will choose the targeted application’s directory from the list and click on the “Load
Folder” in order to execute actions on the targeted directory. It is possible to perform the
following actions with one click:
View File
The View File button allows viewing files inside the targeted application. After loading the
folder into the tree view, it is possible to select a file inside the tree view, click the cat file, and
view its content.
Edit File
The Edit File button allows modifying files inside the targeted application. With a single click
AppUse will pull the file and open it in an Editor (SQLite for DB files and getit for other
extension). In order to help the pentester in modifying the file, after the pentester modifies
the file and saves it, it will be pushed back into the device automatically.
Pull File/Folder
The Pull File/Folder button pulls files or directories from the targeted application. The tree
view functionally allows the pentester to view and choose what files or folders to pull, in a
much faster way.
Extract Databases
The Extract Databases button allows the pentester to view the databases files. Instead of
pulling the DB files and opening each one in the SQLLITE browser, with a single click AppUse
will pull the DB files and parse the database’s data to HTML via Doxygen, allowing the
pentester to view the entire table in each file.
Open App Data Directory
The Open Target Directory button opens the targeted application’s directory, in order to view
files and perform actions on them.
® All Rights Reserved to AppSec Labs 2014
ReFrameworker
Launch ReFrameworker
The Launch ReFrameworker button launches the ReFrameworker platform that will be
elaborated on later on in this document.
Enable/Disable ReFrameworker
The Enable/Disable ReFrameworker button replaces the JAR files in the emulator and reboots
it, in order to allow ReFramewoker hooks to load into the emulator.
Add Internet Permissions
In order to send messages to Reframeworker's dashboard, Reframeworker creates a web
request from the application to the dashboard. If you send "Send" or "Proxy" in
Reframeworker's dashboard mode and your application has no permissions for web requests,
it will not work. This button gives your application temporary internet permissions in order to
fix it.
Vulnerable Apps
The Training section is implemented in order to turn on the server-side training applications;
it is possible to turn on HackMePal HTTP/S servers, GoatDroid and ExploitMe.
® All Rights Reserved to AppSec Labs 2014
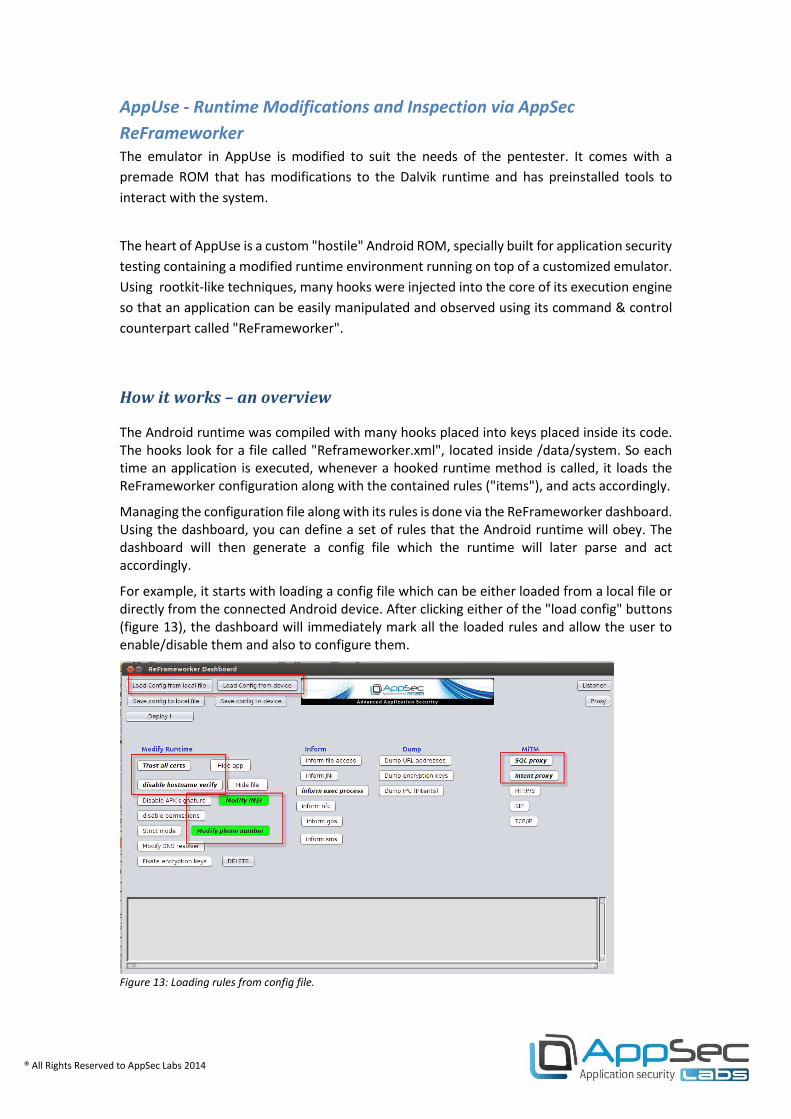
AppUse - Runtime Modifications and Inspection via AppSec
ReFrameworker
The emulator in AppUse is modified to suit the needs of the pentester. It comes with a
premade ROM that has modifications to the Dalvik runtime and has preinstalled tools to
interact with the system.
The heart of AppUse is a custom "hostile" Android ROM, specially built for application security
testing containing a modified runtime environment running on top of a customized emulator.
Using rootkit-like techniques, many hooks were injected into the core of its execution engine
so that an application can be easily manipulated and observed using its command & control
counterpart called "ReFrameworker".
How it works – an overview
The Android runtime was compiled with many hooks placed into keys placed inside its code.
The hooks look for a file called "Reframeworker.xml", located inside /data/system. So each
time an application is executed, whenever a hooked runtime method is called, it loads the
ReFrameworker configuration along with the contained rules ("items"), and acts accordingly.
Managing the configuration file along with its rules is done via the ReFrameworker dashboard.
Using the dashboard, you can define a set of rules that the Android runtime will obey. The
dashboard will then generate a config file which the runtime will later parse and act
accordingly.
For example, it starts with loading a config file which can be either loaded from a local file or
directly from the connected Android device. After clicking either of the "load config" buttons
(figure 13), the dashboard will immediately mark all the loaded rules and allow the user to
enable/disable them and also to configure them.
Figure 13: Loading rules from config file.

® All Rights Reserved to AppSec Labs 2014
After the file is loaded, the dashboard marks all the defined rules with bold, and highlights all
rules which are also enabled in green.
Then the user can choose which kind of behavior he wants from the runtime. For example, he
can turn on sniffing of important information, bypassing of certain logic, perform string
replacement, send some data to the ReFrameworker dashboard, and so on.
Next, the user can save the new configuration (figure 14). If the user chooses to save it into
the device, from now on the device will behave according to that rule.
Figure 14: Ssaving rules to config file.
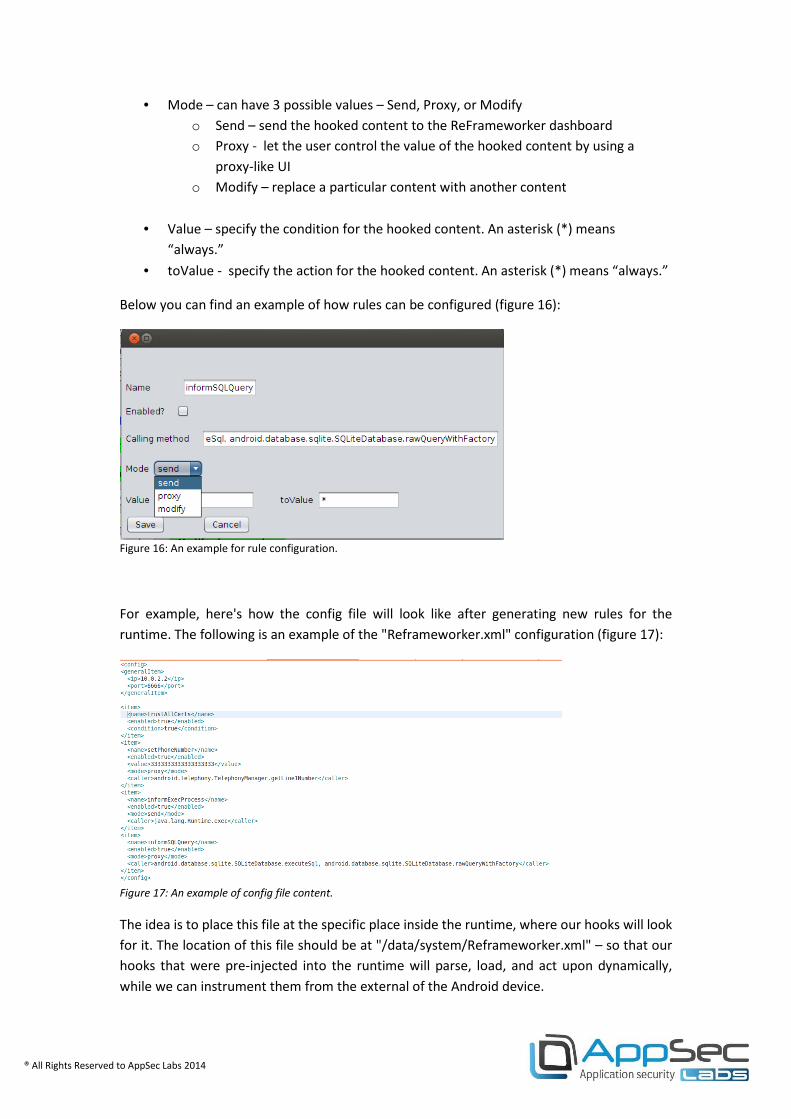
Configuring the behavior of each rule can be achieved by clicking on the rule's item, and
selecting "configure" from the sub-menu, as can be seen in figure 15.
Figure 15: Configuring an item.
Then, a new window will appear, containing the values of that rule. Each rule has the following
properties:
• Name – the name of the rule
• Enabled – is it enabled?
• Calling method – the name of the runtime method upon which this rule should apply
® All Rights Reserved to AppSec Labs 2014
• Mode – can have 3 possible values – Send, Proxy, or Modify
o Send – send the hooked content to the ReFrameworker dashboard
o Proxy - let the user control the value of the hooked content by using a
proxy-like UI
o Modify – replace a particular content with another content
• Value – specify the condition for the hooked content. An asterisk (*) means
“always.”
• toValue - specify the action for the hooked content. An asterisk (*) means “always.”
Below you can find an example of how rules can be configured (figure 16):
Figure 16: An example for rule configuration.
For example, here's how the config file will look like after generating new rules for the
runtime. The following is an example of the "Reframeworker.xml" configuration (figure 17):
Figure 17: An example of config file content.
The idea is to place this file at the specific place inside the runtime, where our hooks will look
for it. The location of this file should be at "/data/system/Reframeworker.xml" – so that our
hooks that were pre-injected into the runtime will parse, load, and act upon dynamically,
while we can instrument them from the external of the Android device.
® All Rights Reserved to AppSec Labs 2014
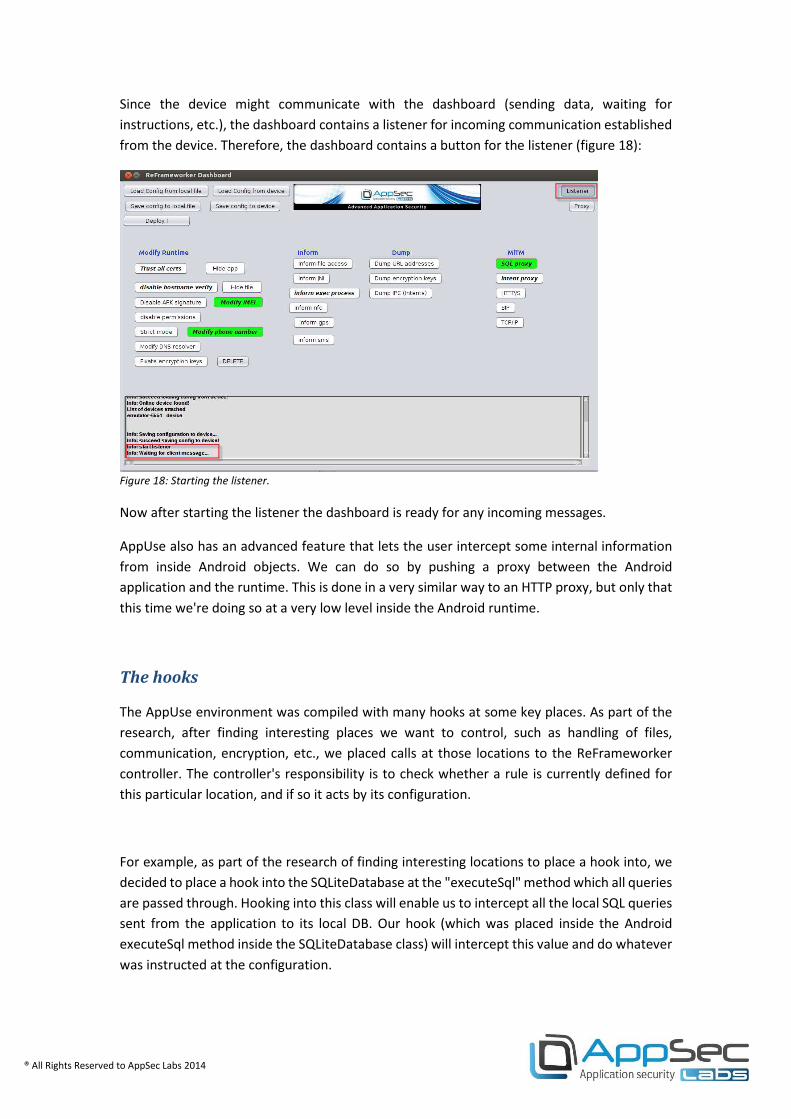
Since the device might communicate with the dashboard (sending data, waiting for
instructions, etc.), the dashboard contains a listener for incoming communication established
from the device. Therefore, the dashboard contains a button for the listener (figure 18):
Figure 18: Starting the listener.
Now after starting the listener the dashboard is ready for any incoming messages.
AppUse also has an advanced feature that lets the user intercept some internal information
from inside Android objects. We can do so by pushing a proxy between the Android
application and the runtime. This is done in a very similar way to an HTTP proxy, but only that
this time we're doing so at a very low level inside the Android runtime.
The hooks
The AppUse environment was compiled with many hooks at some key places. As part of the
research, after finding interesting places we want to control, such as handling of files,
communication, encryption, etc., we placed calls at those locations to the ReFrameworker
controller. The controller's responsibility is to check whether a rule is currently defined for
this particular location, and if so it acts by its configuration.
For example, as part of the research of finding interesting locations to place a hook into, we
decided to place a hook into the SQLiteDatabase at the "executeSql" method which all queries
are passed through. Hooking into this class will enable us to intercept all the local SQL queries
sent from the application to its local DB. Our hook (which was placed inside the Android
executeSql method inside the SQLiteDatabase class) will intercept this value and do whatever
was instructed at the configuration.

® All Rights Reserved to AppSec Labs 2014
Hooks are usually placed around an important value, so that if a rule is defined for this
particular hook, then the controller's responsibility will be to do something with it. The
controller can either do nothing and leave that value as is (in case no rule is defined or the
rule is disabled), it can send that data to a remote location, it can allow the user to break and
modify that value in real time (i.e in a similar manner as a proxy), or it can do an automatic
replace for another value.
For example, this is how the pre-loaded hook will look like when hooking at the executeSql
method into the "sql" string parameter. -The actual query that will be executed by the
runtime, as requested from the upper level application (figure 19).
Figure 19: ReFrameworker hook that was pre-injected into the runtime.
Suppose the relevant configuration rule for this was defined as "proxy". Now each time this
method is called the device will send this data (the original query) to the proxy, and will
replace the original value with a modified received value.
® All Rights Reserved to AppSec Labs 2014
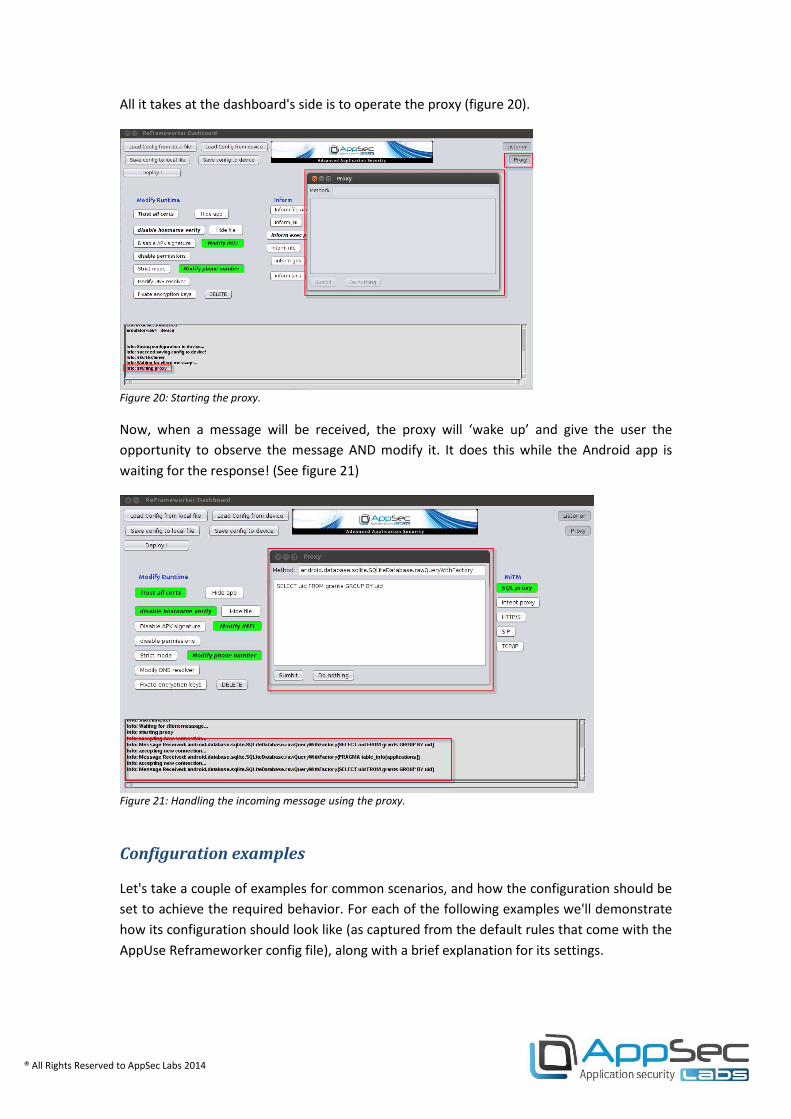
All it takes at the dashboard's side is to operate the proxy (figure 20).
Figure 20: Starting the proxy.
Now, when a message will be received, the proxy will ‘wake up’ and give the user the
opportunity to observe the message AND modify it. It does this while the Android app is
waiting for the response! (See figure 21)
Figure 21: Handling the incoming message using the proxy.
Configuration examples
Let's take a couple of examples for common scenarios, and how the configuration should be
set to achieve the required behavior. For each of the following examples we'll demonstrate
how its configuration should look like (as captured from the default rules that come with the
AppUse Reframeworker config file), along with a brief explanation for its settings.
® All Rights Reserved to AppSec Labs 2014
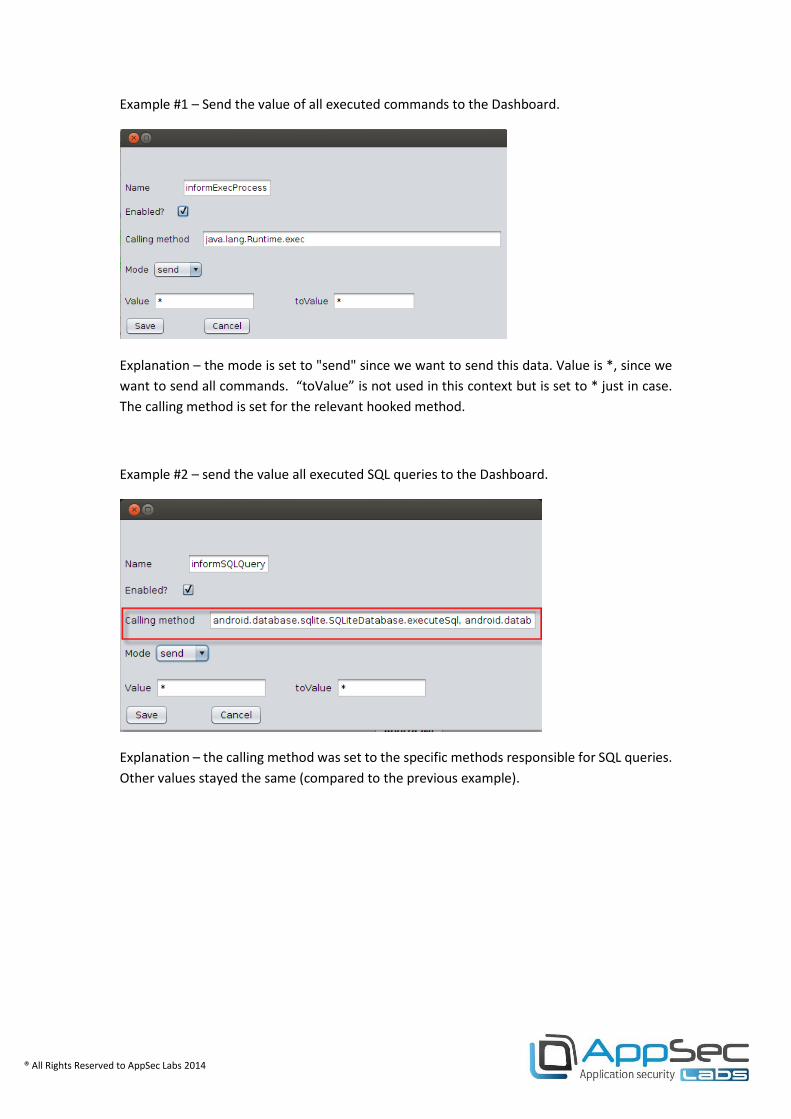
Example #1 – Send the value of all executed commands to the Dashboard.
Explanation – the mode is set to "send" since we want to send this data. Value is *, since we
want to send all commands. “toValue” is not used in this context but is set to * just in case.
The calling method is set for the relevant hooked method.
Example #2 – send the value all executed SQL queries to the Dashboard.
Explanation – the calling method was set to the specific methods responsible for SQL queries.
Other values stayed the same (compared to the previous example).
® All Rights Reserved to AppSec Labs 2014
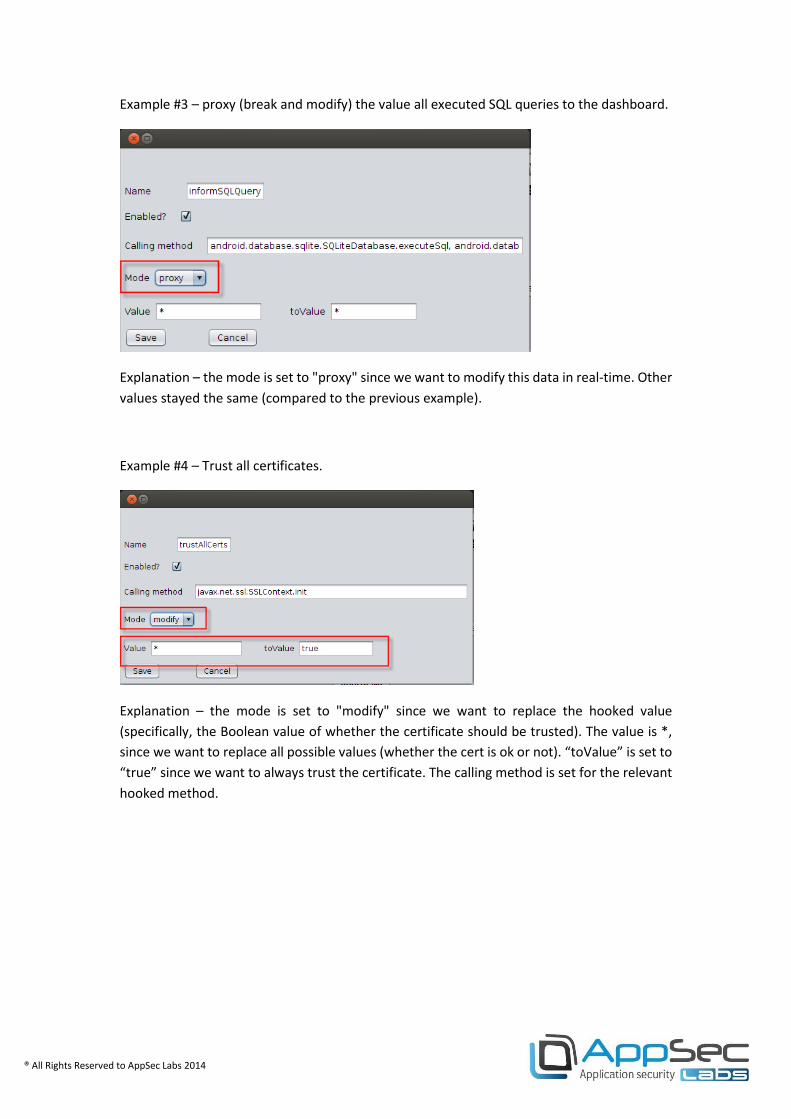
Example #3 – proxy (break and modify) the value all executed SQL queries to the dashboard.
Explanation – the mode is set to "proxy" since we want to modify this data in real-time. Other
values stayed the same (compared to the previous example).
Example #4 – Trust all certificates.
Explanation – the mode is set to "modify" since we want to replace the hooked value
(specifically, the Boolean value of whether the certificate should be trusted). The value is *,
since we want to replace all possible values (whether the cert is ok or not). “toValue” is set to
“true” since we want to always trust the certificate. The calling method is set for the relevant
hooked method.

® All Rights Reserved to AppSec Labs 2014
Example #5 – Disable hostname verification.
Explanation – this is quite similar to the previous example. The only difference is the value of
the calling method which is the hooked method responsible for the hostname verification.
Example #6 – replace the value of the phone IMEI number with another value.
Explanation – the mode is set to "modify" since we want to replace this data. Value is *, since
we want to replace all possible values. “ toValue” is set to "111111111111" which is the value
we want to set in this example. The calling method is set for the relevant hooked method.
Note – if we wanted to replace only a specific number, all we needed to do is to set it as
"value" (rather than using * in this example).

® All Rights Reserved to AppSec Labs 2014
Example #7 – the proxy (break and modify) is the value phone IMEI number.
Explanation – the mode is set to "proxy" since we want to modify this data in real-time. Other
values have stayed the same (compared to the previous example).
Of course, this is just a very brief introduction to all the ReFrameworker strength, as there are
many other rules AppUse can manage and for each one of them there are many different
settings we can play with.


![Hacking ético [Pentest]](https://img.dokumen.tips/doc/110x75/546d59abaf79595d298b5379/hacking-etico-pentest.jpg)