Embed Size (px)
Citation preview

MJH; Reviewed:
SPOC 4/5/2011
Solution & Interoperability Test Lab Application Notes
©2011 Avaya Inc. All Rights Reserved.
1 of 41
AC_M3K_IPO
Avaya Solution & Interoperability Test Lab
Application Notes for Configuring a SIP Trunk between
AudioCodes Mediant 3000 and Avaya IP Office - Issue 1.0
Abstract
These Application Notes describe the steps to configure a SIP trunk between AudioCodes
Mediant 3000 and Avaya IP Office.
The AudioCodes Mediant 3000 is a SIP Session Border Controller (SBC) that manages and
protects the flow of SIP signaling and related media across an untrusted IP network. The
compliance testing focused on telephony scenarios between an enterprise site, where the
AudioCodes Mediant 3000 and Avaya IP Office were located, and a second site simulating a
service provider service node.
Information in these Application Notes has been obtained through DevConnect compliance
testing and additional technical discussions. Testing was conducted via the DevConnect
Program at the Avaya Solution and Interoperability Test Lab.

MJH; Reviewed:
SPOC 4/5/2011
Solution & Interoperability Test Lab Application Notes
©2011 Avaya Inc. All Rights Reserved.
2 of 41
AC_M3K_IPO
1. Introduction These Application Notes describe a sample configuration for a network consisting of Avaya IP
Office connected to an AudioCodes Mediant 3000 e-SBC via a SIP trunk.
The compliance testing focused on telephony scenarios between an enterprise site, where the
AudioCodes Mediant 3000 e-SBC and Avaya IP Office were located, and a second site
simulating a service provider service node.
2. General Test Approach and Test Results The general test approach was to make calls between the main enterprise site and the 2nd site
simulating a service provider service node using various codec settings and exercising common
telephony features.
2.1. Interoperability Compliance Testing
The compliance testing focused on interoperability between AudioCodes Mediant 3000 and
Avaya IP Office by making calls between the enterprise site and a second site simulating a
service provide service node that were connected through the Mediant 3000 using direct SIP
trunks. The following functions and features were tested:
Calls from both SIP and non-SIP endpoints between sites
G.711 µLAW, G.711ALAW, and G.729(a) codec support
Proper recognition of DTMF transmissions by navigating voicemail menus
Proper operation of voicemail with message waiting indicators (MWI)
Telephony features including Multiple Call Appearances, Hold, Transfer, Conference,
Call Forwarding, Call Park, Call Pickup, and Send All Calls.
Inbound and outbound fax calls.
Calls using IP Office Softphone
Proper system recovery after a Mediant 3000 restart and/or re-establishment of broken IP
connectivity.
2.2. Test Results
The AudioCodes Mediant 3000 passed compliance testing.
2.3. Support
For technical support on the AudioCodes Mediant 3000, visit their online support at
http://www.audiocodes.com/support.

MJH; Reviewed:
SPOC 4/5/2011
Solution & Interoperability Test Lab Application Notes
©2011 Avaya Inc. All Rights Reserved.
3 of 41
AC_M3K_IPO
3. Reference Configuration Figure 1 illustrates the test configuration. The test configuration shows two sites connected via
a SIP trunk across an untrusted IP network: the main enterprise site and a second site that
simulates a service provider service node. The AudioCodes Mediant 3000 Session Border
Controller (SBC) is at the edge of the main site. The public side of the Mediant 3000 is
connected to the untrusted network and the private side is connected to the trusted corporate
LAN.
All SIP traffic between two sites flows through the Mediant 3000. In this manner, the Mediant
3000 can protect the main site’s infrastructure from any SIP-based attacks. The voice
communication across the untrusted network uses SIP over TCP and RTP for the media streams.
IP Office connects to the Mediant 3000 using a SIP trunk. IP Office endpoints include both 3rd
party SIP and Avaya non-SIP endpoints.
The 2nd
site (shown as a cloud), simulates a service provider service node, and comprises of a
Communication Manager, System Manager, and Session Manager, with both SIP and non-SIP
endpoints.
Figure 1: AudioCodes Mediant 3000 SIP Trunking Test Configuration
MJH; Reviewed:
SPOC 4/5/2011
Solution & Interoperability Test Lab Application Notes
©2011 Avaya Inc. All Rights Reserved.
4 of 41
AC_M3K_IPO
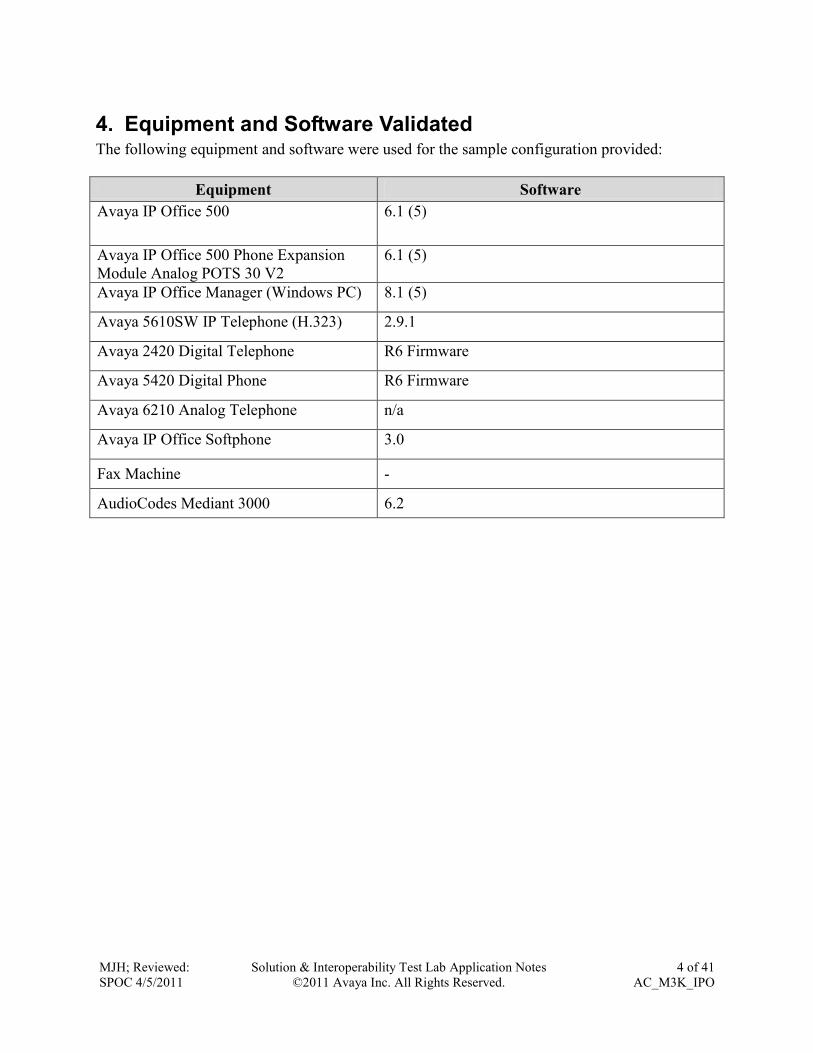
4. Equipment and Software Validated The following equipment and software were used for the sample configuration provided:
Equipment Software
Avaya IP Office 500 6.1 (5)
Avaya IP Office 500 Phone Expansion
Module Analog POTS 30 V2
6.1 (5)
Avaya IP Office Manager (Windows PC) 8.1 (5)
Avaya 5610SW IP Telephone (H.323) 2.9.1
Avaya 2420 Digital Telephone R6 Firmware
Avaya 5420 Digital Phone R6 Firmware
Avaya 6210 Analog Telephone n/a
Avaya IP Office Softphone 3.0
Fax Machine -
AudioCodes Mediant 3000 6.2

MJH; Reviewed:
SPOC 4/5/2011
Solution & Interoperability Test Lab Application Notes
©2011 Avaya Inc. All Rights Reserved.
5 of 41
AC_M3K_IPO
5. Configure Avaya IP Office This section describes the steps required for configuring a static SIP trunk on IP Office.
IP Office is configured via the IP Office Manager program. Log into the IP Office Manager PC
and select StartAll ProgramsIP OfficeManager to launch the Manager application.
Log into the Manager application using the appropriate credentials.
1. Verify the SIP Trunk Channels License.
Click on License in the left panel. Confirm that there is a valid SIP Trunk Channels entry.
If a required feature is not enabled or there is insufficient capacity, contact an authorized
Avaya sales representative to make the appropriate changes.

MJH; Reviewed:
SPOC 4/5/2011
Solution & Interoperability Test Lab Application Notes
©2011 Avaya Inc. All Rights Reserved.
6 of 41
AC_M3K_IPO
2. Enable SIP Trunks.
Select System in the left panel. Click the LAN2 tab. Under the LAN2 tab, select the VOIP
tab, and check the SIP Trunks Enable box. Click the OK button.

MJH; Reviewed:
SPOC 4/5/2011
Solution & Interoperability Test Lab Application Notes
©2011 Avaya Inc. All Rights Reserved.
7 of 41
AC_M3K_IPO
3. Create a SIP line.
Select Line in the left panel. Right-click and select NewSIP Line. The screen below
appears. Note the Line Number, or select another unused line number.

MJH; Reviewed:
SPOC 4/5/2011
Solution & Interoperability Test Lab Application Notes
©2011 Avaya Inc. All Rights Reserved.
8 of 41
AC_M3K_IPO
4. Configure Transport parameters for the SIP Line.
Select the Transport tab.
Configure the following:
For ITSP Proxy Address, enter the IP address for AudioCodes Mediant 3000.
For Layer 4 Protocol and Send Port, select UDP and 5060 respectively.
For Use Network Topology Info, select LAN 2.
Use default values for other fields.

MJH; Reviewed:
SPOC 4/5/2011
Solution & Interoperability Test Lab Application Notes
©2011 Avaya Inc. All Rights Reserved.
9 of 41
AC_M3K_IPO
5. Configure SIP URI parameters for the SIP Line.
Select the SIP URI tab. Click the Add button.
Select Use Internal Data for the Local URI, Contact, and Display Name fields. This tells
the system to use the information configured on the SIP tab for each individual user. Enter
unused numbers for the Incoming Group and Outgoing Group fields. The Incoming
Group field will be used for mapping inbound calls from the SIP trunk to local stations. The
Outgoing Group will be used for routing calls externally via the Short Code configured in
Step 9. Use default values for all other fields. Click the OK button.

MJH; Reviewed:
SPOC 4/5/2011
Solution & Interoperability Test Lab Application Notes
©2011 Avaya Inc. All Rights Reserved.
10 of 41
AC_M3K_IPO
6. Configure VOIP parameters for the SIP Line.
Select the VOIP URI tab. Click the Add button.
For Compression Mode, select Automatic Select or the desired codec from the drop-down
list. Check the Fax Transport Support and Re-invite Supported check boxes.

MJH; Reviewed:
SPOC 4/5/2011
Solution & Interoperability Test Lab Application Notes
©2011 Avaya Inc. All Rights Reserved.
11 of 41
AC_M3K_IPO
7. Configure T38 Fax parameters for the SIP Line.
Select the T38 Fax tab.
Check the Use Default Values check box. Click the OK button.

MJH; Reviewed:
SPOC 4/5/2011
Solution & Interoperability Test Lab Application Notes
©2011 Avaya Inc. All Rights Reserved.
12 of 41
AC_M3K_IPO
8. Configure SIP OPTIONS timer for “keep alive” function
Select System in the left panel. Under the LAN2 tab, select the Network Topology tab.
Set the Binding Refresh Time to the desired interval which determines the frequency with
which OPTIONS messages will be sent to AudioCodes. For Public IP Address, enter the
Avaya IP Office system IP address. Accept the default values for all other fields. Click the
OK button.

MJH; Reviewed:
SPOC 4/5/2011
Solution & Interoperability Test Lab Application Notes
©2011 Avaya Inc. All Rights Reserved.
13 of 41
AC_M3K_IPO
9. Configure a short code to route calls to AudioCodes.
Select Short Code in the left panel. Right click and select New.
During compliance testing, 3xxxx was entered for the Code field. All calls to a 5 digit
extension, beginning with a 3, were routed to AudioCodes for further routing. Select Dial for
the Feature field. Enter the period symbol “.” for the Telephone Number field. Enter the
Outgoing Group created in Step 5 for the Line Group Id field. Use default values for all
other fields. Click the OK button.

MJH; Reviewed:
SPOC 4/5/2011
Solution & Interoperability Test Lab Application Notes
©2011 Avaya Inc. All Rights Reserved.
14 of 41
AC_M3K_IPO
10. Create an Incoming Call Route for the Inbound SIP calls.
Select Incoming Call Route in the left panel. Right-click and select New.
Enter the following:
Any Voice for the Bearer Capability field.
The Incoming Group created for the URI in Step 5 in the Line Group Id field.
Use default values for all other fields.

MJH; Reviewed:
SPOC 4/5/2011
Solution & Interoperability Test Lab Application Notes
©2011 Avaya Inc. All Rights Reserved.
15 of 41
AC_M3K_IPO
Next, navigate to the Destinations tab and enter the period symbol “.” for the
Destination field. The “.” is used to match the Incoming Number field.
Click the OK button.

MJH; Reviewed:
SPOC 4/5/2011
Solution & Interoperability Test Lab Application Notes
©2011 Avaya Inc. All Rights Reserved.
16 of 41
AC_M3K_IPO
11. After making the changes, click on the floppy disk icon to push the changes to the IP Office
system and have them take effect. Changes will not take effect until this step is
completed. ** NOTE ** This may cause a reboot of Avaya IP Office resulting in
service disruption.

MJH; Reviewed:
SPOC 4/5/2011
Solution & Interoperability Test Lab Application Notes
©2011 Avaya Inc. All Rights Reserved.
17 of 41
AC_M3K_IPO
6. Configure AudioCodes Mediant 3000 e-SBC This section provides the procedures for configuring the AudioCodes Mediant 3000 e-SBC. It is
assumed that the craft person has proper knowledge of the AudioCodes e-SBC usage,
configuration, support, and experience with the product platform. The following information is
derived from the product manuals and is referenced only as a general guide. Configuration of
the e-SBC will vary for each specific customer environment; however, AudioCodes has provided
screenshots (and called-out specific fields on each screen with “arrows”), to show the
configuration used during compliance testing.
All of the configuration shown in this section can be completed using the AudioCodes Mediant
3000 e-SBC web interface. From a browser, enter the IP address of the e-SBC and log in with
the appropriate credentials.
6.1. Configure IP Routing Network Parameters
Ensure the IP Routing is set properly for the support of the routing for the each network that is
intended to interwork.
Add an Index with Application Type of OAMP + Media + Control and ensure the Interface
Mode is set to IPv4, and the IP Address of the unit is in the IP Address field. Also ensure the
Default Gateway is set properly for the operation.

MJH; Reviewed:
SPOC 4/5/2011
Solution & Interoperability Test Lab Application Notes
©2011 Avaya Inc. All Rights Reserved.
18 of 41
AC_M3K_IPO
Once the administration is completed for the data segment, submit, Burn to Flash, and restart the
device. Navigate to the Maintenance Actions page (Management tab > Management
Configuration menu > Maintenance Actions).
Under the Reset Configuration group, from the Burn To FLASH drop-down list, select
Yes, and then click the Reset button. The Burn to flash will save the configuration and
will allow the unit to recover from future resets in the configuration saved.
The device's new configuration (i.e., global IP address) is saved (burned) to the flash memory
and the device performs a reset. The Web interface session terminates, as it's no longer
accessible using the blade's private IP address.
Ensure the IP Routing Table is set properly for the support of the routing for the each network that
is intended to interwork.

MJH; Reviewed:
SPOC 4/5/2011
Solution & Interoperability Test Lab Application Notes
©2011 Avaya Inc. All Rights Reserved.
19 of 41
AC_M3K_IPO
6.2. Enable SBC functionality
Open the Applications page (Configuration tab > VoIP menu > Applications Enabling) to
configure the SBC functionality.
Configure the parameter Enable SBC Application to Enabled.
Click the Submit button to save your changes.
Save the changes to flash memory. This is performed by selecting the Burn button at the
top of the page. This is referred to as, “Saving Configuration'', and will be referenced as
such throughout this document.
Notice the “Lightning Bolt” . All items marked with this symbol require a reset to take
effect. Reset the device as noted previously in Section 6.1. Once the device is reset with
the SBC application enabled, a submenu within the VoIP menu will appear.

MJH; Reviewed:
SPOC 4/5/2011
Solution & Interoperability Test Lab Application Notes
©2011 Avaya Inc. All Rights Reserved.
20 of 41
AC_M3K_IPO
6.3. Configure Media Realm
Open the Media Realm Configuration page (Configuration tab > VoIP menu > Media
submenu > Media Realm Configuration submenu) to configure the Media Realm settings.
Configure the parameters as required.
Click the Submit button to save your changes.
Save the changes to flash memory, refer to “Saving Configuration” as shown in Section
6.2

MJH; Reviewed:
SPOC 4/5/2011
Solution & Interoperability Test Lab Application Notes
©2011 Avaya Inc. All Rights Reserved.
21 of 41
AC_M3K_IPO
6.4. Configure Signaling Routing Domains (SRD) Table
Open the SRD Table page (Configuration tab > VoIP menu > Control Network submenu >
SRD Table submenu) to configure the device's SRD table.
Select an index that is unused “Not Exist”.
Configure the parameters as required.
Click the Submit button to save your changes.
Save the changes to flash memory, refer to “Saving Configuration” as shown in Section
6.2
Repeat the process for the required SRD(s).
Ensure that there is a unique SRD name which is bound to a Media Realm created
previously.

MJH; Reviewed:
SPOC 4/5/2011
Solution & Interoperability Test Lab Application Notes
©2011 Avaya Inc. All Rights Reserved.
22 of 41
AC_M3K_IPO
6.5. Configure SIP Interfaces
Create an interface in the SIP Interface Table (Configuration tab > VoIP menu > Control
Network submenu > SIP Interface Table). Ensure the Network Interface name used for the
new index matches the name used in the initial settings for IP Settings. This is the interface for
the SBC Application.

MJH; Reviewed:
SPOC 4/5/2011
Solution & Interoperability Test Lab Application Notes
©2011 Avaya Inc. All Rights Reserved.
23 of 41
AC_M3K_IPO
6.6. Configure the IP Group Table Settings
Open the IP Group Table page (Configuration tab > VoIP menu > Control Network submenu
> IP Group Table) to configure the IP Group(s) and their respective parameters.
Configure an unused IP Group index and assign its appropriate parameters as required.
Click the Submit button to save your changes.
Repeat previous two steps for the required amount of IP Groups needed.
To save the changes to flash memory, refer to “Saving Configuration” as shown in
Section 6.2

MJH; Reviewed:
SPOC 4/5/2011
Solution & Interoperability Test Lab Application Notes
©2011 Avaya Inc. All Rights Reserved.
24 of 41
AC_M3K_IPO

MJH; Reviewed:
SPOC 4/5/2011
Solution & Interoperability Test Lab Application Notes
©2011 Avaya Inc. All Rights Reserved.
25 of 41
AC_M3K_IPO
6.7. Configure Proxy Set Indices
The use of Proxy Set index is utilized for identifying the specific Proxy (or set of proxy devices)
for a respective IP Group Indice (reference Section 6.6 as an example: IP Group 1 is serviced by
IP Proxy Set 1). Configure an unused Proxy Set Index and identify the IP address of the proxy
for which calls will be routed. Do this for each unique IP group.
Open the IP Group Table page (Configuration tab > VoIP menu > Control Network submenu
> Proxy Sets Table) to configure the Proxy Set(s) and their respective parameters:
Configure a Proxy Set ID specified in the IP Group Table previous section and assign its
appropriate parameters as required. (Note: 10.64.21.64 is the IP address of Avaya IP
Office at the Enterprise site. 10.64.20.31 is the IP address of Session Manager at the
simulated 2nd
site)
Click the Submit button to save your changes.
Repeat previous two steps for the required amount of Proxy Set IDs needed.
To save the changes to flash memory, refer to “Saving Configuration” as shown in
Section 6.2

MJH; Reviewed:
SPOC 4/5/2011
Solution & Interoperability Test Lab Application Notes
©2011 Avaya Inc. All Rights Reserved.
26 of 41
AC_M3K_IPO

MJH; Reviewed:
SPOC 4/5/2011
Solution & Interoperability Test Lab Application Notes
©2011 Avaya Inc. All Rights Reserved.
27 of 41
AC_M3K_IPO
6.8. Configure SIP General Parameters
Open the SIP General Parameters page (Configuration tab > VoIP menu > SIP Definitions
submenu > General Parameters) to configure the general SIP protocol parameters.
Configure the parameters as required. (Note: Transport protocol UDP and Port 5060
were used for communication with Avaya IP Office).
Click the Submit button to save your changes.
To save the changes to flash memory, refer to “Saving Configuration” as shown in
Section 6.2

MJH; Reviewed:
SPOC 4/5/2011
Solution & Interoperability Test Lab Application Notes
©2011 Avaya Inc. All Rights Reserved.
28 of 41
AC_M3K_IPO
6.9. Configure Proxy & Registration
Open the Proxy & Registration page (Configuration tab > VoIP menu > SIP Definitions
submenu > Proxies & Registration) to configure the proxy and registration parameters.
Configure the parameters as required.
Click the Submit button to save your changes.
To save the changes to flash memory, refer to “Saving Configuration” as shown in
Section 6.2

MJH; Reviewed:
SPOC 4/5/2011
Solution & Interoperability Test Lab Application Notes
©2011 Avaya Inc. All Rights Reserved.
29 of 41
AC_M3K_IPO
6.10. Configure General Settings
Open the General Settings page (Configuration tab > VoIP menu > SBC submenu > General
Settings) to configure the general SBC parameters.
Configure the parameters as required.
Allowing of Unclassified calls is optional. All calls were classified by IP Group Index.
Click the Submit button to save your changes.
To save the changes to flash memory, refer to “Saving Configuration” as shown in
Section 6.2

MJH; Reviewed:
SPOC 4/5/2011
Solution & Interoperability Test Lab Application Notes
©2011 Avaya Inc. All Rights Reserved.
30 of 41
AC_M3K_IPO
6.11. Configure Coders
Open the Coders page for the SBC application (Configuration tab > VoIP menu > SBC
submenu > Allowed Coders Group) to configure the device's SBC Allowed coders.
From the Coder Name drop-down list, select the required coder.
Repeat steps for the next optional coders.
Click the Submit button to save your changes.
To save the changes to flash memory, refer to “Saving Configuration” as shown in
Section 6.2

MJH; Reviewed:
SPOC 4/5/2011
Solution & Interoperability Test Lab Application Notes
©2011 Avaya Inc. All Rights Reserved.
31 of 41
AC_M3K_IPO
6.12. Configure IP to IP Routing Table
Open the IP to IP Routing Table page (Configuration tab > VoIP menu > SBC submenu >
Routing SBC submenu > IP to IP Routing Table) to configure IP2IP routing rules.
The figures below shows the following configured outbound IP routing rules:
Rule 1: If the incoming message originates from Source IP Group “1” and is associated with
a call (Invite), then the call will be routed to a Destination IP Group of “2” and an SRD of
“1”.
Rule 2: If the incoming message is not associated with a call and originates from Source IP
Group “1”, then terminate the message to the internal device. This is set to support the
“Options” message as a heartbeat with the SBC returning a 200 OK rather than sending the
received “Options” message to the terminating route.
Rule 3: If the incoming message originates from Source IP Group “2” and is associated with
a call (Invite), then the call will be routed to a Destination IP Group of “1” and an SRD of
“1”.
Rule 4: If the incoming message is not associated with a call and originates from Source IP
Group “2”, then terminate the message to the internal device. This is set to support the
“Options” message as a heartbeat with the SBC returning a 200 OK rather than sending the
received “Options” message to the terminating route.
From the Routing Index drop-down list, select the range of entries that you want to add.
Configure the outbound IP routing rules according to the table below.
Click the Submit button to apply your changes.
To save the changes to flash memory, refer to “Saving Configuration” as shown in
Section 6.2

MJH; Reviewed:
SPOC 4/5/2011
Solution & Interoperability Test Lab Application Notes
©2011 Avaya Inc. All Rights Reserved.
32 of 41
AC_M3K_IPO
6.13. Configure IP Media Settings
Open the IP Media Settings page (Configuration tab > VoIP menu > IP Media submenu > IP
Media Settings) to configure the IP Media Settings.
Configure the IP Media Settings according to the required amount of supported sessions.
Click the Submit button to save your changes.
To save the changes to the flash memory, refer to “Saving Configuration” as shown in
Section 7.2
Reset the device to ensure the media resources are properly reserved.

MJH; Reviewed:
SPOC 4/5/2011
Solution & Interoperability Test Lab Application Notes
©2011 Avaya Inc. All Rights Reserved.
33 of 41
AC_M3K_IPO
6.14. Configure SRD Table
Open the SRD Table page (Configuration tab > VoIP menu > Control Network submenu >
SRD Table submenu) to view and confirm the device's intended SRD tables and respective
routing interdependencies:
Select the index that was created earlier.
Insure the configured parameters are set as required.
Click the IP Group Status Table and Proxy Sets Status Table sections to expand.
Ensure the entries match that of the datafill entered.
Ensure the Network Interface name used for the new index matches the name used in the initial
settings for IP Settings. This is the interface for the SBC Application.

MJH; Reviewed:
SPOC 4/5/2011
Solution & Interoperability Test Lab Application Notes
©2011 Avaya Inc. All Rights Reserved.
34 of 41
AC_M3K_IPO
If Heartbeating is required by the device, ensure that the value is set accordingly in the
Proxy Set Indices. Note that during compliance testing, the SBC was only configured to
respond to OPTIONS messages from Avaya IP Office and the 2nd
site with a 200K (as
described in Section 6.12).
Ensure that there is a unique SRD name which is bound to a Media Realm created
previously.
6.15. ini File
For completeness, the AudioCodes Mediant 3000 e-SBC ini configuration file (with its appropriate
parameters) that was used during compliance testing is shown below:
;**************
;** Ini File **
;**************
[SYSTEM Params]
PM_VEDSPUtil = '1,43,48,15'
SyslogServerIP = 10.64.21.100
EnableSyslog = 1
[BSP Params]
PCMLawSelect = 3
RoutingTableDestinationsColumn = 10.64.21.0, 10.64.20.0
RoutingTableDestinationPrefixLensColumn = 16, 16
RoutingTableGatewaysColumn = 10.64.21.1, 10.64.20.1
[ControlProtocols Params]
AdminStateLockControl = 0
[MGCP Params]
[MEGACO Params]

MJH; Reviewed:
SPOC 4/5/2011
Solution & Interoperability Test Lab Application Notes
©2011 Avaya Inc. All Rights Reserved.
35 of 41
AC_M3K_IPO
EP_Num_0 = 0
EP_Num_1 = 1
EP_Num_2 = 1
EP_Num_3 = 0
EP_Num_4 = 0
[PSTN Params]
[SS7 Params]
[Voice Engine Params]
CNGDetectorMode = 1
[WEB Params]
LogoWidth = '145'
HTTPSCipherString = 'RC4:EXP'
WanMgmtHttpPort = 80
[SIP Params]
MEDIACHANNELS = 1008
GWDEBUGLEVEL = 5
SIPGATEWAYNAME = 'avaya.com'
FAXCNGMODE = 1
ALLOWUNCLASSIFIEDCALLS = 1
ENABLESBCAPPLICATION = 1
SBCMAXFORWARDSLIMIT = 70
[SCTP Params]
[VXML Params]
[IPsec Params]
[Audio Staging Params]
[SNMP Params]
[Video Params]

MJH; Reviewed:
SPOC 4/5/2011
Solution & Interoperability Test Lab Application Notes
©2011 Avaya Inc. All Rights Reserved.
36 of 41
AC_M3K_IPO
;
; *** TABLE InterfaceTable ***
;
;
[ InterfaceTable ]
FORMAT InterfaceTable_Index = InterfaceTable_ApplicationTypes, InterfaceTable_InterfaceMode,
InterfaceTable_IPAddress, InterfaceTable_PrefixLength, InterfaceTable_Gateway,
InterfaceTable_VlanID, InterfaceTable_InterfaceName;
InterfaceTable 0 = 6, 10, 10.64.21.90, 24, 10.64.21.1, 1, Voice;
[ \InterfaceTable ]
;
; *** TABLE DspTemplates ***
; This table contains hidden elements and will not be exposed.
; This table exists on board and will be saved during restarts
;
;
; *** TABLE CpMediaRealm ***
;
;
[ CpMediaRealm ]
FORMAT CpMediaRealm_Index = CpMediaRealm_MediaRealmName, CpMediaRealm_IPv4IF,
CpMediaRealm_IPv6IF, CpMediaRealm_PortRangeStart, CpMediaRealm_MediaSessionLeg,
CpMediaRealm_PortRangeEnd;
CpMediaRealm 1 = LanRealm, Voice, , 6000, 10, 6090;
[ \CpMediaRealm ]
;
; *** TABLE ProxyIp ***
;
;
[ ProxyIp ]
FORMAT ProxyIp_Index = ProxyIp_IpAddress, ProxyIp_TransportType, ProxyIp_ProxySetId;
ProxyIp 0 = 10.64.20.31, -1, 1;
ProxyIp 1 = 10.64.21.64, -1, 2;
[ \ProxyIp ]
;
; *** TABLE IpProfile ***

MJH; Reviewed:
SPOC 4/5/2011
Solution & Interoperability Test Lab Application Notes
©2011 Avaya Inc. All Rights Reserved.
37 of 41
AC_M3K_IPO
;
;
[ IpProfile ]
FORMAT IpProfile_Index = IpProfile_ProfileName, IpProfile_IpPreference,
IpProfile_CodersGroupID, IpProfile_IsFaxUsed, IpProfile_JitterBufMinDelay,
IpProfile_JitterBufOptFactor, IpProfile_IPDiffServ, IpProfile_SigIPDiffServ, IpProfile_SCE,
IpProfile_RTPRedundancyDepth, IpProfile_RemoteBaseUDPPort, IpProfile_CNGmode,
IpProfile_VxxTransportType, IpProfile_NSEMode, IpProfile_IsDTMFUsed,
IpProfile_PlayRBTone2IP, IpProfile_EnableEarlyMedia, IpProfile_ProgressIndicator2IP,
IpProfile_EnableEchoCanceller, IpProfile_CopyDest2RedirectNumber,
IpProfile_MediaSecurityBehaviour, IpProfile_CallLimit, IpProfile_DisconnectOnBrokenConnection,
IpProfile_FirstTxDtmfOption, IpProfile_SecondTxDtmfOption, IpProfile_RxDTMFOption,
IpProfile_EnableHold, IpProfile_InputGain, IpProfile_VoiceVolume, IpProfile_AddIEInSetup,
IpProfile_SBCExtensionCodersGroupID, IpProfile_MediaIPVersionPreference,
IpProfile_TranscodingMode, IpProfile_SBCAllowedCodersGroupID,
IpProfile_SBCAllowedCodersMode, IpProfile_SBCMediaSecurityBehaviour,
IpProfile_SBCRFC2833Behavior, IpProfile_SBCAlternativeDTMFMethod,
IpProfile_SBCAssertIdentity, IpProfile_AMDSensitivityParameterSuit,
IpProfile_AMDSensitivityLevel, IpProfile_AMDMaxGreetingTime,
IpProfile_AMDMaxPostSilenceGreetingTime, IpProfile_SBCDiversionMode,
IpProfile_SBCHistoryInfoMode;
IpProfile 1 = , 1, 0, 1, 10, 10, 46, 40, 0, 0, 0, 0, 2, 0, 0, 0, 1, -1, 1, 0, 0, -1, 0, 4, -1, 1, 1, 0, 0, , -1, 0, 0,
-1, 0, 0, 0, 0, -1, 0, 8, 300, 400, -1, -1;
[ \IpProfile ]
;
; *** TABLE ProxySet ***
;
;
[ ProxySet ]
FORMAT ProxySet_Index = ProxySet_EnableProxyKeepAlive, ProxySet_ProxyKeepAliveTime,
ProxySet_ProxyLoadBalancingMethod, ProxySet_IsProxyHotSwap, ProxySet_SRD,
ProxySet_ClassificationInput, ProxySet_ProxyRedundancyMode;
ProxySet 0 = 0, 60, 0, 0, 0, 0, -1;
ProxySet 1 = 0, 60, 0, 0, 1, 0, -1;
ProxySet 2 = 0, 60, 0, 0, 1, 0, -1;
[ \ProxySet ]
;
; *** TABLE IPGroup ***
;
;
[ IPGroup ]

MJH; Reviewed:
SPOC 4/5/2011
Solution & Interoperability Test Lab Application Notes
©2011 Avaya Inc. All Rights Reserved.
38 of 41
AC_M3K_IPO
FORMAT IPGroup_Index = IPGroup_Type, IPGroup_Description, IPGroup_ProxySetId,
IPGroup_SIPGroupName, IPGroup_ContactUser, IPGroup_EnableSurvivability,
IPGroup_ServingIPGroup, IPGroup_SipReRoutingMode, IPGroup_AlwaysUseRouteTable,
IPGroup_RoutingMode, IPGroup_SRD, IPGroup_MediaRealm, IPGroup_ClassifyByProxySet,
IPGroup_ProfileId, IPGroup_MaxNumOfRegUsers, IPGroup_InboundManSet,
IPGroup_OutboundManSet, IPGroup_ContactName;
IPGroup 1 = 0, AvayaPublic, 1, avaya.com, avaya.com, 0, -1, 0, 0, -1, 1, LanRealm, 1, 0, -1, -1, -1, ;
IPGroup 2 = 0, AvayaPrivate, 2, avaya.com, avaya.com, 0, -1, 0, 0, -1, 1, LanRealm, 1, 0, -1, -1, -1, ;
IPGroup 3 = 0, , -1, , , 0, -1, 0, 0, -1, 2, , 1, 0, -1, -1, -1, ;
[ \IPGroup ]
;
; *** TABLE IP2IPRouting ***
;
;
[ IP2IPRouting ]
FORMAT IP2IPRouting_Index = IP2IPRouting_SrcIPGroupID, IP2IPRouting_SrcUsernamePrefix,
IP2IPRouting_SrcHost, IP2IPRouting_DestUsernamePrefix, IP2IPRouting_DestHost,
IP2IPRouting_RequestType, IP2IPRouting_DestType, IP2IPRouting_DestIPGroupID,
IP2IPRouting_DestSRDID, IP2IPRouting_DestAddress, IP2IPRouting_DestPort,
IP2IPRouting_DestTransportType, IP2IPRouting_AltRouteOptions;
IP2IPRouting 1 = 1, *, *, *, *, 1, 0, 2, 1, , 0, -1, 0;
IP2IPRouting 2 = 1, *, *, *, *, 0, 1, -1, -1, internal, 0, -1, 0;
IP2IPRouting 3 = 2, *, *, *, *, 1, 0, 1, 1, , 0, -1, 0;
IP2IPRouting 4 = 2, *, *, *, *, 0, 1, -1, -1, internal, 0, -1, 0;
[ \IP2IPRouting ]
;
; *** TABLE SIPInterface ***
;
;
[ SIPInterface ]
FORMAT SIPInterface_Index = SIPInterface_NetworkInterface, SIPInterface_ApplicationType,
SIPInterface_UDPPort, SIPInterface_TCPPort, SIPInterface_TLSPort, SIPInterface_SRD;
SIPInterface 0 = Voice, 2, 5060, 5060, 5061, 1;
[ \SIPInterface ]
;
; *** TABLE SRD ***
;
;
[ SRD ]

MJH; Reviewed:
SPOC 4/5/2011
Solution & Interoperability Test Lab Application Notes
©2011 Avaya Inc. All Rights Reserved.
39 of 41
AC_M3K_IPO
FORMAT SRD_Index = SRD_Name, SRD_MediaRealm, SRD_IntraSRDMediaAnchoring,
SRD_BlockUnRegUsers, SRD_MaxNumOfRegUsers, SRD_EnableUnAuthenticatedRegistrations;
SRD 1 = LanSRD, LanRealm, 0, 0, -1, 1;
[ \SRD ]
;
; *** TABLE CodersGroup0 ***
;
;
[ CodersGroup0 ]
FORMAT CodersGroup0_Index = CodersGroup0_Name, CodersGroup0_pTime,
CodersGroup0_rate, CodersGroup0_PayloadType, CodersGroup0_Sce;
CodersGroup0 0 = g711Alaw64k, 20, 0, -1, 0;
CodersGroup0 1 = g711Ulaw64k, 20, 0, -1, 0;
CodersGroup0 2 = g729, 20, 0, -1, 0;
[ \CodersGroup0 ]
;
; *** TABLE AllowedCodersGroup0 ***
;
;
[ AllowedCodersGroup0 ]
FORMAT AllowedCodersGroup0_Index = AllowedCodersGroup0_Name;
AllowedCodersGroup0 0 = g711Alaw64k;
AllowedCodersGroup0 1 = g711Ulaw64k;
AllowedCodersGroup0 2 = g729;
[ \AllowedCodersGroup0 ]
;
; *** TABLE StaticRouteTable ***
;
;
[ StaticRouteTable ]
FORMAT StaticRouteTable_Index = StaticRouteTable_InterfaceName,
StaticRouteTable_Destination, StaticRouteTable_PrefixLength, StaticRouteTable_Gateway,
StaticRouteTable_Description;
StaticRouteTable 1 = Voice, 10.64.20.0, 24, 10.64.20.1, ;
[ \StaticRouteTable ]

MJH; Reviewed:
SPOC 4/5/2011
Solution & Interoperability Test Lab Application Notes
©2011 Avaya Inc. All Rights Reserved.
40 of 41
AC_M3K_IPO
7. Verification Steps The proper installation/configuration of both the AudioCodes Mediant 3000 and Avaya IP Office
can be tested by placing inbound and outbound calls between two sites via the Mediant 3000.
Verify that the calls are routed properly, the calls can be answered with 2-way talk paths, and
that the calls can be terminated properly.
8. Conclusion The AudioCodes Mediant 3000 passed compliance testing. These Application Notes describe
the procedures required to configure the AudioCodes Mediant 3000 to interoperate with Avaya
IP Office to support the network shown in Figure 1, where IP Office connects to the Mediant
3000 using a SIP trunk.
9. Additional References Product documentation for Avaya products may be found at http://support.avaya.com.
[1] IP Office Installation, Issue 22h, December 2010, Document Number 15-601042
[2] IP Office Manager, Issue 25k, January 2011, Document Number 15-601011
Additional IP Office documentation can be found at:
[3] http://marketingtools.avaya.com/knowledgebase/
Product documentation for the AudioCodes Mediant 3000 e-SBC can be found at
http://www.audiocodes.com/support.
[4] LTRT-26901_SIP_CPE_Release_Notes_Ver._6.2.pdf
[5] LTRT-52306_SIP_CPE_Product_Reference_Manual_Ver_6.2.pdf
[6] LTRT-94707_Mediant_3000_SIP-MGCP-MEGACO_Installation_Manual_Ver._6.2.pdf
[7] LTRT-89709_Mediant_3000_SIP_User's_Manual_Ver_6.2.pdf

MJH; Reviewed:
SPOC 4/5/2011
Solution & Interoperability Test Lab Application Notes
©2011 Avaya Inc. All Rights Reserved.
41 of 41
AC_M3K_IPO
©2011 Avaya Inc. All Rights Reserved.
Avaya and the Avaya Logo are trademarks of Avaya Inc. All trademarks identified by ® and
™ are registered trademarks or trademarks, respectively, of Avaya Inc. All other trademarks
are the property of their respective owners. The information provided in these Application
Notes is subject to change without notice. The configurations, technical data, and
recommendations provided in these Application Notes are believed to be accurate and
dependable, but are presented without express or implied warranty. Users are responsible for
their application of any products specified in these Application Notes.
Please e-mail any questions or comments pertaining to these Application Notes along with the
full title name and filename, located in the lower right corner, directly to the Avaya
DevConnect Program at [email protected].