Embed Size (px)
Citation preview

1
Application Note AN‐126: Arduino UART Interface to K‐30 Sensor
Introduction
The Arduino Uno, Mega or Mega2560 are ideal microcontrollers for operating SenseAir’s K‐30 or K‐33
CO2 sensors using an industry‐standard UART TXD‐RXD connection. Two examples are described:
1. Basic ‐ Software.Serial is a library built into the
Arduino software that can read CO2 levels only.
2. kseries.h ‐ A CO2Meter‐developed library
which gives greater control of the sensor like
calibration. It also allows you to access
additional outputs on SenseAir’s K‐33 series
(ELG, BLG, ICB) of sensors that include
temperature and %RH.
If you are new to Arduino hardware, these low‐cost development boards are available from many
sources. We recommend you start with authentic Arduino products and the Basic example below.
Run the Blink Example
The best way to become familiar with the Arduino Graphical User’s Interface (GIU) is to verify your
Arduino board is operating properly. Create an Arduino project and run the example Blink. This
simple test program confirms that a number of connection details and that the GUI are working
properly.
Caution: Do not connect the Arduino board to the USB port until the Arduino software is installed.
Otherwise Windows will install a generic driver and the Arduino will not operate.
Step 1: Install Arduino software on your computer. From this page select the Windows Installer.
https://www.arduino.cc/en/Main/Software
Step 2: To run the Blink example follow these instructions: https://www.arduino.cc/en/Tutorial/Blink
Note that the MEGA Arduinos have a LED on board. The Arduino UNO may require a LED and resistor
be added as specified in the tutorial.
Once Blink runs properly, you can connect the K‐30 or K‐33 sensor.
2
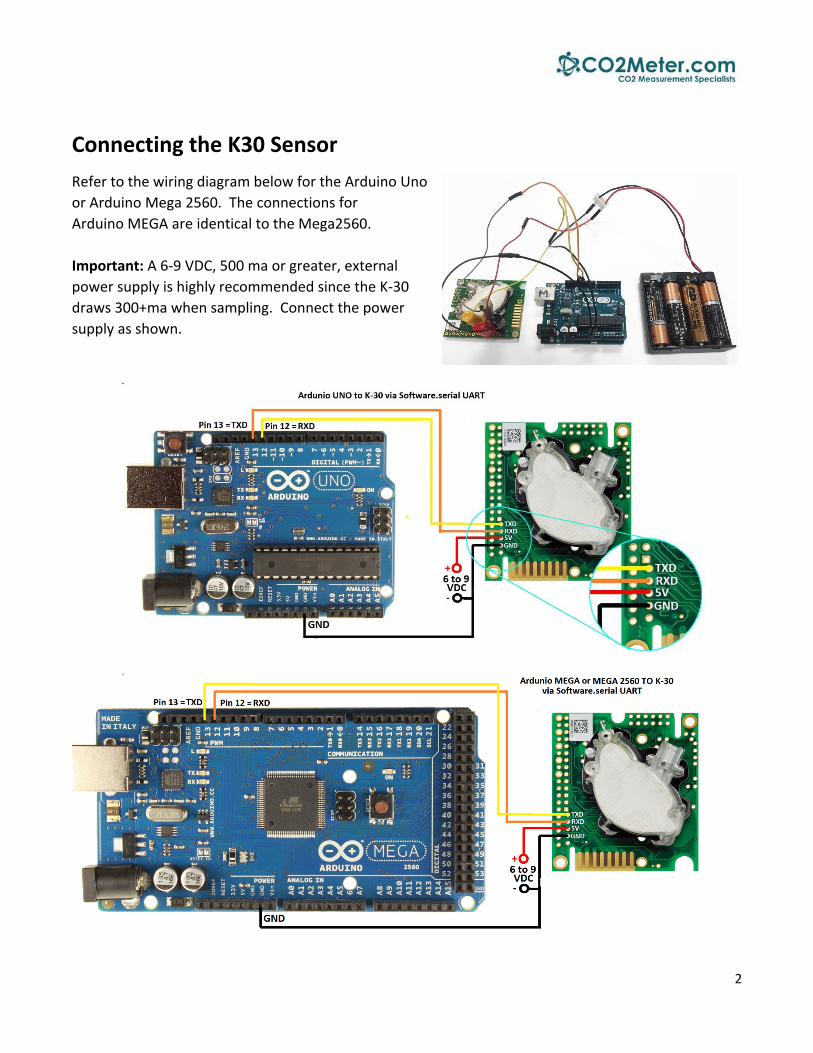
Connecting the K30 Sensor
Refer to the wiring diagram below for the Arduino Uno
or Arduino Mega 2560. The connections for
Arduino MEGA are identical to the Mega2560.
Important: A 6‐9 VDC, 500 ma or greater, external
power supply is highly recommended since the K‐30
draws 300+ma when sampling. Connect the power
supply as shown.

3
Creating an Arduino Project
Example 1: Basic
This example uses the Software.Serial driver which is built into the Arduino software. This statement
SoftwareSerial K_30_Serial(12,13) Sets up a virtual serial port using pin 12 for Rx and pin 13 for Tx on both the UNO and MEGA boards.
Demo file download instructions
1. Click on the following link or copy this URL to download the example code:
www.co2meters.com/Documentation/AppNotes/AN126-K3x-sensor-arduino-uart.zip
2. Save the example code to your hard drive. Inside the .zip file, navigate to the K30_basic.ino file in the example
folder. Extract it from the .zip file.
3. Double‐click the K30_basic.ino file to open it in the Arduino GUI. It will start and ask the following:
4. Click on OK. Observe the Arduino project code is displayed.
5. Click on Sketch >> Verify/Compile. The project should compile without errors.
6. Verify that your Arduino board is recognized correctly:
a. Click on Tools. Set Board to Arduino Uno or MEGA.
b. Confirm that Processor matches your Arduino: Uno, MEGA or MEGA 2560.
7. Click on Upload. When done uploading, your project is now running in the Arduino board.

4
8. To view program operation, click on Tools >> Serial Monitor.
9. Observe the following:
Note Appendix A contains the .txt version of Ardunio code. It is also available in the AN126‐K3x‐sensor‐
arduino‐uart.zip file.
Example 2: kseries.h
CO2Meter has written the kseries.h library to enable additional features beyond simply reading the
current CO2 levels from the K‐30 and K‐33 series sensors. This library includes useful functions such as
getCO2(char format) getTemp(), getRH() chkSensorType(), chkK33(), chkASCII()
Note that not all sensor functionality is implemented in this library. It is only used as an example of the
most common functions. However, using this model, you can easily discover how to implement
additional functions specific to each sensor by referring to the particular sensor’s documentation on
the CO2Meter.com website.
Installing the Arduino library
Like other Arduino libraries, this one is distributed as a folder in a .ZIP file. The name of the folder
Kseries folder is the name of the library. Inside the folder will be .cpp (C++) files, .h file files, a
keywords.txt file, and examples in the \example folder. Starting with Arduino version 1.0.5, this allows
you to install our libraries in the IDE.
1. Click on the following link or copy this URL to download the example code:
www.co2meters.com/Documentation/AppNotes/AN126-K3x-sensor-arduino-uart.zip

5
Do not unzip the downloaded library, leave it as is.
2. Open the Arduino IDE, navigate to Sketch > Include Library. At the top of the drop down list, select
the option to "Add .ZIP Library''.
3. Navigate to your Download directory and click on the AN126‐K3x‐sensor‐arduino‐uart.zip file. The
IDE will install the .h files, the .ccp files and additional necessary files.
4. From the zip file’s \examples\K30_example_2 folder, double‐click K30example_2.ino to open it in
the Arduino GUI.
5. The GUI will ask you to create a project folder. Click OK. Observe the Arduino project code is
displayed.
6. Click on Sketch >> Verify/Compile. The project should compile without errors.
7. Verify that your Arduino board is recognized correctly:
1. Click on Tools. Set Board to Arduino Uno or MEGA.
2. Confirm that Processor matches your Arduino: Uno, MEGA or MEGA 2560.
8. Click on Upload. When done uploading, your project is now running in the Arduino board.
9. To view program operation, click on Tools >> Serial Monitor. Observe the output as follows:

6
Appendix: Example 1
K30_basic.ino // AN-126 Demo of K-30 using Software Serial #include <SoftwareSerial.h> /* Basic Arduino example for K-Series sensor Created by Jason Berger Co2meter.com */ #include "SoftwareSerial.h" SoftwareSerial K_30_Serial(12,13); //Sets up a virtual serial port //Using pin 12 for Rx and pin 13 for Tx byte readCO2[] = {0xFE, 0X44, 0X00, 0X08, 0X02, 0X9F, 0X25}; //Command packet to read Co2 (see app note) byte response[] = {0,0,0,0,0,0,0}; //create an array to store the response //multiplier for value. default is 1. set to 3 for K-30 3% and 10 for K-33 ICB int valMultiplier = 1; void setup() { // put your setup code here, to run once: Serial.begin(9600); //Opens the main serial port to communicate with the computer K_30_Serial.begin(9600); //Opens the virtual serial port with a baud of 9600 Serial.println(" Demo of AN-126 Software Serial and K-40 Sensor"); } void loop() { sendRequest(readCO2); unsigned long valCO2 = getValue(response); Serial.print("Co2 ppm = "); Serial.println(valCO2); delay(2000); } void sendRequest(byte packet[]) { while(!K_30_Serial.available()) //keep sending request until we start to get a response { K_30_Serial.write(readCO2,7); delay(50);

7
} int timeout=0; //set a timeout counter while(K_30_Serial.available() < 7 ) //Wait to get a 7 byte response { timeout++; if(timeout > 10) //if it takes too long there was probably an error { while(K_30_Serial.available()) //flush whatever we have K_30_Serial.read(); break; //exit and try again } delay(50); } for (int i=0; i < 7; i++) { response[i] = K_30_Serial.read(); } } unsigned long getValue(byte packet[]) { int high = packet[3]; //high byte for value is 4th byte in packet in the packet int low = packet[4]; //low byte for value is 5th byte in the packet unsigned long val = high*256 + low; //Combine high byte and low byte with this formula to get value return val* valMultiplier; }

8
Appendix: Example 2 K30_example_2.ino
/* AN-126 Example 2 uses kseries.h Reports values from a K-series sensor back to the computer written by Jason Berger Co2Meter.com */ #include "kSeries.h" //include kSeries Library kSeries K_30(12,13); //Initialize a kSeries Sensor with pin 12 as Rx and 13 as Tx void setup() { Serial.begin(9600); //start a serial port to communicate with the computer Serial.println("Serial Up!"); } void loop() { double co2 = K_30.getCO2('p'); //returns co2 value in ppm ('p') or percent ('%') Serial.print("Co2 ppm = "); Serial.println(co2); //print value delay(1500); //wait 1.5 seconds }


![[PPT]UART and UART Driver - University at Buffalobina/cse321/fall2009/UARTDriver.ppt · Web viewUART and UART Driver B. Ramamurthy * UART UART: Universal Asynchronous Receiver/Transmitter](https://img.dokumen.tips/doc/110x75/5b2ab3637f8b9a55068b752f/pptuart-and-uart-driver-university-at-binacse321fall2009uartdriverppt.jpg)