Embed Size (px)
Citation preview

http://support.automation.siemens.com/WW/view/en/68011496
Application Description 02/2014
Creating user-defined Web Pages on S7-1500 SIMATIC STEP 7 V12, S7-1500

Warranty and Liability
Own Web Page for S7-1500 Entry ID: 68011496, V1.0, 02/2014 2
S
iem
ens
AG 2
014
All r
ight
s re
serv
ed
Warranty and Liability
Note The Application Examples are not binding and do not claim to be complete regarding the circuits shown, equipping and any eventuality. The application examples do not represent customer-specific solutions; they are only intended to provide support for typical applications. You are responsible for ensuring that the described products are used correctly. These application examples do not relieve you of the responsibility to use safe practices in application, installation, operation and maintenance. When using these application examples, you recognize that we cannot be made liable for any damage/claims beyond the liability clause described. We reserve the right to make changes to these Application Examples at any time and without prior notice. If there are any deviations between the recommendations provided in this application example and other Siemens publications – e.g. catalogs – the contents of the other documents have priority.
We do not accept any liability for the information contained in this document. Any claims against us – based on whatever legal reason – resulting from the use of the examples, information, programs, engineering and performance data etc., described in this application example will be excluded. Such an exclusion will not apply in the case of mandatory liability, e.g. under the German Product Liability Act (“Produkthaftungsgesetz”), in case of intent, gross negligence, or injury of life, body or health, guarantee for the quality of a product, fraudulent concealment of a deficiency or breach of a condition which goes to the root of the contract (“wesentliche Vertragspflichten”). The damages for a breach of a substantial contractual obligation are, however, limited to the foreseeable damage, typical for the type of contract, except in the event of intent or gross negligence or injury to life, body or health. The above provisions do not imply a change of the burden of proof to your detriment. Any form of duplication or distribution of these application examples or excerpts hereof is prohibited without the expressed consent of Siemens Industry Sector.
Security informa-tion
Siemens provides products and solutions with industrial security functions that support the secure operation of plants, solutions, machines, equipment and/or networks. They are important components in a holistic industrial security concept. With this in mind, Siemens’ products and solutions undergo continuous development. Siemens recommends strongly that you regularly check for product updates.
For the secure operation of Siemens products and solutions, it is necessary to take suitable preventive action (e.g. cell protection concept) and integrate each component into a holistic, state-of-the-art industrial security concept. Third-party products that may be in use should also be considered. For more information about industrial security, visit http://www.siemens.com/industrialsecurity.
To stay informed about product updates as they occur, sign up for a product-specific newsletter. For more information, visit http://support.automation.siemens.com.

Table of Contents
Own Web Page for S7-1500 Entry ID: 68011496, V1.0, 02/2014 3
S
iem
ens
AG 2
014
All r
ight
s re
serv
ed
Table of Contents Warranty and Liability ................................................................................................. 2 1 Preface ................................................................................................................ 4 2 Automation Task ................................................................................................ 5
2.1 Overview............................................................................................... 5 3 Automation Solution ......................................................................................... 6
3.1 General solution overview .................................................................... 6 3.2 Description of the content of this application ..................................... 10 3.3 Hardware and software components ................................................. 11
4 Principles of Standard Web Pages ................................................................ 13 5 Functional Mechanisms of this Application ................................................. 14
5.1 Functional principle of the S7 program .............................................. 14 5.1.1 Startup (OB100) ................................................................................. 15 5.1.2 Main (OB1) ......................................................................................... 15 5.1.3 TankSimu (FB1) ................................................................................. 15 5.2 Functional principle of the HTML file .................................................. 17 5.2.1 AWP commands ................................................................................. 17 5.2.2 Outputting CPU variables ................................................................... 18 5.2.3 Outputting texts via enumerations ...................................................... 18 5.2.4 Setting variables in the CPU with value and button ........................... 18 5.2.5 Setting variables in the CPU via button only ...................................... 19 5.2.6 Logging on directly on user-definable web pages .............................. 20 5.2.7 Creating time-optimized HTML pages (optional) ............................... 22
6 Configuration and Settings............................................................................. 25 6.1 Procedure for creating a web page .................................................... 25 6.2 Configuring the hardware ................................................................... 26 6.3 Creating the variables in the variable table or DB .............................. 29 6.4 Creating the HTML files ...................................................................... 29 6.5 Web server settings and generating of the data blocks ..................... 30 6.6 Creating, compiling and loading of the S7 program ........................... 32
7 Installation ........................................................................................................ 33 7.1 Hardware and software installation .................................................... 33 7.2 Installation of the application example ............................................... 34
8 Operating the Application ............................................................................... 35 9 Related Literature ............................................................................................ 40
9.1 Bibliography ........................................................................................ 40 9.2 Internet link specifications .................................................................. 40
10 History............................................................................................................... 41

1 Preface
Own Web Page for S7-1500 Entry ID: 68011496, V1.0, 02/2014 4
S
iem
ens
AG 2
014
All r
ight
s re
serv
ed
1 Preface Objective of the application
The application on hand shows you how to simply and quickly create your own web pages for S7-1500.
Main topics of this application The following main points will be discussed in this application: • Principles of user-defined web pages • Creating user-defined web pages • Configuring the web server with user-defined web pages
Advantages • Integrated web server
The standard web pages for simple display of services and diagnostic information are activated with a click. Additionally, individually created, user-defined web pages can be generated.
• Location-independent The web page can be called up world-wide via a standard internet browser.
• Application example Universal usage of the application for all controllers
Benefits
• No additional hardware and software required. • The access to the web server is possible across large distances via mobile
communication devices such as tablet PC, smart phone, etc.. • Reduced working hours through simple activation of the web server • Time saving in planning and implementing your automation solution through
simple adaptation of the application on hand
Note The application example as well as the web server should not and cannot replace an HMI system.

2 Automation Task
Own Web Page for S7-1500 Entry ID: 68011496, V1.0, 02/2014 5
S
iem
ens
AG 2
014
All r
ight
s re
serv
ed
2 Automation Task 2.1 Overview
Overview of the automation task Modern automation technology increasingly integrates internet technologies which – together with an integrated Ethernet-based communication – enable, for example, direct access to the system via the intranet. During the test and commissioning phase, the commissioning engineer wants to have flexible access to the CPU; individual data is to be visualized during operation for diagnostic purposes. For access mechanisms via the internet or intranet it is reasonable to use already existing standards, such as, for example, http technology, standard web browsers and common "languages" such as HTML (Hypertext Markup Language) or JavaScript. Figure 2-1 Overview of the automation problem
PROFINET
Industrial Ethernet
Controller 1
Laptop
Remote access
Controller 2
Controller 3
<html>…
Web page 1 Web page 2 Web page 3
<html>…
<html>…
Smartphone
Requirements for the automation task • Access the CPU with standard hardware and standard mechanisms via
Industrial Ethernet. You do not require any additional hardware and software.
• Access the CPU individually related to the system and also visualized, if required. Each CPU has its own individual web page.
• Operating personnel without any automation knowledge is also provided simple access to the CPU.
3 Automation Solution
Own Web Page for S7-1500 Entry ID: 68011496, V1.0, 02/2014 6
S
iem
ens
AG 2
014
All r
ight
s re
serv
ed
3 Automation Solution 3.1 General solution overview
Schematic layout SIMATIC CPUs with PROFINET interfaces provide the opportunity to access CPU variables with the help of web pages provided by the system. Access the web server of the CPU via a web browser. The web server contains standard web pages, such as start page, identification, diagnostic buffer, module status, messages, communication, topology and file browser. A detailed description of the setup of the standard web pages is available in the S7-1500 Web server function manual; it is not subject of this application document. In addition to the standard web pages, you can also design and call the web pages individually for your application case. The web server with the web page is already integrated in the CPU. To create your web page (user-defined web page), you can use any tools such as Microsoft Frontpage, Notepad++, etc.. For designing your web page, you can use all options provided to you by HTML, CSS (Cascading Style Sheets) and JavaScript. In addition, there is the Automation Web Programming (AWP) command for directed communication with the CPU. The following figure gives an overview of the implemented solution. Figure 3-1 Overview of the overall solution
PROFINET
Industrial Ethernet
CPU 1516-3 PN/DPas web server
SIMATIC STEP 7 V12
HTML Editor- HTML file
Client withweb browser
S7 Program
- blocks- …
HTML file
Web page
Request

3 Automation Solution
Own Web Page for S7-1500 Entry ID: 68011496, V1.0, 02/2014 7
S
iem
ens
AG 2
014
All r
ight
s re
serv
ed
Advantages and application options of web server applications By having access options through various web browsers, control data can be displayed and to a limited degree controlled, by any computer or web-enabled devices without additional software installation. Another advantage is the use of the entire network infrastructure of a plant without any additional hardware components. I.e., each place of the plant where a network access is provided, can access the respective controllers. Evaluating, diagnosing and controlling the controllers can therefore also be performed over large distances or mobile communication devices such as tablet PC, smartphone, etc. However, due to the missing time deterministic of web applications, the use of the web server is not a full-fledged substitute for an operator control and monitoring system. The replacement of a HMI system is therefore not the aim of this application!
WARNING
No safety-relevant functions should be realized via the web server functionality due to the missing time deterministic of web applications!
3 Automation Solution
Own Web Page for S7-1500 Entry ID: 68011496, V1.0, 02/2014 8
S
iem
ens
AG 2
014
All r
ight
s re
serv
ed
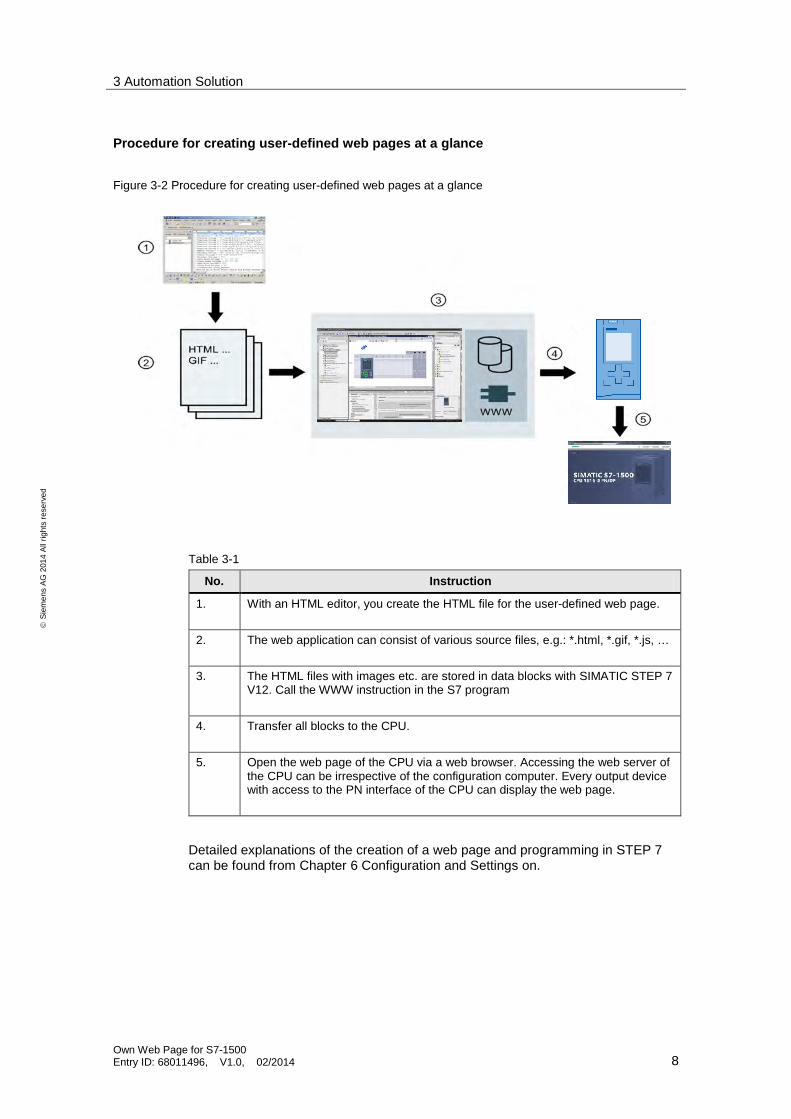
Procedure for creating user-defined web pages at a glance
Figure 3-2 Procedure for creating user-defined web pages at a glance
Table 3-1
No. Instruction
1. With an HTML editor, you create the HTML file for the user-defined web page.
2. The web application can consist of various source files, e.g.: *.html, *.gif, *.js, …
3. The HTML files with images etc. are stored in data blocks with SIMATIC STEP 7 V12. Call the WWW instruction in the S7 program
4. Transfer all blocks to the CPU.
5. Open the web page of the CPU via a web browser. Accessing the web server of the CPU can be irrespective of the configuration computer. Every output device with access to the PN interface of the CPU can display the web page.
Detailed explanations of the creation of a web page and programming in STEP 7 can be found from Chapter 6 Configuration and Settings on.

3 Automation Solution
Own Web Page for S7-1500 Entry ID: 68011496, V1.0, 02/2014 9
S
iem
ens
AG 2
014
All r
ight
s re
serv
ed
Structure of the application This application was implemented with a CPU 1516-3 PN/DP. A PC is connected via the PROFINET interface. The PC serves for the creation of the S7 program and the HTML file, as well as for displaying the web page in a web browser. Shown are all steps necessary to create a web page and to subsequently call it via the CPU.
Delimitation This application is an introduction to user-defined web pages for beginners. Shown are simple methods for accessing the web page of a CPU with HTML and SIMATIC STEP 7 V12. This application does not include a complete description of HTML. To gain deeper knowledge of HTML and JavaScript, please refer to the literature and internet pages specified in Chapter 9 Related Literature.
Required knowledge We assume that you are already familiar with SIMATIC S7 and STEP 7. Basic knowledge of HTML is not necessarily required.

3 Automation Solution
Own Web Page for S7-1500 Entry ID: 68011496, V1.0, 02/2014 10
S
iem
ens
AG 2
014
All r
ight
s re
serv
ed
3.2 Description of the content of this application
Content of the example application The example application provides the following detailed contents: • Configuration of the web server for a CPU with PN interface • Creation of a user-defined web page for the CPU with the following functions:
– Displaying CPU variables – Graphic display of CPU variables – Setting of CPU variables – Checking the input values with Javascript – Displaying of texts which are linked with CPU variables – Displaying of pictures which are linked with CPU variables – Going to web pages with links in the navigation bar – Cyclic refreshing of the web page – Automatic refreshing of the variable with Java Script – Login window
• Particularities in the S7 program creation – Providing variables for the web page – Further processing of variables from the web page in the S7 program
3 Automation Solution
Own Web Page for S7-1500 Entry ID: 68011496, V1.0, 02/2014 11
S
iem
ens
AG 2
014
All r
ight
s re
serv
ed
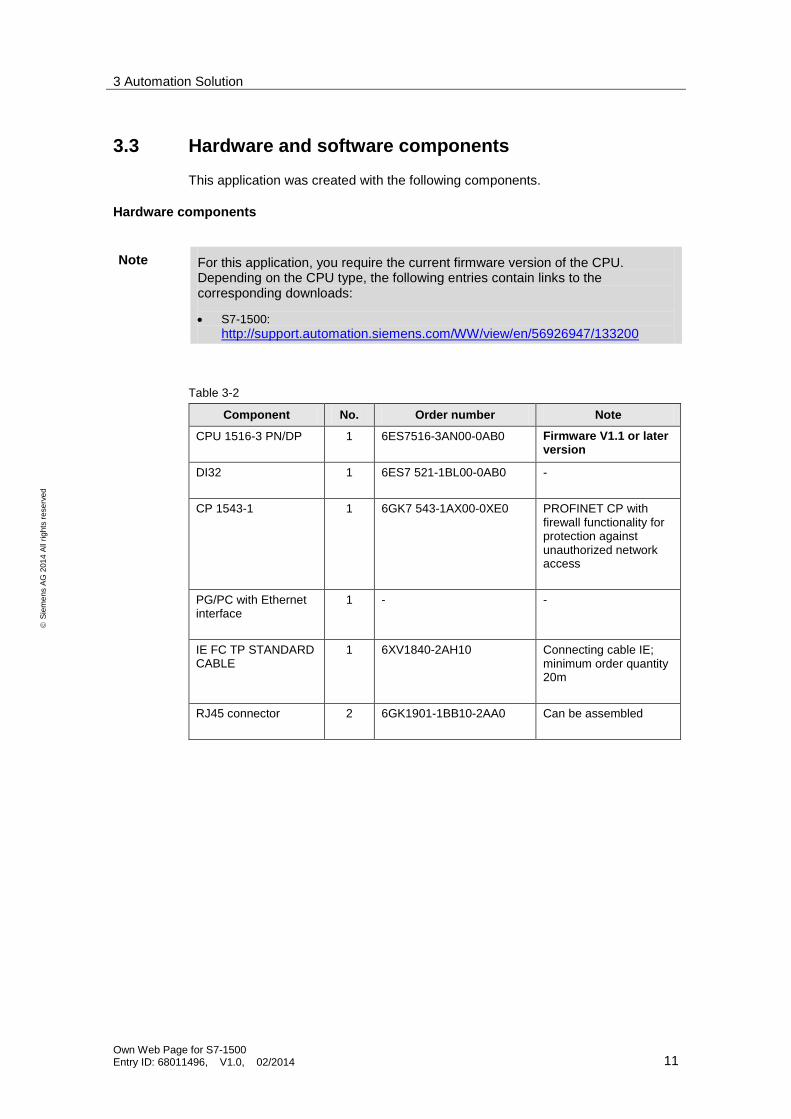
3.3 Hardware and software components
This application was created with the following components.
Hardware components
Note For this application, you require the current firmware version of the CPU. Depending on the CPU type, the following entries contain links to the corresponding downloads:
• S7-1500: http://support.automation.siemens.com/WW/view/en/56926947/133200
Table 3-2
Component No. Order number Note
CPU 1516-3 PN/DP
1 6ES7516-3AN00-0AB0 Firmware V1.1 or later version
DI32
1 6ES7 521-1BL00-0AB0 -
CP 1543-1 1 6GK7 543-1AX00-0XE0 PROFINET CP with firewall functionality for protection against unauthorized network access
PG/PC with Ethernet interface
1 - -
IE FC TP STANDARD CABLE
1 6XV1840-2AH10 Connecting cable IE; minimum order quantity 20m
RJ45 connector 2 6GK1901-1BB10-2AA0 Can be assembled

3 Automation Solution
Own Web Page for S7-1500 Entry ID: 68011496, V1.0, 02/2014 12
S
iem
ens
AG 2
014
All r
ight
s re
serv
ed
Software components Table 3-3
Component No. Order number Note
SIMATIC STEP 7 V12 SP1 Update 3
1 6ES7822-1A.02-.. -
Software tool for creating HTML files, e.g. Frontpage, Notepad++, …
1 - -
Web browser, e. g. Internet Explorer, Mozilla Firefox1)
1 - Application optimized for Internet Explorer 11.0.
1) The following web browsers were explicitly tested for communication with the CPU:
• Internet Explorer (version 11) • Mozilla Firefox (version 5.0) • mobileSafari (iOS5)
Note The application is optimized for Internet Explorer 11.0. For the use of other browsers, adjustments may have to be made.
Sample files and projects The following list includes all files and projects that are used in this example. Table 3-4
Component Comments
68011496_S7-1500_Webserver_CODE_v10.zip The zip file contains the STEP 7 project with the related HTML file. The HTML file with the associated files, are located in the \html directory.
68011496_S7-1500_Webserver_DOKU_V10_en.pdf This document.
4 Principles of Standard Web Pages
Own Web Page for S7-1500 Entry ID: 68011496, V1.0, 02/2014 13
S
iem
ens
AG 2
014
All r
ight
s re
serv
ed
4 Principles of Standard Web Pages Requirements
In STEP 7, the following settings are required in the properties of the PLC: • The web server must be activated. • If you require safe access to the standard web pages, enable the "Permit
access only with HTTPS" checkbox. • Automatic refreshing of the standard web pages is enabled. The refresh
interval is preset to 10 s and can lie in the range of between 1 to 999.
Access via HTTP or HTTPS With the URL "http://ww.xx.yy.zz" or "https://ww.xx.yy.zz" you get access to the standard web pages. "ww.xx.yy.zz" corresponds to the IP address of the S7-1500 CPU. HTTPS is used for the encryption and authentication of the communication between browser and web server. When the "Permit access only with HTTPS" checkbox is enabled, calling the web pages of S7-1500 CPU is only possible via HTTPS.
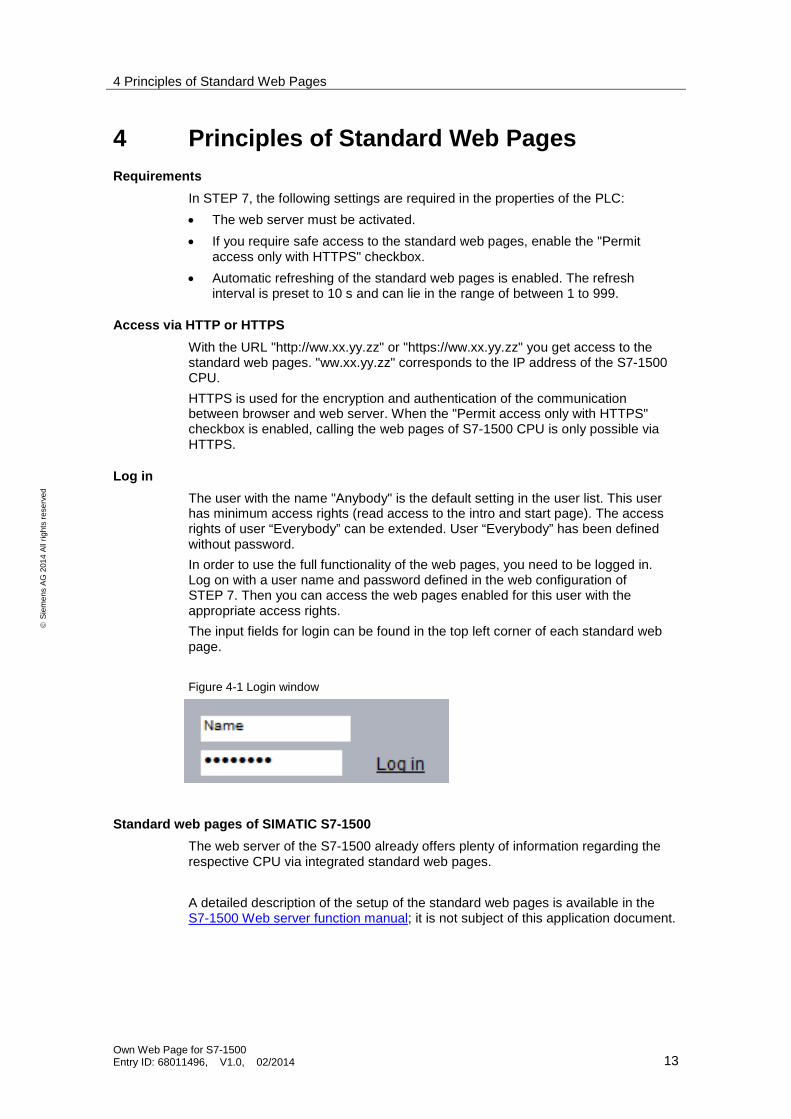
Log in The user with the name "Anybody" is the default setting in the user list. This user has minimum access rights (read access to the intro and start page). The access rights of user “Everybody” can be extended. User “Everybody” has been defined without password. In order to use the full functionality of the web pages, you need to be logged in. Log on with a user name and password defined in the web configuration of STEP 7. Then you can access the web pages enabled for this user with the appropriate access rights. The input fields for login can be found in the top left corner of each standard web page. Figure 4-1 Login window
Standard web pages of SIMATIC S7-1500 The web server of the S7-1500 already offers plenty of information regarding the respective CPU via integrated standard web pages. A detailed description of the setup of the standard web pages is available in the S7-1500 Web server function manual; it is not subject of this application document.

5 Functional Mechanisms of this Application
Own Web Page for S7-1500 Entry ID: 68011496, V1.0, 02/2014 14
S
iem
ens
AG 2
014
All r
ight
s re
serv
ed
5 Functional Mechanisms of this Application 5.1 Functional principle of the S7 program
The S7 program of this application only serves for representing individual functional principles of STEP 7 by way of example. The call structure in the S7 program looks as follows: Figure 5-1 Call structure of the S7-program
TankSimu [FB1]ResetData [FC3]
Main [OB1]
Cycliccall
WWW [FC99] DB333…
Startup [OB100]
TimeToString [FC2]CopyData [FC1]
The following symbols and variables are used in the “Data_Buffer” data block: Figure 5-2 Tag table
5 Functional Mechanisms of this Application
Own Web Page for S7-1500 Entry ID: 68011496, V1.0, 02/2014 15
S
iem
ens
AG 2
014
All r
ight
s re
serv
ed
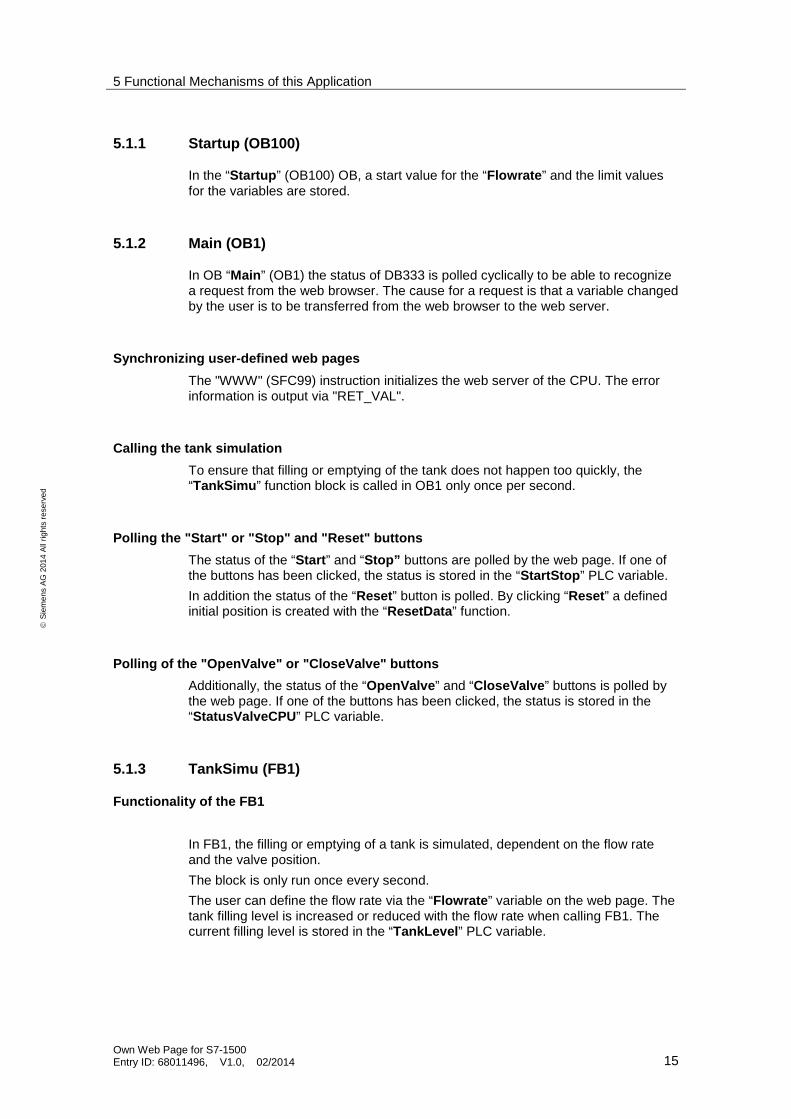
5.1.1 Startup (OB100)
In the “Startup” (OB100) OB, a start value for the “Flowrate” and the limit values for the variables are stored.
5.1.2 Main (OB1)
In OB “Main” (OB1) the status of DB333 is polled cyclically to be able to recognize a request from the web browser. The cause for a request is that a variable changed by the user is to be transferred from the web browser to the web server.
Synchronizing user-defined web pages The "WWW" (SFC99) instruction initializes the web server of the CPU. The error information is output via "RET_VAL".
Calling the tank simulation To ensure that filling or emptying of the tank does not happen too quickly, the “TankSimu” function block is called in OB1 only once per second.
Polling the "Start" or "Stop" and "Reset" buttons The status of the “Start” and “Stop” buttons are polled by the web page. If one of the buttons has been clicked, the status is stored in the “StartStop” PLC variable. In addition the status of the “Reset” button is polled. By clicking “Reset” a defined initial position is created with the “ResetData” function.
Polling of the "OpenValve" or "CloseValve" buttons Additionally, the status of the “OpenValve” and “CloseValve” buttons is polled by the web page. If one of the buttons has been clicked, the status is stored in the “StatusValveCPU” PLC variable.
5.1.3 TankSimu (FB1)
Functionality of the FB1 In FB1, the filling or emptying of a tank is simulated, dependent on the flow rate and the valve position. The block is only run once every second. The user can define the flow rate via the “Flowrate” variable on the web page. The tank filling level is increased or reduced with the flow rate when calling FB1. The current filling level is stored in the “TankLevel” PLC variable.

5 Functional Mechanisms of this Application
Own Web Page for S7-1500 Entry ID: 68011496, V1.0, 02/2014 16
S
iem
ens
AG 2
014
All r
ight
s re
serv
ed
Via the two PLC variables “OpenValve” and “CloseValve”, the valve position is read in and stored in the CPU in the “StatusValveCPU” PLC variables. Dependent on the tank filling level, the following heights are displayed:
• Tank has been fully drained (TankLevelLack) • Tank filling level is at minimum (TankLevelMinimum) • Tank filling level is 50 % (TankLevelMidth) • Tank filling level is at maximum (TankLevelMaximum) • Tank is overflowing (TankLevelOverflow)
Via the “Alarm” variable, the tank filling level is output in clear text (also as enumeration)
StartStop status Only when the “StartStop” is set, the tank filling level changes and values are entered in the ring buffer.
Valve status Via the “StatusVentilCPU” bit, the button pressed last (OpenValve or CloseValve) is memorized. Dependent on this bit, the tank is either emptied or filled.
Filling the tank The filling of the tank starts with a query whether the tank is already full. If the tank is not full, the tank filling level is increased with the flow rate. The tank filling level is limited to the “TankLevelOverflow” value.
Emptying the tank The emptying of the tank is similar to the filling of the tank. The tank filling level is reduced with the flow rate and is limited to 0.
Alarm status Subsequently, the tank filling level is compared with the specifications for the limit values of the tank filling level. Depending on the filling level reached, the values "0" to "5" are stored in the “Alarm” variable. With the value of the “Alarm” variable, HTML texts (enumerations) are stored, which display the filling level of the tank in clear text.
Storing data in the ring buffer The current filling level is stored together with the time stamp (string) in a ring buffer of 20 value pairs and displayed.

5 Functional Mechanisms of this Application
Own Web Page for S7-1500 Entry ID: 68011496, V1.0, 02/2014 17
S
iem
ens
AG 2
014
All r
ight
s re
serv
ed
With the “TimeToString” function a time stamp is created as string from the local time. With the “CopyData” function the value pairs are copied in the ring buffer.
5.2 Functional principle of the HTML file
The following chapter provides a detailed explanation of the individual sections of the HTML file. For the creation of the HTML pages only fixed values are used for the position and size of the elements. This prevents the elements from moving and overlapping when the browser window is made smaller.
5.2.1 AWP commands
Basics AWP commands are inserted as HTML comments in HTML files. AWP commands can be located at any position in the HTML file. However, for reasons of clarity it is appropriate to list the central AWP commands at the beginning of the HTML file. Figure 5-3 AWP commands
Explanations Table 5-1
Code Explanation
<!-- AWP_In_Variable Name='"Start"' -->
All variables transferred to the CPU must be identified as AWP_In_Variable. Note: Keep in mind that the quotation marks are nested. The variable is written between quotation marks and framed by an inverted comma (' " … " ').
<!-- AWP_Enum_Def Name="AlarmValue" Values='0:"Tank empty!", 1:"Tank level below minimum!", 2:"Tank level between minimum and width!", 3:"Tank level between width and maximum!", 4:"Tank level over maximum!", 5:"Tank level overflow!"' -->
ENUM types are defined with AWP_Enum_Def.
<!-- AWP_Enum_Ref Name='"Alarm"' Enum="AlarmValue" -->:="Alarm":
The ENUM types are assigned to variables with AWP_Enum_Ref.

5 Functional Mechanisms of this Application
Own Web Page for S7-1500 Entry ID: 68011496, V1.0, 02/2014 18
S
iem
ens
AG 2
014
All r
ight
s re
serv
ed
5.2.2 Outputting CPU variables
Explanations Variables of the CPU are always displayed via the symbol name: Figure 5-4 Representation of tags in the HTML file
Instead of “TankLevel”, always the current value from the CPU is output on the web page.
5.2.3 Outputting texts via enumerations
Explanations Via enumerations, texts can be allocated to the individual values of a CPU variable. Figure 5-5 Representation of enumerations in the HTML file
Instead of the individual values of "Alarm", the previously assigned texts in HTML are output. These texts stored as enum-type "AlarmValue" and are transferred to the web page via DB333.
5.2.4 Setting variables in the CPU with value and button
Basics To be able to transfer variables to the CPU via the web page, you have to work with forms and, for example, the "POST" method.
Explanations Figure 5-6 Representation of entries in the HTML file

5 Functional Mechanisms of this Application
Own Web Page for S7-1500 Entry ID: 68011496, V1.0, 02/2014 19
S
iem
ens
AG 2
014
All r
ight
s re
serv
ed
Table 5-2
Code Explanation
<form method="post" action="" onsubmit="return check();"> <input type="text" id="wert1" name='"Flowrate"' size="2" style="height: 45px; width: 50px; font-size: 21px; text-align: center; padding: 8px;"> <input type="submit" value="Set a new Flowrate" style="height: 45px; width: 200px"> </form>
Calling the form with the post method. Under action, no details are required since with action the current page is called by default. With the calling onsubmit event handler, the check() function is executed that is defines in the JS file. With a click on submit, the function checks whether the input is in the range of 1 to 10. If this condition is met, the check() function reports back TRUE otherwise the return value is FALSE and an additional message is output. With input type="text", an input field is linked, whose content is sent to the web server of the CPU with submit (only if check() = TRUE). submit is controlled via a button called "Set a new Flowrate".
5.2.5 Setting variables in the CPU via button only
Basics To assign variables in the CPU a predefined value, you have to work with a form, the "POST" method and a hidden value.
Explanations Figure 5-7 Representation of buttons in the HTML file

5 Functional Mechanisms of this Application
Own Web Page for S7-1500 Entry ID: 68011496, V1.0, 02/2014 20
S
iem
ens
AG 2
014
All r
ight
s re
serv
ed
Table 5-3
Code Explanation
<form method="post" action=""> <input type="submit" value="OpenValve"> <input type="hidden" name='"OpenValve"' size="20px" value="1"> <input type="hidden" name='"CloseValve"' size="20px" value="0"> </form>
Calling the form with the post method. Under action, no details are required since with action the current page is called by default. With input type="hidden", the "OpenValve" variable is assigned the value 1, the "CloseValve" variable the value 0. With submit, the values of the variables are sent to the web server of the CPU.
<form method="post" action=""> <input type="submit" value="CloseValve"> <input type="hidden" name='"CloseValve"' size="20px" value="1"> <input type="hidden" name='"OpenValve"' size="20px" value="0"> </form>
Reverse action to the row above: calling the form to assign the value 1 to "CloseValve" and the value 0 to "OpenValve".
5.2.6 Logging on directly on user-definable web pages
Basics In order to write variable to the CPU, you must generally be logged in at the web server of the CPU. Login is not necessary if you wish to grant write rights to the user-defined pages for user “Everybody”. However, this cannot be recommended from the point of view of plant security. The login window is available in the top left corner of the standard web pages. The login-window was integrated on the user-defined web pages so you need not change to the standard web pages for the login.

5 Functional Mechanisms of this Application
Own Web Page for S7-1500 Entry ID: 68011496, V1.0, 02/2014 21
S
iem
ens
AG 2
014
All r
ight
s re
serv
ed
Explanations Figure 5-8 Login on user-defined web pages in the HTML file
Table 5-4
Code Explanation
<body onload="loginCheck()"> For each refreshing of the web page, the JavaScript function loginCheck() is automatically executed.
<iframe id="WebserverIFrame" name="WebserverIFrameName" src="../../Portal/Portal.mwsl" style="display:none"></iframe>
In the user-defined page, an iframe is defined which contains the standard web page. The iframe is made invisible with the style="display:none" attribute.
iv id="logForm" class="Login_Area" colspan="2"></div>
class="Login_Area" assigns the formats from the CSS file to the login window with id="logForm". The ID is defined in the loginCheck() function.
function loginCheck() The JavaScript function loginCheck() polls in the iFrame on the standard web page whether the form for logging in or logging out exists. The respective form for logging in or logging out is added respectively on the user-defined web page.

5 Functional Mechanisms of this Application
Own Web Page for S7-1500 Entry ID: 68011496, V1.0, 02/2014 22
S
iem
ens
AG 2
014
All r
ight
s re
serv
ed
5.2.7 Creating time-optimized HTML pages (optional)
Creating time-optimized HTML pages is not described in the manuals of the S7-1500. The idea behind refreshing via JavaScript is that of a sub-web page being integrated into the user-defined web page. This is done with a so-called “inline frame” (iFrame). In order to fetch new values from the controller, not the complete web page is reloaded but only the sub-web page in the inline frame. This has the advantage that only few data needs to be called by the controller. If, for example, pictures are used on the main page, they need not be requested from the controller for each refreshing, which they do in both of the other introduced mechanisms. Refreshing via JavaScript therefore causes a low data transmission which may also have a positive effect on the network load as well as the cycle time of the controller. The concept is displayed in the figure below.
Figure 5-9 Read/write variable
Update_DataOpti.html
DataOpti.html
Start_Stop_buttons.html
Rea
dva
riabl
eW
rite
varia
ble

5 Functional Mechanisms of this Application
Own Web Page for S7-1500 Entry ID: 68011496, V1.0, 02/2014 23
S
iem
ens
AG 2
014
All r
ight
s re
serv
ed
Table 5-5
No. Description
1. There is a user-defined HTML page (below called main page) to be displayed. In this application this is the “DataOpti.html” HTML page. It is not refreshed.
2. This main page does not include variables. All control variables to be read or to be written are packed in additional HTML files (here “Update_DataOpti.html” and “Start_Stop_buttons.html”), which on their part are embedded as frames (iframe) in the main page. Only the individual frames are refreshed.
3. The “Update_DataOpti.html” file contains two tables. In the second line of the first table, the update time is given in milliseconds (e.g. 1000). From the second line of the second table on, the left column contains AWP commands of the variable to be read (e.g. :="Data_Buffer".Data[1].Data_Struct.TimeStamp:). The right column contains the respective IDs (e.g. TimeId1). The IPs must be unique. The main page “DataOpti.html” contains the entered IDs instead of the AWP commands of the variable to be read. I.e., in order to use an element for the update, the "ID" attributes must be entered and pre-assigned with the respective ID name (e.g. id="TimeId1"). The separate HTML file “Update_DataOpti.html” is embedded as frame (iframe, see point ý2) in the main page “DataOpti.html”. The respective syntax is as follows: <iframe src="Update_DataOpti.html" style="display:none;" /> The “display:none” CSS property, noted for the frame, prevents its display on the main page.
4. The JavaScript functions (see Figure 5-10 JavaScript functions) in the “Update_DataOpti.html” file automatically determine the current size of the second table. The HTML elements with the ID are determined in the main page. The JavaScript program code replaces the entire content of this HTML element with the content of the left table column of the second table. Finally, a wait time is set from the time defined in the first table and the update is then renewed.
5. For input variables forms are inserted in separate HTML files. The HTML files are embedded as frames in the main page. Several forms can be written in a HTML file.

5 Functional Mechanisms of this Application
Own Web Page for S7-1500 Entry ID: 68011496, V1.0, 02/2014 24
S
iem
ens
AG 2
014
All r
ight
s re
serv
ed
Figure 5-10 JavaScript functions
Note The “Update_DataOpti.html” file can be adapted to your application with little effort. You only need to enter your variable with the respective ID into the second table. On your main page you replace the variable with the respective ID. This does not require any changes at JavaScript.
Further information on this topic is available at the following FAQ: How can user-defined web pages and standard web pages be updated automatically in STEP 7 (TIA Portal)?
6 Configuration and Settings
Own Web Page for S7-1500 Entry ID: 68011496, V1.0, 02/2014 25
S
iem
ens
AG 2
014
All r
ight
s re
serv
ed
6 Configuration and Settings This chapter contains all information on how you can create and operate a web page for a CPU with PN interface for yourself. The CPU 1516-3 PN/DP is used as an example in this Section. All steps are presented by means of the completed example application. If you just want to take the completed example application into operation, please continue reading in Chapter 7 Installation.
6.1 Procedure for creating a web page
The configuration and settings in STEP 7 and the writing of the HTML file are closely linked. The following procedure is recommendable for that: 1. Configuring the hardware 2. Creating the variables in the variable table or DB 3. Creating the HTML files 4. Web server settings and generating of the data blocks 5. Creating, compiling and loading of the S7 program

6 Configuration and Settings
Own Web Page for S7-1500 Entry ID: 68011496, V1.0, 02/2014 26
S
iem
ens
AG 2
014
All r
ight
s re
serv
ed
6.2 Configuring the hardware Table 6-1
No. Action Comment
1. Start STEP 7 V12 and create a new project named “Webserver_S7_1500” in “Project > New…”.
2. Insert a S7-1500 station via “Add new device” >> “PLC > SIMATIC S7-1500 > CPU > CPU 1516-3 PN/DP > 6ES7 516-3AN00-0AB0 V1.0”. The device view of the PLC opens.
3. Click the “Add new subnet” button in the properties of the Ethernet interface.
4. Assign the IP address 192.168.0.1 of the CPU to the Ethernet interface. Via this IP address, you will later access the web page of the CPU with your web browser.
5. Insert the DI32 module “DI >> DI32x24VDC HF >> 6ES7 521-1BL00-0AB0” from the hardware catalog.
6. Insert module “Communication modules >> PROFINET/Ethernet >> CP 1543-1 >> 6GK7 543-1AX00-0XE0” from the hardware catalog.
6 Configuration and Settings
Own Web Page for S7-1500 Entry ID: 68011496, V1.0, 02/2014 27
S
iem
ens
AG 2
014
All r
ight
s re
serv
ed
No. Action Comment
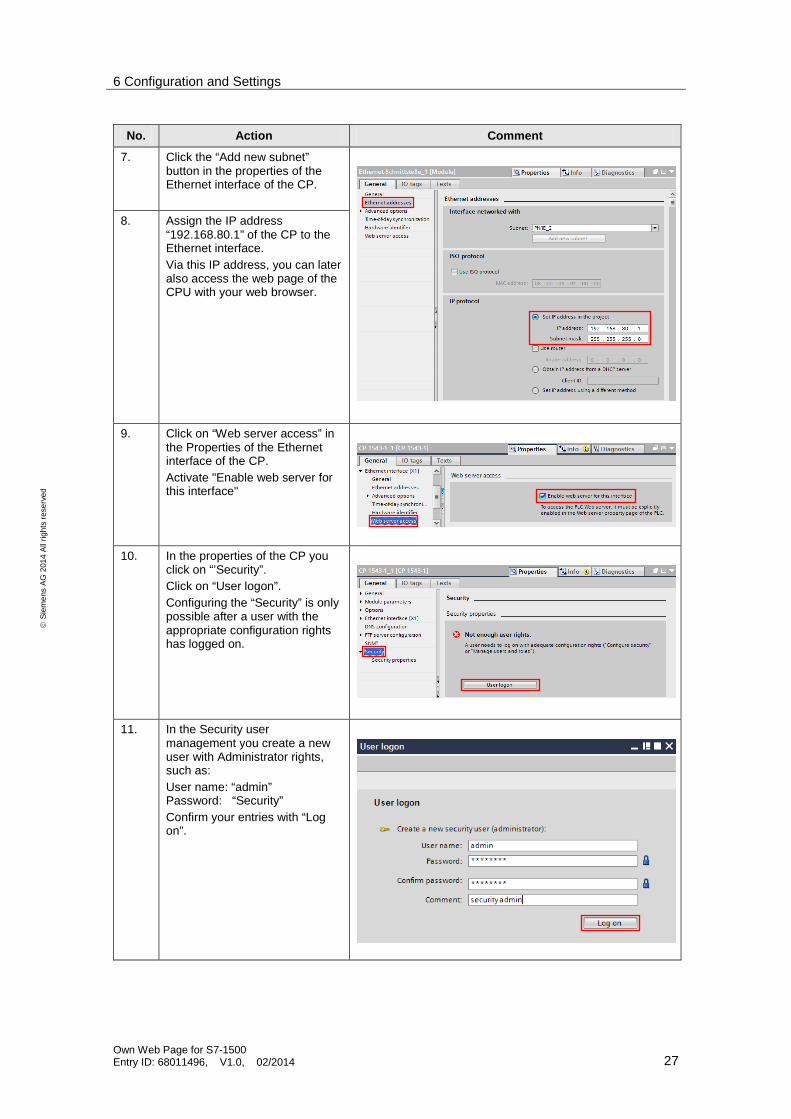
7. Click the “Add new subnet” button in the properties of the Ethernet interface of the CP.
8. Assign the IP address “192.168.80.1” of the CP to the Ethernet interface. Via this IP address, you can later also access the web page of the CPU with your web browser.
9. Click on “Web server access” in the Properties of the Ethernet interface of the CP. Activate "Enable web server for this interface"
10. In the properties of the CP you
click on “’Security”. Click on “User logon”. Configuring the “Security” is only possible after a user with the appropriate configuration rights has logged on.
11. In the Security user
management you create a new user with Administrator rights, such as: User name: “admin” Password: “Security” Confirm your entries with “Log on”.

6 Configuration and Settings
Own Web Page for S7-1500 Entry ID: 68011496, V1.0, 02/2014 28
S
iem
ens
AG 2
014
All r
ight
s re
serv
ed
No. Action Comment
12. Refresh the Properties of the CP. Enable “Activating security features”.
13. Open the “Security” area and
select “Firewall”. Enable the following: • “Activate firewall”
• “Allow HTTP” • “Allow HTTPS”
6 Configuration and Settings
Own Web Page for S7-1500 Entry ID: 68011496, V1.0, 02/2014 29
S
iem
ens
AG 2
014
All r
ight
s re
serv
ed
6.3 Creating the variables in the variable table or DB Table 6-2
No. Action Comment
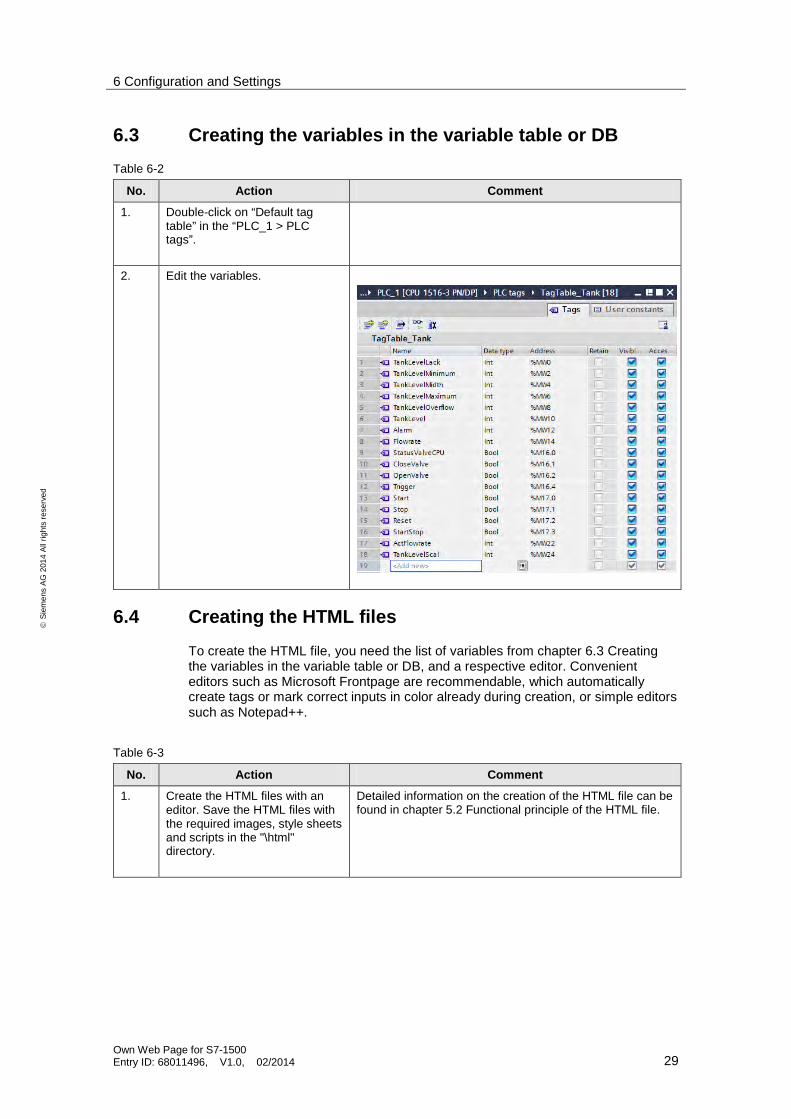
1. Double-click on “Default tag table” in the “PLC_1 > PLC tags”.
2. Edit the variables.
6.4 Creating the HTML files To create the HTML file, you need the list of variables from chapter 6.3 Creating the variables in the variable table or DB, and a respective editor. Convenient editors such as Microsoft Frontpage are recommendable, which automatically create tags or mark correct inputs in color already during creation, or simple editors such as Notepad++.
Table 6-3
No. Action Comment
1. Create the HTML files with an editor. Save the HTML files with the required images, style sheets and scripts in the "\html" directory.
Detailed information on the creation of the HTML file can be found in chapter 5.2 Functional principle of the HTML file.

6 Configuration and Settings
Own Web Page for S7-1500 Entry ID: 68011496, V1.0, 02/2014 30
S
iem
ens
AG 2
014
All r
ight
s re
serv
ed
6.5 Web server settings and generating of the data blocks Table 6-4
No. Action Comment
1. Click “Web server” in the properties of the PLC. Activate the option box “Activate web server on this module” and “Enable automatic update”. If you require safe access to the standard web pages, enable the “Permit access only with HTTPS” checkbox.
2. Create a new user "admin" with
the password "s7". Assign read and write access to the user-defined pages to the user “admin” by activating “open user-defined web pages” and “write in user-defined web pages”. You can assign further rights to the user. Note: When assigning read access to user-defined pages for user “Everybody“, then you can call the user-defined pages directly with your web browser, e.g. http://192.168.0.1/awp/Applicationname/Start.html of via the CP with http://192.168.80.1/awp/Applicationname/Start.html.

6 Configuration and Settings
Own Web Page for S7-1500 Entry ID: 68011496, V1.0, 02/2014 31
S
iem
ens
AG 2
014
All r
ight
s re
serv
ed
No. Action Comment
3. Enter the HTML directory of your HTML files and select a start HTML page from the directory. Assign a name to the application (e.g. “Applicationname”).
4. Generate the Web_Control_DB (default: DB333) and the Fragment_DBs (default: from DB334), by clicking "Generate blocks". STEP 7 V12 verifies the project with regard to the variables, loads the complementary files, such as, for example, the enumerations or images, reads in the variables of the HTML file, verifies the fragments, and writes all data in DB333 and from DB334. The status of the generation is displayed in an independent window or in the inspector window under info.
5. Enable the interfaces which shall provide access to the web server.

6 Configuration and Settings
Own Web Page for S7-1500 Entry ID: 68011496, V1.0, 02/2014 32
S
iem
ens
AG 2
014
All r
ight
s re
serv
ed
6.6 Creating, compiling and loading of the S7 program
An exemplary S7 program can be found in the appendix to this entry. The following aspects must be considered when creating the S7 program: • Call the "WWW" (SFC99) instruction. The "WWW" instruction initializes the
web server of the CPU. With the cyclic calling of the "WWW" instruction, you ensure that changed variables of the CPU can be displayed on the web page. The cyclic calling of the "WWW" instruction is done in OB1.
• Enter the number of the web control DB (e.g. 333) at the CTRL_DB input parameter of the "WWW" instruction.
Table 6-5
No. Action Comment
1. Compiling User the mouse to right-click on the CPU 1516-3 PN/DP and select “Compile > Hardware and software (only changes)”.
2. Loading project Right-click on the CPU 1516-3 PN/DP and select “Download to device > Hardware and software (only changes)”. Set your PG/PC interface in the dialog window as follows: • PN/IE • <Network card> • (local) PN/IE Select CPU 1516-3 PN/DP and then click on “Load”.
The dialog window for setting the PG/PC interface is only displayed during the first loading.
Note If you want to use a different S7-1500, you have to exchange the CPU under “Devices & Networks”. After the exchange, the web server has to be re-enabled (see 6.5 Web server settings and generating of the data blocks).

7 Installation
Own Web Page for S7-1500 Entry ID: 68011496, V1.0, 02/2014 33
S
iem
ens
AG 2
014
All r
ight
s re
serv
ed
7 Installation 7.1 Hardware and software installation
Hardware installation The figure below shows the hardware configuration of the sample application. The PC with the web browser must be connected to the CPU via Industrial Ethernet, e.g. • directly at the PN interface of the CPU • directly at communication module CP 1543-1 • via a switch Figure 7-1
PROFINET
Industrial Ethernet
CPU 1516-3 PN/DP
SIMATIC STEP 7 V12
HTML editor
Browser
Note Please observe the installation and connection guidelines from the corresponding manuals.
Installation of the software
Table 7-1
No. Action Comment
1. Install STEP 7 V12.
2. Install a tool for creating the web page, e.g. MS Frontpage or Notepad++ on the PC with which you want to create the web page.
3. Install a web browser on the PC, e.g. Firefox or Internet Explorer, with which you want to access the website of the CPU.

7 Installation
Own Web Page for S7-1500 Entry ID: 68011496, V1.0, 02/2014 34
S
iem
ens
AG 2
014
All r
ight
s re
serv
ed
7.2 Installation of the application example
Table 7-2
No. Action Comment
1. Unzip the “68011496_S7-1500_Webserver_CODE_v10.zip” file in your project directory.
2. Start SIMATIC STEP 7 V12
3. Open the project in SIMATIC STEP 7 V12.
4. Go to the device view.
5. If you are using a different CPU, change the device.
6. In the CPU properties, assign the IP address of your CPU to the Ethernet interface.
Information in Section 6.2 Configuring the hardware
7. Select the S7-1500 and load the entire project in the CPU.
8. Start a web browser and call the web page of your CPU via the IP address.
Information in Section 8 Operating the Application
8 Operating the Application
Own Web Page for S7-1500 Entry ID: 68011496, V1.0, 02/2014 35
S
iem
ens
AG 2
014
All r
ight
s re
serv
ed
8 Operating the Application In this chapter
This chapter provides information on how to operate the example application.
Operation Table 8-1
No. Action Comment
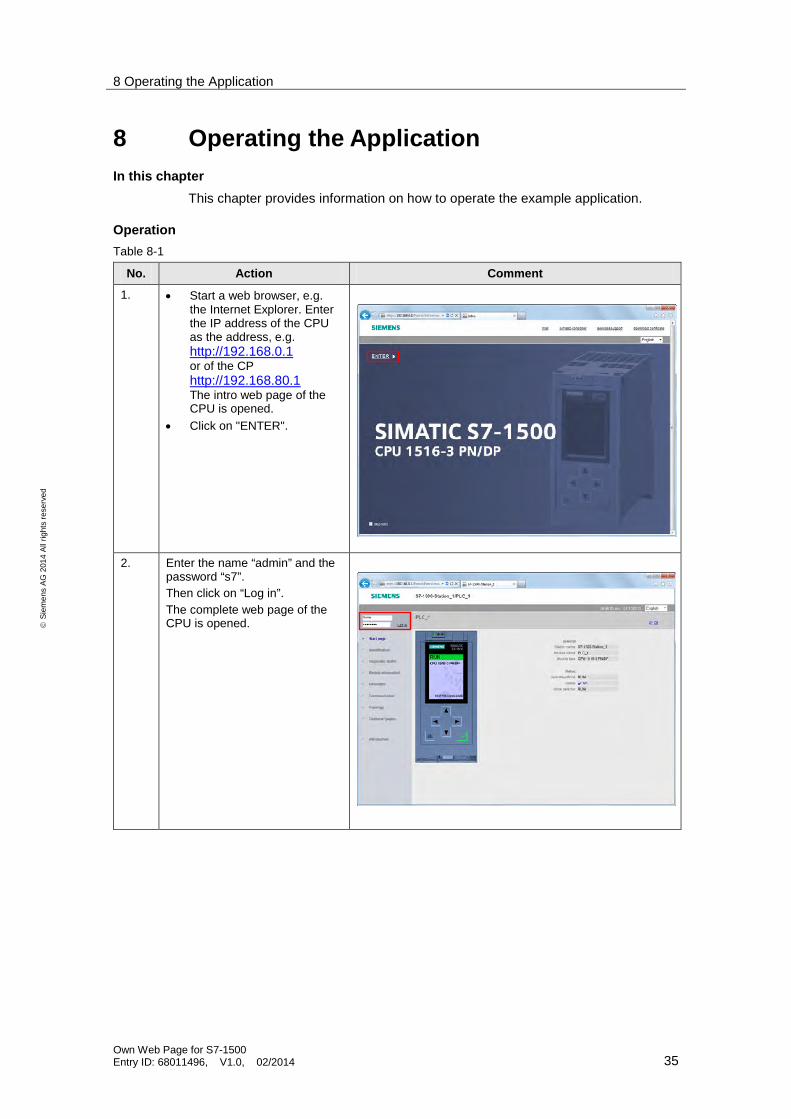
1. • Start a web browser, e.g. the Internet Explorer. Enter the IP address of the CPU as the address, e.g. http://192.168.0.1 or of the CP http://192.168.80.1 The intro web page of the CPU is opened.
• Click on "ENTER".
2. Enter the name “admin” and the
password “s7”. Then click on “Log in”. The complete web page of the CPU is opened.

8 Operating the Application
Own Web Page for S7-1500 Entry ID: 68011496, V1.0, 02/2014 36
S
iem
ens
AG 2
014
All r
ight
s re
serv
ed
No. Action Comment Note: If “There is a problem with this website's security certificate” appears instead of the desired page, go to the "Introduction" introductory page and download the Siemens security certificate for, e.g. IE as follows: • Click the "download certificate" link on the introductory page. A query for opening the file
appears. • In the query you click on “Open” to open the file. After the download of the file you click on
“Open” again. The dialog window “Certificate” opens. • Click the "Install Certificate" button in the "Certificate" dialog, to call the assistant for
importing the certificate. • Follow the dialog instructions of the “Certificate Import Wizard” to import the certificate.
Select the "Trustworthy root certificate authorities" certification storage.
3. Click "Customer pages" to go to the user-defined web page.
4. To start the example application,
click on "Homepage of the application". The "Start" web page opens.
8 Operating the Application
Own Web Page for S7-1500 Entry ID: 68011496, V1.0, 02/2014 37
S
iem
ens
AG 2
014
All r
ight
s re
serv
ed
No. Action Comment
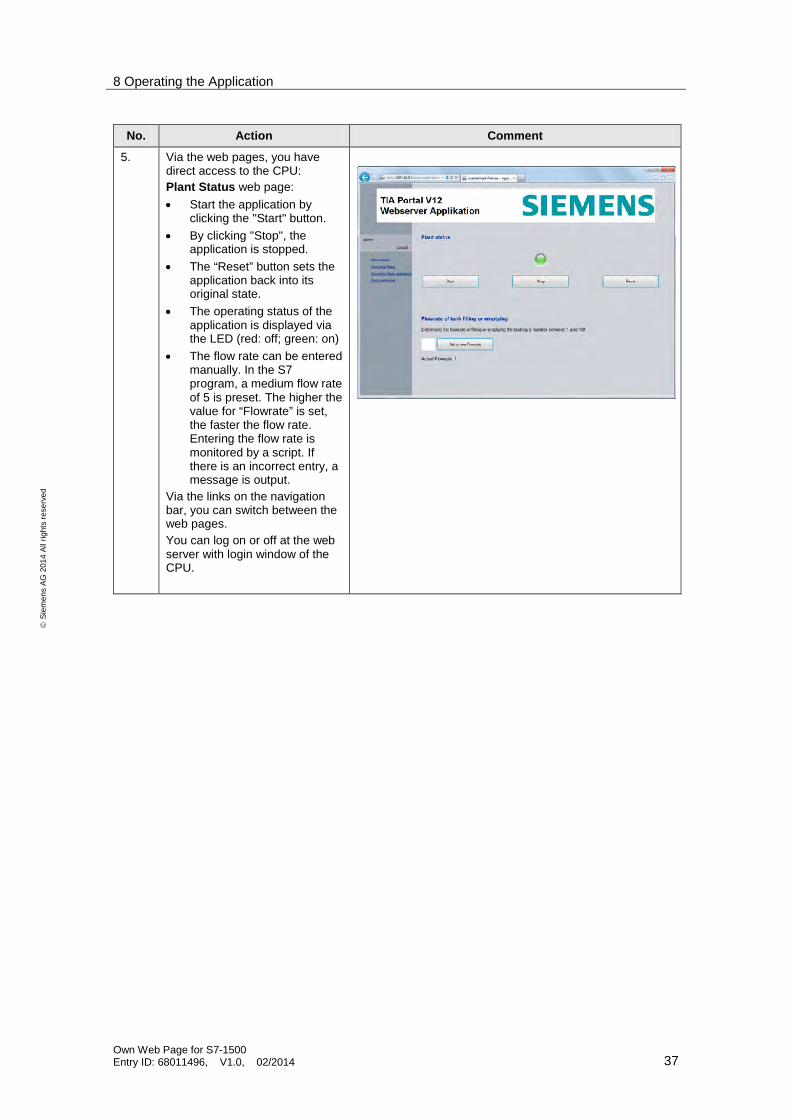
5. Via the web pages, you have direct access to the CPU: Plant Status web page: • Start the application by
clicking the "Start" button. • By clicking "Stop", the
application is stopped. • The “Reset” button sets the
application back into its original state.
• The operating status of the application is displayed via the LED (red: off; green: on)
• The flow rate can be entered manually. In the S7 program, a medium flow rate of 5 is preset. The higher the value for “Flowrate” is set, the faster the flow rate. Entering the flow rate is monitored by a script. If there is an incorrect entry, a message is output.
Via the links on the navigation bar, you can switch between the web pages. You can log on or off at the web server with login window of the CPU.

8 Operating the Application
Own Web Page for S7-1500 Entry ID: 68011496, V1.0, 02/2014 38
S
iem
ens
AG 2
014
All r
ight
s re
serv
ed
No. Action Comment
6. Tank overview web page: • Via “TankLevel” you can see
the current filling level of the tank. Additionally, the filling level is commented via clear text.
• The limits of the filling levels are displayed underneath.
• When clicking the “OpenValve” button, the tank is emptied.
• The valve is closed via "CloseValve" – the tank is filled again.
• Valve green: open Valve red: closed
• The web page is automatically refreshed and the values are adjusted.
Via the links on the navigation bar, you can switch between the web pages. Logon at the web server of the CPU via the login window is not possible here, since the inputs are automatically overwritten when refreshing the page.
7. Tank overview optimized web page: • For the function please refer
to the Tank overview web page:
• Only the variables of the page are automatically updated with a JavaScript. The static elements of the page are not updated.
You can log on or off at the web server with login window of the CPU.
8 Operating the Application
Own Web Page for S7-1500 Entry ID: 68011496, V1.0, 02/2014 39
S
iem
ens
AG 2
014
All r
ight
s re
serv
ed
No. Action Comment
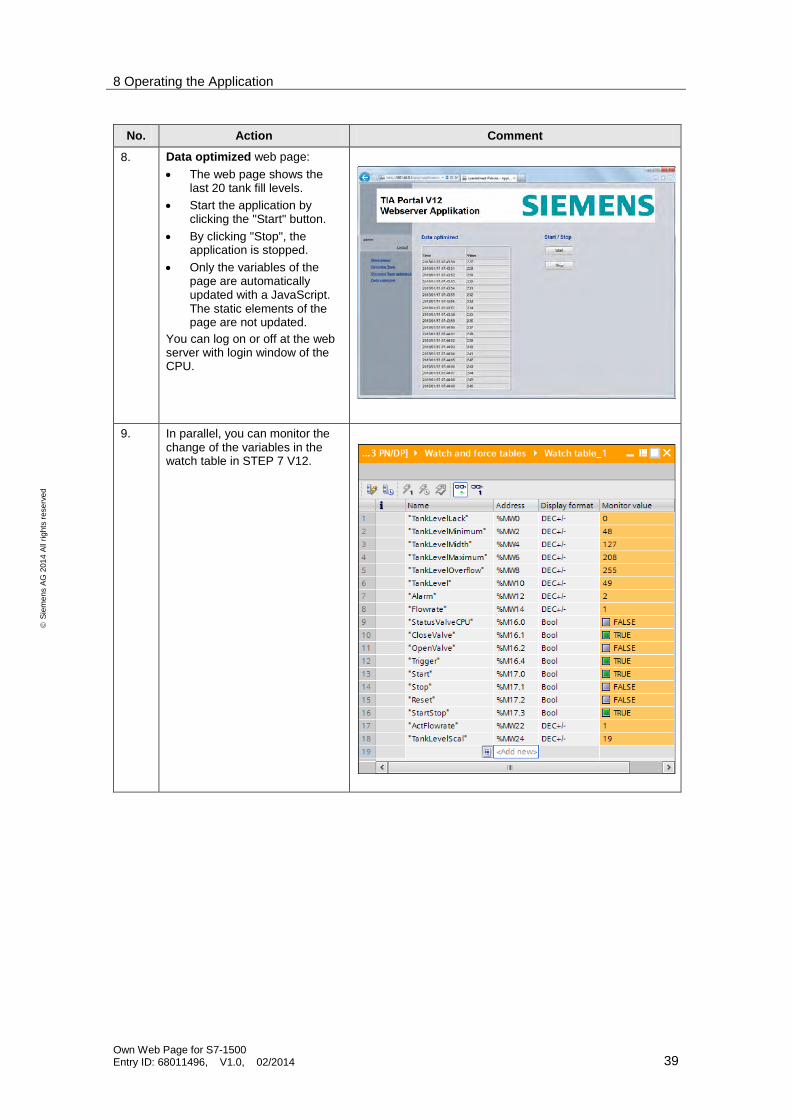
8. Data optimized web page: • The web page shows the
last 20 tank fill levels. • Start the application by
clicking the "Start" button. • By clicking "Stop", the
application is stopped. • Only the variables of the
page are automatically updated with a JavaScript. The static elements of the page are not updated.
You can log on or off at the web server with login window of the CPU.
9. In parallel, you can monitor the
change of the variables in the watch table in STEP 7 V12.

9 Related Literature
Own Web Page for S7-1500 Entry ID: 68011496, V1.0, 02/2014 40
S
iem
ens
AG 2
014
All r
ight
s re
serv
ed
9 Related Literature 9.1 Bibliography
This table offers you a variety of pertinent literature. Table 9-1
Topic Title
/1/ HTML HTML und CSS, Praxisrezepte für Einsteiger [HTML and CSS, practical recipes for beginners] Robert R. Agular mitp ISBN 978-3-8266-1779-9
/2/ HTML HTML Handbuch [HTML Manual] Stefan Münz/Wolfgang Nefzger Franzis Verlag ISBN 3-7723-6654-6
/3/ Javascript JavaScript und Ajax, Das umfassende Handbuch [JavaScript and Ajax, The comprehensive manual] Christian Wenz Galileo Press ISBN 978-3-8362-1128-4
9.2 Internet link specifications
This table contains a selection of links on further information. Table 9-2
Topic Title
/1/ Link to this document
http://support.automation.siemens.com/WW/view/en/68011496
/2/ Siemens Industry Online Support
http://support.automation.siemens.com
/3/ HTML, JavaScript http://www.selfhtml.de/ http://de.selfhtml.org/ http://www.little-boxes.de/
/4/ S7-1500 Web server function manual
http://support.automation.siemens.com/WW/view/en/59193560
/5/ S7-1500 System Manual
http://support.automation.siemens.com/WW/view/en/59191792

10 History
Own Web Page for S7-1500 Entry ID: 68011496, V1.0, 02/2014 41
S
iem
ens
AG 2
014
All r
ight
s re
serv
ed
10 History Table 10-1
Version Date Modifications
V1.0 02/2014 First version