Embed Size (px)
Citation preview

AFR650OPERATION MANUAL
APPLIANCES FOR LIVING

Congratulations, you are now the proud owner of an ARTUSI cooking appliance. Thank you for purchasing ARTUSI and welcome to the ARTUSI Family.
This instruction manual has been specially created to inform you of the full range of features your ARTUSI appliance has to offer and serves as an introduction to getting the very best out of your ARTUSI appliance.
We present detailed information on each of the features your ARTUSI appliance consists of. Once you have read this section you will be able to choose the most appropriate settings for your appliance when cooking different types of food.
We ask you to read the instructions in this booklet very carefully as this will allow you to get the best results from using your appliance. KEEP THE DOCUMENTATION OF THIS PRODUCT FOR FUTURE REFERENCE.
TO REGISTER YOUR PRODUCT WITH ARTUSI, PLEASE FILL OUT THE WARRANTY CARD AT THE END OF THIS BOOKLET AND POST IT TO: REPLY PAID 83617 LEICHHARDT NSW 2040
Dear Artusi Customer, please read this user manual carefully before using the product and, keep it permanently at your disposal.Note: This user manual is prepared for more than one model. Some of the features specified in this Manual may not be available on your appliance.All our appliances are only for domestic use, not for commercial use. Products marked with (*) are optional.
“THIS APPLIANCE SHALL BE INSTALLED IN ACCORDANCE WITH THE REGULA TIONS FORCE AND ONLY USED IN A WELL VENTILATED SPACE. READ THE INSTRUCTIONS BEFORE INSTALLING OR USING THIS APPLIANCE”
“Conforms with the WEEE Regulations.”
HOOD DUCTING GUIDE
Here are some important points to consider when choosing and/or installing a range hood:• An externally ducted range hood will generally
outperform a recirculating range hood.• We discourage the use of flexible ducting as this has
a significant negative impact on airflow and noise due to turbulence
• caused by the ribs. Instead consider using semi-rigid or rigid duct.
• Avoid using a narrower duct than specified as this will reduce airflow; the best performance is obtained when the range hood is installed with a short duct with minimal bends.
• To determine the required clearance between the cooktop and the range hood always consult the installation manual for both the range hood and cooktop. The required clearance is the greater of the distance specified in either manual (and a minimum of 600mm between the highest point of the highest burner for gas cooktops).
• Five metres is the recommended maximum length for ducting (see diagram 1.). When the ducting exceeds five metres in length the installation of a TD500 or TD350 in-line motor is required, which must be placed one metre from the external vent (see diagram 2.).
1.0m
1.0m
1.0m
90˚ Bend = 1.0m
1.0m
2.0m
1.0m
1.0m
90˚ Bend = 1.0m
3.0m
1.0m
In-line Motor - this needs to run off a separate activation switch to the range hood
External Vent
External VentDiagram 1.
Diagram 2.
1
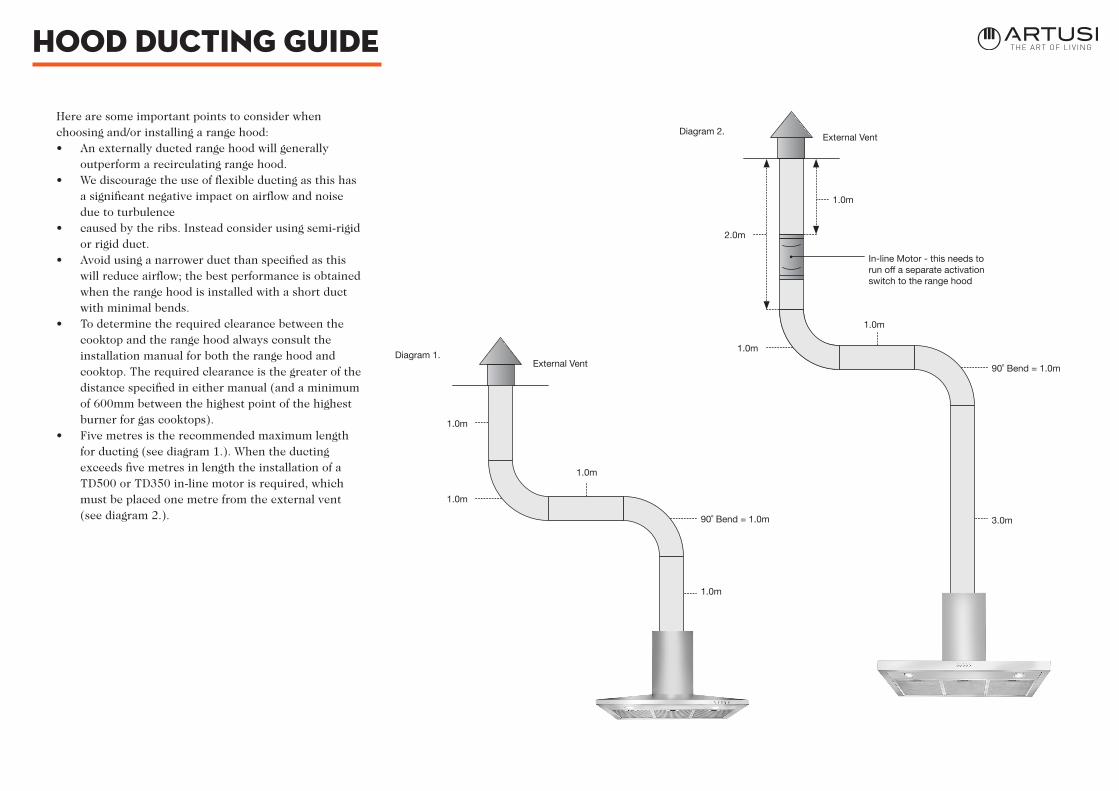
Information and adviceCAUTION: Accessible parts may become hot when used with cooking appliances.
In certain circumstances electrical appliance may be a danger hazard.
G) Disconnect the electrical plug prior to any maintenance.F)Constantly check food frying to avoid that the overheated oil may become a fire hazard.E)Avoid opening gasometer when there is no pan on the stove , as it is damaging for the filters and a fire hazardD)Do not flambe under the cooker hood.C)Do not touch the light bulb within half an hour after appliance use.B)Do not check the status of the filters while the cooker hood is operating. A)There shall be adequate ventilation of the room when the cooker hood is used at the same time as appliances burning gas or other fuels.
H) Regulations concerning the discharge of air have to be fulfilled.I) When the range hood and appliances supplied with energy other than electricity are simultaneously in operation.
The negative pressure in the room must not exceed 4 Pa (4x10¯ bar)5
J)This appliance is not intended for use by persons (including children) with reduced physical, sensory or mental capabilities, or lack of experience and knowledge, unless they have been given supervision or instruction concerning use of the appliance by a person responsible for their safety.
K)Children should be supervised to ensure that they do not play with the appliance.L)The range hood is intended to be installed over a hob having no more than four hob elements. M) Indoor use and household use only.N)When the appliance is not in use and before cleaning, unplug the appliance from the outlet.O)To protect against the risk of electrical shock, do not immerse the unit, cord or plug in water or other liquid.
P)If the supply cord is damaged,it must be replaced by the manufacturer its service agent or similarly qualified persons in order to avoid a hazard.Q)There is a fire risk if cleaning is not carried out in accordance with the instructions.R)The details concerning the method and frequency of cleaning.S)The air must not be discharged into a flue that is used for exhausting fumes from appliances burning gas or other fuels.

2
Know your cooker hood
Congratulations on the purchase of our cooker hood which is designed to include many superior features. Before installing and using the hood carefully read all the instructions.

3
Fully convertible for vertical, horizontal or recirculating operation.
Selection of the venting direction
The air must not be discharged into a flue that is used for exhausting fumes from appliances burning gas or other fuels
Recirculating
dischargevertical
3
4
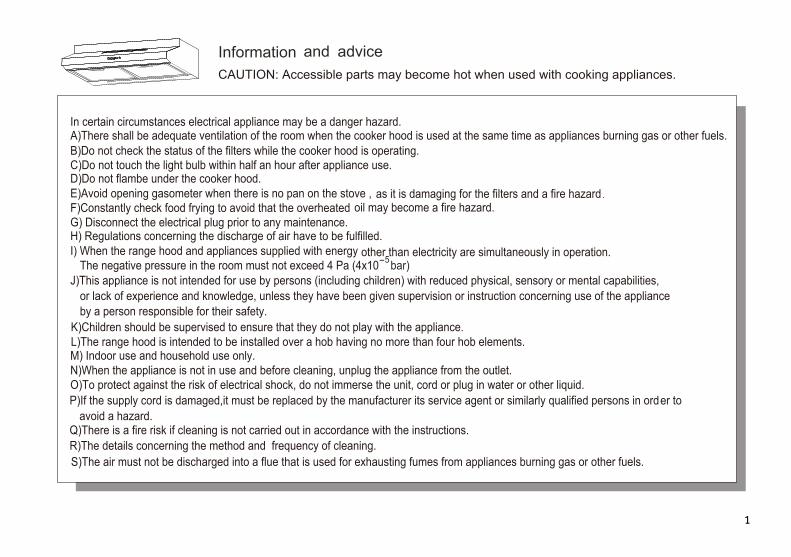
Vertical dischargeRefer to diagram 2. Remove knockout A. Use a flat head screwdriver inserted under one end and gently lever it up. Cut the attachment points using tin snips and remove.
RecirculatingRefer to diagram 3. Leave knockout A in place. Note: The air is recirculated back into the kitchen. The hood is supplied with carbon filters to reduce cooking odours.
Re-circulating
5
65
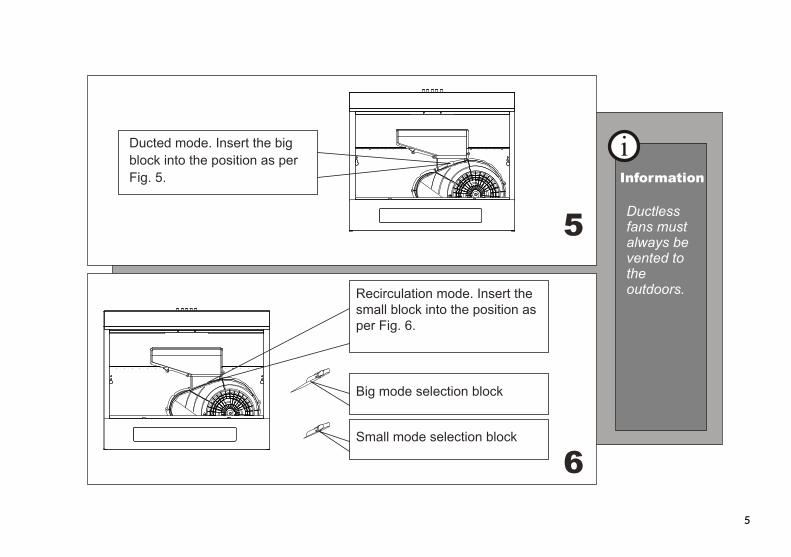
Ducted mode. Insert the big block into the position as per Fig. 5.
Recirculation mode. Insert the small block into the position as per Fig. 6.
Big mode selection block
Small mode selection block

6
Note: You will need two people to install this hood.Tools required;
Drill Flat head screwdriver Phillips head screwdriver or cordless drill with a Phillips head bit. Tin snips Measuring tape
Refer to diagram 7. 1. Remove the hood from the carton and remove all packaging materials2. Lay it upside down on a padded/ protected surface to prevent damage.3. Install the hood so that the bottom of it is no less than 600mm and no more than 750mm above the cooking elements / burners.
Ensure the power is turned off before beginning this installation.
Installation work and electrical wiring must be done by qualified person(s) in accordance with all applicable laws, regulations and safety standards.
600-750mm

7
2. If the underside of the cabinet is thin or recessed and can't accommodate the mounting screws, attach wooden blocks (not supplied) on both sides of the installation area to provide a sturdy support for the hood. The bottom of each block should be flush with the bottom of the cabinet lip.3. Make sure the opening in the hood aligns with the ductwork when using vertical or horizontal discharge methods. Adjust if necessary while the mounting screws are still only halfway tightened.4. Tighten all screws and then install screws into the security holes to prevent hood movement as a safety precaution.
Refer to diagram 8.Caution: The hood should be power OFF1. Hold the hood in position, and (with the help of someone) mark the location of the keyhole-shaped holes in the hood. Drive screws about halfway into the underside of the cabinet on those markings, and slip the hood onto the screws. Use the screws that are supplied for your model to ensure stability. Note: If the underside of the cabinet can't accommodate mounting screws, put blocks of wood (not supplied) on both sides of the installation area.
Know where the electrical wiring and other utilities are located behind walls before cutting or drilling into walls or ceilings.
160
300
199 596545

Refer to diagram 9 Should the hood be unable to be secured to the cabinet then fix it to the wall. 1. Hold the hood in position, and (with the help of someone) mark the location of the keyhole-shaped holes in the hood on the wall.2. Drive screws into position and slip the hood onto the screws.3. Make sure the opening in the hood aligns with the ductwork when using vertical or horizontal discharge methods. Adjust if necessary while the mounting screws are still only halfway tightened.4. Tighten all screws and then Install screws into the security holes to prevent hood movement as a safety precaution.
The hood must not be installed and connected to flues where other appliances are installed.
8
500
545
141
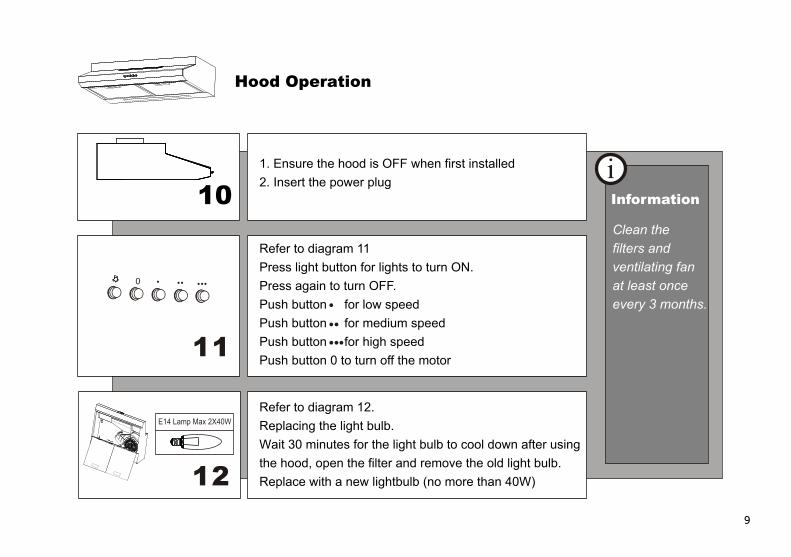
1. Ensure the hood is OFF when first installed2. Insert the power plug
Refer to diagram 11Press light button for lights to turn ON. Press again to turn OFF.Push button for low speedPush button for medium speedPush button for high speedPush button 0 to turn off the motor
Clean the filters and ventilating fan at least once every 3 months.
Refer to diagram 12. Replacing the light bulb. Wait 30 minutes for the light bulb to cool down after using the hood, open the filter and remove the old light bulb. Replace with a new lightbulb (no more than 40W)
10
Hood Operation
E14 Lamp Max 2X40W
9

Cleaning instructions
Caution: Turn off the hood before cleaning.
1. Clean the surface of the hood frequently using mild soap or detergent at least once every 3 months.
2. Avoid the use of harsh cleaning agents as it may spoil the hood’s appearance.
3. Wash the filters using mild soap or detergent. Note that heavy grease build up may not be able to be cleaned and the filters should be replaced.
Never let water enter the motor or electrical parts as this may cause an electric shock hazard.
10
11
The manufacturer shall decline all responsibility when the recommendations and instructions regarding installation, maintenance
and use are not observed.

Worldwide Appliances Pty Limited A.B.N. 45868077422Office:48-50 Moore Street, Leichhardt N.S.W 2040 Post:Locked Bag 3000, Annandale, N.S.W 2038 P: 1300 694 583WARRANTY REGISTRATIONYour ongoing satisfaction with your artusi product is important to us. We ask that you complete the enclosed Warranty Registration Card and return it to us so that we have a record of the artusi product purchased by you.
PRIVACYWorldwide Appliances respects your privacy and is committed to handling your personal information in accordance with the National Privacy Principles and the Privacy Act 1988 (Cth). A copy of the Worldwide Appliances Privacy Policy is available at www.artusi.com.au. Worldwide Appliances will not disclose any personal information set out in the Warranty Registration Card (“Personal Information”) without your consent unless required by:1. law;2. any Worldwide Appliances related company;3. any service provider which provide services to artusi or assist artusi in providing services (including repair and warranty services) to customers. Our purpose in collecting the Personal Information isto keep a record of the artusi product purchased by you, in order to provide a better warranty service to you in the unlikely event that there is a problem with your artusi product. Worldwide Appliances may contact you at any one or more of the address, email address or telephone numbers set out in the Warranty Registration
Card. Please contact artusi on 1300 694 583 should you not wish to be contacted by Worldwide Appliances.
WARRANTY1. WarrantyWorldwide Appliances warrants that each artusi product will remain, for a period of either 12 months or 24 months of warranty. All Warranties are valid from the original date of purchase, And warranty claims must be accompanied by the proof of purchase.24 months warranty products:All Built-in Appliances – Limited to Ovens, Gas, Induction and Electric Cooktops, and All RangehoodsFreestanding Cookers - Gas and Electric Models (900mm Width)Dishwashers - Freestanding, Fully Integrated, Semi Integrated and built-in12 months warranty products:Freestanding Cookers - Gas and Electric Models in 50cm, 54cm and 60cm WidthsPortable Appliances* – Benchtop Models and Portable Gas Models
2. What is not Covered by the Warranty.The Warranty does not apply if an artusi product is defective by a factor other than a defect arising in the manufacture of the artusi product, including but not limited to:(a) damage through misuse (including failure to maintain, service or use with proper care), neglect, accident or ordinary wear and tear (including deterioration of parts and accessories and glass breakage);(b) use for purpose for which the artusi product was not sold or designed;(c) use or installation which is not in accordance with any specified instructions for use or installation;(d) use or operation after a defect has occurred or been discovered;(e) damage through freight, transportation or
handling in transit (other than when Worldwide Appliances is responsible);(f) damage through exposure to chemicals, dusts, residues, excessive voltage, heat, atmospheric conditions or other forces or environmental factors outside the control or Worldwide Appliances;(g) repair, modification or tampering by the purchaser or any person other than Worldwide Appliances, an employee of Worldwide Appliances or an authorised artusi service contractor*;(h) use of parts, components or accessories which have not been supplied or specifically approved by artusi.(i) damage to surface coatings caused by cleaning or maintenance using products not recommended in the artusi product handbook provided to the purchaser upon purchase of the artusi product;(j) damage to the base of an electric oven due to items having been placed on the base of the oven cavity or covering the base, such as aluminium foil (this impedes the transfer of heat from the element to the oven cavity and can result in irreparable damage); or(k) damages, dents or other cosmetic imperfections not affecting the performance of the artusi in respect of an artusi product purchased as a “factory second” or from displayThe Warranty does not extend to light globes used in artusi products.3. Domestic UseEach artusi product is made for domestic use. This Warranty may not extend to artusi products used for commercial purposes.4. Time for Claim under the WarrantyYou must make any claim under this Warranty within twenty eight (28) days after the occurrence of an event which gives rise to a claim pursuant to the Warranty, by booking a service call on the telephone number below.
Continued over...

Please complete and send to ARTUSI at: REPLY PAID 83617 LEICHHARDT NSW 2040
Last Name: First Name:
Address:
State: Postcode: Email:
Home Phone: Mobile:
Purchase Date: / / (Please attach proof of purchase to validate warranty)
MODEL NUMBER SERIAL NUMBER (if you cannot locate the serial number please call ARTUSI on 1300 694 583)
1
2
3
4
WARRANTY REGISTRATION CARD01052013
01032014
5. Proof of PurchaseCustomers must retain proof of purchase in order to be eligible to make a warranty claim in respect of an artusi product.
6. Claiming under the WarrantyCustomers will bear the cost of claiming under this Warranty unless Worldwide Appliances determines the expenses are reasonable, in which case the customer must claim those expenses by providing written evidence of each expense to Worldwide Appliances at the address on the Warranty Registration Card.
7. Statutory Rights(a) These terms and conditions do not affect your statutory rights.(b) The limitations on the Warranty set out in this document do not exclude or limit the application of the consumer guarantees set out in the Act or any other equivalent or corresponding legislation in the relevant jurisdiction where to do so would:(i) contravene the law of the relevant jurisdiction; or (ii) cause any part of the Warranty to be void.
(c) Worldwide Appliances excludes indirect or consequential loss of any kind (including, without limitation, loss of use of the artusi product) and (other than expressly provided for in these terms and conditions) subject to all terms,conditions and warranties implied by custom, the general law, the Act or other statute.(d) The liability of Worldwide Appliances to you for a breach of any express or non-excludable implied term, condition or warranty is limited at the option of Worldwide Appliances to:(i) replacing or repairing the defective part of the artusi product;(ii) paying the cost of replacing or repairing the defective part of the artusi product;(iii) replacing the artusi product; or(iv) paying the cost of replacing the artusi product.(e) Our goods come with guarantees that cannot be excluded under the Australian Consumer Law. You are entitled to a replacement or refund for a major failure and for compensation for any other reasonably foreseeable loss or damage. You are also entitled to have the goods repaired or replaced if the goods fail to be of acceptable quality and the failure does not amount to a Warranty Card tear off
major failure.
8. DefectsAny part of an artusi product deemed to be defective and replaced by Worldwide Appliances is the property of Worldwide Appliances. Worldwide Appliances reserves the right to inspect and test artusi products in order to determine the extent of any defect and the validity of a claim under the Warranty.*To locate your closest artusi authorised service agent please contact us on 1300 652 100 or visit www.artusi.com.au
ALL SERVICE CALLS MUST BE BOOKED THROUGH AN AUTHORISED DEALER OR WARRANTY DEPARTMENT ON 1300 652 100 OR stokesaps.com.au/artusi-service 01032014


A RT U S I .CO M . AUP: 1 3 0 0 6 49 5 8 3
NSW & ACT (HEAD OFFICE)48-50 MOORE STREET LEICHHARDTF 02 8569 4699
QLD1/42 CAVENDISH ROAD COORPAROOF 07 3397 0850
VIC, TAS & SA1211 TOORAK ROAD CAMBERWELLF 03 9809 2155
WA & NTUNIT 10/55 HOWE STREET OSBORNE PARKF 08 9201 9188
NZPO BOX 11.160SOCKBURN CHRISTCHURCHF 03 344 5906
ARTUSI OFFICES ARE OPEN DAILY FROM 9AM–5PM AND SATURDAYS 10AM–4PM
DISCLAIMERWorldwide Appliances PTY LTD, trading as ARTUSI, is continually seeking ways to improve the design specifications, aesthetics and production techniques of its products. As a result alterations to our products and designs take place continually. Whilst every effort is made to produce information and literature that is up to date, this brochure should not be regarded as an infallible guide to the current specifications, nor does it constitute an offer for the sale of any particular product. Product dimensions indicated in our literature is indicative only. Actual product only should be used to define dimension cutouts. Distributors, and retailers are not agents of ARTUSI and are not authorised to bind ARTUSI by any express or implied undertaking or representation.