Embed Size (px)
Citation preview

Lesson and media files available for download
Logic Pro XProfessional Audio Production
David Nahmani
Apple Pro Training Series
Level One Certification

Apple Pro Training Series
Logic Pro XDavid Nahmani

Apple Pro Training Series: Logic Pro X David NahmaniCopyright © 2014 by David Nahmani Updated for Logic Pro X v10.0.6 February 6, 2014
Peachpit Presswww.peachpit.com
To report errors, please send a note to [email protected]. Peachpit Press is a division of Pearson Education. Apple Series Editor: Lisa McClainEditor: Bob LindstromProduction Coordinator: Kim Elmore, Happenstance Type-O-RamaTechnical Editor: Robert BrockApple Project Manager: Shane RossApple Reviewer: Shane RossCopy Editor: Darren MeissTechnical Reviewer: John MooresProofreader: Darren MeissCompositor: Cody Gates, Happenstance Type-O-RamaIndexer: Jack LewisCover Illustration: Paul MavridesCover Production: Cody Gates, Happenstance Type-O-Rama
Notice of RightsAll rights reserved. No part of this book may be reproduced or transmitted in any form by any means, electronic, mechani-cal, photocopying, recording, or otherwise, without the prior written permission of the publisher. For information on getting permission for reprints and excerpts, contact [email protected].
BIG © 2013 composed and produced by Distant Cousins used with permission. For more on Distant Cousins, visit www.soundcloud.com/distant_cousins; Facebook.com/3Distantcousins; @3Distantcousins. All rights reserved.
Little Lady © 2013 composed and produced by Matt McJunkins and David Nahmani; drums performed by Jeff Friedl, bass guitar performed by Matt McJunkins, guitars performed by David Nahmani. All rights reserved.
Raise It Up © 2012 composed and produced by Distant Cousins used with permission. Available on iTunes. For more on Distant Cousins, visit www.soundcloud.com/distant_cousins; Facebook.com/3Distantcousins; @3Distantcousins. All rights reserved.
Alliance © 2013 written and produced by Tim Butler and Tom Parry used with permission. For more on Televisor, visit www.televisormusic.com. All rights reserved.
The projects and footage supplied with this book may only be used for educational purposes in association with the lessons included. Any other use, including but not limited to incorporating footage into another project, duplicating or distributing footage, is expressly forbidden and requires explicit permission from the copyright holders listed above.
Notice of Liability The information in this book is distributed on an “As Is” basis, without warranty. While every precaution has been taken in the preparation of the book, neither the author nor Peachpit Press shall have any liability to any person or entity with respect to any loss or damage caused or alleged to be caused directly or indirectly by the instructions contained in this book or by the computer software and hardware products described in it.
Trademarks Many of the designations used by manufacturers and sellers to distinguish their products are claimed as trademarks. Where those designations appear in this book, and Peachpit was aware of a trademark claim, the designations appear as requested by the owner of the trademark. All other product names and services identified throughout this book are used in editorial fashion only and for the benefit of such companies with no intention of infringement of the trademark. No such use, or the use of any trade name, is intended to convey endorsement or other affiliation with this book.
ISBN 13: 978-0-321-96759-6 ISBN 10: 0-321-96759-3 9 8 7 6 5 4 3 2 Printed and bound in the United States of America

Acknowledgments My deepest gratitude to the artists and producers who agreed to provide their Logic sessions for this book: Distant Cousins for their songs “Raise It Up” and “BIG,” Televisor for their song “Alliance,” and Matt McJunkins for helping me write and produce the song “Little Lady.”


Contents at a Glance
v
Getting Started . . . . . . . . . . . . . . . . . . . . . . . . . . . . . . . . . . . . . . . . . xi
Exploring the Interface and Working with Real InstrumentsLesson 1 Make Music with Logic Now! . . . . . . . . . . . . . . . . . . . . . . . . . . . . . 3Lesson 2 Recording Audio . . . . . . . . . . . . . . . . . . . . . . . . . . . . . . . . . . . . . . . 59Lesson 3 Editing Audio . . . . . . . . . . . . . . . . . . . . . . . . . . . . . . . . . . . . . . . . 103
Working with Virtual InstrumentsLesson 4 Produce a Virtual Drum Track . . . . . . . . . . . . . . . . . . . . . . . . . 145Lesson 5 Recording MIDI and Using Controllers . . . . . . . . . . . . . . . . . . 185Lesson 6 Creating and Editing MIDI . . . . . . . . . . . . . . . . . . . . . . . . . . . . 247
Building a SongLesson 7 Editing Pitch and Time . . . . . . . . . . . . . . . . . . . . . . . . . . . . . . . . 297Lesson 8 Editing an Arrangement . . . . . . . . . . . . . . . . . . . . . . . . . . . . . . . 343
Mixing and Automating a SongLesson 9 Mixing . . . . . . . . . . . . . . . . . . . . . . . . . . . . . . . . . . . . . . . . . . . . . . 385Lesson 10 Automating the Mix . . . . . . . . . . . . . . . . . . . . . . . . . . . . . . . . . . . 435
Appendix A Using External MIDI Devices . . . . . . . . . . . . . . . . . . . . . . . . . . 469Appendix B Keyboard Shortcuts (Default for U.S. Keyboard) . . . . . . . . . . 485
Glossary . . . . . . . . . . . . . . . . . . . . . . . . . . . . . . . . . . . . . . . . . . . . . 491 Index . . . . . . . . . . . . . . . . . . . . . . . . . . . . . . . . . . . . . . . . . . . . . . . . 503

Table of Contents
vi
Getting Started . . . . . . . . . . . . . . . . . . . . . . . . . . . . . . xi
Exploring the Interface and Working with Real Instruments
Lesson 1 Make Music with Logic Now! . . . . . . . . . . . . . . . . . . 3 Creating a Logic Pro X Project . . . . . . . . . . . . . . . . . . . . . . . . . . . . 3 Exploring the Interface . . . . . . . . . . . . . . . . . . . . . . . . . . . . . . . . . . . 7 Navigating the Project . . . . . . . . . . . . . . . . . . . . . . . . . . . . . . . . . . 15 Build Up the Arrangement . . . . . . . . . . . . . . . . . . . . . . . . . . . . . . 33 Mixing the Song . . . . . . . . . . . . . . . . . . . . . . . . . . . . . . . . . . . . . . . 40 Mixing Down to a Stereo File . . . . . . . . . . . . . . . . . . . . . . . . . . . . 51 Lesson Review . . . . . . . . . . . . . . . . . . . . . . . . . . . . . . . . . . . . . . . . . 54
Lesson 2 Recording Audio . . . . . . . . . . . . . . . . . . . . . . . . . . . . 59 Setting Up Digital Audio Recording . . . . . . . . . . . . . . . . . . . . . . 59 Recording a Single Track . . . . . . . . . . . . . . . . . . . . . . . . . . . . . . . . 63 Recording Additional Takes . . . . . . . . . . . . . . . . . . . . . . . . . . . . . 74 Punching In and Out . . . . . . . . . . . . . . . . . . . . . . . . . . . . . . . . . . . 80 Changing Recording Settings . . . . . . . . . . . . . . . . . . . . . . . . . . . . 89 Deleting Unused Audio Files . . . . . . . . . . . . . . . . . . . . . . . . . . . . 98 Lesson Review . . . . . . . . . . . . . . . . . . . . . . . . . . . . . . . . . . . . . . . . 100
Lesson 3 Editing Audio . . . . . . . . . . . . . . . . . . . . . . . . . . . . . . 103 Assigning Mouse Tools . . . . . . . . . . . . . . . . . . . . . . . . . . . . . . . . 104 Editing Regions in the Workspace . . . . . . . . . . . . . . . . . . . . . . . 108 Comping Takes . . . . . . . . . . . . . . . . . . . . . . . . . . . . . . . . . . . . . . . 111 Adding Fades and Crossfades . . . . . . . . . . . . . . . . . . . . . . . . . . . 118

Contents vii
Editing Regions in the Audio Track Editor . . . . . . . . . . . . . . . . 125 Editing Files in the Audio File Editor . . . . . . . . . . . . . . . . . . . . 131 Aligning Audio . . . . . . . . . . . . . . . . . . . . . . . . . . . . . . . . . . . . . . . 134 Lesson Review . . . . . . . . . . . . . . . . . . . . . . . . . . . . . . . . . . . . . . . . 140
Working with Virtual Instruments
Lesson 4 Produce a Virtual Drum Track . . . . . . . . . . . . . . . 145 Creating a Drummer Track . . . . . . . . . . . . . . . . . . . . . . . . . . . . . 146 Arranging the Drum Track . . . . . . . . . . . . . . . . . . . . . . . . . . . . . 158 Customizing the Drum Kit . . . . . . . . . . . . . . . . . . . . . . . . . . . . . 173 Lesson Review . . . . . . . . . . . . . . . . . . . . . . . . . . . . . . . . . . . . . . . . 182
Lesson 5 Recording MIDI and Using Controllers . . . . . . . . 185 Using a Patch from the Library . . . . . . . . . . . . . . . . . . . . . . . . . . 186 Recording MIDI . . . . . . . . . . . . . . . . . . . . . . . . . . . . . . . . . . . . . . 191 Correcting the Timing of a MIDI Recording . . . . . . . . . . . . . . 194 Joining Recordings into a MIDI Region . . . . . . . . . . . . . . . . . . 197 Recording MIDI Takes . . . . . . . . . . . . . . . . . . . . . . . . . . . . . . . . . 202 Punching In and Out . . . . . . . . . . . . . . . . . . . . . . . . . . . . . . . . . . 205 Creating a Layered Sound Patch . . . . . . . . . . . . . . . . . . . . . . . . . 208 Creating a Split Keyboard Patch . . . . . . . . . . . . . . . . . . . . . . . . . 212 Mapping Smart Controls to Patch Parameters . . . . . . . . . . . . . 215 Controlling Logic from an iPad Using Logic Remote . . . . . . . 223 Using Step Input Recording . . . . . . . . . . . . . . . . . . . . . . . . . . . . . 232 Processing MIDI Notes with MIDI Plug-Ins . . . . . . . . . . . . . . 236 Lesson Review . . . . . . . . . . . . . . . . . . . . . . . . . . . . . . . . . . . . . . . . 244
Lesson 6 Creating and Editing MIDI . . . . . . . . . . . . . . . . . . 247 Creating MIDI Notes in the Piano Roll Editor . . . . . . . . . . . . . 248 Creating MIDI Notes in the Score Editor . . . . . . . . . . . . . . . . . 261 Importing a MIDI File . . . . . . . . . . . . . . . . . . . . . . . . . . . . . . . . . 271 Editing MIDI Data in the Event List . . . . . . . . . . . . . . . . . . . . . 273 Creating and Editing MIDI Continuous Controllers . . . . . . . 280 Lesson Review . . . . . . . . . . . . . . . . . . . . . . . . . . . . . . . . . . . . . . . . 292

viii Contents
Building a Song
Lesson 7 Editing Pitch and Time . . . . . . . . . . . . . . . . . . . . . . 297 Setting a Project Tempo by Detecting
the Tempo of a Recording . . . . . . . . . . . . . . . . . . . . . . . . . . . . 298 Using and Creating Apple Loops . . . . . . . . . . . . . . . . . . . . . . . . 301 Creating Tempo Changes and Tempo Curves . . . . . . . . . . . . . 308 Adding a Turntable or Tape Slow-Down Effect . . . . . . . . . . . . 313 Making One Track Follow the Groove of Another Track . . . . 315 Change the Playback Pitch and Speed with Varispeed . . . . . . 318 Editing the Timing of an Audio Region . . . . . . . . . . . . . . . . . . 321 Tuning Vocal Recordings . . . . . . . . . . . . . . . . . . . . . . . . . . . . . . . 330 Lesson Review . . . . . . . . . . . . . . . . . . . . . . . . . . . . . . . . . . . . . . . . 339
Lesson 8 Editing an Arrangement . . . . . . . . . . . . . . . . . . . . . 343 Previewing the Song . . . . . . . . . . . . . . . . . . . . . . . . . . . . . . . . . . . 343 Copying Material to Fill in Parts . . . . . . . . . . . . . . . . . . . . . . . . 346 Rendering Multiple Regions . . . . . . . . . . . . . . . . . . . . . . . . . . . . 357 Adding and Deleting Sections . . . . . . . . . . . . . . . . . . . . . . . . . . . 360 Cutting Regions to Remove Silence or Noise . . . . . . . . . . . . . . 370 Lesson Review . . . . . . . . . . . . . . . . . . . . . . . . . . . . . . . . . . . . . . . . 379
Mixing and Automating a Song
Lesson 9 Mixing . . . . . . . . . . . . . . . . . . . . . . . . . . . . . . . . . . . . 385 Organizing Windows and Tracks . . . . . . . . . . . . . . . . . . . . . . . . 386 Using the Amp Designer . . . . . . . . . . . . . . . . . . . . . . . . . . . . . . . 394 Adjusting Levels and Pan . . . . . . . . . . . . . . . . . . . . . . . . . . . . . . . 401 Submixing Tracks and Processing the Submix . . . . . . . . . . . . . 403 Using an EQ Plug-In . . . . . . . . . . . . . . . . . . . . . . . . . . . . . . . . . . . 410 Using Delay and Reverberation . . . . . . . . . . . . . . . . . . . . . . . . . 416 Using Dynamic Processing Plug-ins . . . . . . . . . . . . . . . . . . . . . 424 Using a Few Tips and Tricks . . . . . . . . . . . . . . . . . . . . . . . . . . . . 431 Lesson Review . . . . . . . . . . . . . . . . . . . . . . . . . . . . . . . . . . . . . . . . 432

Contents ix
Lesson 10 Automating the Mix . . . . . . . . . . . . . . . . . . . . . . . . 435 Creating and Editing Offline Automation . . . . . . . . . . . . . . . . . 436 Recording Live Automation . . . . . . . . . . . . . . . . . . . . . . . . . . . . 448 Using MIDI Controllers . . . . . . . . . . . . . . . . . . . . . . . . . . . . . . . . 458 Bouncing the Mix . . . . . . . . . . . . . . . . . . . . . . . . . . . . . . . . . . . . . 462 Lesson Review . . . . . . . . . . . . . . . . . . . . . . . . . . . . . . . . . . . . . . . . 465
Appendix A Using External MIDI Devices . . . . . . . . . . . . . . . . 469 Using the External Instrument Plug-in . . . . . . . . . . . . . . . . . . . 470 Configuring MIDI Hardware . . . . . . . . . . . . . . . . . . . . . . . . . . . 472
Appendix B Keyboard Shortcuts (Default for U.S. Keyboard) . . . . . . . . . . . . . . . . . . 485 Panes and Windows . . . . . . . . . . . . . . . . . . . . . . . . . . . . . . . . . . . 485 Navigation and Playback . . . . . . . . . . . . . . . . . . . . . . . . . . . . . . . 486 Zooming . . . . . . . . . . . . . . . . . . . . . . . . . . . . . . . . . . . . . . . . . . . . . 487 Channel Strip, Track, and Region Operations . . . . . . . . . . . . . 487 Project Audio Browser . . . . . . . . . . . . . . . . . . . . . . . . . . . . . . . . . 489 Piano Roll Editor . . . . . . . . . . . . . . . . . . . . . . . . . . . . . . . . . . . . . . 489 Finder . . . . . . . . . . . . . . . . . . . . . . . . . . . . . . . . . . . . . . . . . . . . . . . 489
Glossary . . . . . . . . . . . . . . . . . . . . . . . . . . . . . . . . . . . 491Index . . . . . . . . . . . . . . . . . . . . . . . . . . . . . . . . . . . . . 503


xi
Getting Started
Welcome to the official Apple Pro Training Series course for Logic Pro X.
This book is a comprehensive introduction to professional music produc-
tion with Logic Pro X. It uses real-world music and hands-on exercises
to teach you how to record, edit, arrange, mix, produce, and polish audio
and MIDI files in a professional workflow. So let’s get started!
The MethodologyThis book takes a hands-on approach to learning the software, so you’ll be working through the project files and media you download from www.peach-pit.com. It’s divided into lessons that introduce the interface elements and ways of working with them, building progressively until you can comfortably grasp the entire application and its standard workflows.
Each lesson in this book is designed to support the concepts learned in the preceding lesson, and first-time readers should go through the book from start to finish. However each lesson is self-contained, so when you need to review a topic, you can quickly jump to any lesson.
The book is designed to guide you through the music production process as it teaches Logic. The lessons are organized into four sections.

xii Getting Started
Lessons 1–3: Exploring the Interface and Working with Real InstrumentsIn this section, you’ll explore the fundamentals of Logic Pro X, and learn to record and edit audio.
Lesson 1 starts you out with an overview of the entire process. You’ll become familiar with the interface and the various ways to navigate a project; use Apple loops to build a song from scratch; and then arrange, mix, and export the song to an MP3 file.
Lessons 2 and 3 dive deeper into typical situations you may encounter when recording from microphones or other audio sources. You’ll edit recordings to select the best portions of multiple takes, remove clicks, align recordings, and even reverse a recording to create a special effect.
Lessons 4–6: Working with Virtual InstrumentsLesson 4 describes how to produce a virtual drummer performance using the new Drummer and Drum Kit Designer features. You will choose the right drummer for the project, swap a drum kit with the kit of another drummer, edit the patterns, change which kit elements the drummer plays, shape an interpretation, and precisely control where fills are placed.
Lessons 5 and 6 immerse you in using software instruments. After choosing virtual instru-ments and recording MIDI performances, you’ll map Smart Controls to various plug-ins and assign them to your MIDI controller. Using the free Logic Remote app, you’ll control Logic from your iPad, and then create virtual performances in MIDI editors using your mouse or your MIDI keyboard.
Lessons 7–8: Building a SongIn Lessons 7 and 8, you’ll apply Flex editing to precisely adjust the timing and pitch of notes in an audio recording. Varispeed will allow you to work with your project at differ-ent tempos. You’ll add tempo changes and tempo curves to a project, match the tempos of multiple tracks, and make a track follow the groove of another track. Also covered are tuning a vocal recording, editing a project’s regions in the workspace to complete an arrangement, and adding and removing sections of a project.
Lessons 9–10: Mixing and Automating a SongLessons 9 and 10 instruct you in mixing audio and MIDI files into a final project: adding audio effects, adjusting levels, panning, EQing, adding delay and reverb, automating the

System Requirements xiii
mix by creating automation curves on your screen, and altering parameter values in real time with the mouse or a MIDI controller.
Appendix A describes how to use external MIDI devices, and Appendix B lists a wealth of useful keyboard shortcuts.
System RequirementsBefore using Apple Pro Training Series: Logic Pro X, you should have a working knowledge of your Mac and the Mac OS X operating system. Make sure that you know how to use the mouse and standard menus and commands; and also how to open, save, and close files. If you need to review these techniques, see the printed or online documentation included with your system.
Logic Pro X and the lessons in this book require the following system resources:
▶▶ Mac computer with an Intel processor, including:
4 GB of RAM
Display with 1280 x 768 or higher resolution
Mac OS X v10.8.4 or later
Minimum 40 GB of disk space to install Logic Pro X and its default media content
High-speed Internet connection for installation▶▶ A USB-connected MIDI keyboard (or compatible MIDI keyboard and interface) to
play software instruments▶▶ A low-latency multi-I/O audio interface (highly recommended for audio recording)▶▶ An iPad (optional, for controlling Logic using the Logic Remote iPad app)
Preparing Your Logic WorkstationThe exercises in this book require that you install Logic Pro X along with its default media content. If you have not yet installed Logic, you may purchase it from the App Store. When your purchase is completed, Logic Pro X will automatically be installed on your hard drive.
All the instructions and descriptions in this book assume that you installed Logic Pro X on a Mac without any legacy Logic media, and that you downloaded all the additional media except for the Legacy and Compatibility content.

xiv Getting Started
When you first open Logic Pro X, the app will automatically download and install about 2 GB of essential content. An alert then offers to download additional media content.
Click Download Additional Content to make sure that you install all the Logic Pro X media content. After you click Download Additional Content, the Additional Content window opens. Click the Select All Uninstalled button at the bottom left, and click the “Legacy and Compatibility” checkbox twice to deselect it. Depending on the speed of your Internet connection, the download process may take several hours.
NoTE ▶ If you have already installed Logic Pro X but did not install the additional con-tent, choose Logic Pro X > Download Additional Content, click Select All Uninstalled (make sure the Legacy and Compatibility content is not selected) and click Install.

Preparing Your Logic Workstation xv
NoTE ▶ If you have previously installed the Legacy and Compatibility content, or if you have earlier versions of Logic installed on your Mac, you may not always see the same results as those shown in the book, especially when viewing the Library, the Loop Browser, or the plug-in settings menus.
Downloading and Using the Logic Lesson FilesThe downloadable content for Apple Pro Training Series: Logic Pro X includes the project files you will use for each lesson, as well as media files that contain the audio and MIDI content you will need for each exercise. After you save the files to your hard disk, each les-son will instruct you in their use.
To download these files, you must have your guide’s access code—provided on a card in the back of the printed editions of this book or on the “Where Are the Lesson Files?” page in electronic editions of this book. When you have the code:
1 Go to www.peachpit.com/redeem, and enter your access code.
2 Click Redeem Code, and sign in or create a Peachpit.com account.
3 Locate the downloadable files on your Account page under the Lesson & Update Files tab.
4 Click the lesson file link and download the file to your Mac desktop.
NoTE ▶ If you purchase or redeem a code for the electronic version of this guide directly from Peachpit, the lesson file link will automatically appear on the Lesson & Update Files tab without the need to redeem an additional code.
5 After downloading the file to your Mac desktop, you’ll need to unzip the file to access a folder titled Logic Pro X Files, which you will save to your Mac desktop.
Logic Pro X Files contains two subfolders, Lessons and Media, that contain the work-ing files for this course. Make sure you keep these two folders together in the Logic Pro X Files folder on your hard disk. If you do so, your Mac should be able to main-tain the original links between the lessons and media files. Each lesson explains which files to open for that lesson’s exercises.

xvi Getting Started
Using Default Preferences and Selecting the Advanced ToolsAll the instructions and descriptions in this book assume that you are using the default preferences (unless instructed to change them) and the initialized key command preset for a U.S. keyboard. At the beginning of Lesson 1, you will be instructed how to show advanced tools and select all additional options.
If you have changed some of your Logic Pro X preferences, you may not realize the same results as described in the exercises. To make sure that you can follow along with this book, it’s best to revert to the initial set of Logic preferences before you start the lessons. Keep in mind, however, that when you initialize preferences, you lose your custom set-tings, and later you may want to reset your favorite preferences manually.
1 Choose Logic Pro X > Preferences > Advanced Tools.
2 Under Additional Options, select Audio, Surround, MIDI, Control Surfaces, Score, and Advanced Editing, and then close the preferences window.
3 Choose Logic Pro X > Preferences > Initialize All Except Key Commands.
A confirmation message appears.
4 Click Initialize.
Your preferences are initialized to their default states.
If you’re jumping ahead to a lesson other than Lesson 1, make sure that you select all additional options as detailed in step 2.
Using the U.S. Key Command PresetThis book assumes that you are using the default initialized key command preset for a U.S. keyboard. So, you may find that some of the key commands in your Logic installation do not function as they are described in this book.
If at any point, you find that the key commands don’t respond as described (for example, T doesn’t open the Toolbox as explained in the first exercise of Lesson 3), then you should per-form the following steps to back up your current key command set and replace it with the key command preset included with the lesson files downloaded from www.peachpit.com.
1 Choose Logic Pro X > Key Commands > Edit.
First, it is important to back up your current key commands, particularly if you’ve already created a set of custom key commands and want to restore it after you’ve fin-ished working with this book.

Preparing Your Logic Workstation xvii
2 In the Key Commands window, choose Options > Export Key Commands.
A Save As dialog opens.
3 In the Save As dialog, keep the default Key Commands location in the Save As field, and name your preset My shortcuts.
Your custom shortcuts can now be recalled as any other key command preset.
4 In the Key Commands window, choose Options > Preset to open the menu.
Your new preset appears at the bottom of the Presets sub-menu.
Now let’s import the key commands that you downloaded with your lesson files. The next steps assume that you’ve completed the steps in the Getting Started section, “Downloading and Using the Logic Lesson Files,” and that the Logic Pro X folder you downloaded from peachpit.com is on your desktop.
5 In the Key Commands window, choose Options > Import Key Commands.
An Open dialog appears.

xviii Getting Started
6 In the Open dialog, click the Desktop icon in the sidebar (or press Command-D). Open the Logic Pro X Files folder, and inside the Media folder, open US-Defaults.logikcs.
Logic will now respond to the key commands as described in this book.
Screen ResolutionDepending on your display resolution, some of the project files may appear different on your screen than they do in the book. When you open a project, if you can’t see the whole Arrange window, move the window until you can see the three window controls at the left of the title bar, and click the Zoom button (the third button from the left) to fit the window to the screen.
When using a low display resolution, you may also have to zoom or scroll more often than instructed in the book when performing some of the exercise steps. In some cases, you may have to temporarily resize or close an area of the Arrange window to complete an action in another area.
About the Apple Pro Training SeriesApple Pro Training Series: Logic Pro X is both a self-paced learning tool and the official curriculum of the Apple Pro Training and Certification Program. Developed by experts in the field and certified by Apple, the series is used by Apple Authorized Training Cen-ters worldwide and offers complete training in all Apple Pro products. The lessons are designed to let you learn at your own pace. Each lesson concludes with review questions and answers summarizing what you’ve learned, which can be used to help you prepare for the Apple Pro Certification Exam.
For a complete list of Apple Pro Training Series books, see the ad at the back of this book or visit www.peachpit.com/apts.

Apple Pro Certification Program xix
Apple Pro Certification ProgramThe Apple Pro Training and Certification Program is designed to keep you at the forefront of Apple digital media technology while giving you a competitive edge in today’s ever-changing job market. Whether you’re an editor, graphic designer, sound designer, special-effects artist, or teacher, these training tools are meant to help you expand your skills.
Upon completing the course material in this book, you can become a certified Apple Pro by taking the certification exam at an Apple Authorized Training Center. Successful cer-tification as an Apple Pro gives you official recognition of your knowledge of Apple pro-fessional applications while allowing you to market yourself to employers and clients as a skilled, pro-level user of Apple products.
For those who prefer to learn in an instructor-led setting, Apple offers training courses at Apple Authorized Training Centers worldwide. These courses, which use the Apple Pro Training Series books as their curriculum, are taught by Apple Certified Trainers and bal-ance concepts and lectures with hands-on labs and exercises. Apple Authorized Training Centers have been carefully selected and have met Apple’s highest standards in all areas, including facilities, instructors, course delivery, and infrastructure. The goal of the pro-gram is to offer Apple customers, from beginners to the most seasoned professionals, the highest-quality training experience.
For more information, please see the ad at the back of this book, or to find an Authorized Training Center near you, go to training.apple.com.
ResourcesApple Pro Training Series: Logic Pro X is not intended as a comprehensive reference man-ual, nor does it replace the documentation that comes with the application. For compre-hensive information about program features, refer to these resources:
▶▶ Logic Pro Help, accessed through the Logic Pro X Help menu, contains a description of most features. Other documents available in the Help menu can also be valuable resources.
▶▶ The Apple websites www.apple.com/logic-pro/ and www.apple.com/support/logicpro/.▶▶ The Logic Pro Help website, an online community of Logic users moderated by the
author of this book, David Nahmani: www.logicprohelp.com/forum.

This page intentionally left blank

4 Time This lesson takes approximately 75 minutes to complete.
Goals Create a new project with a Drummer track
Choose a drummer and drum kit
Edit the drummer performance
Arrange the song structure
Edit performances in the new sections
Make the drummer play behind or ahead of the beat
Customize the drum kit
Tune and dampen individual kit pieces

145
In most popular modern music genres, drums are the backbone of the
instrumentation. They provide the foundation for the tempo and the
groove of the piece. For recording sessions in which the instruments
are not tracked at the same time, drums are usually recorded or pro-
grammed first, so that the other musicians can record while listening to
their rhythmic reference.
To meet today’s high production standards, producing drum tracks
usually involves using several techniques, including live recording,
programming, sampling, audio quantizing, and sound replacement. In
Logic Pro X, you can speed up the process by taking advantage of the
new Drummer feature along with its companion software instrument,
Drum Kit Designer.
In this lesson, you will produce a virtual drum track to start producing
a new imaginary indie-rock song. After selecting a genre and choos-
ing the best drummer for your project, you will adjust the drummer’s
performance, making him play busier patterns or simpler ones, louder
or softer, and changing his feel, almost like a producer would communi-
cate with a real drummer in a recording session.
Produce a Virtual Drum Track
Lesson 4

146 Produce a Virtual Drum Track
Creating a Drummer TrackDrummer is a new Logic Pro X feature that allows you to produce drum tracks using a virtual drummer with his own playing style. His performance is placed in Drummer regions on a Drummer track. You edit the performance data in the regions using the Drummer Editor. The virtual drummer also has his own drum kit loaded in a software instrument plug-in called Drum Kit Designer.
First, let’s open a new project, add a Drummer track, and examine the display of the drum performance in the Drummer region.
1 Choose File > New (or press Command-Shift-N).
A new project opens along with the New Tracks dialog.
2 In the New Tracks dialog, select Drummer, and click Create.
A Drummer track is created along with two eight-bar Drummer regions. At the bot-tom of the main window, the Drummer Editor opens, allowing you to choose a drum-mer and his drum kit, and to edit the performance in the Drummer region(s) that are selected in the workspace. The track is named SoCal, which is the name of the drum kit used by the default virtual drummer, Kyle.
Drummer Editor
Drummer regions

Creating a Drummer Track 147
3 Press the Spacebar to listen to the two Drummer regions.
In the first region, the drummer starts with a crash cymbal, and plays a straightfor-ward rock pattern. At the end of the first four measures, he plays the simplest of fills (a single tom hit), followed by a crash cymbal that accentuates the first downbeat of bar 5. At the end of the first Drummer region, a drum fill leads into the next section.
In the second region, the drummer switches from the hi-hat to the ride cymbal, and plays a more complex pattern: The kick is busier, and the snare adds ghost notes (very quiet hits) between beats. As in the first region, the drummer plays a fill at the end of the first four measures, followed by a crash. He plays another fill at the end of the region.
Let’s take a closer look at that Drummer region.
4 Control-Option-drag over the first bar of the first Drummer region. If necessary, con-tinue zooming vertically by dragging the vertical zoom slider (or pressing Command-Down Arrow) until you can see two lanes in the Drummer region.
Crash cymbal
Stronger hi-hat
Softer hi-hat
Snare
Kick
The Drummer region displays drum hits as triangles on lanes, roughly emulating the look of drum hits on an audio waveform. Kicks and snares are shown on the bottom lane; cymbals, toms, and hand percussions are on the top lane.

148 Produce a Virtual Drum Track
5 In the top half of the ruler, drag a one-measure cycle area at bar 1.
6 Listen to the first bar a few times while looking at the drum hits in the Drummer region.
Although you cannot edit individual drum hits in the Drummer region, the region display gives you a quick glance at the drummer’s performance.
MoRE INFo ▶ At the end of this lesson you will convert Drummer regions to MIDI regions. In Lesson 6, you will learn how to edit MIDI regions.
7 Turn off Cycle mode.
8 In the workspace, click the background and press Z to zoom out and see both drum-mer regions.
Now you can read the Drummer regions. In the next exercise, you will listen to multiple drummers and several performance presets. Later, you will zoom in again to see the Drummer regions update as you adjust their settings in the Drummer Editor.
Choosing a Drummer and a StyleEach drummer has his own playing style and drum kit, and those combine to create a unique drum sound. Before you start fine-tuning the drummer’s performance, you need to choose the right drummer for the song.
In the Drummer Editor, drummers are categorized by music genres. By default, choosing a new drummer means loading a new virtual drum kit, and updating Drummer region

Creating a Drummer Track 149
settings; but sometimes you may want to keep the same drum kit while changing the drummer, which you will do in this exercise.
Genre pop-up menu
Drummer
Character card
Drum kit
1 In the character card, click the drummer.
All the drummers from the Rock category are displayed.
2 Place the mouse pointer over Anders (the first drummer in the second row).
A help tag describes that drummer’s playing style and the sound of his drum kit. It mentions straightforward rock beats, which would work for this song; but for now, let’s get to know the other drummers.

150 Produce a Virtual Drum Track
3 Continue by placing the pointer over other rock drummers to read their descriptions. When you’re through, click the drummer named Jesse.
A dialog explains how to retain region settings when changing the drummer.
4 In the dialog, select “Do not show this message again,” and click Change Drummer.
In the workspace, the two Drummer regions update to display Jesse’s performance.
5 In the workspace, click the first Drummer region (at bar 1) to select it.
The Drummer Editor shows you the settings for the selected Drummer region. A yel-low ruler allows you to position the playhead anywhere within the region, and you can click the Play button to the left of the ruler to preview the Drummer region. As in the Tracks area, you can also double-click the ruler to start and stop playback.
6 In the Drummer Editor, click the Play button.
Play button
Playhead
The selected region plays in Cycle mode, and the cycle area automatically matches the region position and length. The selected region is soloed—indicated by a thin yellow frame—and the other region is dimmed. Soloing the region helps you focus on the drums when you have other tracks in the project.

Creating a Drummer Track 151
Although you will later fine-tune the drummer’s performance, Jesse’s busy, syncopated drum patterns are not a good fit for this indie rock song. You are looking for a drum-mer with a simple, straightforward style that more appropriately serves the song.
7 Stop playback.
In the Tracks area, Cycle mode is automatically turned off, the dimmed cycle area returns to its original position and length, and the selected region is no longer soloed.
8 In the Drummer Editor, click the Genre menu at the top of the character card, and choose Alternative.
Drummers from the Alternative category are shown.
9 Click the first drummer, Aidan.
10 In the Drummer Editor, click the Play button.
While the region is playing back in Cycle mode, you can try selecting other region settings presets to explore Aidan’s full range of playing style.
11 In the Presets column, click a few different presets while the region plays back.
When you click a preset, the region settings update and you can hear another perfor-mance from the same drummer.

152 Produce a Virtual Drum Track
12 Without stopping playback, from the Genre menu, choose Rock.
13 Click the fourth drummer, Max, and listen to a few of his presets.
Although Max’s hyperactive performance is not what you’re looking for, his drum kit sounds punchy. Let’s assign the first drummer, Kyle, to play on Max’s drum set, East Bay Kit.
14 In the character card, click the drummer to display the drummers.
You can Option-click a new drummer to select that drummer while keeping the cur-rent drum kit.
15 Option-click Kyle.
Kyle is now playing Max’s East Bay Kit. Let’s make him play a bit faster.
16 In the control bar, set the tempo to 142 bpm.
17 Stop playback.
You have found a drummer that plays the straightforward style you’re seeking for this project, paired him with a punchy sounding drum kit, and set a tempo that will drive your indie rock song. You are now ready to customize the performance.

Creating a Drummer Track 153
Editing the Drum PerformanceIn a recording session with a live drummer, the artist, the producer, or the musical direc-tor must communicate their vision of the completed song. They may ask the drummer to play behind or ahead of the beat to change the feel of the groove, or to switch from the hi-hat to the ride cymbal during the chorus, or to play a drum fill in a specific location.
In Logic Pro X, editing a drummer performance is almost like giving instructions to a real drummer. In this exercise, you will play a drum region in Cycle mode as you adjust the drummer settings.
1 In the workspace, make sure the first Drummer region is still selected, and in the Drummer Editor, click the Play button.
Next to the presets, an XY pad with a yellow puck lets you adjust both the loudness and complexity of the drum pattern.
2 As the region plays, drag the puck, or click different locations inside the pad to reposition it.
To undo your most recent Drummer Editor adjustment, press Command-Z.
After positioning the puck, you must wait for the region to update (update time var-ies depending on your computer). If you drag the puck constantly, the region will not update.
As you position the puck farther to the right, the drum pattern becomes more com-plex; and as you move the puck toward the top of the pad, the drummer plays louder. Try placing the puck in the pad’s corners for extreme settings, such as soft and simple, or loud and complex.

154 Produce a Virtual Drum Track
As the drummer plays softer, he closes the hi-hat and switches from hitting the snare drum on the skin to playing rim clicks (hitting only the rim of the drum). As he plays louder, he opens the hi-hat and start playing rim shots (hitting the skin and the rim simultaneously for accent).
Let’s make the drummer play a solid, straightforward beat in this first Drummer region, which will be used for the first verse of the song.
3 Settle for a puck position where the drummer plays a rather simple and fairly loud pattern.
You can still hear a lot of syncopation on the kick drums. To the right of the XY pad, you can choose from several Kick & Snare pattern variations.
4 Drag the Kick & Snare slider to position 2 (or click the second increment on the slider).
The drummer now simply alternates kick and snare on every beat. If you don’t hear the drummer play the snare on beats 2 and 4, slightly readjust the horizontal position of the puck in the XY pad so it’s in the same position as in the figure following step 3.
Listen to the hi-hat: It is currently playing eighth notes.
5 Click the first increment on the Hi-Hat slider.

Creating a Drummer Track 155
The hi-hat now plays only on the beat (quarter notes), which works well for up-tempo songs.
The drummer is playing a fill in the middle of the region (before bar 5) and another at the end (before bar 9). Let’s get rid of the first fill and keep only one at the end.
6 Look at the region in the workspace while trying different positions for the Fills knob, and drag the Fills knob down until you see the fill before bar 5 disappear. You should still see a fill at the end of the region.
NoTE ▶ Clicking the small lock icon next to the Fills and Swing knobs locks the knob into position as you preview presets or drummers.
Each time you adjust a setting in the Drummer Editor, the selected region is refreshed and the drummer plays a new subtle variation. Dragging the Fills knob by a tiny amount is a quick way to refresh a region. You can also click the Action pop-up menu next to the Presets menu, and choose Refresh Region; or Control-click the region in the workspace, and from the shortcut menu, choose Edit > Refresh Region.
You now have a very straightforward beat. Because the drummer plays less now, he can make the hi-hat ring a bit more.

156 Produce a Virtual Drum Track
7 In the Drummer Editor, click the Details button to display three knobs.
8 Below the Hi-Hat knob, deselect the Automatic option.
9 Drag the Hi-Hat knob up to open it a little bit.
This verse drum pattern now sounds great, so let’s move on to the second Drummer region, which you’ll use for the chorus.
10 In the Drummer Editor, click the Details button to hide the three buttons.
11 Stop playback.
12 In the workspace, select the second Drummer region.

Creating a Drummer Track 157
Hi-hat
Hand percussions
Cymbals
Toms
Snare
Kick drum
The Drummer Editor updates to show the second region’s settings. On the drum kit, the hi-hat is now dimmed, while the cymbals are highlighted in yellow. The drummer no longer plays the hi-hat, but instead plays a ride or crash cymbal in that region.
13 In the Drummer Editor, click the Play button.
You can hear the second region in Cycle mode. The drummer is playing the ride cym-bal on every eighth note. For a more powerful chorus, you instead want him to play crash cymbals on every beat.
14 Click the first increment of the Cymbals slider.
You now hear crash cymbals on every beat. Even for a chorus, the beat is a little too busy.

158 Produce a Virtual Drum Track
15 On the XY pad, drag the puck toward the left to create a simpler beat.
Let’s listen to the verse going into the chorus.
16 Stop playback.
17 Go to the beginning of the song and listen to both Drummer regions.
You now have a simple, straightforward beat for the verse, and then the drummer switches to the crash cymbal for the busier chorus pattern.
You have carefully crafted two eight-measure drum grooves: one for the verse and one for the chorus. They are the two most important building blocks of the song that you will now start arranging.
Arranging the Drum TrackIn this exercise, you will lay out the whole song structure and continue editing drum regions for each section, still using the two Drummer regions you edited for the verses and choruses.
Using Markers in the Arrangement TrackUsing the Arrangement track, you will now create arrangement markers for all the sections of your song. You’ll adjust their lengths, positions, and order, and fill all the new sections with Drummer regions.

Arranging the Drum Track 159
1 At the top of the track headers, click the Global Tracks button (or press G).
The global tracks open, with the Arrangement track at the top. You won’t need the other global tracks, so you can hide them.
2 Control-click a global track header, and choose Hide Marker. Also Control-click the Signature and Tempo tracks, and hide them.
The Arrangement track is now closer to the regions in the workspace, making it easier to see their relationships.
3 In the Arrangement track header, click the Add Marker button (+).
An eight-measure arrangement marker named Intro is created at the beginning of the song. By default, arrangement markers are eight bars long and are placed one after the other, starting from the beginning of the song. Let’s rename the marker.

160 Produce a Virtual Drum Track
4 Click the name of the marker, and from the menu, choose Verse.
5 Click the Add Marker button (+) to create a marker for the chorus.
An eight-bar marker named Chorus is created.
You will now create a marker for a new intro section and insert it before the Verse and Chorus markers.
6 In the Arrangement track header, click the Add Marker (+) button.
An eight-bar marker named Chorus is created.
7 Click the name of the new marker, and from the pop-up menu, choose Intro.
A four-measure intro will be long enough, so you can resize the Intro marker before moving it.
8 Drag the right edge of the Intro marker toward the left to shorten it to four bars.
9 Click the marker away from its name (to avoid opening the Name pop-up menu), and drag the Intro marker to bar 1.

Arranging the Drum Track 161
The Intro marker is inserted at bar 1, and the Verse and Chorus markers move to the right of the new Intro section. In the workspace, the Drummer regions move along with their respective arrangement markers.
As with regions in the workspace, you can Option-drag a marker to copy it.
10 Press Command-Left Arrow to zoom out horizontally and make space to the right of the existing song sections. Option-drag the Verse marker to bar 21, right after the chorus.
The Verse marker and the Drummer region are copied together.
11 Option-drag the Chorus marker to bar 29, after the second verse.
The Chorus and the Drummer region are copied together.
The song is taking shape. You will now finish arranging the song structure with a bridge, a chorus, and an outro section. As you place the last three markers, continue zooming out horizontally as necessary.
162 Produce a Virtual Drum Track
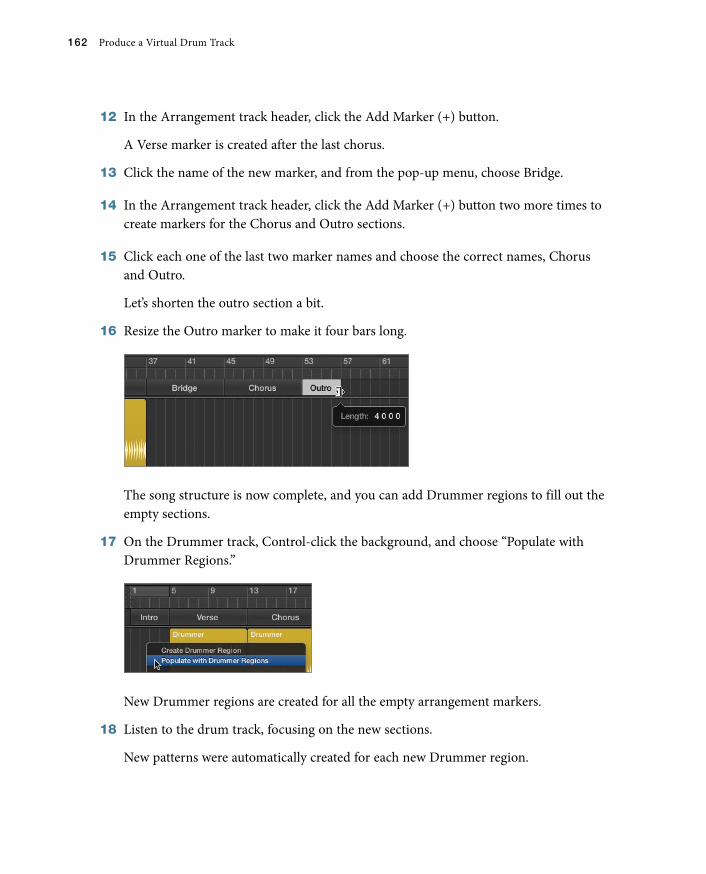
12 In the Arrangement track header, click the Add Marker (+) button.
A Verse marker is created after the last chorus.
13 Click the name of the new marker, and from the pop-up menu, choose Bridge.
14 In the Arrangement track header, click the Add Marker (+) button two more times to create markers for the Chorus and Outro sections.
15 Click each one of the last two marker names and choose the correct names, Chorus and Outro.
Let’s shorten the outro section a bit.
16 Resize the Outro marker to make it four bars long.
The song structure is now complete, and you can add Drummer regions to fill out the empty sections.
17 On the Drummer track, Control-click the background, and choose “Populate with Drummer Regions.”
New Drummer regions are created for all the empty arrangement markers.
18 Listen to the drum track, focusing on the new sections.
New patterns were automatically created for each new Drummer region.

Arranging the Drum Track 163
Amazing as his playing is, Kyle (the drummer) might not have guessed what you had in mind for each section. You will now edit the new regions to finish adjusting the drum-mer’s performance.
Editing the Intro Drum PerformanceIn this exercise, you will make the drummer play the snare instead of the toms. Later, you’ll cut the Intro region in two and make the drummer play the snare only during the first half. Then you’ll add the kick and hi-hat in the second half.
1 In the workspace, click the background to deselect all regions, and click the Intro region to select it.
The Drummer Editor shows its settings.
Throughout this exercise you can click the Play button in the Drummer Editor to start and stop playback, or you can navigate the workspace by pressing the Spacebar (Play or Stop) and the Return key (Go to Beginning).
2 Listen to the Intro.
Let’s mute the toms.
3 In the Drummer Editor, click one of the toms.
The toms are dimmed to indicate that they are muted. In the Intro region, the toms disappear from the top lane.
4 Click the snare to unmute it.
In the Intro region, snare hits appear next to the kick hits on the bottom lane.
To play the kick in only the first half of the intro, followed by the kick and snare in the second half, you will cut the Intro region in two.

164 Produce a Virtual Drum Track
5 Stop playback.
6 Hold down Command to use the Marquee tool, and double-click the Intro region at bar 3.
The region is divided into two two-measure regions. When a region is divided, the drummer automatically adapts his performance, and plays a fill at the end of each new region.
7 Select the first Intro region.
8 In the Drummer Editor, drag the Fills knob all the way down.
Notice how the crash disappears from the first beat of the following region. Even though it is in another region, the crash is actually a part of the fill.
9 On the drum kit, click the kick drum to mute it.

Arranging the Drum Track 165
In the first two measures, the drummer will be playing only the snare. Let’s have him play the snare very softly on every beat, as if he’s counting in the band.
10 In the Kick & Snare slider, click the sixth increment.
The snare plays every beat.
In multi-track projects, when you click the Follow checkbox, a pop-up menu appears instead of the Kick & Snare slider that lets you choose a track to influence what the drummer plays on the kick and snare.
11 In the XY pad, drag the puck all the way down and to the left.
Now the drummer plays rim clicks at the beginning of the first Intro region, and hits the snare a few times at the end.
12 In the workspace, select the second Intro region.
13 In the Kick & Snare slider, click the second increment.

166 Produce a Virtual Drum Track
14 On the XY pad, drag the puck toward the upper left.
The drums play a straightforward beat with a fill at the end. Let’s add an open hi-hat to inject some energy.
15 On the drum kit, click the hi-hat to unmute it.
16 In the Hi-Hat slider, click the first increment.
Now you will open the hi-hat to add energy to the end of the intro.
17 In the Drummer Editor, click the Details button.
18 Below the Hi-Hat knob, deselect Automatic.
19 Drag the Hi-Hat knob up nearly all the way until the hi-hat sounds really open, but you can still clearly hear the individual hits.
20 Click the Details buttons to display the drum kit again.
21 Listen to the whole intro going into the first verse.

Arranging the Drum Track 167
Your have a short two-part intro. The drummer plays the snare on the first eight beats, and then a basic rock pattern with a very open hi-hat adds energy. At bar 5, a crash punctuates the fill at the end of the intro. The straightforward groove continues in the Verse section with the hi-hat a little less open to leave space to later add a singer.
Editing the Bridge Drum PerformanceIn a song, the bridge serves to break the sequence of alternating verses and choruses. Often, the main idea of the song is exposed in the choruses, and verses help support or develop that statement. The bridge can present an alternate idea, a different point of view. Departing from the main idea of the song increases the listener’s appreciation for return-ing to the chorus at the end of the song—almost like taking a vacation can increase your appreciation for going back home.
For this fast, high-energy indie-rock song, a quieter bridge in which the instruments play softer will offer a refreshing dynamic contrast. Playing softer does not mean the instru-ments have to play less, however. In fact, you will make the drums play a busier pattern during this bridge.
1 Listen to the Bridge region.
When pressing the Spacebar to play a section, you can use Cycle mode to ensure that playback always starts at the beginning of the section. Drag a section’s arrangement marker into the ruler to turn on Cycle mode and create a cycle area that matches the section.
The drummer plays at the same level as in the previous sections, but he plays more here. You need to bring down his energy level.
2 Select the Bridge Drummer region.

168 Produce a Virtual Drum Track
3 In the XY pad, position the puck all the way down and to the right.
The drummer is still playing a lot, but he’s much quieter. He no longer hits the snare’s skin but plays rim clicks instead. However, rim clicks are not the type of sound you’re going for; you want Kyle to play toms.
4 On the drum kit, mute the snare, and unmute the toms.
When you click the toms, the hi-hat is automatically muted. Aside from the kick and snare, the drummer can focus on the toms, the hi-hat, or the cymbals (ride and crash).
Let’s choose a busier pattern for the toms.
5 On the Toms slider, click increment 3.
Kyle is now playing sixteenth notes on the toms, which create a mysterious vibe simi-lar to tribal percussions. You will make him switch from the toms to the ride cymbal in the second half of the bridge to brighten things up.
6 Command-double-click the Bridge region at bar 41 to cut it into two four bar regions.

Arranging the Drum Track 169
The drummer now plays a different fill at the end of the first Bridge region.
While the second Bridge region is still selected, you can adjust the cycle area.
7 Control-click the cycle area, and choose “Set Locators by Regions/Events/Marquee” (or press Command-U).
8 Unmute the cymbals.
The toms are muted, and the drummer now plays the ride cymbal. However, the groove still seems to be missing something.
9 Unmute the snare.
You can hear rim clicks.
10 In the XY pad, drag the puck up just until Kyle switches from hitting the rim to hit-ting the head of the snare (about a quarter of the way up).
11 On the Cymbals slider, click the third increment.

170 Produce a Virtual Drum Track
The drummer hits the ride cymbal differently, giving it more of a bell-like sound. He plays a crescendo, thereby building up energy to lead into the next chorus.
Kyle plays slightly ahead of the beat during the bridge. However, the timing nuance is subtle, and difficult to hear without any other instruments to compare with Kyle’s tim-ing. Let’s turn on the metronome and experiment with the feel of his performance.
12 In the control bar, click the Metronome button (or press K).
You will be editing the feel of both Bridge regions simultaneously.
13 In the workspace, select both Bridge regions, and press Command-U to set the locators.
At the top of the Drummer Editor, the ruler, Play button, and playhead are hidden because multiple regions are selected. You can now adjust the settings of all the selected regions at once.
NoTE ▶ When adjusting a setting that is set to different values in multiple regions, the value offset between the regions stays the same (wherever possible).
14 In the Drummer Editor, click the Details button to display the three setting knobs.
15 Try setting different positions of the Feel knob and then listen to the results.
Both regions change their “feel.”
As you experiment with different feels, listen to the way the drums play compared to the steady, precise beat of the metronome. Don’t be afraid to drag the Feel knob all the way up or down to hear the effect of extreme Feel settings.
▶▶ Dragging the Feel knob toward Push makes the drummer play ahead of the beat. He sounds as if he’s rushing, thereby creating a sense of urgency.
▶▶ Dragging the Feel knob toward Pull makes him play behind the beat. He sounds as if he’s lazy or late, and the groove is more relaxed.
Settle on a Feel knob position more toward Pull to realize a reasonably relaxed groove.

Arranging the Drum Track 171
16 Click the Details button to hide the three setting knobs.
17 Turn off Cycle mode.
18 In the control bar, click the Metronome button (or press K) to turn it off.
You have radically changed the drummer’s performance in that region. Kyle now starts the bridge with a busy pattern on the toms, and then moves on to a bell sound on the ride. He uses restraint, hitting softly and behind the beat, with a slight crescendo toward the end. The quiet and laid-back yet complex drum groove brings a welcome pause to an otherwise high-energy drum performance, and builds up tension leading into the last two sections.
Editing the Chorus and outro SectionsYou will now finish editing the drummer’s performance by adjusting the settings of the last two Chorus and Outro Drummer regions in your workspace.
1 Select the Chorus region after the bridge and listen to it.
That Chorus region was created when you populated the track with Drummer regions earlier in this lesson. It doesn’t have the same settings as the previous two choruses and sounds busier, except for Kyle playing the ride cymbal instead of the crash.
2 On the Cymbals slider, click the first increment.
The drummer now plays the crash, and this last chorus is more consistent with the previous two choruses.
3 Select the Outro region at the end of the track and listen to it.
The drummer plays a loud beat, heavy on the crash, which could work for an outro. You will, however, make him play double-time (twice as fast) to end the song in a big way.
4 On the Kick & Snare slider, click the last increment (8).
Now it sounds like you’ve unleashed Kyle! Playing double-time at that fast tempo makes the sixteenth notes on the kick drum sound ridiculously fast.

172 Produce a Virtual Drum Track
5 On the XY pad, drag the puck toward the left until the drummer stops playing six-teenth notes on the kick drum.
The performance now sounds more realistic while retaining the driving effect of its double-time groove.
Let’s finish the song with a longer drum fill.
6 Drag the Fills knob all the way up.
The drum fill at the end of the outro is now longer. However, raising the number of fills has the undesirable effect of adding a new fill in the middle of the outro. To remove that fill, you will cut the Outro region in two.
7 With the Marquee tool, double-click the Outro region at bar 55.
You now have two two-bar Outro regions.
8 Select the first Outro region.
9 Drag the Fills knob all the way down to remove the fill in the middle of the Outro section.
10 Listen to the last chorus and the outro.
The outro has the required power to drive the last four measures; however, it seems like the drummer stops abruptly before he can finish his fill. Usually drummers end a song by playing the last note on the first beat of a new bar, but here a crash cymbal is missing on the downbeat at bar 57. You will resize the last Outro region in the work-space to accommodate that last drum hit.

Customizing the Drum Kit 173
11 Resize the last Outro region to lengthen it by one beat (until the help tag reads Length: 2 1 0 0 +0 1 0 0).
A moment after you release the mouse button, the Drummer region updates, and you can see a kick and a crash on the downbeat at bar 57.
12 Listen to the outro. The drummer finishes his fill, punctuating it with the last hit at bar 57.
NoTE ▶ The final crash cymbal continues ringing until its natural sustain fades out, well after the playhead has passed the end of the last Outro region.
You’ve laid out the entire song structure by creating section markers in the arrangement track, populated each section with Drummer regions, and edited each region’s settings to customize its drum pattern. You are now done editing the drum performance and can focus on the sound of the drums.
Customizing the Drum KitWhen recording a live drummer in a studio, the engineer often positions microphones on each drum. This allows control over the sound of each drum, so he can individually equalize or compress the sound of each kit piece. The producer may also want the drum-mer to try different kicks or snares, or to experiment with hitting the cymbals softer before he begins recording.
In Logic, when using Drummer, the sounds of each drum are already recorded. However, you can still use several tools to customize the drum kit and adjust the sound of each drum.

174 Produce a Virtual Drum Track
Adjusting the Drum Levels Using Smart ControlsSmart Controls are a set of knobs and switches that are premapped to the most important parameters of the plug-ins on the channel strip of the selected track. You will study Smart Controls in more detail in Lesson 5.
In this exercise, you will use Smart Controls to quickly adjust the levels and tones of dif-ferent drums. Then you’ll open Drum Kit Designer to swap one snare for another, and fine-tune the crash cymbal sound.
1 In the control bar, click the Smart Controls button (or press B).
The Smart Controls pane opens at the bottom of the main window, replacing the Drummer Editor. It is divided into three sections: Mix, Compression, and Effects.
In the Mix section, six knobs allow you to balance the levels of the drum. To the right of each knob, a button lets you mute the corresponding drum or group of drums.
2 Position the playhead before the first chorus and start playback.
3 Turn the cymbals down a bit by dragging the Cymbals knob.

Customizing the Drum Kit 175
Even with the Amount knob turned all the way down in the Compression section, the compressor is still slightly processing the drum sound. Let’s turn it off.
4 In the Compression section, click the On button.
On the left channel strip in the inspector, the Compressor plug-in is dimmed, indicat-ing that it is turned off.
5 In the Effects section, drag the Tone knob up.
As you drag up the knob, the drums’ sound changes timbre and becomes brighter. On the left channel strip in the inspector, the EQ curve on the channel strip’s EQ display reflects the changes made to the Channel EQ plug-in.
EQ display
MoRE INFo ▶ You will further examine the Channel EQ plug-in in Lesson 9.
6 Drag up the Room knob.
As you drag up the knob, you will start hearing the subtle reverberation of a drum booth. In the inspector, you can see the Bus 1 Send knob move along with the Tone knob.
MoRE INFo ▶ You will learn how to use bus sends to route an audio signal to a reverb and to change the character of the reverb in Lesson 9.
7 In the control bar, click the Editors button (or press E) to open the Drummer Editor.

176 Produce a Virtual Drum Track
You can also double-click a Drummer region to open the Drummer Editor.
You have adjusted the levels and timbres of the drums, and you’re now ready to fine-tune the sound of the individual drum kit pieces.
Customizing the Kit with Drum Kit DesignerDrum Kit Designer is the software instrument plug-in that plays drum samples triggered by Drummer. It allows you to customize the drum kit by choosing from a collection of drums and cymbals and tuning and dampening them.
1 At the bottom of the character card, click East Bay Kit to open the Drum Kit Designer.

Customizing the Drum Kit 177
To have the Drummer regions play a different instrument, you can choose another patch from the Library or insert another software instrument plug-in on the channel strip. You can also drag Drummer regions to another software instrument track, and they are automatically converted to MIDI regions. (You will learn more about MIDI in Lesson 5.)
2 In Drum Kit Designer, click the snare.
You can hear the snare sample. The snare stays lit while the rest of the drum kit is in shadow. To the left, a Snares panel contains your choice of three snare drums, and to the right, an Edit panel includes three setting knobs.
The left panel shows only a limited selection of snares. To gain access to the entire collection of drum samples included with Logic Pro X, you need to choose a Producer Kit in the Library.
3 In the control bar, click the Library button (or press Y).
To the left of the inspector, the Library opens, listing patches for the selected track. The current patch, East Bay, is selected.

178 Produce a Virtual Drum Track
4 In the Library, select Producer Kits, and then select East Bay+.
The Drum Kit Designer window is reset. The East Bay+ kit sounds the same as East Bay while allowing a wide array of options to customize the drum kit and its mix.
MoRE INFo ▶ In the track header, you may have noticed that the drum icon is now framed in a darker rectangle with a disclosure triangle: The track is now a Track Stack that contains one track for each microphone used to record the drum kit. Clicking the disclosure triangle displays the individual tracks and their channel strips. You will use Track Stacks in Lesson 5.
5 Click the Library button (or press Y) to close the library.
6 In Drum Kit Designer, click the snare.
This time the left pane displays a choice of 15 snare drums (use your mouse to scroll down the list). The current snare, Black Brass, is selected.
7 Click another snare, and then click the Info button next to it.

Customizing the Drum Kit 179
A description of the selected snare opens.
Continue previewing different snares and try listening to a verse or a chorus to hear your customized drum kit in action.
8 At the top of the left pane, click the Bell Brass snare.
9 In Drum Kit Designer, click the kick drum.
The info pop-up window updates to show you information on the selected kick drum.
Listen to the kick drum. This kick is the right choice for your song, but it has a long resonance. Typically, the faster the tempo of the song, the less resonance you want on the kick; otherwise low frequencies build up and could become a problem during the mix. You may have seen drummers stuff an old blanket in their kick drum to dampen them. In Drum Kit Designer, you only have to raise the dampening level.

180 Produce a Virtual Drum Track
10 In the right pane, drag the Dampen knob up to about 75%, and click the kick to listen to it.
The kick’s resonance is shortened.
You will now tune the toms, which are mainly used in the bridge section.
11 In the workspace, select the first Bridge region.
12 In the Drummer Editor, click the Play button and mute the kick.
You can hear only the low and mid toms.
13 In Drum Kit Designer, click one of the toms.
The Edit panel opens with four tabs: All (for adjusting settings of all three toms in the kit together); and Low, Mid, and High (for adjusting settings of each individual tom).
14 Click the Mid tab and raise the Tune knob to around +156 cent.
You can hear the mid tom being pitched up as Kyle continues repeating the first half of the bridge.
If you want, feel free to continue exploring Drum Kit Designer and adjusting the sound of the hi-hat, ride, and crash cymbals.
15 Stop playback and close the Drum Kit Designer window.
You have exchanged the snare for another one that sounds a little clearer, dampened the kick drum to tame its resonance, and tuned the mid tom to pitch it a bit higher. You have now fully customized both the drum performance and the drum kit.

Customizing the Drum Kit 181
Converting the Drummer Performance to MIDINow that you’re happy with the bulk of the drummer’s performance, you will go further and gain complete control over each individual drum hit by converting the Drummer regions to MIDI regions.
1 Click the background of the workspace and press Z to see all the regions.
To select all regions on a track, make sure Cycle mode is off, and click the track header. If Cycle mode is on, only the regions within the cycle area are selected.
2 Make sure Cycle mode is off, and click the East Bay+ track header to select all the regions on the track.
3 Control-click a region, and from the shortcut menu, choose Convert > Convert to MIDI Region.
Piano roll
MIDI regions
The Drummer regions are converted to MIDI regions. At the bottom of the main window, the Piano Roll opens, showing the contents of the selected regions, ready to be edited. Individual drum hit are represented by note beams on a grid, making it easy to select, move, or delete any of them.

182 Produce a Virtual Drum Track
You have produced drums for a whole song, and learned many ways to edit the drummer’s performance and change his feel. You also customized the drum kit to get your desired sound. With Drummer and Drum Kit Designer, Logic Pro X allows you to quickly lay down a rhythmic foundation for any new song.
Lesson Review
1. How do you choose a drummer?
2. How do you choose a new drummer while keeping the current drum kit?
3. Where do you edit Drummer regions?
4. How do you mute or unmute drum parts?
5. How do you make the drummer play softer or louder, simpler or more complex?
6. How do you access the Feel knob to make the drummer play behind or ahead of the beat?
7. How do you open Smart Controls?
8. How do you open Drum Kit Designer?
9. When customizing a drum kit, how can you access all the available drum kit pieces?
10. How do you dampen or tune an individual drum?
11. How do you convert Drummer regions to MIDI regions?
Answers
1. Click the drummer in the character card, or from the Genre pop-up menu, choose a genre, and then click the desired drummer.
2. Option-click the desired drummer.
3. In the Drummer Editor at the bottom of the main window
4. Click the drum parts in the drum kit that is displayed in the Drummer Editor.
5. Move the puck on the XY pad.
6. Click the Details button at the bottom right of the Drummer Editor.
7. Click the Smart Controls button in the control bar, or press B.
8. Click the drum kit at the bottom of the character card.
9. Select the appropriate Producer Kit in the Library.
10. In Drum Kit Designer, click a drum and adjust the settings in the Edit panel.
11. Select the regions, Control-click one of them, and choose Convert > Convert to MIDI Region.

Lesson Review 183
Keyboard Shortcuts
Main Window
B Opens the Smart Controls
G Opens the global tracks
Command-Shift-N Opens a new file without opening the Templates dialog
Y Opens the Library

Index
503
Numbers16-bit recordings
AIFF using, 490CDs using, 492Logic set at default to, 63
24-bit recordings, 63, 49044.1 kHz sample rate, 61, 49248 kHz sample rate, 6170s Analog Lead patch,
209–212, 215–216
AA/D (analog-to-digital)
converter, recording audio, 60
AAC standard, 491Adaptive Limiter plug-in,
430–431Add Device button, MIDI
hardware, 473–474Add Marker (+) button,
159–160, 344Add Tracks button (+), 64, 78Additional Options, 5–6Adjust Tempo Using Beat
Detection, 299, 340Adjustment to Bar, 253Advanced Options, project
tempo, 299advanced tools, 5–6aftertouch (or pressure),
273, 491AIFF (Audio Interchange File
Format), 97–98, 491alerts
add/delete section, 363–365
add section, 363assign controller to
Automation Quick Access, 460
assign key commands, 82browse loops, 14change recording
settings, 90choose program
remotely, 479close current project, 188connect Logic Remote to
Logic on Mac, 224connecting Logic Remote
to Mac, 224create new audio file, 124creating key
commands, 83Delete, 73–74, 101record single track, 73replace existing patch of
same name, 223System Overload, 96
aliasescloning audio regions, 353defined, 491
aligning audio in workspaceoverview of, 134using anchor, 134–137using Flex tool, 137–139
alignment guidesadding section, 362aligning with other
regions on track, 135–137
arranging regions, 378
All Files Browseraudio files in, 73importing audio files,
125–126importing MIDI files,
271–273Allow Quick Punch-In, 84alternative arrangements,
saving, 360–361ambience, creating with delay,
416–419Amp Designer plug-in
adding fade-out, 118–120customizing amp model,
397–401defined, 394inserting plug-in in signal
flow, 394–397monitoring effects during
recording, 67–68other uses of, 401overview of, 394
amp model, customizing, 397–401
amplifier envelope (AMP ENV), Arpeggiator MIDI effect, 243
analog signal, recording audio, 60
analog-to-digital (A/D) converter, recording audio, 60
Analyzer button, frequency analyzer, 411
anchor, 134–137, 491

504 Index
Apple Loopsbrowsing/previewing
loops, 12–15creating, 305–307creating green, 307creating/naming tempo
sets, 308–310defined, 491hiding, 23opening Loop Browser,
10–11setting project’s key
signature, 303–305using Loop Browser,
301–303applications, opening/
searching in Launchpad, 3arming, tracks, 491Arpeggiator button, Logic
Remote, 226Arpeggiator MIDI effect,
238–244arrangement, building
adding lead synths, 33–36creating break, 36–40
arrangement, editingadding section, 361–366arranging resulting
regions, 377–379copying material to fill in
parts, 346–357cutting regions to remove
silence/noise, 370–376
cutting section, 366–369dividing regions by
removing silence, 372–376
keyboard shortcuts, 381muting/deleting marquee
selections, 370–372overview of, 343previewing song, 343–346rendering multiple
regions, 357–359review Q & A, 379–380
saving alternative arrangements, 360–361
Arrangement trackcreating section
markers in, 173defined, 491hiding, 308–309using markers in,
158–163arrangements. See drum
tracks, arrangingAscending, setting inputs for
multiple tracks, 78Audio Click setting,
metronomes, 92audio effect plug-ins
Amp Designer. See Amp Designer plug-in
Compressor. See Compressor plug-in
latency introduced by some, 97
Multipressor, 199recording MIDI events
using patch from Library, 190–191
using, 394audio effects, 187audio effects, MIDI Draw, 291audio file
defined, 491rendering multiple
regions into single, 357–359
Audio File Editoraligning audio using
anchor, 136defined, 492editing files in, 131–134
Audio FX sloton channel strips, 493Gain Reduction
meter inserting Compressor into, 426
opening plug-in menu, 48–51
opening Tuner, 69audio interface
defined, 492number of inputs, 79recording audio, 63recording multiple
tracks, 78Audio MIDI Setup, 472–477audio regions
adding batch fades to remove click sounds, 355–357
adjusting setting with different values in multiple, 170
applying green Apple Loops as, 307
arranging resulting, 377–379
clicking track header to quickly select all tracks, 345
cloning, 352–354converting loops to,
347–349copying, 27defined, 492determining length/
position of, 25dividing by removing
silence, 372–376editing in Audio Track
Editor, 125–130editing in workspace,
108–111editing timing of, 321–330joining 126muting or deleting
marquee selections, 370–372
nondestructive editing in workspace, 99
playing backward, 131–134

Index 505
previewing and naming, 104–107
rendering multiple, 357–359
resizing, 28, 348–349scrubbing with Solo
tool, 105select all, 52starting playback at
beginning of, 346undoing last move, 27viewing all in
workspace (Z), 32zooming into, 28–31
audio signaladding reverb, 422adjusting dynamic range
of, 424–425, 430dB measuring volume
of, 494monitoring for record-
enabled tracks, 66mute automation and, 443processing instruments
with plug-ins, 47–51sample rate of, 499Volume fader affecting
gain applied to, 46Audio Track Editor
editing note pitches in, 334–339
editing regions in, 127–130
opening Audio File Editor in, 132
audio tracksapplying green Apple
Loops as regions on, 307
creating new, 5, 63–65defined, 492flex modes for, 313placing audio regions
on, 14, 492record-enabled, 66, 476specifying type of, 64, 78
Auto Zoom, 9automated mixes
bouncing, 462–465defined, 492keyboard shortcuts, 466live automation. See
live automation, recording
offline automation. See offline automation
overview of, 435–436review Q & A, 465–466using MIDI controllers,
458–462automatic punching
defined, 81overview of, 85–89
automatic save, 7Automation button, 436–437Automation Curve tool, 285automation curves
automating plug-in bypass, 456–458
pan, 441recording live automation
in Latch mode, 453–456
recording live automation in Touch mode, 448–453
volume, 436–440automation, defined, 492automation, in MIDI Draw
copying MIDI control data, 285–288
of modulation data, 288–291
of pitch blend, 281–285Automation Mode pop-up
menu, 448, 452–453Automation Parameter
pop-up menu, 441, 444Automation Quick Access,
459–462, 492Autopunch mode, 85–89,
205–208
aux, 492aux sends, 419–424
Bbalance
adjusting volume, 45checking when
recording, 70stereo audio content,
35–36bar
count-in from beginning of, 91
defined, 492defining length of MIDI
notes, 253numerical values of, 25recording additional
takes in Cycle mode, 77
basscreating MIDI notes in
Piano Roll Editor, 248–251
defining length of MIDI notes with existing notes, 252–253
editing MIDI note velocity, 257–260
Bass Amp Designer plug-in, 48–49
bass loopsbuilding up rhythm
section, 22–26continuously repeating
section, 17–21bass regions
building up rhythm section, 22
creating MIDI notes in the Piano Roll Editor, 249
punching in and out, 206–207
batch fades, 355–357beats, numerical values of, 25

506 Index
bit depthchoosing, 62–63defined, 492digital recordings and, 60
bounceautomated mix, 462–465defined, 492mixing down music to
single file, 52–53rendering multiple
regions, 358Breakdown marker, 321breaks
adding section to arrangements, 361–366
creating, 36–40cutting section from
arrangements, 366–369
saving alternative arrangements, 360–361
taking while mixing, 431bridge drums
creating markers for, 162customizing, 180editing performance,
167–171Brooklyn patch, 199–202Browsers button
deleting unused audio files, 98–101
importing audio files using All Files Browser, 125–126
importing MIDI file, 271setting project tempo, 298using Flex tool, 137
browsing loops, in Loop Browser, 12–15
bus, defined, 492bus sends
adding reverb during mixing, 419–424
adjusting levels using Smart Controls, 175
loading patch without its, 191
recording MIDI events using patch from Library, 190–191
BWF (Broadcast Wave File) or WAVE, 97–98, 501
bypass, 492Bypass Effect Plug-ins, 358
CC-Press events, editing MIDI
data, 274Cabinet pop-up menu, Amp
Designer, 398–399CAF (Core Audio Format)
Apple Loops as AIFF or, 301
reasons to choose, 463storing audio files in,
97–98Capture as Recording, 204Catch button, 349, 492catch mode, 492cc# (continuous control
number), 493CD Audio (Compact Disc-
Audio), 492channel, defined, 493Channel EQ plug-in
adjusting drum levels, 175adjusting pan in mixing,
401–402automating plug-in
bypass, 457–458mixing using, 410–416recording automation
in Touch mode, 448–453
using Amp Designer, 395channel strip settings
adding reverb during mixing with aux sends, 419–424
choosing names/icons for tracks, 41–43
customizing locked screenset, 392–394
defined, 493inserting Tremolo plug-in
for submix, 407keyboard shortcuts
for operations in, 487–489
Logic Remote mixer, 227recording MIDI events
using patch from Library, 187, 189–191
resizing Mixer area to see more, 44–45
settings for, 187viewing destination
channel strip on, 403–406
character cardchoosing drummer,
149, 152opening Drum Kit
Designer at bottom of, 176
chorus sectioncreating markers for, 162editing, 171–173
Citrus Fuzz channel strip, 283–284
Classic Rock Organ patch, 261–264, 269–271
Clean button, adding lead synths, 33
click soundsremoving with batch
fades, 355–357removing with fade-outs,
118–120, 366removing with fades/
crossfades, 120–124clip, defined, 493cloning, audio regions,
352–354

Index 507
coaching tips, Logic Remote, 229
colorcomping takes with,
114–118identifying instruments
in workspace, 344previewing takes with,
113–114showing tracks on track
headers with, 344Color palette (Option-C),
113–114Command-Click tool,
105–107commercial mixes, 431Compact Disc-Audio
(CD Audio), 492comping takes
overview of, 114–118previewing takes,
111–114Compression section, Smart
Controls, 174–175Compressor plug-in
adding fade-out, 119for dynamic range of
vocal track, 424–428inserting Amp Designer
before, 395–396mastering own mix,
428–431turning off to add
fades, 120continuous control number
(cc#), 493control bar
adding “Play from Selection” button to, 346
adding Varispeed display to, 318–319
customizing display, 85–86
customizing main window, 9–11
defined, 8, 493LCD display in. See LCD
display, control barLogic Remote, 224–231transport buttons in,
16–17Tuner in, 69
control pointsautomating modulation
data in MIDI Draw, 289–291
automating pitch blend in MIDI Draw, 281–285
copying MIDI control data in MIDI Draw, 286–288
correcting value of, 282creating, 281creating tempo
change, 311creating volume
automation curves, 437–438
defined, 493deleting, 283editing MIDI data in
Event List, 274offline mute automation,
445–447offline pan automation,
441–442repositioning tempo, 311
Control-Spacebar (play/stop selection in browsers/editors), 57
control surfaces, live automation in MIDI, 458–462
controllers, MIDIassigning knobs to screen
controls, 221–223identifying tracks in Logic
Remote mixer, 227joining recordings in
Cycle mode, 200
overview of, 185–186recording MIDI, 192
Convert Loops to Regions, 348
Convert to MIDI region, 181–182, 260
copyadding section to
arrangement, 364arranging resulting
regions, 377–378capturing take while
recording in, 204changing pitch/speed
with Varispeed, 318–321
markers, 161for marquee selection, 109regions, 27, 30, 35, 39
copy material, to fill in partsadding batch fades,
355–357cloning audio regions,
352–354looping regions with
Loop tool, 347–349repetition and, 346using folders to
determine loop length, 349–352
Core Audio, 95–97, 493Core MIDI, 493count-in, 89count-in settings
metronome, 72, 93recording audio without,
89–91CPU meter, adjusting I/O
buffer size, 95–96crash cymbals
arranging drum track, 170, 172–173
creating drummer track, 146–147, 157–158
customizing drum kit, 180

508 Index
Create Empty MIDI Region, 232, 261
Create Take Folders, recording MIDI, 202–204
crescendo, MIDI note velocity, 277–280
crossfadesadding to avoid clicks,
120–124comping takes, 117–118defined, 493
current pitch, editing in Audio Track Editor, 335
curvesadjusting speed fade, 315creating tempo, 311–313offline pan automation
and, 441offline volume animation
and, 436–440Custom LCD display, MIDI
connections, 191–192customization
amp model, 397–401control bar and display, 85drum kit. See drum kit,
customizinghidden functions in
shortcut menu, 86main window layout, 8–11
cutregions to remove
silence/noise, 370–376
section from arrangement, 366–369
Cycle modeadding batch fades in,
355–357choosing drummer and
style in, 150–152continuously repeating
section in, 17–21cutting section from
arrangement in, 366–369
defined, 493ensuring playback starts
at beginning, 167joining MIDI recordings
in, 199–202joining recordings in,
199–202muting marquee selections
in, 370–371navigating song with
Mixer open in, 45–46
previewing takes in, 113–114
processing instruments with plug-ins in, 47–51
recording additional takes in, 76–77
recording MIDI takes in, 202–204
turning off, 21, 181turning on and setting
locators, 19cymbals
adjusting drum levels with Smart Controls, 174
crash. See crash cymbalsride. See ride cymbals
Cymbals slider, 157
Ddampening level, customizing,
179–180DAW (digital audio
workstation), 103, 494dB (decibels), 494dBFS (decibels Full Scale),
68–69, 494delay, 416–419delete
all unused recordings, 90arranging regions,
377–378control points, 283
editing MIDI data in Event List, 274
marquee selections, 370–371
new recording, 73selection of loops, 37–38unused audio files, 98–100unused tracks when
rendering multiple regions, 359
Delete Mapping, Parameter Mapping area, 218, 220
descriptors, Apple Loops, 306Desktop
hiding all apps to view, 53saving file to, 6–7selecting from Where
pop-up menu, 6Destination box, 52–53destination channel strip, 404Details button, Drummer
Editor, 156, 166, 170–171digital audio workstation
(DAW), 103, 494digital recording
sample rate and bit depth, 60
setting up, 59–63display, score, 268–271divisions
defined, 25grid mapping positions
of, 495help tag displaying
lengths of, 25DJs, Varispeed used by, 318Dock, adding Logic Pro X to, 4Done button, Logic Remote
Help, 231driver, defined, 494drum hits, in Drummer
region, 146–147drum kit, customizing
adjusting drum levels using Smart Controls, 174–176

Index 509
converting drummer performance to MIDI, 181–182
with Drum Kit Designer, 176–180
keyboard shortcuts, 182overview of, 171
Drum Kit Designer, 176–180drum kit, Drummer Editor, 146drum loops
building up rhythm section, 22–26
continuously repeating section, 17–21
creating simple project, 15positioning playhead to
location, 17drum region
continuously repeating section, 18–19
navigating project, 16drum tracks, arranging
editing bridge drums performance, 167–171
editing chorus and outro sections, 171–173
editing intro drums performance, 163–167
keyboard shortcuts, 182using markers in
Arrangement track, 158–163
drum tracks, virtualarranging. See drum
tracks, arrangingchoosing drummer and
style, 148–152creating Drummer track,
146–152customizing drum
kit. See drum kit, customizing
editing drum performance, 153–158
keyboard shortcuts, 183overview of, 145review Q & A, 182
Drummer Editoradjusting levels using
Smart Controls, 175–176
choosing drummer and style, 150–151
editing Drummer regions, 153–158
editing intro drums performance, 163–167
genres of drummers in, 148–149
muting/unmuting instruments in, 163
overview of, 146Drummer regions
arranging drum tracks. See drum tracks, arranging
converting to MIDI regions, 181–182, 260
creating Drummer track, 146–148
customizing in Drum Kit Designer, 175–176
editing in Drummer Editor, 153–158
populating empty arrangement markers, 162
refreshing, 155updated when changing
drummer, 150drums, accessing entire
collection in Library, 177–178
dry signal, 67, 418duration bars, Score Editor,
265–267dynamic processing plug-ins
compressing/limiting mix, 428–431
overview of, 424using compressor, 424–428
EEast Bay Kit, 175–176East Bay+ Kit, 179, 181–182echo, creating, 416–419Edit Alternatives window, 361editing. See also
nondestructive editingadding fade-out, 118–120adding fades to remove
clicks, 120–124aligning audio material,
134–139arrangements. See
arrangement, editingassigning mouse tools,
104–107bridge drums
performance, 167–171
chorus and outro sections, 171–173
comping takes, 111–118drummer performance,
153–158files in Audio File Editor,
131–134intro by zooming in,
26–32MIDI. See MIDI,
creating/editingoverview of, 103regions in Audio Track
Editor, 125–130regions in workspace,
108–111review Q & A, 140–141
editor, defined, 494Editors button, 175, 200,
270, 335effects, monitoring during
recording, 67–68Effects section, Smart
Controls, 174–175

510 Index
electric pianocreating split keyboard
patch, 213–214Open Library loading
patch for, 188electronic voice lists, 481Empty Project template, 4Enable Automation Quick
Access, 460Enable Patch Merging, 191engineer, for punching on
the fly, 81, 85EQ
adjusting pan in mixing process, 401–402
change display parameters, 345
Channel EQ. See Channel EQ plug-in
customizing amp model, 400
EqP crossfades, 123Eraser tool, 212ES2 instrument plug-in,
283–284Event List
creating crescendo via note velocity, 277–280
defined, 494overview of, 273–275quantizing pitches, scales
and timings of MIDI notes, 275–277
events. See MIDI eventsexporting
MIDI region as standard MIDI file, 273
score as PDF, 269External Assignment area,
MIDI controllers, 221–223External Instrument plug-in,
470–472external MIDI devices
accessing with External Instrument plug-in, 470–472
choosing program remotely, 479–482
configuring MIDI hardware, 472–477
overview of, 469routing external MIDI
tracks, 477–479
Ffade-out
adding batch fades, 356–357
adjusting speed fades, 314–315
Fade tooladding fade-out, 119–120defined, 494removing fade with, 141
fader. See also Volume fader, 494
fadesadding batch, 355–357adding fade-out, 118–120adding in Audio Track
Editor, 129–130adding to remove clicks,
120–124defined, 118speed, 314–315
feedbackavoiding when recording
multiple tracks, 79avoiding when recording
with microphone, 66from record-enabled
tracks, 65Feedback screen control,
220, 222Feel knob, 170files, audio
editing in Audio File Editor, 131–134
importing MIDI, 271–273
importing using All Files Browser, 125–126
Fills knobarranging drum track, 164creating Drummer track,
155–156customizing drum kit,
172–173Filter screen control, 219, 221Finder
configuring MIDI hardware, 472–477
hiding all apps to view desktop, 53
keyboard shortcuts for, 489
Fine Pitch hotspot, 338Finger tool, 311–312Flex editing
aligning audio, 137–139creating and naming
tempo sets, 310defined, 494editing note pitches in
Audio Track Editor, 338–339
Flex Pitch, 330–335Flex Time, 310, 321–323time stretching single
note, 328–331time stretching waveform
between transient markers, 321–326
Flex Pitch editing, 331–334folder stacks, 387–388folders
closing, 352defined, 494determining loop length,
349–352packing multiple regions
on same/multiple tracks, 350
Follow checkbox, 165Formant hotspot, 338formats, audio file, 97–98forward, 16–17, 26

Index 511
frequencyautomation in Touch
mode, 448–453screen control, 220using Channel EQ
plug-in, 410–416using EQ plug-ins, 410
frequency analyzer, Channel EQ plug-in, 411–416
Ggain
adjusting in Channel EQ, 413–414
adjusting volume, 45customizing amp
model, 397mastering own mix,
429–432recording audio, 60using Compressor,
425–427Gain Reduction meter,
Compressor, 425–427General MIDI (GM) device,
477, 495Genre menu, Drummer,
148–149, 151–152Global Tracks
automatically assigning recorded tracks, 65
creating and naming tempo sets, 308–310
creating tempo changes/curves, 311–312
as main track for layered sound patch, 211
naming tracks before recording, 65
renaming arrangement markers, 159–162
renaming regions with Text tool, 106
renaming tracks/channel strips, 41–43
split keyboard patches, 214
take folder, 75using markers in
Arrangement track, 159
GM Device Multi-Instrument window, 479
GM (General MIDI) device, 477, 495
“Go to Beginning” buttonnavigating project, 16, 26punching on the fly, 83volume animation curve,
439–440green Apple Loops, 307grid
defined, 495note pitches in Audio
Track Editor as beams on, 335–339
Piano Roll Editor. See Piano Roll Editor, creating MIDI notes
quantizing note timings to, 276–277
groove tracks, 316–318, 495groups of instruments, track
stacks for, 389
HHand tool
creating tempo change, 311
defined, 495moving waveform
sections without time-stretching, 326–328
hardwareconfiguring MIDI,
472–477routing MIDI tracks,
476–479headroom, 68–69, 495Help, Logic Remote, 231help tag
defined, 495
lengths/positions of regions, 25
position/pitch of note in Score Editor, 262
position/pitch/velocity of MIDI notes, 278
resizing MIDI notes, 250value of velocity for MIDI
note, 259hi-hat
adjusting levels using Smart Controls, 174
creating Drummer track, 147
customizing in Drum Kit Designer, 180
editing drum performance, 154–156, 166
joining MIDI recordings in Cycle mode, 200–202
Hide all other applications, 53Hide current application, 53Hide Marker, 159Hip Hop, 301–303hotspots, Audio Track Editor,
336–338
II/O buffer size
choosing for recording audio, 94–97
defined, 495IAC Driver icon, Audio MIDI
Setup, 473icons
choosing for recorded track, 66
choosing for tracks/channel strips, 41–43
importaudio files using All Files
Browser, 125–126MIDI files, 271–273tempo into project, 14

512 Index
Info button, Logic Remote, 229Info column, deleting unused
audio files, 98–100info display, Piano Roll Editor,
249–250input activity monitor, MIDI,
191–194input device, 63–65Input menu, 64input number
in Input menu, 79preparing track for
recording, 63–64reassigning for track, 79recording multiple tracks,
78–79Input pop-up menu, External
Instrument plug-in, 471Input Scale, mastering own
mix, 430Insert Silence at Locators, 362insert slot, channel strips, 495inspector
building up rhythm section, 22–26
customizing main window, 8
defined, 495hiding when not
needed, 23main window area, 8Smart Controls, 217
interfaceadding Apple Loops, 11browsing and previewing
loops, 12–15customizing main
window layout, 8–11main window, 8using Quick help for
information, 9Intergalactic Beat, 302Intergalactic Rising Synth,
302–303
intro drumscreating markers for,
160–161editing performance,
163–167iPad, Logic Remote app,
223–231
Jjoins
recording MIDI in Cycle mode, 199–202
recording MIDI in selected MIDI region, 197–198
rendering multiple regions, 357–359
Kkey commands
appearing with menu commands, 19
assigning for punch on the fly, 81–83
building up rhythm section, 26
defined, 495editing pitch of MIDI
notes using, 253–257Logic Remote, 223, 230muting or deleting
marquee selections, 370–372
resetting to their defaults, 83
when multiple panes are open, 16
Key Commands window, 81–83key focus, 15–16key signature, project, 303–305keyboard shortcuts
accessing hidden functions in, 86
channel strip, track, and region operations, 487–489
Finder, 489navigation, 486–487panes and windows,
485–486Piano Roll Editor, 489Project Audio
Browser, 489turning Mac keyboard into
MIDI controller, 186zoom, 487
keyword buttons, Loop Browser, 12–13, 37
keyword search, 12–13Kick & Snare slider
editing drum performance, 154
editing intro drum performance, 165–166
editing outro section, 171–172
kick drumadjusting levels using
Smart Controls, 174customizing in Drum Kit
Designer, 179editing drum
performance, 157–158
editing intro drums performance, 163–167
editing outro section, 172
LLatch, Arpeggiator MIDI
effect, 239Latch mode, recording live
automation, 453–456latency
adjusting I/O buffer size, 94–97
defined, 66, 496Launchpad, 3–4layered sound patch, 208–212

Index 513
layoutscustomizing main
window, 8–11mapping screen
controls to plug-in parameters, 217
LCD display, control baradding Varispeed to, 319adjusting tempo to match
recording, 300Flex tool position, 139I/O buffer size, 95indicating Logic is
receiving MIDI events, 191
joining MIDI recordings in Cycle mode, 199–200
Logic Remote, 229MIDI input activity
monitor, 191–192of playhead, 25, 71previewing tempo, 13–14punching automatically, 85recording MIDI, 193sending MIDI events
to external MIDI devices, 191
Solo tool in, 105, 344Lead Synth region, 273–274,
275–277lead synths, 33–37Learn button, Parameter
Mapping area, 218, 220–221
Left-click tool, assigning, 104–105
Legacy and Compatibility content, lesson in this book, 12
lengthadjusting MIDI notes,
265–267adjusting speed fade, 315
defining for MIDI notes, 251–253
loop, 349–352levels
adjusting in mixing, 401–403
adjusting recording, 68–69Library
creating layered sound patch, 209–212
creating MIDI notes in Piano Roll Editor, 248–249
customizing, 177–178defined, 187, 496joining MIDI
recordings, 199navigating categories/
patches in, 189Producer Kit in, 177routing external MIDI
tracks to, 476–479using patch from, 186–191viewing plug-in settings
in, 187Lists button, Event List, 273live automation, recording
in Latch mode, 453–456overview of, 447–448plug-in bypass animation,
456–458review Q & A, 465–466in Touch mode, 448–453using MIDI controllers
for, 458–462Live mode
processing MIDI notes with MIDI effects, 241–242
record-enabled instrument in, 203–204
locatorsdefined, 496
editing bridge drums performance, 170–171
setting to adjust cycle area, 19–21
setting with Command-U, 170–171
Lock button, Smart Help in Logic Remote, 231
locked screensets, 391–394Logic Remote
controlling Logic with, 223–231
defined, 496Help documentation, 10
Loop Browserbrowsing/previewing
loops, 12–15building up rhythm
section, 23–26continuously repeating
section, 17–21creating Apple Loops,
305–307creating break, 36–40customizing main
window, 11transport buttons/key
commands, 15–17using, 301–303
Loop parameter, 25Loop tool
converting loops to regions, 347–349
creating break, 38–39loops
converting to regions with Loop tool, 347–349
defined, 496rendering multiple
regions, 357–359using folders to
determine length of, 349–352

514 Index
MMac OS X, keyboard
shortcuts, 57main track, Track Stack, 210,
216main window
areas of, 8customizing layout, 8–11defined, 496toggling plug-ins on/off for
interaction with, 215make-up gain, removing, 426mapping Smart Controls,
to patch parameters, 215–223
maps, complex tempo, 313markers
arranging drum track, 158–163
creating new, 344defined, 496Drummer regions
moving with, 161in offline mute
automation, 444recording automation
in Touch mode, 448–453
renaming default, 159–160resizing, 160submixing with summing
stack, 403–406time stretching waveform
between transient, 321–326
using Amp Designer, 394–395
using to identify sections in Marker track, 394–397
Marquee tooladjusting speed fade, 314creating break, 37defined, 496
dividing region in two, 164, 168–169, 172
editing files in Audio File Editor, 131
editing regions in workspace, 109–110
moving waveform sections without time-stretching, 326–327
muting or deleting marquee selections, 370–372
previewing and naming regions, 107
volume animation curve, 439–440
mastering own mix, 428–431Match Groove Track
checkbox, 317–318menu bar, 496menu commands, 19metronome
adjusting project tempo, 298–300
adjusting settings, 91–94automatically turning
on, 72correcting MIDI
recording timing, 196defined, 496editing bridge drums
performance, 170–171microphone
avoiding feedback, 66customizing amp model,
398–399preamps, 60recording audio, 60ribbon, 398
MIDIcreating layered sound
patch, 208–212creating split keyboard
patch, 212–214
defined, 496functionality of, 185–186Logic Remote and,
223–231mapping Smart Controls
to patch parameters, 215–223
online reference for, 186processing MIDI notes
with MIDI effects, 236–244
punching in and out, 205–208
recording, 191–194recording, correcting
timing, 194–196recording MIDI takes,
202–204recordings, joining
into MIDI region, 197–202
step input recording, 232–236
using patch from Library, 186–191
MIDI channel, 269–270, 496MIDI Click setting,
metronomes, 92MIDI continuous controller
(MIDI CC) events, 185MIDI controllers, recording
live automation with, 458–462
MIDI, creating/editingcreating notes in Piano
Roll Editor, 248–260creating notes in Score
Editor, 261–271editing data in Event List,
273–280importing file, 271–273keyboard shortcuts, 293MIDI continuous
controllers, 280–291

Index 515
overview of, 247review Q & A, 292
MIDI Destination, External Instrument plug-in, 470–472
MIDI devices. See external MIDI devices
MIDI Drawautomating modulation
data, 288–291automating pitch blend,
281–285copying MIDI control
data, 285–288creating crescendo
via note velocity, 277–280
defined, 496drawing automation
graphically. See offline automation
reverting to straight line, 285
MIDI editorsEvent List. See Event Listfinding features in, 291note events in, 192Piano Roll Editor. See
Piano Roll Editorprogramming MIDI
sequences in, 247Score Editor. See Score
EditorMIDI effects, 236–244, 497MIDI events
defined, 494displayed in Event List,
273–280LCD display of, 191in Live mode, 203–204MIDI editors
programming, 247overview of, 185recording MIDI, 191–194
recording using patch from Library, 186–191
routing external MIDI tracks, 476–479
MIDI files (SMF), 271–273MIDI In button, 232MIDI keyboard
assigning screen control knobs, 221–223
creating layered sound patch, 209–210
creating organ part, 261–265
creating split keyboard patch, 212–214
joining MIDI recordings, 200–202
Logic Remote, 226, 228in MIDI Draw, 281–291modulation wheel for
controller, 459overview of, 186, 280–281processing MIDI notes,
237–238recording MIDI, 191–194recording MIDI events,
189–191recording MIDI takes,
202–204turning Mac keyboard
into, 186using step input
recording, 232–236MIDI notes, creating
creating and resizing, 248–251
defining length, 251–253editing pitch, 253–257editing velocity, 257–260overview of, 248
MIDI notes, defined, 185MIDI Out, 256–257, 258, 470MIDI regions
converting drummer performance to, 181–182
converting Drummer regions automatically to, 177
creating aliases, 352creating green Apple
Loops, 307defined, 497exporting as standard
MIDI files, 273joining recordings in
Cycle mode, 199–202
punching in and out of, 205–208
quantizing, 194–195recording into selected,
197–198recording MIDI, 193selecting all on track, 181using step input
recording, 232–236MIDI Thru parameters,
quantization, 195–196mix automation
bouncing, 462–465defined, 492keyboard shortcuts, 466live automation. See
live automation, recording
offline automation. See offline automation
overview of, 435–436review Q & A, 465–466using MIDI controllers,
458–462Mix section, Smart
Controls, 174Mixer
adding effects plug-ins, 47–51
adjusting volume/stereo position, 44–47
channel strips created in, 188–190

516 Index
customizing main window layout, 10
defined, 497Logic Remote, 223, 227name of track/channel
strip, 42names/icons for tracks/
channel strips, 41–43mixing. See also automated
mixesadding delay, 416–419adding reverb using aux
sends, 419–424adjusting levels and pan,
401–403adjusting volume/stereo
position, 44–47compressing/limiting
mix, 428–431customizing locked
screenset, 392–394defined, 497keyboard shortcuts, 433names/icons for tracks/
channel strips, 41–43organizing windows and
tracks, 386–394overview of, 40, 385–386processing with plug-ins,
47–51project to single audio
file, 51–54review Q & A, 432–433submixing, 403–410switching between Tracks
area and, 389–392tips and tricks, 431–432using Amp Designer,
394–401using compressor,
424–428using dynamic
processing. See dynamic processing plug-ins
using EQ plug-in, 410–416
using track stacks, 386–389
Modern Synth 6 layout, 217modulation data, automating
in MIDI Draw, 288–291monitoring
adjusting recording level, 68–69
effects during recording, 67–68
signal to record-enabled tracks, 66
mono audio content, Pan knob, 35–36
mouse tools, assigning, 104–107
MP3 format, 52–53, 497multi-timbral instrument,
477, 497music
adding Apple Loops, 11adding lead synths, 33–36browsing/previewing
loops, 12–15building arrangement,
33–40creating break, 36–40creating project, 3–7exploring interface, 7–15mixing. See mixingmixing down to stereo
file, 51–54navigating project. See
navigationreview keyboard
shortcuts, 57–58review Q & A, 54–55sample rate of recorded, 61
Musical Instrument Digital Interface. See MIDI
Musical Typing, 186, 497mute
arranging regions, 377–378
arranging resulting regions, 377
creating/snapping mute animation, 443–446
defined, 497dimmed regions
in workspace indicating, 344
dimmed takes in workspace indicating, 111
in Drum Kit Designer, 180editing bridge drums,
168–169editing intro drums,
163–164, 166for layered sound
patch, 210marquee selections,
370–372offline animation of,
443–447in Smart Controls, 174
Mute tool, 497Muted Single Notes region,
105–106, 108–111
Nnaming
alternative arrangement, 360–361
arrangement markers, 159–162
MIDI device programs, 481–482
recorded tracks automatically, 65
regions with Text tool, 106take folder, 75tempo sets, 309–310tracks before recording, 65tracks/channel strips,
41–43navigation
building up rhythm section, 22–26

Index 517
continuously repeating section, 17–21
keyboard shortcuts for, 486–487
Logic Remote, 223overview of, 15transport buttons/key
commands for, 15–17
zooming to edit intro, 26–32
Network icon, Audio MIDI Setup, 473
New Tracks dialogcreating Drummer track,
146–148creating new project, 4–5joining MIDI recordings
in Cycle mode, 199recording multiple
tracks, 78recording single track,
64–65selecting Open Library
in, 188Nightlife Lead, 209–212,
215–216, 219noise, cutting regions to
remove, 370–376nondestructive editing
of audio regions in workspace, 108–111
defined, 497punching as, 81quantizing as, 196in workspace, 99
Normalize, rendering multiple regions, 358–359
notation, MIDI notes as Western music. See Score Editor
note off events, MIDI, 192note on events, MIDI, 192
Note Order section, Arpeggiator MIDI effect, 239–241
notesediting pitch in Audio
Track Editor, 334–339editing pitch in
workspace, 331–334time stretching single,
328–331Notes event type button, 274number keys, 388numerical values
adjusting, 13dragging region to Loop
Browser, 306length/position of
region, 25MIDI events with,
273–280
oOctave –/+ buttons, MIDI
keyboard, 200–202offline automation
defined, 436mute animation, 443–447pan automation, 440–443review Q & A, 465–466volume automation
curves, 436–440Open Library, 188Option-Down Arrow, 255, 257Option-Up Arrow, 255–256organ part
adjusting, 268–271creating, 261–264
Oscillator section, Retro Synth plug-in, 237–238
Output channel strip, 429, 497output device, 63Output menu, 63outro section, 162, 171–173
outside studio, listening to your mix, 431
overlapping recordings, 202–204, 206
Ppan
adjusting in mixing, 401–403
importing MIDI files, 272–273
for mono audio content, 35–36
offline automation of, 440–443
recording live automation in Latch mode, 455
panels, keyboard shortcuts, 57panes, keyboard shortcuts,
485–486Parameter Mapping area,
218–221parameters, returning to
default values, 272Part box, opening as floating
window, 262patches
choosing with Logic Remote iPad app, 223
creating layered sound, 208–212
creating split keyboard, 212–214
defined, 498loading without bus
sends/auxiliary channel straps, 191
mapping Smart Controls to, 216–223
multi-timbral instruments and, 477
recording MIDI events from Library, 186–191

518 Index
remotely choosing on external MIDI device, 479–482
Pattern area, Arpeggiator MIDI effect, 241–243
PCM (pulse-code modulated audio), 498
PDF, printing/exporting score as, 269
peak level meter, 68–69Pencil tool
creating MIDI notes with, 250–251, 263
defined, 248, 498defining length of MIDI
notes, 251–253percussion, adjusting levels in
Smart Controls, 174Percussions region, 345perfect pitch
in Audio Track Editor, 335–336
in workspace, 334Piano 1/3 staff style, 268–269Piano channel strip, 50–51Piano Roll Editor
copying MIDI control data in MIDI Draw, 286–288
correcting MIDI recording timing, 195–196
correcting notes, 194creating crescendo via
MIDI note velocity, 277–280
creating MIDI notes. See MIDI notes, creating
creating organ part in Score Editor, 261
defined, 498joining MIDI recordings
in Cycle mode, 200–202
keyboard shortcuts for, 489
overview of, 248quantizing MIDI notes in
Event List, 275–277recording into selected
MIDI region, 197–198recording MIDI, 192–193using step input
recording, 232–236viewing all notes, 193viewing all notes in, 198
pitchadjusting in
metronome, 92checking MIDI notes, 251correcting notes, 194editing MIDI notes,
253–257editing notes, 331–334joining MIDI recordings,
200–201keyboard shortcuts, 340overview of, 297–298quantizing MIDI notes,
275–277recording MIDI, 193review Q & A, 339–340tuning vocal recordings,
330–339using/creating Apple
Loops, 301–307Pitch Bend, 281–285pitch curve, Audio Track
Editor, 335, 338“Play from Selection,” 346, 378Play/Stop
adjusting volume/stereo position, 45
building up rhythm section, 26
navigating project, 16toggling playback, 21
playheadbuilding up rhythm
section, 26
continuously repeating section, 17–21
control bar displaying position of, 25
defined, 498navigating with transport
buttons, 16–17positioning in ruler, 17relocating in Logic
Remote, 229plug-ins
automating bypass animation, 456–458
choosing, 48defined, 498hiding/showing open, 396inserting Tuner as, 69mapping screen controls
to parameters, 216–221
opening for mapping, 215–216
ordering multiple, 395–397
processing instruments with, 47–51
toggling on and off, 215viewing settings in
Library, 187Pointer tool
correcting value of control points, 282
creating Apple Loops, 305
defined, 498editing MIDI note
velocity, 260pop-up menu, choosing
plug-in from, 48Populate with Drummer
regions, 162position, MIDI notes in Piano
Roll Editor, 251Power button, 49Pre/Post EQ button, Channel
EQ plug-in, 411

Index 519
preferencesadjusting I/O buffer size,
94–97advanced tools, 5–6choosing bit depth, 62–63defined, 498offline mute
automation, 445record-enabled tracks, 66settings for, 62
Preferences window, 63presets, Drummer region
settings, 151–152pressure (aftertouch), 273, 491preview
loops in Loop Browser, 13regions, 104–107song before editing
arrangement, 343–346
takes before comping, 111–114
print score, as PDF, 269Producer Kits, Library,
177–178programs, 479–482, 498Project Audio Browser
defined, 498deleting all unused
recordings, 90deleting unused audio
files, 98–100Flex tool, 137–139keyboard shortcut for,
489Project Chooser, 4project, creating new, 3–7Project Settings, 62, 197–198properties, MIDI hardware,
474–475puck. See XY pad puckpulse-code modulated audio
(PCM), 498punch in, punch out
automatically, 81, 85–89defined, 498
on the fly, 81–85MIDI recordings, 205–208overview of, 80–81
QQ (width or resonance), in
Channel EQ, 413–414quantization
correcting timing for MIDI recording, 194–195
default settings for, 195–196
defined, 498joining MIDI recordings
in Cycle mode, 200of MIDI notes in Event
List, 275–277Quantize menu, 194Quick Help window, 9–10Quick Swipe Comping, 112,
114–118
Rramp time, 452Ratio screen control,
219–220, 222Read automation mode, 456Record button
automatic punching, 88enabling punching on
the fly, 84recording additional
takes, 74recording audio, 71recording MIDI, 192, 196recording MIDI takes, 203
Record Enable buttonrecording additional
takes, 75, 79, 81recording single track,
65, 67record-enabled tracks
all incoming MIDI data routed to, 472
creating layered sound patch as, 208–212
monitoring signal to, 66possible feedback from, 65recording additional
takes, 76–77recording multiple tracks,
78–80recording single track,
65–66Record Toggle
assigning key command to, 81–83
punching on the fly, 83–85
recording audioadditional takes, 74–76additional takes in Cycle
mode, 76–77count-in setting, 89–91deleting unused files,
98–100digital audio recording,
59–63file type setting, 97–98I/O buffer size setting,
94–97keyboard shortcuts, 101metronome setting,
91–94multiple tracks, 77–80overview of, 59punching in and out. See
punch in, punch outreview Q & A, 100–101single tracks. See tracks,
recording singlerecording live automation
in Latch mode, 453–456overview of, 447–448plug-in bypass animation,
456–458in Touch mode, 448–453using MIDI controllers
for, 458–462

520 Index
recording MIDIcorrecting timing,
194–196creating layered sound
patch, 208–212creating split keyboard
patch, 212–214joining recordings
into MIDI region, 197–202
mapping Smart Controls to patch parameters, 215–223
overview of, 191–194processing MIDI notes
with MIDI effects, 236–244
punching in and out, 205–208
takes, 202–204using Logic Remote,
223–231using step input
recording, 232–236Redo last action, 57reflections, sound
adding delay to create artificial, 416–419
adding reverb to create artificial, 419–424
in natural environment, 416
refresh region, 155Region inspector
adding batch fades, 355–357
adjusting Fade In parameter, 123
building up rhythm section, 22–26
creating MIDI notes in Score Editor, 263, 268
defined, 499recording MIDI in Cycle
mode, 200
time-correcting MIDI regions, 194–196
using folders to determine loop length, 352
regionsaudio. See audio regionsdefined, 498Drummer. See Drummer
regionsfolders as. See folderskeyboard shortcuts for,
487–489MIDI. See MIDI regionstake folders as. See take
foldersremote programs, external
MIDI device, 479–482rendering, multiple regions in
editing, 357–359Repeat command, 352Repeat Regions/Events dialog
adjusting MIDI note lengths, 266–267
cloning audio regions, 352–354
defining length of MIDI notes, 252–253
Replace modedefined, 499punching MIDI
recordings, 205–208Reset button, 19, 37Reset Pitch Curve, 338resize
audio regions, 28, 109, 348folder length, 350MIDI notes in Piano Roll
Editor, 250–251Resize pointer, 29–30, 44–45Resize tool, 129Resulting Tempo,
Varispeed, 320Retro Synth plug-in, MIDI
notes, 237, 241–343
Return (Go to Beginning), 57reverb
customizing amp model, 397–398
offline mute automation of, 443–447
using aux sends in mixing for, 419–424
Reverse, 133–134Rewind, 17, 26rhythm section, building up, 22ribbon mics, 398ride cymbals
arranging drum track, 168–171
creating Drummer track, 147, 153, 157
customizing in Drum Kit Designer, 180
Right Arrow, editing MIDI notes, 255–256
Ringshifter plug-in, 216, 220Rounding pop-up menu,
project tempo, 300roundtrip latency, 94routing tracks, external MIDI
devices, 477–479ruler
defined, 499positioning playhead in, 17
Ssample accurate editors,
492, 499sample patterns, repeating, 346sample rate, 60–63, 499save
arrangement as new alternative, 360–361
audio recording as Apple Loop, 305–307
files, 6–7layered sound patch,
210–211Logic Pro X automatic, 7

Index 521
scales, quantizing MIDI notes, 276–277
score display, in Score Editor, 268–271
Score Editoradding note lengths,
265–267creating MIDI notes,
261–271creating organ part,
261–265defined, 499score display adjustments,
268–271using MIDI Draw in, 280
screen controlsassigning MIDI controller
knobs to, 221–223mapping to plug-in
parameters, 216–221screenset
customizing locked, 392–394
defined, 499inserting tremolo for
submix, 408–410submixing with, 404–406switching Tracks area/
Mixer, 389–392scrubbing, 105, 499searching
applications by name in Launchpad, 3
in key commands, 82sections
adding to arrangement, 361–366
cutting from arrangement, 366–369
send. See also bus sends, 499Set Locators by Regions/
Events/Marquee, 370–371Set to Perfect Pitch, editing
notes, 334, 336
Setting buttons, channel strips, 187, 392
Settings button, Logic Remote Help, 231
Shift-Option-Down Arrow, 255Shift-Option-Up Arrow, 255Show Groove Track, 316signal flow, Amp Designer in,
394–397Signature list, key signatures,
304–305silence
cloning audio regions, 354cutting regions to
remove, 370–376inserting one bar of,
361–365single tracks. See tracks,
recording singlesixteenth notes, number of
ticks in, 26skip cycle area, cutting
section, 367–369slap-back delay, 416–419Slow Drums region
creating Apple Loops, 305–307
creating/naming tempo sets, 308, 310
creating tempo changes, 312–313
setting project tempo, 298–299
using Loop Browser, 303Smart Controls
adding audio effects in MIDI Draw, 291
adjusting drum levels, 174–176
controlling with Logic Remote, 223–225
defined, 174keyboard shortcut, 174mapping to patch
parameters, 215–223
Smart Help, Logic Remote, 230–231
SMF (MIDI files), 271–273SMPTE (Society of Motion
Picture and Television Engineers), 499
snap modesadding section, 362–363,
365–366arranging resulting
regions, 378comping takes, 115–118disabling, 109editing audio regions,
108–111offline mute automation,
445–446snare drums
adjusting levels/tones with Smart Controls, 174
arranging drum track, 163–169
creating Drummer track, 146–147, 154, 157
customizing kit in Drum Kit Designer, 177–179
joining recordings into MIDI region, 199–201
in mute animation, 444–447
Society of Motion Picture and Television Engineers (SMPTE), 499
soft synths (or soft samplers). See software instruments
software instrumentsabout Live mode, 203–204creating layered sound
patch, 208–212creating MIDI notes in
Piano Roll, 248–251creating organ part in
Score Editor, 261–265

522 Index
creating split keyboard patch, 212–214
defined, 500External Instrument
plug-in, 470–472importing MIDI files, 272joining MIDI recordings
in Cycle mode, 199–202
playing with Logic Remote, 223
recording MIDI events using patch, 188–191
recording MIDI takes, 202Solo mode
applying Strip Silence, 373–376
arranging resulting regions, 377–379
assigning mouse tools, 104–105
avoiding delayed reaction in, 345
defined, 500for individual tracks,
315, 317muting marquee
selections, 370–371previewing song, 344–346using Amp Designer, 395
soundcreating layered sound
patch, 208–212pressure waves, 60speed of travel, 94–95
Space Designer plug-in, 50–51Spacebar, play/stop project, 57speaker cabinet, customizing
amp model, 398–399speed fades, 314–315speed, Varispeed, 318–321split keyboard patches, 212–214spoken lines, not tuning, 334standard MIDI files (SMF)
defined, 500exporting MIDI region(s)
as, 273importing, 271
Steinway Grand Piano patch, 190, 272
Step Input keyboard, 234–235step input recording
defined, 500overview of, 232–236undoing wrong note, 236
stereo audioBalance knob for, 35–36mixing down project to
single file, 51–55regions, appearing as
single waveform, 127–128
Stereo Out channel strip, mastering own mix, 428–431
stereo position, Mixer, 46–47Stinger Bass
creating MIDI notes in Piano Roll Editor, 248–251
editing note velocity, 257punching in and out, 207recording MIDI takes,
202–203Stop button, playback, 16, 20Strip Silence, 373–376Style, Score Editor, 268submixing
processing with Tremolo plug-in, 406–410
with summing stack, 403–406
subtracks, Track Stack, 210, 454summing stack
defined, 387–388inserting Tremolo
plug-in, 406–410
layered sound patches with, 209–210
split keyboard patches with, 213
submixing tracks with, 403–406
Swing knob, Drummer Editor, 155
Sync button, Tape Delay, 418synthesizer, defined, 500synths
adding lead, 33–37adjusting volume/stereo
position, 45–46creating layered sound
patch, 209processing MIDI notes
with MIDI effects, 236–244
System Overload alert, 96
TTab key, navigating project, 16Take Folder pop-up menu,
112, 117take folders
comping takes, 114–118deleting, 90multiple comps in, 117previewing takes, 111–114punching, 80–81, 84,
88–89recording additional
takes, 74–77recording MIDI takes,
202–204takes
capturing as recording in playback mode, 204
comping, 114–118previewing, 111–114recording additional, in
Cycle mode, 76–77

Index 523
recording additional, on multiple tracks, 77–80
recording additional, overview of, 74–76
recording MIDI, 202–204Tape Delay plug-in
for mapping, 216mapping screen controls
to, 220slap-back delay with,
416–419tape slow-down effect, 313–315templates, saving program
names for MIDI device, 482
tempoadjusting project, 13–14adjusting to match
recording, 298–300changing playback
pitch/speed with Varispeed, 318–321
for continuously repeating sections, 20
creating and naming tempo sets, 308–310
creating Apple Loops, 305–307
creating changes and curves in, 310–313
defined, 500editing outro section,
171–172setting drummer, 152Tape Delay auto
synchronized to, 417using Loop Browser,
301–303Tempo tracks
arranging drum track, 159creating and naming
tempo sets, 308–310
creating tempo change and curves, 310–311
defined, 500text, showing MIDI events as,
273–280Text tool
assigning mouse tools, 105–107
defined, 500renaming new region
with, 124Thick Layered Synth region
creating split keyboard patch, 212
mapping Smart Controls to patch parameters, 215, 220
using step input recording, 232–236
ticks, numerical values of, 25timbre, altering with pitch
correction, 338Time Quantize Strength
slider, 277time signature
beat as denominator in, 25continuously repeating
section, 20defined, 500displayed in control bar, 8
time stretchdefined, 500moving waveform sections
without, 326–328for single note, 328–331of waveform between
transient markers, 321–326
timingadding turntable/tape
slow-down effect, 313–315
correcting for MIDI recording, 194–196
creating tempo changes and curves, 308–313
editing for audio region, 321–330
getting tracks in same groove, 315–318
quantizing MIDI notes in Event List, 275–277
review Q & A, 339–340setting project tempo,
298–300setting project’s key
signature, 303–304Varispeed changing
playback, 318–321volume animation
curve, 439toms
adjusting in Smart Controls, 174
customizing, 180editing bridge drums,
168–169Tonality slider, metronome, 93tone
Apple Loops not matching root, 303
Smart Controls adjusting, 175
Tool menusassigning mouse tools,
104–107creating breaks, 36–40creating editing MIDI,
258, 268defined, 501Fade tool, 119keyboard shortcut for
opening, 141toolbar
customizing main window, 9–11
defined, 500tools, advanced Tools, 5–6

524 Index
Touch instruments, Logic Remote, 225
Touch mode, recording live automation in, 448–453
track automation, 363–365, 501track header, 501Track inspector
choosing program remotely, 479
creating and naming tempo sets, 310
creating split keyboard patch, 213–214
defined, 501track numbers, 393Track Stack
creating layered sound patch, 208–212
defined, 501Logic Remote, 226–228opening plug-ins for
mapping, 215–216overview of, 208streamlining workspace
with, 386–389submixing with summing
stack, 403–406tracks
choosing names/icons for, 41–43
creating software instrument, 188–191
defined, 501getting into same groove,
315–318keyboard shortcuts for,
487–489recording multiple, 77–80showing colors on track
headers, 344submixing with summing
stack, 403–406using folders to pack
multiple regions, 350
Tracks areaadding volume
automation to vocals, 436–440
assigning mouse tools, 104–107
choosing names/icons, 41–43
customizing main window layout, 10–11
defined, 8, 501Display Level button,
351–352navigating project, 16navigating song with
Mixer open, 45streamlining workspace
with track stacks, 386–389
using MIDI Draw in, 280tracks, organizing for mixing
customizing locked screenset, 392–394
streamlining workspace with track stacks, 386–389
switching with screensets, 389–392
tracks, recording singleadjusting recording level,
68–69checking balance, 70monitoring effects, 67–68preparing track, 63–67recording audio, 71–74tuning instrument, 69–70
transient markers, time stretching waveform, 321–326
transport buttons, navigating project, 16
Tremolo plug-in, inserting for submix, 406–410
troubleshootingwith Event List, 273–280MIDI connections, 191
Tuner, 69–70turntable stop effect, 313–315
UUndo last action, 57, 73Unlock, customizing locked
screenset, 392–394upright bass, 213–214
VVarispeed, 318–321velocity
adjusting metronome settings, 92
creating crescendo via MIDI notes, 277–280
creating MIDI notes of same, 253
defined, 501editing MIDI note,
257–260vibrato, 289–291, 337View button, Logic Remote,
224–225, 227, 230–231Vintage B3 plug-in window,
269–270virtual drum track. See drum
tracks, virtualvirtual instruments. See
software instrumentsvocal tracks
adding delay, 416–419adding volume
automation, 436–440automatic punching,
86–89dynamic range using
Compressor, 424–428

Index 525
punching on the fly, 83–85
recording live automation in Touch mode, 448–453
vocals, tuning recordingsediting note pitches in
Audio Track Editor, 334–339
editing note pitches in workspace, 331–334
overview of, 331Voice Separation tool, Score
Editor, 268volume animation curve,
438–439Volume fader
Balance knob on, 35checking balance when
recording, 70dynamic processing
plug-ins, 429EQ plug-in, 415–416external MIDI devices, 478Logic Remote, 228MIDI controllers, 461mixing, 388, 402–403,
408, 412mixing song, 47, 50offline automation,
437–438Option-clicking to return
to default value, 272patch from Library, 187rendering multiple
regions, 357–358Volume slider
automating mix, 438checking balance when
recording, 70dynamic processing
plug-ins, 429editing MIDI data in
Event List, 274
importing MIDI file, 272rhythm section, 26setting metronome, 93
WWAV, WAVE format,
97–98, 501Waveform Zoom button,
128–130waveforms
adding fades to remove clicks, 121–124
for Autopunch mode, 86–88
comping takes, 115–117defined, 500, 501deleting unused audio
files, 99dividing regions by
removing silence, 373–376
editing audio by reading, 103
editing note pitches in workspace, 331–334
editing regions, 109, 126–130
getting tracks into same groove, 316–317
incoming data displayed as, 60
moving sections without time-stretching, 326–328
muting or deleting marquee selections, 370–372
reading, 139recording audio, 72time stretching between
transient markers, 321–326
Wet signal, Tape Delay plug-in, 418
Wi-Fi networks, Logic Remote, 224
Wide Channel Strips button, 393
windowskeyboard shortcuts for,
485–486workflow navigation. See
navigationworkspace
appearance of stereo audio regions in, 127–128
color-coded regions identifying instruments in, 344
defined, 14, 502editing note pitches in,
331–334editing regions in,
108–111hiding areas in, 23repeating sample patterns
in. See copy material, to fill in parts
streamlining with track stacks, 386–389
Write automation mode, 456
XX crossfades, 123X S crossfades, 123XY pad puck
editing bridge drums performance, 168
editing drum performance, 153–154, 157–158, 165–166
editing outro section, 172

526 Index
Zzoom
adding lead synths, 33–34browsing and previewing
loops, 12–13creating breaks, 39–40defined, 502
editing MIDI note velocity, 259
horizontally, 31–32in, 26–32keyboard shortcuts for,
57, 487offline pan automation,
442–443
out, 29time stretching
waveforms, 321vertically, 32volume/stereo position, 45
Zoom tool, defined, 502

Copyright © 2013 Apple Inc. All rights reserved.training.apple.com/certification
Differentiate yourself. Get Apple Certified.
Stand out from the crowd. Differentiate yourself and gain recognition for your expertise by earning Apple Certified Pro status to validate your Logic Pro X skills.
This book prepares you to pass the Apple Certified Pro – Logic Pro X exam, and earn Apple Certified Pro – Logic Pro X status. The exam is available at Apple Authorized Training Centers (AATCs) worldwide. Earning this certification verifies knowledge of Logic Pro X core functionality, including the ability to record, edit, mix and output audio projects with Logic Pro X.
Three Steps to Certification
1 Choose your certification path. More info: training.apple.com/certification.
2 All Apple Authorized Training Centers (AATCs) offer all OS X and Pro Apps exams, even if they don’t offer the corresponding course. To find the closest AATC, please visit training.apple.com/locations.
3 Register for and take your exam(s).
“ Apple certification places you in a unique class of professionals. It not only shows that you care enough about what you do to go the extra mile to get certified, it also demonstrates that you really know your stuff.”
— Brian Sheehan, Multimedia Studio Manager, MFS Investment Management
Reasons to Become an Apple Certified Pro
• Raise your earning potential. Studies show that certified professionals can earn more than their non-certified peers.
• Distinguish yourself from others in your industry. Proven mastery of an application helps you stand out from the crowd.
• Display your Apple Certification logo. Each certifica-tion provides a logo to display on business cards, resumes and websites.
• Publicize your certifications. Publish your certifica-tions on the Apple Certified Professionals Registry (apple.com//certification/verify) to connect with schools, clients and employers.
Training Options
Apple’s comprehensive curriculum addresses your needs, whether you’re an IT or creative professional, educator, or student. Hands-on training is available through a worldwide network of Apple Authorized Training Centers (AATCs). Self-paced study is available through the Apple Pro Training Series books, which are also accessible as eBooks via the iBooks app. Video training and video training apps are also available for select titles. Visit training.apple.com to view all your learning options.

The Apple Pro Training SeriesApple offers comprehensive certification programs for creative and IT professionals. The Apple Pro Training Series is both a self-paced learning tool and the official curriculum of the Apple Training and Certification program, used by Apple Authorized Training Centers around the world.
To see a complete range of Apple Pro Training Series books, videos and apps visit: www.peachpit.com/appleprotraining
APT_1PageAd.indd 1 11/5/13 12:14 PM


televisormusic.com


Unlimited online access to all Peachpit, Adobe Press, Apple Training and New Riders videos and books, as well as content from other leading publishers including: O’Reilly Media, Focal Press, Sams, Que, Total Training, John Wiley & Sons, Course Technology PTR, Class on Demand, VTC and more.
No time commitment or contract required! Sign up for one month or a year. All for $19.99 a month
Sign up todaypeachpit.com/creativeedge