Embed Size (px)
Citation preview

Fall 2018 • Volume 34 • Number 3 24
“Get in Line”: Tips to Create Ideal Line Angles (Accreditation Case Types IV & V)James H. Peyton, DDS, FAACDBrian J. Gilbert, DDS, AAACD
…proper placement of line angles is critical to achieving the correct anatomic form and primary
anatomy of a restoration.
25 Journal of Cosmetic Dentistry
IntroductionUpon completing a large anterior composite, you notice that the anatomy does not look quite right. One of the most common reasons for this is that the line angles are not correct. As indicated in Accreditation Criterion #43 (Have the line angles been properly developed?), proper placement of line angles is critical to achieving the correct anatomic form and primary anatomy of a restoration.1 The shape/anatomy of the final restoration is arguably more important than the correct shade. Line angles that are “in line” will lead to a final restoration that is ana-tomically correct.
However, correcting the line angles on a composite restoration can be challenging. Many times, in the case of an over contoured restoration, conservative removal of composite can correct the line angles. With an under contoured restoration, a little more effort is involved, re-quiring the building up of the restoration to create ideal line angles.
Peyton/Gilbert
Tips for Creating Line Angles • The best approach to creating ideal line angles is to build
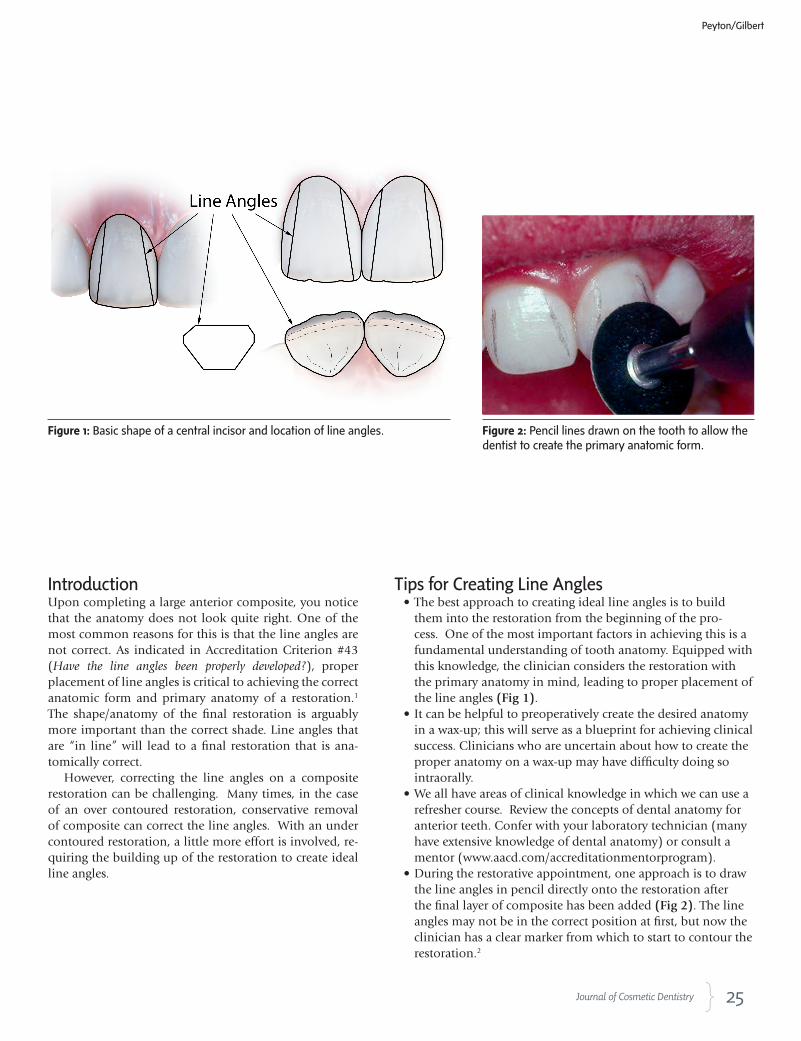
them into the restoration from the beginning of the pro-cess. One of the most important factors in achieving this is a fundamental understanding of tooth anatomy. Equipped with this knowledge, the clinician considers the restoration with the primary anatomy in mind, leading to proper placement of the line angles (Fig 1).
• It can be helpful to preoperatively create the desired anatomy in a wax-up; this will serve as a blueprint for achieving clinical success. Clinicians who are uncertain about how to create the proper anatomy on a wax-up may have difficulty doing so intraorally.
• We all have areas of clinical knowledge in which we can use a refresher course. Review the concepts of dental anatomy for anterior teeth. Confer with your laboratory technician (many have extensive knowledge of dental anatomy) or consult a mentor (www.aacd.com/accreditationmentorprogram).
• During the restorative appointment, one approach is to draw the line angles in pencil directly onto the restoration after the final layer of composite has been added (Fig 2). The line angles may not be in the correct position at first, but now the clinician has a clear marker from which to start to contour the restoration.2
Figure 1: Basic shape of a central incisor and location of line angles. Figure 2: Pencil lines drawn on the tooth to allow the dentist to create the primary anatomic form.

Figure 3: Common mistakes: a bulky composite center and under contoured proximal line angle areas.
Figure 4: Viewing the restoration to determine the correct contours.
26 Fall 2018 • Volume 34 • Number 3
• The first and most important step is the creation of the facioincisal line angle. Once it is accurately created, mark it again and leave it alone so that it will not be altered or accidentally removed. Next, observe the restoration from an incisal view. From this vantage point, the bulk or defi-ciencies in the restoration can be analyzed. Once the line angles are developed, adjusted, and determined to be cor-rect, mark them in pencil and leave them alone. Finally, create the proper facial contours. At this point, make sure the line angles are not sharp. If necessary, round the edges slightly with a small disc. Draw the line angles again and use these lines to avoid unintentionally eliminating the ideal contours you have already created. The final result should be a restoration with ideal anatomy and proper line angles.3,4
• Most large composite restorations are over contoured and bulky in the center of the tooth, while being deficient in the proximal line angle areas (Figs 3 & 4).5 Creating the proper primary anatomy using the technique described previously should avoid bulky and anatomically incorrect composite restorations.
• After the first restorative appointment, take photographs and study models. Upon analyzing the restoration, deci-sions can be made as to what can be done to improve the restoration at a follow-up visit. If the restoration is under contoured, roughen the area with a disc, micro etch, acid etch, add bonding agent, then carefully add composite and smooth with a brush to eliminate voids and to create the proper contour (Fig 5).

27 Journal of Cosmetic Dentistry
Peyton/Gilbert
Dr. Peyton is an AACD Accredited Fellow and has
served as an AACD Accreditation Examiner since 2000.
A part-time instructor at the UCLA School of Dentistry,
he practices in Bakersfield, California.
Dr. Gilbert is an AACD Accredited Member and has
served as an AACD Accreditation Examiner since 1998.
He practices in Las Cruces, New Mexico.
Disclosures: The authors did not report any disclosures.
Figure 5: Adding composite to an under contoured proximal area. Figure 6: The correct anatomy and correct line angle development will provide very natural-looking, light-reflective surfaces.
Ideal restoration contour plays as significant a role as shade selection in a restoration’s success. When the anatomy of a res-toration is incorrect, the final outcome may look asymmetrical due to differences in light reflection as compared to the contra-lateral tooth. As a result, the shade also may not look correct. So, “get in line” to achieve ideal line angles and start creating beautiful composite restorations today (Fig 6).
References
1. American Academy of Cosmetic Dentistry (AACD). A guide to
Accreditation criteria. Madison (WI): AACD; 2014.
2. Peyton JH. Finishing and polishing techniques: direct composite resin res-
torations. Pract Proced Aesthet Dent. 2004 May;16(4):293-8.
3. Fahl N Jr. Step-by-step approaches for anterior direct restorative challeng-
es: mastering composite artistry to create anterior masterpieces—part 2. J
Cosmetic Dent. 2011 Winter;26(4):42-55.
4. Peyton J, Arnold J. Six or more direct resin veneers case for Accreditation:
hands-on typodont exercise. J Cosmetic Dent. 2008 Fall;24(3):38-48.
5. Mackenzie L, Parmar D, Shortall AC, Burke FJ. Direct anterior composites:
a practical guide. Dent Update. 2013 May;40(4):297-9, 301-2, 305-8. jCD
Acknowledgment
The authors extend appreciation to Dr. Newton Fahl for his mastery in creating beautiful line angles.