Embed Size (px)
Citation preview

ANZ TRANSACTIVE – GLOBAL PAYMENTS USER GUIDE
November 2017
Public

CONTENTS
Introduction 4 About this guide ......................................................................................................................................... 4 Online Help .................................................................................................................................................. 4 Online Resources ........................................................................................................................................ 4 Further Assistance ...................................................................................................................................... 4
Payments 5
Overview 5 Payments menu options .......................................................................................................................... 5 Payment Types ............................................................................................................................................ 5 Payment Statuses ....................................................................................................................................... 6 Payment processing & cut-off times .................................................................................................... 6
Create Payment 7 Create an Account Transfer ..................................................................................................................... 7 Create a Domestic Payment — Australia ............................................................................................ 9 Create a Domestic Payment — China ............................................................................................... 12 Create an International Payment ....................................................................................................... 15 Create a Pay a Bill Payment .................................................................................................................. 18 Create a Payment using a Payment Template ............................................................................... 19 Create a Payment using a Payment File ........................................................................................... 20 Create a Payment from a Past Payment ........................................................................................... 20
Current Payments 22 Current Payments Columns ................................................................................................................. 22 Payment Details Screen ......................................................................................................................... 24 Control Bar ................................................................................................................................................. 24
Past Payments 25 Payment Search Fields ........................................................................................................................... 25 Past Payments Search Result Columns ............................................................................................. 27 Past Payments Details Screen .............................................................................................................. 28 Control Bar ................................................................................................................................................. 28
Payment Actions 29 Edit a Payment ......................................................................................................................................... 29 Recall a Payment...................................................................................................................................... 30 Approve or Reject a Payment .............................................................................................................. 30 Reject an Instruction in a Payment .................................................................................................... 31 Delete a Payment .................................................................................................................................... 31 Resubmit a Payment .............................................................................................................................. 32 Stop a Payment ........................................................................................................................................ 32 Copy a Payment ....................................................................................................................................... 33
Payee List 34 Payee List Columns ................................................................................................................................. 34 Beneficiary Statuses ................................................................................................................................ 35 Create a Beneficiary ................................................................................................................................ 36

Public
View a Beneficiary ................................................................................................................................... 38 Edit a Beneficiary ..................................................................................................................................... 38 Delete a Beneficiary ................................................................................................................................ 39 Approve or Reject a Beneficiary .......................................................................................................... 39
Templates 41 Payment Template Columns ............................................................................................................... 41 Templates Details Screen ...................................................................................................................... 42 Control Bar ................................................................................................................................................. 42 Payment Template Statuses ................................................................................................................ 42 Create a Domestic Payment Template — Australia ..................................................................... 43 Create a Domestic Payment Template — China ........................................................................... 45 Create an International Payment Template .................................................................................... 48 Create a Pay Bill Template .................................................................................................................... 51 View a Template ...................................................................................................................................... 53 Edit a Template ........................................................................................................................................ 53 Recall a Template .................................................................................................................................... 54 Approve or Reject a Template ............................................................................................................. 54 Delete a Template ................................................................................................................................... 55 Copy a Template ...................................................................................................................................... 55 Create Payment from Template .......................................................................................................... 56
File Import Summary 57 File Import Summary Columns ........................................................................................................... 57
Payment Reports and Advices 58 Payment Audit Report ........................................................................................................................... 58 Payment Detail Report........................................................................................................................... 58 Payment Summary Report ................................................................................................................... 59
3

Public
INTRODUCTION
About this guide This user guide contains information and procedures for the Payments component of ANZ Transactive – Global provided by Australia and New Zealand Bank (China) Company Limited.
This user guide will be updated when there is new and/or updated information. Please ensure you regularly check the available version for the most up-to-date information. We recommend that you read this guide in conjunction with the applicable product terms and conditions.
Online Help The online help in ANZ Transactive – Global allows you to access screen specific help and frequently asked questions.
Online Resources You can access the ANZ Transactive – Global Quick Reference Guides, User Guides and other information from the Online Resources page. To access the page, click on the Help icon within the application and then the Online Resources link.
Further Assistance If you require further assistance, please contact your local Customer Service Centre. Details can be found at anz.com/servicecentres.
4
Public
PAYMENTS
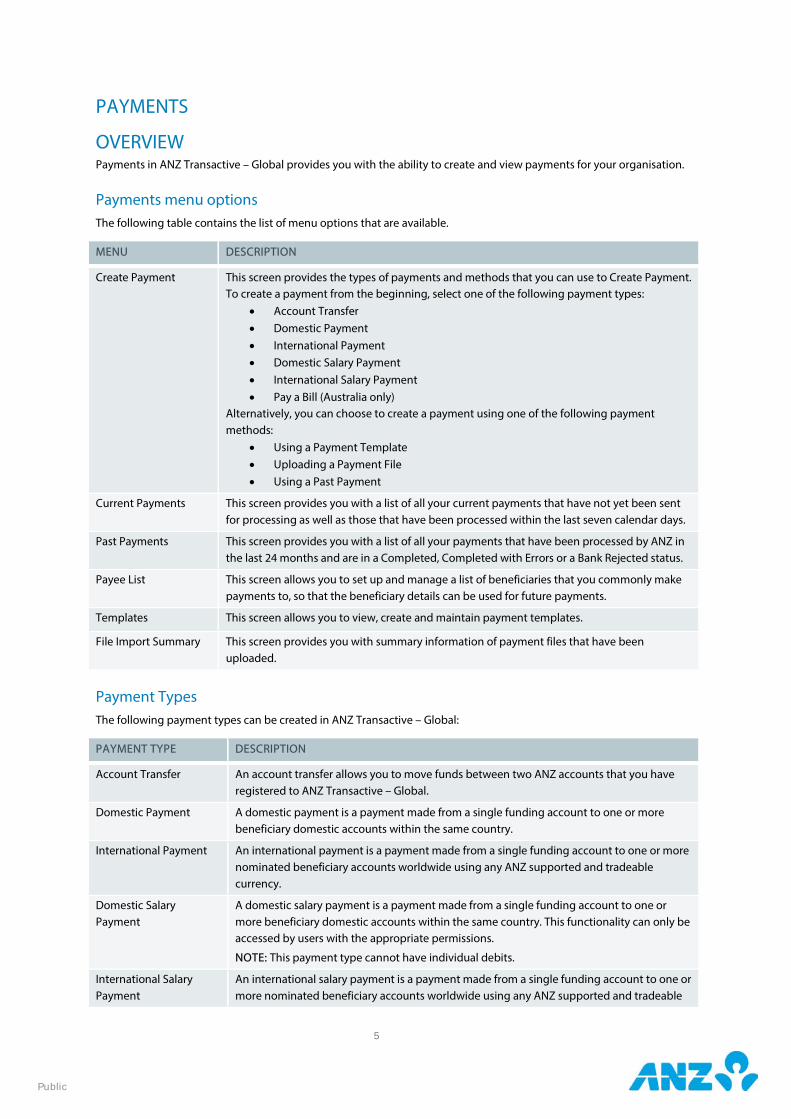
OVERVIEW Payments in ANZ Transactive – Global provides you with the ability to create and view payments for your organisation.
Payments menu options The following table contains the list of menu options that are available.
MENU DESCRIPTION
Create Payment This screen provides the types of payments and methods that you can use to Create Payment. To create a payment from the beginning, select one of the following payment types:
• Account Transfer • Domestic Payment • International Payment • Domestic Salary Payment • International Salary Payment • Pay a Bill (Australia only)
Alternatively, you can choose to create a payment using one of the following payment methods:
• Using a Payment Template • Uploading a Payment File • Using a Past Payment
Current Payments This screen provides you with a list of all your current payments that have not yet been sent for processing as well as those that have been processed within the last seven calendar days.
Past Payments This screen provides you with a list of all your payments that have been processed by ANZ in the last 24 months and are in a Completed, Completed with Errors or a Bank Rejected status.
Payee List This screen allows you to set up and manage a list of beneficiaries that you commonly make payments to, so that the beneficiary details can be used for future payments.
Templates This screen allows you to view, create and maintain payment templates.
File Import Summary This screen provides you with summary information of payment files that have been uploaded.
Payment Types The following payment types can be created in ANZ Transactive – Global:
PAYMENT TYPE DESCRIPTION
Account Transfer An account transfer allows you to move funds between two ANZ accounts that you have registered to ANZ Transactive – Global.
Domestic Payment A domestic payment is a payment made from a single funding account to one or more beneficiary domestic accounts within the same country.
International Payment An international payment is a payment made from a single funding account to one or more nominated beneficiary accounts worldwide using any ANZ supported and tradeable currency.
Domestic Salary Payment
A domestic salary payment is a payment made from a single funding account to one or more beneficiary domestic accounts within the same country. This functionality can only be accessed by users with the appropriate permissions.
NOTE: This payment type cannot have individual debits.
International Salary Payment
An international salary payment is a payment made from a single funding account to one or more nominated beneficiary accounts worldwide using any ANZ supported and tradeable
5

Public
PAYMENT TYPE DESCRIPTION
currency. This functionality can only be accessed by users with the appropriate permissions.
NOTE: This payment type cannot have individual debits.
Pay a Bill Pay a Bill (BPAY®*) is a national Australian billing service that enables customers to make payments from their AU domestic accounts to registered billers within Australia. These are payments made to any organisation that is a registered biller within Australia. The funding account is always an ANZ AUD account domiciled in Australia. * BPAY® is a registered trademark of BPAY Pty Ltd ABN 69 079 137 518.
Payment Statuses As a payment moves through the payment workflow, it goes through a number of different statuses as a result of the actions performed on it. The following table details each payment status.
PAYMENT STATUS DESCRIPTION
Draft The payment has been created and saved but not yet submitted for approval.
Pending Approval The payment has been created and submitted for approval. If the payment requires multiple approvals, it will remain in this status until the final approval has been actioned. Once fully approved, it will move to an Approved status.
Approver Rejected The payment has been rejected by one of the approvers. It will need to be edited if necessary and resubmitted for approval. Alternatively it can be deleted.
Deleted The payment has been deleted. A payment can only be deleted if it is in a Draft, Pending Approval, Approver Rejected or Needs Repair status. Deleted payments will remain visible in the system for seven days.
Approved The payment has been fully approved and will begin processing by ANZ.
Needs Repair Indicates that there is an error with the payment which needs to be repaired before it can be approved.
Processing The payment has been fully approved and is being processed by ANZ. The status will be updated once ANZ has processed the payment.
Warehoused The payment has been approved and is being held for processing on the nominated value date. Payments can be future dated up to 120 business days.
Insufficient Funds The payment has been submitted for processing and has failed due to insufficient funds in the funding account.
The payment can be resent once the funding account has sufficient funds by using the Resubmit action. In this instance, the payment will not require additional approval but needs to be resubmitted prior to the cut-off time on the same value date. If the payment is not resent prior to this time, the status will automatically change to Bank Rejected.
Completed The payment has been successfully processed by ANZ.
Completed with Errors The payment contains one or more instructions that could not be processed by ANZ.
Bank Rejected The payment has been rejected by ANZ.
Payment processing & cut-off times Payment processing and cut-off times vary depending on the payment types and currencies used. The system determines the cut-off time based on the following attributes: the Debit Account Currency, the Debit Account Country and the Payment Type.
You can view the cut-off time for a payment in the Cut-off Time column located in the Current Payments screen. The time is displayed in the Time Zone set up in the Settings & Preferences menu.
6

Public
CREATE PAYMENT Menu > Payments > Create Payment
The Create Payment screen can be accessed from the Payments Menu.
To create a payment from the beginning, select one of the following payment types:
Account Transfer Domestic Payment International Payment Domestic Salary Payment International Salary Payment Pay a Bill (BPAY) (Australia only)
Alternatively, you can choose to create a payment using one of the following methods: Use Payment Template Use Payment File Use Past Payment
Create an Account Transfer
To create an account transfer, follow the steps below.
NOTE: Mandatory fields are marked with an asterisk. You may not see all of the fields as they may only be required in specific markets.
STEP ACTION
1 Click on Account Transfer on the Create Payment screen.
2 Complete the From and To fields: FIELD DESCRIPTION Division* Select the Division under which the transfer will be made.
NOTE: Available if your Organisation is set up with a hierarchy. Debit Account* Select the account the funds are being transferred from.
NOTE: You will only have access to debit accounts that you have permissions for and that are set up under the selected Division.
Credit Account* Select the account the funds are being transferred to. NOTE: You will be able to select all accounts that you have permissions for across all divisions.
7

Public
STEP ACTION
3 Complete the Payment Details section: FIELD DESCRIPTION Value Date* Select the date on which the payment is to be processed. By default, “Today” is
selected. To select an alternative Value Date, click on “Later” and choose a future date, up to 120 business days, from the calendar.
Payment Reference* Enter a payment reference up to 16 characters. This will appear as part of the narrative on the Debit Account, Debit Advice and Payment Reports.
Payment Currency & Amount*
Enter the amount of the transfer in the Payment Currency & Amount field. By default, the Payment Currency is the currency of the credit account.
Debit Currency & Amount Available if the debit and credit account are different currencies and displays the debit amount.
Enter Amounts in Debit Currency
Available if the debit and credit account are different currencies. If you prefer to specify the debit amount, tick this option and enter the amount in the Debit Currency & Amount field. The equivalent credit amount will be displayed.
Debit Statement Narrative Enter a Debit Statement Narrative up to 160 characters. This will appear as part of the narrative on the Debit Account.
Credit Statement Narrative Enter a Credit Statement Narrative up to 160 characters. This will appear as part of the narrative on the Credit Account.
4 Complete the Remittance Information section (optional): FIELD DESCRIPTION Debit Advice Description Enter a debit advice description up to 140 characters. This will appear as part of
the narrative on the Debit Advice. Invoice Details You can enter 80 x 60 lines of data that will be displayed on the Beneficiary
Advice, Debit Advice and Payment Detail Report.
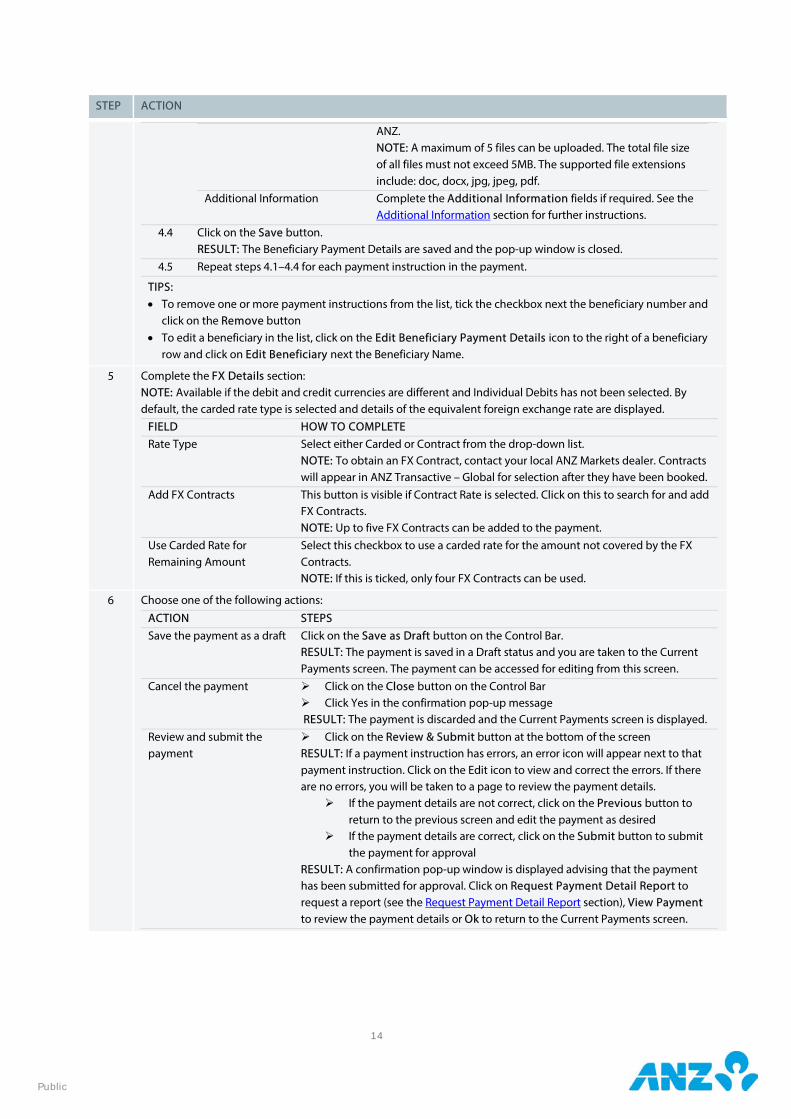
5 Complete the FX Details section: NOTE: This field is visible if the debit and credit accounts are different currencies. By default, the carded/dynamic rate type is selected and details of the equivalent foreign exchange rate are displayed.
FIELD HOW TO COMPLETE Rate Type Select either Carded/Dynamic or Contract from the drop-down list.
NOTE: To obtain an FX Contract, contact your local ANZ Markets dealer. Contracts will appear in ANZ Transactive – Global for selection after they have been booked.
Add FX Contracts Available if Contract Rate is selected. Click on this to search for and add FX Contracts. NOTE: Up to five FX Contracts can be added to the payment.
Use Carded/Dynamic Rate for Remaining Amount
Tick this checkbox to use a carded rate or a dynamic rate (depending on your region) for the amount not covered by the FX Contracts. NOTE: If this is ticked, only four FX Contracts can be used.
6 Complete the Supporting Documents section if you need to upload a file to accompany your payment. Click on the Attach Document button to attach a file to accompany your payment. For China customers, the document will be submitted to ANZ. For Australian customers, you can use this to provide additional information to an approver if desired. NOTE: A maximum of 5 files can be uploaded. The total file size of all files must not exceed 5MB. The supported file extensions include: doc, docx, jpg, jpeg, pdf.
7 China customers will need to complete the Additional Information section if the payment requires additional regulatory information. See the Additional Information section of this guide for further instructions. NOTE: This section will appear only if the payment requires this information.
8 Review the details on screen, then choose one of the following actions: ACTION STEPS Save the transfer as a draft Click on the Save As Draft button on the Control Bar.
RESULT: The transfer is saved in a draft status and can be reviewed and edited in the Current Payments screen. A confirmation pop-up window is displayed
8

Public
STEP ACTION
providing the Payment ID. Cancel transfer Click on the Close button on the Control Bar.
RESULT: The transfer is discarded and the Current Payments screen is displayed. Review and submit the transfer
Click on the Review & Submit button at the bottom of the screen If the transfer details are not correct, click on the Previous button to return
to the previous screen and edit the payment as desired If the transfer details are correct, click on the Submit button to submit the
payment for approval. RESULT: A confirmation pop-up window is displayed advising that the transfer has been submitted for approval. Click on Request Payment Detail Report to request a report (see the Request Payment Detail Report section), View Payment to review the payment details or Ok to return to the Current Payments screen.
Create a Domestic Payment — Australia
To create a domestic payment in Australia, follow the steps below.
NOTE: Mandatory fields are marked with an asterisk.
STEP ACTION
1 Select Domestic Payment or Domestic Salary Payment from the Create Payment screen. NOTE: Domestic Salary Payments can only be accessed by users with the appropriate permissions.
2 Complete the From fields: FIELD HOW TO COMPLETE Division* Select the Division under which the payment will be made.
NOTE: Available if your Organisation is setup with a hierarchy. Debit Account* Select the account the funds are being debited from.
3 Select the Payment Method. Direct Entry is the Payment Method required for Domestic Payments.
4 Complete the Payment Details fields: FIELD HOW TO COMPLETE Value Date* Select the date on which the payment is to be processed. By default, “Today” is
selected. To select an alternative Value Date, click on “Later” and choose a future date, up to 120 business days, from the calendar.
Payment Name* Enter a name up to 16 characters which may be a payment or beneficiary name. This will appear on payment reports.
Payment Reference* Enter a payment reference up to 18 characters. This will appear as part of the narrative on the debit account and beneficiaries statement and on payment reports.
Statement Narrative* Enter a Statement Narrative up to 40 characters. This will appear as part of the narrative on the funding account statement.
Direct Entry User ID* Select a Direct Entry User ID from the drop-down list.
5 Click on the Batch Defaults button to set the default Trace Account, Remitter Name and Transaction Code for the batch.
FIELD HOW TO COMPLETE Trace Account* Select a Trace Account (defaults to the debit account). Any transactions that are
rejected by other banks will be returned to this account. This will appear as part of the narrative on the debit account statement.
Remitter Name* By default the nickname of the debit account is displayed but can be changed if necessary. The Remitter Name can be up to 16 characters and will appear as part of the narrative on the beneficiary's statement.
Transaction Code* Select the appropriate transaction code for the batch payment. Possible codes are: • 50 — General Payment
9

Public
STEP ACTION
• 51 — Commonwealth Interest • 52 — Family Allowance • 53 — Payroll • 54 — Pension • 55 — Allotment • 56 — Dividend • 57 — Debenture Interest
6 Complete the Beneficiary Details section. Follow the steps below: STEP ACTION
6.1 Click on the Add button to add a payment instruction to the list. RESULT: A new line item is displayed.
6.2 Add beneficiary details to each payment instruction in the list. a) To add an existing beneficiary from the Payee List: Click on the “Beneficiary Name” field and select a beneficiary from the drop-down list, or click on Search Beneficiaries to search for a beneficiary b) To create a new beneficiary: Click on the “Beneficiary Name” field and click on Add New Beneficiary from the drop-down list Enter the details on screen and click on the Proceed button NOTES: • You will only see “Add New Beneficiary” if you have permissions to create new beneficiaries • When creating a new beneficiary, you can add the beneficiary to the Payee List for future use by
selecting the Add this beneficiary to Address Book checkbox • See the Create a Beneficiary section for further instructions
6.3 Add the amount to pay the beneficiary either directly into the Amount field or enter the details in the Beneficiary Payment Details pop-up window. This can be accessed by clicking on the Edit Beneficiary Payment Details icon to the right of a beneficiary row. The following details can also be updated:
FIELD HOW TO COMPLETE Payment Currency & Amount* Enter the amount to pay the beneficiary. Lodgement Reference* By default the Payment Reference is displayed but can be
changed for this beneficiary if necessary. The Lodgement Reference can be up to 18 characters and will appear as part of the narrative on the debit account and beneficiaries statement and on payment reports.
Remitter Name* By default the Remitter Name in the Batch Defaults is displayed but can be changed for this beneficiary if necessary.
Withholding Tax Indicator & Amount
If tax is to be withheld from the payment, choose a Withholding Tax Indicator and enter in the amount withheld.
Transaction Code By default the Transaction Code e in the Batch Defaults is selected but can be changed for this beneficiary if necessary.
Trace Account* By default the Trace Account in the Batch Defaults is selected but can be changed for this beneficiary if necessary.
Remittance Information Enter remittance information up to 140 characters. This will appear on Debit and Beneficiary Advices and the Detailed Payment Report.
Invoice Details You can enter 80 x 60 lines of data that will be displayed on the Beneficiary Advice, Debit Advice and Payment Detail Report.
Email Beneficiary Advice Tick this checkbox and enter an email address to have Beneficiary Advice for this payment sent to the email address. You cannot edit the email address unless the checkbox is ticked.
Supporting Documents Click on the Attach Document button to attach a file to provide additional information to an approver if desired. NOTE: A maximum of 5 files can be uploaded. The total file size
10

Public
STEP ACTION
of all files must not exceed 5MB. The supported file extensions include: doc, docx, jpg, jpeg, pdf.
6.4 Click on the Save button. RESULT: The Beneficiary Payment Details are saved and the pop-up window is closed.
6.5 Repeat steps 6.1–6.4 for each payment instruction in the payment.
TIPS: • To remove one or more payment instructions from the list, tick the checkbox next the beneficiary number and
click on the Remove button • To edit a beneficiary in the list, click on the Edit Beneficiary Payment Details icon to the right of a beneficiary
row and click on Edit Beneficiary next the Beneficiary Name.
7 Choose one of the following actions:
ACTION STEPS Save the payment as a draft Click on the Save As Draft button on the Control Bar.
RESULT: The payment is saved in a Draft status and you are taken to the Current Payments screen. The payment can be accessed for editing from this screen.
Cancel the payment Click on the Close button on the Control Bar Click Yes in the confirmation pop-up message RESULT: The payment is discarded and the Current Payments screen is displayed.
Review and submit the payment
Click on the Review & Submit button at the bottom of the screen RESULT: If a payment instruction has errors, an error icon will appear next to that payment instruction. Click on the Edit icon to view and correct the errors. If there are no errors, you will be taken to a page to review the payment details.
If the payment details are not correct, click on the Previous button to return to the previous screen and edit the payment as desired
If the payment details are correct, click on the Submit button to submit the payment for approval
RESULT: A confirmation pop-up window is displayed advising that the payment has been submitted for approval. Click on Request Payment Detail Report to request a report (see the Request Payment Detail Report section), View Payment to review the payment details or Ok to return to the Current Payments screen.
11

Public
Create a Domestic Payment — China
To create a domestic payment in China, follow the steps below.
NOTE: Mandatory fields are marked with an asterisk.
STEP ACTION
1 Select Domestic Payment or Domestic Salary Payment from the Create Payment screen. NOTE: Domestic Salary Payments can only be accessed by users with the appropriate permissions.
2 Complete the From fields: FIELD HOW TO COMPLETE Division* Select the Division under which the payment will be made.
NOTE: Available if your Organisation is setup with a hierarchy. Debit Account* Select the account the funds are being debited from.
3 Complete the Payment Details fields: FIELD HOW TO COMPLETE Value Date* Select the date on which the payment is to be processed. By default, “Today” is
selected. To select an alternative Value Date, click on “Later” and choose a future date, up to 120 business days, from the calendar.
Payment Name* Enter a name up to 16 characters which may be a payment or beneficiary name. This will appear on payment reports.
Payment Reference* Enter a payment reference up to 16 characters. This will appear as part of the narrative on the debit account and beneficiaries statement and on payment reports.
Payment Currency* Select the currency that the funds will be credited in. By default, the currency of the debit account is displayed.
Debit Advice Description Enter a debit advice description up to 140 characters. This will appear as part of the narrative on the Debit Advice.
Enter Amounts in Debit Currency
If ticked, enter the amounts to credit the beneficiaries in the currency of the debit account instead of the credit account. NOTE: This option is only available if the debit account currency is different to the payment currency.
Individual Debits If ticked, the payment is debited at a transaction level and will appear on the statement as single entries, i.e. a debit for each beneficiary NOTE: Individual Debits are not available for Domestic Salary Payments. By default these payments are bulk debited, i.e. a debit for each batch.
Urgent If ticked, this option defaults the payment instructions to use the fastest available clearing method.
4 Complete the Beneficiary Details section. Follow the steps below: STEP ACTION
4.1 Click on the Add button to add a payment instruction to the list. RESULT: A new line item is displayed.
4.2 Add beneficiary details to each payment instruction in the list. a) To add an existing beneficiary from the Payee List: Click on the “Beneficiary Name” field and select a beneficiary from the drop-down list, or click on Search Beneficiaries to search for a beneficiary b) To create a new beneficiary: Click on the “Beneficiary Name” field and click on Add New Beneficiary from the drop-down list Enter the details on screen and click on the Proceed button NOTES: • You will only see “Add New Beneficiary” if you have permissions to create new beneficiaries • When creating a new beneficiary, you can add the beneficiary to the Payee List for future use by
selecting the Add this beneficiary to Address Book checkbox • If the beneficiary’s bank is not supported by the payment type, an error message will be displayed • See the Create a Beneficiary section for further instructions
12

Public
STEP ACTION
4.3 Add the amount to pay the beneficiary either directly into the Amount field or enter the details in the Beneficiary Payment Details pop-up window. This can be accessed by clicking on the Edit Beneficiary Payment Details icon to the right of a beneficiary row. The following details can also be updated:
FIELD HOW TO COMPLETE Payment Method* Choose from Low Value Payment or High Value Payment. Reference* By default the Payment Reference is displayed but can be
changed for this beneficiary if necessary. The Reference can be up to 16 characters and will appear as part of the narrative on the debit account and beneficiaries statement and on payment reports.
Payment Currency & Amount* Enter the amount to pay the beneficiary in the Payment Currency selected.
Debit Currency & Amount* Enter the amount to pay the beneficiary in the currency of the Debit Account. Available if the debit and credit account are different currencies.
Charges* Select who will incur the charges associated with cross-border payments: • BEN — the beneficiary pays all transfer charges and receives
the payment minus the transfer charges • OUR — you pay all transfer charges and the beneficiary
receives the full amount of the payment • SHA — you pay outgoing transfer charges and the beneficiary
pays the correspondent bank charges. The beneficiary will receive the payment minus the correspondent bank charges.
NOTE: Available if the Payment Method is High Value Payment System (HVPS).
Remitter Name By default the nickname of the debit account is displayed but can be changed for this beneficiary if necessary. The Remitter Name can be up to 16 characters and will appear as part of the narrative on the beneficiary's statement.
Purpose Code Select a Purpose Code from the drop-down list. NOTE: Available if the Payment Method is a cross-border HVPS (High Value Payment System).
Debit Advice Description Enter a Debit Advice Description up to 140 characters. This will appear as part of the narrative on the Debit Advice. NOTE: Available if you have ticked the Individual Debits checkbox.
FX Details Complete the FX Details section. NOTE: Available if the debit and credit currencies are different and you have selected Individual Debits.
Remittance Information Enter remittance information up to 140 characters. This will appear on Debit and Beneficiary Advices and the Detailed Payment Report.
Instructions Remarks Enter Instruction Remarks if required. NOTE: Available if Payment Type is BEPS (Bulk Electronic Payment System) or HVPS (High Value Payment System).
Invoice Details You can enter 80 x 60 lines of data that will be displayed on the Beneficiary Advice, Debit Advice and Payment Detail Report.
Email Beneficiary Advice Tick this checkbox and enter an email address to have Beneficiary Advice for this payment sent to the email address. You cannot edit the email address unless the checkbox is ticked.
Supporting Documents Click on the Attach Document button to attach a file to accompany your payment. The document will be submitted to
13
Public
STEP ACTION
ANZ. NOTE: A maximum of 5 files can be uploaded. The total file size of all files must not exceed 5MB. The supported file extensions include: doc, docx, jpg, jpeg, pdf.
Additional Information Complete the Additional Information fields if required. See the Additional Information section for further instructions.
4.4 Click on the Save button. RESULT: The Beneficiary Payment Details are saved and the pop-up window is closed.
4.5 Repeat steps 4.1–4.4 for each payment instruction in the payment.
TIPS: • To remove one or more payment instructions from the list, tick the checkbox next the beneficiary number and
click on the Remove button • To edit a beneficiary in the list, click on the Edit Beneficiary Payment Details icon to the right of a beneficiary
row and click on Edit Beneficiary next the Beneficiary Name.
5 Complete the FX Details section: NOTE: Available if the debit and credit currencies are different and Individual Debits has not been selected. By default, the carded rate type is selected and details of the equivalent foreign exchange rate are displayed.
FIELD HOW TO COMPLETE Rate Type Select either Carded or Contract from the drop-down list.
NOTE: To obtain an FX Contract, contact your local ANZ Markets dealer. Contracts will appear in ANZ Transactive – Global for selection after they have been booked.
Add FX Contracts This button is visible if Contract Rate is selected. Click on this to search for and add FX Contracts. NOTE: Up to five FX Contracts can be added to the payment.
Use Carded Rate for Remaining Amount
Select this checkbox to use a carded rate for the amount not covered by the FX Contracts. NOTE: If this is ticked, only four FX Contracts can be used.
6 Choose one of the following actions:
ACTION STEPS Save the payment as a draft Click on the Save as Draft button on the Control Bar.
RESULT: The payment is saved in a Draft status and you are taken to the Current Payments screen. The payment can be accessed for editing from this screen.
Cancel the payment Click on the Close button on the Control Bar Click Yes in the confirmation pop-up message RESULT: The payment is discarded and the Current Payments screen is displayed.
Review and submit the payment
Click on the Review & Submit button at the bottom of the screen RESULT: If a payment instruction has errors, an error icon will appear next to that payment instruction. Click on the Edit icon to view and correct the errors. If there are no errors, you will be taken to a page to review the payment details.
If the payment details are not correct, click on the Previous button to return to the previous screen and edit the payment as desired
If the payment details are correct, click on the Submit button to submit the payment for approval
RESULT: A confirmation pop-up window is displayed advising that the payment has been submitted for approval. Click on Request Payment Detail Report to request a report (see the Request Payment Detail Report section), View Payment to review the payment details or Ok to return to the Current Payments screen.
14

Public
Create an International Payment
To create an international payment, follow the steps below.
NOTE: Mandatory fields are marked with an asterisk. Some fields may not be available depending on your region, payment method and payment type.
STEP ACTION
1 Click on International Payment or International Salary Payment on the Create Payment screen. NOTE: International Salary Payments can only be accessed by users with the appropriate permissions.
2 Complete the From fields: FIELD HOW TO COMPLETE Division* Select the Division under which the payment will be made.
NOTE: Available if your Organisation is setup with a hierarchy. Debit Account* Select the account the funds are being debited from.
3 Complete the Payment Details fields: FIELD HOW TO COMPLETE Value Date* Select the date on which the payment is to be processed. By default, “Today” is
selected. To select an alternative Value Date, click on “Later” and choose a future date, up to 120 business days, from the calendar.
Payment Name* Enter a payment name up to 16 characters which may be a payment or beneficiary name. This will appear on payment reports.
Payment Reference* Enter a payment reference up to 16 characters. This will appear as part of the narrative on the debit account and beneficiaries statement and on payment reports.
Payment Currency* Select the currency that the funds will be credited in. By default, the currency of the debit account is displayed.
Debit Advice Description Enter a debit advice description up to 140 characters. This will appear as part of the narrative on the Debit Advice. NOTE: Only available for International Payments with a CNY debit account.
Enter Amounts in Debit Currency
Tick this box to enter the amounts to credit the beneficiaries in the currency of the debit account. NOTE: This option is only available if the debit account currency is different to the payment currency.
Individual Debits Tick this box if you want the payment debited at a transaction level and each item will appear on the statement as single entries, i.e. a debit for each beneficiary. NOTES: • Only available for International Payments with a CNY debit account. • Individual Debits are not available for International Salary Payments. By default
these payments are bulk debited, i.e. a debit for each batch.
4 Complete the Beneficiary Details section. Follow the steps below: STEP ACTION
4.1 Click on the Add button to add a payment instruction to the list. RESULT: A new line item is displayed.
4.2 Add beneficiary details to each payment instruction in the list. a) To add an existing beneficiary from the Payee List: Click on the “Beneficiary Name” field in a row and select a beneficiary from the drop-down list, or click on Search Beneficiaries to search for a beneficiary.
b) To create a new beneficiary and add them to a payment instruction: Click on the “Beneficiary Name” field in a row and click on Add New Beneficiary from the drop-
down list Enter the details on screen and click on the Proceed button NOTES: • You will only see “Add New Beneficiary” if you have permissions to create new beneficiaries • When creating a new beneficiary, you can add the beneficiary to the Payee List for future use by
15

Public
STEP ACTION
ticking the Add this beneficiary to Address Book checkbox • If the beneficiary’s bank is not supported by the payment type, an error message will be displayed • See the Create a Beneficiary section for further instructions
4.3 Add the amount to pay the beneficiary either directly into the Amount field or enter the details in the Beneficiary Payment Details pop-up window. This can be accessed by clicking on the Edit Beneficiary Payment Details icon to the right of a beneficiary row. The following details can also be updated:
FIELD HOW TO COMPLETE Payment Currency & Amount*
Enter the amount to pay the beneficiary.
Debit Currency & Amount* Enter the amount to pay the beneficiary in the currency of the Debit Account. Available if the debit and credit account are different currencies.
Charges* Select who will incur the charges associated with the payment: • BEN — the beneficiary pays all transfer charges and receives
the payment minus the transfer charges (not available in Australia)
• OUR — you pay all transfer charges and the beneficiary receives the full amount of the payment
• SHA — you pay outgoing transfer charges and the beneficiary pays the correspondent bank charges. The beneficiary will receive the payment minus the correspondent bank charges.
Client Reference* By default the Payment Reference is displayed but can be changed
for this beneficiary if necessary. The Client Reference can be up to 16 characters and will appear as part of the narrative on the debit account and beneficiaries statement and on payment reports.
FX Details Complete the FX Details section. NOTE: Available if the debit and credit currencies are different and you have selected Individual Debits.
Remittance Information Enter remittance information up to 140 characters. This will appear on Debit and Beneficiary Advices and the Detailed Payment Report.
Debit Advice Description Enter a Debit Advice Description up to 140 characters. This will appear as part of the narrative on the Debit Advice. NOTE: Available if you have selected Individual Debits.
Invoice Details Complete the Invoice Details section if required. You can enter 80 x 60 lines of data that will be displayed on the Beneficiary Advice, Debit Advice and Payment Detail Report.
Email Beneficiary Advice Tick this checkbox and enter an email address to have Beneficiary Advice for this payment sent to the email address. You cannot edit the email address unless the checkbox is ticked.
Supporting Documents Click on the Attach Document button to attach a file to accompany your payment. For China customers, the document will be submitted to ANZ. For Australian customers, you can use this to provide additional information to an approver if desired. NOTE: A maximum of 5 files can be uploaded. The total file size of all files must not exceed 5MB. The supported file extensions include: doc, docx, jpg, jpeg, pdf.
Additional Information China customers will need to complete the Additional Information section if the payment requires additional regulatory information. See the Additional Information section of this guide for further instructions. NOTE: This section will appear only if the payment requires this information.
16

Public
STEP ACTION
4.4 Click on the Save button. RESULT: The Beneficiary Payment Details are saved and the pop-up window is closed.
4.5 Repeat steps 4.1–4.4 for each payment instruction in the payment.
TIPS: • To remove one or more payment instructions from the list, tick the checkbox next to the beneficiary number
and click on the Remove button • To edit a beneficiary in the list, click on the Edit Beneficiary Payment Details icon to the right of a beneficiary
row and click on Edit Beneficiary next the Beneficiary Name
5 Complete the FX Details section. NOTE: This field is visible if the debit and credit currencies are different and Individual Debits has not been selected. By default, the Carded/Dynamic Rate type is selected and details of the equivalent foreign exchange rate are displayed.
FIELD HOW TO COMPLETE Rate Type Select either Carded or Contract from the drop-down list.
NOTE: To obtain an FX Contract, contact your local ANZ Markets dealer. Contracts will appear in ANZ Transactive – Global for selection after they have been booked.
Add FX Contracts Available if Contract Rate is selected. Click on this to search for and add FX Contracts. NOTE: Up to five Contracts can be added to the payment.
Use Carded/Dynamic Rate For Remaining Amount
Tick this checkbox to use a carded rate or a dynamic rate for the amount not covered by the FX Contracts. NOTE: If this is ticked, you can only add four contracts to the payment.
6 Choose one of the following actions: ACTION STEPS Save the payment as a draft
Click on the Save As Draft button on the Control Bar. RESULT: The payment is saved in a Draft status and you are taken to the Current Payments screen. The payment can be accessed for editing from this screen.
Cancel the payment Click on the Close button on the Control Bar. RESULT: The payment is discarded and the Current Payments screen is displayed.
Review and submit the payment
Click on the Review & Submit button at the bottom of the screen. RESULT: If a payment instruction has errors, an error icon will appear next to that payment instruction. Click on the Edit icon to view and correct the errors. If there are no errors, you will be taken to a page to review the payment details.
If the payment details are not correct, click on the Previous button to return to the previous screen and edit the payment as desired.
If the payment details are correct, click on the Submit button to submit the payment for approval.
RESULT: A confirmation pop-up window is displayed advising that the payment has been submitted for approval. Click on Request Payment Detail Report to request a report (see the Request Payment Detail Report section), View Payment to review the payment details or Ok to return to the Current Payments screen.
17

Public
Create a Pay a Bill Payment
To create a Pay a Bill payment, follow the steps below.
NOTE: Only available in Australia. Mandatory fields are marked with an asterisk.
STEP ACTION
1 Click on Pay a Bill on the Create Payment screen.
2 Complete the From fields: FIELD HOW TO COMPLETE Division* Select the Division under which the payment will be made.
NOTE: Available if your Organisation is setup with a hierarchy. Debit Account* Select the account the funds are being debited from.
NOTE: You will only have access to debit accounts that you have permissions for and that are set up under the selected Division.
3 Complete the Payment Details fields: FIELD DESCRIPTION Value Date* Select the date on which the payment is to be processed. By default, “Today” is
selected. To select an alternative Value Date, click on “Later” and choose a future date, up to 120 business days, from the calendar.
Payment Name* Enter a name up to 16 characters which may be a payment or beneficiary name. This will appear on payment reports.
Payment Reference* Enter a payment reference up to 16 characters. This will appear as part of the narrative. This is NOT your BPAY customer reference number.
4 Complete the Biller Details section. Follow the steps below: STEP ACTION
4.1 Click on the Add button to add one or more payment instructions to your payment. RESULT: A new line item is displayed in the list.
4.2 Enter biller details for each payment instruction in the list. a) To add an existing biller from the Payee List: Click on the “Biller Code” field in a row in the list and select a biller from the drop-down list, or click on Search Biller to search for a beneficiary. b) To create a new biller and add them to a payment instruction: Click on the “Biller Code” field in a row in the list and click on Add New Biller from the drop-down
list Enter the Biller Code and your customer reference number, then click on the Proceed button NOTES: • You will only see “Add New Biller” if you have permissions to create new billers • When creating a new biller, you can add the biller to the Payee List for future use by ticking the Add
this beneficiary to Address Book checkbox 4.3 Add the amount to pay the biller either directly into the Amount field or enter the details in the Biller
Payment Details pop-up window. This can be accessed by clicking on the Edit Biller Payment Details icon to the right of a biller row. The following details can also be updated:
FIELD DESCRIPTION Payment Currency & Amount*
Enter the amount to pay the biller.
Payment Reference* Enter a payment reference up to 16 characters. This will appear as part of the narrative. This is NOT your BPAY customer reference number.
4.4 Repeat steps 4.1–4.3 until all billers have been added to the payment.
TIPS: • To remove one or more payment instructions from the list, tick the checkbox next the payment instruction
number and click on the Remove button • To edit a biller in the list, click on the Edit Biller Payment Details icon to the right of a biller row and click on
Edit Biller next the Biller Name. Note that your Customer Reference Number is in the Reference field.
18

Public
STEP ACTION
5 Review the details on screen, then choose one of the following actions: ACTION STEPS Save the payment as a draft Click on the Save as Draft button on the Control Bar.
RESULT: The payment is saved in a draft status and can be reviewed and edited in the Current Payments screen. A confirmation pop-up window is displayed providing the Payment ID.
Cancel payment Click on the Close button on the Control Bar. RESULT: The payment is discarded and the Current Payments screen is displayed.
Review and submit the payment
Click on the Review & Submit button at the bottom of the screen. RESULT: If a payment instruction has errors, an error icon will appear next to that payment instruction. Click on the Edit icon to view and correct the errors. If there are no errors, you will be taken to a page to review the payment details.
If the payment details are not correct, click on the Previous button to return to the previous screen and edit the payment as desired.
If the payment details are correct, click on the Submit button to submit the payment for approval.
RESULT: A confirmation pop-up window is displayed advising that the payment has been submitted for approval. Click on Request Payment Detail Report to request a report (see the Request Payment Detail Report section), View Payment to review the payment details or Ok to return to the Current Payments screen.
Create a Payment using a Payment Template
To create a payment using a payment template, follow the steps below.
STEP ACTION
1 Click on Use Payment Template on the Create Payment screen. RESULT: The Use Payment Template pop-up window is displayed with a list of available templates.
2 To search for a template, enter the search criteria into any of the Template Name, Template Description, Debit Account or Debit Currency fields and click on the Search button. RESULT: Templates that match the search criteria will be displayed.
3 Select the template to use to create the payment and click on the Yes button in the confirmation pop-up window. RESULT: A confirmation message is displayed providing the Payment ID. The payment is ready to be edited and submitted for approval.
19

Public
Create a Payment using a Payment File
To create a payment using a payment file, follow the steps below.
NOTE: Mandatory fields are marked with an asterisk. Some fields may not be available depending on your region, payment method and payment type.
STEP ACTION
1 To upload a Payment File, use one of the following methods: a) Click on Use Payment File on the Create Payment screen b) Click on Upload Payments File on the File Import Summary screen RESULT: The Upload Payment File pop-up window is displayed.
2 Complete the following details: FIELD HOW TO COMPLETE File Format* Choose from ISO XML or Fixed Length. File Encoding* Options available are based on your language selection. For English, UTF-8 is available
as the default pre-selection. Choose from: • English (UTF-8, US-ASCII) • Traditional Chinese ( Big5, UTF-8) • Japanese (Shift-JIS, 1byte Kana, UTF-8) • Vietnamese (Windows, UTF-8) • Khmer (UTF-8) • Simplified Chinese (GB2312, UTF-8)
Upload Payments File*
Click on the Browse button to find and select the payment file to import.
3 Select one of the following actions: ACTION STEPS Start Upload Click on the Start Upload button.
RESULT: A confirmation message is displayed advising that the file will be scanned and processed and a File ID is provided. You can view the status of the file in the File Import Summary screen. If processed successfully, payments will be created and available to view in the Current Payments Screen.
Cancel Upload Click on the Cancel button.
Create a Payment from a Past Payment
To create a payment using a past payment, follow the steps below.
STEP ACTION
1 Click on Use a Past Payment on the Create Payment screen. RESULT: The Use a Past Payment pop-up window is displayed with a list of available past payments.
2 To search for a payment, enter the search criteria into any of the Payment Name, Debit Account, Payment Type, Payment Currency, Payment Amount or Value Date fields and click on the Search button. RESULT: Payments that match the search criteria will be displayed.
3 Select the payment to use and click on the Yes button in the confirmation pop-up window. RESULT: A confirmation message is displayed providing the Payment ID. The payment is ready to be edited and submitted for approval.
20

Public
Additional Information section
If your payment requires additional regulatory information, you will need to complete the Additional Information section. Note that if you complete the BOP form in ANZ Transactive — Global, you do not need to provide a hard copy of the form to the bank.
NOTE: Applicable to payments in China only. Mandatory fields for payments are marked with an asterisk. There are no mandatory fields for Templates.
FIELD HOW TO COMPLETE
Provided BOP form manually to bank
If you have provided the BOP (Balance Of Payments) form manually to the bank, select this checkbox. NOTE: If selected the remaining fields will no longer be visible.
Amount in Words* Enter the amount of the payment in words. NOTE: This will be auto-populated in English if an amount has been entered.
BOP Transaction Code 1* Select the appropriate BOP Transaction Code.
BOP Transaction Description 1* This will be auto-populated based on the BOP Transaction Code 1 selected. You can update the description if required.
BOP CCY1* This will be auto-populated based on the Payment Currency or Debit Currency being used.
BOP Amount 1* Enter the BOP Amount for BOP Transaction Code 1.
BOP Transaction Code 2 If required, select the appropriate BOP Transaction Code. NOTE: This needs to be a different Transaction Code to BOP Transaction Code 1.
BOP Transaction Description 2 This will be auto-populated based on the BOP Transaction Code 2 selected. You can update the description if required.
BOP CCY 2 If you are using BOP Amount 2, enter the transaction currency.
BOP Amount 2 Enter the BOP Amount 2 for BOP Transaction Code 2. NOTE: BOP Amount 1 plus BOP Amount 2 should equal the total BOP amount.
Unit Code* Enter the 9 digit Unit Code of your organisation.
Beneficiary Resident Country/Region Name*
This will be auto-populated based on the remitter’s bank country name.
Beneficiary Resident Country/Region Code*
This will be auto-populated based on the remitter’s bank country code.
Payment Nature* Select the nature of the payment from the drop down list. NOTE: This should be based on the declaration document.
Tax Free Goods* Select Yes or No.
Type of Payment* Select the type of payment from the drop down list.
Contract Number* If there is a contract for this transaction, enter the Contract Number or enter "N/A".
Invoice Number* If there is an invoice for this transaction, enter the Invoice Number or enter "N/A".
Safe Batch/Registration Number Enter the 20 digit Safe Batch/Registration Number or enter "N/A".
BOP Reporting Type* Select the BOP reporting type from the drop down list.
21

Public
CURRENT PAYMENTS Menu > Payments > Current Payments
The Current Payments screen can be accessed from the Payments Menu. This screen provides you with a summary of your current payments that have not yet been sent for processing as well as those that have been processed within the last seven calendar days.
Use the Control Bar to quickly and easily access key tasks. See the Getting Started User Guide for full details. Change the View to display My Payments, Payments For My Action, Payments For My Approval, Payments For
Repair, Approved Payments, Rejected Payments or Warehoused Payments Click on New to create a payment Use Settings to save the View and Group selected Click on a row to view the details screen Right-click on a row to Edit, Approve, Reject, Recall, Resubmit, Stop, Copy, Delete or generate a Payment Summary
Report, Payment Detail Report or Payment Audit Report
Current Payments Columns
COLUMN DESCRIPTION
Payment Alerts If a payment has an alert, you can click on the warning indicator to view the details. An alert will be issued to advise you of the following: > The payment is a possible duplicate > The payment has been modified since creation > Beneficiaries within the payment have been updated as a result of Payee List changes
Beneficiary/Payment Name The payment name entered when creating the payment. Note: If the payment only contains one beneficiary, the Beneficiary Name will be displayed.
Payment ID System generated Payment ID.
Debit Amount The amount that is being debited to fund the payment.
Debit Account The account number used to fund the payment.
Debit Ccy The currency that the funds will be debited in.
Status The status of the payment.
Value Date The date on which the payment will be processed.
Template Name If a template has been used to create the payment, the name of the template.
Payment Type The Payment Type: Account Transfer, Domestic Payment and International Payment.
Debit Account Name The account name used to fund the payment.
Payment Amount The amount that is being paid.
Payment Ccy The currency that the funds will be credited in.
22

Public
COLUMN DESCRIPTION
Beneficiary Account The beneficiary’s account number. If there are multiple beneficiaries in the payment, this field will be blank.
Beneficiary Bank Name The beneficiary’s Bank Name. If there are multiple beneficiaries in the payment, this field will be blank.
FX Rate The FX Rate used for cross currency payments. If Individual Debits was selected making the payment debited at a transaction level, Multiple will be displayed.
Created By The User ID of the person that created the payment.
Creation Date The date and time the payment was created.
Last Modified By The User ID of the person that last modified the payment.
Last Approved By The User ID of the person that last approved the payment.
Last Modified Date The date and time the payment was last modified.
Last Action Time The date and time the last action was performed on the payment.
No. of Items The number of Payment Instructions (beneficiaries) in the payment.
Cut-off Time The payment cut-off time based on the following attributes; the Debit Account Currency, the Debit Account Country and the Payment Type. The time is displayed in the Time Zone you have set up in the Settings & Preferences menu.
File Name If the payment was created using a payment file, the name of the file will be displayed.
File ID If the payment was created using a payment file, the system generated File ID.
FX Contract ID The FX Contract ID used to fund the payment. If multiple FX Contracts were used, Multiple will be displayed. If a carded rate was used, Carded will be displayed.
Division Name The name of division under which the payment was made.
Salary A flag (Yes or No) to indicate if the payment is a Salary payment.
23
Public
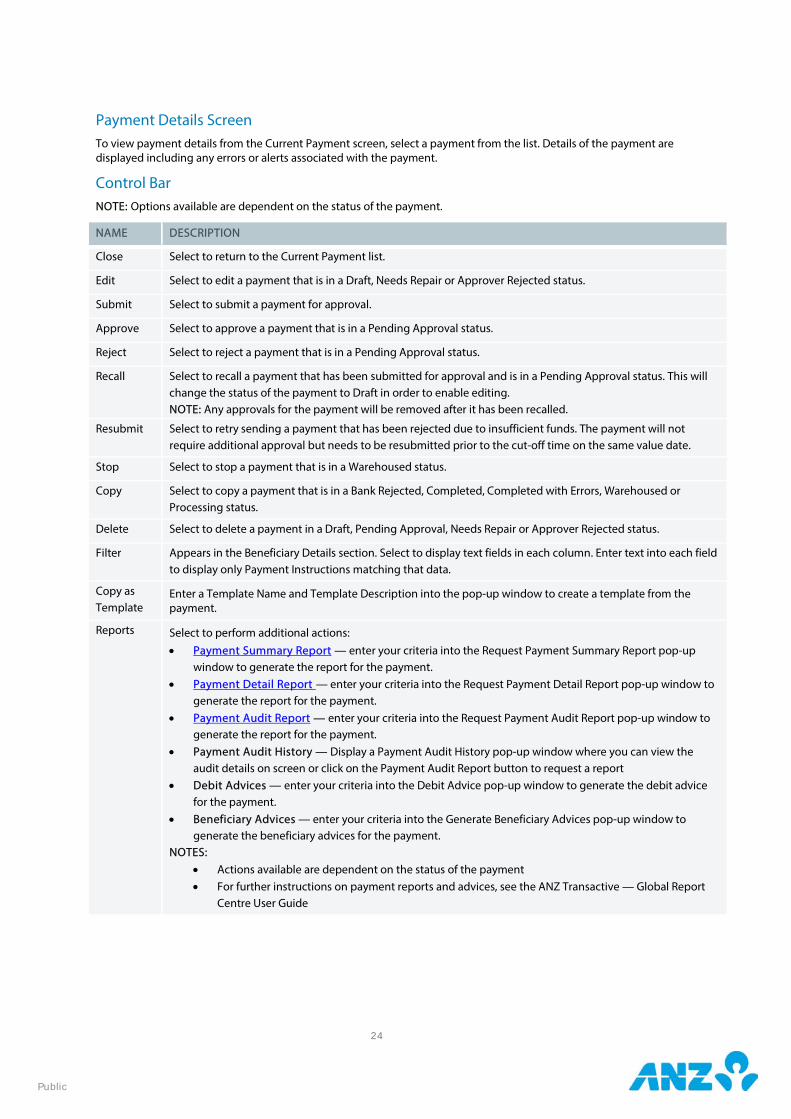
Payment Details Screen To view payment details from the Current Payment screen, select a payment from the list. Details of the payment are displayed including any errors or alerts associated with the payment.
Control Bar NOTE: Options available are dependent on the status of the payment.
NAME DESCRIPTION
Close Select to return to the Current Payment list.
Edit Select to edit a payment that is in a Draft, Needs Repair or Approver Rejected status.
Submit Select to submit a payment for approval.
Approve Select to approve a payment that is in a Pending Approval status.
Reject Select to reject a payment that is in a Pending Approval status.
Recall Select to recall a payment that has been submitted for approval and is in a Pending Approval status. This will change the status of the payment to Draft in order to enable editing. NOTE: Any approvals for the payment will be removed after it has been recalled.
Resubmit Select to retry sending a payment that has been rejected due to insufficient funds. The payment will not require additional approval but needs to be resubmitted prior to the cut-off time on the same value date.
Stop Select to stop a payment that is in a Warehoused status.
Copy Select to copy a payment that is in a Bank Rejected, Completed, Completed with Errors, Warehoused or Processing status.
Delete Select to delete a payment in a Draft, Pending Approval, Needs Repair or Approver Rejected status.
Filter Appears in the Beneficiary Details section. Select to display text fields in each column. Enter text into each field to display only Payment Instructions matching that data.
Copy as Template
Enter a Template Name and Template Description into the pop-up window to create a template from the payment.
Reports Select to perform additional actions: • Payment Summary Report — enter your criteria into the Request Payment Summary Report pop-up
window to generate the report for the payment. • Payment Detail Report — enter your criteria into the Request Payment Detail Report pop-up window to
generate the report for the payment. • Payment Audit Report — enter your criteria into the Request Payment Audit Report pop-up window to
generate the report for the payment. • Payment Audit History — Display a Payment Audit History pop-up window where you can view the
audit details on screen or click on the Payment Audit Report button to request a report • Debit Advices — enter your criteria into the Debit Advice pop-up window to generate the debit advice
for the payment. • Beneficiary Advices — enter your criteria into the Generate Beneficiary Advices pop-up window to
generate the beneficiary advices for the payment. NOTES:
• Actions available are dependent on the status of the payment • For further instructions on payment reports and advices, see the ANZ Transactive — Global Report
Centre User Guide
24

Public
PAST PAYMENTS Menu > Payments > Past Payments
The Past Payments screen can be accessed from the Payments Menu. This screen allows you to perform a search for payments processed through ANZ Transactive – Global that are in a Completed, Completed with Errors or a Bank Rejected status within the last 24 months. By default the screen shows payments made in the last seven days.
Use the Control Bar to quickly and easily access key tasks. See the Getting Started User Guide for full details. Use the View menu to display and manage saved searches Use Settings to save the View and Group selected Use the Save button to save a search for future use Click on a row to view the details screen Right-click on a row to copy the payment or request a payment report
Payment Search Fields Select the Advanced Search button to display or hide the search criteria fields. To complete any type of search, at least one search criteria must be entered. Searches on fields that are left blank, will return all available data for that field.
FIELD DESCRIPTION
Payment Name Add a payment name to your search criteria. Clicking on the search filter will enable you to choose from the following options:
• Like — enter any part of the payment name. The search will return results that contain the search string entered.
• Equal To — enter a payment name to add to the search • Not Equal To — enter a payment name to exclude from the search
Payment ID Add a Payment ID to your search criteria. Clicking on the search filter will enable you to choose from the following options:
• Like — enter any part of the Payment ID. The search will return results that contain the search string entered.
• Equal To — enter a Payment ID to add to the search • Not Equal To — enter a Payment ID to exclude from the search
Debit Amount Add a debit amount or debit amount range to your search criteria. Clicking on the search filter will enable you to choose from the following options:
• Equal To — enter an amount to add to the search • Not Equal To — enter an amount to exclude from the search • Greater Than — search for an amount that is greater than this amount • Less Than — search for an amount that is less than this amount • Between — search for an amount between these two amounts
Debit Account Add a debit account to your search criteria. Clicking on the search filter will enable you to choose from the following options:
• Equal To — enter one or more accounts to add to the search
25

Public
FIELD DESCRIPTION
• Not Equal To — enter one or more accounts to exclude from the search To add accounts, use one of the following methods: 1. Click the Search Accounts button to display the Add Debit Accounts pop-up window. Select the
accounts to include in the search criteria and click on the Add button. 2. Add accounts directly into the Debit Account field by placing the mouse cursor in field and typing
any part of account name, BSB or number
Value Date Add a value date or value date range to your search criteria. Clicking on the search filter will enable you to choose from the following options:
• Specific Date — choose an exact value date from a calendar to add to the search • Date Range — search for a value date that is between the "From" and "To" entered into the
search fields • Rolling Dates — choose from Today, Yesterday, Week to Date, Last Week, Month to Date
and Last Month
Payment Type Add a payment type to your search criteria. Clicking on the search filter will enable you to choose from the following options:
• Equal To — select one or more payment types to add to the search • Not Equal To — select one or more payment types to exclude from the search
Status Add a payment status (Completed, Completed with Error or Bank Rejected) to your search criteria. Clicking on the search filter will enable you to choose from the following options:
• Equal To — select one or more payment statutes to add to the search • Not Equal To — select one or more payment statutes to exclude from the search
Payment Amount Add a payment amount or payment amount range to your search criteria. Clicking on the search filter will enable you to choose from the following options:
• Equal To — enter an amount to add to the search • Not Equal To — enter an amount to exclude from the search • Greater Than — search for an amount that is greater than this amount • Less Than — search for an amount that is less than this amount • Between — search for an amount between these two amounts
Payment Currency Add a payment currency to your search criteria. Clicking on the search filter will enable you to choose from the following options:
• Equal To — select one or more payment currencies to add to the search • Not Equal To — select one or more payment currencies to exclude from the search
Beneficiary Account Add a beneficiary account to your search criteria. Clicking on the search filter will enable you to choose from the following options:
• Like — enter any part of the beneficiary account. The search will return results that contain the search string entered.
• Equal To — enter a beneficiary account to add to the search • Not Equal To — enter a beneficiary account to exclude from the search
Beneficiary Name Add a beneficiary name to your search criteria. Clicking on the search filter will enable you to choose from the following options:
• Like — enter any part of the beneficiary name. The search will return results that contain the search string entered.
• Equal To — enter a beneficiary name to add to the search • Not Equal To — enter a beneficiary name to exclude from the search
Division Name If you have multiple divisions, you can add specific divisions to your search criteria. Clicking on the search filter will enable you to choose from the following options:
• Equal To — select one or more divisions to add to the search • Not Equal To — enter one or more divisions to exclude from the search
Instruction ID
Add an Instruction ID to your search criteria to find the payment an Instruction ID belongs to. Clicking on the search filter will enable you to choose from the following options:
26
Public
FIELD DESCRIPTION
• Like — enter any part of the Instruction ID. The search will return results that contain the search string entered.
• Equal To — enter an Instruction ID to add to the search • Not Equal To — enter an Instruction ID to exclude from the search
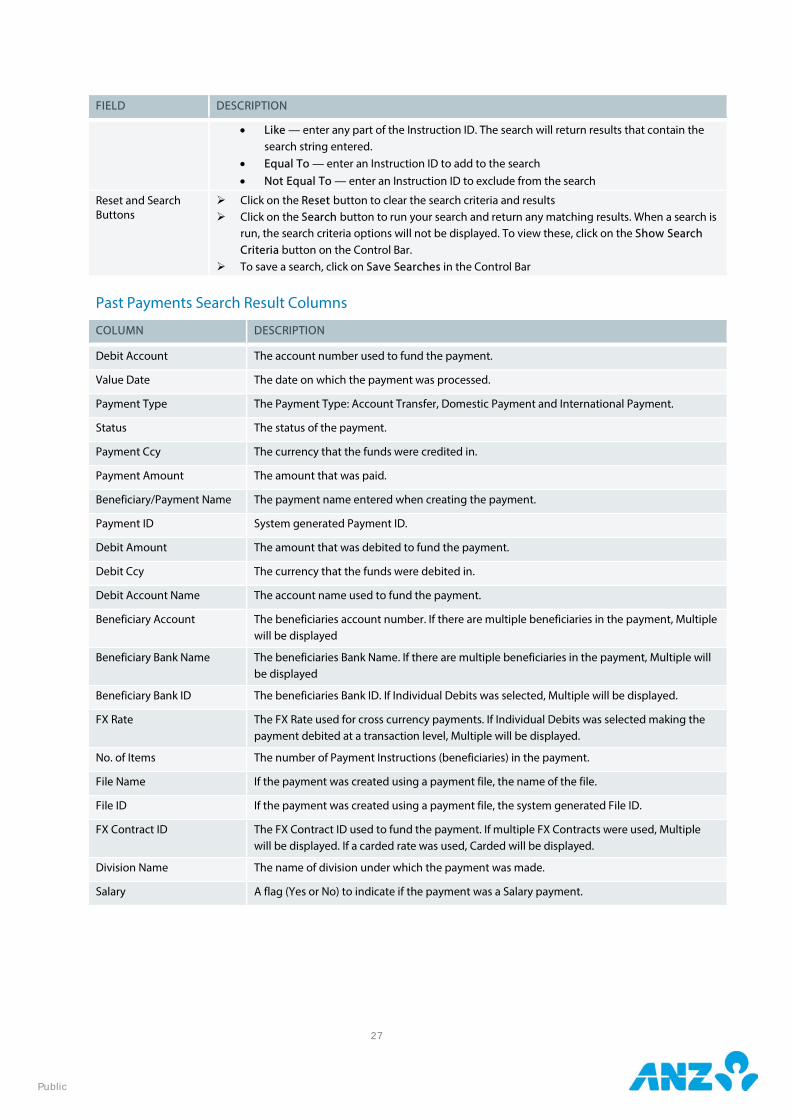
Reset and Search Buttons
Click on the Reset button to clear the search criteria and results Click on the Search button to run your search and return any matching results. When a search is
run, the search criteria options will not be displayed. To view these, click on the Show Search Criteria button on the Control Bar.
To save a search, click on Save Searches in the Control Bar
Past Payments Search Result Columns
COLUMN DESCRIPTION
Debit Account The account number used to fund the payment.
Value Date The date on which the payment was processed.
Payment Type The Payment Type: Account Transfer, Domestic Payment and International Payment.
Status The status of the payment.
Payment Ccy The currency that the funds were credited in.
Payment Amount The amount that was paid.
Beneficiary/Payment Name The payment name entered when creating the payment.
Payment ID System generated Payment ID.
Debit Amount The amount that was debited to fund the payment.
Debit Ccy The currency that the funds were debited in.
Debit Account Name The account name used to fund the payment.
Beneficiary Account The beneficiaries account number. If there are multiple beneficiaries in the payment, Multiple will be displayed
Beneficiary Bank Name The beneficiaries Bank Name. If there are multiple beneficiaries in the payment, Multiple will be displayed
Beneficiary Bank ID The beneficiaries Bank ID. If Individual Debits was selected, Multiple will be displayed.
FX Rate The FX Rate used for cross currency payments. If Individual Debits was selected making the payment debited at a transaction level, Multiple will be displayed.
No. of Items The number of Payment Instructions (beneficiaries) in the payment.
File Name If the payment was created using a payment file, the name of the file.
File ID If the payment was created using a payment file, the system generated File ID.
FX Contract ID The FX Contract ID used to fund the payment. If multiple FX Contracts were used, Multiple will be displayed. If a carded rate was used, Carded will be displayed.
Division Name The name of division under which the payment was made.
Salary A flag (Yes or No) to indicate if the payment was a Salary payment.
27

Public
Past Payments Details Screen To view payment details from the Past Payments screen, select a payment from the list. Details of the payment are displayed including any errors or alerts associated with the payment.
Control Bar NOTE: Options available are dependent on the status of the payment.
NAME DESCRIPTION
Close Select to return to the Past Payments list.
Copy Select to copy a payment that is in a Bank Rejected, Completed or Completed with Errors status.
Reports Select to perform additional actions: • Create Template — enter a Template Name and Template Description into the pop-up window to
create a template from the payment • Payment Summary Report —enter your criteria into the Request Payment Summary Report pop-up
window to generate the report for the payment. • Payment Detail Report — enter your criteria into the Request Payment Detail Report pop-up
window to generate the report for the payment. • Payment Audit Report — enter your criteria into the Request Payment Audit Report pop-up window
to generate the report for the payment. • Payment Audit History — Display a Payment Audit History pop-up window where you can view the
audit details on screen or click on the Payment Audit Report button to request a report. • Debit Advices — enter your criteria into the Debit Advice pop-up window to generate the debit
advice for the payment • Beneficiary Advices — enter your criteria into the Generate Beneficiary Advices pop-up window to
generate the beneficiary advices for the payment NOTE: Actions available are dependent on the status of the payment.
28

Public
PAYMENT ACTIONS
Edit a Payment To edit details of a payment that is in a Draft, Needs Repair or Approver Rejected status, follow the steps below.
NOTE: To edit a payment that has already been submitted for approval and is in a Pending Approval status, you must recall the payment first.
STEP ACTION
1 Go to the Payments > Current Payments screen
2 Locate the payment and use one of the following methods to edit the payment:
Method 1: Click on the payment in the list to display the Payment Details screen and then click on the Edit button
Method 2: Right-click on the payment and click on Edit Method 3: Select the payment and click on Edit in the Actions menu
RESULT: The payment is in edit mode.
3 Edit the payment details as required.
TIPS: To remove one or more beneficiaries from the list, select the checkbox next the beneficiary number and click on
the Remove button To edit a beneficiary in the list, click on the beneficiary and edit the details in the Edit A Payment Instruction
pop-up window
4 Select one of the following actions: ACTION STEPS Close payment Click on the Close button
Click on the Yes button in the confirmation pop-up window RESULT: Any changes made to the payment will not be saved.
Review and submit the payment
Click on the Review & Submit button at the bottom of the screen. RESULT: If a payment instruction has errors, an error icon will appear next to that payment instruction. Click on the Edit icon to view and correct the errors. If there are no errors, you will be taken to a page to review the payment details.
If the payment details are not correct, click on the Previous button to return to the previous screen and edit the payment as desired.
If the payment details are correct, click on the Submit button to submit the payment for approval.
RESULT: A confirmation pop-up window is displayed advising that the payment has been submitted for approval. Click on Request Payment Detail Report to request a report (see the Request Payment Detail Report section), View Payment to review the payment details or Ok to return to the Current Payments screen.
View payment audit history
Click on the Payment Audit History button RESULT: A Payment Audit History pop-up window is displayed View the audit details on screen or click on the Payment Audit Report button to
request a report
29

Public
Recall a Payment To recall a payment for editing that has been submitted for approval and is in a Pending Approval status, follow the steps below. This will change the status of the payment to Draft in order to enable editing.
NOTE: You can recall payments individually, or several at a time.
STEP ACTION
1 Go to the Payments > Current Payments screen
2 Locate the payment and use one of the following methods to recall the payment:
Method 1: Click on the payment in the list to display the Payment Details screen and then click on the Recall button. NOTE: Only one payment at a time can be recalled using this method.
Method 2: Right-click on the selected payment and click on Recall Method 3: Select the payment and click on Recall in the Actions menu
RESULT: A confirmation pop-up window is displayed.
3 Click on the Yes button in the confirmation pop-up window. RESULT: A confirmation message is displayed advising that the payment has been recalled and the payment status changes to Draft.
Approve or Reject a Payment To approve or reject a payment that is in a Pending Approval status, follow the steps below. It is recommended that you view payment details prior to approving payments.
NOTE: You must have the appropriate permissions to approve payments. You can approve or reject payments individually, or several at a time.
STEP ACTION
1 Go to the Payments > Current Payments screen
2 Select View > Payments For My Approval from the Control Bar. RESULT: Payments that you are entitled to approve will be displayed.
3 Choose one of the following methods to display the approve and reject actions:
Method 1: Click on the payment in the Current Payments list. RESULT: The Payment Details screen is displayed. NOTE: Only one payment at a time can be actioned using this method.
Method 2: Right-click on the selected payment. RESULT: The Actions menu is displayed.
Method 3: Select the payment and click on the Actions menu
4 To APPROVE the payment, follow the steps below:
STEP ACTION 4.1 Click on Approve
Click on the Yes button in the confirmation pop-up window RESULT: If the payment requires additional approvals, a confirmation message is displayed advising that the payment has been approved. It will remain in a Pending Approval status until all approvals are obtained. Skip remaining steps. If this is the final approval, the Approve Selected Payments pop-up window will be displayed and you will need to sign the transaction in order to release it to the bank Go to Step 4.2.
4.2 Check the details of the payment in the Approve Selected Payments pop-up window and click on the Approve button. RESULT: You will be prompted to enter your security credentials.
4.3 Enter your security credentials into the eSigner pop-up window. RESULT: A confirmation message is displayed advising that the payment has been submitted and the
30

Public
STEP ACTION
payment status changes to Processing.
To Reject the payment, follow the steps below:
STEP ACTION 4.1 Click on Reject.
RESULT: An Enter A Reason For Rejection pop-up window is displayed. 4.2 Enter a reason for rejecting the payment and click on the OK button
RESULT: A confirmation message is displayed advising that the payment has been Rejected and the payment status changes to Approver Rejected.
Reject an Instruction in a Payment To reject an instruction in a payment that is in a Pending Approval status, follow the steps below.
NOTES: You must have the appropriate permissions to reject instructions.
STEP ACTION
1 Go to the Payments > Current Payments screen
2 Select View > Payments For My Approval from the Control Bar. RESULT: Payments that you are entitled to approve will be displayed.
3 Locate and click on the payment to display the Payment Details screen
4 Locate and click on the instruction in the Payment Instructions section. RESULT: The Payment Instruction pop-up window is displayed.
5 Click on Reject. RESULT: An Enter A Reason For Rejection pop-up window is displayed.
6 Enter a reason for rejecting the instruction and click on the OK button. RESULT: A confirmation message is displayed advising that the instruction has been rejected.
Delete a Payment To delete a payment that is in a Draft, Pending Approval, Needs Repair or Approver Rejected status, follow the steps below.
NOTES: > Deleted payments will remain in the system for seven days > You can delete payments individually, or several at a time
STEP ACTION
1 Go to the Payments > Current Payments screen
2 Locate the payment and use one of the following methods to delete the payment:
Method 1: Click on the payment in the list to display the Payment Details screen and then click on the Delete button. NOTE: Only one payment at a time can be deleted using this method.
Method 2: Right-click on the selected payment and click on Delete Method 3: Select the payment and click on Delete in the Actions menu
RESULT: A confirmation pop-up window is displayed.
3 Click on the Yes button in the confirmation pop-up window. RESULT: A confirmation message is displayed advising that the payment has been deleted and the payment status changes to Deleted.
31
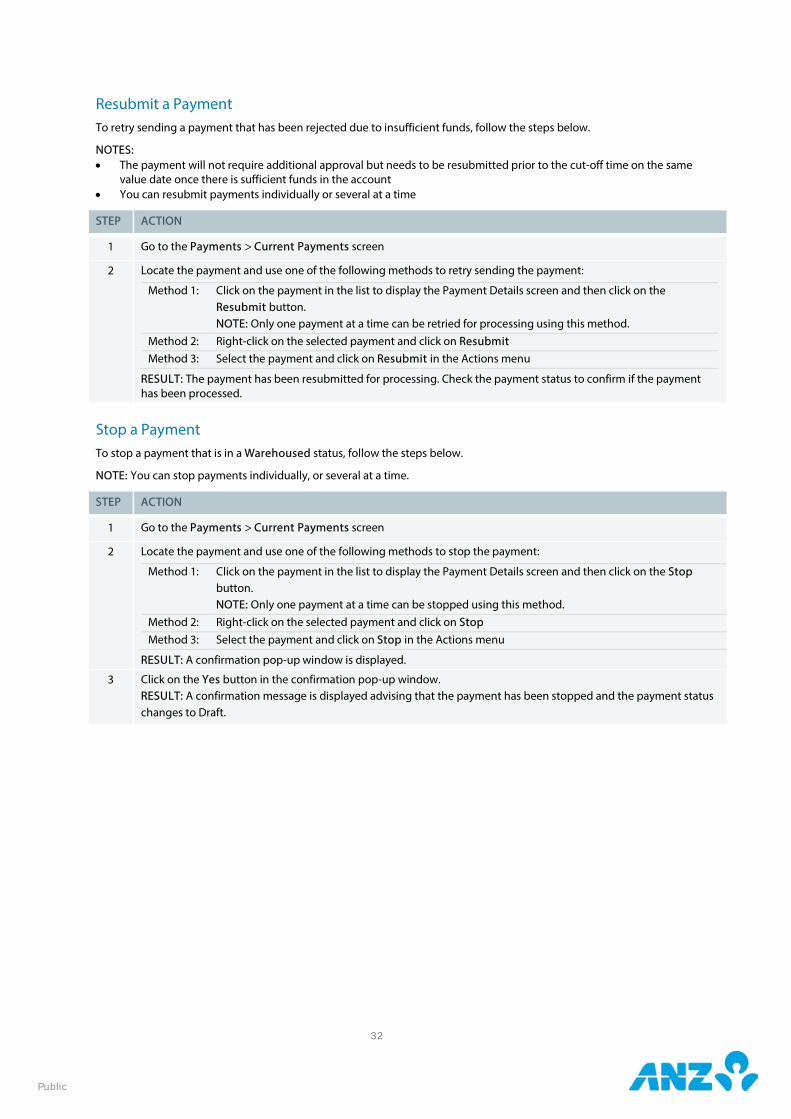
Public
Resubmit a Payment To retry sending a payment that has been rejected due to insufficient funds, follow the steps below.
NOTES: • The payment will not require additional approval but needs to be resubmitted prior to the cut-off time on the same
value date once there is sufficient funds in the account • You can resubmit payments individually or several at a time
STEP ACTION
1 Go to the Payments > Current Payments screen
2 Locate the payment and use one of the following methods to retry sending the payment:
Method 1: Click on the payment in the list to display the Payment Details screen and then click on the Resubmit button. NOTE: Only one payment at a time can be retried for processing using this method.
Method 2: Right-click on the selected payment and click on Resubmit Method 3: Select the payment and click on Resubmit in the Actions menu
RESULT: The payment has been resubmitted for processing. Check the payment status to confirm if the payment has been processed.
Stop a Payment To stop a payment that is in a Warehoused status, follow the steps below.
NOTE: You can stop payments individually, or several at a time.
STEP ACTION
1 Go to the Payments > Current Payments screen
2 Locate the payment and use one of the following methods to stop the payment:
Method 1: Click on the payment in the list to display the Payment Details screen and then click on the Stop button. NOTE: Only one payment at a time can be stopped using this method.
Method 2: Right-click on the selected payment and click on Stop Method 3: Select the payment and click on Stop in the Actions menu
RESULT: A confirmation pop-up window is displayed.
3 Click on the Yes button in the confirmation pop-up window. RESULT: A confirmation message is displayed advising that the payment has been stopped and the payment status changes to Draft.
32
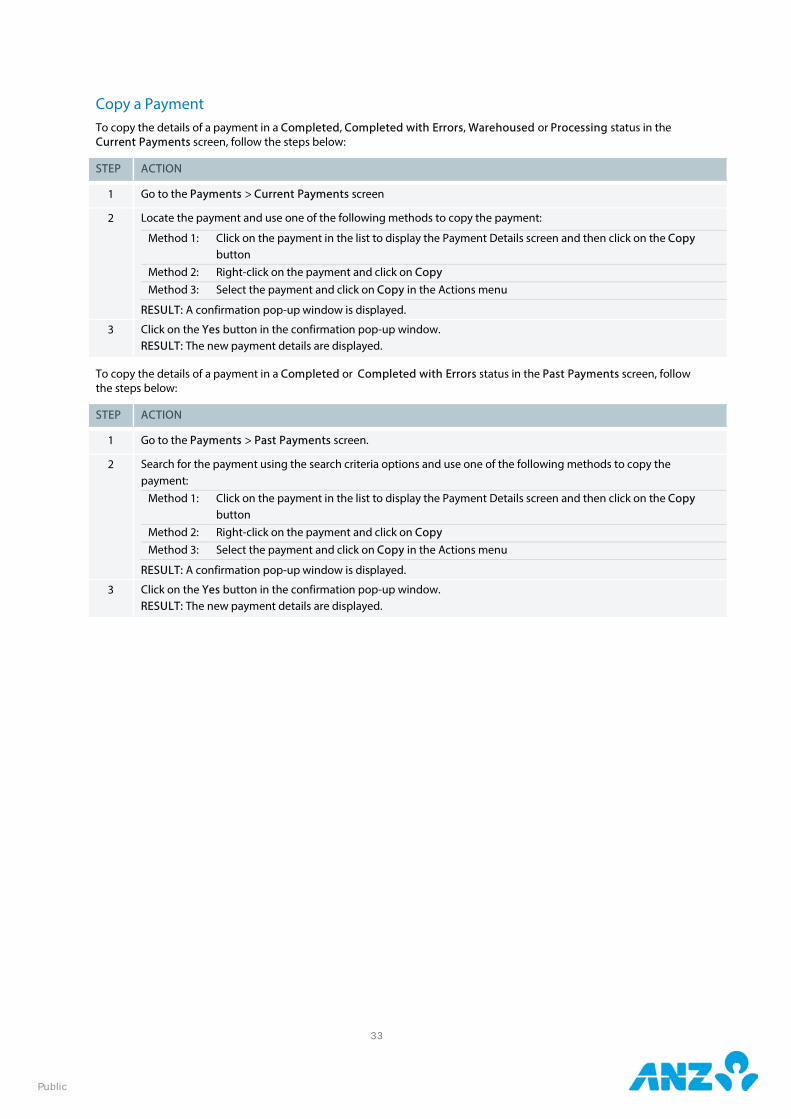
Public
Copy a Payment To copy the details of a payment in a Completed, Completed with Errors, Warehoused or Processing status in the Current Payments screen, follow the steps below:
STEP ACTION
1 Go to the Payments > Current Payments screen
2 Locate the payment and use one of the following methods to copy the payment:
Method 1: Click on the payment in the list to display the Payment Details screen and then click on the Copy button
Method 2: Right-click on the payment and click on Copy Method 3: Select the payment and click on Copy in the Actions menu
RESULT: A confirmation pop-up window is displayed.
3 Click on the Yes button in the confirmation pop-up window. RESULT: The new payment details are displayed.
To copy the details of a payment in a Completed or Completed with Errors status in the Past Payments screen, follow the steps below:
STEP ACTION
1 Go to the Payments > Past Payments screen.
2 Search for the payment using the search criteria options and use one of the following methods to copy the payment:
Method 1: Click on the payment in the list to display the Payment Details screen and then click on the Copy button
Method 2: Right-click on the payment and click on Copy Method 3: Select the payment and click on Copy in the Actions menu
RESULT: A confirmation pop-up window is displayed.
3 Click on the Yes button in the confirmation pop-up window. RESULT: The new payment details are displayed.
33

Public
PAYEE LIST Menu > Payments > Payee List
The Payee List screen can be accessed from the Payments Menu. This screen allows you to set up and manage a list of beneficiaries that you commonly make payments to, so that the beneficiary details can be used for future payments.
If your organisation needs to approve beneficiaries, each beneficiary must be approved by another user with appropriate permissions before it can be used.
Use the Control Bar to quickly and easily access key tasks. See the Getting Started User Guide for full details. Change the View to display beneficiaries Awaiting Approval, Active or Rejected or those that are in one of your
folders. Click on New to Create a Beneficiary. Upload a beneficiary file from the Actions menu. You can download the template using the Download file
template link if required. Note that you need to click on the Create CSV button and save the beneficiary information before uploading to ANZ Transactive – Global.
Create and manage folders containing beneficiaries that you want to view from the Actions menu. Use Settings to save the View and Group selected. Click on a row to view the details screen. Right-click on a row to View, Edit, Delete, Approve, Reject, or to move the beneficiary to a folder you have created.
Payee List Columns
COLUMN DESCRIPTION
Beneficiary ID System generated Beneficiary ID.
Beneficiary Name The name of the beneficiary.
Status The status of the beneficiary.
Account The beneficiary’s account number.
Swift Code The beneficiary’s bank Swift Code.
My Beneficiary ID The Beneficiary Code that is typically in your ERP system.
Beneficiary Bank Country The beneficiary’s Bank country.
Beneficiary Country The country the beneficiary resides in.
Beneficiary Name (Local Language)
The name of the beneficiary in their local language.
Beneficiary Bank Name The beneficiary’s Bank Name.
Branch Name The beneficiary’s Bank Branch Name.
Clearing Code The beneficiary’s Bank local Clearing Code.
34

Public
COLUMN DESCRIPTION
Division Name The Division under which the beneficiary is saved and available for use.
Biller Code The biller’s BPAY Biller Code, as provided by your biller.
Reference The reference number provided to a Biller when a Pay a Bill payment is made.
Beneficiary Statuses
The following table details each of the beneficiary statuses.
NOTE: You may not see all of the statuses if your organisation has not been set up with the approve beneficiaries workflow.
BENEFICIARY STATUS DESCRIPTION
Pending Approval The beneficiary has been created and is awaiting approval. Once approved, it will move to an Approved status.
Creation Rejected The creation of a beneficiary has been rejected by an Approver. It will need to be edited if necessary and resubmitted for approval.
Modification Pending Approval The beneficiary details have been modified and are awaiting approval by an Approver.
Deletion Pending Approval The beneficiary has been deleted from the Payee List and is awaiting approval by an Approver.
Deleted The beneficiary has been deleted from the Payee List.
Modification Rejected The modifications made to a beneficiary or the deletion of a beneficiary has been rejected.
Approved The beneficiary is ready for use.
35

Public
Create a Beneficiary
To create a beneficiary, follow the steps below.
NOTE: Mandatory fields are marked with an asterisk.
STEP ACTION
1 Click on the New button on the Payee List screen Control Bar. RESULT: The Add New Payee screen is displayed.
2 Complete the Division details: Select the Division under which the beneficiary will be saved and available for use. NOTE: Available if your Organisation is set up with a hierarchy.
3 Complete the Beneficiary Details: FIELD HOW TO COMPLETE Beneficiary Name* Enter the name of the beneficiary. Beneficiary Name (Local Language)
Enter the name of the beneficiary in your local language.
Email Address Enter the email address of the beneficiary. My Beneficiary ID* Enter a Beneficiary Code that is typically in your ERP system.
NOTE: If a Beneficiary Code is provided in a payment file, the beneficiary information, including the beneficiary bank details (Bank, Branch, Account Number, Account Currency, IBAN), are derived from the matching My Beneficiary ID in the Payee List and the values in the file will be ignored.
Address Enter the address details of the beneficiary. City Enter the city where the beneficiary resides. Country Select the beneficiary’s country from the drop-down menu.
4 Select the Beneficiary Bank Country from the drop-down list.
NEXT STEP: If beneficiary’s bank is in Australia, go to Step 5 If beneficiary’s bank is NOT in Australia go to Step 6
5 For beneficiaries where their bank is in Australia, complete the Beneficiary Bank Information: FIELD HOW TO COMPLETE Select Payment Address Type*
Choose from: • BSB Account —select to send domestic payments to the beneficiary • Swift BIC — select to send international payments to the beneficiary • BPAY — select to pay bills to the beneficiary
Payment Address Type = BSB Account BSB* Enter the 6 digit BSB associated to the beneficiary’s account number (no spaces or
hyphens). Account Number* Enter the beneficiary’s 9 digit account number (no spaces or hyphens). Payment Address Type =SWIFT BIC Swift BIC Choose from:
SWIFT: Type in the bank’s Swift Code (11 digits) into the textbox. Alternatively, click on the search icon to Find a Swift Clearing Code
Australian Bank State Branch (BSB) Code (AU) — AU: Type in the bank’s BSB Code (6 digits) into the textbox. Alternatively, click on the search icon to Find a Clearing Code
NOTE: If you cannot find the Beneficiary Bank, contact the ANZ Customer Service Centre for assistance.
Account Number* Enter the full account number provided to you with no spaces or hyphens. Bank Name Details will be auto-populated based on the Swift BIC selected. Branch Name Details will be auto-populated based on the Swift BIC selected. Bank Address Details will be auto-populated based on the Swift BIC selected.
36

Public
STEP ACTION
Next Step: Go to Step 7
Payment Address Type = BPAY Biller Code* Enter the BPAY Biller Code, as provided by your biller. To find a biller, click on the
Search icon to display the Find a Biller pop-up window. Biller Name This field is automatically populated with the biller's name, based on the Biller Code
entered. Check this name to confirm that you have entered the correct Biller Code. Reference Enter your Reference number, as provided by the biller.
6 For beneficiaries where their bank is NOT in Australia, complete the Beneficiary Bank Information details:
NOTE: Available fields are based on the Country selected.
FIELD HOW TO COMPLETE Account Number* Enter the full account number provided to you with no spaces or hyphens.
Examples: IBAN:
BE88320034713441 GR101101250000000012300695
Other: 099445344211 06098821346720
NOTE: If sending payments to European Union countries, you must use an IBAN. Account Type Select the beneficiary’s account type. Choose from Individual Resident, Individual
Non-Resident, Corporate Resident and Corporate Non-Resident. Local Clearing Information Clearing Code Click on the search icon to Find a Local Clearing Code. Enter the Bank Name, Branch
Name or Clearing Code and click on the Search button. Select the Bank from the results. NOTE: You can enter part of the Bank Name, Branch Name or Clearing Code.
Bank Name Details will be auto-populated based on the Local Clearing Code selected. Branch Name Details will be auto-populated based on the Local Clearing Code selected. Address Details will be auto-populated based on the Local Clearing Code selected. SWIFT Clearing Information Swift Code Type the bank’s Swift Code (11-digits) into this field. Alternatively, click the search
icon to Find a Swift Clearing Code. NOTE: If you cannot find the Beneficiary Bank, contact the ANZ Customer Service Centre for assistance.
Bank Name Details will be auto-populated based on the Swift Code selected. Branch Name Details will be auto-populated based on the Swift Code selected. Address Details will be auto-populated based on the Swift Code selected. City Details will be auto-populated based on the Swift Code selected.
7 Select one of the following actions:
ACTION STEPS Cancel Click on the Cancel button.
RESULT: The beneficiary will not be saved and you will be returned to the Payee List screen.
Submit the beneficiary Click on the Submit button Click on the Yes button in the confirmation pop-up window RESULT: A confirmation message is displayed advising that the beneficiary has been created. NOTE: If your organisation does not need to approve beneficiaries, the beneficiary status changes to Approved. If your organisation needs to approve beneficiaries, the beneficiary status changes to Pending Approval and the beneficiary will need to be approved by another user. See the Approve or Reject a Beneficiary section for
37

Public
STEP ACTION
further instructions.
View a Beneficiary To view the details of a beneficiary, follow the steps below.
STEP ACTION
1 Go to the Payments > Payee List screen
2 Locate the beneficiary and use one of the following methods to view the beneficiary details:
Method 1: Click on the beneficiary in the list Method 2: Right-click on the beneficiary and click on View Method 3: Select the beneficiary and click on View in the Actions menu
RESULT: The Beneficiary Details screen is displayed. Click on the Close button to exit the screen.
Edit a Beneficiary To edit the details of a beneficiary, follow the steps below.
NOTE: To reduce the risk of fraud, ANZ recommends you always confirm beneficiary detail changes directly with the beneficiary before changing details.
STEP ACTION
1 Go to the Payments > Payee List screen
2 Locate the beneficiary and use one of the following methods to edit the beneficiary details:
Method 1: Click on the beneficiary in the list to display the Beneficiary Details screen and click on the Edit button
Method 2: Right-click on the selected beneficiary and click on Edit Method 3: Select the beneficiary and click on Edit in the Actions menu
RESULT: The beneficiary is in edit mode.
3 Edit the beneficiary details as required
4 Select one of the following actions: ACTION STEPS Cancel Click on the Cancel button
Click on the Yes button in the confirmation pop-up window RESULT: Any changes made to the beneficiary will not be saved.
Submit the changes to the beneficiary
Click on the Submit button Click on the Yes button in the confirmation pop-up window If there are any impacts to current payment and templates as a result of the changes, an Impact Summary pop-up window will be displayed. You can click on the numbers in the table to view which payments and templates are affected. To continue, click on the Yes button. RESULT: A confirmation message is displayed advising that the beneficiary has been submitted. NOTE: If your organisation does not need to approve beneficiaries, the beneficiary status changes to Approved. If your organisation needs to approve beneficiaries, the beneficiary status changes to Modification Pending Approval and the changes need to be approved before the beneficiary can be used in a payment. See the Approve or Reject a Beneficiary section for further instructions.
38

Public
Delete a Beneficiary To delete a beneficiary that is in a Pending Approval, Creation Rejected, Modification Rejected, Modification Pending Approval or Approved status from the Payee List, follow the steps below.
NOTE: You can delete beneficiaries individually or several at a time.
STEP ACTION
1 Go to the Payments > Payee List screen
2 Locate the beneficiary and use one of the following methods to delete the beneficiary from the Payee List:
Method 1: Click on the beneficiary in the list to display the Beneficiary Details screen and click on the Delete button. NOTE: Only one beneficiary at a time can be deleted using this method.
Method 2: Right-click on the selected beneficiary and click on Delete Method 3: Select the beneficiary and click on Delete in the Actions menu
RESULT: A confirmation pop-up window is displayed.
3 Click on the Yes button in the confirmation pop-up window. If there are any impacts to current payment and templates as a result of the deletion, an Impact Summary pop-up window will be displayed. You can click on the numbers in the table to view which payments and templates are affected. To continue, click on the Yes button. RESULT: A confirmation message is displayed advising that the beneficiary has been deleted. NOTE: If your organisation does not need to approve beneficiaries, the beneficiary status changes to Deleted. If your organisation needs to approve beneficiaries, the beneficiary status changes to Deletion Pending Approval and the deletion needs to be approved. See the Approve or Reject a Beneficiary section for further instructions.
Approve or Reject a Beneficiary To approve or reject a beneficiary that is in a Deletion Pending Approval, Modification Pending Approval or a Pending Approval status, follow the steps below. It is recommended that you view beneficiary details prior to approving.
NOTES: If your organisation has not been set up to approve beneficiaries, you will not be required to complete this action You must have the appropriate permissions to approve or reject beneficiaries You can approve or reject beneficiaries individually, or several at a time
STEP ACTION
1 Go to the Payments > Payee List screen.
2 Select View > Awaiting Approval from the Control Bar. RESULT: Beneficiaries that are awaiting approval will be displayed.
3 Choose one of the following methods to display the approve and reject actions: Method 1: Click on the beneficiary in the Payee List.
RESULT: The Beneficiary Details screen is displayed. NOTE: Only one beneficiary at a time can be actioned using this method.
Method 2: Right-click on the selected beneficiary. RESULT: The Actions menu is displayed.
Method 3: Select the beneficiary and click on the Actions menu
4 Follow the steps below to approve or reject the beneficiary. ACTION STEPS Approve the request Click on Approve
Click on the Yes button in the confirmation pop-up window If there are any impacts to current payment and templates as a result of the changes, an Impact Summary pop-up window will be displayed. You can click on the numbers in the table to view which payments and templates are affected. To continue, click on the Yes
39

Public
STEP ACTION
button. RESULT: A confirmation message is displayed advising that the beneficiary has been approved. If the request was to approve a new or edited beneficiary, the beneficiary status changes to Approved. If the request was to approve deleting a beneficiary, the beneficiary status changes to Deleted.
Reject the request Click on Reject Click on the Yes button in the confirmation pop-up window RESULT: A confirmation message is displayed advising that the beneficiary has been Rejected. If the request is to reject a new beneficiary, the beneficiary status changes to Creation Rejected. If the request is to reject a beneficiary that has been edited or that has been deleted, the beneficiary status changes to Modification Rejected.
40

Public
TEMPLATES Menu > Payments > Templates
The Templates screen can be accessed from the Payments Menu. This screen allows you to view, create and maintain Templates.
f your organisation needs to approve templates, each template must be approved by a user with appropriate permissions before it can be used to create a payment.
Use the Control Bar to quickly and easily access key tasks. See the Getting Started User Guide for full details. Change the View to display templates Pending Approval, Approved or requiring action or those that are in one of
your folders Click on New to create a template Create and manage folders containing templates that you want to view from the Actions menu Use Settings to save the View and Group selected Click on a row to view the details screen Right-click on a row to View, Edit, Submit, Approve, Reject, Recall, Copy, Delete, Create Payment or to move the
template to a folder you have created
Payment Template Columns
COLUMN DESCRIPTION
Template ID System generated Template ID.
Template Name The name of the template.
Template Description The description of the template.
Debit Account The account number that will be used to fund the payment.
Debit Account Name The account name that will be used to fund the payment.
Debit Amount The amount that will be debited to fund the payment.
Debit Ccy The currency that the funds will be debited in.
Payment Amount The amount that is being paid.
Payment Ccy The currency that the funds will be credited in.
Payment Type The Payment Type: Account Transfer, Domestic Payment, International Payment and Pay Bill
Status The status of the template.
No. of Items The number of Payment Instructions in the template.
Division Name The name of division under which the template was created.
Creation Date The date and time the template was created.
41

Public
Templates Details Screen To view payment template details from the Templates screen, select a template from the list. Details of the template are displayed including any errors or alerts associated with the template.
Control Bar NOTE: Options available are dependent on the status of the template.
NAME DESCRIPTION
Close Select to return to the Templates list.
Edit Select to edit a template that is in a Draft, Needs Repair, Approver Rejected or Approved status.
Submit Select to submit a template for approval.
Approve Select to approve a new template or approve modifications made to a template.
Reject Select to reject a new template or reject modifications made to a template.
Recall Select to recall a template that has been submitted for approval and is in a Pending Approval status. This will change the status of the template to Draft in order to enable editing.
Copy Select to create a new template with the same details as an existing template.
Delete Select to delete a template in a Draft, Needs Repair, Approver Rejected or Approved status.
Create Payment Select to create a payment using the template.
Template Audit History Select to view the Payment Template Audit History pop-up window.
Payment Template Statuses The following table details each of the payment template statuses.
TEMPLATE STATUS DESCRIPTION
Draft The template has been created and is in a Draft status.
Pending Approval The template has been created and is awaiting approval.
Approver Rejected The template has been rejected by an Approver. It will need to be edited if necessary and resubmitted for approval.
Needs Repair Indicates that there is an error with the template which needs repair before it can be approved.
Approved The template has been approved and is ready for use.
Deleted The template has been deleted.
42

Public
Create a Domestic Payment Template — Australia
To create a domestic payment template in Australia, follow the steps below.
NOTE: Mandatory fields are marked with an asterisk.
STEP ACTION
1 Click on the New button on the Templates screen Control Bar. RESULT: The Create Payment Template screen is displayed.
2 Click on Domestic Payment Template or Domestic Salary Payment Template. NOTE: Domestic Salary Templates can only be accessed by users with the appropriate permissions.
3 Complete the From fields: FIELD HOW TO COMPLETE Division* Select the Division under which the template will be used to create a payment.
NOTE: Available if your Organisation is setup with a hierarchy. Debit Account* Select the account the funds will be debited from.
4 Select the Payment Method. Direct Entry is the Payment Method required for Domestic Payments.
5 Complete the Payment Details fields:
FIELD HOW TO COMPLETE Template Name* Enter a template name up to 16 characters. This will become the Payment Name
when you create a payment from this template. Template Description* Enter a template description up to 40 characters. Payment Reference* Enter a payment reference up to 18 characters. This will appear as part of the
narrative on the debit account and beneficiary’s statement and on payment reports. Statement Narrative* Enter a Statement Narrative up to 40 characters. This will appear as part of the
narrative on the funding account statement. Direct Entry User ID* Select a Direct Entry User ID from the drop-down list.
6 Click on the Batch Defaults button to set the default Trace Account, Remitter Name and Transaction Code for the batch.
FIELD HOW TO COMPLETE Trace Account* Select a Trace Account (defaults to the debit account). Any transactions that are
rejected by other banks will be returned to this account. This will appear as part of the narrative on the debit account statement.
Remitter Name* By default the nickname of the debit account is displayed but can be changed if necessary. The Remitter Name can be up to 16 characters and will appear as part of the narrative on the beneficiary's statement.
Transaction Code* Select the appropriate transaction code for the batch payment. Possible codes are: • 50 — General Payment • 51 — Commonwealth Interest • 52 — Family Allowance • 53 — Payroll • 54 — Pension • 55 — Allotment • 56 — Dividend • 57 — Debenture Interest
7 Complete the Beneficiary Details section. Follow the steps below to add beneficiaries to the template: NOTE: At least one beneficiary must be added to the template before it can be submitted for approval.
STEP ACTION 7.1 Click on the Add button to add a payment instruction to the list.
RESULT: A new line item is displayed. 7.2 Add beneficiary details to each payment instruction in the list.
a) To add an existing beneficiary from the Payee List: Click on the “Beneficiary Name” field and select a beneficiary from the drop-down list, or click on
43
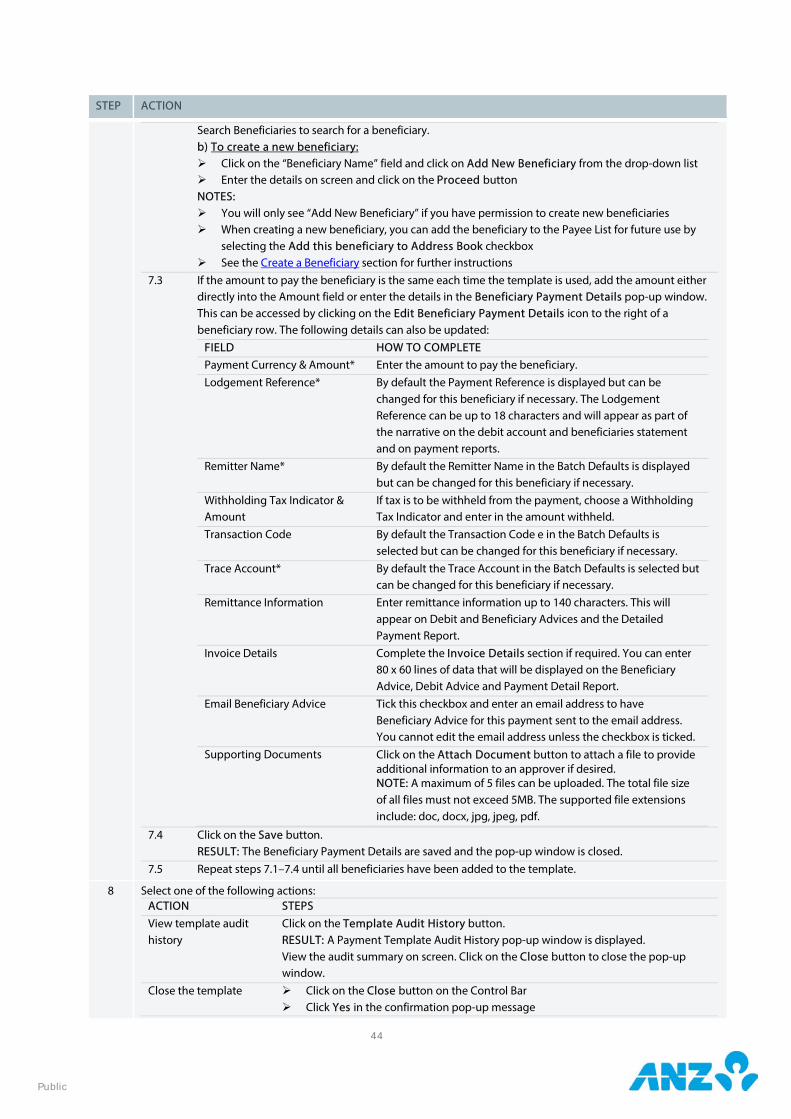
Public
STEP ACTION
Search Beneficiaries to search for a beneficiary. b) To create a new beneficiary: Click on the “Beneficiary Name” field and click on Add New Beneficiary from the drop-down list Enter the details on screen and click on the Proceed button NOTES: You will only see “Add New Beneficiary” if you have permission to create new beneficiaries When creating a new beneficiary, you can add the beneficiary to the Payee List for future use by
selecting the Add this beneficiary to Address Book checkbox See the Create a Beneficiary section for further instructions
7.3 If the amount to pay the beneficiary is the same each time the template is used, add the amount either directly into the Amount field or enter the details in the Beneficiary Payment Details pop-up window. This can be accessed by clicking on the Edit Beneficiary Payment Details icon to the right of a beneficiary row. The following details can also be updated:
FIELD HOW TO COMPLETE Payment Currency & Amount* Enter the amount to pay the beneficiary. Lodgement Reference* By default the Payment Reference is displayed but can be
changed for this beneficiary if necessary. The Lodgement Reference can be up to 18 characters and will appear as part of the narrative on the debit account and beneficiaries statement and on payment reports.
Remitter Name* By default the Remitter Name in the Batch Defaults is displayed but can be changed for this beneficiary if necessary.
Withholding Tax Indicator & Amount
If tax is to be withheld from the payment, choose a Withholding Tax Indicator and enter in the amount withheld.
Transaction Code By default the Transaction Code e in the Batch Defaults is selected but can be changed for this beneficiary if necessary.
Trace Account* By default the Trace Account in the Batch Defaults is selected but can be changed for this beneficiary if necessary.
Remittance Information Enter remittance information up to 140 characters. This will appear on Debit and Beneficiary Advices and the Detailed Payment Report.
Invoice Details Complete the Invoice Details section if required. You can enter 80 x 60 lines of data that will be displayed on the Beneficiary Advice, Debit Advice and Payment Detail Report.
Email Beneficiary Advice Tick this checkbox and enter an email address to have Beneficiary Advice for this payment sent to the email address. You cannot edit the email address unless the checkbox is ticked.
Supporting Documents Click on the Attach Document button to attach a file to provide additional information to an approver if desired. NOTE: A maximum of 5 files can be uploaded. The total file size of all files must not exceed 5MB. The supported file extensions include: doc, docx, jpg, jpeg, pdf.
7.4 Click on the Save button. RESULT: The Beneficiary Payment Details are saved and the pop-up window is closed.
7.5 Repeat steps 7.1–7.4 until all beneficiaries have been added to the template.
8 Select one of the following actions: ACTION STEPS View template audit history
Click on the Template Audit History button. RESULT: A Payment Template Audit History pop-up window is displayed. View the audit summary on screen. Click on the Close button to close the pop-up window.
Close the template Click on the Close button on the Control Bar Click Yes in the confirmation pop-up message
44

Public
STEP ACTION
RESULT: The template is discarded and the Templates screen is displayed. Save the template as a draft
Click on the Save as Draft button on the Control Bar. RESULT: The template is saved in a Draft status and you are taken to the Templates screen. The template can be accessed for editing from this screen.
Submit the template Click on the Review & Submit button at the bottom of the screen. RESULT: If a payment instruction has errors, an error icon will appear next to that payment instruction. Click on the Edit icon to view and correct the errors. If there are no errors, you will be taken to a page to review the template details.
If the template details are not correct, click on the Previous button to return to the previous screen and edit the template as desired.
If the template details are correct, click on the Submit button to submit the template for approval.
RESULT: A confirmation pop-up window is displayed advising that the template has been submitted for approval. The template will need to be approved before it can be used to create a payment. See the Approve or Reject a Template section for further instructions.
Create a Domestic Payment Template — China To create a China domestic payment template, follow the steps below.
NOTE: Mandatory fields are marked with an asterisk.
STEP ACTION
1 Click on the New button on the Templates screen Control Bar. RESULT: The Create Payment Template screen is displayed.
2 Click on Domestic Payment Template or Domestic Salary Payment Template. NOTE: Domestic Salary Templates can only be accessed by users with the appropriate permissions.
3 Complete the From fields: FIELD HOW TO COMPLETE Division* Select the Division under which the template will be used to create a payment.
NOTE: Available if your Organisation is setup with a hierarchy. Debit Account* Select the account the funds will be debited from.
4 Complete the Payment Details fields:
FIELD HOW TO COMPLETE Template Name* Enter a template name up to 16 characters. This will become the Payment Name
when you create a payment from this template. Template Description* Enter a template description up to 40 characters. Payment Reference* Enter a payment reference up to 16 characters. This will appear as part of the
narrative on the debit account and beneficiary’s statement and on payment reports. Payment Currency* Select the currency that the funds will be credited in. By default, the currency of the
debit account is displayed. Enter Amounts in Debit Currency
If ticked, enter the amounts to credit the beneficiaries in the currency of the Debit Account NOTE: This option is only available if the debit account currency is different to the payment currency.
Individual Debits If ticked, the payment is debited at a transaction level and will appear on the statement as single entries, i.e. a debit for each beneficiary NOTE: Individual debits are not available for Domestic Salary Payments. By default these payments are bulk debited, i.e. a debit for each batch.
Urgent If ticked, this option defaults the payment instructions to use the fastest available clearing method.
Debit Advice Description Enter a debit advice description up to 140 characters. This will appear as part of the
45
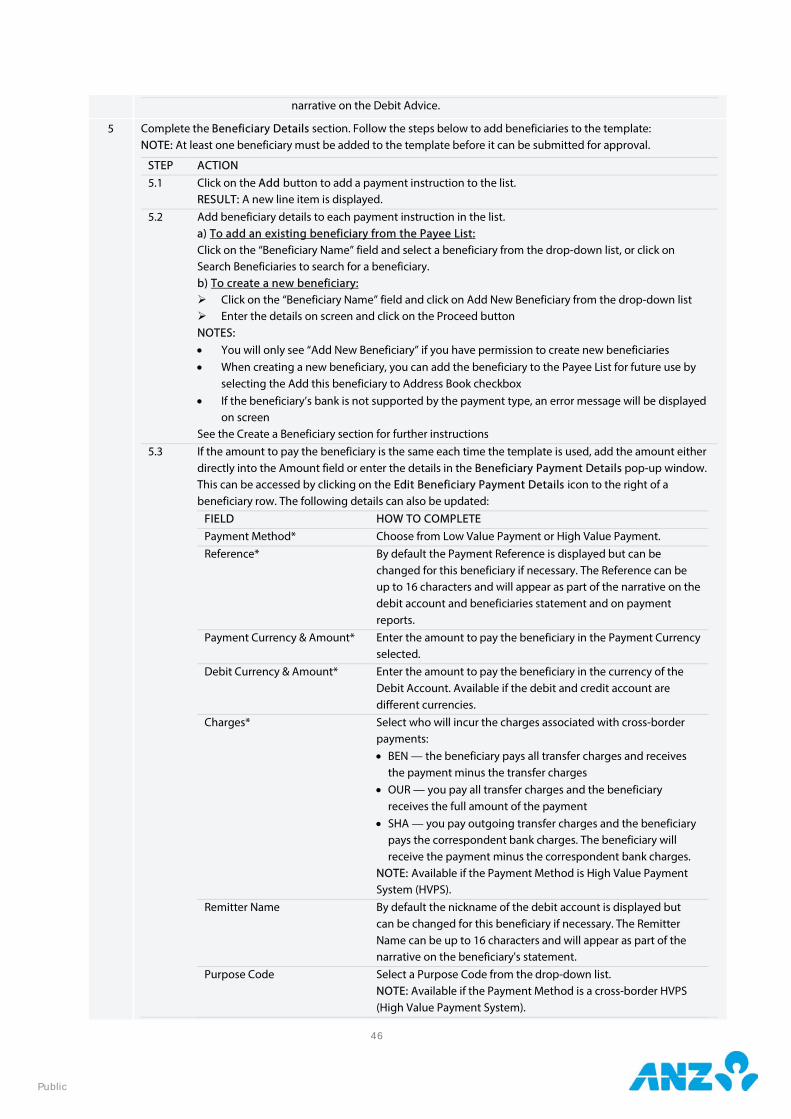
Public
narrative on the Debit Advice.
5 Complete the Beneficiary Details section. Follow the steps below to add beneficiaries to the template: NOTE: At least one beneficiary must be added to the template before it can be submitted for approval.
STEP ACTION 5.1 Click on the Add button to add a payment instruction to the list.
RESULT: A new line item is displayed. 5.2 Add beneficiary details to each payment instruction in the list.
a) To add an existing beneficiary from the Payee List: Click on the “Beneficiary Name” field and select a beneficiary from the drop-down list, or click on Search Beneficiaries to search for a beneficiary. b) To create a new beneficiary: Click on the “Beneficiary Name” field and click on Add New Beneficiary from the drop-down list Enter the details on screen and click on the Proceed button NOTES: • You will only see “Add New Beneficiary” if you have permission to create new beneficiaries • When creating a new beneficiary, you can add the beneficiary to the Payee List for future use by
selecting the Add this beneficiary to Address Book checkbox • If the beneficiary’s bank is not supported by the payment type, an error message will be displayed
on screen See the Create a Beneficiary section for further instructions
5.3 If the amount to pay the beneficiary is the same each time the template is used, add the amount either directly into the Amount field or enter the details in the Beneficiary Payment Details pop-up window. This can be accessed by clicking on the Edit Beneficiary Payment Details icon to the right of a beneficiary row. The following details can also be updated:
FIELD HOW TO COMPLETE Payment Method* Choose from Low Value Payment or High Value Payment. Reference* By default the Payment Reference is displayed but can be
changed for this beneficiary if necessary. The Reference can be up to 16 characters and will appear as part of the narrative on the debit account and beneficiaries statement and on payment reports.
Payment Currency & Amount* Enter the amount to pay the beneficiary in the Payment Currency selected.
Debit Currency & Amount* Enter the amount to pay the beneficiary in the currency of the Debit Account. Available if the debit and credit account are different currencies.
Charges* Select who will incur the charges associated with cross-border payments: • BEN — the beneficiary pays all transfer charges and receives
the payment minus the transfer charges • OUR — you pay all transfer charges and the beneficiary
receives the full amount of the payment • SHA — you pay outgoing transfer charges and the beneficiary
pays the correspondent bank charges. The beneficiary will receive the payment minus the correspondent bank charges.
NOTE: Available if the Payment Method is High Value Payment System (HVPS).
Remitter Name By default the nickname of the debit account is displayed but can be changed for this beneficiary if necessary. The Remitter Name can be up to 16 characters and will appear as part of the narrative on the beneficiary's statement.
Purpose Code Select a Purpose Code from the drop-down list. NOTE: Available if the Payment Method is a cross-border HVPS (High Value Payment System).
46

Public
Debit Advice Description Enter a Debit Advice Description up to 140 characters. This will appear as part of the narrative on the Debit Advice. NOTE: Available if you have ticked the Individual Debits checkbox.
FX Details Complete the FX Details section. NOTE: Available if the debit and credit currencies are different and you have selected Individual Debits.
Remittance Information Enter remittance information up to 140 characters. This will appear on Debit and Beneficiary Advices and the Detailed Payment Report.
Instructions Remarks Enter Instruction Remarks if required. NOTE: Available if Payment Type is BEPS (Bulk Electronic Payment System) or a HVPS (High Value Payment System).
Invoice Details Complete the Invoice Details section if required. You can enter 80 x 60 lines of data that will be displayed on the Beneficiary Advice, Debit Advice and Payment Detail Report.
Email Beneficiary Advice Tick this checkbox and enter an email address to have Beneficiary Advice for this payment sent to the email address. You cannot edit the email address unless the checkbox is ticked.
Supporting Documents Click on the Attach Document button to attach a file to accompany your payment. The document will be submitted to ANZ. NOTE: A maximum of 5 files can be uploaded. The total file size of all files must not exceed 5MB. The supported file extensions include: doc, docx, jpg, jpeg, pdf.
Additional Information Complete the Additional Information fields if required. See the Additional Information section for further instructions.
5.4 Click on the Save button. RESULT: The Beneficiary Payment Details are saved and the pop-up window is closed.
5.5 Repeat steps 5.1–5.4 until all beneficiaries have been added to the template.
6 Select one of the following actions: ACTION STEPS View template audit history
Click on the Template Audit History button. RESULT: A Payment Template Audit History pop-up window is displayed. View the audit summary on screen. Click on the Close button to close the pop-up window.
Close the template Click on the Close button on the Control Bar Click Yes in the confirmation pop-up message RESULT: The template is discarded and the Templates screen is displayed.
Save the template as a draft
Click on the Save as Draft button on the Control Bar. RESULT: The template is saved in a Draft status and you are taken to the Templates screen. The template can be accessed for editing from this screen.
Submit the template Click on the Review & Submit button at the bottom of the screen. RESULT: If a payment instruction has errors, an error icon will appear next to that payment instruction. Click on the Edit icon to view and correct the errors. If there are no errors, you will be taken to a page to review the template details.
If the template details are not correct, click on the Previous button to return to the previous screen and edit the template as desired.
If the template details are correct, click on the Submit button to submit the template for approval.
RESULT: A confirmation pop-up window is displayed advising that the template has been submitted for approval. The template will need to be approved before it can be used to create a payment. See the Approve or Reject a Template section for further instructions.
47

Public
Create an International Payment Template
To create an international payment template, follow the steps below.
NOTE: Mandatory fields are marked with an asterisk. Some fields may not be available depending on your region, payment method and payment type.
STEP ACTION
1 Click on the New button on the Template screen Control Bar. RESULT: The Create Payment Template screen is displayed.
2 Click on International Payment Template or International Salary Payment Template. NOTE: International Salary Templates can only be accessed by users with the appropriate permissions.
3 Complete the From fields: FIELD HOW TO COMPLETE Division* Select the Division under which the template will be used to create a payment.
NOTE: Available if your Organisation is setup with a hierarchy. Debit Account* Select the account the funds will be debited from.
4 Complete the Payment Details fields:
FIELD HOW TO COMPLETE Template Name* Enter a template name up to 16 characters. This will become the Payment Name
when you create a payment from this template. Template Description* Enter a template description up to 40 characters. Payment Reference* Enter a payment reference up to 16 characters. This will appear as part of the
narrative on the debit account and beneficiary’s statement and on payment reports. Payment Currency* Select the currency that the funds will be credited in. By default the currency of the
Debit Account is displayed. Debit Advice Description Enter a debit advice description up to 140 characters. This will appear as part of the
narrative on the Debit Advice. NOTE: Only available for International Payments with a CNY debit account.
Enter Amounts in Debit Currency
Tick this box to enter the amounts to credit the beneficiaries in the currency of the debit account. NOTE: This option is only available if the debit account currency is different to the payment currency.
Individual Debits Tick this box if you want the payment debited at a transaction level and each item will appear on the statement as single entries, i.e. a debit for each beneficiary. NOTES: • Only available for International Payments with a CNY debit account. • Individual Debits are not available for International Salary Payments. By default
these payments are bulk debited, i.e. a debit for each batch.
5 Complete the Beneficiary Details section. Follow the steps below: NOTE: At least one beneficiary must be added to the template before it can be submitted for approval.
STEP ACTION 5.1 Click on the Add button to add a payment instruction to the list.
RESULT: A new line item is displayed. 5.2 Add beneficiary details to each payment instruction in the list.
a) To add an existing beneficiary from the Payee List: Click on the “Beneficiary Name” field in a row and select a beneficiary from the drop-down list, or click on Search Beneficiaries to search for a beneficiary
b) To create a new beneficiary and add them to a payment instruction: Click on the “Beneficiary Name” field in a row and click on Add New Beneficiary from the drop-
down list Enter the details on screen and click on the Proceed button NOTES:
48

Public
STEP ACTION
• You will only see “Add New Beneficiary” if you have permissions to create new beneficiaries • When creating a new beneficiary, you can add the beneficiary to the Payee List for future use by
ticking the Add this beneficiary to Address Book checkbox • If the beneficiary’s bank is not supported by the payment type, an error message will be displayed • See the Create a Beneficiary section for further instructions
5.3 If the amount to pay the beneficiary is the same each time the template is used, add the amount either directly into the Amount field or enter the details in the Beneficiary Payment Details pop-up window. This can be accessed by clicking on the Edit Beneficiary Payment Details icon to the right of a beneficiary row. The following details can also be updated:
FIELD HOW TO COMPLETE Payment Currency & Amount*
Enter the amount to pay the beneficiary.
Debit Currency & Amount* Enter the amount to pay the beneficiary in the currency of the Debit Account. Available if the debit and credit account are different currencies.
Charges* Select who will incur the charges associated with the payment: • BEN — the beneficiary pays all transfer charges and receives
the payment minus the transfer charges (not available in Australia)
• OUR — you pay all transfer charges and the beneficiary receives the full amount of the payment
• SHA — you pay outgoing transfer charges and the beneficiary pays the correspondent bank charges. The beneficiary will receive the payment minus the correspondent bank charges
Client Reference* Enter a Client Reference up to 16 characters. This will appear as
part of the narrative on the debit account and beneficiaries statement and on payment reports.
Remittance Information Enter remittance information up to 140 characters. This will appear on Debit and Beneficiary Advices and the Detailed Payment Report.
Additional Information Complete the Additional Information section if the payment will require additional regulatory information. See the Additional Information section of this guide for further instructions. NOTE: Only applicable for China customers.
5.4 Click on the Save button. RESULT: The Beneficiary Payment Details are saved and the pop-up window is closed.
5.5 Repeat steps 5.1– 5.4 for each payment instruction in the payment.
TIPS: • To remove one or more payment instructions from the list, tick the checkbox next to the beneficiary number
and click on the Remove button • To edit a beneficiary in the list, click on the Edit Beneficiary Payment Details icon to the right of a beneficiary
row and click on Edit Beneficiary next the Beneficiary Name
6 Choose one of the following actions:
ACTION STEPS View template audit history
Click on the Template Audit History button. RESULT: A Payment Template Audit History pop-up window is displayed. View the audit summary on screen. Click on the Close button to close the pop-up window.
Close template Click on the Close button on the Control Bar. Click Yes in the confirmation pop-up message. RESULT: The template is discarded and the Templates screen is displayed.
49

Public
STEP ACTION
Save the template as a draft
Click on the Save as Draft button on the Control Bar. RESULT: The template is saved in a Draft status and you are taken to the Templates screen. The template can be accessed for editing from this screen.
Submit the template Click on the Review & Submit button at the bottom of the screen. RESULT: If a payment instruction has errors, an error icon will appear next to that payment instruction. Click on the Edit icon to view and correct the errors. If there are no errors, you will be taken to a page to review the template details.
If the template details are not correct, click on the Previous button to return to the previous screen and edit the template as desired.
If the template details are correct, click on the Submit button to submit the template for approval.
RESULT: A confirmation pop-up window is displayed advising that the template has been submitted for approval.
50

Public
Create a Pay Bill Template
To create a Pay Bill template, follow the steps below.
NOTE: Only available in Australia. Mandatory fields are marked with an asterisk.
STEP ACTION
1 Click on the New button on the Template screen Control Bar. RESULT: The Create Payment Template screen is displayed.
2 Click on Pay Bill Template. RESULT: The Pay Bill Template screen is displayed.
3 Complete the From fields: FIELD HOW TO COMPLETE Division* Select the Division under which template will be used to create a payment.
NOTE: Available if your Organisation is setup with a hierarchy. Debit Account* Select the account the funds will be debited from.
NOTE: You will only have access to debit accounts that you have permissions for and that are set up under the selected Division.
4 Complete the Payment Details fields:
FIELD HOW TO COMPLETE Template Name* Enter a template name up to 16 characters. This will become the Payment Name
when you create a payment from this template. Template Description* Enter a template description up to 40 characters. Payment Reference* Enter a payment reference up to 16 characters. This will appear as part of the narrative
on the debit account and beneficiary’s statement and on payment reports. This is NOT your BPAY customer reference number.
5 Complete the Biller Details section. Follow the steps below: NOTE: At least one biller must be added to the template before it can be submitted for approval.
STEP ACTION 5.1 Click on the Add button to add one or more payment instructions to your payment.
RESULT: A new line item is displayed in the list. 5.2 Enter biller details for each payment instruction in the list.
a) To add an existing biller from the Payee List: Click on the “Biller Code” field in a row in the list and select a biller from the drop-down list, or click on Search Biller to search for a beneficiary. b) To create a new biller and add them to a payment instruction: Click on the “Biller Code” field in a row in the list and click on Add New Biller from the drop-down
list Enter the Biller Code and your customer reference number, then click on the Proceed button NOTES: • You will only see “Add New Biller” if you have permissions to create new billers • When creating a new biller, you can add the biller to the Payee List for future use by ticking the Add
this beneficiary to Address Book checkbox 5.3 Add the amount to pay the biller either directly into the Amount field or enter the details in the Biller
Payment Details pop-up window. This can be accessed by clicking on the Edit Biller Payment Details icon to the right of a biller row. The following details can also be updated:
FIELD DESCRIPTION Payment Currency & Amount*
Enter the amount to pay the biller.
Payment Reference* Enter a payment reference up to 16 characters. This will appear as part of the narrative. This is NOT your BPAY customer reference number.
5.4 Repeat steps 5.1– 5.3 until all billers have been added to the template.
51
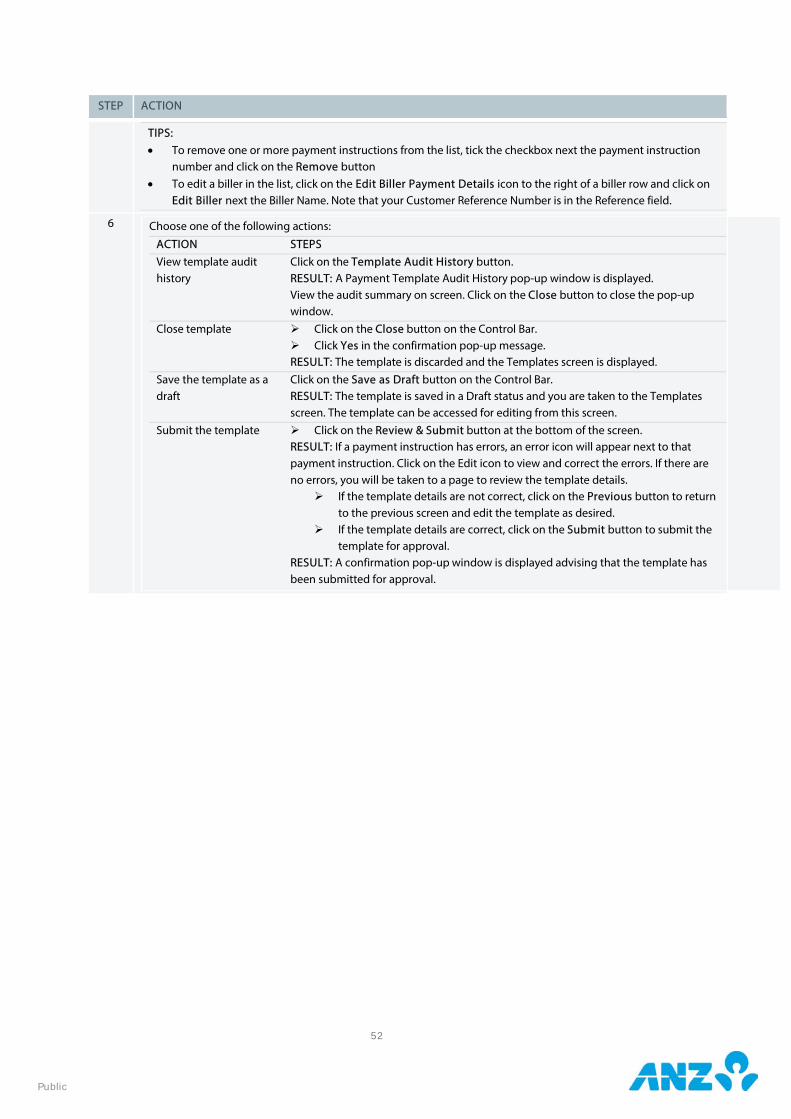
Public
STEP ACTION
TIPS: • To remove one or more payment instructions from the list, tick the checkbox next the payment instruction
number and click on the Remove button • To edit a biller in the list, click on the Edit Biller Payment Details icon to the right of a biller row and click on
Edit Biller next the Biller Name. Note that your Customer Reference Number is in the Reference field.
6 Choose one of the following actions:
ACTION STEPS View template audit history
Click on the Template Audit History button. RESULT: A Payment Template Audit History pop-up window is displayed. View the audit summary on screen. Click on the Close button to close the pop-up window.
Close template Click on the Close button on the Control Bar. Click Yes in the confirmation pop-up message. RESULT: The template is discarded and the Templates screen is displayed.
Save the template as a draft
Click on the Save as Draft button on the Control Bar. RESULT: The template is saved in a Draft status and you are taken to the Templates screen. The template can be accessed for editing from this screen.
Submit the template Click on the Review & Submit button at the bottom of the screen. RESULT: If a payment instruction has errors, an error icon will appear next to that payment instruction. Click on the Edit icon to view and correct the errors. If there are no errors, you will be taken to a page to review the template details.
If the template details are not correct, click on the Previous button to return to the previous screen and edit the template as desired.
If the template details are correct, click on the Submit button to submit the template for approval.
RESULT: A confirmation pop-up window is displayed advising that the template has been submitted for approval.
52

Public
View a Template To view the details of a template, follow the steps below.
STEP ACTION
1 Go to the Payments > Templates screen
2 Locate the template and use one of the following methods to view the template details:
Method 1: Click on the template in the list Method 2: Right-click on the template and click on View Method 3: Select the template and click on View in the Actions menu
RESULT: The Payment Template Details screen is displayed. Click on the Close button to exit the screen
Edit a Template To edit the details of a template that is in a Draft, Needs Repair, Approver Rejected or Approved status, follow the steps below.
STEP ACTION
1 Go to the Payments > Templates screen
2 Locate the template and use one of the following methods to edit the template details:
Method 1: Click on the template in the list to display the Payment Template Details screen and then click on the Edit button
Method 2: Right-click on the selected template and click on Edit Method 3: Select the template and click on Edit in the Actions menu
RESULT: The template is in edit mode.
3 Edit the template details as required.
4 Select one of the following actions: ACTION STEPS Cancel Click on the Close button
Click on the Yes button in the confirmation pop-up window RESULT: Any changes made to the template will not be saved.
Submit the changes to the template
Click on the Review & Submit button RESULT: A confirmation message is displayed advising that the template has been updated. NOTE: If your organisation does not need to approve templates, the template status changes to Approved. If your organisation needs to approve templates, the template status changes to Pending Approval and the changes need to be approved before the template can be used in a payment. See the Approve or Reject a Template section for further instructions.
View template audit history Click on the Template Audit History button RESULT: A Payment Template Audit History pop-up window is displayed View the audit summary on screen and click on the Close button
53

Public
Recall a Template To recall a template that has been submitted for approval and is in a Pending Approval status, follow the steps below.
STEP ACTION
1 Go to the Payments > Templates screen
2 Locate the template and use one of the following methods to recall the template so that it can be edited:
Method 1: Click on the template in the list to display the Payment Template Details screen and then click on the Recall button
Method 2: Right-click on the selected template and click on Recall Method 3: Select the template and click on Recall in the Actions menu
RESULT: A message is displayed advising that the template has been recalled. The template can be edited as required.
Approve or Reject a Template To approve or reject a template that is in a Pending Approval status, follow the steps below. It is recommended that you view template details prior to approving.
NOTES:
• If your organisation has not been set up to approve templates, you will not be required to complete this action • You must have the appropriate permissions to approve or reject templates • You can approve or reject templates individually, or several at a time
STEP ACTION
1 Go to the Payments > Templates screen.
2 Select View > Pending Approval from the Control Bar. RESULT: Templates that you are entitled to approve will be displayed.
3 Choose one of the following methods to display the approve and reject actions:
Method 1: Click on the template in the list. RESULT: The Payment Template Details screen is displayed. NOTE: Only one template at a time can be actioned using this method.
Method 2: Right-click on the selected template. RESULT: The Actions menu is displayed.
Method 3: Select the template and click on the Actions menu
4 Follow the steps below to approve or reject the template.
ACTION STEPS Approve the request Click on Approve
Click on the Yes button in the confirmation pop-up window RESULT: A confirmation message is displayed advising that the template has been approved and the template status changes to Approved.
Reject the request Click on Reject Enter a reason for rejecting the template in the pop-up window and click on the OK
button. RESULT: A confirmation message is displayed advising that the template has been rejected and the template status changes to Approver Rejected.
54

Public
Delete a Template To delete a payment template that is in a Draft, Needs Repair, Approver Rejected or Approved status, follow the steps below. NOTE: You can delete templates individually or several at a time.
STEP ACTION
1 Go to the Payments > Templates screen
2 Locate the template and use one of the following methods to delete the template:
Method 1: Click on the template in the list to display the Payment Template Details screen and then click on the Delete button. NOTE: Only one template at a time can be deleted using this method.
Method 2: Right-click on the selected template and click on Delete. Method 3: Select the template and click on Delete in the Actions menu.
RESULT: A confirmation pop-up window is displayed.
3 Click on the Yes button in the confirmation pop-up window. RESULT: A confirmation message is displayed advising that the template has been deleted.
Copy a Template To copy a payment template that is in an Approved or Deleted status, follow the steps below. NOTE: You can only copy templates individually.
STEP ACTION
1 Go to the Payments > Templates screen
2 Locate the template and use one of the following methods to copy the template:
Method 1: Click on the template in the list to display the Payment Template Details screen and then click on the Copy button.
Method 2: Right-click on the selected template and click on Copy. Method 3: Select the template and click on Copy in the Actions menu.
RESULT: A confirmation pop-up window is displayed.
3 Click on the Yes button in the confirmation pop-up window. RESULT: The template details are copied into a new template that can be edited, saved as a draft or submitted for approval.
55

Public
Create Payment from Template To create a payment from a template that is in Approved status, follow the steps below. NOTE: You can only create payments from one template at a time.
Method 1:
STEP ACTION
1 Go to the Payments > Templates screen
2 Click on the template.
RESULT: A confirmation pop-up window is displayed.
3 Click on the Create Payment button on the Control Bar.
RESULT: A payment is created with the payment details from the template automatically filled in.
4 Enter the remaining payment details as required. For more information, see the Create Payment section.
Method 2:
STEP ACTION
1 Go to the Payments > Create Payments screen
2 Click on Use Payment Template.
RESULT: The Use Payment Template pop-up window is displayed.
3 Use the search fields to filter the list of templates as desired. Click on the desired template in the list. Click Yes in the confirmation pop-up message box.
RESULT: A message is displayed providing the Payment ID.
4 Enter the remaining payment details as required. For more information, see the Create Payment section.
56
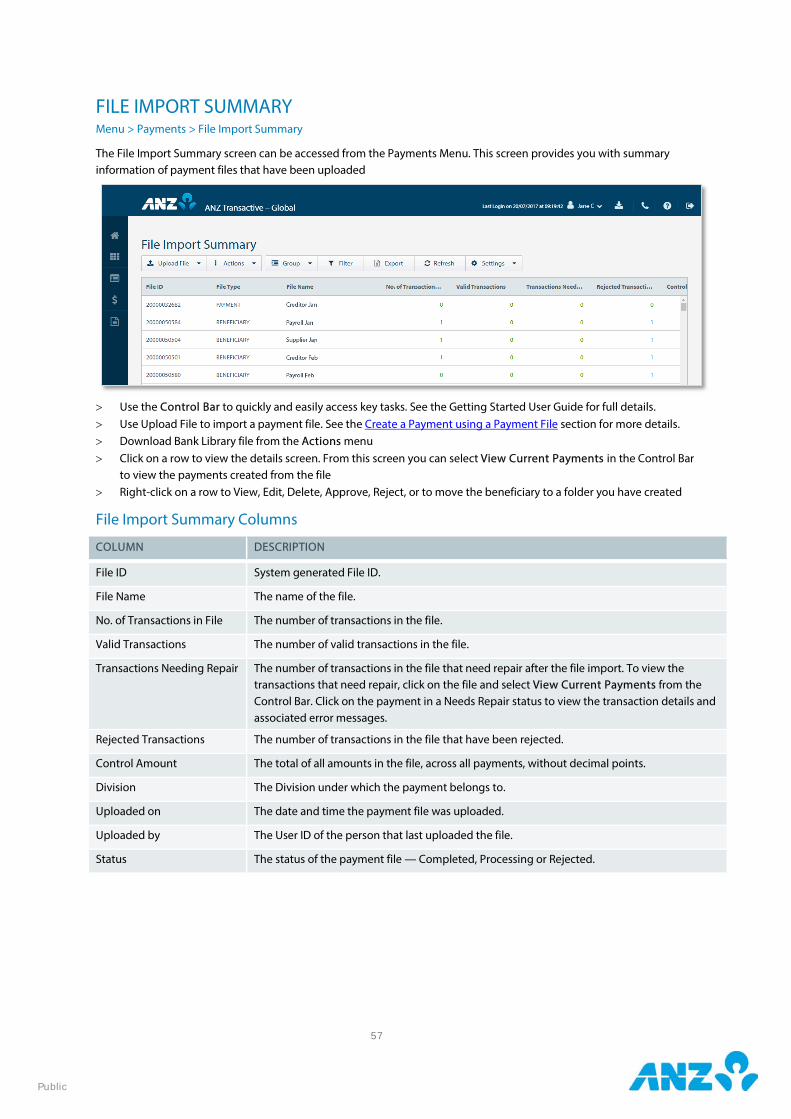
Public
FILE IMPORT SUMMARY Menu > Payments > File Import Summary
The File Import Summary screen can be accessed from the Payments Menu. This screen provides you with summary information of payment files that have been uploaded
> Use the Control Bar to quickly and easily access key tasks. See the Getting Started User Guide for full details. > Use Upload File to import a payment file. See the Create a Payment using a Payment File section for more details. > Download Bank Library file from the Actions menu > Click on a row to view the details screen. From this screen you can select View Current Payments in the Control Bar
to view the payments created from the file > Right-click on a row to View, Edit, Delete, Approve, Reject, or to move the beneficiary to a folder you have created
File Import Summary Columns
COLUMN DESCRIPTION
File ID System generated File ID.
File Name The name of the file.
No. of Transactions in File The number of transactions in the file.
Valid Transactions The number of valid transactions in the file.
Transactions Needing Repair The number of transactions in the file that need repair after the file import. To view the transactions that need repair, click on the file and select View Current Payments from the Control Bar. Click on the payment in a Needs Repair status to view the transaction details and associated error messages.
Rejected Transactions The number of transactions in the file that have been rejected.
Control Amount The total of all amounts in the file, across all payments, without decimal points.
Division The Division under which the payment belongs to.
Uploaded on The date and time the payment file was uploaded.
Uploaded by The User ID of the person that last uploaded the file.
Status The status of the payment file — Completed, Processing or Rejected.
57

Public
PAYMENT REPORTS AND ADVICES Payment reports and advices can be generated using one of the following methods:
• Selecting a payment in the Current Payments or Past Payments screens and choosing the report type from the Reports menu
• Right-clicking on a payment in the Current Payments or Past Payments screens and selecting the report type from the menu
• Creating a new Report Profile within the Report Centre section • Creating a new Scheduled Report within the Report Centre section
Payment Audit Report To generate a Payment Audit Report from the Request Payment Audit Report pop-up window, follow the steps below.
NOTE: Mandatory fields are marked with an asterisk.
STEP ACTION
1 Enter your criteria for generating the Report: FIELD DESCRIPTION
Report Format* Choose from XLSX, CSV or PDF. Report Language* Choose from English or Simplified Chinese.
Report Encoding Available for selection if CSV is used as your report format. The encoding options are based on your language selection. Choose from: > English: UTF-8, US-ASCII > Simplified Chinese: GB2312, UTF-8
Report Name Enter a name for the report (up to 20 characters). Report Description Enter a description for the report (up to 100 characters).
2 Click on the Submit button.
RESULT: The report will be created and available at the bottom of your screen, in the Download Centre or in Report Centre > Download Reports.
Payment Detail Report To generate a Payment Detail Report from the Request Payment Detail Report pop-up window, follow the steps below.
NOTE: Mandatory fields are marked with an asterisk.
STEP ACTION
1 Enter your criteria for generating the Report: FIELD DESCRIPTION
Report Format* Choose from XLSX, CSV or PDF. Report Language* Choose from English or Simplified Chinese.
Report Encoding Available for selection if CSV is used as your report format. The encoding options are based on your language selection. Choose from:
• English: UTF-8, US-ASCII • Simplified Chinese: GB2312, UTF-8
Report Name Enter a name for the report (up to 20 characters). Report Description Enter a description for the report (up to 100 characters).
2 Click on the Submit button.
RESULT: The report will be created and available at the bottom of your screen, in the Download Centre or in Report Centre > Download Reports.
58

Public
Payment Summary Report To generate a Payment Summary Report from the Request Payment Summary Report pop-up window, follow the steps below.
NOTE: Mandatory fields are marked with an asterisk.
STEP ACTION
1 Enter your criteria for generating the Report: FIELD DESCRIPTION
Report Format* Choose from XLSX, CSV or PDF. Report Language* Choose from English or Simplified Chinese.
Report Encoding Available for selection if CSV is used as your report format. The encoding options are based on your language selection. Choose from:
• English: UTF-8, US-ASCII • Simplified Chinese: GB2312, UTF-8
Report Name Enter a name for the report (up to 20 characters). Report Description Enter a description for the report (up to 100 characters).
2 Click on the Submit button.
RESULT: The report will be created and available at the bottom of your screen, in the Download Centre or in Report Centre > Download Reports.
59

Australia and N
ew Zealand Banking G
roup Limited (A
NZ) A
BN 11 005 357 522.
anz.com