Embed Size (px)
Citation preview

1
Cisco AnyConnect Secure Mobility Client installation guide
Contents Cisco AnyConnect Secure Mobility Client installation guide .................................................................. 1
Downloading the AnyConnect Client ...................................................................................................... 1
Windows installation .............................................................................................................................. 3
Client installation steps ....................................................................................................................... 3
Duo Enrolment .................................................................................................................................... 5
Mobile phone or Tablet .................................................................................................................. 6
Landline ......................................................................................................................................... 14
Connecting to NVIDIA’s Corporate Gateways ................................................................................... 15
Reconnecting to the Gateway ........................................................................................................... 23
MAC OSX installation ............................................................................................................................ 24
Client installation steps ..................................................................................................................... 24
Connecting to NVIDIA’s Corporate Gateways ................................................................................... 28
Reconnecting to the Gateway ........................................................................................................... 29
Linux installation ................................................................................................................................... 30
Client installation steps ..................................................................................................................... 30
Connecting to NVIDIA’s Corporate Gateways ................................................................................... 31
Reconnecting to the Gateway ........................................................................................................... 33
FAQ’s ..................................................................................................................................................... 39
Created by: Prasad Kuber
Creation Date: 8 Dec 2016
Revision number: 1.2
Installation Package: All operating systems
Downloading the AnyConnect Client
Step 1: Navigate to our VPN Homepage: http://ngvpn.nvidia.com . This page contains a list of all
worldwide gateways and the link to the client download page, see below.

2
Step 2: Click the hyperlink “here” to Navigate to the Client Download Page.
Step 3: Click the operating system name to download the correct version of the client for your
operating system. Save this file to your Desktop or another location you can easily access.
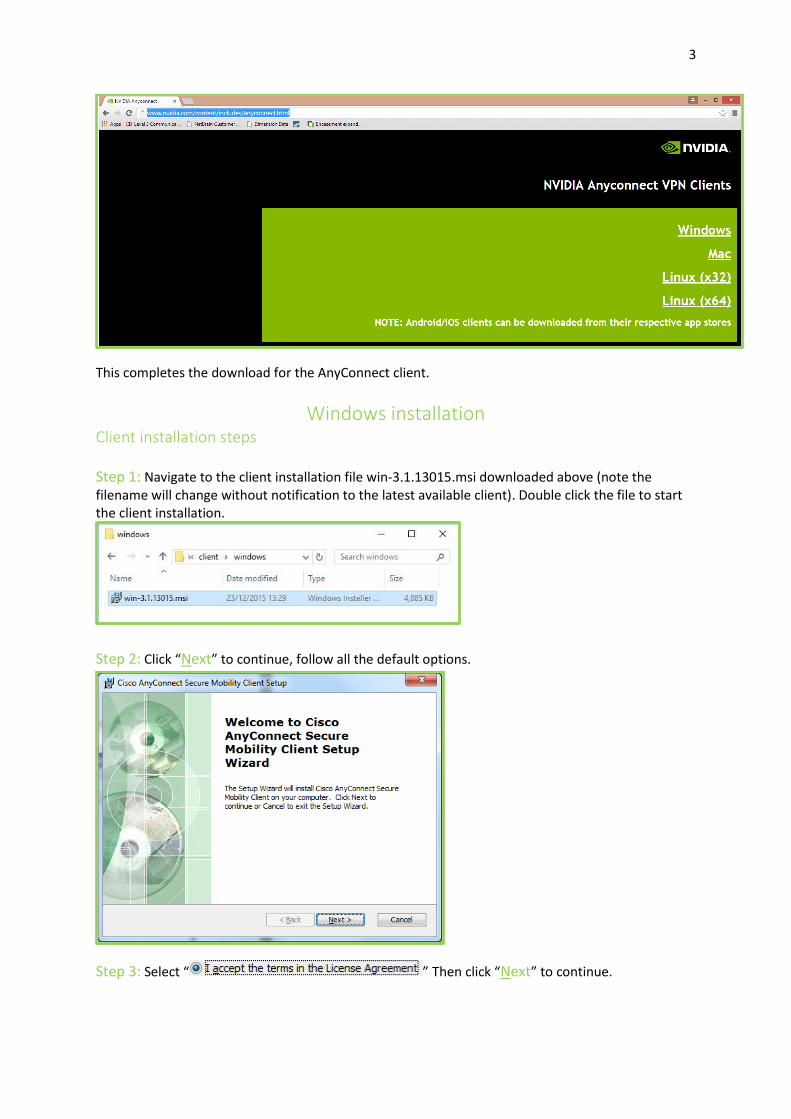
3
This completes the download for the AnyConnect client.
Windows installation Client installation steps Step 1: Navigate to the client installation file win-3.1.13015.msi downloaded above (note the filename will change without notification to the latest available client). Double click the file to start the client installation.
Step 2: Click “Next” to continue, follow all the default options.
Step 3: Select “ ” Then click “Next” to continue.
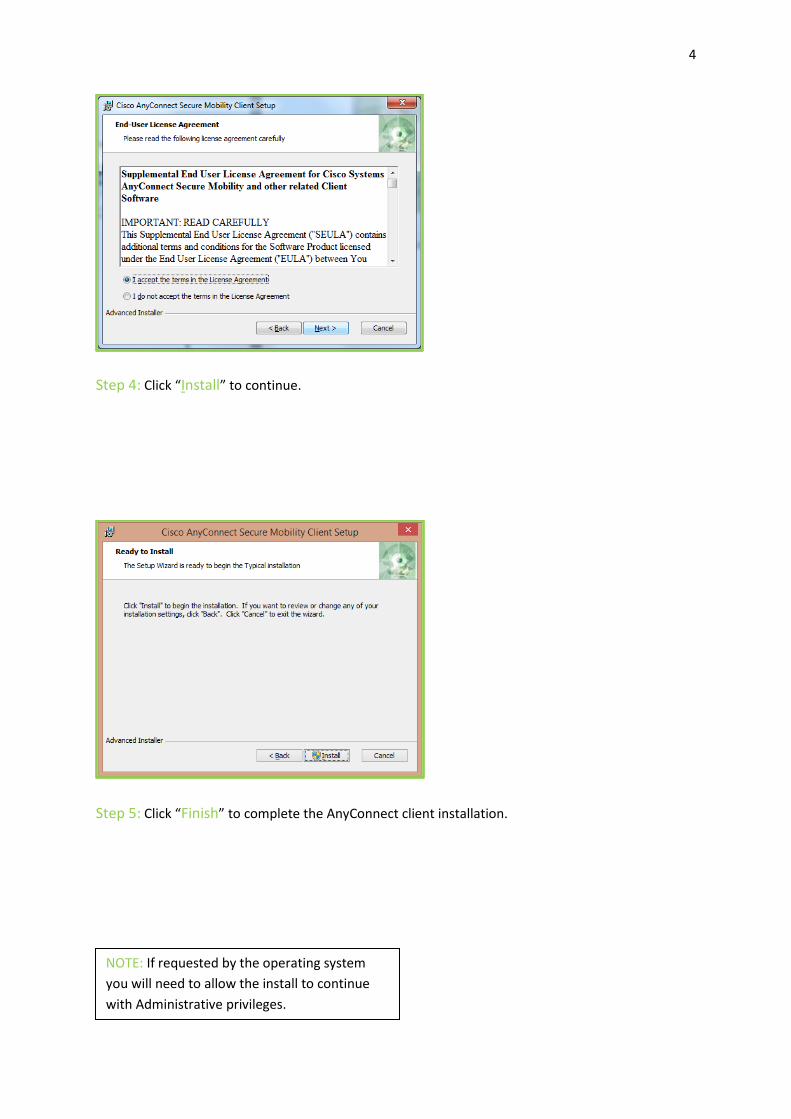
4
Step 4: Click “Install” to continue.
Step 5: Click “Finish” to complete the AnyConnect client installation.
NOTE: If requested by the operating system
you will need to allow the install to continue
with Administrative privileges.

5
Duo Enrolment
i. Open the Duo Enrolment email received in your mailbox. Another way is you can open Internet browser and type https://duo.nvidia.com.
ii. Click on the Enrolment link. And use the steps for setting up Duo (Go to step vi). iii. Input username and password (Windows/Domain Password). Click "LOGIN"

6
iv. Click Start setup.
v. Select your device type; then, click Continue.
vi. Follow the instruction set below corresponding to the option you chose: mobile phone or
tablet, landline. vii. Once you have followed one of the below instruction sets, continue down to Connecting to
VPN using Duo with Cisco AnyConnect.
Mobile phone or Tablet
1. (Mobile phone option only) Select your country from the dropdown list and type in your phone number. Be sure to use the number of the mobile phone that you’ll have with you when logging into a Duo-protected application.

7
2. (Mobile phone option only) Confirm that you entered your number correctly by checking the box; then, click Continue.
3. Choose your mobile device’s operating system and click Continue.
4. Install the Duo Mobile app on your device following the directions provided by the Duo
webpage.
5. Once installed, open the application on your mobile device. 6. After accepting the License Agreement, return to your web browser and click I have Duo
Mobile installed. 7. Within the Duo Mobile app, click Add Account.

8
8. Activate Duo Mobile by scanning the barcode on the web browser using the app’s built-in barcode scanner via your smartphone’s camera. When you successfully scan the barcode, a green checkmark will appear.

9
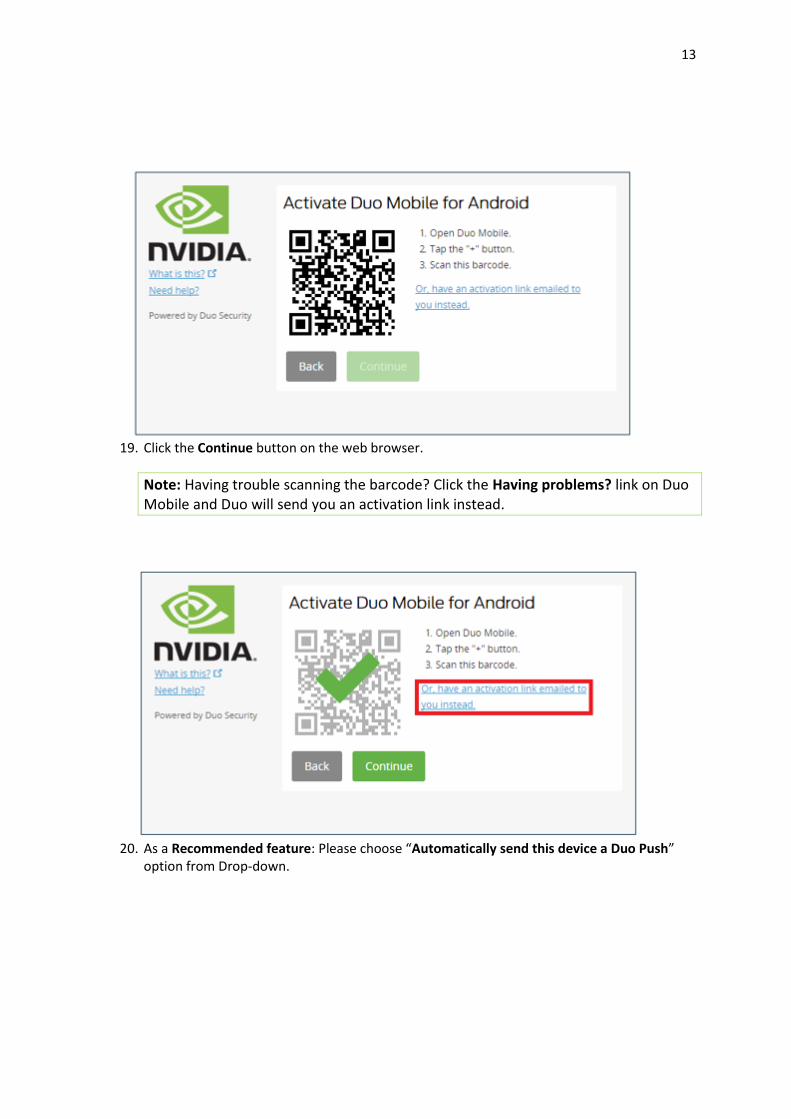
9. Click the Continue button on the web browser.
Note: Having trouble scanning the barcode? Click on “Or, have an activation link emailed to you instead. ”and Duo will send you an activation link on email.
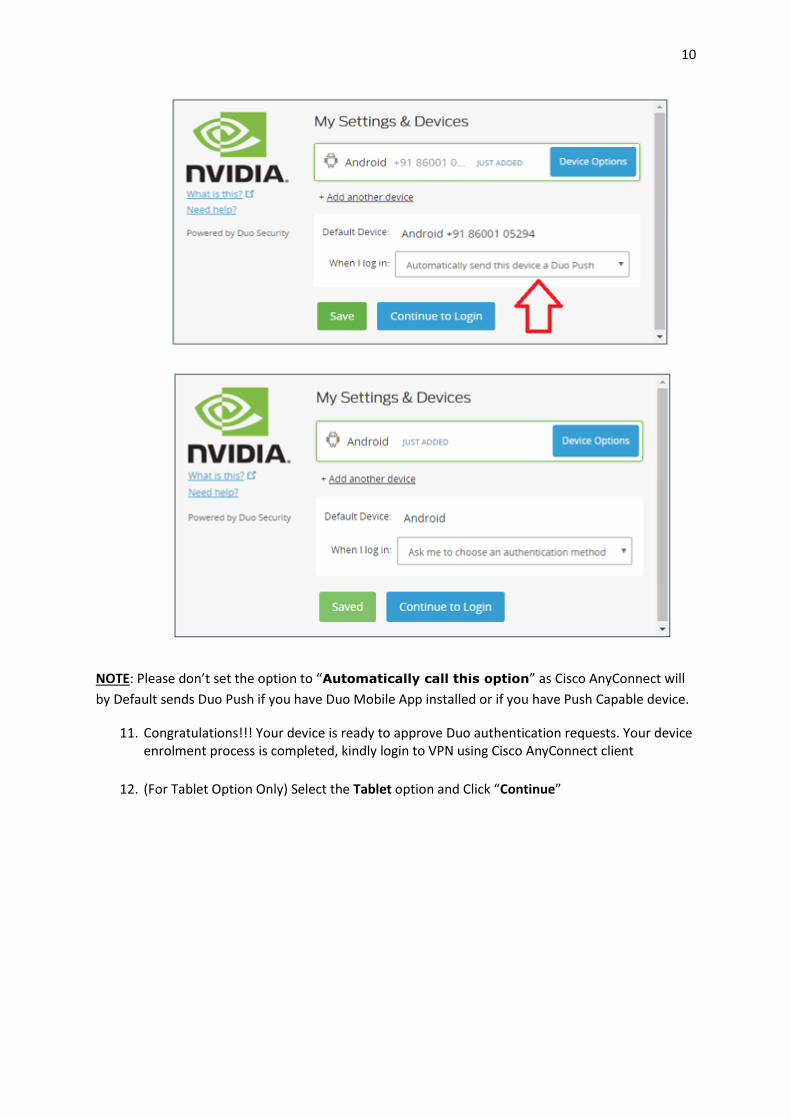
10. As an Recommended feature: Please choose “Automatically send this device a Duo Push” option from Drop-down.
10
NOTE: Please don’t set the option to “Automatically call this option” as Cisco AnyConnect will
by Default sends Duo Push if you have Duo Mobile App installed or if you have Push Capable device.
11. Congratulations!!! Your device is ready to approve Duo authentication requests. Your device enrolment process is completed, kindly login to VPN using Cisco AnyConnect client
12. (For Tablet Option Only) Select the Tablet option and Click “Continue”

11
13. Select the Operating System on Tablet.
14. Install the Duo Mobile app on your device following the directions provided by the Duo
webpage.
15. Once installed, open the application on your mobile device. 16. After accepting the License Agreement, return to your web browser and click I have Duo
Mobile installed. 17. Within the Duo Mobile app, click Add Account.

12
18. Activate Duo Mobile by scanning the barcode on the web browser using the app’s built-in barcode scanner via your smartphone’s camera. When you successfully scan the barcode, a green checkmark will appear.
13
19. Click the Continue button on the web browser.
Note: Having trouble scanning the barcode? Click the Having problems? link on Duo Mobile and Duo will send you an activation link instead.
20. As a Recommended feature: Please choose “Automatically send this device a Duo Push” option from Drop-down.
14
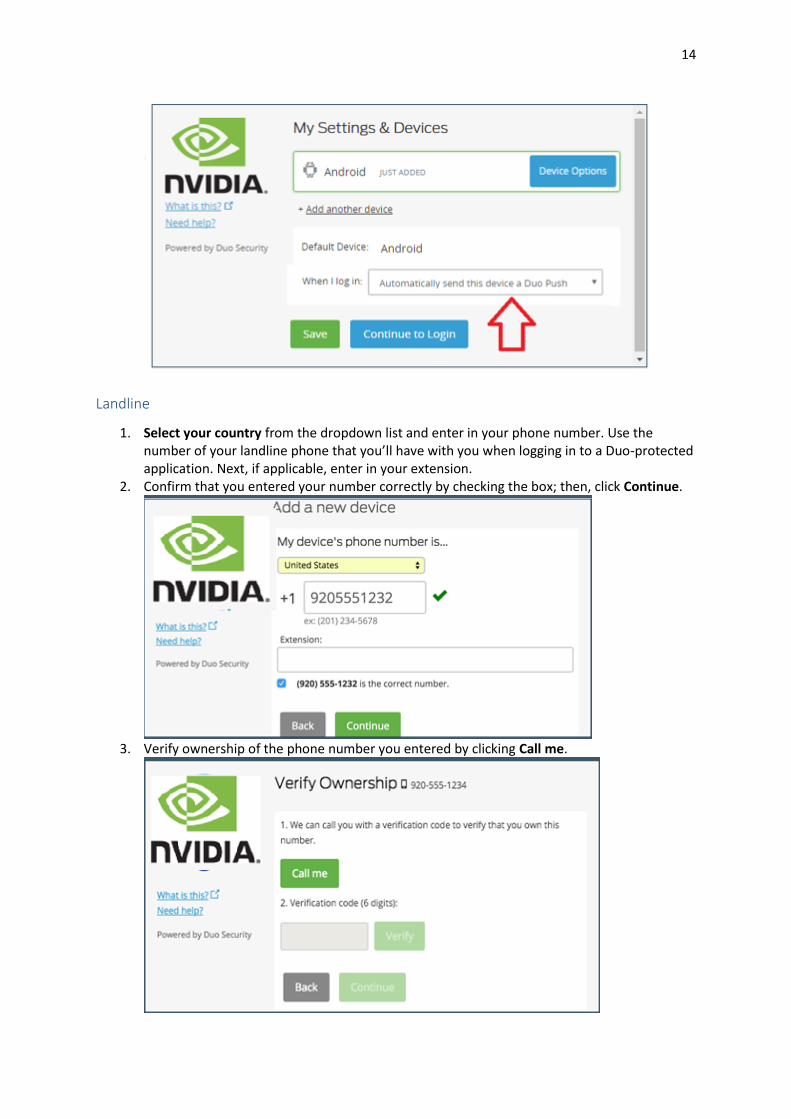
Landline
1. Select your country from the dropdown list and enter in your phone number. Use the number of your landline phone that you’ll have with you when logging in to a Duo-protected application. Next, if applicable, enter in your extension.
2. Confirm that you entered your number correctly by checking the box; then, click Continue.
3. Verify ownership of the phone number you entered by clicking Call me.

15
4. Duo will call you and provide a 6-digit verification code. Enter in the verification code and click Verify.
5. After verifying your phone number, click Continue.
6. Recommended Feature - If this is the device you'll use most often with Duo then you have to
choose option “When I Log in: Automatically call this device” from Drop-down.
With this option set, Duo automatically calls your phone to authenticate once you log in
to a protected application, saving you time during the authentication process.
7. Congratulations!!! Your landline phone is ready to approve Duo authentication requests
Note: Yubikey and DigiPass token Enrolment will be only done by IT Admins.
Connecting to NVIDIA’s Corporate Gateways
Note: A full list of corporate gateways is available here: http://ngvpn.nvidia.com
It is recommended that you connect to the gateway nearest to you or to the
regional Data Center.
Step 1: Launching the client:
a) Go to System Tray > locate the Cisco Tray Icon > Click Cisco AnyConnect Secure Mobility
Client and launch the client application “Cisco AnyConnect Secure Mobility Client”.
Or
b) Go to Start > All Programs > Cisco > Cisco AnyConnect Secure Mobility Client and launch
the client application “Cisco AnyConnect Secure Mobility Client”.
a)

16
b)
Step 2: Type the address of the server, in this example “ngvpn01.nvidia.com” Santa Clara gateway.
Click “Connect” to continue.
Note: China Employees please ONLY connect using below gateways
Hong Kong (CN) - ngvpn30.nvidia.com, Beijing (CN) - ngvpn31.nvidia.com, Shanghai(CN) -
ngvpn32.nvidia.com, Shenzhen(CN) - ngvpn33.nvidia.com
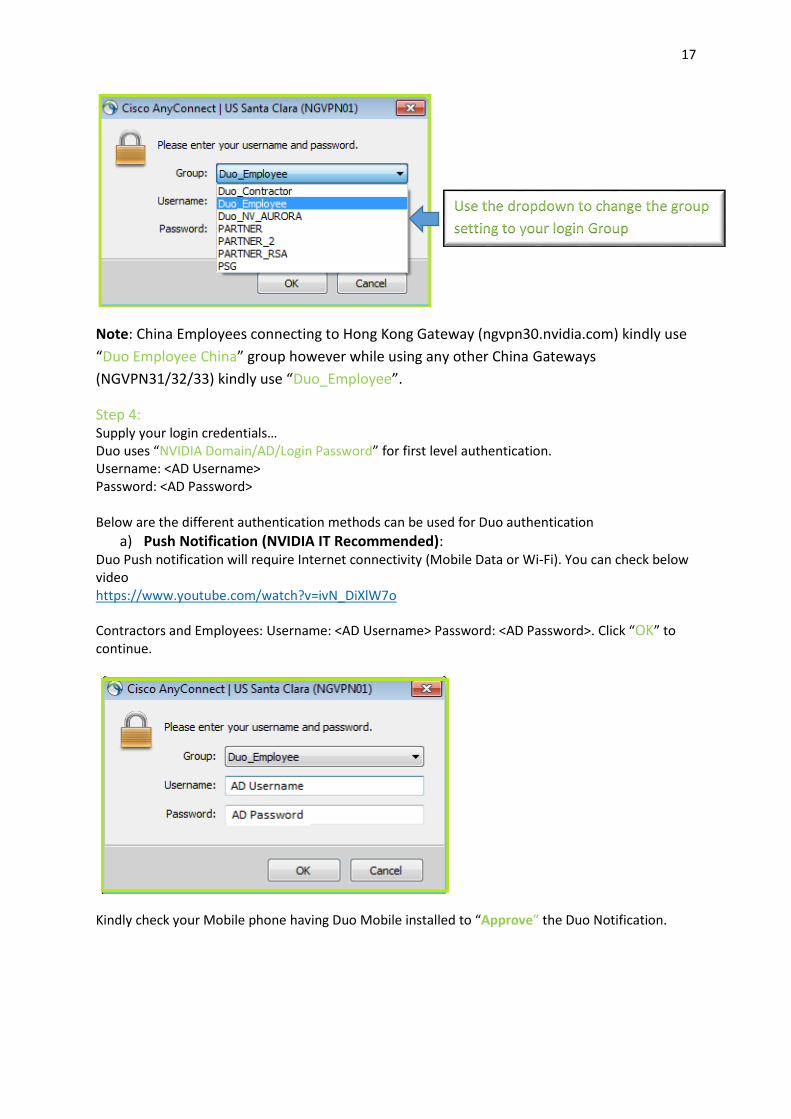
Step 3: Extend the “Group” selection by selecting the down arrow. Select the appropriate Group for
your login.
For Employee “Duo_Employee” and Contractors “Duo_Contractor”
Click to launch:
“Cisco AnyConnect Secure Mobility Client”
Click to launch:
“Cisco AnyConnect Secure Mobility Client”
17
Note: China Employees connecting to Hong Kong Gateway (ngvpn30.nvidia.com) kindly use
“Duo Employee China” group however while using any other China Gateways
(NGVPN31/32/33) kindly use “Duo_Employee”.
Step 4: Supply your login credentials… Duo uses “NVIDIA Domain/AD/Login Password” for first level authentication. Username: <AD Username> Password: <AD Password> Below are the different authentication methods can be used for Duo authentication
a) Push Notification (NVIDIA IT Recommended): Duo Push notification will require Internet connectivity (Mobile Data or Wi-Fi). You can check below video https://www.youtube.com/watch?v=ivN_DiXlW7o
Contractors and Employees: Username: <AD Username> Password: <AD Password>. Click “OK” to continue.
Kindly check your Mobile phone having Duo Mobile installed to “Approve” the Duo Notification.
Use the dropdown to change the group
setting to your login Group

18
You should be connected to the VPN.
Note: Users in China with Android device will require to use Pull to refresh to get Duo notification in
Duo Mobile App (Reference Link: https://duo.com/docs/whats_new_in_duo_mobile#pull-to-refresh
). If you haven’t sent Default Authentication Method
Please use "Password,Push" (no space after comma) for login to VPN.
Click “OK” to continue. You should be connected to the VPN.

19
b) Passcode:
You can generate a passcode from Duo Mobile app (no internet connectivity required) for login to
the VPN. Open your Duo mobile app and click on the KEY symbol to generate the passcode.
Note: Please use "Password,Passcode" for login to VPN. If your Windows/AD password is ABCD1234
then you should use "ABCD1234,632814" (no space between comma and passcode) in Cisco VPN.
Click “OK” to continue. You should be connected to the VPN.
c) Phone Call:
You will phone call on your registered mobile device phone number or landline number. You will
receive the call and press any key on the authenticate (kindly listen to IVR).
“Use AD Password,Phone” (no space between comma and Phone)

20
Note: Please don’t type actual phone number in place of Phone.
Click “OK” to continue. You should be connected to the VPN.
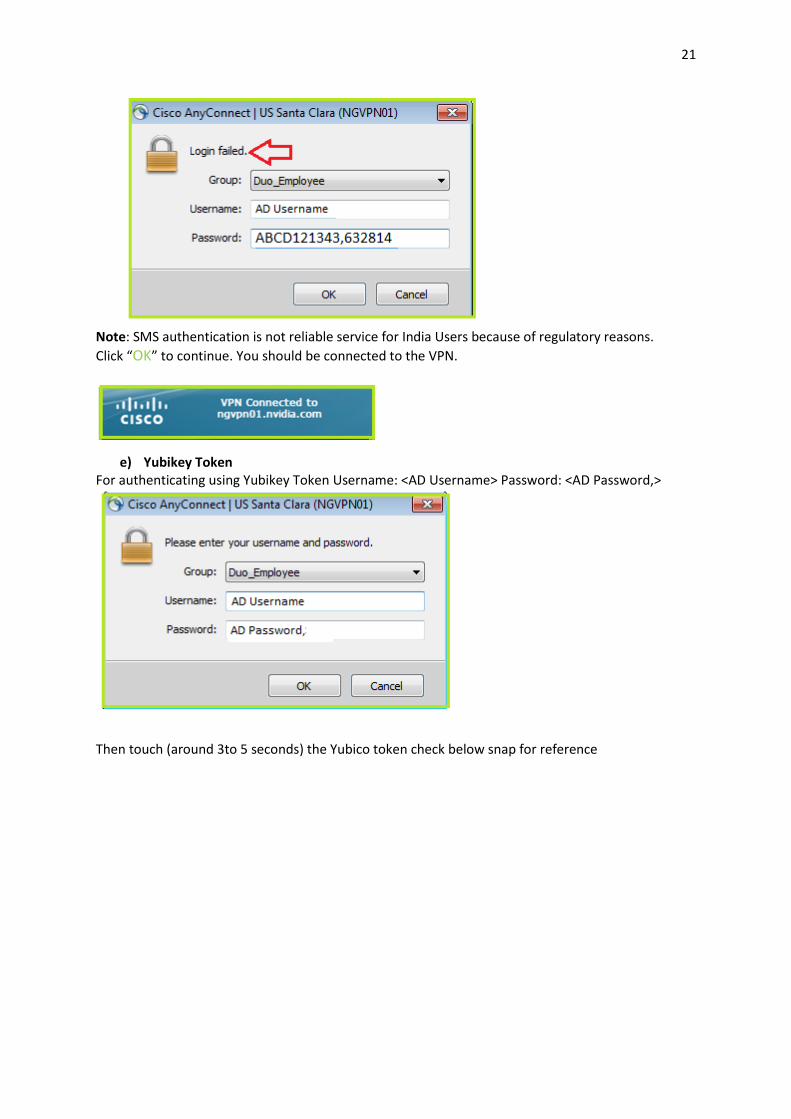
d) SMS: Duo will send you set of multiple passcodes over SMS and you can anyone of the code for login to VPN.
You will receive set of passcodes on your registered phone number and you can any of the code for authentication. Cisco AnyConnect will show you login failed message. Enter the passcode received on the SMS along with AD Password. “AD Password,SMS Passcode” (no space between comma and passcode) Check below snap as example where “ABCD121343” is AD Password (Windows Password) and “632814” is the passcode received on SMS.
21
Note: SMS authentication is not reliable service for India Users because of regulatory reasons.
Click “OK” to continue. You should be connected to the VPN.
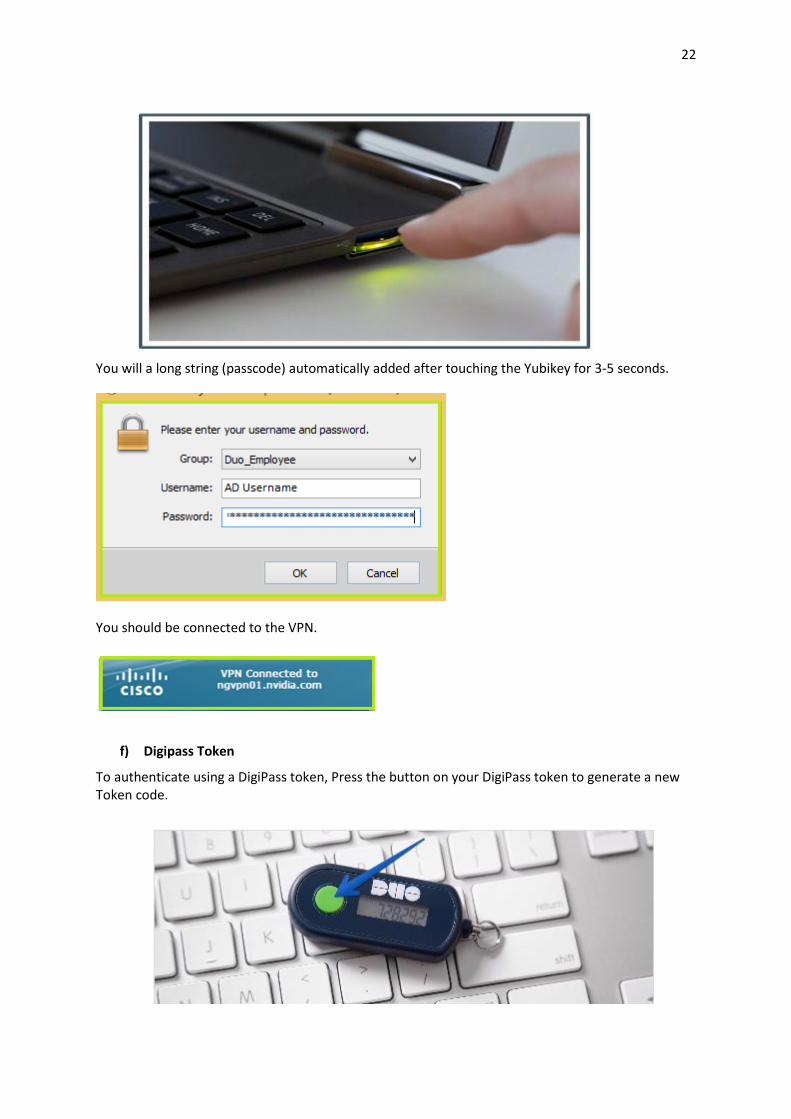
e) Yubikey Token For authenticating using Yubikey Token Username: <AD Username> Password: <AD Password,>
Then touch (around 3to 5 seconds) the Yubico token check below snap for reference
22
You will a long string (passcode) automatically added after touching the Yubikey for 3-5 seconds.
You should be connected to the VPN.
f) Digipass Token
To authenticate using a DigiPass token, Press the button on your DigiPass token to generate a new Token code.

23
Enter Password, and type the displayed Token code (“Password,Passcode” no space after comma).
Click “OK” to continue. You should be connected to the VPN.
PSG users: Username: <AD username> Password: <AD Password> supplied by NVIDIA. Click “OK” to continue.
Step 5: On first logon the gateway will push the profile setting and install the posture module on the
local system. This is a “one-time” installation and will not be repeated on subsequent logins.
Congratulations! You have successfully connected to NGVPN.
Reconnecting to the Gateway
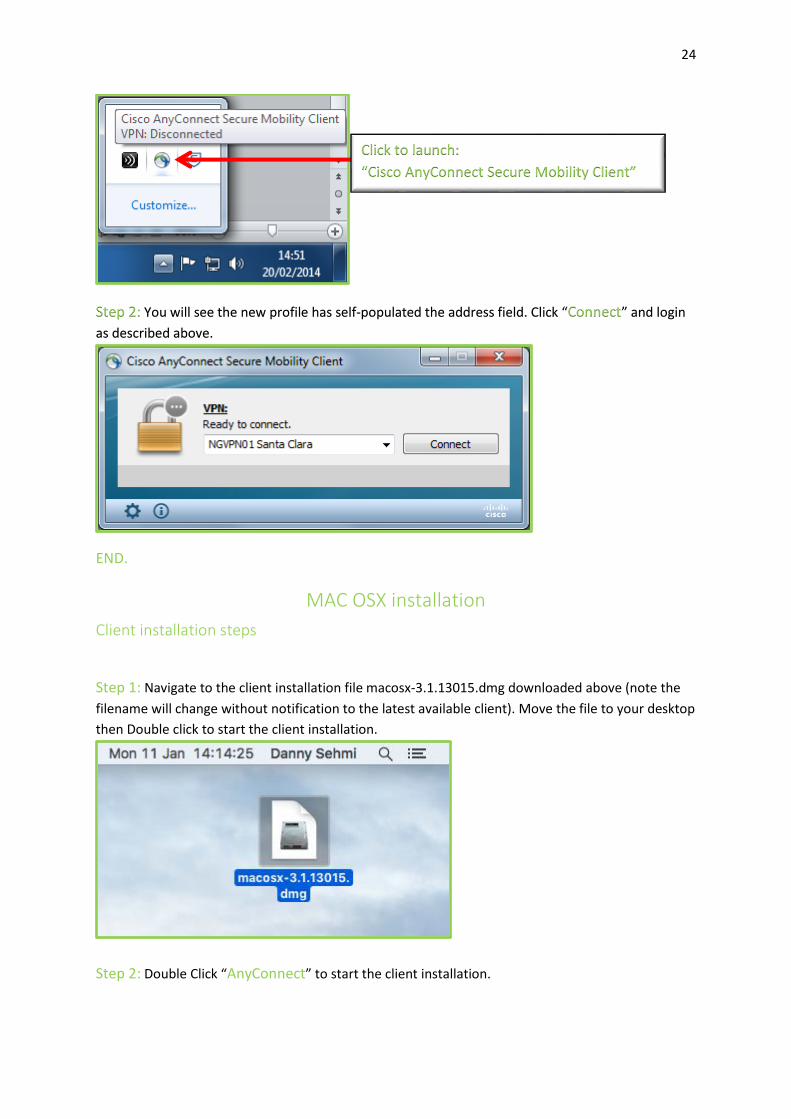
Step 1: The AnyConnect application is in the windows system tray. Click to launch.
24
Step 2: You will see the new profile has self-populated the address field. Click “Connect” and login
as described above.
END.
MAC OSX installation
Client installation steps
Step 1: Navigate to the client installation file macosx-3.1.13015.dmg downloaded above (note the
filename will change without notification to the latest available client). Move the file to your desktop
then Double click to start the client installation.
Step 2: Double Click “AnyConnect” to start the client installation.
Click to launch:
“Cisco AnyConnect Secure Mobility Client”
25
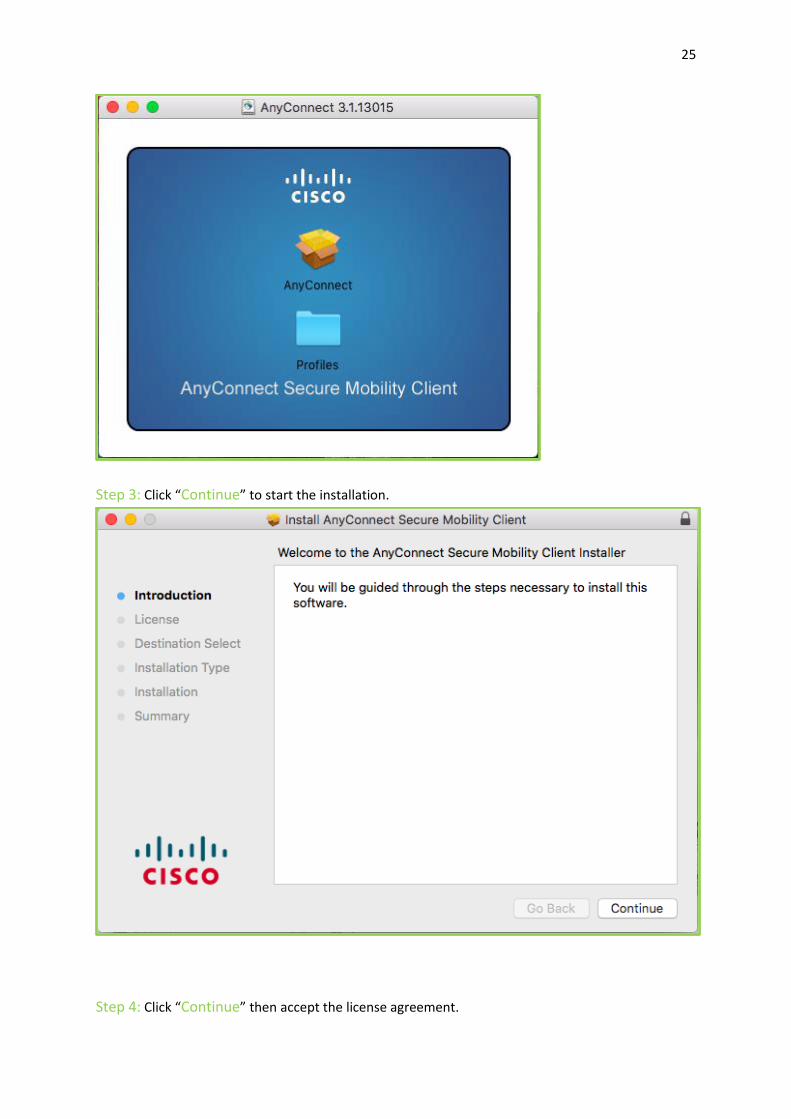
Step 3: Click “Continue” to start the installation.
Step 4: Click “Continue” then accept the license agreement.

26
Step 5: Click “Agree” to continue.
Step 6: Uncheck all other options. Only the VPN client is to be installed, then click “Continue”.
Step 7: Click “Install” to continue.

27
Step 8: If prompted you will need to enter your local username and password to allow the install to
proceed. Enter the credentials then click “Install Software”.
Step 9: Click “Close” to complete the installation.
28
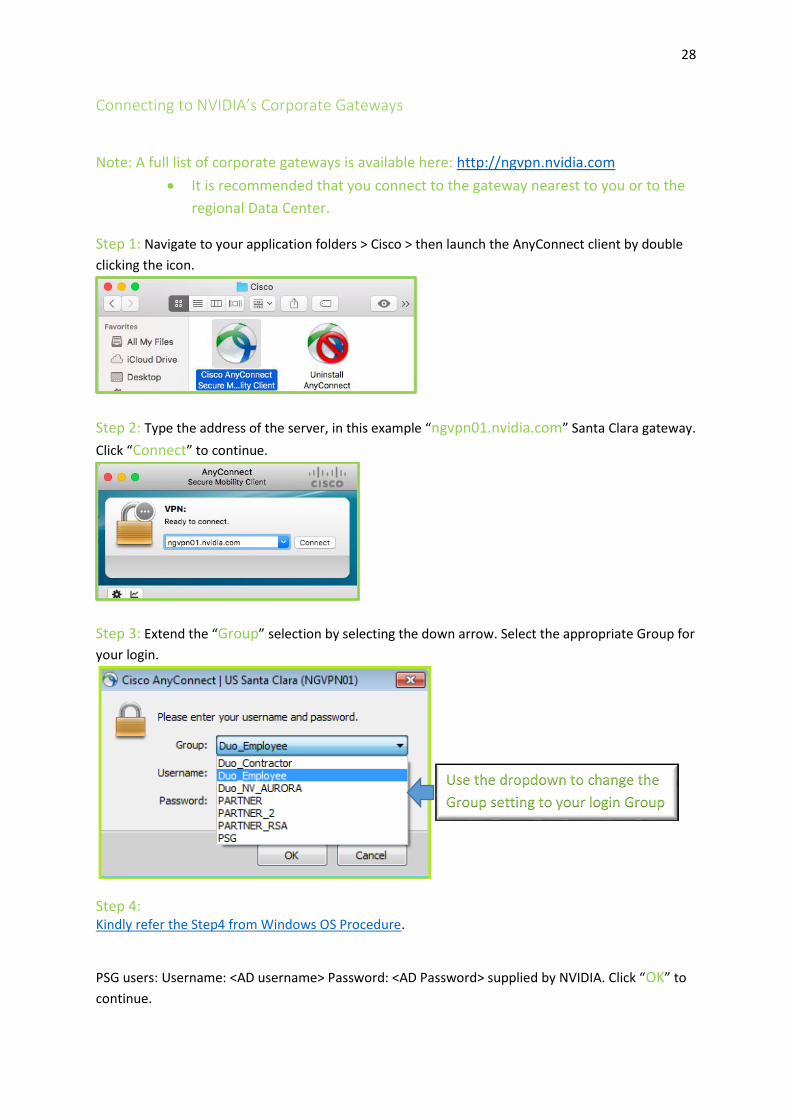
Connecting to NVIDIA’s Corporate Gateways
Note: A full list of corporate gateways is available here: http://ngvpn.nvidia.com
It is recommended that you connect to the gateway nearest to you or to the
regional Data Center.
Step 1: Navigate to your application folders > Cisco > then launch the AnyConnect client by double
clicking the icon.
Step 2: Type the address of the server, in this example “ngvpn01.nvidia.com” Santa Clara gateway.
Click “Connect” to continue.
Step 3: Extend the “Group” selection by selecting the down arrow. Select the appropriate Group for
your login.
Step 4: Kindly refer the Step4 from Windows OS Procedure.
PSG users: Username: <AD username> Password: <AD Password> supplied by NVIDIA. Click “OK” to
continue.
Use the dropdown to change the
Group setting to your login Group
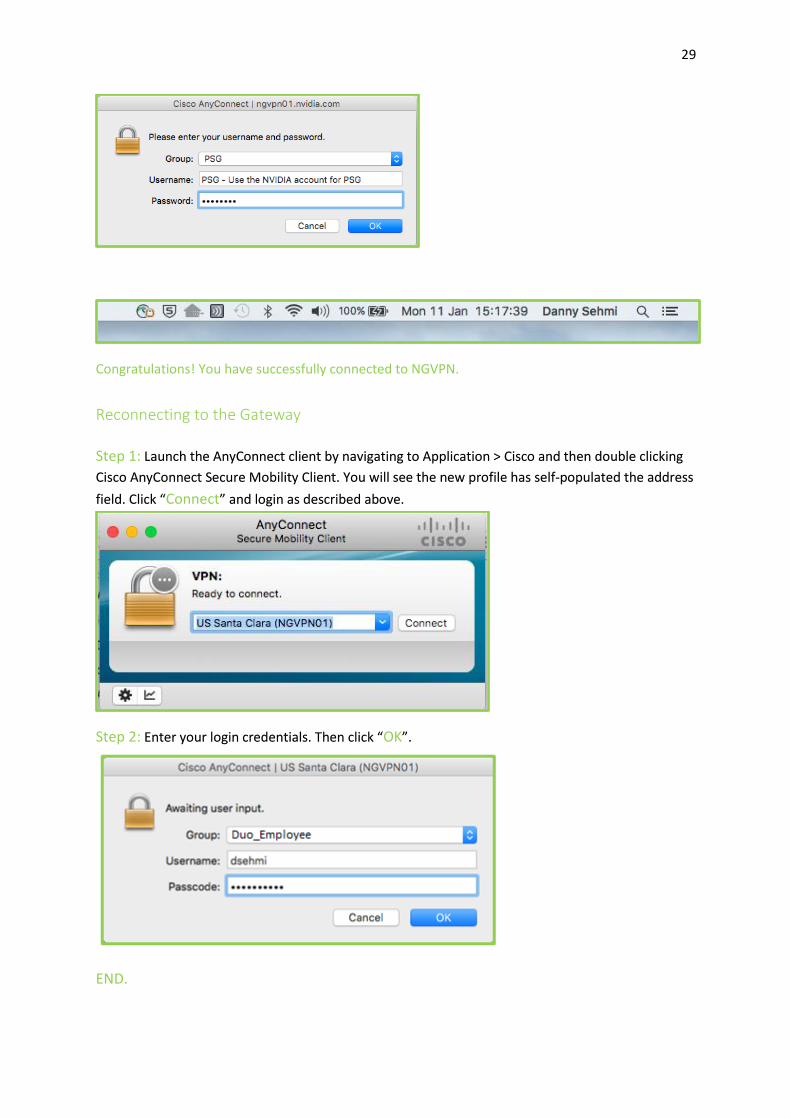
29
Congratulations! You have successfully connected to NGVPN.
Reconnecting to the Gateway
Step 1: Launch the AnyConnect client by navigating to Application > Cisco and then double clicking
Cisco AnyConnect Secure Mobility Client. You will see the new profile has self-populated the address
field. Click “Connect” and login as described above.
Step 2: Enter your login credentials. Then click “OK”.
END.

30
Linux installation
Client installation steps
Step 1: Navigate to the client installation file linux-64-3.1.13015.gz downloaded above (note the
filename will change without notification to the latest available client).
Step 2: Unpack the gunzip file by opening a terminal window. Change directory to the location of the file and then unpack the gunzip file as shown below. You will now see a tar file.
Step 3: Unpack the tar file by typing the commands in a terminal window as shown below. You will
see a new folder appear anyconnect-3.1.13015 in this case.
31
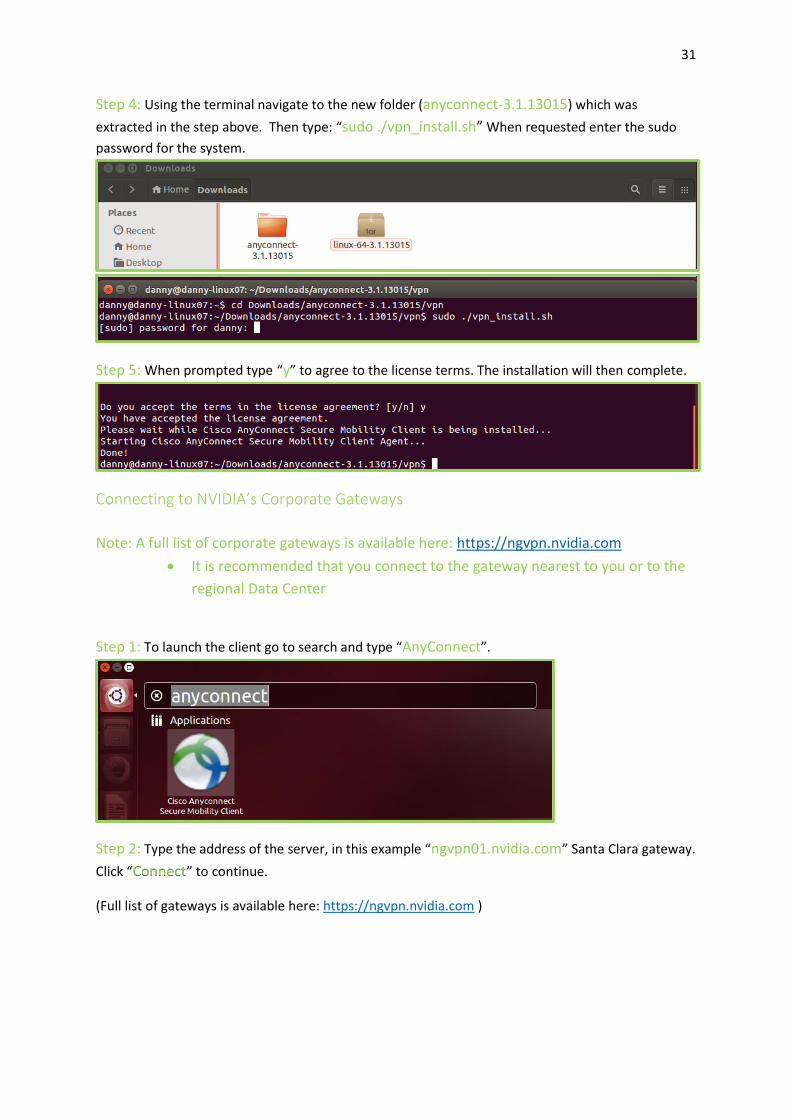
Step 4: Using the terminal navigate to the new folder (anyconnect-3.1.13015) which was
extracted in the step above. Then type: “sudo ./vpn_install.sh” When requested enter the sudo
password for the system.
Step 5: When prompted type “y” to agree to the license terms. The installation will then complete.
Connecting to NVIDIA’s Corporate Gateways
Note: A full list of corporate gateways is available here: https://ngvpn.nvidia.com
It is recommended that you connect to the gateway nearest to you or to the
regional Data Center
Step 1: To launch the client go to search and type “AnyConnect”.
Step 2: Type the address of the server, in this example “ngvpn01.nvidia.com” Santa Clara gateway.
Click “Connect” to continue.
(Full list of gateways is available here: https://ngvpn.nvidia.com )

32
Step 3: Extend the “Group” selection by selecting the down arrow. Select the appropriate Group for
your login.
Step 4:
Kindly refer the Step4 from Windows OS Procedure or watch below video for Duo Push procedure: https://www.youtube.com/watch?v=4MfeDTC-2A4
Use the dropdown to change the
Group setting to your login Group

33
PSG users: Username: <AD username> Password: <AD Password> supplied by NVIDIA. Click
“Connect” to continue.
Congratulations! You have successfully connected to NGVPN.
Reconnecting to the Gateway
Step 1: To launch the client go to search and type “AnyConnect”.
Step 2: You will see the new profile has self-populated the address field. Click “Connect” and login
as described above.
PSG – Use the NVIDIA account for PSG
PSG – Password from NVIDIA account

34
END.
Duo Device Management Portal For new device enrolment and managing enrolled devices users can login to Device Management
Portal using URL https://duo.nvidia.com
If you have already completed the Device Enrolment process you will be challenged for 2 Factor
authentications. Available options will be
Call Me: Choose Call Me method to get Phone call on registered mobile number. Pick-up a phone
and IVR will instruct to press any key for authentication. Once authenticated you can manage
enrolled devices or add new device.

35
Passcode: Choose Passcode authentication to use the passcode generated in Duo Mobile app or
passcode received over SMS for authentication. Check below image to check the passcode from Duo
Mobile App. For receiving passcode over SMS, Click “Text me new codes” and once you will receive
the batch of passcodes use anyone passcode to authenticate in Device management portal (old sms
passcodes will get expired once you receive new batch of sms passcodes).
Duo Push: Choose Duo Push authentication method to receive Push Notification on your mobile
device (China Android users kindly use Pull to Refresh or if you are unable to see Duo Push
notification please try the Pull option).

36
Note: If you want re-activate Duo Mobile app please use Call Me or Passcode (SMS passcode) for
authentication.
Once logged in to the Device Management portal you can view the authentication devices added.
For activating Duo Mobile App please click on the Device Options
Then click on “Reactivate Duo Mobile”
Note: You can also change the “Device name” or “Delete” the device by selecting appropriate
option.
Select the type of mobile device and click “Continue”

37
Install Duo Mobile on your phone and click on “I have Duo Mobile installed”.
Activate Duo Mobile by scanning the barcode on the web browser using the app’s built-in barcode
scanner via your smartphone’s camera. When you successfully scan the barcode, a green checkmark
will appear.
Note: Having trouble scanning the barcode? Click on link “Or, have an activation link emailed to you instead.”, Duo will send you an activation link on email.

38
For adding additional device for Duo authentication
You can also change the “Default Device” or “Log In” option, check snaps below
Note: Cisco AnyConnect will send Duo Push if you have added any Push Capable device
(Phone/Tablet) or device having Duo Mobile App configured to receive Duo Push. In case if you
added device without installing Duo Mobile App (Landline/Cell Phone) then you will get Phone Call
automatically. For getting phone call while login to VPN enter "Password,Phone"(no space after
39
comma). If the option set to “Ask me to choose an authentication method” you will need to enter
“Password,Push” (no space after comma) everytime while signing in to Cisco AnyConnect.
FAQ’s
What is Duo?
Duo Security is a two-step verification service that provides additional security for access to
institutional data, servers, applications, and personal data. Duo combines modern two-factor
authentication with advanced endpoint security solutions to protect users from account takeovers
and data breaches during VPN connections.
Why two-factor authentication?
Two-factor authentication strengthens your login security by requiring two methods, or factors, to
verify your identity. By adding a second layer of security, your account is secure even if your
password is compromised. With Duo, you’ll be alerted right away (on your phone) if someone is
trying to Connect to VPN as you.
This second factor of authentication is separate and independent from your username and password
– Duo never sees your password.
The factors may include:
Push Notifications – a mobile push notification and one-button verification of identity to a smartphone (requires the free Duo Mobile app)
Mobile Passcodes – a one-time code generated on a smartphone
Phone Callbacks – a telephone call which will prompt you to validate the login request
SMS Passcodes – a one-time code generated by Duo and sent to a handset via SMS text messaging
Hardware Tokens (DigiPass, Yubikey)
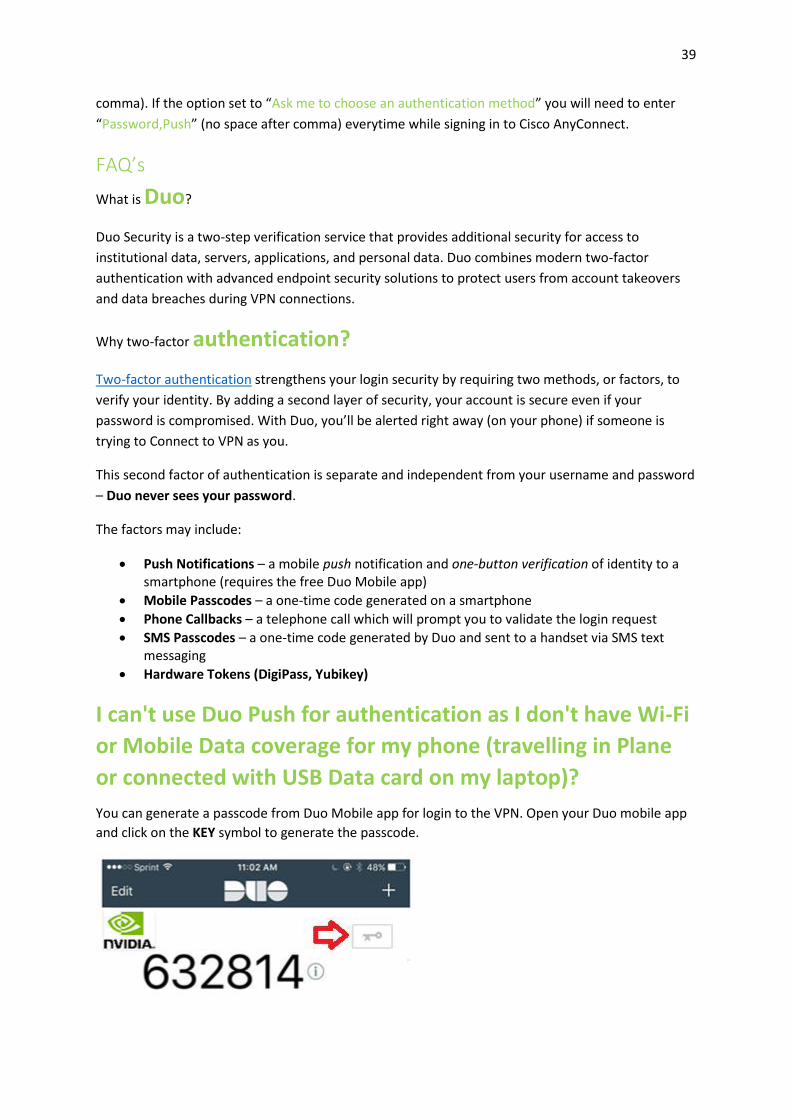
I can't use Duo Push for authentication as I don't have Wi-Fi
or Mobile Data coverage for my phone (travelling in Plane
or connected with USB Data card on my laptop)?
You can generate a passcode from Duo Mobile app for login to the VPN. Open your Duo mobile app
and click on the KEY symbol to generate the passcode.

40
Note: Please use "Password,Passcode" for login to VPN. If my domain/windows password is
ABCD1234 then I must use "ABCD1234,632814" (no space between comma and passcode) in Cisco
VPN.
Duo provides software application for installing on
Laptop/PC?
No. Duo is available ONLY for Mobile devices. Below are operating OS platforms:
Android
iOS
Windows
Blackberry
What if I don’t get SMS for Authentication?
You can still use Call option for authentication.
Can I enrol multiple devices in Duo for authentication?
Yes, you can enrol multiple devices in Duo from Device Management Portal http://nv/duo/ (Portal
Help). Please contact service desk for further assistance.
Can I add Yubikey on Self-Service Portal?
Yubikey needs to be added as Hardware token from Duo Admin Console. Hence, only IT admins can
assign Yubikey tokens.
I am not getting passcode via SMS
SMS is not reliable service for Duo Authentication for (India users) because of regulations. Kindly use
Call or any other authentication method (Passcode/Duo Push) for authentication.
Are Microsoft tablets supported as authentication devices?

41
Using the Duo Mobile app on devices running Windows Phone is supported. Microsoft tablets that
run a desktop operating system are not a supported second factor of authentication, just as
Windows desktop workstations are not a supported authentication method.
Why do I have to press Confirm on the Android Duo Push
dropdown notification?
Because the Approve and Deny buttons are immediately visible in the dropdown notification, we
require you to press Confirm after choosing to approve. This is to prevent the accidental approval of
a login request.
iOS devices don't require confirmation because you must first pull down on the notification to see
the Approve button.
Is there a Duo Mobile app for Android smartwatches?
No, there is not a standalone Duo Mobile app for Android smartwatches, but you can approve
authentication requests on your watch via the notification. After approving the authentication
request, you will be asked to confirm.
I don’t have a mobile device OR I do not want to use my
mobile Device for Duo Authentication? What are my
options?
IT Recommended authentication method will be Duo Push; however, if you don’t want to use your
Mobile device (only users without NVIDIA Corporate Mobile device or not opted for Mobile Device
Stipend are eligible) OR you do not have a mobile device to use, your alternate options are either a
Tablet/Landline phone call or to request a Hardware token (Yubikey or Digipass).
Will Duo Mobile accounts be saved on my device if I delete
the app?
Whether Duo Mobile accounts are retained or not depends on the device's operating system. On
iOS, all accounts are retained in the device's secure keychain when you delete the app. This means
both Duo-protected and third-party accounts will be available if you reinstall Duo Mobile. Accounts
are only deleted when done so explicitly in the app. On Android and Windows Phone, all accounts
are deleted when you delete the app.
Does Duo work in China?
While Duo Push and other features do work in China (on Apple Devices), the Google Play Store is not
available on Android Devices, and SMS messages containing links are blocked. Users can get Duo
App APK file from IT (Path: \\mis1\apps\vpn\Duo).
Users in China with Android device will require to use Pull to refresh to get Duo notification in Duo
Mobile App (Reference Link: https://duo.com/docs/whats_new_in_duo_mobile#pull-to-refresh )

42
I am getting account locked out message while login using Duo?
Your account will get locked out if your authentication fails 30 times. Your account status will revert
to active automatically after 30 minutes.
My NVIDIA Domain Password is expired?
Kindly call Servicedesk to reset your Domain Password.
How can get Duo Push or Phone call on my second device?
Please use below format in password option in Cisco AnyConnect for getting Duo Push on second
device.
"Password,Push2" (no space between comma and Push2)
Please use below format in Cisco AnyConnect for getting Phone Call on second device
"Password,Phone2" (no space between comma and Phone2)
Note: For getting sms on your secondary device you can use "Password,sms2" (no space
between comma and sms2)

43
I have set option to "Automatically call this option" however still getting Duo push instead of phone call while login to VPN using Cisco AnyConnect?
Cisco AnyConnect will send Duo Push if you have added any Push Capable device (Phone/Tablet) or
device having Duo Mobile App configured to receive Duo Push. In case if you added device without
installing Duo Mobile App (Landline/Cell Phone) then you will get Phone Call automatically. For
getting phone call while login to VPN enter "Password,Phone"(no space after comma)
I have formatted my mobile how can I activate/register Duo Mobile App again?
Please login to Duo Device management portal URL: https://duo.nvidia.com and authenticate using
your NVIDIA Username and Password.

44
Once logged in please click on “Call Me” option and you receive a call on your registered mobile
number. Kindly pick up the call and follow the IVR instructions (press any key to authenticate).
Click on “Device Options” and then click “Reactivate Duo Mobile”

45
Select the type of mobile device and click “Continue”
Install Duo Mobile on your phone and click on “I have Duo Mobile installed”.
Activate Duo Mobile by scanning the barcode on the web browser using the app’s built-in
barcode scanner via your smartphone’s camera. When you successfully scan the barcode, a
green checkmark will appear.
Note: Having trouble scanning the barcode? Click on link “Or, have an activation link
emailed to you instead.”, Duo will send you an activation link on email.

46
Once you receive the link just open the link using Duo App and the account will be added to Duo
Mobile app.
Duo References Enrolling your mobile device and Duo Mobile: https://www.youtube.com/watch?v=4jp7Ps5mc-U
Logging in to Cisco AnyConnect (Windows): https://www.youtube.com/watch?v=ivN_DiXlW7o
Logging in to Cisco AnyConnect (Ubuntu): https://www.youtube.com/watch?v=4MfeDTC-2A4
Duo Device Management Portal (External-Accessible from Internet): https://duo.nvidia.com
Duo Device Management Portal (Internal-Accessible from NVIDIA Network or VPN): http://nv/duo
Duo ITHELP Knowledge Base: https://nvidiaprod.service-now.com/navpage.do
If you have any questions regarding this guide, please submit a help request here: http://ITHELP.NVIDIA.COM