Embed Size (px)
Citation preview

Antipodes EX Music Server Quick Guidev18.02
antipodes audio limited - antipodesaudio.com - [email protected]

ii | AntipodesEXMusicServer
EX Rear Panel
EX SOLUTION
User-Installable With EX

QUICKGUIDE | 1
1 Installation & Turning On/Off
INSTALLATION
CONNECTIONS
Make the following connections to the EX back panel:
1. Mains power using an IEC cord. Check that the voltage displayed on the rear of the EX matches the AC voltage from the wall socket.
2. Wired Ethernet connection to your network for communications. You can also play to networked players on your network via this connection.
3. A signal cable from your EX to your DAC or amplifier. This can be:
• A second wired Ethernet connection direct to the Ethernet input on a DAC - for superior sound than when playing over your network.
• A pair of stereo analog cables with RCA connectors to your amplifier.
• For the best sound quality connect a high quality USB cable from the EX black USB ports to the USB input on your DAC.
ADDING STORAGE
You can insert any 2.5”, 7mm Sata Drive in the disk ports at the rear of the EX. You can use spinning hard drives, but audio quality is dramatically improved if you use SSDs.
Then email our team at [email protected] so that they can login to your EX over the internet to setup and optimise your storage. This only takes about 5 minutes to complete.
CABLES
Audiophile cables - power, Ethernet, USB - will generally improve sound quality.
NETWORK
Just because you successfully browse the internet, does not mean your network is of suitable quality to
run a demanding client-server application. A small investment in your network equipment and cabling may pay large dividends in the user experience.
Antipodes music servers are controlled over your network from computers, tablets or smartphones so must be connected to your network. Ripping CDs requires a connection to the internet to gather metadata.
Wifi is not an option on Antipodes music servers because including it is detrimental to audio quality. But if you do not have or want a wired connection from your stereo to your router, you can use a wifi bridge. Contact our team at [email protected] for advice, or contact your dealer.
ADD AUTO-RIPPING
You can connect the high quality P1 to one of the blue USB ports on the rear of the EX and it becomes an auto-ripper without further setup. Just insert disks and they will rip automatically, and eject when finished.
Or you can still get good ripping results with any standard USB CD/DVD drive, available from computer stores.
TURN ON/OFF
• Turn on the power at the rear panel, and the front panel button will glow amber, indicating standby mode.
• Click the front panel button and it will flash till the EX is ready for use, when the front panel button will glow green.
• To power down, click the front panel and it will flash till it goes into standby mode - amber.
• If the EX does not power down, this may be due to a network or DAC issue, simply hold the front power button in until it glows amber.
• For best sound, leave your EX powered up, or in standby mode when not in use.

2 | AntipodesEXMusicServer
You never need to connect a mouse, keyboard or screen to the EX. To setup an EX, turn it on and wait for the front button glow green.
Open a browser (eg. IE, Chrome, Firefox Safari etc)on a computing device (eg. desktop, laptop, tablet or smartphone) and browse to this address:
myantipodes.com
Click on the ‘Manage’ button to open the Antipodes GUI for the music server.
The GUI is intuitive and you can just look around and try things. A key area to become familiar with early is the Settings menu.
If you cannot open the GUI, contact Antipodes Support for assistance by emailing [email protected].
Once you have opened the GUI, you can click on Help and then on the link to open the Server Guide for more detailed instructions. Once there you will also be able to view ‘how-to’ videos illustrating how to use the GUI.
2 Opening The Antipodes GUI
QUICKGUIDE | 3
With the Antipodes EX, you have the choice of:• Three complete playback solutions (incorporating
both server & renderer apps): • Roon - Roon Server & Roon Ready• Squeezebox - Squeezebox Server &
Squeezelite• MPD - A special case as it is just a renderer
app but it can play from the EX library.
• Two separate renderer solutions.• The HQPlayer NAA solution enables your
EX to be a renderer to play from HQPlayer. HQPlayer (the server app) needs to be running on computer elsewhere on your network.
• The MPD solution enables your EX to be a renderer to play from a DLNA/UPnP server on your network. The server app could be on an Antipodes or on another device.
• A range of server solutions, including DLNA/UPnP and Plex Media Server, plus your EX can be easily configured to be a music source for a SONOS system.
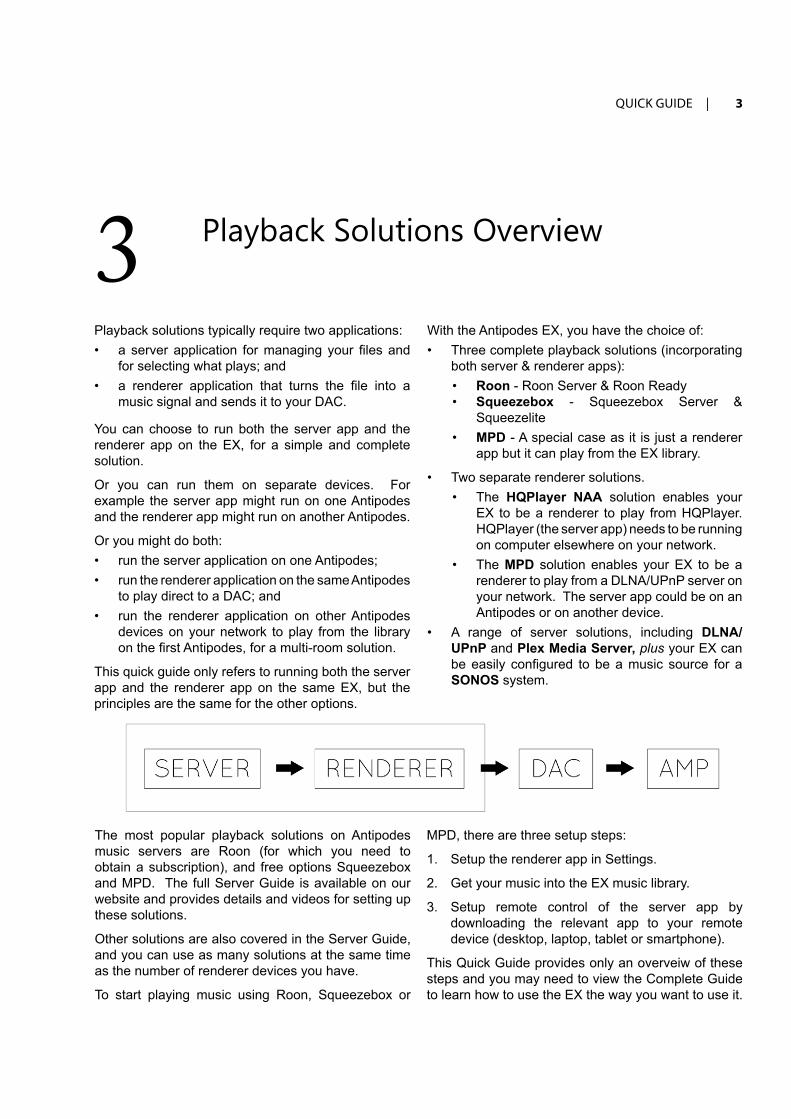
Playback solutions typically require two applications:• a server application for managing your files and
for selecting what plays; and • a renderer application that turns the file into a
music signal and sends it to your DAC.
You can choose to run both the server app and the renderer app on the EX, for a simple and complete solution.
Or you can run them on separate devices. For example the server app might run on one Antipodes and the renderer app might run on another Antipodes.
Or you might do both:• run the server application on one Antipodes; • run the renderer application on the same Antipodes
to play direct to a DAC; and • run the renderer application on other Antipodes
devices on your network to play from the library on the first Antipodes, for a multi-room solution.
This quick guide only refers to running both the server app and the renderer app on the same EX, but the principles are the same for the other options.
3 Playback Solutions Overview
The most popular playback solutions on Antipodes music servers are Roon (for which you need to obtain a subscription), and free options Squeezebox and MPD. The full Server Guide is available on our website and provides details and videos for setting up these solutions.
Other solutions are also covered in the Server Guide, and you can use as many solutions at the same time as the number of renderer devices you have.
To start playing music using Roon, Squeezebox or
MPD, there are three setup steps:
1. Setup the renderer app in Settings.
2. Get your music into the EX music library.
3. Setup remote control of the server app by downloading the relevant app to your remote device (desktop, laptop, tablet or smartphone).
This Quick Guide provides only an overveiw of these steps and you may need to view the Complete Guide to learn how to use the EX the way you want to use it.

4 | AntipodesEXMusicServer
4 Setup A Renderer
• You also need to set how to send DSD files to your DAC - as PCM files, DoP, Native DSD...
In the Roon Ready Settings screen you can also set how you wish to control volume. For example you might like to control volume digitally from your tablet. The setting selected below sets the digital volume to 100%, so that you control volume via your amp.
Make your selections and save them. You can setup more than one renderer app and switch between them using the Audio App Switcher found in the Apps menu.
At the Antipodes GUI, select the menu item ‘Settings’.
Only the apps that have setup options are shown on the ‘Settings’ screen. In the screen shot below, the renderer apps are Squeezelite, MPD and Roon Ready.
To setup one of these renderer apps, you begin by clicking on the relevant icon. The renderer app settings screens vary, but there are two main settings, and a button for saving your changes:
• For an EX, you need to set whether you are going to use the Analog Stereo or USB Audio outputs.
OVERVIEW
QUICKGUIDE | 5
There are four ways you can add music files to the shared library of the server apps on your EX.
The first three ways involve adding files to the internal storage of your Antipodes:
1. Rip CDs to the EX. Simply connect a P1 or USB CD drive, insert a CD and it will eject when ripping is finished.
2. Copy files to the EX. Open File Explorer (Windows), Finder (Mac) etc and the EX will show as ‘Antipodes’ under Network. Copy and Paste or drag and drop your files to the EX.
3. Download music files to the EX. Set the ‘save’ location in the download app to the EX.
The fourth way is:
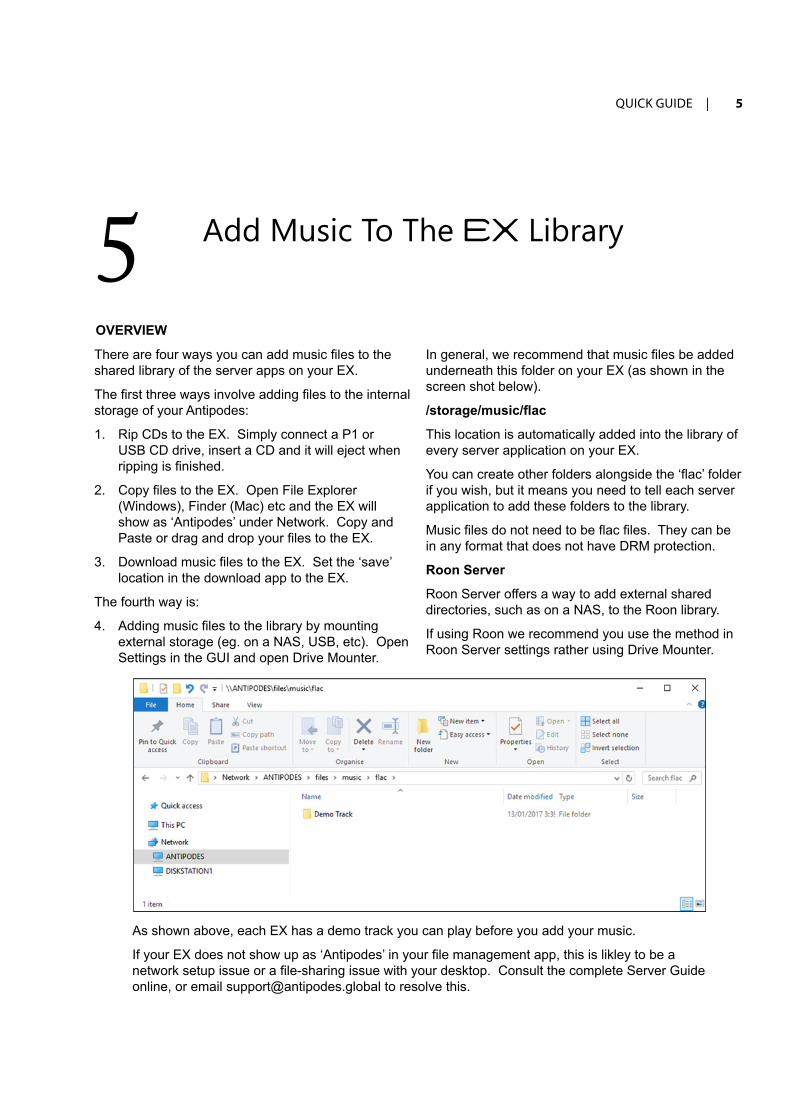
4. Adding music files to the library by mounting external storage (eg. on a NAS, USB, etc). Open Settings in the GUI and open Drive Mounter.
In general, we recommend that music files be added underneath this folder on your EX (as shown in the screen shot below).
/storage/music/flac
This location is automatically added into the library of every server application on your EX.
You can create other folders alongside the ‘flac’ folder if you wish, but it means you need to tell each server application to add these folders to the library.
Music files do not need to be flac files. They can be in any format that does not have DRM protection.
Roon Server
Roon Server offers a way to add external shared directories, such as on a NAS, to the Roon library.
If using Roon we recommend you use the method in Roon Server settings rather using Drive Mounter.
5 Add Music To The EX Library
OVERVIEW
As shown above, each EX has a demo track you can play before you add your music.
If your EX does not show up as ‘Antipodes’ in your file management app, this is likley to be a network setup issue or a file-sharing issue with your desktop. Consult the complete Server Guide online, or email [email protected] to resolve this.

6 | AntipodesEXMusicServer
To control what your EX plays, you need to setup remote control on a desktop, laptop, tablet or smartphone that is connected to the same network as the EX.
The EX and remote control device talk to each other over your network. The EX displays your music files and streaming services on the remote device, and you use the remote device to tell the EX what to play.
The remote control applications are simple and intuitive to setup and use.
The steps involved are:• download the remote control application to your
device• complete the setup of the remote control
application, and set it to control the EX.• use the remote control application to play music.
RoonTo use a desktop or laptop, go to www.roonlabs.com and download the Roon app (not Roon Server, Roon Remote, Roon Bridge or Rock) for your operating system. Install it and follow the instructions for setup,
6 Setup Remote Control
but be sure to indicate that you are going to be using the app for remote control.To use a tablet or smartphone, go to the app store for your remote device and download/install Roon.
SqueezeBoxYou can control playback by simply selecting the Apps menu in the EX GUI, and then the SqueezeBox Server App. But this app is not designed for ease of use on a tablet or smartphone - you should go to the app store for your remote device and search on SqueezeBox and select one of the apps.
MPDYou can control playback by simply selecting the Apps menu in the EX GUI, and then the YMPD app. But we recommend you download Cantata for a desktop or laptop, or go to the app store for your remote device to select an MPD client app.
Contact [email protected] if you need advice on the best remote app for your needs.
OVERVIEW
WARRANTYYour Antipodes EX comes with a return-to-seller warranty from Antipodes Audio Limited providing repair or replacement to rectify all manufacturing defects. The warranty period is 24 months for an unregistered server. We strongly recommend you visit www.antipodesaudio.com/sever-registration.html, and input the details of the purchase to extend the warranty to 36 months following the purchase date.
Antipodes Audio Limited is not responsible for any consequential damages caused by user error, or damages due to loss of data. If any repairs under warranty are required, please contact the original seller.
Purchase Date: Seller:
Model: Serial Number: