Embed Size (px)
Citation preview

Annotation & NomenclatureAnnotation & Nomenclature
By Corey [email protected]
for PG&G GIS Workshop, 2010
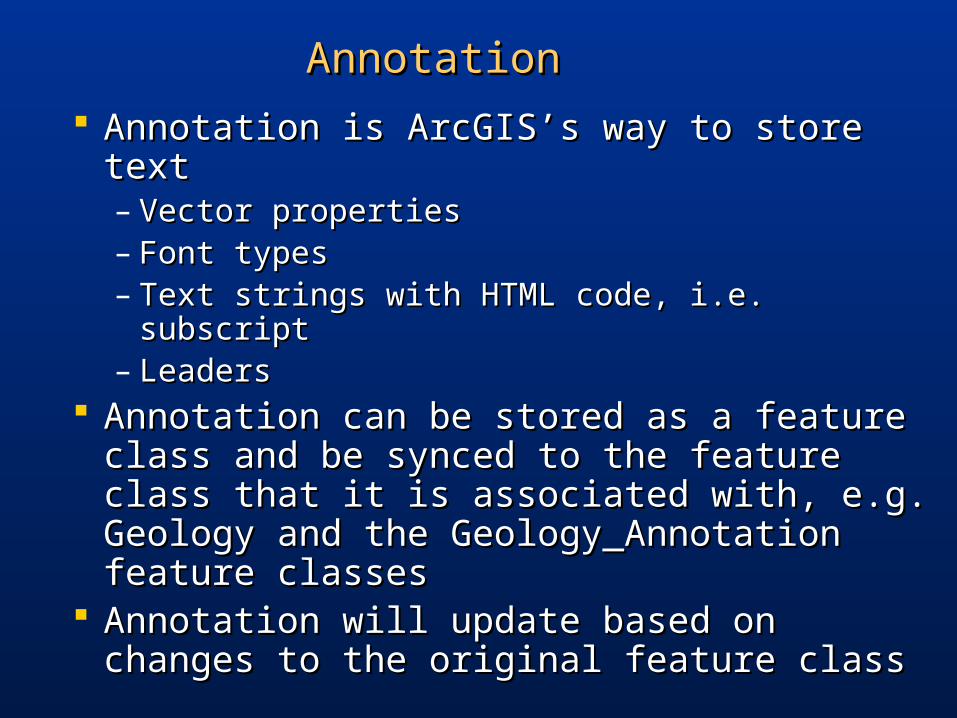
AnnotationAnnotation
Annotation is ArcGIS’s way to store textAnnotation is ArcGIS’s way to store text– Vector propertiesVector properties– Font typesFont types– Text strings with HTML code, i.e. subscriptText strings with HTML code, i.e. subscript– Leaders Leaders
Annotation can be stored as a feature class Annotation can be stored as a feature class and be synced to the feature class that it is and be synced to the feature class that it is associated with, e.g. Geology and the associated with, e.g. Geology and the Geology_Annotation feature classesGeology_Annotation feature classes
Annotation will update based on changes to Annotation will update based on changes to the original feature classthe original feature class
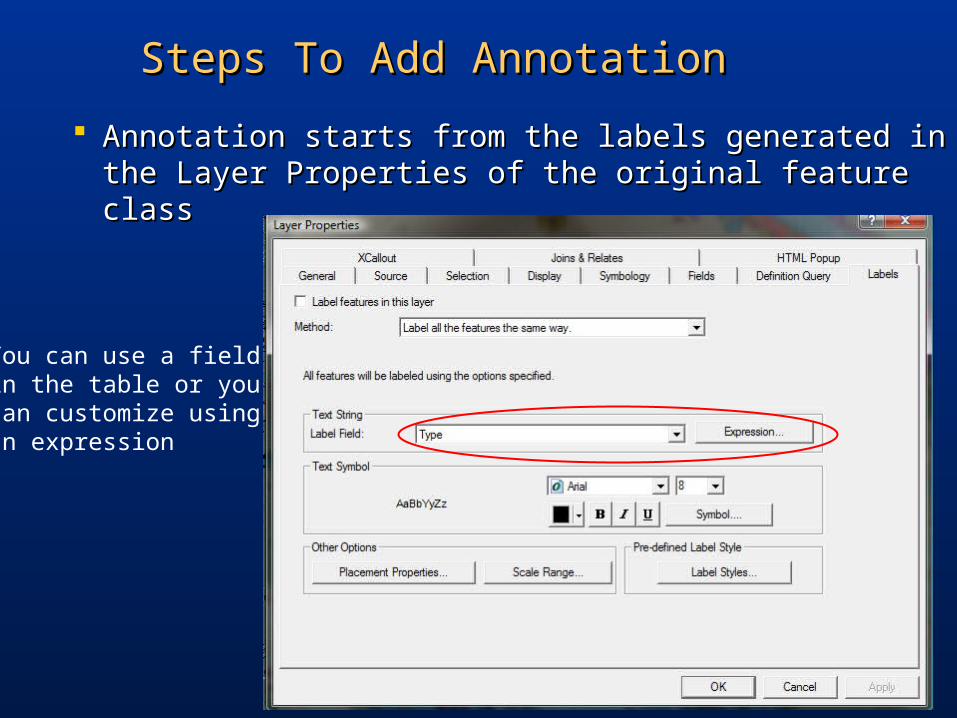
Steps To Add AnnotationSteps To Add Annotation
Annotation starts from the labels generated in the Annotation starts from the labels generated in the Layer Properties of the original feature classLayer Properties of the original feature class
You can use a fieldin the table or you can customize usingan expression

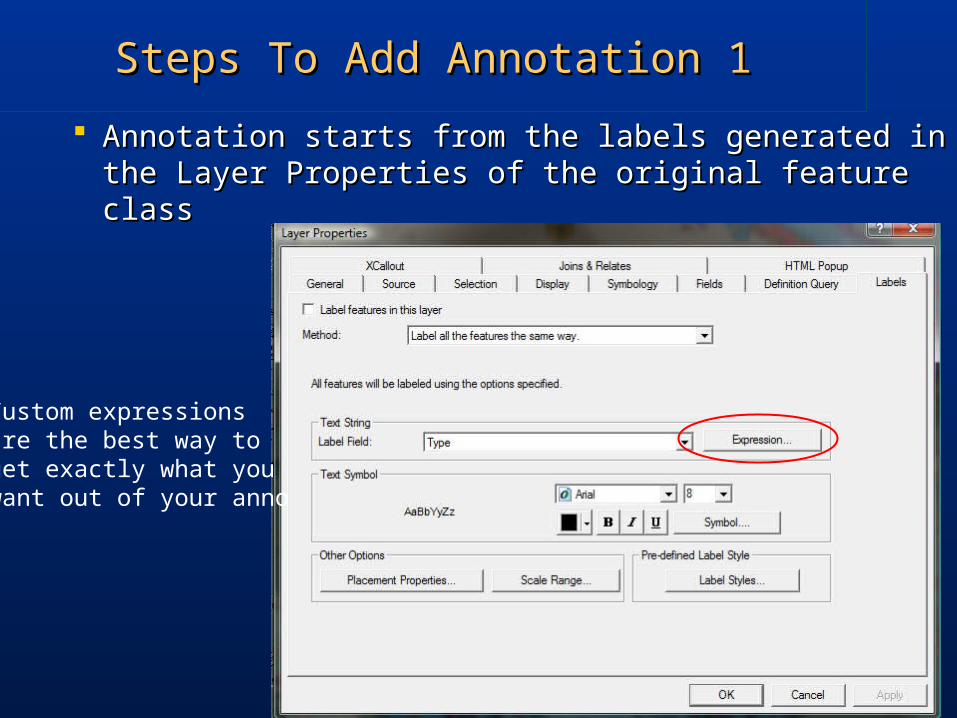
Steps To Add Annotation 1Steps To Add Annotation 1
Annotation starts from the labels generated in the Annotation starts from the labels generated in the Layer Properties of the original feature classLayer Properties of the original feature class
You can adjust thefont, size, or use a predefined symbol

Steps To Add Annotation 1Steps To Add Annotation 1
Annotation starts from the labels generated in the Annotation starts from the labels generated in the Layer Properties of the original feature classLayer Properties of the original feature class
You can adjust howyour labels draw &at what scales the labels are visible

Steps To Add Annotation 1Steps To Add Annotation 1
Annotation starts from the labels generated in the Annotation starts from the labels generated in the Layer Properties of the original feature classLayer Properties of the original feature class
You can use theESRI label styles,mostly topo or roadmap styles
Steps To Add Annotation 1Steps To Add Annotation 1
Annotation starts from the labels generated in the Annotation starts from the labels generated in the Layer Properties of the original feature classLayer Properties of the original feature class
Custom expressionsare the best way to get exactly what youwant out of your anno

Steps To Add Annotation 2Steps To Add Annotation 2
Set up your table to reflect what you want out of Set up your table to reflect what you want out of the labelsthe labels
Type = Full unit namesSymbol = Full unit symbolAge = Age SymbolProvince = Province SymbolUnit = Unit SymbolSubscript = Subscript characters
Use separate fields for portions of the symbols if there will be differences in how you want them to be represented
ABvi (no need to separate fields)ABvi (put into separate fields)

Steps To Add Annotation 3Steps To Add Annotation 3
Write the proper expression to customize your Write the proper expression to customize your annotationannotation
Expression components can be found at Expression components can be found at http://webhelp.esri.com/arcgisdesktop/9.3/index.cfm?TopicName=About_building_label_expressions
For the table on the previous slide:For the table on the previous slide:"<FNT name='Arial' size='8'>" & [Age] & "</FNT>" & "<FNT name='Arial' "<FNT name='Arial' size='8'>" & [Age] & "</FNT>" & "<FNT name='Arial'
size='7'>" & [Province] & "</FNT>" &"<FNT name=‘Arial' size='8'>" & [Unit] size='7'>" & [Province] & "</FNT>" &"<FNT name=‘Arial' size='8'>" & [Unit] & "</FNT>" & "<FNT name=‘Arial' size=‘7'><SUB>" & [Subscript] & & "</FNT>" & "<FNT name=‘Arial' size=‘7'><SUB>" & [Subscript] & "</SUB></FNT>”"</SUB></FNT>”
OUTPUT: OUTPUT: AABBvvii
Visually inspect your map and your labels to make sure their “look” is correct. Don’t worry about Visually inspect your map and your labels to make sure their “look” is correct. Don’t worry about placement within the polygon, you will fix that after converting to annotation. If some polygons placement within the polygon, you will fix that after converting to annotation. If some polygons don’t have a label, you can go back to placement properties and “Draw overlapping labels” or don’t have a label, you can go back to placement properties and “Draw overlapping labels” or wait until you convert to annotation because you can copy and paste extra labelswait until you convert to annotation because you can copy and paste extra labels

Steps To Add Annotation 4Steps To Add Annotation 4
Change labels to an annotation feature class Change labels to an annotation feature class associated with the vector feature classassociated with the vector feature class

Steps To Add Annotation 4Steps To Add Annotation 4
Change labels to annotation feature class Change labels to annotation feature class associated with the vector feature classassociated with the vector feature class
Store annotation: Always choose “In a database”NOT the map
If the Reference Scale is not specified, cancel this dialog box and go to the Table of Contents, right click on Properties and set the reference scale to the scale of your print map
Create Annotation: Choose “All features”

Steps To Add Annotation 4Steps To Add Annotation 4
Change labels to annotation feature class Change labels to annotation feature class associated with the vector feature classassociated with the vector feature class
Make sure the Feature Layer is correct
Check Feature Linked
You shouldn’t have to worry about append, if it is checked, remove the check
Annotation Feature Class shows the name of the new class
Check the Destination

Steps To Add Annotation 4Steps To Add Annotation 4
Change labels to annotation feature class Change labels to annotation feature class associated with the vector feature classassociated with the vector feature class
If there is a check in “Convert unplaced labels to unplaced annotation”, you can go back into the Label tab in the Feature properties and adjust the Placement Properties.
OR
Not worry about it because we can copy and paste annotation
Click on Convert

Manipulating AnnotationManipulating Annotation
Change location, add leader/multiple leaders, Change location, add leader/multiple leaders, change the appearance using the Annotation change the appearance using the Annotation Toolbar and/or Annotation Attributes.Toolbar and/or Annotation Attributes.
Anno Toolbar
Anno right-click
Anno Attributes

Manipulating AnnotationManipulating Annotation
Things I typically do:Things I typically do:– Select all, add a “Simple Line Callout” (Leader) Select all, add a “Simple Line Callout” (Leader)
using a 1.00 thick black line to every piece of using a 1.00 thick black line to every piece of anno using the Annotation Attributes menuanno using the Annotation Attributes menu
– Zoom into a corner of the map and start to Zoom into a corner of the map and start to move anno to clear locations, and move anno to clear locations, and systematically pan through the mapsystematically pan through the map
– Add multiple leaders in locations where the Add multiple leaders in locations where the units are too dense for clear placement of units are too dense for clear placement of multiple unit symbolsmultiple unit symbols

Manipulating AnnotationManipulating Annotation
Select all, add a “Simple Line Callout” using a 1.00 thick black line to Select all, add a “Simple Line Callout” using a 1.00 thick black line to every piece of anno using the Annotation Attributes menuevery piece of anno using the Annotation Attributes menu
Why: Depending on the density of units in your map, there is a Why: Depending on the density of units in your map, there is a potential need for a lot of leaders. Faster to delete them from anno that potential need for a lot of leaders. Faster to delete them from anno that doesn’t need them.doesn’t need them.
How: How: 1.1. Right click on the annotation feature class in the Table of Contents, choose Right click on the annotation feature class in the Table of Contents, choose
‘Selection’, Choose ‘Select All’‘Selection’, Choose ‘Select All’
2.2. Start editingStart editing
3.3. Using the Annotation toolbar, use the ‘Edit Annotation Tool’ (black arrow with an Using the Annotation toolbar, use the ‘Edit Annotation Tool’ (black arrow with an uppercase ‘A’), right click on any selected anno, choose ‘Attributes’ (very bottom)uppercase ‘A’), right click on any selected anno, choose ‘Attributes’ (very bottom)
4.4. In the left pane of the new window click on the top word in the box (HINT: it will be In the left pane of the new window click on the top word in the box (HINT: it will be the name of the annotation feature class). Make sure it is highlighted the name of the annotation feature class). Make sure it is highlighted
5.5. Click on Leader in the bottom right of the Attributes window, a new window will Click on Leader in the bottom right of the Attributes window, a new window will appearappear
6.6. Click on the Type dropdown menu in the right side Properties pane and choose Click on the Type dropdown menu in the right side Properties pane and choose ‘Simple Line Callout’‘Simple Line Callout’
7.7. Click the ‘Symbol’ button and change the color to blackClick the ‘Symbol’ button and change the color to black
8.8. Click ‘OK’, Click ‘OK’, Click ‘Apply’Click ‘OK’, Click ‘OK’, Click ‘Apply’
Manipulating AnnotationManipulating Annotation
AlternativelyAlternatively– If you don’t think you will need a lot of leaders then you If you don’t think you will need a lot of leaders then you
can add leaders manually:can add leaders manually: Select the anno Select the anno Right click using the Edit Annotation Tool Right click using the Edit Annotation Tool Choose ‘Add Leader’ Choose ‘Add Leader’ Follow steps 5 – 8 from the slide above to customize the look of Follow steps 5 – 8 from the slide above to customize the look of
the leaderthe leader
Manipulating AnnotationManipulating Annotation
Zoom into a corner of the map and start to move anno to Zoom into a corner of the map and start to move anno to locations where they are clear, and systematically pan locations where they are clear, and systematically pan through the map to make sure all anno is placed and that through the map to make sure all anno is placed and that all features are annotated. Turn on all of the features and all features are annotated. Turn on all of the features and other layers of annotation to detect conflictsother layers of annotation to detect conflicts
The labeling rules from FGDC Carto Standards (pp.27-29)The labeling rules from FGDC Carto Standards (pp.27-29)– ““For a map to be easily read, labels and leaders should be placed For a map to be easily read, labels and leaders should be placed
where they are clear and legible, taking care to avoid overprinting where they are clear and legible, taking care to avoid overprinting of linework, symbols, or other labels” –FGDC (2006)of linework, symbols, or other labels” –FGDC (2006)
– All feature labels should be horizontalAll feature labels should be horizontal– Leaders are straight lines, should cross the contact at as high an Leaders are straight lines, should cross the contact at as high an
angle as possible, should extend into the unit, should not cross angle as possible, should extend into the unit, should not cross through multiple units unless absolutely necessarythrough multiple units unless absolutely necessary
– Multiple leaders from a single label should not be joined at their Multiple leaders from a single label should not be joined at their label ends.label ends.

Manipulating AnnotationManipulating Annotation
Add multiple leaders in locations where the units are too Add multiple leaders in locations where the units are too dense or for clear placement of multiple unit symbolsdense or for clear placement of multiple unit symbols

Manipulating AnnotationManipulating Annotation
In ArcGIS, you cannot add more than one leader per label. In ArcGIS, you cannot add more than one leader per label. But there is a work aroundBut there is a work around
Manipulating AnnotationManipulating Annotation
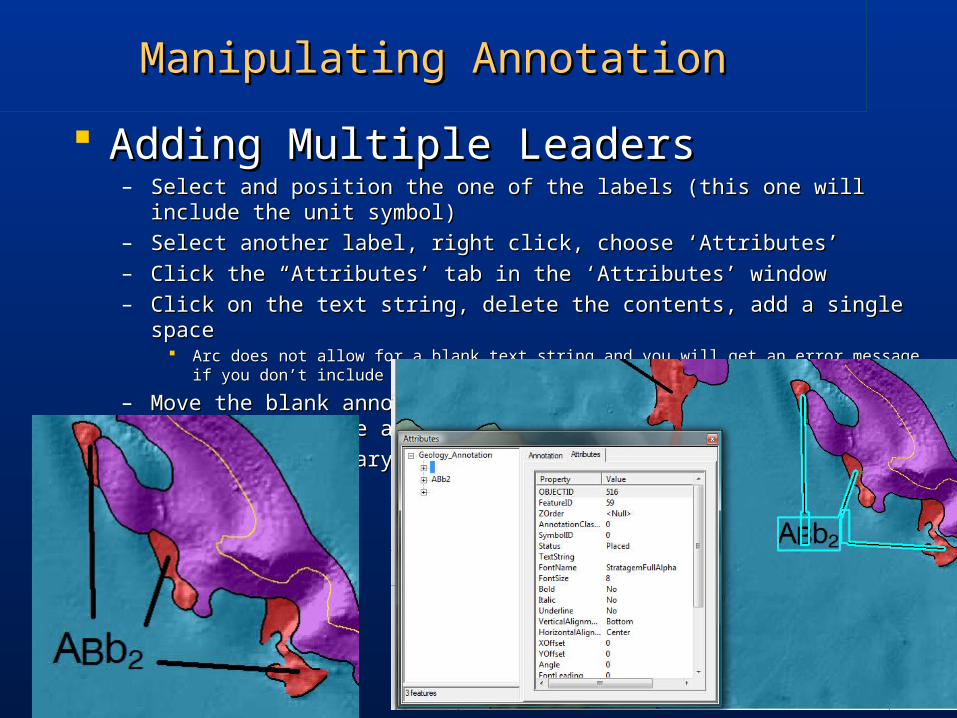
Adding Multiple LeadersAdding Multiple Leaders– Select and position the one of the labels (this one will include the unit symbol)Select and position the one of the labels (this one will include the unit symbol)– Select another label, right click, choose ‘Attributes’Select another label, right click, choose ‘Attributes’– Click the “Attributes’ tab in the ‘Attributes’ windowClick the “Attributes’ tab in the ‘Attributes’ window– Click on the text string, delete the contents, add a single spaceClick on the text string, delete the contents, add a single space
Arc does not allow for a blank text string and you will get an error message if you don’t include the spaceArc does not allow for a blank text string and you will get an error message if you don’t include the space
– Move the blank annotation with the leader so that it is pointing from the annotation Move the blank annotation with the leader so that it is pointing from the annotation that displays the unit symbolthat displays the unit symbol
– Repeat as necessaryRepeat as necessary
Adding NomenclatureAdding Nomenclature
Adding the nomenclature to your map area is good for:Adding the nomenclature to your map area is good for:– Review map copiesReview map copies– Helping control the final layout of your mapHelping control the final layout of your map
Because there are no features for the annotation to be tied Because there are no features for the annotation to be tied to, you have to create a new annotation feature classto, you have to create a new annotation feature class– Before you do this, it is helpful to know what nomenclature types Before you do this, it is helpful to know what nomenclature types
are included in your area. GIS nomenclature shapefiles now are included in your area. GIS nomenclature shapefiles now available at:available at:
http://planetarynames.wr.usgs.gov/
– Font styles are different for certain types of nomenclature and are Font styles are different for certain types of nomenclature and are size dependent you may want to set up different symbols for each size dependent you may want to set up different symbols for each categorycategory
This is not required as each anno label can be thoroughly manipulated through This is not required as each anno label can be thoroughly manipulated through the attributes pop-up windowthe attributes pop-up window
We are working on a document that lists standardized fonts and styles based on We are working on a document that lists standardized fonts and styles based on map scale and feature sizemap scale and feature size

Creating an Annotation Feature ClassCreating an Annotation Feature Class
Open ArcCatalogOpen ArcCatalog Navigate to the FILE geodatabase where you want to saveNavigate to the FILE geodatabase where you want to save
Right clickChoose ‘New’and ‘Feature Class’
Creating an Annotation Feature ClassCreating an Annotation Feature Class
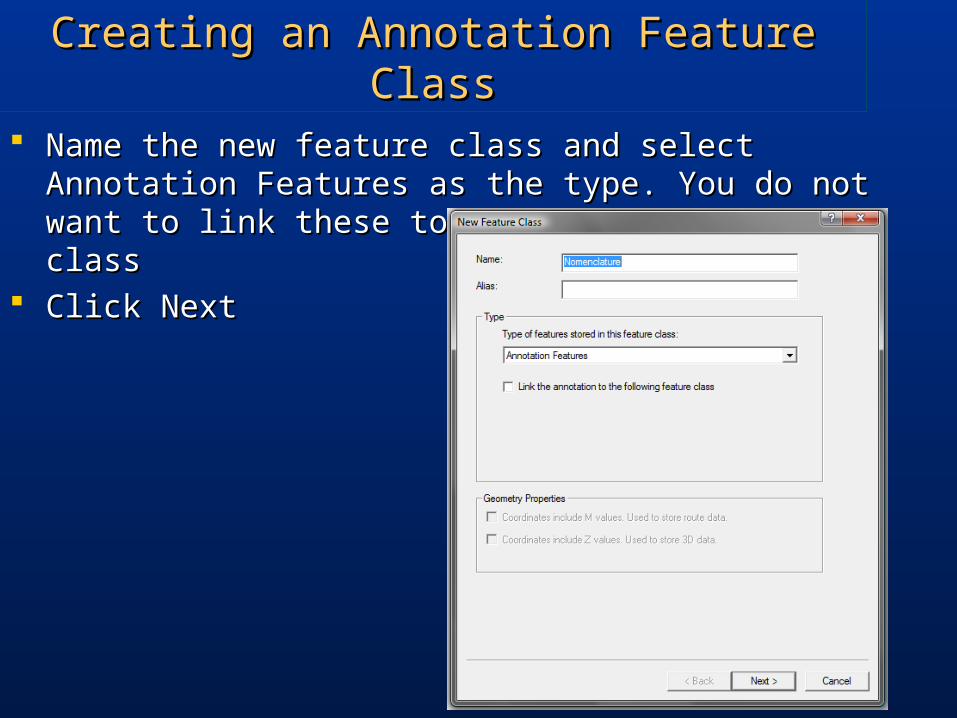
Name the new feature class and select Annotation Name the new feature class and select Annotation Features as the type. You do not want to link these to an Features as the type. You do not want to link these to an existing feature classexisting feature class
Click NextClick Next
Creating an Annotation Feature ClassCreating an Annotation Feature Class
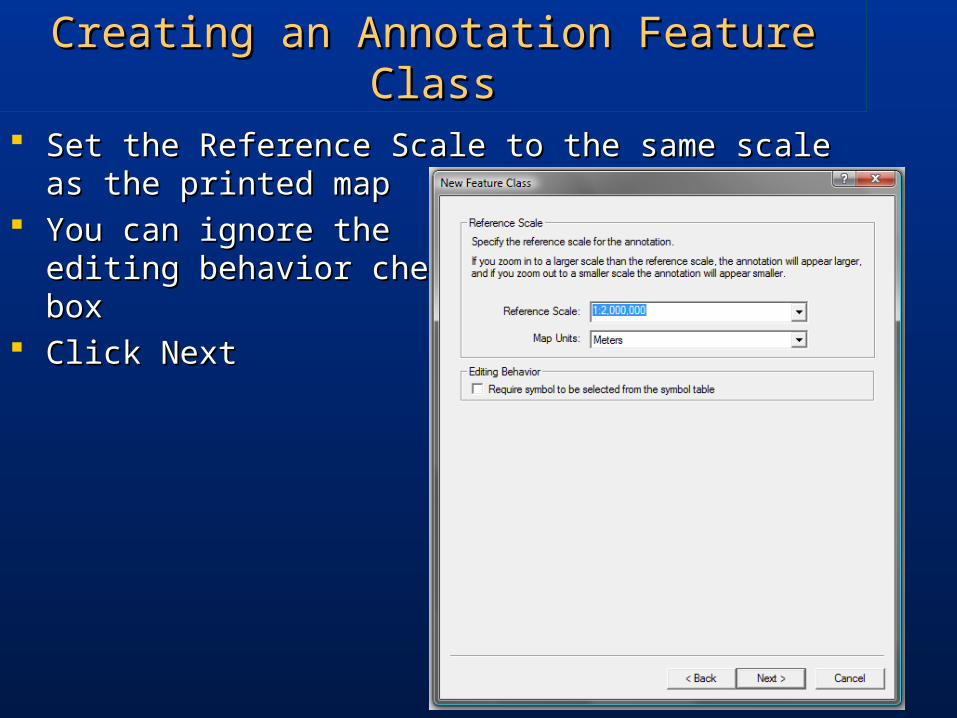
Set the Reference Scale to the same scale as the printed Set the Reference Scale to the same scale as the printed mapmap
You can ignore the You can ignore the editing behavior checkediting behavior checkboxbox
Click NextClick Next

Creating an Annotation Feature ClassCreating an Annotation Feature Class
This is where, if you want, you This is where, if you want, you can set up different annotation can set up different annotation classesclasses
Choose “New”, and name the Choose “New”, and name the classclass
Select the Text Symbol that is Select the Text Symbol that is appropriate for this classappropriate for this class
When done click nextWhen done click next If you don’t want to create If you don’t want to create
different annotation classes different annotation classes click Nextclick Next
Click Next and then FinishClick Next and then Finish

Adding AnnotationAdding Annotation
Add the new annotation feature class to your project in Add the new annotation feature class to your project in ArcMapArcMap
Start Editing and add annotation using:Start Editing and add annotation using:– Horizontal – Top is always upHorizontal – Top is always up– Straight – Not horizontal, at an angleStraight – Not horizontal, at an angle– Curved – Curved textCurved – Curved text– Follow Feature – Not as useful as it soundsFollow Feature – Not as useful as it sounds
All of these are drawn using the Annotation toolbar tool set All of these are drawn using the Annotation toolbar tool set and the Edit menu draw tool (pencil)and the Edit menu draw tool (pencil)