Embed Size (px)
Citation preview
ANDROID
Introduction to Android &
Android Application
Design
CH - 1
Prepared By :
Ms. Kakadiya Jainam A.

POINTS TO BE LEARN :
1.1 Basic Introduction
1.2 What is Android ?
1.3 The OHA
1.4 The Android Platform
1.5 Android SDK
1.6 Steps to Download and Install Android SDK
1.7 Building a Sample Android Application
1.8 AVD Creation Steps
BASIC INTRODUCTION
Mobile phones are now a regular choice for consumers, Stylish and versatile phones packing hardware features like GPS, touch screens are an enticing platform upon which to create innovative mobile applications.
Android hardware will be designed to attract consumers, but the real win is for developers.
With existing mobile development built on proprietary operating systems that restrict third-party applications, Android offers an open and equal alternative.

WHAT IS ANDROID ?
Android is an Operating system based on the Linux kernel, and designed primarily for touch screen mobile devices such as smart phones and tablet computers.
Andy Rubin has been credited as the father of the Android platform.
Android is a Linux-based OS for smart phones and tablets. It includes a touch screen user interface, widget, camera, network data monitoring and all the other features that enable a cell phone to be called Smartphone.
FEATURES OF ANDROID
The important features of android are given below:
1) It is open-source.
2) AnyOne can customize the Android Platform.
3) There are a lot of mobile applications that can
be chosen by the consumer.
4) It provides many interesting features like
weather details, opening screen etc.

CATEGORIES OF ANDROID APPLICATIONS
There are many android applications in the market.
The top categories are:
Entertainment (Hotstar TV, SonyLive)
Tools (Antivirus, Applock )
Communication(telegram, Wechat etc..)
Productivity (MyJio, Rout Finder)
Personalization (Wallpaper, color keypad)
Music and Audio (Wynk music, gaana Bollyw etc)
Social (Facebook lite, Funny jokes)
Media and Video (MX player, Ringtone maker)
Travel and Local etc. (Train Enquiry, Bus ticket)
THE OPEN HANDSET ALLIANCE
OHA is a group of 84 companies such as Google,
Samsung, HTC, Sony, KDDI, Garmin, Teleca,
Ebay, Intel etc.
The OHA was established on 6th November 2007,
led by Google with 47 members including mobile
handset makers, application developers, some
carriers and chip makers.
It is committed to advance open standards, provide
services and deploy handsets using the Android
Platform.

HISTORY OF ANDROID
Let's understand the android history in a
sequence.
1) Initially, Andy Rubin founded Android
Incorporation in Palo Alto, California, United
States in October, 2003.
2) In 17th August 2005, Google acquired android
Incorporation.
3) Android is the nick name of Andy Rubin.
4) In 2007, Google announces the development of
android OS.
5) In 2008, HTC launched the first android mobile.

ANDROID ARCHITECTURE
Android architecture or Android software stack
is categorized into five parts:
1. Linux kernel
2. Native libraries (middleware),
3. Android Runtime
4. Application Framework
5. Applications
Let's see the android architecture first.
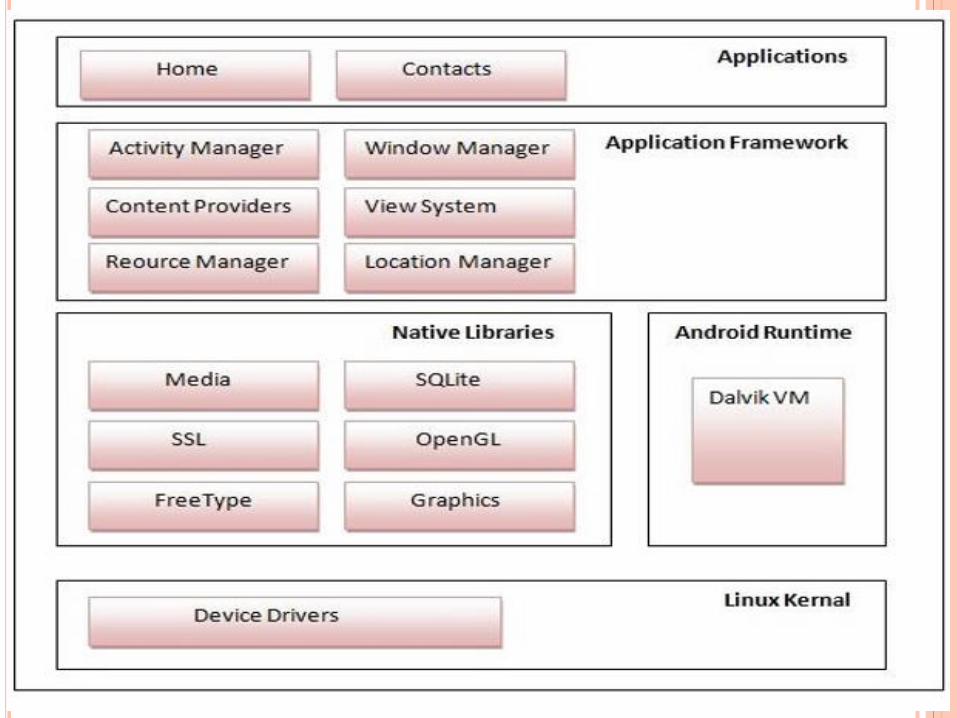

ANDROID ARCHITECTURE…
Linux kernel :
At the bottom of the layers is Linux. This provides basic system functionality like process management, memory management, device management like camera, keypad, display etc.
Libraries :
On top of Linux kernel there is a set of libraries including open-source Web browser engine webkit, well known library libc, SQLite database which is a useful repository for storage and sharing of application data, liberaries to play and record audio and vedio.

3) Android Runtime
In android runtime, there are core libraries and
DVM (Dalvik Virtual Machine) which is
responsible to run android application. DVM is
like JVM it is optimized for mobile devices.
4) Android Framework
On the top of Native libraries and android
runtime, there is android framework. Android
framework includes Android API's such as UI
(User Interface), telephony, resources,
locations, Content Providers (data) and
package managers.
5) Applications
On the top of android framework, there are
applications. All applications such as home,
contact, settings, games, browsers are using
android framework that uses android runtime
and libraries. Android runtime and native
libraries are using linux kernal.

ANDROID VERSIONS, AND CODENAME
Let's see the android versions and codenames
provided by Google.

The android platform was launched in 2007 by
the Open Handset Alliance, an alliance of
famous companies that includes Google, HTC,
Motorola, Texas Instruments and others.
Although most of the applications that run on the
Android Platform are written in Java, there is no
Java Virtual Machine.
Instead, the Java classes are first compiled into
what are known as Dalvik Executables and run
on the Dalvik Virtual Machine.

1) Android 1.0 (API level 1) :
Android 1.0, the first commercial version of the
software, was released on 23 September 2008.
the first commercially available Android device
was the HTC Dream. Android 1.0 incorporated
the following features :
Android Market application download and
updates through the Market application.
Other application include : Alarm, Clock,
Calculator, Picture Gallery etc...

2) Android 1.1 (API level 2) :
On 9 February 2009, the android 1.1 update
was released, initially for the HTC Dream only,
Android 1.1 was known not used officially, The
update resolve bugs, changes the Android API
and needed a number of feature :
Ability to save attachments in messages.
Longer in-call screen timeout default when
using the speakerphone, plus ability to
show/hide dialpad.
3) Android 1.5 Cupcake (API level 3) :
On 27 April 2009, the Android 1.5 update was
released, based on Linux kernel.
This was the first released to officially use a
codename based on a dessert item
(“Cupcake”), The update includes several new
features and UI :
Support for third-party virtual keyboards with
text prediction and user dictionary for custom
words.

4) Android 1.6 Donut (API level 4) :
On 15 September 2009, the Android 1.6 SDK –
donut was released, based on Linux kernel
2.6.29. included in the update were numerous
new features :
Easier searching and ability to view app
screenshots in Android Market.
Gallery and camera are fully integrated, with
faster camera access.

5) Android 2.0 Éclair (API level 5) :
On 26 October 2009, the Android 2.0 SDK Eclair
was released based on Linux kernel 2.6.29.
changes included :
Expanded Account sync, allowing users to add
multiple accounts to a device for
synchronization of email and contact.
Bluetooth 2.1 support
Optimized hardware speed and UI.

6) Android 2.0.1 Éclair (API level 6) :
On 3 December 2009, the Android 2.1 Eclair was
released. changes included :
Minor API changes, bug fixes and framework
behavioural changes.
7) Android 2.1 Eclair (API level 7) :
Released on 12 January 2010. Changes include:
Minor amendments to the API and bug fixes.

8) Android 2.2 Froyo (API level 8) :
On 20 May 2010, the SDK for Android 2.2 was
released. Included many features :
Speed, memory, and performance
optimizations.
Additional application speed improvements,
implementation through JIT compilation.
USB tethering and Wi-Fi hotspot functionality.

9) Android 2.3 Gingerbread (API level 8) :
On 6 December 2010, the Android 2.3
(Gingerbread) SDK was released, changes
included:
Update user interface design with increased
simplicity and speed.
Support for multiple camera on the device,
including a front-camera.

10) Android 3.0 Honeycomb (API level 11) :
On 22 February 2011, the Android 3.0
Honeycomb was released. The update’s
features included :
Added System Bar, featuring quick access to
notification, status, and navigation buttons.
Ability to encrypt all user data.

11) Android 4.0 Ice Cream Sandwich (API
level 14) :
Released on 19 October 2011. included
feature :
Easier-to-create folder, with a drag-and-drop
style.
Pinch to zoom functionality in the calendar.
Integrated screenshot capture.
Ability to access application directly from lock
screen.

12) Android 4.1 Jelly Bean (API level 16) :
Google announced Android 4.1 at the Google
I/O conference on 27 June 2012.
Jelly Bean was an incremental update with the
primary aim of improving the functionality and
performance of the user interface. Include
following features :
Ability to turn off notifications on an
application-specific basis.

12) Android 4.4 Kitkat (API level 19) :
Google announced Android 4.4 Kitkat on 3
September 2013. following features included :
Public API for developing and managing text
messaging clients.
Shortcuts and widgets can automatically be re-
arranged .
Provides more security.
Provides sensor for sensing a device.

ANDROID SDK
The Android SDK (Software Development Kit)
includes a set of development tool.
These includes a debugger, libraries, sample
code, Documentation and handset emulator.
The officially supported integrated development
environment (IDE) is Eclipse using the Android
Development Tool (ADT).

STEPS TO DOWNLOAD AND INSTALL
ANDROID SDK
System Requirement :
Operating Systems :-
Windows XP(32-bit), Vista (32 or 64 bit), or
Windows 7 (32 or 64 bit).
Mac OS
Linux 64-bit (Tested on Ubuntu Linux).
Hardware :-
Dual-core CPU.
Minimum 2 GB RAM.
And other standard hardware.

STEPS TO DOWNLOAD AND INSTALL
ANDROID SDK
Steps to Download:-
1) Open your web Browser and type following
URL in it,
http://developer.android.com/com/sdk/index.
html.
2) Next screen is for license agreement, in that
agree to their rules and provide your OS-bit.
3) Now Click on “Download SDK” button.

STEPS TO DOWNLOAD AND INSTALL
ANDROID SDK
Steps to Install Android SDK:-
1) Go to the location where you had stored
Downloaded .Zip file.
2) Extract it to your desired location.
3) Now open eclipse folder and find eclipse.exe
in it.

4) Double click on it and it will be started.
5) Next screen it will ask you to set up
workspace path.(this is the path where your
all projects are going to store).
6) It will perform this process every time you
start Android. If you want to set it once and
for all then click on check box.
8) And it’s done now you are ready to develop
your first android application.
BUILDING A SAMPLE ANDROID
APPLICATION
1) Click New in the folder.
2) In the window that appears, open the Android
folder, select Android Application Project, and
click Next.
OR
Click file -> New-> Android Application Project.

4) On the next screen to configure the project,
leave the default selections and click Next.
5) The next screen can help you create a
launcher icon for your app.
6) now you can select an activity template from
which to begin building your app. For this project,
select BlankActivity and click Next.

7) Leave all the details for the activity in their
default state and click Finish.
8) your First Basic Application is ready to run.
9) If you have already created AVD then just
Right Click on project in project Explorer and
select RunAs->Android Application.
10) If you do not created AVD then first Create
AVD using following Steps :
Steps to Create AVD :
1) To Execute your Application this or next all,
you need a virtual device (Emulator) that work
as phone in your system and give you put that
will be very much same in your original device.
2) Now let’s create our own emulator that will
give us output.

3) Start eclipse and go to windows-> Android
Virtual Device Manager.
4) Just click on new to create your device.
5) Now click on Ok and your AVD is done.
6) Now you are ready to execute your first
Project.

POINTS OF LEARN :
2.1 Anatomy (Structure) of an Android Application.
2.2 Android Terminologies.
2.3 Application Context, Activities, Services And Intents.
2.4 Android Manifest File and its Common Settings.

ANATOMY(STRUCTURE ) OF ANDROID
APPLICATION
Android application contains components such
as java source code, string resources, images,
manifest file, apk file etc…
Let’s understand structure of android
application :


1) SRC : Java source code files will be available here.
2) Gen : The gen directory in an Android project contains auto generated files.
3) Res : Android supports resource like image and creating XML configuration files these can be keeping separate from the source code.
4) /res/values : Used to define strings, colors, dimensions, styles and static arrays of strings or integers.

5) /res/values-v11 : is the values of the API version 11, and res/values/v-14 the values of API version 14.
res/ values – layout for normal screen size or default.
res/ values- small – layout for small screen size.
res/ values- large – layout for large screen size.
res/ values- xlarge – layout for Extra-large screen size.

6) /res/layout : This folder contains the layouts to be used in the application.
7) /res/menu : This folder contains menu resource to be used in the application (Option Menu, Context Menu or sub Menu).
8) /res/drawable : Drawable folders are resource directories in an application that provides different bitmap drawable for medium, high, and extra high density screen.
/res/drawable-ldpi – bitmap for lower density.
/res/drawable-mdpi – bitmap for medium density.
/res/drawable-hdpi - bitmap for high quality.

9) libs : External library files will be placed in this folder. If you want to any external library in your project place the library jar inside this folder and it will be added to the classpath automatically.
10) assests : This folder contains raw hierarchy of files and directories, with no other capabilities. It is just an unstructured hierarchy of files.
11) bin: Bin folder is the area used by the compiler to prepare the files to be finally packaged to the application’s APK file.

12) AndroidManifest.xml: All the android application will have an AndroidManifest.xml file in the root directory.
This file will contain essential information about the application to the Android system.
13) project properties: project properties is the main project’s properties file containing information such as the build platform target and the library dependencies has been renamed from default properties in the folder SDK versions.

ANDROID TERMINOLOGIES
How Android applications function and interact with one
another.
Context:
The context is the central command center for an
Android application.
All application-specific functionality can be accessed
through the context.
Activity:
An Android application is a collection of tasks, each
of which is called an Activity.
Each Activity within an application has a unique task
or purpose.

Intent:
The Android operating system uses an
asynchronous messaging mechanism to match
task requests with the appropriate Activity.
Each request is packaged as an Intent.
Service:
An object of class Service that runs in the
background to perform various persistent actions,
such as playing music or monitoring network
activity.

.apk file : Android application package file. Each Android application is compiled and package in a single file includes all of the application’s code resources, assests, and manifest file.
.dex file : Compiled Android application code file. Android programs are compiled into .dex(Dalvik Executable) files, which are in turn zipped into a single .apk file on the device.
adb : Android Debugger Bridge, a command-line debugging application included with the SDK. It provides tools to browse the device, copy tools on the device, and forwards ports for debugging.

Application : From a component viewpoint, an Android application consists of one or more activities, services, listeners, and intent receivers.
Canvas : Canvas is the simplest, easiest way to draw 2D objects on the screen.
Content Provider : A content provider is built on the ContentProvider class, which handles content query strings of a specific format.
DDMS : Dalvik Debug Monitor Service, a GUI debugging application included with the SDK

Dialog : A floating window that acts as a lightweight form. A dialog can have button controls only and is intended to perform a simple action and return value.
Drawable : A drawable is typically into another UI element, for example as a background image. Drawable resource are compiled into subclasses of android.graphical.drawable.
Theme : A set of properties bundled together to define various default display settings. Android provides a new standard themes.

View : A view is a base class for most layout components of an Activity or Dialog screen.
Viewgroup : A container object that groups a set of child Views. The viewgroup is responsible for deciding where child views are positioned and how large they can be, as well as for calling each to draw itself when appropriate.
Window: In an Android application, an object derived from the abstract class Window that specifies the elements of a generic window, such as the look and feel.

APPLICATION CONTEXT, ACTIVITIES,
SERVICES , INTENTS Context:
Is probably the most used element in android
applications.(All functionality can be accessed
through the context.)
Application:
The application object is created whenever one
of your Android components is started. This
object provides the following lifecycle methods:
onCreate() : called before the first
components of the application starts.

onLowMemory() : called when the Android
system request that the application cleans up
memory.
OnTerminate() : only for testing, not called in
production.
onConfigurationChanged() : called
whenever and runs at least as long as another
component of the application runs.

Activity lifecycle :
An activity can be in different state which are
described by the following state.
Activity state :
1) Running : Activity is visible and interacts
with the user.
2) Paused : Activity is still visible but partially
obscured, instant is running but might be killed
by the system.
3) Stopped : Activity is not visible, instance is
running but might be killed by system.
4) killed : Activity has been terminated by the
system of by a call to its finish() method.

The Android system define a lifecycle for
activities via predefined (lifecycle) methods. The
most important method are :
1) onCreate() : Called when the activity is
created. Used to initialize the activity, for
example create the user interface.
2) onResume() : Called if the activity gets visible
again and the user starts interfacting with the
activity again. Used to initialize fields, register
listerners,bind services, etc.

3) onPause() : Called once another activity gets
into the foreground. Always called before the
activity is not visible anymore. Used to release
resources or save application data.
For example you unregister listener, intent
receivers, unbind from service or remove system
service listener.
4) onStop() : Called once the activity is no
longer visible. Time or CPU intensive shut-down
operations, such as writing information to a
database should be down in the onStop()
method.


Services : A service is a component that runs in
the background to perform long-running
operations without needing to interact with the
user.
For example, a service might play music in the
background while the user is in a different
application. A service can essentially take two
states:
Started :
A service is started when an application
component, such as an activity, starts it by
calling startService().
Once started, a service can run in the background
indefinitely, even if the component that started it is
destroyed.
Bound :
A service is bound when an application
component binds to it by calling bindService().
A bound service offers a client-server interface
that allows components to interact with the
service, send requests, get results, and even do
so across processes with interprocess
communication (IPC).


To create an service, you create a Java class that
extends the Service base class.
The Service base class defines various callback
methods and the most important are given below.
onStartCommand() : The system calls this
method when another component, such as an
activity, requests that the service be started, by
calling startService().

onBind() : The system calls this method when
another component wants to bind with the service
by calling bindService().
onUnbind() : The system calls this method when
all clients have disconnected from a particular
interface published by the service.
onRebind() : The system calls this method when
new clients have connected to the service, after it
had previously been notified that all had
disconnected in its onUnbind(Intent).
onCreate() : The system calls this method when
the service is first created using
onStartCommand() or onBind().
onDestroy() : The system calls this method
when the service is no longer used and is being
destroyed. Your service should implement this to
clean up any resources such as threads,
registered listeners, receivers, etc.
Intents and Intent Filters :
Intent is messaging object you can use to request
an action from another app component there are
three fundamental use -cases :
1 To start an activity (Context.startActivity()) :
The Intent object is passed to this method to
launch a new activity or get an existing activity to
do something new.
2 To start a service (Context.startService()) :
The Intent object is passed to this method to
initiate a service or deliver new instructions to an
ongoing service.

3 To deliver a broadcast
(Context.sendBroadcast()) : The Intent object is
passed to this method to deliver the message to all
interested broadcast receivers.
Intent Objects :
An Intent object is a bundle of information which
is used by the component that receives the intent
plus information used by the Android system.
The primary information contained in Intent is the
following :

Action :
A string that the generic action to perform (such
as view or pick). You can specify your own action
for use by intents within your app (or for use by
other apps to invoke components in your app).
The action in an Intent object can be set by the
setAction() method and read by getAction().
Data :
When creating intent, it’s often important to
specify the type of data. So specifying the MIME
type of your data helps the Android system find
the best component to receive your intent.

Category
The category is an optional part of Intent object
and it's a string containing additional information
about the kind of component that should handle
the intent. The addCategory() method places a
category in an Intent object, removeCategory()
deletes a category previously added, and
getCategories() gets the set of all categories
currently in the object.
Extras
This will be in key-value pairs for additional
information that should be delivered to the
component handling the intent. The extras can be
set and read using the putExtras() and
getExtras() methods respectively.
Flags
These flags are optional part of Intent object and
instruct the Android system how to launch an
activity, and how to treat it after it's launched etc.
Component Name
This optional field is an android ComponentName
object representing either Activity, Service or
BroadcastReceiver class.
The component name is set by setComponent(),
setClass(), or setClassName() and read by
getComponent().
Types of Intents :
There are following two types of intents :
(1) Explicit Intents
These intents designate the target component
by its name and they are typically used for
application-internal messages.
(2) Implicit Intents
These intents do not name a target and the
field for the component name is left blank.
Implicit intents are often used to activate
components in other applications.

ANDROID MANIFEST FILE AND ITS COMMON
SETTINGS Manifest file for an android application is a resource
file which contains all the details needed by the
android system about the application.
It is a key file that works as a bridge between the
android developer and the android platform.
Element of AndroidManifest.xml :
<action> <category>
<activity> <data>
<activity-alias> <grant-uri-permission>
<application> <insrtumentation>

<intent-filter> <receiver>
<manifest> <service>
<meta-data> <supports-screens>
<permission> <uses-permission>
<permission-group> <uses-feature>
<uses-configuration> <uses-sdk>
<provider> <permission-tree>
<uses-library>
Element for Application Properties :
Uses-permission : used to specify permission
that are requested for the purpose of security.
Permission : used to set permissions to
provide access control for some specific
component of the application.
Permission-tree : refer one specific name of
the component which is the owner or parent of
the set of component.
Instrumentation : enable to know interaction
between Android system and application.
Uses-sdk : specifies the platform compatibility
of the application.

Uses-configuration : specifies set of hardware
and software requirement of the application.
Uses-feature : specifies single hardware and
software requirement and their related entity.
Activity : has the set of attributes based on
user interface.
Activity-alias : specifies target activity.
Provider : provides some structure to access
application data.

Structure of AndroidManifest.xml :
<manifest>
<elements for app properties should come here>
<application>
<elements for app components
should come here>
</application>
</manifest>

RESOURCES OVERVIEW
You should always externalize resources such as
image and string from your application code, so
that you can maintain them independently.
For any type of resources, you can specify default
and multiple alternative resources for your
application :
Default resources are those that should be
used regardless of the device configuration or
when there are no alternative resources that
match the current configuration.
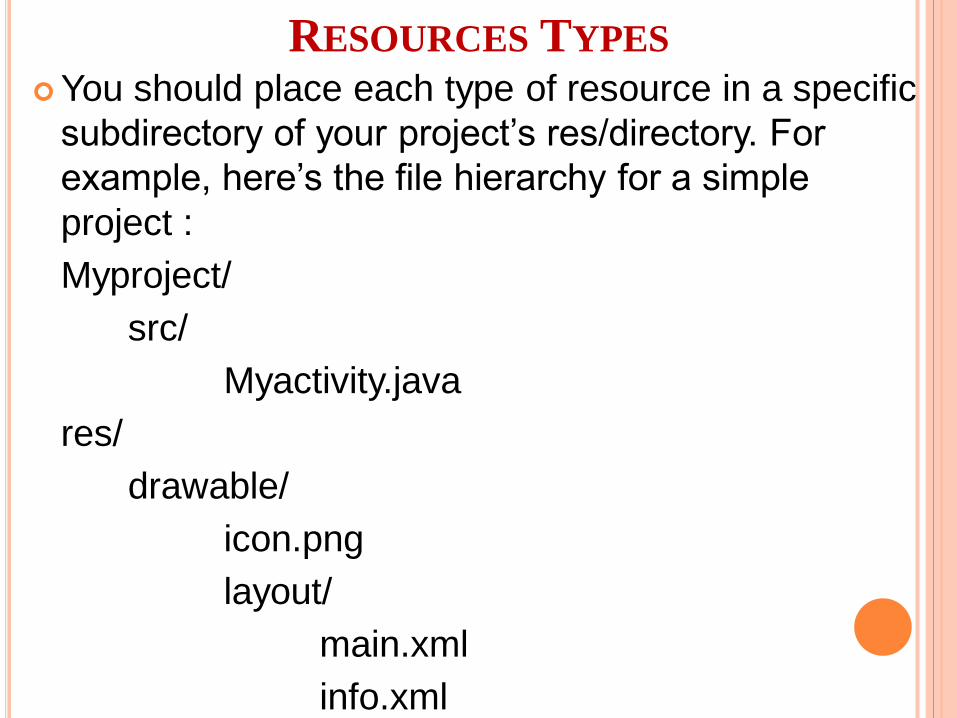
RESOURCES TYPES You should place each type of resource in a specific
subdirectory of your project’s res/directory. For
example, here’s the file hierarchy for a simple
project :
Myproject/
src/
Myactivity.java
res/
drawable/
icon.png
layout/
main.xml
info.xml

Resource directories supported inside
project res/directory.


ACCESSING RESOURCES IN CODE
When your Android application is compiled, a R
class gets generated, which contains resource IDs
for all the resources available in your res/ directory.
You can use R class to access that resource using
sub-directory and resource name or directly
resource ID.
Example:
To access res/drawable/myimage.png and set an
ImageView you will use following code:
ImageView imageView = (ImageView)
findViewById(R.id.myimageview);
imageView.setImageResource(R.drawable.myi
mage);