Embed Size (px)
DESCRIPTION
ANDROID. ING.IVAN PETRLIK AZABACHE. COMPONENTES BASICOS DE TIPO VIEW. FORM WIDGETS. COMPONENTES BASICOS DE TIPO VIEW. LAYOUTS. COMPONENTES BASICOS DE TIPO VIEW. COMPOSITE. COMPONENTES BASICOS DE TIPO VIEW. IMAGES & MEDIA. COMPONENTES BASICOS DE TIPO VIEW. TIME & DATE. - PowerPoint PPT Presentation
Citation preview

ANDROID
ING.IVAN PETRLIK AZABACHE

COMPONENTES BASICOS DE TIPO VIEW
• FORM WIDGETS

COMPONENTES BASICOS DE TIPO VIEW
• LAYOUTS

COMPONENTES BASICOS DE TIPO VIEW
• COMPOSITE

COMPONENTES BASICOS DE TIPO VIEW
• IMAGES & MEDIA

COMPONENTES BASICOS DE TIPO VIEW
• TIME & DATE

COMPONENTES BASICOS DE TIPO VIEW
• TRANSITIONS

COMPONENTES BASICOS DE TIPO VIEW
• ADVANCED

COMPONENTES BASICOS DE TIPO VIEW (DE FORM WIDGETS)
EditText
Largo del componente
Ancho del componente
Nombre del componente

COMPONENTES BASICOS DE TIPO VIEW (DE FORM WIDGETS)
EditText

• Nota Importante :• wrap_content : ocupa sólo el espacio necesario
para mostrar tu contenido
• match_parent : ocupa todo el espacio posible
• fill_parent

• Observación :• Nótese que anteriormente “match_parent" era conocido como “fill_parent“, luego es muy
común encontrar este valor en lugar del anterior.
• A efectos prácticos son lo mismo, sin embargo la evolución de Android favorece este nuevo nombre.

COMPONENTES BASICOS DE TIPO VIEW (DE FORM WIDGETS)
EditText

COMPONENTES BASICOS DE TIPO VIEW (DE FORM WIDGETS)
EditText

COMPONENTES BASICOS DE TIPO VIEW (DE FORM WIDGETS)
EditText

COMPONENTES BASICOS DE TIPO VIEW (DE FORM WIDGETS)
EditText

COMPONENTES BASICOS DE TIPO VIEW (DE FORM WIDGETS)
EditText

COMPONENTES BASICOS DE TIPO VIEW (DE FORM WIDGETS)
EditText

COMPONENTES BASICOS DE TIPO VIEW (DE FORM WIDGETS)
EditText Paso 1 : Paso 2 :
12 1
2

COMPONENTES BASICOS DE TIPO VIEW (DE FORM WIDGETS)
EditText Paso 3 : Finalmente aparece así el EditText
:
100 dp

COMPONENTES BASICOS DE TIPO VIEW (DE FORM WIDGETS)
EditText Si nosotros le colocamos 300dp al ancho del editText.
300 dp

COMPONENTES BASICOS DE TIPO VIEW (DE FORM WIDGETS)
TEXTVIEW
XMLNombre del componente
Ancho del componente
Largo del componente
Texto o etiqueta del
textview
Este es el TextView

COMPONENTES BASICOS DE TIPO VIEW (DE FORM WIDGETS)
BUTTON
Nombre del componente
Ancho del componente
Largo del componente
Texto del boton

COMPONENTES BASICOS DE TIPO VIEW (DE FORM WIDGETS)
RADIOBUTTON
Nombre del componente
Ancho del componente
Largo del componente
Texto del radio button

COMPONENTES BASICOS DE TIPO VIEW (DE FORM WIDGETS)
CHECKBOX
Ancho del componente
Texto del radio button
Nombre del componente
Largo del componente

COMPONENTES BASICOS DE TIPO VIEW (DE FORM WIDGETS)
SPINNER
Largo del componente
Ancho del componente
Nombre del componente

COMPONENTES BASICOS DE TIPO VIEW (DE FORM WIDGETS)
PROGRESSBAR
Nombre del componente
Largo del componente
Ancho del componente

COMPONENTES BASICOS DE TIPO VIEW ( LAYOUTS)
LINEARLAYOUT Es un contenedor que utiliza el modelo de caja para desplegar
los elementos que están dentro de él. Los widgets y contenedores secundarios que se declaren dentro de un elemento <LinearLayout> se alinearán en una columna o en un fila, uno detrás de otro.

COMPONENTES BASICOS DE TIPO VIEW ( LAYOUTS)
LINEARLAYOUT
Orientación del
contenedor
Largo del contenedor
Ancho del contenedor

COMPONENTES BASICOS DE TIPO VIEW ( LAYOUTS)
LINEARLAYOUT

COMPONENTES BASICOS DE TIPO VIEW ( LAYOUTS)
LINEARLAYOUT

COMPONENTES BASICOS DE TIPO VIEW ( LAYOUTS)
LINEARLAYOUT

COMPONENTES BASICOS DE TIPO VIEW ( LAYOUTS)
• RelativeLayout• Su principal característica es
que los widgets que estén dentro de este contenedor basarán su posición en relación con los otros elementos. De esta forma, podemos definir que el widget X quede debajo del widget Y y que éste a su vez se alinie verticalmente con el widget Z.

COMPONENTES BASICOS DE TIPO VIEW ( LAYOUTS)
• RelativeLayout• Cuando se crea un proyecto e n el main.xml existe e
implementado el LinearLayout .• Este LinearLayout se tiene que quitar para agregarle el
RelativeLayout.• A continuación vamos a seguir los pasos necesario para
implementar un RelativeLayout y agregar un componente.

COMPONENTES BASICOS DE TIPO VIEW ( LAYOUTS)
• RelativeLayout
1) Seleccionar y arrastrar
al escenario
2) Soltar sobre el
escenario

COMPONENTES BASICOS DE TIPO VIEW ( LAYOUTS)
• RelativeLayout
3) Aparece el RelativeLayout

COMPONENTES BASICOS DE TIPO VIEW ( LAYOUTS)
• RelativeLayout
4) Seleccionar y arrastrar el
Button y soltarlo sobre el
escenario

COMPONENTES BASICOS DE TIPO VIEW ( LAYOUTS)
• RelativeLayout
5) Soltar el Button sobre el
escenario

COMPONENTES BASICOS DE TIPO VIEW ( LAYOUTS)
• RelativeLayout
6) Otra vez Seleccionar y arrastrar el
Button y soltarlo sobre el
escenario

COMPONENTES BASICOS DE TIPO VIEW ( LAYOUTS)
• RelativeLayout
7) Soltar el Button sobre el
escenario

COMPONENTES BASICOS DE TIPO VIEW ( LAYOUTS)
• TableLayout Te ayudará a posicionar tus widgets con la ayuda de celdas.
Nosotros controlamos el número de columnas y filas, las primeras pueden adaptarse al contenido que le queramos asignar mostrándose más estrechas o más amplias según sea el caso.
• TableRow Son un conjunto elementos del TableLayout ,podemos
controlar el número de filas que aparecerán en nuestra tabla.

COMPONENTES BASICOS DE TIPO VIEW ( LAYOUTS)
• TableLayout y TableRow Sobre un proyecto nuevo , se realiza el correspondiente
diseño, cambiando de LinearLayout a TableLayout.
1) Seleccionar y arrastrar
al escenario
2) Arrastrar y
soltar sobre el
escenario

COMPONENTES BASICOS DE TIPO VIEW ( LAYOUTS)
• TableLayout y TableRow
3) Aparece el Layout
correspondiente sobre el
escenario

COMPONENTES BASICOS DE TIPO VIEW ( LAYOUTS)
• TableLayout y TableRow
4) Seleccionar y arrastrar el TableRow al
escenario
5) Arrastrar y soltar sobre el escenario, esta operación se va
ha repetir cuatro veces

COMPONENTES BASICOS DE TIPO VIEW ( LAYOUTS)
• TableLayout y TableRow
6) 4 Filas generadas 7) Allí se
observa las 4 filas generadas
en el OutLine

COMPONENTES BASICOS DE TIPO VIEW ( LAYOUTS)
• TableLayout y TableRow
8) 4Seleccionar y
arrastrar el TextView sobre
el primer TableRow
9) Arrastrar y soltar sobre el
primer TableRow

COMPONENTES BASICOS DE TIPO VIEW ( LAYOUTS)
• TableLayout y TableRow
10) El TextView que
se ha agregado aparece en el código XML

COMPONENTES BASICOS DE TIPO VIEW ( LAYOUTS)
• TableLayout y TableRow
11) Seleccionar y arrastrar el Plain Text
sobre el primer TableRow
12) Arrastrar y soltar sobre el
primer TableRow

COMPONENTES BASICOS DE TIPO VIEW ( LAYOUTS)
• TableLayout y TableRow
13) El campo de texto esta
finalmente insertado sobre
el primer TableRow

COMPONENTES BASICOS DE TIPO VIEW ( LAYOUTS)
• TableLayout y TableRow
14) El campo de texto EditText ( plain text ) se
encuentra insertado en el XML, ahora se tiene que
modificar algunas propiedades

COMPONENTES BASICOS DE TIPO VIEW ( LAYOUTS)
• TableLayout y TableRow
15) Aparece el campo de texto debidamente perfilado

COMPONENTES BASICOS DE TIPO VIEW ( LAYOUTS)
• TableLayout y TableRow
16) Seleccionar y arrastrar el TextView sobre el segundo TableRow
17) Arrastrar y soltar sobre el segundo TableRow

COMPONENTES BASICOS DE TIPO VIEW ( LAYOUTS)
• TableLayout y TableRow18) El TextView que se ha agregado aparece en el código XML

COMPONENTES BASICOS DE TIPO VIEW ( LAYOUTS)
• TableLayout y TableRow
19) Seleccionar y arrastrar el Plain Text sobre el segundo TableRow
20) Arrastrar y soltar sobre el segundo TableRow

COMPONENTES BASICOS DE TIPO VIEW ( LAYOUTS)
• TableLayou y TableRow
14) El campo de texto EditText ( plain text ) se
encuentra insertado en el XML, ahora se tiene que
modificar algunas propiedades
21) El EditText que se ha agregado aparece en el código XML

COMPONENTES BASICOS DE TIPO VIEW ( LAYOUTS)
• TableLayout y TableRow
22) Diseño generado hasta el momento
COMPONENTES BASICOS DE TIPO VIEW ( LAYOUTS)
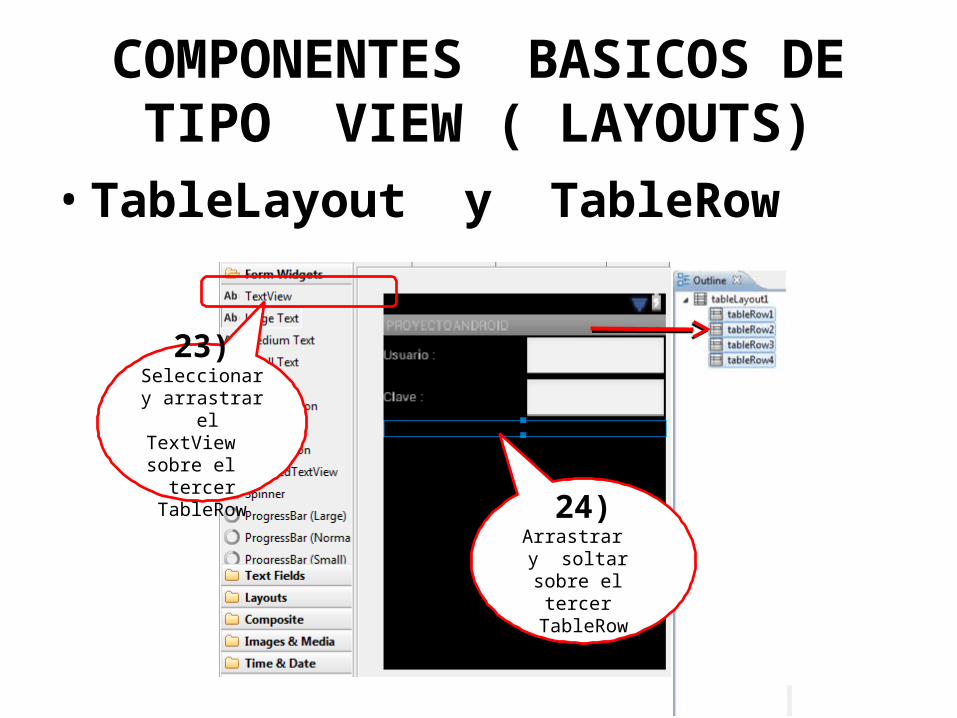
• TableLayout y TableRow
23) Seleccionar y arrastrar el
TextView sobre el tercer TableRow
24) Arrastrar y soltar sobre el
tercer TableRow

COMPONENTES BASICOS DE TIPO VIEW ( LAYOUTS)
• TableLayout y TableRow
25) El TextView ya se encuentra dentro del TableRows y se le borra
el contenido de la propiedad Text

COMPONENTES BASICOS DE TIPO VIEW ( LAYOUTS)
• TableLayout y TableRow
26) Seleccionar y arrastrar el
Button sobre el Tercer
TableRow
27) Arrastrar y soltar sobre el
tercer TableRow

COMPONENTES BASICOS DE TIPO VIEW ( LAYOUTS)
• TableLayout y TableRow
28) El Button se logro insertar dentro del
TableRow

COMPONENTES BASICOS DE TIPO VIEW ( LAYOUTS)
• TableLayout y TableRow
29) Seleccionar y arrastrar el
TextView sobre el cuarto TableRow
30) Arrastrar y soltar sobre el
cuarto TableRow

COMPONENTES BASICOS DE TIPO VIEW ( LAYOUTS)
• TableLayout y TableRow
31) El TextView se ha agregado en el código XML, además se tiene que modificar sus propiedades
32) Se le agrego estas propiedades

COMPONENTES BASICOS DE TIPO VIEW ( LAYOUTS)
• TableLayout y TableRow
33) Diseño generado hasta el momento

COMPONENTES BASICOS DE TIPO VIEW ( LAYOUTS)
• TableLayout y TableRow
34) Agregando color de fondo al TableLayout

COMPONENTES BASICOS DE TIPO VIEW ( LAYOUTS)
• TableLayout y TableRow
35) Diseño final generado

COMPONENTES BASICOS DE TIPO VIEW ( LAYOUTS)
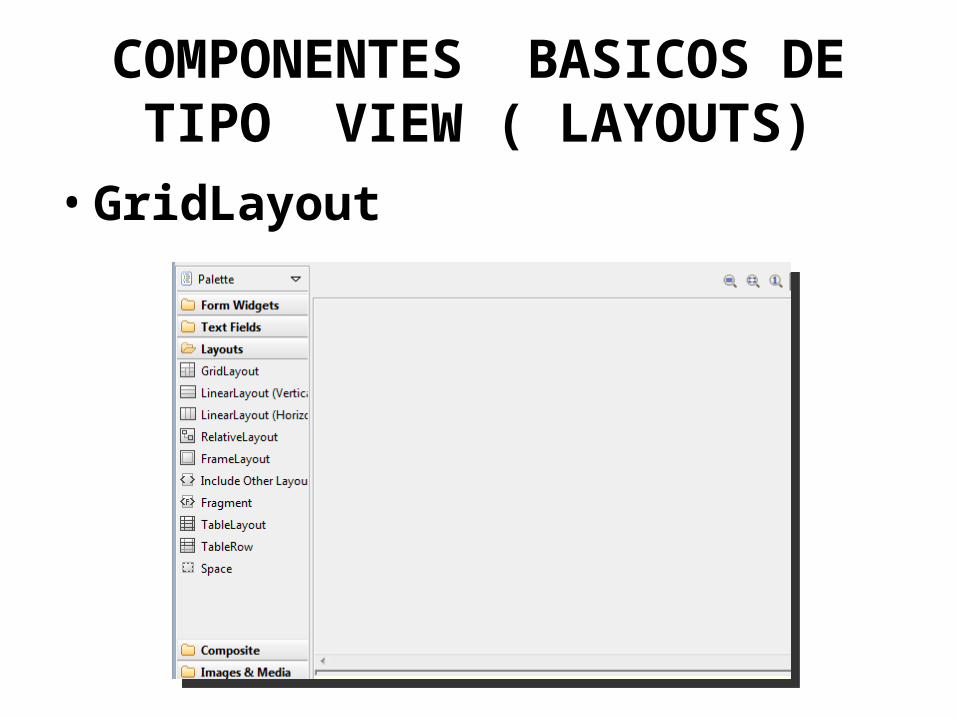
• GridLayout
COMPONENTES BASICOS DE TIPO VIEW ( LAYOUTS)
• GridLayout

COMPONENTES BASICOS DE TIPO VIEW ( LAYOUTS)
• GridLayout

COMPONENTES BASICOS DE TIPO VIEW ( LAYOUTS)
• GridLayout

COMPONENTES BASICOS DE TIPO VIEW ( LAYOUTS)
• GridLayout

COMPONENTES BASICOS DE TIPO VIEW ( LAYOUTS)
• GridLayout

COMPONENTES BASICOS DE TIPO VIEW ( LAYOUTS)
• GridLayout

COMPONENTES BASICOS DE TIPO VIEW ( LAYOUTS)
• GridLayout

COMPONENTES BASICOS DE TIPO VIEW ( LAYOUTS)
• GridLayout

COMPONENTES BASICOS DE TIPO VIEW ( LAYOUTS)
• GridLayout

COMPONENTES BASICOS DE TIPO VIEW ( LAYOUTS)
• GridLayout
) Seleccionar y arrastrar el
TextView sobre el GridLayout ) Arrastrar y
soltar sobre el GridLayout

COMPONENTES BASICOS DE TIPO VIEW ( LAYOUTS)
• GridLayout

COMPONENTES BASICOS DE TIPO VIEW ( LAYOUTS)
• GridLayout

COMPONENTES BASICOS DE TIPO VIEW ( LAYOUTS)
• GridLayout
) Nuevamente Seleccionar y arrastrar el
TextView sobre el GridLayout
) Arrastrar y soltar sobre el
GridLayout

COMPONENTES BASICOS DE TIPO VIEW ( LAYOUTS)
• GridLayout

COMPONENTES BASICOS DE TIPO VIEW ( LAYOUTS)
• GridLayout

COMPONENTES BASICOS DE TIPO VIEW ( LAYOUTS)
• GridLayout
) Nuevamente Seleccionar y arrastrar el
TextView sobre el GridLayout
) Arrastrar y soltar sobre el
GridLayout

COMPONENTES BASICOS DE TIPO VIEW ( LAYOUTS)
• GridLayout

COMPONENTES BASICOS DE TIPO VIEW ( LAYOUTS)
• GridLayout

COMPONENTES BASICOS DE TIPO VIEW ( LAYOUTS)
• GridLayout
) Nuevamente Seleccionar y arrastrar el
TextView sobre el GridLayout ) Arrastrar y
soltar sobre el GridLayout

COMPONENTES BASICOS DE TIPO VIEW ( LAYOUTS)
• GridLayout

COMPONENTES BASICOS DE TIPO VIEW ( LAYOUTS)
• GridLayout

COMPONENTES BASICOS DE TIPO VIEW ( LAYOUTS)
• GridLayout Ejemplo : Desarrollar el siguiente diseño

COMPONENTES BASICOS DE TIPO VIEW ( LAYOUTS)
• GridLayout Sobre el código XML digitar lo siguiente :

COMPONENTES BASICOS DE TIPO VIEW ( LAYOUTS)
• GridLayout Sobre el código XML digitar lo siguiente :

COMPONENTES BASICOS DE TIPO VIEW ( LAYOUTS)
• GridLayout Mostrar el diseño :

COMPONENTES BASICOS DE TIPO VIEW ( LAYOUTS)
• GridLayout Sobre el código XML digitar lo siguiente :

COMPONENTES BASICOS DE TIPO VIEW ( LAYOUTS)
• GridLayout Mostrar el diseño :

COMPONENTES BASICOS DE TIPO VIEW ( LAYOUTS)
• GridLayout Sobre el código XML digitar lo siguiente :

COMPONENTES BASICOS DE TIPO VIEW ( LAYOUTS)
• GridLayout Mostrar el diseño :

COMPONENTES BASICOS DE TIPO VIEW ( LAYOUTS)
• GridLayout Sobre el código XML digitar lo siguiente :

COMPONENTES BASICOS DE TIPO VIEW ( LAYOUTS)
• GridLayout Mostrar el diseño :

COMPONENTES BASICOS DE TIPO VIEW ( LAYOUTS)
• GridLayout Sobre el código XML digitar lo siguiente :

COMPONENTES BASICOS DE TIPO VIEW ( LAYOUTS)
• GridLayout Mostrar el diseño :

COMPONENTES BASICOS DE TIPO VIEW ( LAYOUTS)
• GridLayout Este proceso se repite hasta que se ha logrado obtener
el siguiente diseño:

COMPONENTES BASICOS DE TIPO VIEW ( LAYOUTS)
• FrameLayout Este layout consiste en un marco que ocupa toda la
pantalla, y donde los controles se dispondrán a partir de la esquina superior izquierda, por lo que es probable que haya elementos que se queden ocultos detrás de otros.

COMPONENTES BASICOS DE TIPO VIEW ( LAYOUTS)
• FrameLayout
1)Seleccionar y arrastrar el
FrameLayout sobre el
escenario
2) Arrastrar y soltar el
FrameLayout sobre el
escenario

COMPONENTES BASICOS DE TIPO VIEW ( LAYOUTS)
• FrameLayout
3)Aparece el FrameLayout

COMPONENTES BASICOS DE TIPO VIEW ( LAYOUTS)
• FrameLayout
3)codigo XML generado

COMPONENTES BASICOS DE TIPO VIEW ( LAYOUTS)
• FrameLayout

COMPONENTES BASICOS DE TIPO VIEW ( LAYOUTS)
• FrameLayout

COMPONENTES BASICOS DE TIPO VIEW ( LAYOUTS)
• FrameLayout

COMPONENTES BASICOS DE TIPO VIEW ( LAYOUTS)
• FrameLayout

COMPONENTES BASICOS DE TIPO VIEW ( LAYOUTS)
• FrameLayout

COMPONENTES BASICOS DE TIPO VIEW ( LAYOUTS)
• FrameLayout

COMPONENTES BASICOS DE TIPO VIEW ( LAYOUTS)
• FrameLayout

COMPONENTES BASICOS DE TIPO VIEW ( LAYOUTS)
• FrameLayout