Embed Size (px)
Citation preview

Analyzing an Image using MAC Systems
Sleuth kit version 3.2.0 & Autopsy 2.24
Page 325 from “Guide to Computer Forensics and Investigations 4th
edition”

MAC Forensic Tools
Sleuth Kit – base program for Unix investigations. Uses a command-line interface.
Autopsy – Graphical User Interface (GUI) that “sits on top” of Sleuth Kit command-line interface. Allows access to Sleuth Kit functions via a GUI.

Boot your MAC
Select number 2 on your KVM Switch
Press the power button on the MAC
Login in to the ‘student’ account
Password: $tudent1

Starting Autopsy At Terminal change the working directory by typing “cd /autopsy-
2.24/” without the quotes Now type “sudo ./autopsy” and enter the Student password Be sure to add spaces after cd and sudo Right-click on ‘http://localhost:9999/autopsy’ and select Open URL

Autopsy Forensic Browser
Click on New Case

Creating a new case
Enter the following information:
Case name: GCFI-CH8
Description: Superior Bicycle Investigation
Investigator Names:a. ‘Your Name’
Click New Case
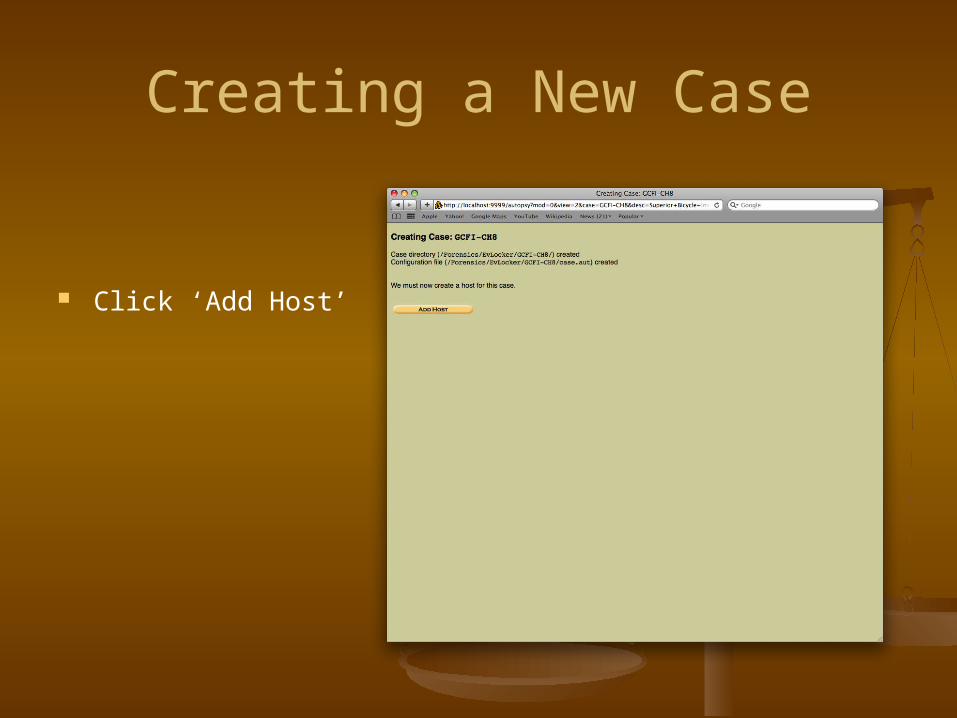
Creating a New Case
Click ‘Add Host’

Creating a New Case
Enter the following information:• Host Name: sb10• Description: Drive
Image• Time zone: EST• Timeskew: 0• Click Add Host

Creating a New Case
• click Add Image

Adding an Image
• click Add Image File

Adding a New Image
• CaSe SeNsItIvE• Location:
/Forensics/CH8/
LX/GCFI*
(entries are case sensitive)• Type: Partiton• Import Method: Copy • click Next

Adding a New Image
• Make sure the image files are in the correct order
• Click next

Calculating Hash Values
• Click the Calculate the hash value for this image
• Click Add• This will take a few
minutes…so don’t keep clicking the Add button

Adding a New Image
• Notice the blue bar in the URL, this means it is calculating the hash value
• Verify your hash value matches the value in the slide
• After MD5 is calculated, click ok

Analyzing the Image
• Click Analyze

Keyword Search
• Click on Keyword search

Keywords
• Note the Magnifying glass under key word search. This is where you currently are
• Type “martha” in the search box
• Click Search
• You will not see a status so be patient and don’t mash buttons

Keyword Search
• If case sensitive was selected typing “Martha” or “martha” would give you different results
• This search takes about 6 minutes
• Click link to results

Viewing Keyword Search
• Look for Fragment 236019, click on ASCII
• Review other fragments using the “ASCII” & “Hex” links next to each fragment

Viewing Keyword Search
• Contents of a fragment can be exported for reports via clicking “Export contents”
• Notes about each fragment can be taken by clicking the “Add Note”

Viewing Keyword Search
• We now want to return to the Select a volume to analyze time lines
• Click Close to navigate back
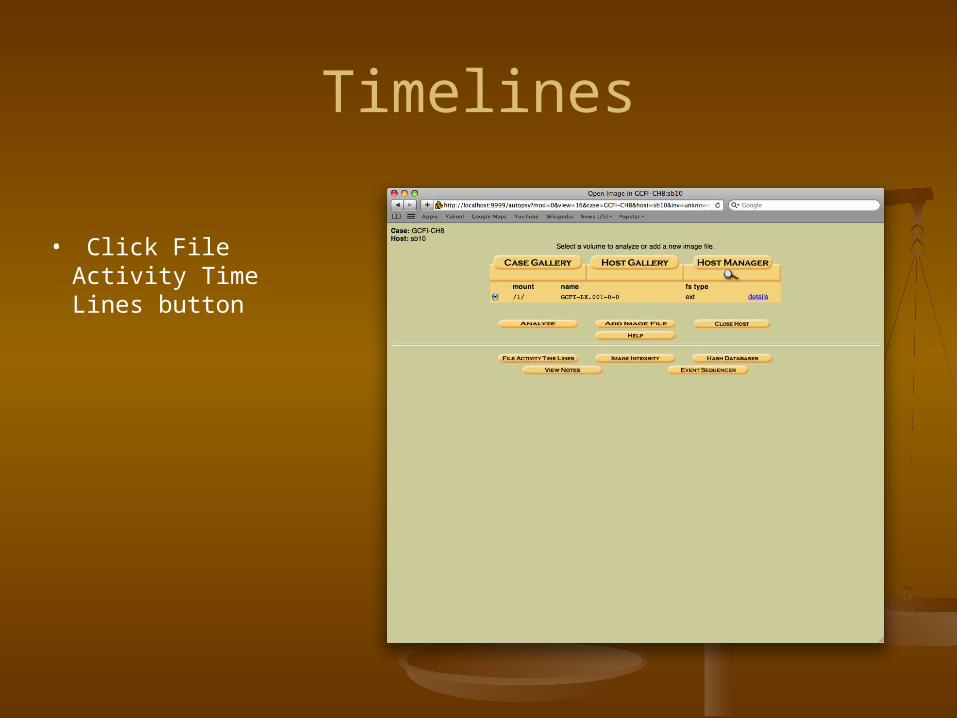
Timelines
• Click File Activity Time Lines button

Creating a Data File
• Click Create Data File

Creating a Data File
• Select /1/ GCFI-LX.001-0-0
• Type in GCFI-LX-body for the name of output file
• Click OK
• This will take about 30 seconds to complete

Creating a Data File
• Click OK again

Creating a Timeline
• Select GCFI-LX-body
• For starting date click specify and select Dec 1, 2006
• For ending date click specify and select Jan 23, 2007
• Click OK

Creating a Timeline
• The timeline will also take about 30 seconds to generate
• When the timeline is complete click OK

Viewing a Timeline
• Use the navigation buttons under the menus to select the dates to view
• You can also navigate to the text file by opening CIS POD, Forensics, EvLocker, GCFI-CH8, sb10, output and selecting timeline.txt

Closing Sleuth Kit
• Click the red x in the upper left corner of the browser
• Click inside the Terminal window and use ‘ctrl -c’ to exit the process
• You can then click the red x in the upper left corner to close Terminal