Embed Size (px)
Citation preview

ELECTRONIC TIME RECORDER
P
EX 3000N
AMANO

TAB LE OF CONTENTS[INTRODUCTION . . . . . . . . . . . . . . . . . . . . . . . . . . . . . . . . . . . . . . . . . . . . . . . . . . . . . . . . . . . . . . . . . . . . . . . . . . . . . . . 1
Components 1
NAMES OF PARTS! 2Names of Exterior Parts 2Programming Section 3
BEFORE OPERATION 6Power Source 6Installation 6Wall Mounting 7How to Connect an External Time Signal Unit 8
OPERATION1 9Selecting the Print Column 9Inserting Time Cards 9Opening and Closing the Lid 10
SETTING ,, 11Set Value Ranges and Initial Values 11Setting Imprint 13Changing Pay Period Ending Date 16Day Time Change 18Setting the Clock 19Changing Time Signal Duration 22Setting Daylight Savings Time 23Setting Weekly Program 27
Setting Day of the Week and Time 27Setting 2-Color Printing 28Setting Time Signal 29
TROUBLES HOOTING~, 31Troubleshooting 31List of Error Codes 32
MAINTENANCE . . . . . . . . . . . . . . . . . . . . . . . . . . . . . . . . . . . . . . . . . . . . . . . . . . . . . . . . . . . . . . . . . . . . . . . . . . . . . . . . 33Replacing Ribbon Cassette . . . . •• • 33Daily Maintenance 34
APPENDIX 34Specifications 34Weekly Program Setting Table••35

INTRODUCTION
Read this manual carefully, in order to operate your EX3000N Series timerecorder correctly and efficiently for a long time .
The specifications, appearance, and descriptions are subject to change due toimprovement.This manual has been carefully prepared, but if you find any errors or anydescriptions which you cannot understand clearly, contact the dealer fromwhom you have bought your time recorder .
List of Models
Note : EX3000N Series time recorders will not operate normally unless installed in aproper environment . Do not install them outdoors or where they are exposedto rain .
EX3000N Series components are as follows . Be sure to check beforeoperation that all components are supplied .
EIEX3000N Series
DAn operation manualtime recorder
(this manual)
(four keys)Two pairs of keys
DA bracket for
DA fuse
OSeals forwall installation
(250V 1 A). . . 100/1 20VAC(250V T500mA). . .220/240VAC
c(Attached to the front case)
c>c
different languages
1
EX3000N EX3100N EX3200N
1-color printing 02-color printing 0 0Time signal

2
NAMES O F PARTS
Dust cover
~~~
Lid
3 ,
~
EX300
'V®
0N/
J
Keyhole
Card Pocket
Clock
Column buttons (setting buttons)Column buttons
Revolving index
Setting buttons
,,,,,ME RED
Display
l
we'll ,
W,
EX 3000N
II
I
Ribbon cassette
Open the lid to set each item . Turn the setting index, press the setting itembutton and start setting items written on the index. For setting details see pages11- 30 .
Note : The following explains the setting method according to the index of EX3200N .The functions of EX3000N/EX3100N are different from those of EX3200N, soparts of their indexes are blank .
Setting Index 1 ,
3
PAY ENDBLANK
CURRENT W .
This button is used to select a pay period ending date or week,a blank row position on time card (monthly pay only) or acurrent week (in case of bi-weekly pay only) . Press the "+" or "-" button to change the value .
DAYCHANGE
This button is used to change the time at which the datechanges over. Press the " +" or "-" button to change the value .
SECOND RESET Press this button to advance the clock one minute . Hold thisbutton down to advance the clock quickly . The moment thisbutton is pressed, the clock is reset to 00 seconds . The analogclock is synchronized .
+ M IN .
SECOND RESET i Press this button to reset the clock at 0 seconds . At the momentI this button is released, the clock is reset to 00 seconds .STOP
IMPRINT Use this button to change print formats such as card type,24hours/12hours indication printing change, minute imprint,day of the week, etc .
ADJUST Press this button once to increase a set value by 1 . Hold thisbutton down to increase the set value quickly.+
ADJUST Press this button once to decrease a set value by 1 . Hold thisbutton down to decrease a set value quickly .
E
I Press this button to register set values .
PAY END SECOND RESET ADJUSTBLAU' DAY IMPRINT E
CURRENT W CHANGE +MIN. STOP +M
4
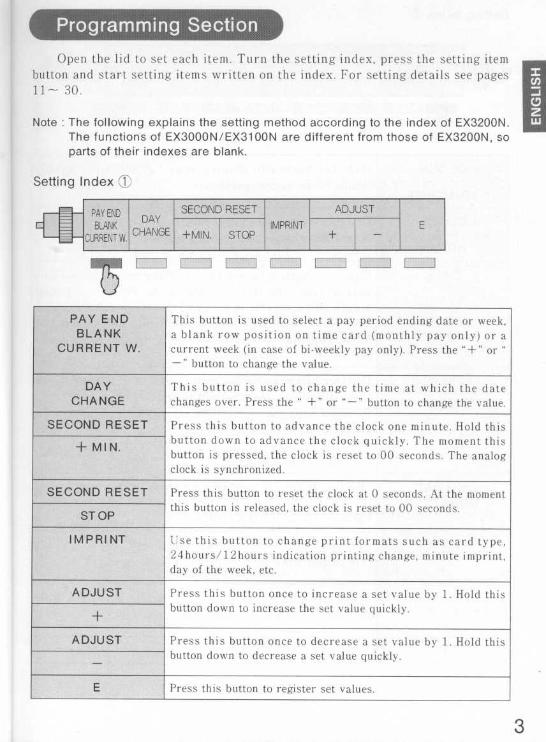
Setting Index O
UCLOCK Use this button to change year, month, and day . To
change these values, press the " +" or "-" button .YR/MO/DT
CLOCK Use this button to change hour and minute . To changethese values, press the "+" or "' button .
HR/MN
D .L .S . Use this button to set the starting date of daylightsavings time. The starting date can be set by designatinga date and a month or a day of the week . The change-over time can be set at any time between one o'clock andnine o'clock in hour units . Change the value by pressingthe "+" or "- ' button .
START
D.L.S . Use this button to set the ending date of daylight savingstime . If both the starting and the ending dates are set tothe same date, the set daylight savings time is canceled . Ifonly the starting date or the ending date is set, thedaylight savings time function will not operate . Changethe value by pressing the "+" or "-" button .
END
SIGNALDURATION
Use this button to change time signal duration . Changethe value by pressing the "+" or "-" button . The initialvalue is 5 seconds. (EX3200N)
ADJUST Press this button once to increase a set value by 1 . Holdthis button down to increase a set value quickly .+
ADJUST Press this button once to decrease a set value by 1 . Holdthe button down to decrease a set value quickly .
E Press this button to register set values .
CLOCK D.L.S . ADJUST- -SIGNAL E
YR/MO/DT HR/MN START END DURATION -1-
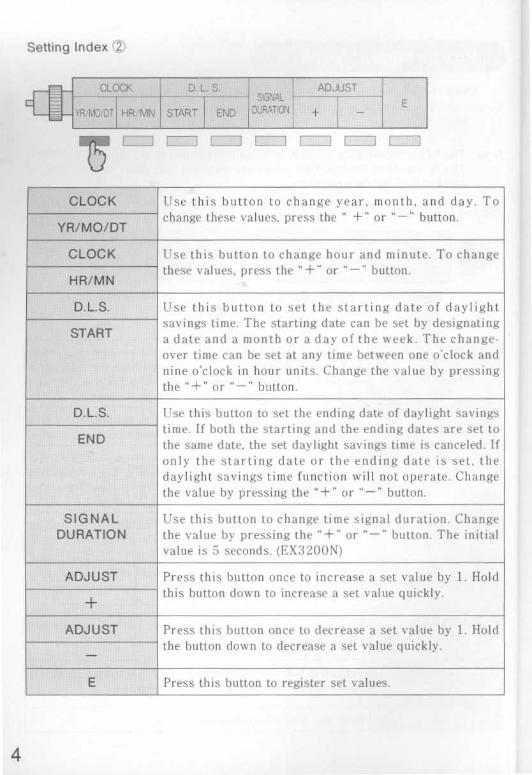
Setting Index ©3 (EX3100N/EX3200N)
WEEKLY PROGRAM Press this button to set day of the week, hour, and minutein a weekly program. (EX3100N/EX3200N)
DY/HR/MN
WEEKLY PROGRAM Press this button to set change-over of ribbon color forprinting time cards in black or red in a weekly program .(EX3100N/EX3200N)RED/BLACK
WEEKLY PROGRAM Press this button to set time signal . (EX3200N)
SIGNAL
C
Hold this button down for more than 2 seconds to cancelthe content of the weekly program number displayed . (Ifthis button is held down for less than 2 seconds, only thescreen contents will be canceled, and the existingprogram contents will remain .)
+
DAY ON
When setting a weekly program, press this button to stopthe day of the week from blinking and make it effectivefor the program. Hold this button down to advance anyvalue quickly .
DAY OFF
When setting a weekly program, press this button toextinguish the day of the week blinking and make itineffective for the program . Hold this button down todecrease any value quickly .
Ei Press this button to register set values .
VVEEKLY PROGRAM
DY1HR'MN RED/BLACK SIGNAL O DAY ON DAY OFF E

6
BEFORE OPERATION
•
Use a power source with a stable voltage .
Use a power source that supplies continuous voltage and is independent of otherequipment .
The time recorder has a built-in lithium battery, on which the inner clock runsand which stores the programming data . (The battery is effective for three yearsof cumulative power failure hours .)
Installation
Proper installation and good power conditions will enable you to operate thetime recorder for a long time .
Installation location
rPrepare a stand about 75cm high .Install the time recorder horizontally .
'III
IIII 7 ~cm
Improper installation locationsPlaces exposed to directsunlight or close to heatsources
•
Dusty or unstable places
•
Places exposed to rain
Places exposed to strongvibrations or shocks

ounting•
Insert a screw into the wall .Place one screw about 94cm (37") to 124cm (48 .8") above the floor .At this height the time recorder is easy to use .
Maximum_~ 2.9mm(0 .114") 4 .1 mm(0 .161 ")
3m~m(0 .118")
~~
f Allow 3mm be-ro \ ra wk
tween the screw•
head and wall .•
ixm2
© Insert a second screw into the wall .Place this screw 13cm to 13 .5cm immediatelybelow the first screw .
•
Peel off the protectivepaper .
ProtectivePaper
4 As shown in the figure,attach the bracket forwall mounting to theback of the case .
• Hook the unit on thescrews through the holeson the back of the case .
6 Secure the bracket to thewall with the lowerscrew .
7

8
How to Co nect an External Time Sig ,,.
EXT P.C .B .
0 0 6
Surge absorber
TB
1
O2
Bell or buzzer
Loosen the band
Contact output : Dry contactContact capacity : AC250V, 0.5A or less
DC24V, 0 .5A or less
Install a surge absorber on the signal unit side .AC INPUT
I Loosen the screws at 2 Insert the wires of the"A", using a screw driver . time signal unit
"' C7L
into "B" .
I iLL1 ''-
I~III\\A II
3 Tighten the screws at 4 Bind the wires with the"A", using the screwdriver .
band .Wires of the
A
external timesignal unit
Band
/
v?p% 7G`I~II

OPERATION
pectin
Press an appropriate IN or OUT button to select the print position for timecards .
IN OUT IN
Column button
Time cards are printed in the column where the column button light is on . Tochange the print position, press the button corresponding to the desired printposition .
T he print position on time cards remains unchanged until another columnbutton is pressed .
OUT IN OUT
Insert a time card lightly in the card pocket .The card is automatically pulled in and printed .
Surface Detection FunctionIf a time card is inserted backwards by
mistake, a long "beep" sound will occur, and thecard will be rejected .
Time cards are automatically pulled in . Do notpush them in the card pocket by force, and donot try to pull them out during printing .
*If a time card is inserted upside down bymistake, it will be printed . Be careful tocorrectly insert time cards in the card pocket .
*Do not insert any objects other than time cards .
9

10
OPENING ANC CLOSING THE LIDOpen the lid when you perform any of the following :
1 . Adjust time2 . Change pay period ending date .3 . Change year, month, or day .4 . Set or change daylight savings time .5 . Set weekly program . (EX3100N/EX3200N)6 . Set time signal . (EX3200N)7. Replace ribbon cassette .
--How to Open the Lid
Insert the keys into thekeyholes on both sides
2 . Open the lid .of the case and turn thekeys in the directionas shown in the figureabove .
*When you remove the keys, be sure to return the keyholes to theiroriginal position .
,,---How to Close the Lid
NOTE : Open and close the lidwith the power on .
3 . Remove the lid .
1 . Connect the hooks on 2 . Bring the lid down 3 . When the lid isthe lid with those on
toward you . Push
closed, the handsthe case . down firmly on the of the clock will
front of the lid move, stop momen-until it clicks into tarily at 12 o'clock,place .
then indicate thecurrent time .
J./
SETTING
Since the clock runs on lithium batteries stored inside, it indicates dates andtimes set in Japan when the power is turned on . Initial values have been set for apay period ending date and for a day time change . If the initial values areacceptable as they are, no setting is necessary . To adjust the clock, change the payperiod ending date, the day time change, or to set the weekly program, see pages11 ~30 for those procedures after turning on the power . The weekly programenables the user to set 2-color printing and time signal .Note : In the EX3000N Series, items to be set are different for each model .
1 1
Item Ci itent Set Value Range Initial Value
Pay period I(Monthly pay) 01 -31 31
Pay period ending date (Weekly pay) Monday to Sunday Fridayending date Current Week 1, 2 1
Blank 01 -32 01
Day time changeHour 00-23 03
Minute fixed at 00 . 00
Year 00-99 93Year, month, day Month 01-12 01
Day 01-31 01
Hour, minuteHour 00-23 00Minute 00-59 00Card type 1---7 1Automatic sur-face detection 1, 2 2
Imprint Imprint of hours 1-3 1Imprint of minutes 1---4 1Imprint of dayof the week 0--8 0

1 2
Item Content Set Value Range Initial Value
Time signalduration
Second 00-59 (EX3200N) 05
Day to startDaylightSavingsTime
Function 0-2 0
Time 1---9 2
Month 01--12
Day
Week/Day
01--31
1-5 / Monday to Sunday
Day to endDaylightSavingsTime
Function 0-2 0
Time 1-9 2
Month 01--12
Day
Week/Day
01-31
1--5 / Monday to Sunday
--
Day, hour, minuteDay
Hour, minute
(Time and day of the week to executea weekly program)
(EX310ON and EX3200N)
Monday
00 : 00
2-color printingR : To start printing in red .
(EX3100N and EX3200N)B : To start printing in black .
R
Time signal Time signal ON/OFF (EX3200N) ON(L )

10-- 1 s% - - 2I
I I1
v.
13 A4
f
aE
Print formats are charged as follows :
The selection of setting is possible only when [1 : monthly pay) cards are used . When(2-r4 : weekly or Bi-weekly pay) cards are used, the setting is fixed at (2 : notoperational) .
©3 Print Format
1 : 24 hours (0-23 hours) (0 is not printed at thetens digit of hour . Example : 9 : 00)
2 : 12 hours (AM/PM hours) (Minute isunderlined for PM. Example : 9 : 00)
3 : 24 hours (0---23 hours) (0 is printed at the tensdigit of hour . Example : 09 : 00)
(A)Minute Indication
1/100 hour A, 1/100 hour B . and I /10 hour-
(55)Day of the weekindication
1 : Minutes 2 : 1/100 hour A3 : 1/100 hour B 4 : 1/10 hour
0 : Date 1 : English 2 : Spanish 3 : French4 : German 5 : Italian 6 : Japanese7 : DAY NO . (1 - 7) 8 : No indication
1 3
Minute I 01100hoecd '00
1 2 3 4 5 6 7 8 - 7 30 31 32 33 3 35 -- 54 55 56 57 58 5902 03 05 07 08 10 12 13 15 - 8 70 52 A3 55 5 58 - 90 92 93 95 97 94
1'100 hour B 100 00 00 05 05 0o 10 10 10 15 - 5 70 50 50 55 55 55 - 90 90 90 95 9 j 951 ;'10 hour . 0 0 0 0 0 0 j 1 1 1 1- 4 5 5 ) 5 5~ 9 9 9 9 9 9
(I)Card Type (with 6mm pitch)
1 : Monthly pay 112-~M v111111111Select from 1 - 7 the
2 : Upper step weekly paymode which applies to
(Bottom space : 23mm) Upper stepthe card you use .
3 : Upper step weekly pay-With 7mm pitch (special
(Bottom space : 35mm)o~8
order), choose either "2"
4 : Lower step weekly pay m~ = Lower step(Bottom space : 23mm)
i Bottom space-or
5 : Lower step weekly pay(Bottom space : 35mm) Pitch
6 : Bi-weekly pay(2 Surface Detection
(Bottom space : 23mm)Function
7 : Bi-weekly pay*The surface detection fun- (Bottom space : 35mm)ction operates only when
When using a monthly pay time card, select 1 or 2 .you use Amano time cards
When using a weekly or bi-weekly pay time card, 2(monthly pay cards) or an
is automatically set .equivalent with a surfacedetection cut-out. Surface detection function
operationalnot operational

Example : Set "Lower step weekly pay (Bottom space : 23mm)", "Surfacedetection function not operational", "12-hour system printing","1/100 hour B" and "Date printing" .
fl Open the lid and turn the setting index .
To change the minute indication,press the "+" or "-" button and set "3" .Press the "E" button to register it .
Minute indication
© To change the card type,press the "+" or "-" button and set "4" .Press the "E" button to register it .
4 To change the surface detection function,perform the following :When (2-7 : weekly / Bi-weekly pay]cards are used, the automatic surfacedetection function is automatically set to
- PAY _VD SECOND RESET- IMPRINT
+MIN STOP
ADJUSTEELIDE
DAYCHANGE___T_-CURRENT
_f f TI f
© Press the "IMPRINT" button . The initialvalue will appear .
Card --ip-
type
Print format
r
f~l
-A--
u~
Surface
detection
function
Day of the week
indication
[2 : not operational] . When [1 : monthlypay] cards are used, select the settingusing the "+" or "-" button and set bypressing the "E" button .
© To change the print format,press the "+" or "-" button and set "2" .Press the "E" button to register it . r_ - I
To change the day of the week indication,press the "+" or "-" button and set "0" .Press the "E" button to register it .
The setting is completed . Close the lid .If required, other settings can also be performed before closing the lid .
15

Pay period ending date can be set three ways : weekly pay, bi-weekly pay andmonthly pay. Select the desired one. Make the selection when setting imprint . (Seepages 13- 15 .)
(Weekly pay)Example : Set the pay period ending day to Monday .
•
Open the lid and turn the setting index .
U'
DAY9LANr,?RcNT6N.i CHANGE
SECOND RESET j
ADJUSTIMPRINT I
~. . .
-+MIN. STOP
+
-
• Press the PAY END button, and the initialvalue will appear . (The © mark blinks at"FR" .)
• Press the "+" or "-" button and bring the0 mark to "MO" . Press the "E" button,and the blinking 0 mark stops blinking .The setting has been registered .
(Bi-weekly pay)Example : Set the pay period ending day to Sunday and the current week to
the second week .
•
Open the lid and turn the setting index .
PAY z%,
I SECOND RESE
ADJUST
ELAN
CHANGE
IMPRINTCURRENT
:TS. ANGE +MIN. STOP
+-
I
E
• Press the PAY END button, and the initialvalue will appear . (The © mark blinks at"FR", and the current week is the firstweek.)
• Press the "+" or "-" button and bring theIs mark to "SU" . Press the "E" button, andthe blinking 19 mark stops blinking . Thesetting has been registered .Press the "+" or "-" button to change thenumber to "2" . Press the "E" button, andthe blinking number stops blinking . The
16
setting has been registered .
.I
•
- Pay period
ending day
t
L
I
- • - F-Pay period
ending day
t --t --current week

(Monthly pay)When the pay period ending date is set, a blank row is set automatically .
A blank row means a row is left blank out of the 32 rows on the surface and backof a time card . When the pay period ending date is set at 31 or 1--14, the 1strow on the time card is set as a blank row . When the pay period ending date isset at 15--30 . the 17th row is set as the blank row .
Card surface
Card back
(The top row)
w 1st rowf 2nd row
1
(The top row)
f 17th row+- 18th row
1
16th row
7r77T7777 f. 32nd row(The bottom row)
(The bottom row)
Example : Set the pay period ending date to the 25th .
Open the lid and turn the setting index .
PAY
C DAB i SECOND RESET 1
ADJUST
r . T
+MIN. STOP
+
-C
BLANK
NIPPINT
•
Press the "PAY END" button, and theinitial value will appear . (The pay periodending date is the 31st, and the blank row
Ilk\is the 1st .)
Pay period ending date
Blank row
• Press the "+" or "-" button and set 25 inplace of 31 . Press the "E" button toregister it . The blank row is set at the17th .
4 To change the blank row to anothernumber, press the "+" or "-" button unti Ithe desired number appears . Press the "E"button, and the blinking number stopsblinking . T he setting has been registered .
, f I.4 ff -
The setting is completed . Close the lid .If required, other settings can also be performed before closing the lid .
1 7
1 8
Day Time ChangeA day time change is the time when a print row is changed on a time card
When a day time change is made, only hours are changed, and the minutes portionis fixed at 00 . The initial day time change has been set at 3 o'clock a .m .
Example : Set the day time change at 5 : 00 .
•
Open the lid and turn the setting index .
BLANKCLRREAT W
1 SECOND RESETDAY
CHANGE +MIN. STOPMPRIN
I ADJUST
E
I
C
I L
'--- I C
I
•
Press the "DAY CHANGE" button . Theinitial value will appear . (3 : 00)
• Press the "+" or " - " button, then set"05 : 00" . Press the "E" button, and theblinking display will stop blinking . Thesetting has been registered .
The setting is completed . Close the lid .If required, other settings can also be performed before closing the lid .

Setting the CIoq.
There are two procedures : setting the minutes, and setting the date and hour .
Setting Minutes
0 Open the lid and turn the setting index .
SECOND RESET
ADJUSTPAY Ew DAYBLANKCHANGE
STOP IM
EURRENTW.
+MIN .
TOP
+
-
C 7 C
~ .I . C_ I
C~, C-7
H Correct the time by using the "+ MIN ." and "STOP" buttons .
SECOND RESET
+MIN . STOP
Each time this button is pressed,the clock advances one minute .
Holding it down will advance the
clock quickly . Press the button,
and the clock will automatically
begin at 00 seconds .
L 71 1_ J
Press this button to correctseconds .
Pressing this button stops the
second counting . Release the
button, and the clock will
automatically start from 00
seconds.
X Minutes cannot be moved backward . If the clock is several minutes fast,adjust the time by pressing the "STOP" button . When the clock is ten ormore minutes fast, press the "HR/MN" button of the clock to adjust thetime. (See page 20, 21 .)

20
Setting the DateYear, month, date, hour, and minute are set as follows
Press the "+" or "-" button to change values . Be sure to press the "E"button before setting a new item or when registering values .
(Setting of Year, Month, and Date)Example : Change December 18, 1993 to April 21, 1994 .
•
Open the lid and turn the setting index .
S T
:LDC
HR MN START
L o .
E
•
Press the "YR/MO/DT" button .
• Press the "+" or "-" button to change theyear and press the "E" button . If it is notnecessary to change the year, press the"E" button .
4 Press the "+" or "-" button to change themonth and press the "E" button . If it is notnecessary to change the month, press the"E" button .
• Press the "+" or "-" button to change thedate . Press the "E" button to register thesetting .
ADJUST
E
Year
Month --~~ h I!:!.*- daten_ u_1
'ii_i ''I#j I i 1
The setting is completed . Close the lid .If required, other settings can also be performed before closing the lid .

(Setting of Hour and Minute)Example : Change 18 : 00 to 8 : 30 .
0 Open the lid and turn the setting index .
D
DSsNAL
HR, MN START END DUIATGN
+
1
I
7
l
I
© Press the "HR/MN" button .
© Press the "+" or "-" button to change thehour. Press the "E" button to register thesetting .
4 Press the "+" or "-" button to change theminute . The clock hands move to matchthe set time .
i •nn1-08 LIU
2 1

22
Time signal duration is changed as follows :
Press the "+" or "-" button when changing values . Be sure to press the"E" button when registering values .
Example : Change the initial value to 10 seconds .
•
Open the lid and turn the setting index .
CLOC
R . CG ST HR/MN START
D. L S .
END
S Cr&
DLEATION
ADJUST
I
I
G
I
I I
-1 1- .. I
• Press the "SIGNAL DURATION" button,and the initial value (5 seconds) willappear .
• Press the "+" or "-" button to set thevalue at 10 . Press the "E" button toregister the setting .
The setting is completed . Close the lid .If required, other settings can also be performed before closing the lid .
E
(EX3200N)

Se.
ght Savings Time
The following explains how to set the starting and ending dates of daylightsavings time . Daylight savings time can be set by setting months and dates ordays of the week . If the starting and ending times are set at 2 : 00, the clock willadvance to 3 : 00 at 2 : 00 of the starting date and will return to 1 : 00 at 2 : 00of the ending date . If the starting and ending dates are set to the same date, nodaylight savings time is set . (A long "beep" sound will be heard, and the settingwill be canceled .)
Note : The function works only when both the starting and ending dates of daylightsavings time are set .
(Setting Month and Day)Example : Set the starting time and date to 5 : 00 of March 15th .
0 Open the lid and turn the index .
Items to be setI
f--Starting time/t~ p- Ending time
r_t_t r-t
Starting moth/
Starting date/Ending month
Ending date
CLOCK
0. L . S .
I
ADJUSTSDNAL
E
YR'MOVHR/MN START END DIYTATION
+
-
F I C
I CZi I
=7 -
I I _
• Press the "START" but-ton, and the initial value0 will blink .
• Press the "+" or ` - 'button and set 1 . Pressthe "E" button to registerthe setting .
Items 0 • • • No function1 . . . Setting of month
and date2 • . . Setting of month,
week, and dayof the week
23
24
4 Press the "+" or "-" button to set thestarting time .The time can be set from 1 : 00 to 9 : 00 .Press the "E" button to register thesetting .
© Press the "+" or "-" button to set thestarting month .Press the "E" button to register thesetting .
6 Press the "+" or "-" button to set thestarting date .Press the "E" button to register thesetting .
Press the "E" button again . The setting ofthe ending date will start . Perform thesetting of the ending date of daylightsavings time following the proceduresfrom step © .
The setting of daylight savings time is completed . Close the lid .If required, other settings can also be performed before closing the lid .
f3 r•i i-L 1 I r
n itoJ 1 _1
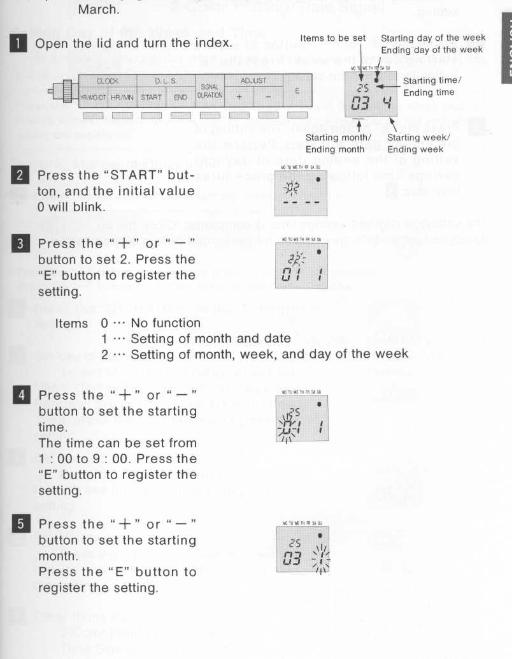
March .
0 Open the lid and turn the index .
CCLOCK
D. L 5
SIG µ
ADJUST
YR/M0/DT HR/MN START END OJRATON
+
r-
• Press the "START" but-ton, and the initial value0 will blink .
• Press the "+" or ` - 'button to set 2. Press the"E" button to register thesetting .
E
Items to be set
Starting day of the weekEnding day of the week
TStarting month/
Starting week/Ending month
Ending week
1,C
wE EH FA SA
Items 0 . . . No function1 . . . Setting of month and date2 . . . Setting of month, week, and day of the week
4 Press the "+" or " - 'button to set the startingtime .The time can be set from1 : 00 to 9 : 00 . Press the"E" button to register thesetting .
• Press the "+" or ' - 'button to set the startingmonth .Press the "E" button toregister the setting .
J1-1
I IJf
11
_
Sta ting time/Ending time
1_I1~I 1_I
_I
I

26
Press the "E" button to register thesetting .
Press the "+" or "-" button to set thestarting day of the week . Press the "E"button to register the setting .
8 Press the "E" button again . The setting ofthe ending date will start . Perform thesetting of the ending date of daylightsavings time following the proceduresfrom step
The setting of daylight savings time is completed . Close the lid .If required, other settings can also be performed before closing the lid .
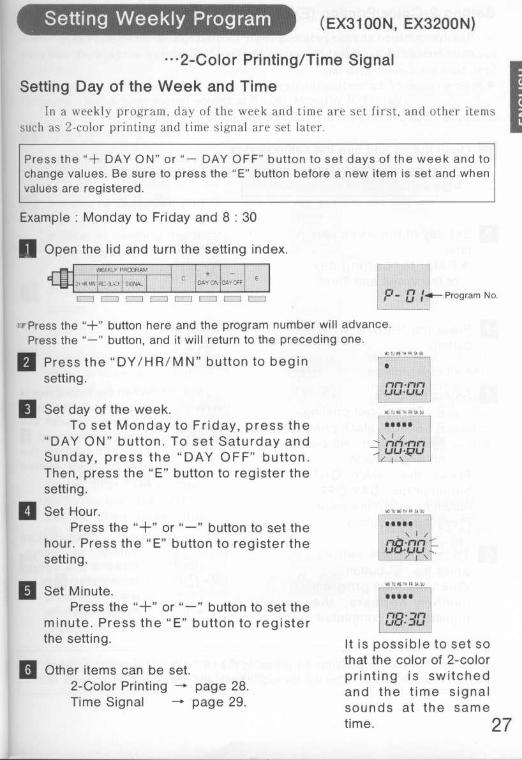
. . . 2-Color Printing/Time Signal
Setting Day of the Week and TimeIn a weekly program, day of the week and time are set first, and other items
such as 2-color printing and time signal are set later .
Press the "+ DAY ON" or "- DAY OFF" button to set days of the week and tochange values . Be sure to press the "E" button before a new item is set and whenvalues are registered .
Example : Monday to Friday and 8 : 30
fl Open the lid and turn the setting index .WEEKLY PROGRAM
ap' '3U.
SIfN
L- LI I
~ ---1
I I
F__1
-Press the
button here and the program number will advance .Press the "-" button, and it will return to the preceding one .
© Press the "DY/HR/MN" button to beginsetting .
r7n ,rireiULI •U„,
© Set day of the week .To set Monday to Friday, press the
"DAY ON" button . To set Saturday and
_Sunday, press the "DAY OFF" button .Then, press the "E" button to register thesetting .
4 Set Hour .Press the "+" or "-" button to set the
hour. Press the "E" button to register thesetting .
© Set Minute .Press the "+" or "-" button to set the
minute . Press the "E" button to registerthe setting .
6 Other items can be set .2-Color Printing - page 28.Time Signal
- page 29 .
(EX3100N, EX3200N)
ii-
I o Program No .
It is possible to set sothat the color of 2-colorprinting is switchedand the time signalsounds at the sametime .
27
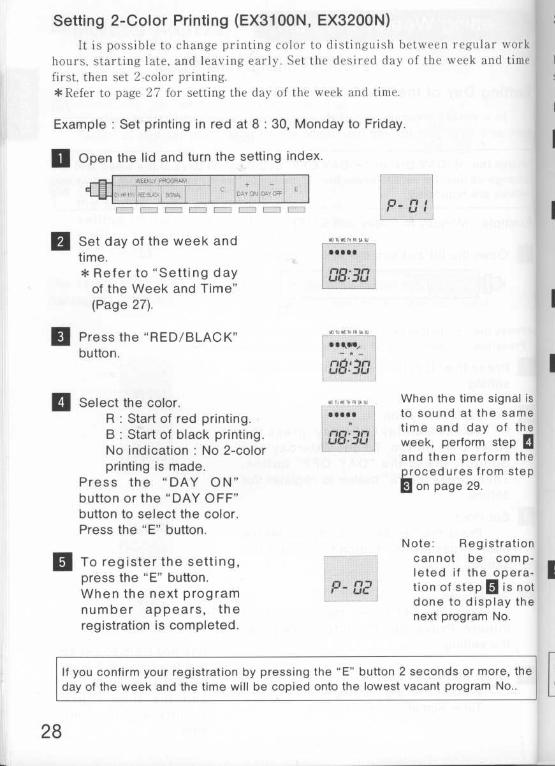
Setting 2-Color Printing (EX3100N, EX3200N)It is possible to change printing color to distinguish between regular work
hours, starting late, and leaving early . Set the desired day of the week and time
tfirst, then set 2-color printing .*Refer to page 27 for setting the day of the week and time .
Example : Set printing in red at 8 : 30, Monday to Friday .
•
Open the lid and turn the setting index .
2 8
"- rl Iu
~,
~ u
•
Set day of the week andtime .* Refer to "Setting dayof the Week and Time"(Page 27) .
•
Press the "RED/BLACK"button .
4 Select the color .R : Start of red printing .B : Start of black printing .No indication : No 2-colorprinting is made .
Press the "DAY ON"button or the "DAY OFF"button to select the color .Press the "E" button .
•
To register the setting,press the "E" button .When the next programnumber appears, theregistration is completed .
1-11-181:JLI 31,01
< TI ~1, F1 11 11
1-11-1131 :311-1•
-11
r1 101j,
When the time signal isto sound at the sametime and day of theweek, perform step Qand then perform theprocedures from step© on page 29 .
If you confirm your registration by pressing the "E" button 2 seconds or more, theday of the week and the time will be copied onto the lowest vacant program No . .
f
I
Note : Registrationcannot be comp-leted if the opera-tion of step 0 is notdone to display thenext program No .
I

Setting Time Signal (EX3200N)It is possible to sound external time signals to signal starts and ends of
breaks and working hours . Set the desired day of the week first, and then setsignal time .
Example : Set a time signal sound at 8 : 30, Monday to Friday .
0 Turn the setting index .
Ia
WEEKLY PROGRAM_
+
1 Nr NIE -KKK Si6NA_
O
DA ON DA OFF
E
JJ C-1 r-1 1-..7 E:- [. . 1 f 1 I. . .. I
© Set day of the week andtime .* Refer to "Setting day ofthe Week and Time"(Page 27) .
© Press the "SIGNAL"button .
Select whether the timesignal is sounded or not .When
is indicated, thetime signal sounds .When no mark is shown,the time signal does notsound .Select the above byusing the "DAY ON"button or the "DAY OFF"button, then, press the"E" button .
© To register the setting,press the "E" button .When the next programnumber appears, theregistration is completed .
u. ,~ wE, . .F u
. . . . .
~ f'lll • 'lllI_ll_1 • _II_I
08:311-171
n n,
When the 2-colorprinting is to be set atthe same time and dayof the week, performstep 0 and thenperform the proceduresfrom step © on page28 .
Note : Registrationcannot be comp-leted if the opera-tion of step © is notdone to display thenext program No .
If you confirm your registration by pressing the "E" button 2 seconds or more, theday of the week and the time will be copied onto the lowest vacant program No . .
2 9
30
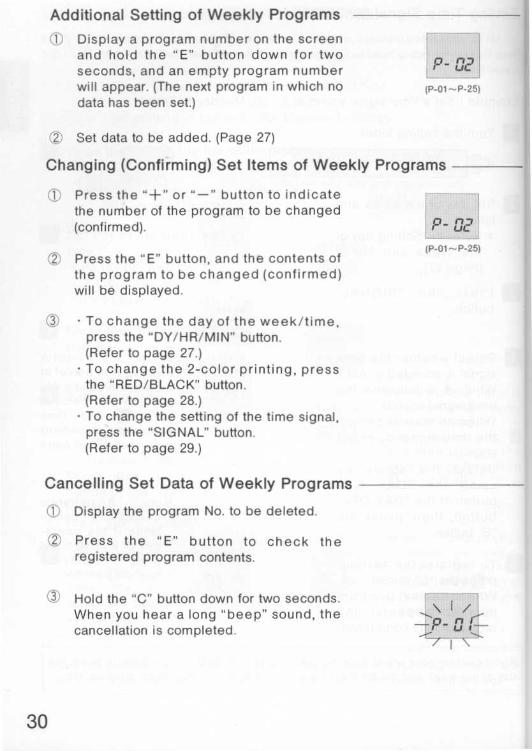
Additional Setting of Weekly Programs1~ Display a program number on the screen
and hold the "E" button down for twoseconds, and an empty program numberwill appear. (The next program in which nodata has been set .)
Z2 Set data to be added . (Page 27)
Changing (Confirming) Set Items of Weekly Programs
10 Press the "+" or "-" button to indicatethe number of the program to be changed
'1-(confirmed) .
02e
(2 Press the "E" button, and the contents ofthe program to be changed (confirmed)will be displayed .
03
To change the day of the week/time,press the "DY/HR/MIN" button .(Refer to page 27 .)To change the 2-color printing, pressthe "RED/BLACK" button .(Refer to page 28 .)To change the setting of the time signal,press the "SIGNAL" button .(Refer to page 29 .)
Cancelling Set Data of Weekly Programs
11 Display the program No . to be deleted .
02 Press the "E" button to check theregistered program contents .
Hold the "C" button down for two seconds .When you hear a long "beep" sound, thecancellation is completed .
c'_ ' 12(P-01-P-25)
(P-01---P-25)
i
TROUBLESHOOTING
3 1
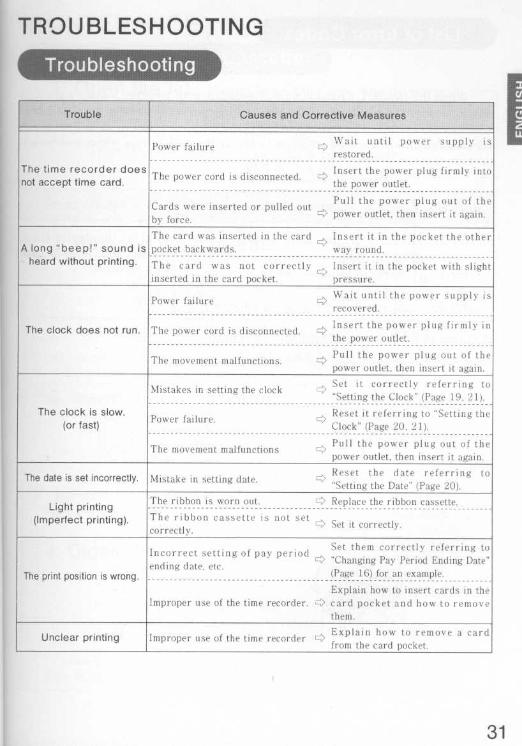
Trouble Causes and Corrective Measures
The time recorder doesnot accept time card .
Power failure
-* Wait until power supplyrestored --------------- --------------- - -----------------
The power cord is disconnected
Insert the power plug firmly into. the power outlet
Cards were inserted or pulled out
Pull the power plug out of thepower outlet, then insert it again .by force .
A long "beep!" sound isheard without printing .
The card was inserted in the card
Insert it in the pocket the otherpocket backwards .
way round .--- ------------------ - -------------
---------------------------------- ---The card was not correctly
Insert it in the pocket with slightinserted in the card pocket .
pressure .Wait until the power supply isPower failurereco vered .
The clock does not run . The power cord is disconnected .--------- -
----------------- - --------------The movement malfunctions .
Insert the power plug firmly inthe power outlet .--------------- - ------------Pull the power plug out of thepower outlet, then insert it again .
Mistakes in setting the clock Set it correctly referring toSetting the Clock" (Page 19, 21) .-------------------------------------------- ---- --------------- - -------------
The clock is slow.(or fast) Power failure.
* Reset it referring to "Setting theClock (Page 20, 21) .
--------------------------- - -------------------------------- ---------------The movement malfunctions Pull the power plug out of the
power outlet, then insert it again .
The date is set incorrectly . Mistake in setting date . Reset the date referring to"Setting the Date" (Page 20) .
Light printing(Imperfect
The ribbon is worn out .
- --Replace
-the
- ribbon cassette-----------------
-------printing).
The ribbon cassette is not set
Set it correctly.correctly .
The print position is wrong .
Incorrect setting of pay period
Set them correctly referring to
ending
"Changing Pay Period Ending Date"date, etc .
(page 16) for an example .--------- - -------------------- ------------------------------------Explain how to insert cards in the
Improper use of the time recorder . card pocket and how to removethem .
Unclear printing Improper use of the time recorder Explain how to remove a cardfrom the card pocket .
32
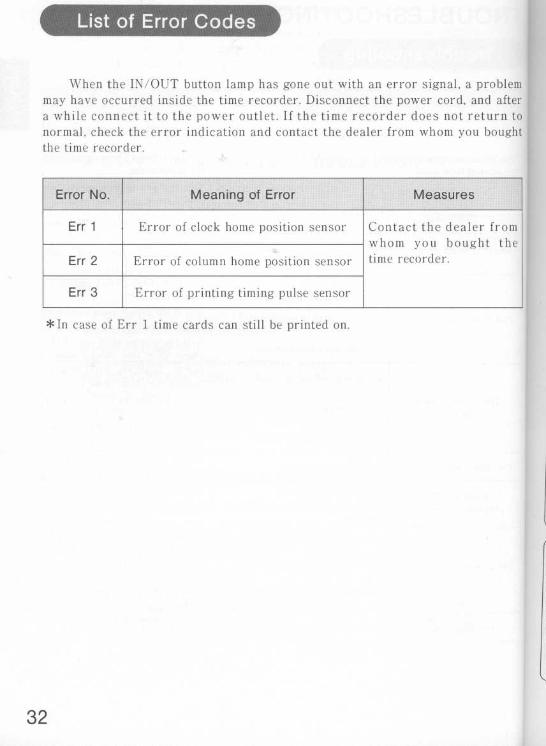
When the IN/OUT button lamp has gone out with an error signal, a problemmay have occurred inside the time recorder . Disconnect the power cord, and aftera while connect it to the power outlet . If the time recorder does not return tonormal, check the error indication and contact the dealer from whom you boughtthe time recorder .
*In case of Err 1 time cards can still be printed on .
Error No . Meaning of Error Measures
Err 1 Error of clock home position sensor Contact the dealer fromwhom you bought thetime recorder .Err 2 Error of column home position sensor
Err 3 Error of printing timing pulse sensor

MAINTENANCE
,-- 1 . Open the lid .
Note: Change the ribbon with the power on .
Aft
yJ
Insert the keys into the keyholes on both side of the case, turn the keysin the direction indicated in the figure above, and open the lid .
2. Remove the cassette .
As shown in the figure above, pull the ribbon holders toward you and,holding them there, pull out the cassette .
3. Insert a new cassette .
Correctly insert a new cassettebetween the ribbon guide andthe dot printer head .
J
4. Close the lid .A
BT li
!* ©
Ribbon holders
21i
Ribbon guide
- Dot printer headwl, ∎ ~∎
Knob:I~
Push the cassette head until itclicks into place . Turn the knobclockwise to remove any slack-ness in the ribbon .
1l
A
"»g __
. .
B
11-11,48
(-- i
(
Connect the hooks in the lid (A in the figure) with the hooks in the case(B). Bring the lid down toward you until it is inserted into place .

Wipe the window glass with a dry soft cloth . Be careful when wiping it becausethe glass surface has been specially processed .
34
Dai
Clean the case when it becomes soiled .
•
Wet a soft cloth with water or a neutraldetergent and wipe the case lightly .
• Do not use benzine, volatile thinner orother chemicals for cleaning, because theymay damage or discolor the case .
•
Note that spraying insecticide over the casemay also damage or discolor the case .
APPENDIX
Specifica
•
Power source : 100/120VAC or 220/240VAC +/-10 %, 50/60Hz
•
Power consumption : Ordinary 4W, Maximum 20W
•
Operating conditions : Temperature -10 1C to 40 CHumidity 10 % to 90 % RH (without condensation)
•
Weight : 2 .3kg (5 .1 e bs .)
•
Dimensions : 190(W) X 224(H) X 127(D) mm(7 .1 /2"') X (8 .6/8"") X (5"')
•
Clock system : Quartz oscillation system, Accuracy +/-3 seconds per week(25 C+/- 5 C) (77"F+/-10°F)

Example
Setting Table
A maximum of 25 weekly programs can be set .
35
PROGRAM
NDAY
HR
MIN
RED
BLACKSIC\ I
1 3 MO TU WE TH FR SA SU R B
14 MO TO WE TH FR SA SU R B
1 i MO TU WE TH FR SA SO R B
16 510 TO WE TH FR SA SU R B
MO TU WE TH FR SA SU R B
18 MO TO WE TH FR SA SU R B
19 MO TU WE TH FR SA SU R B
0 MO TV WE TH FR SA SU R B
21 MO TU WE TH FR SA SU R B
I MO TU WE TH FR SA SU R B
23 MO TFI WE TH FR SA SU R B
MO TU WE TH FR SA SO R B
MO TO WE TH FR SA SU R B
PROGRAMNo .
DAY HR/MIN RED/BLACK SIGNAL
1 „VVdjVOSA Sty 6 .30 ® B X2 dbMdp(DSA SU ,'7 DG R o 0
^RO(R 1M
I
3
DAY
MO TU WE TH FR SA Sl'
MO TU WE TH FR SA SC
MO TV WE TH FR SA SO
MO TV WE TH FR SA SO
NMO TO WE TH FR SA SU
MO TU WE TH FR SA SU
HR
115
RFD
BLAC
R
R
R
R
R
R
B
B
B
B
B
B
1 CN I
MO TI' WE TH FR SA SL: R B
8 MO TO WE TH FR SA SO R B
MO TU WE TH FR SA SU R B
10 MO TU WE TH FR SA SU R B
11 MO TO WE TH FR SA SU R B
17 MO TEI WE TH FR SA SU R B