Embed Size (px)
Citation preview
Alfresco Workflow Student Guide
Publication Date: 14th May 2010 Version: 1.1
Alfresco Training
Alfresco Workflow
14 April 2010 Page 2
Document Information Information in this document is subject to change without notice. No part of this document may be reproduced or transmitted in any form or by any means, electronic or mechanical, for any purpose, without the express written permission of Alfresco. The trademarks, service marks, logos, or other intellectual property rights of Alfresco and others used in this documentation ("Trademarks") are the property of Alfresco and their respective owners. The furnishing of this document does not give you license to these patents, trademarks, copyrights, or other intellectual property except as expressly provided in any written agreement from Alfresco.
The United States export control laws and regulations, including the Export Administration Regulations of the U.S. Department of Commerce, and other applicable laws and regulations apply to this documentation which prohibit the export or re-‐export of content, products, services, and technology to certain countries and persons. You agree to comply with all export laws, regulations, and restrictions of the United States and any foreign agency or authority and assume sole responsibility for any such unauthorized exportation.
You may not use this documentation if you are a competitor of Alfresco, except with Alfresco's prior written consent. In addition, you may not use the documentation for purposes of evaluating its functionality or for any other competitive purposes.
If you need technical support for this product, contact Customer Support by email at [email protected]. If you have comments or suggestions about this documentation, contact us at [email protected].
Alfresco 2010
Revision History
This shows the history of the course software and materials and the applicable releases of Alfresco software which this course relates to.
Reference Course Version Alfresco Releases Publication Date Notes 360 1.0 3.2r onwards
Alfresco Explorer only 2010-‐04-‐14
1.1 ditto 2010-‐05-‐14 Added missing exercise 6
Typographical Conventions
The following conventions are used in this guide to indicate types of information.
Convention Type of Information bold Identifies user interface elements and items to select, such as menu options,
command buttons, and items in a list. monospace Identifies file and path names, input text, standard output, code, and so on. italics Emphasizes importance and used to introduce new concepts and terms.
Alfresco Workflow
14 April 2010 Page 3
Contents
Document Information ................................................................................................................. 2
Revision History ................................................................................................................................................ 2 Typographical Conventions .............................................................................................................................. 2
Contents ....................................................................................................................................... 3
Exercises ....................................................................................................................................... 5
System Requirements ...................................................................................................................................... 5 Downloading and installing VMware ............................................................................................................... 6 Virtual Machine details .................................................................................................................................... 6 Accessing the Virtual Machine ......................................................................................................................... 6 Sample Documents and Workflows ................................................................................................................. 8
Welcome ...................................................................................................................................... 9
Course Summary .............................................................................................................................................. 9 Objectives ......................................................................................................................................................... 9 Audience .......................................................................................................................................................... 9 Course Outline ................................................................................................................................................. 9
1. Alfresco Workflow Overview ................................................................................................... 10
Learning Objectives ........................................................................................................................................ 10 What is covered in this section ...................................................................................................................... 10 Exercises ......................................................................................................................................................... 10
2. Defining Workflows ................................................................................................................ 11
Learning Objectives ........................................................................................................................................ 11 What is covered in this section ...................................................................................................................... 11 Exercise .......................................................................................................................................................... 11
3. Process Definition Language .................................................................................................... 12
Learning Objectives ........................................................................................................................................ 12 What is covered in this section ...................................................................................................................... 12 Exercise .......................................................................................................................................................... 12
4. Task Definition ........................................................................................................................ 18
Learning Objectives ........................................................................................................................................ 18 What is covered in this section ...................................................................................................................... 18 Exercise .......................................................................................................................................................... 18
5. Alfresco Explorer Integration ................................................................................................... 23
Learning Objectives ........................................................................................................................................ 23 What is covered in this section ...................................................................................................................... 23 Exercise .......................................................................................................................................................... 23
6. Workflow and the Repository ................................................................................................. 25
Learning Objectives ........................................................................................................................................ 25 What is covered in this section ...................................................................................................................... 25 Exercise .......................................................................................................................................................... 25

Alfresco Workflow
14 April 2010 Page 4
7. Process Completion ................................................................................................................. 26
8. Stretch Goals ........................................................................................................................... 27
Solutions ..................................................................................................................................... 28
Part 6 – Process Creation ............................................................................................................................... 28 Part 7 – Process Enhancement ....................................................................................................................... 29 Part 8 – Process Enhancement Multiple Tokens ............................................................................................ 30 Alfresco Explorer Integration ......................................................................................................................... 31
References .................................................................................................................................. 33
Alfresco Training ............................................................................................................................................ 33 jBPM ............................................................................................................................................................... 33 Alfresco Community ....................................................................................................................................... 33 Trade and Industry Organizations .................................................................................................................. 33 Books .............................................................................................................................................................. 33
Alfresco Workflow
14 April 2010 Page 5
Exercises This is an interactive course where the exercises have been designed to augment what you learn in class and re-‐enforce your knowledge through progressively more complex labs.
A lab environment is provided to you in the form of a virtual machine based on VMWare’s VMWare Server product. In order to run these labs you must install either of these products on your laptop:
• For Windows: VMWare Server 2 • For Linux: VMware Server 2 for Linux Operating Systems • For Mac: VMware Fusion 3
VMWare Server for Windows and Linux is free, although you will need to register with www.vmware.com, VMWare Fusion for the Mac is however a purchasable product which can be acquired for a small sum. If you have not used the product before you can download a 30 day free trial for use on the course.
System Requirements
In order to run the VMWare machine your laptop (called the host by VMWare) needs to have some spare capacity. Below we list the machine requirements for different host operating systems.
Windows
• Standard x86-‐compatible or x86-‐64-‐compatible processor with up to 16 processors. 733MHz or faster CPU minimum.
• Minimum 2GB of RAM (4GB RAM recommended). • 1.7GB free disk space for VMware Server installation and at least 8GB for the Alfresco virtual
machine
Macintosh
• Minimum 1GB of RAM (2GB RAM recommended) • 700MB free disk space for VMware Fusion and at least 8GB for the Alfresco virtual machine • Mac OS X 10.5.8 or later; Mac OS X 10.6 or later
Linux
The system requirements for Linux are the same as for a Windows laptop. The currently supported host operating systems are listed below, for a full list including version numbers refer to the VMWare website:
• Mandrake Linux • Mandriva Corporate Server 4 • Red Hat Enterprise Linux • Red Hat Enterprise Linux AS • Red Hat Enterprise Linux ES • Red Hat Enterprise Linux WS • SUSE Linux Enterprise Server • TurboLinux Enterprise Server • Ubuntu Linux
Alfresco Workflow
14 April 2010 Page 6
Downloading and installing VMware
Visit the VMWare site and download the appropriate version of VMware. If you have arrived at the course without VMWare pre-‐installed then your instructor may have the software which you can copy rather than having to download.
Virtual Machine details
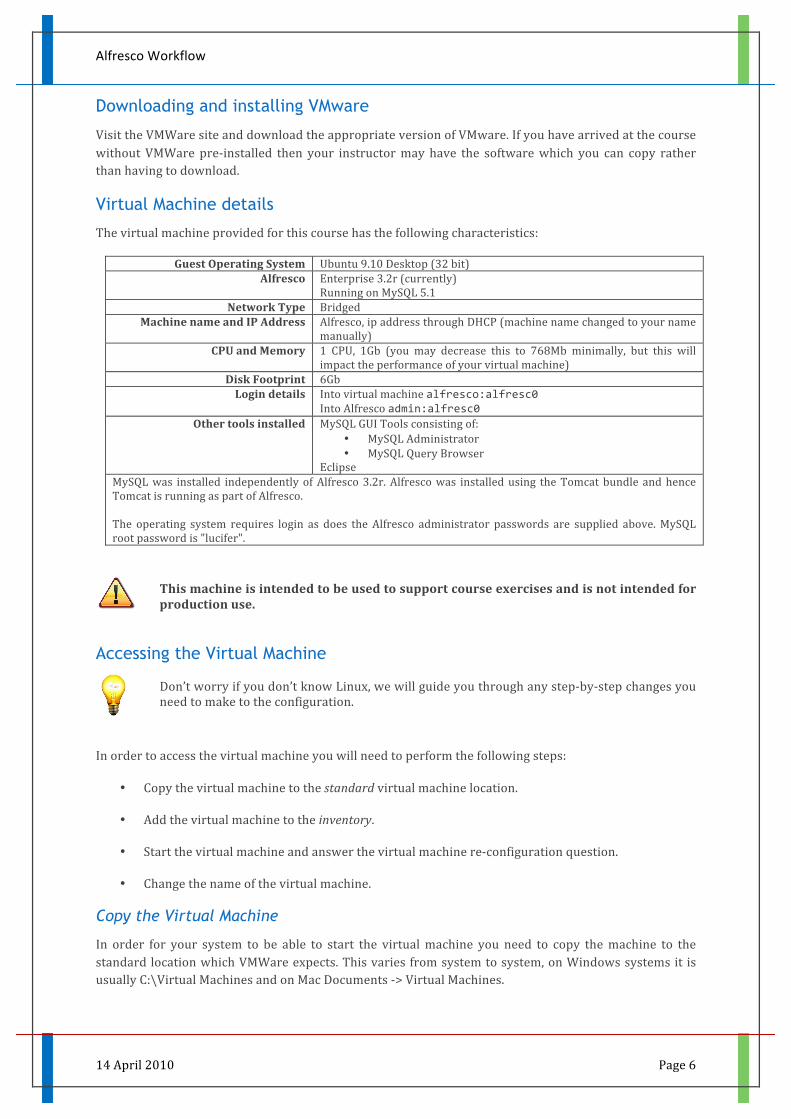
The virtual machine provided for this course has the following characteristics:
Guest Operating System Ubuntu 9.10 Desktop (32 bit) Alfresco Enterprise 3.2r (currently)
Running on MySQL 5.1 Network Type Bridged
Machine name and IP Address Alfresco, ip address through DHCP (machine name changed to your name manually)
CPU and Memory 1 CPU, 1Gb (you may decrease this to 768Mb minimally, but this will impact the performance of your virtual machine)
Disk Footprint 6Gb Login details Into virtual machine alfresco:alfresc0
Into Alfresco admin:alfresc0 Other tools installed MySQL GUI Tools consisting of:
• MySQL Administrator • MySQL Query Browser
Eclipse MySQL was installed independently of Alfresco 3.2r. Alfresco was installed using the Tomcat bundle and hence Tomcat is running as part of Alfresco. The operating system requires login as does the Alfresco administrator passwords are supplied above. MySQL root password is "lucifer".
This machine is intended to be used to support course exercises and is not intended for production use.
Accessing the Virtual Machine
Don’t worry if you don’t know Linux, we will guide you through any step-‐by-‐step changes you need to make to the configuration.
In order to access the virtual machine you will need to perform the following steps:
• Copy the virtual machine to the standard virtual machine location.
• Add the virtual machine to the inventory.
• Start the virtual machine and answer the virtual machine re-‐configuration question.
• Change the name of the virtual machine.
Copy the Virtual Machine
In order for your system to be able to start the virtual machine you need to copy the machine to the standard location which VMWare expects. This varies from system to system, on Windows systems it is usually C:\Virtual Machines and on Mac Documents -‐> Virtual Machines.
Alfresco Workflow
14 April 2010 Page 7
Add the Virtual Machine to the Inventory
Now we need to add the virtual machine to the inventory so that it can be started and used.
Windows From within the VMWare Console (this is accessed through your browser), you should select Virtual Machine -‐> Add Virtual Machine to Inventory. Then navigate to the virtual machine and navigate to the standard directory and contents and add finally select Virtual Machine.vmx and click OK.
If you are running VMWare on Windows, please note that the VMWare console does not run under Firefox 3.6. Use either Internet Explorer or a version of Firefox pre-‐dating 3.6.
Mac
When you are running VMWare Fusion navigate to File -‐> Open and open the virtual machine this will add the machine to the inventory.
Accessing the Virtual Machine
In order to access the virtual machine from your laptop or mac you will need to use either the hostname (alfresco) of the virtual machine or its IP address. In order to use the hostname to access the virtual machine you will need to change your hosts file. This can be protracted and so for this course we recommend that you simply use the IP address. Assuming that you make no changes to the virtual machine it should come preconfigured with an IP address of 192.168.78.130 but you should confirm the IP address before using it, see below.
Start Your Virtual Machine This is done through the VMWare Console or the VMWare Fusion application. Once your virtual machine is started, open the console and login as the user alfresco. When starting the virtual machine you may need to wait 45-‐60 seconds before all the necessary system services are running before you will be able to connect.
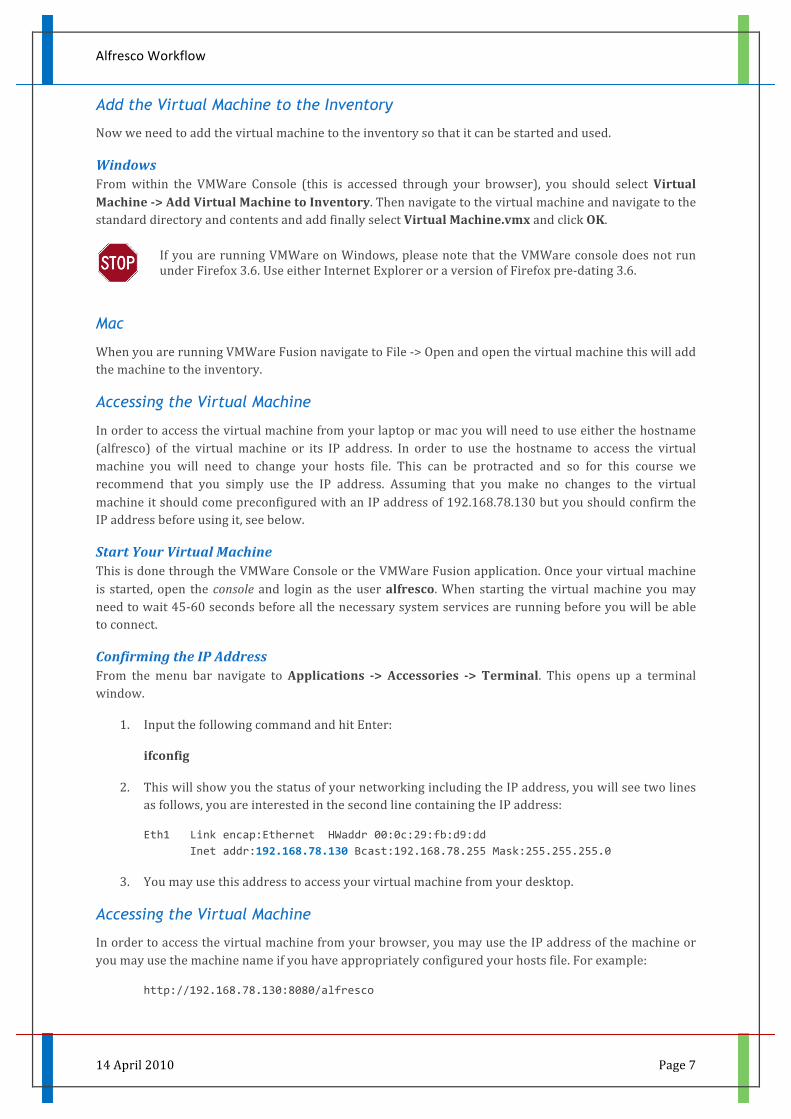
Confirming the IP Address From the menu bar navigate to Applications -‐> Accessories -‐> Terminal. This opens up a terminal window.
1. Input the following command and hit Enter:
ifconfig
2. This will show you the status of your networking including the IP address, you will see two lines as follows, you are interested in the second line containing the IP address:
Eth1 Link encap:Ethernet HWaddr 00:0c:29:fb:d9:dd Inet addr:192.168.78.130 Bcast:192.168.78.255 Mask:255.255.255.0
3. You may use this address to access your virtual machine from your desktop.
Accessing the Virtual Machine
In order to access the virtual machine from your browser, you may use the IP address of the machine or you may use the machine name if you have appropriately configured your hosts file. For example:
http://192.168.78.130:8080/alfresco
Alfresco Workflow
14 April 2010 Page 8
You may keep the virtual machine afterwards; the license is valid for the installed Alfresco version and does not expire but is limited to a single user.
Sample Documents and Workflows
You will be provided with a sample documents folder which contains a number of files that will be used through the exercises. Copy this to your machine and use it whenever the Sample Documents folder is referred to.
Solutions
Where appropriate solutions are provided, this Student Guide contains a Solutions section which explains the solutions in more detail and a folder is also provided containing the solutions themselves. We suggest that you work through the exercises before turning to the solutions, however the solutions are written such that if you are having difficulties with one particular exercise you can turn to the appropriate solution and you won’t be held back.
Alfresco Workflow
14 April 2010 Page 9
Welcome Welcome to the Alfresco Workflow Course. Your Student Guide is designed to help you through the course, contains the exercises or Labs and provides supplementary information which you might find useful.
Course Summary
This course covers Alfresco Advanced Workflows from start to finish, and will enable the design, development, and deployment of custom workflows that meet your business needs.
Objectives
At the end of this course you will:
• Understand workflows
• Know how to define workflows
• Know how to define task models
• Be able to customize the Alfresco Explorer for workflow
• Understand how workflow can interact with content
• Know how to deploy custom workflows
Audience
This course is aimed at developers who have prior knowledge of Alfresco and now want to be able to create and deploy workflows in an Alfresco environment.
Delegates are expected to understand workflow concepts and have used Alfresco, they should be familiar with java and an Integrated Development Environment (IDE) such as Eclipse.
It is desirable and helpful if delegates have been on the Content Modelling and Alfresco Explorer Configuration training course or the Intensive Alfresco for Development training course.
Course Outline
• Alfresco Workflow Overview
• Defining and Viewing Workflows
• Process Definition
• Task Definition
• Alfresco Explorer Client Integration
• Workflow and the Repository
Alfresco Workflow
14 April 2010 Page 10
1. Alfresco Workflow Overview
Learning Objectives
Our goal in this section is to begin to understand workflow concepts and some of the terminology which Alfresco uses in these contexts.
What is covered in this section
• What is a workflow
• How end users see workflows
• Workflow architecture
• Administering workflow
• Developer features
Exercises
Our goal in this section is to explore the user interface functions for workflow by initiating and running a workflow through to completion based on the in-‐built process definitions.
Authenticate and Login
1. Point your browser to http://<server name>:8080/alfresco
2. Login as Tom Small (tom:small)
3. Navigate to Company Home > Geo-‐Thermal Division > Marketing > Branding Project
4. Choose one of the documents you find in here and then initiate a Review & Approve workflow.
5. Enter some instructions and choose Harriet Slim as the Reviewer.
6. Once the workflow has started login as Harriet (harriet:slim)
7. Complete the task that has been delivered to Harriet
Stretch Goals
1. What differences did you notice between this workflow and the Ad-‐Hoc workflow?
2. Turn to the Default Workflow Process Definitions section of this guide and review the workflow definitions for the Ad-‐Hoc and Review & Approve Workflows; this will start to familiarize you with the process definitions which Alfresco uses.
Alfresco Workflow
14 April 2010 Page 11
2. Defining Workflows
Learning Objectives
In this section we introduce you to jBPM the workflow engine used by Alfresco and we look at how it integrates into the Alfresco architecture. We also looks at the different apporoches to defining workflows, this will allow you to understand the best way for you to define workflows and begin to understand the best practices involved in the definition and building of Alfresco workflows.
What is covered in this section
• jBPM
• Workflow definitions
• Approaches to defining workflows
Exercise
This section has no exercises.
Alfresco Workflow
14 April 2010 Page 12
3. Process Definition Language
Learning Objectives
In this section you will build and deploy a simple process definition. You will use a text editor to create the XML process definition and deploy the workflow using the Workflow Console. This will familiarize you with the process of deployment, troubleshooting and creating workflow process definitions from scratch. We will also start to develop our case study workflow using the Graphical Process Designer.
What is covered in this section
• jBPM
• Workflow definitions
• Approaches to defining workflows
Exercise
The goal of this exercise is to create a simple workflow and deploy that workflow using the workflow console then to use the workflow console to step through the workflow one step at a time.
Part 1
1. In your sample documents folder you will find a subfolder called Labs in here you will find a file called 01simple.xml. Open this file using a normal text editor. If you are working inside the virtual machine use gedit as the text editor. If you are working in your own environment use your preferred text editor, e.g. Notepad ++, Editpad Pro, etc.
2. In here create a simple workflow with a start node and an end node.
3. Transition the start node to the end node. Call the process definition "simple".
4. Save the workflow to {configRoot}/alfresco/workflow/simple.xml, on your virtual machine {configRoot} is: /opt/alfresco/tomcat/webapps/alfresco/WEB-‐INF/classes
5. Invoke workflow console:
http://<server name>:8080/alfresco/faces/jsp/admin/workflow-‐console.jsp
6. Deploy the workflow
7. Using the workflow commands start the workflow, view the transitions and step through the workflow one node at a time.
Part 2
1. In your sample documents folder you will find a subfolder called Labs in here you will find a file called 02two-‐step.xml. Open this file using a normal text editor. If you are working inside the virtual machine use gedit as the text editor. If you are working in your own environment use your preferred text editor, e.g. Notepad ++, Editpad Pro, etc.
2. In this file you will find the complete example from part one, alternatively use the file you developed in Part 1 and extend it using these instructions.
3. Create two new steps in the workflow, use state nodes for this.
Alfresco Workflow
14 April 2010 Page 13
4. Transition the start node to both new steps.
5. Transition each new step to the end node.
6. Call the process definition “two-‐step”.
7. Save the workflow to {configRoot}/alfresco/workflow/simple.xml, on your virtual machine.
8. Deploy the workflow
9. Using the workflow commands start the workflow, view the transitions and step through the workflow one node at a time.
10. Stretch: start the workflow again and see if you can understand how the transition paths work through the workflow and how you can change these.
Part 3
1. In your sample documents folder you will find a subfolder called Labs in here you will find a file called 03fork.xml. Open this file using a normal text editor.
2. In this file you will find the complete example from part one, alternatively use the file you developed in Part 2 and extend it using these instructions.
3. Enhance the two-‐step workflow to include a fork node after the start node.
4. The fork node should fork to the two steps.
5. Call the process definition "forking".
6. Deploy the workflow
7. Using the workflow commands start the workflow, view the transitions and step through the workflow one node at a time.
8. Stretch: start the workflow again and see if you can understand how the transition paths work through the workflow and how you can influence these.
Part 4
1. In your sample documents folder you will find a subfolder called Labs in here you will find a file called 04join.xml. Open this file using a normal text editor.
2. In this file you will find the complete example from part one, alternatively use the file you developed in Part 3 and extend it using these instructions.
3. Enhance the join workflow to include a join node which brings together the transitions from the two steps and then transitions to the end node.
4. Call the process definition "join".
5. Deploy the workflow
6. Using the workflow commands start the workflow, view the transitions and step through the workflow one node at a time.
7. Stretch: start the workflow again and see if you can understand how the transition paths work through the workflow and how you can influence these.
Alfresco Workflow
14 April 2010 Page 14
Part 5 - Setup
We now change our focus to the case study. Our case study focuses around an imaginary company called Green Energy whose mission is:
Provide scientifically sound, high quality products to save the environment through renewable energy.
As part of their manufacturing processes Green Energy use Standard Operating Procedures (SOPs) to ensure quality and consistency and to make sure that they comply with Health and Safety Regulations. These SOPs are detailed instructions for carrying out a process such as the start-‐up and shutdown of a complex machine, or the process for measuring the quality of manufactured goods.
Sometimes a new SOP is required for a new process or an existing SOP has to be changed because a new machine is introduced for example.
A subject matter expert will revise an existing SOP or author a new one, this SOP must then be reviewed and approved before it can be used.
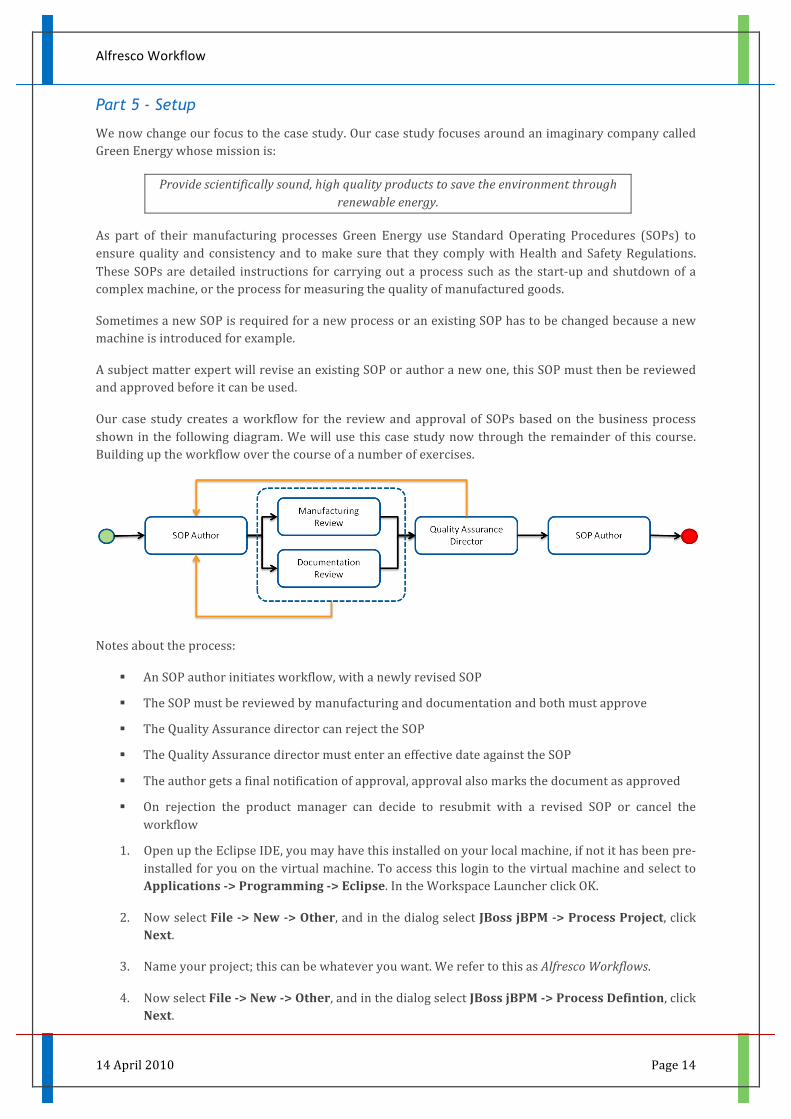
Our case study creates a workflow for the review and approval of SOPs based on the business process shown in the following diagram. We will use this case study now through the remainder of this course. Building up the workflow over the course of a number of exercises.
Notes about the process:
§ An SOP author initiates workflow, with a newly revised SOP
§ The SOP must be reviewed by manufacturing and documentation and both must approve
§ The Quality Assurance director can reject the SOP
§ The Quality Assurance director must enter an effective date against the SOP
§ The author gets a final notification of approval, approval also marks the document as approved
§ On rejection the product manager can decide to resubmit with a revised SOP or cancel the workflow
1. Open up the Eclipse IDE, you may have this installed on your local machine, if not it has been pre-‐installed for you on the virtual machine. To access this login to the virtual machine and select to Applications -‐> Programming -‐> Eclipse. In the Workspace Launcher click OK.
2. Now select File -‐> New -‐> Other, and in the dialog select JBoss jBPM -‐> Process Project, click Next.
3. Name your project; this can be whatever you want. We refer to this as Alfresco Workflows.
4. Now select File -‐> New -‐> Other, and in the dialog select JBoss jBPM -‐> Process Defintion, click Next.
Alfresco Workflow
14 April 2010 Page 15
5. Name your process; this can be whatever you want. We refer to this as SOP Review and Approve.
6. You can now start creating your workflow definition.
If you have not already done so, turn on debug logging so that you can track your workflow in the alfresco.log file.
Part 6 – Process Creation
Using the business process diagram as the basis for your workflow, use the graphical process designer to complete the following:
1. Add in the task-‐nodes, those done by or interacting with a human, for now you can name these whatever makes sense based on the diagram.
2. Add in the transitions between the nodes.
3. Add in reject transitions.
4. Deal with the fact that you can’t reject back to the start node, we also want the SOP Author who initiated the workflow to revise it.
5. Make sure that the SOP author is able to terminate the workflow if the SOP has not been approved, rather than revising.
6. Finally we need to mark the document as approved. This will require an automated node.
If you have any problems you can refer to the solution for any of the case study exercises for hints.
Deploying and Running the Workflow No we have our workflow it would be good to be able to run it just to see how it flows. In order to do this we need to deploy the workflow. In order to run the workflow you can do this in one of two ways. You can use the workflow console to run the workflow this is easier because it requires no change to the workflow definition, but more time consuming. Alternatively you can run the workflow from the Alfresco Explorer, but in order for this to work you need to associate the Task Nodes with an actor.
The easiest way to test a workflow process at the outset is to have all the tasks carried out by the initiator. To do this we can assign a single swim lane (initiator) to all of the tasks.
Adding Task Assignments Make sure you are focused on the Process Definition, either in the Design or the Diagram tab. Now clicking Swimlane in the Outline (right-‐hand panel), click Swimlanes in the bottom panel and in the empty list, right click to add a new Swimlane.
Make sure that you call the swimlane “initiator”.
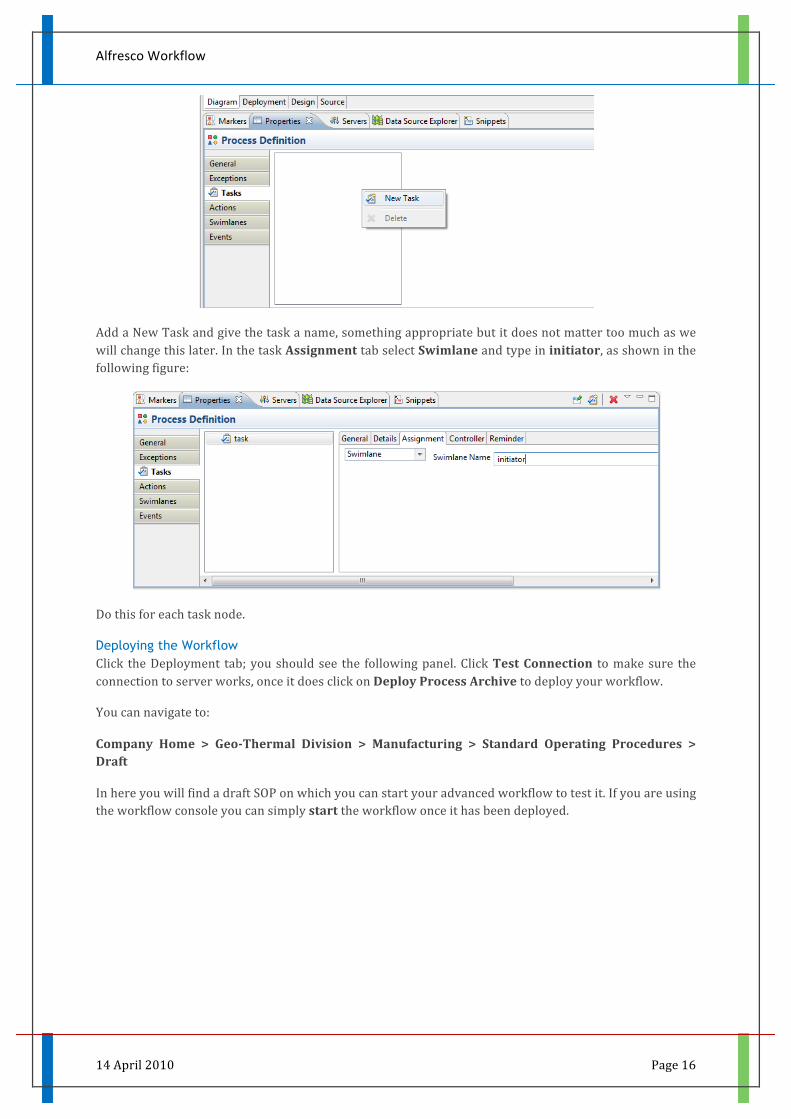
You now need to add a task to each Task-‐Node and associate the swimlane. Select each task node in turn, in the bottom panel select the Tasks tab and in the empty box, right-‐click, you should see the following:
Alfresco Workflow
14 April 2010 Page 16
Add a New Task and give the task a name, something appropriate but it does not matter too much as we will change this later. In the task Assignment tab select Swimlane and type in initiator, as shown in the following figure:
Do this for each task node.
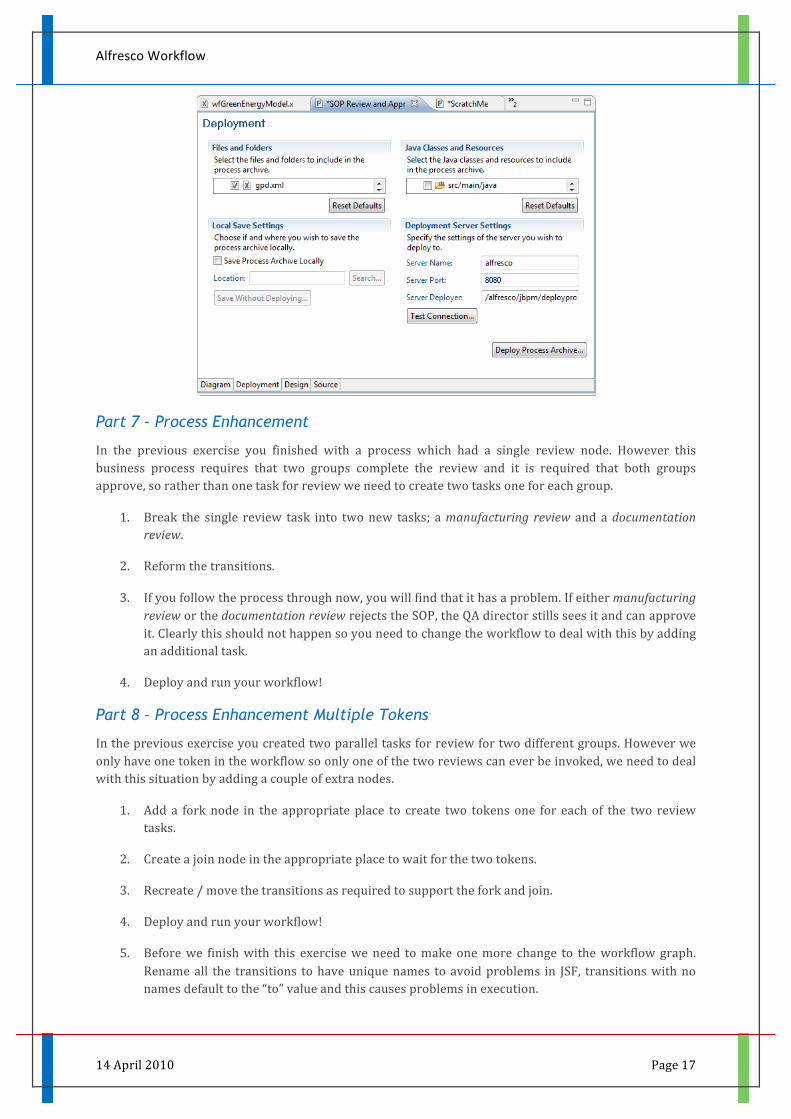
Deploying the Workflow Click the Deployment tab; you should see the following panel. Click Test Connection to make sure the connection to server works, once it does click on Deploy Process Archive to deploy your workflow.
You can navigate to:
Company Home > Geo-‐Thermal Division > Manufacturing > Standard Operating Procedures > Draft
In here you will find a draft SOP on which you can start your advanced workflow to test it. If you are using the workflow console you can simply start the workflow once it has been deployed.
Alfresco Workflow
14 April 2010 Page 17
Part 7 – Process Enhancement
In the previous exercise you finished with a process which had a single review node. However this business process requires that two groups complete the review and it is required that both groups approve, so rather than one task for review we need to create two tasks one for each group.
1. Break the single review task into two new tasks; a manufacturing review and a documentation review.
2. Reform the transitions.
3. If you follow the process through now, you will find that it has a problem. If either manufacturing review or the documentation review rejects the SOP, the QA director stills sees it and can approve it. Clearly this should not happen so you need to change the workflow to deal with this by adding an additional task.
4. Deploy and run your workflow!
Part 8 – Process Enhancement Multiple Tokens
In the previous exercise you created two parallel tasks for review for two different groups. However we only have one token in the workflow so only one of the two reviews can ever be invoked, we need to deal with this situation by adding a couple of extra nodes.
1. Add a fork node in the appropriate place to create two tokens one for each of the two review tasks.
2. Create a join node in the appropriate place to wait for the two tokens.
3. Recreate / move the transitions as required to support the fork and join.
4. Deploy and run your workflow!
5. Before we finish with this exercise we need to make one more change to the workflow graph. Rename all the transitions to have unique names to avoid problems in JSF, transitions with no names default to the “to” value and this causes problems in execution.
Alfresco Workflow
14 April 2010 Page 18
4. Task Definition
Learning Objectives
In this section you will learn how a workflow process can interact with the repository and the users. This will require you to put your prior knowledge of content modeling to create a new task model for the case study workflow. You will build upon the case study workflow and move away from the graphical process designer to editing the process definition by hand and adding in the required logic to the workflow.
This will familiarize you with the process of creating a task model to interact with a process, understand how they link together and how additional logic can be added to the process definition.
What is covered in this section
• The workflow content model
• The task model
• Task types
• Starting tasks
• The relationship of tasks to aspects
Exercise
The goal of this exercise is to create the required task mode, change the process definition to reference the task model. You will also transition from using the graphical process designer to updating the process definition directly.
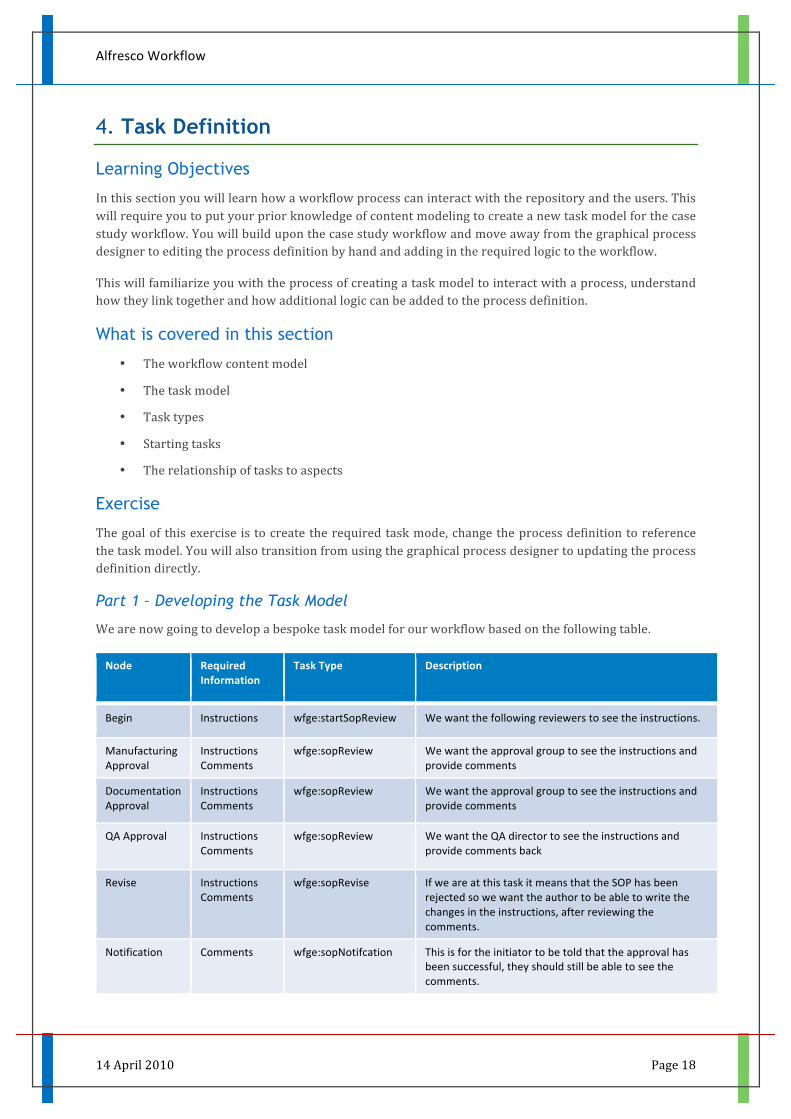
Part 1 – Developing the Task Model
We are now going to develop a bespoke task model for our workflow based on the following table.
Node Required Information
Task Type Description
Begin Instructions wfge:startSopReview We want the following reviewers to see the instructions.
Manufacturing Approval
Instructions Comments
wfge:sopReview We want the approval group to see the instructions and provide comments
Documentation Approval
Instructions Comments
wfge:sopReview We want the approval group to see the instructions and provide comments
QA Approval Instructions Comments
wfge:sopReview We want the QA director to see the instructions and provide comments back
Revise Instructions Comments
wfge:sopRevise If we are at this task it means that the SOP has been rejected so we want the author to be able to write the changes in the instructions, after reviewing the comments.
Notification Comments wfge:sopNotifcation This is for the initiator to be told that the approval has been successful, they should still be able to see the comments.
Alfresco Workflow
14 April 2010 Page 19
Notes a. Because Instructions and Comments are common across a number of tasks we will define these
as aspects.
b. The abbreviation for our model is going to be wfge (workflow green energy).
You should be familiar with defining models from the Content Modelling Course, however if you have difficulties please see the solution or follow the step-‐by-‐step instructions below.
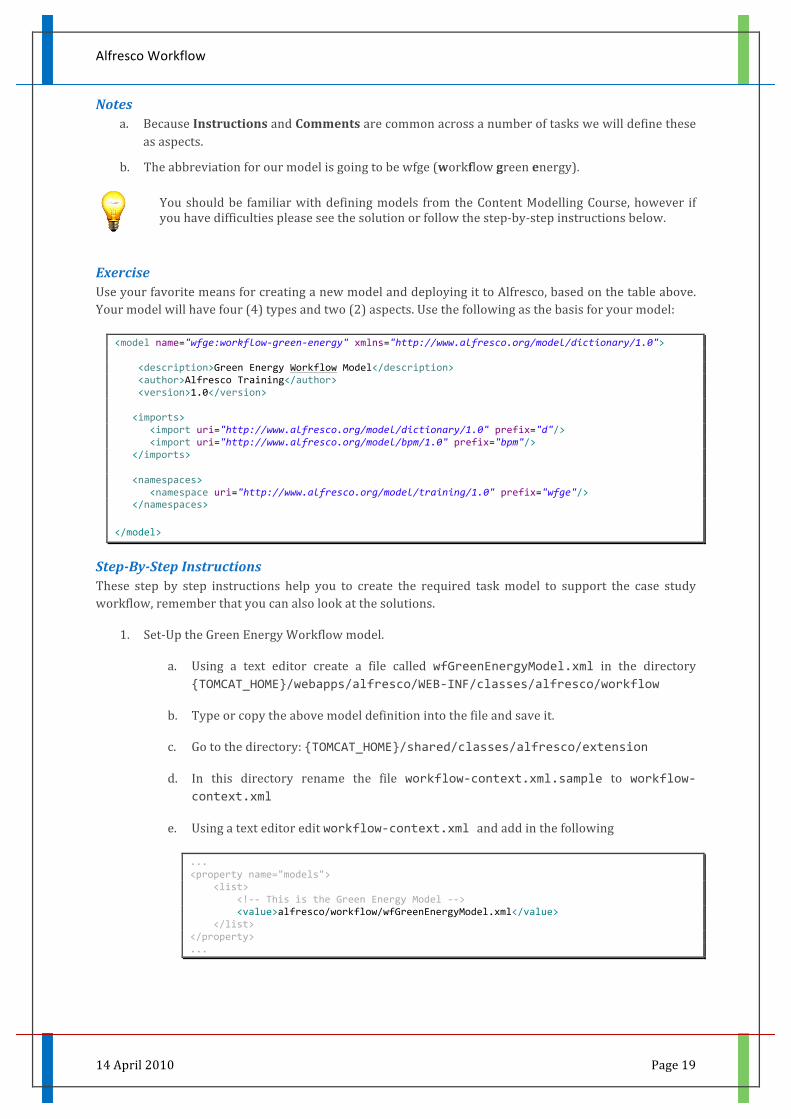
Exercise Use your favorite means for creating a new model and deploying it to Alfresco, based on the table above. Your model will have four (4) types and two (2) aspects. Use the following as the basis for your model:
<model name="wfge:workflow-‐green-‐energy" xmlns="http://www.alfresco.org/model/dictionary/1.0"> <description>Green Energy Workflow Model</description> <author>Alfresco Training</author> <version>1.0</version> <imports> <import uri="http://www.alfresco.org/model/dictionary/1.0" prefix="d"/> <import uri="http://www.alfresco.org/model/bpm/1.0" prefix="bpm"/> </imports> <namespaces> <namespace uri="http://www.alfresco.org/model/training/1.0" prefix="wfge"/> </namespaces>
</model>
Step-‐By-‐Step Instructions These step by step instructions help you to create the required task model to support the case study workflow, remember that you can also look at the solutions.
1. Set-‐Up the Green Energy Workflow model.
a. Using a text editor create a file called wfGreenEnergyModel.xml in the directory {TOMCAT_HOME}/webapps/alfresco/WEB-‐INF/classes/alfresco/workflow
b. Type or copy the above model definition into the file and save it.
c. Go to the directory: {TOMCAT_HOME}/shared/classes/alfresco/extension
d. In this directory rename the file workflow-‐context.xml.sample to workflow-‐context.xml
e. Using a text editor edit workflow-‐context.xml and add in the following
... <property name="models"> <list> <!-‐-‐ This is the Green Energy Model -‐-‐> <value>alfresco/workflow/wfGreenEnergyModel.xml</value> </list> </property> ...
Alfresco Workflow
14 April 2010 Page 20
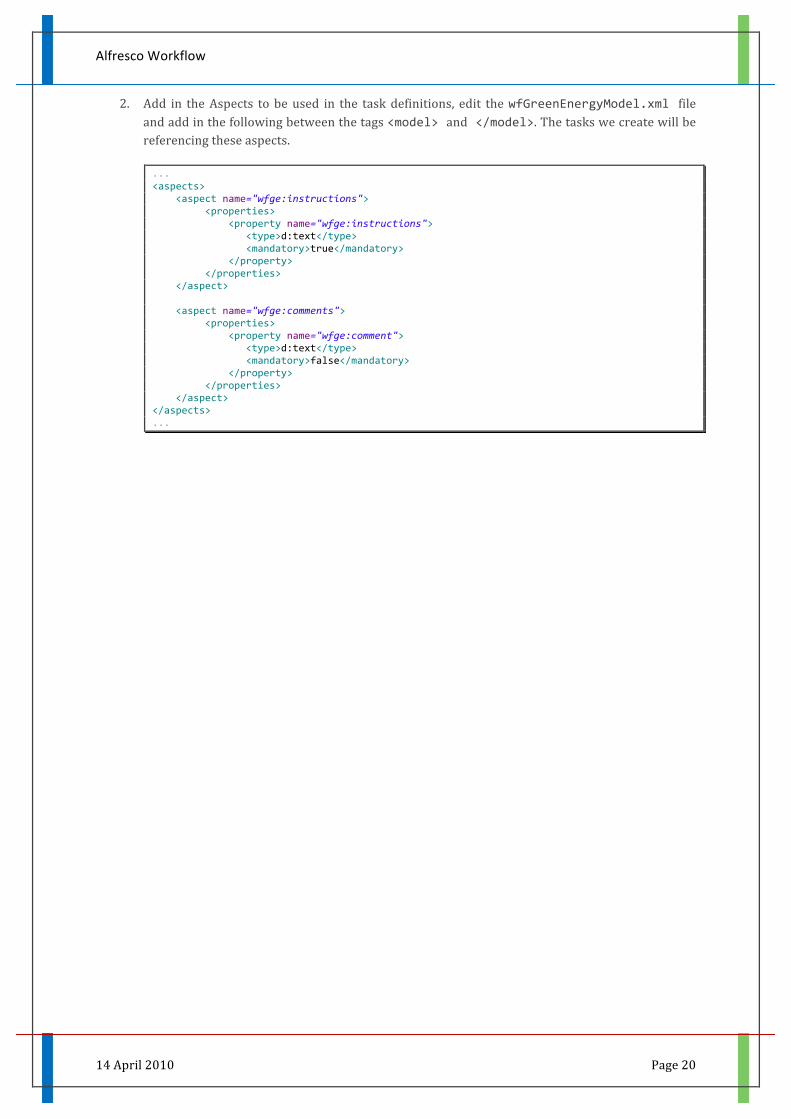
2. Add in the Aspects to be used in the task definitions, edit the wfGreenEnergyModel.xml file and add in the following between the tags <model> and </model>. The tasks we create will be referencing these aspects.
... <aspects> <aspect name="wfge:instructions"> <properties> <property name="wfge:instructions"> <type>d:text</type> <mandatory>true</mandatory> </property> </properties> </aspect> <aspect name="wfge:comments"> <properties> <property name="wfge:comment"> <type>d:text</type> <mandatory>false</mandatory> </property> </properties> </aspect> </aspects> ...
Alfresco Workflow
14 April 2010 Page 21
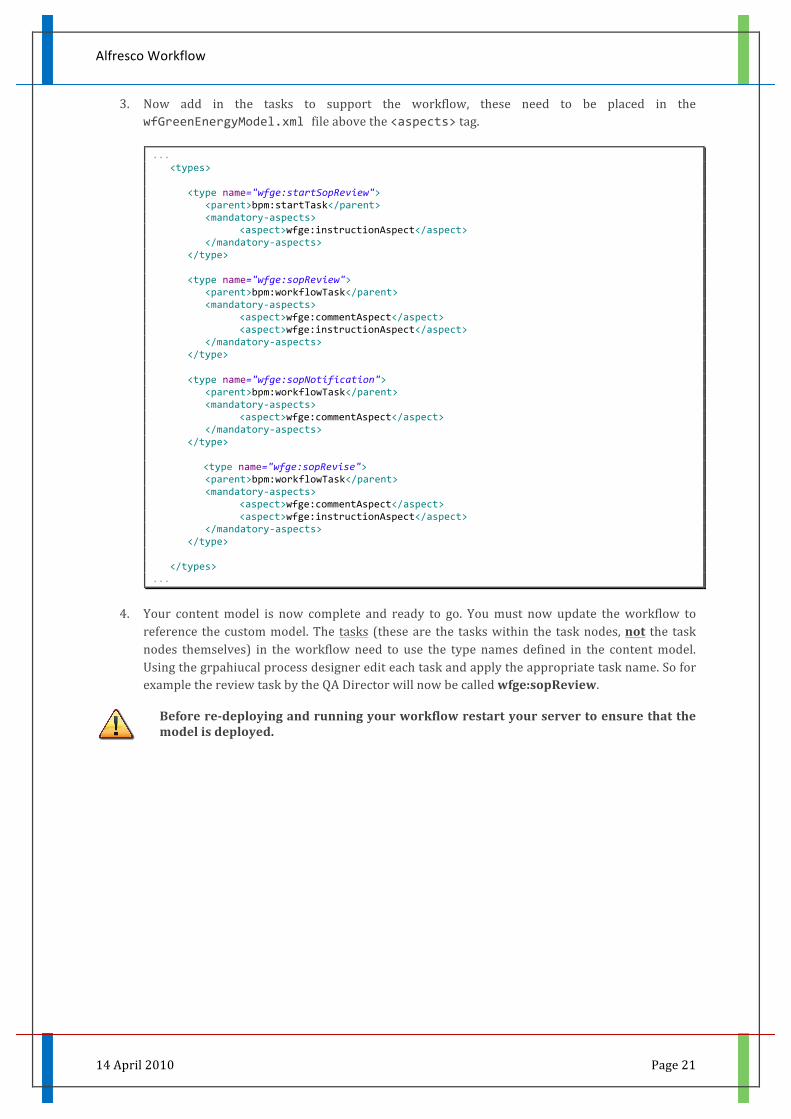
3. Now add in the tasks to support the workflow, these need to be placed in the wfGreenEnergyModel.xml file above the <aspects> tag.
... <types> <type name="wfge:startSopReview"> <parent>bpm:startTask</parent> <mandatory-‐aspects> <aspect>wfge:instructionAspect</aspect> </mandatory-‐aspects> </type> <type name="wfge:sopReview"> <parent>bpm:workflowTask</parent> <mandatory-‐aspects> <aspect>wfge:commentAspect</aspect> <aspect>wfge:instructionAspect</aspect> </mandatory-‐aspects> </type> <type name="wfge:sopNotification"> <parent>bpm:workflowTask</parent> <mandatory-‐aspects> <aspect>wfge:commentAspect</aspect> </mandatory-‐aspects> </type> <type name="wfge:sopRevise"> <parent>bpm:workflowTask</parent> <mandatory-‐aspects> <aspect>wfge:commentAspect</aspect> <aspect>wfge:instructionAspect</aspect> </mandatory-‐aspects> </type> </types> ...
4. Your content model is now complete and ready to go. You must now update the workflow to reference the custom model. The tasks (these are the tasks within the task nodes, not the task nodes themselves) in the workflow need to use the type names defined in the content model. Using the grpahiucal process designer edit each task and apply the appropriate task name. So for example the review task by the QA Director will now be called wfge:sopReview.
Before re-‐deploying and running your workflow restart your server to ensure that the model is deployed.
Alfresco Workflow
14 April 2010 Page 22
Part 2 – Adding Logic
With this exercise we are going to move away from the graphical designer and we will start to add in code directly to the XML of the process definition. You can edit the process definition in Eclipse by clicking on the Source pane, this has the advantage of still allowing you to use Eclipse for deployment.
By now you will have realized that the decision node always takes the default transition because there is no decision or conditional logic. This means that in the decision node we need to check to see if both reviews have approved, the simplest way to accomplish this is to have each review increment a count and then see if the count is 2 at the decision node.
However since the review and approval workflow may go through several iterations we need to initialize the count, a good place to do this is in the Submit node as this will be executed for each re-‐iteration of the workflow. We can use the node-‐enter event to do this.
1. Edit the Submit node and add in code to execute when the node is entered. The code should set a variable (e.g. approvalCount) to zero (0).
2. Edit the two Review nodes and in here add in code (script) to increment the counter variable, but only on the Approve transition.
3. In the Decision Node we need to check the value of the variable, it should be 2 if both approvals have happened. Add a condition to the transition to the QA Director Review to check if the variable is set to 2.
4. Re-‐deploy and re-‐run your workflow, test that the various combinations work.
Alfresco Workflow
14 April 2010 Page 23
5. Alfresco Explorer Integration
Learning Objectives
In this section you will learn how the workflow process you have developed integrates with the Alfresco Explorer so that users can fully interact and control the workflow.
What is covered in this section
• Configuring task dialogs
• Configuring workflow packages
Exercise
The goal of this exercise is to configure the system to change the behavior of the Alfresco Explorer web client.
Part 1 - Display the Properties
We need to change the Alfresco Explorer configuration to show the two new properties we added to the workflow tasks: instructions and comments.
1. Go to the directory {TOMCAT_HOME}/shared/classes/alfresco/extension and edit the file web-‐client-‐config-‐custom.xml using a text editor.
2. Add the necessary property support for the two task types: wfge:StartSopReview and wfge:sopReview. Make the comments appear as a text area.
3. Restart your server and retest your workflow.
The goal of this exercise is to enhance the workflow process to control the package actions each tasks is allowed to display based on the business requirements.
Alfresco Workflow
14 April 2010 Page 24
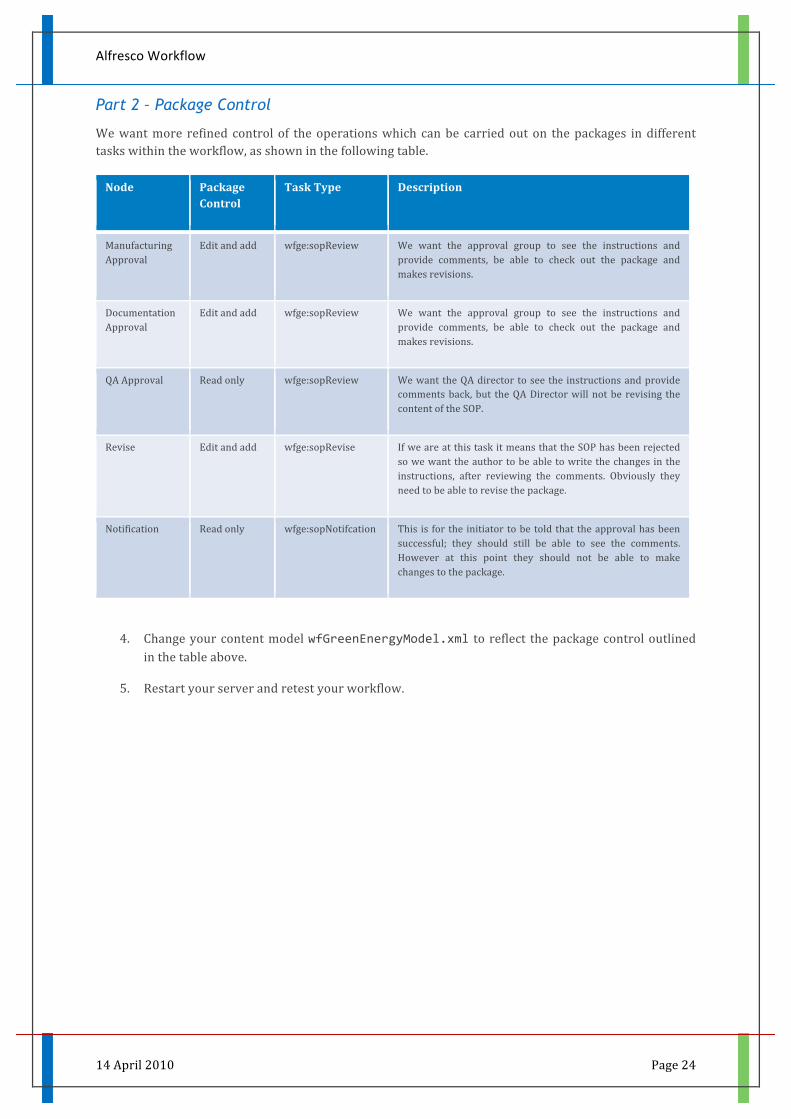
Part 2 – Package Control
We want more refined control of the operations which can be carried out on the packages in different tasks within the workflow, as shown in the following table.
Node Package Control
Task Type Description
Manufacturing Approval
Edit and add wfge:sopReview We want the approval group to see the instructions and provide comments, be able to check out the package and makes revisions.
Documentation Approval
Edit and add wfge:sopReview We want the approval group to see the instructions and provide comments, be able to check out the package and makes revisions.
QA Approval Read only wfge:sopReview We want the QA director to see the instructions and provide comments back, but the QA Director will not be revising the content of the SOP.
Revise Edit and add wfge:sopRevise If we are at this task it means that the SOP has been rejected so we want the author to be able to write the changes in the instructions, after reviewing the comments. Obviously they need to be able to revise the package.
Notification Read only wfge:sopNotifcation This is for the initiator to be told that the approval has been successful; they should still be able to see the comments. However at this point they should not be able to make changes to the package.
4. Change your content model wfGreenEnergyModel.xml to reflect the package control outlined in the table above.
5. Restart your server and retest your workflow.
Alfresco Workflow
14 April 2010 Page 25
6. Workflow and the Repository
Learning Objectives
In this section you will learn how the workflow process can access the repository to both check objects and make changes.
What is covered in this section
• Alfresco Javascript
• Adding Lifecycle
Exercise
In this exercise we want to mark the document as approved and we also want to allow the QA director to set an effective date on the document if it’s approved.
1. There are a number of ways of achieving this goal. Think about the possible options before setting out on developing the solution.
2. You can use aspects to model this requirement.
3. If the QA Director leaves the date blank set the effective date to today. Otherwise use what they have entered.
Alfresco Workflow
14 April 2010 Page 26
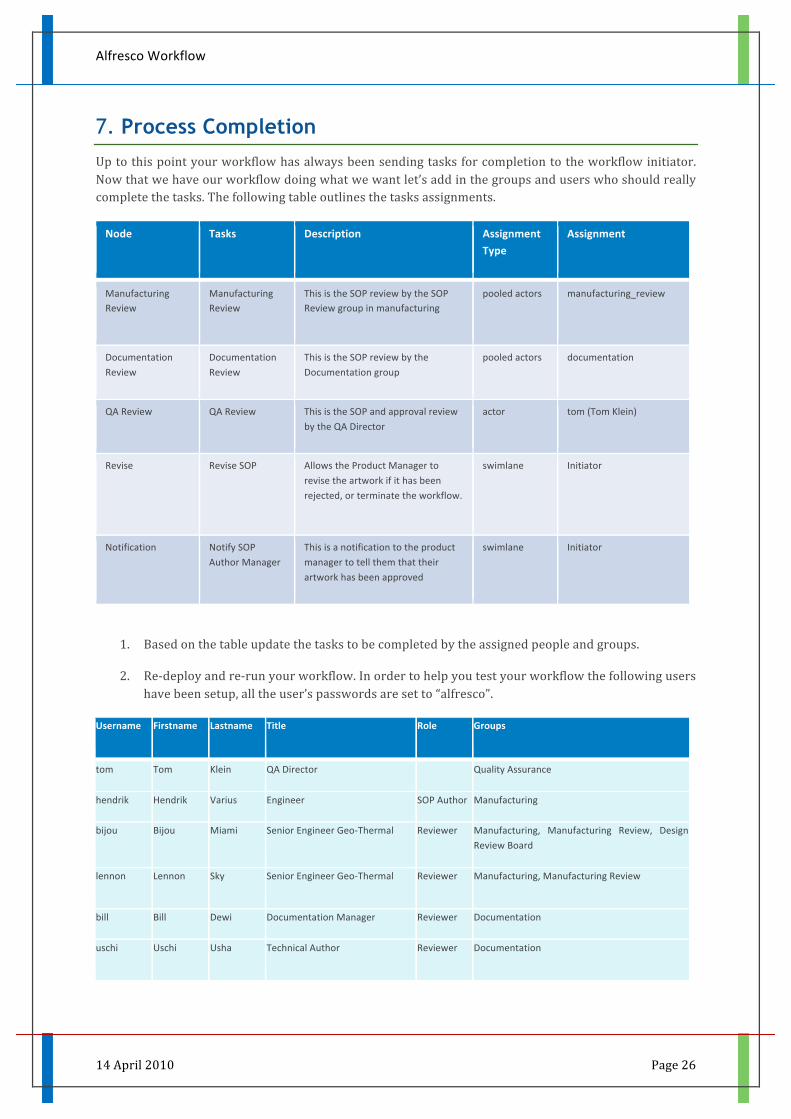
7. Process Completion Up to this point your workflow has always been sending tasks for completion to the workflow initiator. Now that we have our workflow doing what we want let’s add in the groups and users who should really complete the tasks. The following table outlines the tasks assignments.
Node Tasks Description Assignment Type
Assignment
Manufacturing Review
Manufacturing Review
This is the SOP review by the SOP Review group in manufacturing
pooled actors manufacturing_review
Documentation Review
Documentation Review
This is the SOP review by the Documentation group
pooled actors documentation
QA Review QA Review This is the SOP and approval review by the QA Director
actor tom (Tom Klein)
Revise Revise SOP Allows the Product Manager to revise the artwork if it has been rejected, or terminate the workflow.
swimlane Initiator
Notification Notify SOP Author Manager
This is a notification to the product manager to tell them that their artwork has been approved
swimlane Initiator
1. Based on the table update the tasks to be completed by the assigned people and groups.
2. Re-‐deploy and re-‐run your workflow. In order to help you test your workflow the following users have been setup, all the user’s passwords are set to “alfresco”.
Username Firstname Lastname Title Role Groups
tom Tom Klein QA Director Quality Assurance
hendrik Hendrik Varius Engineer SOP Author Manufacturing
bijou Bijou Miami Senior Engineer Geo-‐Thermal Reviewer Manufacturing, Manufacturing Review, Design Review Board
lennon Lennon Sky Senior Engineer Geo-‐Thermal Reviewer Manufacturing, Manufacturing Review
bill Bill Dewi Documentation Manager Reviewer Documentation
uschi Uschi Usha Technical Author Reviewer Documentation
Alfresco Workflow
14 April 2010 Page 27
8. Stretch Goals
These stretch goals can be completed during the course if you have time or alternatively after the course has finished where you can work at your own pace.
1. Think about changes you could make to the workflow, to make it more robust and meaningful?
2. What changes could you make to the business process to make it more useful?
3. Using the knowledge you gained on the Content Modelling and Alfresco Explorer Integration course create a resources file with strings for the different elements of the workflow (e.g. task names, buttons, etc.) in your local language. Deploy and test the web client configuration changes you have made.
4. The following location in the folder structure:
Company Home > Geo-‐Thermal Division > Manufacturing > Standard Operating Procedures
has 4 folders Draft, In Review, Effective and Superseded. Enhance the workflow so that the SOP document moves to the appropriate folder depending on its stage in the workflow. How else could you have completed the same task.
5. A new business process has been introduced which requires that an SOP can only be changed or created based on a Change Request. A Change Request is another type of document which lists the reasons and rationale for creating or altering an existing SOP, this might simply be to make a correction in grammar or spelling or could be required for a more major reason. The Change Request may refer to multiple SOPs. When this workflow is invoked it should be associated with the Change Requests that it addresses. Change Requests also have a lifecycle, they start out open and when they have been addressed they are closed. How would you model this, would it require significant changes?
6. A change has been made to the business process which requires a Change Notice to be authored and associated to an approved SOP(s). The Change Notice is another document which describes the changes made to the SOPs. When the SOPs are approved the process now has to close all the Change Requests associated with this Change Notice. How would you model this additional change?
7. Try implementing 5 and 6 into your workflow process. Note that this is not a trivial piece of work.
Alfresco Workflow
14 April 2010 Page 28
Solutions
Part 6 – Process Creation
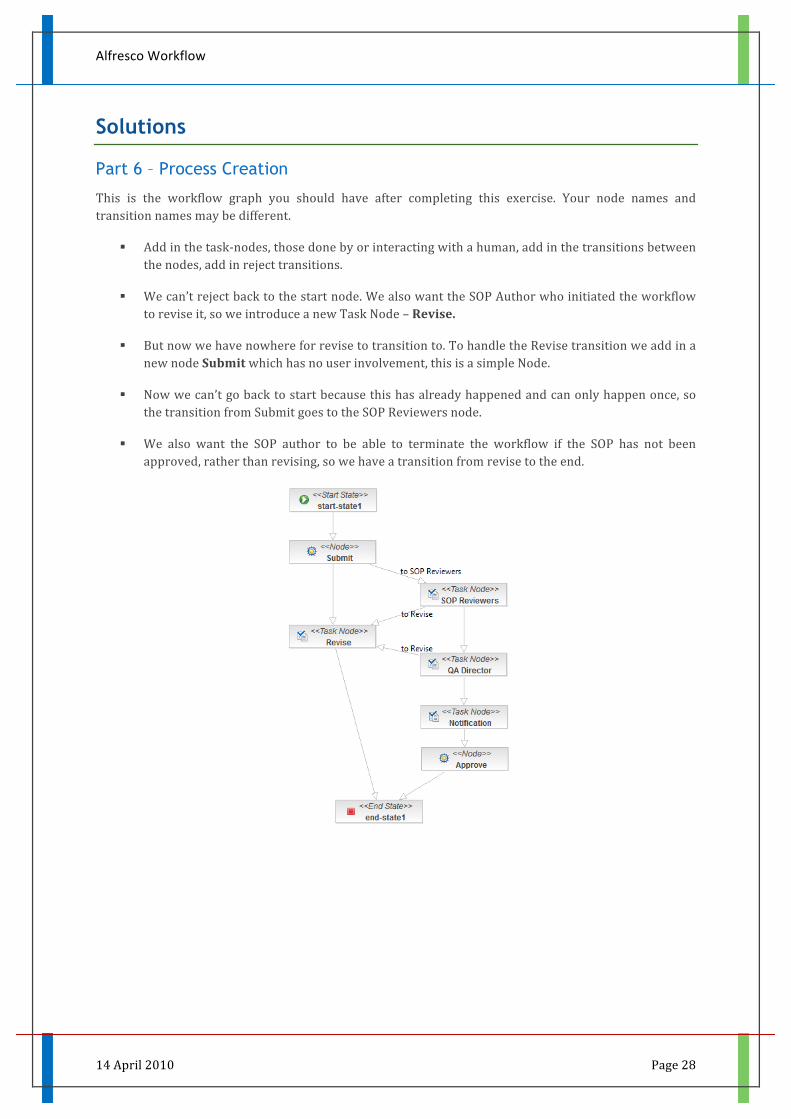
This is the workflow graph you should have after completing this exercise. Your node names and transition names may be different.
§ Add in the task-‐nodes, those done by or interacting with a human, add in the transitions between the nodes, add in reject transitions.
§ We can’t reject back to the start node. We also want the SOP Author who initiated the workflow to revise it, so we introduce a new Task Node – Revise.
§ But now we have nowhere for revise to transition to. To handle the Revise transition we add in a new node Submit which has no user involvement, this is a simple Node.
§ Now we can’t go back to start because this has already happened and can only happen once, so the transition from Submit goes to the SOP Reviewers node.
§ We also want the SOP author to be able to terminate the workflow if the SOP has not been approved, rather than revising, so we have a transition from revise to the end.
Alfresco Workflow
14 April 2010 Page 29
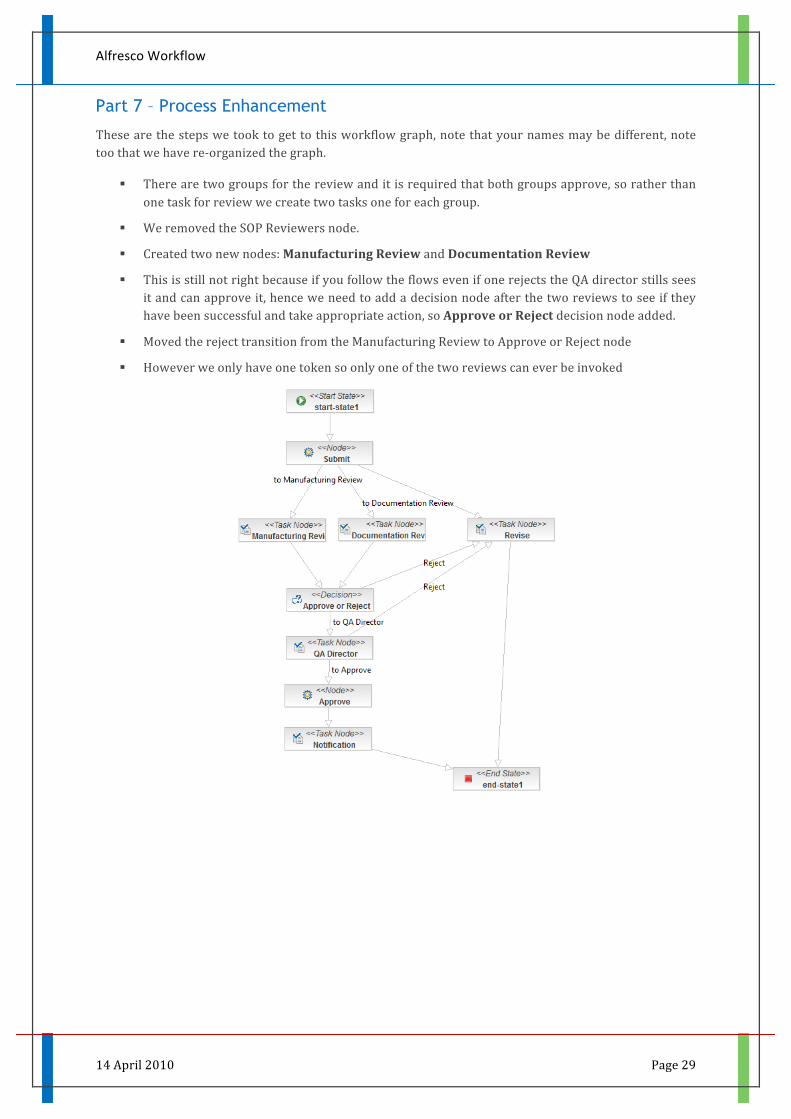
Part 7 – Process Enhancement
These are the steps we took to get to this workflow graph, note that your names may be different, note too that we have re-‐organized the graph.
§ There are two groups for the review and it is required that both groups approve, so rather than one task for review we create two tasks one for each group.
§ We removed the SOP Reviewers node.
§ Created two new nodes: Manufacturing Review and Documentation Review
§ This is still not right because if you follow the flows even if one rejects the QA director stills sees it and can approve it, hence we need to add a decision node after the two reviews to see if they have been successful and take appropriate action, so Approve or Reject decision node added.
§ Moved the reject transition from the Manufacturing Review to Approve or Reject node
§ However we only have one token so only one of the two reviews can ever be invoked
Alfresco Workflow
14 April 2010 Page 30
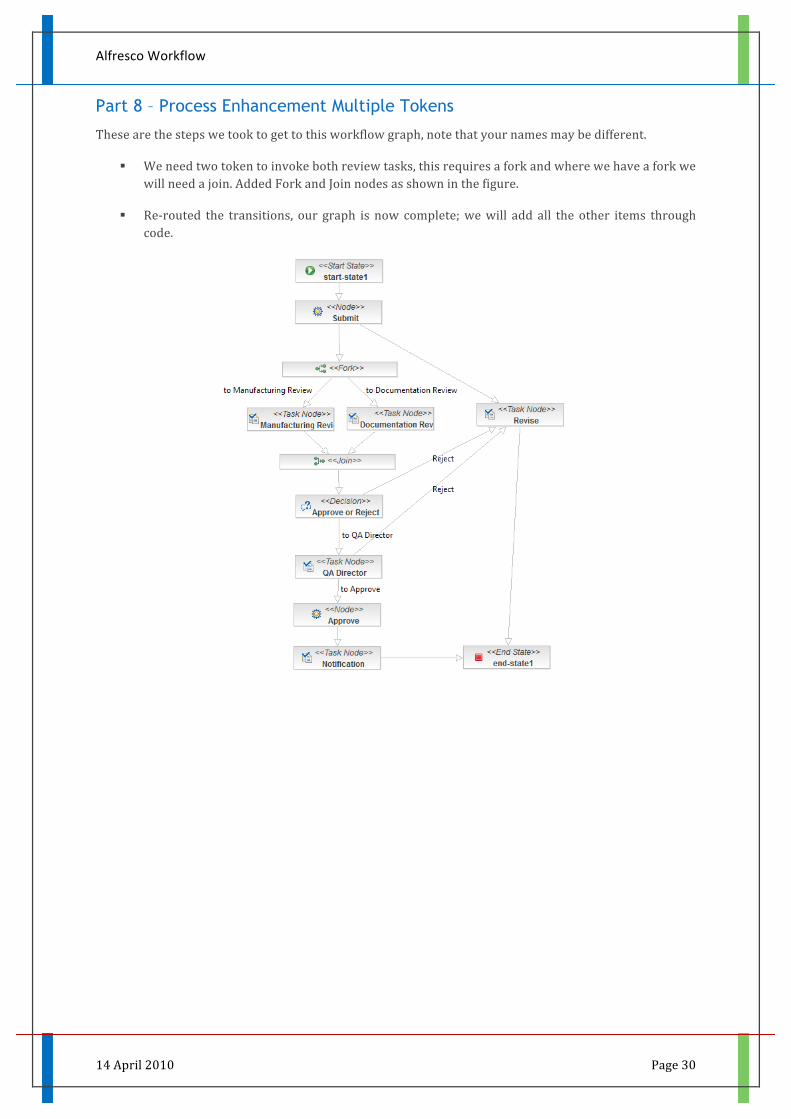
Part 8 – Process Enhancement Multiple Tokens
These are the steps we took to get to this workflow graph, note that your names may be different.
§ We need two token to invoke both review tasks, this requires a fork and where we have a fork we will need a join. Added Fork and Join nodes as shown in the figure.
§ Re-‐routed the transitions, our graph is now complete; we will add all the other items through code.
Alfresco Workflow
14 April 2010 Page 31
Alfresco Explorer Integration
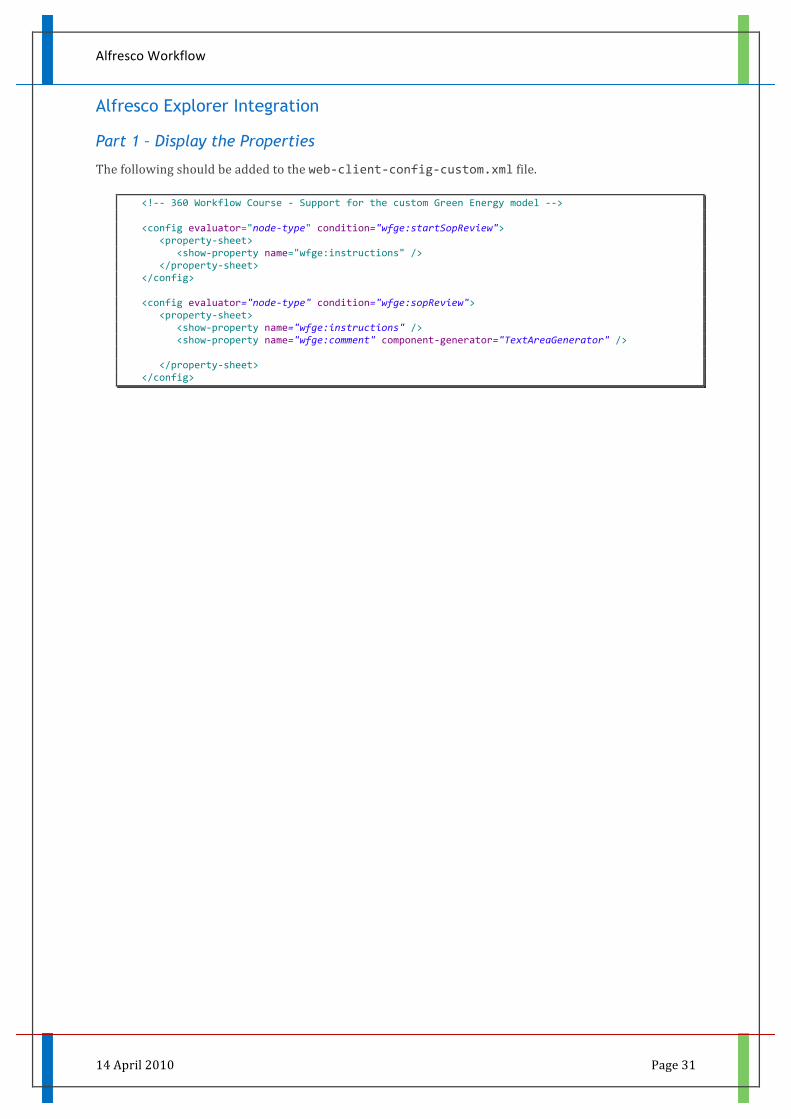
Part 1 – Display the Properties
The following should be added to the web-‐client-‐config-‐custom.xml file.
<!-‐-‐ 360 Workflow Course -‐ Support for the custom Green Energy model -‐-‐> <config evaluator="node-‐type" condition="wfge:startSopReview"> <property-‐sheet> <show-‐property name="wfge:instructions" /> </property-‐sheet> </config> <config evaluator="node-‐type" condition="wfge:sopReview"> <property-‐sheet> <show-‐property name="wfge:instructions" /> <show-‐property name="wfge:comment" component-‐generator="TextAreaGenerator" /> </property-‐sheet> </config>
Alfresco Workflow
14 April 2010 Page 32
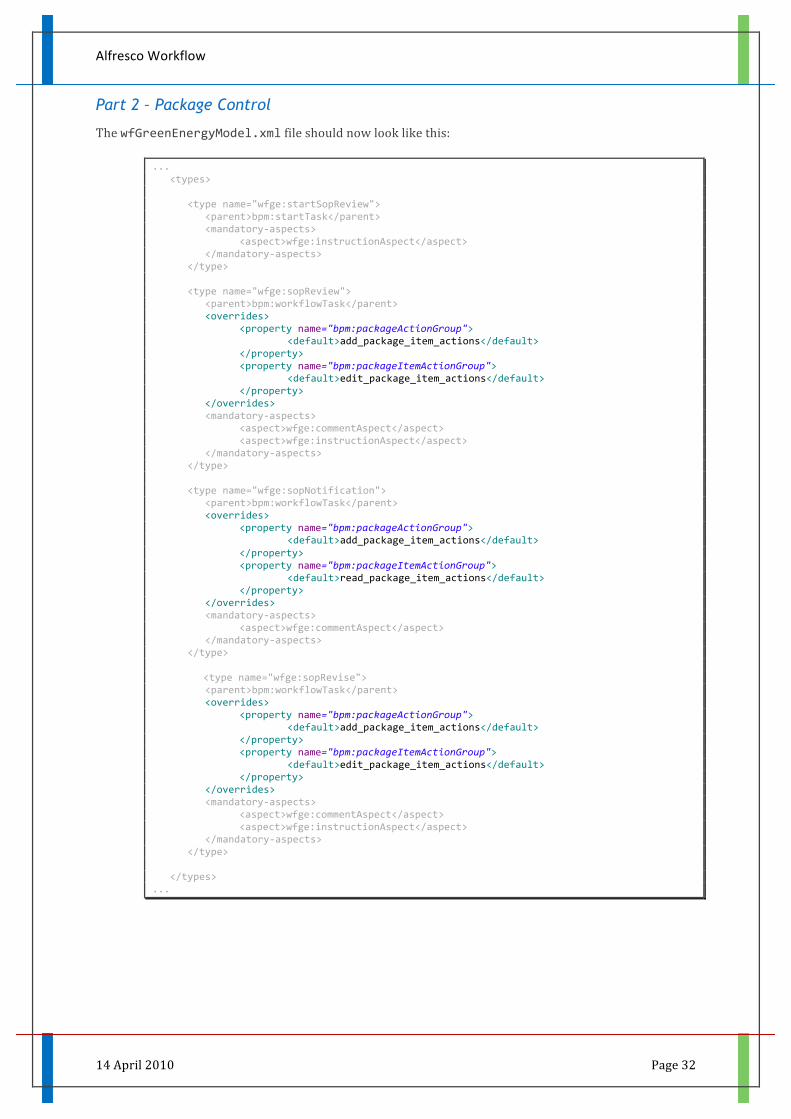
Part 2 – Package Control
The wfGreenEnergyModel.xml file should now look like this:
... <types> <type name="wfge:startSopReview"> <parent>bpm:startTask</parent> <mandatory-‐aspects> <aspect>wfge:instructionAspect</aspect> </mandatory-‐aspects> </type> <type name="wfge:sopReview"> <parent>bpm:workflowTask</parent> <overrides> <property name="bpm:packageActionGroup"> <default>add_package_item_actions</default> </property> <property name="bpm:packageItemActionGroup"> <default>edit_package_item_actions</default> </property> </overrides> <mandatory-‐aspects> <aspect>wfge:commentAspect</aspect> <aspect>wfge:instructionAspect</aspect> </mandatory-‐aspects> </type> <type name="wfge:sopNotification"> <parent>bpm:workflowTask</parent> <overrides> <property name="bpm:packageActionGroup"> <default>add_package_item_actions</default> </property> <property name="bpm:packageItemActionGroup"> <default>read_package_item_actions</default> </property> </overrides> <mandatory-‐aspects> <aspect>wfge:commentAspect</aspect> </mandatory-‐aspects> </type> <type name="wfge:sopRevise"> <parent>bpm:workflowTask</parent> <overrides> <property name="bpm:packageActionGroup"> <default>add_package_item_actions</default> </property> <property name="bpm:packageItemActionGroup"> <default>edit_package_item_actions</default> </property> </overrides> <mandatory-‐aspects> <aspect>wfge:commentAspect</aspect> <aspect>wfge:instructionAspect</aspect> </mandatory-‐aspects> </type> </types> ...
Alfresco Workflow
14 April 2010 Page 33
References
Alfresco Training
• Training – Content Modelling and Alfresco Explorer Integration
jBPM
• User Guide docs.jboss.com/jbpm/v3.3/userguide
• BeanShell www.beanshell.org
Alfresco Community
• Forums forums.alfresco.com
• Wiki wiki.alfresco.com/wiki/Workflow
• Workflow JavaScript API wiki.alfresco.com/wiki/Workflow_JavaScript_API
Trade and Industry Organizations
• WFMC (Workflow Management Coalition) www.wfmc.org
• OMG (Object Management Group) BPMN www.bpmn.org
Books
• jBPM Developer Guide by Mauricio Salatino (2009)
• Business Process Management with JBoss jBPM: A Practical Guide for Business Analysts by Matt Cumberlidge (2007)
• BPMN 2.0 by Thomas Allweye
• Professional Alfresco: Practical Solutions for Enterprise Content Management (2010)
• Alfresco Developer Guide by Jeff Potts (2008)