Embed Size (px)
Citation preview

BA lind Year (Fashion Design)
INTRODUCTIONThe purpose of this book is to help design students to develop fashion sketching techniques and the skills of creating and communicating design ideas. The designer should possess a general awareness of fashion and a sound knowledge of fabrics and the use of colour. He or she should be capable of finding inspiration from many different sources, and should be able to develop these Ideas to create original designs. A sound knowledge of both patter - cutting and the method of making up garments are also necessary requirements.Initially, many students of design find it difficult to express their ideas on paper and need help in acquiring good fashion drawing techniques. This book is arranged in section to cover the different stages in the fashion process. It shows how the fashion figure can be developed; working from the basic proportions of the figure can be developed, working from the basic proportion of the figure, by creating and utilizing figure templates. In the early stages, the beginner can copy or trace figure templates directly from the books, over which design ideas may be developed with the aid of semi-transparent paperora light box.The fashion designer needs to develop a style of drawing that is clear, fluent and adaptable. Costume and life classes are extremely helpful, and should be attended if at all possible. The different methods illustrated in this book should help the student to produce attractive and functional fashion design drawings
FMO&SCD (1 )

BA IlndYear (Fashion Design)Fashion illustration
The fashion illustrator works in a specialized area of advertising and marketing, producing drawings for promotional magazines and newspapers, as well as publicity material for catalogues and stores. Fashion drawings are also used for window displays and exhibition stands. A further area of work is the production of fashion prediction trend drawing.Fashion illustrations are often trained as graphic designers however, many illustrators start fashion drawing while studying on fashion design courses. Styles of fashion vary considerably. Glossy magazines and stores with a high fashion image tend to use elegant and free style kinds of drawings. Drawing style is constantly changing to reflect the influences and moods of fashion at any particular time.
What is Fashion?Fashion can be defined in many ways and fashion means many things to many people it may be applause golden dream looking good traffic stoppers stroke of genius right of exclusive taste the superlative reviving up to face the future chameleon like creatureFashion may be defined as what a specific group of people wear and use during a giving time period. This is a simple definition fashion is human behavior, fashion is an art it is science to be briefer, it is an artistic science and science art of learning to combine colour, form pattern and texture for the final effect that is light for the time the place and for the user.What do we do and how we live, it’s a fashion that makes use all perceive. Fashion is forever but trends will we new. For who knows just what next will ensure. One must be aware, that over the years and centuries, we have lived with fashion. The word “fashion” connects the way of living each one of use whether young, old or tiny torts. Fashion is what we visualize.It is the inner feeling of every human being to present himself or herself according to her drawing styles are constantly changing to reflect the influence and mood of fashion at any particular time.
FMD&SCD (2)

BA lind Year (PashK}n Design) CHAPTER-1 (Line drawing)
IntroductionThe line-drawing algorithm attempts to find edges of solid bodies and intersections with other bodies. The lines in three-dimensional space are the intersection of two surfaces. In body geometry, the intersection of two surfaces belonging to the same body is explicitly known. The intersection of two surfaces belonging to different bodies is generated by points given by the intersection of “scanning" rays, that are confined to the surface of one body, with other bodies. For each point of intersection, there is a path back to the viewpoint. The intersection of these paths with an imaginary view plane produces the three-dimensional projection of the geometry.The path to the viewpoint may be traced to determine if the point is hidden by an opaque body; if so, the line segment(s) connected to that point is considered obscured and not drawn. All projections are determined before the plot is displayed so that the extent of the image on the view plane can be calculated and the image thereby scaled to fill the window; a priori knowledge of the spatial bounds is not required.Line drawing works well for simple, body-defined models. The time required increases as the square of the number of bodies, and will exceed the time required for a ray-traced rendering of a complex model. Drawing may be limited to a subset of defined bodies, known as a draw set, thereby increasing rendering speed.In surface mode, the algorithms are sometimes confused by infinite surfaces and draw lines that extend far beyond the model. Line drawing of surface geometry is neither recommended nor supported. Line drawings are invoked by the DRAW button and the RDRAW and DRAW commands.Line drawing cannot handle surface descriptions which include infinite bodies. Cutter bodies cannot be used; a body introduced to serve as a cutter body is considered just one more object to be drawn.Even though more geometries can be handled with ray tracing, there are situations when line drawing is preferable. Line drawing offers greater resolution than lines made by ray tracing with ETCH, which, unless very high resolution is used, shows jagged lines
PMO&SCO (3)

BA lind Year (Fashion Design)
«
J
/
I if •«
fA
FMD&SCD (4)

BA lind Year (Fashion Design) Content
The range of pens used for line drawing can be divided into fine groups- technical pens- plastic tip pen- ball point pens- roller pens- felt tip pensExperiment with pens and combine different line values in one drawing. The surface of the paper has to be considered as it affects the line value.A drawing in two stages using different values. The plastic black line around the figure gives the furnishing touch to this technique. The importance of creating working drawing of flats for production departments and presentation work can not be overestimated. Every detail of the design must be considered. The placement of seams, pocket, yokes and dart position should be indicated, and the design should be shown from both front and back. Notes are often added to explain details on the drawing. Casual jacket trouser back and front view with detailed drawing from the yoke and elasticized waist band.The drawing was produced with two pens of different line value.The illustration is developed wjth pencil, working on the pattern of the coat and the shading of the hood and trouser. Note the different tone values used and the pressure of the pencils. To complete the final presentation, the figure is placed against a country scene to create a suitable mood. This working drawing illustrates the back and front. Note the attention to the detail of the pockets, collar cuffs and elasticated bands at the waist. Design development sheets illustrate a collection of design ideas based round a theme. The designer will produce a series of sketches before selecting the designs to develop for a collection. The sheets would illustrate front and back views, together with detail sketches, notes and sample fabrics. Presentation drawings are used to promote a design collection. The drawings are made a standard size, which means that it is easier to handle them and send them by post.The presentation should reflect the complete look, together with back view. It may be a working flat drawing or a figure. Often lettering and a background are added to project the mood and theme.This type of work is helpful when the work of a student is assessed, as it gives a clear idea of how the ideas are developed and the effect of the final presentation.
FMD & SCD ( 5)
BA lind Year (Fashion Design)Review Question
Q) Sketch (jifferent poses showing different drapes- Box pleat- Knife pleat gathers- Inverted box pleatQ) Design sport wear for 1 male and 1 female child and give the spec details.
FMD&SCD (6)

BA l!nd Year (Fasten Design) CHAPTER - 2 (Head and hats)
IntroductionWhen designing hats, it is very important to develop your design ideas on a theme. The design sketches are the starting point before the designs are developed further in the work room,When drawing hats, make sure the hat is correctly placed on the head. Draw the shape of the head with light pencil lines, and then sketch your designs over this outline, making sure that the hat is in the correct position.
FMO&SCO (7)HEADGEAR

BA IlndYear- (Fashion Design)Content
It is helpful to work from photographs when a mode Is not available. Select faces of different age are groups from photographs you have taken or from magazines.For fashion sketches you should stylized and simplify the drawings. Adapt the features and hairstyle to gain the effect you require for your illustration. The hat is drawn in two stages. It is helpful first to construct a drawing with a few guidelines sketches ihlightly with a pencil , indicating the position of hat in relation to the head.Selection of some of the basic style from which makes many variations can be .worked. When designing, keep the sketches simple. They would be developed using different illustrative techniques if they were intended for presentation.
Review questionQ) Design and sketch 5 different types of hat from the basic shape of head?
FMD&SCD (8)

BAilndYear (Fashion Design) CHAPTER-3 (Drawing from template)
IntroductionFor practice in designing over a template, you may either trace the figure poses from this section, or preferably, construct your own figures using the methods illustrated, working from the grid.The technique of drawing garments over a figure guide can be used to develop your own design ideas. By drawing a series of simple figures, including both front and back views illustrated here, you can go on to create a variety of different designs for a garment. The resulting collection of drawings may be used as a design sheet.Work around the outline of the figure to create your design, remembering to take into account the type of fabric you have selected, and the way in which the material will gather and fall.
ContentCreating and using templates1) Sketch the figure. This will be used as your template.2) Place layout paper over the template. The outline of the figure should be
clearly visible through the semi transparent paper.3) Develop the design sketch, remembering to relate its detail to the over all
proportions of the figure. The balance line falls from the nape of the neck to the feet, taking the weight of the body.The final sketch was produced in three stages
- Firstly a template of the figure was drawn weeding from the basic proportion.
- The largest paper was placed over the figure and design sketched.
- Sketch was developed using marker pan and soft black pen of shading on one side of the figure was made darker to give extra dimension to the sketch.
Observe the movement of the two figures. The textured effect was achieved by placing canvas under the paper and supply pencil over the surface.
FMD&SCOI (9)

BA ilnd Year (Fashion Design)
FMO&SCD (10)

BA lImJYear (Fashion Design) This drawing was produced with soft black car Othelio pencil. When weakling
with this pencil, your need to use a fixative spray in order to protect the sketch from smudging emphasized to give extra dimension to the sketch
Review questionQ) Sketches 1 female that fullness of the folds and gathers with the help of
soft black pencil and fine art line pen for detail?i
FMD&SCD (11 }

BA lind Year (Fashion Design)CHAPTER- 4 (Faces, features and hairstyle)
IntroductionThe drawing of the faces and hair plays a major role in reflecting the fashion
Image that you wish to project in your design.The face may be merely suggested, using a few lines, or worked up in greater detail. The style may be very realistic, or more stylized.Fashion in hairstyle vary from a simple, clear cut outline, to a more elaborate style, which might be dressed with flower, clips or headbands.Observe new trends, new trends and note the many different techniques of make-up application and colouring.
FMD&SCD (12)

B.A. iind Year (Fashion Design) * V
MOtmf: COKStRUCndK
FMD & SCD ( V3 )

BA IlndYear (Fashion Design)
FMD&SCD (15}

B.A. lind Year (Fashion Design)The drawing of the face and hair plays a major role in reflecting the fashion
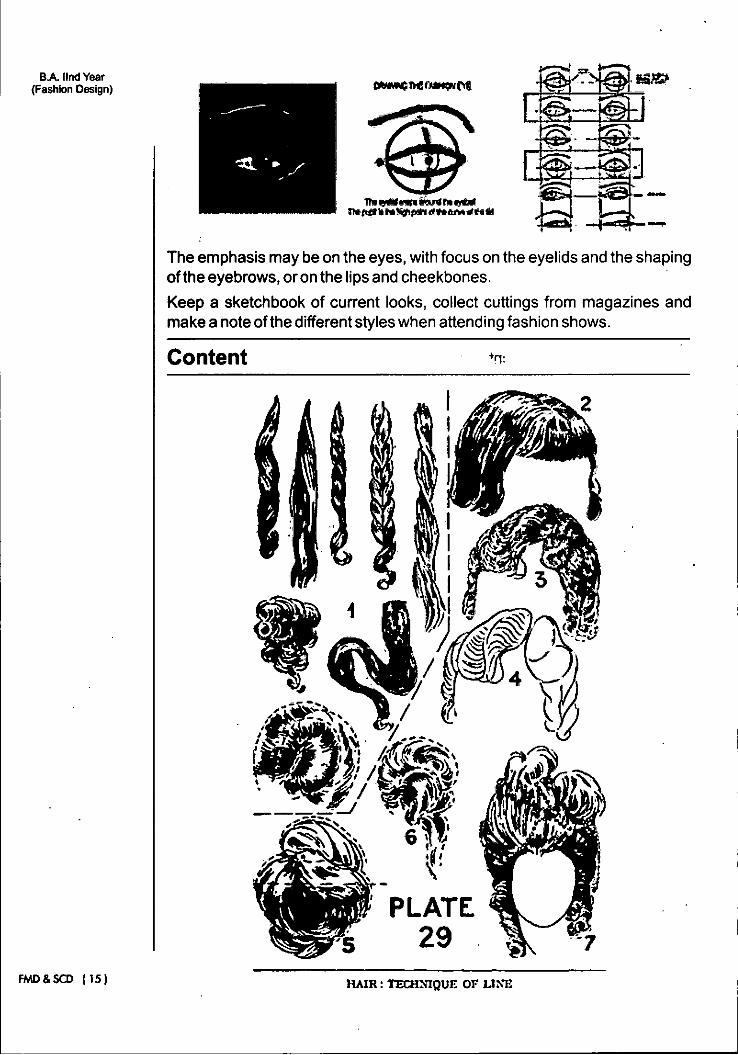
image that you wish to project in your design. The face may be merely suggested, using a few lines, or worked up in greater detail. The style may be very realistic, or more stylized.Fashion In hairstyles vary from simple, clear cut outline, to a more elaborate style, which might be dressed with flower, clips or headbands.Observe new trends, and note the many different techniques of make-up application and colouring. The emphasis may be on the eyes, with focus on the eyelids and the shaping of the eyebrows, or on the lips and cheekbones.Keep a sketchbook of current looks, collect cutting from magazine and make a note of the different styles when attending fashion shows!Fashion in make up and hair style often reflect former eras such as the Hollywood glamour years, the forties fifties or sixties. Use your sketchbook to experiment with different techniques of the portraying hairstyles and facial features - lips, eyes and nose. It is important to practice sketching the head from different angles, including back, side, and three-quarter views.
Review questionQ) Sketch the profile of a female face from different angles?
Q) Sketch the eyes giving outline and detailed study?Q) Draw 5 different types of hair style on the same face?Q) sketch 5 different type effaces in different angles?
FMD&SCD ( 16)

B.A. lind Year (Fashion Design) CHAPTER -5 (Stylization)
IntroductionBy the term stylization is understood the exaggeration of the structure of the body, reducing it to few essential features.There are various ways of stylization, one of them in enlargement & reduction.
ContentImprove your lines first by just making few line sketching and trying different poses. While making these sketches try to create composition giving the effect of some show .The composition helps to create interest in the assignment and also shows the different angles of the garment.
The movement or the story created by the poses generated interest and catches the eyes of the viewers.
Review questionQ) Stylize an illustration by elongate or reducing the illustration?
FMD&SCD (17)

B.A. lind Year (Fashion Design)CHAPTER-6 Drawing Photograph
introductionPhotograph can be useful sources of reference when developing new poses for your designs. Choose photograph which are appropriate to the mood of your design, with the figure either static or in motion according to your needs. It’s tempting to pick out photographs that are complex and therefore more interesting as a pose, but bear in mind that these may not work well as a drawing. Be very selective and work from straightforward poses to start with. If possible, analyses the pose to find the position of the balance line, from the neck to the load bearing foot, and notice how the movement of the shoulders relates to the waist and hips. The centre front line is always a good guide for constructing a pose. Keep the details simple, it is enough merely to suggest the outlines of hand and face. Different poses can be developed from a single template. Use layout paper to work over the figure, changing the position of arms legs and head as required.
1Drawing the basic figureFrom magazines select photographs suitable for figure reference preferably photographs which give a clear indication of the figure: swimwear being an ideal example.Use the photograph as a guide only, adapting them as required to produce a simple figure sketch.Working from a photograph or a model first study the pose, note the leg, which is taking the weight of the figure and the tilt of the shoulder and hips.Start by sketching lines that indicate the size, proportions and gesture or action.Sketch using a fee iine or shading, many of the lines will be covered or erased as the drawing develops.When working from a photograph select one illustrating swimwear enabling you to sketch the figure.
Review questionQ) make a template of a female figure from a photograph in the magazine?
. Q) renderthe same illustration as in photograph giving the feel of fabric?FMD&SCD (18)
B.A. llnd Year (Fashion Design) CHAPTER-7 (Different colour medium &
presentation of illustration)IntroductionLight and toneIt is effective when developing a sketch to indicate the main direction of light on the figure by adding areas of tone that are not directly lit.This may be achieved with pencil shading, marker pens or a water colour wash. The effect can be dramatic and will give the drawing volume.Effect of folds and drapery may be easily achieved by adding light and tone to the sketch. A pantone marker pen has been applied to give contrast and depth to the folds.Line and washAs a progression it is interesting to experiment with different media. Use different drawing and painting techniques to indicate colour, pattern and texture. A varied selection of art materials is available including watercolour, designer gouache, coloured pencils, marker pens, inks, and pastels.When working with different media be sure to select suitable paper on which to apply the colour otherwise the experimenting may result in disappointment. For the best results always use good quality brushes, mix the colours in a clean pallet and use plenty of clean water.The line and wash techniques particularly suited for quick fashion design sketches.One method is to begin with a pen or pencil drawing then apply with a brush a water colour wash leaving areas of the sketch white. When using this technique you should avoid filling in the sketch to look like a colouring book exercise. It is often more effective to apply the washes in a free manner, then work into the sketch with more detail with pencil or pen if necessary.Design sketch produced over templates using a very fine waterproof drawing pen adding a water colourwash to suggest the folds and drapery.Templates - presentationThe presentation of'design work is very important and should be careful considered. When presenting work for an assessment or competition, or when preparing a portfolio for an interview, a student should give careful thought to the organization of the material making it easy to view.- Casual poses illustrating sports leisure wear garments.- Sketch produced using the templates.- 81/2 head measurement into the figure.- Pencils and black schawan stabilo soft colour pencils. For finer details.
FMD&SCD (19 }

B.A. lind Year (Fashion Design)seams, pockets, buttons, and, belt, pilot hi leopoint v 7 fine pen.
- A free pencil shading on trouser and boots in contrast to the more controlled technique in other areas of the sketch.
Sketch books : when planning the lay out of the design work for presentation, sketch a selection of rough layout ideas before making a final arrangement. Considered the most suitable figure poses to present the designs.
Presentation board- The same pose has been adopted and reversed. Figure cut out and
mounted onto card against a photograph to suggest the mood.- The working drawing produced with a fine pointed pilot hi Leo point V5.- Experiment with layout and presenting effects before making the final
decisions (by hand or on the computer).Frottage- This technique is used in drawing to obtain textured effects and shading
by placing a texture under a sheet of paper and rubbing or drawing across the surface of the paper with a soft pencil or crayon.
- This effect can be produced from almost any firm textured surface on which you can place your paper.
- A thin layout paper or thin cartridge is suitable to achieve the textural effect through the paper.
Texture produced using Hessian, leather, nets, wire mesh and canvas. It is effective when using this technique to leave areas of white and add darkertones as illustrated.
Note how the same pose has been used to illustrate a selection of designs. Regards the head is an egg shape. When suggestion the face and head in a fashion sketch it is essential to work from the basic proportion first. Divide the main features need only be suggested when design sketching, a more detailed effect may be developed for presentation work.Sketch book: sketch faces from a model or photographs working from different angles. Keep the sketches simple.
Presentation boards collageCollage is an effective way of introducing pattern, texture and areas of flat colour. The techniques vary, from using neat paper cut out shapes to abstract and torn pieces, collage may also be combined with different media using, for instance fabrics and photographs. This technique is used successfully for promotional presentations, textiles and fashion forecasting.Fabrics photocopied and reduced to scale. Then the shapes are cut out and
FMD&SCD (20)

B.A. lind Year (Fashion Design) applied to the sketch using spray mount adhesive, leaving areas of white. If
the sketch is filled in the effect tends to look rather solid. Experiment with the shapes until you achieve the effect you require.
Review questionQ) Draw different illustration in
Casual wear Party wear Sports wearin different colours and mediums.
FMD & SCD ( 21 )

BA lind Year (Fashion Design)CHAPTER- 8 (The leg analysis)
Introduction- Thelegisthelowerlimbofthebody.- Proportionately the leg. including the foot, has a height of approximately
few units of the over all figure.- Structurally the limb is made up of 3 moving parts the thigh, the legs, the
foot, which are connected by the points of the hip, the knee and the ankle.- The various anatomical parts of the entire leg bend and rotate by means
of a moving and rounded bend structure, which allows extreme mobility.Legs portrayed from a variety of perspectives, drawn with rhythmic structure,
points of articulation and bending. Sizes and proportion change according to the type of perspective.
- the length of the thigh is equal to that of the shin.- In the first and the third drawing, the.rhythmic structure assume a curved
aspect which starts from the hip joint going as far as the centre of the knee, where after it descends vertically to the onside of the foot.
- In the leg shown in profile the rhythmic structure assumes the form of an elongated letters by contrast.
FMO&SCD (22)

BA lind Year (Felton Design)
ContentLeg motionAction rules- The waist line and the ridge of the hips will always follow the stoup of the
hip line.- Naturally, this slant creates a high hip and how hip side left versus right.- It makes a visual sense that this same slant is effected in both thee knee
and ankle position.- The % turned figure looks best with a supporting % turned leg. This
support balance is usually of the high hip side.- To reflect this balance, the % turned legs needs a % foot view. Do the
same for profile and full front leg.Some example of legs drawn in outlineShoes of various styles are depicted the better to show the elegance which aleg assumes when a model high - heeled shoes. In order to understand thesize and proportions involved. Practice using an artistic manikin.
Review questionQ) Do a Structural analysis of leg and sketch different parts?
Q) Sketch different types of leg motion?
FAAO&SCD (23)

BA lind Year (Fashion Design)CHAPTER- 9 (Hand Analysis)
IntroductionHands are often difficult to draw when design sketching they can be particularly problematic when there is no time to draw details,Especially when making quick sketches to express and develop ideas from the imagination. It can be helpful to practice sketching hands from a model or even drawing your own from different angles.
Content- Keep the hand, long, slender and elegant.- do not over emphasize it.Rectangularformula1 half palm/half finger.They equal each other in length.2 make three dots for the finger base by the knuckles equal spacing
Between the dots3 divide the fingers into the knuckles section one half, then again in half,
FMD&SCD (24)

B.A. lind Year (Fashion Design)
-43-
FMD&SCD (25)

BA lind Year (Fashtof^ Design)
9
IIt
HAND AND WRIST MEAStjREMENTS
FMO&SCO (26)
BA find Year (Fashion Design) 4. draw as the middle fingers towards it. Notice the large arrow. It shows
where the thumb begins. Follow that to the smaller arrow where thum puds.
It is certainly difficult for a designer who is just beginning to reproduce this part of the body accurately.In order to understand its dimension better enclose the hand in a geometrical form limiting external space, and do the same with the interior of the hand, uniting all of the Joints.Then reproduce the hand making a broad sketch which underlines its three dimensionally and actual structure, and then finally reintroduced the hand with a clear line and light chiaroscuro.
Review questionQ) Sketch the structure of hand with the example of a rectangular Formula?Q) Sketch different types of hand movements?
FMD&SCD (27)

BA lind year (Fashion Design)CHAPTER-10 (Drawing the foot)
IntroductionPractice sketching legs and feet, either from a model or from photographs in fashion magazines, lightly sketch the shape of the foot to indicate its position, using the method illustrated here. Keep a sketchbook of drawings, making a study of the foot. When you start sketching different shoe style, it is always helpful to draw in the shape of the foot first with a light outline.
FMD&SCO |28)

B.A. lind Year (Fashion Design) Formulas -
Again, the dominate view prevail. Practice the full front, Ya turn, and profile foot. Start with a trapezoidal shape. The toe area is drawn wider thaw the ankle.2 The Ya turned view is a combination of both the full front formulas. Stress
is placed on the arch.3 The profile view can be easily altered to suggest a flat as high heel shoe.
The centre triangle is important for both shoe types. Lay the triangle flat or tip it on an angle to create the desired height.
1 practices the formulas in both a left and right foot views. A bare foot is for proportion, the foot in the shoe is for style. The style is subject to change but the foot in the shoe is not.
- Keep the feet long and narrow.Top: sketches of feet drawn from a number of perspectives with visible lines of construction and in outline.Right: representation of the foot in outline seen from different perspectives. Shoe styleSandalsWhether they are strappy, lace ups or thongs - high - heeled or flat - drawn them on a naked foot showing just a tiny bit of toes.
BootsWhen drawing a cow boy, riding or sport boot, maintain the character of the material...,. Leather, suede, canvas for example. Always let the boot crush or fold gently at the ankleFlatsDepending upon the current style the height of the heel will vary. Draw the arch lower so that heel is aligned with the toe area.HellsThis illustrates a sling - back shoe. It shows off the
curve of the heel. Notice how high the arch is and how much the heel of the shoe slants in. again this styling will change with fashion trends.WedgiesShown here are tow examples of wedge (or heel) height. The more exaggerated the arch, the higherthe heel will be.
Review questionQ) Sketch the feet step by step?Q) Sketch different types of feet and shoes?FMD&SCD (29)

BA lind Year (Fashion Design)CHAPTER-11 (Figure proportion of a child)
IntroductionThe height of the average figure varies from between seven - and - a - half to eight times the height of the head. When drawing a fashion sketch, the proportions are usually eight- and-a-half with exaggeration on the length of the legs. Try not to over- exaggerate when producing sketches, however, as this may distort the proportion of yourdesign.When sketching, draw the figure first with very light pencil lines and check that the positions of the chest, waist, and hips are correct, as well as the overall proportions when sketching, you will find it helpful to draw a faint line should be drawn from the pit of the neck to the foot that is carrying the weight of the body, to indicate that the head and neck are aligned with the supporting foot. This will serve as a guide when designing relative details,
uptiM. i^owioHjywfiiewiMMEi^Ate
1«
?</^4* t
lA* '.sas,:X i JSA,■SsC
viwi Ti ■■•k
IMContentBasic figure drawingIn order to express your design ideas precisely, and to present them attractively, you will need to develop your skills in figure drawing, when designing, you should be able to sketch a figure from memory in a number of different poses.Start by studying figure drawing until you can memorize the correct the proportion and draw free hand figure with confidence.I have grouped the different techniques of drawing the fashion figure under the following headings;1 drawing the figure-basic proportion2 drawing from templates
FMD&SCO (30)

B.A. ilhd Year (Fashion Design) 3 drawing from the imagination - stylized drawings.
4 drawing from life.
Review questionQ) Make a chart of basic figures properties of the following age groups?
1,2,3,6,8,10,12&15years.
FMD & SCD ( 31 )

BA lind Year (Fashion Design)CHAPTER-12 (8 HEAD FIGURE)
IntroductionWhen producing fashion sketches and presentation drawings it is important to be aware of standard proportions of the human figure. One of the most effective methods of classification is the number of times the length of the heads fits into the total height of the body.Proportions vary from person to person. One should rely upon observation for the correct proportion of human figure.
Zlat Head Chin line
Shoulder line
7
2n& Head \ » 3tast line/
Ifaiet lino
Abdoisen3rd Head
Elp line
Sad of Toreok &i Head
(j3th Htsad
Sfh Head Knee llxte (half way between hip line and feet)
7 th Head
8th Bead Ankle line
9th Head —. FMD&SCO (32)TASHIOH n<ms

BA lind Year (Fashion Design)
ti
MALE
ContentWhen we divide the human body in 8 % heads keeping the head as a unit of measurement we can conclude that each segment contains:1) The head2) The neck and the shoulders3) The breast, the lower part of the chest and waist4) The pelvis and public region
FMD&SCO (33)
/V

B.A. lind Year (Fashion Design)5) Thecentralpartofthighs
6) The bottom ofthe thighs, the knee7) The central part ofthe leg and the calf8) The extremity ofthe legs, the ankle and the feet9) Foot extended forwardThe arms and the head extend from the second to the fifth segment.
■ Use the head as the basic unit of measurement for drawing. The head may be viewed when drawing both in terms of its width and height.- The head is used from chin to the top of the skull for vertical
measurements, the width of head for horizontal measurements. The shoulders are three widths across.
- To give volume to your figure drawing is to feel the shapes as you observe and draw them.
- When developing fashion sketches from imagination, draw round the shapes, consider the basic cylindrical, tubular and spherical parts of which the body is made up.
- It is helpful to think body in terms of simple basic forms and understanding the essential masses of the separate parts and placing them on correct proportion and relationships.
- At this stage ignore hair and features as well as the more subtle curves of the figure resulting from underlying bone and muscle structure.
- Once you have an understanding of the basic forms you will follow with drawing the details ofthe figure.
- The female’s shoulders are narrow and sloping with wide hips.- The male is broad shouldered and relatively narrow at hips.- The fashion drawing tends to dictate the shape ofthe figure depending on
the cut and style ofthe garment and the image designer is creating.- Note the point at which motion occurs.- The individual parts are connected by 3 very different types of joints.Ball and socket (shoulder-hips-ankles)Hingejoint-(knees-elbows)The flexible column (spine and neck)Divide the figure furthers and note the relationship between the sections themselves. Each section is slightly longer or shorter in comparison to the next.Now put the figure back together in natural units. Sections are still important and should be practiced, step by step. The goal is to create a figure - all these parts must fit easily together.Remember this is not a true figure, but a fashion figure. It has been elongated
FMD&SCD (34)

BA iind Year (Fashion Design) to match style and trends. Again, this ratio of half to half of weeks - front as
side view.There are sewing lines on the front, back and side views. They fit within our given proportions and are not subject to change with the exception of the bust line or buttocks, which are sometimes placed higher or lower.Notice how these sewing lines section off the figure, each directly related to the other, princess seams are parallel to each other. This breaks the figure into quarters - left front and side. On the profile (side) view, a princess seam becomes the outside contour line, leaving the side seem to define the inner figure.You will need all these lines when drawing design details. Always include them on yourfigure sketch.
Review questionQ) Make 8 head block figure of female?
FMD&SCD (35)
BA lind Year (Fashkxi Design)CHAPTER - 13 (MULTIPLE POSES)
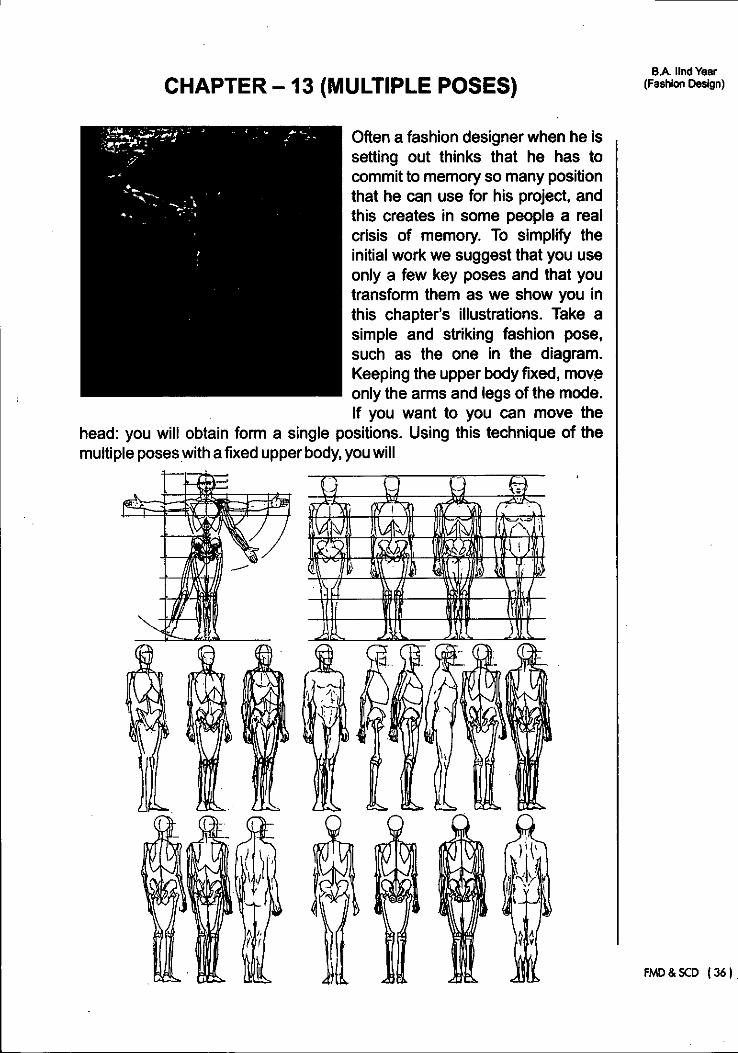
Often a fashion (jesigner when he is setting out thinks that he has to cx)mmit to memory so many position that he can use for his project, and this creates in some people a real crisis of memory. To simplify the initial work we suggest that you use only a few key poses and that you transform them as we show you in this chapter’s illustrations. Take a simple and striking fashion pose, such as the one in the diagram. Keeping the upper body fixed, move only the arms and legs of the mode. If you want to you can move the
head: you will obtain form a single positions. Using this technique of the multiple poses with a fixed upper body, you will
.t -
V5
Is) l<lVA
FMO&SCD (36)

Jt-