Embed Size (px)
DESCRIPTION
Aix 6 User Accounts
Citation preview

Student NotebookV4.1
Uempty
Unit 14. Security and user administrationWhat this unit is about
This unit explains key concepts related to AIX users and groups, and also describes the files that contain user account information.
What you should be able to do
After completing this unit, you should be able to:
• Define the concepts of users and groups, and explain how and when these should be allocated on the system
• Describe ways of controlling root access on the system • Explain the uses of SUID, SGID, and SVTX permission bits • Administer user accounts and groups • Identify the data files associated with users and security
How you will check your progress
Accountability:
• Checkpoint questions • Exercise
References
SG24-7424 AIX 6.1 Advanced Security Features
Introduction and Configuration
Online AIX 6.1 Security Guide
Note: References listed as “Online” above are available at the following address:
http://publib.boulder.ibm.com/infocenter/pseries/v6r1/index.jsp
Course materials may not be reproduced in whole or in part without the prior written permission of IBM.
© Copyright IBM Corp. 1997, 2008 Unit 14. Security and user administration 14-1

Student Notebook
Figure 14-1. Unit objectives AU1412.0
Notes:
© Copyright IBM Corporation 2008
Unit objectives
After completing this unit, you should be able to:• Define the concepts of users and groups, and explain how
and when these should be allocated on the system• Describe ways of controlling root access on the system• Explain the uses of SUID, SGID, and SVTX permission bits• Administer user accounts and groups• Identify the data files associated with users and security
Course materials may not be reproduced in whole or in part without the prior written permission of IBM.
14-2 AIX System Administration I © Copyright IBM Corp. 1997, 2008

Student NotebookV4.1
Uempty
14.1. Security conceptsCourse materials may not be reproduced in whole or in part without the prior written permission of IBM.
© Copyright IBM Corp. 1997, 2008 Unit 14. Security and user administration 14-3

Student Notebook
Figure 14-2. User accounts AU1412.0
Notes:
Importance of user accounts
The security of the system is based on a user being assigned a unique name, user ID (UID) and password. When the user logs in, the UID is used to validate all requests for file access.
File ownership
When a file is created, the UID associated with the process that created the file is assigned ownership of the file. Only the owner or root can change the access permissions.
© Copyright IBM Corporation 2008
User accounts
• Each user has a unique name, numeric ID, and password
• File ownership is determined by a numeric user ID
• The owner is usually the user who created the file, but ownership can be transferred by root
• Default users:– root Superuser– adm, sys, bin, ... IDs that own system files but
cannot be used for login
Course materials may not be reproduced in whole or in part without the prior written permission of IBM.
14-4 AIX System Administration I © Copyright IBM Corp. 1997, 2008

Student NotebookV4.1
Uempty
Automatically created user accountsThere are several user accounts automatically created. root, for example, is one. Some user accounts are not made for login but only to own certain files. adm, sys, and bin are examples of that type of account.
Course materials may not be reproduced in whole or in part without the prior written permission of IBM.
© Copyright IBM Corp. 1997, 2008 Unit 14. Security and user administration 14-5

Student Notebook
Figure 14-3. Groups AU1412.0
Notes:
Function of groups
Users that require shared access to a set of files are placed in groups. Each group has a unique name and Group ID (GID). The GID, like the UID, is assigned to a file when it is created.
A user can belong to multiple groups.
Predefined groups
There are several groups predefined on an AIX system. For example, the system group is root's group and the staff group is for all ordinary users.
© Copyright IBM Corporation 2008
Groups
• A group is a set of users, all of whom need access to a given set of files.
• Every user is a member of at least one group and can be a member of several groups.
• The user has access to a file if any group in the user’s groupset provides access. To list the groupset, use the groups command.
• The user's real group ID is used for file ownership on creation.To change the real group ID, use the newgrp command.
• Default groups:– System administrators: system– Ordinary users: staff
Course materials may not be reproduced in whole or in part without the prior written permission of IBM.
14-6 AIX System Administration I © Copyright IBM Corp. 1997, 2008

Student NotebookV4.1
Uempty
Planning and administering groupsThe creation of groups to organize and differentiate the users of a system or network is part of systems administration. The guidelines for forming groups should be part of the security policy. Defining groups for large systems can be quite complex, and once a system is operational, it is very difficult to change the group structure. Investing time and effort in devising group definitions before your system arrives is recommended.
Groups should be defined as broadly as possible and be consistent with your security policy. Do not define too many groups because defining groups for every possible combination of data type and user type can lead to impossible extremes.
A group administrator is a user who is allowed to assign the members and administrators of a group. It does not imply that the user has any administrative abilities for the system.
Types of groups
There are three types of groups on the system:
- User Groups User groups should be made for people who need to share files on the system, such as people who work in the same department, or people who are working on the same project.
- System Administrator Groups System administrators are automatically members of the system group. Membership of this group allows the administrators to perform some of the system tasks without having to be the root user.
- System Defined Groups Several system-defined groups exist. staff is the default group for all non-administrative users created in the system. security is another system-defined group having limited privileges for performing security administration. The system-defined groups are used to control certain subsystems.
Use of the newgrp command
A user’s real group identification is used to determine the group ownership of a file created by that user. The newgrp command changes a user's real group identification. If you provide a group name as a parameter to the newgrp command, the system changes the name of your real group to the group name specified (if the group name specified is part of your groupset). If no group name is provided as a parameter, the newgrp command changes your real group to the group specified as your primary group in the /etc/passwd file.
Course materials may not be reproduced in whole or in part without the prior written permission of IBM.
© Copyright IBM Corp. 1997, 2008 Unit 14. Security and user administration 14-7

Student Notebook
Figure 14-4. Group hierarchy AU1412.0
Notes:
Rights to administrative functions
As indicated on the visual, membership in some groups confers rights to the use of certain administrative functions. Membership in the staff group does not provide rights to the use of administrative functions.
Common groups
Common groups on the system (and their intended uses) are as follows:
system For most configuration and standard hardware and software maintenance.
printq For managing queuing. Typical commands which can be run by members of this group are: enable, disable, qadm, qpri, and so forth.
© Copyright IBM Corporation 2008
Group hierarchy
system security
printqadm audit
shutdown
staff
Rights to administrative
functions
Ordinaryuser
Course materials may not be reproduced in whole or in part without the prior written permission of IBM.
14-8 AIX System Administration I © Copyright IBM Corp. 1997, 2008

Student NotebookV4.1
Uempty
security To handle most passwords and limits control. Typical commands which can be run by members of this group are: mkuser, rmuser, pwdadm, chuser, chgroup, and so forth.adm Most monitoring functions such as performance, cron, accounting
staff Default group assigned to all new users. You may want to change this in /usr/lib/security/mkuser.defaults.
audit For auditors.
shutdown Allows use of the shutdown command.
Course materials may not be reproduced in whole or in part without the prior written permission of IBM.
© Copyright IBM Corp. 1997, 2008 Unit 14. Security and user administration 14-9

Student Notebook
Figure 14-5. User hierarchy AU1412.0
Notes:
Capabilities of members of certain groups
The ability to perform certain system tasks (like creating users) depends upon the standard AIX file permissions. Most system administration tasks can be performed by users other than root if those users are assigned to groups such as system, security, printq, cron, adm, audit or shutdown. In particular, a user in the security group can add/remove/change other users and groups.
Purpose of user hierarchy
To protect important users/groups from users in the security group, AIX has three levels of user hierarchy: root, admin users/groups and normal users/groups. Only root can add, remove, or change an admin user or admin group. Therefore, you can define a user that has a high level of access, but who is protected from users in the security group.
© Copyright IBM Corporation 2008
User hierarchy
• To protect important users and groups from members of the security group, AIX has admin users and admin groups
• Only root can add, remove, or change an admin user oradmin group
• Any user on the system can be defined as an admin userregardless of the group they are in
root
admin user(admin flag set to true)
normal user
Course materials may not be reproduced in whole or in part without the prior written permission of IBM.
14-10 AIX System Administration I © Copyright IBM Corp. 1997, 2008

Student NotebookV4.1
Uempty
Figure 14-6. Controlling access to the root account AU1412.0
Notes:
Guidelines for root account password
If the root password is known by too many people, no one can be held accountable. The root password should be limited to just two or three administrators. The fewer people who know root's password the better.
The system administrator should ensure that distinct root passwords are assigned to different machines. You may allow normal users to have the same passwords on different machines, but never do this for root.
Use of the su command
Attempts to become root through su can be investigated. Successful and unsuccessful attempts might be logged by the audit system.
© Copyright IBM Corporation 2008
Controlling access to the root account
• Restrict access to privileged logins
• root's passwords should be changed on an unannounced schedule by the system administrator
• Assign different root passwords to different machines
• System administrators should always login as themselves first and then su to root instead of logging in as root. This helps provide an audit trail for root usage
• Do not include unsecured directories in root's PATH
Course materials may not be reproduced in whole or in part without the prior written permission of IBM.
© Copyright IBM Corp. 1997, 2008 Unit 14. Security and user administration 14-11

Student Notebook
PATH variable for root account
Do not include unsecured directories in the value of PATH for the root account. Note that root's PATH is used by many implicit system functions, not just by a user logged in as root.
Course materials may not be reproduced in whole or in part without the prior written permission of IBM.
14-12 AIX System Administration I © Copyright IBM Corp. 1997, 2008

Student NotebookV4.1
Uempty
Figure 14-7. Security logs AU1412.0
Notes:
The sulog file
The sulog file is an ASCII text file that can be viewed with more or pg. In the file, the following information is recorded: date, time, terminal name and login name. The file also records whether the login attempt was successful (and indicates a success by a + and a failed login by a -).
The utmp and wtmp files
The /etc/utmp file contains a record of users logged into the system, and the /var/adm/wtmp file contains connect-time accounting records. To obtain information from either file use the who command with the file name. The who command normally examines the /etc/utmp file, but you can specify either one of the files just mentioned as an argument to the command.
© Copyright IBM Corporation 2008
Security logs
/var/adm/sulog
/var/adm/wtmp
/etc/security/failedlogin
/etc/utmp
Audit trail of su activity
Log of successful logins
List of users currently logged in
Information on fail login attempts
Course materials may not be reproduced in whole or in part without the prior written permission of IBM.
© Copyright IBM Corp. 1997, 2008 Unit 14. Security and user administration 14-13

Student Notebook
The last command
The last command can also be used to display, in reverse chronological order, all previous logins and logoffs still recorded in the /var/adm/wtmp file. The /var/adm/wtmp file collects login and logout records as these events occur and holds them until the records are processed by the accounting commands.
For example:
# last root Displays all the recorded logins and logoffs by the user root
# last reboot Displays the time between reboots of the system
The utmpd daemon
AIX 5L V5.2 introduced a new daemon called utmpd to manage the entries in the /etc/utmp file. This daemon monitors the validity of the user process entries at regular intervals. The default interval time would be 300 seconds.
The syntax of the command is:
/usr/sbin/utmpd [ Interval ]
To start utmpd from the /etc/inittab, add the following entry to the file:
utmpd:2:respawn:/usr/sbin/utmpd
The failedlogin file
The /etc/security/failedlogin file maintains a record of unsuccessful login attempts. The file can be displays using the who command with the file as an argument.
Course materials may not be reproduced in whole or in part without the prior written permission of IBM.
14-14 AIX System Administration I © Copyright IBM Corp. 1997, 2008

Student NotebookV4.1
Uempty
Figure 14-8. File/Directory permissions AU1412.0
Notes:
Permission bits
There are a number of permission bits associated with files and directories. The standard r (read), w (write) and x (execute) permissions define three levels of access for the user (owner), group and others. In addition there are three permission bits known as SUID (set UID), SGID (set GID) and SVTX (sticky bit).
The SUID bit
SUID on an executable file means that when the file runs, the process runs with an effective UID of the owner of the file. SUID is not supported on shell scripts.
SUID has no meaning on a directory.
© Copyright IBM Corporation 2008
File/Directory permissions
Must be owner of files to delete files from directory
SVTX--------
Files created in directory inherit the same group as the directory
SGIDRun program with effective GID of group
--------SUIDRun program with effective UID of owner
Give access to directoryxUse file name to execute as a command
Create and remove files in directory
wModify content of file
List content of directoryrRead content of file
DirectoryPerm. BitFile
Course materials may not be reproduced in whole or in part without the prior written permission of IBM.
© Copyright IBM Corp. 1997, 2008 Unit 14. Security and user administration 14-15

Student Notebook
The SGID bit
SGID on an executable file means that when the file runs, the process runs with an effective GID of the group owner of the file.
SGID on a directory means that any file or directory created within the directory will have the same group ownership as the directory rather than the real group ID or primary group of the user.
The SGID permission bits are propagated down through the directory structure, so that any directory created in a directory with the SGID bit set also inherits that bit.
The SVTX bit
SVTX on a file has no meaning in AIX. (It was used in earlier versions of UNIX.)
SVTX on a directory means that even if the directory has global write permission (for example, /tmp), users cannot delete a file within it unless they either own the file or the directory.
Traditional UNIX used SVTX to keep a program in memory after it had completed running, but with memory management routines, this is no longer necessary. SVTX is known as the sticky bit.
Course materials may not be reproduced in whole or in part without the prior written permission of IBM.
14-16 AIX System Administration I © Copyright IBM Corp. 1997, 2008

Student NotebookV4.1
Uempty
Figure 14-9. Reading permissions AU1412.0
Notes:
How SUID, SGID, and SVTX settings are indicated
The SUID bit is indicated by an S or s in the slot normally reserved for the execute permission for owner (user). The SGID bit is indicated by an S or s in the slot normally reserved for the execute permission for group. The SVTX bit is indicated by a T or t in the slot normally reserved for the execute permission for others. Since this slot must show if execute is on/off and whether the additional permission bit is on/off, the uppercase S or T is used to indicate that the execute permission is off. The lowercase s or t indicates the execute permission is on.
© Copyright IBM Corporation 2008
Reading permissions
SUID SUID SGID SGID sticky stickyonly + x only + x bit bit
only + x
rwr x
sS
r w x
sS
w x
tT
owner group other
# ls -ld /usr/bin/passwd /usr/bin/crontab /tmp
-r-sr-xr-x root security ... /usr/bin/passwd-r-sr-sr-x root cron ... /usr/bin/crontabdrwxrwxrwt bin bin ... /tmp
Course materials may not be reproduced in whole or in part without the prior written permission of IBM.
© Copyright IBM Corp. 1997, 2008 Unit 14. Security and user administration 14-17

Student Notebook
Discussion of examples on visual
Three examples of files that use these additional permissions are shown on the visual:
- The passwd command allows users to change their passwords even though passwords are stored in a restricted area
- The crontab command allows users to create a crontab file even though access to the directory where crontab files reside is restricted for ordinary users
- Permission bit settings for /tmp allow everyone to write to the directory, but only the owner of a file can remove a file from the /tmp directory
Course materials may not be reproduced in whole or in part without the prior written permission of IBM.
14-18 AIX System Administration I © Copyright IBM Corp. 1997, 2008
Student NotebookV4.1
Uempty
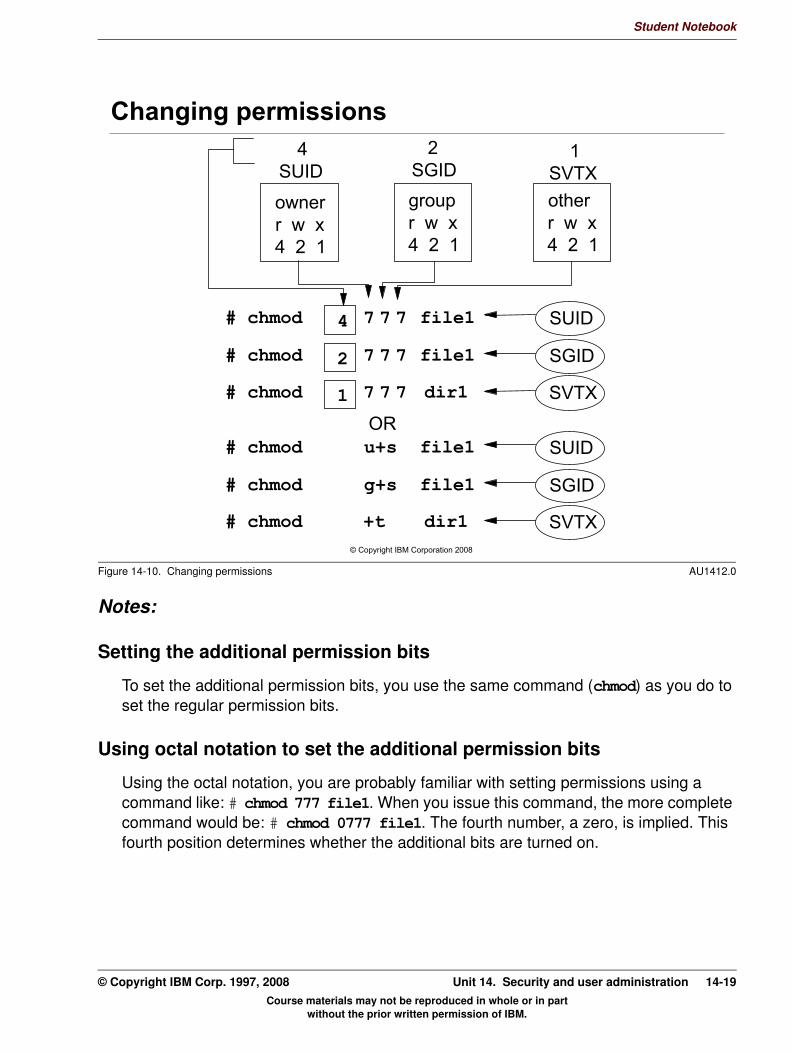
Figure 14-10. Changing permissions AU1412.0
Notes:
Setting the additional permission bits
To set the additional permission bits, you use the same command (chmod) as you do to set the regular permission bits.
Using octal notation to set the additional permission bits
Using the octal notation, you are probably familiar with setting permissions using a command like: # chmod 777 file1. When you issue this command, the more complete command would be: # chmod 0777 file1. The fourth number, a zero, is implied. This fourth position determines whether the additional bits are turned on.
© Copyright IBM Corporation 2008
Changing permissions
# chmod 4 7 7 7 file1 SUID
# chmod 2 7 7 7 file1 SGID
# chmod 1 7 7 7 dir1 SVTX
4SUID
2SGID
1SVTX
ownerr w x4 2 1
groupr w x4 2 1
otherr w x4 2 1
# chmod u+s file1 SUID
# chmod g+s file1 SGID
# chmod +t dir1 SVTX
OR
Course materials may not be reproduced in whole or in part without the prior written permission of IBM.
© Copyright IBM Corp. 1997, 2008 Unit 14. Security and user administration 14-19

Student Notebook
You normally use the numeric values of 4, 2, and 1 to set r, w and x. That remains the same. To set the additional bits, you are affecting the x position in either the user, group or other area. If you assign numeric values to user (4), group (2), and other (1), these are the values that you insert into the fourth position to set the additional bit:
- SUID is indicated in the user's area; therefore use a 4 in the fourth position
- SGID is indicated in the group area; therefore use a 2 in the fourth position
- SVTX is indicated in the others area; therefore use a 1 in the fourth position
Using the symbolic method to set the additional permission bits
You can also use the symbolic method to set the additional permission bits. The visual shows how to set the values using the symbolic method.
Course materials may not be reproduced in whole or in part without the prior written permission of IBM.
14-20 AIX System Administration I © Copyright IBM Corp. 1997, 2008

Student NotebookV4.1
Uempty
Figure 14-11. umask AU1412.0
Notes:
Function of umask
The umask specifies what permission bits are set on a new file when it is created. It is an octal number that specifies which of the permission bits are not set.
Default value of umask
If no umask was used, then files would be created with permissions of 666 and directories would be created with permissions of 777. The system default umask is 022 (indicating removal of the 2 bit or write from the group and others area). Therefore, removing write from group and other results in an initial permission for files of 644 and, for directories, 755. Execute permission is never set initially on a file.
© Copyright IBM Corporation 2008
umask
• The umask governs permissions on new files and directories
• System default umask is 022
• A umask of 027 is recommended
• If the umask value is set to 022, then any ordinary files or directories created inherit the following permissions:
– Ordinary file: rw-r--r--
– Directory: rwxr-xr-x
• /etc/security/user specifies default and individual user umask values
Course materials may not be reproduced in whole or in part without the prior written permission of IBM.
© Copyright IBM Corp. 1997, 2008 Unit 14. Security and user administration 14-21

Student Notebook
Changing the umask to enhance security
The default setting of the umask is 022. For tighter security you should make the umask 027, or even 077.
The umask command
To view or change the value of the umask for the current session use the umask command.
Values stored in /etc/security/user file
The umask is specified in /etc/security/user. The default stanza in this file specifies the system wide default, but a value can be specified on a per-user basis.
Course materials may not be reproduced in whole or in part without the prior written permission of IBM.
14-22 AIX System Administration I © Copyright IBM Corp. 1997, 2008

Student NotebookV4.1
Uempty
Figure 14-12. Changing ownership AU1412.0
Notes:
Using chown to change ownership
As illustrated on the visual, the chown command can be used by root to change the ownership on a file.
Using chgrp to change group ownership
The chgrp command is used to change the group ownership of a file. Any owner of a file can change the group ownership to any group in their groupset. The root user can change the group ownership to any group on the system.
© Copyright IBM Corporation 2008
Changing ownershipThe chown command:
# chown fred file1
The chgrp command:
# chgrp staff file1
Changing both user and group ownership:
# chown fred:staff file1# chown fred.staff file1
Course materials may not be reproduced in whole or in part without the prior written permission of IBM.
© Copyright IBM Corp. 1997, 2008 Unit 14. Security and user administration 14-23

Student Notebook
Changing both ownership and group ownership
The chown command can be used by root to set both the ownership and group ownership of a file. As illustrated on the visual, this can be done two different ways:
- Method 1:
# chown fred:staff file1
- Method 2:
# chown fred.staff file1
Course materials may not be reproduced in whole or in part without the prior written permission of IBM.
14-24 AIX System Administration I © Copyright IBM Corp. 1997, 2008

Student NotebookV4.1
Uempty
Figure 14-13. Role based access control (RBAC) AU1412.0
Notes:
Why do we need RBAC?
The difficulty with permission (or even access control list) base access control is that you must secure the needed resource rather than the command. It was often difficult to know which resources were the ones needed. In some cases we are dealing with kernel resources. In addition, a given resource may have multiple uses and a single group access to it may not work. Allowing a program to be root with suid allowed one to bypass the resource permissions, but suid itself was a potential exposure.
With Enhanced Resource Based Access Control (RBAC), resource access is controlled via privileged commands and then only users with the proper authorization are allowed execute the privileged command. The authorization and privileges are fine grained.
© Copyright IBM Corporation 2008
Role based access control (RBAC)• Fine grained delegation of authority
– Roles assigned as an attribute of the user or group
• Legacy RBAC (AIX V4.2+):– User space implementation– Role assignment alone was insufficient
• Enhanced RBAC (AIX 6.1):– Covers user and kernel space– Effective role assignment without additional configuration– AIX 6.1 SP1 provides 10 predefined roles
• User can activate/inactivate roles as needed– Create subshell with role in effect:$ swrole SysBoot
Course materials may not be reproduced in whole or in part without the prior written permission of IBM.
© Copyright IBM Corp. 1997, 2008 Unit 14. Security and user administration 14-25

Student Notebook
Legacy RBAC
Starting with AIX 4.2, a form of RBAC was provided but was difficult to work with. Even though a user was assign a role, that user was often still unable to execute the associated tasks until a requisite command was converted to a set uid executable and the user was made a member of the associated command. In addition, the legacy framework was implemented without involvement of the kernel.
Enhanced RBAC
Starting with AIX 6.1, an enhanced form of RBAC is provided. The enhanced RBAC framework involves the kernel and thus is more secure. The new framework is also more granular and extensive than the legacy RBAC. Once a role is assigned to a user, they have the authorization to do the related tasks without having to play with file permissions or group membership. While the framework supports user defined privileged commands, authorizations and roles, AIX 6.1 SP1 provides 10 predefined roles that can be used without additional RBAC configuration.
The details of the RBAC framework is outside the scope of this course.
Activation and deactivation of user roles
Under enhanced RBAC, users can control when they are using their assigned roles. To activate a role, the user would run the swrole command with one or more comma delimited roles as an argument. The designated role must either be one assigned as an attribute of the user or as an attribute of a group the user belongs to. This creates a subshell where the specified roles are in effect. When the user exits the subshell the activated roles are then effectively deactivated.
If a user attempts a task without activating the related role, the normal authorization mechanisms are in effect (permission settings, hard coded identify checks in the executable, and so forth).
Course materials may not be reproduced in whole or in part without the prior written permission of IBM.
14-26 AIX System Administration I © Copyright IBM Corp. 1997, 2008

Student NotebookV4.1
Uempty
Figure 14-14. Predefined enhanced RBAC roles AU1412.0
Notes:
Overview
AIX 6.1 SP1 provides 10 predefined roles. The first three in the list provide authorization for broad task areas. The ones after that provide the ability to delegate smaller and more focused task areas which are a subset of what the first three provide.
The following are only summaries of authorization. The complete and detail description can only be determined through researching the RBAC databases on your system.
role: isso - Information system security officer
The ISSO role is responsible for creating and assigning roles and is thus the most powerful user-defined role on the system. Some of the ISSO responsibilities include:
- Establishing and maintaining security policy
- Setting passwords for users
© Copyright IBM Corporation 2008
Predefined enhanced RBAC roles• isso - Information System Security Officer
• sa - System Administrator
• so – System Operator
• AccountAdmin - User and Group Account Administration
• BackupRestore -Backup and Restore Administration
• DomainAdmin - Remote Domain Administration
• FSAdmin - File System Administration
• SecPolicy - Security Policy Administration
• SysBoot - System Boot Administration
• SysConfig - System Configuration
Course materials may not be reproduced in whole or in part without the prior written permission of IBM.
© Copyright IBM Corp. 1997, 2008 Unit 14. Security and user administration 14-27

Student Notebook
- Network configuration
- Device administration
role: sa - System administrator
The SA role provides the functionality for daily administration and is responsible for:
- User administration (except password setting)
- File system administration
- Software installation update
- Network daemon management
- Device allocation
role: so - System operator
The SO role provides the functionality for day to day operations and is responsible for:
- System shutdown and reboot
- File system backup, restore, and quotas
- System error logging, trace, and statistics
- Workload administration
role: AccountAdmin - User and group account administrator
The AccountAdmin role provides the functionality for users and group definitions and is responsible for:
- Define, modify and remove users
- Define modify and remove groups
role: BackupRestore - Backup and restore administrator
The BackupRestore role provides the functionality for backup and restore operations for file systems using various commands such as:
- cpio, pax, tar, backup and restore
role: DomainAdmin - Remote domain administrator
The DomainAdmin role provides the functionality for managing network security mechanisms such as:
- kerberos, ldap, NIS, and PKI
Course materials may not be reproduced in whole or in part without the prior written permission of IBM.
14-28 AIX System Administration I © Copyright IBM Corp. 1997, 2008
Student NotebookV4.1
Uempty
role: FSAdmin - File system administratorThe FSAdmin role provides the functionality for managing file systems and has the ability to:
- Create, modify and remove file systems
- Mount and unmount file systems
- Defrag file systems
- Format file system logs
- Manage file system user quotas
- Create and manage JFS2 snapshots
role: SecPolicy - Security policy administrator
The SecPolicy role provides the functionality for security administration and is responsible for most of what the ISSO covers, except for:
- Domain Administration
- System Configuration
role: SysBoot - System boot administrator
The SysBoot role provides the functionality system shutdown and booting via the facilities for:
- halt, shutdown, and reboot
role: SysConfig - System configuration
The SysConfig role provides the functionality for system configuration and is responsible for such components as:
- inittab
- System console
- Kernel extensions
- uname
- Resource sets
- Date and time zone
- Software license management
- Performance tunables
- Diagnostics
Course materials may not be reproduced in whole or in part without the prior written permission of IBM.
© Copyright IBM Corp. 1997, 2008 Unit 14. Security and user administration 14-29

Student Notebook
Figure 14-15. Exercise 15: Security files AU1412.0
Notes:
Introduction
This lab gives you a chance to look at some of the security files and allows you an opportunity to work with the SUID, SGID, and SVTX.
The exercise can be found in your Student Exercises Guide.
© Copyright IBM Corporation 2008
Exercise 15: Security files
• Security control files
• SUID and sticky bit
Course materials may not be reproduced in whole or in part without the prior written permission of IBM.
14-30 AIX System Administration I © Copyright IBM Corp. 1997, 2008

Student NotebookV4.1
Uempty
14.2. User administrationCourse materials may not be reproduced in whole or in part without the prior written permission of IBM.
© Copyright IBM Corp. 1997, 2008 Unit 14. Security and user administration 14-31

Student Notebook
Figure 14-16. Login sequence AU1412.0
Notes:
Introduction
When a user attempts to log in, AIX checks a number of files to determine if entry is permitted to the system and, if permitted, what parts of the system the user can access. This section provides an overview of the checks performed during the login process.
The getty process
Ports set up for login are listed in the /etc/inittab. When init runs, a getty process is started for each port in the list providing a login prompt on the terminal attached to that port. The actual message displayed (also known as the herald) by the getty process is defined in /etc/security/login.cfg. Once the message is displayed, the getty process waits for a user to make a login attempt.
© Copyright IBM Corporation 2008
Login sequence
/etc/profile$HOME/.profile
shell
Display /etc/motd?
Invalid
Log entry in:/etc/security/failedlogin
getty
login
User enters login name
User enters password
Verify user nameand password
Valid
Setup environment
Started by initport settings in ODM
Settings in:/etc/security/login.cfg
/etc/passwd/etc/security/passwd
/etc/environment/etc/security/environ/etc/security/limits/etc/security/user
$HOME/.hushlogin
Course materials may not be reproduced in whole or in part without the prior written permission of IBM.
14-32 AIX System Administration I © Copyright IBM Corp. 1997, 2008

Student NotebookV4.1
Uempty
Entry of username and passwordWhen a user is ready to log in, they enter their user name at the login prompt. The login program is passed the user name and then checks /etc/passwd and /etc/security/passwd to see if a password is required. If a password is required or the user name doesn't match a valid name, the Password: prompt is displayed and the invis terminal attribute is set so that the password is not displayed as it is entered.
Validation
When the user enters the password, it is checked. If the password is incorrect or if an invalid user name was given, then the login fails, and an entry is made in the file /etc/security/failedlogin. (Use the command who /etc/security/failedlogin to view this file.) The number of failed attempts is also tracked (by user account) in /etc/security/lastlog. The Login: prompt is redisplayed for another attempt.
It is possible to set the characteristics for a user to prevent unlimited attempts on an account. If the number of attempts exceeds the maximum allowable failed attempts, the account is locked.
If a user successfully enters the user name and password, the usw stanza in /etc/security/login.cfg is checked. This stanza sets the maximum number of concurrent logins for a user account. If that number is exceeded, the login is denied and a message is displayed to the user.
Setup of user’s environment
If everything is successful to this point, then the user's environment is set using /etc/environment, /etc/security/environ, /etc/security/limits and /etc/security/user. The login program sets the current directory to the user's HOME directory and displays the content of /etc/motd (if no .hushlogin file is found in the HOME directory), date of the last successful login, and the number of unsuccessful login attempts since the last successful login.
Passing of control to shell
Finally, control is passed to the login shell (as defined in /etc/passwd) which will read /etc/environment and run /etc/profile and $HOME/.profile when using Korn or Bourne shells.
Results of a user logging out
When a user logs out, the shell terminates and a new getty process is spawned for that port.
Course materials may not be reproduced in whole or in part without the prior written permission of IBM.
© Copyright IBM Corp. 1997, 2008 Unit 14. Security and user administration 14-33

Student Notebook
Figure 14-17. User initialization process AU1412.0
Notes:
The /etc/environment file
/etc/environment is used to set variables. No commands should be placed in this file. Only root can change this file.
The /etc/profile file
/etc/profile will be read and executed during every login. Like the /etc/environment file, this file can be changed only by root.
The $HOME/.profile and $HOME/.kshrc files
$HOME/.profile and $HOME/.kshrc can be customized by the user. The user can overwrite any variable set in /etc/environment and /etc/profile.
© Copyright IBM Corporation 2008
User initialization processLOGIN
/etc/environment
/etc/profile
$HOME/.kshrc
Establishes base environment sets PATH, TZ, LANG, and NLSPATH
Shell script run at all logins sets TERM, MAILMSG, and MAIL
User's personal file tocustomize their environmentPATH, ENV, PS1
$HOME/.profile
User's personal file to customizethe Korn shell environmentset –o vi, alias
Course materials may not be reproduced in whole or in part without the prior written permission of IBM.
14-34 AIX System Administration I © Copyright IBM Corp. 1997, 2008

Student NotebookV4.1
Uempty
Common Desktop Environment (CDE) considerationsIf you are using CDE, .profile is not read by default. In the users HOME directory, the .dtprofile file is used to establish the environment when working with CDE. .dtprofile replaces the function of .profile in the CDE environment. If you want to use both, in the .dtprofile, uncomment the line near the end of the file that references the DTSOURCEPROFILE variable.
Course materials may not be reproduced in whole or in part without the prior written permission of IBM.
© Copyright IBM Corp. 1997, 2008 Unit 14. Security and user administration 14-35

Student Notebook
Figure 14-18. Security and users AU1412.0
Notes:
The Security & Users menu
The Security & Users menu is used to manage user and group IDs on the system. The menu consists of the seven options described below.
Users
This option is used to add users to the system, delete existing users and change the characteristics of existing users.
Groups
This option is used to add groups to the system, delete groups and change the characteristics of existing groups.
© Copyright IBM Corporation 2008
Security and users# smit security
Security & Users
Move cursor to desired item and press Enter.UsersGroupsPasswordsLogin ControlsRolesPKILDAPRole Based Access Control (RBAC)Trusted Execution
F1=Help F2=Refresh F3=Cancel F8=ImageF9=Shell F10=Exit Enter=Do
Course materials may not be reproduced in whole or in part without the prior written permission of IBM.
14-36 AIX System Administration I © Copyright IBM Corp. 1997, 2008

Student NotebookV4.1
Uempty
PasswordsThis option is used to change the password for a user. It is also required when setting up a new user or when a user has forgotten their password.
Login Controls
This option provides functions to restrict access for a user account or on a particular terminal.
PKI
PKI stands for X.509 Public Key Infrastructure certificates. This option is used to authenticate users using certificates and to associate certificates with processes as proof of a user’s identity.
LDAP
LDAP stands for Light Directory Access Protocol. It provides a way to centrally administer common configuration information for many platforms in a networked environment. A common use of LDAP is the central administration of user authentication. The SMIT option here allows us to configure this platform as either an LDAP client or an LDAP server.
Roles Based Access Control (RBAC)
This option sets up user roles. User roles allow root to give authority to an ordinary user to perform a portion of root's functions.
Trusted Execution
Trusted Execution (TE) refers to a collection of features that are used to verify the integrity of the system and implement advanced security policies, which together can to used enhance the trust level of the complete system.
Using the Web-based System Manager
The Web-based System Manager can also be used to manage users and groups.
Course materials may not be reproduced in whole or in part without the prior written permission of IBM.
© Copyright IBM Corp. 1997, 2008 Unit 14. Security and user administration 14-37

Student Notebook
Figure 14-19. SMIT users AU1412.0
Notes:
Add a User
Add user accounts.
Change a User's Password
Make password changes.
Change/Show Characteristics of a User
Changes the many characteristics that are a part of the user account. The password restrictions are part of this area.
© Copyright IBM Corporation 2008
SMIT users# smit users
Users
Move cursor to desired item and press Enter.
Add a UserChange a User's PasswordChange / Show Characteristics of a UserLock / Unlock a User's AccountReset User's Failed Login CountRemove a UserList All Users
F1=Help F2=Refresh F3=Cancel F8=ImageF9=Shell F10=Exit Enter=Do
Course materials may not be reproduced in whole or in part without the prior written permission of IBM.
14-38 AIX System Administration I © Copyright IBM Corp. 1997, 2008

Student NotebookV4.1
Uempty
Lock/Unlock a User's AccountThis is used to temporarily disable an account. It is a good security practice to disable accounts if they are not expected to be used for a reasonably long period of time, as when someone is on an extended leave of absence.
Reset User's Failed Login Count
If the administrator has set a limit to the number of failed attempts that can be made on an account before locking it, this resets that count.
Remove a User
Removes the user account, but not files owned by that user.
List all users
Runs the lsuser command.
Course materials may not be reproduced in whole or in part without the prior written permission of IBM.
© Copyright IBM Corp. 1997, 2008 Unit 14. Security and user administration 14-39

Student Notebook
Figure 14-20. List all users AU1412.0
Notes:
Function of the lsuser command
The lsuser command is used to list the attributes of all users (ALL) or individual users on the system.
Using SMIT to list users
When the List All Users option in SMIT is used, the user name, ID and home directory are listed.
Commonly used lsuser flags
When the lsuser command is issued directly, the data may be listed in line format, in colon format (-c) or in stanza format (-f). Individual attributes or all attributes may be selected. The output can also be generated for individual users.
© Copyright IBM Corporation 2008
List all users
The lsuser command:lsuser [-c | -f] [-a attribute …] {ALL | username …}
Example:
# lsuser –a id home ALLroot id=0 home=/daemon id=1 home=/etcbin id=2 home=/bin...john id=200 home=/home/john...
Course materials may not be reproduced in whole or in part without the prior written permission of IBM.
14-40 AIX System Administration I © Copyright IBM Corp. 1997, 2008

Student NotebookV4.1
Uempty
Sources of information listedThe information reported by lsuser is gathered from the various security files: /etc/passwd, /etc/security/limits and /etc/security/user.
Course materials may not be reproduced in whole or in part without the prior written permission of IBM.
© Copyright IBM Corp. 1997, 2008 Unit 14. Security and user administration 14-41

Student Notebook
Figure 14-21. Add a user to the system AU1412.0
Notes:
Ways of adding a user
The mkuser command or SMIT can be used to add a user. User attributes can be specified to override the default values.
User name
The only value that must be specified is the user name. Traditionally, this name was restricted to 8 characters in length. Beginning with AIX 5L V5.3, this limit can be changed to allow names as long as 255 characters. The limit is modified in the Change/Show Attributes of the Operating System panel (smit chsys).
© Copyright IBM Corporation 2008
Add a user to the system# smit mkuser
Add a User
...[Entry Fields]
* User NAME [ ]User ID [ ] #ADMINISTRATIVE USER? false +Primary GROUP [ ] +Group SET [ ] +ADMINISTRATIVE GROUPS [ ] +ROLES [ ] +Another user can SU TO USER? true +SU GROUPS [ALL] +HOME directory [ ]Initial PROGRAM [ ]User INFORMATION [ ]EXPIRATION date (MMDDhhmmyy) [0]Is this user ACCOUNT LOCKED? false +
[MORE ...37]...
Course materials may not be reproduced in whole or in part without the prior written permission of IBM.
14-42 AIX System Administration I © Copyright IBM Corp. 1997, 2008

Student NotebookV4.1
Uempty
Resources involved in user creation processThe following resources are involved in the user creation process:
- Default ID numbers stored in etc/security/.ids
- The usr/lib/security/mkuser.sys shell script used to set up a user ID
- Default values for characteristics stored in usr/lib/security/mkuser.default
- Default values for characteristics stored in /etc/security/user
- The default .profile stored in etc/security/.profile
Some of these resources are discussed further in the material that follows.
The /usr/lib/security/mkuser.default file
The /usr/lib/security/mkuser.default file contains the defaults for the mkuser command. This file can only be edited by the root user. This file contains the following information:
user: pgrp = staff groups = staff shell = /usr/bin/ksh home = /home/$USER
admin: pgrp = system groups = system shell = /usr/bin/ksh home = /home/$USER
The user stanza of this file is picked up if an ordinary user is being added, and the admin stanza is picked up if an administrative user is being added.
The /etc/security/.ids file
If the user ID is not specified, then a default ID number is chosen from the /etc/security/.ids file. Administrative users are given IDs starting from 6, and normal users are given IDs starting from 200.
The /usr/lib/security/mkuser.sys shell script
The shell script /usr/lib/security/mkuser.sys is run during the user creation process. This creates the user's home directory and creates the .profile file. This shell script can be modified to perform any function that is required when setting up the user.
Course materials may not be reproduced in whole or in part without the prior written permission of IBM.
© Copyright IBM Corp. 1997, 2008 Unit 14. Security and user administration 14-43

Student Notebook
List of user characteristics
The full list of user characteristics contains entries which are not often used. Many of these fields may be left empty with no ill effect. For the complete list, refer to SMIT (fastpath smit mkuser).
Setting a password
When a new user is created, the ID is disabled (an asterisk “*” is placed in the password field of the /etc/passwd file). To enable the ID, a password must be set with the Change a User's Password option or either the passwd or pwdadm command.
Course materials may not be reproduced in whole or in part without the prior written permission of IBM.
14-44 AIX System Administration I © Copyright IBM Corp. 1997, 2008

Student NotebookV4.1
Uempty
Figure 14-22. Change / Show Characteristics of a User AU1412.0
Notes:
Changing user characteristics
The Change / Show Characteristics of a User option (which runs the chuser command), allows any of the user characteristics listed previously, except the user name, to be changed. This can only be executed by root or a member of the security group (only root can change an admin user). This SMIT screen holds exactly the same attributes as the Add a User screen.
The User INFORMATION characteristic
The user information is not required by the system. This is the fifth field in the /etc/passwd file, which is usually used to hold the user's real name, telephone number, and so forth. Some programs (such as the finger program) use this information when reporting on user activity. Users can change their own user information.
© Copyright IBM Corporation 2008
Change / Show Characteristics of a User# smit chuser
Change / Show Characteristics of a User
...[Entry Fields]
* User NAME georgeUser ID [206] #ADMINISTRATIVE USER? false +Primary GROUP [staff ] +Group SET [staff,security] +ADMINISTRATIVE GROUPS [ ] +ROLES [ ] +Another user can SU TO USER? true +SU GROUPS [ALL] +HOME directory [/home/george ]Initial PROGRAM [/usr/bin/ksh ]User INFORMATION [ ]EXPIRATION date (MMDDhhmmyy) [0]Is this user ACCOUNT LOCKED? false +
[MORE ...37]...
Course materials may not be reproduced in whole or in part without the prior written permission of IBM.
© Copyright IBM Corp. 1997, 2008 Unit 14. Security and user administration 14-45

Student Notebook
The Initial PROGRAM characteristic
The initial program is the shell which the user logs into. It is usually set to one of:
- /usr/bin/bsh (Bourne shell)
- /usr/bin/csh (C shell)
- /usr/bin/ksh (Korn shell) (default)
A user can only change their shell to one of the above whereas root can change a user's shell to any program. Also note that users can change their login shell (as well as their own full name).
The chuser command
The following command can be used to change characteristics of a user:
# chuser attribute=value username
Course materials may not be reproduced in whole or in part without the prior written permission of IBM.
14-46 AIX System Administration I © Copyright IBM Corp. 1997, 2008
Student NotebookV4.1
Uempty
Figure 14-23. Remove a user from the system AU1412.0
Notes:
Ways to remove a user
The Remove a User from the System option in SMIT or the rmuser command can be used to remove any user from the system. Only the root user may remove administrative users.
The -p option of rmuser
The -p option removes authentication information from the /etc/security/* files. Typically, this information is the user password, as well as other login restrictions which have been previously set for the ID.
© Copyright IBM Corporation 2008
Remove a user from the system
# rmuser –p team01
•The rmuser command or SMIT can be used to deletea user from the system.
• When you remove a user, that user’s home directoryis not deleted. Therefore, you must remember to manually clean up the directories of users you remove.(Remember to backup important files first!)
# rm -r /home/team01
Course materials may not be reproduced in whole or in part without the prior written permission of IBM.
© Copyright IBM Corp. 1997, 2008 Unit 14. Security and user administration 14-47

Student Notebook
Removing the user’s files
The user's home directory and associated files are not removed by this option. They must be removed separately by the administrator. To do this you can use the -r option on the rm command to recursively remove files. Remember to back up any important files before removing the user's home directory.
Course materials may not be reproduced in whole or in part without the prior written permission of IBM.
14-48 AIX System Administration I © Copyright IBM Corp. 1997, 2008

Student NotebookV4.1
Uempty
Figure 14-24. Passwords AU1412.0
Notes:
Setting an initial password
When a user ID is created with SMIT or with the mkuser command, the user ID is disabled. (An asterisk (*) is in the password field of /etc/passwd.) To enable the ID, the passwd or pwdadm command must be used to set up the initial password for the user.
Entry of passwords (things to be aware of)
When passwords are entered, they are not displayed. When changing a password, the new password is requested a second time for verification.
The ADMCHG flag
If root or a member of the security group sets the password for a user, the ADMCHG flag is set in the flags field in /etc/security/passwd. The user is then prompted to change the password at the next login.
© Copyright IBM Corporation 2008
Passwords
# passwd [username]
• A new user ID cannot be used until a password isassigned
• There are two commands available for making passwordchanges:
# pwdadm username
• SMIT invokes the passwd command
• An ordinary user can use the passwd command tochange own password
• Only root or member of security group can change password of another user
Course materials may not be reproduced in whole or in part without the prior written permission of IBM.
© Copyright IBM Corp. 1997, 2008 Unit 14. Security and user administration 14-49

Student Notebook
Recovering from a forgotten password
There is no way to examine an existing password on the system. The only way to recover from a forgotten password is for an administrator or root to set a new one for the user.
Invocation of passwd command by SMIT
The option Passwords on the Users menu of SMIT uses the passwd command.
Using the passwd command
Ordinary users who use passwd to change their passwords are first prompted for the old password, and then they are asked twice for a new password. When root uses passwd to set a user's password, passwd only prompts twice for the new password.
Using the pwdadm command
Members of the security group can use pwdadm to change the passwords of non-administrative accounts. Members of the security group are first prompted to enter their own password, then prompted twice to enter the user's new password. The root user is only prompted twice for the new password.
Users with ADMIN flag set
Only root can change the password for a user who has the ADMIN flag set in /etc/security/passwd.
Course materials may not be reproduced in whole or in part without the prior written permission of IBM.
14-50 AIX System Administration I © Copyright IBM Corp. 1997, 2008

Student NotebookV4.1
Uempty
Figure 14-25. Regaining root's password AU1412.0
Notes:
Introduction
A series of steps that can be used to recover if you forget the root password are given on this visual.
Step 1
First, you must boot your machine from media other than its normal hard drive. Either an installation CD, a NIM server or a mksysb tape works just fine. Remember to invoke the service boot list, usually by pressing F5 while your machine is booting. Booting in maintenance mode is covered in AU16 course.
© Copyright IBM Corporation 2008
Regaining root's password
1. Boot from CD-ROM, NIM, or a bootable tape
2. Select option 3: Start Maintenance Mode for System Recovery from the Installation and Maintenance menu
3. Follow the options to activate the root volume group and obtain a shell
4. Once a shell is available, execute the passwd command to change root's password
5. Enter the following command:# sync ; sync
6. Reboot the system
Course materials may not be reproduced in whole or in part without the prior written permission of IBM.
© Copyright IBM Corp. 1997, 2008 Unit 14. Security and user administration 14-51

Student Notebook
Step 2
You will need to define your system console and select a language. Then the Installation and Maintenance menu is displayed. Be certain to select Option 3, Start Maintenance Mode for System Recovery. If you select Option 1 or 2, you are reinstalling your operating system.
Step 3
Select the options required to activate the root volume group and start a shell. This gets you access to rootvg without any passwords.
Step 4
Once you get the # prompt, use the passwd command as you normally would to create a new root password.
Step 5
Enter the command # sync ; sync. This ensures that the memory buffer is written to disk. In other words, it ensures that the new root password is saved to disk.
Step 6
Reboot your system. The command shutdown -Fr is a good way to accomplish this.
Course materials may not be reproduced in whole or in part without the prior written permission of IBM.
14-52 AIX System Administration I © Copyright IBM Corp. 1997, 2008

Student NotebookV4.1
Uempty
Figure 14-26. SMIT groups AU1412.0
Notes:
Purpose of groups
The purpose of groups is to give a common set of users the ability to share files. The access is controlled using the group set of permission bits.
Group management restrictions
Only root and members of the security group can create groups. root and security group members can select a member of the group to be the group administrator. This privilege allows the user to add and remove users from the group.
Predefined groups
There are a number of predefined groups on AIX systems, like the system group (which is root's group) and the staff group (which contains the ordinary users).
© Copyright IBM Corporation 2008
SMIT groups# smit groups
Groups
Move cursor to desired item and press Enter.
List All GroupsAdd a GroupChange / Show Characteristics of a GroupRemove a Group
F1=Help F2=Refresh F3=Cancel F8=ImageF9=Shell F10=Exit Enter=Do
Course materials may not be reproduced in whole or in part without the prior written permission of IBM.
© Copyright IBM Corp. 1997, 2008 Unit 14. Security and user administration 14-53

Student Notebook
Figure 14-27. List all groups AU1412.0
Notes:
The lsgroup command
The lsgroup command is used to list all groups or selected groups on the system. The data is presented in line format by default or in colon format (-c) or in stanza format (-f).
Commonly used options of the lsgroup command
The -c option displays the attribute for each group in colon separated records.
The -f option displays the group attributes in stanza format with each stanza identified by a group name.
© Copyright IBM Corporation 2008
List all groupsThe lsgroup command:lsgroup [-c | -f] [-a attribute …] {ALL | groupname …}
Example:
# lsgroup ALLsystem id=0 admin=true users=root,test2 registry=compatstaff id=1 admin=false users=ipsec,team01,team02,team03,team04,team05,test1,daemon registry=compatbin id=2 admin=true users=root,bin registry=compatsys id=3 admin=true users=root,bin,sys registry=compatadm id=4 admin=true users=bin,adm registry=compatuucp id=5 admin=true users=uucp,nuucp registry=compat...ipsec id=200 admin=false users= registry=compat
Course materials may not be reproduced in whole or in part without the prior written permission of IBM.
14-54 AIX System Administration I © Copyright IBM Corp. 1997, 2008

Student NotebookV4.1
Uempty
Figure 14-28. Add a Group AU1412.0
Notes:
The mkgroup command
The mkgroup command is the command used to create a new group. The group name, traditionally, must be a unique string of eight or fewer characters. With AIX 5L V5.3 and later, the maximum name length can be modified to be as large as 255 characters.
Limit on group membership
A user may belong to no more than 32 groups.
The -a option
The mkgroup -a option is used to indicate that the new group is to be an administrative group. Only the root user can add administrative groups to the system.
© Copyright IBM Corporation 2008
Add a Group# smit mkgroup
Add a Group
Type or select values in entry fields.Press Enter AFTER making all desired changes.
[Entry Fields]
* Group NAME [support]ADMINISTRATIVE group? false +Group ID [300] #USER list [fred,barney] +ADMINISTRATOR list [fred] +Projects [ ] +Initial Keystore Mode [ ] +Keystore Encryption Algorithm [ ] +Keystore Access [ ] +
F1=Help F2=Refresh F3=Cancel F4=ListF5=Reset F6=Command F7=Edit F8=ImageF9=Shell F10=Exit Enter=Do
Course materials may not be reproduced in whole or in part without the prior written permission of IBM.
© Copyright IBM Corp. 1997, 2008 Unit 14. Security and user administration 14-55

Student Notebook
The -A option
The -A option makes the invoker of the mkgroup command the group administrator.
ADMINISTRATOR list and USER list
In the SMIT screen shown on the visual, ADMINISTRATOR list is a list of members from the USER list that are allowed to change the characteristics of a group and add or remove members.
The Projects field
Starting with AIX 5L V5.3, the SMIT Add a Group screen has a new field, Projects, for tracking resource usage in the Advanced Accounting subsystem provided in AIX 5L V5.3 and later.
Initial Keystore Mode
The efs_initalks_mode of admin allows for root or other security privileged system users to reset the user's key store password. Otherwise, if the user forgets their key store password, they will not be able to access their Encrypted File System files. If the guard mode is selected, then root cannot reset the user's key store password.
Keystore Encryption Algorithm
This option specifies the algorithm for the user's key within the key store. This key protects the encrypting key of files the user creates within the Encrypted File System.
Keystore Access
The key store will allow the user to utilize files in Encrypted File System. The selection of file will create a key store file associated with this user. It is recommended that file is selected. Select none for no key store to be created. All other EFS (efs_*) attributes will not have any effect.
Course materials may not be reproduced in whole or in part without the prior written permission of IBM.
14-56 AIX System Administration I © Copyright IBM Corp. 1997, 2008

Student NotebookV4.1
Uempty
Figure 14-29. Change / remove groups AU1412.0
Notes:
The chgroup command
The chgroup command is used to change the characteristics of a group. It can only be run by root or a member of the security group.
Group attributes
The group attributes are:
- Group ID (id=groupid). It is not advisable to change the group ID, but it is occasionally done immediately after a group has been created to match the ID of a previously deleted group, or a specific group ID needed for a particular software package.
- ADMINISTRATIVE group? (admin=true|false). Only the root user can change a group to be an administrative group or make changes to an existing administrative group.
© Copyright IBM Corporation 2008
Change / remove groups# smit chgroup
Change Group Attributes
Type or select values in entry fields.Press Enter AFTER making all desired changes.
[Entry Fields]Group NAME [Support]Group ID [300] #ADMINISTRATIVE group? False +USER list [fred, barney, wilma] +ADMINISTRATOR list [fred] +Projects [ ] +Initial Keystore Mode [ ] +Keystore Encryption Algorithm [ ] +Keystore Access [ ] +
F1=Help F2=Refresh F3=Cancel F4=ListF5=Reset F6=Command F7=Edit F8=ImageF9=Shell F10=Exit Enter=Do
Course materials may not be reproduced in whole or in part without the prior written permission of IBM.
© Copyright IBM Corp. 1997, 2008 Unit 14. Security and user administration 14-57

Student Notebook
- USER list (users=usernames). This is a comma separated list of the names of all the members of the group. The group may be their primary group or an additional one.
- ADMINISTRATOR list (adms=adminnames). This is the list of group administrators.
- Projects (projects=projectnames). As previously mentioned, this attribute was added to support the Advanced Accounting subsystem.
The chgrpmem command
The chgrpmem command can be used by any user to change either the administrators or the members of a group for which the user running the command is a group administrator.
The rmgroup command
The rmgroup command is used to remove a group from the system. This command has no options and the only parameter is the group name. Only the root user can delete an administrative group.
Course materials may not be reproduced in whole or in part without the prior written permission of IBM.
14-58 AIX System Administration I © Copyright IBM Corp. 1997, 2008

Student NotebookV4.1
Uempty
Figure 14-30. Message of the day AU1412.0
Notes:
Using the /etc/motd file
The message of the day (motd) is a convenient way to communicate information, such as installed software version numbers or current system news, to all users. The message of the day is contained in the /etc/motd file. To change the message of the day, simply edit this file.
Other ways to communicate with the user community
Many other commands exist to provide ways to communicate with the user community. Several of these commands, such as write, wall, mail and talk, are covered in the AIX 6.1 Basics course.
© Copyright IBM Corporation 2008
Message of the day
• The file /etc/motd contains text that is displayed every time a user logs in
• This file should only contain information necessary for the users to see
• If the $HOME/.hushlogin file exists in a user's home directory, then the contents of the /etc/motd file are not displayed to that user
Course materials may not be reproduced in whole or in part without the prior written permission of IBM.
© Copyright IBM Corp. 1997, 2008 Unit 14. Security and user administration 14-59

Student Notebook
Figure 14-31. Exercise 16: User administration (parts 1-5) AU1412.0
Notes:
Introduction
This lab gives you an opportunity to expand your knowledge of user administration. You add users and groups and review many of the user characteristics.
The exercise can be found in your Student Exercise Guide.
Be sure to only do Parts 1-5. You will be doing Parts 6-7 at the end of this unit.
© Copyright IBM Corporation 2008
Exercise 16: User administration (parts 1-5)
• Part 1 - User administration• Part 2 - Group administration• Part 3 - Customizing the default
.profile file• Part 4 - Removing users• Part 5 - Communicating with users
Course materials may not be reproduced in whole or in part without the prior written permission of IBM.
14-60 AIX System Administration I © Copyright IBM Corp. 1997, 2008

Student NotebookV4.1
Uempty
14.3. Security filesCourse materials may not be reproduced in whole or in part without the prior written permission of IBM.
© Copyright IBM Corp. 1997, 2008 Unit 14. Security and user administration 14-61

Student Notebook
Figure 14-32. Security files AU1412.0
Notes:
Introduction
The security on the system is controlled by a number of ASCII files. Key files are listed on the visual and briefly described below.
/etc/passwd
The /etc/passwd file lists the valid users, and the user ID, primary group, home directory, and default login shell for each of these users.
/etc/group
The /etc/group file lists the valid groups, their group IDs, and members.
© Copyright IBM Corporation 2008
Security files
• Files used to contain user attributes and control access:
– /etc/passwd Valid users (not passwords)– /etc/group Valid groups
– /etc/security Directory not accessible to normal users
– /etc/security/passwd User passwords– /etc/security/user User attributes, password
restrictions– /etc/security/group Group attributes– /etc/security/limits User limits– /etc/security/environ User environment settings– /etc/security/login.cfg Login settings
Course materials may not be reproduced in whole or in part without the prior written permission of IBM.
14-62 AIX System Administration I © Copyright IBM Corp. 1997, 2008

Student NotebookV4.1
Uempty
The /etc/security directoryThe /etc/passwd and /etc/group files have global read access to all users. A number of other files control the attributes of users. These files are in the /etc/security directory, which can only be accessed by root or the security group.
/etc/security/passwd
/etc/security/passwd contains the encrypted password and update information for users.
/etc/security/user
/etc/security/user contains extended user attributes.
/etc/security/group
/etc/security/group contains extended group attributes.
/etc/security/limits
/etc/security/limits contains process resource limits for users.
/etc/security/environ
/etc/security/environ contains environment variables for users. This file is not often used.
/etc/security/login.cfg
/etc/security/login.cfg is a configuration file for the login program. This file contains security enhancements that limit the logins on a port, for example, the number of login attempts and the valid login programs (shells).
Course materials may not be reproduced in whole or in part without the prior written permission of IBM.
© Copyright IBM Corp. 1997, 2008 Unit 14. Security and user administration 14-63

Student Notebook
Figure 14-33. /etc/passwd file AU1412.0
Notes:
Role of the /etc/passwd file
The /etc/passwd file lists the users on the system and some of their attributes. This file must be readable by all users, because commands such as ls access it.
Fields in the /etc/passwd file
The fields in the /etc/passwd file are:
• User name - Up to eight alphanumeric characters (not all uppercase).
• Password - On older UNIX systems, this contained the encrypted password. Beginning with AIX 5L, it cannot contain the encrypted password on AIX systems and should contain a ! to refer to the /etc/security/passwd file. Other common values are an *, which means the ID is invalid, and no value, which means there is no password assigned.
• UID - The user ID number for the user.
© Copyright IBM Corporation 2008
/etc/passwd file# cat /etc/passwd
root:!:0:0::/:/usr/bin/kshdaemon:!:1:1::/etc:bin:!:2:2::/bin:sys:!:3:3::/usr/sys:adm:!:4:4::/var/adm:uucp:!:5:5::/usr/lib/uucp:guest:!:100:100::/home/guest:nobody:!:4294967294:4294967294::/:lpd:!:9:4294967294::/:lp:*:11:11::/var/spool/lp:/bin/falseinvscout:*:6:12::/var/adm/invscout:/usr/bin/kshsnapp:*:200:13:snapp login user:/usr/sbin/snapp:/usr/sbin/snappdnuucp:*:7:5:uucp login user:/var/spool/uucppublic:/usr/sbin/uucp/uucicoipsec:*:201:1::/etc/ipsec:/usr/bin/kshesaadmin:*:811:0::/home/esaadmin:/usr/bin/kshjohn:!:200:0:x7560 5th floor:/home/john:/usr/bin/kshbill:*:201:1::/home/bill:/usr/bin/ksh
Course materials may not be reproduced in whole or in part without the prior written permission of IBM.
14-64 AIX System Administration I © Copyright IBM Corp. 1997, 2008

Student NotebookV4.1
Uempty
• GID - The ID of the primary group to which this user belongs.• Information - Any descriptive text for the user.
• Directory - The login directory of the user and the initial value of the $HOME variable.
• Login program - Specifies the initial program or shell that is executed after a user invokes the login command or su command.
Using index files for better login performance
In AIX, additional files can be created to be used as index files for the /etc/passwd, /etc/security/passwd and /etc/security/lastlog files. These index files provide for better performance during the login process. Use the mkpasswd -f command to create the indexes. The command mkpasswd -c can be used to check the indexes and rebuild any that look suspicious.
Course materials may not be reproduced in whole or in part without the prior written permission of IBM.
© Copyright IBM Corp. 1997, 2008 Unit 14. Security and user administration 14-65

Student Notebook
Figure 14-34. /etc/security/passwd file AU1412.0
Notes:
Role of the /etc/security/passwd file
The /etc/security/passwd file contains the encrypted user passwords and can only be accessed by root. The login, passwd, pwdadm and pwdck commands (which run with root authority) update this file. This file is in stanza format with a stanza for each user.
Index files
As previously mentioned, in AIX, additional files can be created to be used as index files for /etc/security/passwd and some related files. These index files provide for better performance during the login process. These indexes are created using the mkpasswd command.
© Copyright IBM Corporation 2008
/etc/security/passwd file# cat /etc/security/passwd
root:password = 92t.mzJBjlfbYlastupdate = 885485990flags =
daemon:password = *
bin:password = *
...
john:password = q/gD6q.ss21x.lastupdate = 884801337flags = ADMCHG,ADMIN,NOCHECK
Course materials may not be reproduced in whole or in part without the prior written permission of IBM.
14-66 AIX System Administration I © Copyright IBM Corp. 1997, 2008

Student NotebookV4.1
Uempty
Entries in /etc/security/passwdValid entries in /etc/security/passwd are:
• password Either the encrypted password or * for invalid, or blank for no password
• lastupdate The date and time of the last password update in seconds from January 1, 1970
• flags ADMCHG - The password was last changed by an administrator or root
ADMIN - The user's password can only be changed by root
NOCHECK - Password restrictions are not in force for this user
(See /etc/security/user for password restrictions.)
Course materials may not be reproduced in whole or in part without the prior written permission of IBM.
© Copyright IBM Corp. 1997, 2008 Unit 14. Security and user administration 14-67

Student Notebook
Figure 14-35. /etc/security/user file (1 of 2) AU1412.0
Notes:
admin
Defines the administrative status of the user. Possible value: true or false.
login
Defines whether a user can login. Possible values: true or false.
su
Defines whether other users can switch to this user account. The su command supports this attribute. Possible values: true or false.
© Copyright IBM Corporation 2008
/etc/security/user file (1 of 2)# cat /etc/security/user
default:admin = falselogin = truesu = truedaemon = truerlogin = truesugroups = ALLadmgroups = ttys = ALLauth1 = SYSTEMauth2 = NONEtpath = nosakumask = 022expires = 0
...
Course materials may not be reproduced in whole or in part without the prior written permission of IBM.
14-68 AIX System Administration I © Copyright IBM Corp. 1997, 2008

Student NotebookV4.1
Uempty
daemonDefines whether the user can execute programs using the system resource controller (SRC). Possible values: true or false.
rlogin
Defines whether the user account can be accessed by remote logins. Commands rlogin and telnet support this attribute. Possible values: true or false.
sugroups
Defines which groups can switch to this user account. Alternatively, you may explicitly deny groups by preceding the group name with a ! character. Possible values: A list of valid groups separated by commas, ALL or *
admgroups
Lists the groups that a user administers. The value is a comma-separated list of valid group names.
ttys
Defines which terminals can access the user account. Alternatively you may explicitly deny terminals by preceding the terminal name with the ! character. Possible values: List of device paths separates by commas, ALL or *
auth1
Defines the primary authentication method for a user. The commands login, telnet, rlogin and su support these authentication methods.
auth2
Defines the secondary authentication methods for a user. It is not a requirement to pass this method to login.
tpath
Defines the user's trusted path characteristics. Possible values: nosak, notsh, always or on. (For more information refer to the online documentation.)
umask
Defines the default umask for the user. Possible values: 3-digit octal value.
Course materials may not be reproduced in whole or in part without the prior written permission of IBM.
© Copyright IBM Corp. 1997, 2008 Unit 14. Security and user administration 14-69

Student Notebook
expires
Defines the expiration time for the user account. Possible values: a valid date in the form MMDDHHMMYY or 0. If 0, the account does not expire. The 'YY' supports the last two digits of the years 1939 to 2038. If 0101000070 then the account is disabled.
Course materials may not be reproduced in whole or in part without the prior written permission of IBM.
14-70 AIX System Administration I © Copyright IBM Corp. 1997, 2008

Student NotebookV4.1
Uempty
Figure 14-36. /etc/security/user file (2 of 2) AU1412.0
Notes:
SYSTEM
This attribute can be used to describe multiple or alternate authentication methods the user must use successfully before gaining access to the system. Possible tokens are:
• files Allows only local users access to the system
• compat The normal login procedure and therefore allows local and NIS users access to the system
• DCE The Distributed Computing Environment authentication
© Copyright IBM Corporation 2008
/etc/security/user file (2 of 2)
default...
SYSTEM = "compat"logintimes = pwdwarntime = 0account_locked = falseloginretries = 0histexpire = 0histsize = 0minage = 0maxage = 0maxexpired = -1minalpha = 0minother = 0minlen = 0mindiff = 0maxrepeats = 8dictionlist = pwdchecks =
Course materials may not be reproduced in whole or in part without the prior written permission of IBM.
© Copyright IBM Corp. 1997, 2008 Unit 14. Security and user administration 14-71

Student Notebook
logintimes
Defines the times a user can login. The value is a comma separated list of items as follows:
[!][MMdd[-MMdd]]:hhmm-hhmm
or
[!]MMdd[-MMdd][:hhmm-hhmm]
or
[!][w[-w]]:hhmm-hhmm
or
[!]w[-w][:hhmm-hhmm]
where MM is a month number (00=January, 11-December), dd is the day on the month, hh is the hour of the day (00 - 23), mm is the minute of the hour, and w is the day of the week (0=Sunday, 6=Saturday).
pwdwarntime
The number of days before a forced password change that a warning is given to the user informing them of the impending password change. Possible values: a positive integer or 0 to disable this feature.
account_locked
Defines whether the account is locked. Locked accounts cannot be used for login or su. Possible values: true or false.
loginretries
The number of invalid login attempts before a user is not allowed to login. Possible values: a positive integer or 0 to disable this feature.
histexpire
Defines the period of time in weeks that a user will not be able to reuse a password. Possible values: an integer value between 0 and 260. 26 (approximately 6 months) is the recommended value.
histsize
Defines the number of previous passwords which cannot be reused. Possible values: an integer between 0 and 50.
Course materials may not be reproduced in whole or in part without the prior written permission of IBM.
14-72 AIX System Administration I © Copyright IBM Corp. 1997, 2008
Student NotebookV4.1
Uempty
minageDefines the minimum number of weeks between password changes. Default is 0. Range: 0 to 52.
maxage
Defines the maximum number of weeks a password is valid. The default is 0, which is equivalent to unlimited. Range: 0 to 52.
maxexpired
Defines the maximum number of weeks after maxage that an expired password can be changed by a user. The default is -1, which is equivalent to unlimited. Range: -1 to 52. maxage must be greater than 0 for maxexpired to be enforced. (root is exempt from maxexpired).
minalpha
Defines the minimum number of alphabetic characters in a password. The default is 0. Range: 0 to 8.
minother
Defines the minimum number of non-alphabetic characters in a password. The default is 0. Range: 0 to 8.
minlen
Defines the minimum length of a password. The default is 0. Range: 0 to 8. Note that the minimum length of a password is determined by minlen and/or "minalpha + minother", whichever is greater. "minalpha + minother" should never be greater than 8. If "minalpha + minother" is greater than 8, then minother is reduced to "8 - minalpha".
mindiff
Defines the minimum number of characters in the new password that were not in the old password. The default is 0. Range: 0 to 8.
maxrepeats
Defines the maximum number of times a given character can appear in a password. The default is 8, which is equivalent to unlimited. Range: 0 to 8.
Course materials may not be reproduced in whole or in part without the prior written permission of IBM.
© Copyright IBM Corp. 1997, 2008 Unit 14. Security and user administration 14-73

Student Notebook
dictionlist
Defines the password dictionaries used when checking new passwords. The format is a comma separated list of absolute path names to dictionary files. A dictionary file contains one word per line where each word has no leading or trailing white space. Words should only contain 7 bit ASCII characters. All dictionary files and directories should be write protected from everyone except root. The default is valueless which is equivalent to no dictionary checking.
pwdchecks
Defines external password restriction methods used when checking new passwords. The format is a comma separated list of absolute path names to methods or method path names relative to /usr/lib. A password restriction method is a program module that is loaded by the password restrictions code at run time. All password restriction methods and directories should be write protected from everyone except root. The default is valueless, which is equivalent to no external password restriction methods.
Course materials may not be reproduced in whole or in part without the prior written permission of IBM.
14-74 AIX System Administration I © Copyright IBM Corp. 1997, 2008

Student NotebookV4.1
Uempty
Figure 14-37. Group files AU1412.0
Notes:
The /etc/group file
The fields in the /etc/group file are:
• Group - Up to eight alphanumeric characters (not all uppercase)
• Password - This field is not used in AIX and should contain a !
• ID - The group ID
• Members - A comma-separated list of the users who belong to this group
© Copyright IBM Corporation 2008
Group files
system:!:0:root,johnstaff:!:johnbin:!:2:root,binsys:!:3:root,bin,sys...usr:!:100:guestaccounts:!:200:john...
system:admin=true
staff:admin=false
accounts:admin=falseadms=johnprojects=system
# more /etc/group
# more /etc/security/group
Course materials may not be reproduced in whole or in part without the prior written permission of IBM.
© Copyright IBM Corp. 1997, 2008 Unit 14. Security and user administration 14-75

Student Notebook
The /etc/security/group file
The /etc/security/group file is a stanza file with one stanza for each group. The valid entries are:
• admin Defines whether the group is an administrative group; values are true or false.
• adms A comma-separated list of the users who are administrators for the group. If admin=true this stanza is ignored because only root can change an administrative group.
• projects A list of project names to be associated with the group.
Course materials may not be reproduced in whole or in part without the prior written permission of IBM.
14-76 AIX System Administration I © Copyright IBM Corp. 1997, 2008

Student NotebookV4.1
Uempty
Figure 14-38. /etc/security/login.cfg file AU1412.0
Notes:
herald
Specifies the initial message to be printed out when getty or login prompts for a login name. This value is a string that is written out to the login port. If the herald is not specified, then the default herald is obtained from the message catalog associated with the language set in /etc/environment.
logintimes
Defines the times a user can use this port to login.
logindisable
Number of unsuccessful login attempts before this port is locked. Use this in conjunction with logininterval.
© Copyright IBM Corporation 2008
/etc/security/login.cfg file
default:herald =“Authorized use only.\n\rlogin:"logintimes = logindisable = 0logininterval = 0loginreenable = 0logindelay = 0pwdprompt = "Password: "usernameecho = false
Course materials may not be reproduced in whole or in part without the prior written permission of IBM.
© Copyright IBM Corp. 1997, 2008 Unit 14. Security and user administration 14-77

Student Notebook
logininterval
The number of seconds during which logindisable unsuccessful attempts must occur for a port to be locked.
loginreenable
The number of minutes after a port is locked that it automatically unlocked.
logindelay
The delay in seconds between unsuccessful login attempts. This delay is multiplied by the number of unsuccessful logins - that is, if the value is two, then the delay between unsuccessful logins is two seconds, then four seconds, then six seconds and so forth.
pwdprompt
Defines the password prompt message printed when requesting password input. The value is a character string.
usernameecho
Defines whether the user name should be echoed on a port. If true (this is the default) the user name echo is enabled. If false, user name echo is disabled. The user name is not echoed at the login prompt and is masked out of security-related messages.
The chsec command
Changes to the /etc/security/login.cfg file can be done by the command chsec:
# chsec -f /etc/security/login.cfg -s default -a pwdprompt=”Password:”
To reset to the default value:
# chsec -f /etc/security/login.cfg -s default -a pwdprompt=
Course materials may not be reproduced in whole or in part without the prior written permission of IBM.
14-78 AIX System Administration I © Copyright IBM Corp. 1997, 2008

Student NotebookV4.1
Uempty
Figure 14-39. Validating the user environment AU1412.0
Notes:
Use of validation commands
The commands listed on the visual can be executed by root or any user in the security group to clean up after a change to the user configuration. Because they run with root permissions, they give administrative users the ability to make necessary changes to the /etc/security/passwd file in a controlled way, without knowing the root password.
The usrck command
The usrck command verifies the validity of the user definitions in the user database files, by checking the definitions for ALL the users or for the users specified by the user parameter. You must select a flag to indicate whether the system should try to fix erroneous attributes.
© Copyright IBM Corporation 2008
Validating the user environment• pwdck verifies the validity of local authentication information:
– pwdck {-n|-p|-t|-y} {ALL | username}
– Verifies that /etc/passwd and /etc/security/passwd are consistentwith each other and with /etc/security/login.cfg and /etc/security/user
• usrck verifies the validity of a user definition:– usrck {-l|-b|-n|-p|-t|-y} {ALL | username}
– Checks each user name in /etc/passwd, /etc/security/user,/etc/security/limits and /etc/security/passwd
– Checks are made to ensure that each has an entry in /etc/group and/etc/security/group
• grpck verifies the validity of a group:– grpck {-n|-p|-t|-y} {ALL | groupname }
– Verifies that the files /etc/passwd, /etc/security/user, /etc/groupand /etc/security/group are consistent
Course materials may not be reproduced in whole or in part without the prior written permission of IBM.
© Copyright IBM Corp. 1997, 2008 Unit 14. Security and user administration 14-79

Student Notebook
Options for pwdck, usrck, and grpck commands
All the options for pwdck, usrck, and grpck are as follows:
-n Reports errors but does not fix them
-p Fixes errors but does not report them
-t Reports errors and asks if they should be fixed
-y Fixes errors and reports them
Additional options for usrck, are as follows:
-b Reports users who are not able to access the system and the reasons, with the reasons displayed in a bit-mask format.
-l Scans all users or the users specified by the User parameter to determine if the users can access the system.
Course materials may not be reproduced in whole or in part without the prior written permission of IBM.
14-80 AIX System Administration I © Copyright IBM Corp. 1997, 2008
Student NotebookV4.1
Uempty
Figure 14-40. Documenting security policy and setup AU1412.0
Notes:
Planning user and group administration
Plan and organize your user and group administration. Every user does not need their own group. Good planning up front reduces any reorganizing of users and groups later on.
Use of the sticky bit
Always protect your shared directories by setting the sticky bit. Then users won't be removing each others file accidentally (or on purpose).
© Copyright IBM Corporation 2008
Documenting security policy and setup
• Identify the different types of users and what data they will need to access
• Organize groups around the type of work that is to be done
• Organize ownership of data to fit with the group structure
• Set SVTX on shared directories
• Remember that UNIX/AIX has no concept of application ownership
SecurityPolicy and
Setup
SecurityPolicy and
Setup
Course materials may not be reproduced in whole or in part without the prior written permission of IBM.
© Copyright IBM Corp. 1997, 2008 Unit 14. Security and user administration 14-81

Student Notebook
Figure 14-41. Checkpoint (1 of 2) AU1412.0
Notes:
© Copyright IBM Corporation 2008
Checkpoint (1 of 2)
1. What are the benefits of using the su command to switch user to root over logging in as root?__________________________________________________________________________________________________________
2. Why is a umask of 027 recommended?__________________________________________________________________________________________________________
3. As a member of the security group, which password command would you use? __________________________________________________
4. Which password change command does SMIT use?__________________________________________________
5. True or False? When you delete a user from the system, all the user's files and directories are also deleted.
Course materials may not be reproduced in whole or in part without the prior written permission of IBM.
14-82 AIX System Administration I © Copyright IBM Corp. 1997, 2008

Student NotebookV4.1
Uempty
Figure 14-42. Checkpoint (2 of 2) AU1412.0
Notes:
© Copyright IBM Corporation 2008
Checkpoint (2 of 2)
6. If an ordinary user forgets their password, can the system administrator find out by querying the system as to what the user's password was set to? _______ Why? ___________________ _________________________________________________
7. Password restrictions are set in which of the following files?a. /etc/passwdb. /etc/security/passwdc. /etc/security/restrictionsd. /etc/security/user
8. Which of the following statements are true?a. A user can only belong to one groupb. A member of the security group can administer user accountsc. An admin user is a user whose account cannot be administered by any
member of the security group (except root)d. The chmod g+s command sets the SUID permission of a filee. The root user, commonly known as the superuser has UID=0
and GID=0
Course materials may not be reproduced in whole or in part without the prior written permission of IBM.
© Copyright IBM Corp. 1997, 2008 Unit 14. Security and user administration 14-83

Student Notebook
Figure 14-43. Exercise 16: User administration (parts 6-7) AU1412.0
Notes:
Introduction
This lab gives you an opportunity to expand your knowledge of user administration. You will examine the security set up and customize the login herald.
The exercise can be found in your Student Exercises Guide.
© Copyright IBM Corporation 2008
Exercise 16: User administration (parts 6-7)
• Part 6 - Examine the security set up
• Part 7 - Customizing the login herald
Course materials may not be reproduced in whole or in part without the prior written permission of IBM.
14-84 AIX System Administration I © Copyright IBM Corp. 1997, 2008

Student NotebookV4.1
Uempty
Figure 14-44. Unit summary AU1412.0
Notes:
© Copyright IBM Corporation 2008
Unit summary
• User and groups can be added and deleted from the systemby using SMIT or by using high level commands.
• Passwords must be set for all users using either pwdadmor passwd.
• Administrative users and groups can only be administered by root.
• Every user must be in at least one group.
• Certain groups give users additional privileges.
• Security files are located in ASCII text files in the /etc and/etc/security directories.
Course materials may not be reproduced in whole or in part without the prior written permission of IBM.
© Copyright IBM Corp. 1997, 2008 Unit 14. Security and user administration 14-85

Student Notebook
Course materials may not be reproduced in whole or in part without the prior written permission of IBM.
14-86 AIX System Administration I © Copyright IBM Corp. 1997, 2008