Embed Size (px)
Citation preview
When specified, an air/water-resistive barrier must be installed over the entire sheathed substrate and wrapped into rough openings prior to installation of wall cladding systems. The air/water-resistive barrier can be vapor permeable or vapor impermeable depending on design requirements. The following guidelines and drawings are intended to illustrate concepts and common installation practices. Proper use and installation of these barriers will help to properly protect openings and sheathing substrates in addition to contributing to improved energy efficiency.
Guidelines for the application of sheathing joint and rough opening protection using SENERSHIELD-R or SENERSHIELD-VB liquid applied air/water-resistive/vapor barriers with SHEATHING FABRIC or WS FLASH and FLASHING PRIMER.
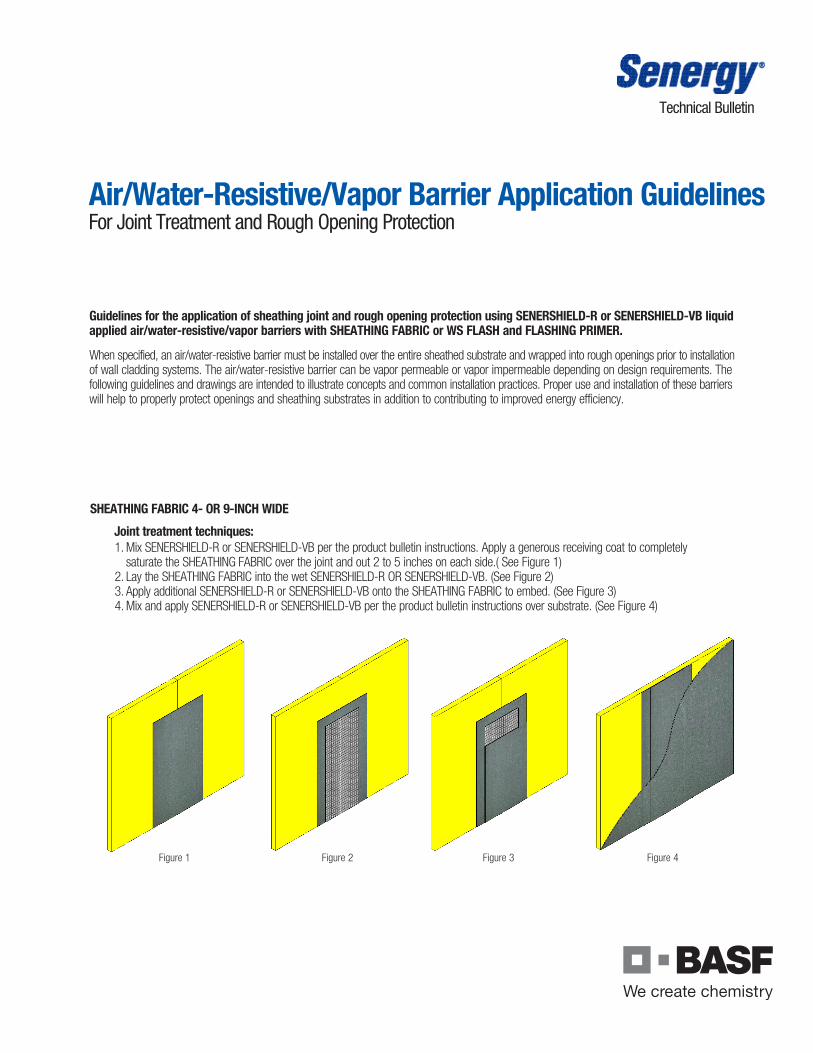
SHEATHING FABRIC 4- OR 9-INCH WIDE
1. Mix SENERSHIELD-R or SENERSHIELD-VB per the product bulletin instructions. Apply a generous receiving coat to completely saturate the SHEATHING FABRIC over the joint and out 2 to 5 inches on each side.( See Figure 1)2. Lay the SHEATHING FABRIC into the wet SENERSHIELD-R OR SENERSHIELD-VB. (See Figure 2)3. Apply additional SENERSHIELD-R or SENERSHIELD-VB onto the SHEATHING FABRIC to embed. (See Figure 3)4. Mix and apply SENERSHIELD-R or SENERSHIELD-VB per the product bulletin instructions over substrate. (See Figure 4)
Joint treatment techniques:
Figure 1 Figure 2 Figure 3 Figure 4
Air/Water-Resistive/Vapor Barrier Application Guidelines For Joint Treatment and Rough Opening Protection
Technical Bulletin

Air/Water-Resistive/Vapor Barriers Guidelines
SHEATHING FABRIC 4- OR 9-INCH WIDE
1. Mix SENERSHIELD-R or SENERSHIELD-VB per the product bulletin instructions. Apply a generous receiving coat to the corners of openings and out onto the substrate. (See Figure 5)2. Cut SHEATHING FABRIC to desired size. Place the SHEATHING FABRIC into the wet SENERSHIELD-R or SENERSHIELD-VB. (See Figure 6) 3. Apply additional SENERSHIELD-R or SENERSHIELD-VB onto the SHEATHING FABRIC to completely saturate and embed. Verify SHEATHING FABRIC is smooth, free of wrinkles and voids. (See Figure 7)
Rough opening protection techniques:
Figure 7Figure 6Figure 5
Figure 10Figure 9Figure 8
4. Apply additional SENERSHIELD-R or SENERSHIELD-VB over the areas to receive additional SHEATHING FABRIC. (See Figure 8)5. Cut SHEATHING FABRIC to desired size. Place the SHEATHING FABRIC into the wet SENERSHIELD-R OR SENERSHIELD-VB. (See Figure 9) 6. Apply additional SENERSHIELD-R or SENERSHIELD-VB onto the SHEATHING FABRIC to embed. Verify SHEATHING FABRIC is smooth, free of wrinkles, and voids. (See Figure 10)
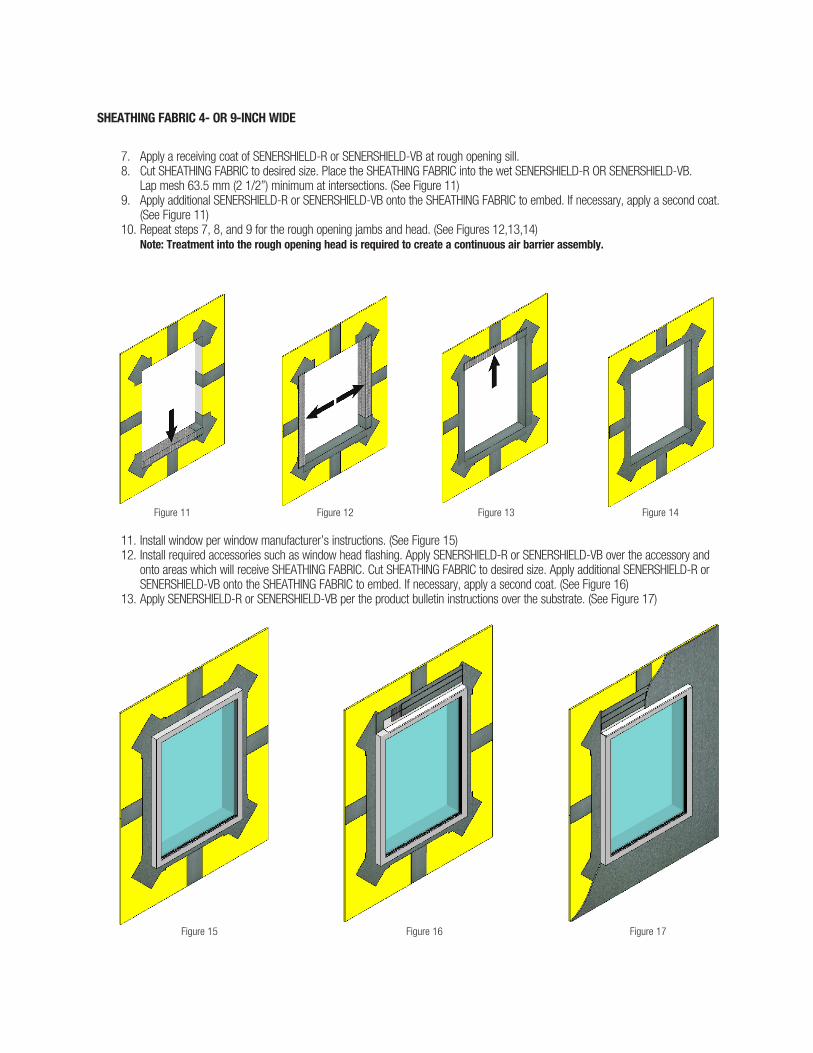
7. Apply a receiving coat of SENERSHIELD-R or SENERSHIELD-VB at rough opening sill. 8. Cut SHEATHING FABRIC to desired size. Place the SHEATHING FABRIC into the wet SENERSHIELD-R OR SENERSHIELD-VB. Lap mesh 63.5 mm (2 1/2”) minimum at intersections. (See Figure 11)9. Apply additional SENERSHIELD-R or SENERSHIELD-VB onto the SHEATHING FABRIC to embed. If necessary, apply a second coat. (See Figure 11) 10. Repeat steps 7, 8, and 9 for the rough opening jambs and head. (See Figures 12,13,14) Note: Treatment into the rough opening head is required to create a continuous air barrier assembly.
SHEATHING FABRIC 4- OR 9-INCH WIDE
Figure 11
11. Install window per window manufacturer’s instructions. (See Figure 15)12. Install required accessories such as window head flashing. Apply SENERSHIELD-R or SENERSHIELD-VB over the accessory and onto areas which will receive SHEATHING FABRIC. Cut SHEATHING FABRIC to desired size. Apply additional SENERSHIELD-R or SENERSHIELD-VB onto the SHEATHING FABRIC to embed. If necessary, apply a second coat. (See Figure 16)13. Apply SENERSHIELD-R or SENERSHIELD-VB per the product bulletin instructions over the substrate. (See Figure 17)
Figure 17Figure 16Figure 15
Figure 12 Figure 13 Figure 14

Air/Water-Resistive/Vapor Barriers Guidelines
FLASHING PRIMER AND WS FLASH 4 OR 9
1. Prime the joint area with a generous amount of primer, out 2 to 5 inches on each side, with FLASHING PRIMER. Allow to dry until tacky. (See Figure 18)2. Remove the backing from the WS FLASH 4 or 9. Using a roller firmly press the WS FLASH over the joint ensuring it is well and evenly adhered. The joint is now ready to receive the final coat of SENERSHIELD-R or SENERSHIELD-VB. (See Figure 19)3. Mix and apply SENERSHIELD-R or SENERSHIELD-VB per the product bulletin instructions over substrate. (See Figure 20)
Joint treatment techniques:
1. Apply a generous amount of FLASHING PRIMER to the corners of openings and out onto the substrate. (See Figure 21)2. Cut WS FLASH to desired size. Remove release film immediately before application. Using a roller firmly press the WS FLASH into the corner, onto the surface, keeping the membrane smooth. (See Figure 22)3. Apply FLASHING PRIMER over the areas to receive additional WS FLASH. (See Figure 23) 4. Cut WS FLASH to desired size. Remove release film immediately before application. Using a roller firmly press the WS FLASH keeping the membrane smooth. (See Figure 24)
Rough opening protection techniques:
Figure 18 Figure 19 Figure 20
Figure 22 Figure 23 Figure 24Figure 21
FLASHING PRIMER AND WS FLASH 4 OR 9
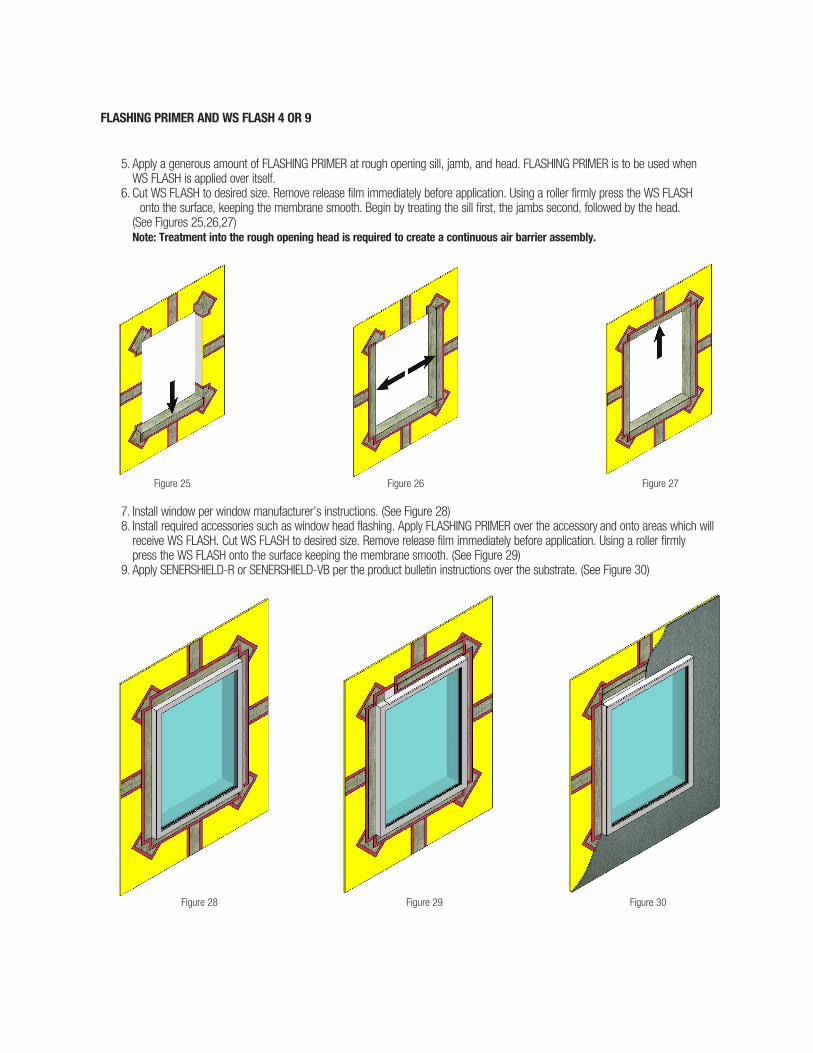
5. Apply a generous amount of FLASHING PRIMER at rough opening sill, jamb, and head. FLASHING PRIMER is to be used when WS FLASH is applied over itself.6. Cut WS FLASH to desired size. Remove release film immediately before application. Using a roller firmly press the WS FLASH onto the surface, keeping the membrane smooth. Begin by treating the sill first, the jambs second, followed by the head. (See Figures 25,26,27) Note: Treatment into the rough opening head is required to create a continuous air barrier assembly.
Figure 25
7. Install window per window manufacturer’s instructions. (See Figure 28)8. Install required accessories such as window head flashing. Apply FLASHING PRIMER over the accessory and onto areas which will receive WS FLASH. Cut WS FLASH to desired size. Remove release film immediately before application. Using a roller firmly press the WS FLASH onto the surface keeping the membrane smooth. (See Figure 29)9. Apply SENERSHIELD-R or SENERSHIELD-VB per the product bulletin instructions over the substrate. (See Figure 30)
Figure 30Figure 29Figure 28
Figure 26 Figure 27

Air/Water-Resistive/Vapor Barriers Guidelines
Note BASF Wall Systems is an operating unit of BASF Corporation (herein referred to as “BASF Wall Systems”)
DisclaimerThis information and all further technical advice are based on BASF Wall Systems’ present knowledge and experience. However, BASF assumes no liability for providing such information and advice including the extent to which
BASF Wall
Systems 3550 St. Johns Bluff Road South Jacksonville, FL 32224-2614 Phone 800 • 221 • 9255 Fax 904 • 996 • 6300 www.senergy.basf.com
©2011 BASF Corporation Printed in U.S.A. 02/11
Technical InformationConsult our Technical Services Department for specific recommendations concerning all other applications. Consult the Senergy website, www.senergy.basf.com, for additional information about products and systems and for updated literature.
GeneralFor additional information regarding application of SENERSHIELD-R and SENERSHIELD-VB, refer to their product bulletins.