Embed Size (px)
Citation preview
Page 1 of 21
Brian Messier June 2011 - Rev 1.0.1
AirSpeed Multi StreamAirSpeed Multi StreamAirSpeed Multi StreamAirSpeed Multi Stream Ins Ins Ins Installation Guidetallation Guidetallation Guidetallation Guide This guide is intended for Avid Support Personnel.
Minimum System Requirements:Minimum System Requirements:Minimum System Requirements:Minimum System Requirements: CPU: The AirSpeed Multi Stream is an Avid built box using an Avid baseboard and Video I/O board. A Sony MSQ-201 chip
is used for HD MPEG Long GOP. SD is encoded / decoded via software. The AirSpeed Multi Stream comes in four varieties:
AirSpeed Multi Stream SD (7020-20280-xx) - Single VIO card SD only. AirSpeed Multi Stream MPEG-2 HD “XDCAM” (7020-20279-xx) - Dual VIO cards SD/HD. AirSpeed Multi Stream DNxHD (7020-30015-xx) - Single VIO card SD/HD. AirSpeed Multi Stream AVC-Intra (7020-30069-xx) - Dual VIO cards SD/HD.
Minimum RAM: AMS 1.x comes with 4gigs of RAM (7860-20010-01 - MEM,RDIMM,1GB,DDR2,ECC,SDRAM,PC2-5300). Internal HD: AMS 1.x includes one 120GB internal system drive which is partitioned into a C: and D: drive. Later models ship with
a 250GB internal. AMS 1.x also includes four 500GB drives in a RAID 0 stripe. These are included for buffering media during capture
and storage for playback. * A USB Flash drive is provided with each AirSpeed in the event you need to re-image your AMS. Operating System:
AMS 1.0 – 1.7.x run Windows XP Embedded – SP2 AMS 1.5 introduced support for Windows XP SP3 (not documented). AMS 1.8.0 and higher requires Windows XP Service Pak 3.
Document current as of AirSpeed Multi Stream v1.7.5 (some v1.8.0 information included)
Page 2 of 21
Brian Messier June 2011 - Rev 1.0.1
Installation:Installation:Installation:Installation: Note1: Exit out of any New Hardware Wizards that may appear. Driver installation will be covered later in this installation process. Note2: Once you have the hostname and networking configured, you can configure the AMS via VNC or Windows Remote
Desktop if desired. Both are supported by Avid. Windows “Administrator” defaults to no password. Default AMS application login is: amsuser / is-admin
*) Installation Prerequisites a) Work with the Project Manager to ensure that the network topology (IP addresses, location of DNS, NTP, hostname naming
convention, Domain name, etc) has been decided upon prior to installation.
1) Add any required hardware Note1: Do not yet connect power to the AirSpeed Multi Stream. Connecting power will initiate a boot sequence. Note2: The AMS does not come with rail kits. Rack mount ears are included.
a) If your site has ordered the low-res board option, install the H.264 board prior to rack-mounting the AMS. b) Insert the four media drives. c) Connect the AirSpeed to a KVM or a USB keyboard/mouse with a VGA monitor. There are no PS2 ports on the AMS. A USB
splitter (Y-cable) is suggested so that the second USB port is available if needed. Avid does not supply the splitter or USB mouse / keyboard.
Note: AMS 1.8.0 ReadMe details a known bug with USB Keyboard/Mouse and H.264 option. In this config, the AMS may not boot properly. The solution is to temporarily disconnect the USB Keyboard/Mouse and reconnect after the boot cycle.
d) AMS supports both standard blackburst and tri-level sync. Connect one of these reference sources to either of the REF IN / THRU connectors on your first AMS. This is especially important for playout channels. If you have additional AirSpeeds, connect a jumper cable from the first AMS to the next. Add a 75 ohm terminator to any unused REF IN/ TRHU connectors.
e) If available connect an cable to the LTC IN / THRU connector on your first AMS. If you have additional AirSpeeds, connect a jumper cable from the first AMS to the next. Add a 75 ohm terminator to any unused LTC IN/ TRHU
connectors. The AMS syncs to LTC automatically. If no LTC is provided, AMS will use time-of-day timecode which is synced to the Unity shared storage server.
f) Connect your SDI video I/O cables: SD / DNxHD Model: - Connect SDI cables to IN 1 and/or 2 - Connect SDI cables to OUT 1, 2, 3 and / or 4
MPEG2-HD / AVC Intra Model: - Connect SDI cables to IN 1, 2, 5 and/or 6 - Connect SDI cables to OUT 1, 2, 3, 4, 5, 6, 7 and/or 8
g) Connect any serial control cables to any of the RJ-45 ports on the back of the AMS. These cables must be straight cables with all 8 conductors wired. The AMS can be controlled via VDCP protocol or Sony BVW protocol.
h) Connect the Expansion Port cable(s) if the AMS is to connect to a GPIO device. i) Connect power cables to the AMS.
2) Verify the Installed Image Version If you are using the “XPe v21” image, you must add an AMS Operating System patch. The patch is available on the Avid
Download Center. Make sure the file name has a “.exe” at the end.
OS Image Version Supported AMS Software Version OS Patch Required?
v14 (Released with AMS 1.0) 1.0 only No
V21 (Released with AMS 1.1) 1.1 or higher Yes
v23 (Released with AMS 1.2) 1.1 or higher No
Open the image.txt file on the C: drive of the AMS. You can also determine the installed OS, by typing “pcleShowImageVer” at a Command Prompt and verifying the Image Version.
A patched version of the v21 OS will report the following Image file name: “ams_x86_pams11_mbphilo_v21.gho” The v23 image is preferred and is supported with AMS 1.2 and higher.
Page 3 of 21
Brian Messier June 2011 - Rev 1.0.1
3) Configure Windows Note1: Base Analyzer and Server Prep are not supported for use on the AirSpeed Multi Stream. Note2: On boot, if you see a prompt for the “Smasher Driver”, this relates to the H.264 codec board. Cancel these prompts for
now as the driver install will be covered later. Note3: AMS 1.8.0 introduced a 2.5GB memory switch to the boot.ini file. This occurs during the install of the AMS software. a) Add a unique hostname for the AMS. Example: wavdams-1. If you plan to configure these AMS in a Studio configuration, the
naming convention is important. See notes on Studio configurations in Appendix A of this document. Note1: Hostnames must comply with “RFC 952” standards. Hostnames can be up to 24 characters, but for Avid purposes keep it under 15 characters. Hostnames can contain numbers, but never begin a hostname with a number. The only “special character” allowed in a hostname is a dash “ - “. Underscores are not allowed. Note2: Reminder…if you haven’t decided on a hostname naming convention, now is the time!!
b) During the Interplay Engine install process, a local Windows Administrator account was created. Create that account here as well. Suggested example: LA-Avid – “local administrator”
c) The AMS will auto-login to Windows under the default “amsuser” account. Once you have the Avid administrator account created (example: LA-Avid) you should reconfigure Windows to auto-login as this account. Click Start Menu>Run and type: control userpasswords2. This will allow you to set the auto-login user account. Note: If AMS software is installed, you can also use the AmsAutoLogon tool to configure auto-login. This is located at Start Menu>Programs>Avid.
d) Log out of the “amsuser” account and log in as your new local administrator account. e) Configure Startup and Recovery options.
- Right-click on My Computer and choose Properties. - In the Advanced tab, click Startup & Recovery Settings. - Deselect “Automatically reboot” under System Failure. - Select “Kernel Memory Dump” in the Write debugging information menu. - Click OK, OK and OK again. Do not reboot the computer at this time.
f) Confirm that the Date & Time are correct – make sure to verify Time Zone. g) Configure BGinfo. Interplay generally uses a lot of servers. It’s important to always know which box you are working on, so it’s
suggested to install BGinfo to ensure you are working on the correct server at all times. h) Upgrade Windows Service Pak. AMS 1.5.0 added support for WinXP SP3. AMS v1.8.0 and higher requires Win XP SP3.
4) Download and Install Windows Updates Download an updated bundle of supported Microsoft hotfixes from: ftp://csftp2:[email protected]/Vic/HotFix_Updater/. Contrary to the ISIS System Director which also runs Windows XP Embedded, the AMS supports windows hotfixes. These are the
same hotfixes as would apply with Windows XP Professional.
5) Configure your media drives Note: If you have just re-imaged the AMS and the RAID 0 volume was previously configured, do not complete this step.
a) Ensure no USB drives are connected to the AMS at this time. b) On the AMS navigate to C:\Installables\Utils\Windows\Scripts. c) (optional) Open a CMD prompt window. The .bat files in the following two steps run quickly and you won’t be able to see what
they are doing. If you want to watch the process, type: “cd C:\Installables\Utils\Windows\Scripts” and then drag the .bat file into the CMD window and run it from there.
d) Double-click the CreateMediaRaid.bat file. This will run quickly. e) Once the script has completed, double-click the FormatMediaRaid.bat file. This will also run quickly. f) Right-click on My Computer and select Manage. g) Click on Disk Management on the left and verify that you have a 4-way “WINDOWS_MEDIA_RAID” volume E:. Note: If any of the four media drives are missing from Disk Management, see page 309 of the 1.6 AMS Install Guide for
troubleshooting help.
Page 4 of 21
Brian Messier June 2011 - Rev 1.0.1
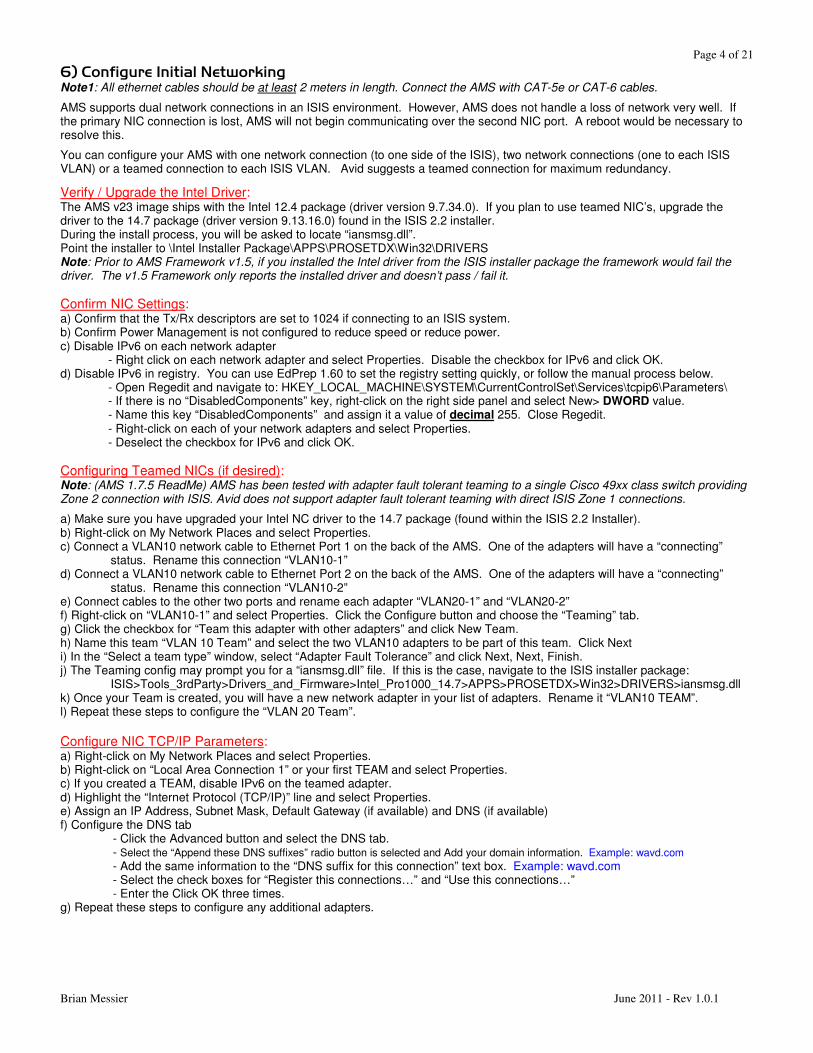
6) Configure Initial Networking Note1: All ethernet cables should be at least 2 meters in length. Connect the AMS with CAT-5e or CAT-6 cables.
AMS supports dual network connections in an ISIS environment. However, AMS does not handle a loss of network very well. If the primary NIC connection is lost, AMS will not begin communicating over the second NIC port. A reboot would be necessary to resolve this.
You can configure your AMS with one network connection (to one side of the ISIS), two network connections (one to each ISIS VLAN) or a teamed connection to each ISIS VLAN. Avid suggests a teamed connection for maximum redundancy.
Verify / Upgrade the Intel Driver: The AMS v23 image ships with the Intel 12.4 package (driver version 9.7.34.0). If you plan to use teamed NIC’s, upgrade the driver to the 14.7 package (driver version 9.13.16.0) found in the ISIS 2.2 installer. During the install process, you will be asked to locate “iansmsg.dll”. Point the installer to \Intel Installer Package\APPS\PROSETDX\Win32\DRIVERS Note: Prior to AMS Framework v1.5, if you installed the Intel driver from the ISIS installer package the framework would fail the driver. The v1.5 Framework only reports the installed driver and doesn’t pass / fail it.
Confirm NIC Settings: a) Confirm that the Tx/Rx descriptors are set to 1024 if connecting to an ISIS system. b) Confirm Power Management is not configured to reduce speed or reduce power. c) Disable IPv6 on each network adapter
- Right click on each network adapter and select Properties. Disable the checkbox for IPv6 and click OK. d) Disable IPv6 in registry. You can use EdPrep 1.60 to set the registry setting quickly, or follow the manual process below.
- Open Regedit and navigate to: HKEY_LOCAL_MACHINE\SYSTEM\CurrentControlSet\Services\tcpip6\Parameters\ - If there is no “DisabledComponents” key, right-click on the right side panel and select New> DWORD value. - Name this key “DisabledComponents” and assign it a value of decimal 255. Close Regedit. - Right-click on each of your network adapters and select Properties. - Deselect the checkbox for IPv6 and click OK.
Configuring Teamed NICs (if desired): Note: (AMS 1.7.5 ReadMe) AMS has been tested with adapter fault tolerant teaming to a single Cisco 49xx class switch providing Zone 2 connection with ISIS. Avid does not support adapter fault tolerant teaming with direct ISIS Zone 1 connections.
a) Make sure you have upgraded your Intel NC driver to the 14.7 package (found within the ISIS 2.2 Installer). b) Right-click on My Network Places and select Properties. c) Connect a VLAN10 network cable to Ethernet Port 1 on the back of the AMS. One of the adapters will have a “connecting”
status. Rename this connection “VLAN10-1” d) Connect a VLAN10 network cable to Ethernet Port 2 on the back of the AMS. One of the adapters will have a “connecting”
status. Rename this connection “VLAN10-2” e) Connect cables to the other two ports and rename each adapter “VLAN20-1” and “VLAN20-2” f) Right-click on “VLAN10-1” and select Properties. Click the Configure button and choose the “Teaming” tab. g) Click the checkbox for “Team this adapter with other adapters” and click New Team. h) Name this team “VLAN 10 Team” and select the two VLAN10 adapters to be part of this team. Click Next i) In the “Select a team type” window, select “Adapter Fault Tolerance” and click Next, Next, Finish. j) The Teaming config may prompt you for a “iansmsg.dll” file. If this is the case, navigate to the ISIS installer package:
ISIS>Tools_3rdParty>Drivers_and_Firmware>Intel_Pro1000_14.7>APPS>PROSETDX>Win32>DRIVERS>iansmsg.dll k) Once your Team is created, you will have a new network adapter in your list of adapters. Rename it “VLAN10 TEAM”. l) Repeat these steps to configure the “VLAN 20 Team”.
Configure NIC TCP/IP Parameters: a) Right-click on My Network Places and select Properties. b) Right-click on “Local Area Connection 1” or your first TEAM and select Properties. c) If you created a TEAM, disable IPv6 on the teamed adapter. d) Highlight the “Internet Protocol (TCP/IP)” line and select Properties. e) Assign an IP Address, Subnet Mask, Default Gateway (if available) and DNS (if available) f) Configure the DNS tab
- Click the Advanced button and select the DNS tab. - Select the “Append these DNS suffixes” radio button is selected and Add your domain information. Example: wavd.com - Add the same information to the “DNS suffix for this connection” text box. Example: wavd.com - Select the check boxes for “Register this connections…” and “Use this connections…” - Enter the Click OK three times.
g) Repeat these steps to configure any additional adapters.
Page 5 of 21
Brian Messier June 2011 - Rev 1.0.1
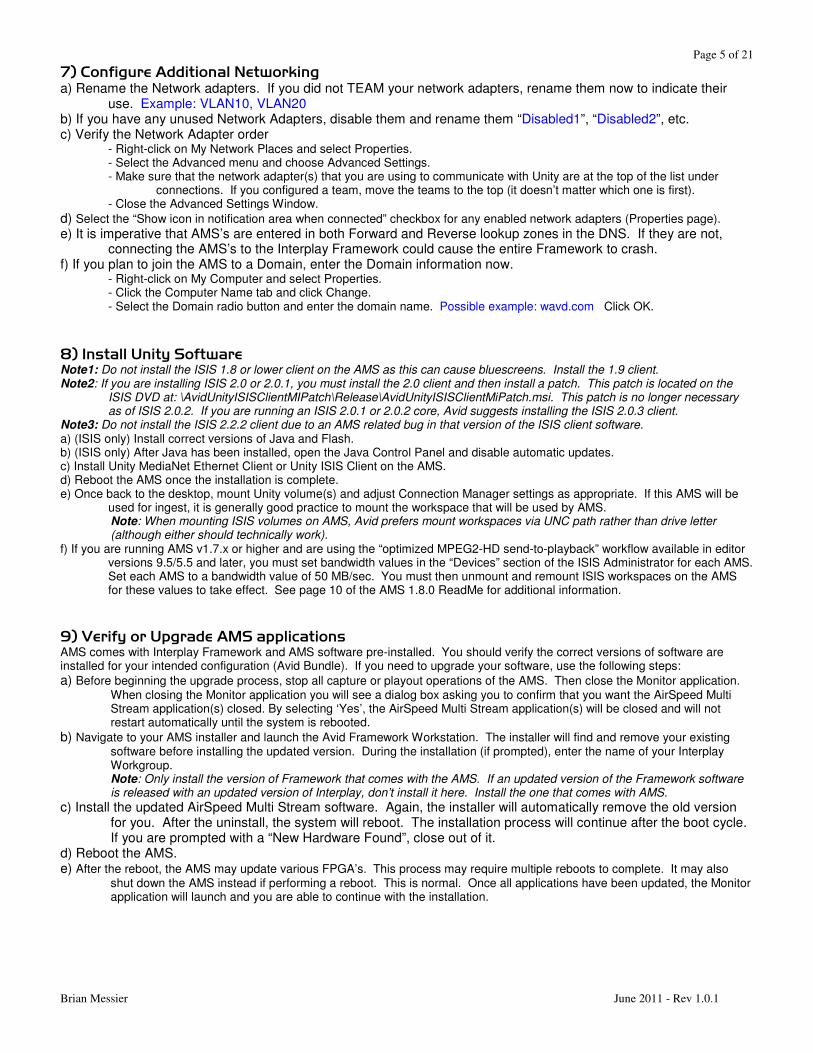
7) Configure Additional Networking a) Rename the Network adapters. If you did not TEAM your network adapters, rename them now to indicate their
use. Example: VLAN10, VLAN20 b) If you have any unused Network Adapters, disable them and rename them “Disabled1”, “Disabled2”, etc. c) Verify the Network Adapter order
- Right-click on My Network Places and select Properties. - Select the Advanced menu and choose Advanced Settings. - Make sure that the network adapter(s) that you are using to communicate with Unity are at the top of the list under
connections. If you configured a team, move the teams to the top (it doesn’t matter which one is first). - Close the Advanced Settings Window.
d) Select the “Show icon in notification area when connected” checkbox for any enabled network adapters (Properties page). e) It is imperative that AMS’s are entered in both Forward and Reverse lookup zones in the DNS. If they are not,
connecting the AMS’s to the Interplay Framework could cause the entire Framework to crash. f) If you plan to join the AMS to a Domain, enter the Domain information now.
- Right-click on My Computer and select Properties. - Click the Computer Name tab and click Change. - Select the Domain radio button and enter the domain name. Possible example: wavd.com Click OK.
8) Install Unity Software Note1: Do not install the ISIS 1.8 or lower client on the AMS as this can cause bluescreens. Install the 1.9 client. Note2: If you are installing ISIS 2.0 or 2.0.1, you must install the 2.0 client and then install a patch. This patch is located on the
ISIS DVD at: \AvidUnityISISClientMIPatch\Release\AvidUnityISISClientMiPatch.msi. This patch is no longer necessary as of ISIS 2.0.2. If you are running an ISIS 2.0.1 or 2.0.2 core, Avid suggests installing the ISIS 2.0.3 client.
Note3: Do not install the ISIS 2.2.2 client due to an AMS related bug in that version of the ISIS client software. a) (ISIS only) Install correct versions of Java and Flash. b) (ISIS only) After Java has been installed, open the Java Control Panel and disable automatic updates. c) Install Unity MediaNet Ethernet Client or Unity ISIS Client on the AMS. d) Reboot the AMS once the installation is complete. e) Once back to the desktop, mount Unity volume(s) and adjust Connection Manager settings as appropriate. If this AMS will be
used for ingest, it is generally good practice to mount the workspace that will be used by AMS. Note: When mounting ISIS volumes on AMS, Avid prefers mount workspaces via UNC path rather than drive letter (although either should technically work).
f) If you are running AMS v1.7.x or higher and are using the “optimized MPEG2-HD send-to-playback” workflow available in editor versions 9.5/5.5 and later, you must set bandwidth values in the “Devices” section of the ISIS Administrator for each AMS. Set each AMS to a bandwidth value of 50 MB/sec. You must then unmount and remount ISIS workspaces on the AMS for these values to take effect. See page 10 of the AMS 1.8.0 ReadMe for additional information.
9) Verify or Upgrade AMS applications AMS comes with Interplay Framework and AMS software pre-installed. You should verify the correct versions of software are installed for your intended configuration (Avid Bundle). If you need to upgrade your software, use the following steps:
a) Before beginning the upgrade process, stop all capture or playout operations of the AMS. Then close the Monitor application. When closing the Monitor application you will see a dialog box asking you to confirm that you want the AirSpeed Multi Stream application(s) closed. By selecting ‘Yes’, the AirSpeed Multi Stream application(s) will be closed and will not restart automatically until the system is rebooted.
b) Navigate to your AMS installer and launch the Avid Framework Workstation. The installer will find and remove your existing software before installing the updated version. During the installation (if prompted), enter the name of your Interplay Workgroup. Note: Only install the version of Framework that comes with the AMS. If an updated version of the Framework software is released with an updated version of Interplay, don’t install it here. Install the one that comes with AMS.
c) Install the updated AirSpeed Multi Stream software. Again, the installer will automatically remove the old version for you. After the uninstall, the system will reboot. The installation process will continue after the boot cycle. If you are prompted with a “New Hardware Found”, close out of it.
d) Reboot the AMS. e) After the reboot, the AMS may update various FPGA’s. This process may require multiple reboots to complete. It may also
shut down the AMS instead if performing a reboot. This is normal. Once all applications have been updated, the Monitor application will launch and you are able to continue with the installation.
Page 6 of 21
Brian Messier June 2011 - Rev 1.0.1
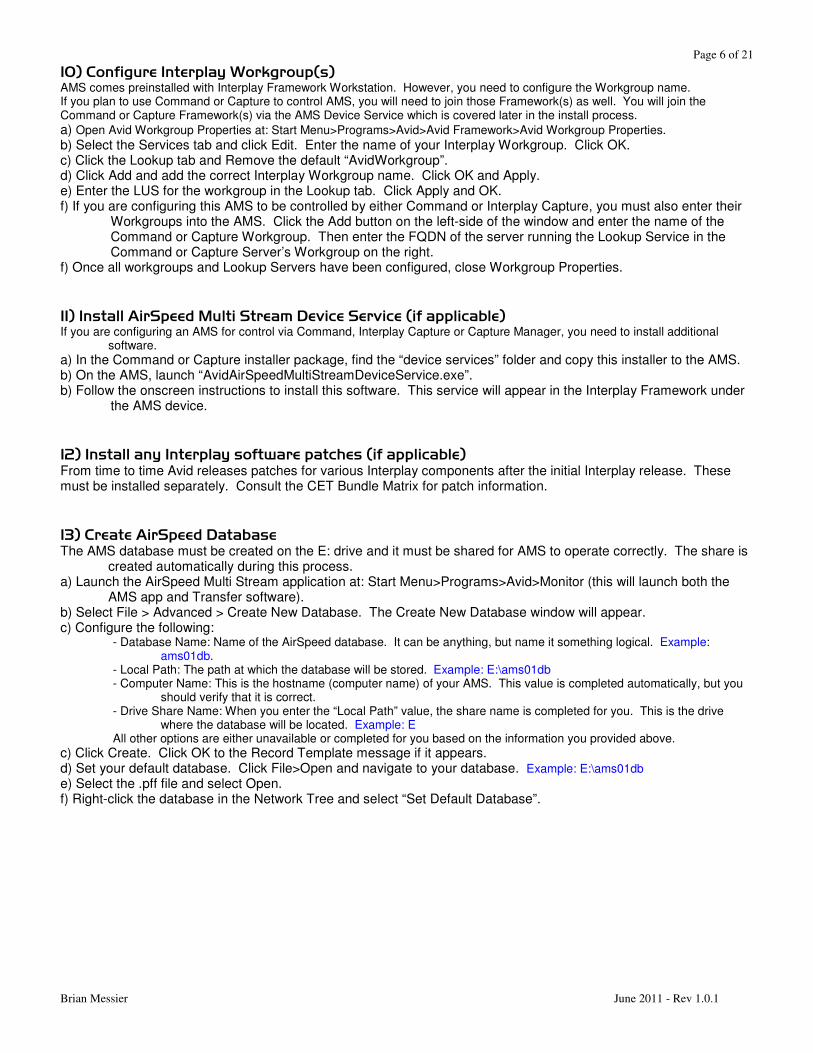
10) Configure Interplay Workgroup(s) AMS comes preinstalled with Interplay Framework Workstation. However, you need to configure the Workgroup name. If you plan to use Command or Capture to control AMS, you will need to join those Framework(s) as well. You will join the Command or Capture Framework(s) via the AMS Device Service which is covered later in the install process.
a) Open Avid Workgroup Properties at: Start Menu>Programs>Avid>Avid Framework>Avid Workgroup Properties. b) Select the Services tab and click Edit. Enter the name of your Interplay Workgroup. Click OK. c) Click the Lookup tab and Remove the default “AvidWorkgroup”. d) Click Add and add the correct Interplay Workgroup name. Click OK and Apply. e) Enter the LUS for the workgroup in the Lookup tab. Click Apply and OK. f) If you are configuring this AMS to be controlled by either Command or Interplay Capture, you must also enter their
Workgroups into the AMS. Click the Add button on the left-side of the window and enter the name of the Command or Capture Workgroup. Then enter the FQDN of the server running the Lookup Service in the Command or Capture Server’s Workgroup on the right.
f) Once all workgroups and Lookup Servers have been configured, close Workgroup Properties.
11) Install AirSpeed Multi Stream Device Service (if applicable) If you are configuring an AMS for control via Command, Interplay Capture or Capture Manager, you need to install additional
software.
a) In the Command or Capture installer package, find the “device services” folder and copy this installer to the AMS. b) On the AMS, launch “AvidAirSpeedMultiStreamDeviceService.exe”. b) Follow the onscreen instructions to install this software. This service will appear in the Interplay Framework under
the AMS device.
12) Install any Interplay software patches (if applicable) From time to time Avid releases patches for various Interplay components after the initial Interplay release. These must be installed separately. Consult the CET Bundle Matrix for patch information.
13) Create AirSpeed Database The AMS database must be created on the E: drive and it must be shared for AMS to operate correctly. The share is
created automatically during this process. a) Launch the AirSpeed Multi Stream application at: Start Menu>Programs>Avid>Monitor (this will launch both the
AMS app and Transfer software). b) Select File > Advanced > Create New Database. The Create New Database window will appear. c) Configure the following:
- Database Name: Name of the AirSpeed database. It can be anything, but name it something logical. Example: ams01db.
- Local Path: The path at which the database will be stored. Example: E:\ams01db - Computer Name: This is the hostname (computer name) of your AMS. This value is completed automatically, but you
should verify that it is correct. - Drive Share Name: When you enter the “Local Path” value, the share name is completed for you. This is the drive
where the database will be located. Example: E All other options are either unavailable or completed for you based on the information you provided above.
c) Click Create. Click OK to the Record Template message if it appears. d) Set your default database. Click File>Open and navigate to your database. Example: E:\ams01db e) Select the .pff file and select Open. f) Right-click the database in the Network Tree and select “Set Default Database”.
Page 7 of 21
Brian Messier June 2011 - Rev 1.0.1
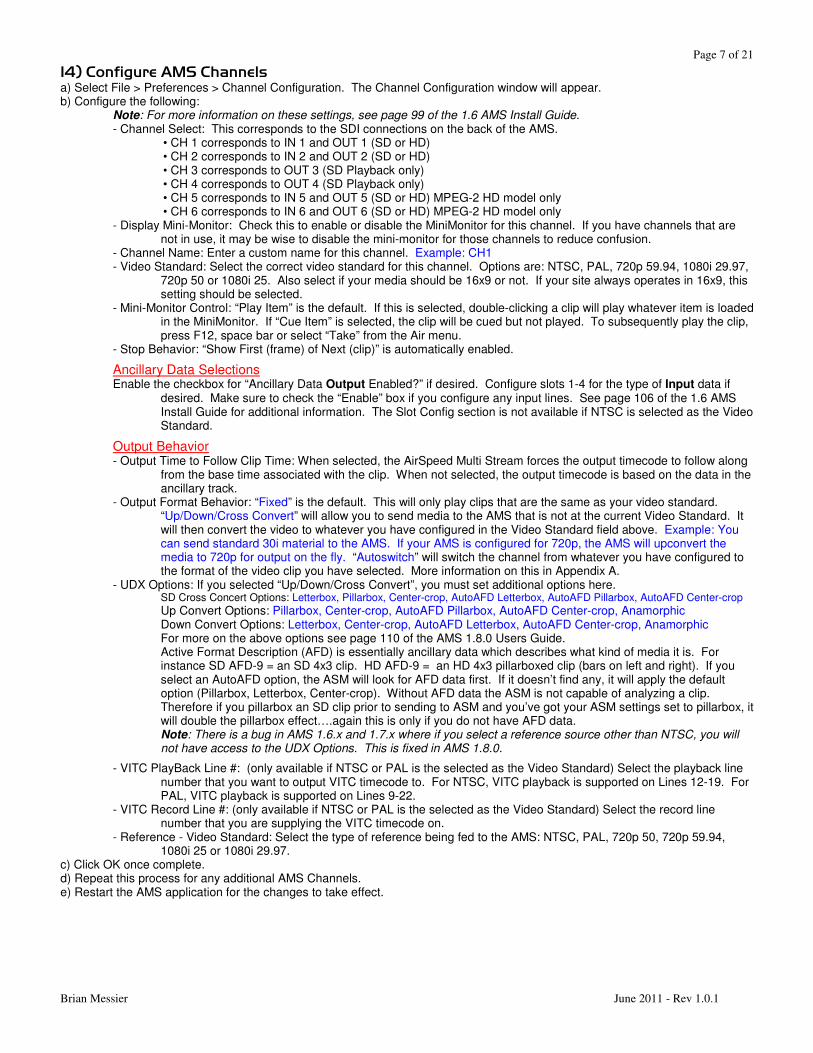
14) Configure AMS Channels a) Select File > Preferences > Channel Configuration. The Channel Configuration window will appear. b) Configure the following:
Note: For more information on these settings, see page 99 of the 1.6 AMS Install Guide. - Channel Select: This corresponds to the SDI connections on the back of the AMS.
• CH 1 corresponds to IN 1 and OUT 1 (SD or HD) • CH 2 corresponds to IN 2 and OUT 2 (SD or HD) • CH 3 corresponds to OUT 3 (SD Playback only) • CH 4 corresponds to OUT 4 (SD Playback only) • CH 5 corresponds to IN 5 and OUT 5 (SD or HD) MPEG-2 HD model only • CH 6 corresponds to IN 6 and OUT 6 (SD or HD) MPEG-2 HD model only
- Display Mini-Monitor: Check this to enable or disable the MiniMonitor for this channel. If you have channels that are not in use, it may be wise to disable the mini-monitor for those channels to reduce confusion.
- Channel Name: Enter a custom name for this channel. Example: CH1 - Video Standard: Select the correct video standard for this channel. Options are: NTSC, PAL, 720p 59.94, 1080i 29.97,
720p 50 or 1080i 25. Also select if your media should be 16x9 or not. If your site always operates in 16x9, this setting should be selected.
- Mini-Monitor Control: “Play Item” is the default. If this is selected, double-clicking a clip will play whatever item is loaded in the MiniMonitor. If “Cue Item” is selected, the clip will be cued but not played. To subsequently play the clip, press F12, space bar or select “Take” from the Air menu.
- Stop Behavior: “Show First (frame) of Next (clip)” is automatically enabled.
Ancillary Data Selections Enable the checkbox for “Ancillary Data Output Enabled?” if desired. Configure slots 1-4 for the type of Input data if
desired. Make sure to check the “Enable” box if you configure any input lines. See page 106 of the 1.6 AMS Install Guide for additional information. The Slot Config section is not available if NTSC is selected as the Video Standard.
Output Behavior - Output Time to Follow Clip Time: When selected, the AirSpeed Multi Stream forces the output timecode to follow along
from the base time associated with the clip. When not selected, the output timecode is based on the data in the ancillary track.
- Output Format Behavior: “Fixed” is the default. This will only play clips that are the same as your video standard. “Up/Down/Cross Convert” will allow you to send media to the AMS that is not at the current Video Standard. It will then convert the video to whatever you have configured in the Video Standard field above. Example: You can send standard 30i material to the AMS. If your AMS is configured for 720p, the AMS will upconvert the media to 720p for output on the fly. “Autoswitch” will switch the channel from whatever you have configured to the format of the video clip you have selected. More information on this in Appendix A.
- UDX Options: If you selected “Up/Down/Cross Convert”, you must set additional options here. SD Cross Concert Options: Letterbox, Pillarbox, Center-crop, AutoAFD Letterbox, AutoAFD Pillarbox, AutoAFD Center-crop Up Convert Options: Pillarbox, Center-crop, AutoAFD Pillarbox, AutoAFD Center-crop, Anamorphic Down Convert Options: Letterbox, Center-crop, AutoAFD Letterbox, AutoAFD Center-crop, Anamorphic For more on the above options see page 110 of the AMS 1.8.0 Users Guide. Active Format Description (AFD) is essentially ancillary data which describes what kind of media it is. For instance SD AFD-9 = an SD 4x3 clip. HD AFD-9 = an HD 4x3 pillarboxed clip (bars on left and right). If you select an AutoAFD option, the ASM will look for AFD data first. If it doesn’t find any, it will apply the default option (Pillarbox, Letterbox, Center-crop). Without AFD data the ASM is not capable of analyzing a clip. Therefore if you pillarbox an SD clip prior to sending to ASM and you’ve got your ASM settings set to pillarbox, it will double the pillarbox effect….again this is only if you do not have AFD data. Note: There is a bug in AMS 1.6.x and 1.7.x where if you select a reference source other than NTSC, you will not have access to the UDX Options. This is fixed in AMS 1.8.0.
- VITC PlayBack Line #: (only available if NTSC or PAL is the selected as the Video Standard) Select the playback line number that you want to output VITC timecode to. For NTSC, VITC playback is supported on Lines 12-19. For PAL, VITC playback is supported on Lines 9-22.
- VITC Record Line #: (only available if NTSC or PAL is the selected as the Video Standard) Select the record line number that you are supplying the VITC timecode on.
- Reference - Video Standard: Select the type of reference being fed to the AMS: NTSC, PAL, 720p 50, 720p 59.94, 1080i 25 or 1080i 29.97.
c) Click OK once complete. d) Repeat this process for any additional AMS Channels. e) Restart the AMS application for the changes to take effect.
Page 8 of 21
Brian Messier June 2011 - Rev 1.0.1
15) Configure AMS Integration Service in the Interplay Framework a) Select Start Manu>Programs>Avid>Avid Framework>Avid Service Configuration. b) Enter the name of your Interplay Workgroup into the dialog box. Select the “Always” checkbox and click OK. c) Click the arrow next to your AMS to expand options and highlight the Avid AMS Integration Service option. d) Enter the Admin password if required and click OK. e) Configure the following tabs:
Service Tab - Stand-alone Mode (AMS 1.0 – 1.7.x): Enable this checkbox to enter standalone mode. Enabling this box will disable the
local Transfer Engine software in the Monitor application on the AMS. See Appendix A for more info on this feature. - Interplay Enabled (AMS 1.8.x and higher): If connecting to an Interplay Workgroup, this should be enabled. Disable this
checkbox if you want to configure a Standalone AMS or a Team configuration. - Transfer Engine Enabled (AMS 1.8.x and higher): If connecting to an Interplay Workgroup, this should be enabled. This
checkbox should aloe be enabled for a “Team” configuration. Disable this checkbox if you want to configure a Standalone AMS.
- Server Name: Enter the name of your Interplay Engine or virtual Interplay Engine. - Database Name: Name of the Interplay Engine database. AvidWG - User Name: Enter your Avid Admin account . Example: LA-Avid. This user will be used to check media into Interplay. - Password: Enter the password for this user. - Click Apply when done.
User Profiles (AMS 1.6 and higher) This tab allows you to set preferences for any user that requires access to the AMS Remote
Console. In a workgroup environment, the user list is pulled from Interplay. In a standalone AMS environment the users are pulled from the users created within the Windows OS.
- Click Add. You will see “New User” appear on the left side of the window. - Select a user from the “Name” pulldown window on the right or enter a custom user name. - Select your options (Inventory, Play, Record). - If you want to grant access to the remote apps to another user, repeat the process by clicking Add and repeating the process above. - Once you have configured all your users, click Apply. - Go back to the User Profiles window and ensure your user exists. - Launch the AMS Remote Console application to test your login and access to the AMS’s.
Record Templates Note: Default Avid templates cannot be deleted. - You don’t necessarily need to do anything in this window. In most cases, the Avid provided default templates are used.
If you want to create a custom Record Template, follow the instructions below. - Select a template from the list on the left and click Copy. - A new Record template is created based on the default options from the Avid supplied template. - Enter a name for the template. Keep this name under 31 characters. - Enter a Description if desired. This will appear as metadata for your recorded media. - (Optional) Enter a name for each audio stream. - Set the Type of audio that should be created for each stream (PCM-16, PCM-24, AC-3 or Dolby-E). Each “stream”
represents a stereo pair. Example: Stream 1 = Ch1&2. Stream 2 = Ch3&4. - Click the Apply button to save this template.
Destination Templates Note: By default AMS adds media to the Catalogs folder and Incoming Media folder in the Interplay database. This cannot be changed. - Click the New button to create a new Destination template. - Enter a Name for the template. Keep this name under 31 characters. Example: AMSIN-1 - (Optional) Enter a Description. - (Optional) Enter a Clip ID. Example: AMSIN-1 - (Optional) Enter a Clip Name. To ensure all clips have a unique name in the ASM database, type “.$n” at the end of the
clip name. Example: AMSIN-1.$n - (Optional) Enter a Tape Name. Example: AMSIN-1 - (Optional) Enter an Interplay Folder Path (Project Path) Example: /Feeds/subfolder - (Optional) Enter a Proxy Interplay Folder Path (Proxy Project Path) (AMS 1.7 and higher) Example: /Feeds/lowres - Workspace: Select the name of the Unity Workspace from the pulldown menu where media will be saved. - Proxy Workspace: You can select a different or the same workspace for the proxy media.
Note: AMS 1.8.0 ReadMe: Bug Number: UDevC00155636 When using Capture as a record controller for AMS with the H.264 low-res option available, you must not assign separate Interplay Folder and Workspace paths for the high- and low-res assets. Assigning different paths will break the association between the assets in the masterclip created by Capture.
- (Optional / if applicable) Categories: Select one or more Categories that you want your captures to be associated with. Clips will be checked into the Interplay Database and will be associated with these predefined categories. The information will show up as metadata associated with the clip. Categories are created in the Interplay Administrator application under “Configure Categories”. This list is populated automatically.
- Click the Apply button to save this template. - Create additional templates for each AMS.
Page 9 of 21
Brian Messier June 2011 - Rev 1.0.1
Default Templates Note1: If you ever change the Video Standard (found in Configure AMS Channels), these default templates will be reset.
You must go back and reapply these settings. Note2: If no Destination Template is configured, AMS will not transfer to the shared storage. Note3: If you do not see any default templates listed, go back to the AMS software and configure all Channels. If AMS
Channels are not configured, the “templates” list will appear empty. - For each Channel, select the Record and Destination templates that will be most common to your site’s workflow. - If your AMS includes the H.264 codec board, indicate if the channel should create a proxy. If no, select “none”. - HD send-to-playback: If you want to send HD media to the AirSpeed Multi Stream, select the location from the “HD send-
to-playback format based on” list. - Ingest transfer workspace: In the event that there is a failed transfer upon ingest, specify a destination template to be
used to re-transfer the asset. - Click Apply when done.
Inventory - Allow Play While Transfer: Enable or disable the checkbox for this option. - Transfer Ancillary Streams to Interplay: Enable or disable the checkbox to allow the ancillary data to be checked into
Interplay. This requires Ancillary Data to be enabled in the Channel Configuration window. Do not enable this option if you are running a version of Interplay prior to version 2.2. Enabling this option will create a Data track that is checked into Interplay.
- Generate local MPEG-1 proxy (low-res proxy) after playback transfer completes: This setting is not related to the H.264 Proxies. Low res proxies are for local playback on the AMS only. They do not get transferred to Unity. Under heavy loads, generating proxies while ingesting or playing out can inhibit system performance.
- Delete after ingest transfer completes?: This will only delete media directly off the AirSpeed Multi Stream server. - Delete XDCAM Temporary Files after Transfer (new in 1.7): This should be enabled by default. The only reason to
disable the checkbox is if you are troubleshooting an issue with the XDCAM encode / transfer. - Transfer Compressed (Proxy) Audio Streams to Interplay: This relates to the H.264 Proxies. - Begin Delete: Enable or disable the checkbox for this option. Configure deletion rules. - Restart transfer engine daily at [time]: If you perform many transfers in the course of a day, it is recommended to restart
the Transfer application for best performance. This setting allows you to automate this process. TM will restart at the first idle period after the designated restart time. In the event the system is never idle, work with the customer to identify a planned (automatic or manual) restart of the TM service.
- (legacy) Enable framework logging for transfer engine: Only enable this setting if instructed for troubleshooting purposes. - Click Apply when done.
f) Repeat this process for all AMS servers.
16) Configure AMS Device Service in the Interplay Framework (if applicable) This service will only appear if previously installed. It is used for communication with iNEWS Command, Interplay Capture or
Capture Manager. The service appears under the AMS device in both the Interplay Framework and Command / Capture Framework.
a) Select Start Manu>Programs>Avid>Avid Framework>Avid Service Configuration. b) You will most likely be connecting to the Interplay Framework. Click the arrow next to your AMS to expand options
and highlight the Avid AMS Device Service. c) Enter the Admin password if required and click OK. d) Configure the following:
Capture Manager Configuration: - Select the “Enable Avid Interplay CaptureManager” radio button for “Yes”. - Enter the CaptureManager System Service: Example: wavd-capman - Click Apply. Upon applying the new settings, and if the CapMan is enabled, the system will append a port number to the
end of the hostname you entered for the CapMan. Example: wavd-capman:6001
Command Configuration: - Select the “Enable Second Workgroup” radio button for “Yes”. - In the Second Workgroup box, enter the hostname of the Command Framework Workgroup (case sensitive). - Click Apply.
Interplay Capture Configuration: - Select the “Enable Second Workgroup” radio button for “Yes”. - In the Second Workgroup box, enter the hostname of the Interplay Capture Framework Workgroup (case sensitive). - Click Apply.
e) Close the Service Configuration Window. f) Open the Avid Service Configuration tool on the Command or Interplay Capture server. g) Click the arrow next to your AMS to expand options and highlight the Avid AMS Device Service option. h) Enter the Admin password if required and click OK.
Page 10 of 21
Brian Messier June 2011 - Rev 1.0.1
i) Verify that the AMS’s appear in this Framework and the Device Service is configured with the settings you applied above.
j) Close the Service Configuration tool. k) Open the Interplay Health Monitor on the Command server and expand the Command server to reveal all services. l) Highlight the Avid Inventory Manager service and verify that you see the AMS’s listed under Devices. If all Command and AMS
services are running normally, the “Available” line should indicate “true”. Playout AMS servers will also indicate an “Inventory” count.
m) Click Apply when done. n) Repeat this process for all AMS servers.
17) Configure AMS Communication Protocols (if applicable) If you have external devices that will control your AMS, you must define communication protocols for each channel. a) Within the AirSpeed Multi Stream application select File > Preferences > Protocol Setup b) Select the radio button for the channel you want to configure. c) Select the Protocol type: None (AirSpeed Multi Stream’s own API), VDCP (LouthSerial), BVW75 (Sony protocol). d) Select the appropriate Port. Options are 1-8 and refer to the RJ-45 serial control ports 1-8 on the back of the AMS. e) Enable / Disable Story TC: Enables you to specify story timecode cue in values as opposed to zero based offsets. f) Enable / Disable Preset / Cue: (VDCP only) With this option enabled, if there is nothing previously loaded on the
channel, it loads the clip with the first frame of the video displayed on the MiniMonitor and Output monitor. g) Enable / Disable Auto Play: With this option enabled, following the first VDCP Play command each new item cued
will automatically take without an explicit PLAY command from Automation. h) Database: In most cases you will leave this blank. This is referring to the AMS database on drive E: i) Click OK when done. j) Restart the AMS for changes to take effect. k) Notes for specific control servers:
Ignite Notes: Channel 1 is generally configured for VDCP / Port1. Enable the checkbox for Preset/Cue.
Channel 2 is generally configured for VDCP / Port2. Enable the checkbox for Preset/Cue. Ensure Ignite is configured for 32 character IDs. If not, Ignite will not be able to communicate with AMS. VDCP commands are different between 8 and 32 character.
18) Configure GPI Communication (if applicable) AirSpeed Classic pinouts for the DB25 connection are hard coded. See page 193 of the AirSpeed 2.7.0 Users Guide for details. AirSpeed Multistream pinouts are hard coded to a pin, but not a function. You can assign functions in the AMS software. See
page 360 of the AMS 1.8.0 User Guide for details.
a) Launch the AirSpeed Multi Stream application at: Start Menu>Programs>Avid>Avid AirSpeed Multi Stream b) Select File > Preferences and ensure “Enable GPI Triggers” is checked. c) Select File > Preferences > Assign GPIs d) All GPIs default to OFF / NONE. You can configure each GPI command here.
Input options: OFF, Play, Stop, Cue, Record. Channels 3 & 4 cannot be assigned the Record command. Output options: NONE, Server Ready, Play, Record. Channels 3 & 4 can only be assigned the Play command.
e) Test your GPI control by clicking Start Test. This puts the dialog box into a “diagnostics mode” which enables you to initiate each trigger to confirm pinouts and show how many times a particular trigger has been activated. When in this state, the outputs will turn the tallies On and Off to confirm pinouts.
f) Click OK to save your configuration.
19) Configure AMS Options a) Launch the AirSpeed Multi Stream application at: Start Menu>Programs>Avid>Avid AirSpeed Multi Stream b) Select File > Preferences > Database Options. See page 72 of the 1.7.5 AMS ReadMe for details.
- Add Items to End of Workspace (defaults off) - Keep Write Lock During Copy/Modify Operations (defaults off) - Keep Database Views Updated (defaults on) - Update Clip Length While Recording (defaults on) - Update Video Id When Modifying Item Number (defaults on) - Give warning while recording when disk is xx %. (defaults to 95%)
c) Select File > Preferences > Channel Assignments > Lock. This locks the channel as the default playback channel preventing accidental changes.
Page 11 of 21
Brian Messier June 2011 - Rev 1.0.1
20) Miscellaneous Configuration a) Avid supports installing an antivirus application on the AirSpeed Multi Stream. However, Avid does not support
using this software while AMS is in operation. Completely disable antivirus while AMS is in operation. b) Install 7-Zip if not already installed. c) Install Avid System Diagnostics. Base Analyzer is not supported for AMS servers. d) If you are using a Capture Manager server, ensure that the (AirSpeed) Interplay Adapter is installed somewhere.
AirSpeed Multi Stream does not need this service, but Capture Manager still does. e) Select Start Menu>Programs>Avid>AMS AutoLogon. To allow the AMS software to launch after a reboot cycle,
enter your user, password, domain here and select the checkbox for “Enable Auto-Login”. The default settings here are amsuser / is-admin with auto-login enabled.
f) Add ISIS / AMS Startup script. If you have the AMS configured to auto-login, the ISIS Client icon may not appear in the System Tray as expected. Delete the ISIS Client and the AMS Monitor from the All Users Startup Menu and add the ISIS-AMS startup script. This is available at:
ftp://avidcsdownload:[email protected]/.MISC_SW_NO_CUSTOMERS_AVID_ONLY/AMS_Tools/
21) Configure IsoSync (if applicable) (To be added to future version) Although you will see references to AMS in IsoSync 2.0.x, it is not supported. IsoSync 2.1 is the first version that fully
supports AMS.
22) (Standalone AMS only) Configure AFAP Settings If you are configuring an AMS in standalone mode, you must verify / update AFAP (As Fast As Possible) settings. AFAP is the
filter driver for the disk I/O system on the AirSpeed Multi Stream. a) Close the AMS Monitor to close out AMS and Transfer applications. b) Navigate to C:\Program Files\Avid\Afap\ and launch AFAPManager.exe c) In the Volume pane, select the E:\ volume. d) Write down the default values for each of the fields as defined in the “Manage” tab. Keep a record of these values for future
reference. e) On the Manage tab, click the Stop Filtering button. The lower fields will then be enabled. f) In the AFAP Control section, change the values of the following fields (following values valid for AMS 1.7.0 and higher):
- New Total Bandwidth = 95000 - Write Penalty (%) = 115 - IO Cost (uS) = 2000 - Extension List = tmf;mxf;g
g) Check the lower instance of the “Persistent” check box. h) Click Start Filtering to restart filtering and close the AFAP Manager dialog box.
i) See page 29 of the AMS 1.7.5 ReadMe for additional details on Standalone configs or Appendix A of this document.
23) Testing a) Can you access the Interplay Framework and (if applicable) the Command or Capture Framework? b) Is the Interplay Health Monitor Green? c) Use Avid System Diagnostics’ Collect Tool to obtain information on the completed server. d) Use the AMS Setting Save and Restore Tool (AMS 1.3 and higher) to create a backup copy of your configured AMS settings. In
the event that the AMS looses its settings or if there is a catastrophic failure, a backup copy of the settings will be useful. - Navigate to C:\Program Files\Avid\Avid Airspeed Multi Stream and launch: AsmsSettingsUtil.exe. - Click Save and Next. - Browse to a location where you would like to save the settings and click OK. - Confirm the selection and click OK to close the application. - Copy these settings to an external location for safety.
e) Can the AMS be controlled by Command for Playout? Note: The 1.6 AMS ReadMe says that after upgrading AMS software, playback transfers may not initially work. Avid suggests restarting the Transfer application on the AMS to clear this condition.
f) Can the AMS be controlled by Capture Manager / Interplay Capture for Ingest? g) Can the AMS be controlled via serial communication (if configured)? h) Does the AMS respond to GPI commands (if configured)? i) Ensure that Windows time / timezone is correct on all AirSpeed Multi’s. If LTC is connected, ensure that each AMS
has a good “green” LTC light on the front. Many CapMan / AMS issues can be traced back to sync. j) Open the Interplay Health Monitor and verify the AMS’s Workstation Service’s “Local Clock Information” is “Stable”.
Page 12 of 21
Brian Messier June 2011 - Rev 1.0.1
Upgrading the Upgrading the Upgrading the Upgrading the AirSpeed Multi StreamAirSpeed Multi StreamAirSpeed Multi StreamAirSpeed Multi Stream
*) Verify Upgrade Prerequisites a) If upgrading from AMS 1.0 to 1.1 or higher, you must reimage your AMS. See the upgrade process below for details. b) (Optionally) Run Avid Collect Tool prior to the upgrade to capture existing configuration. c) (Optionally) Run the AMS Setting Save and Restore Tool to create a backup copy of your configured AMS settings. d) Before beginning the upgrade process, stop all capture or playout operations of the AMS. Then close the Monitor application.
When closing the Monitor application you will see a dialog box asking you to confirm that you want the AirSpeed Multi Stream application(s) closed. By selecting ‘Yes’, the AirSpeed Multi Stream application(s) will be closed and will not restart automatically until the system is rebooted.
e) It is possible to upgrade the boards in the AirSpeed Multi Stream to add features such as upgrading an existing AMS to include the AVC-Intra option. If adding hardware, complete that process first as a reinstallation of the AMS software is required to complete the installation process. See Appendix A of this doc for information on the documentation for this process. Pay particular attention to the Bomar tool required for some upgrades.
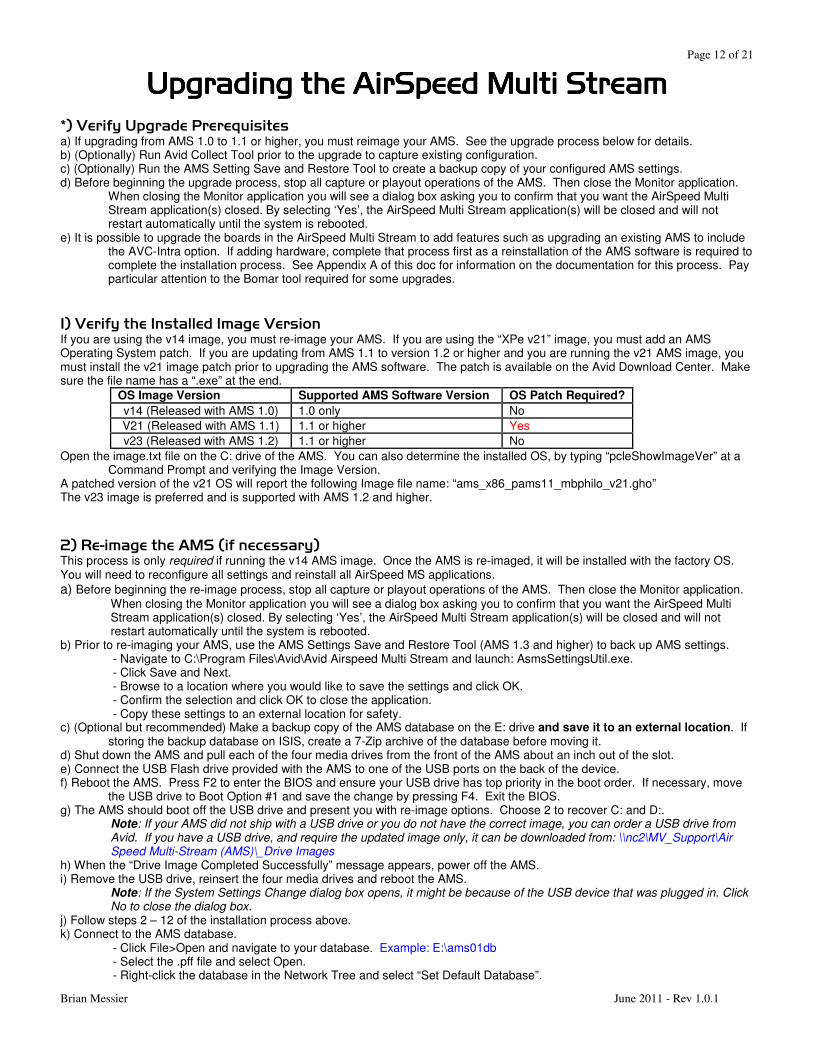
1) Verify the Installed Image Version If you are using the v14 image, you must re-image your AMS. If you are using the “XPe v21” image, you must add an AMS Operating System patch. If you are updating from AMS 1.1 to version 1.2 or higher and you are running the v21 AMS image, you must install the v21 image patch prior to upgrading the AMS software. The patch is available on the Avid Download Center. Make sure the file name has a “.exe” at the end.
OS Image Version Supported AMS Software Version OS Patch Required?
v14 (Released with AMS 1.0) 1.0 only No
V21 (Released with AMS 1.1) 1.1 or higher Yes
v23 (Released with AMS 1.2) 1.1 or higher No
Open the image.txt file on the C: drive of the AMS. You can also determine the installed OS, by typing “pcleShowImageVer” at a Command Prompt and verifying the Image Version.
A patched version of the v21 OS will report the following Image file name: “ams_x86_pams11_mbphilo_v21.gho” The v23 image is preferred and is supported with AMS 1.2 and higher.
2) Re-image the AMS (if necessary) This process is only required if running the v14 AMS image. Once the AMS is re-imaged, it will be installed with the factory OS. You will need to reconfigure all settings and reinstall all AirSpeed MS applications.
a) Before beginning the re-image process, stop all capture or playout operations of the AMS. Then close the Monitor application. When closing the Monitor application you will see a dialog box asking you to confirm that you want the AirSpeed Multi Stream application(s) closed. By selecting ‘Yes’, the AirSpeed Multi Stream application(s) will be closed and will not restart automatically until the system is rebooted.
b) Prior to re-imaging your AMS, use the AMS Settings Save and Restore Tool (AMS 1.3 and higher) to back up AMS settings. - Navigate to C:\Program Files\Avid\Avid Airspeed Multi Stream and launch: AsmsSettingsUtil.exe. - Click Save and Next. - Browse to a location where you would like to save the settings and click OK. - Confirm the selection and click OK to close the application. - Copy these settings to an external location for safety.
c) (Optional but recommended) Make a backup copy of the AMS database on the E: drive and save it to an external location. If storing the backup database on ISIS, create a 7-Zip archive of the database before moving it.
d) Shut down the AMS and pull each of the four media drives from the front of the AMS about an inch out of the slot. e) Connect the USB Flash drive provided with the AMS to one of the USB ports on the back of the device. f) Reboot the AMS. Press F2 to enter the BIOS and ensure your USB drive has top priority in the boot order. If necessary, move
the USB drive to Boot Option #1 and save the change by pressing F4. Exit the BIOS. g) The AMS should boot off the USB drive and present you with re-image options. Choose 2 to recover C: and D:.
Note: If your AMS did not ship with a USB drive or you do not have the correct image, you can order a USB drive from Avid. If you have a USB drive, and require the updated image only, it can be downloaded from: \\nc2\MV_Support\Air Speed Multi-Stream (AMS)\_Drive Images
h) When the “Drive Image Completed Successfully” message appears, power off the AMS. i) Remove the USB drive, reinsert the four media drives and reboot the AMS.
Note: If the System Settings Change dialog box opens, it might be because of the USB device that was plugged in. Click No to close the dialog box.
j) Follow steps 2 – 12 of the installation process above. k) Connect to the AMS database.
- Click File>Open and navigate to your database. Example: E:\ams01db - Select the .pff file and select Open. - Right-click the database in the Network Tree and select “Set Default Database”.
Page 13 of 21
Brian Messier June 2011 - Rev 1.0.1
l) Use the AMS Settings Save and Restore Tool to restore your AMS settings. m) Rebuild the database. The process of upgrading AMS from v1.0 to 1.1 or later requires a rebuild of the database. Note: No other AMS upgrades require a database rebuild at this time.
- Launch the AirSpeed Multi Stream application. - Select File > Advanced > Rebuild Database - See page 306 of the 1.6 AMS Install and User Guide for information on the rebuild options.
n) Continue with step 14 of the installation process to complete / confirm the AMS configuration and final installation steps.
3) Download and Install Windows Updates Upgrade Windows Service Pak. AMS 1.5.0 added support for WinXP SP3. AMS v1.8.0 and higher requires Win XP SP3.
Install updated Windows Hotfixes. You can download this these from: ftp://csftp2:[email protected]/Vic/HotFix_Updater/ Contrary to the ISIS System Director which also runs Windows XP Embedded, the AMS supports windows hotfixes. These are the
same hotfixes as would apply with Windows XP Professional.
4) Upgrade Unity Software Note1: Do not install the ISIS 1.8 or lower client on the AMS as this can cause bluescreens. Install the 1.9 client. Note2: If you are installing ISIS 2.0 or 2.0.1, you must install the 2.0 client and then install a patch. This patch is located on the
ISIS DVD at: \AvidUnityISISClientMIPatch\Release\AvidUnityISISClientMiPatch.msi. This patch is no longer necessary as of ISIS 2.0.2. If you are running an ISIS 2.0.1 or 2.0.2 core, Avid suggests installing the ISIS 2.0.3 client.
Note3: Do not install the ISIS 2.2.2 client due to an AMS related bug in that version of the ISIS client software. a) (ISIS only) Ensure correct versions of Java and Flash are installed. b) (ISIS only) If you update Java, open the Java Control Panel and disable automatic updates. d) Uninstall the existing Unity client and reboot. e) Install the updated Unity MediaNet Ethernet Client or Unity ISIS Client on the AMS. f) Reboot the AMS once the installation is complete. g) Once back to the desktop, mount Unity volume(s) and adjust Connection Manager settings as appropriate. If this AMS will be
used for ingest, it is generally good practice to mount the workspace that will be used by AMS. Note: When mounting ISIS volumes on AMS, Avid prefers mount workspaces via UNC path rather than drive letter (although either should technically work).
h) If you are running AMS v1.7.x or higher and are using the “optimized MPEG2-HD send-to-playback” workflow available in editor versions 9.5/5.5 and later, you must set bandwidth values in the “Devices” section of the ISIS Administrator for each AMS. Set each AMS to a bandwidth value of 50. You must then unmount and remount ISIS workspaces on the AMS for these values to take effect. See page 10 of the AMS 1.8.0 ReadMe for additional information.
5) Upgrade AMS applications Note: If you need to back-rev the AMS, uninstall all from Add/Remove first and then install the version you want. Otherwise, follow
the instructions below.
a) Before beginning the upgrade process, stop all capture or playout operations of the AMS. Then close the Monitor application. When closing the Monitor application you will see a dialog box asking you to confirm that you want the AirSpeed Multi Stream application(s) closed. By selecting ‘Yes’, the AirSpeed Multi Stream application(s) will be closed and will not restart automatically until the system is rebooted.
b) Prior to AMS version 1.3, AMS’s had AFAP (“As Fast As Possible”) software installed. If you are upgrading to AMS 1.3 or higher, uninstall this software and reboot.
c) Navigate to your AMS installer and launch the Avid Framework Workstation installer. The updated installer will find and remove your existing software before installing the updated version. During the installation, enter the name of your Interplay Workgroup. Note: Only install the version of Framework that comes with the AMS. If an updated version of the Framework software is released with an updated version of Interplay, don’t install it here. Install the one that comes with AMS.
d) Install the updated AirSpeed Multi Stream software. Again, the installer will automatically remove the old version for you. After the uninstall, the system will reboot. The installation process will continue after the boot cycle. If you are prompted with a “New Hardware Found”, close out of it.
e) Reboot the AMS. f) After the reboot, the AMS may update various FPGA’s. This process may require multiple reboots to complete. It
may also shut down the AMS instead if performing a reboot. This is normal. Once all applications have been updated, the Monitor application will launch and you are able to continue with the installation.
Page 14 of 21
Brian Messier June 2011 - Rev 1.0.1
6) Upgrade AirSpeed Multi Stream Device Service (if applicable) If you are configuring an AMS for control via Command, Interplay Capture or Capture Manager, you need to upgrade this service.
a) On the Command, Interplay Capture or Capture Manager installer package, find the “device services” folder and copy this installer to the AMS.
b) On the AMS, launch “AvidAirSpeedMultiStreamDeviceService.exe”. b) Follow the onscreen instructions to install this software. This service will appear in the Interplay Framework under
the AMS device.
7) Install any Interplay software patches (if applicable) From time to time Avid releases patches for various Interplay components after the initial Interplay release. These must be installed separately. Consult the CET Bundle Matrix for patch information.
8) Upgrade IsoSync (if applicable) (To be added to future version)
9) Rebuild the AMS database (if necessary) An upgrade from AMS 1.0 to 1.1 or higher requires a rebuild of the AMS database post-upgrade. Note: No other AMS upgrades require a database rebuild at this time. a) Launch the AirSpeed Multi Stream application b) Select File > Advanced > Rebuild Database c) See page 306 of the 1.6 AMS Install and User Guide for information on the rebuild options.
10) Review AirSpeed settings in Service Config and update if necessary The AMS Integration Service has been updated a few times to include new features. Verify settings.
11) Miscellaneous Configuration a) Avid supports installing an antivirus application on the AirSpeed Multi Stream. However, Avid does not support
using this software while AMS is in operation. Completely disable antivirus while AMS is in operation. b) Add ISIS / AMS Startup script. If you have the AMS configured to auto-login, the ISIS Client icon may not appear
in the System Tray as expected. Delete the ISIS Client and the AMS Monitor from the All Users Startup Menu and add the ISIS-AMS startup script. This is available at:
ftp://avidcsdownload:[email protected]/.MISC_SW_NO_CUSTOMERS_AVID_ONLY/AMS_Tools/
12) Testing a) Can you access the Interplay Framework and (if applicable) the Command or Capture Framework? b) Is the Interplay Health Monitor Green? c) Use Avid System Diagnostics’ Collect Tool to obtain information on the completed server. d) Use the AMS Setting Save and Restore Tool (AMS 1.3 and higher) to create a backup copy of your configured AMS settings. In
the event that the AMS looses its settings or if there is a catastrophic failure, a backup copy of the settings will be useful. - Navigate to C:\Program Files\Avid\Avid Airspeed Multi Stream and launch: AsmsSettingsUtil.exe. - Click Save and Next. - Browse to a location where you would like to save the settings and click OK. - Confirm the selection and click OK to close the application. - Copy these settings to an external location for safety.
e) Can the AMS be controlled by Command for Playout? Note: The 1.6 AMS ReadMe says that after upgrading AMS software, playback transfers may not initially work. Avid suggests restarting the Transfer application on the AMS to clear this condition.
f) Can the AMS be controlled by Capture Manager / Interplay Capture for Ingest? g) Can the AMS be controlled via serial communication (if configured)? h) Ensure that Windows time / timezone is correct on all AirSpeed Multi’s. If LTC is connected, ensure that each AMS
has a good “green” LTC light on the front. Many CapMan / AMS issues can be traced back to sync.
Page 15 of 21
Brian Messier June 2011 - Rev 1.0.1
AAAAPPENDIX APPENDIX APPENDIX APPENDIX A
Troubleshooting and General Info
Microsoft Windows Commands and Troubleshooting 1) System Information Utility - select the Start Menu>Run and type “winmsd”. This will open the System Information Utility. 2) System Configuration Utility - select the Start Menu>Run and type “msconfig”. This utility allows you to view and change various
aspects of how your system starts. This command is only available in Windows XP. 3) Event Viewer – right-click on My Computer and Select Manage. Click the + next to Event viewer and click on one of the
categories (Application, Security, System). 4) Hold down the F5 key to get boot options (Safe Mode, VGA Mode, etc) 5) Manually remove programs from Add/Remove Programs Control Panel: http://support.microsoft.com/?kbid=247501
AMS Troubleshooting – Location of Logs and Tools Transfer Manager logs: C:\Documents and Settings\All Users\Application Data\Avid\Temp\tmserverlog Integration Service Logs: C:\Program Files\Avid\Avid AirSpeed Multi Stream\state\default\log
AMS Troubleshooting – Other 1) E-mail “MultiStreamSupport” for assistance if needed. 2) At FCS Avid suggested reboots of the AMS every two weeks. Future versions hoped to decrease this to every four weeks. 3) AMS comes with a diagnostic tool which can be found at: C:\Program Files\Avid\Avid AirSpeed Multi
Stream\Utilities\Diagnostics\AirspeedMultiStreamTest.exe. Once you run a test, a log file will be created in the Utilities folder called “AED_LOG_xxxxxx.txt”. See Appendix B of the 1.6 AMS Install Guide for more info.
4) You can view Transfer log information in the Framework Diagnostics Tool. 5) If you need to swap the boot drive of the AMS, Avid has written a document regarding this process. See the TechPubs site at:
http://confluence/display/publicdoc. This is a 1.0 AMS document. 6) I have lost one of the four drives in my RAID 0 (E: drive). Page 309 of the AMS 1.6 Install Guide instructs you how to identify a
failed media drive and how to replace it. 7) One of my VIO modules is missing. In April of 2009 Avid put a stop ship on the AMS because of an issue with a defective
crystal on the VIO module. The result was that the module would go missing between the 20th to 200th restart of the system. A full power down and reboot would clear this. All AirSpeed with this issue should have already been swapped by Avid, but if you are dealing with one of the first AirSpeed Multi’s ever shipped, it may be worth investigation.
8) My AMS keeps rebooting over and over. Did you mistakenly run EdPrep on the AMS to set the \3GB switch in the boot.ini file? The \3GB switch is not supported on AMS. Boot off of an external CD or USB device that allows you access to the file structure on the AMS internal drive and remove the \3GB switch. You could also move the internal HD to another CPU as a secondary drive and navigate to the boot.ini that way as well.
9) Health Monitor reports the AMS Integration Service as “inactive”. This was an issue with version 1.3.4 of the Framework Workstation. Version 1.4 corrected this issue. UDevC00133800 and UDevC00134713. This does not affect actual operation of the AMS.
10) Health Monitor is reporting that the AMS voltage is wrong. This has been in issue in multiple AMS / Framework releases. It was said to be fixed in 1.1 and then 1.2 then another instance was fixed in AMS 1.5. You may want to check the AMS ReadMe, but this is probably a non issue. Where you should be concerned is if you have only one of multiple AMS servers configured with the same software version reporting a voltage issue.
11) Health Monitor is reporting the Power Supply PDB Revision is wrong (v00.13). In mid-to-late 2010 a batch of incorrect revision supplies and PDBs were shipped from Avid. The only way to correct this issue is to swap the AMS.
12) Health Monitor is reporting that Processors 2 & 4 are missing. This is a known issue in older versions of the Health Monitor on AMS’s that have been upgraded to Windows XP SP3. This was fixed in AMS v1.8.0.
Error Messages: - “WARNING Named workspace does not have a directory path” This error is seen in the AMS Transfer Engine window. the AMS
may not be able to create the “Avid MediaFiles” or “MXF” folders. Use an editor to create this folder structure. - “Internal Error in the DLL that sends media to the playback device : Operation not allowed on Receiver” – Verify that the AMS’s
channels are correctly configured for the desired resolution. In the past a hard shutdown of the AMS has caused this setting to revert back to a default state.
- “ASMS::TransferWorkerg::run:unable to open file manager for file ://faahq-vme(virtual name)/P2(workspace)/Temp/nameofclip.mxf” This error occurred during a Send To Playback command to the AMS. Verify that the E: drive is shared on the AMS. Open a command prompt and type “net share” to show all shares on the AMS. The editor may be having trouble writing media to the E: drive or trouble updating the AMS database.
Page 16 of 21
Brian Messier June 2011 - Rev 1.0.1
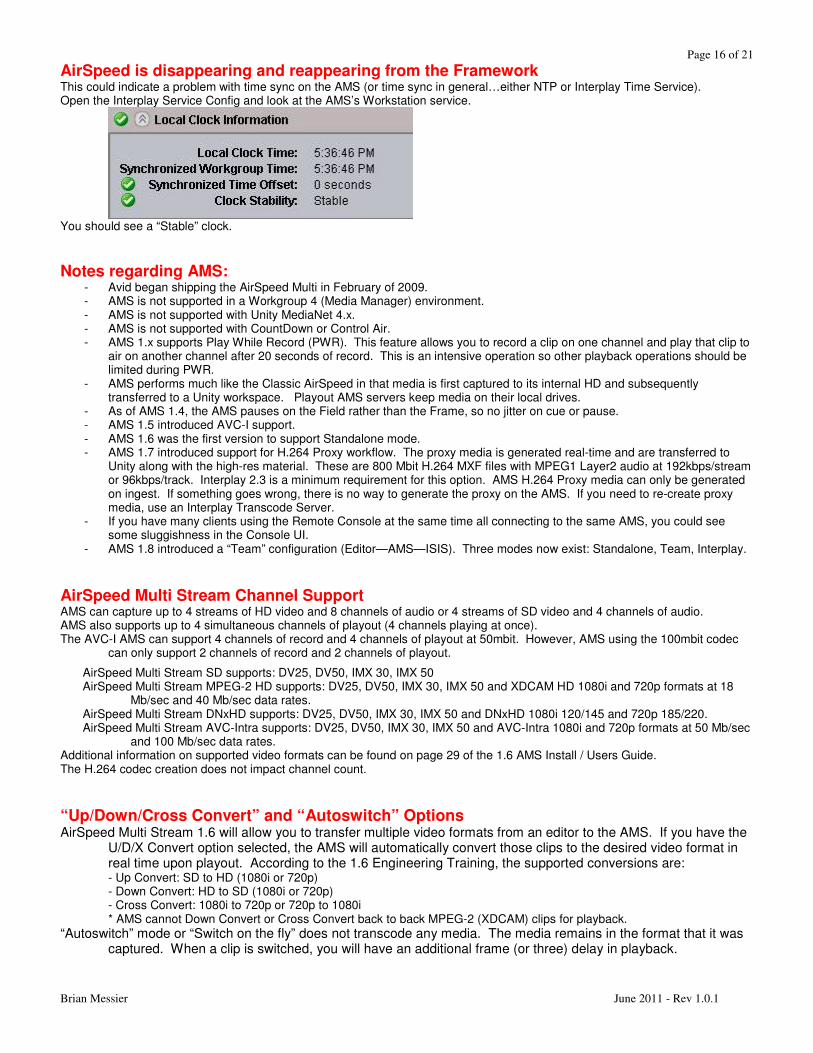
AirSpeed is disappearing and reappearing from the Framework This could indicate a problem with time sync on the AMS (or time sync in general…either NTP or Interplay Time Service). Open the Interplay Service Config and look at the AMS’s Workstation service.
You should see a “Stable” clock.
Notes regarding AMS: - Avid began shipping the AirSpeed Multi in February of 2009. - AMS is not supported in a Workgroup 4 (Media Manager) environment. - AMS is not supported with Unity MediaNet 4.x. - AMS is not supported with CountDown or Control Air. - AMS 1.x supports Play While Record (PWR). This feature allows you to record a clip on one channel and play that clip to
air on another channel after 20 seconds of record. This is an intensive operation so other playback operations should be limited during PWR.
- AMS performs much like the Classic AirSpeed in that media is first captured to its internal HD and subsequently transferred to a Unity workspace. Playout AMS servers keep media on their local drives.
- As of AMS 1.4, the AMS pauses on the Field rather than the Frame, so no jitter on cue or pause. - AMS 1.5 introduced AVC-I support. - AMS 1.6 was the first version to support Standalone mode. - AMS 1.7 introduced support for H.264 Proxy workflow. The proxy media is generated real-time and are transferred to
Unity along with the high-res material. These are 800 Mbit H.264 MXF files with MPEG1 Layer2 audio at 192kbps/stream or 96kbps/track. Interplay 2.3 is a minimum requirement for this option. AMS H.264 Proxy media can only be generated on ingest. If something goes wrong, there is no way to generate the proxy on the AMS. If you need to re-create proxy media, use an Interplay Transcode Server.
- If you have many clients using the Remote Console at the same time all connecting to the same AMS, you could see some sluggishness in the Console UI.
- AMS 1.8 introduced a “Team” configuration (Editor—AMS—ISIS). Three modes now exist: Standalone, Team, Interplay.
AirSpeed Multi Stream Channel Support AMS can capture up to 4 streams of HD video and 8 channels of audio or 4 streams of SD video and 4 channels of audio. AMS also supports up to 4 simultaneous channels of playout (4 channels playing at once). The AVC-I AMS can support 4 channels of record and 4 channels of playout at 50mbit. However, AMS using the 100mbit codec
can only support 2 channels of record and 2 channels of playout.
AirSpeed Multi Stream SD supports: DV25, DV50, IMX 30, IMX 50 AirSpeed Multi Stream MPEG-2 HD supports: DV25, DV50, IMX 30, IMX 50 and XDCAM HD 1080i and 720p formats at 18
Mb/sec and 40 Mb/sec data rates. AirSpeed Multi Stream DNxHD supports: DV25, DV50, IMX 30, IMX 50 and DNxHD 1080i 120/145 and 720p 185/220. AirSpeed Multi Stream AVC-Intra supports: DV25, DV50, IMX 30, IMX 50 and AVC-Intra 1080i and 720p formats at 50 Mb/sec
and 100 Mb/sec data rates. Additional information on supported video formats can be found on page 29 of the 1.6 AMS Install / Users Guide. The H.264 codec creation does not impact channel count.
“Up/Down/Cross Convert” and “Autoswitch” Options AirSpeed Multi Stream 1.6 will allow you to transfer multiple video formats from an editor to the AMS. If you have the
U/D/X Convert option selected, the AMS will automatically convert those clips to the desired video format in real time upon playout. According to the 1.6 Engineering Training, the supported conversions are:
- Up Convert: SD to HD (1080i or 720p) - Down Convert: HD to SD (1080i or 720p) - Cross Convert: 1080i to 720p or 720p to 1080i * AMS cannot Down Convert or Cross Convert back to back MPEG-2 (XDCAM) clips for playback.
“Autoswitch” mode or “Switch on the fly” does not transcode any media. The media remains in the format that it was captured. When a clip is switched, you will have an additional frame (or three) delay in playback.
Page 17 of 21
Brian Messier June 2011 - Rev 1.0.1
Upgrading the AMS Hardware You can upgrade an existing AMS with a new codec board in the field. Avid provides documentation on this process:
AMS_ DNxHD_Upgrade_Guide.pdf AMS_ MPEG2_HD_Upgrade_Guide.pdf AMS_ AVC_Intra_Upgrade_Guide.pdf AirSpeed_MS_H.264_Upgrade_Guide-NewModels.pdf AirSpeed_MS_H.264_Upgrade_Guide-OldModels.pdf
The actual process of installing the new board sets will not be covered here. Once installed, use the Hardware Diagnostics application at: “C:\Program Files\Avid\Avid AirSpeed Multi
Stream\Utilities\Diagnostics” to confirm the hardware was installed correctly. Avid does not support the end user completing the field upgrade of an AMS. Avid Field personnel are required onsite.
Capture Manager Notes - Although AMS doesn’t use it, the Capture Manager still requires the Interplay Adapter for proper operation. - CapMan does not require the “AirSpeed Video Service” or “Unity Video Service” for AMS operation. AMS
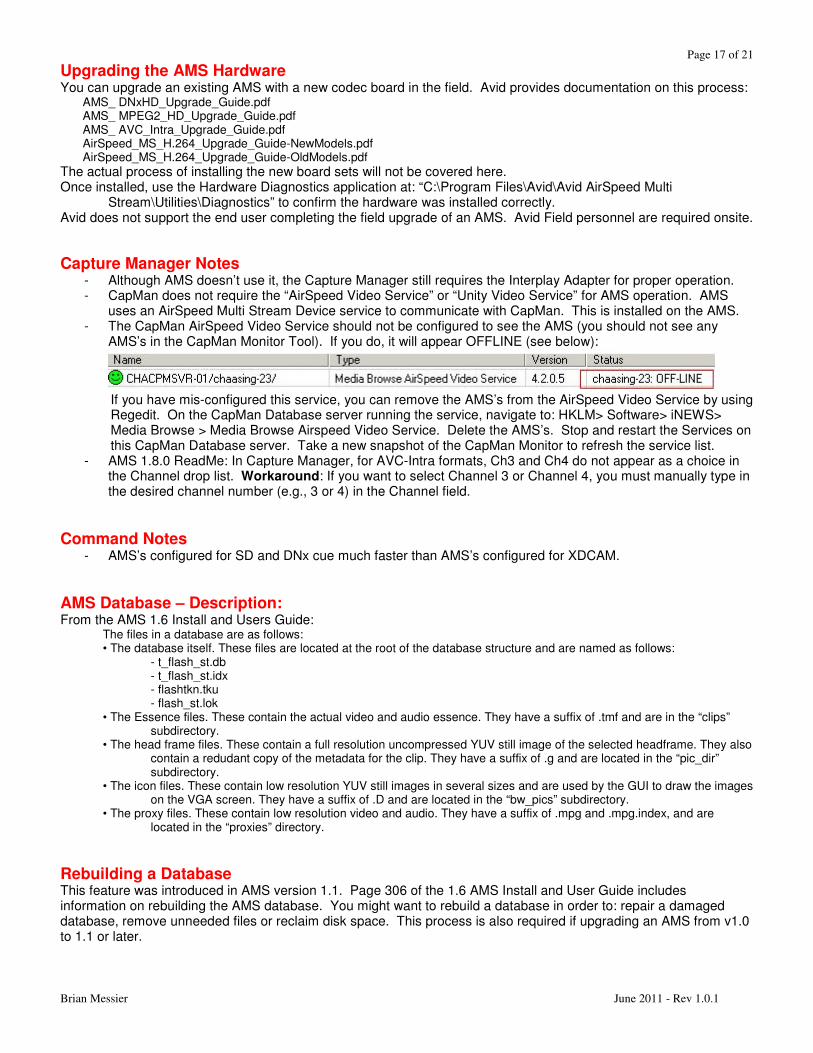
uses an AirSpeed Multi Stream Device service to communicate with CapMan. This is installed on the AMS. - The CapMan AirSpeed Video Service should not be configured to see the AMS (you should not see any
AMS’s in the CapMan Monitor Tool). If you do, it will appear OFFLINE (see below):
If you have mis-configured this service, you can remove the AMS’s from the AirSpeed Video Service by using Regedit. On the CapMan Database server running the service, navigate to: HKLM> Software> iNEWS> Media Browse > Media Browse Airspeed Video Service. Delete the AMS’s. Stop and restart the Services on this CapMan Database server. Take a new snapshot of the CapMan Monitor to refresh the service list.
- AMS 1.8.0 ReadMe: In Capture Manager, for AVC-Intra formats, Ch3 and Ch4 do not appear as a choice in the Channel drop list. Workaround: If you want to select Channel 3 or Channel 4, you must manually type in the desired channel number (e.g., 3 or 4) in the Channel field.
Command Notes - AMS’s configured for SD and DNx cue much faster than AMS’s configured for XDCAM.
AMS Database – Description: From the AMS 1.6 Install and Users Guide:
The files in a database are as follows: • The database itself. These files are located at the root of the database structure and are named as follows:
- t_flash_st.db - t_flash_st.idx - flashtkn.tku - flash_st.lok
• The Essence files. These contain the actual video and audio essence. They have a suffix of .tmf and are in the “clips” subdirectory.
• The head frame files. These contain a full resolution uncompressed YUV still image of the selected headframe. They also contain a redudant copy of the metadata for the clip. They have a suffix of .g and are located in the “pic_dir” subdirectory.
• The icon files. These contain low resolution YUV still images in several sizes and are used by the GUI to draw the images on the VGA screen. They have a suffix of .D and are located in the “bw_pics” subdirectory.
• The proxy files. These contain low resolution video and audio. They have a suffix of .mpg and .mpg.index, and are located in the “proxies” directory.
Rebuilding a Database This feature was introduced in AMS version 1.1. Page 306 of the 1.6 AMS Install and User Guide includes information on rebuilding the AMS database. You might want to rebuild a database in order to: repair a damaged database, remove unneeded files or reclaim disk space. This process is also required if upgrading an AMS from v1.0 to 1.1 or later.
Page 18 of 21
Brian Messier June 2011 - Rev 1.0.1
Backing up and restoring the AMS Database This is process is as simple as copying the contents of the E: drive to an external location. When you want to restore the
database, copy it back to the E: drive and import the .pff database into the AMS application. Prior to backing up the database, the following is recommended:
1) Stop the AMS application so new items are not being added to the database. 2) If you have enough space on the E: drive, it may be wise to use an application like 7-Zip to archive your database to a
single file. If storing the backup database on ISIS, this step becomes important so that you are not filling the ISIS system with many new files.
What are “.tmf” files? From an e-mail from Chris Quinones (Sr. Product Designer – Video Servers) on 5/19/09: “AirSpeed Multi Stream internally uses a proprietary file format (tmf) for storing media files. The essence in the file is identical to
what is stored in the mxf files in the Avid workflow – the structure of how the essence is stored in the file is different. tmf is the only file format we currently support on AirSpeed Multi Stream. We may support other formats in the future. There are no specific plans or timelines at this time.”
How many transfers are supported by the AMS Transfer Engine at one time? An e-mail from Wayne Cochrane on 9/10/09 indicated the following: “Four, although there are cases where there could be as many as 8 at a time due to PWT prioritization.” The 1.5 AMS NPI Training indicated: “Up to 4 real-time transfers per system depending on configuration.”
Studio Rules for AirSpeed Multi Stream AMS 1.6 Install Guide: “Up to eight devices (a combination of original AirSpeeds and AirSpeed Multi Stream systems) together can be grouped to form a Studio. A maximum of four AirSpeed Multi Stream systems can be part of a Studio totaling up to eight systems.” Version 1.0 supported the AMS in a studio configuration for SD only. AMS version 1.2 supported an AMS configured for HD to also be included in a studio configuration.
Remote Console Notes: - Remote Console requires Framework to be installed. Framework is used to communicate with the AMS. - If you launch the Remote Console and see an option for "Configure Transfer Engine" and not "Connect to Remote Server",
ensure that you have users created in the AMS Integration Service. Login to the console as one of these users. - Once a user has access to an AirSpeed, that user will see all channels available. However, they will only be able to interact with
the channels you have granted access to in the Integration Service. This is normal.
- AMS 1.7.1 and higher supports a maximum of ten simultaneous Remote Console connections.
Can I transfer media between Classic AirSpeed and AMS? There is no way to transfer media between a Classic and AMS. You cannot drag and drop from Classic I/O Tools to the Multistream Remote Console. The only way to transfer media is to drag media via FlightPlan from the Classic AirSpeed to an editor and retransfer back to the AMS.
Page 19 of 21
Brian Messier June 2011 - Rev 1.0.1
Configuring AMS in Standalone or Team Mode These configurations assume there is no Interplay Engine in the environment. Prior to AMS 1.8.0, a “standalone” config could mean either that only local storage was available on the editor or it could mean that a shared storage solution was available. As of AMS 1.8.0, Standalone mode referred strictly to an environment with AMS and editors only. A new config called a “Team” refers to an environment with AMS, Editors and Shared Storage…more on that below. In a Standalone configuration, the editor has both Transfer Client and Transfer Server software installed. The local Transfer Engine software on the AMS is disabled. An Ingest AMS captures media to its local drives and the editor initiates a manual transfer to the desired storage location via the Remote Console Tool. Send to Playback AMS works the same with the exception that AMS Studio is not available. MPEG-2/XDCAM is only supported using shared storage. In a Team configuration, the editor only has Transfer Client installed. The AMS Transfer Server software is enabled and it handles the actual transfers between AMS and the shared storage. Team configurations support Send To Playback to a Studio config. Unity MediaNetwork and Macintosh clients are not supported in a Team Configuration. Standalone Notes: 1) In a standalone configuration, you must create matching user accounts in two or three places: Windows level on the editor,
Windows level on the AirSpeed Multistream and within the MediaNet or ISIS Administrator (if applicable). 2) Also ensure that the E: drive is shared on a windows level with full access to Everyone. 3) On the AMS, open workgroup Properties. - Login Tab: Disable the checkbox for “Automatically join the preferred workgroup” - Lookup Tab: Under the “Local Machine” Workgroup, enter “localhost” as the Lookup Server. Select the Expected
checkbox.
Basic steps to configuring the Transfer Engine software on the client: See page 31 of the AMS 1.7.5 ReadMe for additional details.
1) Make sure you have installed the Transfer Engine software on the client with the FTP option enabled. You do not need to configure the FTP Parameters, but it does need to be installed.
2) Launch the Transfer Engine software on the client and configure the following: 3) “Standalone Settings” – Configure all settings in this box. Set the radio button to AAF mode. 4) Configure the Storage Type menu. 5) Set the Integration Service on the AMS to “Stand-alone Mode”. 6) Open the Remote Console and add AMS servers. This will add information to the Transfer Engine Config window. If you
enter an AMS configured for XDCAM, the Remote Console will configure the FTP Parameters for you.
See page 29 of the AMS 1.7.5 ReadMe for additional details on Standalone configurations.
Spare / Replacement Parts List: 7020-20278-01 - AirSpeed Multi Stream Spare 500GB Drive in Carrier 7840-20024-01 - AirSpeed Multi Stream Spare Power Supply 7010-30112-01 - KIT, AMS RECOVERY MODULE V21. This is the v21 image on a USB Flash drive. 7010-30170-01 - KIT, AMS RECOVERY MODULE V23. This is the v23 image on a USB Flash drive.
Documents reviewed: 1.0.0_AS-MS_Training PowerPoint 1.0.0_AS-MS_Setup&Configuration Video 1.3.0_AS-MS_NPI_Training_Video 1.4.0_AS-MS_NPI_Training_Video 1.5.0_AS-MS_NPI_Training_Video 1.0.0_AS-MS_Boot_Drive_Swap.pdf 1.6.0_AS-MS_Install_Users_Guide.pdf 1.6.0_AS-MS_RN.pdf 1.6.0_AS-MS_Pricebook_August-2010.xls 1.6.0_AS-MS_NPI_Training_Video 1.7.0_AS-MS_NPI_Training_Video 1.7.5_AS-MS_RN.pdf 1.8.0_AS-MS_NPI_Training_Video 1.8.0_AS-MS_RN.pdf 1.8.0_AS-MS_Install_Users_Guide.pdf - not reviewed in this doc revision. Interplay_2.3.0_ReadMe_Rev-C.pdf
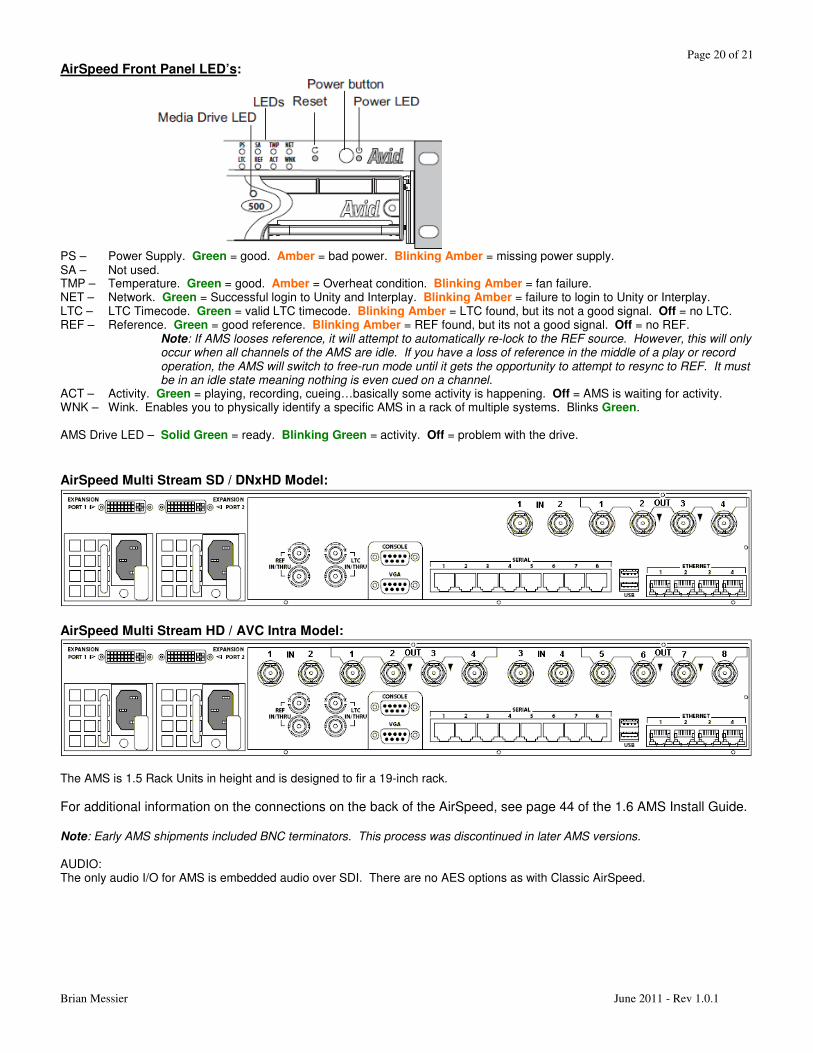
Page 20 of 21
Brian Messier June 2011 - Rev 1.0.1
AirSpeed Front Panel LED’s:
PS – Power Supply. Green = good. Amber = bad power. Blinking Amber = missing power supply. SA – Not used. TMP – Temperature. Green = good. Amber = Overheat condition. Blinking Amber = fan failure. NET – Network. Green = Successful login to Unity and Interplay. Blinking Amber = failure to login to Unity or Interplay. LTC – LTC Timecode. Green = valid LTC timecode. Blinking Amber = LTC found, but its not a good signal. Off = no LTC. REF – Reference. Green = good reference. Blinking Amber = REF found, but its not a good signal. Off = no REF.
Note: If AMS looses reference, it will attempt to automatically re-lock to the REF source. However, this will only occur when all channels of the AMS are idle. If you have a loss of reference in the middle of a play or record operation, the AMS will switch to free-run mode until it gets the opportunity to attempt to resync to REF. It must be in an idle state meaning nothing is even cued on a channel.
ACT – Activity. Green = playing, recording, cueing…basically some activity is happening. Off = AMS is waiting for activity. WNK – Wink. Enables you to physically identify a specific AMS in a rack of multiple systems. Blinks Green. AMS Drive LED – Solid Green = ready. Blinking Green = activity. Off = problem with the drive.
AirSpeed Multi Stream SD / DNxHD Model:
AirSpeed Multi Stream HD / AVC Intra Model:
The AMS is 1.5 Rack Units in height and is designed to fir a 19-inch rack.
For additional information on the connections on the back of the AirSpeed, see page 44 of the 1.6 AMS Install Guide. Note: Early AMS shipments included BNC terminators. This process was discontinued in later AMS versions. AUDIO: The only audio I/O for AMS is embedded audio over SDI. There are no AES options as with Classic AirSpeed.
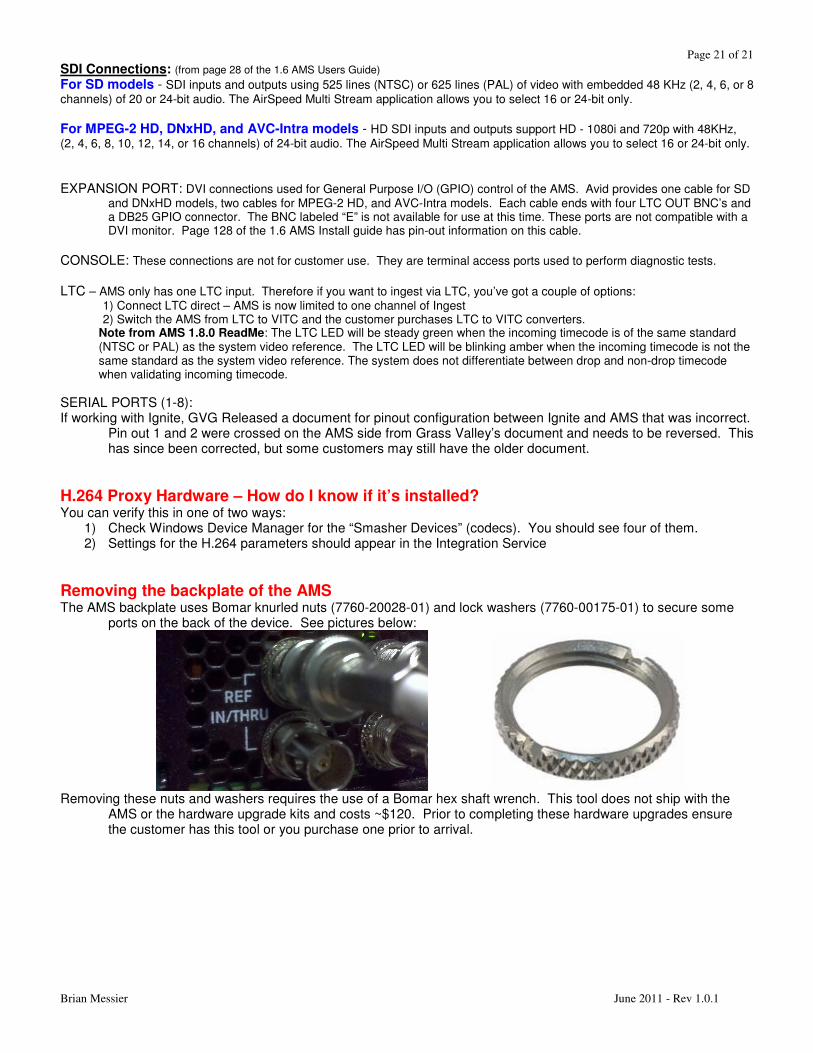
Page 21 of 21
Brian Messier June 2011 - Rev 1.0.1
SDI Connections: (from page 28 of the 1.6 AMS Users Guide) For SD models - SDI inputs and outputs using 525 lines (NTSC) or 625 lines (PAL) of video with embedded 48 KHz (2, 4, 6, or 8 channels) of 20 or 24-bit audio. The AirSpeed Multi Stream application allows you to select 16 or 24-bit only. For MPEG-2 HD, DNxHD, and AVC-Intra models - HD SDI inputs and outputs support HD - 1080i and 720p with 48KHz, (2, 4, 6, 8, 10, 12, 14, or 16 channels) of 24-bit audio. The AirSpeed Multi Stream application allows you to select 16 or 24-bit only. EXPANSION PORT: DVI connections used for General Purpose I/O (GPIO) control of the AMS. Avid provides one cable for SD
and DNxHD models, two cables for MPEG-2 HD, and AVC-Intra models. Each cable ends with four LTC OUT BNC’s and a DB25 GPIO connector. The BNC labeled “E” is not available for use at this time. These ports are not compatible with a DVI monitor. Page 128 of the 1.6 AMS Install guide has pin-out information on this cable.
CONSOLE: These connections are not for customer use. They are terminal access ports used to perform diagnostic tests. LTC – AMS only has one LTC input. Therefore if you want to ingest via LTC, you’ve got a couple of options:
1) Connect LTC direct – AMS is now limited to one channel of Ingest 2) Switch the AMS from LTC to VITC and the customer purchases LTC to VITC converters.
Note from AMS 1.8.0 ReadMe: The LTC LED will be steady green when the incoming timecode is of the same standard (NTSC or PAL) as the system video reference. The LTC LED will be blinking amber when the incoming timecode is not the same standard as the system video reference. The system does not differentiate between drop and non-drop timecode when validating incoming timecode.
SERIAL PORTS (1-8): If working with Ignite, GVG Released a document for pinout configuration between Ignite and AMS that was incorrect.
Pin out 1 and 2 were crossed on the AMS side from Grass Valley’s document and needs to be reversed. This has since been corrected, but some customers may still have the older document.
H.264 Proxy Hardware – How do I know if it’s installed? You can verify this in one of two ways:
1) Check Windows Device Manager for the “Smasher Devices” (codecs). You should see four of them. 2) Settings for the H.264 parameters should appear in the Integration Service
Removing the backplate of the AMS The AMS backplate uses Bomar knurled nuts (7760-20028-01) and lock washers (7760-00175-01) to secure some
ports on the back of the device. See pictures below:
Removing these nuts and washers requires the use of a Bomar hex shaft wrench. This tool does not ship with the
AMS or the hardware upgrade kits and costs ~$120. Prior to completing these hardware upgrades ensure the customer has this tool or you purchase one prior to arrival.