Embed Size (px)
Citation preview

AirOS Quick Setup Guide
Quick Setup Guide describes the configuration steps for the AirOS powered subscriber station
(wireless client - bridge) use case.
NanoStation2, LiteStation2 and PowerStation2 operate in IEEE 802.11b/g modes, while
NanoStation5, LiteStation5 and PowerStation5 operate in IEEE 802.11a mode. All the devices can
operate in Client (Station), Access Point/Repeater and WDS modes.
Note: the screenshots in this document represent PowerStation2 graphical user interface but they
are also fully applicable for NanoStation2 and LiteStation2 series devices. The graphical user
interface elements which are specific for the NanoStation5, LiteStation5 and PowerStation5 are
described individually in the AirOS User's Guide.
This document will guide you through quick and easy configuration of the subscriber station (client
bridge) including:
Changing of the IP settings (static or dynamic),
Defining the ESSID to which the subscriber station will be associated,
Defining the basic wireless settings, IEEE 802.11 mode,
Defining the wireless security mode (None, WEP, WPA™ or WPA2™),
Changing the administrator’s password.
For detailed setup and configuration instructions, please refer to the AirOS User's Guide. For
subscriber station quick setup via web-browser interface, follow these steps.
Step 1 - Login to the web management
Open the web browser and type the default IP address of the AirOS powered
device http://192.168.1.20 into the browser address field. You will be prompted to enter the
default administrator login credentials:
User Name: ubnt
Password: ubnt
After successful administrator log on you will see the Main page of the web
management interface.
Note: your PC should have the pre-configured static IP address from the 192.168.1.0
subnet (with netmask 255.255.255.0) in order to establish the connection with the
subscriber station on the same physical network segment.
4Gon www.4Gon.co.uk [email protected] Tel: +44 (0)1245 808295 Fax: +44 (0)1245 808299

Step 2 - Configure the network settings
The IP configuration is required for device management purposes.
IP addresses can either be retrieved from a DHCP server or configured manually. Use
the Network page for the IP settings configuration:
Network Mode: specify the Bridge operating mode (selected by default). Router operating mode
configuration is described in the AirOS User's Guide.
Bridge IP Address: specify the IP mode:
DHCP – choose this option to assign the dynamic IP address, Gateway and DNS address by
the local DHCP server.
Static – choose this option to assign the static IP address for the device management.
IP Address: enter IP address of the device.
Netmask: enter a subnet mask of the device.
Gateway IP: enter a Gateway IP address.
Primary DNS IP: enter a DNS IP address.
Click the Change button to save the changes.
Step 3 - Configure the basic wireless settings
4Gon www.4Gon.co.uk [email protected] Tel: +44 (0)1245 808295 Fax: +44 (0)1245 808299

Use Link Setup page to specify the ESSID of the Access Point to which the subscriber station will
be associated:
Wireless Mode: specify the Station wireless mode (selected by default) for the subscriber station
functionality.
ESSID: specify the ESSID of the Access Point which the subscriber station should associate to.
There can be several Access Points with the same ESSID. The list of the available Access Points
can be retrieved using the Select button, which activates Site Survey tool.
MAC Clone: this option makes the subscriber station transparent while acting as the PC which is
connected to the LAN port (Ethernet interface). MAC Cloning option is effective for one and the
only PC connected to the subscriber station’s LAN port. Subscriber station will authenticate and
associate to the chosen Access Point using the MAC address of the PC.
Lock to AP MAC: specify the MAC address of the one and the only wireless network device which
the subscriber station will associate to (optional). Locking to one particular AP MAC will disable
roaming between several Access Points with the same ESSID. Refer to the section Basic Wireless
Settings in the AirOS User's Guide for more detailed configuration information.
Step 4 - Specify the IEEE 802.11 settings
Select the subscriber station wireless network mode which defines the standard used for the
communication with the Access Point. B/G mixed mode (compatible with both 802.11b and
802.11g) is selected by default:
Country Code: specify the country in which the subscriber station will be used. The channel list,
output power limits, IEEE 802.11 and Channel Spectrum Width modes will be tuned according to
the regulations of the selected country.
IEEE 802.11 Mode: select the IEEE 802.11 mode of your wireless network.
PowerStation2/LiteStation2/Nano Station2 supported IEEE 802.11 modes:
4Gon www.4Gon.co.uk [email protected] Tel: +44 (0)1245 808295 Fax: +44 (0)1245 808299

B only – connect to a 802.11b only network.
B/G Mixed – connect to a 802.11b/g network (selected by default).
G only – connect to a 802.11g only network.
PowerStation5/LiteStation5/Nano Station5 supported IEEE 802.11 modes:
A – connect to a 802.11a network (selected by default).
Channel Spectrum Width: select the wireless channel spectrum width of your wireless network:
5MHz – is the channel spectrum with the width of 5 MHz (also known as Quarter-Rate
mode).
10MHz – is the channel spectrum with the width of 10 MHz (also known as Half-Rate
mode).
20MHz – is the standard channel spectrum width (selected by default).
PowerStation5/LiteStation5/Nano Station5 additionally supports 40MHz – the widest channel
spectrum width required to connect to a 802.11a network which supports Static Turbo feature.
Step 5 - Specify the wireless security mode
Choose the security method according to the Access Point security policy. Subscriber station
should be authorized by Access Point in order to get access to the network and all the user data
transferred between subscriber station and Access Point will be encrypted if the wireless security
methods are used:
Security: select the security mode of your wireless network:
WEP – enable WEP encryption.
WPA – enable WPA™ security mode.
WPA-TKIP – enable WPA™ security mode with TKIP support only.
WPA-AES – enable WPA™ security mode with AES support only.
WPA2 – enable WPA2™ security mode.
WPA2-TKIP – enable WPA2™ security mode with TKIP support only.
WPA2-AES – enable WPA2™ security mode with AES support only.
4Gon www.4Gon.co.uk [email protected] Tel: +44 (0)1245 808295 Fax: +44 (0)1245 808299
Authentication Type: one of the following authentication modes should be selected if WEP
security method is used:
Open Authentication – station is authenticated automatically by AP (selected by default).
Shared Authentication – station is authenticated after the challenge, generated by AP.
WEP Key Length: 64-bit (selected by default) or 128-bit WEP Key length should be selected if
WEP security method is used.
Key Type: HEX (selected by default) or ASCII option specifies the character format for the WEP
key if WEP security method is used.
WEP Key: WEP encryption key for the wireless traffic encryption and decryption should be
specified if WEP security method is used:
For 64-bit – specify WEP key as 5 HEX (0-9, A-F or a-f) pairs (e.g. 00112233AA) or 5
ASCII characters.
For 128-bit – specify WEP key as 13 HEX (0-9, A-F or a-f) pairs (e.g.
00112233445566778899AABBCC) or 13 ASCII characters.
Key Index: specify the Index of the WEP Key used.
WPA Authentication: one of the following WPA™ key selection methods should be specified if
WPA™ or WPA2™ security method is used:
PSK – WPA™ or WPA2™ with Pre-shared Key method (selected by default).
EAP – WPA™ or WPA2™ with EAP (Extensible Authentication Protocol) IEEE 802.1x
authentication method. This option is used in Enterprise networks.
WPA Pre-shared Key: the pass phrase for WPA™ or WPA2™ security method should be specified
if the Pre-shared Key method is selected. The pre-shared key is an alpha-numeric password
between 8 and 63 characters long.
Refer to the section Basic Wireless Settings in the AirOS User's Guide for more detailed
configuration information.
Click the Change button to save the changes.
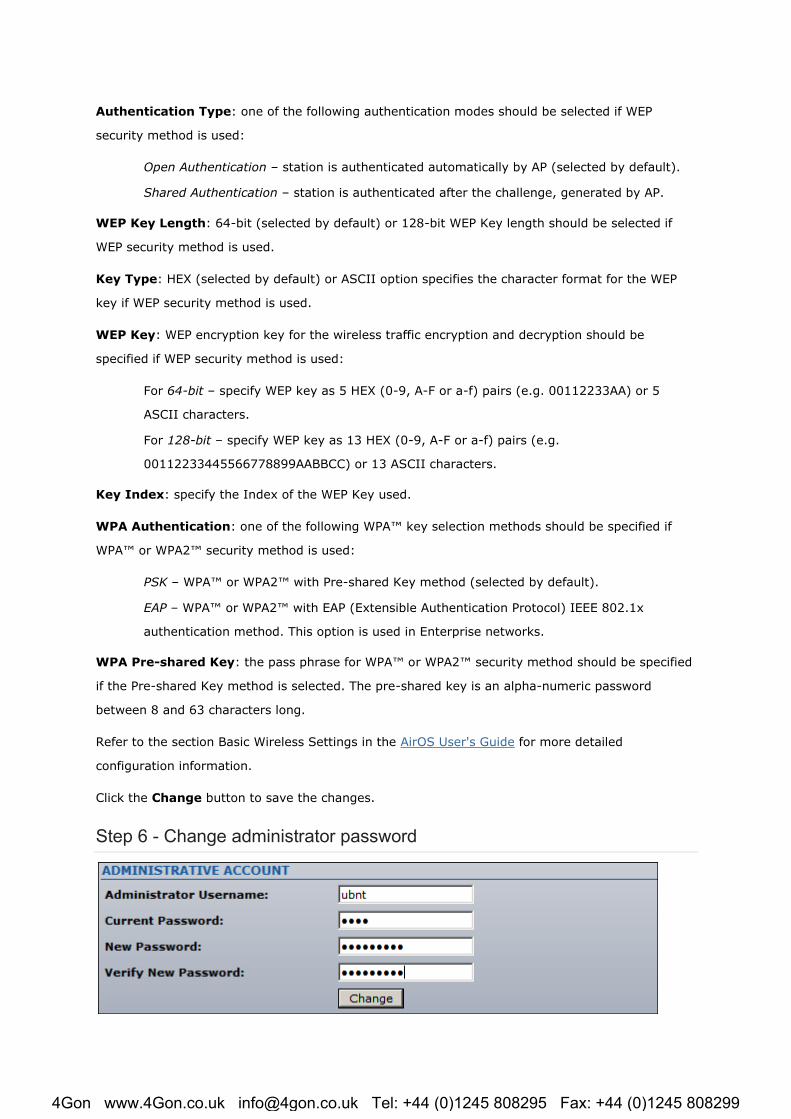
Step 6 - Change administrator password
4Gon www.4Gon.co.uk [email protected] Tel: +44 (0)1245 808295 Fax: +44 (0)1245 808299

For the security reasons the default administrator’s password should be changed immediately.
Use the System menu and specify the parameters:
Current Password: enter a current administrator password (“ubnt” by default). Default
administrator username is also “ubnt”.
New Password: enter a new password used for administrator authentication.
Verify Password: re-enter the new password to verify its accuracy.
Click the Change button to save the changes.
Step7 - Apply the changes
After each configuration change the informational message suggesting you to apply changes and
reboot the device will appear:
Click the Apply button to apply the changes and reboot the device.
Click the Discard button to discard the changes and start the configuration over again.
A pop-up progress window will appear during the Apply operation:
After the configuration of the general settings, the device is ready for basic operation. Web
interface can be used for further device configuration. Please refer to the AirOS User's Guide for
detailed configuration instructions.
4Gon www.4Gon.co.uk [email protected] Tel: +44 (0)1245 808295 Fax: +44 (0)1245 808299