Embed Size (px)
Citation preview

DEPARTMENT OF THE AIR FORCE Headquarters US Air Force
AFQTP 4B051-7 20 March 2015
Washington, DC 20330-1030
AIR FORCE SPECIALTY CODE 4B051 BIOENVIRONMENTAL ENGINEERING
Occupational and Environmental Air/Gas Sampling
QUALIFICATION TRAINING PACKAGE
Accessibility: Publications and forms are available on the e-publishing website at http://www.e-publishing.af.mil for downloading or ordering.
Realeasability: There are no releasability restrictions on this publication.
AFQTP 4B051-7 Journeyman Training Guide: Occupational & Environmental Air/Gas Sampling
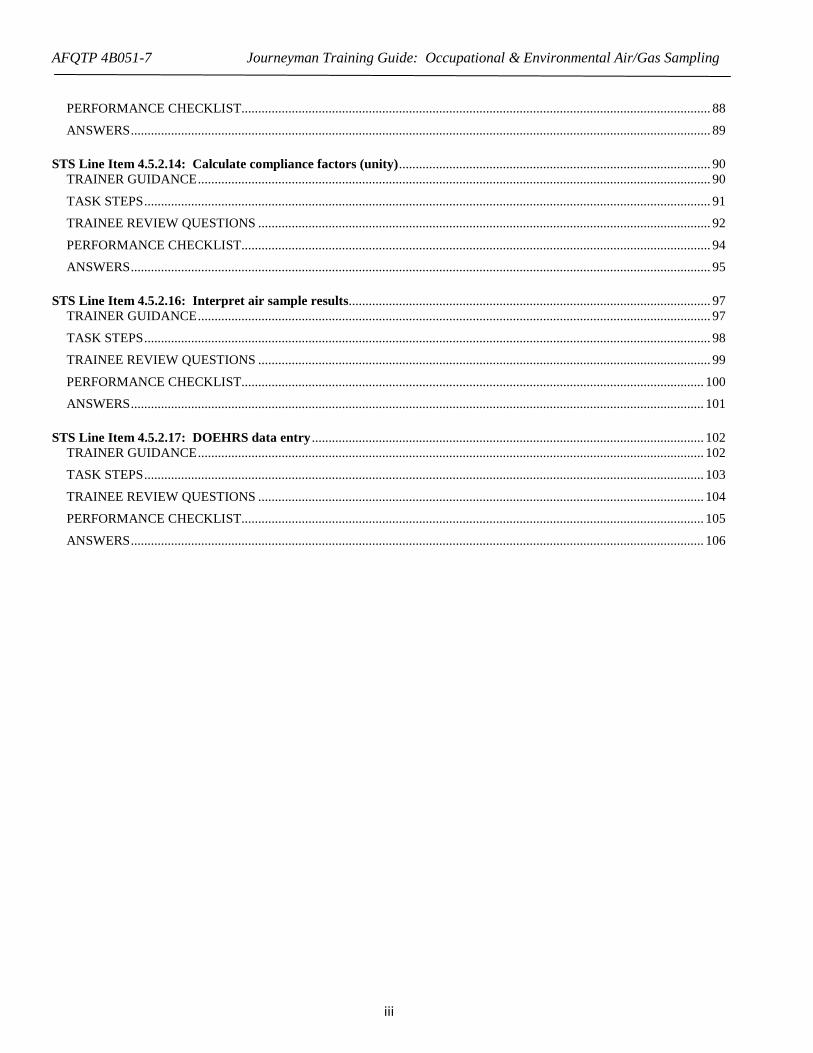
Table of Contents
STS Line Item 4.5.2.4: Determine or establish air sampling strategies ................................................................................ 1 TRAINER GUIDANCE ........................................................................................................................................................... 1
TASK STEPS ........................................................................................................................................................................... 2
TRAINEE REVIEW QUESTIONS ......................................................................................................................................... 3
PERFORMANCE CHECKLIST.............................................................................................................................................. 4
ANSWERS ............................................................................................................................................................................... 5
STS Line Item 4.5.2.5: Calculate sampling rates and volumes .............................................................................................. 6 TRAINER GUIDANCE ........................................................................................................................................................... 6
TASK STEPS ........................................................................................................................................................................... 7
TRAINEE REVIEW QUESTIONS ......................................................................................................................................... 8
PERFORMANCE CHECKLIST............................................................................................................................................ 10
ANSWERS ............................................................................................................................................................................. 11
STS Line Item 4.5.2.6.1: Detector Tubes or Chips (Draeger Civil Defense Simultest Kit) ................................................ 12 TRAINER GUIDANCE ......................................................................................................................................................... 12
TASK STEPS ......................................................................................................................................................................... 13
TRAINEE REVIEW QUESTIONS ....................................................................................................................................... 15
PERFORMANCE CHECKLIST............................................................................................................................................ 16
ANSWERS ............................................................................................................................................................................. 18
STS Line Item 4.5.2.6.2: PID/FID .......................................................................................................................................... 19 TRAINER GUIDANCE ......................................................................................................................................................... 19
TASK STEPS ......................................................................................................................................................................... 20
TRAINEE REVIEW QUESTIONS ....................................................................................................................................... 23
PERFORMANCE CHECKLIST............................................................................................................................................ 24
ANSWERS ............................................................................................................................................................................. 26
STS Line Item 4.5.2.6.3: Portable GC/MS (HAPSITE®) ...................................................................................................... 27 TRAINER GUIDANCE ......................................................................................................................................................... 27
TASK STEPS ......................................................................................................................................................................... 28
PERFORMANCE CHECKLIST............................................................................................................................................ 33
STS Line Item 4.5.2.6.4: Combustible Gas Meters: MSA Passport® Personal Alarm ...................................................... 37 TRAINER GUIDANCE ......................................................................................................................................................... 37
TASK STEPS ......................................................................................................................................................................... 38
PERFORMANCE CHECKLIST............................................................................................................................................ 39
STS Line Item 4.5.2.6.4: Combustible Gas Meters: MSA Sirius® Multigas Detector ........................................................ 40 TRAINER GUIDANCE ......................................................................................................................................................... 40
TASK STEPS ......................................................................................................................................................................... 41
PERFORMANCE CHECKLIST............................................................................................................................................ 47
i
AFQTP 4B051-7 Journeyman Training Guide: Occupational & Environmental Air/Gas Sampling STS Line Item 4.5.2.7: Calibrate / Operate air sampling pumps (Low/High flow pump) ................................................. 50
TRAINER GUIDANCE ......................................................................................................................................................... 50
TASK STEPS ......................................................................................................................................................................... 51
TRAINEE REVIEW QUESTIONS ....................................................................................................................................... 52
PERFORMANCE CHECKLIST............................................................................................................................................ 53
ANSWERS ............................................................................................................................................................................. 54
STS Line Item 4.5.2.8: Collect area air samples ................................................................................................................... 55 TRAINER GUIDANCE ......................................................................................................................................................... 55
TASK STEPS ......................................................................................................................................................................... 56
TRAINEE REVIEW QUESTIONS ....................................................................................................................................... 57
PERFORMANCE CHECKLIST............................................................................................................................................ 58
ANSWERS ............................................................................................................................................................................. 59
STS Line Item 4.5.2.9: Collect breathing zone air samples .................................................................................................. 60 TRAINER GUIDANCE ......................................................................................................................................................... 60
TASK STEPS ......................................................................................................................................................................... 61
TRAINEE REVIEW QUESTIONS ....................................................................................................................................... 62
PERFORMANCE CHECKLIST............................................................................................................................................ 63
ANSWERS ............................................................................................................................................................................. 65
STS Line Item 4.5.2.10: Calculate equivalent OEELs .......................................................................................................... 66 TRAINER GUIDANCE ......................................................................................................................................................... 66
TASK STEPS ......................................................................................................................................................................... 67
TRAINEE REVIEW QUESTIONS ....................................................................................................................................... 68
PERFORMANCE CHECKLIST............................................................................................................................................ 69
ANSWERS ............................................................................................................................................................................. 70
STS Line Item 4.5.2.11: Convert raw concentrations (i.e., grams to mg/m3) ..................................................................... 71 TRAINER GUIDANCE ......................................................................................................................................................... 71
TASK STEPS ......................................................................................................................................................................... 72
TRAINEE REVIEW QUESTIONS ....................................................................................................................................... 73
PERFORMANCE CHECKLIST............................................................................................................................................ 75
ANSWERS ............................................................................................................................................................................. 76
STS Line Item 4.5.2.12: Calculate time-weighted averages ................................................................................................. 78 TRAINER GUIDANCE ......................................................................................................................................................... 78
TASK STEPS ......................................................................................................................................................................... 79
TRAINEE REVIEW QUESTIONS ....................................................................................................................................... 80
PERFORMANCE CHECKLIST............................................................................................................................................ 82
ANSWERS ............................................................................................................................................................................. 83
STS Line Item 4.5.2.13: Calculate upper and lower confidence limits ............................................................................... 85 TRAINER GUIDANCE ......................................................................................................................................................... 85
TASK STEPS ......................................................................................................................................................................... 86
TRAINEE REVIEW QUESTIONS ....................................................................................................................................... 87
ii
AFQTP 4B051-7 Journeyman Training Guide: Occupational & Environmental Air/Gas Sampling
PERFORMANCE CHECKLIST............................................................................................................................................ 88
ANSWERS ............................................................................................................................................................................. 89
STS Line Item 4.5.2.14: Calculate compliance factors (unity) ............................................................................................. 90 TRAINER GUIDANCE ......................................................................................................................................................... 90
TASK STEPS ......................................................................................................................................................................... 91
TRAINEE REVIEW QUESTIONS ....................................................................................................................................... 92
PERFORMANCE CHECKLIST............................................................................................................................................ 94
ANSWERS ............................................................................................................................................................................. 95
STS Line Item 4.5.2.16: Interpret air sample results............................................................................................................ 97 TRAINER GUIDANCE ......................................................................................................................................................... 97
TASK STEPS ......................................................................................................................................................................... 98
TRAINEE REVIEW QUESTIONS ....................................................................................................................................... 99
PERFORMANCE CHECKLIST.......................................................................................................................................... 100
ANSWERS ........................................................................................................................................................................... 101
STS Line Item 4.5.2.17: DOEHRS data entry ..................................................................................................................... 102 TRAINER GUIDANCE ....................................................................................................................................................... 102
TASK STEPS ....................................................................................................................................................................... 103
TRAINEE REVIEW QUESTIONS ..................................................................................................................................... 104
PERFORMANCE CHECKLIST.......................................................................................................................................... 105
ANSWERS ........................................................................................................................................................................... 106
iii
AFQTP 4B051-7 Journeyman Training Guide: Occupational & Environmental Air/Gas Sampling
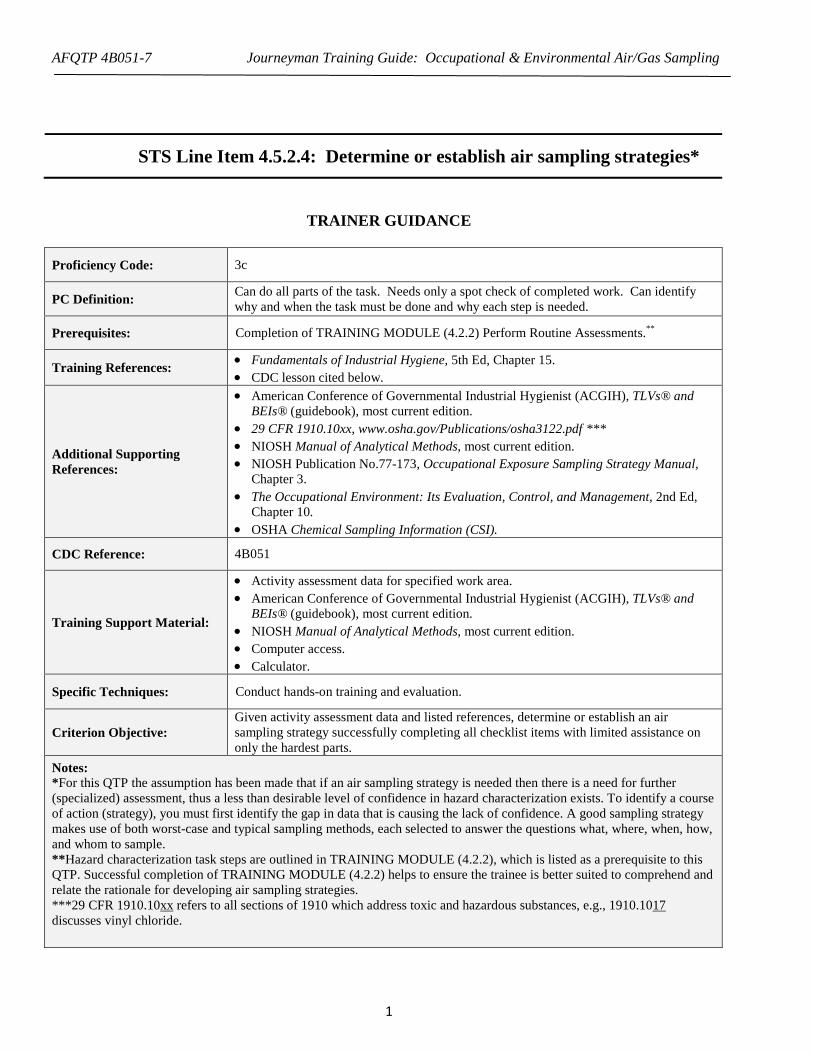
STS Line Item 4.5.2.4: Determine or establish air sampling strategies*
TRAINER GUIDANCE
Proficiency Code: 3c
PC Definition: Can do all parts of the task. Needs only a spot check of completed work. Can identify why and when the task must be done and why each step is needed.
Prerequisites: Completion of TRAINING MODULE (4.2.2) Perform Routine Assessments.**
Training References: • Fundamentals of Industrial Hygiene, 5th Ed, Chapter 15. • CDC lesson cited below.
Additional Supporting References:
• American Conference of Governmental Industrial Hygienist (ACGIH), TLVs® and BEIs® (guidebook), most current edition.
• 29 CFR 1910.10xx, www.osha.gov/Publications/osha3122.pdf *** • NIOSH Manual of Analytical Methods, most current edition. • NIOSH Publication No.77-173, Occupational Exposure Sampling Strategy Manual,
Chapter 3. • The Occupational Environment: Its Evaluation, Control, and Management, 2nd Ed,
Chapter 10. • OSHA Chemical Sampling Information (CSI).
CDC Reference: 4B051
Training Support Material:
• Activity assessment data for specified work area. • American Conference of Governmental Industrial Hygienist (ACGIH), TLVs® and
BEIs® (guidebook), most current edition. • NIOSH Manual of Analytical Methods, most current edition. • Computer access. • Calculator.
Specific Techniques: Conduct hands-on training and evaluation.
Criterion Objective: Given activity assessment data and listed references, determine or establish an air sampling strategy successfully completing all checklist items with limited assistance on only the hardest parts.
Notes: *For this QTP the assumption has been made that if an air sampling strategy is needed then there is a need for further (specialized) assessment, thus a less than desirable level of confidence in hazard characterization exists. To identify a course of action (strategy), you must first identify the gap in data that is causing the lack of confidence. A good sampling strategy makes use of both worst-case and typical sampling methods, each selected to answer the questions what, where, when, how, and whom to sample. **Hazard characterization task steps are outlined in TRAINING MODULE (4.2.2), which is listed as a prerequisite to this QTP. Successful completion of TRAINING MODULE (4.2.2) helps to ensure the trainee is better suited to comprehend and relate the rationale for developing air sampling strategies. ***29 CFR 1910.10xx refers to all sections of 1910 which address toxic and hazardous substances, e.g., 1910.1017 discusses vinyl chloride.
1
AFQTP 4B051-7 Journeyman Training Guide: Occupational & Environmental Air/Gas Sampling
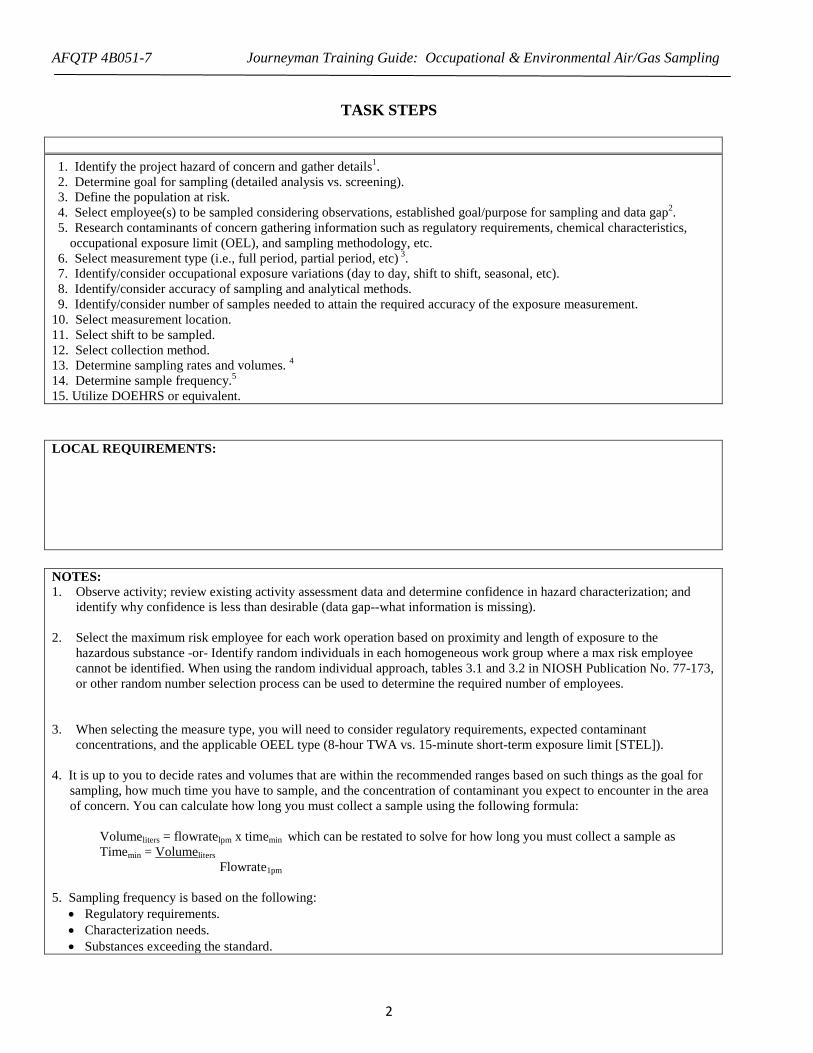
TASK STEPS
1. Identify the project hazard of concern and gather details1. 2. Determine goal for sampling (detailed analysis vs. screening). 3. Define the population at risk. 4. Select employee(s) to be sampled considering observations, established goal/purpose for sampling and data gap2. 5. Research contaminants of concern gathering information such as regulatory requirements, chemical characteristics,
occupational exposure limit (OEL), and sampling methodology, etc. 6. Select measurement type (i.e., full period, partial period, etc) 3. 7. Identify/consider occupational exposure variations (day to day, shift to shift, seasonal, etc). 8. Identify/consider accuracy of sampling and analytical methods. 9. Identify/consider number of samples needed to attain the required accuracy of the exposure measurement.
10. Select measurement location. 11. Select shift to be sampled. 12. Select collection method. 13. Determine sampling rates and volumes. 4 14. Determine sample frequency.5 15. Utilize DOEHRS or equivalent. LOCAL REQUIREMENTS:
NOTES: 1. Observe activity; review existing activity assessment data and determine confidence in hazard characterization; and
identify why confidence is less than desirable (data gap--what information is missing). 2. Select the maximum risk employee for each work operation based on proximity and length of exposure to the
hazardous substance -or- Identify random individuals in each homogeneous work group where a max risk employee cannot be identified. When using the random individual approach, tables 3.1 and 3.2 in NIOSH Publication No. 77-173, or other random number selection process can be used to determine the required number of employees.
3. When selecting the measure type, you will need to consider regulatory requirements, expected contaminant
concentrations, and the applicable OEEL type (8-hour TWA vs. 15-minute short-term exposure limit [STEL]). 4. It is up to you to decide rates and volumes that are within the recommended ranges based on such things as the goal for
sampling, how much time you have to sample, and the concentration of contaminant you expect to encounter in the area of concern. You can calculate how long you must collect a sample using the following formula:
Volumeliters = flowratelpm x timemin which can be restated to solve for how long you must collect a sample as Timemin = Volumeliters Flowrate1pm
5. Sampling frequency is based on the following:
• Regulatory requirements. • Characterization needs. • Substances exceeding the standard.
2

AFQTP 4B051-7 Journeyman Training Guide: Occupational & Environmental Air/Gas Sampling
TRAINEE REVIEW QUESTIONS
STS Line Item 4.5.2.4: Determine or establish air sampling strategies
1. List factors that must be considered for formulating a sampling strategy.
2. List considerations for determining the maximum risk worker. 3. The volume of air to be sampled and duration of sampling is based on what factors? 4. List the considerations for determining the number of samples to take.
3

AFQTP 4B051-7 Journeyman Training Guide: Occupational & Environmental Air/Gas Sampling
PERFORMANCE CHECKLIST
STS Line Item 4.5.2.4: Determine or establish air sampling strategies
Proficiency Code: 3c
PC Definition: Can do all parts of the task. Needs only a spot check of completed work. Can identify why and when the task must be done and why each step is needed.
DID THE TRAINEE…
YES NO
1. Identify the project hazard of concern and gather details?
2. Determine goal for sampling (detailed analysis vs. screening)?
3. Define the population at risk?
4. Select employee(s) to be sampled considering observations, established goal/purpose for sampling and data gap?
5. Research contaminants of concern gathering information such as regulatory requirements, chemical characteristics, OEL, and sampling methodology, etc?
6. Select measurement type (i.e., full period, partial period, etc)?
7. Identify/consider occupational exposure variations (day to day, shift to shift, seasonal, etc)?
8. Identify/consider accuracy of sampling and analytical methods?
9. Identify/consider number of samples needed to attain the required accuracy of the exposure measurement?
10. Select measurement location?
11. Select shift to be sampled?
12. Select collection method?
13. Determine sampling rates and volumes?
14. Determine sample frequency?
15. Utilize DOEHRS or equivalent?
Did the trainee successfully complete the task?
TRAINEE NAME (PRINT) TRAINER NAME (PRINT)
4
AFQTP 4B051-7 Journeyman Training Guide: Occupational & Environmental Air/Gas Sampling
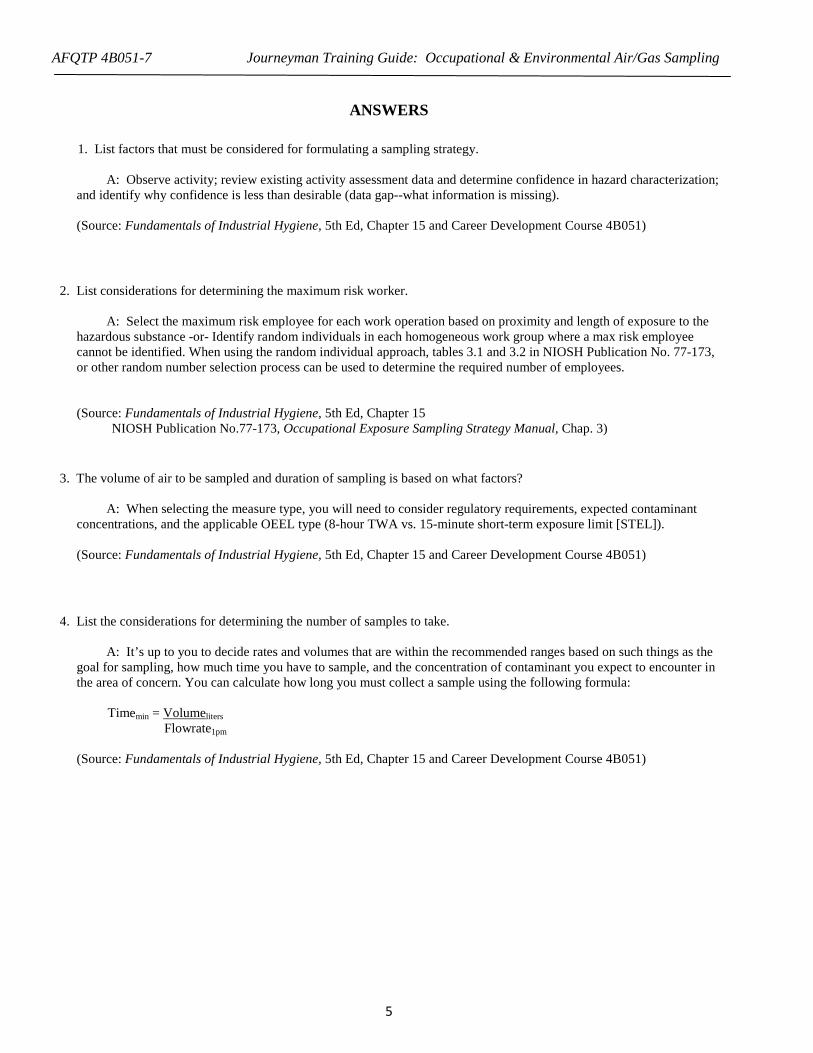
ANSWERS
1. List factors that must be considered for formulating a sampling strategy. A: Observe activity; review existing activity assessment data and determine confidence in hazard characterization; and identify why confidence is less than desirable (data gap--what information is missing).
(Source: Fundamentals of Industrial Hygiene, 5th Ed, Chapter 15 and Career Development Course 4B051)
2. List considerations for determining the maximum risk worker. A: Select the maximum risk employee for each work operation based on proximity and length of exposure to the hazardous substance -or- Identify random individuals in each homogeneous work group where a max risk employee cannot be identified. When using the random individual approach, tables 3.1 and 3.2 in NIOSH Publication No. 77-173, or other random number selection process can be used to determine the required number of employees.
(Source: Fundamentals of Industrial Hygiene, 5th Ed, Chapter 15 NIOSH Publication No.77-173, Occupational Exposure Sampling Strategy Manual, Chap. 3)
3. The volume of air to be sampled and duration of sampling is based on what factors? A: When selecting the measure type, you will need to consider regulatory requirements, expected contaminant concentrations, and the applicable OEEL type (8-hour TWA vs. 15-minute short-term exposure limit [STEL]).
(Source: Fundamentals of Industrial Hygiene, 5th Ed, Chapter 15 and Career Development Course 4B051)
4. List the considerations for determining the number of samples to take. A: It’s up to you to decide rates and volumes that are within the recommended ranges based on such things as the goal for sampling, how much time you have to sample, and the concentration of contaminant you expect to encounter in the area of concern. You can calculate how long you must collect a sample using the following formula:
Timemin = Volumeliters Flowrate1pm
(Source: Fundamentals of Industrial Hygiene, 5th Ed, Chapter 15 and Career Development Course 4B051)
5
AFQTP 4B051-7 Journeyman Training Guide: Occupational & Environmental Air/Gas Sampling
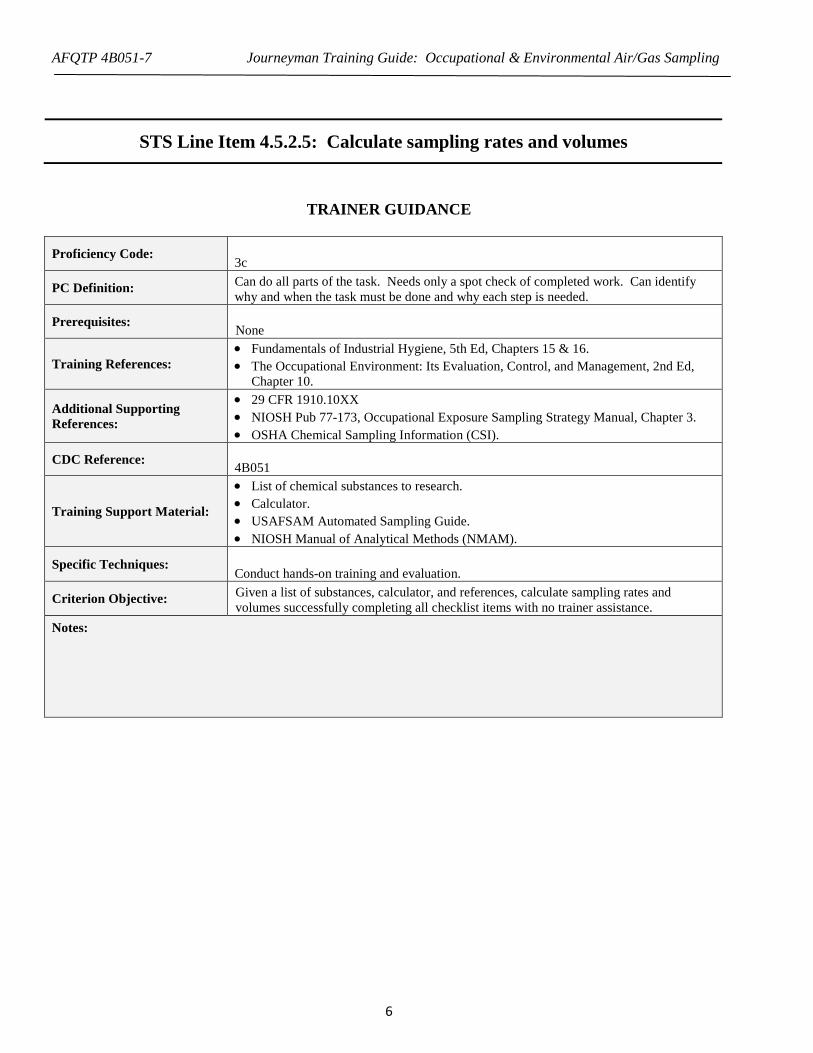
STS Line Item 4.5.2.5: Calculate sampling rates and volumes
TRAINER GUIDANCE
Proficiency Code: 3c
PC Definition: Can do all parts of the task. Needs only a spot check of completed work. Can identify why and when the task must be done and why each step is needed.
Prerequisites: None
Training References: • Fundamentals of Industrial Hygiene, 5th Ed, Chapters 15 & 16. • The Occupational Environment: Its Evaluation, Control, and Management, 2nd Ed,
Chapter 10.
Additional Supporting References:
• 29 CFR 1910.10XX • NIOSH Pub 77-173, Occupational Exposure Sampling Strategy Manual, Chapter 3. • OSHA Chemical Sampling Information (CSI).
CDC Reference: 4B051
Training Support Material:
• List of chemical substances to research. • Calculator. • USAFSAM Automated Sampling Guide. • NIOSH Manual of Analytical Methods (NMAM).
Specific Techniques: Conduct hands-on training and evaluation.
Criterion Objective: Given a list of substances, calculator, and references, calculate sampling rates and volumes successfully completing all checklist items with no trainer assistance.
Notes:
6
AFQTP 4B051-7 Journeyman Training Guide: Occupational & Environmental Air/Gas Sampling
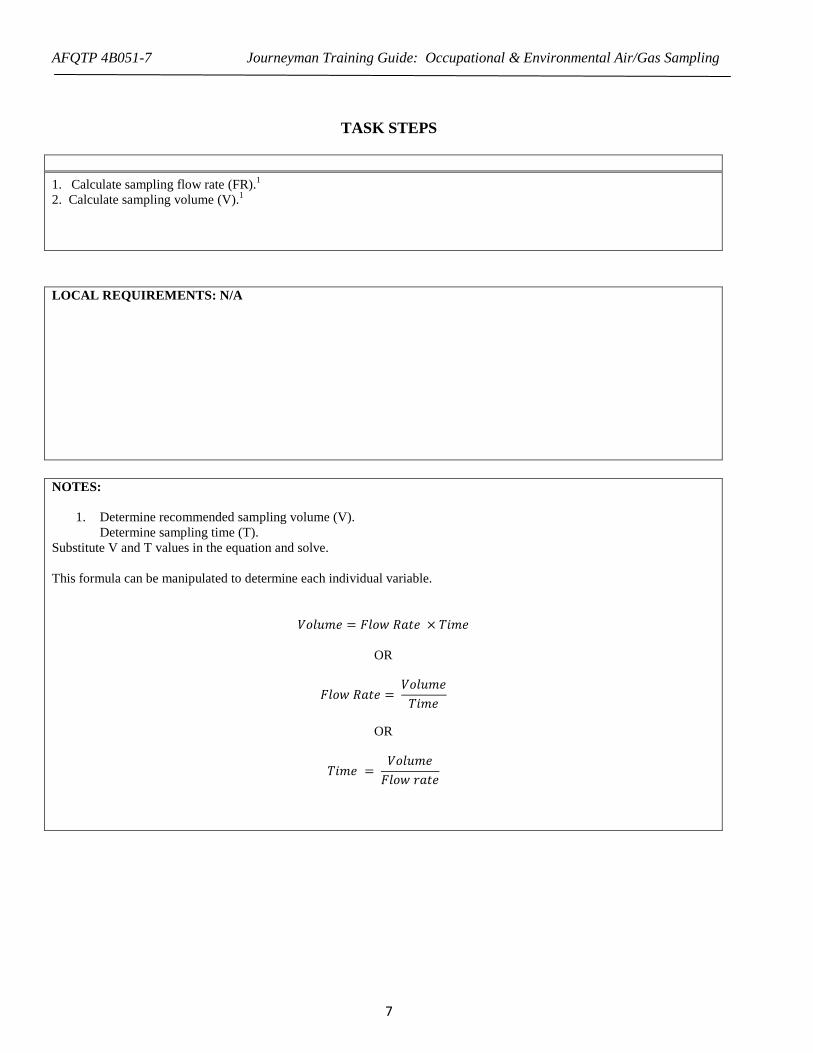
TASK STEPS
1. Calculate sampling flow rate (FR).1
2. Calculate sampling volume (V).1
LOCAL REQUIREMENTS: N/A
NOTES:
1. Determine recommended sampling volume (V). Determine sampling time (T).
Substitute V and T values in the equation and solve. This formula can be manipulated to determine each individual variable.
𝑉𝑉𝑉𝑉𝑉𝑉𝑉𝑉𝑉𝑉𝑉𝑉 = 𝐹𝐹𝑉𝑉𝑉𝑉𝐹𝐹 𝑅𝑅𝑅𝑅𝑅𝑅𝑉𝑉 × 𝑇𝑇𝑇𝑇𝑉𝑉𝑉𝑉
OR
𝐹𝐹𝑉𝑉𝑉𝑉𝐹𝐹 𝑅𝑅𝑅𝑅𝑅𝑅𝑉𝑉 = 𝑉𝑉𝑉𝑉𝑉𝑉𝑉𝑉𝑉𝑉𝑉𝑉𝑇𝑇𝑇𝑇𝑉𝑉𝑉𝑉
OR
𝑇𝑇𝑇𝑇𝑉𝑉𝑉𝑉 = 𝑉𝑉𝑉𝑉𝑉𝑉𝑉𝑉𝑉𝑉𝑉𝑉𝐹𝐹𝑉𝑉𝑉𝑉𝐹𝐹 𝑟𝑟𝑅𝑅𝑅𝑅𝑉𝑉
7
AFQTP 4B051-7 Journeyman Training Guide: Occupational & Environmental Air/Gas Sampling
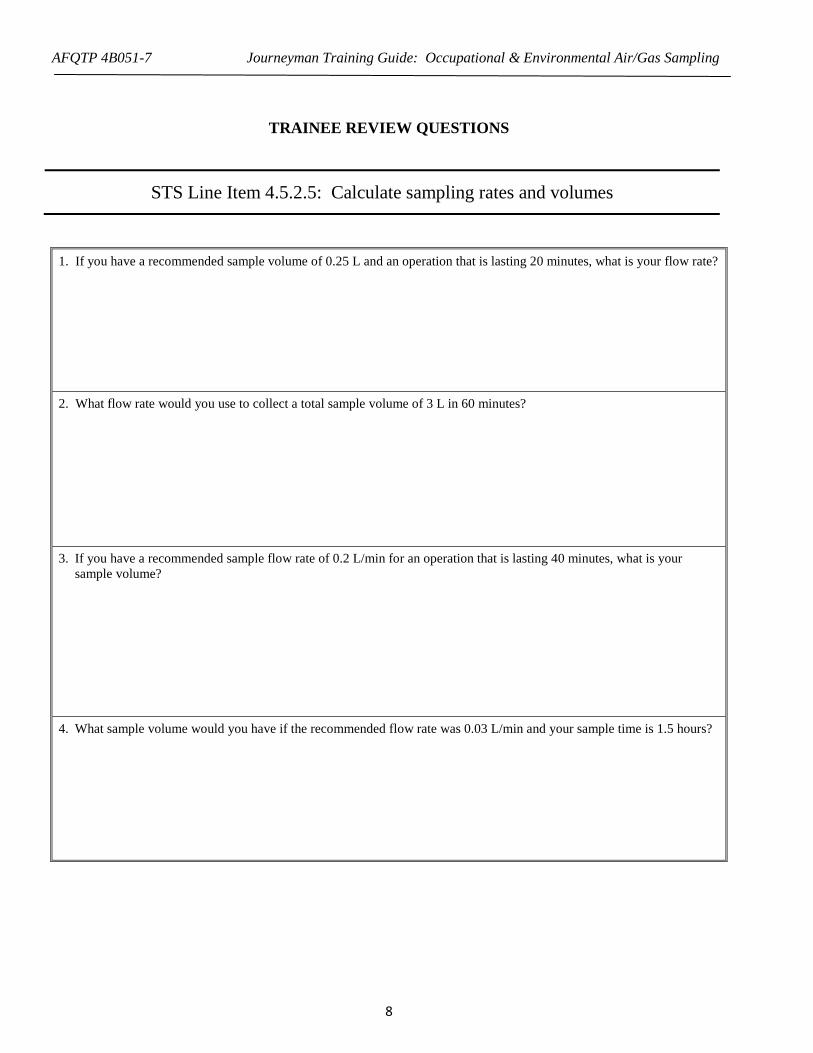
TRAINEE REVIEW QUESTIONS
STS Line Item 4.5.2.5: Calculate sampling rates and volumes
1. If you have a recommended sample volume of 0.25 L and an operation that is lasting 20 minutes, what is your flow rate?
2. What flow rate would you use to collect a total sample volume of 3 L in 60 minutes? 3. If you have a recommended sample flow rate of 0.2 L/min for an operation that is lasting 40 minutes, what is your
sample volume? 4. What sample volume would you have if the recommended flow rate was 0.03 L/min and your sample time is 1.5 hours?
8
AFQTP 4B051-7 Journeyman Training Guide: Occupational & Environmental Air/Gas Sampling
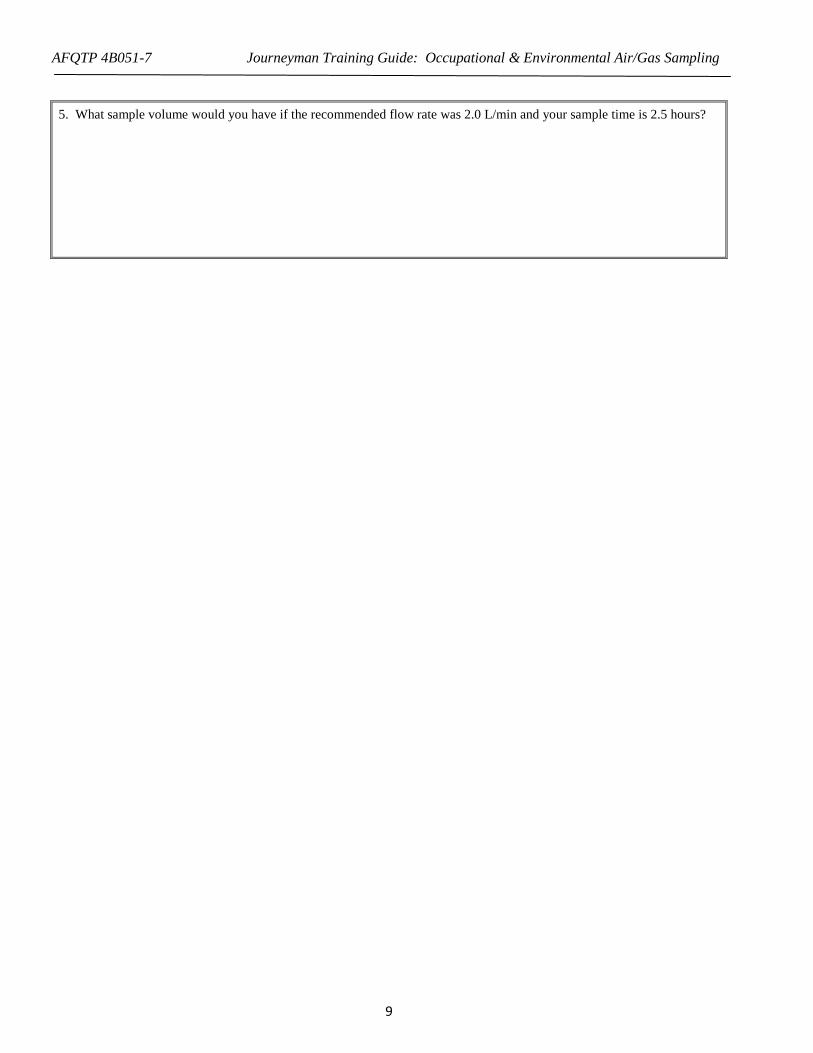
5. What sample volume would you have if the recommended flow rate was 2.0 L/min and your sample time is 2.5 hours?
9
AFQTP 4B051-7 Journeyman Training Guide: Occupational & Environmental Air/Gas Sampling
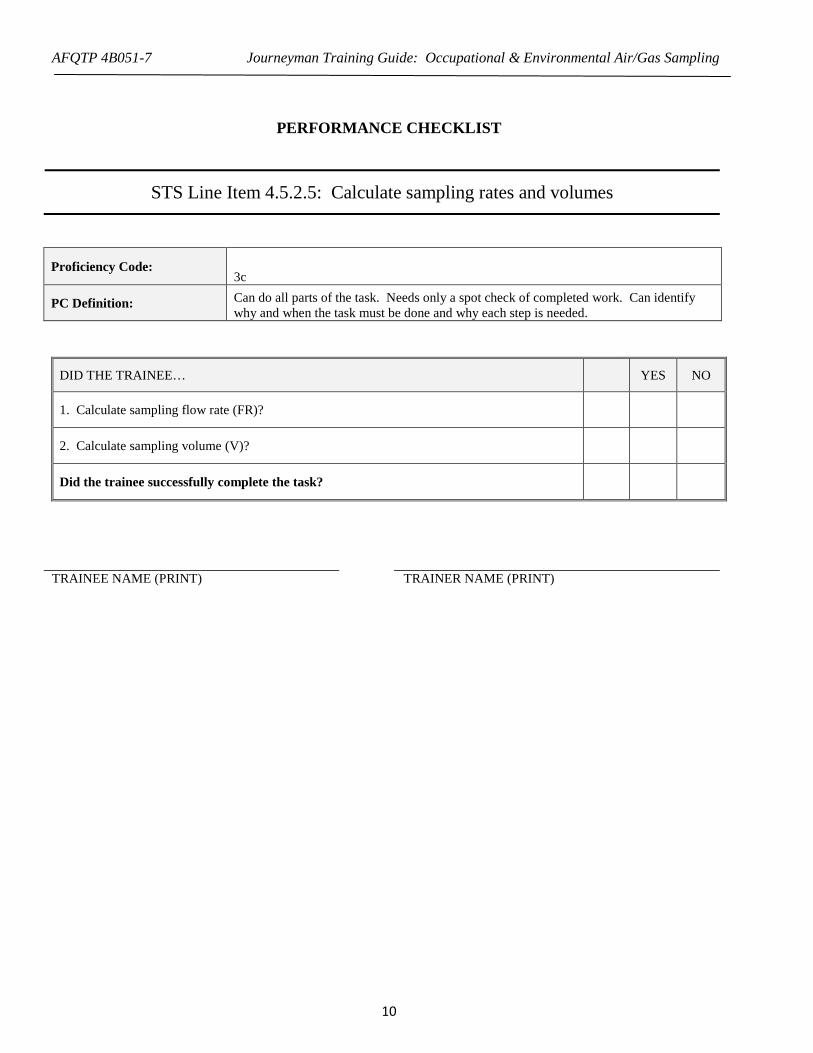
PERFORMANCE CHECKLIST
STS Line Item 4.5.2.5: Calculate sampling rates and volumes
Proficiency Code: 3c
PC Definition: Can do all parts of the task. Needs only a spot check of completed work. Can identify why and when the task must be done and why each step is needed.
DID THE TRAINEE…
YES NO
1. Calculate sampling flow rate (FR)?
2. Calculate sampling volume (V)?
Did the trainee successfully complete the task?
TRAINEE NAME (PRINT) TRAINER NAME (PRINT)
10

AFQTP 4B051-7 Journeyman Training Guide: Occupational & Environmental Air/Gas Sampling
ANSWERS
1. If you have a recommended sample volume of 0.25 L and an operation that is lasting 20 minutes, what is your flow rate?
A: 0.25L / 20 mins = 0.0125 L/min (Source: Step #1 of this QTP)
2. What flow rate would you use to collect a total sample volume of 3 L in 60 minutes? A: 3L / 60 mins = 0.05 L/min (Source: Step #1 of this QTP)
3. If you have a recommended sample flow rate of 0.2 L/min for an operation that is lasting 40 minutes, what is your sample volume?
A: 0.2 L/min X 40 mins = 8L (Source: Step #2 of this QTP)
4. What sample volume would you have if the recommended flow rate was 0.03 L/min and your sample time is 1.5 hours?
A: 1.5 hours = 90 mins 0.03 L/min X 90 mins = 2.7 L
(Source: Step #2 of this QTP)
5. What sample volume would you have if the recommended flow rate was 2.0 L/min and your sample time is 2.5 hours?
A: 2.5 hours = 150 mins 2.0 L/min X 150 mins = 300L (Source: Step #2 of this QTP)
11
AFQTP 4B051-7 Journeyman Training Guide: Occupational & Environmental Air/Gas Sampling
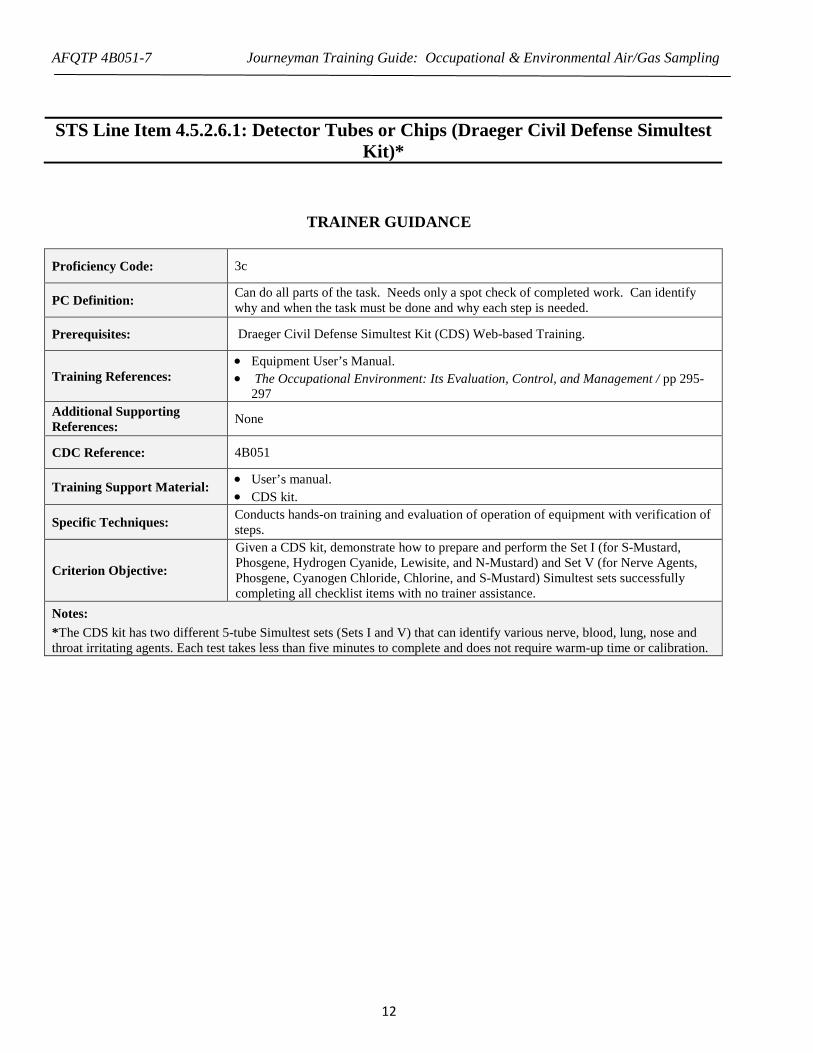
STS Line Item 4.5.2.6.1: Detector Tubes or Chips (Draeger Civil Defense Simultest Kit)*
TRAINER GUIDANCE
Proficiency Code: 3c
PC Definition: Can do all parts of the task. Needs only a spot check of completed work. Can identify why and when the task must be done and why each step is needed.
Prerequisites: Draeger Civil Defense Simultest Kit (CDS) Web-based Training.
Training References: • Equipment User’s Manual. • The Occupational Environment: Its Evaluation, Control, and Management / pp 295-
297 Additional Supporting References: None
CDC Reference: 4B051
Training Support Material: • User’s manual. • CDS kit.
Specific Techniques: Conducts hands-on training and evaluation of operation of equipment with verification of steps.
Criterion Objective:
Given a CDS kit, demonstrate how to prepare and perform the Set I (for S-Mustard, Phosgene, Hydrogen Cyanide, Lewisite, and N-Mustard) and Set V (for Nerve Agents, Phosgene, Cyanogen Chloride, Chlorine, and S-Mustard) Simultest sets successfully completing all checklist items with no trainer assistance.
Notes: *The CDS kit has two different 5-tube Simultest sets (Sets I and V) that can identify various nerve, blood, lung, nose and throat irritating agents. Each test takes less than five minutes to complete and does not require warm-up time or calibration.
12

AFQTP 4B051-7 Journeyman Training Guide: Occupational & Environmental Air/Gas Sampling
TASK STEPS
PUMP LEAK TEST: 1. Insert an unopened detector tube into the pump socket. 2. Squeeze the pump completely and release. 3. After 15 minutes, look for the end-of-stroke indicator.1 4. If the pump is deemed leak-proof, remove the tube and reset the counter on the pump to zero. PREPARE AND OPERATE ACCURO® PUMP WITH DETECTOR TUBES: 1. Determine which set tubes will be used for sampling.2 2. Open detector tubes only on pump side first (direction of arrow). 3 3. Insert the open ends of the tube(s) into the tube adapter (flow arrows pointing in). 4. Score and break off tips on other side of set. 5. Activate the cyanogen chloride tube (Simultest Set V only).4 6. Connect the tube set to pump.5 7. Check stroke number.6 8. Operate the pump.7 9. Complete sampling.8
10. Remove the used tubes from the adapter and dispose of them correctly.9 11. Purge pump.10 RECORD DATA: 1. Utilize DOEHRS or equivalent as applicable. LOCAL REQUIREMENTS: N/A
NOTES: 1. If the end-of-stroke indicator does not appear, the pump is leak-proof and you are ready to continue. If the end-of-stroke indicator appears, your pump is not leak-proof and therefore should not be used. 2. Some tubes contain ampoules that require additional steps, in these circumstances, refer to laminated card for specific instructions. The laminated instruction cards provide a quick reference for easy use and color change interpretations specific to each ampoule (detector tube). The laminated instruction cards also provide reference for groups of related contaminants. 3. Tube Opener Procedures:
A. Simultest Tube Opener: • Carefully scrape the ceramic edge of the tube set opener against the ends of the tubes (at an angle)
multiple times to score all five glass tips. • With the ceramic cutter UP, push opener completely over rubber tube block and apply pressure down
until all tube tips break off (if some tubes don’t break off, re-scrape or use the singe-tube breaker, described below).
13

AFQTP 4B051-7 Journeyman Training Guide: Occupational & Environmental Air/Gas Sampling
B. Deluxe Tube Opener (for individual tubes): • Insert the tube into the cutter. Keep it pressed against the ceramic edge while turning it (scoring it). • To open the tube, insert the tube into the opener and push on it at an angle until the tip breaks off (dispose
of glass tip).
C. Pump Tube Opener (for individual tubes): • To score and open an individual tube using the opener on the Accuro® pump; insert the tube into the
opener. Press the tube against the ceramic edge while turning it to score the glass; then pull the tube at an angle until the tip breaks off (dispose of glass tip).
• When using the pump to open a tube, be sure to keep the pump facing downwards to prevent any glass splinters from entering the pump.
4. Before beginning the test using the Simultest Set V detector tubes, you will need to activate the cyanogen chloride tube. Remove the tub from the holder and bend the tube between the two black dots, allowing the reagent to flow onto the indicator until it is moistened. Place the tube back into the test holder, always keeping the arrows on the tube pointing towards the pump. 5. A special adapter is used to connect the Simultest Set to the pump. This adapter consists of a 5-slot manifold for the tube sets, 1 meter extension hose that connects to the Accuro® pump. 6. The number of strokes required is stated on the back of the Simultest Set holder and is also included in the Instructions for Use. Conveniently, both Simultest Set I and V require 50 strokes. 7. Grip and hold the Accuro® pump so that the end-of-stroke indicator and stroke counter are facing you. Squeeze the pump until it is fully compressed (the stroke indicator will advance) then release to allow the bellows to re-expand by itself until. A white dot reappears on the top of the pump and indicates re-expansion is complete (end of stroke). 8. Repeat STEP 6 until the number on the stroke counter corresponds to the number of required strokes. 9. All tubes, even those with negative results, cannot be reused and must be disposed of as hazardous waste. 10. The Accuro® pump must be purged after every use, regardless of test results. Flush out the pump by performing a few pump strokes (STEP 6) in clean air.
14

AFQTP 4B051-7 Journeyman Training Guide: Occupational & Environmental Air/Gas Sampling
TRAINEE REVIEW QUESTIONS
STS Line Item 4.5.2.6.1: Detector Tubes or Chips (Draeger Civil Defense Simultest Kit)
1. When sampling using the Simultest Set V, what step must be performed prior to beginning the test?
15

AFQTP 4B051-7 Journeyman Training Guide: Occupational & Environmental Air/Gas Sampling
PERFORMANCE CHECKLIST
STS Line Item 4.5.2.6.1: Detector Tubes or Chips (Draeger Civil Defense Simultest Kit)
Proficiency Code: 3c
PC Definition: Can do all parts of the task. Needs only a spot check of completed work. Can identify why and when the task must be done and why each step is needed.
DID THE TRAINEE… YES NO
PUMP LEAK TEST
1. Insert an unopened detector tube into the pump socket?
2. Squeeze the pump completely and release?
3. After 15 minutes, look for the end-of-stroke indicator.?
4. If the pump is deemed leak-proof, remove the tube and reset the counter on the pump to zero?
PREPARE AND OPERATE ACCURO® PUMP WITH DETECTOR TUBES
1. Determine which set tubes will be used for sampling?
2. Open detector tubes only on pump side first (direction of arrow)?
3. Insert the open ends of the tube(s) into the tube adapter (flow arrows pointing in)?
4. Score and break off tips on other side of set?
5. Activate the cyanogen chloride tube (Simultest Set V only)?
6. Connect the tube set to pump?
7. Check stroke number?
8. Operate the pump?
9. Complete sampling?
10. Remove the used tubes from the adapter and dispose of them correctly?
11. Purge pump?
16
AFQTP 4B051-7 Journeyman Training Guide: Occupational & Environmental Air/Gas Sampling
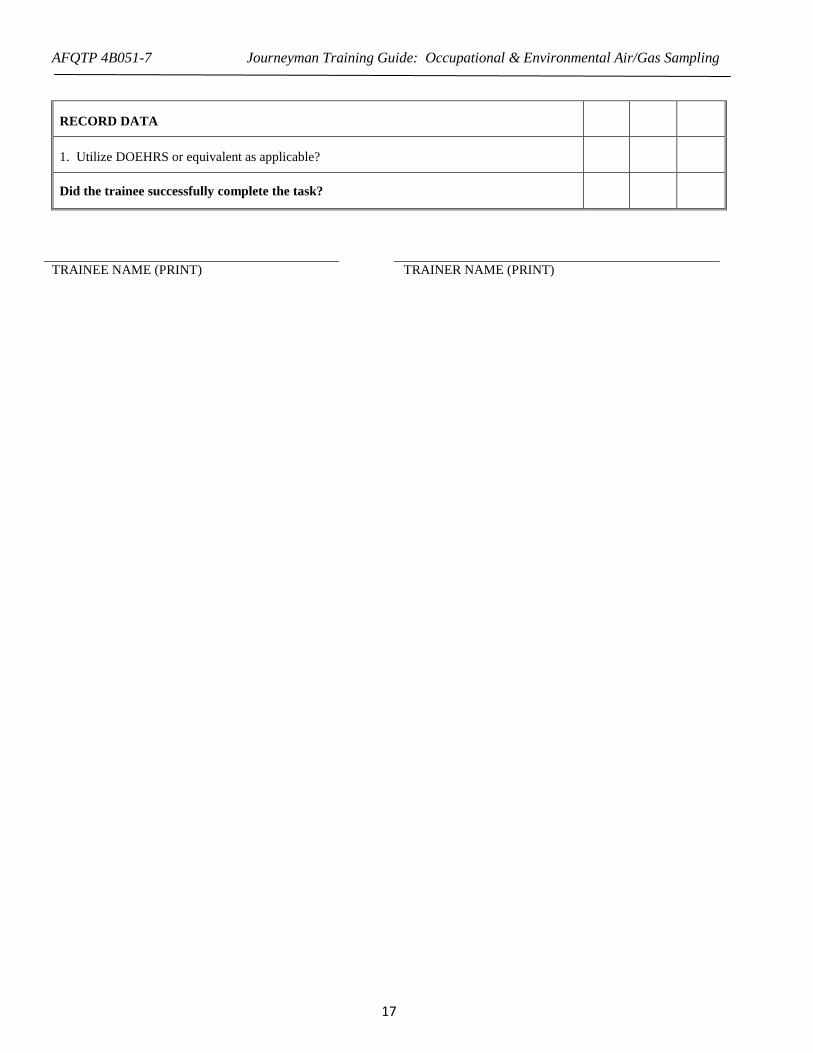
RECORD DATA
1. Utilize DOEHRS or equivalent as applicable?
Did the trainee successfully complete the task?
TRAINEE NAME (PRINT) TRAINER NAME (PRINT)
17

AFQTP 4B051-7 Journeyman Training Guide: Occupational & Environmental Air/Gas Sampling
ANSWERS 1. When sampling using the Simultest Set V, what step must be performed prior to beginning the test?
A: Before beginning the test using the Simultest Set V detector tubes, you will need to activate the cyanogen chloride
tube. Remove the tub from the holder and bend the tube between the two black dots, allowing the reagent to flow onto the indicator until it is moistened. Place the tube back into the test holder, always keeping the arrows on the tube pointing towards the pump
(Source: Equipment User’s Manual)
18

AFQTP 4B051-7 Journeyman Training Guide: Occupational & Environmental Air/Gas Sampling
STS Line Item 4.5.2.6.2: PID/FID
TRAINER GUIDANCE
Proficiency Code: 3c
PC Definition: Can do all parts of the task. Needs only a spot check of completed work. Can identify why and when the task must be done and why each step is needed.
Prerequisites: None
Training References: • TVA-1000B Toxic Vapor Analyzer Instruction Manual • TVA-1000B Operational Checklist (ESOH Service Center Website) • Bioenvironmental Engineer’s Guide to TVA-1000B (ESOH Service Center Website)
Additional Supporting References: None
CDC Reference: 4B051
Training Support Material:
• TVA-1000B Toxic Vapor Analyzer Instruction Manual • TVA 1000B • Calibration gases (isobutylene, methane, zero grade air) • Tedlar bag
Specific Techniques: Conduct hands-on training and evaluation of calibration and operation of equipment with verification of steps.
Criterion Objective: Given a TVA 1000B, perform calibration and functional check on the analyzer, demonstrating how to operate the analyzer successfully completing all the checklist items with limited no trainer assistance.
Notes: * The TVA-1000B Toxic Vapor Analyzer is a direct reading portable monitor that can display, monitor, and log data in either a flame ionization detector (FID), a photo ionization detector (PID), or both simultaneously to provide real-time measurements of organic, and some inorganic, vapor concentrations in air. It cannot confidently determine unknowns at low ppm (parts per million). Therefore, in these types of situations it is recommended that the analyzer be used more for approximations when exact concentrations are not required.
19
AFQTP 4B051-7 Journeyman Training Guide: Occupational & Environmental Air/Gas Sampling
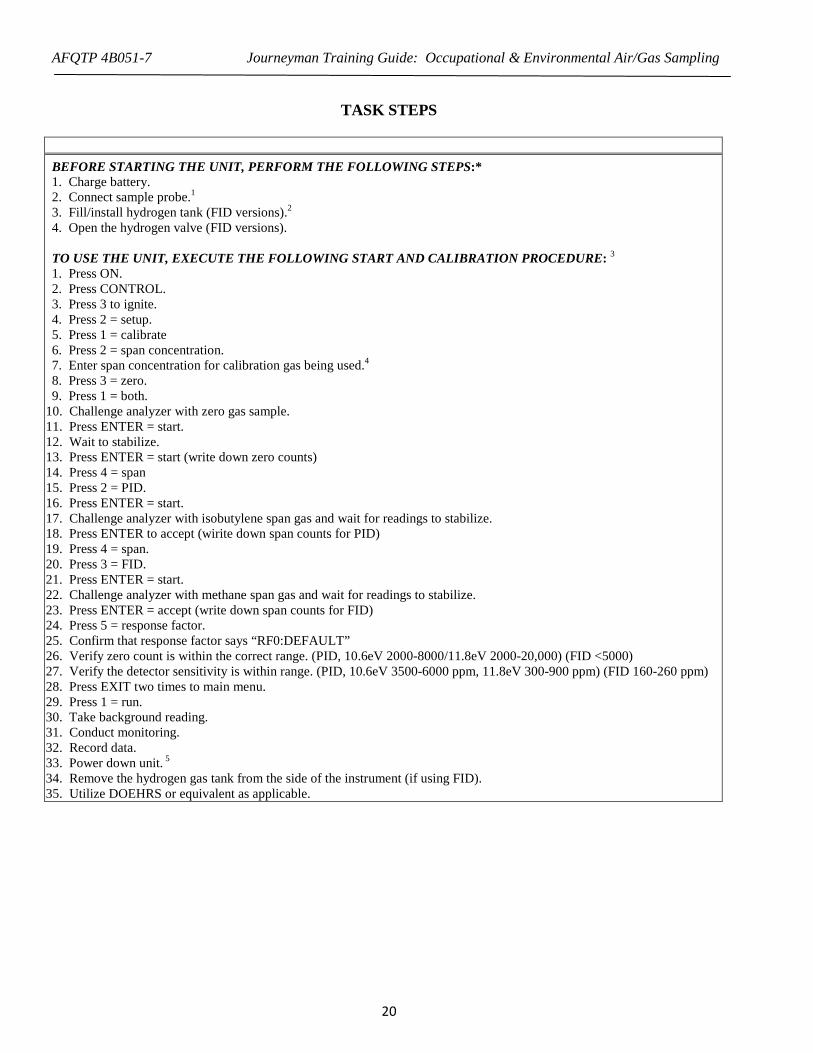
TASK STEPS
BEFORE STARTING THE UNIT, PERFORM THE FOLLOWING STEPS:* 1. Charge battery. 2. Connect sample probe.1
3. Fill/install hydrogen tank (FID versions).2
4. Open the hydrogen valve (FID versions). TO USE THE UNIT, EXECUTE THE FOLLOWING START AND CALIBRATION PROCEDURE: 3 1. Press ON. 2. Press CONTROL. 3. Press 3 to ignite. 4. Press 2 = setup. 5. Press 1 = calibrate 6. Press 2 = span concentration. 7. Enter span concentration for calibration gas being used.4
8. Press 3 = zero. 9. Press 1 = both.
10. Challenge analyzer with zero gas sample. 11. Press ENTER = start. 12. Wait to stabilize. 13. Press ENTER = start (write down zero counts) 14. Press 4 = span 15. Press 2 = PID. 16. Press ENTER = start. 17. Challenge analyzer with isobutylene span gas and wait for readings to stabilize. 18. Press ENTER to accept (wirite down span counts for PID) 19. Press 4 = span. 20. Press 3 = FID. 21. Press ENTER = start. 22. Challenge analyzer with methane span gas and wait for readings to stabilize. 23. Press ENTER = accept (write down span counts for FID) 24. Press 5 = response factor. 25. Confirm that response factor says “RF0:DEFAULT” 26. Verify zero count is within the correct range. (PID, 10.6eV 2000-8000/11.8eV 2000-20,000) (FID <5000) 27. Verify the detector sensitivity is within range. (PID, 10.6eV 3500-6000 ppm, 11.8eV 300-900 ppm) (FID 160-260 ppm) 28. Press EXIT two times to main menu. 29. Press 1 = run. 30. Take background reading. 31. Conduct monitoring. 32. Record data. 33. Power down unit. 5 34. Remove the hydrogen gas tank from the side of the instrument (if using FID). 35. Utilize DOEHRS or equivalent as applicable.
20
AFQTP 4B051-7 Journeyman Training Guide: Occupational & Environmental Air/Gas Sampling LOCAL REQUIREMENTS:
NOTES: 1. The sample probe assembly is a hand-held device that enables you to take vapor samples at precise locations. It connects
to the instrument by means of an umbilical. The umbilical has two quick-disconnect fasteners (one electrical, one sample line) at the instrument end.
2. The FID mode is used to detect most organic compounds and can be used to detect gaseous hydrocarbons in depressions
or confined spaces. It is best suited to detect combustible compounds such as gasoline and methane. The PID mode is sensitive to compounds with double bonds, such as aromatic and chlorinated compounds. It can also measure some inorganic compounds that the FID does not detect, such as ammonia, carbon disulfide, carbon tetrachloride, chloroform, ethylamine, formaldehyde, and hydrogen sulfide. Calibration must be completed each day the TVA-1000B is used. The FID is calibrated with methane and the PID is calibrated with isobutylene.
To refill the hydrogen tank, follow these steps:
1. Turn the supply tank valve to OFF. 2. Attach the tank filler adapter to the supply cylinder with valve and manifold valves in OFF position. 3. Attach the TVA-1000B hydrogen tank to the tank filler adapter (left hand thread-do not over tighten). 4. Open the supply tank valve. 5. Move the fill adapter valve to FILL position. 6. Wait for TVA-1000B tank to fill (may take two to three minutes because of flow restrictors in the tank
and fill adapter). Do not fill past 2200psi. 7. Once full, close the fill adapter valve. 8. Remove the TVA-1000B tank. 9. Close the supply cylinder valve. 10. Reopen the adapter valve to release gas remaining in tank fill adapter (removes pressure and makes
adapter removal easier). 11. Remove the tank fill adapter. (Always remove tank from instrument for storage.)
3. Calibration must be completed each day the TVA-1000B is used. Prior to performing calibration, the instrument must be
on and warmed up for approximately 30 minutes. The pump must be ON, the PID lamp must be ON, and the FID must be ignited throughout the warm-up period.
4. If PID only, enter concentration of isobutylene. If FID only, enter concentration of methane. If dual, enter concentration
of both gases. 5. To power down this instrument, press and hold the OFF key. With FID versions, you must also shut off the gas valve to
avoid depleting the tank supply.
21
AFQTP 4B051-7 Journeyman Training Guide: Occupational & Environmental Air/Gas Sampling
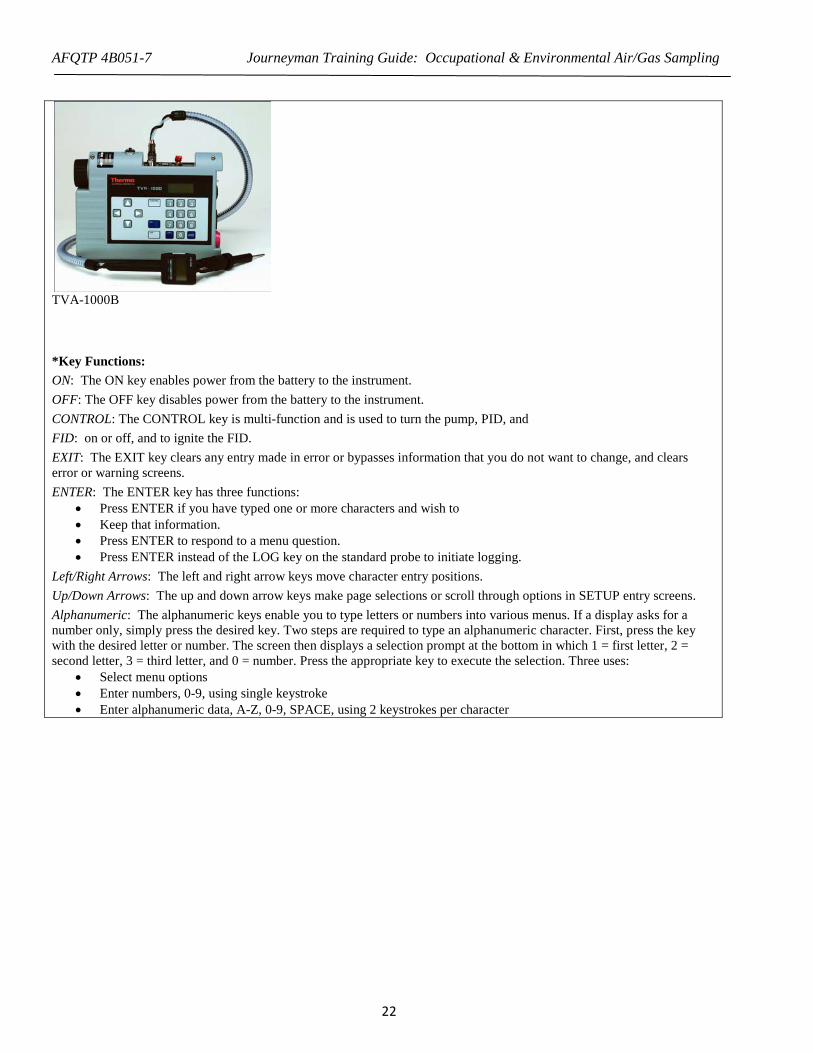
TVA-1000B *Key Functions: ON: The ON key enables power from the battery to the instrument. OFF: The OFF key disables power from the battery to the instrument. CONTROL: The CONTROL key is multi-function and is used to turn the pump, PID, and FID: on or off, and to ignite the FID. EXIT: The EXIT key clears any entry made in error or bypasses information that you do not want to change, and clears error or warning screens. ENTER: The ENTER key has three functions:
• Press ENTER if you have typed one or more characters and wish to • Keep that information. • Press ENTER to respond to a menu question. • Press ENTER instead of the LOG key on the standard probe to initiate logging.
Left/Right Arrows: The left and right arrow keys move character entry positions. Up/Down Arrows: The up and down arrow keys make page selections or scroll through options in SETUP entry screens. Alphanumeric: The alphanumeric keys enable you to type letters or numbers into various menus. If a display asks for a number only, simply press the desired key. Two steps are required to type an alphanumeric character. First, press the key with the desired letter or number. The screen then displays a selection prompt at the bottom in which 1 = first letter, 2 = second letter, 3 = third letter, and 0 = number. Press the appropriate key to execute the selection. Three uses:
• Select menu options • Enter numbers, 0-9, using single keystroke • Enter alphanumeric data, A-Z, 0-9, SPACE, using 2 keystrokes per character
22
AFQTP 4B051-7 Journeyman Training Guide: Occupational & Environmental Air/Gas Sampling
TRAINEE REVIEW QUESTIONS
STS Line Item 4.5.2.6.2: PID/FID
1. Which detector(s) within the TVA-1000B is/are able to distinguish inorganic material?
2. How should the TVA-1000B be decontaminated?
3. How does the ion potential (IP) directly relate to the detection capabilities of the TVA-1000B? 4. How is the reponse factor calculated?
23

AFQTP 4B051-7 Journeyman Training Guide: Occupational & Environmental Air/Gas Sampling
PERFORMANCE CHECKLIST
STS Line Item 4.5.2.6.2: PID/FID
Proficiency Code: 3c
PC Definition: Can do all parts of the task. Needs only a spot check of completed work. Can identify why and when the task must be done and why each step is needed.
DID THE TRAINEE…
YES NO
BEFORE STARTING THE UNIT
1. Charge battery?
2. Connect sample probe?
3. Fill/install hydrogen tank (FID versions)?
4. Open the hydrogen valve (FID versions)?
TO USE THE UNIT, EXECUTE THE FOLLOWING START AND CONFIGURE PROCEDURE
1. Press ON?
2. Press CONTROL?
3. Press 3 to ignite?
4. Press 2 = setup?
5. Press 1 = calibrate?
6. Press 2 = span concentration?
7. Enter Span Concentration for calibration gas being used?
8. Press 3 = zero?
9. Press 1 = both?
10. Challenge analyzer with zero gas sample?
11. Press ENTER = start?
12. Wait to stabilize?
13. Press ENTER = start?
24

AFQTP 4B051-7 Journeyman Training Guide: Occupational & Environmental Air/Gas Sampling
14. Press 4 = span?
15. Press 2 = PID?
16. Press ENTER = start?
17. Challenge analyzer with isobutylene span gas and wait for readings to stabilize?
18. Press ENTER to accept?
19. Press 4 = Span?
20. Press 3 = FID?
21. Press ENTER = start?
22. Challenge analyzer with methane span gas and wait for readings to stabilize?
23. Press ENTER = accept?
24. Press 5 = response factor?
25. Confirm that response factor says “RF0:DEFAULT”?
26. Verify zero count is within the correct range. (PID, 10.6eV 2000-8000/11.8eV 2000-20,000) (FID <5000)
27. Verify the detector sensitivity is within range. (PID, 10.6eV 3500-6000 ppm, 11.8eV 300-900 ppm) (FID 160-260 ppm)
28. Press EXIT two times to main menu?
29. Press 1 = run?
30. Take background reading?
31. Conduct monitoring?
32. Record data?
33. Power down unit?
34. Remove the hydrogen tank from the side of the instrument (if using FID)?
35. Utilize DOEHRS or equivalent as applicable?
Did the trainee successfully complete the task?
TRAINEE NAME (PRINT) TRAINER NAME (PRINT)
25

AFQTP 4B051-7 Journeyman Training Guide: Occupational & Environmental Air/Gas Sampling
ANSWERS
1. Which detector(s) within the TVA-1000B is/are able to distinguish inorganic material? A: Photoionization Detector
(Source: Bioenvironmental Engineer’s Guide to TVA-1000B)
2. How should the TVA-1000B be decontaminated? A: The TVA-1000B can be decontaminated by wiping the exterior with a moist towel. Do NOT decontaminate
the TVA-1000B by submerging it in water. If the TVA-1000B is accidentally contaminated by drawing a liquid sample into the probe head, it is recommended to call the manufacturer, Thermo Fisher Scientific.
(Source: Bioenvironmental Engineer’s Guide to TVA-1000B) 3. How does the ion potential (IP) directly relate to the detection capabilities of the TVA-1000B? A: Dependent upon what lamp (10.6 eV or 11.8 eV) is installed for the PID will correlate to the detection of the
chemical in question. For example, acetaldehyde has an IP of 10.21 therefore it can be detected by either a 10.6 eV or an 11.8 eV PID lamp but chlorine has an IP of 11.47 so it cannot be detected by the 10.6 eV. An 11.8eV lamp would have to be used.
(Source: Bioenvironmental Engineer’s Guide to TVA-1000B) 4. How is the response factor calculated? Response Factor = Actual Concentration / Measured Concentration (Source: Bioenvironmental Engineer’s Guide to TVA-1000B)
26
AFQTP 4B051-7 Journeyman Training Guide: Occupational & Environmental Air/Gas Sampling
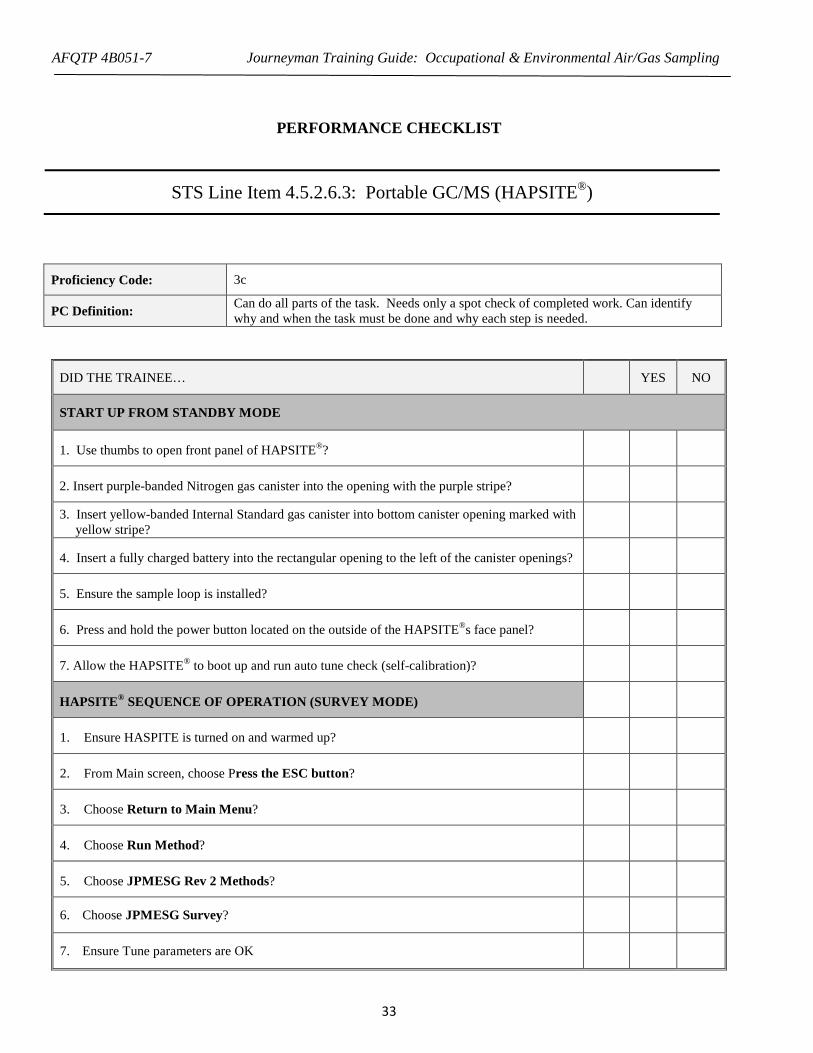
STS Line Item 4.5.2.6.3: Portable GC/MS (HAPSITE®)*
TRAINER GUIDANCE
Proficiency Code: 3c
PC Definition: Can do all parts of the task. Needs only a spot check of completed work. Can identify why and when the task must be done and why each step is needed.
Prerequisites: Complete Computer Based Training.
Training References: • Inficon Equipment User’s Manual. • HAPSITE® Smart Plus Chemical Identification System Operating Manual (ESOH
Service Center Website)
Additional Supporting References:
• Fundamentals of Industrial Hygiene, 5th Edition, Chapter 17. • Technical Report on BE HAPSITE® Preventive Maintenance and KD Analytical
Support Guidance, July 21, 2010 • HAPSITE® GC/MS Training Guide – United States Training Version, 2002
CDC Reference: 4B051
Training Support Material: HAPSITE® (GC/MS) VOC test sample
Specific Techniques: Conduct hands-on training and evaluation.
Criterion Objective: Given a HAPSITE® (GC/MS), perform pre-operational check and operate instrument successfully completing all checklist items with NO trainer assistance.
Notes: *The HAPSITE® is a gas chromatograph/mass spectrometer (GC/MS) proven to provide verifiable data for critical health-risk decisions. The HAPSITE® systems deliver fast, dependable on-site analysis of volatile organic compounds (VOCs) in air, water, and soil for emergency response, environmental, hazardous waste, industrial hygiene, process monitoring, and medical applications. The HAPSITE® Headspace sampling system supports the HAPSITE® Smart Chemical Identification System in detecting and identifying VOCs in water or soil on-site or from another location. INFICON recommends storing the HAPSITE® Smart in extended standby mode. This keeps the NEG (pump) operating at 400°C and the ion pump ON to maintain proper vacuum conditions. Extended standby ensures the battery is charged and ready for deployment/response. While extended standby is recommended, it is not a substitute for system use and it is not a feature to extend the time period between system operations. Using the system or running a weekly Blank Run is the best method to ensure overall operational readiness. The Guidance Document (HAPSITE® Field Guide) referenced above is designed to provide user’s the capability to maximize the use of deployment technology at both garrison and deployed environments in both routine and emergency response situations.
27
AFQTP 4B051-7 Journeyman Training Guide: Occupational & Environmental Air/Gas Sampling
TASK STEPS
START UP FROM STANDBY MODE: (These steps are ONLY for resuming use when the HAPSITE® has been placed in STANDBY MODE.) 1. Using your thumbs, Open front panel of HAPSITE®.1 2. Insert purple-banded Nitrogen gas canister into the opening with the purple stripe2. 3. Insert yellow-banded Internal Standard gas canister into bottom canister opening marked with yellow stripe.2 4. Insert a fully charged battery into the rectangular opening to the left of the canister openings.3 5. Ensure the sample loop is installed.4 6. Naviigate to main menu. 7. Allow the HAPSITE® to boot up and run auto tune check (self-calibration). 5 HAPSITE® SEQUENCE OF OPERATION (SURVEY MODE): 1. Ensure HASPITE is turned on and warmed up. 2. Navigate to main screen. 3. Choose “Return to Main Menu” 4. Choose “Run Method” 5. Choose JPMESG Rev 2 Methods 6. Choose JPMESG Survey 7. Ensure Tune parameters are OK, 8. Press Run and sample background in ambient air surrounding for about a minute to allow the background to drop and
stabilize.6 9. Get a volatile organic compound (VOC) sample to test (e.g., toluene, acetone, gasoline). 10. Hold probe over sample for up to one minute while monitoring the TIC count. Look for a response (spike) and pull
probe away. (Remember: TIC count over 60 million is indicative of oversaturation.) 11. Keep running the HAPSITE® for at least one minute away from the sample and allow background to drop again. 12. After the clean background has been obtained leave the HAPSITE® running in the clean area for a minimum of a minute
prior to entering a suspected contaminated area. 13. When entering an area ensure the TIC count is being observed at all times, if the TIC count reaches 60,000,000 back
away from the area. 14. Return to the clean area and let HAPSITE® run for 1 minute 15. Select Escape to end the method and return to main menu. 16. Review findings HAPSITE® SEQUENCE OF OPERATION (SAMPLE LOOP BLANK): 1. Ensure HASPITE is turned on and warmed up. 2. Navigate to main screen. 3. Choose “Return to Main Menu” 4. Choose “Run Method” 5. Choose JPMESG Rev 2 Methods 6. Choose JPMESG GCMS 7. Ensure the Sample Loop is installed with the correct cover. Sample Loop cover will have Sample Loop written on it. 8. Select JPMESG Loop Method 9. Select gc_sl. 10. Press Run. 11. HAPSITE® will start sampling as soon as the user selects the run button. 12. Sample collection time is 60 seconds, collection of sample is indicated on the bottom of the screen as “loop fill” 13. When complete, review the blank run. It should show the following:8
• Air Peak at 1:20 +/- 10 seconds • Internal Standard #1 at 2:30 minutes +/- 10 seconds (TRIS) • Internal Standard #2 at: 8:00 minutes +/- 10 seconds (BPFB) • No additional peaks and low background
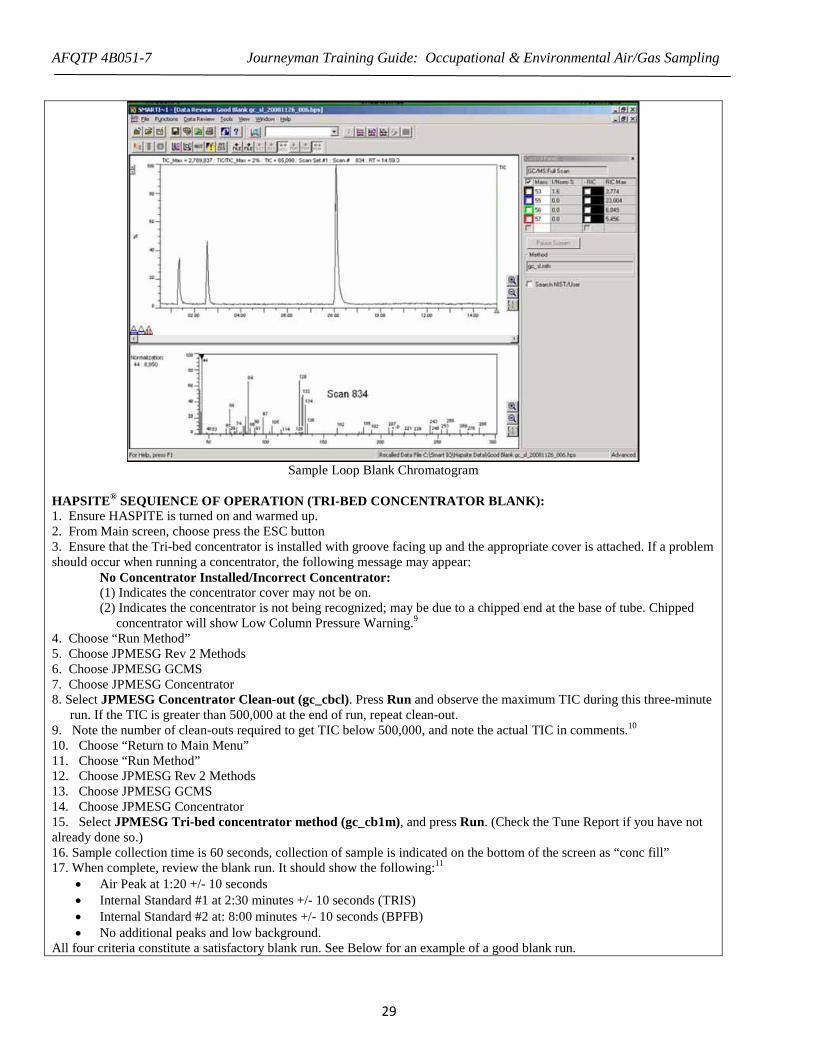
All four criteria constitute a satisfactory blank run. See the figure below for an example of a good Sample Loop blank run with all three peaks identified and no additional peaks.
28
AFQTP 4B051-7 Journeyman Training Guide: Occupational & Environmental Air/Gas Sampling
Sample Loop Blank Chromatogram
HAPSITE® SEQUIENCE OF OPERATION (TRI-BED CONCENTRATOR BLANK): 1. Ensure HASPITE is turned on and warmed up. 2. From Main screen, choose press the ESC button 3. Ensure that the Tri-bed concentrator is installed with groove facing up and the appropriate cover is attached. If a problem should occur when running a concentrator, the following message may appear:
No Concentrator Installed/Incorrect Concentrator: (1) Indicates the concentrator cover may not be on. (2) Indicates the concentrator is not being recognized; may be due to a chipped end at the base of tube. Chipped
concentrator will show Low Column Pressure Warning.9 4. Choose “Run Method” 5. Choose JPMESG Rev 2 Methods 6. Choose JPMESG GCMS 7. Choose JPMESG Concentrator 8. Select JPMESG Concentrator Clean-out (gc_cbcl). Press Run and observe the maximum TIC during this three-minute
run. If the TIC is greater than 500,000 at the end of run, repeat clean-out. 9. Note the number of clean-outs required to get TIC below 500,000, and note the actual TIC in comments.10 10. Choose “Return to Main Menu” 11. Choose “Run Method” 12. Choose JPMESG Rev 2 Methods 13. Choose JPMESG GCMS 14. Choose JPMESG Concentrator 15. Select JPMESG Tri-bed concentrator method (gc_cb1m), and press Run. (Check the Tune Report if you have not already done so.) 16. Sample collection time is 60 seconds, collection of sample is indicated on the bottom of the screen as “conc fill” 17. When complete, review the blank run. It should show the following:11
• Air Peak at 1:20 +/- 10 seconds • Internal Standard #1 at 2:30 minutes +/- 10 seconds (TRIS) • Internal Standard #2 at: 8:00 minutes +/- 10 seconds (BPFB) • No additional peaks and low background.
All four criteria constitute a satisfactory blank run. See Below for an example of a good blank run.
29

AFQTP 4B051-7 Journeyman Training Guide: Occupational & Environmental Air/Gas Sampling
Tri-bed Concentrator Blank Chromatogram
HAPSITE® SEQUENCE OF OPERATION (HEADSPACE SAMPLING SYSTEM (HSS) SET-UP METHOD):12 1. Ensure HAPSITE® is in Extended Standby Mode. 2. Attach “Y”-Cable Power Splitter. Connect the single connector end of the cable to the Convertec, power supply.
Connect one of the split ends of the cable to the left side of the HAPSITE® and the other to the back of the Headspace unit.
Back of HAPSITE® Analytical Module
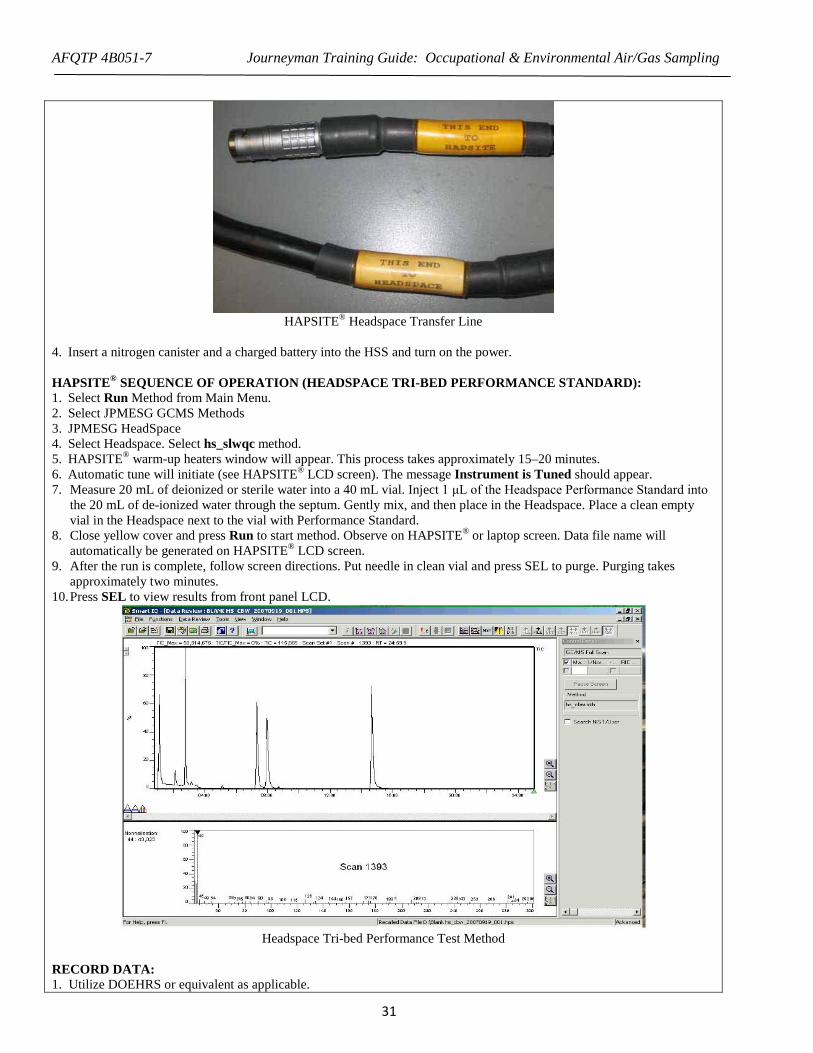
3. Remove probe from the HAPSITE®. Connect the HSS transfer line and ensure that the end of the HSS transfer line with
the yellow label marked “This End to HAPSITE®” is connected to HAPSITE®. Connect the end of transfer line with the white label marked “This End to Headspace” to the back of the HSS.
30
AFQTP 4B051-7 Journeyman Training Guide: Occupational & Environmental Air/Gas Sampling
HAPSITE® Headspace Transfer Line
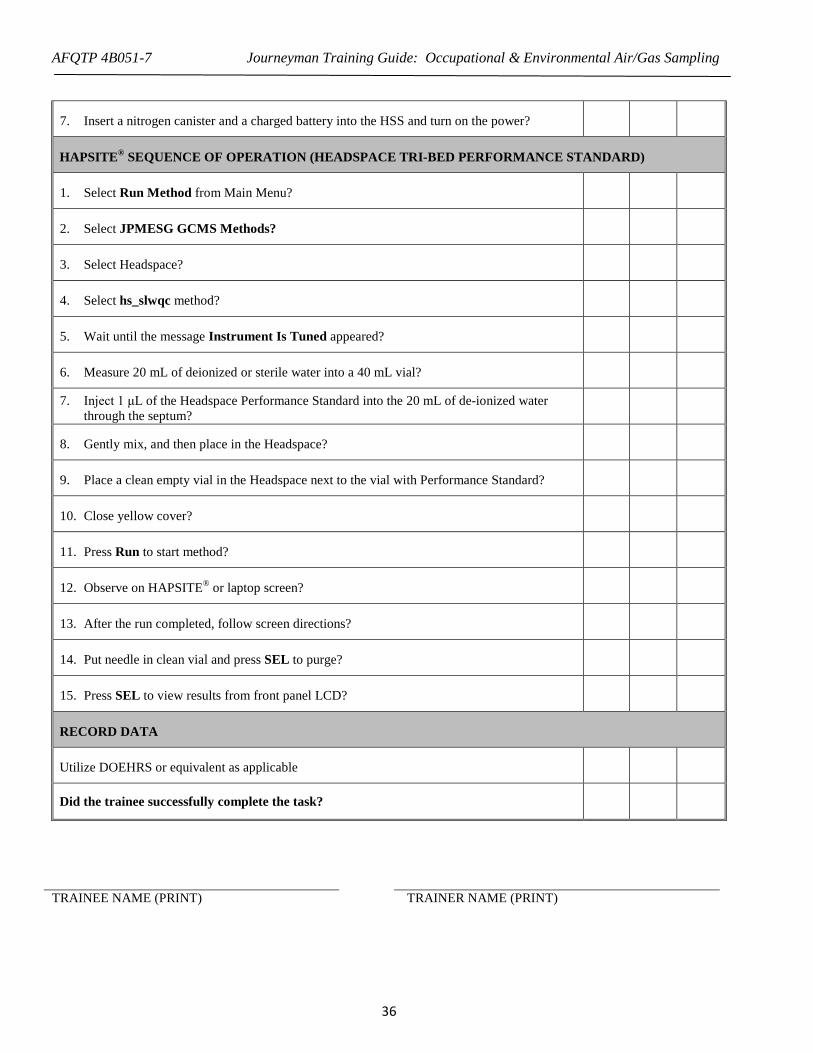
4. Insert a nitrogen canister and a charged battery into the HSS and turn on the power. HAPSITE® SEQUENCE OF OPERATION (HEADSPACE TRI-BED PERFORMANCE STANDARD): 1. Select Run Method from Main Menu. 2. Select JPMESG GCMS Methods 3. JPMESG HeadSpace 4. Select Headspace. Select hs_slwqc method. 5. HAPSITE® warm-up heaters window will appear. This process takes approximately 15–20 minutes. 6. Automatic tune will initiate (see HAPSITE® LCD screen). The message Instrument is Tuned should appear. 7. Measure 20 mL of deionized or sterile water into a 40 mL vial. Inject 1 μL of the Headspace Performance Standard into
the 20 mL of de-ionized water through the septum. Gently mix, and then place in the Headspace. Place a clean empty vial in the Headspace next to the vial with Performance Standard.
8. Close yellow cover and press Run to start method. Observe on HAPSITE® or laptop screen. Data file name will automatically be generated on HAPSITE® LCD screen.
9. After the run is complete, follow screen directions. Put needle in clean vial and press SEL to purge. Purging takes approximately two minutes.
10. Press SEL to view results from front panel LCD.
Headspace Tri-bed Performance Test Method
RECORD DATA: 1. Utilize DOEHRS or equivalent as applicable.
31
AFQTP 4B051-7 Journeyman Training Guide: Occupational & Environmental Air/Gas Sampling LOCAL REQUIREMENTS:
NOTES: 1. Place hands on top of front panel, using thumbs, pull panel down and outward to open. Care should be taken not to tear
the seal. 2. Insert instructions for canisters are located on the inside of the front panel and require the operator to press and hold the
PUSH button located to the right of the containment area while inserting canister. With canister pushed in, release the button and this should engage the canister to stay in the containment area. If you can pull it out then it was not inserted properly.
3. The battery is loaded in the opening to the left of the canisters. The INFICON name will be in the upper left corner of
the battery and the TEST button in the upper right corner when the battery has been inserted correctly. When the HAPSITE® is in extended standby a battery should be in the machine. The battery will be recharged while in extended standby.
4. Sample loop is located to the right of the canisters. When installing the Sample Loop do not over tighten. 5. When tune check is complete, PRESS ANY BUTTON TO CONTINUE will appear at the top of the display screen. Any
button you press on the HAPSITE® will cause the display window to show the MAIN MENU. 6. TIC generally should be less than 200,000. If not, check area for inteferents such as chemicals that may be in the area. 7. Instrument will continuously run until you stop it while in Survey Mode. 8. Monitoring what a normal blank looks like is one step in verifying the operation of the HAPSITE® and determining if
there is a problem. If there are additional peaks in the blank spectrum, and they cannot be removed with additional blank runs, review your blank chromatogram, note the additional analytes, and contact the ESOH Service Center.
9. It is important to blow out the ferrule chamber to ensure broken pieces of the chipped tube are not imbedded. 10. Clean-outs required. 11. If there are additional peaks in the blank spectrum, and they cannot be removed with additional blank runs, AND they
are not getting in the way of other analytes, note the additional analytes, and adjust your sample spectrum accordingly. Remember that in future samples, if the chemical that showed up in the blank run is sampled, there will be an increase in peak heights.
12. The Headspace Performance Standard is a test of the HAPSITE® and Headspace connections using the Tri-bed
concentrator.
32
AFQTP 4B051-7 Journeyman Training Guide: Occupational & Environmental Air/Gas Sampling
PERFORMANCE CHECKLIST
STS Line Item 4.5.2.6.3: Portable GC/MS (HAPSITE®)
Proficiency Code: 3c
PC Definition: Can do all parts of the task. Needs only a spot check of completed work. Can identify why and when the task must be done and why each step is needed.
DID THE TRAINEE…
YES NO
START UP FROM STANDBY MODE
1. Use thumbs to open front panel of HAPSITE®?
2. Insert purple-banded Nitrogen gas canister into the opening with the purple stripe?
3. Insert yellow-banded Internal Standard gas canister into bottom canister opening marked with yellow stripe?
4. Insert a fully charged battery into the rectangular opening to the left of the canister openings?
5. Ensure the sample loop is installed?
6. Press and hold the power button located on the outside of the HAPSITE®s face panel?
7. Allow the HAPSITE® to boot up and run auto tune check (self-calibration)?
HAPSITE® SEQUENCE OF OPERATION (SURVEY MODE)
1. Ensure HASPITE is turned on and warmed up?
2. From Main screen, choose Press the ESC button?
3. Choose Return to Main Menu?
4. Choose Run Method?
5. Choose JPMESG Rev 2 Methods?
6. Choose JPMESG Survey?
7. Ensure Tune parameters are OK
33

AFQTP 4B051-7 Journeyman Training Guide: Occupational & Environmental Air/Gas Sampling
8. Press Run and sample background in ambient air surrounding for about a minute to allow the background to drop and stabilize?
9. Get a volatile organic compound (VOC) sample to test?
10. Hold probe over sample for up to one minute while monitoring the TIC count?
11. Keep running the HAPSITE® for at least one minute away from the sample and allow background to drop again repeating steps 4 and 5 two or three times?
12. After the clean background has been obtained leave the HAPSITE® running in the clean area for a minimum of a minute prior to entering a suspected contaminated area?
13. When entering an area ensure the TIC count is being observed at all times?
14. Return to the clean area and let HAPSITE® run for one minute?
15. Select ESC to end the method and return to main menu?
16. Review findings?
HAPSITE® SEQUENCE OF OPERATION (SAMPLE LOOP BLANK)
1. Ensure HASPITE is turned on and warmed up?
2. From Main screen, choose press the ESC button?
3. Choose Return to Main Menu?
4. Choose Run Method?
5. Choose JPMESG Rev 2 Methods?
6. Choose JPMESG GCMS?
7. Ensure the Sample Loop is installed with the correct cover?
8. Select JPMESG Loop Method?
9. Select gc_sl?
10. Press Run?
11. Allow sample collection time of 60 seconds?
12. When complete, review the blank run?
HAPSITE® SEQUIENCE OF OPERATION (TRI-BED CONCENTRATOR BLANK)
1. Ensure HASPITE® is turned on and warmed up?
2. From Main screen, choose the ESC button?
34

AFQTP 4B051-7 Journeyman Training Guide: Occupational & Environmental Air/Gas Sampling
3. Ensure that the Tri-bed concentrator is installed with groove facing up and the appropriate cover is attached?
4. Choose Return to Main Menu?
5. Choose Run Method?
6. Choose JPMESG Rev 2 Methods?
7. Choose JPMESG GCMS?
8. Choose JPMESG Concentrator?
9. Select JPMESG Concentrator Clean-out (gc_cbcl)?
10. Press Run and observe the maximum TIC during this three-minute run?
11. Note the number of clean-outs required to get TIC below 500,000, and note the actual TIC in comments?
12. Choose Return to Main Menu?
13. Choose Run Method?
14. Choose JPMESG Rev 2 Methods?
15. Choose JPMESG GCMS?
16. Choose JPMESG Concentrator?
17. Select JPMESG Tri-bed Concentrator Method (gc_cb1m)?
18. Press Run?
19. Allow a sample collection time of 60 seconds?
20. When complete, review the blank run?
HAPSITE® SEQUENCE OF OPERATION (HEADSPACE SAMPLING SYSTEM (HSS) SET-UP METHOD)
1. Ensure HAPSITE® is in Extended Standby Mode?
2. Attach “Y”-Cable Power Splitter?
3. Remove probe from the HAPSITE®?
4. Connect the HSS transfer line?
5. Ensure that the end of the HSS transfer line with the yellow label marked “This End to HAPSITE®” is connected to HAPSITE®?
6. Connect the end of transfer line with the white label marked “This End to Headspace” to the back of the HSS?
35
AFQTP 4B051-7 Journeyman Training Guide: Occupational & Environmental Air/Gas Sampling
7. Insert a nitrogen canister and a charged battery into the HSS and turn on the power?
HAPSITE® SEQUENCE OF OPERATION (HEADSPACE TRI-BED PERFORMANCE STANDARD)
1. Select Run Method from Main Menu?
2. Select JPMESG GCMS Methods?
3. Select Headspace?
4. Select hs_slwqc method?
5. Wait until the message Instrument Is Tuned appeared?
6. Measure 20 mL of deionized or sterile water into a 40 mL vial?
7. Inject 1 μL of the Headspace Performance Standard into the 20 mL of de-ionized water through the septum?
8. Gently mix, and then place in the Headspace?
9. Place a clean empty vial in the Headspace next to the vial with Performance Standard?
10. Close yellow cover?
11. Press Run to start method?
12. Observe on HAPSITE® or laptop screen?
13. After the run completed, follow screen directions?
14. Put needle in clean vial and press SEL to purge?
15. Press SEL to view results from front panel LCD?
RECORD DATA
Utilize DOEHRS or equivalent as applicable
Did the trainee successfully complete the task?
TRAINEE NAME (PRINT) TRAINER NAME (PRINT)
36

AFQTP 4B051-7 Journeyman Training Guide: Occupational & Environmental Air/Gas Sampling
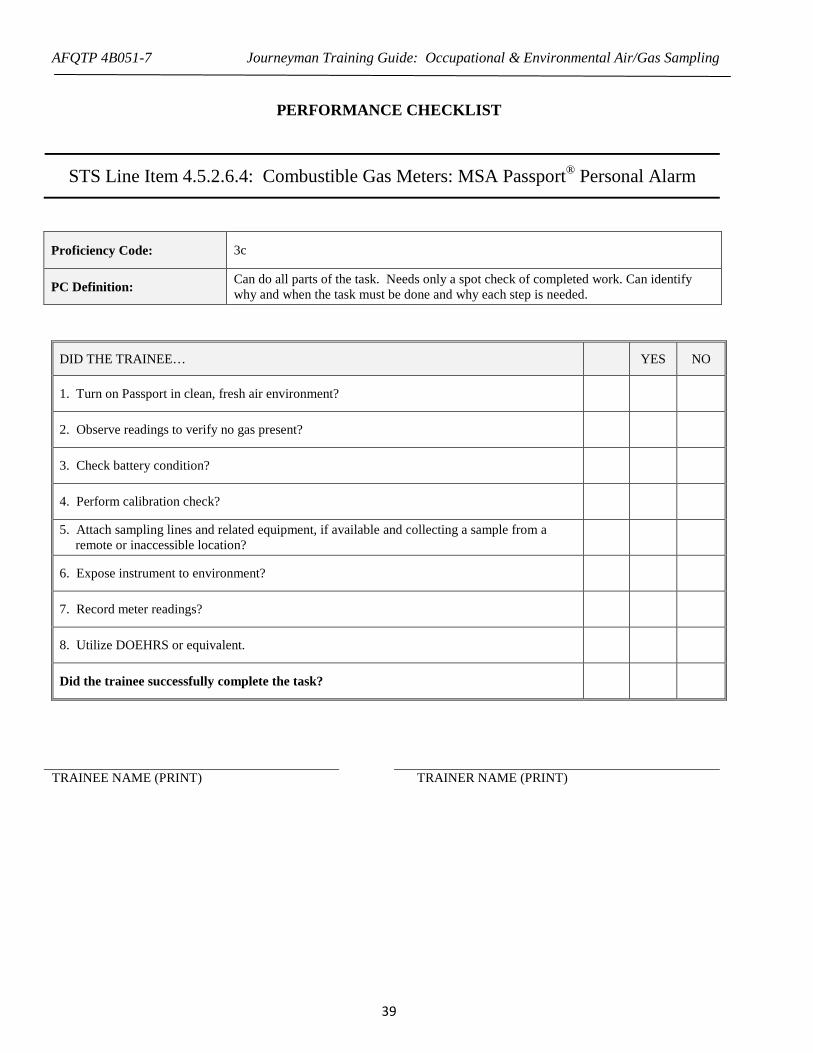
STS Line Item 4.5.2.6.4: Combustible Gas Meters: MSA Passport® Personal Alarm*
TRAINER GUIDANCE
Proficiency Code: 3c
PC Definition: Can do all parts of the task. Needs only a spot check of completed work. Can identify why and when the task must be done and why each step is needed.
Prerequisites: None
Training References: MSA Passport® Personal Alarm Instruction Manual
Additional Supporting References:
MSA Passport® Personal Alarm Technical Manual http://media.msanet.com/NA/USA/PortableInstruments/CombinationInstrumentsandCombustibleGasIndicators/PassportPersonalAlarm/803919.pdf
CDC Reference: 4B051
Training Support Material: • MSA Passport® Personal Alarm with fully charged battery pack/power source • Calibration gas
Specific Techniques: Conduct hands-on training and evaluation of calibration and operation of equipment with verification of steps.
Criterion Objective: Given a Passport® Personal Alarm, demonstrate how to operate and calibrate it successfully completing all the checklist items with no trainer assistance.
Notes: * The Passport® Personal Alarm detects oxygen (O2), carbon monoxide (CO), hydrogen sulfide (H2S), and sulfur dioxide (SO2). The Passport® Personal Alarm detects gases and vapors in air only. It cannot measure combustible or toxic gases in reducing atmospheres, furnace stacks, or environments with inert gas backgrounds. The Passport Alarm measures combustible gases and vapors; however, it cannot measure the presence of combustible airborne mists such as lubricating oils.
37

AFQTP 4B051-7 Journeyman Training Guide: Occupational & Environmental Air/Gas Sampling
TASK STEPS
1. Turn on Passport in clean, fresh air environment.1 2. Observe readings to verify no gas present. 3. Check battery condition. 4. Perform calibration check.2 5. Attach sampling lines and related equipment, if available and collecting a sample from a remote or inaccessible
location.3 6. Expose instrument to environment. 7. Record meter readings. 8. Utilize DOEHRS or equivalent. LOCAL REQUIREMENTS:
NOTES: 1. When the unit is turned on it responds with the following:
• backlight flashes • screen flashes • alarm sounds • alarm lights flash • major electronic components are tested automatically
2. Calibration checks must be made frequently if materials such as silicone, silicates, or lead-containing compounds such
as leaded gasoline are suspected to be present in the tested atmosphere. If you do not recalibrate, the instrument may give false readings and endanger life and health. To perform a calibration check, do the following steps:
a. Attach the pump module or calibration cap to the Passport Alarm, orienting the inlet fitting to point toward the
battery pack b. Attach the calibration adapter to the calibration cap or pump module c. Attach the regulator to the cylinder d. Connect the black tubing to the regulator e. Open the valve on the regulator and connect the other end of the tubing to the inlet fitting f. Observe readings are within limits stated on the calibration cylinder
3. To attach probe to sampling line, follow these steps:
a. Grasp the probe handle by the top two sections [the large section (cap) with the MSA logo and the center section (base) with the label].
b. Unscrew lower section (guard) from the label section. c. Feed male end of the sample line through the guard and screw into the exposed connector ring on the probe. d. Screw the guard back onto the base.
38
AFQTP 4B051-7 Journeyman Training Guide: Occupational & Environmental Air/Gas Sampling
PERFORMANCE CHECKLIST
STS Line Item 4.5.2.6.4: Combustible Gas Meters: MSA Passport® Personal Alarm
Proficiency Code: 3c
PC Definition: Can do all parts of the task. Needs only a spot check of completed work. Can identify why and when the task must be done and why each step is needed.
DID THE TRAINEE… YES NO
1. Turn on Passport in clean, fresh air environment?
2. Observe readings to verify no gas present?
3. Check battery condition?
4. Perform calibration check?
5. Attach sampling lines and related equipment, if available and collecting a sample from a remote or inaccessible location?
6. Expose instrument to environment?
7. Record meter readings?
8. Utilize DOEHRS or equivalent.
Did the trainee successfully complete the task?
TRAINEE NAME (PRINT) TRAINER NAME (PRINT)
39

AFQTP 4B051-7 Journeyman Training Guide: Occupational & Environmental Air/Gas Sampling
STS Line Item 4.5.2.6.4: Combustible Gas Meters: MSA Sirius® Multigas Detector*
TRAINER GUIDANCE
Proficiency Code: 3c
PC Definition: Can do all parts of the task. Needs only a spot check of completed work. Can identify why and when the task must be done and why each step is needed.
Prerequisites: None
Training References: MSA Sirius® Multigas Detector Operating Manual
Additional Supporting References:
http://www.msanorthamerica.com/catalog/product16577.html http://www.msanorthamerica.com/
CDC Reference: 4B051
Training Support Material: • MSA Sirius® Multigas Detector with fully charged battery/power source • Calibration gas
Specific Techniques: Conduct hands-on training and evaluation of calibration and operation of equipment with verification of steps.
Criterion Objective: Given a Sirius® Multigas Detector, demonstrate how to operate it successfully completing all the checklist items with no trainer assistance.
Notes: * The Sirius® Multigas Detector is designed to detect gases and vapors in air only and to detect only specified toxic gases for which a sensor is installed. Use only Teflon sampling lines for reactive gases such as chlorine (CL2), phosphine (PH3), ammonia (NH3), hydrogen cyanide (HCN), and for semivolatile organic compounds such as gasoline and jet fuels. Do not use silicone tubing or sampling lines. The operating manual contains additional warnings and acceptable usage limits for the unit as well as a discussion of how the unit functions.
40

AFQTP 4B051-7 Journeyman Training Guide: Occupational & Environmental Air/Gas Sampling
TASK STEPS
Turning ON the Sirius® Multigas Detector 1. Press the Power ON button.1
1. Perform Fresh Air Set Up Option for automatic zero adjustment of the Sirius® Multigas Detector sensors.2 Verifying Pump Operation
1. Turn ON the Sirius® Multigas Detector.3 2. Once gas readings are displayed, plug the free end of the sampling line or probe.4
3. Check the pump before each day's use. 4. Press the RESET/ button to reset the alarm and restart the pump. 8
Clearing an Alarm
1. Correct any flow blockage. 2. Press the RESET/ button. The Pump will now restart.
Conducting a Pre-Operational Check The pre-operational check is simple and should only take about one minute. Perform this check before each day's use for each installed sensor.
1. Turn ON the Sirius® Multigas Detector in clean, fresh air. 2. Verify that readings indicate no gas is present. 3. Attach regulator (supplied with calibration kit) to the cylinder. 4. Connect tubing (supplied with calibration kit) to the regulator. 5. Attach other end of tubing to the instrument. 6. Open the valve on the regulator, if so equipped. 7. Determine that the reading on the Sirius® Multigas Detector display is within the limits stated on the calibration
cylinder or limits pre-determined by your flight. 8. If necessary, change cylinder to introduce other calibration gases. 9. If readings are not within these limits, the Sirius® Multigas Detector requires recalibration.6
Conducting a Calibration Check
1. Turn ON the Sirius® Multigas Detector in clean, fresh air. 2. Verify that readings indicate no gas is present. 3. Attach regulator (supplied with calibration kit) to the cylinder. 4. Connect tubing (supplied with calibration kit) to the regulator. 5. Attach other end of tubing to the instrument. 6. Open the valve on the regulator, if so equipped.7
Performing Recalibration (if necessary)
1. Turn ON the instrument and verify that battery has sufficient life. 2. Wait until the Measure Gases page appears. 3. Push and hold the RESET/ button until CAL ZERO? flashes on the display. 4. Push the ON-OFF/ACCEPT button to zero the instrument.8
5. Connect the appropriate calibration gas (MSA recommends 100ppm isobutylene) to the instrument by connecting one end of the tubing to the pump inlet on the instrument and the other end of tubing to the cylinder regulator (supplied in the calibration kit).*
6. Open the valve on the regulator, if so equipped. 7. Push the ON-OFF/ACCEPT button to calibrate (span) the instrument.9
8. Remove the tubing from the instrument.
41
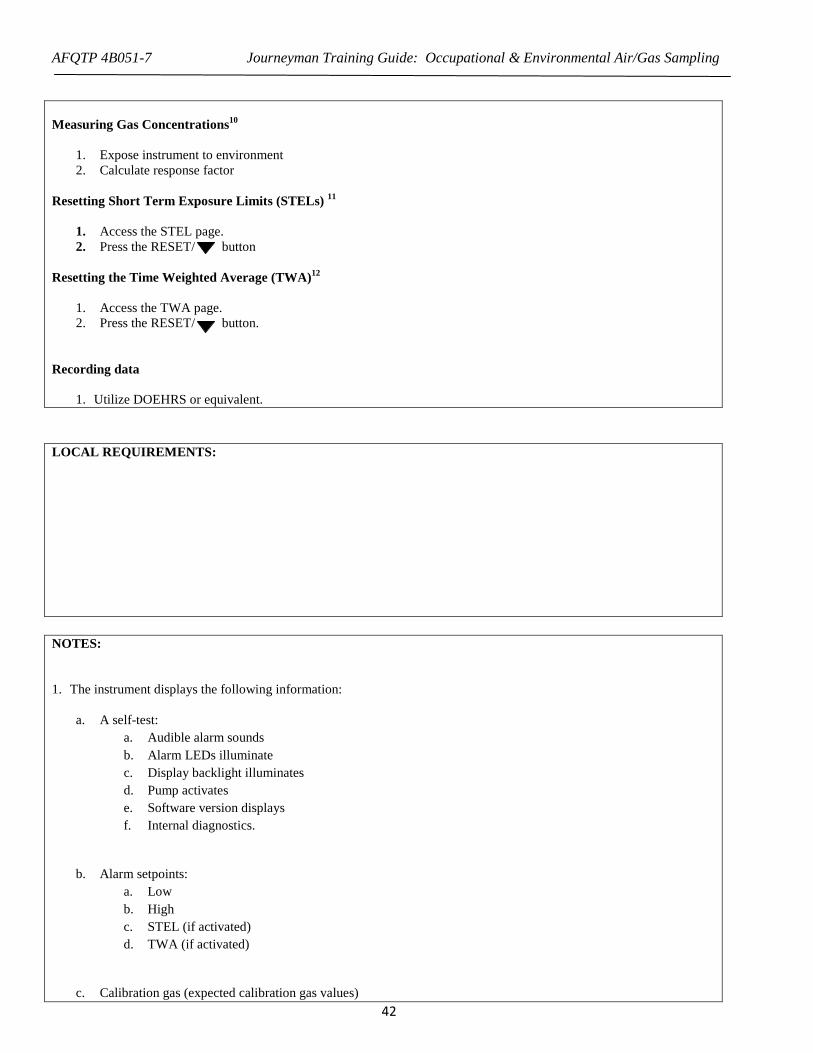
AFQTP 4B051-7 Journeyman Training Guide: Occupational & Environmental Air/Gas Sampling Measuring Gas Concentrations10
1. Expose instrument to environment 2. Calculate response factor
Resetting Short Term Exposure Limits (STELs) 11
1. Access the STEL page. 2. Press the RESET/ button
Resetting the Time Weighted Average (TWA)12
1. Access the TWA page. 2. Press the RESET/ button.
Recording data
1. Utilize DOEHRS or equivalent. LOCAL REQUIREMENTS:
NOTES: 1. The instrument displays the following information:
a. A self-test:
a. Audible alarm sounds b. Alarm LEDs illuminate c. Display backlight illuminates d. Pump activates e. Software version displays f. Internal diagnostics.
b. Alarm setpoints: a. Low b. High c. STEL (if activated) d. TWA (if activated)
c. Calibration gas (expected calibration gas values) 42

AFQTP 4B051-7 Journeyman Training Guide: Occupational & Environmental Air/Gas Sampling
d. Time and date (if data logging option installed)
e. Last CAL date (if data logging option installed) —The Sirius® Multigas Detector is equipped with a “last successful calibration date” feature. The date shown is the last date that all installed sensors were successfully calibrated. LAST CAL is displayed with this date in the following format: MM/DD/YY
f. Instrument warm-up period
g. Fresh Air Setup (FAS) option.
2. Persons responsible for the use of the Sirius® Multigas Detector must determine whether or not the Fresh Air Setup
option should be used. The user's abilities, training and normal work practices must be considered when making this decision.
Warning: Do not activate the Fresh Air Setup unless you are certain you are in fresh, uncontaminated air; otherwise, inaccurate readings can occur which can falsely indicate that a hazardous atmosphere is safe. If you have any doubts as to the quality of the surrounding air, do not use the Fresh Air Setup feature. Do not use the Fresh Air Setup as a substitute for daily calibration checks. The calibration check is required to verify span accuracy. Failure to follow this warning can result in serious personal injury or death.
To perform a Fresh Air Setup, push the ON/OFF button while ZERO? is flashing. The Fresh Air Setup (FAS) has limits. If a hazardous level of gas is present, the Sirius® Multigas Detector ignores the FAS command and goes into alarm.
Once the instrument self check is complete, ZERO? flashes for 10 seconds. If no buttons are pushed, the ZERO? automatically stops flashing after the 10 seconds have expired and the FAS is not performed.
To immediately skip the FAS, push the RESET/ button.
3. The pump motor will start fast and then slows down as the instrument adjusts the power to run the pump.
4. If the pump motor shuts down and an alarm sounds, PUMP ALARM will flash on the display and the readings on the display may change. When the pump inlet, sample line or probe is blocked, the pump alarm must activate. If the alarm does not activate, check the sample line and probe for leaks. Once leak is fixed, re-check pump alarm by blocking flow.
5. Warning: Perform a blocked flow test before each day’s use. Do not use the pump, sample line, or probe unless the pump
alarm activates when the flow is blocked. Lack of an alarm is an indication that a sample may not be drawn to the sensors, which could cause inaccurate readings. Failure to follow the above can result in serious personal injury or death.
During operation, a pump alarm may occur when the flow system is blocked, pump is inoperative, and sample lines are attached or removed. When the instrument is in a gas alarm, the pump alarm may not display until gas alarm is cleared.
6. The presence of other calibration gases may cause the PID to under range, indicated by dashes for the displayed VOC reading.
43
AFQTP 4B051-7 Journeyman Training Guide: Occupational & Environmental Air/Gas Sampling
7. The reading on the Sirius® Multigas Detector display should be within the limits stated on the calibration cylinder or
limits which are predetermined by the user. If necessary, change cylinder to introduce other calibration gases. If readings are not within these limits, the Sirius Multigas Detector requires recalibration.
8. Instrument must be in fresh air to perform the zero. CAL ZERO flashes. To skip the Zero procedure and move directly to
the calibration span procedure, push the RESET/ button. If no button is pushed for 30 seconds, the instrument returns to the Measure mode. Once the zeros are set, CAL SPAN? flashes
9. CAL SPAN flashes for approximately 90 seconds. If autocalibration sequence passes, the instrument beeps three times
and returns to the Measure mode. To skip calibration and return to the Measure mode, push the RESET/ button. If no button is pushed for 30 seconds, it will return to the Measure page.
10. Warning: Never let the end of the sampling line touch or go under any liquid surface. If liquid is sucked into the
instrument, readings will be inaccurate and the instrument could be damaged. We recommend the use of an MSA Sample Probe (P/N 10042621, 10042622, 10040589, or equivalent) containing a special membrane filter, permeable to gas but impermeable to water, to prevent such an occurrence.
The Sirius® Multigas Detector can be equipped to detect combustible gases in the atmosphere. a. Alarms sound when concentrations reach:
i. Alarm Setpoint or ii. 100% LEL (Lower Explosive Limit), 5% CH4.
b. When the combustible gas indication reaches the Alarm Setpoint:
i. Alarm sounds ii. Alarm lights flash
iii. % LEL or CH4 flag above the concentration flashes.
c. To silence the alarm, press the RESET/ button. The alarm will stay silent if the alarm condition has cleared.
d. When the combustible gas indication reaches 100% LEL or 5% CH4, the LockAlarm™ circuit locks the combustible gas reading and alarm and:
i. Alarm sounds
ii. Alarm lights flash iii. 100 (or 5.00 in CH4 mode) appears on the display and flashes.
e. This alarm cannot be reset with the RESET/ button. After moving to a safe, fresh-air environment, reset the alarm by turning OFF the instrument and turning it ON again.
To determine a response factor for a target chemical, perform the following procedure:
44

AFQTP 4B051-7 Journeyman Training Guide: Occupational & Environmental Air/Gas Sampling
1. Calibrate the Sirius Detector using isobutylene as the span gas.
2. On the monitor, set the sample gas name to isobutylene.
3. Apply a known concentration of the target chemical to the monitor and note the concentration reported in the display.
4. The response factor for the target chemical relative to isobutylene:
RF target gas = Actual known concentration Concentration reported by instrument
For example: A monitor is calibrated on isobutylene, and has isobutylene defined as the sample gas. When sampling 106 ppm of benzene in air, the instrument reports a concentration of 200 ppm. In this example, the response factor for benzene relative to isobutylene would be: RF benz = 106 ppm known conc. benzene = 0.53 200 ppm reported When surveying, if benzene is selected as the sample gas in the Response Factor page, and 0.53 is entered into the monitor as the response factor, the instrument would use this response factor to automatically correct the displayed concentration into PPM benzene. If a chemical has a response factor between zero and one, the monitor has a higher detector response for this chemical than isobutylene. If the response factor is greater than one, the monitor has a lower detector response for this chemical than isobutylene.
11. The STEL alarm is calculated over a 15-minute exposure. Calculation examples are as follows:
• Assume the detector has been running for at least 15 minutes:
• 15-minute exposure of 35 PPM:
(15 minutes x 35 PPM) = 35 PPM 15 minutes
• 10-minute exposure of 35 PPM
• 5-minute exposure of 15 PPM:
(10 minutes x 35 PPM) + (5 minutes x 15 PPM) = 28 PPM
15 minutes
45
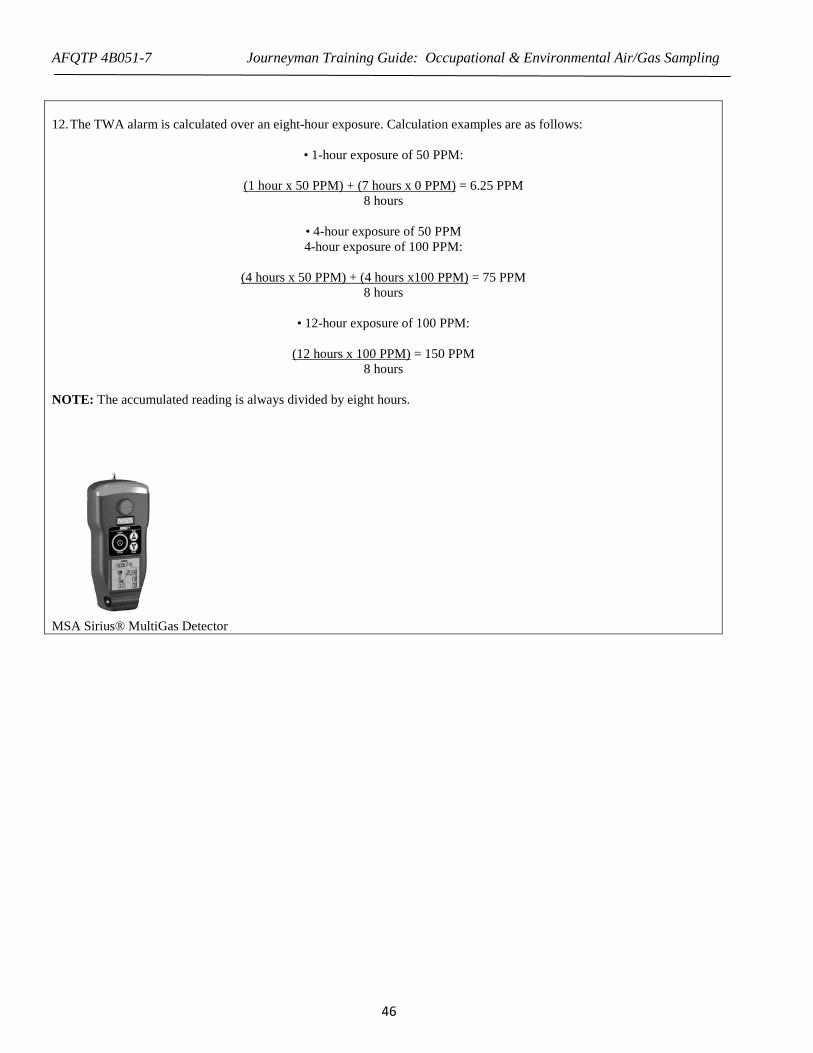
AFQTP 4B051-7 Journeyman Training Guide: Occupational & Environmental Air/Gas Sampling 12. The TWA alarm is calculated over an eight-hour exposure. Calculation examples are as follows:
• 1-hour exposure of 50 PPM:
(1 hour x 50 PPM) + (7 hours x 0 PPM) = 6.25 PPM
8 hours
• 4-hour exposure of 50 PPM 4-hour exposure of 100 PPM:
(4 hours x 50 PPM) + (4 hours x100 PPM) = 75 PPM
8 hours
• 12-hour exposure of 100 PPM:
(12 hours x 100 PPM) = 150 PPM 8 hours
NOTE: The accumulated reading is always divided by eight hours.
MSA Sirius® MultiGas Detector
46

AFQTP 4B051-7 Journeyman Training Guide: Occupational & Environmental Air/Gas Sampling
PERFORMANCE CHECKLIST
STS Line Item 4.5.2.6.4: Combustible Gas Meters: MSA Sirius® Multigas Detector
Proficiency Code: 3c
PC Definition: Can do all parts of the task. Needs only a spot check of completed work. Can identify why and when the task must be done and why each step is needed.
DID THE TRAINEE…
YES NO
TURNING ON THE SIRIUS® MULTIGAS DETECTOR
1. Press the Power ON button?
2. Perform Fresh Air Set Up Option for automatic zero adjustment of the Sirius® MultiGas Detector sensors?
VERIFYING PUMP OPERATION
1. Turn ON the Sirius® MultiGas Detector?
2. Once gas readings were displayed, plug the free end of the sampling line or probe?
3. Check the pump before use?
4. Press the RESET/ button to reset the alarm and restart the pump?
CLEARING AN ALARM
1. Correct any flow blockage?
2. Press the RESET/ button to restart the pump?
CONDUCTING A PRE-OPERATIONAL CHECK
1. Turn ON the Sirius® Multigas Detector in clean, fresh air?
2. Verify that readings indicate no gas is present?
3. Attach regulator (supplied with calibration kit) to the cylinder?
4. Connect tubing (supplied with calibration kit) to the regulator?
5. Attach other end of tubing to the instrument?
6. Open the valve on the regulator, if so equipped?
47
AFQTP 4B051-7 Journeyman Training Guide: Occupational & Environmental Air/Gas Sampling
7. Determine that the reading on the Sirius® Multigas Detector display is within the limits stated on the calibration cylinder or limits pre-determined by your flight?
8. If necessary, change cylinder to introduce other calibration gases?
9. If readings are not within these limits, the Sirius® Multigas Detector requires recalibration?
CONDUCTING A CALIBRATION CHECK
1. Turn ON the Sirius Multigas Detector in clean, fresh air?
2. Verify that readings indicate no gas is present?
3. Attach regulator (supplied with calibration kit) to the cylinder?
4. Connect tubing (supplied with calibration kit) to the regulator?
5. Attach other end of tubing to the instrument?
6. Open the valve on the regulator, if so equipped?
PERFORMING RECALIBRATION (IF NECESSARY)
1. Turn ON the instrument and verify that battery has sufficient life?
2. Wait until the Measure Gases page appears?
3. Push and hold the RESET/ button until CAL ZERO? flashes on the display?
4. Push the ON-OFF/ACCEPT button to zero the instrument?
5. Connect the appropriate calibration gas to the instrument by connecting one end of the tubing to the pump inlet on the instrument and the other end of tubing to the cylinder regulator (supplied in the calibration kit)?
6. Open the valve on the regulator, if so equipped?
7. Push the ON-OFF/ACCEPT button to calibrate (span) the instrument?
8. Remove the tubing from the instrument?
MEASURING GAS CONCENTRATIONS
1. Expose instrument to environment?
2. Calculate a response factor?
RESETTING SHORT TERM EXPOSURE LIMITS (STELS)
1. Access the STEL page
2. Press the RESET/ button
RESETTING THE TIME WEIGHTED AVERAGE (TWA)
48

AFQTP 4B051-7 Journeyman Training Guide: Occupational & Environmental Air/Gas Sampling
1. Access the TWA page
2. Press the RESET/ button
RECORDING DATA
1. Utilize DOEHRS or equivalent.
Did the trainee successfully complete the task?
TRAINEE NAME (PRINT) TRAINER NAME (PRINT)
49
AFQTP 4B051-7 Journeyman Training Guide: Occupational & Environmental Air/Gas Sampling
STS Line Item 4.5.2.7: Calibrate / Operate air sampling pumps (Low/High flow pump)
TRAINER GUIDANCE
Proficiency Code: 3c
PC Definition: Can do all parts of the task. Needs only a spot check of completed work. Can identify why and when the task must be done and why each step is needed.
Prerequisites: None
Training References: • Fundamentals of Industrial Hygiene, 5th Edition, Chapter 16.
Additional Supporting References: • NIOSH Manual of Analytical Methods, Chapter D.
CDC Reference: 4B051
Training Support Material:
• Training scenario. • Electronic flow meter. • Burette. • Burette stand. • Beaker of soap solution. • Air sampling train. • Stopwatch. • AF Form 2750 or equivalent. • Paper and writing utensil.
Specific Techniques: Conduct hands-on training and evaluation.
Criterion Objective: Given a scenario, air sampling pump, calibrator, calculator, and supplies, calibrate an air sampling pump to a designated flow rate successfully completing all checklist items with limited trainer assistance on only the hardest parts.
Notes:
1. See website at http://www.osha.gov/dts/osta/otm/otm_ii/otm_ii_1.html#appendix_ii_1-1
50

AFQTP 4B051-7 Journeyman Training Guide: Occupational & Environmental Air/Gas Sampling
TASK STEPS
1. Turn on pump and allow to run for 5 minutes before calibration. 2. Check the battery. 3. Assemble sample train.
• Determine sample media. • Identify proper air flow direction through sample media. Attach the outlet end of the sample media to the inlet
valve on the pump with a piece of Tygon tubing of adequate length. • Assemble the components of the sample train as shown in the Fundamentals of Industrial Hygiene, Figure 16-16.
4. Identify the components of the calibration apparatus: burette, burette stand, and beaker of soap solution? 5. Determine calibration volume and calculate time (T) for a bubble to run the volume (see notes 1 & 2). 6. Clean the burette and wet the inside with soap solution or water. 7. Assemble the components of the calibration apparatus as shown in the Fundamentals of Industrial Hygiene, Figure 16-
17.3 8. Draw two or three bubbles up the length of the burette to ensure at least one bubble completes its run. 9. Adjust pump rotometer, if available, to desired flow rate. 10. Draw a soap bubble and, using a stop watch, measure the time it takes to get from zero to the desired calibration volume
(100mL or 1,000mL). 11. Adjust the flow rate if the time is not within the range of accuracy (within ±1of the time corresponding to the desired flow rate)? 12. Once correct flow rate is obtained, repeat the determination at least twice. 13. Calculate the average flow rate. 14. Record the following calibration data: volumes measured, elapsed times, air temperature, atmospheric pressure, make,
model, and serial number of sampling pump, collection device used, name, date, and time of person performing calibration.
LOCAL REQUIREMENTS: In instances where trainee is using manufacturer’s instructions to calibrate an air sampling pump, it is recommended that the trainer develop an internal checklist following the manufacturer’s instructions to evaluate the trainee.
NOTES: 1. To calibrate high-volume pumps use the 0 to 1000 ml mark. To calibrate low-flow pumps use 0 to 100 ml mark. 2. 𝐹𝐹𝑉𝑉𝑉𝑉𝐹𝐹 𝑅𝑅𝑅𝑅𝑅𝑅𝑉𝑉 (𝐹𝐹𝑅𝑅) = 𝑉𝑉𝑉𝑉𝑉𝑉𝑉𝑉𝑉𝑉𝑉𝑉(𝑉𝑉)
𝑇𝑇𝑇𝑇𝑉𝑉𝑉𝑉 (𝑇𝑇)
3. Attach the inlet end of the media to the top of the calibrator using another piece of Tygon tubing4. If media is a cassette filter, use a large jar with outlet end of media suspended in a jar through the opening in the lid, and inlet tube from jar to the calibrator.
51

AFQTP 4B051-7 Journeyman Training Guide: Occupational & Environmental Air/Gas Sampling
TRAINEE REVIEW QUESTIONS
STS Line Item 4.5.2.7: Calibrate / Operate air sampling pumps (Low/High flow pump)
1. When should air sampling equipment be calibrated?
2. Why must you use the same media for calibration as you do for sampling?
3. Why would a secondary calibration device be used?
4. How and when can a rotometer be used for evaluation of pump efficiency?
52
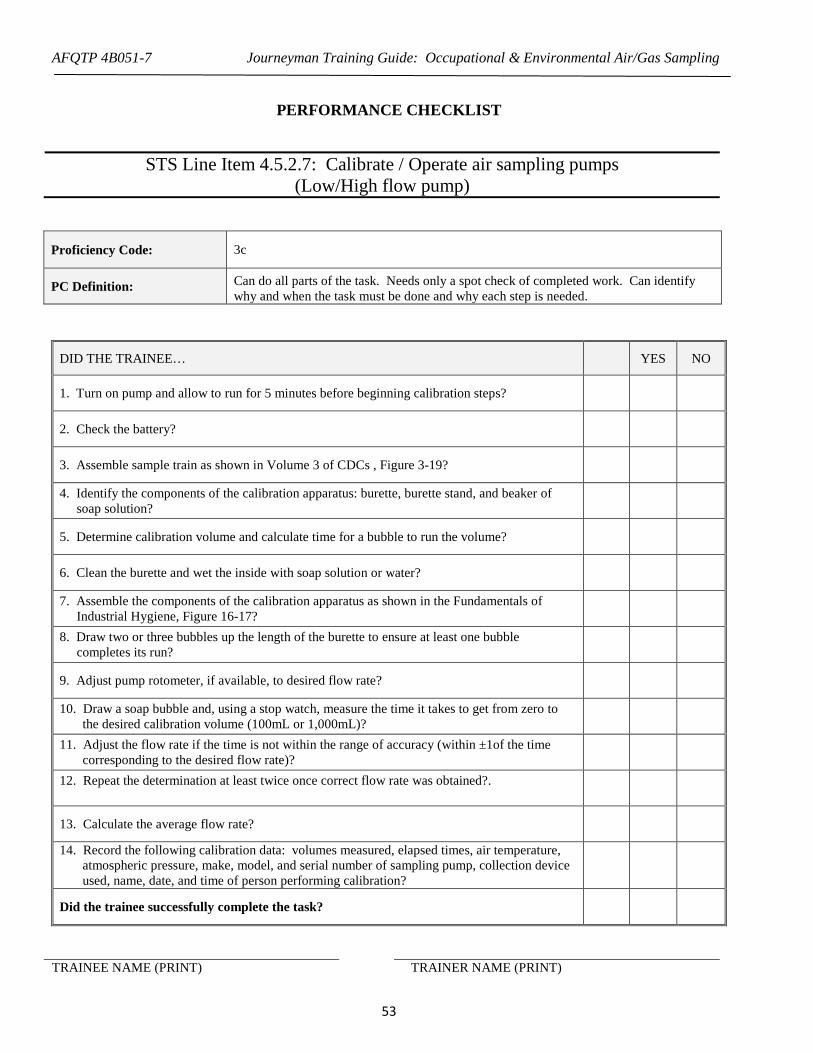
AFQTP 4B051-7 Journeyman Training Guide: Occupational & Environmental Air/Gas Sampling
PERFORMANCE CHECKLIST
STS Line Item 4.5.2.7: Calibrate / Operate air sampling pumps (Low/High flow pump)
Proficiency Code: 3c
PC Definition: Can do all parts of the task. Needs only a spot check of completed work. Can identify why and when the task must be done and why each step is needed.
DID THE TRAINEE…
YES NO
1. Turn on pump and allow to run for 5 minutes before beginning calibration steps?
2. Check the battery?
3. Assemble sample train as shown in Volume 3 of CDCs , Figure 3-19?
4. Identify the components of the calibration apparatus: burette, burette stand, and beaker of soap solution?
5. Determine calibration volume and calculate time for a bubble to run the volume?
6. Clean the burette and wet the inside with soap solution or water?
7. Assemble the components of the calibration apparatus as shown in the Fundamentals of Industrial Hygiene, Figure 16-17?
8. Draw two or three bubbles up the length of the burette to ensure at least one bubble completes its run?
9. Adjust pump rotometer, if available, to desired flow rate?
10. Draw a soap bubble and, using a stop watch, measure the time it takes to get from zero to the desired calibration volume (100mL or 1,000mL)?
11. Adjust the flow rate if the time is not within the range of accuracy (within ±1of the time corresponding to the desired flow rate)?
12. Repeat the determination at least twice once correct flow rate was obtained?.
13. Calculate the average flow rate?
14. Record the following calibration data: volumes measured, elapsed times, air temperature, atmospheric pressure, make, model, and serial number of sampling pump, collection device used, name, date, and time of person performing calibration?
Did the trainee successfully complete the task?
TRAINEE NAME (PRINT) TRAINER NAME (PRINT)
53

AFQTP 4B051-7 Journeyman Training Guide: Occupational & Environmental Air/Gas Sampling
ANSWERS
1. When should air sampling equipment be calibrated?
A: Always calibrate the air sampling equipment before starting any sample collection. A post calibration is performed after sampling is complete. This should be performed before recharging the pump.
(Source: Career Development Course 4B051, Bioenvironmental Engineering Journeyman)
2. Why must you use the same media for calibration as you do for sampling? A: It is important that the sampling train contain the same type of media that will be used to conduct air sampling because each media causes a different/unique pressure drop; the pressure drop can affect the sampling pump’s flow rate
(Source: Career Development Course 4B051, Bioenvironmental Engineering Journeyman)
3. Why would a secondary calibration device be used? A: Secondary standards are typically used to calibrate sampling pumps in the field when it is inconvenient or impractical to use a primary standard. (Source: Career Development Course 4B051, Bioenvironmental Engineering Journeyman)
4. How and when can a rotometer be used for evaluation of pump efficiency? A: They can be used to estimate whether a pump is still pulling the same airflow it was when it was calibrated. After calibration, mark the position of the rotameter so it can be periodically checked while sampling. If collecting consecutive samples, a good time to do this is when switching media. (Source: Career Development Course 4B051, Bioenvironmental Engineering Journeyman)
54
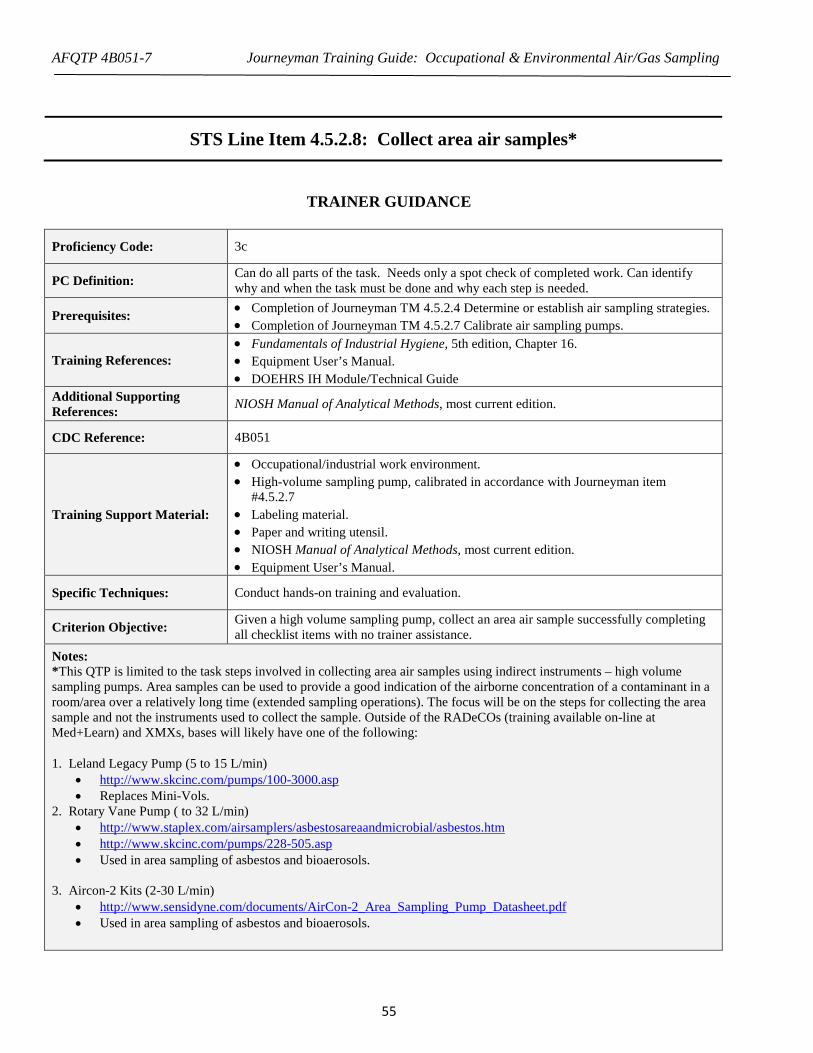
AFQTP 4B051-7 Journeyman Training Guide: Occupational & Environmental Air/Gas Sampling
STS Line Item 4.5.2.8: Collect area air samples*
TRAINER GUIDANCE Proficiency Code: 3c
PC Definition: Can do all parts of the task. Needs only a spot check of completed work. Can identify why and when the task must be done and why each step is needed.
Prerequisites: • Completion of Journeyman TM 4.5.2.4 Determine or establish air sampling strategies. • Completion of Journeyman TM 4.5.2.7 Calibrate air sampling pumps.
Training References: • Fundamentals of Industrial Hygiene, 5th edition, Chapter 16. • Equipment User’s Manual. • DOEHRS IH Module/Technical Guide
Additional Supporting References: NIOSH Manual of Analytical Methods, most current edition.
CDC Reference: 4B051
Training Support Material:
• Occupational/industrial work environment. • High-volume sampling pump, calibrated in accordance with Journeyman item
#4.5.2.7 • Labeling material. • Paper and writing utensil. • NIOSH Manual of Analytical Methods, most current edition. • Equipment User’s Manual.
Specific Techniques: Conduct hands-on training and evaluation.
Criterion Objective: Given a high volume sampling pump, collect an area air sample successfully completing all checklist items with no trainer assistance.
Notes: *This QTP is limited to the task steps involved in collecting area air samples using indirect instruments – high volume sampling pumps. Area samples can be used to provide a good indication of the airborne concentration of a contaminant in a room/area over a relatively long time (extended sampling operations). The focus will be on the steps for collecting the area sample and not the instruments used to collect the sample. Outside of the RADeCOs (training available on-line at Med+Learn) and XMXs, bases will likely have one of the following: 1. Leland Legacy Pump (5 to 15 L/min)
• http://www.skcinc.com/pumps/100-3000.asp • Replaces Mini-Vols.
2. Rotary Vane Pump ( to 32 L/min) • http://www.staplex.com/airsamplers/asbestosareaandmicrobial/asbestos.htm • http://www.skcinc.com/pumps/228-505.asp • Used in area sampling of asbestos and bioaerosols.
3. Aircon-2 Kits (2-30 L/min)
• http://www.sensidyne.com/documents/AirCon-2_Area_Sampling_Pump_Datasheet.pdf • Used in area sampling of asbestos and bioaerosols.
55
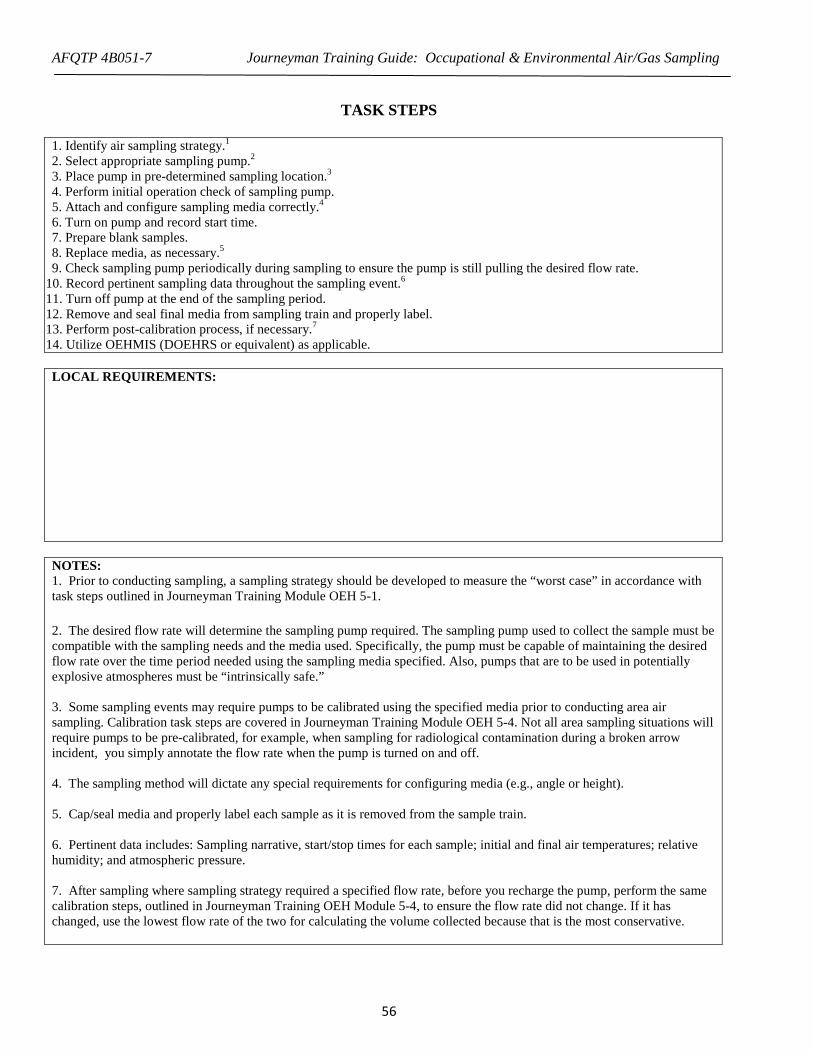
AFQTP 4B051-7 Journeyman Training Guide: Occupational & Environmental Air/Gas Sampling
TASK STEPS 1. Identify air sampling strategy.1 2. Select appropriate sampling pump.2 3. Place pump in pre-determined sampling location.3 4. Perform initial operation check of sampling pump. 5. Attach and configure sampling media correctly.4 6. Turn on pump and record start time. 7. Prepare blank samples. 8. Replace media, as necessary.5 9. Check sampling pump periodically during sampling to ensure the pump is still pulling the desired flow rate.
10. Record pertinent sampling data throughout the sampling event.6 11. Turn off pump at the end of the sampling period. 12. Remove and seal final media from sampling train and properly label. 13. Perform post-calibration process, if necessary.7 14. Utilize OEHMIS (DOEHRS or equivalent) as applicable. LOCAL REQUIREMENTS:
NOTES: 1. Prior to conducting sampling, a sampling strategy should be developed to measure the “worst case” in accordance with task steps outlined in Journeyman Training Module OEH 5-1. 2. The desired flow rate will determine the sampling pump required. The sampling pump used to collect the sample must be compatible with the sampling needs and the media used. Specifically, the pump must be capable of maintaining the desired flow rate over the time period needed using the sampling media specified. Also, pumps that are to be used in potentially explosive atmospheres must be “intrinsically safe.” 3. Some sampling events may require pumps to be calibrated using the specified media prior to conducting area air sampling. Calibration task steps are covered in Journeyman Training Module OEH 5-4. Not all area sampling situations will require pumps to be pre-calibrated, for example, when sampling for radiological contamination during a broken arrow incident, you simply annotate the flow rate when the pump is turned on and off. 4. The sampling method will dictate any special requirements for configuring media (e.g., angle or height). 5. Cap/seal media and properly label each sample as it is removed from the sample train. 6. Pertinent data includes: Sampling narrative, start/stop times for each sample; initial and final air temperatures; relative humidity; and atmospheric pressure. 7. After sampling where sampling strategy required a specified flow rate, before you recharge the pump, perform the same calibration steps, outlined in Journeyman Training OEH Module 5-4, to ensure the flow rate did not change. If it has changed, use the lowest flow rate of the two for calculating the volume collected because that is the most conservative.
56
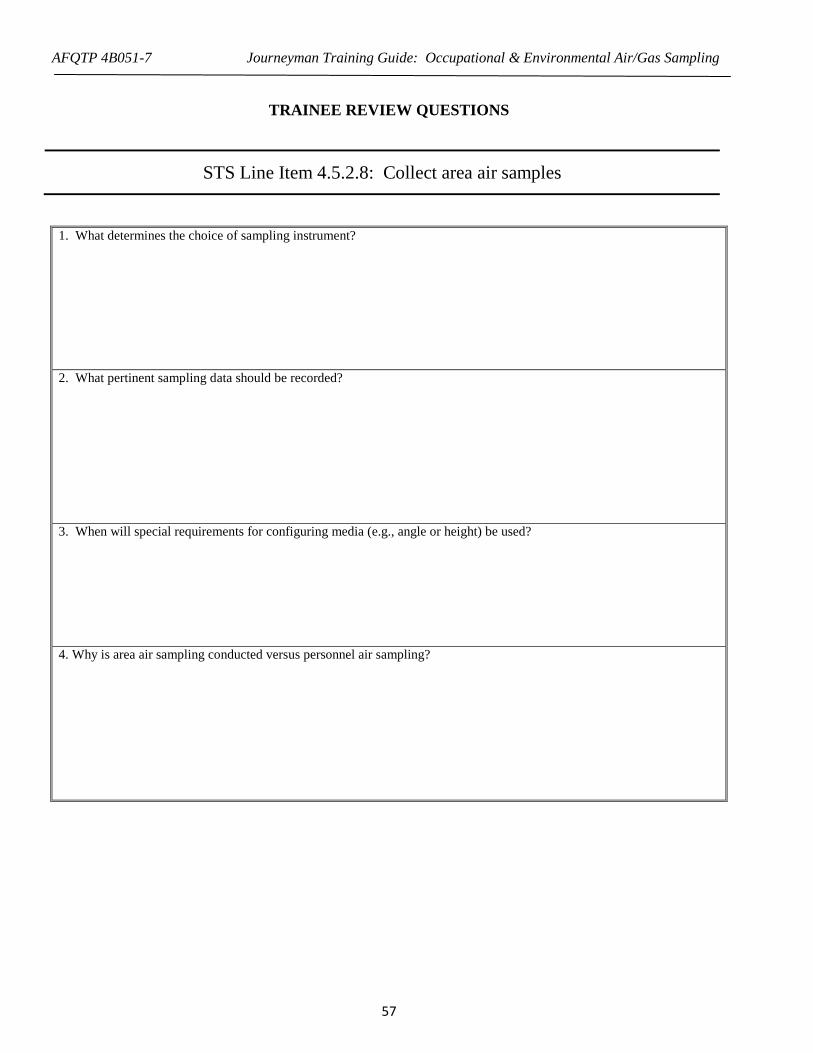
AFQTP 4B051-7 Journeyman Training Guide: Occupational & Environmental Air/Gas Sampling
TRAINEE REVIEW QUESTIONS
STS Line Item 4.5.2.8: Collect area air samples
1. What determines the choice of sampling instrument?
2. What pertinent sampling data should be recorded? 3. When will special requirements for configuring media (e.g., angle or height) be used? 4. Why is area air sampling conducted versus personnel air sampling?
57

AFQTP 4B051-7 Journeyman Training Guide: Occupational & Environmental Air/Gas Sampling
PERFORMANCE CHECKLIST
STS Line Item 4.5.2.8: Collect area air samples
Proficiency Code: 3c
PC Definition: Can do all parts of the task. Needs only a spot check of completed work. Can identify why and when the task must be done and why each step is needed.
DID THE TRAINEE…
YES NO
1. Identify sampling strategy?
2. Select appropriate sampling pump?
3. Place pump in pre-determined sampling location?
4. Perform initial operation check of sampling pump?
5. Attach and configure sampling media, as appropriate?
6. Turn on pump and record start time?
7. Prepare blank samples?
8. Replace media, as necessary?
9. Check sampling pump periodically during sampling to ensure the pump is still pulling the desired flow rate?
10. Record pertinent sampling data throughout the sampling event?
11. Turn off pump at the end of the sampling period?
12. Remove and seal final media from sampling train and properly label?
13. Perform post-calibration process, if necessary?
14. Utilize OEHMIS (DOEHRS or equivalent) as applicable
Did the trainee successfully complete the task?
TRAINEE NAME (PRINT) TRAINER NAME (PRINT)
58

AFQTP 4B051-7 Journeyman Training Guide: Occupational & Environmental Air/Gas Sampling
ANSWERS
1. What determines the choice of sampling instrument? A:
• reason for sampling • facility/work area layout • capabilities of sampling instrument • location and movement of workers • chemical/hazard • location of any control measures • projected length of sample time • environmental conditions
(Source: Career Development Course 4B051) 2. What pertinent sampling data should be recorded? A:
• Sampling narrative • Stop/start times for each sample • Initial and final air temperatures • Relative humidity • Atmospheric pressure • DOEHRS
(Source: DOEHRS IH Module/Technical Guide, How to Enter General Air Samples) 3. When will special requirements for configuring media (e.g., angle or height) be used? A: When the sampling method dictates. (Source: NIOSH Manual of Analytical Methods (NMAM), each method will be different if applicable)
4. Why is area air sampling conducted versus personnel air sampling? A: Collecting integrated samples for laboratory analysis can be used to provide a good indication of the airborne concentration of a chemical contaminant in a room/area over a relatively long time. It can also help to locate the source of exposure or evaluate the effectiveness of controls. (Source: Career Development Course 4B051and Fundamentals of Industrial Hygiene 5th Edition, Chapter 16 )
59
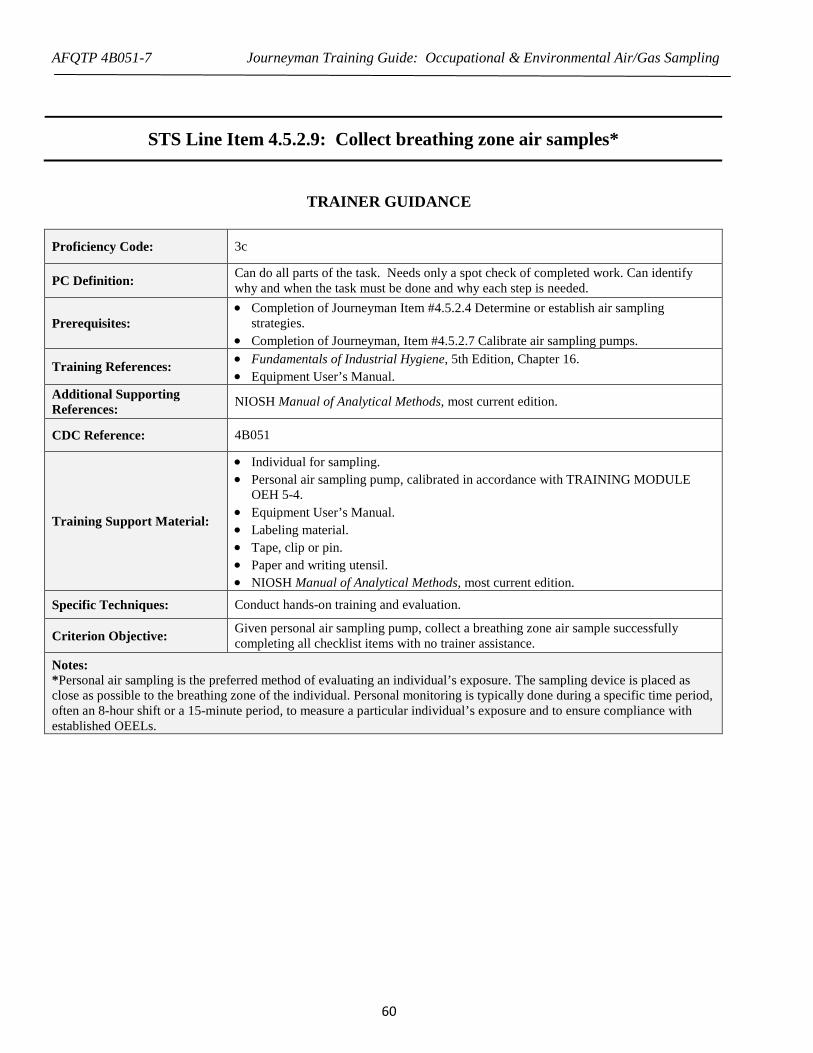
AFQTP 4B051-7 Journeyman Training Guide: Occupational & Environmental Air/Gas Sampling
STS Line Item 4.5.2.9: Collect breathing zone air samples*
TRAINER GUIDANCE Proficiency Code: 3c
PC Definition: Can do all parts of the task. Needs only a spot check of completed work. Can identify why and when the task must be done and why each step is needed.
Prerequisites: • Completion of Journeyman Item #4.5.2.4 Determine or establish air sampling
strategies. • Completion of Journeyman, Item #4.5.2.7 Calibrate air sampling pumps.
Training References: • Fundamentals of Industrial Hygiene, 5th Edition, Chapter 16. • Equipment User’s Manual.
Additional Supporting References: NIOSH Manual of Analytical Methods, most current edition.
CDC Reference: 4B051
Training Support Material:
• Individual for sampling. • Personal air sampling pump, calibrated in accordance with TRAINING MODULE
OEH 5-4. • Equipment User’s Manual. • Labeling material. • Tape, clip or pin. • Paper and writing utensil. • NIOSH Manual of Analytical Methods, most current edition.
Specific Techniques: Conduct hands-on training and evaluation.
Criterion Objective: Given personal air sampling pump, collect a breathing zone air sample successfully completing all checklist items with no trainer assistance.
Notes: *Personal air sampling is the preferred method of evaluating an individual’s exposure. The sampling device is placed as close as possible to the breathing zone of the individual. Personal monitoring is typically done during a specific time period, often an 8-hour shift or a 15-minute period, to measure a particular individual’s exposure and to ensure compliance with established OEELs.
60
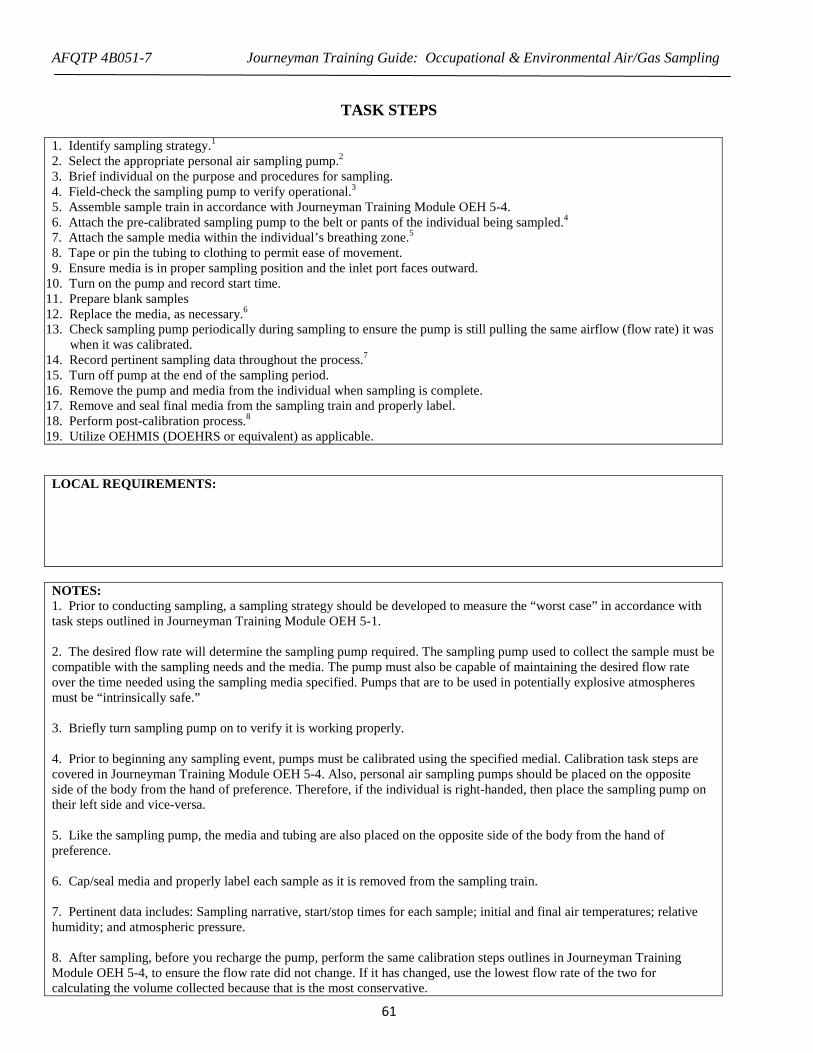
AFQTP 4B051-7 Journeyman Training Guide: Occupational & Environmental Air/Gas Sampling
TASK STEPS 1. Identify sampling strategy.1 2. Select the appropriate personal air sampling pump.2 3. Brief individual on the purpose and procedures for sampling. 4. Field-check the sampling pump to verify operational.3 5. Assemble sample train in accordance with Journeyman Training Module OEH 5-4. 6. Attach the pre-calibrated sampling pump to the belt or pants of the individual being sampled.4 7. Attach the sample media within the individual’s breathing zone.5 8. Tape or pin the tubing to clothing to permit ease of movement. 9. Ensure media is in proper sampling position and the inlet port faces outward.
10. Turn on the pump and record start time. 11. Prepare blank samples 12. Replace the media, as necessary.6 13. Check sampling pump periodically during sampling to ensure the pump is still pulling the same airflow (flow rate) it was
when it was calibrated. 14. Record pertinent sampling data throughout the process.7 15. Turn off pump at the end of the sampling period. 16. Remove the pump and media from the individual when sampling is complete. 17. Remove and seal final media from the sampling train and properly label. 18. Perform post-calibration process.8 19. Utilize OEHMIS (DOEHRS or equivalent) as applicable. LOCAL REQUIREMENTS:
NOTES: 1. Prior to conducting sampling, a sampling strategy should be developed to measure the “worst case” in accordance with task steps outlined in Journeyman Training Module OEH 5-1. 2. The desired flow rate will determine the sampling pump required. The sampling pump used to collect the sample must be compatible with the sampling needs and the media. The pump must also be capable of maintaining the desired flow rate over the time needed using the sampling media specified. Pumps that are to be used in potentially explosive atmospheres must be “intrinsically safe.” 3. Briefly turn sampling pump on to verify it is working properly. 4. Prior to beginning any sampling event, pumps must be calibrated using the specified medial. Calibration task steps are covered in Journeyman Training Module OEH 5-4. Also, personal air sampling pumps should be placed on the opposite side of the body from the hand of preference. Therefore, if the individual is right-handed, then place the sampling pump on their left side and vice-versa. 5. Like the sampling pump, the media and tubing are also placed on the opposite side of the body from the hand of preference. 6. Cap/seal media and properly label each sample as it is removed from the sampling train. 7. Pertinent data includes: Sampling narrative, start/stop times for each sample; initial and final air temperatures; relative humidity; and atmospheric pressure. 8. After sampling, before you recharge the pump, perform the same calibration steps outlines in Journeyman Training Module OEH 5-4, to ensure the flow rate did not change. If it has changed, use the lowest flow rate of the two for calculating the volume collected because that is the most conservative.
61

AFQTP 4B051-7 Journeyman Training Guide: Occupational & Environmental Air/Gas Sampling
TRAINEE REVIEW QUESTIONS
STS Line Item 4.5.2.9: Collect breathing zone air samples
1. How do you make the choice of sampling pump?
2. Why do you periodically check the sampling pump during sampling?
3. Under what circumstances would collection of a breathing zone air sample continue during a worker’s lunch time? 4. What, if any, pertinent data will be documented?
62
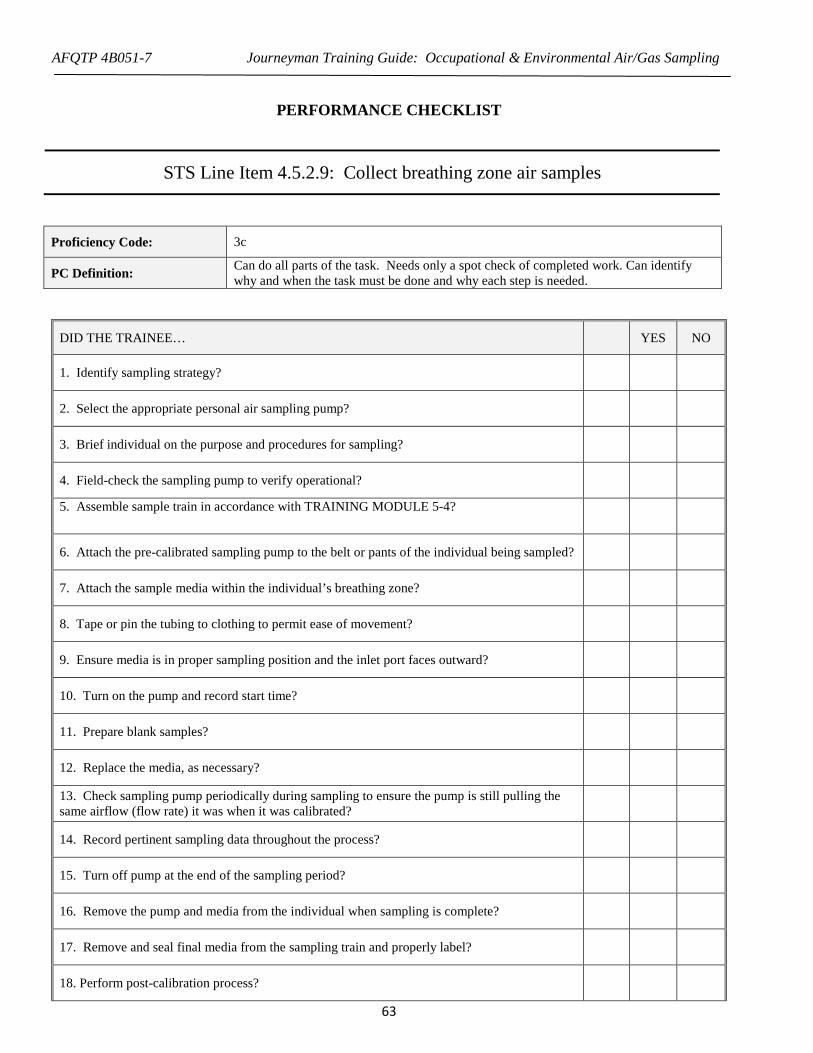
AFQTP 4B051-7 Journeyman Training Guide: Occupational & Environmental Air/Gas Sampling
PERFORMANCE CHECKLIST
STS Line Item 4.5.2.9: Collect breathing zone air samples
Proficiency Code: 3c
PC Definition: Can do all parts of the task. Needs only a spot check of completed work. Can identify why and when the task must be done and why each step is needed.
DID THE TRAINEE…
YES NO
1. Identify sampling strategy?
2. Select the appropriate personal air sampling pump?
3. Brief individual on the purpose and procedures for sampling?
4. Field-check the sampling pump to verify operational?
5. Assemble sample train in accordance with TRAINING MODULE 5-4?
6. Attach the pre-calibrated sampling pump to the belt or pants of the individual being sampled?
7. Attach the sample media within the individual’s breathing zone?
8. Tape or pin the tubing to clothing to permit ease of movement?
9. Ensure media is in proper sampling position and the inlet port faces outward?
10. Turn on the pump and record start time?
11. Prepare blank samples?
12. Replace the media, as necessary?
13. Check sampling pump periodically during sampling to ensure the pump is still pulling the same airflow (flow rate) it was when it was calibrated?
14. Record pertinent sampling data throughout the process?
15. Turn off pump at the end of the sampling period?
16. Remove the pump and media from the individual when sampling is complete?
17. Remove and seal final media from the sampling train and properly label?
18. Perform post-calibration process?
63

AFQTP 4B051-7 Journeyman Training Guide: Occupational & Environmental Air/Gas Sampling
19. Utilize OEHMIS (DOEHRS or equivalent) as applicable?
Did the trainee successfully complete the task?
TRAINEE NAME (PRINT) TRAINER NAME (PRINT)
64
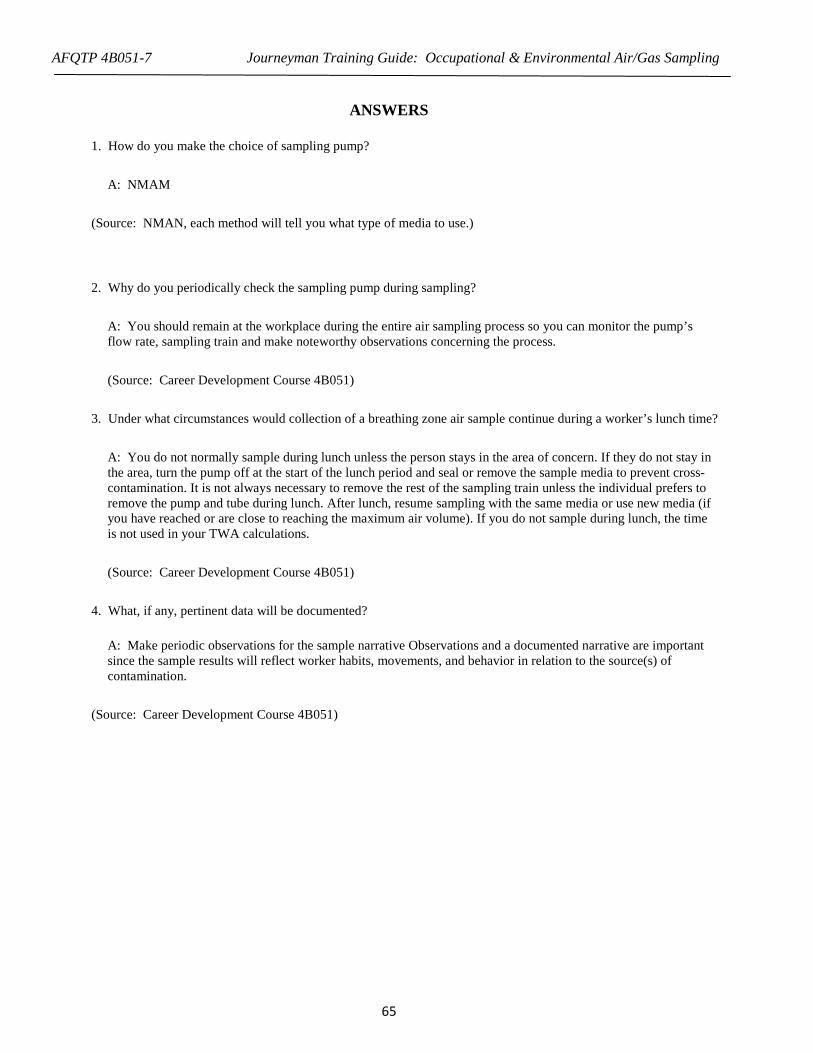
AFQTP 4B051-7 Journeyman Training Guide: Occupational & Environmental Air/Gas Sampling
ANSWERS
1. How do you make the choice of sampling pump?
A: NMAM (Source: NMAN, each method will tell you what type of media to use.)
2. Why do you periodically check the sampling pump during sampling?
A: You should remain at the workplace during the entire air sampling process so you can monitor the pump’s flow rate, sampling train and make noteworthy observations concerning the process. (Source: Career Development Course 4B051)
3. Under what circumstances would collection of a breathing zone air sample continue during a worker’s lunch time?
A: You do not normally sample during lunch unless the person stays in the area of concern. If they do not stay in the area, turn the pump off at the start of the lunch period and seal or remove the sample media to prevent cross-contamination. It is not always necessary to remove the rest of the sampling train unless the individual prefers to remove the pump and tube during lunch. After lunch, resume sampling with the same media or use new media (if you have reached or are close to reaching the maximum air volume). If you do not sample during lunch, the time is not used in your TWA calculations. (Source: Career Development Course 4B051)
4. What, if any, pertinent data will be documented?
A: Make periodic observations for the sample narrative Observations and a documented narrative are important since the sample results will reflect worker habits, movements, and behavior in relation to the source(s) of contamination.
(Source: Career Development Course 4B051)
65
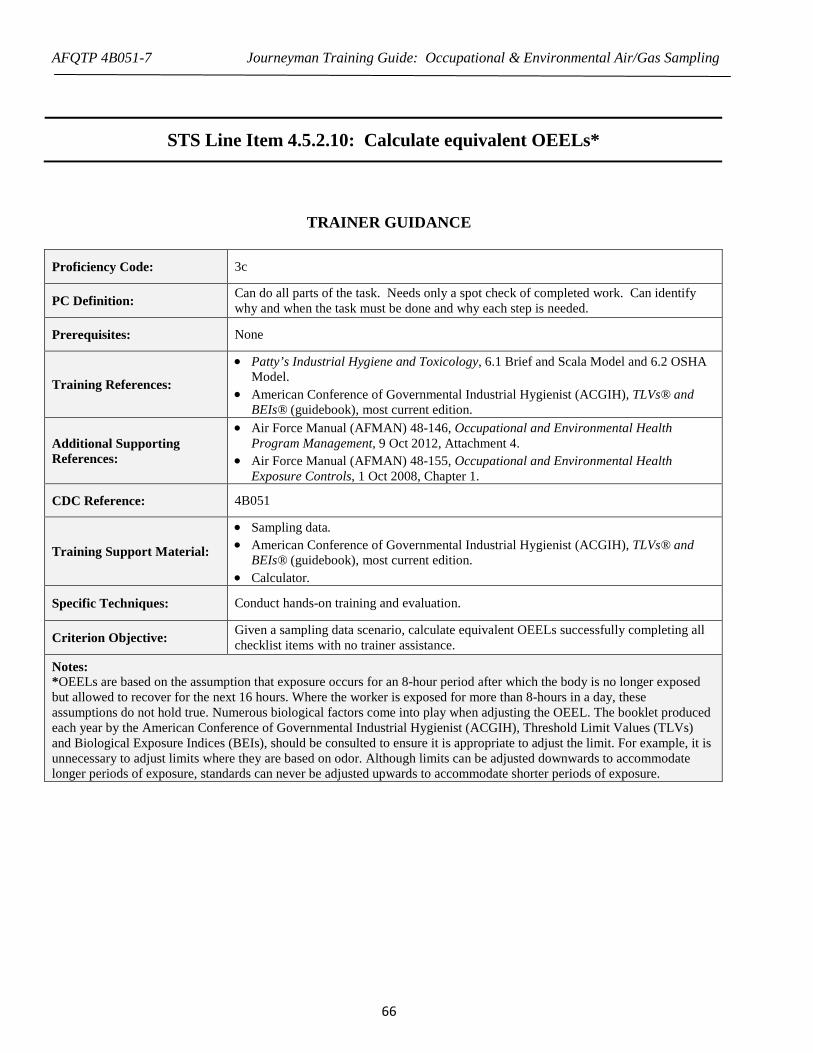
AFQTP 4B051-7 Journeyman Training Guide: Occupational & Environmental Air/Gas Sampling
STS Line Item 4.5.2.10: Calculate equivalent OEELs*
TRAINER GUIDANCE
Proficiency Code: 3c
PC Definition: Can do all parts of the task. Needs only a spot check of completed work. Can identify why and when the task must be done and why each step is needed.
Prerequisites: None
Training References:
• Patty’s Industrial Hygiene and Toxicology, 6.1 Brief and Scala Model and 6.2 OSHA Model.
• American Conference of Governmental Industrial Hygienist (ACGIH), TLVs® and BEIs® (guidebook), most current edition.
Additional Supporting References:
• Air Force Manual (AFMAN) 48-146, Occupational and Environmental Health Program Management, 9 Oct 2012, Attachment 4.
• Air Force Manual (AFMAN) 48-155, Occupational and Environmental Health Exposure Controls, 1 Oct 2008, Chapter 1.
CDC Reference: 4B051
Training Support Material:
• Sampling data. • American Conference of Governmental Industrial Hygienist (ACGIH), TLVs® and
BEIs® (guidebook), most current edition. • Calculator.
Specific Techniques: Conduct hands-on training and evaluation.
Criterion Objective: Given a sampling data scenario, calculate equivalent OEELs successfully completing all checklist items with no trainer assistance.
Notes: *OEELs are based on the assumption that exposure occurs for an 8-hour period after which the body is no longer exposed but allowed to recover for the next 16 hours. Where the worker is exposed for more than 8-hours in a day, these assumptions do not hold true. Numerous biological factors come into play when adjusting the OEEL. The booklet produced each year by the American Conference of Governmental Industrial Hygienist (ACGIH), Threshold Limit Values (TLVs) and Biological Exposure Indices (BEIs), should be consulted to ensure it is appropriate to adjust the limit. For example, it is unnecessary to adjust limits where they are based on odor. Although limits can be adjusted downwards to accommodate longer periods of exposure, standards can never be adjusted upwards to accommodate shorter periods of exposure.
66
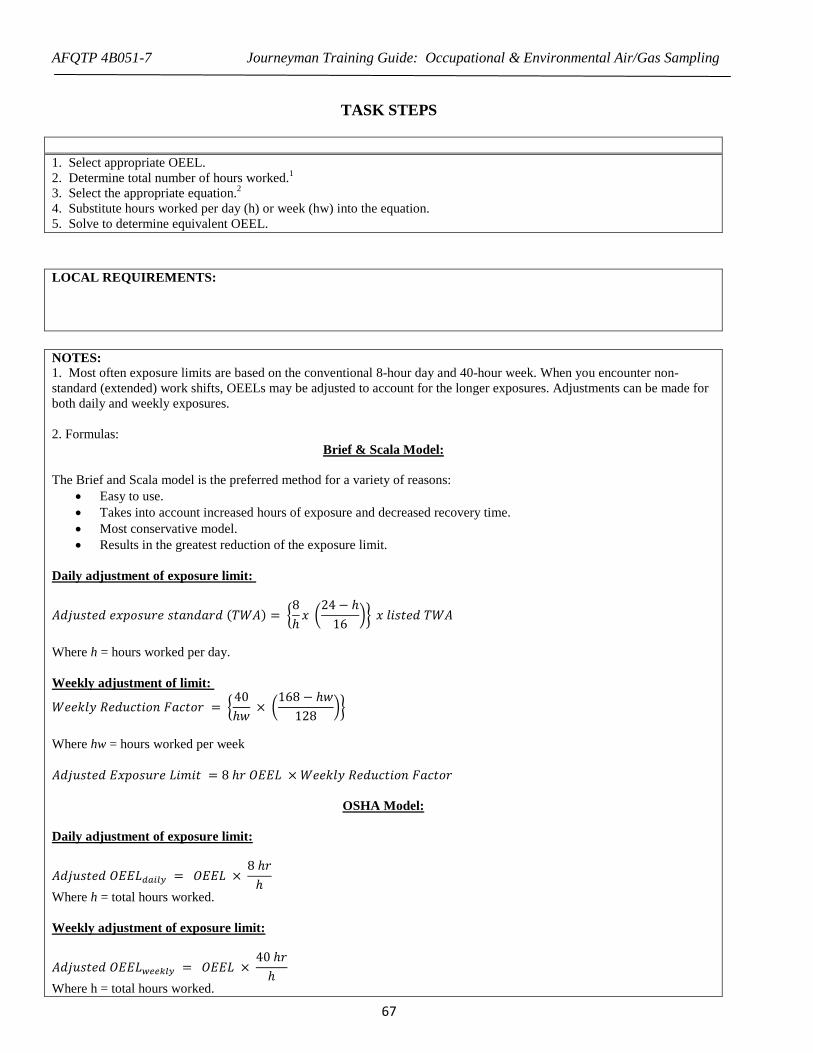
AFQTP 4B051-7 Journeyman Training Guide: Occupational & Environmental Air/Gas Sampling
TASK STEPS
1. Select appropriate OEEL. 2. Determine total number of hours worked.1 3. Select the appropriate equation.2
4. Substitute hours worked per day (h) or week (hw) into the equation. 5. Solve to determine equivalent OEEL. LOCAL REQUIREMENTS: NOTES: 1. Most often exposure limits are based on the conventional 8-hour day and 40-hour week. When you encounter non-standard (extended) work shifts, OEELs may be adjusted to account for the longer exposures. Adjustments can be made for both daily and weekly exposures. 2. Formulas:
Brief & Scala Model: The Brief and Scala model is the preferred method for a variety of reasons:
• Easy to use. • Takes into account increased hours of exposure and decreased recovery time. • Most conservative model. • Results in the greatest reduction of the exposure limit.
Daily adjustment of exposure limit:
𝐴𝐴𝐴𝐴𝐴𝐴𝑉𝑉𝐴𝐴𝑅𝑅𝑉𝑉𝐴𝐴 𝑉𝑉𝑒𝑒𝑒𝑒𝑉𝑉𝐴𝐴𝑉𝑉𝑟𝑟𝑉𝑉 𝐴𝐴𝑅𝑅𝑅𝑅𝑠𝑠𝐴𝐴𝑅𝑅𝑟𝑟𝐴𝐴 (𝑇𝑇𝑇𝑇𝐴𝐴) = �8ℎ𝑒𝑒 �
24 − ℎ16
�� 𝑒𝑒 𝑉𝑉𝑇𝑇𝐴𝐴𝑅𝑅𝑉𝑉𝐴𝐴 𝑇𝑇𝑇𝑇𝐴𝐴
Where h = hours worked per day. Weekly adjustment of limit:
𝑇𝑇𝑉𝑉𝑉𝑉𝑒𝑒𝑉𝑉𝑒𝑒 𝑅𝑅𝑉𝑉𝐴𝐴𝑉𝑉𝑅𝑅𝑅𝑅𝑇𝑇𝑉𝑉𝑠𝑠 𝐹𝐹𝑅𝑅𝑅𝑅𝑅𝑅𝑉𝑉𝑟𝑟 = �40ℎ𝐹𝐹
× �168 − ℎ𝐹𝐹
128��
Where hw = hours worked per week 𝐴𝐴𝐴𝐴𝐴𝐴𝑉𝑉𝐴𝐴𝑅𝑅𝑉𝑉𝐴𝐴 𝐸𝐸𝑒𝑒𝑒𝑒𝑉𝑉𝐴𝐴𝑉𝑉𝑟𝑟𝑉𝑉 𝐿𝐿𝑇𝑇𝑉𝑉𝑇𝑇𝑅𝑅 = 8 ℎ𝑟𝑟 𝑂𝑂𝐸𝐸𝐸𝐸𝐿𝐿 × 𝑇𝑇𝑉𝑉𝑉𝑉𝑒𝑒𝑉𝑉𝑒𝑒 𝑅𝑅𝑉𝑉𝐴𝐴𝑉𝑉𝑅𝑅𝑅𝑅𝑇𝑇𝑉𝑉𝑠𝑠 𝐹𝐹𝑅𝑅𝑅𝑅𝑅𝑅𝑉𝑉𝑟𝑟
OSHA Model:
Daily adjustment of exposure limit:
𝐴𝐴𝐴𝐴𝐴𝐴𝑉𝑉𝐴𝐴𝑅𝑅𝑉𝑉𝐴𝐴 𝑂𝑂𝐸𝐸𝐸𝐸𝐿𝐿𝑑𝑑𝑑𝑑𝑇𝑇𝑉𝑉𝑑𝑑 = 𝑂𝑂𝐸𝐸𝐸𝐸𝐿𝐿 × 8 ℎ𝑟𝑟ℎ
Where h = total hours worked. Weekly adjustment of exposure limit:
𝐴𝐴𝐴𝐴𝐴𝐴𝑉𝑉𝐴𝐴𝑅𝑅𝑉𝑉𝐴𝐴 𝑂𝑂𝐸𝐸𝐸𝐸𝐿𝐿𝑤𝑤𝑉𝑉𝑉𝑉𝑤𝑤𝑉𝑉𝑑𝑑 = 𝑂𝑂𝐸𝐸𝐸𝐸𝐿𝐿 × 40 ℎ𝑟𝑟ℎ
Where h = total hours worked.
67
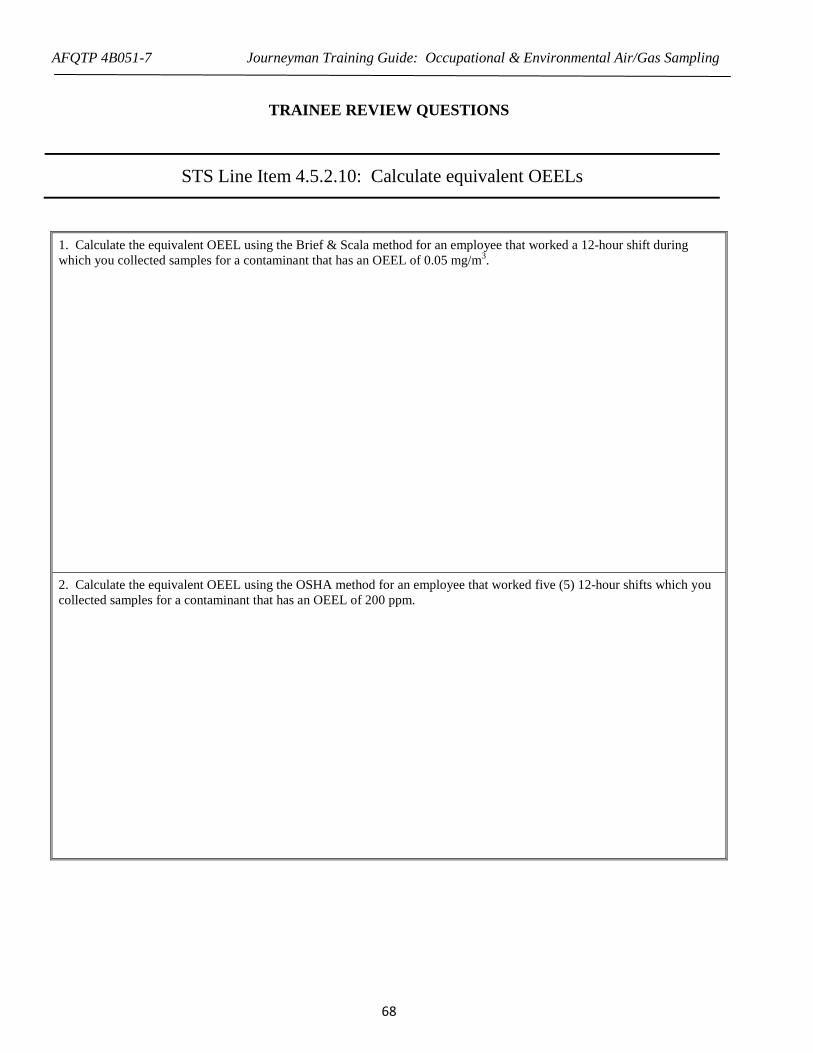
AFQTP 4B051-7 Journeyman Training Guide: Occupational & Environmental Air/Gas Sampling
TRAINEE REVIEW QUESTIONS
STS Line Item 4.5.2.10: Calculate equivalent OEELs
1. Calculate the equivalent OEEL using the Brief & Scala method for an employee that worked a 12-hour shift during which you collected samples for a contaminant that has an OEEL of 0.05 mg/m3. 2. Calculate the equivalent OEEL using the OSHA method for an employee that worked five (5) 12-hour shifts which you collected samples for a contaminant that has an OEEL of 200 ppm.
68
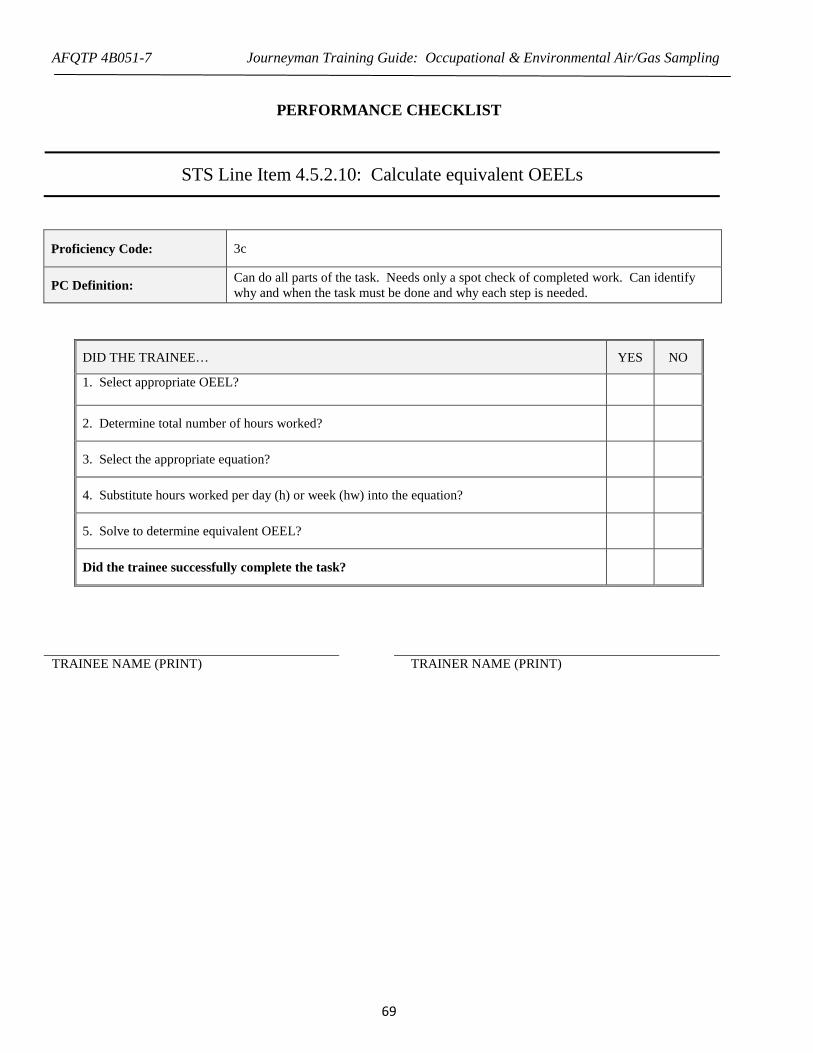
AFQTP 4B051-7 Journeyman Training Guide: Occupational & Environmental Air/Gas Sampling
PERFORMANCE CHECKLIST
STS Line Item 4.5.2.10: Calculate equivalent OEELs
Proficiency Code: 3c
PC Definition: Can do all parts of the task. Needs only a spot check of completed work. Can identify why and when the task must be done and why each step is needed.
DID THE TRAINEE… YES NO
1. Select appropriate OEEL?
2. Determine total number of hours worked?
3. Select the appropriate equation?
4. Substitute hours worked per day (h) or week (hw) into the equation?
5. Solve to determine equivalent OEEL?
Did the trainee successfully complete the task?
TRAINEE NAME (PRINT) TRAINER NAME (PRINT)
69
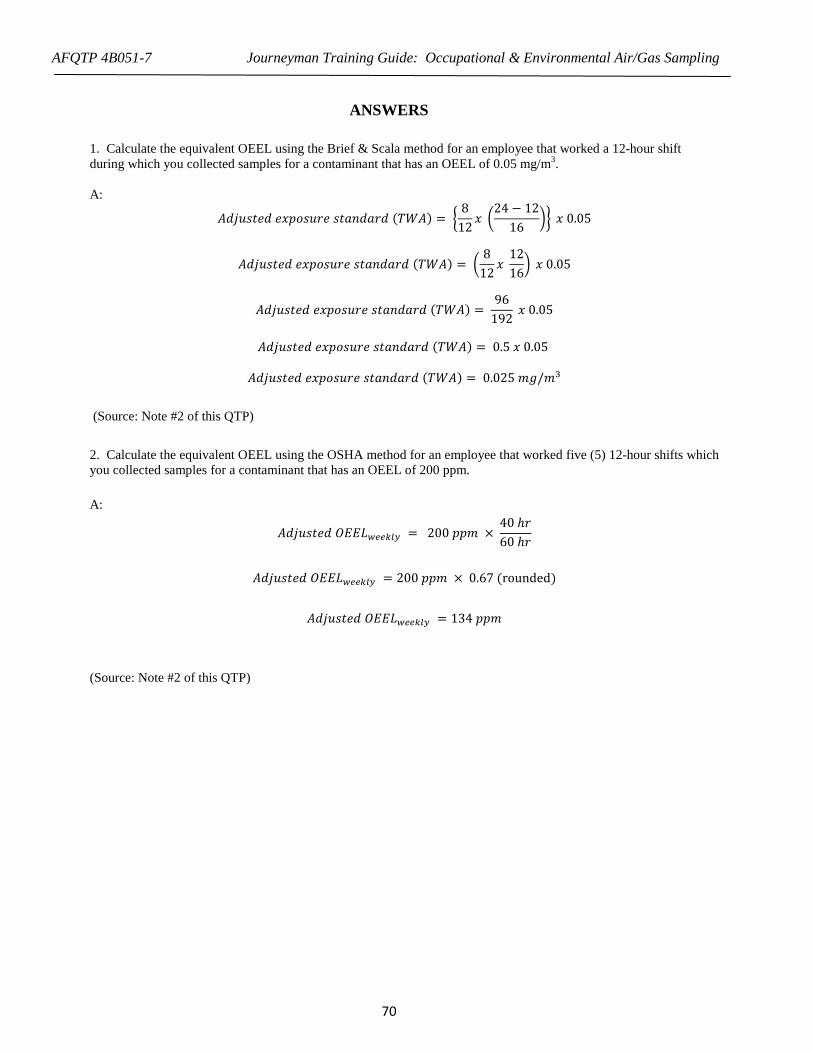
AFQTP 4B051-7 Journeyman Training Guide: Occupational & Environmental Air/Gas Sampling
ANSWERS
1. Calculate the equivalent OEEL using the Brief & Scala method for an employee that worked a 12-hour shift during which you collected samples for a contaminant that has an OEEL of 0.05 mg/m3. A:
𝐴𝐴𝐴𝐴𝐴𝐴𝑉𝑉𝐴𝐴𝑅𝑅𝑉𝑉𝐴𝐴 𝑉𝑉𝑒𝑒𝑒𝑒𝑉𝑉𝐴𝐴𝑉𝑉𝑟𝑟𝑉𝑉 𝐴𝐴𝑅𝑅𝑅𝑅𝑠𝑠𝐴𝐴𝑅𝑅𝑟𝑟𝐴𝐴 (𝑇𝑇𝑇𝑇𝐴𝐴) = �8
12𝑒𝑒 �
24 − 1216
�� 𝑒𝑒 0.05
𝐴𝐴𝐴𝐴𝐴𝐴𝑉𝑉𝐴𝐴𝑅𝑅𝑉𝑉𝐴𝐴 𝑉𝑉𝑒𝑒𝑒𝑒𝑉𝑉𝐴𝐴𝑉𝑉𝑟𝑟𝑉𝑉 𝐴𝐴𝑅𝑅𝑅𝑅𝑠𝑠𝐴𝐴𝑅𝑅𝑟𝑟𝐴𝐴 (𝑇𝑇𝑇𝑇𝐴𝐴) = �8
12𝑒𝑒
1216� 𝑒𝑒 0.05
𝐴𝐴𝐴𝐴𝐴𝐴𝑉𝑉𝐴𝐴𝑅𝑅𝑉𝑉𝐴𝐴 𝑉𝑉𝑒𝑒𝑒𝑒𝑉𝑉𝐴𝐴𝑉𝑉𝑟𝑟𝑉𝑉 𝐴𝐴𝑅𝑅𝑅𝑅𝑠𝑠𝐴𝐴𝑅𝑅𝑟𝑟𝐴𝐴 (𝑇𝑇𝑇𝑇𝐴𝐴) = 96
192 𝑒𝑒 0.05
𝐴𝐴𝐴𝐴𝐴𝐴𝑉𝑉𝐴𝐴𝑅𝑅𝑉𝑉𝐴𝐴 𝑉𝑉𝑒𝑒𝑒𝑒𝑉𝑉𝐴𝐴𝑉𝑉𝑟𝑟𝑉𝑉 𝐴𝐴𝑅𝑅𝑅𝑅𝑠𝑠𝐴𝐴𝑅𝑅𝑟𝑟𝐴𝐴 (𝑇𝑇𝑇𝑇𝐴𝐴) = 0.5 𝑒𝑒 0.05
𝐴𝐴𝐴𝐴𝐴𝐴𝑉𝑉𝐴𝐴𝑅𝑅𝑉𝑉𝐴𝐴 𝑉𝑉𝑒𝑒𝑒𝑒𝑉𝑉𝐴𝐴𝑉𝑉𝑟𝑟𝑉𝑉 𝐴𝐴𝑅𝑅𝑅𝑅𝑠𝑠𝐴𝐴𝑅𝑅𝑟𝑟𝐴𝐴 (𝑇𝑇𝑇𝑇𝐴𝐴) = 0.025 𝑉𝑉𝑚𝑚/𝑉𝑉3
(Source: Note #2 of this QTP) 2. Calculate the equivalent OEEL using the OSHA method for an employee that worked five (5) 12-hour shifts which you collected samples for a contaminant that has an OEEL of 200 ppm. A:
𝐴𝐴𝐴𝐴𝐴𝐴𝑉𝑉𝐴𝐴𝑅𝑅𝑉𝑉𝐴𝐴 𝑂𝑂𝐸𝐸𝐸𝐸𝐿𝐿𝑤𝑤𝑉𝑉𝑉𝑉𝑤𝑤𝑉𝑉𝑑𝑑 = 200 𝑒𝑒𝑒𝑒𝑉𝑉 × 40 ℎ𝑟𝑟60 ℎ𝑟𝑟
𝐴𝐴𝐴𝐴𝐴𝐴𝑉𝑉𝐴𝐴𝑅𝑅𝑉𝑉𝐴𝐴 𝑂𝑂𝐸𝐸𝐸𝐸𝐿𝐿𝑤𝑤𝑉𝑉𝑉𝑉𝑤𝑤𝑉𝑉𝑑𝑑 = 200 𝑒𝑒𝑒𝑒𝑉𝑉 × 0.67 (rounded)
𝐴𝐴𝐴𝐴𝐴𝐴𝑉𝑉𝐴𝐴𝑅𝑅𝑉𝑉𝐴𝐴 𝑂𝑂𝐸𝐸𝐸𝐸𝐿𝐿𝑤𝑤𝑉𝑉𝑉𝑉𝑤𝑤𝑉𝑉𝑑𝑑 = 134 𝑒𝑒𝑒𝑒𝑉𝑉
(Source: Note #2 of this QTP)
70

AFQTP 4B051-7 Journeyman Training Guide: Occupational & Environmental Air/Gas Sampling
STS Line Item 4.5.2.11: Convert raw concentrations (i.e., grams to mg/m3)*
TRAINER GUIDANCE
Proficiency Code: 3c
PC Definition: Can do all parts of the task. Needs only a spot check of completed work. Can identify why and when the task must be done and why each step is needed.
Prerequisites: None
Training References: • American Conference of Governmental Industrial Hygienist (ACGIH), TLVs® and BEIs® (guidebook), most current edition.
Additional Supporting References: None
CDC Reference: 4B051
Training Support Material: • Sample results. • Calculator.
Specific Techniques: Conduct hands-on training and evaluation.
Criterion Objective: Given sampling results, convert concentrations successfully completing all checklist items with no trainer assistance.
Notes: *When you receive your air sampling results back from the analytical laboratory, in most cases you will need to calculate the TWA and compare the results to the applicable OEEL. For those cases where the laboratory uses the air volume you provided and calculates the concentration in milligrams per cubic meter (mg/m3) or parts per million (ppm), at normal temperature and pressure (NTP), no corrections are required; you can simply compare your results directly to the applicable OEEL as long as the OEEL is in the same units. If the units are not the same, you will need to use one of the formulas provided below to convert to the same units as the OEEL: mg/m3 or ppm. In situations where the laboratory reported your results as a weight of contaminant collected on the sample media, such as milligrams (mg) or micrograms (µg), these results cannot be compared to the OEEL. When this happens, you must first determine the volume of air drawn through the sample then calculate the mass/volume concentration in mg/m3. Remember, the units must be the same in order to make a comparison.
71

AFQTP 4B051-7 Journeyman Training Guide: Occupational & Environmental Air/Gas Sampling
TASK STEPS
1. Select the appropriate equation.1
2. Substitute the known variables into the appropriate equation. 3. Solve to convert given results to desired units.
LOCAL REQUIREMENTS:
NOTES: 1. Conversion Formulas: mg/m3 to ppm:
𝑉𝑉𝑚𝑚 𝑉𝑉3⁄ = 𝑀𝑀𝑉𝑉𝑉𝑉𝑉𝑉𝑅𝑅𝑉𝑉𝑉𝑉𝑅𝑅𝑟𝑟 𝑇𝑇𝑉𝑉𝑇𝑇𝑚𝑚ℎ𝑅𝑅 (𝑀𝑀𝑇𝑇) 𝑉𝑉𝑜𝑜 𝐴𝐴𝑉𝑉𝑠𝑠𝐴𝐴𝑅𝑅𝑅𝑅𝑠𝑠𝑅𝑅𝑉𝑉 × 𝑆𝑆𝑅𝑅𝑉𝑉𝑒𝑒𝑉𝑉𝑉𝑉 𝑟𝑟𝑉𝑉𝐴𝐴𝑉𝑉𝑉𝑉𝑅𝑅𝐴𝐴 𝑇𝑇𝑠𝑠 𝑒𝑒𝑒𝑒𝑉𝑉
24.45
Where 24.45 = a constant and represents the molar volume of air liters at NTP conditions (25°C and 760 torr). ppm to mg/m3:
𝑒𝑒𝑒𝑒𝑉𝑉 = 24.45 × 𝑆𝑆𝑅𝑅𝑉𝑉𝑒𝑒𝑉𝑉𝑉𝑉 𝑟𝑟𝑉𝑉𝐴𝐴𝑉𝑉𝑉𝑉𝑅𝑅𝐴𝐴 𝑇𝑇𝑠𝑠 𝑉𝑉𝑚𝑚 𝑉𝑉3⁄
𝑀𝑀𝑉𝑉𝑉𝑉𝑉𝑉𝑅𝑅𝑉𝑉𝑉𝑉𝑅𝑅𝑟𝑟 𝑇𝑇𝑉𝑉𝑇𝑇𝑚𝑚ℎ𝑅𝑅 (𝑀𝑀𝑇𝑇) 𝑉𝑉𝑜𝑜 𝐴𝐴𝑉𝑉𝑠𝑠𝐴𝐴𝑅𝑅𝑅𝑅𝑠𝑠𝑅𝑅𝑉𝑉
Where 24.45 = a constant and represents the molar volume of air liters at NTP conditions (25°C and 760 torr). volume: 𝑉𝑉𝑉𝑉𝑉𝑉𝑉𝑉𝑉𝑉𝑉𝑉 (𝑉𝑉𝑇𝑇𝑅𝑅𝑉𝑉𝑟𝑟𝐴𝐴) = 𝑜𝑜𝑉𝑉𝑉𝑉𝐹𝐹 𝑟𝑟𝑅𝑅𝑅𝑅𝑉𝑉 (𝑉𝑉𝑒𝑒𝑉𝑉) × 𝑅𝑅𝑇𝑇𝑉𝑉𝑉𝑉 liters to cubic meters:
𝑉𝑉𝑉𝑉𝑉𝑉𝑉𝑉𝑉𝑉𝑉𝑉 (𝑉𝑉𝑉𝑉𝑅𝑅𝑉𝑉𝑟𝑟𝐴𝐴3) = 𝑉𝑉𝑇𝑇𝑅𝑅𝑉𝑉𝑟𝑟𝐴𝐴
1 ×
1 𝑉𝑉𝑉𝑉𝑅𝑅𝑉𝑉𝑟𝑟3
1000 𝑉𝑉𝑇𝑇𝑅𝑅𝑉𝑉𝑟𝑟𝐴𝐴
mass/volume concentration in mg/m3:
𝐶𝐶𝑉𝑉𝑠𝑠𝑅𝑅𝑉𝑉𝑠𝑠𝑅𝑅𝑟𝑟𝑅𝑅𝑅𝑅𝑇𝑇𝑉𝑉𝑠𝑠 (𝑉𝑉𝑚𝑚 𝑉𝑉3⁄ ) = 𝑉𝑉𝑅𝑅𝐴𝐴𝐴𝐴 𝑟𝑟𝑉𝑉𝑒𝑒𝑉𝑉𝑟𝑟𝑅𝑅𝑉𝑉𝐴𝐴 (𝑉𝑉𝑚𝑚)
𝑣𝑣𝑉𝑉𝑉𝑉𝑉𝑉𝑉𝑉𝑉𝑉 (𝑉𝑉3)
72
AFQTP 4B051-7 Journeyman Training Guide: Occupational & Environmental Air/Gas Sampling
TRAINEE REVIEW QUESTIONS
STS Line Item 4.5.2.11: Convert raw concentrations (i.e., grams to mg/m3)
1. You just received your air sample results from the analytical laboratory. You were sampling for benzene. The sample results were returned as 1.2 mg/m3 but the OEEL for benzene is listed as ppm, so you will need to convert the concentration in order to compare it to the standard. 2. You just received your air sample results from the analytical laboratory. You were sampling for methyl ethyl ketone (MEK). The sample results were returned as 38 ppm but the OEEL for MEK is listed as mg/m3 so you will need to convert the concentration in order to compare it to the standard. 3. Your sample flow rate was 1.0 liter/minute (lpm) and your total sampling time was 90 minutes, what is your sample volume?
73

AFQTP 4B051-7 Journeyman Training Guide: Occupational & Environmental Air/Gas Sampling
4. Using the sample volume from Question #3, convert the liters to cubic meters (m3). 5. Your sample results have returned from the laboratory, which reported the results as a mass of 18 mg. Using the converted sample volume from Question #4, what are your results in mg/m3?
74
AFQTP 4B051-7 Journeyman Training Guide: Occupational & Environmental Air/Gas Sampling
PERFORMANCE CHECKLIST
STS Line Item 4.5.2.11: Convert raw concentrations (i.e., grams to mg/m3)
Proficiency Code: 3c
PC Definition: Can do all parts of the task. Needs only a spot check of completed work. Can identify why and when the task must be done and why each step is needed.
DID THE TRAINEE… YES NO
1. Select the appropriate equation?
2. Substitute the known variables into the appropriate equation?
3. Solve to convert given results to desired units?
Did the trainee successfully complete the task?
TRAINEE NAME (PRINT) TRAINER NAME (PRINT)
75

AFQTP 4B051-7 Journeyman Training Guide: Occupational & Environmental Air/Gas Sampling
ANSWERS
1. You just received your air sample results from the analytical laboratory. You were sampling for benzene. The sample results were returned as 1.2 mg/m3 but the OEEL for benzene is listed as ppm, so you will need to convert the concentration in order to compare it to the standard.
A:
𝑒𝑒𝑒𝑒𝑉𝑉 = 24.45 × 𝑆𝑆𝑅𝑅𝑉𝑉𝑒𝑒𝑉𝑉𝑉𝑉 𝑟𝑟𝑉𝑉𝐴𝐴𝑉𝑉𝑉𝑉𝑅𝑅𝐴𝐴 𝑇𝑇𝑠𝑠 𝑉𝑉𝑚𝑚 𝑉𝑉3⁄
𝑀𝑀𝑉𝑉𝑉𝑉𝑉𝑉𝑅𝑅𝑉𝑉𝑉𝑉𝑅𝑅𝑟𝑟 𝑇𝑇𝑉𝑉𝑇𝑇𝑚𝑚ℎ𝑅𝑅 (𝑀𝑀𝑇𝑇) 𝑉𝑉𝑜𝑜 𝐴𝐴𝑉𝑉𝑠𝑠𝐴𝐴𝑅𝑅𝑅𝑅𝑠𝑠𝑅𝑅𝑉𝑉
𝑒𝑒𝑒𝑒𝑉𝑉 = 24.45 × 1.2 𝑉𝑉𝑚𝑚 𝑉𝑉3⁄
78.11
𝑒𝑒𝑒𝑒𝑉𝑉 = 0.38 (𝑟𝑟𝑉𝑉𝑉𝑉𝑠𝑠𝐴𝐴𝑉𝑉𝐴𝐴)
(Source: Note 2 of this QTP)
2. You just received your air sample results from the analytical laboratory. You were sampling for methyl ethyl ketone (MEK). The sample results were returned as 38 ppm but the OEEL for MEK is listed as mg/m3 so you will need to convert the concentration in order to compare it to the standard. A:
𝑉𝑉𝑚𝑚 𝑉𝑉3⁄ = 𝑀𝑀𝑉𝑉𝑉𝑉𝑉𝑉𝑅𝑅𝑉𝑉𝑉𝑉𝑅𝑅𝑟𝑟 𝑇𝑇𝑉𝑉𝑇𝑇𝑚𝑚ℎ𝑅𝑅 (𝑀𝑀𝑇𝑇) 𝑉𝑉𝑜𝑜 𝐴𝐴𝑉𝑉𝑠𝑠𝐴𝐴𝑅𝑅𝑅𝑅𝑠𝑠𝑅𝑅𝑉𝑉 × 𝑆𝑆𝑅𝑅𝑉𝑉𝑒𝑒𝑉𝑉𝑉𝑉 𝑟𝑟𝑉𝑉𝐴𝐴𝑉𝑉𝑉𝑉𝑅𝑅𝐴𝐴 𝑇𝑇𝑠𝑠 𝑒𝑒𝑒𝑒𝑉𝑉
24.45
𝑉𝑉𝑚𝑚 𝑉𝑉3⁄ = 𝑀𝑀72.10 × 38 𝑒𝑒𝑒𝑒𝑉𝑉
24.45
𝑉𝑉𝑚𝑚 𝑉𝑉3⁄ = 112 (𝑟𝑟𝑉𝑉𝑉𝑉𝑠𝑠𝐴𝐴𝑉𝑉𝐴𝐴)
(Source: Note 1 of this QTP)
1. Your sample flow rate was 1.0 liter/minute (lpm) and your total sampling time was 90 minutes, what is your
sample volume? A:
𝑉𝑉𝑉𝑉𝑉𝑉𝑉𝑉𝑉𝑉𝑉𝑉 (𝑉𝑉𝑇𝑇𝑅𝑅𝑉𝑉𝑟𝑟𝐴𝐴) = 𝑜𝑜𝑉𝑉𝑉𝑉𝐹𝐹 𝑟𝑟𝑅𝑅𝑅𝑅𝑉𝑉 (𝑉𝑉𝑒𝑒𝑉𝑉) × 𝑅𝑅𝑇𝑇𝑉𝑉𝑉𝑉
𝑉𝑉𝑉𝑉𝑉𝑉𝑉𝑉𝑉𝑉𝑉𝑉 (𝑉𝑉𝑇𝑇𝑅𝑅𝑉𝑉𝑟𝑟𝐴𝐴) = 1.0 𝑉𝑉𝑒𝑒𝑉𝑉 × 90 𝑉𝑉𝑇𝑇𝑠𝑠𝐴𝐴
𝑉𝑉𝑉𝑉𝑉𝑉𝑉𝑉𝑉𝑉𝑉𝑉 = 90 𝑉𝑉𝑇𝑇𝑅𝑅𝑉𝑉𝑟𝑟𝐴𝐴
(Source: Note 3 of this QTP)
76

AFQTP 4B051-7 Journeyman Training Guide: Occupational & Environmental Air/Gas Sampling
4. Using the sample volume from Question #3, convert the liters to cubic meters (m3).
A:
𝑉𝑉𝑉𝑉𝑉𝑉𝑉𝑉𝑉𝑉𝑉𝑉 (𝑉𝑉𝑉𝑉𝑅𝑅𝑉𝑉𝑟𝑟𝐴𝐴3) = 𝑉𝑉𝑇𝑇𝑅𝑅𝑉𝑉𝑟𝑟𝐴𝐴
1 ×
1 𝑉𝑉𝑉𝑉𝑅𝑅𝑉𝑉𝑟𝑟3
1000 𝑉𝑉𝑇𝑇𝑅𝑅𝑉𝑉𝑟𝑟𝐴𝐴
𝑉𝑉𝑉𝑉𝑉𝑉𝑉𝑉𝑉𝑉𝑉𝑉 (𝑉𝑉𝑉𝑉𝑅𝑅𝑉𝑉𝑟𝑟𝐴𝐴3) = 90 𝑉𝑉𝑇𝑇𝑅𝑅𝑉𝑉𝑟𝑟𝐴𝐴
1 ×
1 𝑉𝑉𝑉𝑉𝑅𝑅𝑉𝑉𝑟𝑟3
1000 𝑉𝑉𝑇𝑇𝑅𝑅𝑉𝑉𝑟𝑟𝐴𝐴
𝑉𝑉𝑉𝑉𝑉𝑉𝑉𝑉𝑉𝑉𝑉𝑉 (𝑉𝑉𝑉𝑉𝑅𝑅𝑉𝑉𝑟𝑟𝐴𝐴3) = 0.09 𝑉𝑉3
(Source: Note 4 of this QTP) 5. Your sample results have returned from the laboratory, which reported the results as a mass of 18 mg. Using the converted sample volume from Question #4, what are your results in mg/m3?
A:
𝐶𝐶𝑉𝑉𝑠𝑠𝑅𝑅𝑉𝑉𝑠𝑠𝑅𝑅𝑟𝑟𝑅𝑅𝑅𝑅𝑇𝑇𝑉𝑉𝑠𝑠 (𝑉𝑉𝑚𝑚 𝑉𝑉3⁄ ) = 𝑉𝑉𝑅𝑅𝐴𝐴𝐴𝐴 𝑟𝑟𝑉𝑉𝑒𝑒𝑉𝑉𝑟𝑟𝑅𝑅𝑉𝑉𝐴𝐴 (𝑉𝑉𝑚𝑚)
𝑣𝑣𝑉𝑉𝑉𝑉𝑉𝑉𝑉𝑉𝑉𝑉 (𝑉𝑉3)
𝐶𝐶𝑉𝑉𝑠𝑠𝑅𝑅𝑉𝑉𝑠𝑠𝑅𝑅𝑟𝑟𝑅𝑅𝑅𝑅𝑇𝑇𝑉𝑉𝑠𝑠 (𝑉𝑉𝑚𝑚 𝑉𝑉3⁄ ) = 18 𝑉𝑉𝑚𝑚
0.09 𝑉𝑉3
𝐶𝐶𝑉𝑉𝑠𝑠𝑅𝑅𝑉𝑉𝑠𝑠𝑅𝑅𝑟𝑟𝑅𝑅𝑅𝑅𝑇𝑇𝑉𝑉𝑠𝑠 (𝑉𝑉𝑚𝑚 𝑉𝑉3⁄ ) = 200 𝑉𝑉𝑚𝑚/𝑉𝑉3
(Source: Note 5 of thisQTP)
77
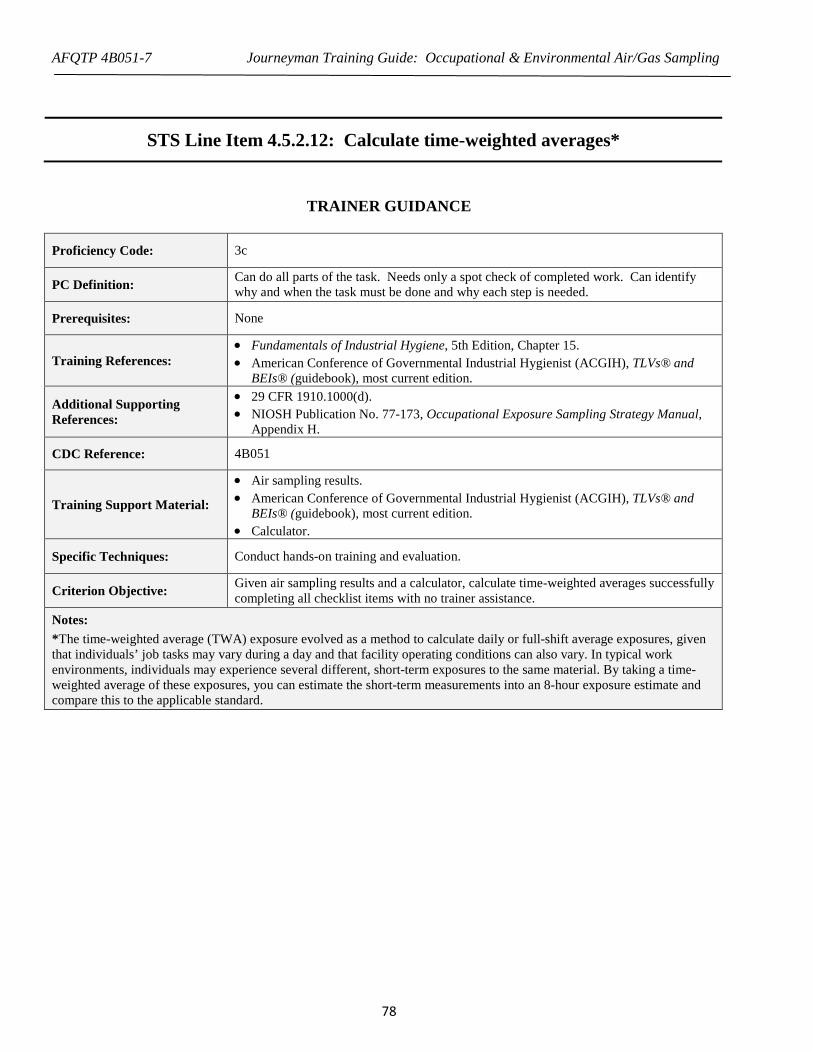
AFQTP 4B051-7 Journeyman Training Guide: Occupational & Environmental Air/Gas Sampling
STS Line Item 4.5.2.12: Calculate time-weighted averages*
TRAINER GUIDANCE
Proficiency Code: 3c
PC Definition: Can do all parts of the task. Needs only a spot check of completed work. Can identify why and when the task must be done and why each step is needed.
Prerequisites: None
Training References: • Fundamentals of Industrial Hygiene, 5th Edition, Chapter 15. • American Conference of Governmental Industrial Hygienist (ACGIH), TLVs® and
BEIs® (guidebook), most current edition.
Additional Supporting References:
• 29 CFR 1910.1000(d). • NIOSH Publication No. 77-173, Occupational Exposure Sampling Strategy Manual,
Appendix H.
CDC Reference: 4B051
Training Support Material:
• Air sampling results. • American Conference of Governmental Industrial Hygienist (ACGIH), TLVs® and
BEIs® (guidebook), most current edition. • Calculator.
Specific Techniques: Conduct hands-on training and evaluation.
Criterion Objective: Given air sampling results and a calculator, calculate time-weighted averages successfully completing all checklist items with no trainer assistance.
Notes: *The time-weighted average (TWA) exposure evolved as a method to calculate daily or full-shift average exposures, given that individuals’ job tasks may vary during a day and that facility operating conditions can also vary. In typical work environments, individuals may experience several different, short-term exposures to the same material. By taking a time-weighted average of these exposures, you can estimate the short-term measurements into an 8-hour exposure estimate and compare this to the applicable standard.
78
AFQTP 4B051-7 Journeyman Training Guide: Occupational & Environmental Air/Gas Sampling
TASK STEPS
1. Determine concentration (C) of a given substance based on air sampling results. 2. Determine the collection time in hours (T) for each concentration. 3. Select the appropriate equation. 4. Calculate an 8-hour TWA.1 5. Calculate a 15-minute TWA.2 LOCAL REQUIREMENTS:
NOTES: 1. The time-weighted average is determined by the following formula, where C = concentration of the contaminant T = time period during which this concentration was measured
8ℎ𝑉𝑉𝑉𝑉𝑟𝑟 𝑇𝑇𝑇𝑇𝐴𝐴 = 𝐶𝐶1 𝑇𝑇1 + 𝐶𝐶2𝑇𝑇2 + 𝐶𝐶𝑛𝑛𝑇𝑇𝑛𝑛
8 ℎ𝑉𝑉𝑉𝑉𝑟𝑟𝐴𝐴
2. A 15-minute TWA is typically referred to as a short-term exposure limit (STEL). The STEL is the concentration of the contaminant to which it is believed that workers can be exposed for a short period of time without suffering from 1) irritation, 2) chronic or irreversible tissue damage, 3) dose-rate-dependent toxic effects, or 4) loss of feeling or consciousness. When a chemical has a STEL listed, it cannot be exceeded in a 15-minute period. The 15-minute TWA (STEL) is determined by the following formula, where C = concentration of the contaminant T = time period during which this concentration was measured
15𝑉𝑉𝑇𝑇𝑠𝑠𝑉𝑉𝑅𝑅𝑉𝑉 𝑇𝑇𝑇𝑇𝐴𝐴 (𝑆𝑆𝑇𝑇𝐸𝐸𝐿𝐿) = 𝐶𝐶1 𝑇𝑇1 + 𝐶𝐶2𝑇𝑇2 + 𝐶𝐶𝑛𝑛𝑇𝑇𝑛𝑛
15 𝑉𝑉𝑇𝑇𝑠𝑠𝑉𝑉𝑅𝑅𝑉𝑉𝐴𝐴
Note: Exposures above the 8-hour TWA and below the 15-minute STEL should not be exceeded more than four times in an 8-hour workday, and there should be at least 60-minutes between successive STEL exposures.
79
AFQTP 4B051-7 Journeyman Training Guide: Occupational & Environmental Air/Gas Sampling
TRAINEE REVIEW QUESTIONS
STS Line Item 4.5.2.12: Calculate time-weighted averages
1. You have sampled for methyl ethyl ketone. The results are:
Sample number Time Results 1 0800 to 1000 220 ppm 2 1020 to 1220 210 ppm 3 1330 to 1430 110 ppm 4 1500 to 1600 80 ppm
Select the appropriate formula and calculate an 8-hour TWA using the data above:
80

AFQTP 4B051-7 Journeyman Training Guide: Occupational & Environmental Air/Gas Sampling
2. You have sampled for ethylene glycol. The results are:
Sample number Time Results 1 0915 to 0920 8.2 mg/m3
2 0930 to 0935 7.5 mg/m3
3 0945 to 0950 8.0 mg/m3
Select the appropriate formula and calculate a 15-minute TWA (STEL) using the following data:
81

AFQTP 4B051-7 Journeyman Training Guide: Occupational & Environmental Air/Gas Sampling
PERFORMANCE CHECKLIST
STS Line Item 4.5.2.12: Calculate time-weighted averages
Proficiency Code: 3c
PC Definition: Can do all parts of the task. Needs only a spot check of completed work. Can identify why and when the task must be done and why each step is needed.
DID THE TRAINEE… YES NO
1. Determine concentration (C) of a given substance based on air sampling results?
2. Determine the collection time in hours (T) for each concentration?
3. Select appropriate equation?
4. Calculate an 8-hour TWA?
5. Calculate a 15-minute TWA?
Did the trainee successfully complete the task?
TRAINEE NAME (PRINT) TRAINER NAME (PRINT)
82

AFQTP 4B051-7 Journeyman Training Guide: Occupational & Environmental Air/Gas Sampling
ANSWERS
1. You have sampled for methyl ethyl ketone. The results are:
Sample number Time Results 1 0800 to 1000 220 ppm 2 1020 to 1220 210 ppm 3 1330 to 1430 110 ppm 4 1500 to 1600 80 ppm
Select the appropriate formula and calculate an 8-hour TWA using the data above: A:
8ℎ𝑉𝑉𝑉𝑉𝑟𝑟 𝑇𝑇𝑇𝑇𝐴𝐴 = 𝐶𝐶1 𝑇𝑇1 + 𝐶𝐶2𝑇𝑇2 + 𝐶𝐶𝑛𝑛𝑇𝑇𝑛𝑛
8 ℎ𝑉𝑉𝑉𝑉𝑟𝑟𝐴𝐴
8ℎ𝑉𝑉𝑉𝑉𝑟𝑟 𝑇𝑇𝑇𝑇𝐴𝐴 = (200 𝑒𝑒𝑒𝑒𝑉𝑉 𝑒𝑒 2 ℎ𝑟𝑟𝐴𝐴) + (210 𝑒𝑒𝑒𝑒𝑉𝑉 𝑒𝑒 2 ℎ𝑟𝑟𝐴𝐴) + (110 𝑒𝑒𝑒𝑒𝑉𝑉 𝑒𝑒 1 ℎ𝑟𝑟) + (80 𝑒𝑒𝑒𝑒𝑉𝑉 𝑒𝑒 1 ℎ𝑟𝑟)
8 ℎ𝑉𝑉𝑉𝑉𝑟𝑟𝐴𝐴
8ℎ𝑉𝑉𝑉𝑉𝑟𝑟 𝑇𝑇𝑇𝑇𝐴𝐴 = (400 𝑒𝑒𝑒𝑒𝑉𝑉/ℎ𝑟𝑟) + (420 𝑒𝑒𝑒𝑒𝑉𝑉/ℎ𝑟𝑟) + (110 𝑒𝑒𝑒𝑒𝑉𝑉/ℎ𝑟𝑟) + (80 𝑒𝑒𝑒𝑒𝑉𝑉/ℎ𝑟𝑟)
8 ℎ𝑉𝑉𝑉𝑉𝑟𝑟𝐴𝐴
8ℎ𝑉𝑉𝑉𝑉𝑟𝑟 𝑇𝑇𝑇𝑇𝐴𝐴 = 1050 𝑒𝑒𝑒𝑒𝑉𝑉/ℎ𝑟𝑟
8 ℎ𝑉𝑉𝑉𝑉𝑟𝑟𝐴𝐴
8ℎ𝑉𝑉𝑉𝑉𝑟𝑟 𝑇𝑇𝑇𝑇𝐴𝐴 = 131.25 𝑒𝑒𝑒𝑒𝑉𝑉
Note: Once trainee has completed calculation; have them compare their results to adopted values presented in the American Conference of Governmental Industrial Hygienist (ACGIH), TLVs® and BEIs® (guidebook), most current edition. Trainee should be able to identify if results have exceeded the recommended time weighted-average. (Source: Note 1 of this QTP and Career Development Course 4B051)
2. You have sampled for ethylene glycol. The results are:
Sample number Time Results 1 0915 to 0920 8.2 mg/m3
2 0930 to 0935 7.5 mg/m3
3 0945 to 0950 8.0 mg/m3
Select the appropriate formula and calculate a 15-minute TWA (STEL) using the following data: A:
15𝑉𝑉𝑇𝑇𝑠𝑠𝑉𝑉𝑅𝑅𝑉𝑉 𝑇𝑇𝑇𝑇𝐴𝐴 (𝑆𝑆𝑇𝑇𝐸𝐸𝐿𝐿) = 𝐶𝐶1 𝑇𝑇1 + 𝐶𝐶2𝑇𝑇2 + 𝐶𝐶𝑛𝑛𝑇𝑇𝑛𝑛
15 𝑉𝑉𝑇𝑇𝑠𝑠𝑉𝑉𝑅𝑅𝑉𝑉𝐴𝐴
83
AFQTP 4B051-7 Journeyman Training Guide: Occupational & Environmental Air/Gas Sampling
15𝑉𝑉𝑇𝑇𝑠𝑠𝑉𝑉𝑅𝑅𝑉𝑉 𝑇𝑇𝑇𝑇𝐴𝐴 (𝑆𝑆𝑇𝑇𝐸𝐸𝐿𝐿) = (8.2 𝑉𝑉𝑚𝑚/𝑉𝑉3𝑒𝑒 5 𝑉𝑉𝑇𝑇𝑠𝑠𝐴𝐴) + (7.5 𝑉𝑉𝑚𝑚/𝑉𝑉3𝑒𝑒 5 𝑉𝑉𝑇𝑇𝑠𝑠𝐴𝐴) + (8.0 𝑉𝑉𝑚𝑚/𝑉𝑉3𝑒𝑒 5 𝑉𝑉𝑇𝑇𝑠𝑠𝐴𝐴)
15 𝑉𝑉𝑇𝑇𝑠𝑠𝑉𝑉𝑅𝑅𝑉𝑉𝐴𝐴
15𝑉𝑉𝑇𝑇𝑠𝑠𝑉𝑉𝑅𝑅𝑉𝑉 𝑇𝑇𝑇𝑇𝐴𝐴 (𝑆𝑆𝑇𝑇𝐸𝐸𝐿𝐿) = (41 𝑉𝑉𝑚𝑚/𝑉𝑉3/𝑉𝑉𝑇𝑇𝑠𝑠) + (37.5 𝑉𝑉𝑚𝑚/𝑉𝑉3/𝑉𝑉𝑇𝑇𝑠𝑠) + (40 𝑉𝑉𝑚𝑚/𝑉𝑉3/𝑉𝑉𝑇𝑇𝑠𝑠)
15 𝑉𝑉𝑇𝑇𝑠𝑠𝑉𝑉𝑅𝑅𝑉𝑉𝐴𝐴
15𝑉𝑉𝑇𝑇𝑠𝑠𝑉𝑉𝑅𝑅𝑉𝑉 𝑇𝑇𝑇𝑇𝐴𝐴 (𝑆𝑆𝑇𝑇𝐸𝐸𝐿𝐿) = (118.5 𝑉𝑉𝑚𝑚/𝑉𝑉3/𝑉𝑉𝑇𝑇𝑠𝑠)
15 𝑉𝑉𝑇𝑇𝑠𝑠𝑉𝑉𝑅𝑅𝑉𝑉𝐴𝐴
15𝑉𝑉𝑇𝑇𝑠𝑠𝑉𝑉𝑅𝑅𝑉𝑉 𝑇𝑇𝑇𝑇𝐴𝐴 (𝑆𝑆𝑇𝑇𝐸𝐸𝐿𝐿) = 7.9 𝑉𝑉𝑚𝑚/𝑉𝑉3
Note: Once trainee has completed calculation; have them compare their results to adopted values presented in the American Conference of Governmental Industrial Hygienist (ACGIH), TLVs® and BEIs® (guidebook), most current edition. Trainee should be able to identify if results have exceeded the recommended time weighted-average.
(Source: Note 2 of this training module and Career Development Course 4B051)
84
AFQTP 4B051-7 Journeyman Training Guide: Occupational & Environmental Air/Gas Sampling
STS Line Item 4.5.2.13: Calculate upper and lower confidence limits
TRAINER GUIDANCE
Proficiency Code: 3c
PC Definition: Can do all parts of the task. Needs only a spot check of completed work. Can identify why and when the task must be done and why each step is needed.
Prerequisites: None
Training References: • ACGIH TLV Booklet, 2008 • 29 CFR 1910.1000(d)
Additional Supporting References:
Fundamentals of Industrial Hygiene, 5th edition http://www.cdc.gov/niosh/docs/2003-154/
CDC Reference: 4B051
Training Support Material:
• Air sampling results • Calculator • NIOSH Manual of Analytical Methods • ACGIH TLV Booklet
Specific Techniques: Conduct hands-on training and evaluation.
Criterion Objective: Given air sampling results and references, calculate upper and lower confidence limits successfully completing all checklist items with no trainer assistance.
Notes: See Notes Section for formulas.
85

AFQTP 4B051-7 Journeyman Training Guide: Occupational & Environmental Air/Gas Sampling
TASK STEPS
1. Obtain laboratory results of analyte(s) sample 2. Determine the standard concentration of the analyte(s) and the sampling procedure information1
3. Identify the sampling and analytical error (SAE) factor for the analyte(s) 2 4. Calculate the upper confidence limit (UCL) 3 5. Calculate the lower confidence limit (LCL) 4 6. Recognize when the OEEL could be exceeded5 7. Utilize OEHMIS (DOEHRS or equivalent), as applicable. LOCAL REQUIREMENTS:
NOTES: 1. The standardized concentration of an analyte takes into consideration random fluctuations of its presence throughout the sampling process. This variation is expressed by the National Institute for Occupational Safety and Health (NIOSH) as SrT which is an equivalent term indicating the measure of precision. It can be found in the NIOSH Manual of Analytical Methods. The standardized concentration, therefore, can be expressed by the following formula where Y equals standardized concentration and X equals the full period sampling result obtained in step one:
Y = X OEEL The occupational exposure limit can be found in the ACGIH TLV Booklet. It is expressed as either a time-weighted average (TWA) or as a short-term exposure limit (STEL). The sampling results obtained will determine which value to use based on the sampling procedure. 2. The SAE is expressed by multiplying the precision measurement obtained in the NIOSH Manual of Analytical Methods by the statistical constant 1.645. In other words, an SAE is found by the SrT multiplied by 1.645, e.g., the SAE of methylene chloride is 0.042 (SrT = 0.026 x 1.645).
SAE = SrT x 1.645 3. The formula to calculate the upper confidence level (UCL) is the following:
UCL = Y + SAE
4. The formula to calculate the lower confidence limit (LCL) is as follows:
LCL = Y – SAE
5. If the TWA is already above the OEEL, there is no need to calculate the UCL; however, an LCL should be calculated. If the SAE results in a UCL of more than 1, it is not clear whether the exposure was in compliance. An error of method could make it unclear as to if the exposure was too high.
• If the UCL < 1, it is with 95 percent confidence that an overexposure does not exist. • If the LCL < 1 and the UCL> 1, it is not certain, so may be classified as a possible overexposure. • If the LCL > 1, it is with 95 percent confidence that an overexposure exists.
86
AFQTP 4B051-7 Journeyman Training Guide: Occupational & Environmental Air/Gas Sampling
TRAINEE REVIEW QUESTIONS
STS Line Item 4.5.2.13: Calculate upper and lower confidence limits
1. What do calculated UCL and LCL values represent?
2. What is the SAE of methylene chloride? 3. Calculate the UCL and LCL for a continuous sampling for the aromatic hydrocarbon benzene. The laboratory results
were 0.46ppm TWA. Did an overexposure occur?
87
AFQTP 4B051-7 Journeyman Training Guide: Occupational & Environmental Air/Gas Sampling
PERFORMANCE CHECKLIST
STS Line Item 4.5.2.13: Calculate upper and lower confidence limits
Proficiency Code: 3c
PC Definition: Can do all parts of the task. Needs only a spot check of completed work. Can identify why and when the task must be done and why each step is needed.
DID THE TRAINEE… YES NO
1. Obtain laboratory results of analyte(s) sample?
2. Determine the standard concentration of the analyte(s) and the sampling procedure information?
3. Identify the sampling and analytical error (SAE) factor for the analyte(s)?
4. Calculate the upper confidence limit (UCL)?
5. Calculate the lower confidence limit (LCL)?
6. Recognize when the OEEL could be exceeded?
7. Utilize OEHMIS (DOEHRS or equivalent), as applicable?
Did the trainee successfully complete the task?
TRAINEE NAME (PRINT) TRAINER NAME (PRINT)
88

AFQTP 4B051-7 Journeyman Training Guide: Occupational & Environmental Air/Gas Sampling
ANSWERS
1. What do calculated UCL and LCL values represent? A: The UCL and LCL incorporate SAE factors statistically in order to obtain the lowest (LCL) and highest (UCL) value that the true exposure could be, within a 95-percent confidence interval. (Source: Fundamentals of Industrial Hygiene, 5th edition)
2. What is the SAE of methylene chloride? A: The SAE of methylene chloride is 0.042. SAE = SrT x 1.645 SAE = 0.026 x 1.645 SAE = 0.042 (Source: Note #2, NIOSH Manual of Analytical Methods) 3. Calculate the UCL and LCL for a continuous sampling for the aromatic hydrocarbon benzene. The laboratory results were 0.46ppm TWA. Did an overexposure occur?
𝑌𝑌 = 𝑋𝑋
𝑂𝑂𝐸𝐸𝐸𝐸𝐿𝐿
𝑌𝑌 = 0.460.5
𝒀𝒀 = 𝟎𝟎.𝟗𝟗𝟗𝟗
SAE = SrT x 1.645
SAE = 0.013 x 1.645
SAE = 0.021
UCL = 0.92 + 0.021 = 0.941
LCL = 0.092 – 0.021 = 0.899
A: An overexposure did not occur. (Source: Note #1 – 5, NIOSH Manual of Analytical Methods and ACGIH TLV Booklet)
89
AFQTP 4B051-7 Journeyman Training Guide: Occupational & Environmental Air/Gas Sampling
STS Line Item 4.5.2.14: Calculate compliance factors (unity)
TRAINER GUIDANCE
Proficiency Code: 3c
PC Definition: Can do all parts of the task. Needs only a spot check of completed work. Can identify why and when the task must be done and why each step is needed.
Prerequisites: None
Training References: • ACGIH TLV Booklet, 2008, App E • 29 CFR 1910.1000(d)
Additional Supporting References: None
CDC Reference: 4B051
Training Support Material:
• Air sampling results • Calculator • NIOSH Pocket Guide to Chemical Hazards • ACGIH TLV Booklet
Specific Techniques: Conduct hands-on training and evaluation.
Criterion Objective: Given air sampling results and a calculator, calculate a compliance factor successfully completing all checklist items with no trainer assistance.
Notes: See Notes section for formulas.
90
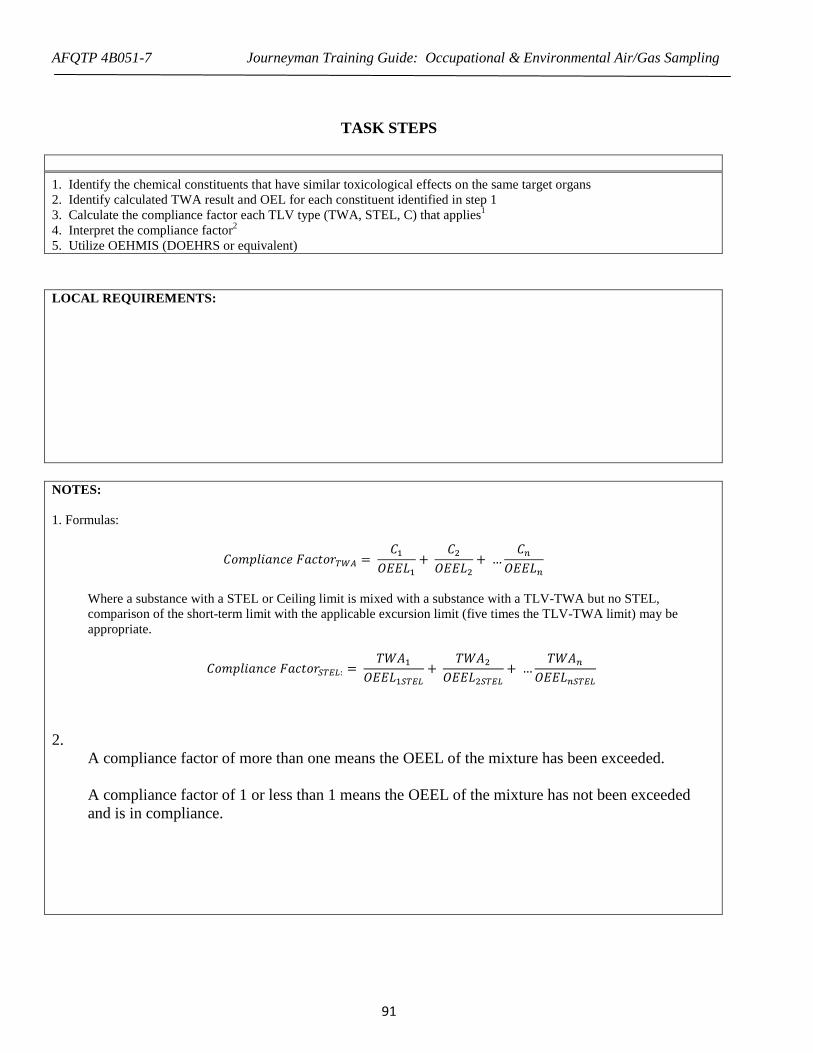
AFQTP 4B051-7 Journeyman Training Guide: Occupational & Environmental Air/Gas Sampling
TASK STEPS
1. Identify the chemical constituents that have similar toxicological effects on the same target organs 2. Identify calculated TWA result and OEL for each constituent identified in step 1 3. Calculate the compliance factor each TLV type (TWA, STEL, C) that applies1
4. Interpret the compliance factor2
5. Utilize OEHMIS (DOEHRS or equivalent) LOCAL REQUIREMENTS:
NOTES: 1. Formulas:
𝐶𝐶𝑉𝑉𝑉𝑉𝑒𝑒𝑉𝑉𝑇𝑇𝑅𝑅𝑠𝑠𝑅𝑅𝑉𝑉 𝐹𝐹𝑅𝑅𝑅𝑅𝑅𝑅𝑉𝑉𝑟𝑟𝑇𝑇𝑇𝑇𝑇𝑇 = 𝐶𝐶1
𝑂𝑂𝐸𝐸𝐸𝐸𝐿𝐿1+
𝐶𝐶2𝑂𝑂𝐸𝐸𝐸𝐸𝐿𝐿2
+ …𝐶𝐶𝑛𝑛
𝑂𝑂𝐸𝐸𝐸𝐸𝐿𝐿𝑛𝑛
Where a substance with a STEL or Ceiling limit is mixed with a substance with a TLV-TWA but no STEL, comparison of the short-term limit with the applicable excursion limit (five times the TLV-TWA limit) may be appropriate.
𝐶𝐶𝑉𝑉𝑉𝑉𝑒𝑒𝑉𝑉𝑇𝑇𝑅𝑅𝑠𝑠𝑅𝑅𝑉𝑉 𝐹𝐹𝑅𝑅𝑅𝑅𝑅𝑅𝑉𝑉𝑟𝑟𝑆𝑆𝑇𝑇𝑆𝑆𝑆𝑆: = 𝑇𝑇𝑇𝑇𝐴𝐴1
𝑂𝑂𝐸𝐸𝐸𝐸𝐿𝐿1𝑆𝑆𝑇𝑇𝑆𝑆𝑆𝑆+
𝑇𝑇𝑇𝑇𝐴𝐴2𝑂𝑂𝐸𝐸𝐸𝐸𝐿𝐿2𝑆𝑆𝑇𝑇𝑆𝑆𝑆𝑆
+ …𝑇𝑇𝑇𝑇𝐴𝐴𝑛𝑛
𝑂𝑂𝐸𝐸𝐸𝐸𝐿𝐿𝑛𝑛𝑆𝑆𝑇𝑇𝑆𝑆𝑆𝑆
2.
A compliance factor of more than one means the OEEL of the mixture has been exceeded. A compliance factor of 1 or less than 1 means the OEEL of the mixture has not been exceeded and is in compliance.
91
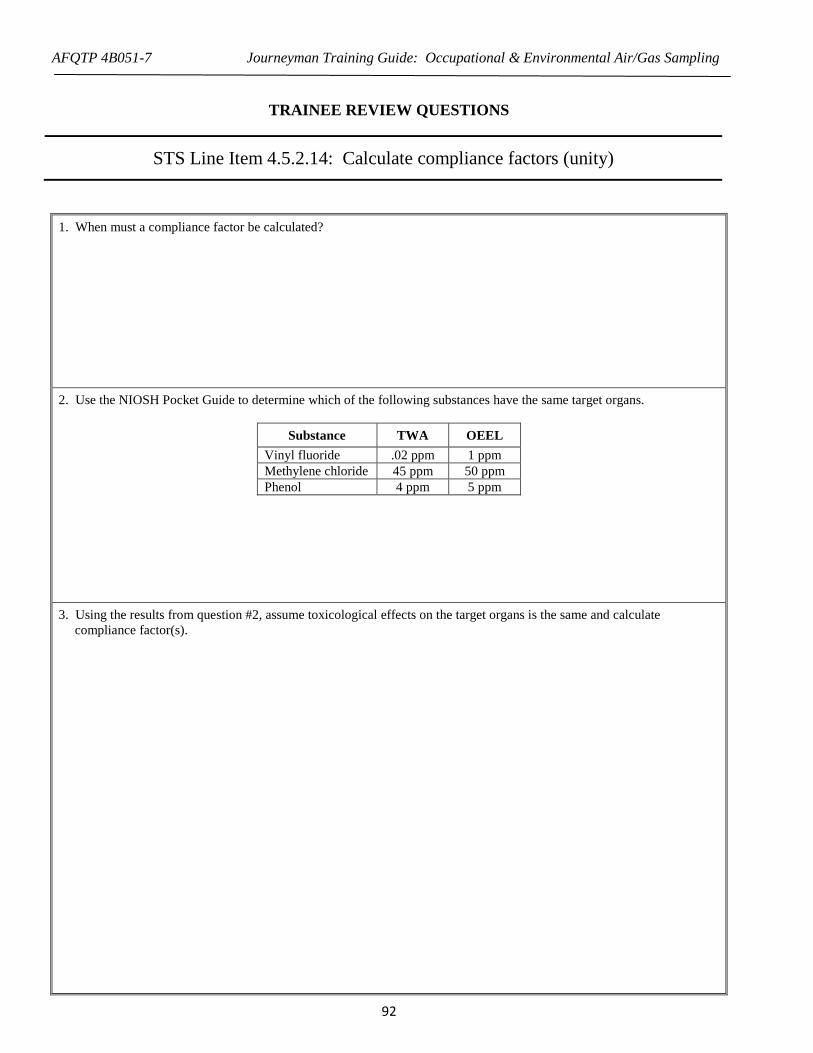
AFQTP 4B051-7 Journeyman Training Guide: Occupational & Environmental Air/Gas Sampling
TRAINEE REVIEW QUESTIONS
STS Line Item 4.5.2.14: Calculate compliance factors (unity)
1. When must a compliance factor be calculated?
2. Use the NIOSH Pocket Guide to determine which of the following substances have the same target organs.
Substance TWA OEEL Vinyl fluoride .02 ppm 1 ppm Methylene chloride 45 ppm 50 ppm Phenol 4 ppm 5 ppm
3. Using the results from question #2, assume toxicological effects on the target organs is the same and calculate
compliance factor(s).
92

AFQTP 4B051-7 Journeyman Training Guide: Occupational & Environmental Air/Gas Sampling
4. Using the results from question #3, interpret what each compliance factor means.
93
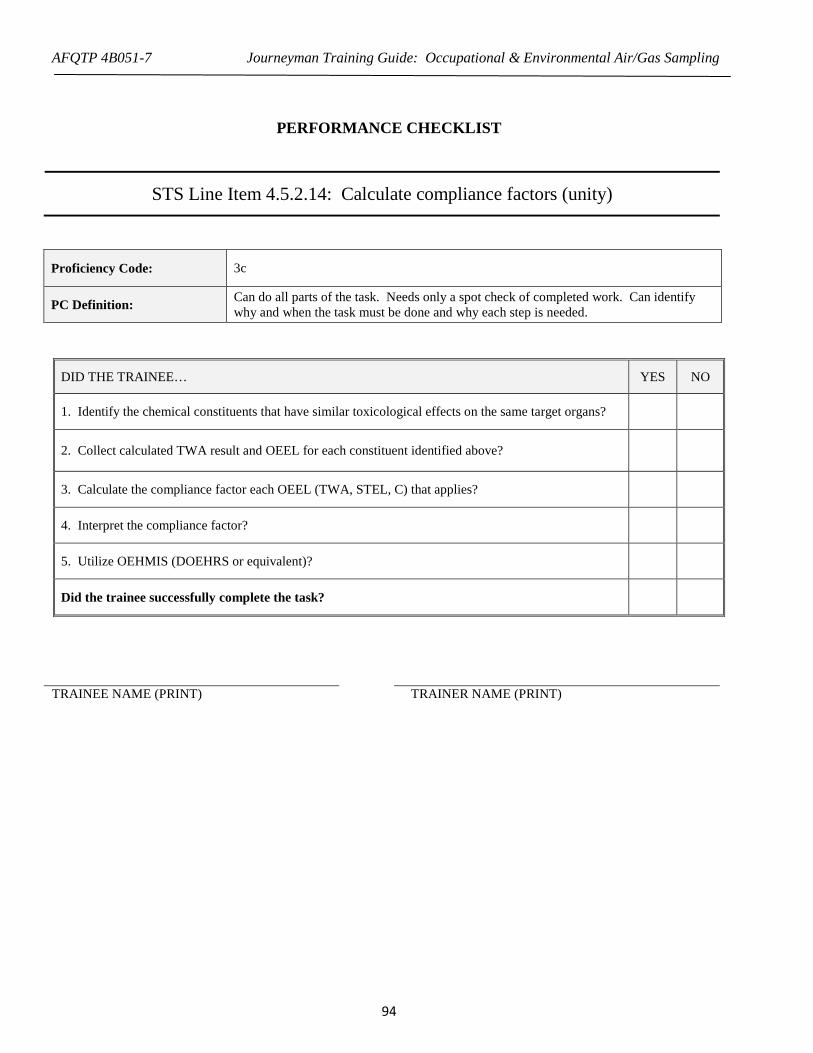
AFQTP 4B051-7 Journeyman Training Guide: Occupational & Environmental Air/Gas Sampling
PERFORMANCE CHECKLIST
STS Line Item 4.5.2.14: Calculate compliance factors (unity)
Proficiency Code: 3c
PC Definition: Can do all parts of the task. Needs only a spot check of completed work. Can identify why and when the task must be done and why each step is needed.
DID THE TRAINEE… YES NO
1. Identify the chemical constituents that have similar toxicological effects on the same target organs?
2. Collect calculated TWA result and OEEL for each constituent identified above?
3. Calculate the compliance factor each OEEL (TWA, STEL, C) that applies?
4. Interpret the compliance factor?
5. Utilize OEHMIS (DOEHRS or equivalent)?
Did the trainee successfully complete the task?
TRAINEE NAME (PRINT) TRAINER NAME (PRINT)
94
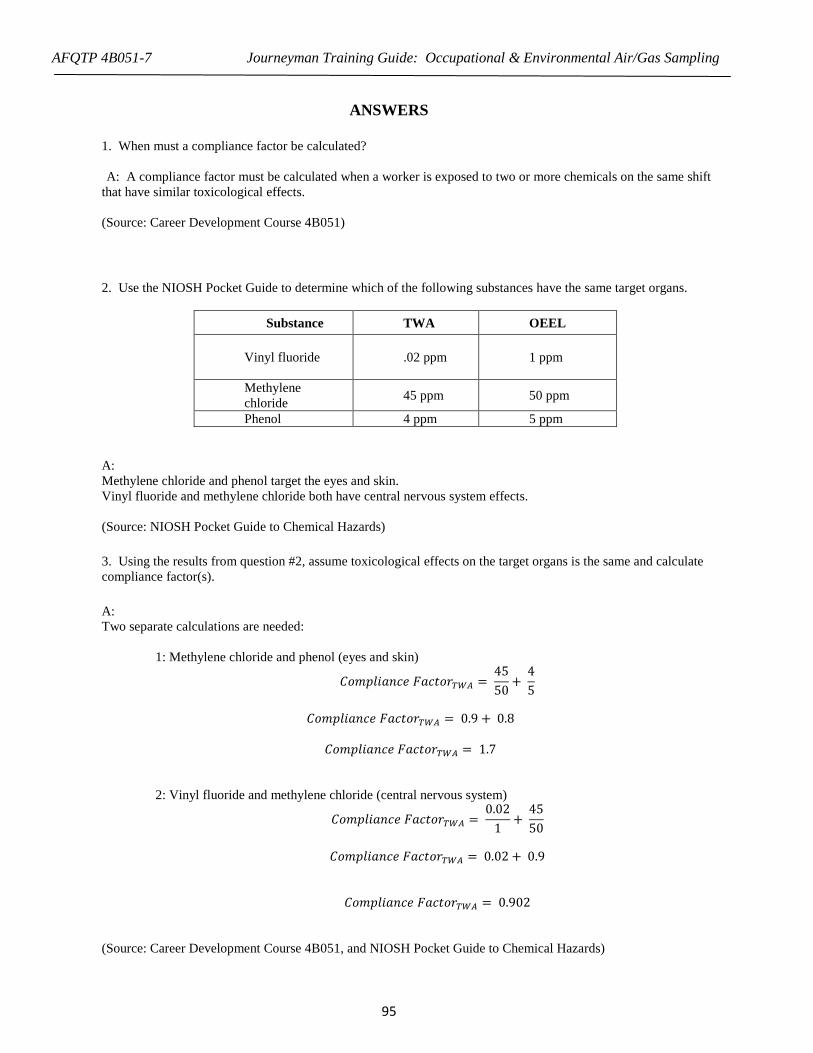
AFQTP 4B051-7 Journeyman Training Guide: Occupational & Environmental Air/Gas Sampling
ANSWERS
1. When must a compliance factor be calculated? A: A compliance factor must be calculated when a worker is exposed to two or more chemicals on the same shift that have similar toxicological effects. (Source: Career Development Course 4B051)
2. Use the NIOSH Pocket Guide to determine which of the following substances have the same target organs.
Substance TWA OEEL
Vinyl fluoride .02 ppm 1 ppm
Methylene chloride 45 ppm 50 ppm
Phenol 4 ppm 5 ppm A: Methylene chloride and phenol target the eyes and skin. Vinyl fluoride and methylene chloride both have central nervous system effects. (Source: NIOSH Pocket Guide to Chemical Hazards) 3. Using the results from question #2, assume toxicological effects on the target organs is the same and calculate compliance factor(s). A: Two separate calculations are needed:
1: Methylene chloride and phenol (eyes and skin)
𝐶𝐶𝑉𝑉𝑉𝑉𝑒𝑒𝑉𝑉𝑇𝑇𝑅𝑅𝑠𝑠𝑅𝑅𝑉𝑉 𝐹𝐹𝑅𝑅𝑅𝑅𝑅𝑅𝑉𝑉𝑟𝑟𝑇𝑇𝑇𝑇𝑇𝑇 = 4550
+ 45
𝐶𝐶𝑉𝑉𝑉𝑉𝑒𝑒𝑉𝑉𝑇𝑇𝑅𝑅𝑠𝑠𝑅𝑅𝑉𝑉 𝐹𝐹𝑅𝑅𝑅𝑅𝑅𝑅𝑉𝑉𝑟𝑟𝑇𝑇𝑇𝑇𝑇𝑇 = 0.9 + 0.8
𝐶𝐶𝑉𝑉𝑉𝑉𝑒𝑒𝑉𝑉𝑇𝑇𝑅𝑅𝑠𝑠𝑅𝑅𝑉𝑉 𝐹𝐹𝑅𝑅𝑅𝑅𝑅𝑅𝑉𝑉𝑟𝑟𝑇𝑇𝑇𝑇𝑇𝑇 = 1.7
2: Vinyl fluoride and methylene chloride (central nervous system)
𝐶𝐶𝑉𝑉𝑉𝑉𝑒𝑒𝑉𝑉𝑇𝑇𝑅𝑅𝑠𝑠𝑅𝑅𝑉𝑉 𝐹𝐹𝑅𝑅𝑅𝑅𝑅𝑅𝑉𝑉𝑟𝑟𝑇𝑇𝑇𝑇𝑇𝑇 = 0.02
1+
4550
𝐶𝐶𝑉𝑉𝑉𝑉𝑒𝑒𝑉𝑉𝑇𝑇𝑅𝑅𝑠𝑠𝑅𝑅𝑉𝑉 𝐹𝐹𝑅𝑅𝑅𝑅𝑅𝑅𝑉𝑉𝑟𝑟𝑇𝑇𝑇𝑇𝑇𝑇 = 0.02 + 0.9
𝐶𝐶𝑉𝑉𝑉𝑉𝑒𝑒𝑉𝑉𝑇𝑇𝑅𝑅𝑠𝑠𝑅𝑅𝑉𝑉 𝐹𝐹𝑅𝑅𝑅𝑅𝑅𝑅𝑉𝑉𝑟𝑟𝑇𝑇𝑇𝑇𝑇𝑇 = 0.902 (Source: Career Development Course 4B051, and NIOSH Pocket Guide to Chemical Hazards)
95
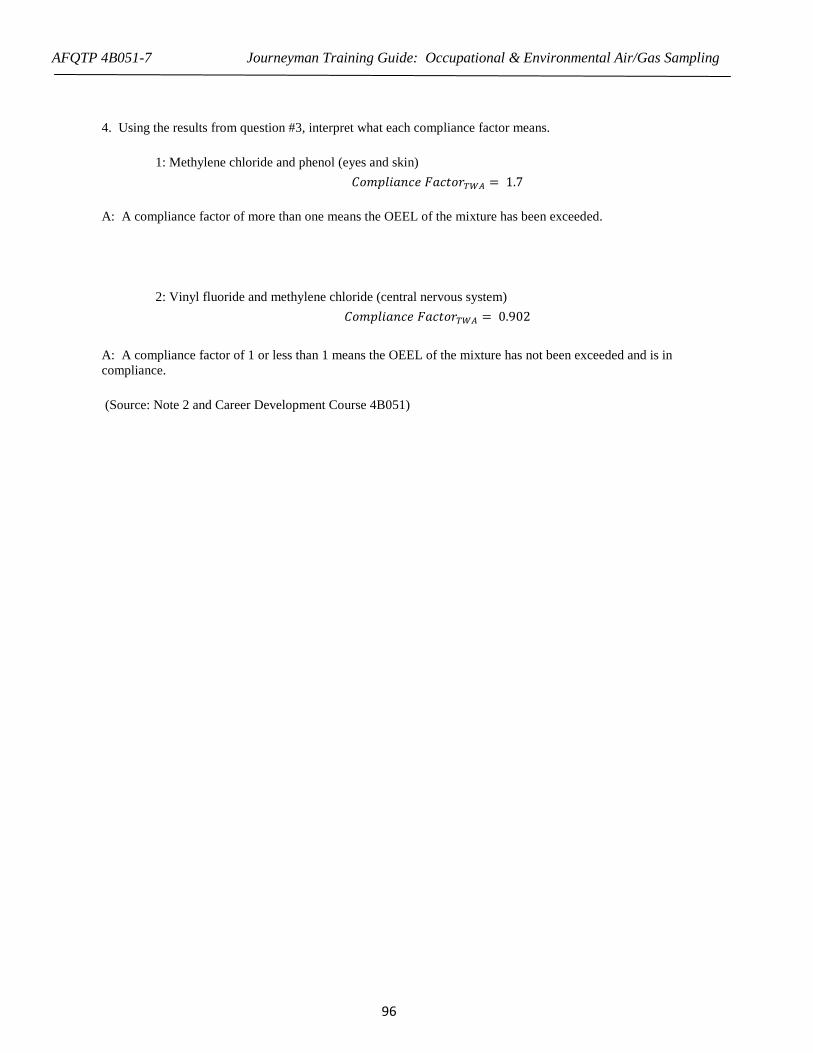
AFQTP 4B051-7 Journeyman Training Guide: Occupational & Environmental Air/Gas Sampling
4. Using the results from question #3, interpret what each compliance factor means.
1: Methylene chloride and phenol (eyes and skin) 𝐶𝐶𝑉𝑉𝑉𝑉𝑒𝑒𝑉𝑉𝑇𝑇𝑅𝑅𝑠𝑠𝑅𝑅𝑉𝑉 𝐹𝐹𝑅𝑅𝑅𝑅𝑅𝑅𝑉𝑉𝑟𝑟𝑇𝑇𝑇𝑇𝑇𝑇 = 1.7
A: A compliance factor of more than one means the OEEL of the mixture has been exceeded.
2: Vinyl fluoride and methylene chloride (central nervous system) 𝐶𝐶𝑉𝑉𝑉𝑉𝑒𝑒𝑉𝑉𝑇𝑇𝑅𝑅𝑠𝑠𝑅𝑅𝑉𝑉 𝐹𝐹𝑅𝑅𝑅𝑅𝑅𝑅𝑉𝑉𝑟𝑟𝑇𝑇𝑇𝑇𝑇𝑇 = 0.902
A: A compliance factor of 1 or less than 1 means the OEEL of the mixture has not been exceeded and is in compliance. (Source: Note 2 and Career Development Course 4B051)
96
AFQTP 4B051-7 Journeyman Training Guide: Occupational & Environmental Air/Gas Sampling
STS Line Item 4.5.2.16: Interpret air sample results
TRAINER GUIDANCE
Proficiency Code: 2b
PC Definition: Can do most parts of the task. Needs help only on hardest parts. Can determine step-by-step procedures for doing the task.
Prerequisites: None
Training References:
ESOH Service Center, Laboratory Sampling Guide https://hpws.afrl.af.mil/dhp/OE/ESOHSC/pages/index.cfm?id=742 AFMAN 48-146, Occupational and Environmental Health Program Management. 9 October 2012. NIOSH Pocket Guide to Chemical Hazards http://www.cdc.gov/niosh/npg/ (or equivalent chemical reference) AFMAN 48-155, Occupational and Environmental Health Program Latest edition of the TLV® Booklet from the American Conference of Governmental Industrial Hygienists (ACGIH)
Additional Supporting References: AFI48-145, Occupational and Environmental Health Program,15 September 2011
CDC Reference: 4B051
Training Support Material: • Sample Report • Calculator
Specific Techniques: Conduct 4.5.2.16 - Interpret Air Sample Results in conjunction with 4.5.2.12 - Calculate Time-weighted Averages and 4.5.2.13 - Calculate Upper and Lower Confidence Limits.
Criterion Objective: Given a Laboratory Sample Report of air sampling results, interpret the data to identify discrepancies successfully completing all steps with limited trainer assistance.
Notes: Trainee should be able to read a Laboratory Sample Report, and identify discrepancies, sample results, blanks, and be able to perform blank corrections. Know how to compare the final Time-weighted Average (TWA) results to the Occupational Environmental Exposure Limit (OEEL).
97
AFQTP 4B051-7 Journeyman Training Guide: Occupational & Environmental Air/Gas Sampling
TASK STEPS
1. Locate “Narrative Comments” on sample report. 2. Identify if data is valid. 3. Check for any comments that might affect your samples. 4. Review sample information for correctness. (Sample ID, Air Volume, Date Sampled, Analyte, Method Reference –
ensure these match what you had sent in.) 5. Check for qualifiers. 6. Check dilution factors. 7. Identify sample(s). 8. Identify blank(s). 9. Check if contaminant is detected greater than the Reporting Limit (RL) on media blanks. 10. Determine if blank correction is necessary. 11. Perform blank correction (if necessary) IAW Laboratory Sampling Guide for all samples. 12. Calculate TWA IAW QTP 4.5.2.12. 13. Calculate upper and lower confidence limits IAW QTP 4.5.2.13. 14. Compare resulting TWA to OEEL and determine if limit was exceeded. LOCAL REQUIREMENTS:
NOTES:
98

AFQTP 4B051-7 Journeyman Training Guide: Occupational & Environmental Air/Gas Sampling
TRAINEE REVIEW QUESTIONS
STS Line Item 4.5.2.16: Interpret air sample results
1. Where would you look to find any discrepancies or potential issues with your sample results?
2. What must be done with the sample result before it can be compared to the OEEL?
99
AFQTP 4B051-7 Journeyman Training Guide: Occupational & Environmental Air/Gas Sampling
PERFORMANCE CHECKLIST
STS Line Item 4.5.2.16: Interpret air sample results
Proficiency Code: 2b
PC Definition: Can do most parts of the task. Needs help only on hardest parts. Can determine step by step procedures for doing the task.
DID THE TRAINEE… YES NO
1. Locate “Narrative Comments” on sample report?
2. Identify if data is valid?
3. Check for any comments that might affect your samples?
4. Review sample information for correctness. (Sample ID, Air Volume, Date Sampled, Analyte, Method Reference – ensure these match what you had sent in.)?
5. Check for qualifiers?
6. Check dilution factors?
7. Identify sample(s)?
8. Identify blank(s)?
9. Check if contaminant is detected greater than the reporting limit (RL) on media blanks?
10. Determine if blank correction is necessary?
11. Perform blank correction (if necessary) IAW Laboratory Sampling Guide for all samples?
12. Calculate TWA IAW QTP 4.5.2.12?
13. Calculate upper and lower confidence limits IAW QTP 4.5.2.13?
14. Compare resulting TWA to OEEL and determine if limit was exceeded?
Did the trainee successfully complete the task?
TRAINEE NAME (PRINT) TRAINER NAME (PRINT)
100
AFQTP 4B051-7 Journeyman Training Guide: Occupational & Environmental Air/Gas Sampling
ANSWERS 1. Where would you look to find any discrepancies or potential issues with your sample results?
A: You would check for any comments in the Narrative Comments.
(Source: Laboratory Sampling Guide, Page 9, Section 1.17.3)
2. What must be done with the sample result before it can be compared to the OEEL? A: Your sample result must be in the same units as your OEEL in order to be able to compare them. (Source: Career Development Course 4B051)
101
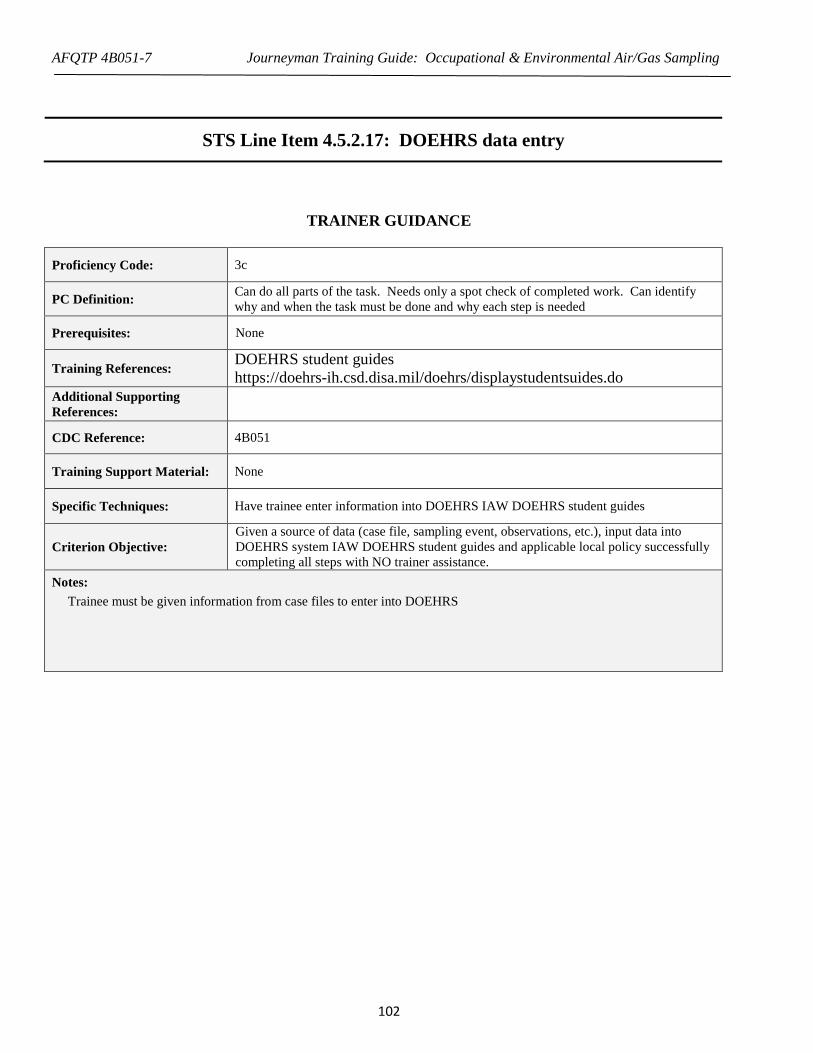
AFQTP 4B051-7 Journeyman Training Guide: Occupational & Environmental Air/Gas Sampling
STS Line Item 4.5.2.17: DOEHRS data entry
TRAINER GUIDANCE
Proficiency Code: 3c
PC Definition: Can do all parts of the task. Needs only a spot check of completed work. Can identify why and when the task must be done and why each step is needed
Prerequisites: None
Training References: DOEHRS student guides https://doehrs-ih.csd.disa.mil/doehrs/displaystudentsuides.do
Additional Supporting References:
CDC Reference: 4B051
Training Support Material: None
Specific Techniques: Have trainee enter information into DOEHRS IAW DOEHRS student guides
Criterion Objective: Given a source of data (case file, sampling event, observations, etc.), input data into DOEHRS system IAW DOEHRS student guides and applicable local policy successfully completing all steps with NO trainer assistance.
Notes: Trainee must be given information from case files to enter into DOEHRS
102

AFQTP 4B051-7 Journeyman Training Guide: Occupational & Environmental Air/Gas Sampling
TASK STEPS
1. Determine type of data.1
2. Enter correct module of DOEHRS. 3. Input data.2 4. Verify accuracy of data.
LOCAL REQUIREMENTS:
NOTES:
1. Data may be any one of the following types: • Observations and notes or shop data • Environmental survey • Radiation survey • Incident response • SEG survey
2. Be sure to fill out all mandatory forms IAW applicable DOEHRS student guides and local policy.
103
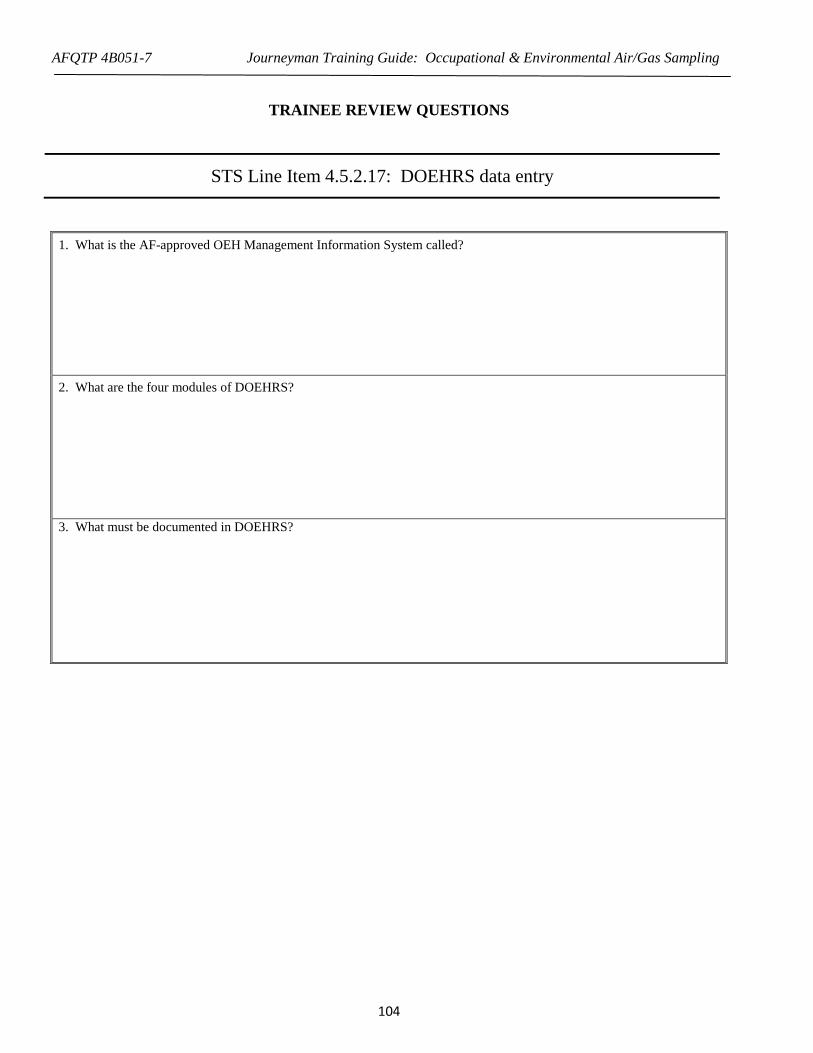
AFQTP 4B051-7 Journeyman Training Guide: Occupational & Environmental Air/Gas Sampling
TRAINEE REVIEW QUESTIONS
STS Line Item 4.5.2.17: DOEHRS data entry
1. What is the AF-approved OEH Management Information System called?
2. What are the four modules of DOEHRS?
3. What must be documented in DOEHRS?
104

AFQTP 4B051-7 Journeyman Training Guide: Occupational & Environmental Air/Gas Sampling
PERFORMANCE CHECKLIST
STS Line Item 4.5.2.17: DOEHRS data entry
Proficiency Code: 3c
PC Definition: Can do all parts of the task. Needs only a spot check of completed work. Can identify why and when the task must be done and why each step is needed
DID THE TRAINEE…
YES NO
1. Determine type of data?
2. Enter correct module of DOEHRS?
3. Input data?
4. Verify accuracy of data?
Did the trainee successfully complete the task?
TRAINEE NAME (PRINT) TRAINER NAME (PRINT)
105
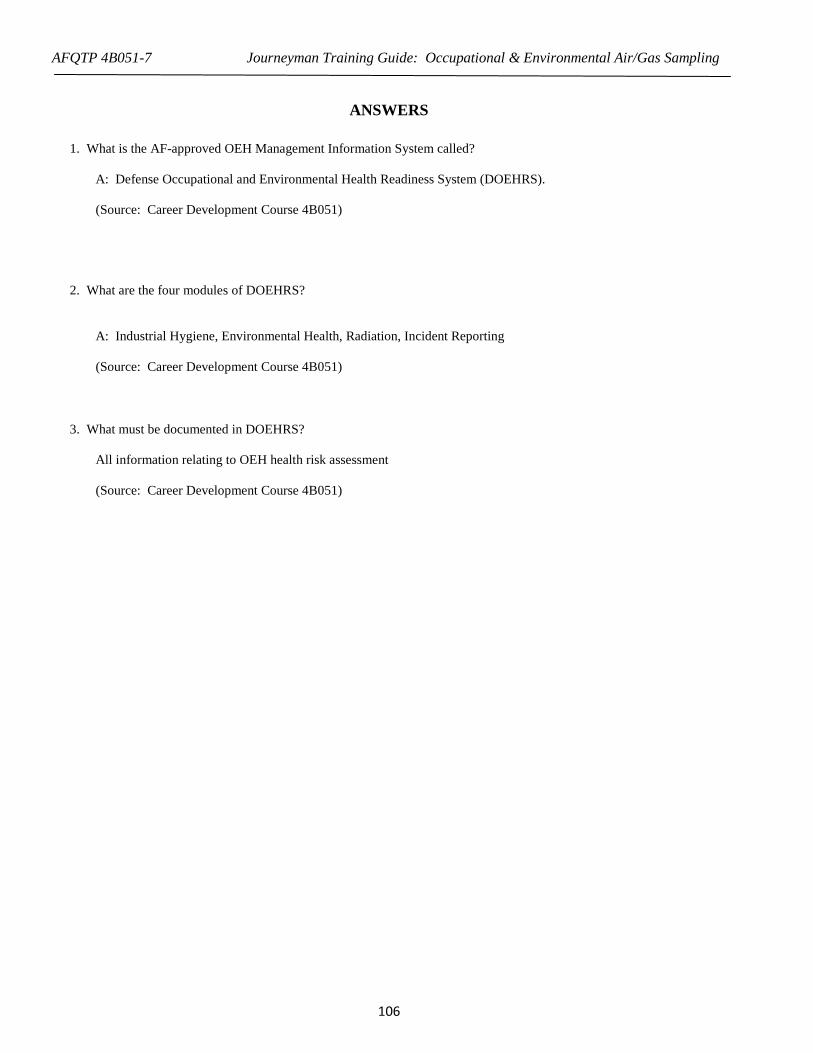
AFQTP 4B051-7 Journeyman Training Guide: Occupational & Environmental Air/Gas Sampling
ANSWERS
1. What is the AF-approved OEH Management Information System called? A: Defense Occupational and Environmental Health Readiness System (DOEHRS). (Source: Career Development Course 4B051)
2. What are the four modules of DOEHRS? A: Industrial Hygiene, Environmental Health, Radiation, Incident Reporting (Source: Career Development Course 4B051)
3. What must be documented in DOEHRS? All information relating to OEH health risk assessment (Source: Career Development Course 4B051)
106