Embed Size (px)
Citation preview
Issue Date: 26/10/10 Page 1 of 6
40 YEARS OF MARINE PROTECTION
System consists of Denso Seashield tapes, primers and mastics with a heavy duty HDPE outer jacket incorporating
supporting bars for fastening with stainless steels nuts and bolts.
Designed to protect piles and surrounding structures from the environment. The tape covers and makes intimate
contact with the entire surface of any substrate in the splash or tidal zone.
For splash or tidal zone protection of piles in harsh marine environments.
Applicable to pilings that have a constant outside diameter (OD) throughout the length of the protection zone. For pilings
without a constant OD products Denso Seashield primer, mastic and prefabricated void fillers can be used to create a
constant OD profile which enables the use of the system.
Used on marinas, jetties, mooring berths and on piers. By refineries, bulk commodities handlers and port authorities on
loading wharfs, jetties, dolphins, piers and beacons. By shipyards on loading wharfs.
• Denso Seashield Primer.
• Denso Seashield Mastic for filling and profiling any irregular surfaces.
• Denso Marine Piling Tape or Seal T Tape corrosion protection layer.
• Seashield Series 2000FD Jackets designed and custom made for each pile for mechanical protection of the system.
• Stainless steel 316 nuts, bolts and washers supplied by Denso to secure and hold jackets in place.
a) Surface Preparation:
Surfaces to be protected must free from all marine growth, loose rust, original coatings, dirt etc. The surface is prepared
by scraping, chipping, water blasting or the use of scrubbers.
The choice of method will depend on a number of factors and will need to take into account the most practical with
regard to site conditions and any environmental constraints imposed due to site location.
Methods can include the use of abrasive blast cleaning, high pressure water jetting, pneumatically or hydraulically driven
tools such as scabblers, wire brushes, rotary scrapers and needle guns. Hand tools such as wire brushes, scrapers,
chipping hammers etc.
• Ensure that all thick layers of rust are removed from all steel surfaces.
• Remove from the area to be protected all marine growth.
• Areas of firmly adhering rust scale must be removed by chipping hammers and/or hand power tools.
• Remove corrosion deposits from the bottom of any deep pitting deeper than 2mm.
• Weld scars and protrusions of any kind (other than the welded seam on the pile) must be cut away and the surfaces
ground smooth to remove sharp edges and sudden changes of profile.
• Wire brush and remove any loose and flaking paint. Wash off surface with seawater and bucket.
APPLICATION INSTRUCTIONS
Seashield Series 2000FD System Heavy Duty Pile Protection
1. SYSTEM:
2. USES:
3. EQUIPMENT LIST:
5. CORROSION PROTECTION:
4. MATERIALS LIST:
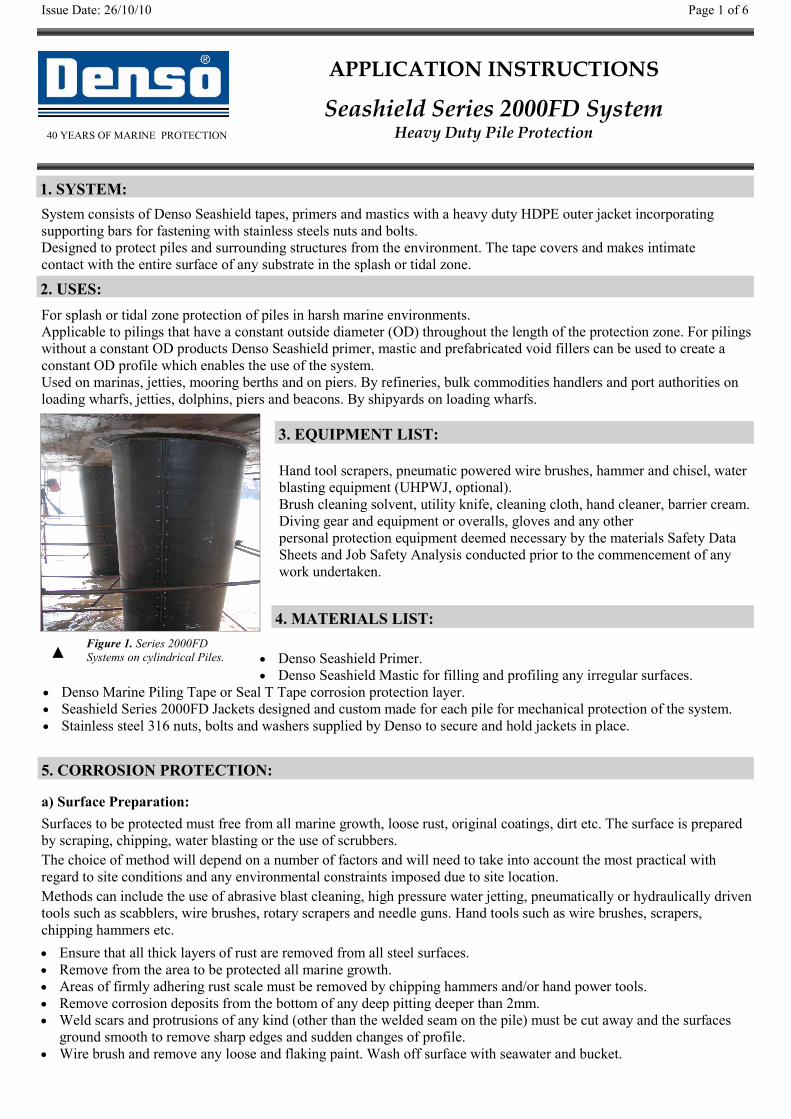
Figure 1. Series 2000FD
Systems on cylindrical Piles. ▲
Hand tool scrapers, pneumatic powered wire brushes, hammer and chisel, water
blasting equipment (UHPWJ, optional).
Brush cleaning solvent, utility knife, cleaning cloth, hand cleaner, barrier cream.
Diving gear and equipment or overalls, gloves and any other
personal protection equipment deemed necessary by the materials Safety Data
Sheets and Job Safety Analysis conducted prior to the commencement of any
work undertaken.

Issue Date: 26/10/10 Page 2 of 6
Precautions may need to be taken due to environmental concerns. During removal of any pre-existing coating measures
should be taken to reduce the amount of debris, paint flakes or old coating etc. from being deposited into the marine en-
vironment. Local regulations may dictate certain precautions to be taken and conditions that need to be met as part of
these works. A job site Environmental Management Plan may be available for guidance in these matters.
First Inspection:
When all growth, rust, etc. has been removed a close examination must be made of the surface area that has been
prepared, to ensure a thoroughly clean surface without growth, sharp or protruding surfaces is obtained.
b) Priming:
Priming is required when using Seal T
Tape. Priming may not be required if using
Marine Piling Tape as it is designed to be
self priming on new steel. On all other
applications Denso Seashield Primer should
be used.
Denso Seashield Primer is applied to the
surface area by gloved hand, cloth, roller or
brush, at a spreading rate of 1.0kg/m². It is
applied in a circular motion obtaining an
even film, while all voids, concaves, and
holes should be filled. Denso Seashield
Primer can be applied above and below the
water’s surface.
5. CORROSION PROTECTION (continued):
Figure 3. Cleaned pile showing the
application of primer down either side
of a vertical weld seam and into pits.
Shown is a hexagonal pile. The
procedure is the same for cylindrical
and universal piles.
Primer is required in;
• Areas of deep pitting: Defined as pits of 2.0mm or deeper where there is a danger
of the tape wrapping ‘bridging’ the pits and leaving a void. These areas must be
treated with a liberal coating of Seashield Primer to fill up any voids. If a very
deep pit occurs then after priming cut a patch if Seashield Mastic and press firmly
into the area.
• Weld Scars: Apply a liberal coat of Seashield Primer over these areas. After
wrapping the pile with tape examine the area where scars occur. If there is any
bridging cut with a sharp knife and press down to remove air. Patch with
additional tape if required.
• Spiral and Vertical Welds: Apply a liberal amount of primer to the weld and
smooth down by hand to create a fillet of primer either side of the weld. Sufficient
should be used to avoid bridging when the tape is applied.
Second Inspection:
The primed area must be thoroughly inspected to ensure that all the surface area has
been properly coated with the primer, including pitted voids, concaves and holes. A
smooth profile must be evident to ease the application of tape.
Figure 2. Preparing surface with
high pressure water blasting. ►
c) Tape Wrapping:
For hexagonal or universal piles Denso can supply foamed void fillers specially designed for filling the voids. The void
is layered with Primer and Seal T Tape then the foamed void filler is pressed into the void. This then produces a uniform
cylindrical external pile profile to enable the spiral application of tapes.
It is important to apply the tape with the correct side facing the pile. The outside of the tape is to make intimate with
the piling substrate. The pile is wrapped from the top down or the bottom up depending on access and the order in
which any stacker jackets are to be fitted. There is not a preferred direction and any weather boarding effect can be
ignored as the tape is deformed under the jacket when it is properly fitted.
In the pile protection zone apply the tape by starting with two full circumferential wraps then proceed spirally along the
pile progressing with a 55% overlap, giving effectively a double layer of tape. This will ensure a minimum double
thickness of tape all the way. Carry on until the roll runs out. Commence each new roll by overlapping the last roll by
the same length as the tape width, for example if the tape is 150mm wide then the overlap will be about 150mm.
As wrapping proceeds smooth by gloved hand to exclude water, air bubbles and wrinkles from under the tape and to aid
sealing of overlaps. Any overlapped edges are to be moulded and blended together by hand. This process is repeated all
the way along the protection zone finishing again with two complete horizontal turns of the tape.

Issue Date: 26/10/10 Page 3 of 6
c) Tape Wrapping (continued):
Figure 4. Marine Piling
Tape overlap of roll ends.
Third Inspection:
It is imperative to thoroughly inspect the wrapped pile surface area
ensuring it has been wrapped with the specified 55% overlap, that all
water, air bubbles and wrinkles are excluded from under the tape and that
all overlaps are sealed moulded and blended together.
It may be worthwhile assessing the number of jackets that can be applied
and the tidal conditions so that only enough tape is applied for the same
number of jackets that can be fitted in a day. The tape that is then left
exposed should be temporarily protected with some spare HDPE sheet until
the job can be finished. Do not leave tape only exposed to the elements and
the sea as it may become dislodged before the job can be completed and
will have to be discarded and the piles rewrapped.
►
◄ Figure 5. Tape being applied under water.
Figure 6. Pile being readied for third inspection after tape wrapping. ►
6. MECHANICAL PROTECTION:
Jacket Installation:
a) Preparations:
Prepare the jacket and the correct number of Stainless 316 nut bolts and
washers in a dry calm area before taking the jacket for fitting. It may
also be handy to have lashing which can be used to hold the jacket in
place before tightening.
A pair of 19mm ring spanners or air wrench with 19mm deep sockets
will be required to do up the M12 bolts and also a small amount of
thread lubricant - Molybdenum or copper grease will do.
Some Seashield Primer may be required to lubricate the pass over flap
of the jacket during fitting.
b) Hydraulic Equipment Assembly:
The following hydraulic tensioning kit is used to
tension and fit the Seashield 2000FD system.
This equipment should not be used for other tasks
without the authority of Denso Australia.
The parts table make up one kit. Three sets of
fittings are required to fit a 1.9m tall Seashield
2000FD jacket. Check you have all the parts
before starting assembly or the job. Also required
is some PTFE (“Teflon”) tape, a 14mm spanner
and an adjustable spanner.
Description Part Number Quantity
Hydraulic Tensioning Cylinder Mount S987335 3
Hydraulic Tensioning Pulling Bars S987340 6
Hydraulic Tensioning Jacking Bars S987345 6
Hydraulic Tensioning Pulling Bars Short S987350 6
M12 x 90mm Bolts 316SS RM380035 4
M12 Plain Washer RM380036 4
M12 Full Nut 316SS RM380037 4
Hydraulic Air Powered Pump PA133 S987303 1
Coupler Model C604 S987312 4
Cylinder RC59 S987313 3
Nipples FZ1619 S987323 3
Manifold A66 S987330 1
Hose 6.1M HC7220 (CH604) S987325 3
Hose 0.9 M S987323 1
Table 1. Complete list of parts for a three tiered hydraulic tensioning kit .▼
▲ Figure 7. Hydraulic tensioning set.

Issue Date: 26/10/10 Page 4 of 6
c) Assembly Instructions:
Remove the hand pump from its packaging and check that the oil filler/
vent cap is firmly closed. Also ensure that the flow control screw, which
is the 3 bladed plastic knob, is firmly closed in a clockwise direction. This
is to prevent hydraulic fluid flowing out of the end of the pump as you
assemble the components. Remove the plug which is firmly screwed into
the end of the pump. A 14mm spanner is required for this.
The gauge adaptor is then screwed into the end of the hand pump and the
gauge then fitted so that it faces the operator when they are using the unit.
PTFE/Teflon tape or high quality sealing compound should be used on the
threads to ensure a hydraulic seal. Never wrap the first thread with tape.
Always wrap in a winding direction so that it winds up with the thread.
Next fit the hose into the end of the adaptor using Teflon tape or high
quality sealing compound.
Figure 8. Illustrates plug to be removed
after checking flow control screw and
filler/vent cap are firmly shut. ▼
◄ Figure 9. The gauge and adaptor in place.
Figure 10. Hose fitted
into adaptor end.. ►
The set is supplied with quick release self sealing couplings between the hose and the cylinder. These also come with
dust caps which need to be removed before the 2 assemblies can be connected. The hose end is pushed up to the female
coupler and the free spinning nut is done up securing the 2 parts together.
◄ Figure 11. The dust caps in place.
Figure 12. The assembled hose
to cylinder connector. Note the
stowage of the dust caps.
►
Now bleed the system of any air as follows;
• Vent pump reservoir and close release valve.
• Position pump at higher elevation than cylinder.
• Position cylinder with the plunger end down.
• Operate pump to fully extend the cylinder.
• Open release valve to retract cylinder. This will force the air trapped to
move up to the pump reservoir.
• Repeat the above steps as necessary.
• Add oil if necessary (Enerpac hydraulic oil is recommended).
• Return vent/fill cap to operating position.
Now fit the front hydraulic cylinder mount to the cylinder. (You will need
to remove the protective cap to do this). ▲ Figure 13. Front mount fitted to cylinder.
The next stage is to fit the tool to the jacket which will have been applied to the pile and being held temporarily with a
lashing.
Issue Date: 26/10/10 Page 5 of 6
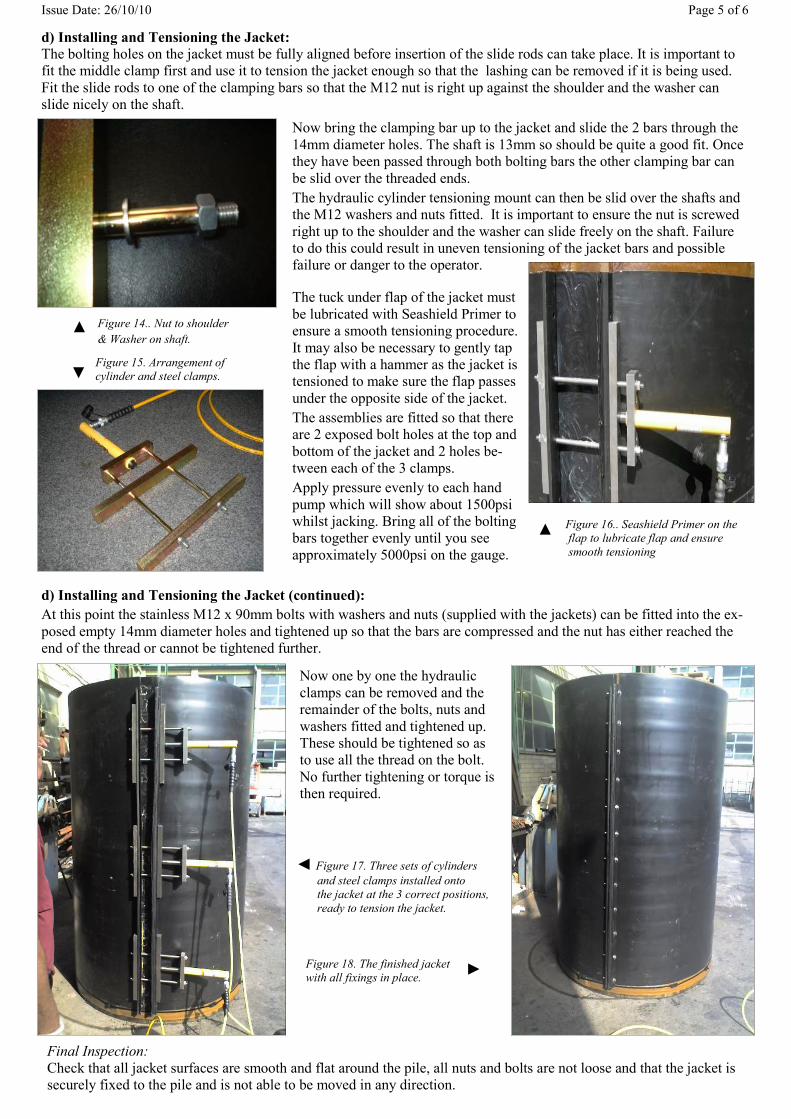
d) Installing and Tensioning the Jacket:
The bolting holes on the jacket must be fully aligned before insertion of the slide rods can take place. It is important to
fit the middle clamp first and use it to tension the jacket enough so that the lashing can be removed if it is being used.
Fit the slide rods to one of the clamping bars so that the M12 nut is right up against the shoulder and the washer can
slide nicely on the shaft.
▲ Figure 14.. Nut to shoulder
& Washer on shaft.
Now bring the clamping bar up to the jacket and slide the 2 bars through the
14mm diameter holes. The shaft is 13mm so should be quite a good fit. Once
they have been passed through both bolting bars the other clamping bar can
be slid over the threaded ends.
The hydraulic cylinder tensioning mount can then be slid over the shafts and
the M12 washers and nuts fitted. It is important to ensure the nut is screwed
right up to the shoulder and the washer can slide freely on the shaft. Failure
to do this could result in uneven tensioning of the jacket bars and possible
failure or danger to the operator.
Figure 15. Arrangement of
cylinder and steel clamps. ▼
▲ Figure 16.. Seashield Primer on the
flap to lubricate flap and ensure
smooth tensioning
The tuck under flap of the jacket must
be lubricated with Seashield Primer to
ensure a smooth tensioning procedure.
It may also be necessary to gently tap
the flap with a hammer as the jacket is
tensioned to make sure the flap passes
under the opposite side of the jacket.
The assemblies are fitted so that there
are 2 exposed bolt holes at the top and
bottom of the jacket and 2 holes be-
tween each of the 3 clamps.
Apply pressure evenly to each hand
pump which will show about 1500psi
whilst jacking. Bring all of the bolting
bars together evenly until you see
approximately 5000psi on the gauge.
Final Inspection:
Check that all jacket surfaces are smooth and flat around the pile, all nuts and bolts are not loose and that the jacket is
securely fixed to the pile and is not able to be moved in any direction.
d) Installing and Tensioning the Jacket (continued):
At this point the stainless M12 x 90mm bolts with washers and nuts (supplied with the jackets) can be fitted into the ex-
posed empty 14mm diameter holes and tightened up so that the bars are compressed and the nut has either reached the
end of the thread or cannot be tightened further.
Now one by one the hydraulic
clamps can be removed and the
remainder of the bolts, nuts and
washers fitted and tightened up.
These should be tightened so as
to use all the thread on the bolt.
No further tightening or torque is
then required.
◄ Figure 17. Three sets of cylinders and steel clamps installed onto
the jacket at the 3 correct positions,
ready to tension the jacket.
Figure 18. The finished jacket
with all fixings in place. ►

Issue Date: 26/10/10 Page 6 of 6
411 - 413 Victoria Street,
Brunswick, Vic 3056
Australia
MELBOURNE ♦ SYDNEY ♦ ADELAIDE ♦ BRISBANE ♦ PERTH
Tel: + 61 3 93567600 or 1300 658 590 (toll free) ♦ Email: [email protected] ♦ Web: www.densoaustralia.com.au
Denso (New Zealand) Limited
Tel: + 64 21 304 660 ♦ Email: [email protected]
MEMBERS OF WINN & COALES INTERNATIONAL
7. SAFETY DATA:
Storage: Denso Seashield Primer, Mastic, Denso Marine Piling Tape or Seal T Tape shall
be stored in a cool dry place out of direct sunlight between 5° and 25°C.
Seashield Series 2000FD Jackets shall be stored the way they arrive, out of direct
sunlight until they are required.
Transport: Avoid prolonged exposure to high temperatures during transit, preferably in an
enclosed vehicle.
Handling: Seashield Series 2000FD Jackets shall be kept rolled and taped to prevent damage
for transportation to the installation site. Care shall be taken to avoid sudden im-
pact that may tear or damage the jacket.
Stainless 316 nuts, bolts and washers shall be kept securely in a dry place. These
should then be bagged in packs for each jacket to ensure no contamination with
dust and dirt.
Action in case of fire: Extinguish with water fog, dry powder, carbon dioxide or chemical foam.
Self-contained breathing apparatus may be required.
Skin Contact: Wash with warm water and mild soap.
Use pumiced heavy duty hand cleaner for stubborn stains.
Swallowing: If feeling unwell, seek medical advice.
Inhalation: In a fire situation avoid inhaling fumes.
Spillage: No materials classified as hazardous. Pick up and collect material by hand or with
absorbent rags or pads.
Disposal: Incineration or landfill in accordance with local regulations.
Other: For more information please refer to Denso safety data and technical data sheets.
Available for all system components.
Approved Quality Management System
AS/NZS ISO 9001:2008 Lloyds Register – Certificate No Mel 0927759
Denso (Australia) Pty Ltd