Embed Size (px)
Citation preview

Age
nts
– H
ands
-On
Exer
cise
sAgent
Hands On Exercise

Chapter 2 – Agents Hands-On Exercises
Agents – H
ands-On Exercises
Sadjadi et al.2
You have just been hired as the lead IT Administrator at the Florida International University (FIU) to manage the computers at the School of Computing and Information Sciences (SCIS), the Machine Room (MR), the Green Library (GL), and the College of Engineering and Computing (CEC). As shown in Fig. 2.49, SCIS, MR, GL, and CEC are physically located in four buildings. SCIS maintains about 200 desktop workstations in its instructional lab, MR maintains about 5 servers, GL maintains about 50 open access guest desktops, and CEC maintains about 500 PCs and laptops. The exact number and configurations of computers are not well documented. Typically, the servers run Windows 2003 and the desktop workstations, PCs, and laptops all run Windows XP. Active Directory is implemented in one of the servers, named dc, and is assigned to all computers in SCIS and GL, but not to those in CEC. As the lead IT Administrator of the organization you are responsible for ensuring that all systems run efficiently with minimal disruption of computing services to the users.
As your limited budget, available manpower, and system availability requirements do not allow for onsite maintenance of all computers, you must automate routine tasks and remotely perform the majority of system maintenance activities. You have, therefore, decided to employ a Kaseya server to help you manage all computers at SCIS, MR, GL, and CEC. Over the weekend you installed the Kaseya server. The Kasaya server is now fully operational and you can start deploying the Kaseya agents to SCIS, MR, GL, and CEC computers and customizing the agents to your needs.
Your dedicated virtual environment includes the computers and network devices depicted in Fig. 2.49 and further described below:
• NAT Router: 192.168.0.1 & 192.168.1.1 & 192.168.2.1 & 192.168.3.1
Background Information
Technical Information
Fig. 2.49A logical
diagram of FIU’s
network infrastructure.

3Chapter 2 – Agents Hands-On Exercises
Age
nts
– H
ands
-On
Exer
cise
s
Sadjadi et al.Sadjadi et al.
• SCIS: ws1.scis.fiu.edu - 192.168.0.100
• MR: dc.scis.fiu.edu - 192.168.0.10 & 192.168.1.10 & 192.168.3.10
• GL: guest1.gl.fiu.edu - 192.168.1.100
• CEC: pc1.cec.fiu.edu - 192.168.2.100
Note: This virtual environment includes only a limited number of representative servers and workstations physically housed in the four buildings.
Now that the Kaseya server is operational and the logical layout is known, it is time to start deploying Kaseya agents and customizing Kaseya to your needs.To begin, you need to setup FIU as the organization and SCIS, MR, GL and CEC as groups, under FIU, so that everything is organized to reflect the logical diagram shown in Fig. 2.49. Fig. 2.50 shows a quick view of the organizational hierarchy.
Create an organization named FIU-<USERNAME> (replace “<USERNAME>” with your Kaseya login name):
Note: As you will be sharing the Kaseya server with other students, everything referring to your dedicated virtual environment should have a unique name by adding your username as its suffix to distinguish your dedicated environment from those of others. When you register for virtual labs, you will receive a document (called “Data Sheet”) that includes all the specific information about your dedicated virtual environment, including your <USERNAME>, <LOGIN_CREDENTIALS>, the <DOMAIN_ADMIN_CREDENTIALS> , <NAT_ROUTER_IP>, <DC_RDP_PORT>, <WS_RDP_PORT>, <GUEST_RDP_PORT>, <PC_RDP_PORT>, <LAPTOP_RDP_PORT> and <KASEYA_SERVER>. Note that all such variables are embedded within ‘<’ and ‘>’ and follow this formatting style: <ITALIC_BOLD>.
1. Open the System module. Go to Orgs / Groups / Depts / Staff > Manage.
2. Click on the New button.
Part 1
Fig. 2.50 FIU
Organizational Hierarchy

4 Chapter 2 – Agents Hands-On Exercises
Agents – H
ands-On Exercises
Sadjadi et al.
3. Type in “FIU-<USERNAME>” under ID and Organization Name- Under the organization name (“FIU-<USERNAME>”), create machine groups to specify the physical locations of the computers. The names of the machine groups are as follows: SCIS, MR, GL, and CEC.
4. Verify if the newly created Organization (“FIU-<USERNAME>”) is checked.
5. Click on Machine Group on the right hand side of the module.
6. Click on New in this section.
Fig. 2.52Adding
organization details.
Fig. 2.51Create the
organizationin Kaseya.
Fig. 2.53Adding
organization details.

5Chapter 2 – Agents Hands-On Exercises
Age
nts
– H
ands
-On
Exer
cise
s
Sadjadi et al.Sadjadi et al.
7. Create a group by typing its name (“SCIS”) under Machine Group Name. Click Save.
8. Repeat steps 4-8 for the MR, GL, and CEC groups.
Having set up the organization and groups, the next step is to install an agent on dc so that we can start discovering the computers associated with the domain.
-Create a package for agent deployment named “package4MR-<USERNAME>”. This package will be used to install agents on all of the servers in MR.
9. Open the Agent module. Go to Install Agents > Deploy Agents. Click on Create Package and a new window will open up.
10. Under Specify how the machine ID is assigned, choose Computer Name - the computer name and under Specify how the group ID is assigned, choose Existing Group - FIU-<USERNAME>.MR ” as the group. Click next to continue.
Part 2
Fig. 2.55Adding
organization details.
Fig. 2.54Creating Machine Group Names

6 Chapter 2 – Agents Hands-On Exercises
Agents – H
ands-On Exercises
Sadjadi et al.
11. On the next screen, make sure to leave everything at its default values and click next.
12. In the Select agent type drop down box choose Windows as the operating system.
13. Make sure Securely bind administrator credentials to the install package? is checked and enter the <DOMAIN_ADMIN_CREDENTIALS> (which you can find in your assigned dedicated virtual environ-ment sheet) under this selection box.
14. Next, under Package Name type “ package4MR-<USERNAME>” and under Package Description
Fig. 2.56Creating an Agent Package
Fig. 2.57Creating an Agent Package

7Chapter 2 – Agents Hands-On Exercises
Age
nts
– H
ands
-On
Exer
cise
s
Sadjadi et al.Sadjadi et al.
type “MR”.
15. Click on “Save”. Use an RDP client (e.g., Microsoft Terminal Server Console, which can be accessed by running mstsc.exe or any other RDP client such as webRDP) to login to the domain controller For example, you can run this command on a Windows XP, for example, to remote login to this machine: “mstsc.exe /admin /v:<NAT_ROUTER_IP>:<DC_RDP_PORT>”.
Install a custom Kaseya agent using the package that you created in steps 8-14, “package4MR-<USERNAME>”, on this machine manually.
16. While logged into dc through RDP, open a browser (IE is preferred), point it to the <KASEYA_SERV-ER>, and use your <LOGIN_CREDENTIALS> to log into Kaseya and go to Agents > Install Agents > Deploy Agents. Click on the link “package4MR-<USERNAME>”. Download and install the file.
17. Verify the agent is installed successfully by going to Machine Status > Agent Status. Look for the icon next to “dc.MR.FIU-<USERNAME>”. The icon should not be grayed out. Another way to verify the successful installation of the agent is to check whether the agent icon shows in the system tray and
Fig. 2.58Creating an Agent Package
Fig. 2.59Installing
Agent Package

8 Chapter 2 – Agents Hands-On Exercises
Agents – H
ands-On Exercises
Sadjadi et al.
whether it is blue (not gray).
Note: The agent icon, by default, is not shown when connecting to a computer remotely, using, for example, a RDP client or the VMware Server Console. Even if you remotely connect to the “console” session, the agent icon will not show in the system tray. To fix this, you should run “regedit.exe” on the remote machine and browse to HKEY_LOCAL_MACHINE\SOFTWARE\Microsoft\Windows\CurrentVersion\Run\ and look for a key with its name starting with “KAS…” and value similar to “C:\Program Files\Kaseya\...\KaUsrTsk.exe”. Now you need to double click on this key and add “ –remote” to the end of the value data for this key, outside the double quotes for the “KaUsrTsk.exe” command. The value data should look like this: “C:\Program Files\Kaseya\...\KaUsrTsk.exe” –remote. Next, you need to reboot the machine and login to see the agent icon in the system tray. To reboot a remote machine, you can run “shutdown –r”.
You have successfully installed an agent on dc. You now want to install agents on other computers at SCIS and GL remotely using the agent installed on dc. As dc is a domain controller, running LAN Watch on this machine will discover all the machines that are being controlled by this domain controller. Also, using LAN Watch, you can discover the IP addresses of all the network devices on the subnets that the domain controller is directly attached to.
Schedule a LAN watch on the dc to discover all the computers in the domain as well as all the computers and network devices attached to the 192.168.0.0/24 and 192.168.1.0/24 networks.
18. Open the Agent module, go to LAN Discovery > LAN Watch.
19. Click on the check-box next to dc.
20. Enter the IP range of your scan in the Scan Range fields (192.168.0.0 – 192.168.1.255). Click on Schedule and a new window will open up.
Fig. 2.60Successfully
installed agent.
Part 3

9Chapter 2 – Agents Hands-On Exercises
Age
nts
– H
ands
-On
Exer
cise
s
Sadjadi et al.Sadjadi et al.
21. Schedule the LAN Watch to run now.
22. Set the distribution to 0 minute to make sure that LAN Watch will start immediately.
23. Finally click on Submit.
Fig. 2.62Executing
LAN Watch
Fig. 2.61Setting up LAN Watch

10 Chapter 2 – Agents Hands-On Exercises
Agents – H
ands-On Exercises
Sadjadi et al.
24. As this process may take some time (approximately 5-10 minutes), you are advised to read through and move on to the next instructions and perform those that are not dependent on LAN Watch (go to steps 24-33).
25. Create three packages for agent deployment named “package4SCIS-<USERNAME>”, “Pack-age4GL-<USERNAME>”, and “Package4CEC-<USERNAME>” to automatically add newly deployed agents to the SCIS, GL, and CEC groups.
26. Open the Agent module. Go to Install Agents > Deploy Agents.
27. Click on Create Package and a new window will open up.
28. Under Specify how the machine ID is assigned, choose Computer Name - the computer name.
29. Under Specify how the group ID is assigned, choose “Existing Group - FIU-<USERNAME>.SCIS” as the group.Click next to continue. On the next screen, make sure to leave everything at its default values and click next.
Fig. 2.63Creating
more packages
for the other buildings.
Fig. 2.64Creating
Agent Packages.

11Chapter 2 – Agents Hands-On Exercises
Age
nts
– H
ands
-On
Exer
cise
s
Sadjadi et al.Sadjadi et al.
30. Under Select agent type choose “Windows” as the operating system.
31. Make sure Securely bind administrator credentials to the install package? is checked and put in the administrator credentials under it.
32. Under Package Name type, enter “SCIS” and under Package Description, type “Package4SCIS-<USERNAME>”.
33. Click on Save.
34. Repeat these steps for the “Package4GL-<USERNAME>” and the “Package4CEC-<USERNAME>”.
Note: Since the CEC building is not on the domain. Leave the Domain textbox blank when creating the CEC package.
Use View AD Users and deploy an agent every time the user “Student” logs in using the new “Package4SCIS-<USERNAME>”. We use this agent deployment strategy because students using the instructional lab computers may uninstall the Kaseya Agents. This way, we make sure that every time a new student logs into an instructional lab computer, if needed, a Kaseya agent is installed.
35. Open the Agent module. Go to LAN Discovery > View AD Users.
36. On the new page, under Logon Name, “Student” should be visible. If the usernames are not shown, select fiu-<USERNAME> from the Machine Group dropdown.
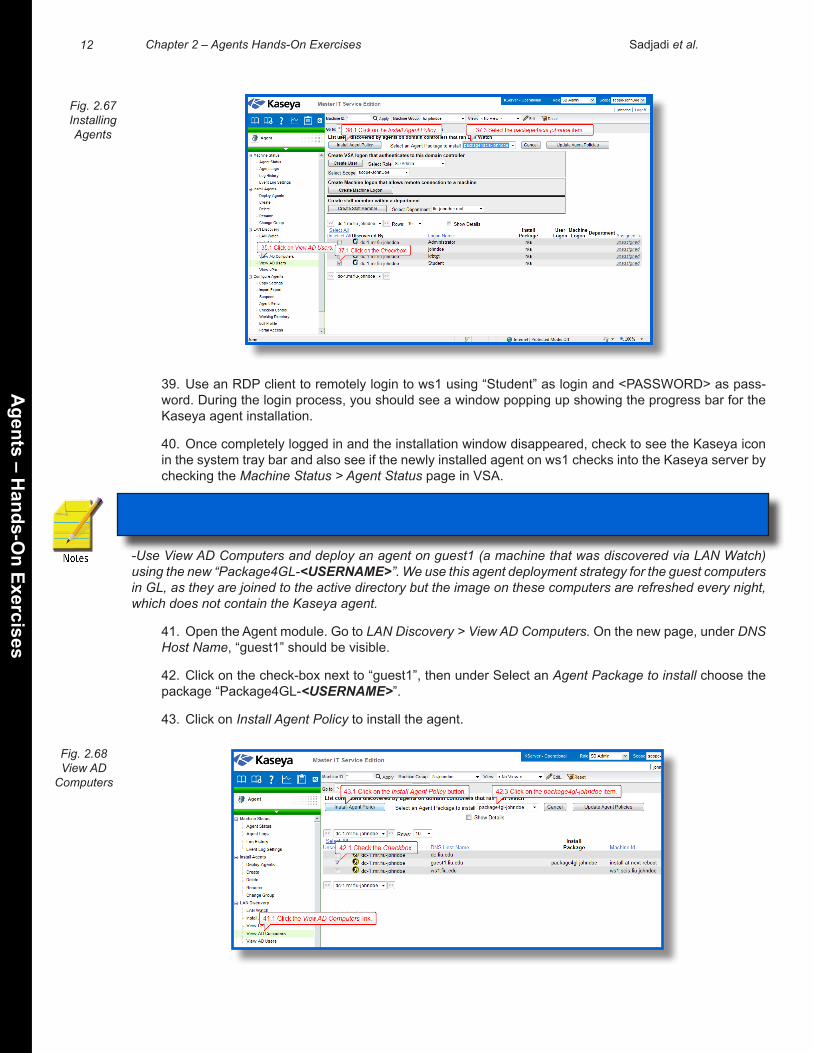
37. Click on the check-box next to “Student”, then under Select an Agent Package to install choose the package “Package4SCIS-<USERNAME>”.
38. Click on Install Agent Policy to install the agent.
Fig. 2.65Creating
Agent Packages.
Fig. 2.66Creating
Agent Packages.
12 Chapter 2 – Agents Hands-On Exercises
Agents – H
ands-On Exercises
Sadjadi et al.
39. Use an RDP client to remotely login to ws1 using “Student” as login and <PASSWORD> as pass-word. During the login process, you should see a window popping up showing the progress bar for the Kaseya agent installation.
40. Once completely logged in and the installation window disappeared, check to see the Kaseya icon in the system tray bar and also see if the newly installed agent on ws1 checks into the Kaseya server by checking the Machine Status > Agent Status page in VSA.
Note: This setting is best for computers that are part of an active directory, have multiple users and some of the users may uninstall the agent. Also, it is very useful if you want to install agent on all computers that some specific users may log into. To remove this option, choose the user in View AD Users and click on Cancel.
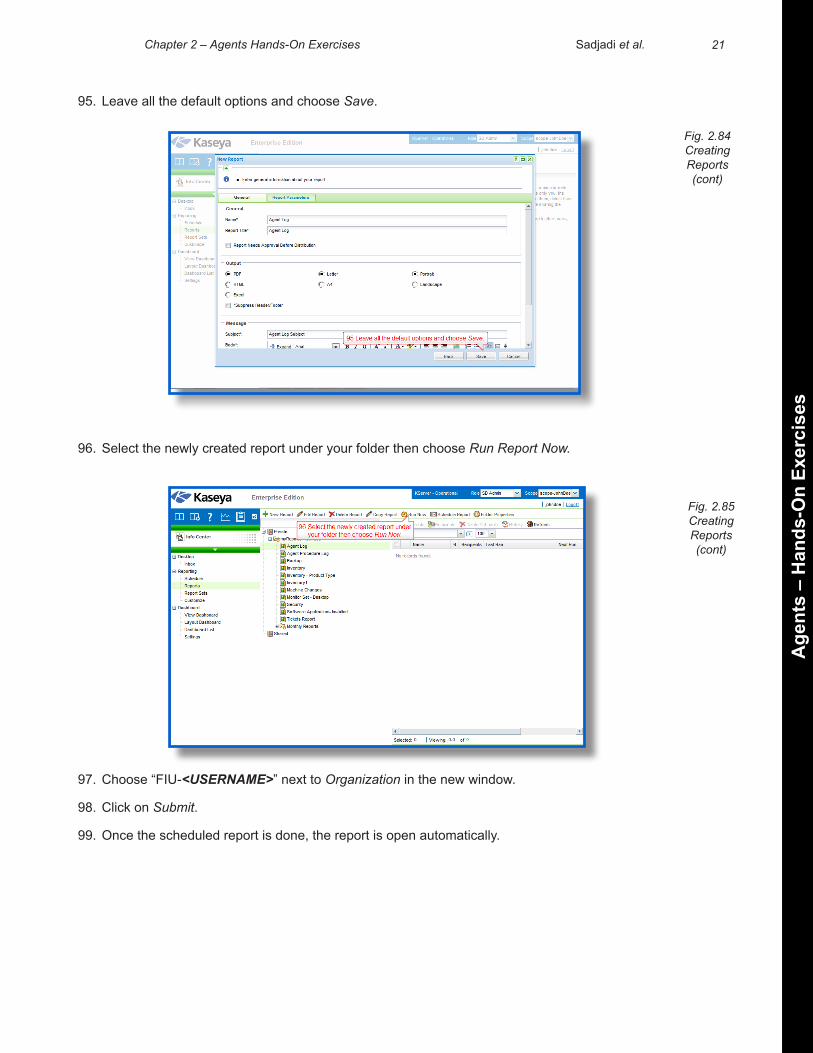
-Use View AD Computers and deploy an agent on guest1 (a machine that was discovered via LAN Watch) using the new “Package4GL-<USERNAME>”. We use this agent deployment strategy for the guest computers in GL, as they are joined to the active directory but the image on these computers are refreshed every night, which does not contain the Kaseya agent.
41. Open the Agent module. Go to LAN Discovery > View AD Computers. On the new page, under DNS Host Name, “guest1” should be visible.
42. Click on the check-box next to “guest1”, then under Select an Agent Package to install choose the package “Package4GL-<USERNAME>”.
43. Click on Install Agent Policy to install the agent.
Fig. 2.67Installing Agents
Fig. 2.68View AD
Computers

13Chapter 2 – Agents Hands-On Exercises
Age
nts
– H
ands
-On
Exer
cise
s
Sadjadi et al.Sadjadi et al.
44. “guest1” must be restarted in order for Active Directory to install the agent packages. Using RDP, log into dc and go to Start > Run. Then type in “shutdown –i” and press OK. Using the GUI, restart guest1 remotely.
45. Check the Machine Status > Agent Status page to see if the newly installed agent on guest1 checks into the Kaseya server.
Note: To see the agent icon in the system tray while in a remote session, you need to fix the registry key and restart the remote computer as indicated in the notes for deploying an agent to dc.
`Note: This setting is best for those who want to deploy agents every time the specified computer restarts regardless of who logs into the computer. To remove this option, choose the computer in View AD Computers and click on Cancel.
Install the custom Kaseya agent, “Package4CEC-<USERNAME>”, on pc1 machine manually.
46. Remotely login to pc1 through RDP (use “mstsc.exe /admin /v:<NAT_ROUTER_IP>:<PC1_RDP_PORT>”), open a browser (IE is preferred), point it to the <KASEYA_SERVER>, and use your <LOG-IN_CREDENTIALS> to log into Kaseya and go to Agents > Install Agents > Deploy Agents. Click on the link “package4CEC-<USERNAME>”. Download and install the file.
47. Verify the agent is installed successfully by going to Machine Status > Agent Status. Look for the icon next to “pc1.CEC.FIU-<USERNAME>”. The icon should not be grayed out.
Note: To see the agent icon in the system tray while in a remote session, you need to fix the registry key and restart the remote computer as indicated in the notes for deploying an agent to dc.
Note: In a real environment, instead of your <LOGIN_CREDENTIAL>, you should use the username and password that has administrator privileges on pc1. For the sake of simplicity, in your dedicate virtual environment, we have used your <LOGIN_CREDENTIALS> to create a user with administrator privileges on all the virtual machine.
WWSD: Manual installation of agents can be easier if you click on the checkbox, labeled List on dl.asp next to the package you want to deploy, in the Agent > Deploy Agents page. This will allow you to see the selected packages in this URL:http://<KASEYA_SERVER>/dl.asp. You can then install the agent without logging into Kaseya VSA.
Since the configuration within CEC is not well-documented, you feel that it is wise to do a LAN Watch just to make sure you account for all the computers within CEC just in case you missed a computer. Also, as there may be new computers deployed or laptops that may only show up on the network every now and then, you may want to schedule the LAN Watch daily.
Schedule a LAN watch on pc1 to discover all the computers on the 192.168.2.0/24 network.
WW
SD? W
HAT W
OULD SADJADI DO? W
WSD
?
Fig. 2.69Executing
LAN Watch.

14 Chapter 2 – Agents Hands-On Exercises
Agents – H
ands-On Exercises
Sadjadi et al.
48. Open the Agent module. Go to LAN Discovery > LAN Watch.
49. Click on the check-box next to “pc1.CEC.FIU-<USERNAME>”.
50. Next, in the Scan Range fields, put in the IP range of your scan (192.168.2.0 – 192.168.2.255).
51. Click on Schedule and a new window will open up.
52. Schedule the LAN Watch to run daily at this time.
53. Set the distribution to 0 minute to make sure that LAN Watch will start immediately.
54. Finally click on “Submit”.
Note: Like the previous LAN Watch, it will take some time before this process is done. Please wait patiently before continuing or perform other tasks that are not dependent to this procedure.
You have found a laptop that is inside CEC named laptop1. This computer is not on Active Directory, so you must install an agent via Install Agents so you can maintain it.
Use LAN Watch to deploy an agent on laptop1 using the “Package4CEC-<USERNAME>” Package.
Fig. 2.70Executing
LAN Watch (cont)
Fig. 2.71Executing
LAN Watch (cont)

15Chapter 2 – Agents Hands-On Exercises
Age
nts
– H
ands
-On
Exer
cise
s
Sadjadi et al.Sadjadi et al.
55. Open the Agent module. Go to LAN Discovery > Install Agents.
56. Click on the pc1 and a new window will open up.
57. On the new page, under Host Name , “laptop1” should be visible.
58. Click on the check-boxes next to “laptop1”, then under Select a Windows Agent Package to install choose the package “Package4CEC-<USERNAME>”.
59. Use your <LOGIN_CREDENTIALS> to enter the Username and Password.
Note: For the Admin Login textbox, include the name of the target machine too. For example, for this exercise, enter “laptop1\johndoe”
60. Click on Install.
Note: To see the agent icon in the system tray while in a remote session, you need to fix the registry key and restart the remote computer as indicated in the notes for deploying an agent to dc.
Note: The page should automatically refresh and give you a notification when the agent is installed correctly. If you see an error, please go back and redo the last two steps.
Fig. 2.72Install Agents
Fig. 2.73Install Agents
(cont)

16 Chapter 2 – Agents Hands-On Exercises
Agents – H
ands-On Exercises
Sadjadi et al.
Now that all machines are discovered and agents are deployed on them, you now want to be able to better manage the agent by developing some “views” that allow you to filter them based on their role, their operating system, the software installed on them, etc. In this exercise, two “views”, namely, servers and workstations will be created.
Define a “view” named “Windows 2003 Server-<USERNAME>” that once selected will only show machines with Windows Server 2003 operating system on them. Then define another “view” named “XP-<USERNAME>” that will only show machines with the Windows XP operating system on them. After you perform the following steps, make sure to check the correctness of this newly created “views” by trying them.
61. Open the Agent module and click on Agent Status. Go to the Views dropdown list, and make sure “<No View>” is selected.
62. Click on Edit. A new window should open up.
63. Click on the checkbox next to OS Type and under the same name choose “Windows Server 2003” as the operating system being filtered.
64. Next, click on Save as and enter “Windows 2003 Server-<USERNAME>”.
65. Click Ok. The view should now be created.
66. Repeat these steps and create the “XP-<USERNAME>” view.
67. To test the correctness of the views, go to Agent Status and under the View dropdown list, select “Win-dows 2003 Server-<USERNAME>”, or “XP-<USERNAME>”.
68. To see all computers, under the same dropdown list, click on “<No View>“.
Part 4
Fig. 2.75Creating
Views
Fig. 2.74Check Agent Status

17Chapter 2 – Agents Hands-On Exercises
Age
nts
– H
ands
-On
Exer
cise
s
Sadjadi et al.Sadjadi et al.
Part 5
In the process of exploring Kaseya’s VSA, you realized the agent’s right click menu can be configured. You decide to remove the agent icon from the server machines since its unnecessary; however, you decide that some of the settings will be useful for all XP machines and their associated users. You don’t want users to exit out of the agent program and you want an option inside of the menu to go to your company’s website. Also you realize that it will be wise to disable the “Disable Remote Control” option and “Set Account” only on certain workstations (namely, ws1, guest1, and pc1).
Disable the Agent Icon for dc.
69. Open the Agent module. Go to Configure Agents > Agent Menu.
70. Put a check next to the server(s).
71. Make sure Enable Agent Icon is unchecked.
72. Click on Update. Refresh the page until the red text turn into black, which indicates that the changes have taken effect on the agent.
Fig. 2.76View using “Windows
2003 Server - johndoe”
Fig. 2.77View
using “xp - johndoe”

18 Chapter 2 – Agents Hands-On Exercises
Agents – H
ands-On Exercises
Sadjadi et al.
73. To verify the outcome of the changes to the agent menu, you need to RDP to dc and check whether the agent icon is still visible in the system tray.
Disable Exit and edit the Your Company URL text box for all the XP machines.
74. Open the Agent module. Go to Configure Agents > Agent Menu.
75. Put a checkbox next to all the XP computers.
76. Uncheck the box next to Exit.
77. Go to the Your Company URL text box and change it to “FIU Web Portal” or the name of your com-pany.
78. In the box right next to it, type in “http://www.fiu.edu” or the URL of your company.
79. Click on Update. Refresh the page until the red text turn into black, which indicates that the changes have taken effect on the agents.
80. Use RDP and <LOGIN_CREDENTIALS> to remotely login to ws1, guest1, pc1, and laptop1 and check whether the “exit” option is still available in the agent menu by right clicking the agent icon in the system tray.
WWSD: Using views can allow you to quickly filter and then use “Select All” check box, accelerating your interactions with Kaseya VSA when you would like to perform similar tasks on all machines with the same characteristics (e.g., role, operating system, and installed software). Thus, spending some time to develop some useful “views” can save you time in the long run.
Fig. 2.78Configuring the Agent
Menu
WW
SD? W
HAT W
OULD SADJADI DO? W
WSD
?
Fig. 2.79Editing
Agent Menu options
for the XP Machines.

19Chapter 2 – Agents Hands-On Exercises
Age
nts
– H
ands
-On
Exer
cise
s
Sadjadi et al.Sadjadi et al.
Remove the Disable Remote Control and Set Account options for the agents on ws1, guest1 and pc1.
81. Open the Agent module. Go to Configure Agents > Agent Menu.
82. Put a checkbox next to ws1, guest1, and pc1 workstations.
83. Make sure the checkboxes next to Disable Remote Control and Set Account is unchecked.
84. Click on Update. Refresh the page until the red text turn into black, which indicates that the changes have taken effect on the agents.
85. Use RDP and <LOGIN_CREDENTIALS> to remotely login to ws1, guest1, pc1, and laptop1 and check whether the “Set Account” option is still available in the agent menu by right clicking the agent icon in the system tray.
Management is tired of people playing solitaire on the computers. They want to find a way to block it, through Kaseya, so that it cannot be executed on any managed machine. Use the Application Blocker to block solitaire.
86. Click on the Agent module, then go to Protection > Application Blocker.
87. Select the checkboxes next to dc, ws1, guest1, and pc1.
88. Type in “sol.exe” in the textbox next to Add application to block.
89. Click on the Block button.
Note: The file name for solitaire is “sol.exe”.
Part 6
Fig. 2.81Application
Blocker

20 Chapter 2 – Agents Hands-On Exercises
Agents – H
ands-On Exercises
Sadjadi et al.
The management has now asked you to print out a report of your work. They need to see immediate progress and you only have a matter of hours to prepare the report. Going around to each computer will take too long, so you look to Kaseya to fulfill your reporting needs.
Generate a report through the Info Center module showing the successful check-in and install of agents using Agent Logs report.
90. Open the Info Center module. Go to Reporting > Reports.
91. Click on your Private folder, “myReports – <USERNAME>”, choose New Report and a new window will open up.
92. Under Template Category choose Logs.
93. Under Report Template choose Agent Logs.
94. Click Next.
Fig. 2.83Creating Reports(cont)
Fig. 2.82Creating Reports
Part 7
21Chapter 2 – Agents Hands-On Exercises
Age
nts
– H
ands
-On
Exer
cise
s
Sadjadi et al.Sadjadi et al.
95. Leave all the default options and choose Save.
96. Select the newly created report under your folder then choose Run Report Now.
97. Choose “FIU-<USERNAME>” next to Organization in the new window.
98. Click on Submit.
99. Once the scheduled report is done, the report is open automatically.
Fig. 2.84Creating Reports (cont)
Fig. 2.85Creating Reports (cont)

22 Chapter 2 – Agents Hands-On Exercises
Agents – H
ands-On Exercises
Sadjadi et al.
Fig. 2.86

23Chapter 2 – Agents Hands-On Exercises
Age
nts
– H
ands
-On
Exer
cise
s
Sadjadi et al.Sadjadi et al.


![FORMULATION AND DEVELOPMENT OF FAST ...pharmaceutical ingredient, sweetening agents, saliva stimulating agent, flavoring agents, coloring agents, stabilizing and thickening agents.[3]](https://img.dokumen.tips/doc/110x75/5f04fcb27e708231d410b239/formulation-and-development-of-fast-pharmaceutical-ingredient-sweetening-agents.jpg)