Embed Size (px)
Citation preview

7/21/2019 Advanced VPN Training v11.7
http://slidepdf.com/reader/full/advanced-vpn-training-v117 1/92
WatchGuard Certified Training
Branch Office VPN Tunnels and
Mobile VPN
Fireware XTM and WatchGuard System Manager v11.7
Revised: January 2013
Updated for: Fireware XTM v11.7

7/21/2019 Advanced VPN Training v11.7
http://slidepdf.com/reader/full/advanced-vpn-training-v117 2/92
TRAINING
www.watchguard.com/training
SUPPORT
www.watchguard.com/support
U.S. and Canada +877.232.3531
All Other Countries +1.206.613.0456
ii WatchGuard Fireware XTM Training
Notice to Users
Information in this guide is subject to change without notice. Companies, names, and data used in
examples herein are fictitious unless otherwise noted. No part of this guide may be reproduced or
transmitted in any form or by any means, electronic or mechanical, for any purpose, without the express
written permission of WatchGuard Technologies, Inc.
Copyright and Patent Information
Copyright© 2013 WatchGuard Technologies, Inc. All rights reserved.
WatchGuard, Firebox, Fireware, LiveSecurity, and spamBlocker are either registered trademarks or
trademarks of WatchGuard Technologies, Inc. in the United States and other countries. This product is
covered by one or more pending patent applications.
All other trademarks and tradenames are the property of their respective owners.
Printed in the United States.

7/21/2019 Advanced VPN Training v11.7
http://slidepdf.com/reader/full/advanced-vpn-training-v117 3/92
ii
Table of Contents
Branch Office VPN Tunnels .................................................................................................... 1
Introduction .................................................................................................................... 1What You Will Learn ...................................................................................................................... 1
Exercise ......................................................................................................................................... 1
What Branch Office VPNs Can Do For You .................................................................................. 1
What You Should Know ................................................................................................. 2How Branch Office VPNs work ..................................................................................................... 2
Terms and Definitions .................................................................................................................. 4
What Happens During Phase 1 Negotiations ............................................................................. 8
What Happens During Phase 2 Negotiations .......................................................................... 25How VPNs Work With Multi-WAN ............................................................................................... 33
How VPNs Work With Modem Failover ..................................................................................... 34
Use IPSec Certificates for the IKE Credentials ........................................................................ 34
Add Policies in Policy Manager to Allow VPN Traffic ............................................................... 38
Troubleshoot Branch Office VPN Tunnels ................................................................................ 38
Before You Begin ......................................................................................................... 41Necessary Equipment And Services ......................................................................................... 41
Management Computer Configuration ..................................................................................... 41
Firewall Configuration ................................................................................................................. 41
Exercise ........................................................................................................................ 42Make a Manual VPN Between a Single-WAN XTM Device and a Multi-WAN XTM Device .... 42
Frequently Asked Questions ....................................................................................... 48
Related Courseware and Information ........................................................................ 49
What You Have Learned .............................................................................................. 49
Test Your Knowledge ................................................................................................... 50
Mobile VPN ........................................................................................................................... 51
What You Will Learn .................................................................................................... 51
Connect Remote Users Securely to the Corporate Network ..................................... 51Types of Mobile VPN .................................................................................................................. 52
Enable the XTM Device for Mobile VPN .................................................................................... 54
Distribute Client Software and Configuration File ................................................................... 55
Use Mobile VPN with IPSec with an Android Device ................................................. 56Configure the IPSec VPN client on the Android Device ............................................................ 57
Use Mobile VPN with IPSec With a Mac OS X or iOS Device ..................................... 58Configure the XTM Device ......................................................................................................... 58
Configure the VPN Client on an iOS Device ............................................................................. 59
Configure the VPN Client on a Mac OS X Device ..................................................................... 59
Use Mobile VPN with L2TP with an iOS Device ......................................................... 60Configure the XTM Device ......................................................................................................... 60
Mobile VPN with L2TP IPSec Settings ........................................................................ 61
Mobile VPN Exercises .................................................................................................. 62

7/21/2019 Advanced VPN Training v11.7
http://slidepdf.com/reader/full/advanced-vpn-training-v117 4/92
iv WatchGuard Fireware XTM Training
Exercise 1: Set Up Mobile User VPN with L2TP ........................................................... 62
Activate L2TP on the XTM Device ............................................................................................. 62
Add Users to the L2TP-Users Group ......................................................................................... 64
Configure the Client Computer ................................................................................................. 65
Exercise 2: Configure Mobile VPN with IPSec and Prepare Mobile VPN Client
Configuration Files .......................................................................................................... 68
Exercise 3: Restrict Mobile VPN with IPSec Users by Policy ....................................... 73
Exercise 4: Use the Shrew Soft IPSec Client ................................................................ 76Install the Shrew Soft VPN Client .............................................................................................. 76
Connect and Disconnect the Shrew Soft VPN Client .............................................................. 77
Exercise 5: Configure the XTM device for Mobile VPN with SSL ................................. 79
Activate the XTM Device for SSL VPN ....................................................................................... 79
Add Users to the SSLVPN-Users Group .................................................................................... 81
Restrict SSL VPN Users by Policy .............................................................................................. 82
Exercise 6: Change the Port Used for Mobile VPN with SSL ....................................... 84
Exercise 7: Use the Mobile VPN with SSL Client .......................................................... 85
Install the Mobile VPN with SSL Client ..................................................................................... 85
Connect with the Mobile VPN with SSL Client ......................................................................... 86
Test Your Knowledge ................................................................................................... 87

7/21/2019 Advanced VPN Training v11.7
http://slidepdf.com/reader/full/advanced-vpn-training-v117 5/92
1
Fireware XTM Training
Branch Office VPN Tunnels
Creating IPSec VPNs in Fireware XTM
Introduction
What You Will LearnIn this course, you learn how to make branch office virtual private networks (BOVPNs) between
WatchGuard XTM devices with Fireware XTM, when one or both devices have multiple connections to
the Internet. You learn how to make these VPNs manually, not with the WatchGuard Management
Server. You also learn how VPN failover works.
Exercise
This course includes a step-by-step exercise to show you how to make VPNs in a multi-WAN
environment. It also illustrates a use case that might apply in your organization.
Before you start the exercise, make sure to read “Before You Begin,” on page 41. This section has a list of
the equipment and software you need for the exercise, and gives you basic information about how to
prepare your device.
About Side Notes
Side notes include
extra information that
is not necessary to
understand the
training. They might be
configuration or
troubleshooting tips,
or extra technical
information.
This training moduledoes not include
instructions to use
Fireware XTM CLI or
the Web UI. All
configuration changes
are made with Policy
Manager, and you
monitor the XTM
devices with WSM and
related tools.
What Branch Office VPNs Can Do For You
A branch office VPN (BOVPN) enables computers at one office to securely transmit private data through
an untrusted public network to computers at another office. The BOVPN provides these benefits:
• Privacy or confidentiality of the data — The VPN uses encryption to guarantee that traffic between
the two offices is secret. An attacker that intercepts the traffic cannot understand it.
• Data integrity — The VPN guarantees that the data that passes through it has not been altered in
transit.
• Data authentication — The VPN guarantees that data that passes through the tunnel actually
comes from one of the two endpoints of the VPN, and not from some attacker on the Internet.• Direct private IP address to private IP address communication — The computers at the two offices
communicate as if they were not behind devices configured with Network Address Translation
(NAT). The data tunnels through NAT for a transparent connection between the devices.

7/21/2019 Advanced VPN Training v11.7
http://slidepdf.com/reader/full/advanced-vpn-training-v117 6/92
2 WatchGuard Fireware XTM Training
What You Should Know
How Branch Office VPNs work
A Branch Office VPN tunnel (BOVPN) is a method that two networks can use to send data through an
untrusted network (typically, the Internet), with an encrypted, authenticated connection.
In this training, thegateway device at
each location is a
WatchGuard X TM
device, but your XTM
device can make an
IPSec VPN tunnel to
any device that
implements the IPSec
standards.
One gateway device at each location completes the IPSec encapsulation process for all the computersbehind the gateway device. The computers at each location do not need any special software and they
are not aware that the IPSec encapsulation process takes place.
The XTM device looks at traffic that comes from and goes to computers on its protected networks. It
knows what traffic to encrypt and send to the other office based on the source and destination IP
address of the traffic and the VPN settings.
Figure 1: Normal traffic and VPN traffic
IPSec is built on a collection of several different protocols. BOVPNs can have more than 30 settings. The
configuration on your XTM device must mirror the configuration of its peer device. We will look at every
setting in the XTM device VPN configuration to give you the information you need to make successful
VPNs every time.
Ports, Protocols, and Traffic Types for IPSec VPNs
UDP port 500 — Internet Security Association and Key Management Protocol (ISAKMP) and
Internet Key Exchange (IKE)
Before you can send traffic through the VPN, the two devices must exchange a series of messages in
what we call negotiations. You will learn about these message exchanges in the subsequent
sections. These negotiations begin over UDP port 500. If UDP port 500 is not open between the two
devices, IPSec VPNs do not work.
UDP port 4500 — NAT Traversal (NAT-T)
NAT traversal can overcome the limitations of some NAT devices that are incompatible with IPSec
traffic. If one of the devices is behind a network device that does Network Address Translation

7/21/2019 Advanced VPN Training v11.7
http://slidepdf.com/reader/full/advanced-vpn-training-v117 7/92
What You Should Know
Branch Office VPN Tunnels 3
(NAT), the VPN negotiations can move to UDP port 4500, and all subsequent traffic between the
two devices uses UDP port 4500. NAT-T prevents the NAT device from interfering with the IPSec-
encoded traffic by re-encapsulating it in an additional layer of UDP and IP headers.
IP Protocol 50 — Encapsulating Security Payload (ESP)
After VPN negotiations succeed, traffic between the two sites can be securely and privately sent
over the tunnel with ESP. ESP authenticates and encrypts the traffic and encapsulates it in new IP
datagrams with IP protocol 50. The ESP traffic may or may not be re-encapsulated in UDP port 4500
packets, depending on whether NAT-T is used.
IP protocol 51 — Authentication Header (AH)
Similar to ESP, AH encapsulates VPN traffic between the two sites after VPN negotiations succeed.
AH does not encrypt traffic, however, it only guarantees that the traffic came from the correct
source and that it was not tampered with in transit. Because AH does not provide privacy
(encryption), it is rarely used for IPSec VPNs today.
IP protocol 50 and 51 are not ports; no ports are associated with ESP or AH. ESP and AH are distinct IP
protocols, like ICMP (IP protocol 1), TCP (IP protocol 6), or UDP (IP protocol 17).
About VPN Negotiations
When two IPSec gateway devices want to make a VPN between them, they exchange a series ofmessages about encryption and authentication, and agree on many different parameters. This process
of agreeing on the VPN parameters is called VPN negotiations. One device in the negotiation sequence
is the initiator and the other device is the responder.
VPN negotiations happen in two distinct phases: Phase 1 and Phase 2. Policy Manager puts the settings
for the two phases in two areas:
• When you create the branch office gateway , you configure Phase 1 settings.
• When you create the branch office tunnel , you configure Phase 2 settings.
Phase 1 negotiations
are often called IKE
negotiations or
ISAKMP negotiations.
Depending on the
mode used, they are
also called Aggressive
Mode Negotiations or
Main Mode
Negotiations.
Phase 1
The main purpose of Phase 1 is to set up a secure encrypted channel through which the two devices
can negotiate Phase 2. When Phase 1 finishes successfully, the devices quickly move to Phase 2negotiations. If Phase 1 fails, the devices cannot begin Phase 2.
Phase 1 negotiations can use one of two modes: Main Mode or Aggressive Mode. We discuss the two
modes in more detail in a subsequent section.
Phase 2
Phase 2 negotiations
are often called IPSec
negotiations or Quick
Mode negotiations.
The purpose of Phase 2 negotiations is for the two peers to agree on a set of parameters that define
what traffic can go over the VPN, and how to encrypt and authenticate the traffic. This agreement is
called a Security Association.
About the Gateway Name and the Tunnel Name
When you create a gateway and tunnel, you assign names to each of them. These names are for youruse only; the XTM device does not send them to the remote peer. Use a name that helps you identify
the remote device for the gateway. Do not use the same name for the gateway name and the tunnel
name. For the examples in the next sections, we call the gateway To_Main_Office, and we call the
tunnel Main_Office_Tunnel .
In the next section we introduce some terms you might see in the training. Then, we look at all the
different parameters that the two VPN devices agree upon during the VPN negotiations. Finally, we
show all steps required to set up a VPN between two XTM devices.

7/21/2019 Advanced VPN Training v11.7
http://slidepdf.com/reader/full/advanced-vpn-training-v117 8/92
4 WatchGuard Fireware XTM Training
Terms and Definitions
Use this list as a reference for the rest of the training course.
IPSec is built on a
collection of open
standards, protocols,
and algorithms that
include:
– Internet KeyExchange (IKE)
protocol
– Oakley key
determination
protocol
– Diffie-Hellman key
exchange algorithm
– Internet Security
Association and Key
Management Protocol
(ISAKMP)
– Authentication
Header (AH)
– EncapsulatingSecurity Payload (ESP)
Encryption algorithms:
– DES
– 3DES
– AES (128, 192, or 256-
bit key length)
Authentication
algorithms:
– HMAC-SHA1
– HMAC-MD5
IPSec operates at the
Network layer, Layer 3,
of the OSI (OpenSystems
Interconnection)
Reference Model.
AES
Advanced Encryption Standard
This encryption algorithm is the strongest available. Fireware XTM can use AES with encryption keys
of length 128, 192, or 256 bits.
AES is also more efficient and more secure than 3DES.
Aggressive Mode
One of the two modes that Phase 1 VPN negotiations can use.
It uses a total of three messages between the two IKE peers. Aggressive Mode does not give
protection for the identities of the two IKE peers.
AH
Authentication Header
Defined in RFC 2402, AH provides security by adding authentication information to the IP datagram.
Because AH does not provide encryption, it is not typically used for VPNs.
Because AH calculates a message digest of the entire IP packet, AH can never be used behind a
device that does network address translation (NAT). NAT, by definition, changes IP headers. Thismeans that verification of the message digest that AH calculates will always fail when NAT is
involved.
The Internet Assigned Numbers Authority (IANA) assigned AH the IP protocol number 51. (Compare
to TCP which is IP protocol 6, and UDP which is IP protocol 17.)
DES
Data Encryption Standard
An older encryption algorithm that is still in wide use. It uses an encryption key that is 56 bits long.
3DES
Triple-DES or three-DES
An encryption algorithm based on DES. The DES encryption algorithm is applied to a data set oncewith one symmetric key, and then the result is encrypted again with DES with a different key. Finally,
this result is encrypted one more time with DES with the first key.
Diffie-Hellman group (DH group)
A group of integers used for the Diffie-Hellman key exchange.
The Diffie-Hellman group is also called the DH group or key group. Fireware XTM can use DH groups
1, 2, and 5. The larger key groups give larger integers to use in the exchange, which provides
stronger security.

7/21/2019 Advanced VPN Training v11.7
http://slidepdf.com/reader/full/advanced-vpn-training-v117 9/92

7/21/2019 Advanced VPN Training v11.7
http://slidepdf.com/reader/full/advanced-vpn-training-v117 10/92
6 WatchGuard Fireware XTM Training
Key expiration
Phase 1 keys usually
expire based on an
amount of time, but
some devices allow
expiration of Phase 1
keys based on the
amount of data
exchanged. Fireware XTM expires the Phase
1 key based only on the
amount of time
passed.
Phase 2 keys usually
expire based on an
amount of time or an
amount of data sent.
The first event that
happens (time elapsed
or amount of data
sent) causes the key to
expire.
If you set either thetime or data limit to
zero, the XTM device
disregards that limit. If
you set both the time
and data limits to zero,
the XTM device expires
the key after 8 hours. If
you set the data limit
to less than less than
24,576 kilobytes, then
24,576 kilobytes is
used.
Phase 1 and Phase 2 session and encryption keys change periodically.
This makes sure an attacker cannot get access to a large data set with the same encryption keys.
When a key must change, the appliance declares the current key no longer valid and negotiates a
new key with the IKE peer.
Main Mode
One of the two modes that Phase 1 VPN negotiations can use.It uses a total of six messages between the two IKE peers. Main Mode gives protection to the
identities of the two IKE peers.
MD5
Message Digest 5
This is a hash algorithm. Verification of the MD5 sum provides data integrity (a guarantee that the
data has not changed in transit). In IPSec, authentication of the data (a guarantee that the data
came from the proper source) is achieved by enhancing the hash with a shared secret key (see
HMAC explanation in the definition of hash). MD5 is not considered as strong a hash algorithm as
SHA-1.
Oakley
Oakley Key Determination Protocol
This is a protocol for two parties to agree on a secret key. RFC 2412 describes the protocol named
Oakley, by which two authenticated parties can agree on secure and secret keying material. The
basic mechanism is the Diffie-Hellman key exchange algorithm.
PFS
Perfect Forward Secrecy
A guarantee that the keying material used to generate one encryption key is not used to generate a
new encryption key. If one key is compromised, it gives the attacker no information about
subsequent encryption keys.
Quick Mode
The mode that Phase 2 VPN negotiations use.Quick Mode is the only mode that Phase 2 uses. The two IKE peers exchange three messages to
complete Quick Mode.
Replay
An attack that captures data packets sent from one IKE peer to another, and then sends them to the
recipient again.
The attacker can get information about the IPSec implementation from the responses it gets from
the recipient. Fireware XTM uses the sequence numbers in ESP packets to reject duplicate packets
and old packets, to protect against replay attacks.

7/21/2019 Advanced VPN Training v11.7
http://slidepdf.com/reader/full/advanced-vpn-training-v117 11/92
What You Should Know
Branch Office VPN Tunnels 7
SA
Security Association
Phase 1 SAs are
sometimes called
ISAKMP SAs. Phase 2
SAs are usually called
IPSec SAs.
This is a contract between two IPSec endpoints. The SA is an abstract object that contains all the
information necessary for two entities to exchange data securely. Successful completion of each
part of VPN negotiations, Phase 1 and Phase 2 negotiations, results in an SA.
There is only one Phase 1 SA between two IKE peers. The Phase 1 SA defines encryption and
authentication parameters that protect all Phase 2 negotiations.
The Phase 2 SA is unidirectional. If a tunnel is a bidirectional tunnel (traffic can go in and out of the
protected network), each peer has one incoming SA and one outgoing SA for that tunnel. Thus,
each tunnel has at least one Phase 2 SA, and usually has two. However, there can be multiple
tunnels between two IKE peers. Each Tunnel Route you add to the Branch Office Tunnel results in
at least one unique Phase 2 SA (and usually two, because most tunnels are bidirectional) when
Phase 2 negotiations finish.
SHA-1
Secure Hash Algorithm 1
A type of hash algorithm called a cryptographic hash function. It provides data integrity (a guarantee
that the data has not changed in transit) as well as authentication of the data (a guarantee that the
data came from the proper source). SHA-1 is considered a stronger hash algorithm than MD5.
SPI
Security Parameters Index
This is a unique 32-bit number that identifies an IPSec (Phase 2) SA. The SPI number is an identifier
in the header of every IPSec data packet. This number tells the receiving gateway device to which
IPSec data flow the packet belongs. The SPI number is not bidirectional. Each device keeps an SPI
number for traffic it sends (outgoing SPI) and an SPI number for traffic it receives (incoming SPI).
Traffic selector
In Fireware XTM 11.3.1
and later, the XTM
device does a route
lookup first. If a trafficflow matches an IPSec
traffic selector, but a
route to the
destination is also in
the device’s local
routing table (not in
the device’s default
route), the device can
honor that route. You
can configure the
device not to use IPSec
to handle the traffic
when a non-default
route exists in the localrouting table.
The configuration parameter that tells the gateway device what traffic should be handled by IPSec.
Traffic selectors in Fireware XTM are called tunnel routes. Traffic selectors consist of source IP
addresses and destination IP addresses. Each peer has a reverse match of the other peer’s traffic
selectors. If one peer has subnet A as the local part of its traffic selector and subnet B as the remote
part of its traffic selector, then the other peer has subnet B as local and subnet A as remote.
When a data packet comes in from a host on an internal network, Fireware XTM checks to see if the
source and destination IP addresses of the packet match a traffic selector. If they do, and if there is a
policy to allow the traffic, then Fireware XTM encapsulates the data packet in IPSec and sends it to
the IPSec peer.

7/21/2019 Advanced VPN Training v11.7
http://slidepdf.com/reader/full/advanced-vpn-training-v117 12/92
8 WatchGuard Fireware XTM Training
In previous versions of
Fireware XTM 11.x, the
XTM device always
used IPSec to process
the traffic when a
traffic selector
matches.
In v11.3.1 and later,
you can control this
behavior in PolicyManager (select VPN >
VPN Settings ). To
configure the XTM
device to honor non-
default routes and use
them to take
precedence over IPSec
traffic selectors, select
the Enable the use of
non-default (static or
dynamic) routes to
determine if IPSec is
used check box.
Tunnel
The virtual path between two locations on the Internet that have a VPN between them.
This virtual path is called a tunnel because data packets are encapsulated inside ESP headers and
trailers, and inside a new IP header. Thus, two computers behind two IKE gateways can send packets
to private IP addresses, effectively tunneling through the public Internet.
What Happens During Phase 1 Negotiations
The main purposes of Phase 1 are:
• To mutually authenticate the IKE peers.
Each peer presents authentication credentials to its peer. The credentials can be either a shared
secret or an IPSec certificate. If one peer does not accept the credentials of the other, Phase 1
negotiations fail.
• To set up a secure encrypted channel through which the two devices can negotiate Phase 2.
When Phase 1 finishes successfully, the devices quickly move on to Phase 2 negotiations. The Phase
2 negotiations are protected by the encryption and authentication parameters agreed upon
during Phase 1.
If Phase 1 fails, the devices cannot begin Phase 2.
When you configure a VPN, the first thing you do is to add a gateway . You configure all the Phase 1
settings when you create the gateway.
To create a new Branch Office VPN Gateway:
1. Open Policy Manager for your XTM device.
2. Click .
Or, select VPN > Branch Office Gateways. The Gateways dialog box appears.
Figure 2: Add a Branch Office Gateway
7/21/2019 Advanced VPN Training v11.7
http://slidepdf.com/reader/full/advanced-vpn-training-v117 13/92
What You Should Know
Branch Office VPN Tunnels 9
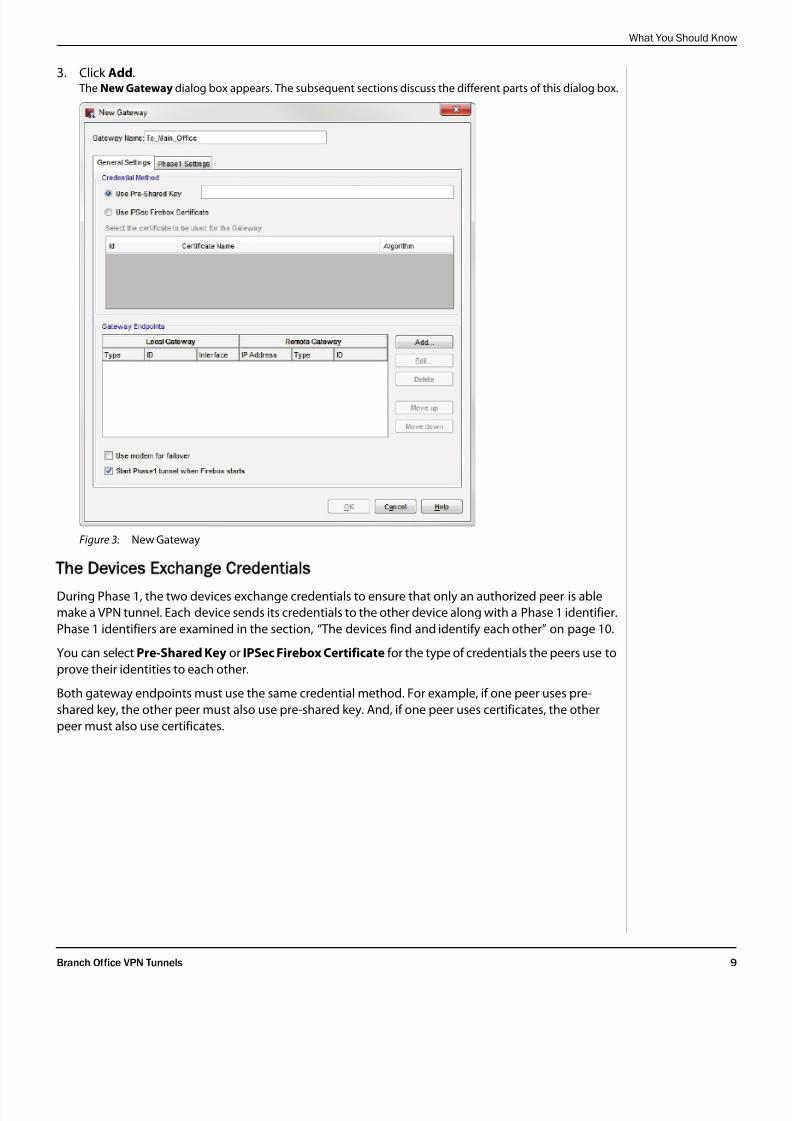
3. Click Add. The New Gateway dialog box appears. The subsequent sections discuss the different parts of this dialog box.
Figure 3: New Gateway
The Devices Exchange CredentialsDuring Phase 1, the two devices exchange credentials to ensure that only an authorized peer is able
make a VPN tunnel. Each device sends its credentials to the other device along with a Phase 1 identifier.
Phase 1 identifiers are examined in the section, “The devices find and identify each other” on page 10.
You can select Pre-Shared Key or IPSec Firebox Certificate for the type of credentials the peers use to
prove their identities to each other.
Both gateway endpoints must use the same credential method. For example, if one peer uses pre-
shared key, the other peer must also use pre-shared key. And, if one peer uses certificates, the other
peer must also use certificates.

7/21/2019 Advanced VPN Training v11.7
http://slidepdf.com/reader/full/advanced-vpn-training-v117 14/92
10 WatchGuard Fireware XTM Training
You specify which method the peers use in the New Gateway dialog box, on the General Settings tab,
in the Credential Method section.
Figure 4: Credential Method
Pre-Shared Key
The pre-shared key is a way for each device to prove that it is the authorized IKE peer for this VPN. Thedevices use the pre-shared key, along with the Phase 1 identifier, to verify that the remote peer is the
correct entity and not an imposter. Do not give the pre-shared key to anyone except the administrator
of the remote IKE peer device.
If you use a pre-shared key, make sure to choose characters that are difficult to guess. You can use a
string of numbers, upper and lower-case letters, and punctuation marks. The pre-shared key must
exactly match the pre-shared key that the remote device uses.
We recommend that you use pre-shared keys for your first VPN. They are easier to configure than
certificates, and it is less likely that you will make an error.
IPSec Firebox Certificate
A certificate is a document used to verify the identity of an unknown individual. For IKE negotiations,
the unknown individual is the remote IKE peer. During Phase 1 negotiations, the two IKE peers
exchange certificates. If each device accepts the peer’s certificate, then each side trusts that the peer is
actually who it claims to be.
You can use an IPSec certificate for the credential method only if a certificate appears in the Select the
certificate to be used for the Gateway list at the bottom of Figure 4. We discuss certificates in more
detail in a subsequent section.
The devices find and identify each other
When your XTM device initiates Phase 1 negotiations, it determines:
• How do I identify myself to the remote peer?
• If I have more than one external interface, which one do I use to send IKE packets to the peer?
• Do I know how to find the remote device? Do I know its IP address or can I learn its IP address from
a DNS query?

7/21/2019 Advanced VPN Training v11.7
http://slidepdf.com/reader/full/advanced-vpn-training-v117 15/92
What You Should Know
Branch Office VPN Tunnels 11
When your XTM device responds to IKE negotiations from the peer, your XTM device must decide:
• Does my configuration allow me to negotiate with this device, based on the way the device
identifies itself and the source IP address of the IKE packets?
• If I specified more than one external interface for this peer to use for negotiations, did the IKE
packets come to the correct one?
The Use modem for
failover check box
appears only if serial
modem failover is
enabled in the device
network settings.
You specify how the XTM device answers these question when you configure the Gateway Endpoints
at the bottom of the New Gateway dialog box.
Figure 5: Gateway Endpoints
Each row in the Gateway Endpoints list in Figure 5 represents one set of gateway endpoints. You can
add more than one set of gateway endpoints if either device has more than one external interface it
can use to send and receive IKE negotiations. This allows VPN Failover to occur.
An IPSec device can terminate a specific VPN on only one interface at a time. However, if a device has
more than one external interface and one of them is not available, your XTM device can try to negotiate
the VPN through a different external interface. You can also use a modem for VPN failover, if you haveenabled serial modem failover on the device.
In Fireware XTM v11.7
and higher, modem
failover is supported
on XTM 2 Series, 3
Series, and 5 Series
devices.
Your XTM device can do VPN failover if:
• Your XTM device runs Fireware 10.x or later, has more than one external interface, and the remote
device can do VPN failover.
You want your XTM device to use one external interface to make the first VPN connection.
However, if that interface is not available, you want your device to use a different external interface
to make the VPN connection.
• The remote peer is a Firebox X e-Series or WatchGuard XTM device that runs Fireware 10.x or later,
and it has more than one external interface.
You want your XTM device to make the VPN connection to one of the remote peer’s external
interfaces first. However, if that interface is not available, you want your device to be able to make
the VPN connection with one of the remote peer’s other external interfaces.
• Your XTM device has a dial-up modem connection that you can use for failover.
You want your XTM device to use an external interface to make the VPN connection. However, if no
external interfaces are available, you want to use the modem to make the VPN connection.
We examine VPN failover in detail in a subsequent section.
The XTM device automatically starts tunnel negotiation upon reboot if the Start Phase1 tunnel check
box is selected.

7/21/2019 Advanced VPN Training v11.7
http://slidepdf.com/reader/full/advanced-vpn-training-v117 16/92
12 WatchGuard Fireware XTM Training
To add a set of gateway endpoints:
1. Open the New Gateway dialog box.
2. Click Add. The New Gateway Endpoints Settings dialog box appears.
Figure 6: Add a new set of gateway endpoints
This dialog box has two separate sections used to define a set of gateway endpoints:
• Local Gateway — This section is for identification of the local gateway (at the top), and is used to
configure how this XTM device identifies itself.
• Remote Gateway — This section is for identification of the remote gateway (at the bottom), and is
used to configure how the XTM device expects the peer to identify itself.
A set of gateway endpoints is a set of Phase 1 identifier information for each IKE peer (your XTM device
and the remote device). Phase 1 identifiers are used like this:
• Each side configures its device to send identifying information (Phase 1 ID) to the other side during
Phase 1. The ID has a specific type and a value for that type.
• Each side also specifies an ID type and a value for that ID type for the remote device. This tells thelocal device what to expect from the remote device during Phase 1 negotiations.
• Each device’s Phase 1 identifier must exactly match what the other device expects to receive. If the
ID information that one device sends to its peer does not match what the peer expects, IKE
negotiations fail.
7/21/2019 Advanced VPN Training v11.7
http://slidepdf.com/reader/full/advanced-vpn-training-v117 17/92
What You Should Know
Branch Office VPN Tunnels 13
Each device can use one of four types of identifiers, or Phase 1 ID types:
After each ID type we
show the common
representation of the
ID type as it is defined
in the relevant RFCs.
For example, with the
IP Address ID Type, the
IKE RFCs define the IDtype ID_IPv4_ADDR.
• IP Address (ID_IPv4_ADDR)
The value for this ID type must be a dotted-decimal IP address, without a subnet mask. This is
almost always the IP address assigned to the device interface that terminates the VPN.
In some network topologies, the value for the IP address ID type can instead be the IP address of a
device configured for Network Address Translation (NAT) that is between the IPSec device and the
Internet. In these cases, the NAT device has a one-to-one NAT mapping that sends all ports andprotocols to the IPSec device behind it.
• Domain Name (ID_FQDN )
The value for this ID type is a string of text. This is usually a fully qualified domain name (such as
example.domain.com or myexample.com) that has a record in the DNS system for the IP address
assigned to the external interface.
When the appliance
has a dynamic IP
address but no DNS
record, you can use this
ID type and the next
one (User ID on
Domain) in a similarway. A later side note
tells you the main
difference between the
two types in this
situation.
It is not necessary for this name to have a corresponding record in DNS. The value for this ID type
can also be a simple name that serves only as a Phase 1 identifier, but does not have an address
record in DNS.
If your XTM device has a static IP address on the external interface and you publish a DNS record for
this IP address, you can use the domain name for the Phase 1 identifier. To learn your XTM device IP
address, the other device can send a DNS query for the domain name. However, in these cases youusually use the IP address for the Phase 1 identifier because the IP address never changes.
If your XTM device has a dynamic IP address and you use the Dynamic DNS service, you can use the
DynDNS host name for your Phase 1 identifier, for example, myexample.dyndns.org. The dynamic
DNS service lets the remote peer find your XTM device with a DNS query even when your XTM
device IP address changes often, so that the peer can initiate IKE negotiations.
Remember, this ID type is intended to relate to a DNS record but it is not necessary. Consider this
scenario:
IPSec device A has a dynamic IP address but does not use a dynamic DNS service. Thus the
DNS system has no record for device A’s external interface. Device A can use Domain Name for its ID type, and the value can be a string of text that does not have a record in the DNS
system.
This is the only identifier information that the other IKE peer, device B, knows about device A.
When device B wants to initiate IKE negotiations to make the VPN to device A, device B sends
a DNS query to resolve this name to an IP address. The DNS query fails and device B cannot
find device A.
In this scenario, device A must be the initiator. IKE negotiations can succeed in this scenario
as long as all other parameters match. Aggressive Mode must be used.
If you use certificates for the credential method, the value for this ID type is the DNS Name or
Domain Name field in the certificate. When you view the certificate with a Windows certificate
viewer, the certificate field name is DNS Name, and it is listed as a Subject Alternative Name.
If you enable VPN failover to a modem, you must configure the local gateway to use an ID (rather
than an IP address) for the gateway ID type. The ID does not need to match an actual domainname.

7/21/2019 Advanced VPN Training v11.7
http://slidepdf.com/reader/full/advanced-vpn-training-v117 18/92
14 WatchGuard Fireware XTM Training
Some IPSec appliances
can use “User ID on
Domain” for the
remote peer only, and
cannot use it for the
local identifier.
– Firebox SOHO, SOHO
6, and legacy (non-e-
Series) Edge
appliances cannot useUser ID for the local
gateway identifier.
– Devices running
Fireware XTM and WFS
can use User ID for the
local ID.
• User ID on Domain (ID_USER_FQDN )
This is typically a user’s ID in the form of an email address, such as [email protected]. It can
also be a simple string of text that does not represent a real email address, such as bobs_firebox .
If you do not use certificates for the credential method, the value of the ID is only a string of
identifying text. It can be a real email address, or just a simple name.
You usually use this ID type when the remote IKE peer is a user who connects from a single
computer (instead of an IPSec device such as a firewall). This is the case with the WatchGuard
Mobile VPN client: the software uses User ID on Domain for its local Phase 1 identifier. (In the
profile settings of the WatchGuard Mobile VPN IPSec client software, the local identifier is called
Fully Qualified Username. The Phase 1 ID type that the WatchGuard Mobile VPN client sends is
actually ID_USER_FQDN .)
If an IPSec appliance that acts as the IKE gateway supports it, this ID type can be the device’s own
local Phase 1 identifier.
The main difference
between the User ID
on Domain and the
Domain Name ID
types when the
external IP address isdynamic is this: the
peer does not try to
resolve a “ User ID on
Domain with a DNS
query, but it usually
does try to resolve a
Domain Name. With
User ID on Domain ,
the peer simply waits
for the remote device
to begin IKE
negotiations. With
Domain Name the
peer can try to initiatenegotiations by first
doing a DNS query to
find the other device.
You can use this ID type for the local identifier if your XTM device has a static IP address or a
dynamic IP address on its external interface. If the IP address on your XTM device is dynamic, this ID
type creates a situation that is similar to the previous scenario (a domain name that does not
resolve to an IP address in DNS). When a device has a dynamic IP address and it uses this ID type for
its Phase 1 identifier, it must be the initiator. This is because the identifier alone is not sufficient
information for its peer to find it. The value for this ID type never resolves to an IP address in DNS.
If you use certificates for the credential method, the value for this ID type is usually the email
address field in the certificate. The certificate field name is RFC822 Name, and is listed as a Subject
Alternative Name when you view the certificate with a Windows certificate viewer.
• X500 name (ID_DER_ASN1_DN)
Use this ID type only when you use certificates for the credential method. The value for the ID is the
value of the certificate’s Subject field. The format of an X500 name is similar to the format of a
distinguished name in an LDAP-style directory service.
For example:
CN=MyExample,OU=Main Office,O=myexample.com,ST=NY,C=US
The Local Gateway Identifier
In the Local Gateway section, you configure the gateway identification information for the XTM
device. You also configure the external interface that sends and receives local packets when the XTM
device uses the local gateway.
Figure 7: Local Gateway information

7/21/2019 Advanced VPN Training v11.7
http://slidepdf.com/reader/full/advanced-vpn-training-v117 19/92
What You Should Know
Branch Office VPN Tunnels 15
The details you include in the Local Gateway section depend on how the external interface is
configured:
In versions prior to
11.x, the IP Address
drop-down list in
Figure 7 shows the IP
addresses for all the
XTM device interfaces.
Be careful to not selectan optional or trusted
IP address. The XTM
device can terminate
BOVPNs only on
external interfaces.
• If your XTM device has a static public IP address on the external interface, your XTM device should
use the external interface IP address to identify itself to the remote device.
Select the By IP Address option. In the IP Address text box, select or type the external interface IP
address.
• If your XTM device has a dynamic IP address on the external interface (DHCP or PPPoE), the IPaddress assigned to your XTM device external interface changes often, so the remote peer cannot
expect your XTM device to use the external interface IP address as the IKE identifier.
In this case, you must select the By Domain Information option. Then click Configure.
Figure 8: Local Gateway ID information if the XTM device has a dynamic address
The Configure Domain for Gateway ID dialog box appears:
Figure 9: Local Gateway ID information if you do not use certificates

7/21/2019 Advanced VPN Training v11.7
http://slidepdf.com/reader/full/advanced-vpn-training-v117 20/92
16 WatchGuard Fireware XTM Training
If you use pre-shared keys for the credential method, you can specify two different types of Domain
Information identifier:
• By Domain Name
If you registered your own domain name, use that name. Because the remote peer will usually send
a DNS query to find your XTM device IP address, the DNS system should always resolve this domain
name to the external IP address of your XTM device.
The XTM deviceDynamic DNS
capability uses only the
service provided by
Dynamic Network
Services (also known
as DynDNS.com or
DynDNS.org).
There are other
Dynamic DNS services
with the same
capability. If you use
one of these services,
you usually have a
computer on anetwork behind the
XTM device that runs a
Dynamic DNS updater
client software
package.
If you use the Dynamic DNS capability of the XTM device, you can use the DynDNS domain namethat you register. This way, the remote device can find your XTM device by DNS lookup.
It is not necessary for the DNS system to have a record associated with the name you use here. If
the DNS system does not have a record for this domain name, then the remote device cannot find
your XTM device by DNS lookup. In this case, your XTM device must be the one to initiate the IKE
negotiations.
Remember that the remote peer usually does a DNS query to resolve this name to an IP address,
even when the DNS system has no such record. If you do not register a DNS name for your XTM
device (whether DynDNS or a static record), you should use the next ID type, User ID on Domain, so
that the remote peer does not waste CPU cycles with an unnecessary DNS query.
• By User ID on Domain
Use this ID type if the DNS system has no address record for your XTM device external interface IPaddress. In this case, your XTM device must be the initiator.
If the XTM device has a certificate available and you use certificates for the credential method in
Figure 4, one additional option appears in the Figure 9 dialog box:
The ID Type X500 that
appears in Figure 10 is
not available for the
Local ID if you do not
use certificates. It is
always available for
the Remote ID.
• By x500 Name:
Figure 10: Local Gateway ID information if you use certificates for the credential method
You can use this type of local gateway identifier only if you use certificates for the credential
method. The X500 name is the distinguished name in the certificate you select for this gateway. This name appears in the certificate as the Subject Name.
When you use certificates for credentials and you select By Domain Information for the local
gateway identifier, you cannot edit the value for the local ID type you select. Policy Manager
automatically puts the correct value for the ID type you select, based on the information in the
XTM device certificate.

7/21/2019 Advanced VPN Training v11.7
http://slidepdf.com/reader/full/advanced-vpn-training-v117 21/92
What You Should Know
Branch Office VPN Tunnels 17
The Remote Gateway Identifier
In the Remote Gateway section, you configure the information for the remote IKE peer. This is how the
XTM device expects the remote peer to identify itself.
Figure 11: Remote Gateway information
For this XTM device to find the remote device, one of these conditions must be true:
• The XTM device must know the IP address of the peer ahead of time.
If the remote device has a static IP address, select Static IP address and type the IP address in the
IP Address text box.
• The XTM device must know a domain name that the DNS service can resolve to an IP address.
If the XTM device
cannot find the peer
with one of those
methods, then it
cannot initiate
negotiations. It must
wait for the other
device to initiate
negotiations.
If the remote device has a dynamic IP address, select Dynamic IP address.
If there is a domain name the XTM device can use to find the remote device, you set it in the next
section.
If your XTM device cannot find the peer’s IP address with a DNS query, the remote device must bethe initiator.
In Phase 1, the remote IKE peer must identify itself correctly. To identify itself, the remote device can use
any of the four ID types discussed at the start of this section.
In the Specify the gateway ID for tunnel authentication section, you select which ID type the remote
peer uses, and the value of that ID type.
• If the remote device has a static IP address, it should use that IP address for the phase 1 identifier.
Select By IP Address and type the remote peer IP address.
• For the other three identification types, select By Domain Information and click Configure. Refer
to the previous sections for information on these ID types.
• If you use certificates and you do not use an IP address for the remote ID type, you must manuallytype the domain information (whether Domain Name, User ID on Domain, or X500 name). You can
get this information from the remote device administrator or if you view the remote peer’s
certificate in a certificate viewer.

7/21/2019 Advanced VPN Training v11.7
http://slidepdf.com/reader/full/advanced-vpn-training-v117 22/92
18 WatchGuard Fireware XTM Training
When you use Domain Name or User ID @ Domain to specify the remote gateway ID, the Attempt to
resolve check box controls whether the XTM device attempts to resolve the domain.
Select the Attempt to resolve check box if the remote gateway uses dynamic DNS to maintain a
mapping between a dynamic IP address and a domain name.
The Devices Decide Whether to Use Main Mode or Aggressive Mode
You must use
Aggressive Mode if the
credential method is
pre-shared keys and
one of the devices has
a dynamic IP address.
Phase 1 negotiations can use one of two modes: Main Mode or Aggressive Mode. The device that starts
the IKE negotiations (the initiator) sends either a Main Mode proposal or an Aggressive Mode proposal.
The responder can reject the proposal if it is not configured to use that mode.
Aggressive Mode communications take place with fewer packet exchanges than Main Mode
communications. Aggressive Mode is less secure but faster than Main Mode.
To specify how the XTM device starts negotiations, in the New Gateway dialog box, select the Phase 1
Settings tab.
Figure 12: Select the mode to use for Phase 1 negotiations

7/21/2019 Advanced VPN Training v11.7
http://slidepdf.com/reader/full/advanced-vpn-training-v117 23/92
What You Should Know
Branch Office VPN Tunnels 19
The XTM device can use one of three methods to start IKE negotiations:
The two devices agree
on all the same Phase 1
parameters regardless
of which mode is used.
The difference is the
number of packet
exchanges and how
much informationeach packet contains.
Main Mode
Main Mode IKE negotiations require a total of six messages (three two-way exchanges of
information). The peers never exchange their identities in the clear.
Use Main Mode when both devices have static external IP addresses.
If you use pre-shared keys for the credential method, to use Main Mode, both sides must use an IP
address as the Phase 1 ID.If one side or the other does not use an IP address for the Phase 1 ID type, you can use Main Mode
only if you use certificates for the credential method.
The XTM device will not use Aggressive Mode if you select Main Mode.
Aggressive Mode
Aggressive Mode IKE negotiations require a total of four messages. Each message includes more
information than in a Main Mode exchange. This makes Aggressive Mode more efficient than Main
Mode, but not as secure, because the peers exchange their identities without encryption.
Use Aggressive Mode when one of the devices has a dynamic external IP address, or both have
dynamic IP addresses. An exception is possible when you use certificates for the credential method
instead of pre-shared keys. See the previous description about Main Mode.
Main failback to Aggressive
To start IKE negotiations, the XTM device sends a Main Mode packet. If the remote gateway device
rejects the first packet, the XTM device sends an Aggressive Mode packet to try to start IKE
negotiations again.
When the XTM device is the responder, it completes either a Main Mode or an Aggressive Mode
exchange, depending on the way the peer initiates IKE negotiations.
Select this option if it is possible for the remote peer to use Main Mode, but you want negotiations
to succeed if the remote peer can only use Aggressive Mode.
The Devices Agree on Whether to Use NAT Traversal
NAT Traversal (NAT-T) is an IPSec extension that can resolve problems that occur when one or both ofthe IKE peers is behind a device with NAT. Some devices use NAT in a way that breaks IPSec, or in a way
that makes it impossible to allow more than one IPSec connection through the NAT at the same time.
To enable NAT Traversal, select the Phase 1 Settings tab.
Figure 13: NAT Traversal fields

7/21/2019 Advanced VPN Training v11.7
http://slidepdf.com/reader/full/advanced-vpn-training-v117 24/92
20 WatchGuard Fireware XTM Training
When the IKE peers agree to use NAT Traversal, they make an additional step for each data packet sent
over the VPN. After an IPSec device encapsulates a data packet inside the IPSec wrapper, it
encapsulates it one more time inside a UDP wrapper.
By re-encapsulating traffic in UDP packets, the IKE peers can overcome the problems that IPSec has
with some implementations of NAT.
Traffic goes over UPD port 4500 when NAT Traversal is used.
How the Peers Agree on Whether to Use NAT-Traversal
There are many
different types of
Vendor-IDs. The NAT-T
Vendor-ID includes a
special hash to signify
that it is for NAT-T.
Each side advertises its ability to use NAT-T in the first IKE packet. If a device can use NAT-T, the first IKE
packet from the device contains a part called a Vendor-ID payload. If both the initiator and the
responder include the NAT-T Vendor-ID payload, then they can use NAT-Traversal.
How the Peers Detect Whether One of Them is Behind a NAT Device
If the peers can both use NAT-T, the second IKE packet from each peer includes a part called the NAT-
Discovery payload. The NAT-Discovery payload that one device sends includes the result of a
computation that is based on the source and destination IP addresses and the source and destination
ports of the packet when it leaves the IKE device.
When the peer device gets the NAT-Discovery payload, it performs the same computation in reverse,
based on the same type of information. However, the receiving end does the computation based on
the information it sees for the packet (which can be different from the information the sending device
sees when a NAT device is between the two).
Both sides compare the results of their own computation with the corresponding value each gets from
the other side. If one or both of the devices is behind a NAT, then the two results of the same
computation do not match because NAT changes the source IP addresses, the source ports, or both.
The mismatch means that there is a NAT device in front of one of the IKE peers.
If the values do match, then no NAT is detected and the devices do not use NAT-T. Even though both
devices can use NAT-T, it is not necessary if neither device is behind a NAT.
How Data Traverses the NAT
If both devices can do NAT-Traversal, and if a NAT is detected, then the devices immediately change the
port they use to communicate. The remaining IKE negotiations switch to UDP port 4500. Data transfers
over the VPN also use UDP port 4500, instead of ESP as the transport method.
After the VPN finishes negotiation of Phase 1 and Phase 2, actual data can be sent over the VPN. When
NAT-T is used, data sent over the VPN is encapsulated in IPSec before the device sends it, just as the
device normally does without NAT-T. However, with NAT-T each packet is re-encapsulated once more
inside a UDP port 4500 packet before the device sends it.
When the peer gets a NAT-T packet that contains data, it unwraps the IPSec packet from the UDP
encapsulation. Then it can process the resulting packet as it normally does for IPSec traffic.
The NAT Traversal Keep-Alive The NAT-T keep-alive keeps the NAT open on the NAT device.
A NAT device does outbound Network Address Translation by changing the source port and source IP
address of a packet before it sends it. The device keeps a map of the original source port/IP address and
the new source port/IP address. It uses the map so that when a packet returns in response (when the
destination of the response packet is the translated source port and translated source IP address), it can
send the response back to the correct computer (the response to the original IP address that started
the data flow is sent with the flow’s original source port).

7/21/2019 Advanced VPN Training v11.7
http://slidepdf.com/reader/full/advanced-vpn-training-v117 25/92
What You Should Know
Branch Office VPN Tunnels 21
The NAT device maintains this map for only a short time when there is no traffic that matches the map.
If the device does not see traffic that uses the NAT map for a certain amount of time, it closes the NAT.
NAT timeouts for UDP traffic are typically much lower than NAT timeouts for TCP connections.
If UDP-encapsulated traffic is sent from behind the NAT device, NAT is opened on the NAT device.
To keep the IPSec tunnel active when NAT-T is used, the IPSec devices keep the NAT map alive. The
IPSec device behind a NAT sends a NAT-T keep-alive packet to keep the NAT map active. The peer that
receives the NAT keep-alive packet replies with a keep-alive ACK to keep the NAT active on the remoteNAT device.
The Keep-Alive Interval affects your XTM device only if your XTM device is the IKE peer behind the
NAT. It specifies how often your device sends a NAT keep-alive packet to keep the NAT map active on
the NAT device in front of the XTM device.
When the remote IKE peer is behind a NAT, it has its own settings for the keep-alive interval. Your XTM
device responds to the NAT keep-alive messages it gets from the other side, but your XTM device does
not influence the interval that the peer uses between the keep-alives it sends.
Each Device Decides Whether to Send IKE Keep-alive Messages
You specify this on the Phase 1 Settings tab of the gateway.
Figure 14: Keep-alive interval
IKE Keep-alive and Dead Peer Detection (DPD, discussed in the next section) messages enable the XTM
device to detect if the IKE peer is still alive. For VPN failover, either IKE Keep-alive or DPD is the method
the XTM device uses to determine whether to fail over to another gateway endpoint pair.
This is the only part of the gateway configuration that is not actually part of the Phase 1 negotiations.
This setting is only to enable or disable the option, and to specify the interval between the messages.
For IKE Keep-alive to work, each peer must be able to respond to the keep-alive messages sent by the
other side.
All WatchGuard
products respond to
IKE Keep-alive
messages. However,
they are specific to
WatchGuard products,
so other vendors’
appliances might not
respond.
When both peers can use IKE Keep-alive messages, each device sends a Hello packet (the IKE Keep-alive
message) to the other side at regular intervals. When a device receives an IKE Keep-alive packet, it
returns an acknowledgement (a keep-alive ACK) to the peer that sent the message. When the sending
peer gets the ACK, it knows that the remote peer is still alive and that the Phase 1 SA between them is
still valid.
If a device sends a specified number of keep-alive messages that get no response, the device closes the
VPN and tries to start tunnel negotiations again.

7/21/2019 Advanced VPN Training v11.7
http://slidepdf.com/reader/full/advanced-vpn-training-v117 26/92
22 WatchGuard Fireware XTM Training
If you use VPN failover and the maximum number of keep-alive failures is reached, the XTM device
starts negotiations with the next gateway endpoints pair in the list (see Figure 5). If there is only one
pair in the list, the device starts IKE negotiations again with that pair.
• For a fast VPN failover, we recommend you set the Message interval to a low value, such as 10
seconds, and set the Max failures to a lower value, such as 2.
• If you have only one gateway endpoint pair for the gateway (you do not use VPN failover), keep the
default settings.
• For a VPN to a third-party device (not a WatchGuard product) we recommend you do not use this
option. To configure the XTM device to not send keep-alive messages, clear the IKE Keep-alive
check box.
• For a VPN to any Firebox or XTM device that can use Dead Peer Detection, we recommend you do
not use this option. To configure the device to not send keep-alive messages, clear the IKE Keep-
alive check box.
The Devices Decide Whether to Use Dead Peer Detection
You specify Dead Peer Detection settings on the Phase 1 Settings tab.
Figure 15: Dead Peer Detection settings
Dead Peer Detection (RFC3706) is a traffic-based detection of an inactive peer. It works in a similar (but
more intelligent) way to IKE Keep-alive. When Dead Peer Detection (DPD) is enabled, the XTM device
sends a DPD probe (a message similar to the IKE Keep-alive message) only if traffic is not received from
the peer for a specified length of time, and data is waiting to be sent to that peer. This method is more
scalable than IKE Keep-alive messages because DPD probes are sent only when no traffic is received
from the other side for some amount of time. (Compare this to the IKE Keep-alives mechanism, which
sends keep-alive messages at regular intervals regardless of the health of the tunnel.)
• In the Traffic idle timeout text box, set the amount of time traffic can be idle before the XTM
device sends a DPD probe to the peer.
• In the Max retries text box, set the number of times the XTM device should send a DPD probebefore the peer is declared dead because it received no response.
Dead Peer Detection is an industry standard that is used by most IPSec devices. If it is supported by the
devices on both ends, we recommend you use Dead Peer Detection instead of IKE Keep-alive,
particularly for VPN failover.
Note
Do not select both IKE Keep-alive and Dead Peer Detection. Use one or the other, but not both. Use
Dead Peer Detection if both endpoint devices support it.

7/21/2019 Advanced VPN Training v11.7
http://slidepdf.com/reader/full/advanced-vpn-training-v117 27/92
What You Should Know
Branch Office VPN Tunnels 23
The Devices Agree on a Transform to Use for Phase 1
A Transform is a set of authentication and encryption parameters and the amount of time the Phase 1
SA lasts. The initiator sends one or more transform proposals to the responder. The responder either
selects one of the proposed transforms, or it rejects the Phase 1 proposal.
You specify the transform proposals your XTM device sends when it is the initiator, or the transforms it
can accept if it is the responder, in the Transform Settings section of the Phase 1 Settings tab.
Figure 16: Transform Settings
The Transform Settings list includes the Phase 1 transforms the XTM device can send for this VPN.
• To add a transform, click Add.
• To edit a transform, select a transform in the list and click Edit.
The Phase 1 Transform dialog box appears.
Figure 17: Phase 1 Transform dialog box

7/21/2019 Advanced VPN Training v11.7
http://slidepdf.com/reader/full/advanced-vpn-training-v117 28/92
24 WatchGuard Fireware XTM Training
The Phase 1 transform settings must exactly match the settings for the Phase 1 transform that the IKE
peer accepts, or IKE negotiations fail. The items you can set in the transform are:
• Authentication
Authentication ensures that the information received is exactly the same as the information sent.
You can use SHA1 or MD5 as the algorithm the peers use to authenticate IKE messages from each
other. SHA1 is more secure.
• Encryption
Encryption keeps the data confidential. You can select DES, 3DES, or AES with 128, 192, or 256-bit
key strength. AES is the most secure.
The Phase 1 SA is
commonly called the
“IKE SA”. The technically
correct term is the
“ISAKMP SA”.
• SA Life
When Phase 1 is completed, the two peers have a Phase 1 Security Association (SA). This SA is
valid for only a certain amount of time. After the Phase 1 SA expires, any new Phase 2 renegotiation
requires the two peers to also renegotiate Phase 1.
If the remote IKE peer
can set a KB limit for
the Phase 1 SA Life,
make sure to set its
Phase 1 SA Life to 0 KB,and use a time setting
that matches the
Fireware XTM peer’s
Phase 1 SA life.
Fireware XTM does not
use an amount of data
for Phase 1 SA
expiration.
Diffie-Hellman Group 1
provides 768 bits of
keying material, Group
2 provides 1,024, and
Group 5 provides1,536.
Some IKE peers can also specify an amount of data, in KB, that can pass through the VPN before the
Phase 1 SA Life expires. Fireware XTM does not specify a data lifetime. In general, if the peer
requires a value for Phase 1 SA data limit, you set the peer to use 0 KB to specify no KB timeout .
• Key Group The Diffie-Hellman Group specifies the length of a mathematical parameter used for the Diffie-
Hellman key exchange. You can select group 1, 2, or 5. A higher number indicates a more secure
key exchange.
Use Multiple Phase 1 Transforms
If you are not sure what Phase 1 transforms the remote peer is configured to accept or propose, you can
add multiple transforms for the XTM device to use. To do this, Phase 1 must use Main Mode.
When the XTM device is the initiator, it can send multiple Phase 1 transforms in the Main Mode
proposal it sends to the IKE peer. This lets the peer select the transform it can use.
Conversely, when your XTM device is the responder to a Main Mode proposal, and you added more
than one Phase 1 transform to the gateway settings, your XTM device can review multiple transforms in
the configuration to determine if the transform sent by the peer is acceptable (or to select one of
multiple transforms sent by the peer).
Because there are many different possible combinations of values for the four items in the Phase 1 SA
proposal, it is always better to get the exact Phase 1 parameters that the remote peer uses. Try not to
guess, or to rely on multiple possibilities.
In some situations, however, the administrator of the remote device may give you incomplete
information. Or, the peer device may have certain IKE or IPSec settings hard-coded and the
configuration might not show these settings. In other words, the administrator might not know what
the device will send or accept for some parameter and cannot configure it. In these situations, get as
much information as you can. Tell the administrator of the peer device to check the manufacturer’sdocumentation to discover the values for hard-coded parameters.
Note
You can add more than one Phase 1 transform only if you use Main Mode for Phase 1. If you use
Aggressive Mode, you can only have one Phase 1 transform in the gateway configuration.

7/21/2019 Advanced VPN Training v11.7
http://slidepdf.com/reader/full/advanced-vpn-training-v117 29/92
What You Should Know
Branch Office VPN Tunnels 25
When Phase 1 is Finished
When Phase 1 finishes, the two devices can negotiate Phase 2 over a secure encrypted channel. Their
Phase 2 negotiations are protected by the Phase 1 SA (Security Association).
Through the Phase 1 negotiations, the two IKE peers generate keying material to use for Phase 2
negotiations. We look at this aspect of Phase 1 when we discuss Perfect Forward Secrecy.
What you LearnedYou learned about the different settings that control Phase 1. All the information is in the gateway
object you create. After you create a new gateway, it appears in the Gateways dialog box.
Figure 18: The newly configured gateway appears in the Gateways list.
What Happens During Phase 2 Negotiations
The purpose of Phase 2 negotiations is to establish the Phase 2 SA (sometimes called the IPSec SA). The
IPSec SA is a set of traffic specifications that determines what traffic the XTM device can send over the
VPN, and how to encrypt and authenticate that traffic.
Unlike Phase 1 negotiations, which have two different modes (Aggressive Mode and Main Mode),Phase 2 uses only one mode: Quick Mode.
Like Phase 1, a goal of Phase 2 negotiations is for the two peer devices to agree on a set of parameters.
You specify all the Phase 2 parameters when you create the Tunnel in Policy Manager.

7/21/2019 Advanced VPN Training v11.7
http://slidepdf.com/reader/full/advanced-vpn-training-v117 30/92
26 WatchGuard Fireware XTM Training
To add a tunnel:
1. Open Policy Manager for your XTM device.
2. Click .
Or, select VPN > Branch Office Tunnels. The Branch Office IPSec Tunnels dialog box appears.
Figure 19: Click to add a new tunnel
3. Click Add. The New Tunnel dialog box appears.
Figure 20: New tunnel. Make sure to select the correct gateway.
4. In the Tunnel Name text box, type a friendly name for the tunnel.
For this example, we type Main_Office_Tunnel.
Do not give the VPN
tunnel the same name
that is used for a VPN
Gateway.
Fireware XTM does not send this name to the peer device. It is only used to identify the tunnel in your device’sconfiguration.
The subsequent sections describe the purpose of each element in the tunnel configuration.

7/21/2019 Advanced VPN Training v11.7
http://slidepdf.com/reader/full/advanced-vpn-training-v117 31/92
What You Should Know
Branch Office VPN Tunnels 27
Peers Use the Phase 1 SA to Secure the Phase 2 Negotiations
The Phase 1 SA that the two peers create applies only to the two peers that negotiated the SA. If you
have multiple VPNs to different remote devices, your XTM device makes a unique Phase 1 SA to each
device.
Because the Phase 2 negotiations are protected by the Phase 1 SA, you must select the correct gateway
to use for the tunnel. To select the gateway for the remote peer device to which the XTM device sends
VPN traffic for this tunnel, in the New Tunnel dialog box, select a gateway from the Gateway drop-down list.
Peers Exchange Phase 2 IDs
The administrators of both IPSec devices must agree on what traffic can pass through the VPN. The two
devices exchange Phase 2 IDs to specify the IP addresses behind each device that is allowed to send
traffic through the VPN.
Phase 2 IDs are always sent as a pair in a Phase 2 proposal: one Phase 2 ID shows which IP addresses
behind the local device can send traffic through the VPN, and the other Phase 2 ID shows which IP
addresses behind the remote device can send traffic through the VPN.
If more than one pair
of local/remote IP
addresses can send
traffic over the VPN,
then a unique SA is
created for each pair.
The devices do a Quick
Mode negotiation for
each local/remote pair
Because the Phase 2 IDs are part of the Phase 2 Security Association (SA), they are sent as part of the
Phase 2 negotiations. Fireware XTM supports three types of Phase 2 IDs:
• Host IP address [ID_IPV4_ADDR]
This is a simple dotted-decimal IP address. For example, 192.168.50.200.
• Network IP Address [ID_IPV4_ADDR_SUBNET]
This is a dotted-decimal IP address that represents a subnet, followed by the slash notation of the
subnet mask. Although you use slash notation for the network IP address, Fireware XTM sends the
Phase 2 ID as a dotted-decimal IP address followed by a dotted-decimal subnet mask.
For example, if the network IP address is 192.168.50.0/24, Fireware XTM sends the Phase 2 ID as:
192.168.50.0 255.255.255.0
• IP address range [ID_IPV4_ADDR_RANGE] A remote peer that is
not a WatchGuard
device might not
support or correctly
interpret an IP address
range.
This is a range of IP addresses. The range you specify includes the first IP address and the last IP
address you specify, as well as every IP address in between.
When you add tunnel routes on the Addresses tab of the New Tunnel dialog box, you specify the
Phase 2 IDs.
Figure 21: The Addresses tab for this tunnel includes IP subnets for the Phase 2 IDs.
The remote IKE peer must have the same type of Phase 2 IDs and they must be the reverse of the Phase
2 IDs on your XTM device.
7/21/2019 Advanced VPN Training v11.7
http://slidepdf.com/reader/full/advanced-vpn-training-v117 32/92
28 WatchGuard Fireware XTM Training
About Broadcast over a BOVPN Tunnel
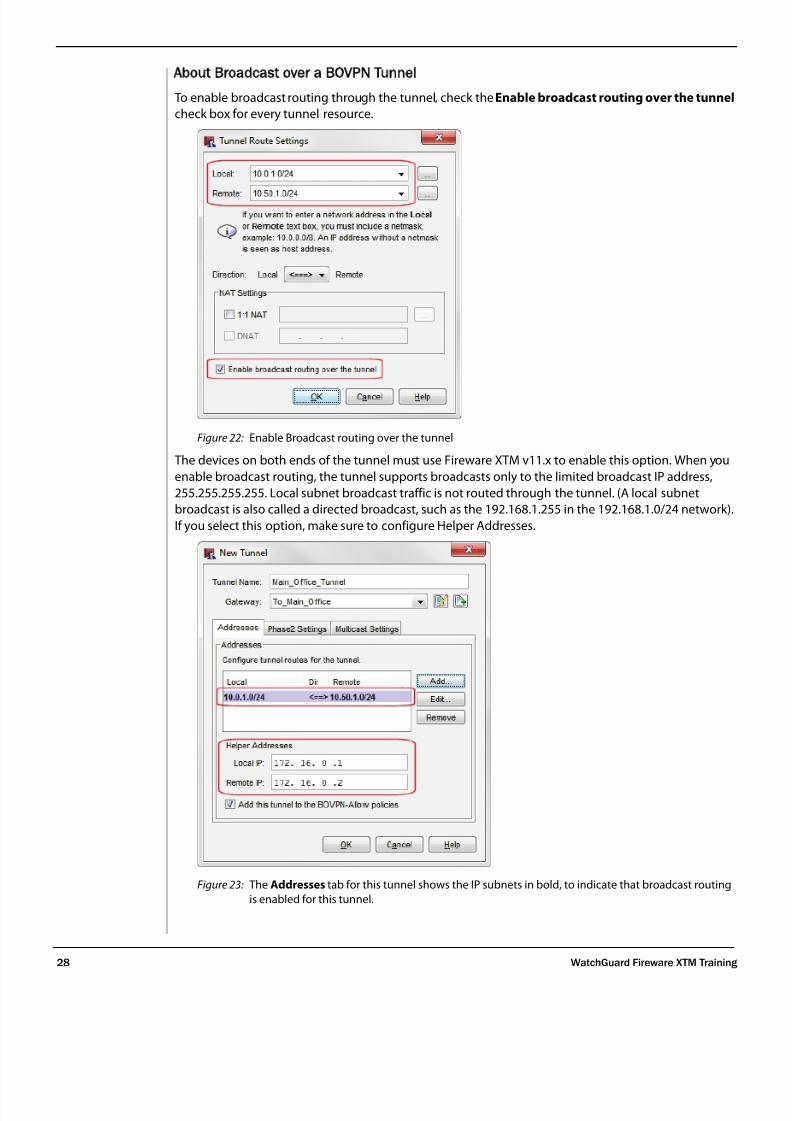
To enable broadcast routing through the tunnel, check the Enable broadcast routing over the tunnel
check box for every tunnel resource.
Figure 22: Enable Broadcast routing over the tunnel
The devices on both ends of the tunnel must use Fireware XTM v11.x to enable this option. When you
enable broadcast routing, the tunnel supports broadcasts only to the limited broadcast IP address,
255.255.255.255. Local subnet broadcast traffic is not routed through the tunnel. (A local subnet
broadcast is also called a directed broadcast, such as the 192.168.1.255 in the 192.168.1.0/24 network).
If you select this option, make sure to configure Helper Addresses.
Figure 23: The Addresses tab for this tunnel shows the IP subnets in bold, to indicate that broadcast routing
is enabled for this tunnel.

7/21/2019 Advanced VPN Training v11.7
http://slidepdf.com/reader/full/advanced-vpn-training-v117 33/92
What You Should Know
Branch Office VPN Tunnels 29
We recommend that
you use IP addresses
that are not used by
any local or remote
network to ensure that
the addresses do not
conflict with any other
device.
If broadcast routing through the tunnel is enabled for the added tunnel routes, the tunnel resources
appear in bold. When broadcast routing is enabled, you must configure Helper Addresses,. We
recommend you use IP addresses in a private network IP address range that is not used by any local
network or by any remote network connected through a VPN. The XTM device uses these addresses as
the endpoints of the GRE tunnel (General Routing Encapsulation tunnel protocol) inside the IPSec
BOVPN tunnel. The XTM device sends the broadcast traffic through the GRE tunnel.
The remote IKE peer must use the same Helper Addresses, and they must be the reverse of your XTM
device Helper Addresses.
When broadcast routing is not enabled the tunnel resources are not bold and the Helper Addresses are
not required.
About Multicast Over a BOVPN Tunnel
In addition to Broadcast over BOVPN, Fireware XTM also supports Multicast over BOVPN. This feature
lets you extend multicast beyond your LAN and private networks. When you enable Multicast over
BOVPN, you can configure your XTM device to route multicast traffic through a BOVPN tunnel to
another XTM device.
Multicast supports one-way traffic streams from a sender at one end of the BOVPN tunnel to a receiver,
or group of receivers, at the other end of the tunnel. The sender sends the multicast packets to the XTM
device through an internal interface, such as the Trusted or Optional interface. When the XTM device
receives a multicast packet on the internal interface, it forwards it through the BOVPN tunnel. When the
XTM device at the other end of the tunnel receives the multicast packet, it forwards it to its internal
interface. The devices that actually receive the multicast packets must first associate themselves with a
group IP address. This group IP address must be known on both ends of the tunnel.
Like broadcast over BOVPN, multicast over VPN requires Helper Addresses to negotiate the GRE Tunnel.
Figure 24: XTM device configured to send Multicast over BOVPN

7/21/2019 Advanced VPN Training v11.7
http://slidepdf.com/reader/full/advanced-vpn-training-v117 34/92
30 WatchGuard Fireware XTM Training
The settings in Figure 24 show that the XTM device is enabled to send multicast traffic. This means that
the origination IP address is a host within the trusted interface network.
• Origination IP — The IP address of the multicast sending device at one end of the tunnel.
• Group IP — A reserved multicast group IP address that is associated with recipients of the
multicast traffic.
• Input Interface — The XTM device internal interface with the subnet that holds the origination IP
address as one of its hosts.
Figure 25: XTM device receiving Multicast over BOVPN
The settings in Figure 25 show that the XTM device is enabled to receive multicast traffic. Theorigination IP address is an address on the other end of the tunnel.
• Origination IP and Group IP — The same values as in the tunnel configuration of the sending
XTM device.
• Output Interface — The XTM device internal interfaces where the multicast traffic is routed. The
receiving hosts must be located on one of the selected internal interfaces.

7/21/2019 Advanced VPN Training v11.7
http://slidepdf.com/reader/full/advanced-vpn-training-v117 35/92
What You Should Know
Branch Office VPN Tunnels 31
Peers Agree on Whether to Use Perfect Forward Secrecy and Which Diffie-
Hellman Group to Use for PFS
At the top of the New Tunnel dialog box Phase 2 Settings tab, you specify whether to use Perfect
Forward Secrecy (PFS) and which Diffie-Hellman group to use to generate new keying material.
Figure 26: Perfect Forward Secrecy
About Perfect Forward Secrecy PFS)
Perfect Forward Secrecy (PFS) specifies how Phase 2 keys are derived. When PFS is enabled, both IKEpeers must use PFS, or Phase 2 rekeys fail.
PFS guarantees that if an encryption key that is used to protect the transmission of some of the data is
compromised, an attacker can get access only to the data protected by that key, not subsequent keys.
The two IKE peers always use the first Phase 1 SA to protect the first Phase 2 negotiations. The same
Phase 1 SA is used to protect Phase 2 rekey negotiations for as long as the Phase 1 SA is valid. If the
Phase 1 SA expires before the next Phase 2 SA expiration, then Phase 1 negotiations must start again
when the two IKE peers negotiate the Phase 2 rekey again. This is true whether PFS is enabled or
disabled.
When PFS is disabled , and Phase 2 SAs expire, the two peers use the existing keying material to derive a
new encryption key for the new Phase 2 SA.When PFS is enabled , the two IKE peers must generate a new set of Phase 1 keying material for every
negotiation of a new Phase 2 SA. This ensures that when Phase 2 SAs expire, the encryption keys used
for new Phase 2 SAs are never generated from existing Phase 1 keying material.
When the two IKE peers generate new keying material as part of PFS, they do not complete a new set of
Phase 1 negotiations from the beginning. The encryption and authentication parameters the IKE peers
agreed upon in the Phase 1 SA negotiations are still valid, and the authentication of the peer is still
valid. These things are still valid as long as the Phase 1 lifetime does not expire.
Even though PFS does not require a new set of Phase 1 negotiations for each Phase 2 rekey, to generate
new session keys for every Phase 2 renegotiation is computationally expensive. Thus, PFS can cause a
short delay in the Phase 2 rekey negotiation process.

7/21/2019 Advanced VPN Training v11.7
http://slidepdf.com/reader/full/advanced-vpn-training-v117 36/92
32 WatchGuard Fireware XTM Training
Peers Agree On a Phase 2 Proposal
As we saw previously, the IP addresses that can send traffic over the tunnel are part of the Phase 2 SA.
The remainder of the Phase 2 SA is a group of encryption and authentication parameters. Fireware XTM
sends these parameters in a Phase 2 proposal. The proposal includes the algorithm to use to
authenticate data, the algorithm to use to encrypt data, and the timeline to make new Phase 2
encryption keys.
To set these parameters, select or create an IPSec Proposal for the tunnel.
1. In the New Tunnel dialog box, select the Phase 2 Settings tab.
2. From the IPSec Proposals list, select a Phase 2 proposal.
Or, click Add to create a new proposal.
Figure 27: Phase 2 Proposals
The New Phase 2 Proposal dialog box appears.
Figure 28: New Phase 2 Proposal dialog box

7/21/2019 Advanced VPN Training v11.7
http://slidepdf.com/reader/full/advanced-vpn-training-v117 37/92
What You Should Know
Branch Office VPN Tunnels 33
3. In the Proposal Details section, configure these options for the new Phase 2 proposal:
Name Type a name for the proposal. Fireware XTM does not send this name to the IKE peer; it is only for
your identification purposes.
Type
Most often, you select ESP (Encapsulating Security Payload). ESP provides authentication and
encryption of the data that passes over the VPN. The other option, AH (Authentication Header),
provides no encryption to the data that passes over the VPN. AH only provides authentication of
the data. (If you select AH, the Encryption drop-down list in Figure 28 is not available.
Authentication
Authentication ensures that the information received is exactly the same as the information sent.
You can select either SHA1 or MD5 as the algorithm the peers use to authenticate IKE messages
from each other. SHA1 is more secure.
Encryption
Encryption keeps the data confidential.
You can select DES, 3DES, or AES with 128, 192, or 256-bit key strength. AES is the most secure.
Force Key Expiration
The longer a Phase 2 encryption key is in use, the more data an attacker has for mounting anattack on the key. Phase 2 expiration can happen based on the amount of time passed since the
SA was created, the amount of data that goes over the VPN since the SA was created, or both.
- Select the Time check box to expire the key after a quantity of time. Type or select thequantity of time that must pass to force the key to expire.
- Select the Traffic check box to expire the key after a quantity of traffic. Type or select the
number of kilobytes of traffic that must pass to force the key to expire.
If both Force Key Expiration options are disabled, the key expiration interval is set to 8 hours.
4. Click OK to save the new proposal.
How VPNs Work With Multi-WAN
You can configure each side of a BOVPN tunnel to create multiple gateway endpoints for each tunnel.
• When your XTM device has more than one external interface, you can specify which interface the
XTM device uses for a VPN to another office. Or, specify that the tunnel can use any of the local
external interfaces in a failover scenario, and the order that the interfaces failover.
• When the remote XTM device has more than one external interface, you can specify which
interface your XTM device uses for VPN communications with that office. Or, specify that the XTM
device uses any of the remote site’s external interfaces for the VPN in a failover scenario, and in
what order.
What Multi-WAN Can Do For Your VPNs
Multiple Internet connections provide these benefits to your VPNs:
• Redundancy — If one Internet gateway is down, the VPN peers automatically use a different
gateway (VPN failover). When the preferred gateway is available again, the peers automatically use
it (VPN failback).
• Stability — Connections that go through the VPN stay connected when VPN failover and failback
occur.
• VPN traffic load distribution — You can specify which external interface to use for each VPN. For
example, you can use a less expensive Internet connection for a VPN with a small amount of traffic,
and a more expensive connection for a VPN that is more critical or that has more traffic.

7/21/2019 Advanced VPN Training v11.7
http://slidepdf.com/reader/full/advanced-vpn-training-v117 38/92
34 WatchGuard Fireware XTM Training
How the XTM Device Detects That the IPSec Peer Gateway is Down
The XTM device detects that the IPSec peer gateway is down in two ways:
• IKE Keep-alive or DPD messages get no response
• Ethernet link failure is detected on an external interface
How VPNs Work With Modem Failover
The branch office VPN failover to a modem can be useful in a situation where you have a central office
that accepts branch office VPN connections from one or more remote offices that use a modem for
failover. To use a modem for branch office VPN failover, you first must enable modem failover in the
network settings of the XTM device configuration.
The XTM device uses the modem for the branch office VPN only when it cannot send traffic through
any external interface. If all external interfaces are down, the XTM device starts a serial modem
connection between the two sites. It then initiates a VPN connection over the modem connection. The
XTM device uses the first local gateway ID configured for the external interface as the local gateway ID
for the modem connection. Because the branch office VPN connection over a modem uses the same
authentication ID as a connection from an external interface, there is no need to change the
configuration of the remote gateway to enable a connection through the modem.
When you use
certificates, make sure
that both devices have
correct time zone
settings, and that their
internal clocks have
approximately the
same time (within a
few minutes).
Certificates are time-
sensitive and are valid
for a specified period of
time (only after aspecific start date and
time and only before a
specific end date and
time). If the time for
one of the clocks is
different by a large
amount, IKE
negotiations can fail
because a certificate is
not yet valid (the clock
is set before the “Valid
From” date) or is no
longer valid (past the
“Valid To” date).
Use IPSec Certificates for the IKE Credentials
A certificate is a document used to verify the identity of an unknown individual. For IKE negotiations,
the unknown individual is the remote IKE peer. During Phase 1 negotiations, the two IKE peers
exchange their certificates. If each device accepts its peer’s certificate, then each side trusts that the
peer is actually who it claims to be.
A certificate is issued by a certification authority (CA), which is an entity that represents an organization
you trust for this purpose. A certification authority also issues a certificate for itself, called the CA
certificate.
When the CA issues a certificate to an entity, it guarantees that the entity is actually who it claims to be.
The CA indicates this guarantee by signing the certificate it issues to the entity.
In a transaction between an entity with a certificate and another party, the certified entity presents its
certificate to the other party as proof of its identity. Thus, any party that wants to accept the certificate
must trust the certification authority that issued the certificate. You indicate your trust in the CA when
you import the CA certificate to the XTM device. You learn how to import certificates in the section
“About Certificates Issued By a Third-party Certification Authority” on page 36.
When the CA signs a client certificate, the client certificate and the CA certificate have a cryptographic
relationship. Because the two certificates are cryptographically tied to each other, you must have the
CA certificate to verify the client certificate.
In many situations, the same CA issues the client certificate for both gateway devices. If this is the case,
the first and third certificates are the same CA certificate and your XTM device needs only twocertificates: the CA certificate and the local device’s client certificate.
If the two gateway devices use certificates issued by different certification authorities, then each device
needs two CA certificates: one from the CA that issued the local device’s certificate and one from the CA
that issued the remote device’s certificate.

7/21/2019 Advanced VPN Training v11.7
http://slidepdf.com/reader/full/advanced-vpn-training-v117 39/92
What You Should Know
Branch Office VPN Tunnels 35
To use certificates with a VPN, each gateway endpoint must have these certificates:
• The CA certificate from the certification authority that issued the certificate for the local device.
Your XTM device must verify the client certificate for the local device (see the subsequent point). It
does this with the CA certificate from the authority that issued the client certificate. Make sure you
import the CA certificate before you import the client certificate. This enables the XTM device to
verify the client certificate.
• The client certificate for the local device.For your XTM device, this is the certificate that your XTM device sends to its VPN peer. The peer
device verifies this certificate by checking it against a CA certificate.
• The CA certificate from the certification authority that issued the remote device’s IPSec certificate.
When your XTM device receives an IPSec certificate from its IKE peer, it must have a way to verify
the peer’s certificate. It does this with the CA certificate of the certification authority that signed
the remote peer’s certificate.
Only client certificates
appear in Policy
Manager; you do not
manage CA certificates
with Policy Manager.
Use Firebox System
Manager to see CA
certificates.
The certificates that your XTM device can use to prove its identity appear in New Gateway dialog box
in the Select the certificate to be used for the Gateway list (see Figure 4). Items in this list can be
certificates that were issued by a WatchGuard Management Server, or certificates issued by a third-
party certification authority that you manually import to the XTM device.
About Certificates Issued by the WatchGuard Management Server
The WatchGuard Management Server is an optional component of the WatchGuard System Manager
(WSM) software. When you install the WatchGuard Management Server, you install a server that lets
you easily manage the VPNs for many Firebox or XTM devices. This also installs a certification authority,
called the WatchGuard Certificate Authority, to issue and verify certificates for the managed client
devices.
Note
If your XTM device is a managed client of a WatchGuard Management Server, you will probably use
the Management Server to create managed VPNs. You cannot create managed VPNs with Policy
Manager. Instead you use the Management Server to set up managed VPNs between managed
devices. The Management Server writes the VPN information to Policy Manager for each device, sothat you can see the managed VPN in Policy Manager. However, you cannot alter the managed VPN
information with Policy Manager.
This training module
does not discuss how
to use the
Management Server to
create VPNs.
If you choose not to create a managed VPN between two managed XTM devices, you can use Policy
Manager to manually set up a VPN between them. You can use the certificates issued by the
Management Server when you create a manual VPN.
The WatchGuard Management Server automatically sends an IPSec certificate to the managed XTM
device, and it appears at the bottom of the New Gateway dialog box. You can use this certificate to
create a VPN to another Firebox or XTM device if both devices are managed by the same WatchGuard
Management Server. The Management Server also automatically sends each managed XTM device the
CA certificate so that each XTM device can verify the certificate that its peer sends in Phase 1. You donot manually import any certificates (described in the next section) if you use these certificates.
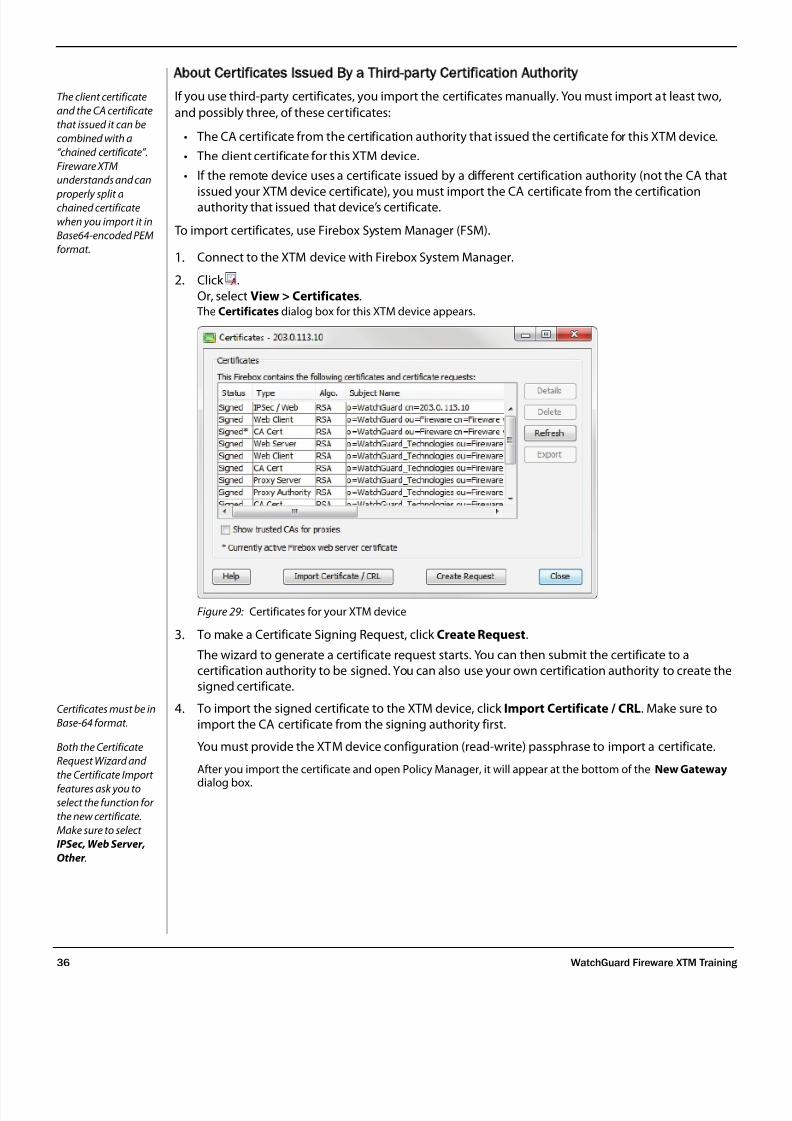
7/21/2019 Advanced VPN Training v11.7
http://slidepdf.com/reader/full/advanced-vpn-training-v117 40/92
36 WatchGuard Fireware XTM Training
About Certificates Issued By a Third-party Certification Authority
The client certificate
and the CA certificate
that issued it can be
combined with a
“chained certificate”.
Fireware XTM
understands and can
properly split achained certificate
when you import it in
Base64-encoded PEM
format.
If you use third-party certificates, you import the certificates manually. You must import at least two,
and possibly three, of these certificates:
• The CA certificate from the certification authority that issued the certificate for this XTM device.
• The client certificate for this XTM device.
• If the remote device uses a certificate issued by a different certification authority (not the CA that
issued your XTM device certificate), you must import the CA certificate from the certificationauthority that issued that device’s certificate.
To import certificates, use Firebox System Manager (FSM).
1. Connect to the XTM device with Firebox System Manager.
2. Click .
Or, select View > Certificates. The Certificates dialog box for this XTM device appears.
Figure 29: Certificates for your XTM device
3. To make a Certificate Signing Request, click Create Request.
The wizard to generate a certificate request starts. You can then submit the certificate to a
certification authority to be signed. You can also use your own certification authority to create the
signed certificate.
Certificates must be in
Base-64 format.
4. To import the signed certificate to the XTM device, click Import Certificate / CRL. Make sure to
import the CA certificate from the signing authority first.
Both the Certificate
Request Wizard and
the Certificate Import
features ask you to
select the function for
the new certificate.
Make sure to select
IPSec, Web Server,
Other .
You must provide the XTM device configuration (read-write) passphrase to import a certificate.
After you import the certificate and open Policy Manager, it will appear at the bottom of the New Gateway dialog box.

7/21/2019 Advanced VPN Training v11.7
http://slidepdf.com/reader/full/advanced-vpn-training-v117 41/92
What You Should Know
Branch Office VPN Tunnels 37
About Certificate Revocation Lists
A revoked certificate is
different from a
certificate that has
expired. It is easy to see
the “Valid To” date on a
certificate, and
expiration happens
automatically afterthat time. To revoke a
certificate is to declare
it invalid before the
expiration date.
A certification authority can revoke a certificate that it previously issued. When it does this, the
certification authority declares that it no longer guarantees the authenticity of the certificate, or the
identity of the certificate holder. To keep your certificate-based VPNs secure, the XTM device must have
access to a list of the revoked certificates, called a Certificate Revocation List (CRL).
To manually import the CRL, in the Certificates dialog box, click Import Certificate / CRL. After you
import this list, the XTM device consults it before it accepts a certificate from any IKE peer. The XTM device can also consult a CRL server to see if a certificate is revoked.
To select the location of the CRL server:
1. Open Policy Manager for your XTM device.
The LDAP server you
specify in Figure 30 is
different from the
LDAP server you
specify if you use an
LDAP server for user
authentication. You
specify that server inPolicy Manager at
Setup >
Authentication >
Authentication
Servers. The XTM
device uses the LDAP
server you specify there
to verify the credentials
of users that
authenticate to the
XTM device for firewall
authentication or for
Mobile User VPN
sessions.
2. Select VPN > VPN Settings. The VPN Settings dialog box appears.
Figure 30: LDAP Server settings for CRL
3. Select the Enable LDAP server for certificate verification check box.
4. In the Server text box, type the IP address or domain name for the LDAP server that hosts the CRL.
The two most common
protocols used to
check CRLs are LDAP
and HTTP. Fireware
XTM v11.x can only use
LDAP to check CRLs,not HTTP.
The XTM device can only use LDAP to check certificates against this CRL server. Change the port
number in the Port text box only if the LDAP server listens on a non-standard port for LDAP.
5. Click OK.

7/21/2019 Advanced VPN Training v11.7
http://slidepdf.com/reader/full/advanced-vpn-training-v117 42/92
38 WatchGuard Fireware XTM Training
Add Policies in Policy Manager to Allow VPN Traffic
Fireware XTM allows traffic to and from your network only if Policy Manager has a policy to allow the
traffic. This is true for all traffic, regardless of whether it goes through a VPN tunnel or not. In this
section we look at three methods you can use to add policies that allow traffic over your BOVPNs.
Automatically Add Policies That Allow Traffic Over All Ports And Protocols
When you select the Add this tunnel to the BOVPN-Allow policies check box, Policy Managerautomatically adds the Any policy to your configuration. This policy allows all traffic through the VPN.
You can remove this policy only when you clear the Add this tunnel to the BOVPN-Allow policies
check box in every tunnel.
Use the BOVPN Policy Wizard
Use the BOVPN Policy Wizard to easily add policies that allow traffic through the VPN over specific ports
and protocols. This adds new aliases in the Aliases dialog box for the BOVPN or BOVPNs you selected in
the wizard.
Manually Add Policies
You can add your own policies to allow traffic from the peer device:
• From — Specific addresses on the other side of the VPN
• To — Specific addresses behind your XTM device
You can also add your own policies to allow traffic to the peer device:
• From — Specific addresses behind your XTM device
• To — Specific addresses on the other side of the VPN
Use the tunnel name as an interface
You can also choose to use the tunnel name as an interface for:
• The Tunnel Address
• Aliases created by BOVPN Policy Wizard
Troubleshoot Branch Office VPN Tunnels
Branch office VPN tunnels rely on a reliable connection, and matching VPN configuration settings on
both VPN endpoints. A configuration error or network connectivity issue can cause problems for
branch office VPN tunnels. WSM includes some tools that can make it easier for you troubleshoot
problems with your branch office VPN tunnels.
VPN Diagnostic Report
You can use the VPN Diagnostic Report in Firebox System Manager to see configuration and statusinformation about any branch office VPN gateway and associated tunnels.
To generate the VPN Diagnostic Report:
1. Connect to the local gateway endpoint with Firebox System Manager.
2. Select Tools > Diagnostic Tasks. The Diagnostic Tasks dialog box appears.
3. Click the VPN tab.
4. From the Gateway drop-down list, select a branch office VPN gateway.

7/21/2019 Advanced VPN Training v11.7
http://slidepdf.com/reader/full/advanced-vpn-training-v117 43/92
What You Should Know
Branch Office VPN Tunnels 39
5. In the Duration text box, type or select a duration for the report to collect log data. The default duration is 20 seconds. The maximum is 60 seconds.
6. Click Start Report.
When you run the VPN diagnostic report, Fireware XTM temporarily increases the diagnostic log level
for the selected gateway, and then collects detailed log data about the gateway and all associated
tunnels. At the end of the specified duration, the report is generated, and the log levels return to their
previous levels.
The VPN Diagnostic Report has six sections. The first two sections show the configuration settings for
the selected gateway and all tunnels that use that gateway.
• Gateway Summary — shows a summary of the gateway configuration, including theconfiguration of each configured gateway endpoint
• Tunnel Summary — shows a summary of the tunnel configuration for all tunnels that use the
selected gateway
The last four sections show run-time information based on the log message data collected when the
report was run.
• Run-time Info (gateway IKE_SA) — shows the status of the IKE (Phase 1) security association for
the selected gateway
• Run-time Info (tunnel IPSEC_SA) — shows the status of the IPSec tunnel (Phase 2) security
association for active tunnels that use the selected gateway
• Run-time Info (tunnel IPSec_SP) — shows the status of the IPSec tunnel (Phase 2) security policy
for active tunnels that use the selected gateway
• Related Logs — shows tunnel negotiation log messages, if a tunnel negotiation occurs during the
time period that you run the diagnostic report
The information provided by the VPN Diagnostic Report can help you see the status of tunnel
negotiations, and help you determine what caused the tunnel negotiations to fail.
The VPN Diagnostic Report is especially helpful if you have multiple tunnels, because it helps you to
focus on just the one you want to troubleshoot.

7/21/2019 Advanced VPN Training v11.7
http://slidepdf.com/reader/full/advanced-vpn-training-v117 44/92
40 WatchGuard Fireware XTM Training
Filter Log Messages by Gateway IP Address
If you want to troubleshoot the VPN connection for a longer period of time than the VPN Diagnostics
Report supports, you can look at the log messages directly in Traffic Monitor. Each log message related
to a branch office VPN tunnel has a header that shows the IP addresses of the local and remote
gateway. The format of the header is:
(local_gateway_ip<->remote_gateway_ip)
Where:
• local_gateway_ip is the ip address of the local gateway
• remote_gateway_ip is the IP address of the remote gateway
If you have installed
WatchGuard Log
Server and Report
Server, you can also
use the Search feature
in WatchGuard
WebCenter to filter log
messages by gateway
IP address.
You can use the gateway IP addresses to filter the log messages to find log messages related to a
specific gateway.
If you use this method to troubleshoot your BOVPN tunnels, you might need to increase the diagnostic
log level for IKE traffic in order to see enough detailed log information.
To change the diagnostic log level for IKE traffic:
1. In Policy Manager, select Setup > Logging.
2. Click Diagnostic Log Level.
3. In the category list, expand the VPN category and select IKE.
4. Move the slider to increase the level of detail the XTM device sends to the log file.
When you increase the IKE diagnostic log level, the log file captures diagnostic log messages for all
branch office VPN gateways. If you have several VPN gateways, you can filter the log messages by the
gateway IP address to see only the log messages for a specific gateway.

7/21/2019 Advanced VPN Training v11.7
http://slidepdf.com/reader/full/advanced-vpn-training-v117 45/92
Before You Begin
Branch Office VPN Tunnels 41
Before You Begin
This section includes a list of all the equipment and software necessary to complete the exercise, along
with initial basic configuration information.
Necessary Equipment And Services
• Management computer To configure the XTM device, you must have a computer with WSM version 11.7 installed. For all
exercises, this computer is connected to the XTM device trusted interface.
• WSM v11.7 management software / Fireware XTM v11.7 OS with a Pro upgrade
Your instructor should provide this software. You can also download it from the WatchGuard web
site with a valid LiveSecurity login.
• WatchGuard security device
WatchGuard XTM device that can run Fireware XTM OS v11.7.
• Feature key
Your instructor will provide a feature key to enable the necessary XTM device features for the
exercise.
• Any additional computers
These are additional computers used to test the traffic flow across XTM device interfaces, not
servers.
• Ethernet cables
You must have enough Ethernet cables to complete the exercise. You need an Ethernet cable to
connect a computer directly to an XTM device interface, and another Ethernet cable to connect the
XTM device to a switch or router.
Management Computer Configuration
Before you begin the exercise, make sure your management computer is configured correctly.
• Install WSM management software and the Fireware XTM OS with a Pro upgrade. You do not have
to install the server components, just the WSM client software.
• Use an Ethernet cable to connect the management computer directly to the trusted interface 1 on
the XTM device.
• Make sure your management computer has an IP address in the same subnet as the trusted
interface with the correct subnet mask. Use the XTM device trusted interface IP address as the
default gateway of the computer.
Firewall Configuration
If your XTM device is not yet configured, run the Quick Setup Wizard and select Routed Mode.

7/21/2019 Advanced VPN Training v11.7
http://slidepdf.com/reader/full/advanced-vpn-training-v117 46/92
42 WatchGuard Fireware XTM Training
Exercise
Make a Manual VPN Between a Single-WAN XTM Device and a Multi-WAN XTM Device
When your XTM device has only one external interface and you create a VPN to a XTM device that has
more than one external interface, your XTM device has more than one remote gateway to select for IKEnegotiations. If one of the external interfaces on the remote XTM device does not respond, your XTM
device can try another external interface at the remote peer.
Conversely, if your XTM device has more than one external interface, and one of the interfaces is not
available, it can use the other external interface to create a VPN to its remote peer.
Network Topology
This diagram shows the two XTM devices and their external interfaces connected to the Internet.
Figure 1: Network topology for the exercise
Your classroom is set up to simulate the Internet connections. XTM device A has one external interface
and XTM device B has two external interfaces.
In this exercise, you work with a partner. Student A configures the single-WAN XTM device (XTM Device
A). Student B configures the multi-WAN XTM device (XTM Device B). In the examples, Student A uses 10
for the student number and IP addresses, and Student B uses 20 for the student number and IPaddresses, as shown in the diagram.

7/21/2019 Advanced VPN Training v11.7
http://slidepdf.com/reader/full/advanced-vpn-training-v117 47/92
Exercise
Branch Office VPN Tunnels 43
Configure XTM Device A Single-WAN Device)
Configure the External Interface
1. From Policy Manager, select Network > Configuration. The Network Configuration dialog box appears.
Figure 2: Interfaces tab of Network Configuration dialog box
2. Set the IP address for Interface 0 to 203.0.113.10/24, and the default gateway to
203.0.113.1.
3. Click OK.
Add a Branch Office Gateway
1. Select VPN > Branch Office Gateways.2. Click Add.
The New Gateway dialog box appears.
3. In the Gateway Name text box, type a friendly name.
For this example, type To_Device_B.
4. In the Credential Method section, select Use Pre-Shared Key.
5. In the Use Pre-Shared Key text box, type shh-secret!, or another string that you and your
partner agree on.
6. Click Add to add a new gateway endpoints pair. The New Gateway Endpoints Settings dialog box appears.
7. In the Local Gateway section, select By IP Address.
8. In the IP Address text box, type 203.0.113.10. The External Interface drop-down list has only one item because this device has only one external interface.
9. In the Remote Gateway section, select Static IP address.
In the IP Address text box, type the IP address of XTM Device B’s primary WAN interface,
203.0.113.20.
10. In the Remote Gateway section, select By IP Address.
In the IP Address text box, type 203.0.113.20.

7/21/2019 Advanced VPN Training v11.7
http://slidepdf.com/reader/full/advanced-vpn-training-v117 48/92
44 WatchGuard Fireware XTM Training
11. Click OK. The new gateway endpoints pair appears in the Gateway Endpoints list.
12. To add a second gateway endpoints pair, repeat Steps 6–12. Make sure to change the Remote
Gateway settings, as described in the subsequent steps.
13. In the Local Gateway section, select By IP Address.
In the IP address text box, type 203.0.113.10. This part is the same as the previous gateway endpoint pair. Your device has only one external interface.
14. In the Remote Gateway section, select Static IP address.In the IP address text box, type the IP address of XTM Device B’s secondary WAN interface,
198.51.100.20.
15. In the Remote Gateway section, select By IP Address.
In the IP address text box, type 198.51.100.20.
16. Click OK. The new gateway endpoints pair appears in the Gateway Endpoints list with the first pair.
17. Select the Phase 1 Settings tab. The mode is set by default to Main Mode. You can use Main Mode because both IKE peers have static IPaddresses. If one of the devices had a dynamic IP address on the external interface, you would use AggressiveMode.
18. In the Dead Peer Detection section, set the Max retries value to 3. This is set to a lower value than the default to ensure a faster VPN failover.
19. Do not change the other settings.
20. Click OK. The new gateway appears in the Gateways dialog box.
21. Click Close to return to Policy Manager. The Gateway configuration is complete.
Add a Branch Office Tunnel
1. Select VPN > Branch Office Tunnels. The Branch Office IPSec Tunnels dialog box appears.
2. Click Add. The New Tunnel dialog box appears.
Do not give your
tunnel the same name
as the branch office
gateway.
3. In the Tunnel Name text box, type a friendly name for the tunnel.
For this exercise, type Tunnel_to_Device_B.
4. Click Add and add a new tunnel route. The Tunnel Route Settings dialog box appears.
5. In the Local text box, type the network address of the trusted interface on your device in slash
notation.
For this exercise, type 10.0.10.0/24.
6. In the Remote text box, type the trusted network address at the remote device. For this exercise,
type 10.0.20.0/24.
7. Click OK. The new tunnel route appears in the New Tunnel dialog box in the Addresses list.
8. Make sure the Add this tunnel to the BOVPN-Allow policies check box is selected.When this check box is selected, Policy Manager automatically adds the BOVPN-Allow.out and BOVPN-Allow.in policies that allow all traffic to flow between the two trusted networks.
9. Click OK. The new tunnel appears in the Branch Office IPSec Tunnels dialog box.
10. Click Close. The new BOVPN-Allow.out and BOVPN-Allow.in policies appear in Policy Manager. The configuration for XTM Device A is complete.
11. Save this configuration to your device.

7/21/2019 Advanced VPN Training v11.7
http://slidepdf.com/reader/full/advanced-vpn-training-v117 49/92
Exercise
Branch Office VPN Tunnels 45
Configure XTM Device B Multi-WAN Device)
Configure the Two External Interfaces
1. From Policy Manager, select Network > Configuration. The Network Configuration dialog box appears.
Figure 3: Interfaces tab of the Network Configuration dialog box
2. Set the IP address for Interface 0 to 203.0.113.20/24.
The default gateway setting is 203.0.113.1.
3. Double-click Interface 6 and edit it.
4. In the Interface Type drop-down list, select External.
5. In the Interface Name (Alias) text box, type a new name for the interface.
For this example, type WAN2.
6. Select Use Static IP.7. In the IP address text box, type 198.51.100.20/24.
8. In the Default Gateway text box, type 198.51.100.1.
9. Click OK to return to Policy Manager.
Add a Branch Office Gateway
1. Select VPN > Branch Office Gateways.
2. Click Add.
3. In the Gateway Name text box, type a friendly name for the gateway.
For this example, type To_Device_A.
4. In the Credential Method section, select Use Pre-Shared Key.
5. In the Use Pre-Shared Key text box, type sshh-secret!, or another string that you and your
partner agree on.
6. Click Add. The New Gateway Endpoints Settings dialog box appears.
7. In the Local Gateway section, select By IP Address.
In the IP address text box, type 203.0.113.20.
8. From the External Interface drop-down list, select External.External is the default name for interface 0. If you changed the name of interface 0, select that name.

7/21/2019 Advanced VPN Training v11.7
http://slidepdf.com/reader/full/advanced-vpn-training-v117 50/92
46 WatchGuard Fireware XTM Training
9. In the Remote Gateway section, select Static IP address.
In the IP address text box, type the IP address of XTM Device B’s primary WAN interface,
203.0.113.10.
10. In the Remote Gateway section, select By IP Address.
In the IP address text box, type 203.0.113.10.
11. Click OK. The new gateway endpoints pair appears in the Gateway Endpoints list.
12. To add a second gateway endpoints pair, repeat Steps 6–12. Make sure to change the LocalGateway settings, as described in the subsequent steps.
13. In the Local Gateway section, select By IP Address.
In the IP address text box, type 198.51.100.20.
14. From the External Interface drop-down list, select WAN2. This is the most common place to make an error. Make sure to select the interface name that corresponds tothe secondary WAN interface on this device.
15. In the Remote Gateway section, select Static IP address.
In the IP address text box, type the IP address of XTM Device B’s secondary WAN interface,
203.0.113.10. These settings do not change from the previous gateway endpoint pair you added. The remote XTM devicehas only one external interface.
16. In the Remote Gateway section, select By IP Address.
In the IP address text box, type 203.0.113.10.
17. Click OK. The new gateway endpoints pair appears in the Gateway Endpoints list with the first pair.
18. Select the Phase 1 Settings tab. The mode is set by default to Main Mode. You can use Main Mode because both IKE peers have static IPaddresses. If one of the XTM devices had a dynamic IP address on the external interface, use AggressiveMode.
19. In the Dead Peer Detection section, set the Max retries value to 3. This is set to a lower value than the default to ensure a faster VPN failover.
20. Do not change the other settings.
21. Click OK. The new gateway appears in the Gateways dialog box.
22. Click Close to return to Policy Manager. The Gateway configuration is complete.
Add a Branch Office tunnel
1. Select VPN > Branch Office Tunnels. The Branch Office IPSec Tunnels dialog box appears.
2. Click Add. The New Tunnel dialog box appears.
3. In the Tunnel Name text box, type a friendly name for the tunnel.
For this exercise, type Tunnel_to_Device_A.4. Click Add and add a new tunnel route.
The Tunnel Route Settings dialog box appears.
5. In the Local text box, type the network address of the trusted interface on your device in slash
notation.
For this exercise, type 10.0.20.0/24.
6. In the Remote text box, type the trusted network address at the remote device, 10.0.10.0/24.
7. Click OK. The new tunnel route appears in the Addresses list.

7/21/2019 Advanced VPN Training v11.7
http://slidepdf.com/reader/full/advanced-vpn-training-v117 51/92
Exercise
Branch Office VPN Tunnels 47
8. Make sure the Add this tunnel to the BOVPN-Allow policies check box is selected.When this option is selected, Policy Manager automatically adds the BOVPN-Allow.out and BOVPN-Allow.inpolicies to your configuration. These policies allow all traffic to flow between the two trusted networks.
9. Click OK. The new tunnel appears in the Branch Office IPSec Tunnels dialog box.
10. Click Close. The new BOVPN-Allow.out and BOVPN-Allow.in policies appear. The configuration for XTM Device B is complete.
11. Save this configuration to your device.
Physically Connect all Devices
Both Devices
1. Connect one end of an Ethernet cable to the device Interface 0.
2. Connect the other end of this Ethernet cable to the hub or switch that connects to the 203.0.113.x
network.
XTM Device B
1. Connect one end of an Ethernet cable to the device Interface 6.2. Connect the other end of this Ethernet cable to the hub or switch that connects to the 198.51.100.x
network.
Demonstrate the Configuration
Use one of these methods to test the VPN tunnel, and multi-WAN VPN failover.
Ping from one management computer to another through the tunnel.
1. Get the IP address of your partner ’s management computer.
2. Start a continuous ping to that address.
For example, if your partner’s management computer IP address is 10.0.20.2, open a command
prompt and type: ping 10.0.20.2 -t
3. Disconnect interface 0 on XTM Device B
The devices start new IKE negotiations with XTM Device B’s secondary WAN interface. Only one to
three pings should time out.
Ping from an XTM device interface to the trusted interface on the other device
The source IP address
you use for the ping in
Tools > Diagnostic
Tasks must be an IP
address assigned to
the local XTM device,and must be within the
phase 2 allowed
address range.
1. Connect to your device with Firebox System Manager.
2. Select Tools > Diagnostic Tasks. The Diagnostic Tasks dialog box appears.
3. Select the Advanced Options check box.
The Arguments text box appears.4. In the Arguments text box, type
-I <local trusted interface IP address> <remote trusted interface IP address>
For example:
You can hover the
mouse over the
Arguments text box to
see a list of command
arguments.
- To ping from Device A to Device B, type: -I 10.0.10.1 10.0.20.1
- To ping from Device B to Device A, type: -I 10.0.20.1 10.0.10.1
5. Disconnect interface 0 on XTM Device B
The devices start new IKE negotiations with XTM Device B’s secondary WAN interface. Only one to
three pings should time out.

7/21/2019 Advanced VPN Training v11.7
http://slidepdf.com/reader/full/advanced-vpn-training-v117 52/92
48 WatchGuard Fireware XTM Training
Frequently Asked Questions
What if my XTM device has a private IP address on the external interface?
A private IP address is an address from one of the three ranges defined in RFC-1918. These addresses
are sometimes called non-routable addresses, because they are not allowed to be routed by public
Internet routers. The private address ranges are:
• 10.0.0.0/8 [10.0.0.1–10.255.255.254]
• 172.16.0.0/12 [172.16.0.1–172.31.255.254]
• 192.168.0.0/16 [192.168.0.0–192.168.255.254]
In this situation, it is likely that your XTM device is behind a device that does NAT. Whether your XTM
device can make a BOVPN to another device depends on the type of NAT this device uses. Most devices
today have an IPSec pass-through option. Make sure to enable this option on the NAT device.
After you enable the IPSec pass-through option on the NAT device, you must still decide how your XTM
device identifies itself to the remote device. You have several options:
• One way to configure the local gateway for the gateway endpoints is to select By Domain
Information.
- If the NAT device has an IP address that can be resolved by DNS query of a domain name,
then the remote device can find your device by domain name. Use the fully qualified domain
name that resolves to the public IP address on the external interface of the NAT device.
- If there is no domain name that resolves to an IP address for the NAT device, you can still use
By Domain Information. However, because the remote device cannot find your device, this
means that your device must always be the initiator.
• You may be able to select By IP Address for the local gateway in the gateway endpoints settings.
The IP address for the local gateway must match the source IP address that the remote device sees
for packets coming from this XTM device. If your XTM device is behind a device that applies NAT to
outgoing packets, the remote device sees the source of your XTM device’s packets as the IP address
on the NAT device. If this is the case, and if the NAT device has a static public IP address, you can
type the public IP address on the Internet-facing interface of the NAT device for the IP address ofthe local gateway for the gateway endpoints settings.
If the IP address on the NAT device is dynamic, you must select By Domain Information for the local
gateway in the gateway endpoints settings.

7/21/2019 Advanced VPN Training v11.7
http://slidepdf.com/reader/full/advanced-vpn-training-v117 53/92
Related Courseware and Information
Branch Office VPN Tunnels 49
Related Courseware and Information
WatchGuard Training: Fireware XTM Advanced Networking Training
The Multi-WAN module in the Advanced Networking course shows you how Fireware XTM handles
outgoing, non-IPSec traffic with each of the four different multi-WAN modes of operation:
- Round-robin
- Failover- Interface Overflow
- Routing Table
More FAQs
The WatchGuard Knowledge Base provides articles that can help expand your knowledge. For
example, the Knowledge Base has articles about:
- BOVPN Interoperability
- Use NAT through a BOVPN tunnel
- Set up a default route to send all Internet-bound traffic through a BOVPN
- Use tunnel switching to route VPN traffic between two BOVPN tunnels
- Use traffic management with BOVPN tunnels
- Improve availability of your VPN connection
- Configure VPN failover
Search the Knowledge Base at http://customers.watchguard.com.
What You Have Learned
You have learned:
• What happens in IPSec Phase 1.
• What happens in IPSec Phase 2.
• How to enable broadcast routing over a VPN.
• How to create a VPN tunnel between a single-WAN XTM device and a multi-WAN XTM device.
• How VPN failover works.

7/21/2019 Advanced VPN Training v11.7
http://slidepdf.com/reader/full/advanced-vpn-training-v117 54/92
50 WatchGuard Fireware XTM Training
Test Your Knowledge
Use these questions to practice what you have learned and exercise new skills.
1. True or false? The XTM device uses the Gateway Name as the Phase 1 ID to identify itself to the
remote peer.
2. True or false? If more than one pair of local/remote IP addresses can send traffic over the VPN, then
a unique SA is created for each pair.
3. If you want to add multiple Phase 1 transforms, Phase 1 must be configured in __________ mode.
(Select one.)
4. Where do you configure the Phase 2 proposal? (Select one.)
5. True or false? You can configure a maximum of one tunnel per gateway.
6. Which is the most secure encryption method? (Select one.)
A) Default
B) Quick
C) Aggressive
D) Passive
E) Main
A) In the BOVPN policy
B) In the Branch Office gateway settings
C) In the Branch Office tunnel settings
D) In the tunnel route
A) SHA1
B) MD5
C) AES-128
D) AES-256
E) DES
F) 3DES
A N S W E R S
1 . F a l s e
2 . T r u e
3 . E
4 . C
5 . F a l s e
6 . D

7/21/2019 Advanced VPN Training v11.7
http://slidepdf.com/reader/full/advanced-vpn-training-v117 55/92
51
Fireware XTM Training
Mobile VPN
Securely Connect Mobile Users
What You Will Learn
WatchGuard System Manager offers three methods to securely connect mobile users to your corporate
network. In this training module, you learn how to: Select the mobile VPN type(s) appropriate for your network
Configure the XTM device to allow mobile VPN connections
Prepare the Mobile VPN client configuration files
Install and use the Mobile VPN client on a remote device
In this module, you will connect to one or more XTM devices. If you take this course with a WatchGuard
Certified Training Partner, your instructor will provide the IP address and passphrases for devices used
in the exercises. For self-instruction, you can safely connect to a XTM device on a production network. It
is helpful to conduct a portion of this exercise from a computer connected to the external network.
Connect Remote Users Securely to the Corporate Network
You can use Mobile VPN to allow your employees who telecommute and travel to connect to your
corporate network while maintaining privacy and security. WatchGuard System Manager supports four
forms of remote user virtual private networks:
• Mobile VPN with PPTP
• Mobile VPN with IPSec
• Mobile VPN with SSL
• Mobile VPN with L2TP

7/21/2019 Advanced VPN Training v11.7
http://slidepdf.com/reader/full/advanced-vpn-training-v117 56/92
52 WatchGuard Fireware XTM Training
Mobile VPN with SSL
also can create a client
configuration file, but
only for the
WatchGuard Mobile
VPN for iOS client.
When you use Mobile VPN, you first configure your XTM device and then the remote client computers.
You use Policy Manager to configure the settings for each user or group of users. For Mobile VPN with
IPSec and Mobile VPN with SSL, Policy Manager creates a Mobile VPN client configuration file that
includes all the settings necessary to connect to the XTM device. You can also configure your policies to
allow or deny traffic from Mobile VPN clients. Mobile VPN users authenticate either to the Firebox user
database on the XTM device or to an external authentication server. In this module, we use the Firebox
authentication method to illustrate the authentication process.
Types of Mobile VPN
WatchGuard System Manager includes three types of mobile VPN. Each type uses a different protocol
to establish and encrypt a connection:
• PPTP — Point-to-Point Tunneling Protocol
PPTP traffic begins over TCP port 1723. This port is used as a control channel to pass connection
information between the mobile user and your XTM device.
After the connection setup is complete, the encrypted traffic then passes over IP protocol 47,
Generic Routing Encapsulation (GRE).
Both TCP port 1723 and IP protocol 47 must be open between the mobile user and your XTM
device for PPTP to work.• IPSec — Internet Protocol Security
VPN negotiations happen over UDP port 500. If this port is not open between the remote client
and your XTM device, the VPN can not work.
Data that passes over the VPN is encapsulated in ESP packets (Encapsulating Security Payload). ESP
uses IP protocol 50. This is not a port; ESP does not use ports. Instead, ESP uses its own IP protocol
number, 50. Compare to TCP (IP protocol 6) and UDP (IP protocol 17).
UDP port 4500 can also be necessary for Mobile VPN with IPSec VPNs. This port is for NAT Traversa
(NAT-T). If either end (the XTM device or the remote client) is behind a network device that does
Network Address Translation, IPSec-encapsulated traffic is re-encapsulated in new UDP port 4500
packets. This prevents problems that can occur with some NAT devices that do not correctly handle
IPSec traffic.
• SSL — Secure Sockets Layer
SSL VPNs typically pass all traffic over TCP port 443. Because port 443 is also used for the HTTPS
traffic that goes to secure web sites, it is normally open everywhere. This is a major advantage of
SSL VPNs, because it is not uncommon for a mobile user to be at a location that blocks IPSec or
PPTP traffic.
The WatchGuard Mobile VPN with SSL option also lets you change the port that your XTM device
uses for Mobile User VPN with SSL. You can use any TCP or UDP port for Mobile User VPN with SSL.
• L2TP — Layer 2 Tunneling Protocol
We recommend that
you do not disableIPSec in the Mobile
VPN with L2TP
configuration.
By default, Mobile VPN with L2TP uses IPSec to provide strong encryption and authentication. This
is the recommended configuration.
L2TP VPN negotiations happen over UDP port 500. Data that passes over the L2TP VPN, with IPSec
enabled is encapsulated in ESP packets (protocol 50).
UDP port 4500 can also be necessary for Mobile VPN with L2TP VPNs when IPSec is enabled. This
port is for NAT Traversal (NAT-T). If either end (the XTM device or the remote client) is behind a
network device that does Network Address Translation, IPSec-encapsulated traffic is re-
encapsulated in new UDP port 4500 packets. This prevents problems that can occur with some NAT
devices that do not correctly handle IPSec traffic.

7/21/2019 Advanced VPN Training v11.7
http://slidepdf.com/reader/full/advanced-vpn-training-v117 57/92
Connect Remote Users Securely to the Corporate Network
Mobile VPN 53
While there are subtle advantages and disadvantages to each method, the type of Mobile VPN you
select largely depends on your existing infrastructure and your network policy preferences. The XTM
device can manage all four types of mobile VPN simultaneously. A client computer can be configured
to use one or more VPN connection methods.
Some considerations that may influence your selection of a mobile VPN protocol are:
• Encryption support
• Client OS support• Authentication server compatibility
• VPN tunnel capacity and licensing
Use this table to compare the characteristics of each mobile VPN protocol:
* The Shrew Soft IPSec VPN client is not compatible with 2-factor authentication.
For the base and maximum number of tunnels supported for Mobile VPN with IPSec and Mobile VPN
with SSL and Mobile VPN with L2TP, see the detailed specifications for your XTM device model.
Note
SSL, IPSec, and L2TP VPN support AES-256 encryption. PPTP is limited to 128 bit (non-AES)
encryption.
Mobile VPNType
Client OS Support AuthenticationServer Support
Maximum VPN tunnels
Mobile VPN withPPTP
No client installationnecessary. PPTP isincluded with WindowsOS
• Firebox-DB• RADIUS
50 tunnels
Mobile VPN with
IPSec
Shrew Soft VPN client
supports:• Windows Vista• Windows 7 and 8• Windows XPWatchGuard Mobile VPNapp for iOS supports:• iOS 5.x and 6.xWatchGuard Mobile VPNapp for Android supports:• Android 4.0.x and 4.1.x
• Firebox-DB
• RADIUS*• LDAP• Active Directory
• Base and maximum
tunnels vary by XTMdevice model.• License purchase is
required to enable themaximum number oftunnels.
Mobile VPN withSSL
• Windows Vista• Windows 7 and 8• Windows XP• Mac OS X v10.5• Mac OS X 10.6 (32-bit)
• Firebox-DB• RADIUS• LDAP• RSA SecurID• Active Directory
• Maximum number oftunnels varies by XTMdevice model.
• Pro upgrade for theFireware XTM OS is
required for maximumSSL VPN tunnels.
• To support more thanone SSL VPN tunnelyou must have a Proupgrade.
Mobile VPN withL2TP
No client installationnecessary. Mobile VPNwith L2TP VPN supportsconnections from mostL2TP VPN v2 clients thatcomply with the L2TP RFC2661 standard.WatchGuard Mobile VPNapp for iOS supports:• iOS 5.x and 6.x
• Firebox-DB• RADIUS• Active Directory
(only through aRADIUS server)
• Maximum number oftunnels varies by XTMdevice model.
• Pro upgrade for theFireware XTM OS isrequired for maximumL2TP VPN tunnels.
• To support more thanone L2TP VPN tunnelyou must have a Proupgrade.

7/21/2019 Advanced VPN Training v11.7
http://slidepdf.com/reader/full/advanced-vpn-training-v117 58/92
54 WatchGuard Fireware XTM Training
Enable the XTM Device for Mobile VPN
To configure the XTM device to accept connections from remote users, you must:
• Activate Mobile VPN
By default, the XTM device does not allow remote users to connect to protected resources on the
trusted and optional networks. To allow these types of connections, you must first activate the
form of Mobile VPN on the XTM device. In the case of SSL and PPTP, this is a single checkbox. With
IPSec, you must also create and distribute Mobile VPN client configuration files.• Define settings
Each type of Mobile VPN includes settings such as encryption method and keep alive interval.
These settings are unique for each type of Mobile VPN. For example, only PPTP requires the
configuration of a range of IP addresses on the trusted network for PPTP clients.
• Select and configure authentication
Before connecting to resources on the company network, remote users must authenticate. You can
select an authentication method for each type of Mobile VPN.
• Configure policies
Even though the Mobile VPN connection is secure, you may want to limit access to trusted and
optional networks through the Mobile VPN tunnel. If you use the XTM device as the authenticationserver, the required Firebox User Groups are automatically added to your XTM device’s
configuration. For RADIUS, LDAP, and Active Directory authentication, you must manually add the
correct group to your authentication server.
The required groups are:
- For Mobile User VPN with PPTP — PPTP-Users
- For Mobile VPN with IPSec — The name of the Mobile VPN with IPSec group you define
- For Mobile VPN with SSL — SSLVPN-Users or the name of the Mobile VPN with SSL group
you define
- For Mobile VPN with L2TP — L2TP-Users or the name of the Mobile VPN with L2TP group
you define
About custom group names for SSL and L2TP authentication
For Mobile VPN with SSL and Mobile VPN with L2TP, you can define your own group names instead
of using the default groups. If you use non-default group names in the VPN configuration, the
group names you define do not appear in the automatically generated policies.
It can be helpful to
think of the group
names in these policies
as aliases for all the
groups and users you
configured in the VPN
configuration.
- If you define custom users or groups in the Mobile VPN with SSL authentication settings, only
the group name SSLVPN-Users appears in the automatically generated Allow SSLVPN-
Users policy. Even though the group name in the policy might not match the custom groups
or user names you defined, this policy does apply to all users and groups you configured in
the Mobile VPN with SSL authentication settings.
- If you define custom users or groups in the Mobile VPN with L2TP or authentication settings,
only the group name L2TP-Users appears in the automatically configured Allow L2TP-Users
policy. Even though the group name in the policy might not match the custom groups or
user names you defined, this policy does apply to all users and groups you configured in the
Mobile VPN with L2TP authentication settings.
Regardless of which authentication server you use, you must make sure that these users and
groups exist on the authentication server, for them to connect with Mobile VPN.

7/21/2019 Advanced VPN Training v11.7
http://slidepdf.com/reader/full/advanced-vpn-training-v117 59/92
Connect Remote Users Securely to the Corporate Network
Mobile VPN 55
Distribute Client Software and Configuration File• Mobile VPN with IPSec on Windows clients
For Mobile VPN with IPSec users on Windows devices, you must distribute the Shrew Soft VPN
client software and a Mobile VPN client configuration file to each remote user. You generate the
configuration file in Policy Manager when you configure Mobile VPN with IPSec on the XTM device.
The Shrew Soft client software is available on the WatchGuard web site.
• Mobile VPN with IPSec on Android devices
For mobile users on Android devices, the mobile user can use the WatchGuard Mobile VPN app for
Android. You can generate the configuration file for the Mobile VPN app in Policy Manager when
you configure Mobile VPN with IPSec on the XTM device. You send the .wgm configuration file as
an email attachment to the Android mobile VPN users. The WatchGuard Mobile VPN app is a free
app available in the Google app store.
• Mobile VPN with IPSec on iOS
For mobile users on iOS devices, the mobile user can use the WatchGuard Mobile VPN app for iOS.
You generate the configuration file for the Mobile VPN app in Policy Manager when you configure
Mobile VPN with IPSec on the XTM device. You send this configuration file as an email attachment
to your iOS mobile VPN users. The WatchGuard Mobile VPN app for iOS imports the configuration
file to the native iOS VPN client. The WatchGuard Mobile VPN app is a free app available in the
Apple app store.
• Mobile VPN with L2TP on iOS
Mobile users on iOS devices, can use the WatchGuard Mobile VPN app for iOS. You generate the
configuration file for the Mobile VPN app in Policy Manager when you configure Mobile VPN with
L2TP on the XTM device. You send this configuration file as an email attachment to your iOS mobile
VPN users. The WatchGuard Mobile VPN app for iOS imports the L2TP VPN configuration file to the
native iOS VPN client. The WatchGuard Mobile VPN app is a free app available in the Apple app
store.
• Mobile VPN with SSL
Mobile VPN with SSL users download the Mobile VPN with SSL client automatically from the XTM
device.

7/21/2019 Advanced VPN Training v11.7
http://slidepdf.com/reader/full/advanced-vpn-training-v117 60/92
56 WatchGuard Fireware XTM Training
Use Mobile VPN with IPSec with an Android Device
There are two Android VPN clients that you can use to make IPSec VPN connections to an XTM device.
Android native VPN client
Mobile devices that run Android version 4.x and later include a VPN client. You can use the Android
VPN client to make an IPSec VPN connection to a WatchGuard XTM device that runs Fireware XTM
v11.5.1 or later. We recommend you use Android version 4.0.4 or later for IPSec VPN connections toa WatchGuard XTM device.
WatchGuard Mobile VPN app for Android
The WatchGuard Mobile VPN app for Android is a VPN app that can use to import a Mobile VPN with
IPSec end-user profile and then use those settings to connect to your network. You can use the
WatchGuard Mobile VPN app for Android to connect to an XTM device that uses Fireware XTM v11.7
or later. The WatchGuard Mobile VPN app is supported on Android 4.0.x or 4.1.x.
Unlike the WatchGuard Mobile VPN app for iOS, the Mobile VPN app for Android is a VPN client — it
does not import the VPN configuration into the Android native VPN client.
Configure the XTM Device
The Mobile VPN with IPSec configuration settings on the XTM device must be set to values that areshown in the subsequent table.
Because these settings are the same as the settings required for the native VPN client on Mac OS X and
iOS devices, you can use the same profile for Android, Mac OS X and iOS mobile users.
Configuration Setting compatible with the VPN client on Android devices
User authenticationserver
Use any supported authentication method (Firebox-DB, RADIUS,SecurID, LDAP).
Tunnel authenticationmethod
Set a Tunnel passphrase. The VPN client on Android cannot use an RSAcertificate for tunnel authentication.
Internet Traffic Force all Internet traffic through the tunnel (default-route VPN). TheVPN client on the Android device does not support split tunneling.
Phase 1Authentication
DES, 3DES, AES (128-bit), or AES (256-bit).
Phase 1 AdvancedSettings
SA Life — 1 hour. The VPN client on the iOS device is configured to rekey after 1 hour. Ifthis profile is only used for connections by VPN client on Android andiOS devices, set the SA Life to 1 hour to match the client setting.Key Group — Diffie-Hellman Group2Do not change any other Phase 1 Advanced settings.
Phase 2 Proposal Authentication — SHA1 or MD5Encryption — 3DES, AES (128-big), or AES (256-bit)Force Key Expiration — 1 hour, 0 kilobytes
Phase 2 PFS Disable PFS. Perfect Forward Secrecy is not supported by the VPNclient on the iOS device.

7/21/2019 Advanced VPN Training v11.7
http://slidepdf.com/reader/full/advanced-vpn-training-v117 61/92

7/21/2019 Advanced VPN Training v11.7
http://slidepdf.com/reader/full/advanced-vpn-training-v117 62/92
58 WatchGuard Fireware XTM Training
Use Mobile VPN with IPSec With a Mac OS X or iOS Device
Apple Mac OS X 10.6 and later, and iOS devices (iPhone, iPad, and iPod Touch) include a built-in IPSec
VPN client. You can use this client to make an IPSec VPN connection to an XTM device that runs
Fireware XTM v11.5.1 or later. To do this, you must configure the VPN settings on your XTM device to
match those on the iOS or Mac OS X device. Then you can configure the settings on the iOS device so
that the VPN client can connect.
For an iOS device, you can install the WatchGuard Mobile VPN app for iOS. This app can import a Mobile
VPN with IPSec profile into the native VPN client on the iOS device. For a Mac OS X device, you must
manually configure the settings in the native VPN client.
Configure the XTM Device
You learn how to use
the Add Mobile VPN
with IPSec Wizard in
Exercise 2.
To configure Mobile VPN with IPSec to work with the VPN client on Mac OS X or iOS devices, you run
the Mobile VPN with IPSec Wizard. Then you change the Phase 1 and Phase 2 settings in the Mobile
VPN with IPSec configuration to settings that are supported by the VPN client on the Mac OS X or iOS
device.
If you want to use this
VPN profile for all
supported VPN clients,
set the SA Life to 8
hours. When the SA
Life is set to 8 hours,
The Shrew Soft VPN
and WatchGuard
Mobile VPN with IPSec
clients rekey after 8
hours, but the VPN
client on the iOS device
uses the smaller rekey
value of 1 hour.
Many of the VPN tunnel configuration settings in the VPN client on the iOS device are not configurable
by the user. It is very important to configure the settings on your XTM device to match the settingsrequired by the VPN client on the Mac OS X or iOS device.
The Mobile VPN with IPSec configuration settings on the XTM device must be set to values that are
shown in the subsequent table.
Configuration Setting compatible with the VPN client on iOS devices
User authenticationserver
Use any supported authentication method (Firebox-DB, RADIUS,SecurID, LDAP).
Tunnel authenticationmethod
Set a Tunnel passphrase. The VPN client on iOS cannot use an RSAcertificate for tunnel authentication.
Internet Traffic Force all Internet traffic through the tunnel (default-route VPN). TheVPN client on the iOS device does not support split tunneling.
Phase 1Authentication
DES, 3DES, AES (128-bit), or AES (256-bit).
Phase 1 AdvancedSettings
SA Life — 1 hour. The VPN client on the iOS device is configured to rekey after 1 hour. Ifthis profile is only used for connections by VPN client on iOS devices,set the SA Life to 1 hour to match the client setting.Key Group — Diffie-Hellman Group2Do not change any other Phase 1 Advanced settings.
Phase 2 Proposal Authentication — SHA1 or MD5Encryption — 3DES, AES (128-big), or AES (256-bit)Force Key Expiration — 1 hour, 0 kilobytes
Phase 2 PFS Disable PFS. Perfect Forward Secrecy is not supported by the VPNclient on the iOS device.

7/21/2019 Advanced VPN Training v11.7
http://slidepdf.com/reader/full/advanced-vpn-training-v117 63/92
Use Mobile VPN with IPSec With a Mac OS X or iOS Device
Mobile VPN 59
Configure the VPN Client on an iOS Device
There are two ways you can configure Mobile VPN with IPSec on an iOS device.
Option 1: Use the WatchGuard Mobile VPN app to Import VPN Settings to the iOS
Native VPN Client
1. In Policy Manager, select VPN > Mobile VPN > IPSec.
2. Select the Mobile VPN group. Click Generate. The .wgm file is generated and encrypted with the passphrase specified in the Mobile VPN with IPSecconfiguration.
3. Send the .wgm profile to the mobile users as an email attachment.
4. Use a secure method to give the passphrase to the mobile users.
5. On the iOS device, install the free WatchGuard Mobile VPN app for iOS from the Apple App Store.
6. In the email client on the iOS device, open the email that contains the .wgm file attachment.
7. Open the .wgm email file attachment. The WatchGuard Mobile VPN app launches.
8. Type the passphrase received from the administrator to decrypt the file. The WatchGuard Mobile VPN app imports the configuration to create an IPSec VPN configuration profile in
the native iOS VPN client.Option 2: Manually Configure VPN Settings in the iOS Native VPN Client
1. On the iOS device, select Settings > General > Network > VPN > Add VPN Configuration .
2. Configure these settings in the VPN client:
- Server — The external IP address of the XTM device
- Account — The user name on the authentication server
- Use Certificate — Set this option to OFF
- Group Name — The group name in the XTM device Mobile VPN with IPSec configuration
- Secret — The tunnel passphrase in the XTM device Mobile VPN with IPSec configuration
- User’s Password — The password for the user in the authentication server configuration
Configure the VPN Client on a Mac OS X Device
Policy Manager does not generate a client configuration file for the VPN client on the Mac OS X device.
The user must manually configure the VPN client settings to match the settings on the XTM device.
To configure the VPN settings on the Mac OS X device:
1. Open System Preferences and select Network .
2. Click + at the bottom of the list to add a new interface. Configure these settings:
- Interface — VPN
- VPN Type — Cisco IPSec
- Service Name — type the name you want to use for this connection
- Server Address — The external IP address of the XTM device - Account Name — The user name on the authentication server
- Password — The password for the user on the authentication server
- Shared Secret — The tunnel passphrase you set in the XTM device Mobile VPN with IPSec
configuration
- Group Name — The group name you chose in the XTM device Mobile VPN with IPSec
configuration

7/21/2019 Advanced VPN Training v11.7
http://slidepdf.com/reader/full/advanced-vpn-training-v117 64/92
60 WatchGuard Fireware XTM Training
Use Mobile VPN with L2TP with an iOS Device
In addition to Mobile VPN with IPSec, the WatchGuard Mobile VPN app for iOS can also import a Mobile
VPN with L2TP profile to the native VPN client on the iOS device.
Configure the XTM Device
Use the WatchGuard L2TP Setup Wizard in Policy Manager to configure Mobile VPN with L2TP settingsto values shown in the subsequent table.
Generate the Mobile VPN with L2TP .wgm profile:
1. In Policy Manager, select VPN > Mobile VPN > L2TP > Mobile Client .
2. Type a Profile Name.
3. Type the external IP address or domain name of your XTM device.
4. Type and confirm the password to encrypt the profile.
5. Click Generate. The .wgm file is generated and encrypted with the encryption password you specify.
6. Send the .wgm profile to the mobile users as an email attachment.7. Use a secure method to give the encryption password to the mobile users.
8. On the iOS device, install the free WatchGuard Mobile VPN app for iOS from the Apple App Store.
9. In the email client on the iOS device, open the email that contains the .wgm file attachment.
10. Open the .wgm email file attachment. The WatchGuard Mobile VPN app launches.
11. Type the encryption password to decrypt the file and import it to the native iOS VPN client.
Now you can select the profile in the native iOS VPN client to start the connection.
Configuration Setting compatible with the VPN client on iOS devices
User authenticationserver
Use Firebox-DB or a configured RADIUS server. Make sure the mobileusers are configured in the authentication server you choose.
Allowed Resources Select Allow access to all resources. This is the default setting.
TunnelAuthentication
Select Use Pre-Shared Key. The WatchGuard Mobile VPN app for iOSdoes not support the use of certificates for authentication.
IPSec settings Use the default settings. The default IPSec settings are compatible withthe native iOS VPN client.

7/21/2019 Advanced VPN Training v11.7
http://slidepdf.com/reader/full/advanced-vpn-training-v117 65/92
Mobile VPN with L2TP IPSec Settings
Mobile VPN 61
Mobile VPN with L2TP IPSec Settings
When you enable Mobile VPN with L2TP, IPSec is enabled in the L2TP configuration automatically. All
IPSec settings, except for the tunnel authentication method, are set to defaults that are compatible
with most L2TP clients.
The Phase 1 and Phase 2 IPSec settings you can configure in Mobile VPN with L2TP are similar to the
IPSec settings in a branch office VPN configuration. Mobile VPN with L2TP uses main mode for phase 1negotiations.
If the device configuration already includes a branch office VPN gateway that uses main mode, and the
remote gateway uses a dynamic IP address, you cannot enable IPSec in the Mobile VPN with L2TP
configuration.
Note
If IPSec cannot be enabled in Mobile VPN with L2TP because of an existing branch office VPN
gateway configuration, a warning message appears when you activate Mobile VPN with L2TP. You
can choose to enable L2TP without IPSec, though that is less secure and is not recommended.

7/21/2019 Advanced VPN Training v11.7
http://slidepdf.com/reader/full/advanced-vpn-training-v117 66/92
62 WatchGuard Fireware XTM Training
Mobile VPN Exercises
Use the exercises in this section to learn about how to configure Mobile VPN options.
Exercise 1: Set Up Mobile User VPN with L2TP
Successful Company starts with just a few mobile users and decides to use the L2TP client built into the
Windows operating system on their laptop computers. It requires more configuration on the client
than the alternatives, but it is a good way to start to implement a company network policy which
includes remote users.
Activate L2TP on the XTM Device
First, activate L2TP on the XTM device. During this process, you must also define an address pool which
can be used by L2TP users while connected.
1. Open WatchGuard System Manager and connect to the XTM device you want to configure.
2. Click or, select Tools > Policy Manager.
Policy Manager opens the configuration file for the selected XTM device.
3. In Policy Manager, select VPN > Mobile VPN > L2TP > Activate. The WatchGuard L2TP Setup Wizard welcome page appears.
If you had configured a
RADIUS server, that
would be another
option on the
authentication servers
list.
If you select more than
one authentication
server, the server at the
top of the list is the
default server. To
authenticate with a
non-default
authentication server,
the user must include
the server as part of the
Username when they
start an L2TP VPN
connection. For
example, if you enable
RADIUS as a secondary
authentication server,
user mbrown must log
in as radius\mbrown to
authenticate with the
RADIUS server.
4. Click Next. The Select the user authentication servers page appears. Firebox-DB is selected by default.

7/21/2019 Advanced VPN Training v11.7
http://slidepdf.com/reader/full/advanced-vpn-training-v117 67/92
Mobile VPN Exercises
Mobile VPN 63
5. Click Next to use Firebox-DB as the authentication server. The Add authorized users and groups page appears. Here, you can use the default group name L2TP-Users,or you can specify users and groups on your authentication server.
6. Click Next to use the default group name, L2TP-Users.
You must allow access
to all resources if you
want to use the
WatchGuard Mobile
VPN app for iOS.
The Configure the allowed resources page appears.
7. Click Next to allow access to all resources. The Define the virtual IP address pool page appears.
8. Click Add. The Add Address dialog box appears.
9. From the Choose Type drop-down list, select Host Range IPv4. The Value and To text boxes appear in the dialog box.
Make sure you select
IP addresses that are
not used by any device
behind the XTM device
10. In the Value text box, type 10.0.1.50.
11. In the To text box, type 10.0.1.74. This sets a range of virtual IP addresses that L2PTP remote users can use while connected. You must add atleast two IP addresses for L2TP to operate correctly.

7/21/2019 Advanced VPN Training v11.7
http://slidepdf.com/reader/full/advanced-vpn-training-v117 68/92
64 WatchGuard Fireware XTM Training
12. Click Next.
The Select the tunnel authentication method page appears.
13. In the Use Pre-Shared Key text box, type sshh-secret! or another text string at least 8
characters long.
14. Click Next. and then Finish to close the L2TP configuration wizard.
You can examine your device configuration to see that the WatchGuard L2TP Setup Wizard made these
changes:• Enabled Mobile VPN with L2TP — To see or edit the configuration, select VPN > Mobile VPN >
L2TP > Configure.
• Automatically generated two policies:
WatchGuard L2TP — This L2TP policy allows L2TP traffic to the XTM device on UDP port 1701.
Allow L2TP Users — This Any policy allows the groups and users you configured for L2TP
authentication to get access to resources on your network.
Add Users to the L2TP-Users Group
Because you selected Firebox-DB as the authentication server, Mobile VPN with L2TP uses the Firebox
user database and the XTM device as the authentication server.
You must now add a user and make the user a member of the L2TP-Users group.
1. Select Setup > Authentication > Authentication Servers. The Authentication Servers dialog box appears.
2. Select the Firebox tab.
The L2TP-Users Firebox
Authentication Group
does not appear in the
screen shot in Step 3
until after you enable
Mobile VPN with L2TP.
3. In the Users section, click Add. The Setup Firebox User dialog box appears.
4. Type the Name and (optional) a Description of the new user.
5. Type and confirm the Passphrase you want the user to use to authenticate.

7/21/2019 Advanced VPN Training v11.7
http://slidepdf.com/reader/full/advanced-vpn-training-v117 69/92
Mobile VPN Exercises
Mobile VPN 65
6. In the Firebox Authentication Groups section, in the Available list, select L2TP-Users and
click . The L2TP-Users group moves from the Available list to the Member list.
7. Click OK. The user is added to the L2TP-Users group. This user can now use the configured username and passphrase toauthenticate through an L2TP client.
Configure the Client ComputerYou can use any L2TP v2 client that complies with the L2TP RFC 2661 standard. Many operating
systems, such as Windows, and Mac OS X, include a native L2TP client.
On the Windows client computer, you configure the L2TP connection in the Control Panel network
settings. When you configure the L2TP connection, the default L2TP configuration enables an
advanced TCP/IP option that forces all the user’s traffic through the tunnel, even traffic that goes to the
internet. The mobile user can edit the advanced TCP/IP settings for the L2TP client connection to clear
the Use default gateway on remote network check box.
If the mobile user does not clear the “Use default gateway on remote network” check box
Default route VPN is
the default setting for
L2TP connections fromWindows 7, Windows
8, and Mac OS X.
If the user keeps this check box selected, traffic the remote user sends to the Internet goes through
your XTM device. This is known as default route VPN. To allow this traffic out to the Internet through
your XTM device, you must modify the policies in your device configuration that are to allow
outgoing traffic. Modify these policies to include the L2TP-Users group in the From list and the
external network in the To list.
This gives you, the administrator of the XTM device, control over what type of traffic the remote
users can send to the Internet while are connected to your protected network.
- Make sure that the IP addresses you have added to the L2TP address pool are included in
your dynamic NAT configuration on the XTM device. From Policy Manager, select Network >
NAT.
- Edit your policy configuration to allow connections from the L2TP-Users group through the
external interface. For example, if you use WebBlocker to control web access, add the L2TP-
Users group to the proxy policy that is configured with WebBlocker enabled.
If the mobile user clears the “Use default gateway on remote network” check box
If the remote user clears this check box, then traffic the remote user sends to the Internet does not
go through the XTM device. This is known as split tunneling. If your L2TP VPN users use split
tunneling, it is important that you select the virtual IP address pool carefully. Because of the method
Windows uses to write routes to the local L2TP adapter, the computer’s L2TP adapter will be able to
route traffic only to the classful subnet of the received virtual IP address.
For example:
• If the virtual IP address the mobile user receives for the VPN session is from the 10.1.1.x network,
the L2TP adapter will be able to route traffic to the entire 10.x.x.x/8 network.
(Class A networks are from 0.0.0.1 through 127.255.255.255)
• If the virtual address is from the 172.16.1.x network, the L2TP adapter will route traffic only to the172.16.0.0/16 network.
(Class B networks are from 128.0.0.0 through 191.255.255.255)
• If the virtual IP address is from the 192.168.1.x network, the L2TP adapter will route traffic only to
the 192.168.1.0/24 network.
(Class C networks are from 192.0.0.0 through 223.255.255.255)

7/21/2019 Advanced VPN Training v11.7
http://slidepdf.com/reader/full/advanced-vpn-training-v117 70/92
66 WatchGuard Fireware XTM Training
Configure an L2TP VPN Connection in Windows
Use these steps to configure an L2TP connection on a Windows 7 computer.
The exact steps could
be slightly different,
depending on your
Control Panel view,
and your existing
configuration.
1. In Windows Control Panel, select Network and Internet.
2. Click Network and Sharing Center.
3. Select Set up a new connection or network .
4. Click Connect to a workplace and click Next. The Connect to a workplace page appears.
5. If your computer has an existing workplace connection, select No, create a new connection and
click Next. The How do you want to connect page appears.
6. Click Use my Internet connection (VPN). The Type the Internet address to connect to page appears.
7. In the Internet address text box, type the hostname or IP address of the XTM device external
interface.
8. In the Destination name text box, type a name for the Mobile VPN (such as "L2TP to XTM").
9. Select whether you want other people to be able to use this connection.
10. Select the Don’t connect now; just set it up so I can connect later check box so that the clientcomputer does not try to connect at this time.
11. Click Next. The Type your user name and password page appears.
12. Type the User name and Password for the mobile user.
13. Click Create.
14. Click Close.
15. Click Connect to a Network .A list of the configured VPN connections appears.
16. Select the name of the VPN connection you just created. Click Connect. The Connect dialog box appears.
17. Click Properties to edit other properties for this connection. The Properties dialog box appears.
The General tab contains the hostname or IP address you provided in the New Connection Wizard.
You do not need to change anything on this tab unless the IP address of your XTM device changes.
18. Select the Security tab.
19. From the Type of VPN drop-down list, select Layer 2 Tunneling Protocol with IPsec (L2TP/
IPSec).
20. From the Data encryption drop-down list, select Require encryption.
21. Select Microsoft CHAP Version 2 as the only allowed protocol.
22. Click Advanced settings.
The Advanced Properties dialog box appears.23. Select Use pre-shared key for authentication.
24. Type the pre-shared key for this tunnel. The pre-shared key must match the pre-shared key
configured on the XTM device Mobile VPN with L2TP IPSec settings.
If you wanted to
enable split tunneling,
you would do that in
the Networking tab.
25. Click OK.Do not change the default settings on the Networking tab.
26. Click OK.

7/21/2019 Advanced VPN Training v11.7
http://slidepdf.com/reader/full/advanced-vpn-training-v117 71/92
Mobile VPN Exercises
Mobile VPN 67
Start the L2TP Connection
1. In Windows Control Panel, click Network and Internet.
2. In the right pane, click Network and Sharing Center.
3. Select Connect to a network .
4. In the connection list, select the name of the VPN connection you just created. Click Connect.
5. Type the user name and password of a user configured in the L2TP-Users group on the XTM device.
6. Click Connect.

7/21/2019 Advanced VPN Training v11.7
http://slidepdf.com/reader/full/advanced-vpn-training-v117 72/92
68 WatchGuard Fireware XTM Training
Exercise 2: Configure Mobile VPN with IPSec and Prepare MobileVPN Client Configuration Files
For Mobile VPN with IPSec, the network security administrator controls Mobile VPN with IPSec
configuration files. You use Policy Manager to configure a user group with Mobile VPN with IPSec
access. For each user group with Mobile VPN with IPSec access, a Mobile VPN profile is saved in four
Mobile VPN configuration files with the file extensions *.wgx, *.ini, .vpn, and .wgm. The .wgx, .ini, .vpn,and .wgx files contain the shared key, user identification, IP addresses, and settings that the VPN client
uses to create a secure tunnel between the remote computer and the XTM device. In this exercise, we
will use the *.vpn file.
Mobile VPN with IPSec generates Mobile VPN client configuration files for three different IPSec VPN
clients:
Shrew Soft VPN Client
WatchGuard added support for the Shrew Soft VPN client in Fireware XTM v11.3.4 and Fireware XTM
v11.4. This client is not supported in earlier versions of Fireware XTM. The Shrew Soft VPN client for
Windows uses the .vpn Mobile VPN client configuration file. The .vpn client configuration file is not
encrypted. We recommend that you use a secure method to distribute this file.
WatchGuard Mobile VPN with IPSec ClientWatchGuard no longer distributes this VPN client, but Fireware XTM still supports it. The
WatchGuard Mobile VPN with IPSec client uses either the .wgx or the .ini Mobile VPN client
configuration file.
WatchGuard Mobile VPN Apps for Android and iOS
The WatchGuard Mobile VPN apps for Android and iOS devices use the .wgm client configuration
file. This file is encrypted with the passphrase in the Mobile VPN with IPSec configuration.
This exercise shows you how to configure the XTM device and deploy the user profile and Shrew Soft
VPN client to a new employee in the IT department of Successful Company.
As a member of the Marketing team, Tim is constantly on the road. The Successful Company network
administrator will use Policy Manager to create a Mobile VPN profile that Tim can use to connectsecurely to the Successful Company network.
1. Select VPN > Mobile VPN > IPSec. The Mobile VPN with IPSec Configuration dialog box appears.
2. Click Add. The Add Mobile VPN with IPSec Wizard appears.
3. Click Next. The Select a user authentication server page appears.
The SecurID
authentication
method is not
supported with the
Shrew Soft VPN client.The Shrew Soft client
does not support 2-
factor authentication.
4. From the Authentication Server drop-down list, select Firebox-DB.You can use the internal Firebox database (Firebox-DB) or the RADIUS, SecurID (or Vasco), LDAP, or ActiveDirectory servers to authenticate users. Make sure that the authentication method you select is enabled inPolicy Manager (select Setup > Authentication > Authentication Servers).

7/21/2019 Advanced VPN Training v11.7
http://slidepdf.com/reader/full/advanced-vpn-training-v117 73/92
Mobile VPN Exercises
Mobile VPN 69
5. In the Group Name text box, type Mobile Users.
If you use an external
authentication server
(not the Firebox
internal user
database), the group
name must be
identical to the group
name on the externalauthentication server.
With RADIUS
authentication, the
RADIUS server must
return a Filter-Id
attribute where the
value of the attribute
matches the name of
the group. If you use
the XTM device as the
authentication server,
Policy Manager
automatically creates
a group with thecorrect name.
The Group Name can be an existing group or a new group. Make sure the name you choose is unique amongVPN group names, as well as all interface and tunnel names.
6. Click Next. The Select a tunnel authentication method page appears.
7. Select Use this passphrase.
8. In the Tunnel Passphrase and Retype Passphrase text boxes, type successfulremote.
9. Click Next. The Direct the flow of internet traffic page appears.
10. Click Next to accept the default, more flexible setting that configures the VPN client to send traffic
through the VPN tunnel only when the traffic destination matches a resource you specify. The Identify the resources accessible through the tunnel page appears.
11. Click Add. The Add Address dialog box appears.

7/21/2019 Advanced VPN Training v11.7
http://slidepdf.com/reader/full/advanced-vpn-training-v117 74/92
70 WatchGuard Fireware XTM Training
12. In the Choose Type drop-down list, select Network IPv4.
13. In the Value text box, type 10.0.1.0/24. This will enable members of the Mobile Users group to access the Successful Company trusted network,10.0.1.0/24.
14. Click OK. The Network IP address appears in the wizard.
15. Click Next. The Create the Virtual IP address pool page appears.
16. To specify the IP addresses that will be assigned to the mobile user connections, click Add. The Add Address dialog box appears.
17. From the Choose Type drop-down list, select Host Range IPv4. The Value and To text boxes appear in the dialog box.
Make sure you select
IP addresses that are
not used by any device
behind the XTM device.
18. In the Value text box, type 10.0.1.200.
19. In the To text box, type 10.0.1.210. This sets a range of virtual IP addresses that IPSec remote users can use while connected. You must add at
least two IP addresses for Mobile VPN with IPSec to operate correctly.

7/21/2019 Advanced VPN Training v11.7
http://slidepdf.com/reader/full/advanced-vpn-training-v117 75/92
Mobile VPN Exercises
Mobile VPN 71
20. Click OK. The IP address range appears in the wizard.
21. Click Next. The wizard completion page appears. This page shows the location where the Mobile VPN clientconfiguration files were created.
22. To add Tim to the Mobile Users group, select the Add users to Mobile Users check box.
23. Click Finish. The Authentication Servers dialog box appears.
24. Select the Firebox tab.
To add or remove users
later, select Setup >
Authentication >
Authentication
Servers.
25. In the Users section, click Add. The Setup Firebox User dialog box appears.

7/21/2019 Advanced VPN Training v11.7
http://slidepdf.com/reader/full/advanced-vpn-training-v117 76/92
72 WatchGuard Fireware XTM Training
26. In the User Information section, type the Name, Description, and Passphrase for Tim.
27. In the Available list, double-click Mobile Users.Mobile Users is moved to the Members list.
28. Click OK. Tim is now a member of the Mobile Users group.
29. Click OK to close the Authentication Servers dialog box.

7/21/2019 Advanced VPN Training v11.7
http://slidepdf.com/reader/full/advanced-vpn-training-v117 77/92
Mobile VPN Exercises
Mobile VPN 73
Exercise 3: Restrict Mobile VPN with IPSec Users by Policy
In a default configuration, Mobile VPN with IPSec users have full access to XTM device resources with
the Any policy. The Any policy allows traffic on all ports and protocols between the Mobile VPN user
and the network resources available through the Mobile VPN tunnel. To restrict VPN user traffic by port
and protocol, you can delete the Any policy on the Mobile VPN with IPSec tab and replace it with
policies that restrict access.
1. In Policy Manager, select the Mobile VPN with IPSec tab.
2. Select the Any policy and delete it.
3. Click .
Or, select Edit > Add Policy. The Select Mobile VPN with IPSec Group dialog box appears.

7/21/2019 Advanced VPN Training v11.7
http://slidepdf.com/reader/full/advanced-vpn-training-v117 78/92
74 WatchGuard Fireware XTM Training
4. Select the Mobile VPN with IPSec group for this policy and click OK.
The Add Policies dialog box appears.
5. Add a policy for the traffic that you want to allow from the Mobile VPN user.For example, expand the Packet Filters list, select the HTTP policy and click Add to add a policy that lets theMobile VPN users connect to resources over port 80.

7/21/2019 Advanced VPN Training v11.7
http://slidepdf.com/reader/full/advanced-vpn-training-v117 79/92
Mobile VPN Exercises
Mobile VPN 75
6. You can edit this policy to limit the Mobile VPN users to only a subset of the resources in the
Allowed Resources list.
- In the Allowed Resources list, select a resource and click Remove.
- To add a more limited set of resources, such as an individual Host IP address, or a smaller
subnet than the subnet in the listed resource, click Add.
Any resource you add to the Allowed Resources list must be a subset of the original allowed resource.
7. You can also limit the users allowed to use this policy.
To select which members of the Mobile VPN with IPSec group are allowed to use this policy, clickSpecify Users.
7/21/2019 Advanced VPN Training v11.7
http://slidepdf.com/reader/full/advanced-vpn-training-v117 80/92
76 WatchGuard Fireware XTM Training
Exercise 4: Use the Shrew Soft IPSec Client
The Successful Company administrator wants to use the Shrew Soft VPN client to enable remote users
to establish a secure, encrypted connection to their protected network over IPSec. To do this, remote
users must first connect their computers to the Internet and then use the Mobile VPN with IPSec client
to connect to the protected network.
Before you install the client software on your user’s computers, make sure the remote computer doesnot have any other IPSec mobile user VPN client software installed. You should also disable or uninstall
any desktop firewall software (other than Microsoft firewall software) from each remote computer.
To ensure the installation is successful, you must log into the remote computer with local administrator
rights.
Install the Shrew Soft VPN Client
The installation process consists of two parts: installing the client software on the remote computer
and importing the Mobile VPN client configuration file into the client. Before you start the installation,
make sure you have these installation components:
• The Shrew Soft VPN client installation file
• A Mobile VPN client configuration file, with a .vpn file extension
The end-user also needs to know the username and password to use to connect
Install the Mobile VPN client software
1. Copy the Shrew Soft VPN installation file to the remote computer.
2. To start the Mobile VPN installation, double-click the .exe file. The Shrew Soft VPN Client Setup Wizard starts.
3. In the setup wizard, select the destination folder.Complete the setup wizard.
Import the Mobile VPN client configuration file
1. Copy the .vpn Mobile VPN client configuration file to the desktop on the remote (client or user)
computer.
2. From the Windows Start Menu, start Shrew Soft VPN Access Manager. The Shrew Soft VPN Access Manager appears.
3. Select File > Import.
4. Browse to select the location of the .vpn file.
5. Click Open. The VPN client configuration is imported and a new site configuration appears in the Shrew Soft VPN AccessManager window.
If you use the Fireware
XTM Web UI togenerate the .vpn file,
the certificates are not
included in the .vpn file
and must be imported
to the Shrew Soft client
as a separate step.
You can use certificates to authenticate the Mobile VPN users if your XTM device is managed by a
WatchGuard Management Server. If you use Policy Manager to generate the Mobile VPN clientconfiguration file, the certificates are embedded in the .vpn file and are automatically imported to the
Shrew Soft VPN client when you import the .vpn configuration file.

7/21/2019 Advanced VPN Training v11.7
http://slidepdf.com/reader/full/advanced-vpn-training-v117 81/92
Mobile VPN Exercises
Mobile VPN 77
Connect and Disconnect the Shrew Soft VPN Client
Now that the client is configured, you can use it to make a connection to the XTM device.
1. Connect to the Internet through a local area network (LAN) or wide area network ( WAN).
2. From the Windows Start menu, start the Shrew Soft VPN Access Manager.
3. Click the Mobile Users.vpn profile icon to select it. Then click Connect. The Shrew Soft VPN Connect dialog box appears.
If you use certificates
for authentication, the
user must type the
username and
password a second
time. This password isused to open the
private key for the
client certificate.
4. Type the Username and Password of the Mobile VPN user.
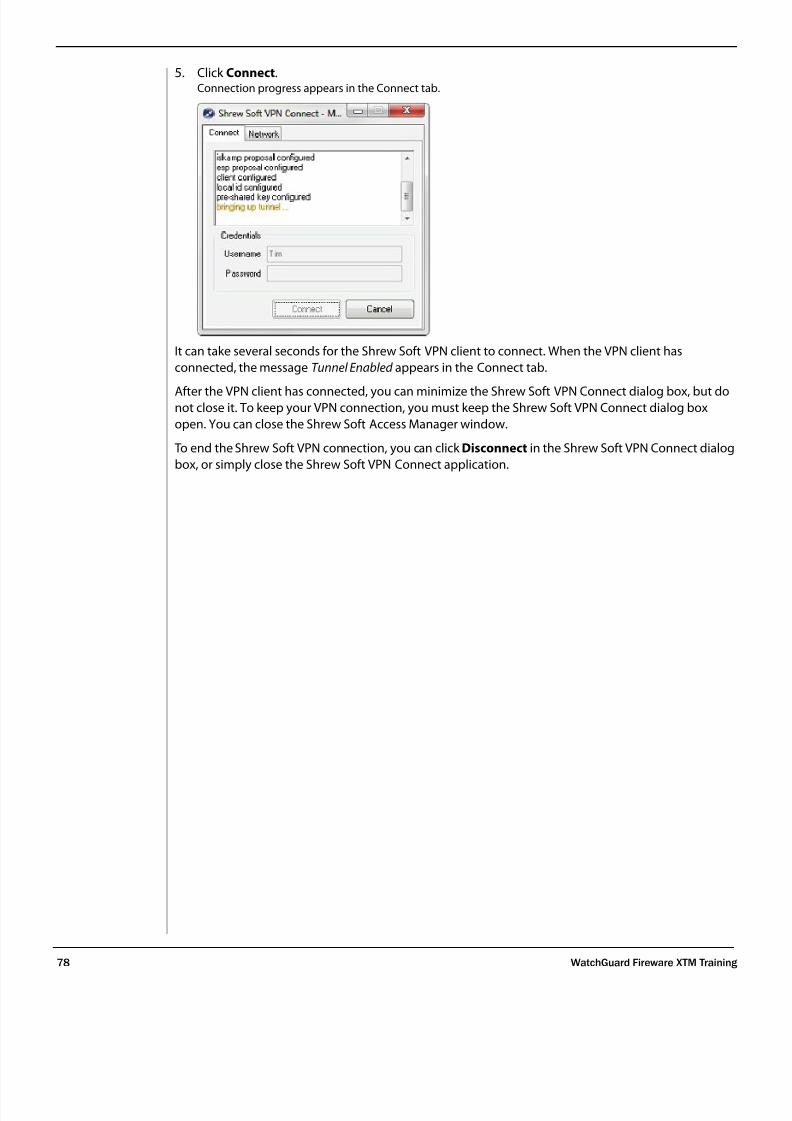
7/21/2019 Advanced VPN Training v11.7
http://slidepdf.com/reader/full/advanced-vpn-training-v117 82/92
78 WatchGuard Fireware XTM Training
5. Click Connect.Connection progress appears in the Connect tab.
It can take several seconds for the Shrew Soft VPN client to connect. When the VPN client has
connected, the message Tunnel Enabled appears in the Connect tab.
After the VPN client has connected, you can minimize the Shrew Soft VPN Connect dialog box, but do
not close it. To keep your VPN connection, you must keep the Shrew Soft VPN Connect dialog box
open. You can close the Shrew Soft Access Manager window.
To end the Shrew Soft VPN connection, you can click Disconnect in the Shrew Soft VPN Connect dialog
box, or simply close the Shrew Soft VPN Connect application.

7/21/2019 Advanced VPN Training v11.7
http://slidepdf.com/reader/full/advanced-vpn-training-v117 83/92
Mobile VPN Exercises
Mobile VPN 79
Exercise 5: Configure the XTM device for Mobile VPN with SSL
For security and ease of use, many organizations use Mobile VPN with SSL. With Mobile VPN with SSL,
remote users connect to the XTM device on TCP port 443 where users can download client software
and a client profile to their computers. The client software is also available on the WatchGuard web site.
A XTM device administrator can also download the client software and make it available at other
locations.
In this exercise, we use Policy Manager to activate the XTM device for Mobile VPN with SSL and create a
policy to restrict SSL VPN user access.
Activate the XTM Device for SSL VPN
1. Select VPN > Mobile VPN > SSL. The Mobile VPN with SSL Configuration dialog box appears.
2. Select the Activate Mobile VPN with SSL check box.
3. Select the Force all client traffic through the tunnel check box. This ensures that all traffic both to and from the remote user computers must pass through the XTM device. This method is more secure, however, it uses more processing power and bandwidth on the XTM device.

7/21/2019 Advanced VPN Training v11.7
http://slidepdf.com/reader/full/advanced-vpn-training-v117 84/92
TRAINING
www.watchguard.com/training
COPYRIGHT © 2013 WatchGuard Technologies, Inc. All rights reserved.
WatchGuard, the WatchGuard logo, Firebox, and Core are registered trademarks ortrademarks of WatchGuard Technologies, Inc. in the United States and/or other
countries.
4. Click the Authentication tab. The list of configured authentication methods appears.
5. Make sure the check box next to Firebox-DB is selected. This is selected by default. The group SSLVPN-Users is also added to the configuration by default.
6. Click OK.
If you select other
authentication servers,
such as LDAP, or Active
Directory, make sure
that you add the users
and groups that exist
on those servers to the
Users and Groups list.
Note
In this exercise, we use Firebox-DB as the authentication server. You can optionally select multiple
authentication servers. If you select more than one authentication server, the server at the top of the
list is the default server. The default server is used for authentication unless a user specifies a
different server. To authenticate with a non-default authentication server, the user must include the
server as part of the Username when they log in from the Mobile VPN with SSL client. For example, ifyou enable LDAP as a secondary authentication server, LDAP user mbrown must log in as
ldap\mbrown.
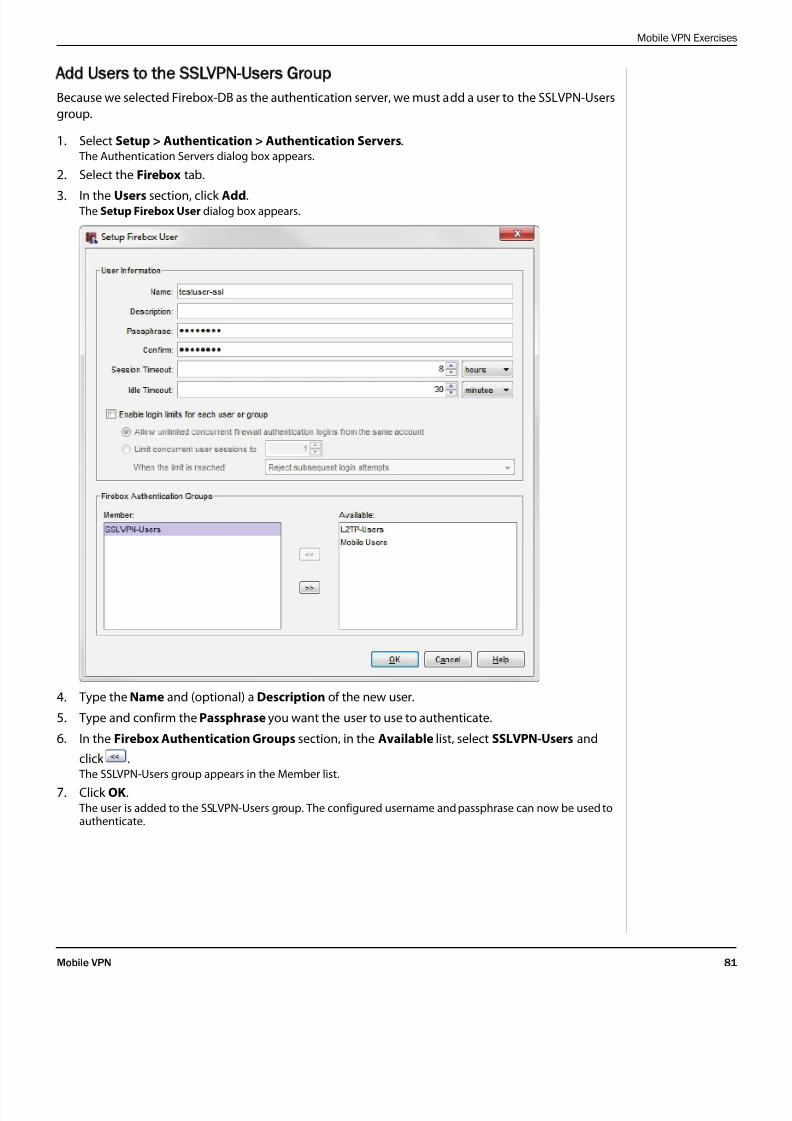
7/21/2019 Advanced VPN Training v11.7
http://slidepdf.com/reader/full/advanced-vpn-training-v117 85/92
Mobile VPN Exercises
Mobile VPN 81
Add Users to the SSLVPN-Users Group
Because we selected Firebox-DB as the authentication server, we must add a user to the SSLVPN-Users
group.
1. Select Setup > Authentication > Authentication Servers. The Authentication Servers dialog box appears.
2. Select the Firebox tab.
3. In the Users section, click Add. The Setup Firebox User dialog box appears.
4. Type the Name and (optional) a Description of the new user.
5. Type and confirm the Passphrase you want the user to use to authenticate.
6. In the Firebox Authentication Groups section, in the Available list, select SSLVPN-Users and
click . The SSLVPN-Users group appears in the Member list.
7. Click OK. The user is added to the SSLVPN-Users group. The configured username and passphrase can now be used toauthenticate.

7/21/2019 Advanced VPN Training v11.7
http://slidepdf.com/reader/full/advanced-vpn-training-v117 86/92
82 WatchGuard Fireware XTM Training
Restrict SSL VPN Users by Policy
You can use a similar
process for IPSec and
PPTP users.
When we activated Mobile VPN with SSL, Policy Manager automatically created a policy to allow all
traffic to resources on the Trusted and Optional networks. In this exercise, the Successful Company
administrator decides to restrict this policy to allow traffic only to their internal HTTP server. In a real-
world environment, the administrator might also want to open FTP and SMTP to internal servers.
1. In the Policy Manager Firewall tab, select the Allow SSLVPN-Users policy.
This policy was automatically created when we activated Mobile VPN with SSL. This is an Any policy thatallows all traffic from Mobile VPN with SSL users to all resources on the Trusted and Optional networks.
2. Click .
Or, select Edit > Delete Policy.A confirmation message appears.
3. Click Yes.
4. Click .
Or, select Edit > Add Policy. The Add Policies dialog box appears.
5. Expand the Proxies list and select HTTP Proxy. Click Add. The New Policy Properties dialog box appears.You can use this policy to control access to the Successful Company web server on the trusted network, or tocontrol access from SSLVPN-Users to the Internet.
6. In the From section, click Add. The Add Address dialog box appears.
7. Click Add User. The Add Authorized Users or Groups dialog box appears.
If you configured
Mobile VPN with SSL to
use an external
authentication server,
and you added
authentication groups
and users, you must
still select the SSLVPNUsers group when you
configure a policy. In a
policy configuration,
the group name
SSLVPN Users refers to
all groups defined in
the Mobile VPN with
SSL configuration.
8. In the Type drop-down lists, select Firewall and Group.A list of Firebox authentication groups appears.
9. Select SSL VPN-Users and click Select. The Add Authorized Users or Groups dialog box closes. The Add Address dialog box appears.
10. In the Selected Members and Addresses list, select Any-Trusted and click Remove.
11. Click OK to close the Add Address dialog box.
The SSLVPN-Users group appears in the New Policy Properties dialog box in the From list.
12. In the To section, click Add. The Add Address dialog box appears.
13. Click Add Other. The Add Member dialog box appears.
14. In the Choose Type drop-down list, select Host IPv4.
15. In the Value text box, type the IP address of the web server: 10.0.2.80. Click OK.In the Add Address dialog box, 10.0.2.80 appears in the Selected Members and Addresses list.
16. In the Selected Members and Addresses list, select Any-External and click Remove.

7/21/2019 Advanced VPN Training v11.7
http://slidepdf.com/reader/full/advanced-vpn-training-v117 87/92
Mobile VPN Exercises
Mobile VPN 83
17. Click OK.In the New Policy Properties dialog box, 10.0.2.80 appears in the To list.
18. Click OK to close the New Policy Properties dialog box.

7/21/2019 Advanced VPN Training v11.7
http://slidepdf.com/reader/full/advanced-vpn-training-v117 88/92
84 WatchGuard Fireware XTM Training
Exercise 6: Change the Port Used for Mobile VPN with SSL
One of the major advantages of Mobile VPN with SSL is that it uses a port that is commonly open
everywhere. The default port is TCP port 443, the same port used for HTTPS-encrypted web sites such
as online banking and shopping web sites.
It is possible that you might need to change this port if:
• Your XTM device is previously configured to allow connections to the device’s external interface IPaddress over TCP port 443.
The most common reason for this is that you have an HTTPS or SSL web server protected by the
XTM device and you have an HTTPS policy that allows incoming TCP port 443 connections with the
external interface IP address.
AND
• You do not have another IP address you can assign to the external interface of your XTM device.
If your XTM device already allows connections to one external IP address over port 443, you cannot use
that same IP address to enable the device to host Mobile VPN with SSL sessions over TCP port 443 at
the same time.
You can change the port that your XTM device uses to host Mobile VPN with SSL sessions:
1. In the Mobile VPN with SSL Configuration dialog box, select the Advanced tab.
2. In the Data channel text box, type or select a new port.

7/21/2019 Advanced VPN Training v11.7
http://slidepdf.com/reader/full/advanced-vpn-training-v117 89/92
Mobile VPN Exercises
Mobile VPN 85
If you change the Data channel value, users must manually type this port in the Mobile VPN with SSL
connection dialog box. For example, if you change the data channel to 444, and the XTM device IP
address is 203.0.113.2, the user types 203.0.113.2:444 instead of 203.0.113.2.
If you keep the Data channel port value at the default setting of port 443, the user types only the XTM
device’s IP address (it is not necessary to type :443 after the IP address).
To learn more about how to use the Mobile VPN with SSL client software to connect to the XTM device,
see Exercise 7:.
Exercise 7: Use the Mobile VPN with SSL Client
In this exercise we authenticate with the SSLVPN User credentials to download and install the SSLVPN
client for Windows. Then we use the client to authenticate to the XTM device.
Install the Mobile VPN with SSL Client
1. Establish an Internet connection.
If you change the data
channel for SSL VPN,
the URL in Step 2changes. After the IP
address or host name,
type a colon, followed
by the new Data
channel port value.
For example, if you
change the data
channel to port 444,
typehttps://
203.0.113.2:444
/sslvpn.html.
2. Open a web browser and go to:
https://[IP address or host name of the device interface]/sslvpn.html
For example: https://203.0.113.2/sslvpn.html
3. Type the Username and Password to authenticate to the XTM device. The client software download page appears.
4. Click Download for the client version you want to install.
5. Save the file to the Desktop.
6. Run the WG-MVPN-SSL.exe installation file.Accept the default settings on each page of the installation wizard.
7. Select the check box to create a desktop icon.

7/21/2019 Advanced VPN Training v11.7
http://slidepdf.com/reader/full/advanced-vpn-training-v117 90/92
86 WatchGuard Fireware XTM Training
Connect with the Mobile VPN with SSL Client
If you change the
data channel for SSL
VPN, for example to
port 444, the user
must type
203.0.113.2:444
instead of203.0.113.2 in
the Server text box.
If Firebox-DB is not
the default SSL VPN
authentication
server, the user must
typeFirebox-
DB\j_smith
instead of
j_smith in the
Username text box.
Each time the Mobile VPN with SSL client connects, it checks for updates to the client configuration.
To start the Mobile VPN with SSL client:
1. Double-click the Mobile VPN with SSL client desktop icon.
Or, in the Windows Start menu, select All Programs > WatchGuard > Mobile VPN with SSL
Client > Mobile VPN with SSL Client.
The WatchGuard Mobile VPN with SSL authentication dialog box appears.
2. Verify the Server and Username.
3. Type the Password.
4. Click Connect.
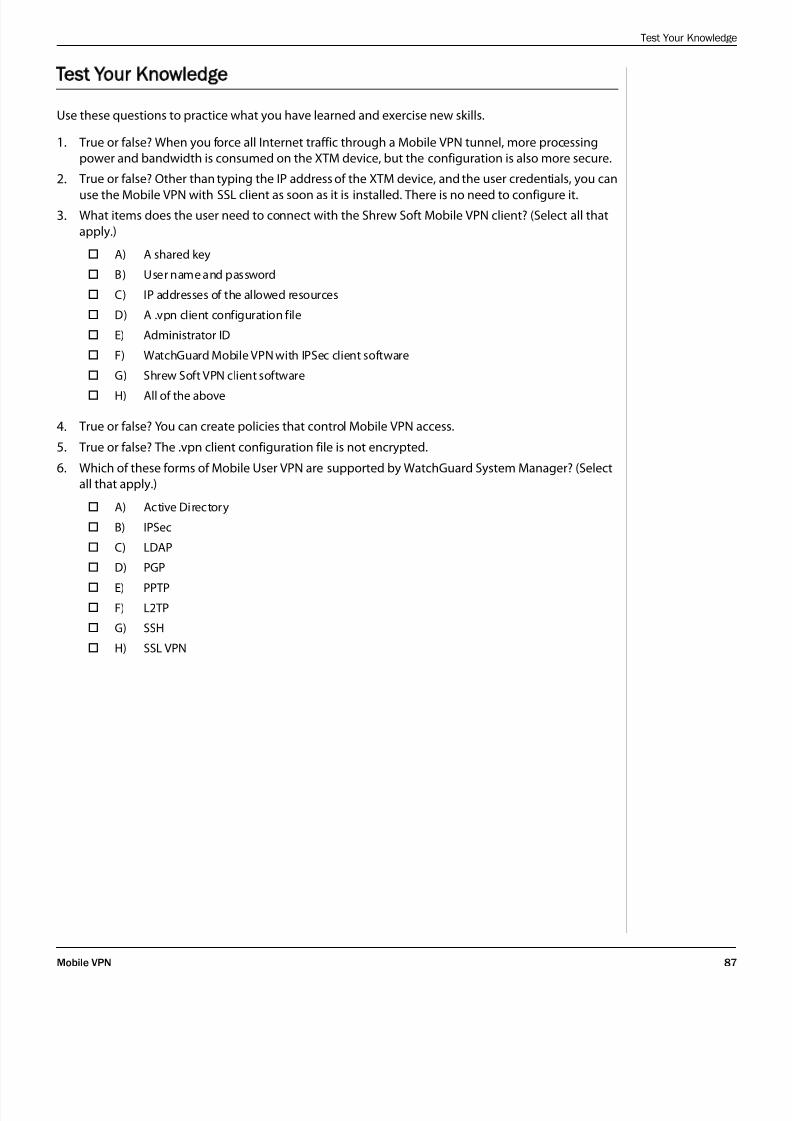
7/21/2019 Advanced VPN Training v11.7
http://slidepdf.com/reader/full/advanced-vpn-training-v117 91/92
Test Your Knowledge
Mobile VPN 87
Test Your Knowledge
Use these questions to practice what you have learned and exercise new skills.
1. True or false? When you force all Internet traffic through a Mobile VPN tunnel, more processing
power and bandwidth is consumed on the XTM device, but the configuration is also more secure.
2. True or false? Other than typing the IP address of the XTM device, and the user credentials, you can
use the Mobile VPN with SSL client as soon as it is installed. There is no need to configure it.
3. What items does the user need to connect with the Shrew Soft Mobile VPN client? (Select all that
apply.)
4. True or false? You can create policies that control Mobile VPN access.
5. True or false? The .vpn client configuration file is not encrypted.
6. Which of these forms of Mobile User VPN are supported by WatchGuard System Manager? (Select
all that apply.)
A) A shared key
B) User name and password
C) IP addresses of the allowed resources
D) A .vpn client configuration file
E) Administrator ID
F) WatchGuard Mobile VPN with IPSec client software
G) Shrew Soft VPN client software
H) All of the above
A) Active Directory
B) IPSec
C) LDAP
D) PGP
E) PPTP
F) L2TP
G) SSH
H) SSL VPN

7/21/2019 Advanced VPN Training v11.7
http://slidepdf.com/reader/full/advanced-vpn-training-v117 92/92