Embed Size (px)
Citation preview
Advanced Teacher Training Guide
Published: July 1, 2014


School Software Group, Inc. BuildYourOwnCurriculum (BYOC) Page 4 of 36
BuildYourOwnCurriculum (BYOC) Advanced Teacher Training Guide
Table of Contents
Introduction ............................................................................................................................................. 6
Accessing the Advanced Features .............................................................................................................. 6
Searching Your District’s and Other District’s Curriculum ............................................................................ 7
Basic Search ............................................................................................................................................................................ 7
Using the Search Boxes ........................................................................................................................................................... 8
Advanced Search .................................................................................................................................................................... 9
Viewing Learning Targets ........................................................................................................................ 10
Topic Level ............................................................................................................................................................................ 10
Learning Target Link .............................................................................................................................................................. 11
Comments: Providing Feedback/Recording Thoughts ............................................................................... 12
Notes: ................................................................................................................................................................................... 12
Suggested Attachments ........................................................................................................................................................ 12
Views of the Curriculum .......................................................................................................................... 15
Course Print .......................................................................................................................................................................... 15
Scope and Sequence Page .................................................................................................................................................... 16
Course Outline/Big Picture ................................................................................................................................................... 17
Course Outline ....................................................................................................................................... 17
Big Picture ............................................................................................................................................. 18
Teacher Portal ........................................................................................................................................ 19
Setting up the Teacher Portal ............................................................................................................................................... 19
Creating Classes .................................................................................................................................... 19
Selecting Your Courses .......................................................................................................................... 20
Selecting Course Colors and Projections .............................................................................................. 20
Teacher Portal Introduction .................................................................................................................................................. 21
Activities ................................................................................................................................................ 21

School Software Group, Inc. BuildYourOwnCurriculum (BYOC) Page 5 of 36
BuildYourOwnCurriculum (BYOC) Advanced Teacher Training Guide
Looking at Standards .............................................................................................................................. 25
Assignments .......................................................................................................................................... 29
Adding a Class ....................................................................................................................................................................... 29
Adding Assignments .............................................................................................................................................................. 30
Viewing an Assignment ......................................................................................................................................................... 32
Creating Lesson Plans ............................................................................................................................. 33
Creating a Class ..................................................................................................................................................................... 33
Setting Up Your Lesson Plan ................................................................................................................................................. 34
Writing Your Lesson Plan ...................................................................................................................................................... 33
School Software Group, Inc. BuildYourOwnCurriculum (BYOC) Page 6 of 36
BuildYourOwnCurriculum (BYOC) Advanced Teacher Training Guide
Introduction
The purpose of this document is to introduce users to the advanced features available in
BYOC. Primarily this will focus on viewing your curriculum and searching other district’s
curriculum. In addition we will discuss how to create activities, use the teacher portal,
and use the comment portion of BYOC. Many of these topics have their own training
document that explains the topic in greater detail and walks you through the process of
using the feature correctly. If you have additional questions or if you would like more
information please see the documents referenced in each section.
Accessing the Advanced Features
All of the advanced BYOC features are available to users via the district’s PUBLIC SITE. To
access the features discussed in the remainder of this document, please follow theses
steps:
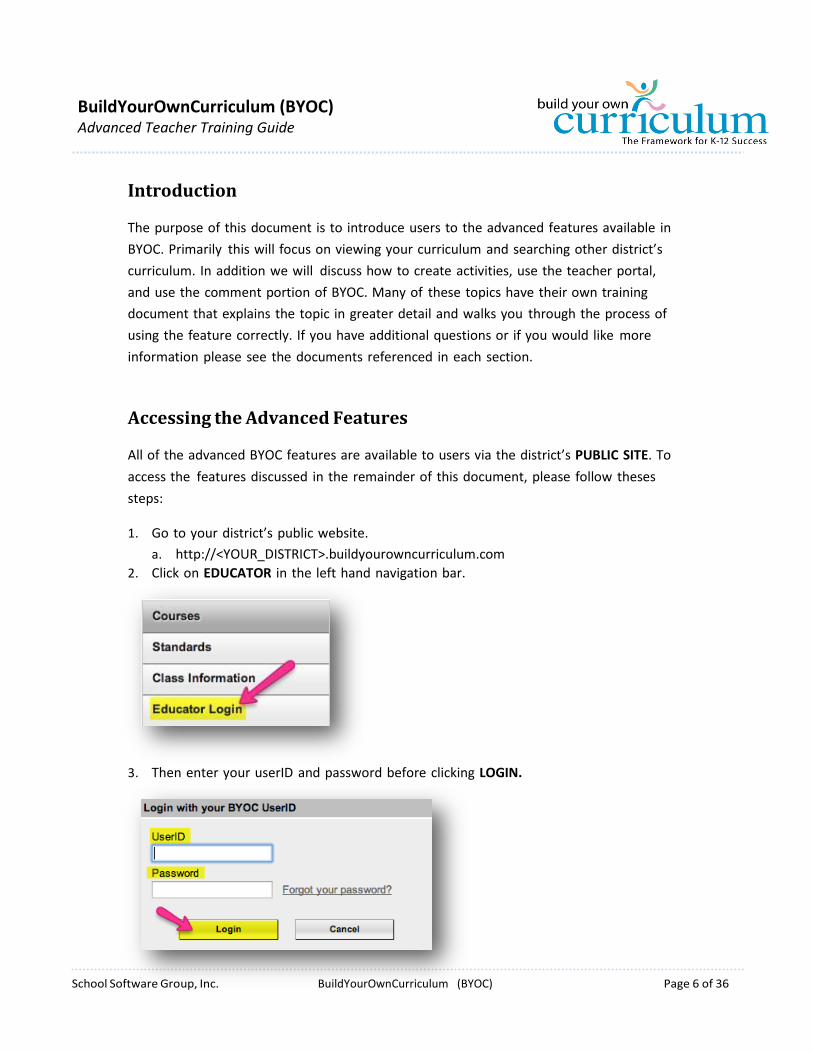
1. Go to your district’s public website.
a. http://<YOUR_DISTRICT>.buildyourowncurriculum.com
2. Click on EDUCATOR in the left hand navigation bar.
3. Then enter your userID and password before clicking LOGIN.
School Software Group, Inc. BuildYourOwnCurriculum (BYOC) Page 7 of 36
BuildYourOwnCurriculum (BYOC) Advanced Teacher Training Guide
Searching Your District’s and Other District’s Curriculum
For a complete overview and introduction to this topic please see the HOW TO- Search
Other District’s Training Document on the BYOC website.
Basic Search
The basic search allows you to search other districts and your own using the District
Dropdown Menu and narrow your search using five search options. To get to the basic
search, you must be on the COURSE PAGE on the public website.
1. Keywords: This allows you to narrow your search using keywords like “Everyday
Math” or “Frog Dissection”. Using this field helps you limit your search and is
especially helpful when you’re looking for lessons or curriculum that specifically
address some particular activity.
2. District: This dropdown allows you to search for courses from all districts in BYOC
(including your own) or just a specific district. To search all districts in BYOC
select ALL DISTRICTS. To search a specific district, select that district from the
dropdown menu.
3. Department: This search menu allows you to specify what department you would
like your search results to come from. For example if you search “Newton” you may
get both science and social studies results, however if you are a history teacher by
selecting social studies you can eliminate any science related results.
a. NOTE: If you choose ALL DISTRICTS you cannot select a department. This is
because each school district has a different selection of departments and
names their departments differently.
4. Grade Level: This dropdown allows you search ALL GRADES or specify
a certain grade
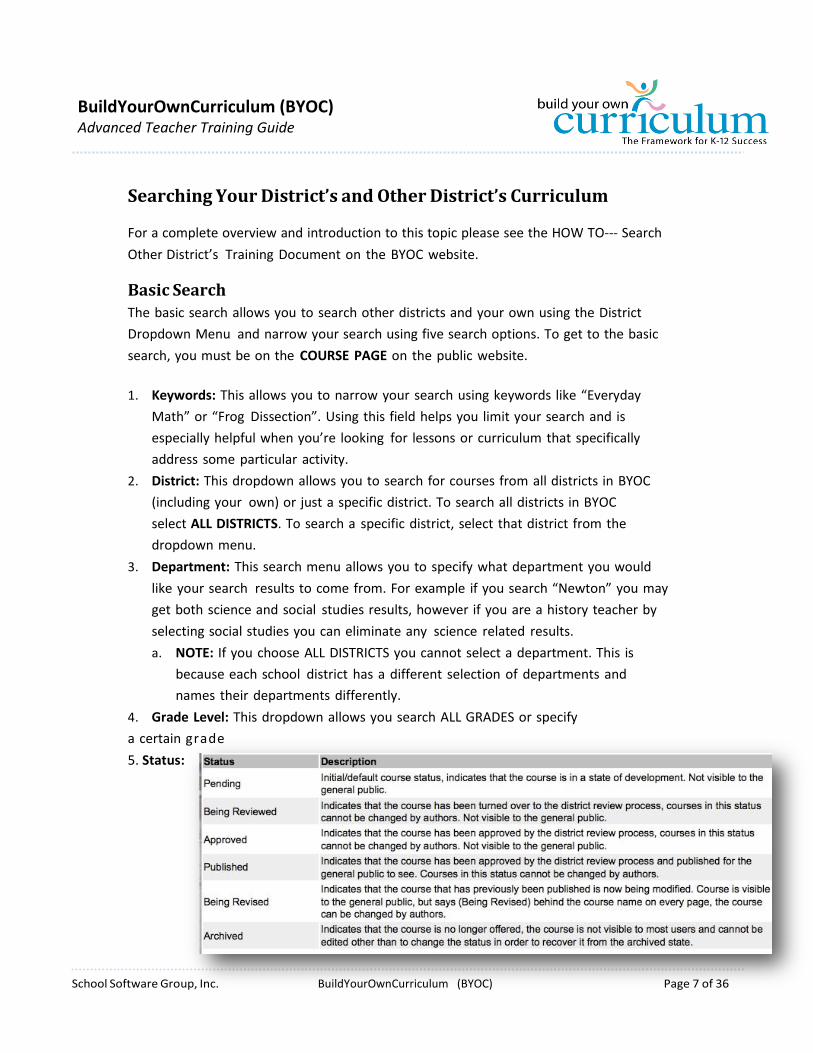
5. Status:

School Software Group, Inc. BuildYourOwnCurriculum (BYOC) Page 8 of 36
BuildYourOwnCurriculum (BYOC) Advanced Teacher Training Guide
Using the Search Boxes 1. To begin your search, fill in the search options based on your preferences.
2. Click SEARCH in the upper right corner of the COURSE PREFERENCE BOX.
3. Your course results will be displayed in the COURSE DISPLAY WINDOW.

School Software Group, Inc. BuildYourOwnCurriculum (BYOC) Page 9 of 36
BuildYourOwnCurriculum (BYOC) Advanced Teacher Training Guide
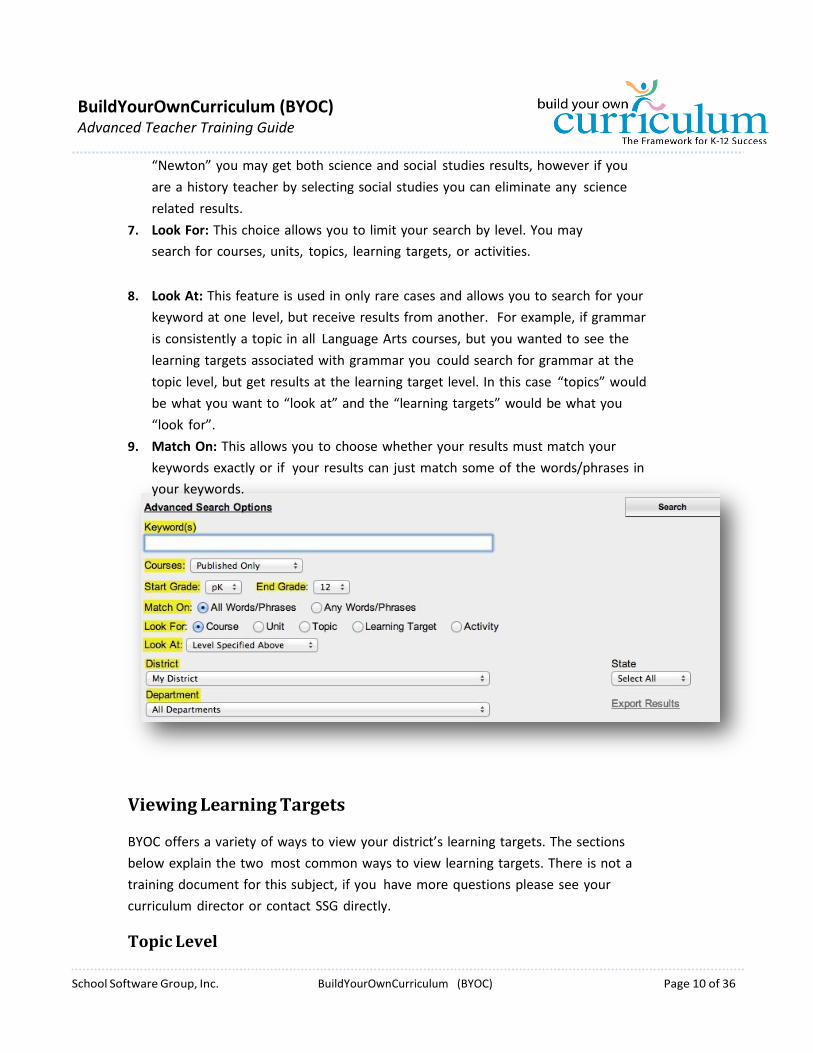
Advanced Search
The advanced search allows you to search other districts and your own using a
variety of different search methods and parameters. To access the advanced
search, click the SHOW ADVANCED SEARCH OPTIONS link located in the bottom,
right corner of the Course Search box.
1. Keywords: This allows you to narrow your search using keywords like
“Everyday Math” or “Frog Dissection”. Using this field helps you limit your
search and is especially helpful when you’re looking for lessons or curriculum
that specifically address some particular activity, program or concept. YOU
MUST PUT SOMETHING IN THIS FIELD FOR THE SEARCH TO WORK.
2. Courses: This dropdown allows you to choose from PUBLISHED ONLY, ALL
ACTIVE COURSES, or ALL ARCHIVED COURSES. Published only will limit your
search to only courses that have already been published. All active will show
you all courses in a district, except those that are archived. All archived will
show you courses that once were published, but are no longer being offered.
3. Start/End Grades: These fields allow you to limit the grade levels of your
results. This is helpful if you are an elementary teacher and do not need
results from the high school level and vise versa.
4. District: This dropdown allows you to search courses from your district only
(MY DISTRICT), courses from all districts (ALL DISTRICTS), or a specific district.
To search a specific district select the district you desire to search from the
dropdown menu.
5. State: This dropdown allows you to choose what state you want to see districts from.
6. Department: This search menu allows you to specify what department you
would like your search results to come from. For example if you search
School Software Group, Inc. BuildYourOwnCurriculum (BYOC) Page 10 of 36
BuildYourOwnCurriculum (BYOC) Advanced Teacher Training Guide
“Newton” you may get both science and social studies results, however if you
are a history teacher by selecting social studies you can eliminate any science
related results.
7. Look For: This choice allows you to limit your search by level. You may
search for courses, units, topics, learning targets, or activities.
8. Look At: This feature is used in only rare cases and allows you to search for your
keyword at one level, but receive results from another. For example, if grammar
is consistently a topic in all Language Arts courses, but you wanted to see the
learning targets associated with grammar you could search for grammar at the
topic level, but get results at the learning target level. In this case “topics” would
be what you want to “look at” and the “learning targets” would be what you
“look for”.
9. Match On: This allows you to choose whether your results must match your
keywords exactly or if your results can just match some of the words/phrases in
your keywords.
Viewing Learning Targets
BYOC offers a variety of ways to view your district’s learning targets. The sections
below explain the two most common ways to view learning targets. There is not a
training document for this subject, if you have more questions please see your
curriculum director or contact SSG directly.
Topic Level

School Software Group, Inc. BuildYourOwnCurriculum (BYOC) Page 11 of 36
BuildYourOwnCurriculum (BYOC) Advanced Teacher Training Guide
As a rule, anytime you navigate to the topic level of a course the appropriate learning
targets will be presented. This way will only show the learning targets for the topic
you are on, it will not show you the learning targets for the entire course.
1. You can get to the topic level by searching for the course you would like to see the
learning targets for and then clicking on it. Once inside your course, you can click
on the unit of the topic you want to see learning targets for and then clicking on
the topic itself.

School Software Group, Inc. BuildYourOwnCurriculum (BYOC) Page 11 of 36
BuildYourOwnCurriculum (BYOC) Advanced Teacher Training Guide
a. On the administrative site ONLY, if your course has two or more units,
you could also use the quick navigate bar to hop to the target level.
Learning Target Link
One quick way to view the learning targets for a course from the
ADMINISTRATIVE SITE is from the Course Details page. This way will allow
you to see all the learning targets for a course at one time.
1. Search for the course whose learning targets you would like to see and then click on it.
2. Once on the Course Details page, select the LEARNING TARGETS link to
view the course’s learning targets.
3. Once you click the learning targets button, you will see a list of all the
learning targets associated with the course.
4. You can view learning targets by alphabetical order, their unit, their topic, or
the standards they are aligned to (government).
5. If you click the Details icon (the magnifying glass) you will see detailed
information about the topic including where it is taught
and what

School Software Group, Inc. BuildYourOwnCurriculum (BYOC) Page 12 of 36
BuildYourOwnCurriculum (BYOC) Advanced Teacher Training Guide
standards
it is
a ligned
to.
Comments: Providing Feedback/Recording Thoughts
Comments can be provided at the course, unit, or topic levels. Comments are located
at the bottom of each page and are open for all educators in your district to provide
feedback. Originally designed to gather feedback during the curriculum-authoring
phase, the comment sections are now used extensively as a diary during the teaching
process to record ideas for improving the curriculum moving forward.
Notes:
1. Comments are displayed from newest to oldest.
2. You can subscribe at the course, unit, or topic level. To do this, simply click the
SUSCRIBE button. You can subscribe at the course, unit or topic level. Clicking
subscribe will cause an email to be generated to you each time a comment is
added at that level or below.
3. A System Administrator or the comment author can delete comments, by clicking the RED X.
Suggested Attachments
School Software Group, Inc. BuildYourOwnCurriculum (BYOC) Page 13 of 36
BuildYourOwnCurriculum (BYOC) Advanced Teacher Training Guide
This is a place where teachers can compile any attachments that they would like
associated with a course throughout the year. Then a system administrator can go
through and approve the attachments he or she would like to be associated with the
course.
1. Give your suggested an attachment a name in the DISPLAY NAME textbox.
2. Choose who you would like your suggested attachment to be VISIBLE TO.

School Software Group, Inc. BuildYourOwnCurriculum (BYOC) Page 14 of 36
BuildYourOwnCurriculum (BYOC) Advanced Teacher Training Guide
3. Then click ADD ATTACHMENT.

School Software Group, Inc. BuildYourOwnCurriculum (BYOC) Page 15 of 36
BuildYourOwnCurriculum (BYOC) Advanced Teacher Training Guide
Views of the Curriculum
BYOC offers a multitude of ways to view the curriculum. This actually is one the
key benefits of using BYOC; we strive to provide you with whatever view into
the curriculum you need at a particular point in time.
Course Print Course Print prints the Course Summary report, which includes a Scope and
Sequence for the course as well as complete details including the course’s units,
topics, and learning targets. By default this printout does not include standards,
but these can be obtained by running the Course Summary report from the
Reports menu and requesting that standards be included in the printout. To
view a course via Course Print follow the steps below:
1. In the Course Search box, search for the course you would like to view.
2. When you find the course, click on the course’s name in the Course Results box.
3. Once on the main course page, click PRINT COURSE in the upper right hand corner of the screen.

School Software Group, Inc. BuildYourOwnCurriculum (BYOC) Page 16 of 36
BuildYourOwnCurriculum (BYOC) Advanced Teacher Training Guide
Scope and Sequence Page The Scope and Sequence page (available only on the PUBLIC website) provides a nice
overview of the entire course, access to any unit or topic, and access to the list of
activities associated with any topic. To view a course using the Scope and Sequence
page follow the steps below:
1. In the Course Search box, search for the course you would like to view.
2. When you find the course, click on the course’s name in the Course Results box.
3. Once on the main course page, click SCOPE AND SEQUENCE in the upper right
hand corner of the screen.

School Software Group, Inc. BuildYourOwnCurriculum (BYOC) Page 17 of 36
BuildYourOwnCurriculum (BYOC) Advanced Teacher Training Guide
Course Outline/Big Picture The Course Outline (only available on the PUBLIC website) or the Big Picture (only
available on the ADMIN website) provides a complete outline of the course
including the course’s units, topics, learning targets, and durations. All entries in
the outline are hyperlinks thus providing you the ability to jump to any desired
portion of the course for more details. To view a course using the Course Outline
follow the steps below:
Course Outline
1. In the Course Search box, search for the course you would like to view.
2. When you find the course, click on the course’s name in the Course Results box.
3. Once on the main course page, click the COURSE OUTLINE link in the upper
right hand corner of the screen.

School Software Group, Inc. BuildYourOwnCurriculum (BYOC) Page 18 of 36
BuildYourOwnCurriculum (BYOC) Advanced Teacher Training Guide
Big Picture
1. In the Course Search box, search for the course you would like to view.
2. When you find the course, click on the course’s name in the Course Results box.
3. Once on the main course page, click BIG PICTURE under courses in the left hand navigation.

School Software Group, Inc. BuildYourOwnCurriculum (BYOC) Page 19 of 36
BuildYourOwnCurriculum (BYOC) Advanced Teacher Training Guide
Teacher Portal
The teacher portal can be accessed only from your district’s PUBLIC website. It is
designed for more technical users and is a more complex screen. It provides you
complete access to all of the components of one or more courses. The information
displayed is controlled by a class created by you and the Course Navigation window
located in the upper left portion of the Teacher Portal page. For more information on
how to use the Teacher Portal please see the HOW TO-Teacher Portal Basics training
document.
Setting up the Teacher Portal
Creating Classes
1. Click on CLASSES in the navigation bar on the left hand side of the screen.
2. Once on the Classes page, click ADD NEW.
3. Enter the name of your class in the CLASS NAME textbox and click SAVE. (Ignore
the other fields because they are not needed for using the teacher portal.)

School Software Group, Inc. BuildYourOwnCurriculum (BYOC) Page 20 of 36
BuildYourOwnCurriculum (BYOC) Advanced Teacher Training Guide
Selecting Your Courses
1. Next you are going to select the courses that you would like to be part of your
class in the “select the primary courses that this class will over” dropdown.
2. Click the checkboxes next to the course(s) that you would like to be part of your class.
3. When you are finished, click SAVE COURSES.
Selecting Course Colors and Projections
After you save your class’s courses, next you need to select a schedule and color for each
course. The schedule and color will determine how your courses will appear in your class
projection.
1. Select the projection you would like for each course in the PROJECTION SCHEDULE
dropdown.
a. Schedules are district defined and control what days of the week and how many periods per day a course will be projected.
b. NOTE: Units whose duration is marked as ongoing cannot be projected and
will thus not be reflected on the calendar.
School Software Group, Inc. BuildYourOwnCurriculum (BYOC) Page 21 of 36
BuildYourOwnCurriculum (BYOC) Advanced Teacher Training Guide
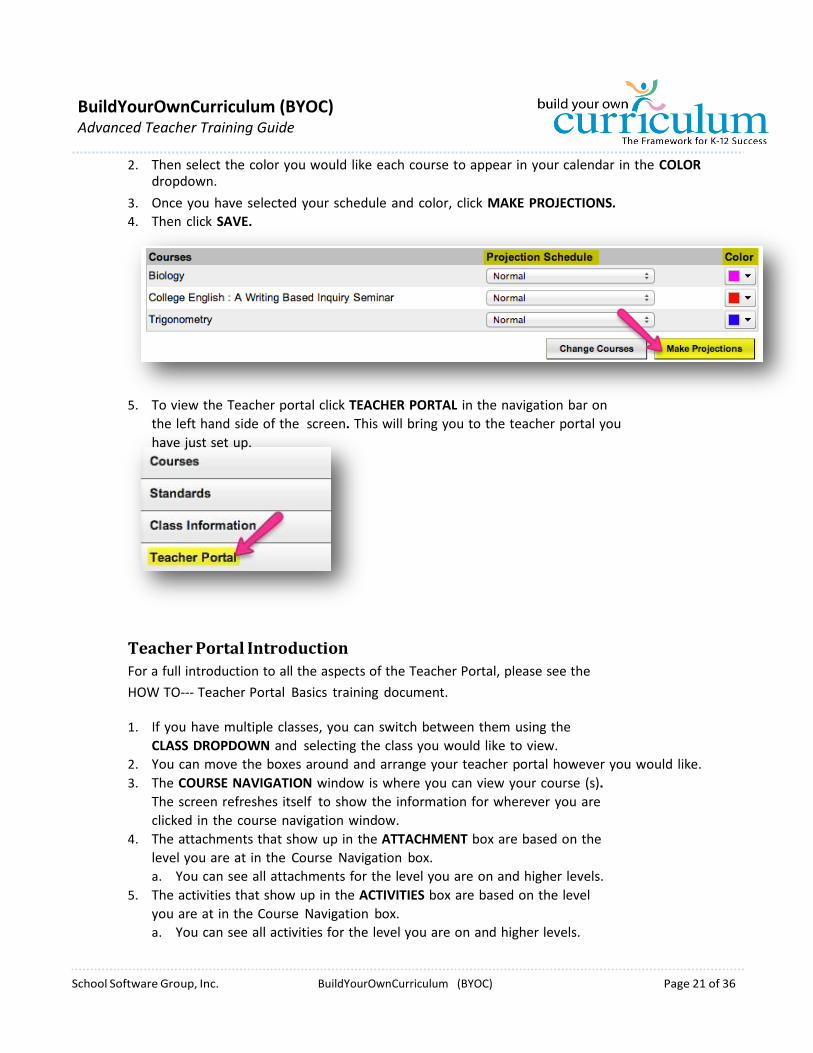
2. Then select the color you would like each course to appear in your calendar in the COLOR dropdown.
3. Once you have selected your schedule and color, click MAKE PROJECTIONS.
4. Then click SAVE.
5. To view the Teacher portal click TEACHER PORTAL in the navigation bar on
the left hand side of the screen. This will bring you to the teacher portal you
have just set up.
Teacher Portal Introduction
For a full introduction to all the aspects of the Teacher Portal, please see the
HOW TO- Teacher Portal Basics training document.
1. If you have multiple classes, you can switch between them using the
CLASS DROPDOWN and selecting the class you would like to view.
2. You can move the boxes around and arrange your teacher portal however you would like.
3. The COURSE NAVIGATION window is where you can view your course (s).
The screen refreshes itself to show the information for wherever you are
clicked in the course navigation window.
4. The attachments that show up in the ATTACHMENT box are based on the
level you are at in the Course Navigation box.
a. You can see all attachments for the level you are on and higher levels.
5. The activities that show up in the ACTIVITIES box are based on the level
you are at in the Course Navigation box.
a. You can see all activities for the level you are on and higher levels.

School Software Group, Inc. BuildYourOwnCurriculum (BYOC) Page 22 of 36
BuildYourOwnCurriculum (BYOC) Advanced Teacher Training Guide
6. The standards that appear in the LOCAL STANDARDS AND GOVERNMENT
STANDARDS BOX are tied to the level you are at in the Course Navigation box.
a. You can see the standards for the level you are on and higher levels.
7. The ASSIGNMENTS box shows all the assignments for this class for the current week.
a. This means that the assignments for all the courses that are a part of your class will show up.
8. The CLASSROOM PLANNING SCHEDULE(S) box shows all the lesson plans for the
current week in the class. a. This means that the lessons plans for all the courses that are a part of your class will
show up. 9. The CLASS PROJECTIONS box contains a calendar that displays each of the courses in your
class.
School Software Group, Inc. BuildYourOwnCurriculum (BYOC) Page 21 of 36
BuildYourOwnCurriculum (BYOC) Advanced Teacher Training Guide
Activities
Activities can be accessed from the PUBLIC or ADMINISTRATIVE websites. The
activities are the “how you teach” portion of BYOC. In BYOC every teacher in the
district can add activities. By default when you create an activity it is a private
activity, meaning that you are the only one who can see it. Ideally over time, you
will share your activity with your peers, thus populating BYOC with a variety of
educational activities and creating a library of good ideas and best practices.
Activities can be created at the topic level from both the Administrative site as
well as the Educator site. The topic page is not only where activities can be
created, but also it is also where activities can be viewed, printed, or edited.
The actual Activity Edit page for your district may appear different than the
following images. The district has the ability to define their own fields and
select what educational concepts they would like to emphasize.
The following steps will walk you through creating an activity. For more
information about activities please see the HOW TO- Create an Activity
training document.
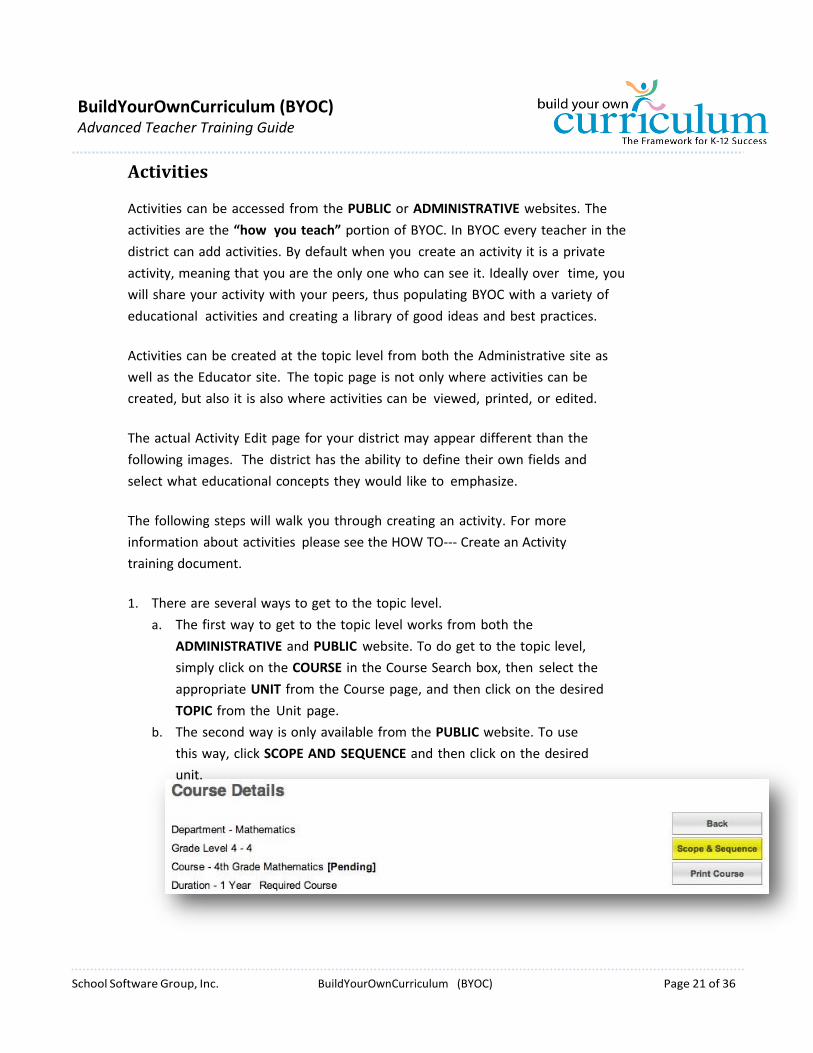
1. There are several ways to get to the topic level.
a. The first way to get to the topic level works from both the
ADMINISTRATIVE and PUBLIC website. To do get to the topic level,
simply click on the COURSE in the Course Search box, then select the
appropriate UNIT from the Course page, and then click on the desired
TOPIC from the Unit page.
b. The second way is only available from the PUBLIC website. To use
this way, click SCOPE AND SEQUENCE and then click on the desired
unit.

School Software Group, Inc. BuildYourOwnCurriculum (BYOC) Page 22 of 36
BuildYourOwnCurriculum (BYOC) Advanced Teacher Training Guide
c. You also could choose to use the Big Picture or Course Outline pages
to navigate to the Topic level if you prefer.
2. Once you are on the topic page, scroll down until you see the ADD ACTIVITY button. Then click on it.
3. Once on the activity screen, then enter the name of you activity in the NAME textbox.
4. Then enter a description of your activity in the DESCRIPTION textbox.
5. When you have finished that click the SAVE AND CONTINUE button on the bottom of the screen.
School Software Group, Inc. BuildYourOwnCurriculum (BYOC) Page 23 of 36
BuildYourOwnCurriculum (BYOC) Advanced Teacher Training Guide
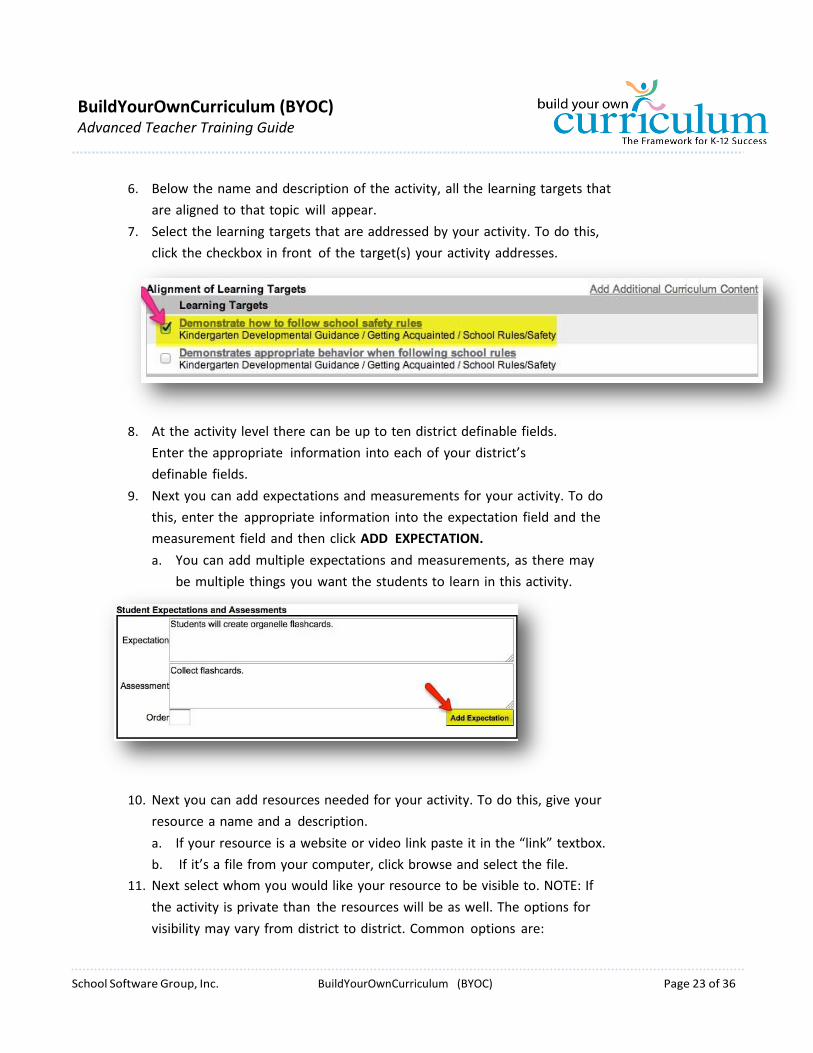
6. Below the name and description of the activity, all the learning targets that
are aligned to that topic will appear.
7. Select the learning targets that are addressed by your activity. To do this,
click the checkbox in front of the target(s) your activity addresses.
8. At the activity level there can be up to ten district definable fields.
Enter the appropriate information into each of your district’s
definable fields.
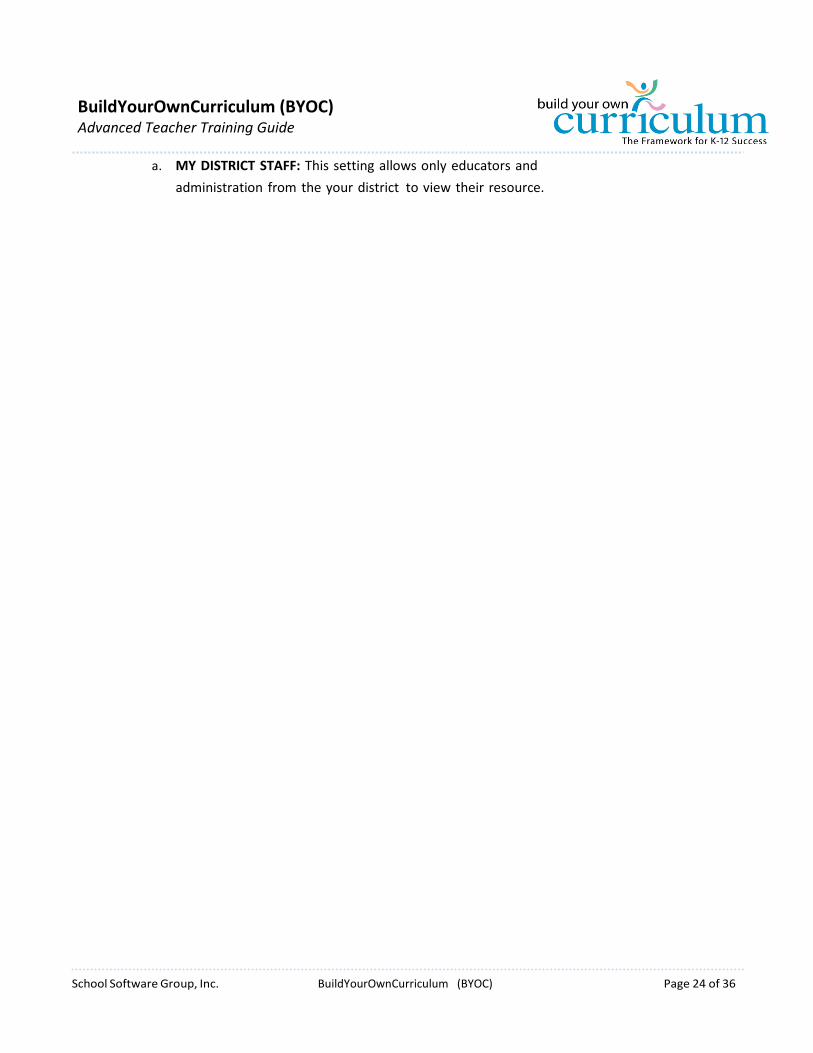
9. Next you can add expectations and measurements for your activity. To do
this, enter the appropriate information into the expectation field and the
measurement field and then click ADD EXPECTATION.
a. You can add multiple expectations and measurements, as there may
be multiple things you want the students to learn in this activity.
10. Next you can add resources needed for your activity. To do this, give your
resource a name and a description.
a. If your resource is a website or video link paste it in the “link” textbox.
b. If it’s a file from your computer, click browse and select the file.
11. Next select whom you would like your resource to be visible to. NOTE: If
the activity is private than the resources will be as well. The options for
visibility may vary from district to district. Common options are:
School Software Group, Inc. BuildYourOwnCurriculum (BYOC) Page 24 of 36
BuildYourOwnCurriculum (BYOC) Advanced Teacher Training Guide
a. MY DISTRICT STAFF: This setting allows only educators and
administration from the your district to view their resource.

School Software Group, Inc. BuildYourOwnCurriculum (BYOC) Page 25 of 36
BuildYourOwnCurriculum (BYOC) Advanced Teacher Training Guide
b. ALL EDUCATORS: This allows any educators from another BYOC district
to view your resource. People who have access to your resource at this
level are teachers from any BYOC district, teachers from your district,
and administrators.
c. PUBLIC: This allows the resource to be viewed by anyone browsing
the district’s curriculum, including parents, students, other teachers,
and administration.
12. When you are done, click the SAVE button at the bottom of the screen.
Looking at Standards
Both district and state/national standards are available in BYOC. Typically your
analysis will be focused on the state/national standards. The most basic needs
when analyzing standards are to see what standards do you or do you not cover
and, if you do cover them, where do you cover them. To see what standards you
cover and where you cover them follow the steps below:
1. Click STANDARDS in the left hand navigation bar.

School Software Group, Inc. BuildYourOwnCurriculum (BYOC) Page 26 of 36
BuildYourOwnCurriculum (BYOC) Advanced Teacher Training Guide
2. In the DEPARTMENT and AREA dropdowns select the standards you would like to search
for.

School Software Group, Inc. BuildYourOwnCurriculum (BYOC) Page 27 of 36
BuildYourOwnCurriculum (BYOC) Advanced Teacher Training Guide
3. In the DISTRICT dropdown, select the district whose standards you would like
to look at. MY DISTRICT, which is the default option, allows you to search your
own district’s standards and learning targets.
a. If you select a district other than your own, you will see only the standards used
by that district and when you click the COVERED icon you will see that district’s
learning targets.
4. In the COVERED FEWER THAN _____ TIMES blank you can enter whatever
number of times you desire to see standards covered less than (only on the
PUBLIC website).
a. If you want to see any standards you do not cover at all, enter “1”.
5. In the STANDARDS BY GRADE dropdowns, select if you want to see standards
covered, introduced, or mastered and the grade you want to view them covered by.
6. On the PUBLIC website, you can click the COVERED ICON to see courses, units, and
topics that address a particular standard. If you click on the COVERED ICON, you will
see a page that lists every place that standard is covered throughout the curriculum.
7. For districts that use BYOA an ASSESSED column will appear next to the Covered
School Software Group, Inc. BuildYourOwnCurriculum (BYOC) Page 28 of 36
BuildYourOwnCurriculum (BYOC) Advanced Teacher Training Guide
column. If you see an icon under the ASSESSED column, you can click it to see any
questions in BYOA that are aligned to that standard.

School Software Group, Inc. BuildYourOwnCurriculum (BYOC) Page 29 of 36
BuildYourOwnCurriculum (BYOC) Advanced Teacher Training Guide
8. If you click on the standard’s number or text you will betaken to the full standard,
Assignments
Adding a Class
To add a class you must be on your district’s PUBLIC website. In order to add assignments
in BYOC, you must first create a class. If you have already created a class, you may skip
this section.
Classes are the basis for many things in BuildYourOwnCurriculum. Classes are needed to
use the teacher portal, to create lesson plans and to post assignments. If you are an
elementary teacher, or you have the same students all day long, create one class. If you
are a high school teacher, or have different students throughout the day, you will
probably want to create a class for each set of students or each course. This is because
you will want to publish assignments and create lesson plans for each separate group of
students.
1. Click on CLASSES in the left hand navigation screen.
2. Once on the Classes page, click ADD NEW.
School Software Group, Inc. BuildYourOwnCurriculum (BYOC) Page 30 of 36
BuildYourOwnCurriculum (BYOC) Advanced Teacher Training Guide
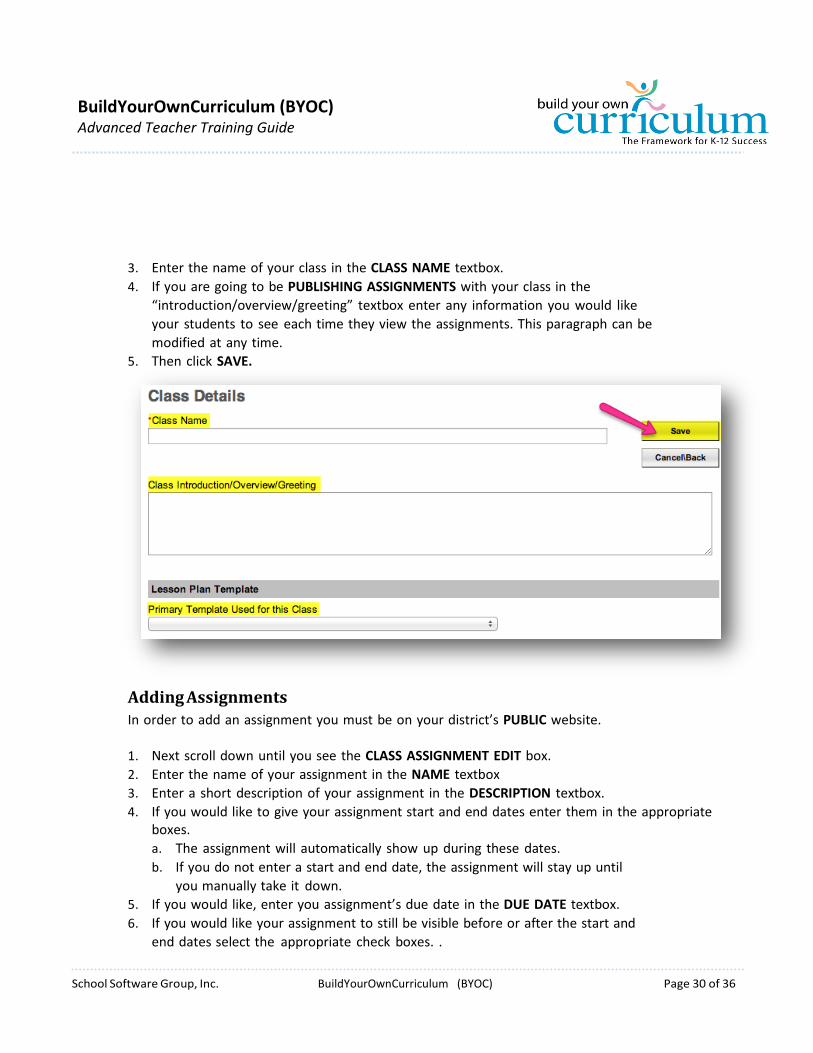
3. Enter the name of your class in the CLASS NAME textbox.
4. If you are going to be PUBLISHING ASSIGNMENTS with your class in the
“introduction/overview/greeting” textbox enter any information you would like
your students to see each time they view the assignments. This paragraph can be
modified at any time.
5. Then click SAVE.
Adding Assignments In order to add an assignment you must be on your district’s PUBLIC website.
1. Next scroll down until you see the CLASS ASSIGNMENT EDIT box.
2. Enter the name of your assignment in the NAME textbox
3. Enter a short description of your assignment in the DESCRIPTION textbox.
4. If you would like to give your assignment start and end dates enter them in the appropriate boxes.
a. The assignment will automatically show up during these dates.
b. If you do not enter a start and end date, the assignment will stay up until
you manually take it down.
5. If you would like, enter you assignment’s due date in the DUE DATE textbox.
6. If you would like your assignment to still be visible before or after the start and
end dates select the appropriate check boxes. .
School Software Group, Inc. BuildYourOwnCurriculum (BYOC) Page 31 of 36
BuildYourOwnCurriculum (BYOC) Advanced Teacher Training Guide
7. In the LINK box you can post any links needed for your assignment.
8. If you would like to upload a file, click BROWSE and select the file from your computer.
9. Click SAVE DETAIL when you are done adding your assignment.

School Software Group, Inc. BuildYourOwnCurriculum (BYOC) Page 32 of 36
BuildYourOwnCurriculum (BYOC) Advanced Teacher Training Guide
10. If your assignment was added successfully it will appear at the bottom of
your screen when you navigate to the correct dates.
Viewing an Assignment
In order to view an assignment you need to be on your district’s PUBLIC website.
1. Click CLASS INFORMATION in the navigation bar on the left hand side of your screen.
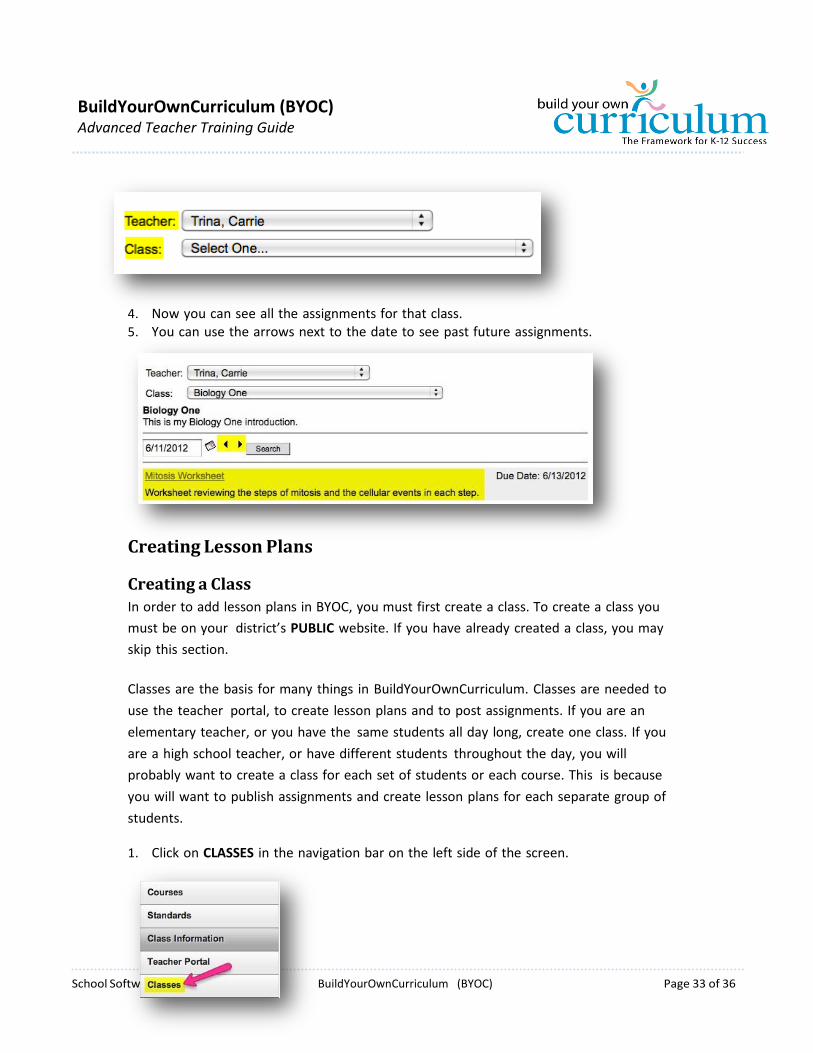
2. Select the teacher from the TEACHER dropdown.
3. Select the appropriate class from the CLASS dropdown.
School Software Group, Inc. BuildYourOwnCurriculum (BYOC) Page 33 of 36
BuildYourOwnCurriculum (BYOC) Advanced Teacher Training Guide
4. Now you can see all the assignments for that class. 5. You can use the arrows next to the date to see past future assignments.
Creating Lesson Plans
Creating a Class
In order to add lesson plans in BYOC, you must first create a class. To create a class you
must be on your district’s PUBLIC website. If you have already created a class, you may
skip this section.
Classes are the basis for many things in BuildYourOwnCurriculum. Classes are needed to
use the teacher portal, to create lesson plans and to post assignments. If you are an
elementary teacher, or you have the same students all day long, create one class. If you
are a high school teacher, or have different students throughout the day, you will
probably want to create a class for each set of students or each course. This is because
you will want to publish assignments and create lesson plans for each separate group of
students.
1. Click on CLASSES in the navigation bar on the left side of the screen.

School Software Group, Inc. BuildYourOwnCurriculum (BYOC) Page 34 of 36
BuildYourOwnCurriculum (BYOC) Advanced Teacher Training Guide
2. Once on the Classes page, click ADD NEW.
3. Enter the name of your class in the CLASS NAME textbox.
4. If you are going to be CREATING LESSON PLANS with your class choose the
appropriate lesson plan template in the “lesson plan template” dropdown.
5. Lesson plan templates vary based on the set-up of the grade you are working with.
6. Then click SAVE.
Setting Up Your Lesson Plan
1. Click on MY LESSON PLANS (name may change from district to district) in the
navigation bar on the left hand side of the screen.

School Software Group, Inc. BuildYourOwnCurriculum (BYOC) Page 31 of 36
BuildYourOwnCurriculum (BYOC) Advanced Teacher Training Guide
2. On this page, there are three different ways to view your lesson plans.
a. ALL PLANS: This option will give you a list of all your lesson plans sorted by date and time.
b. VIEW WEEK: This option will show tabs for each day of the week. Under each
tab, the lesson plans for that day are listed by period/hour.
c. VIEW CALENDAR: This option shows you a calendar with the time of each
lesson plan blocked off.
3. In the SHOW PLANS FOR dropdown, select the class you would like to see lesson plans for.
4. Then navigate to date and time you would like to add a lesson plan too. Click on the
ENTRY link you would like to add a class too.
5. Once on the Lesson Plan Details page fill out all of the templates that are associated
with your class in the TEMPLATE DROPDOWNS.
a. Note: The district determines the template options.

School Software Group, Inc. BuildYourOwnCurriculum (BYOC) Page 32 of 36
BuildYourOwnCurriculum (BYOC) Advanced Teacher Training Guide
NOTE: The screen may have different fields based on what template you have
chosen. For example, if you are at a school that has periods or hours there may
be a dropdown to select what period/hour your lesson is for.
NOTE: Steps 9-13 are setting the primary focus of the lesson plan and are
used in certain reports that BYOC supports.
1. Select the department your lesson plan belongs to in the DEPARTMENT DROPDOWN.
2. Select the course your lesson plan belongs to in the COURSE DROPDOWN.
3. Select the unit your lesson plan belongs to in the UNIT DROPDOWN.
4. Select the topic your lesson plan belongs to in the TOPIC DROPDOWN.
School Software Group, Inc. BuildYourOwnCurriculum (BYOC) Page 33 of 36
BuildYourOwnCurriculum (BYOC) Advanced Teacher Training Guide
5. When you have filled in all the fields on this page click SAVE AND CONTINUE.
NOTE: These steps are only required the first time you create a lesson plan for a
class. For each subsequent lesson plan within that class this information will be
filled in automatically and is adjustable.
Writing Your Lesson Plan 1. Once you click “save and continue” you will see any learning targets,
activities, and attachments that are tied to the course, unit, and topic of your
lesson plan. You may also see other fields your district has chosen to remind
you of.
a. For example you may see vocabulary or key questions.
2. Select the learning targets, activities, and attachments that will be used during your lesson plan.
3. Click SAVE AND CONTINUE.
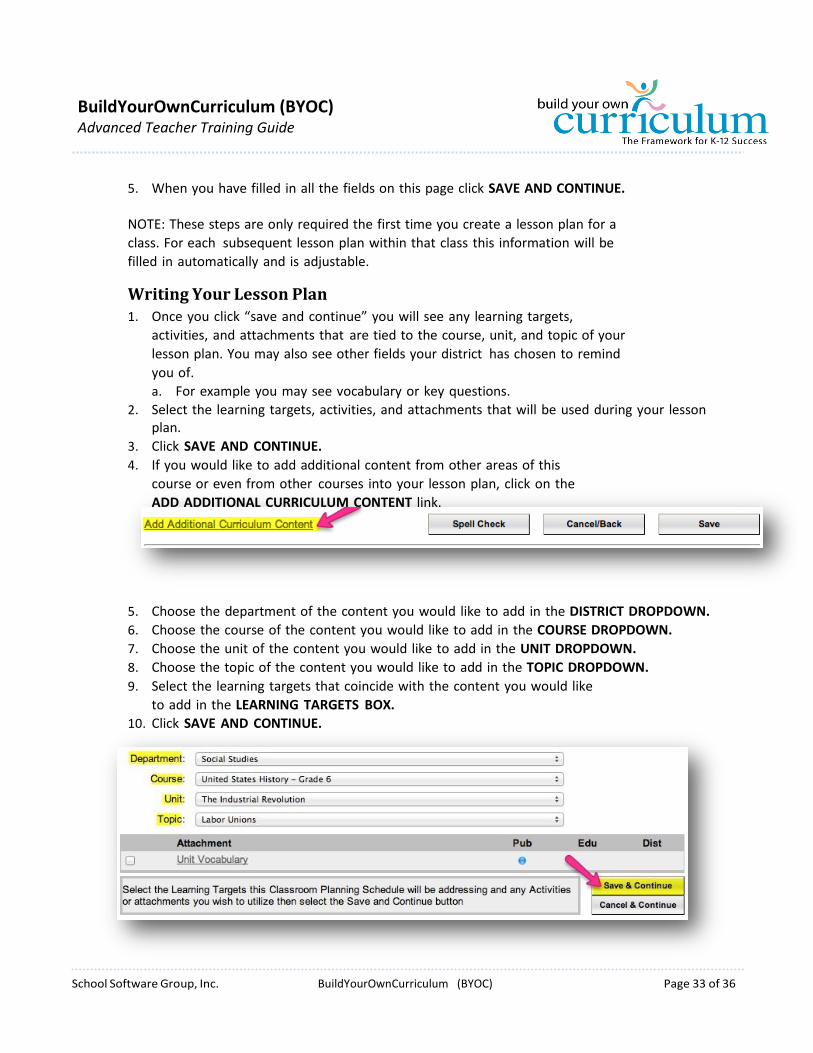
4. If you would like to add additional content from other areas of this
course or even from other courses into your lesson plan, click on the
ADD ADDITIONAL CURRICULUM CONTENT link.
5. Choose the department of the content you would like to add in the DISTRICT DROPDOWN.
6. Choose the course of the content you would like to add in the COURSE DROPDOWN.
7. Choose the unit of the content you would like to add in the UNIT DROPDOWN.
8. Choose the topic of the content you would like to add in the TOPIC DROPDOWN.
9. Select the learning targets that coincide with the content you would like
to add in the LEARNING TARGETS BOX.
10. Click SAVE AND CONTINUE.

School Software Group, Inc. BuildYourOwnCurriculum (BYOC) Page 34 of 36
BuildYourOwnCurriculum (BYOC) Advanced Teacher Training Guide
11. On the main Lesson Plan page, complete any district definable fields that may be present.

School Software Group, Inc. BuildYourOwnCurriculum (BYOC) Page 35 of 36
BuildYourOwnCurriculum (BYOC) Advanced Teacher Training Guide
a. Fields with an “R” beside them are required, the others just complete if it applies to your lesson.
12. In the ATTACHMENTS box add any additional attachments you would like to be
part of your lesson plan.
a. Give you attachment a name in the DISPLAY NAME box. b. You can add a website or video by copying the web link into the LINK box.
c. To add a file from your computer click BROWSE and select the file you would like.
d. Select whom you would like your attachment to be visible to.
e. Click ADD ATTACHMENT.
13. You can remove any learning targets, activities, or attachments you would like
to by clicking the X next to each link.
a. This will just remove the learning target, activity, or attachment from the
lesson plan, it will not delete it from the curriculum.

School Software Group, Inc. BuildYourOwnCurriculum (BYOC) Page 36 of 36
BuildYourOwnCurriculum (BYOC) Advanced Teacher Training Guide
14. When you are finished on this page, click SAVE at the bottom of the screen.