Embed Size (px)
Citation preview

1
Advanced Sharpening in PhotoshopA Tutorial by Ray Grace ARPS DPAGB
There are many various methods of sharpening in Photoshop all of which work to a greater or lesser degree. This particular method is a bit more involved than most, but it does produce particularly good results, especially with those images that contain lots of fine detail edges as well as smooth areas. The edges will be sharpened whilst the smooth areas will remain completely untouched and noise-free. Additionally, an action can be created so that the sharpening can be carried out at the click of a button or two.
Before beginning the tutorial, a quick note about shortcuts.
Shortcuts can save a lot of time when working in Photoshop and I believe in using them whenever possible. Each time you visit the Menu bar to carry out a function, check to see if a shortcut is available. If there is, try to memorise it. The more you use shortcuts the more familiar they will become and Photoshop will become a much smoother and more enjoyable activity. Where shortcuts are available for the actions carried out in this tutorial I will indicate them in brackets.
Both PC and Mac shortcuts will be indicated in the form of ‘PC/Mac+relevant keystroke’. The keystrokes that differ between PC and Mac are: PC Ctrl = Mac Cmd; PC Alt = Mac Opt. Shift is common to both platforms.
Open the image that you wish to work on.
The image chosen to demonstrate this tutorial is shown, in Fig 1, on the right. It has been chosen because it contains lots detail edges to sharpen. There is also a large area of clear blue sky and a smooth face mask, neither of which will be subject to the sharpening effect.
Duplicate the Background. Menu > Layer > New > Layer from background (Ctrl/Cmd+J)
Select All:Menu > Select > All. (Ctrl/Cmd+A).
Copy the selection:Menu > Edit > Copy. (Ctrl/Cmd+C).
Rename the layer. Double-click the layer name and type ‘Sharpen’.
Click on the Channels tab to activate it. It will probably be nested with the Layers and Paths panels. If the Channels panel is not showing:
Menu > Window > Channels will activate it.
Create an Alpha channel.Click the New Channel icon – the folded page icon second from the right at the bottom of the Channels panel. The icon is outlined in red in Fig 2.
Paste the selection:Edit > Paste. (Ctrl/Cmd+V).
Deselect:Select > Deselect. (Ctrl/Cmd+D).
The Alpha channel will now be active, shown right, in Fig 2, with a greyscale image on screen.
Fig 1
Fig 2

2
Fig 3
Fig 6
This sharpening method relies on sharpening the dark edges within the image leaving the whites untouched and avoiding creating any noise in the mid-tone areas.We now need to find the edges in the image and then emphasise them.
Filter > Stylize > Find Edges.Image > Adjustments > Curves.
Drag the black point of the curve to the right to darken the blacks. The amount you use will vary from image to image. Here the point has been dragged to an Input value of 160.Drag the white point to the left to brighten the whites. Again, the amount will vary from image to image. Here the point was dragged to an Input value of 180. The curve is now an almost vertical line, shown in Fig 5.Click OK.
The alpha channel should now have something like a soot & whitewash effect, as shown in Fig 6, shown on the right.
Blur the effect to soften the transition and create a subtle transition between the sharp and smooth areas:Filter > Blur > Gaussian Blur.Set the blur effect to somewhere between 1.5 and 3.0. Click OK.
Since the work here is being done on an Alpha channel (a selection) and not on a layer, the adjustments must be made from the Menu rather the more usual method of using adjustment layers.
Fig 5
Note:
If your Alpha channel shows inverted tones, as shown in Fig 3 on the right, it will be because of the way your Quick Selection tool is set up.
To check this, double-click on the Alpha channel thumbnail and a dialog box, shown in Fig 4 far right, will pop up. If the option is set to show ‘Masked Areas’ and you wish to follow this tutorial fully, change the option to ‘Selected Areas’, as shown.
However, should you wish to leave your Quick Selection tool set to show Masked Areas then you will need to invert the selection later on after applying the layer mask.
Fig 4
3
Now that the image is prepared, the sharpening effect can be applied.Click on the RGB composite channel thumbnail to activate the full colour image.Ctrl/Cmd + click on the Alpha 1 channel to activate a selection.Click the Layers tab to activate the Layers panel.
Ensure the Sharpen layer is active and click the Add layer mask icon at the bottom of the Layers panel.
At this point, if your Quick Mask selection option is set to ‘Masked Areas’ you should invert the selection. (Ctrl/Cmd+I)
Click on the layer thumbnail. The sharpening needs to be done on the layer, not the layer mask.
With the layer mask determining the limitations of the sharpening action, the image can be sharpened. Use either Smart Sharpen or Unsharp Mask. Either method will work equally well. Unsharp Mask will render more quickly.
Menu > Filter > Sharpen > Unsharp Mask/Smart Sharpen Use the following Unsharp Mask settings as a guide:Amount - 200; Radius - 1; Threshold - 0.Click OK.
Check the before and after effects by switching the upper layer off and on. All the edges in the image should show a sharpening effect whilst the smooth areas should remain untouched. There should be no tell-tale white ‘Mackie’ lines.
The before and after images are shown on the next page in Figs 9 & 10 with 100% enlargements shown below that in Figs 11 (original) and 12 (Unsharp Mask).
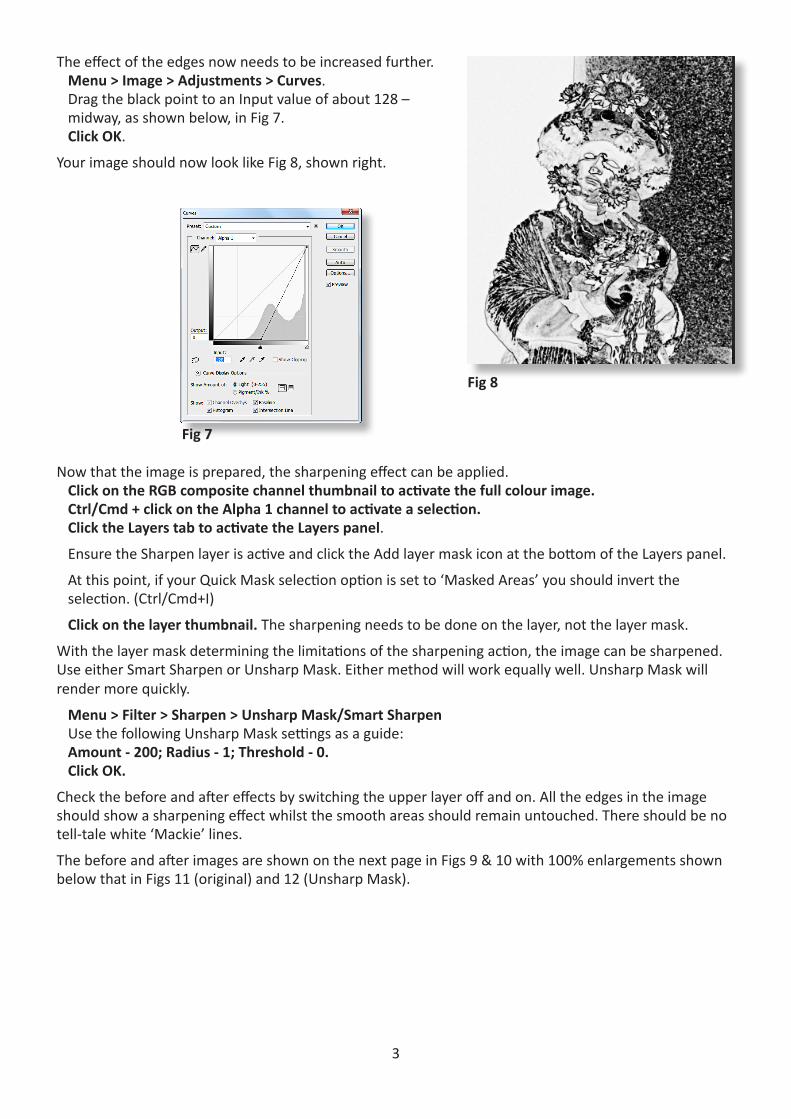
The effect of the edges now needs to be increased further.Menu > Image > Adjustments > Curves.Drag the black point to an Input value of about 128 – midway, as shown below, in Fig 7. Click OK.
Your image should now look like Fig 8, shown right.
Fig 7
Fig 8

4
Fig 9. Original Image
Fig 12. Sharpened – 100% CropFig 11. Original – 100% Crop
Fig 10. Final Sharpened Image
This is quite a complex method of sharpening but worth the effort. It creates a fine, subtle sharpening to edges without affecting smooth areas.
To avoid going through this process with each image, create an action and the whole process will take place almost instantaneously. The procedure for this is on the next page.

5
Creating the ActionOpen the image to be sharpened.
Duplicate the layer.Menu > Layer > New layer from background. (Ctrl/Cmd+J).
Open the Actions panel if it not already active.Menu > Window > Actions or, if you have the panel minimized click the icon on the Panels bar.
Click the Create new action icon at the bottom of the Actions panel as shown in Fig 1.
The Dialog box, shown in Fig 2, will open. Give the action a name and, if you wish, apply a function key. In this example a function key has not been applied.
Click the record button. The red Record icon will highlight.
Now, every action that you do will be recorded. Go through the procedure in the Advanced Sharpening tutorial. There is no hurry so take your time. Mistakes will be recorded.
Once the action is complete click the square icon to the left of the red circular Record button.
The action is now complete. However, if the action is run as it is, it will go through the whole procedure without stopping. Stops should be put in place to allow adjustments to be made to the curves adjustments and the sharpening settings.
All that is needed to put the stops in place is to check the boxes indicated in Fig 3 below.
Finally, check the action.
Open the History panel and take the image back to the beginning.
Click on the ‘Advanced Sharpening’ label in the Actions panel and click the right-facing arrow at the bottom of the panel.
The action will now run and should stop at the first Curves dialog box. Adjust settings or click OK to carry on.
Further stops will occur at the second Curves adjustment and the sharpening dialog box.
Clicking the down-facing arrow on the Advanced Sharpening label will collapse the action but that will not affect the running of the action.
Fig 1
Fig 2