Embed Size (px)
Citation preview

Pervasive.SQL 2000i
Advanced Operations GuideProcedures and References for Advanced Users
Pervasive Software, Inc.12365 Riata Trace Parkway
Building IIAustin, TX 78727 USA
Telephone: +1 512 231 6000 or 800 287 4383Fax: +1 512 231 6010
E-Mail: [email protected]: http://www.pervasive.com

Copyright 2001 Pervasive Software Inc. All rights reserved. Reproduction, photocopying, or transmittal of this publication, or portions of this publication, is prohibited without the express prior written consent of the publisher.
This product includes software developed by Powerdog Industries. Copyright 1994 Powerdog Industries. All rights reserved.
The ODBC Driver Manager for NetWare (ODBC.NLM) included in this product is based on the GNU iODBC software Copyright 1995 by Ke Jin <[email protected]> and was modified by Simba Technologies Inc. in June 1999.
This library is free software; you can redistribute it and/or modify it under the terms of the GNU Lesser General Public License as published by the Free Software Foundation; either version 2 of the License, or (at your option) any later version.
This library is distributed in the hope that it will be useful, but WITHOUT ANY WARRANTY; without even the implied warranty of MERCHANTABILITY or FITNESS FOR A PARTICULAR PURPOSE. See the GNU Lesser General Public License for more details.
A copy of the GNU Lesser General Public License is included in your installation of Pervasive.SQL 2000i at \pvsw\doc\lesser.htm. If you cannot find this license, write to the Free Software Foundation, Inc., 59 Temple Place, Suite 330, Boston, MA 02111-1307 USA. You may contact Pervasive Software Inc. using the contact information on the back cover of this manual.
Advanced Operations GuideMarch 2001100-004076-001
d i s c l a i m e r PERVASIVE SOFTWARE INC. LICENSES THE SOFTWARE AND DOCUMENTATION PRODUCT TO YOU OR YOUR COMPANY SOLELY ON AN “AS IS” BASIS AND SOLELY IN ACCORDANCE WITH THE TERMS AND CONDITIONS OF THE ACCOMPANYING LICENSE AGREEMENT. PERVASIVE SOFTWARE INC. MAKES NO OTHER WARRANTIES WHATSOEVER, EITHER EXPRESS OR IMPLIED, REGARDING THE SOFTWARE OR THE CONTENT OF THE DOCUMENTATION; PERVASIVE SOFTWARE INC. HEREBY EXPRESSLY STATES AND YOU OR YOUR COMPANY ACKNOWLEDGES THAT PERVASIVE SOFTWARE INC. DOES NOT MAKE ANY WARRANTIES, INCLUDING, FOR EXAMPLE, WITH RESPECT TO MERCHANTABILITY, TITLE, OR FITNESS FOR ANY PARTICULAR PURPOSE OR ARISING FROM COURSE OF DEALING OR USAGE OF TRADE, AMONG OTHERS.
t r a d e m a r k s Btrieve, Tango, Client/Server in a Box, and the Pervasive Software logo are registered trademarks of Pervasive Software Inc.Built on Pervasive, Built on Pervasive Software, Extranet in a Box, Pervasive.SQL, Jtrieve, Plug n’ Play Databases, SmartScout, Solution Network, Ultra-light Z-DBA, Z-DBA, ZDBA, UltraLight, MicroKernel Database Engine, and MicroKernel Database Architecture are trademarks of Pervasive Software Inc.
Microsoft, MS-DOS, Windows, Windows NT, Windows 2000, Windows 98, Windows ME, Win32, Win32s, and Visual Basic are registered trademarks of Microsoft Corporation.
Windows 95 is a trademark of Microsoft Corporation.
NetWare and Novell are registered trademarks of Novell, Inc.
NetWare Loadable Module, NLM, Novell DOS, Transaction Tracking System, and TTS are trademarks of Novell, Inc.
All other company and product names are the trademarks or registered trademarks of their respective companies.

iii
Contents
ContentsAbout This Manual . . . . . . . . . . . . . . . . . . . . . . . . . . . xiii
Who Should Read This Manual . . . . . . . . . . . . . . . . . . . . . . . . . . . . . . . xivManual Organization . . . . . . . . . . . . . . . . . . . . . . . . . . . . . . . . . . . . . xvConventions . . . . . . . . . . . . . . . . . . . . . . . . . . . . . . . . . . . . . . . . . . xvii
1 Concepts of Database Maintenance . . . . . . . . . . . . . . . . . 1-1An Introduction to Database Maintenance
File Structure . . . . . . . . . . . . . . . . . . . . . . . . . . . . . . . . . . . . . . . . . 1-2Access Methods . . . . . . . . . . . . . . . . . . . . . . . . . . . . . . . . . . . . . . . . 1-4Client/Server Communications . . . . . . . . . . . . . . . . . . . . . . . . . . . . . . . 1-5Configurations . . . . . . . . . . . . . . . . . . . . . . . . . . . . . . . . . . . . . . . . 1-6Database Security . . . . . . . . . . . . . . . . . . . . . . . . . . . . . . . . . . . . . . . 1-8Data Archival and Restoration . . . . . . . . . . . . . . . . . . . . . . . . . . . . . . . . 1-9Troubleshooting . . . . . . . . . . . . . . . . . . . . . . . . . . . . . . . . . . . . . . . 1-10Summary of Pervasive.SQL Utilities. . . . . . . . . . . . . . . . . . . . . . . . . . . . . 1-11
2 Understanding the Pervasive Component Architecture . . . . . . . 2-1A Detailed Discussion of Smart Components and Related Features
Pervasive.SQL 2000i Database Engine. . . . . . . . . . . . . . . . . . . . . . . . . . . . 2-2Common Address Space. . . . . . . . . . . . . . . . . . . . . . . . . . . . . . . . 2-2Client/Server Version Checking. . . . . . . . . . . . . . . . . . . . . . . . . . . . 2-2Row Level Locking . . . . . . . . . . . . . . . . . . . . . . . . . . . . . . . . . . . 2-2MicroKernel Database Engine . . . . . . . . . . . . . . . . . . . . . . . . . . . . 2-3SQL Relational Database Engine . . . . . . . . . . . . . . . . . . . . . . . . . . . 2-5
Relational Architectural Overview. . . . . . . . . . . . . . . . . . . . . . . . . . . . . . 2-7Pervasive.SQL 2000i Relational Architecture: Server . . . . . . . . . . . . . . . . 2-7
Overview of Smart Components. . . . . . . . . . . . . . . . . . . . . . . . . . . . . . . 2-11Component Identification . . . . . . . . . . . . . . . . . . . . . . . . . . . . . . . . . . 2-13Unique Component Naming . . . . . . . . . . . . . . . . . . . . . . . . . . . . . . . . 2-14Dynamic Binding . . . . . . . . . . . . . . . . . . . . . . . . . . . . . . . . . . . . . . . 2-16Pervasive.SQL Event Logging . . . . . . . . . . . . . . . . . . . . . . . . . . . . . . . . 2-18
Syntax . . . . . . . . . . . . . . . . . . . . . . . . . . . . . . . . . . . . . . . . . . 2-18Sample Entry . . . . . . . . . . . . . . . . . . . . . . . . . . . . . . . . . . . . . . 2-19
Error Code Clarification . . . . . . . . . . . . . . . . . . . . . . . . . . . . . . . . . . . 2-20Diagnosing Load Errors . . . . . . . . . . . . . . . . . . . . . . . . . . . . . . . . . . . 2-21Pervasive Auto-Reconnect . . . . . . . . . . . . . . . . . . . . . . . . . . . . . . . . . . 2-23

iv
Contents
3 Changing Your Configuration . . . . . . . . . . . . . . . . . . . . . 3-1How to Work with the Configuration Utility within PCC
Configuration Utility Overview . . . . . . . . . . . . . . . . . . . . . . . . . . . . . . . 3-2Special Notes on the Configuration Utility . . . . . . . . . . . . . . . . . . . . . . . . 3-4
Ensuring Configuration Changes Take Effect. . . . . . . . . . . . . . . . . . . . 3-4Connecting to Different Machines. . . . . . . . . . . . . . . . . . . . . . . . . . 3-4Interpreting Parameter Settings . . . . . . . . . . . . . . . . . . . . . . . . . . . 3-5Windows 2000 and Restricted Users. . . . . . . . . . . . . . . . . . . . . . . . . 3-7
Configuration Utility Tips . . . . . . . . . . . . . . . . . . . . . . . . . . . . . . . . . 3-8Tuning Performance . . . . . . . . . . . . . . . . . . . . . . . . . . . . . . . . . . . . . 3-9
Spotting Performance Bottlenecks . . . . . . . . . . . . . . . . . . . . . . . . . . 3-9Before You Modify Configuration Parameters . . . . . . . . . . . . . . . . . . . 3-11Minimizing Initial Connection Time . . . . . . . . . . . . . . . . . . . . . . . . 3-11Maximizing Runtime Throughput. . . . . . . . . . . . . . . . . . . . . . . . . . 3-14
4 Configuration Reference. . . . . . . . . . . . . . . . . . . . . . . . 4-1Configuration Settings Available in Pervasive.SQL 2000i
Server Configuration Parameters . . . . . . . . . . . . . . . . . . . . . . . . . . . . . . 4-2Access . . . . . . . . . . . . . . . . . . . . . . . . . . . . . . . . . . . . . . . . . 4-2Communication Buffer Size . . . . . . . . . . . . . . . . . . . . . . . . . . . . . 4-5Communication Protocols . . . . . . . . . . . . . . . . . . . . . . . . . . . . . . 4-7Compatibility . . . . . . . . . . . . . . . . . . . . . . . . . . . . . . . . . . . . . 4-10Data Integrity . . . . . . . . . . . . . . . . . . . . . . . . . . . . . . . . . . . . . 4-11Debugging . . . . . . . . . . . . . . . . . . . . . . . . . . . . . . . . . . . . . . . 4-15Directories . . . . . . . . . . . . . . . . . . . . . . . . . . . . . . . . . . . . . . . 4-18Memory Usage. . . . . . . . . . . . . . . . . . . . . . . . . . . . . . . . . . . . . 4-19Performance Tuning . . . . . . . . . . . . . . . . . . . . . . . . . . . . . . . . . 4-22NetWare RTSS (NetWare only) . . . . . . . . . . . . . . . . . . . . . . . . . . . 4-26Configuration Mapping . . . . . . . . . . . . . . . . . . . . . . . . . . . . . . . 4-27
Win32 Client Configuration Parameters . . . . . . . . . . . . . . . . . . . . . . . . . . 4-31Access . . . . . . . . . . . . . . . . . . . . . . . . . . . . . . . . . . . . . . . . . 4-31Communication Protocols . . . . . . . . . . . . . . . . . . . . . . . . . . . . . . 4-33Performance Tuning . . . . . . . . . . . . . . . . . . . . . . . . . . . . . . . . . 4-34Security. . . . . . . . . . . . . . . . . . . . . . . . . . . . . . . . . . . . . . . . . 4-34Application Characteristics . . . . . . . . . . . . . . . . . . . . . . . . . . . . . . 4-35Configuration Mapping . . . . . . . . . . . . . . . . . . . . . . . . . . . . . . . 4-36
Win16 Client Configuration Parameters . . . . . . . . . . . . . . . . . . . . . . . . . . 4-38Access . . . . . . . . . . . . . . . . . . . . . . . . . . . . . . . . . . . . . . . . . 4-38Application Characteristics . . . . . . . . . . . . . . . . . . . . . . . . . . . . . . 4-38Communication Protocols . . . . . . . . . . . . . . . . . . . . . . . . . . . . . . 4-39Security (NetWare server access only) . . . . . . . . . . . . . . . . . . . . . . . . 4-40Configuration Mapping . . . . . . . . . . . . . . . . . . . . . . . . . . . . . . . 4-40

v
Contents
5 Identifiers, DSNs, and Named Databases . . . . . . . . . . . . . . 5-1An Exploration of Object Names, Named Databases, and DSNs
Identifiers and Object Names . . . . . . . . . . . . . . . . . . . . . . . . . . . . . . . . 5-2Regular and Delimited . . . . . . . . . . . . . . . . . . . . . . . . . . . . . . . . . 5-2Maximum Length . . . . . . . . . . . . . . . . . . . . . . . . . . . . . . . . . . . 5-2Examples . . . . . . . . . . . . . . . . . . . . . . . . . . . . . . . . . . . . . . . . 5-3Unique Scope. . . . . . . . . . . . . . . . . . . . . . . . . . . . . . . . . . . . . . 5-3
DSN Creation Options . . . . . . . . . . . . . . . . . . . . . . . . . . . . . . . . . . . . 5-5Engine DSN Open Mode Options . . . . . . . . . . . . . . . . . . . . . . . . . . 5-5Client DSN Options . . . . . . . . . . . . . . . . . . . . . . . . . . . . . . . . . . 5-7
Connection Strings . . . . . . . . . . . . . . . . . . . . . . . . . . . . . . . . . . . . . . 5-9Maintain Named Databases . . . . . . . . . . . . . . . . . . . . . . . . . . . . . . . . . 5-12
Creating a New Bound Database . . . . . . . . . . . . . . . . . . . . . . . . . . . 5-13
6 Setting Up Referential Integrity . . . . . . . . . . . . . . . . . . . . 6-1An Introduction to Referential Integrity Structures
Concepts of Referential Integrity . . . . . . . . . . . . . . . . . . . . . . . . . . . . . . 6-2Definitions . . . . . . . . . . . . . . . . . . . . . . . . . . . . . . . . . . . . . . . 6-2Understanding Keys and Rules . . . . . . . . . . . . . . . . . . . . . . . . . . . . 6-3
Setting up Primary Keys . . . . . . . . . . . . . . . . . . . . . . . . . . . . . . . . . . . 6-6Creating a Primary Key During Table Creation . . . . . . . . . . . . . . . . . . . 6-6Adding a Primary Key to an Existing Table . . . . . . . . . . . . . . . . . . . . . 6-6
Setting up Foreign Keys . . . . . . . . . . . . . . . . . . . . . . . . . . . . . . . . . . . 6-8Creating a Foreign Key During Table Creation . . . . . . . . . . . . . . . . . . . 6-8Adding a Foreign Key to an Existing Table. . . . . . . . . . . . . . . . . . . . . . 6-8
7 Owner Names and Relational Security . . . . . . . . . . . . . . . . 7-1How to Work with Btrieve Owner Names and Relational Security
Owner Names . . . . . . . . . . . . . . . . . . . . . . . . . . . . . . . . . . . . . . . . . 7-2Relational Security . . . . . . . . . . . . . . . . . . . . . . . . . . . . . . . . . . . . . . 7-4
Securing a Database . . . . . . . . . . . . . . . . . . . . . . . . . . . . . . . . . . 7-4Setting up Users and Groups . . . . . . . . . . . . . . . . . . . . . . . . . . . . . 7-4
Owner Names and Relational Security . . . . . . . . . . . . . . . . . . . . . . . . . . . 7-6Data Encryption. . . . . . . . . . . . . . . . . . . . . . . . . . . . . . . . . . . . . . . . 7-7
8 Backup and Restore . . . . . . . . . . . . . . . . . . . . . . . . . . 8-1Understanding and Using the Backup Features of Pervasive.SQL
Understanding Archival Logging and Continuous Operations . . . . . . . . . . . . . . 8-2Archival Logging and Transaction Durability . . . . . . . . . . . . . . . . . . . . 8-2What if a File Restore is Needed . . . . . . . . . . . . . . . . . . . . . . . . . . . 8-3
Using Archival Logging. . . . . . . . . . . . . . . . . . . . . . . . . . . . . . . . . . . . 8-4General Procedures . . . . . . . . . . . . . . . . . . . . . . . . . . . . . . . . . . 8-4Setting up Archival Logging . . . . . . . . . . . . . . . . . . . . . . . . . . . . . . 8-5

vi
Contents
Roll Forward Command . . . . . . . . . . . . . . . . . . . . . . . . . . . . . . . 8-8Using Continuous Operations . . . . . . . . . . . . . . . . . . . . . . . . . . . . . . . 8-14
Starting and Ending Continuous Operations . . . . . . . . . . . . . . . . . . . . 8-14Backing Up a Database with BUTIL . . . . . . . . . . . . . . . . . . . . . . . . . 8-15Backing Up a Database with SQLUTIL . . . . . . . . . . . . . . . . . . . . . . . 8-18
9 Workgroup Engine in Depth . . . . . . . . . . . . . . . . . . . . . . 9-1Technical Details and Advanced Procedures for the Workgroup Engine
Networking . . . . . . . . . . . . . . . . . . . . . . . . . . . . . . . . . . . . . . . . . . 9-2NetBIOS . . . . . . . . . . . . . . . . . . . . . . . . . . . . . . . . . . . . . . . . 9-2MicroKernel Router Decision Algorithm . . . . . . . . . . . . . . . . . . . . . . 9-2
Technical Differences Server vs. Workgroup . . . . . . . . . . . . . . . . . . . . . . . 9-4Troubleshooting Workgroup Issues . . . . . . . . . . . . . . . . . . . . . . . . . . . . 9-6Re-directing Locator Files . . . . . . . . . . . . . . . . . . . . . . . . . . . . . . . . . . 9-8
10 Monitoring Database Resources . . . . . . . . . . . . . . . . . . . 10-1Using Monitor to Oversee Database Resources
Monitor Utility Overview . . . . . . . . . . . . . . . . . . . . . . . . . . . . . . . . . . 10-2Starting the Monitor Utility . . . . . . . . . . . . . . . . . . . . . . . . . . . . . 10-2
Setting Monitor Utility Options . . . . . . . . . . . . . . . . . . . . . . . . . . . . . . 10-5Monitoring MicroKernel Resources . . . . . . . . . . . . . . . . . . . . . . . . . . . . 10-6
Setting Screen Refresh Options . . . . . . . . . . . . . . . . . . . . . . . . . . . 10-6Viewing Active Files . . . . . . . . . . . . . . . . . . . . . . . . . . . . . . . . . . 10-6Viewing User Information . . . . . . . . . . . . . . . . . . . . . . . . . . . . . . 10-10Viewing MicroKernel Resource Usage. . . . . . . . . . . . . . . . . . . . . . . . 10-13Viewing MicroKernel Communications Statistics . . . . . . . . . . . . . . . . . 10-14
Monitoring SQL Interface Resources . . . . . . . . . . . . . . . . . . . . . . . . . . . . 10-18Monitoring Active SQL Connection Manager Sessions . . . . . . . . . . . . . . 10-18Understanding Session Information . . . . . . . . . . . . . . . . . . . . . . . . . 10-18Refreshing the Active Session List . . . . . . . . . . . . . . . . . . . . . . . . . . 10-19Deleting an Active Session . . . . . . . . . . . . . . . . . . . . . . . . . . . . . . 10-20
11 Testing Btrieve Operations Using the Function Executor . . . . . . 11-1Btrieve Operations Performed with the Function Executor Utility
Function Executor Overview . . . . . . . . . . . . . . . . . . . . . . . . . . . . . . . . 11-2Starting the 32-bit Function Executor Utility . . . . . . . . . . . . . . . . . . . . . . . 11-3
Features of the Win32 Function Executor. . . . . . . . . . . . . . . . . . . . . . 11-3Starting the 16-bit Function Executor Utility . . . . . . . . . . . . . . . . . . . . . . . 11-9Overview of the Function Executor Main Window . . . . . . . . . . . . . . . . . . . . 11-10Performing Operations . . . . . . . . . . . . . . . . . . . . . . . . . . . . . . . . . . . 11-13
Opening a File . . . . . . . . . . . . . . . . . . . . . . . . . . . . . . . . . . . . . 11-13Creating a Btrieve File. . . . . . . . . . . . . . . . . . . . . . . . . . . . . . . . . 11-14

vii
Contents
12 Adding Relational Access to Btrieve Files . . . . . . . . . . . . . . 12-1How to Create Table Definitions for Existing Btrieve Files
How to Use this Chapter . . . . . . . . . . . . . . . . . . . . . . . . . . . . . . . . . . . 12-2Before you Begin . . . . . . . . . . . . . . . . . . . . . . . . . . . . . . . . . . . . 12-2
Creating a Database . . . . . . . . . . . . . . . . . . . . . . . . . . . . . . . . . . . . . . 12-4Associating a Data File with a Database . . . . . . . . . . . . . . . . . . . . . . . . . . . 12-5Building a Table Definition . . . . . . . . . . . . . . . . . . . . . . . . . . . . . . . . . 12-7
Determining background information . . . . . . . . . . . . . . . . . . . . . . . . 12-7Naming Known Fields . . . . . . . . . . . . . . . . . . . . . . . . . . . . . . . . . 12-8Defining Remaining Columns . . . . . . . . . . . . . . . . . . . . . . . . . . . . 12-9Summary of Sample . . . . . . . . . . . . . . . . . . . . . . . . . . . . . . . . . . 12-12Generating a Table Definition. . . . . . . . . . . . . . . . . . . . . . . . . . . . . 12-13Verifying a Table Definition. . . . . . . . . . . . . . . . . . . . . . . . . . . . . . 12-15Conclusion . . . . . . . . . . . . . . . . . . . . . . . . . . . . . . . . . . . . . . . 12-15
13 Manipulating Btrieve Data Files with Maintenance . . . . . . . . . 13-1Handling Btrieve Files with the Maintenance Utility
Maintenance Utilities Overview . . . . . . . . . . . . . . . . . . . . . . . . . . . . . . . 13-2Btrieve Interactive Maintenance Utility . . . . . . . . . . . . . . . . . . . . . . . . . . . 13-3
Extended File Support . . . . . . . . . . . . . . . . . . . . . . . . . . . . . . . . . 13-3Long File Name Support. . . . . . . . . . . . . . . . . . . . . . . . . . . . . . . . 13-3The Btrieve Maintenance Utility Interface . . . . . . . . . . . . . . . . . . . . . . 13-4
File Information Editor. . . . . . . . . . . . . . . . . . . . . . . . . . . . . . . . . . . . 13-7File Information Editor Dialog Elements . . . . . . . . . . . . . . . . . . . . . . 13-7Information Editor Tasks . . . . . . . . . . . . . . . . . . . . . . . . . . . . . . . 13-13
Owner Names . . . . . . . . . . . . . . . . . . . . . . . . . . . . . . . . . . . . . . . . . 13-20Owner Names Tasks . . . . . . . . . . . . . . . . . . . . . . . . . . . . . . . . . . 13-20
Statistics Report . . . . . . . . . . . . . . . . . . . . . . . . . . . . . . . . . . . . . . . . 13-22Statistics Report Tasks . . . . . . . . . . . . . . . . . . . . . . . . . . . . . . . . . 13-22
Indexes . . . . . . . . . . . . . . . . . . . . . . . . . . . . . . . . . . . . . . . . . . . . . 13-24Index Tasks . . . . . . . . . . . . . . . . . . . . . . . . . . . . . . . . . . . . . . . 13-24
Data . . . . . . . . . . . . . . . . . . . . . . . . . . . . . . . . . . . . . . . . . . . . . . 13-27Importing and Exporting ASCII File Format . . . . . . . . . . . . . . . . . . . . 13-27Data Tasks . . . . . . . . . . . . . . . . . . . . . . . . . . . . . . . . . . . . . . . 13-28
Btrieve Command-Line Maintenance Utility (BUTIL) . . . . . . . . . . . . . . . . . . 13-32Commands . . . . . . . . . . . . . . . . . . . . . . . . . . . . . . . . . . . . . . . 13-32Viewing Command Usage Syntax . . . . . . . . . . . . . . . . . . . . . . . . . . 13-33Command Format . . . . . . . . . . . . . . . . . . . . . . . . . . . . . . . . . . . 13-35Command Files. . . . . . . . . . . . . . . . . . . . . . . . . . . . . . . . . . . . . 13-35Description Files . . . . . . . . . . . . . . . . . . . . . . . . . . . . . . . . . . . . 13-36Extended File Support . . . . . . . . . . . . . . . . . . . . . . . . . . . . . . . . . 13-36Owner Names . . . . . . . . . . . . . . . . . . . . . . . . . . . . . . . . . . . . . 13-37Redirecting Error Messages . . . . . . . . . . . . . . . . . . . . . . . . . . . . . . 13-37ASCII File Format . . . . . . . . . . . . . . . . . . . . . . . . . . . . . . . . . . . 13-37

viii
Contents
Rules for Specifying File Names on Different Platforms . . . . . . . . . . . . . . 13-38Importing and Exporting Data . . . . . . . . . . . . . . . . . . . . . . . . . . . . . . . 13-39
COPY. . . . . . . . . . . . . . . . . . . . . . . . . . . . . . . . . . . . . . . . . . 13-39LOAD . . . . . . . . . . . . . . . . . . . . . . . . . . . . . . . . . . . . . . . . . 13-40RECOVER . . . . . . . . . . . . . . . . . . . . . . . . . . . . . . . . . . . . . . . 13-42SAVE . . . . . . . . . . . . . . . . . . . . . . . . . . . . . . . . . . . . . . . . . . 13-44
Creating and Modifying Data Files . . . . . . . . . . . . . . . . . . . . . . . . . . . . . 13-47CLONE. . . . . . . . . . . . . . . . . . . . . . . . . . . . . . . . . . . . . . . . . 13-47CLROWNER . . . . . . . . . . . . . . . . . . . . . . . . . . . . . . . . . . . . . 13-49CREATE . . . . . . . . . . . . . . . . . . . . . . . . . . . . . . . . . . . . . . . . 13-49DROP . . . . . . . . . . . . . . . . . . . . . . . . . . . . . . . . . . . . . . . . . 13-51INDEX . . . . . . . . . . . . . . . . . . . . . . . . . . . . . . . . . . . . . . . . . 13-52SETOWNER . . . . . . . . . . . . . . . . . . . . . . . . . . . . . . . . . . . . . . 13-54SINDEX . . . . . . . . . . . . . . . . . . . . . . . . . . . . . . . . . . . . . . . . 13-55Compacting Btrieve Data Files . . . . . . . . . . . . . . . . . . . . . . . . . . . . 13-56
Viewing Data File Statistics . . . . . . . . . . . . . . . . . . . . . . . . . . . . . . . . . 13-58STAT . . . . . . . . . . . . . . . . . . . . . . . . . . . . . . . . . . . . . . . . . . 13-58
Displaying Btrieve Interface Module Version . . . . . . . . . . . . . . . . . . . . . . . 13-62VER. . . . . . . . . . . . . . . . . . . . . . . . . . . . . . . . . . . . . . . . . . . 13-62
Unloading the Btrieve Interface and Requester (DOS only) . . . . . . . . . . . . . . . 13-63STOP . . . . . . . . . . . . . . . . . . . . . . . . . . . . . . . . . . . . . . . . . . 13-63
Performing Continuous Operations . . . . . . . . . . . . . . . . . . . . . . . . . . . . 13-64
14 Converting Pervasive.SQL 2000i Data . . . . . . . . . . . . . . . . 14-1Maintaining Pervasive.SQL File Compatibility
Null Conversion . . . . . . . . . . . . . . . . . . . . . . . . . . . . . . . . . . . . . . . 14-2Converting MicroKernel Data Files. . . . . . . . . . . . . . . . . . . . . . . . . . . . . 14-5
Running the GUI Rebuild Utility . . . . . . . . . . . . . . . . . . . . . . . . . . 14-6Getting Help . . . . . . . . . . . . . . . . . . . . . . . . . . . . . . . . . . . . . . 14-6Converting a Data File . . . . . . . . . . . . . . . . . . . . . . . . . . . . . . . . 14-7
Command-Line Rebuild Utility. . . . . . . . . . . . . . . . . . . . . . . . . . . . . . . 14-12Running the Rebuild Utility on NetWare . . . . . . . . . . . . . . . . . . . . . . 14-12Changing Configuration Options . . . . . . . . . . . . . . . . . . . . . . . . . . 14-13Viewing the BREBUILD.LOG File . . . . . . . . . . . . . . . . . . . . . . . . . . 14-15
Deleting Temporary Files . . . . . . . . . . . . . . . . . . . . . . . . . . . . . . . . . . 14-16
A Description Files . . . . . . . . . . . . . . . . . . . . . . . . . . . . A-1Using Description Files to Store Btrieve File Information
Rules for Description Files. . . . . . . . . . . . . . . . . . . . . . . . . . . . . . . . . . A-2Description File Examples . . . . . . . . . . . . . . . . . . . . . . . . . . . . . . . . . . A-4Description File Elements . . . . . . . . . . . . . . . . . . . . . . . . . . . . . . . . . . A-7

ix
Figures
1-1 Conceptual View of Database Engine Configuration . . . . . . . . . . . . . . . . 1-6
2-1 Pervasive.SQL 2000i Relational Architecture: Client . . . . . . . . . . . . . . . . 2-82-2 Pervasive.SQL 2000i Relational Architecture: Workstation . . . . . . . . . . . . 2-92-3 Pervasive.SQL 2000i Relational Architecture: Workgroup . . . . . . . . . . . . . 2-10
3-1 Pervasive.SQL Control Center Screen . . . . . . . . . . . . . . . . . . . . . . . . 3-3
5-1 Maintain Named Database Wizard Dialog Box . . . . . . . . . . . . . . . . . . . 5-125-2 Maintain Named Databases Dialog Box . . . . . . . . . . . . . . . . . . . . . . . 5-145-3 Create Named Database Dialog Box . . . . . . . . . . . . . . . . . . . . . . . . . 5-15
6-1 Primary and Foreign Keys . . . . . . . . . . . . . . . . . . . . . . . . . . . . . . . 6-4
8-1 Roll Forward Dialog . . . . . . . . . . . . . . . . . . . . . . . . . . . . . . . . . . 8-98-2 Roll Forward Status Dialog . . . . . . . . . . . . . . . . . . . . . . . . . . . . . . 8-108-3 Roll Forward Continue on Error Dialog . . . . . . . . . . . . . . . . . . . . . . . 8-11
9-1 Redirecting Locator File Example. . . . . . . . . . . . . . . . . . . . . . . . . . . 9-13
10-1 Monitor Utility Main Dialog Box . . . . . . . . . . . . . . . . . . . . . . . . . . . 10-310-2 Connect to Remote Server Dialog Box . . . . . . . . . . . . . . . . . . . . . . . . 10-410-3 Monitor Settings Dialog Box . . . . . . . . . . . . . . . . . . . . . . . . . . . . . 10-510-4 MicroKernel Active Files Dialog Box . . . . . . . . . . . . . . . . . . . . . . . . . 10-710-5 MicroKernel Active Users Dialog Box . . . . . . . . . . . . . . . . . . . . . . . . 10-1110-6 MicroKernel Resource Usage Dialog Box . . . . . . . . . . . . . . . . . . . . . . 10-1310-7 MicroKernel Communications Statistics Dialog Box . . . . . . . . . . . . . . . . 10-1510-8 SQL Connection Manager Active Sessions Dialog Box . . . . . . . . . . . . . . . 10-1810-9 Monitor Settings Dialog Box . . . . . . . . . . . . . . . . . . . . . . . . . . . . . 10-20
11-1 32-bit Function Executor Main Window . . . . . . . . . . . . . . . . . . . . . . 11-311-2 16-bit Function Executor Main Window . . . . . . . . . . . . . . . . . . . . . . 11-911-3 Open Btrieve File Dialog Box . . . . . . . . . . . . . . . . . . . . . . . . . . . . . 11-1411-4 Modify File Definition Dialog Box . . . . . . . . . . . . . . . . . . . . . . . . . . 11-15
12-1 Create Table Wizard—Advanced Settings . . . . . . . . . . . . . . . . . . . . . . 12-512-2 Create Table Wizard—Specify Btrieve File. . . . . . . . . . . . . . . . . . . . . . 12-612-3 Create Table Wizard—Columns and Indexes Detected. . . . . . . . . . . . . . . 12-812-4 Create Table Wizard—Specify Columns . . . . . . . . . . . . . . . . . . . . . . . 12-1012-5 Create Table Wizard—Split Columns . . . . . . . . . . . . . . . . . . . . . . . . 12-10

x
12-6 Create Table Wizard—Save SQL Script . . . . . . . . . . . . . . . . . . . . . . . . 12-1412-7 Create Table Wizard—Finish . . . . . . . . . . . . . . . . . . . . . . . . . . . . . 12-14
13-1 Btrieve Maintenance Utility Main Window . . . . . . . . . . . . . . . . . . . . . . 13-513-2 File Information Editor . . . . . . . . . . . . . . . . . . . . . . . . . . . . . . . . . 13-713-3 Select File Dialog Box . . . . . . . . . . . . . . . . . . . . . . . . . . . . . . . . . . 13-1313-4 Create File Dialog Box . . . . . . . . . . . . . . . . . . . . . . . . . . . . . . . . . 13-1413-5 Description File Comments Dialog Box . . . . . . . . . . . . . . . . . . . . . . . . 13-1613-6 Specify ACS Information Dialog Box . . . . . . . . . . . . . . . . . . . . . . . . . 13-1813-7 Set/Clear Owner Name Dialog Box . . . . . . . . . . . . . . . . . . . . . . . . . . 13-2113-8 Statistics Report Dialog Box . . . . . . . . . . . . . . . . . . . . . . . . . . . . . . 13-2213-9 Statistics Report Example. . . . . . . . . . . . . . . . . . . . . . . . . . . . . . . . 13-2313-10 Create Index Dialog Box . . . . . . . . . . . . . . . . . . . . . . . . . . . . . . . . 13-2413-11 Drop Index Dialog Box . . . . . . . . . . . . . . . . . . . . . . . . . . . . . . . . . 13-2613-12 Format for Records in Input Sequential Files . . . . . . . . . . . . . . . . . . . . . 13-2813-13 Load Dialog Box. . . . . . . . . . . . . . . . . . . . . . . . . . . . . . . . . . . . . 13-2813-14 Save Data Dialog Box . . . . . . . . . . . . . . . . . . . . . . . . . . . . . . . . . . 13-2913-15 Copy Data Dialog Box . . . . . . . . . . . . . . . . . . . . . . . . . . . . . . . . . 13-3113-16 Sample Description File for the CREATE Command . . . . . . . . . . . . . . . . 13-5113-17 Sample Description File for INDEX Command . . . . . . . . . . . . . . . . . . . 13-54
14-1 Null Conversion Wizard Dialog Box . . . . . . . . . . . . . . . . . . . . . . . . . 14-314-2 Null Conversion Wizard - Specify Columns for Conversion Dialog Box. . . . . . 14-314-3 Null Conversion Wizard - Completing Dialog Box . . . . . . . . . . . . . . . . . 14-414-4 Rebuild Utility Main Window . . . . . . . . . . . . . . . . . . . . . . . . . . . . . 14-614-5 Select Files Dialog Box . . . . . . . . . . . . . . . . . . . . . . . . . . . . . . . . . 14-714-6 Settings Dialog Box . . . . . . . . . . . . . . . . . . . . . . . . . . . . . . . . . . . 14-814-7 Start Rebuild Dialog Box . . . . . . . . . . . . . . . . . . . . . . . . . . . . . . . . 14-1014-8 Rebuild Log Display. . . . . . . . . . . . . . . . . . . . . . . . . . . . . . . . . . . 14-11

xi
Tables
Tables
1-1 Files Associated With a Pervasive.SQL Database . . . . . . . . . . . . . . . . . . 1-31-2 Summary of Pervasive.SQL Utilities . . . . . . . . . . . . . . . . . . . . . . . . . 1-11
2-1 Platform Codes . . . . . . . . . . . . . . . . . . . . . . . . . . . . . . . . . . . . . 2-152-2 Component Type Codes. . . . . . . . . . . . . . . . . . . . . . . . . . . . . . . . 2-152-3 Platform Event Log Locations. . . . . . . . . . . . . . . . . . . . . . . . . . . . . 2-182-4 Event Log Fields . . . . . . . . . . . . . . . . . . . . . . . . . . . . . . . . . . . . 2-18
3-1 Parameter Settings . . . . . . . . . . . . . . . . . . . . . . . . . . . . . . . . . . . 3-53-2 Pervasive.SQL Win16, and Win32 Configuration Utilities . . . . . . . . . . . . . 3-63-3 Monitor Resource Usage Corresponding Configuration Settings . . . . . . . . . 3-103-4 Monitor Communications Corresponding Configuration Settings . . . . . . . . 3-10
4-1 Server Supported Protocols . . . . . . . . . . . . . . . . . . . . . . . . . . . . . . 4-94-2 Server Configuration Mapping . . . . . . . . . . . . . . . . . . . . . . . . . . . . 4-274-3 Client Supported Protocols . . . . . . . . . . . . . . . . . . . . . . . . . . . . . . 4-334-4 Client Configuration Settings . . . . . . . . . . . . . . . . . . . . . . . . . . . . . 4-364-5 Client 16-bit Supported Protocols . . . . . . . . . . . . . . . . . . . . . . . . . . 4-394-6 16-bit Client Configuration Settings . . . . . . . . . . . . . . . . . . . . . . . . . 4-40
5-1 Maximum Length of Identifiers. . . . . . . . . . . . . . . . . . . . . . . . . . . . 5-25-2 Unique Scope for Common Identifiers. . . . . . . . . . . . . . . . . . . . . . . . 5-35-3 DSN Open Modes and ODBC Connection Options . . . . . . . . . . . . . . . . 5-55-4 Engine Connection Strings . . . . . . . . . . . . . . . . . . . . . . . . . . . . . . 5-95-5 Client Connection Strings . . . . . . . . . . . . . . . . . . . . . . . . . . . . . . . 5-105-6 Maintain Named Databases Dialog Box Elements . . . . . . . . . . . . . . . . . 5-13
6-1 Choices for RI Rules . . . . . . . . . . . . . . . . . . . . . . . . . . . . . . . . . . 6-4
7-1 Owner Name Options . . . . . . . . . . . . . . . . . . . . . . . . . . . . . . . . . 7-2
8-1 Data Restore Limits After Crash . . . . . . . . . . . . . . . . . . . . . . . . . . . 8-38-2 Roll Forward GUI Options . . . . . . . . . . . . . . . . . . . . . . . . . . . . . . 8-98-3 Commands to Start and Stop Continuous Operation. . . . . . . . . . . . . . . . 8-14
9-1 Gateway Discovery Priorities . . . . . . . . . . . . . . . . . . . . . . . . . . . . . 9-29-2 Redirecting Locator File Path Descriptions . . . . . . . . . . . . . . . . . . . . . 9-10
10-1 Agent IDs . . . . . . . . . . . . . . . . . . . . . . . . . . . . . . . . . . . . . . . . 10-8

xii
Tables
11-1 Win32-Only Function Executor Controls. . . . . . . . . . . . . . . . . . . . . . . 11-711-2 Win16 Function Executor Controls . . . . . . . . . . . . . . . . . . . . . . . . . . 11-10
13-1 File Specification Controls . . . . . . . . . . . . . . . . . . . . . . . . . . . . . . . 13-813-2 Key Specification Controls . . . . . . . . . . . . . . . . . . . . . . . . . . . . . . . 13-1113-3 Key Segment Specification Controls . . . . . . . . . . . . . . . . . . . . . . . . . . 13-1213-4 Create File Dialog Controls. . . . . . . . . . . . . . . . . . . . . . . . . . . . . . . 13-1513-5 ACS Information Controls . . . . . . . . . . . . . . . . . . . . . . . . . . . . . . . 13-1813-6 Command-Line Maintenance Utility Commands . . . . . . . . . . . . . . . . . . 13-3213-7 Maintenance Utility Command Syntax on NetWare . . . . . . . . . . . . . . . . . 13-3413-8 Commands to Import and Export Data . . . . . . . . . . . . . . . . . . . . . . . . 13-3913-9 Commands to Create and Modify Data Files . . . . . . . . . . . . . . . . . . . . . 13-4713-10 Version 5.x and Earlier File Format Features . . . . . . . . . . . . . . . . . . . . . 13-61
14-1 Rebuild Utility Conversions . . . . . . . . . . . . . . . . . . . . . . . . . . . . . . 14-514-2 Controls in the Settings Dialog Box . . . . . . . . . . . . . . . . . . . . . . . . . . 14-9

xiii
About This Manual
This manual describes advanced procedures and provides technical information of use to the advanced user.
Some of the information in this manual may not apply to you. For example, the chapter on Gateway engine configuration does not apply to Server or Workstation engines. Such information is clearly marked throughout the manual.
Pervasive Software would appreciate your comments and suggestions about this manual. As a user of our documentation, you are in a unique position to provide ideas that can have a direct impact on future releases of this and other manuals. If you have comments or suggestions for the product documentation, post your request at http://webforum.pervasive.com/devtalk/ or send E-mail to [email protected].

xiv
About This Manual
Who Should Read This Manual
This manual is provided for advanced users. Advanced users are considered to have a strong understanding of the underlying operating systems on which you run your Pervasive.SQL-based applications. Advanced users should be comfortable configuring their operating system, and in many cases, must have administrative permissions to configure the database engine. Advanced users may include the following:
! network administrators of networks where one or more Pervasive.SQL-based applications are installed
! value-added resellers of Pervasive.SQL-based applications
! developers of Pervasive.SQL-based applications
xv
Manual Organization
Manual Organization
The following list briefly describes each chapter in the manual:
! Chapter 1—“Concepts of Database Maintenance”
This chapter provides a brief introduction to the basic concepts and procedures involved with the job of maintaining a database.
! Chapter 2—“Understanding the Pervasive Component Architecture”
This chapter explains in some detail the major components that make up Pervasive.SQL and some of their unique features.
! Chapter 3—“Changing Your Configuration”
This chapter explains how to use the graphical utility named Configuration and how to tune database engine performance.
! Chapter 4—“Configuration Reference”
This chapter provides detailed information about all of the available configuration options for engines, 32-bit clients, and 16-bit clients.
! Chapter 5—“Identifiers, DSNs, and Named Databases”
This chapter explains internal database names, public Data Source Names, and the limits on identifiers, such as table names, within a database.
! Chapter 6—“Setting Up Referential Integrity”
This chapter explains how to setup referential integrity rules to enforce the internal consistency of related data.
! Chapter 7—“Owner Names and Relational Security”
This chapter explains Btrieve security and SQL security and how the two schemes interact.
! Chapter 8—“Backup and Restore”
This chapter describes how to develop a regular backup procedure to ensure your data is protected, and how to restore from backup if necessary.

xvi
About This Manual
! Chapter 9—“Workgroup Engine in Depth”
This chapter provides technical details and advanced procedures regarding the Workgroup engine.
! Chapter 10—“Monitoring Database Resources”
This chapter explains how to use the graphical utility named Monitor to view users connected to a database, file usage information, and resource usage information.
! Chapter 11—“Testing Btrieve Operations Using the Function Executor”
This chapter explains how to use the utility named Function Executor to perform individual Btrieve operations.
! Chapter 12—“Adding Relational Access to Btrieve Files”
This chapter explains how to create DDFs for existing Btrieve files so that they can be accessed via ODBC.
! Chapter 13—“Manipulating Btrieve Data Files with Maintenance”
This chapter covers the graphical utility named Maintenance and the variety of functions it provides.
! Chapter 14—“Converting Pervasive.SQL 2000i Data”
This chapter covers the graphical utility named Rebuild and its functions, such as upgrading the file format version of a Btrieve file.
! Appendix A—“Description Files”
This appendix covers how to use description files to archive information about Btrieve data files you have created.
This manual also includes an index.
xvii
Conventions
Conventions
Unless otherwise noted, command syntax, code, and examples use the following conventions:
CASE Commands and reserved words typically appear in uppercase letters. Unless the manual states otherwise, you can enter these items using uppercase, lowercase, or both. For example, you can type MYPROG, myprog, or MYprog.
Bold Words appearing in bold include the following: menu names, dialog box names, commands, options, buttons, statements, etc.
Monospaced font
Monospaced font is reserved for words you enter, such as command syntax.
[ ] Square brackets enclose optional information, as in [log_name]. If information is not enclosed in square brackets, it is required.
| A vertical bar indicates a choice of information to enter, as in [file name | @file name].
< > Angle brackets enclose multiple choices for a required item, as in /D=<5|6|7>.
variable Words appearing in italics are variables that you must replace with appropriate values, as in file name.
... An ellipsis following information indicates you can repeat the information more than one time, as in [parameter . ..].
::= The symbol ::= means one item is defined in terms of another. For example, a::=b means the item a is defined in terms of b.

xviii
About This Manual

1-1
c h a p t e r
1Concepts of Database Maintenance
An Introduction to Database Maintenance
Pervasive.SQL 2000i is a comprehensive database management system built around Pervasive Software’s MicroKernel Database Engine. Pervasive.SQL offers easy installation, uncomplicated maintenance, and high levels of performance and reliability. While Pervasive.SQL can run for months or years with practically no maintenance, you can get the most out of it by understanding some of its unique features and learning how to perform useful tasks. This manual describes how to tune, configure, and manage your Pervasive.SQL engine and associated databases.
! “File Structure” on page 1-2
! “Access Methods” on page 1-4
! “Client/Server Communications” on page 1-5
! “Configurations” on page 1-6
! “Database Security” on page 1-8
! “Data Archival and Restoration” on page 1-9
! “Troubleshooting” on page 1-10
! “Summary of Pervasive.SQL Utilities” on page 1-11

1-2
Concepts of Database Maintenance
File Structure
All Pervasive.SQL databases use a common data format. This commonality allows different access methods, such as transactional and relational, to the same data. The database management system through which all access methods operate is called the MicroKernel Database Engine (MKDE).
Each Pervasive.SQL database table is a separate file with a default file extension of MKD. A MicroKernel file may contain both data and indexes, and is organized into various types of pages. A MicroKernel files contains data in the common data format.
Each Pervasive.SQL database also contains a set of data dictionary files, with a file extension of DDF. The DDF files contain the schema of the database. Each database has, at a minimum, three DDF files: file.ddf, field.ddf, and index.ddf.
(The MKDE is completely unconcerned with the schema of the data apart from the key fields. However, the provision for referential integrity or access via SQL requires knowledge of the schema.)
The names and locations of Pervasive.SQL databases are contained in a binary file named dbnames.cfg. On Windows-based systems, this file is located in the %winsysdir% directory. The file is located at sys:system\ for Netware. On Linux systems, the file is located at/usr/local/psql/etc/, and on Solaris at /opt/PVSWpsql/etc/. These locations represent the installation defaults.

1-3
File Structure
All of the files associated with a Pervasive.SQL database can be viewed from the operating system. Table 1-1 summarizes the associated files.
Table 1-1 Files Associated With a Pervasive.SQL Database
Type Description
Database Names Configuration
The dbnames.cfg file. Contains the names and locations of the Pervasive.SQL databases.
Table Data (common data format)
Files named, by default, tablename.MKD. Each database table has a corresponding MicroKernel file.
Data Dictionary Files with an extension of DDF. At a minimum, three always exist for each database: File.DDF, Field.DDF, and Index.DDF.
1-4
Concepts of Database Maintenance
Access Methods
The two primary methods in which data is accessed from Pervasive.SQL databases are transactional and relational.
With transactional, an application program navigates up and down along either physical or logical pathways through data records. Using a navigational API, an application program provides direct control and allows a developer to optimize data access based on knowledge of the underlying structure of the data. Btrieve is an example of a navigational database engine.
Relational is an access method in which data is represented as collections of tables, rows, and columns. The relational model insulates the developer from the underlying data structure and presents the data in a simple table format. ODBC is an example of a relational access method.
A single application program may include both types of access. For example, an application may use transactional access for adding and changing data, and relational access for querying the data and report writing.
You need to know the access method(s) used by the application programs that rely on your installation of Pervasive.SQL. The access methods may have different configurations. You may need to customize the configuration to optimize a particular access method.
Also, troubleshooting is easier when you are aware of the access method(s) used by a given application program. For example, if an application program uses relational access through ODBC, you may need to troubleshoot a problem at the ODBC level rather than at the database management system.
See Chapters 3 and 4 for the tasks and references pertaining to customizing configurations.

1-5
Client/Server Communications
Client/Server Communications
The MKDE supports two types of processing modes, stand-alone (also called workstation) and client/server. A stand-alone application program accesses a local copy of the MKDE. The local MKDE calls upon the operating system of the workstation which performs the I/O on a local or networked hard disk.
Client/server mode uses a client/server MKDE executing on a shared file server. When an application program is operating in client/server mode, a communication program called a requester is called upon instead of the local MKDE. This requester passes transactional-level requests and data records between the application program and the client/server MKDE using the network protocol supported by the operating system. File I/O functions are completely bypassed in client/server mode and the workstation has no operating system handles allocated to shared data files. Database manipulation is performed by the server-based MKDE on behalf of each workstation.
Note that the processing mode is determined by the configuration of the workstation and not the application program itself. This means that an application is capable of running in both workstation and client/server modes. The application program does not have to be recompiled to switch the application to client/server mode from workstation mode.
The stand-alone version of Pervasive.SQL is referred to as the Workstation version. The client/server versions of the product include Workgroup and Server.
The client/server configurations may be customized for the Workgroup and Server versions of Pervasive.SQL. A Configuration utility exists in the Pervasive Control Center (PCC) to facilitate the configuration of client/server configurations as well as stand-alone configurations.
See Chapters 3 and 4 for the tasks pertaining to configuring the client/server communications and database engine.

1-6
Concepts of Database Maintenance
Configurations
You can configure separate settings for the server and client aspects of the database engine. The settings allow you to optimize the performance of the engine based on your business requirements.
Figure illustrates the flow from an application program to the database files at the operating system. The database engine resides between the application program and the data files.
Figure 1-1 Conceptual View of Database Engine Configuration
The types of settings that you can configure for server include the following:
! Access
! Communications buffer size
! Communication protocols
! Compatibility (with previous versions of the MKDE)
! Data integrity
! Debugging
! Directories
! Memory usage
! Performance
ApplicationProgram
Client Aspects Server Aspects
ClientN
etw
ork
Ser
vice
s
Net
wor
k S
ervi
ces
Pervasive.SQL Database Engine Configuration
AccessMethod
AccessMethod
MKDE
DatabaseFiles atOperatingSystem

1-7
Configurations
The types of settings that you can configure for client include the following:
! Access
! Communication protocols
! Performance
! Security
! Application characteristics
You configure these settings within the PCC. See Chapters 3 and 4 for the tasks and references pertaining to configuration.

1-8
Concepts of Database Maintenance
Database Security
The access to a Pervasive.SQL database can be protected several ways. Administrative-level security is set through the operating system. You can control who can administer a Pervasive.SQL database with the security mechanisms native to the operating system.
Pervasive.SQL also provides security at the user and group levels. You can control who can access the data and at what capability. For example, for each table within a Pervasive.SQL database, you can specify whether a user or group can create, select, update, insert into, delete, or alter the table.
You establish security by setting a password for the entire database. At that point, the only user authorized to access the database is a default user named Master. You can then add additional users and groups.
Security can be set within the PCC. Also supported are two Structured Query Language (SQL) statements pertaining to security: GRANT and REVOKE. GRANT and REVOKE also allow you to set security at the column level if you choose.
(The GRANT syntax integrates with Btrieve owner names, which provide security for use with the Btrieve interface. Btrieve owner names are essentially passwords that can be assigned to MicroKernel files along with certain types of behavior, such as read-only, read-write, and so forth.)
See Chapter 7 for the tasks pertaining to security, users, and groups.

1-9
Data Archival and Restoration
Data Archival and Restoration
Backing up data is a routine part of protecting your databases and ensuring disaster recovery. You have several ways in which you can back up and restore your Pervasive.SQL databases.
If your business allows you to stop all applications that access a Pervasive.SQL database, you may use any of the operating system utilities, or third-party software, to backup or restore the database files.
Archival logging is another backup method that you can use to supplement operating system utilities. Archival logging allows you to keep a log of all database operations since your last backup. In case of a system failure, you can restore the data files from backup then roll forward the changes from the log file to return the system to the state it was in prior to the system failure.
Continuous operations allows you to backup database files while the database engine is running and users are connected. After starting Continuous Operations, the database engine closes the active data files and stores all changes in temporary data files (called delta files). When the backup is complete, you turn off Continuous Operations. The database engine then reads the delta file and applies all the changes to the original data files.
(The Pervasive System Analyzer, which runs on Win-32 platforms, lets you archive existing Pervasive.SQL components when you install a newer version of Pervasive.SQL. Although not used for backing up database files, the Pervasive System Analyzer is useful if you need to restore a previous version of the Pervasive.SQL product.)
See Chapters 8 for the tasks pertaining to backing up and restoring databases.

1-10
Concepts of Database Maintenance
Troubleshooting
The Pervasive.SQL User’s Guide and both of the Getting Started with Pervasive.SQL guides (Server and Workstation) contain troubleshooting information. A good place to start if you have troubleshooting questions is the troubleshooting chapter in those books.
The Getting Started books contain troubleshooting information pertaining to installing the Pervasive.SQL products. The User’s Guide contains general troubleshooting information as well as an extensive list of frequently asked questions (FAQs).
The Pervasive System Analyzer is a utility that you may also use for troubleshooting. This utility lets you analyze system and archived components, test network communications, and test the database engines.
Other resources at your disposal for troubleshooting include the Pervasive knowledge base, http://support.pervasive.com/kb, which contains information based on actual customer solutions and common problems, and Pervasive customer support at http://www.pervasive.com/support.
Note that your purchase of Pervasive products entitles you to 30 days of free technical support for installation and configuration problems.

1-11
Summary of Pervasive.SQL Utilities
Summary of Pervasive.SQL Utilities
Pervasive.SQL comes with a variety of utilities designed to help you control and manage your databases. Most of the utilities run only on 32-bit Windows and allow remote function to NetWare or Unix database server engines.
Table 1-2 Summary of Pervasive.SQL Utilities
Utility name Runs on these platforms
Description Server, Workstation, or Workgroup
Pervasive Control Center
Win32 Utilities warehouse for Pervasive.SQL 2000i. Shows list of engines and databases available.
All
Configuration Win32 Manipulates settings for Pervasive client and server components.
All
Monitor Win32 Monitors server engine activity, useful for database administration and programming diagnostics.
Server, Workgroup, Workstation - local
Server - remote
Function Executor
Win16, Win32
Executes Btrieve operations, enabling you to learn how the Btrieve interface works or test and debug an application.
All
Pervasive.SQL Maintenance
Win32 and NetWare
Performs common Pervasive.SQL file and data manipulations, such as importing and exporting data.
Windows NT and NetWare servers
All 32-bit Windows workstations and Unix for command-line version
SQL Data Manager - invoked automatically within PCC
Win32 Allows you to execute SQL Statements interactively. Creates and maintains Data Dictionary Files (DDFs) and database files.
All - local
Server - remote

1-12
Concepts of Database Maintenance
Rebuild Win16, Win32, and NetWare
Converts previous versions of MicroKernel files into more recent versions.
Windows and NetWare servers
Windows 32-bit workstations
Command-line version on Unix
User Count Administrator
Win16 and Win32
Manages Pervasive.SQL user count keys and licenses.
Windows and NetWare servers remotely
Workgroup local
Command-line version on Unix
ODBC Administrator
Win32 Sets up Data Source Names (DSNs) for client and engine interfaces
All Windows engines - local
Server - remote
Gateway Locator
Win32 Used to configure and maintain gateway configuration files for the workgroup engine.
Workgroup engine only
Pervasive System Analyzer
Win32 Analyzes system components, runs communication tests, and archives or restores database engine files on your system.
All
Table 1-2 Summary of Pervasive.SQL Utilities
Utility name Runs on these platforms
Description Server, Workstation, or Workgroup

2-1
c h a p t e r
2Understanding the Pervasive Component Architecture
A Detailed Discussion of Smart Components and Related Features
This chapter covers Smart Components and other features designed to offer a trouble-free environment for installing and running critical applications. This chapter is divided into the following sections:
! “Pervasive.SQL 2000i Database Engine” on page 2-2
! “Relational Architectural Overview” on page 2-7
! “Overview of Smart Components” on page 2-11
! “Component Identification” on page 2-13
! “Unique Component Naming” on page 2-14
! “Dynamic Binding” on page 2-16
! “Pervasive.SQL Event Logging” on page 2-18
! “Error Code Clarification” on page 2-20
! “Diagnosing Load Errors” on page 2-21
! “Pervasive Auto-Reconnect” on page 2-23

2-2
Understanding the Pervasive Component Architecture
Pervasive.SQL 2000i Database Engine
The Pervasive.SQL 2000i engine consists of two database sub-engines:
! MicroKernel Database Engine (MKDE), which provides Btrieve/MicroKernel API support for Pervasive.SQL 2000i applications.
! SQL Relational Database Engine (SRDE), which provides ODBC support for Pervasive.SQL 2000i applications.
Common Ad-dress Space
Pervasive.SQL uses an optimized memory architecture that provides high performance for both transactional and relational data access methods. Both the MKDE and the SRDE load and operate in the same process address space, minimizing the CPU time required to communicate between them.
Client/Server Version Check-ing
The client and server components include a feature designed to guarantee engine-to-client version compatibility. When a client requester first connects to an engine, the client requester compares its internal router version with the value returned from the engine by a Btrieve Version (26) call. If the client version is older than the engine, a message dialog box is displayed on the client system with the message “Engine components’ Version is different from Clients’” along with a suggestion to run Pervasive System Analyzer (PSA). The same message is also logged in the client’s PVSW.LOG file. This message is only a warning. Although the client is not prevented from connecting to the engine in this situation, keep in mind that older clients are not tested against newer engines. Pervasive only guarantees compatibility between engines and clients if the clients are the same version as, or newer than, the engines. When prompted by this message, if you choose not to run PSA to archive older components and replace them with newer ones, you can expect the product to behave unpredictably until the client version is equal to or greater than the engine version.
Row Level Locking
Row level locking improves database engine performance in multi-user environments in which many updates and writes occur at the same time, or in which transactions remain open for an extended period of time.

2-3
Pervasive.SQL 2000i Database Engine
In releases prior to Pervasive.SQL 2000i SP3, the database engine locked data pages containing more than one record in order to update any record on that page. Any other client attempting to update records on that page while the page was still locked had to wait until the first operation released the page lock. This behavior occurred even though the records needed by the second operation were not affected by the first operation.
With the current row level locking architecture, a transaction locks only the rows that it affects directly, not the entire page. One client can update records on a given page at the same time as another client updates different records on the same page. Waiting is necessary only when a second application attempts to modify the exact same records currently locked by the first application. Thus, row level locking decreases overall wait time and improves performance in a multi-user environment.
This feature is completely transparent within the MicroKernel Database Engine. There are no changes to the Btrieve API, data file format, configuration settings, or any external component. This feature is always on and is supported across Server, Workgroup, and Workstation as well as all supported operating system platforms. This feature is supported for data file format v6.x and later. It is not supported for data file format v5.x or earlier.
In this release, row level locking is implemented for key pages and data pages only, not variable pages. Furthermore, a small percentage of key page changes may cause key entries to move from one page to another. An example is when a key page is split or combined. These changes retain a full page lock until the transaction is completed.
MicroKernel Database En-gine
The MicroKernel Database Engine (MKDE) provides Btrieve/MicroKernel API support for Pervasive.SQL 2000i applications. All versions of the engine—Server, Workstation, and Workgroup—support local applications running on the same computer as the engine. The server MKDE (which runs on Linux, Solaris, Windows NT, and NetWare) supports both local applications and remote (client/server) applications. The workgroup MKDE supports applications running on remote machines as well and will service requests made by another peer workgroup engine on a remote machine.
There are four versions of the MicroKernel engine in this release. The server engine runs on Windows NT and NetWare. (The NetWare

2-4
Understanding the Pervasive Component Architecture
version runs as an NLM directly on a NetWare server.) The workstation engine is a stand-alone engine that runs in Windows 95/98/NT and cannot be accessed from remote machines. The fourth engine is the new workgroup engine. This engine can service requests from other workgroup engines or from the Pervasive.SQL requesters running on a remote machine.
For servers, Btrieve client platforms include DOS and Windows 3.x/95/98/NT. Win16 Btrieve applications running on a Win32 workstation that is executing a Pervasive.SQL 2000i engine locally are supported using the existing Btrieve thunk mechanism. Thunking is also the default configuration for remote Pervasive.SQL 2000i engine access from a Win16 Btrieve application running on a Win32 workstation. It is possible to build Btrieve applications as NLMs (NetWare Loadable Modules) that access a local MKDE on NetWare. DOS applications running on a Win95/98 machine use BTRBox95.
The workstation MKDE is loaded when a Pervasive.SQL 2000i application starts running and a Btrieve or ODBC API call is made. The workstation MKDE remains loaded in memory until all Btrieve or ODBC applications have correctly released engine resources, that is, they have logged out, closed files, and issued the correct number and type of Stop operations.
The workgroup engine is by default configured to start up when you log into Windows. A workgroup engine can service requests made by another peer engine if the files have already been opened by the engine. It can also serve in a gateway mode by configuring a particular machine and database engine to act as a gateway, thus preventing another workgroup engine from opening the files.
A “tray icon” is displayed to provide a graphical indication when a Pervasive.SQL 2000i workstation or workgroup MKDE is running. No tray icon is displayed when the workstation MKDE is not running. The tray icon does not display for the server engine.
The Btrieve and ODBC APIs in Pervasive.SQL 2000i support writing distributed database applications that hide the details of connecting to a local or remote database engine from an application. Using this architecture, an application can access data that is co-located with the application (that is, running on the same computer as the application) while also accessing data on a remote computer. Moreover, a SQL database can be distributed by having DDFs (data dictionary files) serviced by a local MicroKernel Database Engine

2-5
Pervasive.SQL 2000i Database Engine
and data files (tables) serviced by a remote MicroKernel Database Engine. Such a SQL database, which is not serviced exclusively by a local MicroKernel Database Engine, is referred to as a “mixed access database.”
Mixed-access databases are subject to the following constraints:
! The following features are not supported: referential integrity (RI), bound databases, triggers, distributed transaction atomicity (requires two-phase commit).
! The SRDE and the MicroKernel Database Engine must be running on the same computer to access DDFs.
! Data files for tables that are involved in an RI relationship, or those that have any triggers defined for them, or are in a bound named database, cannot be opened by a remote MicroKernel Database Engine.
! When opening a file, the SRDE does not verify the version of the MicroKernel Database Engine servicing the request. If an operation that requires v6.30 or higher MicroKernel Database Engine API support (for example, shared locking) is issued to a MicroKernel Database Engine less than v6.30, then an error code is returned. When opening DDFs or when attempting to bind a DDF or data file, the SRDE verifies that the local MicroKernel Database Engine is servicing the request.
Asychronous I/O
The Server MicroKernel engine for Win32 uses asychronous I/O when writing pages to disk. This feature improves performance. The MicroKernel quickly writes pages to the Windows system cache. In turn, Windows signals when the pages are on disk, helping the MicroKernel to perform efficiently for write operations. Read performance is also enhanced when there are many concurrent operations being done in the MicroKernel at the same time, especially if you access your dataset on a striped set of disk drives. Each read causes a worker thread to wait until the page is available. With asynchronous I/O, the operating system can pool the work of multiple readers to make the read operations more efficient.
SQL Relational Database En-gine
The Pervasive.SQL Relational Database Engine (SRDE) provides ODBC support for Pervasive.SQL applications. The SRDE now runs as a service on Windows NT and as an NLM on NetWare.

2-6
Understanding the Pervasive Component Architecture
SRDE platforms include Windows 95/98/NT/NetWare. On NetWare, the workstation engine has no user count.The same SRDE is included in both the Win32 workstation or workgroup engine and NT server engine versions of Pervasive.SQL 2000i. On NetWare servers, NLM versions of the ODBC communications server, ODBC Driver Manager, and SRDE will be provided.
ODBC client platforms include Windows 95/98/NT. Remote ODBC application access to the SRDE requires installation of the ODBC Client, which is a specialized ODBC driver that routes client-side ODBC calls to the ODBC communications server over the network.
Win16 ODBC applications running on a Win32 workstation that is executing a Pervasive.SQL 2000i engine locally are supported using the ODBC thunk mechanism. Thunking with the Microsoft-provided ODBC thunk DLLs is required for remote Pervasive.SQL 2000i engine access from a Win16 ODBC application running on a Win32 workstation.
Features of the SRDE include:
! Atomic statements
! Bidirectional cursors (using the ODBC Cursor Library)
! Outer join support
! Updatable views
! ODBC data type support
! Multiple variable length columns in a table
The ODBC communications server is a Windows NT service that performs the following functions:
! supports network communication for ODBC Clients
! routes ODBC calls to the server-side ODBC Driver Manager (which, in turn, routes ODBC calls to the SRDE)

2-7
Relational Architectural Overview
Relational Architectural Overview
The following diagram illustrates changes in the architectural components of Pervasive.SQL 2000i’s relational ODBC interface for the server version. The SQL Connection Manager (W3SQLMGR.EXE) starts and runs as a service on Windows NT, as an NLM on NetWare, and as a daemon on Unix.
Pervasive.SQL 2000i Relational Architecture: Server
The SQL Connection Manager for the server consists of one executable and three DLL files:
! W3SQLMGR.EXE - SQL Connection Manager
! W3MGRMSG.DLL - Message File
! W3MGRRES.DLL - Resource DLL
! W3MGRRSX.DLL
Once the first SQL Connection Manager is opened, it invokes a child process of the same service. The child process is used to manage requests for 1-25 ODBC connections. If there are more than 25 connections, the next 25 will be served by a second child process, and subsequent connections in increments of 25 processes will be served by additional separate connection manager processes.
The SQL Connection Manager uses the ODBC Driver Manager to make calls to the SQL Relational Database Engine (SRDE), which in turn rests on top of the MicroKernel.
This following diagram illustrates the relational architecture of Pervasive.SQL 2000i on the client machine. The client talks to the SQL Connection Manager on the server through TCP/IP or SPX.

2-8
Understanding the Pervasive Component Architecture
Figure 2-1 Pervasive.SQL 2000i Relational Architecture: Client
The following diagram illustrates the relational architecture of Pervasive.SQL 2000i on a standalone workstation.
SQL ConnectionManager
SRDE
ODBC DriverManager
MicroKernel
SERVER
Pervasive.SQLDriver Manager
SQL Client Server
ODBC DriverManager
CLIENT

2-9
Relational Architectural Overview
Figure 2-2 Pervasive.SQL 2000i Relational Architecture: Workstation
The following diagram illustrates the relational architecture of Pervasive.SQL 2000i in a workgroup computing environment.
WORKSTATION
ODBC DriverManager
MicroKernel
SRDE
Pervasive.SQLODBC Application
ODBC DriverManager
ODBC ClientInterface
SQL ConnectionManager

2-10
Understanding the Pervasive Component Architecture
Figure 2-3 Pervasive.SQL 2000i Relational Architecture: Workgroup
CommonFormat
Data Storage
ODBC DriverManager
MIF
SRDE
Pervasive.SQLODBC Application
ODBC DriverManager
ODBC ClientInterface
SQL ConnectionManager
WORKGROUP
ODBC DriverManager
MicroKernel
SRDE
Pervasive.SQLODBC Application
ODBC DriverManager
ODBC ClientInterface
SQL ConnectionManager
ODBC DriverManager
MIF
SRDE
Pervasive.SQLODBC Application
ODBC DriverManager
ODBC ClientInterface
SQL ConnectionManager

2-11
Overview of Smart Components
Overview of Smart Components
Since version 7.0, Pervasive.SQL has offered a new component architecture called Smart Components, which improves installation and run-time reliability and makes application troubleshooting easier.
In earlier Pervasive Software releases, some developers experienced one or more of the following problems:
! Installation of a new application (with old client Requester components) overwrote new Requester components in shared locations, causing old applications to fail the next time they ran.
! Installation of a new workstation engine was incompatible with existing client Requesters. Existing client Requesters loaded the old engine, failing to provide features required by the new application.
! Difficulty identifying the function, version, and patch level of installed components.
! Difficulty determining the root cause of run-time operational failures, especially in client/server operation.
The Smart Components architecture is designed to reduce or eliminate these problems by providing the following features and benefits:
! Component Identification: Component function, major, and minor functional level are easily identified to aid in problem resolution.
! Unique Component Naming: Each release of a given component has a unique file name, so that updated versions of a component never overwrite previous versions. A Pervasive upgrade will not damage existing Pervasive-based applications.
! Dynamic Binding: Pervasive.SQL no longer loads a fixed set of program files into memory. Dependent components are loaded only if another component specifically requires its functionality, major, and minor functional level. Incompatible components are never accidentally loaded, reducing or eliminating version-related failures.
! Pervasive.SQL Event Logging: All components report errors and messages to a central log, easing the burden of troubleshooting.

2-12
Understanding the Pervasive Component Architecture
! Error Code Clarification: Error conditions from underlying layers are now logged through to the Pervasive.SQL Event Log, rather than hidden within an umbrella status code. Because the root causes of certain errors can now be more quickly determined, troubleshooting is much easier.

2-13
Component Identification
Component Identification
Each component contains a unique embedded Component ID. The Component ID is a string containing information such as:
! Designated operating system
! Functionality
! Major functional level
! Minor functional level
! Build site
! Build number
! Timestamp
! Checksum
Pervasive Software Customer Support representatives can browse the file image of a component to locate the Component ID and verify that it is the correct component.

2-14
Understanding the Pervasive Component Architecture
Unique Component Naming
Pervasive.SQL components have new unique names that reflect the platform, type, and functional level of the component. Each subsequent release of a component (even patches) will have a slightly different name, so that no two releases of the same functional component have the same file name.
This feature both identifies the exact functionality of a file and prevents different versions of a file from overwriting each other during installation of a new version or uninstall to a previous version.
Components are named using a well-defined scheme. All component names adhere to 8.3 notation for compatibility on systems that do not support long file names (such as Windows 3.1). The first two characters of the prefix identify the designated run-time platform. The next three characters identify the component functionality—its type. The sixth character identifies the major functional level (hexadecimal, range 1 to F), and the final two characters identify the minor functional level (hexadecimal, range 00 to FF).
The major functional level defines the version of the component, which began at one (1) with the first release of Pervasive.SQL. The minor functional level begins at zero (0) for each major functional level. Whenever the major functional level increments, the minor functional level is reset to zero. The minor functional level increases with each patch or public release of the component if it contains any changes whatsoever. The following tables show the Platform Codes and a sampling of Component Type Codes.
W3MIF100.DLLPlatformTypeMajor Functional LevelMinor Functional Level

2-15
Unique Component Naming
Table 2-1 Platform Codes
Platform Code
Windows 3.1, Windows for Workgroups (Win16) W1
Windows 95, Windows NT (Win32) W3
Windows NT NT
NetWare 3.2 and 4.x NW
Table 2-2 Component Type Codes
Component Type Code
Btrieve Interface DLL BIF
Network Services Layer NSL
MicroKernel Interface DLL MIF

2-16
Understanding the Pervasive Component Architecture
Dynamic Binding
Rather than load a hard-coded file name, upstream components that require the functionality of a downstream component now can specify what functionality and what revision they require. An upstream component loads before a downstream component. For example, the application loads the Btrieve interface component, or .BIF. The .BIF then loads the .MIF, or the MicroKernel interface module. In this example, the .BIF is an upstream component, and the .MIF is a downstream component.
Upstream components load their downstream components with the help of a component called the Abstract OS Services DLL (Services DLL). The upstream component provides the Services DLL with a binding rule, specifying the type and minimum functional level of the required downstream component. Based on the binding rule, the Services DLL constructs a file name template and searches for a file that can deliver at least the required functionality. When it finds such a file, it returns the full path to the calling component, which then loads the specified downstream component.
When the engine is first started, the operating system searches the default path for W3BTRV7.DLL and W3SCMV7.DLL. On Windows 9X, these DLLs are installed into the system directory.
Once these DLLs are loaded, when looking for additional downstream components, Smart Components first explore the directory specified in the engine’s “InstallInfo\InstallDir” registry key. This registry key is written silently during product installation in the Pervasive Software registry pathway based on the target installation directory. If the requested component is not found in the directory specified in the registry, Smart Components then searches on the platform’s default path.
The Services DLL employs a best first match search algorithm, meaning that it stops in the first directory where it finds an acceptable match and then returns the highest minor functional level of the specified component that exists in that directory.
For example, if a component requires W1MIF101.DLL or later, the Services DLL searches until it finds an instance of W1MIF1xx.DLL, where xx is 01 or greater. Then, the Services DLL searches that directory for the instance of W1MIF1xx.DLL with the greatest value of xx. This file name is then returned to the calling component. For

2-17
Dynamic Binding
example, if W1MIF101.DLL and W1MIF102.DLL are present in that directory, W1MIF102.DLL is returned. If there is an instance of W1MIF103.DLL in a different directory later on the search path, it is never reached.

2-18
Understanding the Pervasive Component Architecture
Pervasive.SQL Event Logging
With the release of Pervasive.SQL 7 and greater, the MicroKernel message log has been replaced by a new centralized event log. All Pervasive.SQL 7 and later components write status and error messages to the same log file. In addition, if two or more Pervasive-based applications are running on the same machine, they share a single event log.
The event log, called PVSW.LOG (or event.log on Unix), is located in the Windows root directory of each machine that is running a Pervasive-based application (on Unix, it is located in the bin subdirectory of the psql installation directory). This location cannot be changed or customized. In the following table, C: represents the drive letter where your operating system is installed.
Syntax The event log consists of ASCII text messages that adhere to the following syntax description:
Table 2-3 Platform Event Log Locations
Platform Event log location
Windows 95/98 and Windows 3.1x C:\WINDOWS
Windows NT C:\WINNT
NetWare SYS:SYSTEM
Unix ~psql/bin
Table 2-4 Event Log Fields
Field Length (in Bytes)
Contents
Date 10 Automatic date-stamp in mm/dd/yyyy format.
Time 8 Automatic time-stamp in hh:mm:ss format.
Component 15 File name of component returning the error (prefix only, no extension).
Process 8 Instance ID of the component, which is either the process ID of the component or the thread group ID in NetWare.

2-19
Pervasive.SQL Event Logging
An entry may be followed by binary data in standard ASCII hexadecimal format. There is no limit to the length of the binary data.
Sample Entry The following shows an example of the type of data contained in the event log.
Process Name
Up to 15 Path and name of the component, truncated to the last 15 characters.
Computer Name
Up to 15 Name assigned to the machine hosting the process, truncated to the first 15 characters.
Type 1 A single character: I for Information, W for Warning, or E for Error.
Category Up to 10 A component-specific text field. Components are not required to provide a value in this field.
Msg ID Up to 8 A numeric message identifier that corresponds to a message string within a resource file associated with the calling component.
Message Up to 1,024 The message text which may be either a string retrieved from a resource associated with the calling component or a text string passed directly from the calling component.
Table 2-4 Event Log Fields continued
Field Length (in Bytes)
Contents
Date Time Component Process Process Name
11-04-1997 14:01:05 NTMKDE 000000DD W3DBSMGR.EXE
Computer Name Type Category Msg ID Message
LABSERVER I MicroKernel is using default settings.

2-20
Understanding the Pervasive Component Architecture
Error Code Clarification
In earlier Btrieve and SQL Interface releases, top-level components occasionally subsumed error codes from underlying components into an umbrella error code returned by the top level component. In some cases, this situation could make troubleshooting difficult because a single error code could have a wide range of possible root causes.
Starting with Pervasive.SQL 7, most top level components were redesigned to pass through error codes from underlying components so that the actual source of the error is clearly identified to the calling application and/or in the log file.
In situations where an error code remains overloaded, specific information in the Pervasive.SQL event log should identify the root cause of the error.

2-21
Diagnosing Load Errors
Diagnosing Load Errors
Pervasive.SQL provides the following types of information you can use in diagnosing module load errors:
! Status codes. You can refer to the Status Codes and Messages manual for more information about the specific status code returned.
! Event log. You can look for the following information in the Pervasive.SQL Event Log to get additional information about a specific module load error:
! On-screen errors. The event log is not functional until the Services DLL loads. Therefore, if a load error occurs while binding to the Services DLL, the event log does not log the error. Instead, Pervasive.SQL can display an on-screen error.
You must enable the Services DLL to display on-screen module load errors by setting the PVSW_DISP_LOAD_ERRS environment variable. Its format is as follows:
Component Name The logical or physical name of the module that received the load failure. Logical names used are:
ServicesIfc—Abstract OS ServicesBtrvIfc—BtrieveMKDEIfc—MicroKernelPSQLIfc—Pervasive.SQL
The physical name is logged if the calling module attempted to load a component using a binding rule. For example, a physical name is W3BIF102.
Type The type of load error, as follows:
E (Error)—The module could not be found or an operating system-specific error occurred while loading the module.
W (Warning)—A symbol could not be found or was not exported by the module.
Message The message depends on the type of module load error. If the module could not be found, the event log contains the binding rule that specified the downstream component. If an operating system-specific error occurred, the event log contains that operating system error. If a symbol could not be found or was not exported, the event log contains that symbol.

2-22
Understanding the Pervasive Component Architecture
PVSW_DISP_LOAD_ERRS=AIF
This environment variable should only be set to diagnose module load errors. In all other cases, it should not be set.
To diagnose an error, set this variable as specified and perform the operation. The load error is displayed in a message box on your system.
2-23
Pervasive Auto-Reconnect
Pervasive Auto-Reconnect
Pervasive Auto-Reconnect (PARC) allows client-server or workgroup applications to endure temporary network interruptions without canceling the current database operation. When Pervasive.SQL detects a network interruption, it automatically attempts to reconnect at specific intervals for a configurable amount of time. This feature also preserves the client context so that when communications are re-established, database access continues exactly where it left off when the network interruption occurred.
This feature preserves the application context and attempts to reconnect regardless of whether the client or server was attempting to send data at the moment when the network communications were interrupted.
When a network interruption occurs, the reconnect attempts occur at specific intervals. For all connections, successive attempts are made at 0.5, 1, 2, 4, and 8 seconds, continuing every 8 seconds thereafter until the AutoReconnect Timeout value is reached. If no attempt is successful before the maximum wait time is reached, then the current operation fails and the client connection is reset. The maximum wait time is configurable between 45 seconds and 65,535 seconds.
This feature is disabled by default. For this feature to operate, you must select Enable Auto Reconnect (page 4-7) for both client and server configurations. You can specify the timeout value using the server setting Auto Reconnect Timeout (page 4-7).
Remarks
This feature is supported for Btrieve, ODBC, and DTI connections. All 16-bit (when thunking to Win32) and 32-bit Windows applications are supported, but not pure DOS or Windows 3.x platforms. DOS using Btrieve DOS box support on 32-bit Windows platforms is supported. This feature is supported on Windows and NetWare.
The Btrieve communication servers may write out *.PAR or *.SAR files to the Transaction Log Directory. These are temporary files that contain the context for the last item that the server tried to send to the client. When a reconnection occurs, the client may ask for data

2-24
Understanding the Pervasive Component Architecture
to be re-sent. The server reads these files to obtain the appropriate data. These files are normally deleted by the server after the data is read or later when the connection is finally terminated.
Interface Support
Options for this feature are supported by Distributed Tuning Interface (DTI), Distributed Tuning Objects (DTO), and Pervasive Control Center (PCC) Configuration program.

3-1
c h a p t e r
3Changing Your Configuration
How to Work with the Configuration Utility within PCC
This chapter covers operating system permissions, network topologies, engine configuration, and client configuration.
! “Configuration Utility Overview” on page 3-2
! “Special Notes on the Configuration Utility” on page 3-4
! “Configuration Utility Tips” on page 3-8
! “Tuning Performance” on page 3-9
3-2
Changing Your Configuration
Configuration Utility Overview
The Pervasive.SQL 2000i Configuration utility uses a tree control/results pane GUI design. It supports the full functionality of the Pervasive.SQL Win32 Configuration utility (configuration of client/server components, remote connection to engines), as well as enabling configuration of Win16 components on Win32 operating systems.
The Configuration utility supports the configuration of the ODBC communications server and the SRDE. Configuration parameters for these components include the following:
! timeout periods
! event logging (integrated with NT event viewer)
! server protocols (including encryption)
! network interfaces (for multi-homed hosts)
! port settings
The Configuration utility manipulates settings for Pervasive.SQL 2000 Server, Workstation, and Workgroup engines along with any local client components (all client components must be configured at each individual workstation).
Configuring these components is optional. If you do not configure them, each component loads with default configuration settings. The Configuration utility works only with Pervasive.SQL 2000i or later.
You can use the Configuration utility for the following reasons:
! Your system or your Pervasive.SQL 2000 application requires you to adjust the settings. Refer to your application documentation for recommended values. If you are running multiple applications concurrently, add the recommended values together. If you are running multiple applications sequentially, use the highest recommended value.
! You want to optimize the settings so that Pervasive.SQL 2000 provides the services you need without using more memory than necessary. (The stated memory requirements provide guidelines for optimizing your computer’s resources.)

3-3
Configuration Utility Overview
Note For some of your changes to take effect, you must shut down and restart the Pervasive.SQL 2000 components. For more information, refer to Getting Started with Pervasive.SQL.
The Configuration utility is tightly integrated with the Pervasive Control Center and appears as nodes in the Control Center tree. Figure 3-1 shows the Configuration utility within the PCC.
Figure 3-1 Pervasive.SQL Control Center Screen

3-4
Changing Your Configuration
Special Notes on the Configuration Utility
This section contains information to help you understand the Configuration utility, which is described in the following sections:
! “Ensuring Configuration Changes Take Effect” on page 3-4
! “Connecting to Different Machines” on page 3-4
! “Interpreting Parameter Settings” on page 3-5
When you start the Configuration utility, it is ready to configure client requesters and the engine on the local machine if one is present.
Ensuring Con-figuration Changes Take Effect
Most engine Configuration parameters require the database engine to be reloaded after they have been changed. You can re-load the engine in one of two ways:
! reboot the server
! stop and re-start the engine as described in Chapter 2 of Pervasive.SQL User’s Guide.
Connecting to Different Ma-chines
The Configuration utility can configure both local and remote engines as well as local client components; however, each engine must be configured separately. To configure a particular Pervasive.SQL engine:
1 Open the Pervasive Control Center and double-click Pervasive.SQL 2000i Engines.
If you wish to configure a machine that is not in your engines list, it must first added:
a. Right click on Pervasive.SQL 2000i Engines and select Register Engine from the pop-up menu.
b. Type in the server name or use the browse button to search for the desired server. Click OK.
2 Expand the desired engine and expand the Configuration section beneath that engine.
3-5
Special Notes on the Configuration Utility
If you are not logged into the server, you will be prompted to enter your user name and password at this time. You must have administrator-level rights on the remote machine or in the domain (if you are logging into the domain) in order to view or change the engine configuration options.
3 Expand all available options beneath Configuration. The options available will vary depending on the platform of the engine you are trying to configure.
When you are connected to a remote machine, you can view and change only engine components. Client components (such as on workgroup and workstation engines and client machines) can only be configured locally on each machine.
Note If you have engines registered that are not running, you may encounter delays in PCC as it periodically attempts to contact these engines. To eliminate the delay, unregister the “dead” engines. You can minimize the delay by performing the following procedure:
In PCC, right-click Pervasive.SQL 2000 Engines and choose Properties. Set Poll interval (seconds) to 999. Click OK. You can also disable polling completely by clearing Enable service state polling on the same panel.
Interpreting Pa-rameter Set-tings
Under each option, there are a number of parameters, which are displayed in the following table:
Table 3-1 Parameter Settings
Name The name of the parameter.
Type Defines the value type. The different types are:
" Numeric
" Bool(ean)
" String
" Multisel(ect) – choose several values from a given list
" SelectOne – must choose one value from a given list
Value Shows the current setting.
Units If the value is numeric, this field explains any specific units of measure, such as KB or seconds, if required.

3-6
Changing Your Configuration
Note If you cannot find information about a particular Configuration setting, click on the Find Setting icon on the tool bar. Enter the name of the desired setting and a list of case matches is displayed. You can display the setting information by clicking on the desired setting.
The following table outlines the functionality of the Configuration utility:
For each parameter appearing in Configuration, you can double-click the parameter to see a window showing the minimum, maximum, default, and current value of the parameter.
Table 3-2 Pervasive.SQL Win16, and Win32 Configuration Utilities
Configuration utilityComponents that it configures
Transactional Access: Where Changed
Relational Access: Where Changed
Win32 Configuration utility
(Runs on Windows 9x/NT/2000 workstations or Windows NT/2000 servers.)
Local Win32 components Windows Registry on local machine
Windows Registry on local machine
Local Win16 components BTI.INI on local machine
ODBC.INI on local machine
Windows NT/2000 Server components (local or remote machines)
Windows Registry on Windows server
Windows Registry on Windows server
NetWare Server components (remote machines only)
BTI.CFG on NetWare server
ODBC.INI on NetWare server
Unix Server components (remote machines only)
bti.ini on Unix server odbd.ini on Unix server
Win16 Configuration utility
(Runs on Windows 3.11, Windows 9x/NT/2000 (using Thunking) – Transactional access only)
Local Win16 components BTI.INI on local machine
No 16-bit relational access
Windows NT/2000 Server components (remote machine only)
Windows Registry on Windows NT server
No 16-bit relational access
NetWare Server components (remote machines only)
BTI.CFG on NetWare server
No 16-bit relational access
Unix Server components (remote machines only)
bti.ini on the Unix server
No 16-bit relational access

3-7
Special Notes on the Configuration Utility
Windows 2000 and Restricted Users
In Windows 2000, a Restricted user is unable to change most of the Client settings in Configuration. In the case of Restricted users, only the administrator can modify the configuration options to ensure complete security. The only setting a Restricted user is allowed to change is Client | Access | Gateway Durability. This setting is interactive and requires the user to reset it when new servers become available.
In Windows 2000, a user must log on as at least a Power user to be able to fully control their Pervasive.SQL client configuration.
Please see http://www.microsoft.com for more information about Restricted users. In Windows 2000, the client settings are unavailable to Restricted users because this type of user is not permitted to make modifications to Registry keys in HKEY_LOCAL_MACHINE.
Most of the Pervasive.SQL client settings are added to this Registry key. However, the Gateway Durability setting is kept in HKEY_CURRENT_USER, a section of the Registry which can be accessed by Restricted users.
In order to support Windows 2000 Restricted users, Pervasive.SQL also keeps the Server Address Table (SAT) keys in HKEY_CURRENT_USER instead of HKEY_LOCAL_MACHINE.
These keys are not configurable settings, but are saved dynamically by the client to remember how it successfully connects to the server(s). If the client is upgrading to Service Pack 2a from a prior version of Pervasive.SQL, the SAT keys found in HKEY_LOCAL_MACHINE will be read the first time the client is started. The client then writes this information to its new location in HKEY_CURRENT_USER. From then on, the client reads and writes the SAT keys only in HKEY_CURRENT_USER.

3-8
Changing Your Configuration
Configuration Utility Tips
The next chapter describes the configuration options available for Pervasive.SQL 2000i. These options are described as they appear in the default view and not the legacy Component View, which view the component parameters in a form similar to that found in Pervasive.SQL v7. To ensure the Configuration utility is set to default view:
1 Click the Configuration node of the desired engine or client and click View on the toolbar.
2 Make sure Component View is not checked.
There is also an optional helper pane that provides basic information about each setting. To view the helper pane:
1 Click any configuration folder beneath the Configuration node of the desired engine or client, and click View on the toolbar.
2 Make sure Show Helper Pane is checked.
Note While working with the configuration settings, if you wish to find a particular setting, click on the Find Setting icon on the tool bar. Enter the name of the desired setting and a list of case matches will be displayed. You can display the setting information by clicking on the desired setting.

3-9
Tuning Performance
Tuning Performance
This section provides some general tips on how to maximize performance on the initial database connection and on runtime operations. While we can offer some general guidelines, the performance of any specific application is dependent on a great number of factors, including but not limited to the following:
! network bandwidth and utilization
! coding techniques in the application
! free disk space
! available memory
! processor speed
! application(s) usage patterns (write-heavy, read-heavy, transactions used/not used, small record size, large record size, complex queries, simple queries, ODBC, Btrieve only, and so on)
! unrelated applications competing for CPU cycles
! database engine configuration parameters
As you can see, the engine configuration plays a relatively limited role in the overall performance of any given application. Further, the database engine dynamically manages a variety of resources based on usage patterns. It tunes itself to your environment as needed. The sections provided below are offered only as helpful guidelines and are not a guarantee of any specific level of performance.
Spotting Perfor-mance Bottle-necks
You can use Monitor to expose performance bottlenecks related to certain database engine configuration parameters. To start Monitor, choose Start | Programs | Pervasive | Pervasive.SQL 2000i | Utilities | Monitor.
Relating Monitor Displays to Configuration Parameters
Two different Monitor menu selections display performance readings related to configuration parameters:
! MicroKernel | Resource Usage
! MicroKernel | Communications

3-10
Changing Your Configuration
The table below shows which configuration parameters correspond to the readings displayed in the Resource Usage window:
The table below shows which configuration parameters correspond to the readings displayed in the Communications window:
Interpreting the Displays and Taking Action
You can make use of the information displayed in Monitor. Monitor displays three pieces of information about each type of resource. For example, the Worker Threads display shows:
! Current. The current number of actual worker threads operating.
! Peak. The highest number of actual worker threads that have been used since the engine was started.
! Maximum. The maximum number of worker threads allowed.
If the Peak value for a resource is the same as the Maximum value, then you may want to use Configuration to increase the Maximum
Table 3-3 Monitor Resource Usage Corresponding Configuration Settings
This performance display ...
... corresponds to this parameter in Configuration:
Files None. Formerly “Maximum Open Files,” now managed dynamically by the database engine.
Handles None. Formerly “Logical File Handles,” now managed dynamically by the database engine.
Clients None. Formerly “Active Clients,” now managed dynamically by the database engine.
Worker Threads “Number of Worker Threads (Windows/Unix server engines only)” on page 4-25. This setting is still available, but the MicroKernel spawns additional worker threads as necessary.
Table 3-4 Monitor Communications Corresponding Configuration Settings
This performance display ...
... corresponds to this parameter in Configuration:
Communications Threads “Communications Threads” on page 4-22.
Total Remote Sessions “Number of Sessions” on page 4-4.

3-11
Tuning Performance
value for the resource, thus allowing the database engine to allocate additional instances of that particular resource when it needs to.
Before You Modify Config-uration Param-eters
The sections below assume the following:
1 Pervasive Control Center (PCC) is already open.
If you need assistance with this task, see “An Overview of Pervasive Control Center” on page 3-2 of Pervasive.SQL User’s Guide.
2 You have already registered (if applicable) the engine you wish to configure.
If you need assistance with this task, see “Registering or Removing a Server” on page 3-4 of Pervasive.SQL User’s Guide.
3 You have already double-clicked on the icon representing the given engine. For the Server configuration settings, you have double-clicked Server or for Client configuration settings, you have double-clicked Client.
4 You have appropriate operating system privileges to configure the given engine.
If you need assistance with this task, see “Granting Administrative Rights for the Database Engine” on page 2-6 of Pervasive.SQL User’s Guide.
5 You must re-start the database engine after making Configuration changes to the engine parameters.
Minimizing Ini-tial Connection Time
The theory underlying minimal connection time revolves around three requirements. These requirements are summarized below, and detailed procedures follow:
! Known communications protocol. You do not want the client or server to spend additional time trying to connect via protocols that are not supported in your environment. By removing client/server support for unavailable protocols, you prevent the networking components from trying to use them.
! Known location of database engine. You do not want the client to attempt to connect to an engine that does not exist. By specifying Workstation-only or Server-only support, as appropriate, you prevent the client from timing out while attempting non-existent connections. In environments where you have both

3-12
Changing Your Configuration
unshared and shared databases, you can use Gateway Durability to force the database engine to keep track of machines where no database engine is running, so that it never attempts to connect to an engine on these machines, but uses another method to access the data.
! Database engine ready to execute. When a sleeping engine receives a new connection request, it takes time to re-allocate resources and return to a runtime state. If connection speed is more important than resource usage on the server, you can prevent the server engine from sleeping when it is not in use.
Client Parameters
You must be at the client machine to change the client parameters. You must change the parameters at each workstation whose settings you wish to change.
➤ To minimize client-side connection delays
1 In Configuration, click on Client | Communication Protocols. Double click Supported Protocols.
2 In the protocol selection window that appears, select the protocols that you are not using in the box labeled “Selected.” Click < to move the protocols into the box labeled “Available.”
3 Click OK. You have now prevented the client from attempting to communicate on protocols that are not supported.
4 Click on Client | Access. If you are using only a remote Server or Workgroup engine, double-click Use Local MicroKernel Engine and set it to Off.
If you are using only a local Workstation engine, double-click Use Remote MicroKernel Engine and set it to Off.
If you sometimes use a Workstation engine and you sometimes connect to a Server engine or a remote Workgroup engine, you must leave both settings On.
In such a mixed environment with shared and unshared data, you can set Access | Gateway Durability to On at each client. This setting forces the client software to keep a list of the names of any machines on which it is unable to connect to a database engine. In order for the client software to determine no engine exists on a given computer, it waits for all of its network protocol

3-13
Tuning Performance
requests to time out. If your data is stored on a server that does not have a Pervasive database engine on it, and you have Access | Use Remote MicroKernel Engine set to Yes, the client must time out at least once to discover that there is no engine on that machine. Gateway Durability ensures that this timeout only happens the first time your application tries to access that data.
Note Using Gateway Durability fixes the network topology. If you later install a Server or Workgroup engine on the remote computer, you must turn off Gateway Durability on each client so that the list of computers without database engines is deleted (thus allowing you to connect to the new database engine). You may turn Gateway Durability back on immediately, but it starts with an empty list.
5 Click OK. You have now prevented the client from attempting to connect to any database engine types that are not in use.
Server Parameters
➤ To minimize server-side connection delays
1 In Configuration, click on Server | Communication Protocols. Double-click Supported Protocols.
2 In the protocol selection window that appears, select the protocols that you are not using in the box labeled “Selected.” Click < to move the protocols into the box labeled “Available.”
Note Be sure that at least one protocol you have selected in the Server configuration is the same as selected in the Client configuration. Your client and server cannot communicate if they are not using the same protocol.
3 Click OK. You have now prevented the server from attempting to communicate on protocols that are not supported.
4 This step does not apply to database engines on NetWare. Click on Server | Memory Usage. Double-click Allocate Resources at Startup. Set the value to On.

3-14
Changing Your Configuration
You have now specified that the database engine should allocate all necessary memory when it starts up, rather than when the first connection request comes in. Choosing this value requires more memory, but from the client perspective allows the engine to become operational faster.
5 This step does not apply to database engines on NetWare. Double-click Back to Minimal State if Inactive. Set the value to Off.
You have now specified that the database engine should not release resources back to the operating system if the engine is inactive. All resources remain allocated and ready for use at the next client connection.
6 Click OK. You must re-start the Server engine for these changes to take effect.
Maximizing Runtime Throughput
The theory behind maximum throughput relies on too many variables to list here. Several of the most significant factors are:
! Adequate physical memory. If your host system has too little RAM, the system spends most of its time and CPU cycles swapping memory to disk and back, as different users and processes compete for limited resources.
! Adequate CPU capacity. If your CPU cannot keep up with the inflow of data processing requests, application performance suffers.
! Adequate network bandwidth. If your network is slow or suffers from a high collision rate, the database engine may sit idle between data access requests, while each client seems to display poor performance.
! Minimal disk I/O. Disk I/O is significantly slower than memory I/O. You want to avoid accessing the disk as much as possible, by having sufficient cache.
! Adequate resource allocations. Even with massive physical memory available, database performance may suffer if database engine configuration parameters are set artificially low.
In the end, optimal performance is a balancing act among network bottlenecks, disk I/O bottlenecks, memory bottlenecks, and CPU bottlenecks. This section provides some guidelines on how to reduce memory and disk I/O bottlenecks.

3-15
Tuning Performance
Ensuring Adequate Physical Memory and Database Cache
Ideally, your database engine should be able to allocate enough memory to cache in memory full copies of every database it hosts, thus avoiding as much disk I/O as possible. Obviously, caching one or more entire databases is not practical in some situations, particularly when database size is very large. In addition, such measures as adding RAM to the machine only improve performance if the existing system resources are heavily loaded under normal usage.
The database engine dynamically selects a cache value when it starts up the first time. However, this value is based on available memory and may not be the ideal amount of cache for your environment.
➤ To calculate the ideal size of the database memory cache
1 Start by adding up the file sizes of all the data files serviced by the database engine.
Note If you have more than one database serviced by the engine, but they are never used at the same time, add up the file sizes of just the largest database.
For example, assume there are two databases on your server, with the following file sizes, and users access both databases at the same time:
The sum of all these files is 1,430 MB.
2 Add 5% for overhead: 1,430 * 1.05 = 1,501.5 MB, or 1,574,436,864 bytes.
Database A Database B
file1.mkd 223 MB Afile.mkd 675 MB
file2.mkd 54 MB Bfile.mkd 54 MB
file3.mkd 92 MB Cfile.mkd 318 MB
file4.mkd 14 MB

3-16
Changing Your Configuration
The number you have now is the maximum amount of memory that the database engine would use if it cached all its hosted data. This number can be referred to as MaxCache.
Note File pages are only written to the database cache when they are accessed. Thus, for a database engine to use MaxCache amount of memory requires every page in the database to be accessed. This system of estimating assumes a long-term steady state for database usage. If you bring the database engine down nightly or weekly, it may be unlikely that the database engine would access every page in the database within the given period of uptime.
If this situation applies to you, you may wish to estimate the average number of distinct pages that your application accesses within the given uptime period, multiply that by the page size, and obtain a more realistic value of MaxCache for your particular uptime scenario.
➤ To determine how much total physical memory you need
1 As a general rule of thumb, your database cache should not take up more than 40% of the memory available on the server. Thus, the ideal amount of total physical memory is at least MaxCache * 2.5.
Continuing the example above, the calculation would yield 3,936,092,160 bytes or about 4GB total physical memory.
2 If you have at least 2.5 times your calculated MaxCache memory installed on your server machine, open Configuration and set Server | Performance Tuning | Cache Allocation Size to the calculated value of MaxCache. Then restart the database engine.
3 If you can easily add enough memory to reach 2.5 times MaxCache, you should consider doing so.
After upgrading the memory, open Configuration and set Server | Performance Tuning | Cache Allocation Size to the calculated value of MaxCache. Then restart the database engine.

3-17
Tuning Performance
4 If it is not practical to add enough memory to reach 2.5 times MaxCache, then you may wish to settle for a smaller cache and a somewhat greater level of disk I/O. Many applications will run almost as fast as 100% cached if the database is at least 25-30% cached. The specific performance ratio is dependent on the design and average usage model of the application.
5 In all cases, you should set Server | Performance Tuning | Cache Allocation Size as high as you can but not more than MaxCache and not more than about 40% of physical memory. If MaxCache for your databases is greater than 1.6 times your physical memory, consider adding additional RAM.
Depending on whether the database engine was previously memory-constrained, you may see a significant performance gain, a marginal performance gain, or none.
Minimizing Disk I/O
Reading and writing data to/from disk is much slower than reading and writing to/from memory. Thus, one way to optimize performance is to minimize disk activity.
An important consideration in your attempts to minimize disk I/O is recoverability of data. Disk I/O is a direct trade off against transaction durability and recoverability. The more data you keep in memory without pausing to log changes to disk, the faster the database performs. On the other hand, the more data you keep in memory without pausing to log changes to disk, the more data you lose if the system experiences a failure.
➤ To reduce disk I/O
1 As discussed in the previous sub-section on page 3-15, “Ensuring Adequate Physical Memory and Database Cache,” one of the most important considerations is to ensure you have enough database memory cache to avoid frequently swapping data pages between disk and cache. See that section for details.
2 The next step is to consider how much logging you require and what quantity of database operations you are willing to lose in a system failure. The greater the quantity of changes you are willing to lose, the more you can risk in the pursuit of performance.

3-18
Changing Your Configuration
Using Archival Logging and Transaction Durability both require log files. By default, archival logging is turned off. Turn it on only if you perform regular backups and you need the capability to restore data up to the moment of a system failure. When you specify the files to be logged, be sure to specify only the files for which you absolutely must have logging. See Chapter 8, “Backup and Restore,” for more information.
By default, transaction durability is turned on. Turn it off only if you don’t use transactions and your database consists of a single data file. Also check with your application vendor to be sure they allow the application to run without transaction durability.
Caution The consistency of any multi-file database cannot be guaranteed if transaction durability is disabled.
3 If you have any logging features turned on, you can specify how much data the engine stores in memory before writing to disk. This feature is important because the changed data builds up over time. The more log data you allow to build up in memory, the less frequent the disk writes are.
The setting Server | Performance Tuning | Log Buffer Size specifies the number of bytes of database operations that the engine stores in memory before writing them out to the log files.
If a system failure occurs, the data in the log buffer is lost.
4 If you have transaction durability turned on, you can specify the maximum size of the log segments on disk. Specifying a larger log segment size can improve performance slightly, because fewer log segments have to be created and closed over time.
The setting Server | Performance Tuning | Transaction Log Size specifies the maximum number of bytes that can be stored in a log segment before closing it and opening a new segment.
5 If your application usage is weighted heavily in favor of database read operations, you can increase performance by turning on Server | Performance Tuning | Index Balancing. Over time, index balancing reduces the number of nodes on the average

3-19
Tuning Performance
index page, allowing read operations to occur faster. However, for insert, update, and delete operations, additional time and disk I/O may be required because the engine balances the index nodes across adjacent pages.
6 Be sure that tracing is turned off, both in the MicroKernel and/or at the ODBC level. Tracing may cause a significant reduction in performance because it can introduce a large amount of disk I/O.
To ensure ODBC tracing is turned off, choose Start | Programs | | Pervasive | Pervasive.SQL 2000i | Utilities | ODBC Administrator and click on the Tracing tab. If tracing is off, you should see a button labeled “Start Tracing Now,” and you should click Cancel. If tracing is on, click Stop Tracing Now, then click OK.
To ensure MicroKernel tracing is turned off, use Configuration to inspect the setting Server | Debugging | Trace Operation. Set the value to Off if it is not already.
Ensuring Adequate Resource Allocation
If your database server platform has adequate memory and CPU power, you should ensure that your database engine can take full advantage of the available hardware resources to service multiple clients and multiple data files most efficiently.
➤ To configure multiple client and file handling
1 The setting Server | Performance Tuning | Communications Threads allows you to specify how many threads are available to handle client connections.
For any network with up to 32 client workstations, you should assign one communications thread for each connected workstation. Above 32 clients, you should use Monitor to evaluate whether the peak usage is hitting the maximum allowed. See “Spotting Performance Bottlenecks” on page 3-9 for more information.
After you increase the maximum value and restart the database engine, wait until a period of peak usage has occurred, then evaluate the situation again using Monitor.

3-20
Changing Your Configuration
2 The setting Server | Performance Tuning | Number of Input/Output Threads allows you to specify how many threads are available to handle file operations.
As a guideline, the value of this setting should be about 1/8 the number of files the application has open, on average. For example, if the application has 40 files open most of the time, I/O Threads should be set to 5.
Using Monitor, choose MicroKernel | Resource Usage from the menu. In the window that appears, the Files: display shows you current and peak number of files open. You can generate an average reading by recording several Current values over time. Then you can specify an appropriate setting for I/O Threads based on the average value.
3 Server engines only: If you always have a large number of clients running on the same computer as the server engine, you may wish to increase the value of Performance Tuning | Number of Worker Threads (Windows/Unix server engines only). The database engine spawns additional threads as needed, but this value specifies how many it initially allocates.
4-1
c h a p t e r
4Configuration Reference
Configuration Settings Available in Pervasive.SQL 2000i
This chapter discusses the following topics:
! “Server Configuration Parameters” on page 4-2
! “Win32 Client Configuration Parameters” on page 4-31
! “Win16 Client Configuration Parameters” on page 4-38

4-2
Configuration Reference
Server Configuration Parameters
Every Pervasive.SQL engine has server configuration options, including the Workstation and Workgroup engines. This section describes the different configuration options available for Pervasive.SQL engines.
Access Accept Remote Request (Windows/Unix engines only)
This setting specifies whether the Communications Manager accepts requests from remote servers and client workstations. If you turn this option to On, the Communications Manager advertises its presence on the network.
Active Clients
This setting is no longer used by the MicroKernel. The client list is allocated dynamically and is limited only by the memory in the computer. Each client requires 308 bytes. By default, this setting is dynamically managed by the database engine. Pervasive recommends that you use the default behavior.
Authentication (Unix engines only)
This option specifies which type of authentication to use for access to the server engine. The available options are:
! Emulate Workgroup Engine. Use this value when Samba is used to authenticate user access on the system.
Name Type Range Default Units
Accept Remote Request Boolean On/Off On N/A
Name Type Range Default Units
Active Clients Numeric 1 - 65535 Dynamic N/A
Name Type Range Default Units
Authentication SelectOne Three options. See below
Emulate Workgroup Engine
N/A

4-3
Server Configuration Parameters
! Proprietary Authentication (using btpasswd). Use this value when not using Samba and the user does not have an account on the server. This allows a separate password file to be maintained when connecting to the Unix system.
! Standard Unix Authentication. Use this value when not using Samba but users have accounts on the Unix system.
Configuration File (Unix engines only)
This setting specifies the location of the smb.conf file used by Unix to export local file systems to Windows clients. The engine requires this file to translate UNC paths on remote systems into local calls to the correct database file.
The default value is /etc/smb.conf. If you installed the Samba configuration file in a different location, enter the correct path and/or file name.
Load brouter (NetWare engines only)
This setting controls whether the Message router (BROUTER.NLM) is loaded during the execution of the BSTART command. The Message Router allows other applications running as NLMs on the server (such as the SQL Interface) to communicate with remote servers on which the MicroKernel is loaded. To access data on a remote server, set this option to On.
Logical File Handles
This setting is no longer used by the MicroKernel. The file handle list is allocated dynamically and is only limited by the memory in the computer. Each handle uses 256 bytes of memory.
Name Type Range Default Units
Configuration File String N/A /etc/smb.comf N/A
Name Type Range Default Units
Load brouter Boolean On/Off Off N/A
Name Type Range Default Units
Logical File Handles Numeric 1 - limited by memory
Dynamic N/A

4-4
Configuration Reference
Maximum Databases
This setting is no longer used by the MicroKernel. The open database list is allocated dynamically and is only limited by the memory in the computer. Each open database uses 810 bytes.
Maximum Open Files
This setting is no longer used by the MicroKernel. The open file list is allocated dynamically and is only limited by the memory in the computer. Each open file requires 2,398 bytes. The MicroKernel maintains file information for each file as long as there is an active client handle to that file or a page in cache for that file.
Number of Sessions
This setting specifies the maximum number of network connections that can access the server at any given time. You cannot improve performance by specifying a value higher than you need.
The available options are:
! Windows NT: 0 through the upper limit of your system memory.
! NetWare: 0 to 4,906 sessions. You can have the same number of sessions for each protocol. For example, if you set this to 10, you can have 10 SPX and 10 TCP/IP sessions, making a total of 20 sessions.
! Unix: 0 to 4,906
The actual number of sessions may be limited by the amount of memory in the individual machine, because each session requires 2 kilobytes. If you have multiple applications running on one client,
Name Type Range Default Units
Maximum Databases Numeric 1 - limited by memory
Dynamic N/A
Name Type Range Default Units
Maximum Open Files Numeric 1 - 64000 Dynamic N/A
Name Type Range Default Units
Number of Sessions Numeric Windows: 0 - limited by memory
NetWare/Unix: 0 - 4906
500, but dynamic on Win32
N/A

4-5
Server Configuration Parameters
each application may generate one or more sessions to the MicroKernel.
On Win32 platforms, this default value is adjusted based on the maximum number of users reported by the user count manager. The engine starts with a default value equal to five times the installed user count, then adjusts that number so that it is between 100 and 1000, inclusive. The current value as read from the registry is adjusted to 100 if it is less than the calculated number. If the calculated value is different than the value in the registry, the calculated value is written to the registry. Note that Win32 systems that currently have the old default value of 15 will get replaced by 100.
Communica-tion Buffer Size
Brouter Communication Buffer Size (NetWare only)
This setting specifies the maximum length of the user data that any local server MicroKernel application can access at a remote server via BROUTER. Specify the length of the user data in bytes. Specifying a value higher than you need does not improve performance and may waste memory.
The actual buffer size may be limited by the amount of memory in the individual machine, because the memory requirement for this option is equal to (buffersize + 355) * 4 bytes.
Communication Buffer Size
This setting specifies the size of the buffer that the Btrieve communications layer allocates for database requests from remote clients. This value should be at least as large as the largest data length parameter for your Btrieve Requester. This value should be the same as the value of MKDE Communications Buffer Size.
Name Type Range Default Units
Brouter Communication Buffer Size
Numeric 1024 - 65153 16384 bytes
Name Type Range Default Units
Communication Buffer Size
Numeric Unix: 1024 - 65149NetWare: 512 - 65116Win32: 1024 - 65153
651496511664512
bytes

4-6
Configuration Reference
MKDE Communication Buffer Size
This setting specifies the length in bytes of the longest block of data that can be transferred between an application running on the server and the MicroKernel server engine. Each worker thread allocates a memory buffer large enough to accommodate this maximum length of data. (A message is a unit of related data that the MicroKernel or the application passes over the network.)
Setting a value higher than you need does not improve performance.
Note System Administrators: Refer to the documentation for your Pervasive.SQL application to get an appropriate value for this option. If you use multiple applications, use the largest value.
Read Buffer Size (Windows/Unix engines only)
This setting specifies the size of the buffer that the MicroKernel uses to read packets from the operating system’s communication layer. Any value you enter is rounded up to the nearest multiple of the system page size (4096 bytes on Intel platforms) at the time that the engine allocates the buffer.
You should set this option equal to the Communications Buffer Size plus an allowance for system overhead (about 400 bytes). However, be aware that setting this option to a higher value than the default carries a memory penalty, because the system allocates a buffer of the specified size for each active remote client connection. For example, if you have 100 active remote clients and you have the buffer size set to 4 KB, the system allocates 400 KB of memory. If you have the buffer size set to 16 KB, the system allocates 1600 KB of memory.
Name Type Range Default Units
MKDE Communication Buffer Size
Numeric Unix: 1024 - 65149NetWare, Win32: 1024 - 65153
6514964512
bytes
Name Type Range Default Units
Read Buffer Size Numeric 4096 - 65536 4096 bytes

4-7
Server Configuration Parameters
Receive Packet Size (NetWare engines only)
This setting only applies to the SPX protocol and specifies the size of the individual network packets this component receives. For the approximate memory required, the number of receive packets can grow dynamically during execution, but starts with the number indicated.
To determine the proper value for your system, use the following formula:
Number of receive packets * Receive packet sizewhere Number of receive packets = (Communications Buffer Size / Receive packets) + 1, or 45, whichever is greater
The default Receive Packet Size varies depending on your network card and hardware capabilities. If you are using the Win32 client Requester on an Ethernet topology, use the default value for this option. If you are on a Token Ring topology, set this value to 4,096 bytes. Setting the value too low may result in workstation hangs or a Status Code 95, “The session is no longer valid.”
Communica-tion Protocols
Auto Reconnect Timeout
This setting specifies how long the client will attempt to connect to the server before giving up. When a AutoReconnect-enabled client first connects to a AutoReconnect-enabled server, the server communicates this value to the client so that both components know how long to attempt to reconnect in the event of a network interruption.
Enable Auto Reconnect
This setting specifies whether you want the server to support clients attempting to auto-reconnect during a network outage. A setting of “On” means AutoReconnect is enabled.
Name Type Range Default Units
Receive Packet Size Numeric 532 - 4096 1500 bytes
Name Type Range Default Units
Auto Reconnect Timeout Numeric 45 - 65535 180 seconds
Name Type Range Default Units
Enable Auto Reconnect Boolean On/Off Off N/A

4-8
Configuration Reference
Auto Reconnect is not in effect for a given client connection unless this setting is also enabled in that client’s configuration.
Listen IP Address
This option specifies the IP address the MicroKernel listens on when TCP/IP Multihomed is Off, and two network cards are present.
NetBIOS Port (Windows engines only)
This option specifies the NetBIOS port the MicroKernel listens on.
ODBC Connection Mgr Supported Protocol (Server engines only)
This option determines which protocol the SQL Connection Manager uses.
Supported Protocols
This setting specifies the protocols that are used by the Communications Requester. If more than one protocol is specified, the Communications Requester attempts to connect on each available protocol. The first protocol to connect is then used for the remainder of the session. The default value varies depending upon the platform; the available options are:
Name Type Range Default Units
Listen IP Address String Any valid IP address
0.0.0.0 N/A
Name Type Range Default Units
NetBIOS Port Numeric 33 - 254 66 N/A
Name Type Range Default Units
ODBC Connection Mgr Supported Protocol
SelectOne TCP, SPX TCP N/A
Name Type Range Default Units
Supported Protocols Multiselect See below Varies N/A

4-9
Server Configuration Parameters
Note You must have at least one specific protocol that is enabled at both the client and the server, or else they cannot communicate.
TCP/IP Multihomed
This options specifies whether the MicroKernel should listen for client connections on all Network Interface Cards. If it is set to On, the IP address listed in the Listen IP Address option is ignored.
Note For Unix servers, Multihomed is the default and there is no way to override or change the behavior.
The default value is set to Off to enable all pre-SP2a clients using TCP/IP to connect to a Pervasive.SQL 2000 v7.82 (or later) server. To enable the multihomed capability, the administrator must change this setting to On, after upgrading all client requestors to Pervasive.SQL 2000 v7.82 (SP2) or later.
Note Older versions of the requesters cannot connect via TCP/IP to a Windows server engine configured with TCP/IP Multihomed setting On.
Table 4-1 Server Supported Protocols
" Microsoft SPX " Novell IPX
" Microsoft SPXII " IBM TCP/IP
" Microsoft IPX " IBM NETBIOS
" Microsoft TCP/IP " NWIPX/XPS SPX
" Novell SPXII " Microsoft NetBIOS
Name Type Range Default Units
TCP/IP Multihomed Boolean On/Off Off N/A

4-10
Configuration Reference
TCP/IP Port (Server engines only)
This setting configures the port number that the SQL Communications Manager listens on.
This port number must be the same as that defined in any Client DSNs pointing to this server. For information on how to change the port number in a Client DSN, see “Client DSN Options” on page 5-7. The Btrieve interface port is 3351, and is not configurable.
Use SAP (NetWare only)
This setting specifies whether the Btrieve Communications Manager should use the Service Advertising Protocol (SAP). This setting applies to SPX communications only.
Compatibility Create File Version
This setting specifies the format in which all new files are created. The 7.x MicroKernel can read files created in 5.x and 6.x versions of the MicroKernel. In addition, the 7.x version can write to files using the existing file format. In other words, it writes to 5.x files using the 5.x file format, writes to 6.x files using the 6.x file format, and writes to 7.x files using the 7.x file format.
Specify 5.x or 6x only if you need backward compatibility with a previous version of the MicroKernel. Specifying 5.x or 6.x does not affect any existing 7.x files.
Name Type Range Default Units
TCP/IP Port Numeric 256 - 65535 1583 N/A
Name Type Range Default Units
Use SAP Boolean On/Off Off N/A
Name Type Range Default Units
Create File Version SelectOne 5.x - 7.x 7.x N/A

4-11
Server Configuration Parameters
System Data
System data refers to a hidden unique key in each record. Because the MicroKernel relies on uniquely identifying rows in order to ensure transaction durability, a file must either have a unique key defined or have system data included in the file. The default value is If needed; the available options are:
! None. By default, system data is not included on file creation. Application developers using the Create operation can override this setting.
! If needed. System data is added to the file on file creation if the file does not have a unique key.
! Always. System data is always added on file creation, regardless of whether the file has a unique key.
Note The System Data setting does not affect existing files. This setting only affects how new files are created.
If you want to use transaction durability with a file that was not created with System Data turned on and does not have a unique key, you must re-create the file after setting System Data to Yes or If needed.
Even if a file has a unique key, you may want to include system data, because users can drop indexes.
Data Integrity Archival Logging Selected Files
This setting controls whether the MicroKernel performs archival logging, which can facilitate your file backup activities. If a system failure occurs, you can use the archival log files and the BUTIL -ROLLFWD command to recover changes made to a file between the time of the last backup and a system failure.
To direct the MicroKernel to perform archival logging, you must specify the files for which the MicroKernel is to perform archival
Name Type Range Default Units
System Data SelectOne See below If needed N/A
Name Type Range Default Units
Archival Logging Selected Files
Boolean On/Off Off N/A
4-12
Configuration Reference
logging by adding entries to an archival log configuration file that you create on the volume that contains the files. For more information about archival logging, refer to “Understanding Archival Logging and Continuous Operations” on page 8-2.
Initiation Time Limit
This setting specifies the time limit that triggers a system transaction. The MicroKernel initiates a system transaction when it reaches the Operation Bundle Limit or the time limit, whichever comes first, or when it needs to reuse cache.
Operation Bundle Limit
This option specifies the maximum number of operations (performed on any one file) required to trigger a system transaction. The MicroKernel initiates a system transaction when it reaches the bundle limit or the Initiation Time Limit, whichever comes first, or when it needs to reuse cache.
The MicroKernel Database Engine treats each user transaction (starting with Begin Transaction until End Transaction or Abort Transaction) as one operation. For example, if there are 100 Btrieve operations between the Begin Transaction and the End Transaction operation, then all the 102 Btrieve operations together are treated as a single operation.
Transaction Durability
Caution Do not turn off Transaction Durability unless your database does not require transaction atomicity among data files. Database integrity for multi-file databases cannot be guaranteed if Transaction Durability is turned off.
Name Type Range Default Units
Initiation Time Limit Numeric 1 - 1800000 10000 milliseconds
Name Type Range Default Units
Operation Bundle Limit Numeric 1 - 65535 65535 N/A
Name Type Range Default Units
Transaction Durability Boolean On/Off On N/A

4-13
Server Configuration Parameters
Do not turn off Transaction Durability unless doing so is supported by your application vendor.
This setting controls whether the MicroKernel performs transaction durability by logging all operations that affect the data file. These operations are written to a transaction log. Transaction log segments are written to the location specified in the setting Transaction Log Directory on page 4-19. The log segments are named *.LOG, where the prefix can be 00000001 through FFFFFFFF.
Transaction durability is the assurance that the MicroKernel finishes writing to the log before returning a successful status code. This option also guarantees multi-file transaction atomicity, which ensures that if any given change within the transaction cannot complete, then none of the changes are completed. An atomic change does not leave partial or ambiguous effects in the database. Changes to individual files are atomic whether transaction durability is on or off. But transactions make it possible to group changes to multiple files into one atomic change. The atomicity of these multi-file transactions are assured by the MicroKernel only when using Transaction Durability.
If a system failure occurs after the Transaction log has been written but before the “committed” operations are flushed to the data files in a system transaction, the “committed” operations are not lost. When the database engine starts up again after the system failure, it reads the log segments and flushes any “committed” operations to the data files. Log segments are deleted only after the operations are flushed to the data files.
This feature allows individual client transactions to receive a successful status code as soon as possible while at the same time taking advantage of performance gains offered by grouping multiple client transactions together and writing them to the data files sequentially.

4-14
Configuration Reference
Note When you turn Transaction Durability on, some files may not be able to support the feature. A file must contain at least one unique key or have the Compatibility | System Data configuration option set to Yes or If Needed. Otherwise, any changes to the file are not written to the transaction log. For files that do not contain a unique key, System Data creates a unique system-defined log key. For more information about transaction durability and system data, refer to Pervasive.SQL Programmer’s Guide available with the SDK.
Because System Data does not affect existing files, you may need to re-create files that were not created with System Data turned on and do not have a unique key. Be sure to turn on System Data before re-creating these files.
Caution Gateway locator files allow different engines to manage files in different directories on the same file server. If your database contains data files in different directories, you must be sure that the same database engine manages all the data files in the database. If you have more than one database engine managing files within the same database, database integrity and transaction atomicity are not guaranteed. For more information on how to avoid this potential problem, see “Re-directing Locator Files” on page 9-8.
Related Settings
The server configuration settings Performance Tuning | Log Buffer Size and Performance tuning | Transaction Log Size are related to Transaction Durability. Log Buffer Size allows you to configure the balance between transaction recoverability and performance. The larger the log buffer, the fewer times it is written to disk, and thus the greater the performance. However, database changes that are in the log buffer are not durable through a system failure. If you must have the absolute maximum level of transaction recoverability, then you want to set the log buffer to its smallest value. If you are willing to risk some recoverability in favor of even minor gains in performance, then you want to set the log buffer larger.
Transaction Log Size controls how large each log segment gets before a new segment is started. Note that all these settings are ignored if Btrieve or SQL transactions are not being used.

4-15
Server Configuration Parameters
Wait Lock Timeout
This setting specifies the wait lock timeout for the MicroKernel. When you fetch records with a wait lock, the MicroKernel does not return control until it has obtained the lock on every record you requested. If another application has locked one of the records you requested, the MicroKernel waits until that application releases the record before proceeding with the lock request. If the wait lock timeout has been reached and the MicroKernel could not lock the record, the MicroKernel returns control to its caller with the appropriate status code.
The purpose of this option is to significantly reduce network traffic, therefore improving network performance in case of a conflict caused by locking. With one exception (as stated in the following note), this configuration option does not have any effect on your application if there is a requester (such as W3BIFxyy.DLL) between your application and the MicroKernel. In this case, even if the wait lock timeout is reached, the requester retries the operation (except for Win16 applications) without notifying your application. The control is returned to your code only if the lock has been granted or a deadlock has been detected.
Note If you have Win16 applications working with Pervasive.SQL, you may want to set this option to a value lower than the default (such as 1 second). For more information on how the MicroKernel handles wait locks with Win16 applications running on Windows 3.x, Windows 95/98, or Windows NT, refer to the Pervasive.SQL Programmer’s Guide.
Debugging Number of Bytes from Data Buffer
This setting specifies the size of the data buffer that the MicroKernel writes to the trace file. The Trace Operation feature must be set to On to use this feature. The size you specify depends on the nature of your
Name Type Range Default Units
Wait Lock Timeout Numeric 0 - 4294697 15 seconds
Name Type Range Default Units
Number of Bytes from Data Buffer
Numeric 0 - 65535 128 bytes

4-16
Configuration Reference
tracing needs (whether you need to see the entire data buffer contents or just enough of the buffer contents to identify a record).
Number of Bytes from Key Buffer
This setting specifies the size of the key buffer that the MicroKernel writes to the trace file. The Trace Operation feature must be set to On to use this feature. The size you specify depends on the nature of your tracing needs (whether you need to see the entire key buffer contents or just enough of the buffer contents to identify a key).
Select Operations
The Selected list displays the available Btrieve Interface operation codes that are traced.
! To remove a Btrieve Interface operation from the Selected list, highlight the operation, and click the < button. To remove all of the Btrieve Interface operation codes from the Selected list, click the << button. The operations will move to the Available list.
! To add a Btrieve Interface operation to the Selected list, highlight the operation in the Available list, and click the > button. To add all of the Btrieve Interface operation codes to the Selected list, click the >> button. The operations will move to the Selected list.
Name Type Range Default Units
Number of Bytes from Key Buffer
Numeric 0 - 255 128 bytes
Name Type Range Default Units
Select Operations Multiselect See below All N/A
" Abort Transaction (21) " Get Position (22)
" Begin Transaction (19) " Get Previous (7)
" Clear Owner (30) " Get Previous Extended (37)
" Close (1) " Insert (2)
" Create (14) " Insert Extended (40)
" Create Index (31) " Open (0)
" Delete (4) " Reset (28)

4-17
Server Configuration Parameters
Trace File Location
This setting specifies the trace file to which the MicroKernel writes trace information. The file name must include a drive or volume specification and path or use a UNC path. If you do not want the trace file in the default location, enter a different path and/or file name.
Note Do not use the same trace file name for ODBC tracing and MicroKernel tracing.
" Drop Index (32) " Set Directory (17)
" End Transaction (20) " Set Owner (29)
" Extend(16) " Stat (15)
" Find Percent (45) " Step First (33)
" Get By Percent (44) " Step Last (34)
" Get Direct/Chunk (23) " Step Next (24)
" Get Directory (18) " Step Next Extended (38)
" Get Equal (5) " Step Previous
" Get First (12) " Stop (25)
" Get Greater (8) " Step Previous Extended (39)
" Get Greater or Equal (9) " Unlock (27)
" Get Last (13) " Update (3)
" Get Less or Equal (11) " Update Chunk (53)
" Get Less Than (10) " Version (26)
" Get Next (6)
" Get Next Extended (36)
Name Type Range Default Units
Trace File Location String N/A C:\pvsw\bin\mkde.tra N/A
" Abort Transaction (21) " Get Position (22)

4-18
Configuration Reference
Trace Operation
This setting enables or disables the trace feature, which allows you to trace each Btrieve Interface call and save the results to a file. Developers can use tracing to debug applications. The MicroKernel writes to the trace file using forced write mode, which ensures that data gets written to the file even if the MicroKernel unloads abnormally. The MicroKernel’s performance can be severely impacted, depending on the frequency of incoming requests. If you enable this option, you must specify a Trace File.
Note You do not need to restart the engine in order to start and stop tracing. You can turn tracing on or off during runtime and apply the changes directly to the engine. If you receive a message from Configuration indicating that you must restart the engine for changes to take effect, you may safely ignore the message for this setting.
Directories DBNames Configuration Location
This setting specifies the path to an alternate location for the DBName configuration file.
For Server engines, this is a local file path, not a directory path. For Workgroup engines this could be a remote path that is accessible to the Workgroup MicroKernel. The defaults vary depending upon your particular engine platform:
! Windows NT/2000: C:\WINNT
! Windows 9X/ME: C:\WINDOWS
! NetWare server: SYS:SYSTEM
! Unix server: /usr/local/psql/etc
If you do not want the configuration file in the default location, enter a valid path.
Name Type Range Default Units
Trace Operation Bool On/Off Off N/A
Name Type Range Default Units
DBNames Configuration Location
String N/A Varies N/A

4-19
Server Configuration Parameters
Transaction Log Directory
This setting specifies the location the MicroKernel uses to store the transaction log. The path must be a valid path and include a drive or volume specification or UNC path. The defaults vary depending upon your operating system:
! Windows: C:\PVSW\BIN\MKDE\LOG
! NetWare server: SYS:SYSTEM\MKDE\LOG
! Unix: /usr/local/psql/log
Working Directory
This setting specifies the location of the MicroKernel working directory, which is used to store temporary files in operations such as building large indexes. If disk space is limited on certain volumes, you can use this option to specify a working directory on a volume with adequate space.
There is no default value specified; however, if you do not specify a working directory, the default will be the location of the data file. To specify a fixed working directory, enter a path in the Value text box. The path must include a drive or volume specification or a UNC path.
Memory Usage Allocate Resources at Startup (Windows/Unix engines only)
This setting instructs the MicroKernel to allocate resources, including threads and memory buffers, when the MicroKernel is started.
Name Type Range Default Units
Transaction Log Directory
String N/A Varies N/A
Name Type Range Default Units
Working Directory String N/A Same directory as data file
N/A
Name Type Range Default Units
Allocate Resources at Startup
Boolean On/Off Off N/A

4-20
Configuration Reference
If you turn this option off, the MicroKernel does not allocate any resources until the first operation request. Pervasive.SQL components automatically allocate resources as needed. Therefore, in most cases you do not need to do so explicitly.
Back to Minimal State if Inactive (Windows/Unix engines only)
This setting causes the MicroKernel to free considerable memory and thread resources to the system and return to a minimal state when there are no active clients. This is the initial state in which the MicroKernel begins. The MicroKernel reallocates resources when another client becomes active.
Extended Operations Buffer Size
This setting is no longer configurable.
This value specifies the size of the buffer required to handle extended (multiple record) operations.
Minimal State Delay (Windows/Unix engines only)
This setting specifies a time interval for the MicroKernel to wait before returning to a minimal state. (This is the initial state in which the MicroKernel begins.) By returning to a minimal state, the MicroKernel frees considerable memory and thread resources to the system. In some cases, you may not want the MicroKernel to return to a minimal state. For example, you may be running a batch file that uses the MicroKernel repeatedly. The MicroKernel reallocates resources when another client becomes active.
Name Type Range Default Units
Back to Minimal State if Inactive
Boolean On/Off On N/A
Name Type Range Default Units
Extended Operations Buffer Size
Numeric 0 - 65536000 Dynamic bytes
Name Type Range Default Units
Minimal State Delay Numeric 0 - 4294967 30 seconds

4-21
Server Configuration Parameters
Sort Buffer Size
This setting specifies the maximum amount of memory (in kilobytes) that the MicroKernel dynamically allocates and de-allocates for sorting purposes during run-time creation of indexes.
If the memory required for sorting exceeds the size specified or is greater than 60 percent of the available process memory, the MicroKernel creates a temporary file. The amount of available memory for a process is a dynamic value and varies according to system configuration and load. If you specify 0 kilobytes, the MicroKernel allocates as much memory as needed, up to 60 percent of the available memory.
System Cache (Windows/Unix engines only)
This option specifies whether the MicroKernel should use the system cache in addition to the MicroKernel’s own database cache, as set using the configuration parameter Cache Allocation Size. In most cases, performance is enhanced by turning on the System Cache. The MicroKernel relies on the system cache to organize and group pages to be written. It delays a flush long enough to allow the system cache to write the pages to disk in a more efficient manner. However, if your server has an advanced self-cached disk array, you might achieve better performance by turning System Cache off.
For Windows Server only: you can use the Paging File and Process objects in the Windows NT/2000 Performance Monitor utility to determine whether the Windows system cache is being used effectively. For the NTDBSMGR instance, monitor the % Usage and % Usage Peak in the Page File object and the Page Faults/Second and Page File Bytes in the Process object.
Name Type Range Default Units
Sort Buffer Size Numeric 0 - limited by memory 0 bytes
Name Type Range Default Units
System Cache Boolean On/Off On N/A

4-22
Configuration Reference
Performance Tuning
Cache Allocation Size
By default, this setting is dynamically managed by the database engine. Pervasive recommends that you use the default behavior.
This setting specifies the size of the cache (in bytes) that the MicroKernel allocates; the MicroKernel uses this cache when accessing any data files. The MicroKernel uses options that are multiples of 16 KB. If you specify a number that is not a multiple of 16 KB, the MicroKernel rounds that number down to the nearest multiple of 16 KB and allocates the cache to exactly that size.
To optimize your performance, allocate a cache size no larger than the sum of the sizes of the files you are using. However, be careful not to take all available memory, especially when the server is running other applications. You cannot improve performance—and may waste memory—by specifying a value higher than you need.
In Pervasive.SQL 2000i, the MicroKernel dynamically generates a default cache size value every time it starts.
! For Server engines, this value is 20 percent of the physical memory on the server platform.
! For Workstation/Workgroup engines, the default cache size is 10% of the physical memory or 8 MB, whichever is less.
This default value is automatically used as the current value for this setting the very first time the engine is started after installation. The MicroKernel writes this value in the Registry or in BTI.CFG if it does not already exist. When the MicroKernel is started in the future, it recalculates the default cache size, but it always uses the value that was written to the registry. This value appears in Configuration.
Communications Threads
This setting specifies how many threads the MicroKernel initially spawns to handle requests from remote clients. Communication
Name Type Range Default Units
Cache Allocation Size Numeric 65536 - limited by memory
Dynamic bytes
Name Type Range Default Units
Communications Threads
Numeric 1 - 1024 16 N/A

4-23
Server Configuration Parameters
threads are the elements that actually perform Btrieve operations on behalf of the requesting remote client process. In this way they are very similar to Worker threads. The difference is that communications threads are not spawned dynamically. They reside in a fixed pool in a sleep state until a request comes in.
On NetWare, each supported protocol spawns the specified number of communications threads. For example, if you set this to 3 threads, you will have 3 SPX and 3 TCP/IP threads, making a total of 6 threads.
This setting may need to be increased for large servers. Although it may be optimal to have one thread for each remote session, this is not feasible in most multi-user environments. Use Monitor to watch the peak communication thread usage and the peak number of sessions. Set the value of Communication Threads in between the two. It does not need to be larger than the peak number of sessions because those sessions do not all issue a request at exactly the same time. A good rule of thumb is to set this to the number of remote clients, up to about 32, then use Monitor to determine whether you need to set this number any higher. If the peak number of communication threads is within two (2) of the maximum, you may want to raise the Communications Threads value higher.
Index Balancing
This setting controls whether the MicroKernel performs index balancing. Index balancing increases performance on read operations; however, when you enable this option, the MicroKernel requires extra time and may require more disk I/O during insert, update, and delete operations. For more information about index balancing, refer to Pervasive.SQL Programmer’s Guide available with the SDK.
Largest Compressed Record Size
This setting is no longer configurable.
Name Type Range Default Units
Index Balancing Boolean On/Off Off N/A
Name Type Range Default Units
Largest Compressed Record Size
Numeric 0 - 65536000 Dynamic bytes

4-24
Configuration Reference
Log Buffer Size
This setting specifies the size of both the transaction log buffer and the archival log buffer that the MicroKernel uses. You can enhance performance by increasing the log buffer size, because the MicroKernel writes the log information to disk less frequently.
Note If you set the Log Buffer Size to a value greater than that of your Transaction Log Size, then the MicroKernel automatically increments the Transaction Log Size to the value you specified for the Log Buffer Size.
Number of Input/Output Threads
This setting specifies how many background I/O threads the MicroKernel spawns. These threads are responsible for writing all pages from the MicroKernel’s cache to the file on disk in an atomic and consistent manner. They also are responsible for initially opening a file and reading the File Control Record. Most of the other reads are done by local worker threads and communication threads. When the MicroKernel updates or writes to data files, it assigns each file to a particular I/O thread sequentially. When it reaches the last thread, the MicroKernel starts over until all data files have been assigned to a background thread. Because the MicroKernel does not spawn additional I/O threads as needed, specify the maximum number of I/O threads you anticipate needing.
For best performance, set this value based on the average number of Open Files. Monitor shows the current and peak number of files open. If your database has an average of 100 files open, then the default of 4 I/O threads makes each thread responsible for 25 files. A good rule of thumb is to have about 8 files per I/O thread. For example, if your average number of open files is 100, you should use
Name Type Range Default Units
Log Buffer Size Numeric 262144 - limited by memory
Dynamic bytes
Name Type Range Default Units
Number of Input/Output Threads
Numeric 1 - 1024 4 N/A

4-25
Server Configuration Parameters
about 12 I/O threads. Specifying a value higher than 64 may degrade performance, but that depends on the capabilities of the system.
Note Application Developers: There is no accurate way to calculate the appropriate number of I/O threads because this setting depends on the machine’s characteristics, OS configuration, and the MicroKernel Database Engine’s planned work load.
Number of Worker Threads (Windows/Unix server engines only)
Worker threads are the elements that actually perform Btrieve operations on behalf of the requesting local client process. This setting specifies how many worker threads the MicroKernel initially spawns to handle requests from local clients.
In general, there is little reason to adjust this setting because the MicroKernel spawns additional threads as needed.
Transaction Log Size
This setting specifies the maximum size of a transaction log segment. When the log file reaches its size limit, the MicroKernel closes the old log segment file and starts a new one. You might want to limit the size of your transaction log segments, because this reduces the disk space that the MicroKernel uses temporarily. However, limiting the size of the transaction log segments does require more processing by the MicroKernel and can decrease performance, because it has to close and create log segments more frequently.
Name Type Range Default Units
Number of Worker Threads
Numeric 1 - 1024 1 N/A
Name Type Range Default Units
Transaction Log Size Numeric 65536 - limited by disk space
524288 bytes

4-26
Configuration Reference
Note If you set the value for this option less than the value you specified for the Log Buffer Size, the MicroKernel Database Engine automatically adjusts the Transaction Log Size by setting it to the value of the Log Buffer Size option.
NetWare RTSS (NetWare only)
Runtime Server Support
This setting specifies the level of Runtime Server Support provided by the MicroKernel. The available options are Complete, Disabled, or Pre-Authorized.
! Specify Complete when you want to require the user to provide a valid user name; you can also specify a password, although not required.
! Specify Pre-Authorized when you want to require the user to enter a valid user name and password.
! Specify Disabled when you want the user to only have a connection to the NetWare server to access any Btrieve files. If the user is not connected to the server, s/he will receive a Status Code 99, “The Btrieve Requester is unable to access the NetWare Runtime server.”
SUPERVISOR and ADMIN are not valid user names, even if supplied with the correct password. If the Requester cannot find a login user name other than SUPERVISOR or ADMIN, there is no valid name to pass. For more information about Runtime Server Support, see your Novell documentation.
Name Type Range Default Units
Runtime Server Support SelectOne See below Complete N/A
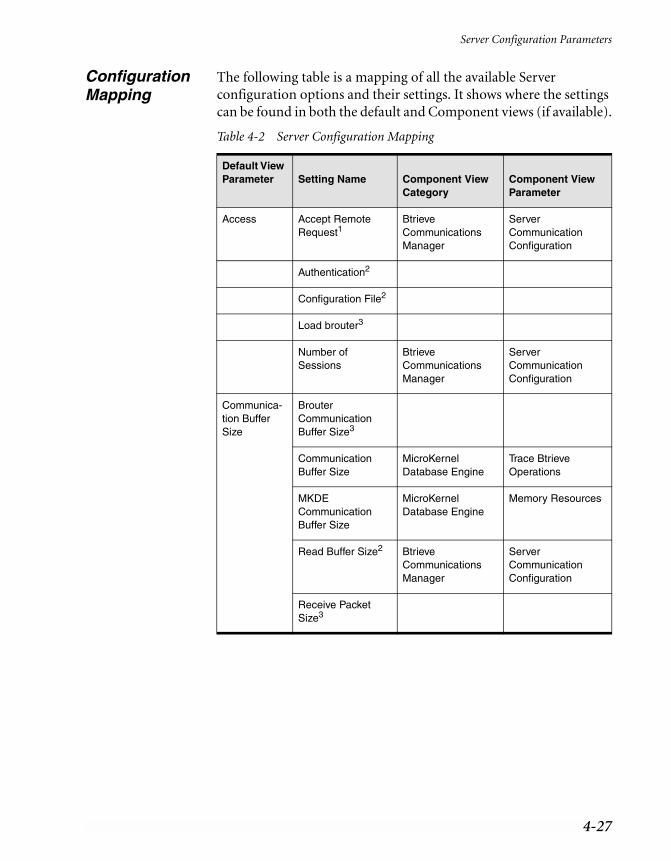
4-27
Server Configuration Parameters
Configuration Mapping
The following table is a mapping of all the available Server configuration options and their settings. It shows where the settings can be found in both the default and Component views (if available).
Table 4-2 Server Configuration Mapping
Default View Parameter Setting Name Component View
CategoryComponent View Parameter
Access Accept Remote Request1
Btrieve Communications Manager
Server Communication Configuration
Authentication2
Configuration File2
Load brouter3
Number of Sessions
Btrieve Communications Manager
Server Communication Configuration
Communica-tion Buffer Size
Brouter Communication Buffer Size3
Communication Buffer Size
MicroKernel Database Engine
Trace Btrieve Operations
MKDE Communication Buffer Size
MicroKernel Database Engine
Memory Resources
Read Buffer Size2 Btrieve Communications Manager
Server Communication Configuration
Receive Packet Size3

4-28
Configuration Reference
Communica-tion Protocol
Listen IP Address
NetBIOS Port4
ODBC Connection Mgr Supported Protocol4
Supported Protocols
Btrieve Communications Manager
Server Communication Configuration
TCP/IP Multihomed
TCP/IP Port5
Use SAP3
Compatibility Create File Version MicroKernel Database Engine
File Settings
System Data MicroKernel Database Engine
File Settings
Data Integrity Archival Logging Selected Files
MicroKernel Database Engine
Files Settings
Initiation Time Limit MicroKernel Database Engine
Client/System Transactions
Operation Bundle Limit
MicroKernel Database Engine
Client/System Transactions
Transaction Durability
MicroKernel Database Engine
Client/System Transactions
Wait Lock Timeout MicroKernel Database Engine
System Resources/Directory
Table 4-2 Server Configuration Mapping
Default View Parameter Setting Name Component View
CategoryComponent View Parameter

4-29
Server Configuration Parameters
Debugging Number of Bytes from Data Buffer
MicroKernel Database Engine
System Resources/Directory
Number of Bytes from Key Buffer
MicroKernel Database Engine
Trace Btrieve Operations
Select Operations MicroKernel Database Engine
Trace Btrieve Operations
Trace File Location MicroKernel Database Engine
Trace Btrieve Operations
Trace Operation MicroKernel Database Engine
Trace Btrieve Operations
Directories DBNames Configuration Location
Transaction Log Directory
MicroKernel Database Engine
System Resources/Directory
Working Directory MicroKernel Database Engine
System Resources/Directory
Memory Usage
Allocate Resource at Startup1
MicroKernel Database Engine
System Resources/Directory
Back to Minimal State if Inactive1
MicroKernel Database Engine
System Resources/Directory
Minimal State of Delay1
MicroKernel Database Engine
System Resources/Directory
Sort Buffer Size MicroKernel Database Engine
Memory Resources
System Cache 1 MicroKernel Database Engine
System Resources/Directory
Table 4-2 Server Configuration Mapping
Default View Parameter Setting Name Component View
CategoryComponent View Parameter

4-30
Configuration Reference
Performance Tuning
Cache Allocation Size
MicroKernel Database Engine
Memory Resources
Communications Threads
Btrieve Communications Manager
Server Communication Configuration
Index Balancing MicroKernel Database Engine
File Settings
Log Buffer Size MicroKernel Database Engine
Client/System Transactions
Number of Input/Output Threads
MicroKernel Database Engine
System Resources/Directory
Number of Worker Threads1
Transaction Log Size
MicroKernel Database Engine
Client/System Transactions
NetWare RTSS
Runtime Server Support3
1 Windows and Unix engines only.2 Unix engines only.3 NetWare engines only.4 Server engines only.
Table 4-2 Server Configuration Mapping
Default View Parameter Setting Name Component View
CategoryComponent View Parameter
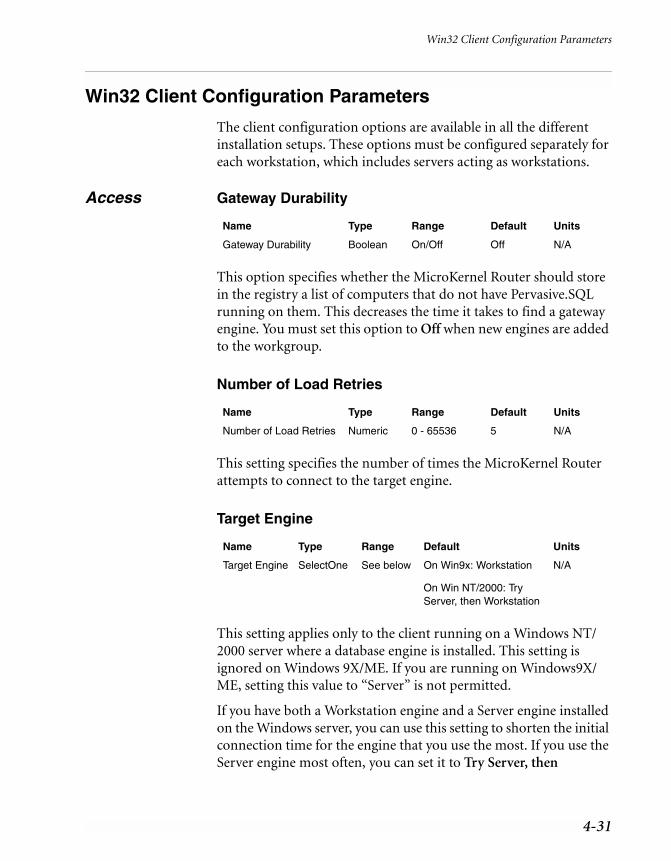
4-31
Win32 Client Configuration Parameters
Win32 Client Configuration Parameters
The client configuration options are available in all the different installation setups. These options must be configured separately for each workstation, which includes servers acting as workstations.
Access Gateway Durability
This option specifies whether the MicroKernel Router should store in the registry a list of computers that do not have Pervasive.SQL running on them. This decreases the time it takes to find a gateway engine. You must set this option to Off when new engines are added to the workgroup.
Number of Load Retries
This setting specifies the number of times the MicroKernel Router attempts to connect to the target engine.
Target Engine
This setting applies only to the client running on a Windows NT/2000 server where a database engine is installed. This setting is ignored on Windows 9X/ME. If you are running on Windows9X/ME, setting this value to “Server” is not permitted.
If you have both a Workstation engine and a Server engine installed on the Windows server, you can use this setting to shorten the initial connection time for the engine that you use the most. If you use the Server engine most often, you can set it to Try Server, then
Name Type Range Default Units
Gateway Durability Boolean On/Off Off N/A
Name Type Range Default Units
Number of Load Retries Numeric 0 - 65536 5 N/A
Name Type Range Default Units
Target Engine SelectOne See below On Win9x: Workstation
On Win NT/2000: Try Server, then Workstation
N/A

4-32
Configuration Reference
Workstation so that the client always tries to connect to the local Server engine first.
If you have only a Workstation/Workgroup engine installed, setting this parameter to Workstation avoids the wait that occurs when the client tries to open a named pipe to a non-existent local Server engine.
If the client occasionally access both a remote Server engine as well as the local Server engine, you can use this setting to determine which engine the client connects to. In this scenario, the remote Server engine is referred to as the Workstation.
If the setting Use Local MicroKernel Engine is turned Off, then this setting is ignored.
Use IDS
This setting specifies that the MicroKernel Router allows access to a Pervasive.SQL I*net Data server running on a remote server. Make sure this setting is set to On before using any of the IDS configuration options.
Use Local MicroKernel Engine
This setting determines whether a local application tries to connect to a local engine. If set to Off, no attempt is made to connect to a local engine.
Use Remote MicroKernel Engine
This setting specifies whether the MicroKernel Router allows access to a Server or Workgroup engine running on a remote server. If this value is set to On, and Use Local MicroKernel is set to On, the remote server is tried first.
Name Type Range Default Units
Use IDS Boolean On/Off On N/A
Name Type Range Default Units
Use Local MicroKernel Boolean On/Off On N/A
Name Type Range Default Units
Use Remote MicroKernel Boolean On/Off On N/A

4-33
Win32 Client Configuration Parameters
Prior to Service Pack 3, this setting was named “Requester.”
Note We recommend you keep Use Remote MicroKernel Engine set to On for a Microsoft’s File and Print Services for NetWare (FPNW) server running Pervasive.SQL. You may receive a Status Code 94, “The application encounter a permission error,” if you change this setting to Off when you are running the Btrieve Interface locally on the FPNW server and using a local FPNW drive mapping or local FPNW UNC path.
Communica-tion Protocols
Enable Auto Reconnect
This setting specifies whether you want the client to attempt to auto-reconnect during a network outage. A setting of “On” means AutoReconnect is enabled.
Auto Reconnect is not in effect unless this setting is also enabled in the server configuration.
Supported Protocols
This setting specifies the protocols that are used by the Communications Requester. If more than one protocol is specified, the Communications Requester attempts to connect using all available protocols. When the first protocol succeeds, that protocol is used for the remainder of the session. The default value varies depending upon the platform; the available options are:
Name Type Range Default Units
Enable Auto Reconnect Boolean On/Off Off N/A
Name Type Range Default Units
Supported Protocols Multiselect N/A Varies N/A
Table 4-3 Client Supported Protocols
" Microsoft TCP/IP " Novell SPX
" Microsoft SPXII " Microsoft NETBIOS
" IBM NETBIOS "

4-34
Configuration Reference
Note You must have at least one specific protocol that is enabled at both the client and the server, or else they cannot communicate.
TCP/IP Timeout for Communication Requester
This setting specifies the number of seconds the requester should wait for any connection request to succeed before timing out.
Note Despite the name for this setting, this setting applies to all protocols, not just TCP/IP.
Performance Tuning
Compress IDS Data
This setting determines if the MicroKernel Router uses compression with the IDS server. Using compression may allow the data to be transmitted in fewer TCP/IP packets and may improve performance.
Security IDS Password
This is the password used by the MicroKernel Router to log into a Pervasive.SQL I*net Data Server running on a remote server. There is no default value and a password must be set by the system administrator on the I*net Data Server and the Use IDS configuration option must be set to On before using this option.
Name Type Range Default Units
TCP/IP Timeout for Communication Requester
Numeric 1 - 2147483647 15 seconds
Name Type Range Default Units
Compress IDS Data Boolean On/Off Off N/A
Name Type Range Default Units
IDS Password String N/A None N/A

4-35
Win32 Client Configuration Parameters
IDS Username
This is the name used by the MicroKernel Router to log into a Pervasive.SQL I*net Data Server running on a remote server. There is no default value and a user name must be set by the system administrator on the I*net Data Server and the Use IDS configuration option must be set to On before using this option.
Runtime Server Support
This setting controls runtime server support. If enabled with the value Yes, the current user name and password for the drive on which you are presently running are used. To enable RTSS with a different username, enter “user_name:password”.
Note SUPERVISOR and ADMIN are not valid user names, even if supplied with the correct password. If the requester cannot find a login user name other than SUPERVISOR or ADMIN, it does not attempt to login.
Application Characteristics
Embedded Spaces
This option instructs the Btrieve Interface to allow embedded spaces in filenames for Btrieve operations.
Name Type Range Default Units
IDS Username String N/A None N/A
Name Type Range Default Units
Runtime Server Support
String YesNouser_name:password
Yes N/A
Name Type Range Default Units
Embedded Spaces Boolean On/Off Off N/A

4-36
Configuration Reference
Splash Screen
This setting controls whether or not the Btrieve Interface splash screen displays. The splash screen displays the first time a Btrieve requester is loaded.
Note The 32-bit Configuration utility enables/disables the splash screen for 32-bit applications and 16-bit applications when thunking is set to On. For 16-bit applications, if thunking is set to Off, use the Client-16-bit Application characteristics options to disable the splash screen.
Configuration Mapping
The following table is a mapping of all the available Client configuration options and their settings. It shows where all the settings can be found in both the default and Component views (if available).
Name Type Range Default Units
Splash Screen Boolean On/Off On N/A
Table 4-4 Client Configuration Settings
Default View Category Parameter Name Component
View CategoryComponent View Parameter
Access Gateway Durability MicroKernel Router
Access Control
Number of Load Retries
MicroKernel Router
Access Control
Target Engine MicroKernel Router
Access Control
Use IDS MicroKernel Router
Access Control
Use Local MicroKernel
MicroKernel Router
Access Control
Use Remote MicroKernel
MicroKernel Router
Access Control

4-37
Win32 Client Configuration Parameters
Communication Protocols
Enable AutoReconnect
Communications Requester
Access Control
Supported Protocols
Communications Requester
Access Control
TCP/IP Timeout for Communication Requester
Communications Requester
Access Control
Performance Tuning
Compress IDS Data MicroKernel Router
Access Control
Security IDS Password MicroKernel Router
Access Control
IDS Username MicroKernel Router
Access Control
Runtime Server Support
Communications Requester
Access Control
Application Characteristics
Splash Screen Btrieve Requester
Client Configuration
Embedded Spaces MicroKernel Router
Access Control
Table 4-4 Client Configuration Settings
Default View Category Parameter Name Component
View CategoryComponent View Parameter

4-38
Configuration Reference
Win16 Client Configuration Parameters
This section describes the configuration options available for the 16-bit client. These must be changed at each individual client and will be used only when running legacy applications. There is no relational engine access when using 16-bit client applications.
Access Use Local MicroKernel Engine
This setting determines whether a local application tries to connect to a local engine. If set to Off, no attempt is made to connect to a local engine.
Use Remote MicroKernel Engine
This setting specifies whether the MicroKernel Router allows access to a MicroKernel server engine running on a remote server. If this value is set to On, and Use Local MicroKernel is set to On, the remote server is tried first.
Application Characteristics
Splash Screen
This setting controls whether or not the Btrieve Interface splash screen displays. The splash screen displays the first time a Btrieve requester is loaded.
Name Type Range Default Units
Use Local Microkernel Engine
Boolean On/Off On N/A
Name Type Range Default Units
Use Remote MicroKernel Engine
Boolean On/Off On N/A
Name Type Range Default Units
Splash screen Boolean On/Off On N/A

4-39
Win16 Client Configuration Parameters
Use IDS
This setting specifies that the MicroKernel Router allows access to a Pervasive.SQL I*net Data server running on a remote server. Make sure this setting is set to On before using any of the IDS configuration options.
Use Thunk
This setting specifies whether the Win16 client requester uses thunking to access Win32 components. This option must be turned on when on a Win32 platform (Windows NT/9X/2000) accessing Win16 (Btrieve) applications.
Communica-tion Protocols
Supported Protocols
This setting specifies the protocols that are used by the Communications Requester. If more than one protocol is specified, the Communications Requester will attempt to use TCP/IP first. If TCP/IP is not available, it uses SPXII. In the case of Unix servers, the only protocol that can be used is TCP/IP; SPX is will not function. The default value varies depending upon the platform; the available options are:
Name Type Range Default Units
Use IDS Boolean On/Off On N/A
Name Type Range Default Units
Use Thunk Boolean On/Off On N/A
Name Type Range Default Units
Supported Protocols Multiselect N/A Varies N/A
Table 4-5 Client 16-bit Supported Protocols
" Microsoft SPX " Microsoft NETBIOS
" Microsoft TCP/IP " NWIPX/SPX SPX

4-40
Configuration Reference
TCP/IP Timeout for Communication Requester
This setting specifies the number of seconds the requester should wait for a TCP/IP connect request to succeed before timing out.
Security (Net-Ware server ac-cess only)
Runtime Server Support
This setting controls runtime server support. If enabled with the value Yes, the current user name and password for the drive on which you are presently running are used. To enable RTSS with a different username, enter “user_name:password”.
Note SUPERVISOR and ADMIN are not valid user names, even if supplied with the correct password. If the requester cannot find a login user name other than SUPERVISOR or ADMIN, it does not attempt to login.
Configuration Mapping
The following table is a mapping of all the available 16-bit Client configuration options and their settings. It shows where all the settings can be found in both the default and Component views (if available).
Name Type Range Default Units
TCP/IP Timeout for Communication Requester
Numeric 1 - 2147483647 15 seconds
Name Type Range Default Units
Runtime Server Support
String YesNouser_name:password
Yes N/A
Table 4-6 16-bit Client Configuration Settings
Default View Parameter Setting Name Component View
CategoryComponent View Parameter
Access Use Local MicroKernel Engine
MicroKernel Router Access Control
Use Remote MicroKernel Engine
MicroKernel Router Access Control

4-41
Win16 Client Configuration Parameters
Application Characteristics
Splash Screen Btrieve Requester Client Configuration
Use IDS MicroKernel Router Access Control
Use Thunk MicroKernel Router Access Control
Communication Protocol
Supported Protocols
Communications Requester
Access Control
TCP/IP Timeout for Communication Requester
Communications Requester
Access Control
Security Runtime Server Support
MicroKernel Router Access Control
Table 4-6 16-bit Client Configuration Settings
Default View Parameter Setting Name Component View
CategoryComponent View Parameter

4-42
Configuration Reference

5-1
c h a p t e r
5Identifiers, DSNs, and Named Databases
An Exploration of Object Names, Named Databases, and DSNs
This chapter delves into Named Databases and DSNs. It is divided into the following sections:
! “Identifiers and Object Names” on page 5-2
! “DSN Creation Options” on page 5-5
! “Connection Strings” on page 5-9
! “Maintain Named Databases” on page 5-12

5-2
Identifiers, DSNs, and Named Databases
Identifiers and Object Names
An identifier is the name of a column, table, procedure, cursor, or other named object within the database. A regular identifier is an identifier that is not surrounded by double quotes. A delimited identifier is an identifier surrounded by double quotes.
Regular and Delimited
A regular identifier must begin with a letter, either upper or lower case. The remainder of the identifier can consist of any combination of upper or lower case letters, digits, and the underscore character (“_”). You cannot use a reserved word as a regular identifier. Regular identifiers are case-insensitive, so that the identifiers Abc, ABC, and abc are identical and can be used interchangeably.
A delimited identifier can consist of any string enclosed in double quotes. While it is not recommended, reserved words can be used as delimited identifiers. For example, INSERT is not permitted as a regular identifier, but "INSERT" is permitted as a delimited identifier. If you need to represent a double-quote within a delimited identifier, use a pair of double quotes without a space between them.
Maximum Length
Almost all identifiers are limited in length. For delimited identifiers, the size limit includes the opening and closing quotations.
Table 5-1 Maximum Length of Identifiers
Type of Identifier Maximum number of characters allowed
Table 20
View 20
Column 20
Index 20
Foreign key 20
User/group name 30
Password 8
Database 20
Stored procedure 30

5-3
Identifiers and Object Names
Examples The following identifiers are permitted:
"INSERT"myInsert"my Insert""3tableA"Table56"Table 56 & (*#)"Long_table_name_1234 [20 characters]"Long_table_name123" [20 characters including quotes]
The following identifiers are not permitted:
INSERT [reserved word requires quotes]my Insert [spaces require quotes]3tableA [regular identifier must start with a letter]Table56(*#) [regular identifier contains only alpha-numeric characters]Long_table_name_12345 [21 characters]"Long_table_name1234" [21 characters including quotes]
Unique Scope Identifiers generally must be unique within a certain scope. That is, instances of the same type of object using the same name cannot be used within the same arena. Table 5-2 shows the arena, or the scope, within which a given object name must be unique.
Trigger 30
Variable none
Data file path name 64 (the maximum length of the data file path name is a combination of Xf$Loc path and the data file path)
Table 5-1 Maximum Length of Identifiers continued
Type of Identifier Maximum number of characters allowed
Table 5-2 Unique Scope for Common Identifiers
A name for this type of object ... ... must be unique within this scope:
Database All databases hosted by a given database engine
Table Database
Trigger or stored procedure Database
User or group Database

5-4
Identifiers, DSNs, and Named Databases
Cursor Database
View Database
Constraint Database
Column Table
Index Table
Table 5-2 Unique Scope for Common Identifiers
A name for this type of object ... ... must be unique within this scope:

5-5
DSN Creation Options
DSN Creation Options
This section explains in detail the driver options that can be configured for Pervasive.SQL DSNs.
Engine DSN Open Mode Op-tions
The DSN Open Mode options available for Engine DSNs allow you to specify one of several characteristics that go into effect when tables are opened through the specified DSN. These options are mutually exclusive—you are not permitted to select more than one.
These options correspond directly to the Btrieve open modes allowed in the Open (0) operation. By setting an Open Mode for a DSN, you are setting the default behavior for tables (corresponding to Btrieve files) opened through that DSN.
Normal
Normal mode is the default. Opening a table in Normal mode allows read/write access according to the permissions defined in the database.
If this mode is selected, the ODBC connection string includes OPENMODE=0, and the following ODBC function call is executed when you connect to the database:
SQLSetConnectOption(pSubDbc, SQL_ACCESS_MODE, SQL_MODE_READ_WRITE);
Table 5-3 DSN Open Modes and ODBC Connection Options
This Open Mode ... ... generates this ODBC connection string ...
... and this SQLSetConnectOption call:
Normal OPENMODE=0 SQLSetConnectOption( pSubDbc, SQL_ACCESS_MODE, SQL_MODE_READ_WRITE);
Accelerated OPENMODE=-1 SQLSetConnectOption is ignored
Read-only OPENMODE=1 SQLSetConnectOption( pSubDbc, SQL_ACCESS_MODE, SQL_MODE_READ_ONLY);
Exclusive OPENMODE=-4 SQLSetConnectOption is ignored

5-6
Identifiers, DSNs, and Named Databases
Accelerated
Opening a table in Accelerated mode provides increased insert/update performance by disabling database engine logging functions for the current user. Logging is not affected for other users accessing the same table.
Caution Because no logging occurs for the given user when this mode is in effect, the database engine cannot guarantee transaction atomicity, transaction durability, or archival log safety during use of Accelerated mode.
For example, if a system failure occurs while the same file is being accessed by a client performing inserts using Accelerated mode and a client performing updates using Normal mode, it is possible for the transaction log to contain updates to records that do not yet exist in the data files, because the Accelerated insert operation in memory was never flushed to disk, while the transactional update operation was written to the transaction log.
When this mode is selected, the ODBC connection string includes OPENMODE=-1, and the SQLSetConnectOption call is ignored by the ODBC driver. You cannot use SQLSetConnectOption to specify this mode.
Read-only
When a table is opened in read-only mode, operations that modify the database structure or the data in the database are not permitted.
If this mode is selected, the ODBC connection string includes OPENMODE=1, and the following ODBC function call is executed when you connect to the database:
SQLSetConnectOption(pSubDbc, SQL_ACCESS_MODE, SQL_MODE_READ_ONLY);
Exclusive
When a table is opened in exclusive mode, no other connections to the table are permitted. If other users are currently accessing the given table, it cannot be opened in Exclusive mode. You must try again later.

5-7
DSN Creation Options
When this mode is selected, the ODBC connection string includes OPENMODE=-4, and the SQLSetConnectOption call is ignored by the ODBC driver. You cannot use SQLSetConnectOption to specify this mode.
Client DSN Op-tions
In the Pervasive Client DSN Setup window, the following options can be modified if you click Options.
Enable Array Fetch
An array fetch is a memory cache on the client machine for result sets. When array fetch is enabled, data from the latest result set is cached to the client machine’s local memory, thereby speeding performance on subsequent queries. We recommend you leave array fetch “On,” if you will be doing multiple queries.
The default size of the buffer used to cache array fetches is 8KB. You can set it anywhere between 1 and 64KB.
TCP/IP Port Number
You can use this setting to change the network port number on which Pervasive.SQL transmits ODBC communications. The network layer on the server engine has a similar setting, described in “TCP/IP Port (Server engines only)” on page 4-10. You must change both settings at the same time, and you must change them both to the same port number, or else your client and server cannot communicate.
Caution Do not change the client port number unless you also change the corresponding port number on the server. If the server and client are not using the same port number, they cannot communicate.
Generally, the only reason you would need to change this port number is if you have another network service that is already using this port, and it is easier to change the port number for your Pervasive.SQL applications than for the other application.
The Btrieve interface communicates over port 3351. This value is not configurable.
5-8
Identifiers, DSNs, and Named Databases
Use OEM/ANSI Conversion
This setting allows applications to store or retrieve character data in any OEM character set using Pervasive.SQL, while allowing the data to be manipulated and displayed using the ANSI Windows character set. The Pervasive ODBC driver translation DLL can perform all necessary translations between the two character sets. This feature can be turned on or off for each DSN.
The Pervasive Control Center (PCC) and the SQL Data Manager (SQLDM) are not fully OEM-character aware if you use extended ASCII characters for column or table names. However, any character data that is passed to and from the database is correctly translated between the OEM and ANSI character sets. OEM-character-aware column and table names within PCC and SQLDM will be fully enabled in a future service pack.
If your application connects to the data source using SQLDriverConnect, you can also specify the translation DLL using the connection string option TRANSLATIONDLL=path_and_DLL_name. The translation DLL name for Pervasive.SQL is W32BTXLT.DLL.
NOTE: The OEM to ANSI translation option is available only for client or local Engine DSNs. It is not available when setting up a remote Engine DSN.
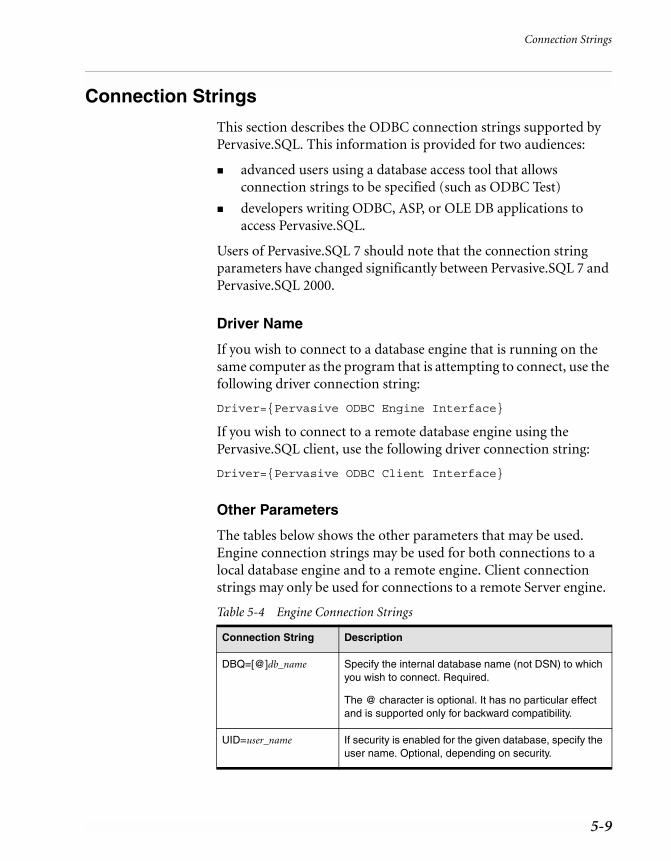
5-9
Connection Strings
Connection Strings
This section describes the ODBC connection strings supported by Pervasive.SQL. This information is provided for two audiences:
! advanced users using a database access tool that allows connection strings to be specified (such as ODBC Test)
! developers writing ODBC, ASP, or OLE DB applications to access Pervasive.SQL.
Users of Pervasive.SQL 7 should note that the connection string parameters have changed significantly between Pervasive.SQL 7 and Pervasive.SQL 2000.
Driver Name
If you wish to connect to a database engine that is running on the same computer as the program that is attempting to connect, use the following driver connection string:
Driver={Pervasive ODBC Engine Interface}
If you wish to connect to a remote database engine using the Pervasive.SQL client, use the following driver connection string:
Driver={Pervasive ODBC Client Interface}
Other Parameters
The tables below shows the other parameters that may be used. Engine connection strings may be used for both connections to a local database engine and to a remote engine. Client connection strings may only be used for connections to a remote Server engine.
Table 5-4 Engine Connection Strings
Connection String Description
DBQ=[@]db_name Specify the internal database name (not DSN) to which you wish to connect. Required.
The @ character is optional. It has no particular effect and is supported only for backward compatibility.
UID=user_name If security is enabled for the given database, specify the user name. Optional, depending on security.

5-10
Identifiers, DSNs, and Named Databases
Examples
Example A
PWD=password If security is enabled for the given database, specify the password. Optional, depending on security.
OPENMODE=-4|-1|0|1 Specify the default file open mode for files opened with the current connection. Default is 0, “Normal.”Can be used only with local connections, not remote client connections. Optional.
For more information on file open modes, see “Engine DSN Open Mode Options” on page 5-5.
TRANSLATIONDLL=path_and_DLL_name
Specify the full path name of the DLL to use for OEM/ANSI translation. For more information, see “Use OEM/ANSI Conversion” on page 5-8.
Table 5-5 Client Connection Strings
Connection String Description
ServerName=server[.port] Specify the machine name or IP address of the computer to which you wish to connect. If you are not using the default port, specify the port number to use. Required.
ServerDSN=dsn_name Specify the Engine DSN to which you wish to connect. Required, unless DBQ is specified.
TransportHint=<TCP|SPX>[:SPX|TCP]
Specify the transport protocol to use, or which to try first. Default is TCP:SPX. Optional.
For example, a value of “TCP” forces the client to try a TCP/IP connection only. A value of “SPX:TCP” forces the client to try an SPX connection first, and if that fails, to try a TCP/IP connection.
TCPPort=port Specify the TCP/IP port on which to find the server. Default is 1583. Optional.
ArrayFetchOn=1|0 Specify whether to cache result sets on the client. Default is 1, “On.” Optional.
ArrayBufferSize=size Specify the size of the client cache, in KB. Default is 8 KB. Optional.
Table 5-4 Engine Connection Strings
Connection String Description

5-11
Connection Strings
This example shows how to connect to a database with the internal name “SOMEDATA” on a remote server named “ServerMain” using TCP/IP port 1590, trying TCP/IP first then SPX:
Driver={Pervasive ODBC Client Interface}; ServerName=ServerMain.1590;DBQ=SOMEDATA; TransportHint=TCP:SPX;
Example B
This example shows how to connect to an Engine DSN named “mydata” on a remote server named “MyServer” with database security turned on:
Driver={Pervasive ODBC Client Interface}; ServerName=MyServer;ServerDSN=mydata;UID=ajones;PWD=jones52;
Example C
This example shows how to connect to a local database with the internal name “DATA5”:
Driver={Pervasive ODBC Engine Interface};DBQ=DATA5;
See Also
For further information on Engine DSN open modes, see “Engine DSN Open Mode Options” on page 5-5.
For further information on Client connection string options, see “Client DSN Options” on page 5-7.

5-12
Identifiers, DSNs, and Named Databases
Maintain Named Databases
A named database is a database that has a logical name that allows users to identify it without knowing its actual location. Pervasive.SQL 2000 requires that all databases be named. When you name a database, you associate that name with a particular dictionary directory path and one or more data file paths. Database names are typically used internally by Pervasive.SQL 2000i and most users will refer to the database by ODBC Data Source Name (DSN) that points to it.
For ODBC access you must set up a DSN to point to the database name. Multiple DSNs may point to the same named database.
To create, modify or delete database names, the Pervasive.SQL 2000 Control Center provides a wizard that can be started by right-clicking on a machine's Configuration namespace node and selecting Maintain named database. The following wizard appears:
Figure 5-1 Maintain Named Database Wizard Dialog Box

5-13
Maintain Named Databases
Table describes the elements in the Maintain named databases dialog box.
Creating a New Bound Data-base
➤ To create a bound database
1 Right-click on the Configuration namespace node of the machine on which the named database is to be created.
2 Open the Maintain Named Databases from the pop-up menu. The Maintain Named Databases dialog box appears.
Table 5-6 Maintain Named Databases Dialog Box Elements
Element Description
Registered DB Names Lists available named databases.
Current database name Displays currently selected database name.
Dictionary Location Displays the location of the Data Dictionary Files (DDF) for the selected database name.
Data File Location Displays the locations of data files for the database.
Bound Indicates whether or not the database is bound. Binding a database ensures that the MicroKernel enforces the database defined security, referential integrity (RI), and triggers, regardless of the method used to access the data.
For more information about bound databases, refer to the API Programmer’s Reference.
Integrity Enforced Displays whether integrity constraints (security, RI, and triggers) are being enforced on the database.

5-14
Identifiers, DSNs, and Named Databases
Figure 5-2 Maintain Named Databases Dialog Box
3 Click on the Add database icon in the upper left hand corner of the dialog box. A new named database will appear in the Registered DB Names panel with its name highlighted. Type in a name for the new database, making sure not to use any spaces.
4 Specify the location for the database in the Dictionary Location field. This location must be on the same server to which you are connected.
# For NetWare, enter a path in the form vol:\path.
# For Windows NT, enter a path in the form drive:\path, where drive is the local drive letter.
# For Unix, enter the standard Unix path format from root.
5 Specify the location of the data file(s) in the Data File Locations field. Click on the Add File Location icon just above the directory list or click on the next available blank line in the list.
If you are specifying paths to data file(s) on this server, specify them in the same manner as in the Dictionary Location field. If you are entering paths to data files on another server, specify the full UNC path.
# For NetWare, enter the path in the form \\server\vol:\path
# For Windows NT, enter the path in the form \\server\sharename\path
# For Unix, enter the path in one of two ways:
\\server\share\path or
\\server\$PVSW$\path
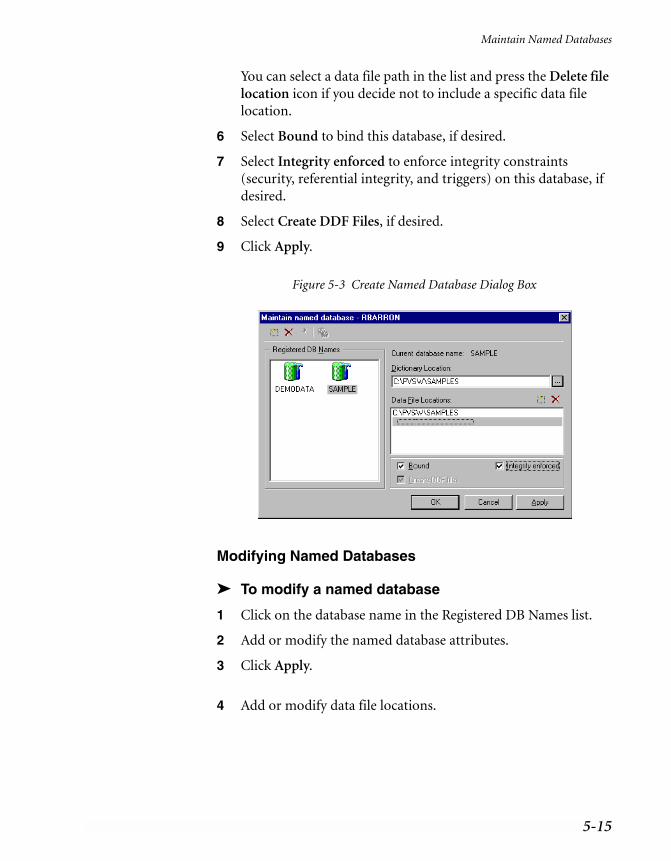
5-15
Maintain Named Databases
You can select a data file path in the list and press the Delete file location icon if you decide not to include a specific data file location.
6 Select Bound to bind this database, if desired.
7 Select Integrity enforced to enforce integrity constraints (security, referential integrity, and triggers) on this database, if desired.
8 Select Create DDF Files, if desired.
9 Click Apply.
Figure 5-3 Create Named Database Dialog Box
Modifying Named Databases
➤ To modify a named database
1 Click on the database name in the Registered DB Names list.
2 Add or modify the named database attributes.
3 Click Apply.
4 Add or modify data file locations.

5-16
Identifiers, DSNs, and Named Databases
Deleting Named Databases
➤ To delete a named database
1 Click on the database name in the Registered DB Names list.
2 Click on the Delete database icon. You can also right-click on the database name and select Delete from the pop-up menu.
Note Deleting a Named Database without deleting the corresponding DSN(s) results in “orphaned” DSNs. Because the underlying database has been removed, these DSNs do not work. You should always remove any DSNs created for a Named Database if you delete the Named Database.

6-1
c h a p t e r
6Setting Up Referential Integrity
An Introduction to Referential Integrity Structures
Referential Integrity is a system of checks and balances that you can create in your database to ensure that tables with related data remain synchronized.
! “Concepts of Referential Integrity” on page 6-2
! “Setting up Primary Keys” on page 6-6
! “Setting up Foreign Keys” on page 6-8
6-2
Setting Up Referential Integrity
Concepts of Referential Integrity
Referential Integrity (RI) allows you to modify or prohibit updates, inserts, or deletes based on whether identical field values exist in the same or other tables.
Definitions A good understanding of RI depends upon a clear understanding of several important terms:
Rule
A rule is a simple statement of cause and effect, carried out by the RI system defined in the database.
Example A
For example, a delete rule defines what happens to records containing a foreign key when a record containing a primary key is deleted: “When the record containing ‘Bhargava Building’ is deleted, all rows in Table A that reference that record are deleted.”
A delete rule can also prohibit the row containing the primary key value from being deleted if there are any foreign key values that reference the given primary key value.
Example B
An update rule defines what happens to a record containing a foreign key when a user attempts to update the record or add a new record: “When a user attempts to insert a new record to Table B, reject the attempt if the building name does not exist in Table C.”
Primary key
A primary key is the column or columns upon which a rule depends. Only one primary key is permitted in any table, and the primary key must not allow duplicate values. For an update rule, the primary key is the column or columns against which updated or inserted columns are compared to determine if the updated or inserted record should be allowed.
In Example A above, the column containing “Bhargava Building” is the primary key.

6-3
Concepts of Referential Integrity
In Example B above, the column in Table C that contains the building name is the primary key.
Foreign key
A foreign key is the column or columns that are compared against a primary key to determine how to proceed.
In Example A above, the column in Table A that may contain the value “Bhargava Building” is the foreign key.
In Example B above, the column in Table B that contains the building name is the foreign key.
Cascade
A cascade rule is a rule in which the database permits the desired operation to occur, then enforces RI by changing other tables or rows to synchronize with the first operation.
For example, if a delete cascade rule is defined, deleting a record in the primary key table causes the database to find and delete all rows throughout the database that have foreign key values the same as the primary key value of the deleted row.
Restrict
A restrict rule is a rule in which the database decides whether or not to permit the desired operation based on existing values in the database.
for example, if an update restrict rule is defined, an attempt to add a row to a table containing a foreign key causes the database engine to compare the value in the foreign key field to the values in the primary key. If there is no primary key row with the same value, the new row is not permitted to be added to the foreign key table.
Understanding Keys and Rules
This section explores the concepts behind primary keys and foreign keys in further detail.

6-4
Setting Up Referential Integrity
Figure 6-1 Primary and Foreign Keys
In the example shown in Figure 6-1, the column named student_ID in Table A (A.student_ID) is an IDENTITY data type that does not allow two rows to the have the same value. Every student has a unique ID number. We will define student_ID as the primary key of Table A.
We can then define the column named stud_ID in Table B (B.stud_ID) as a foreign key that references A.student_ID. Note that the data type of stud_ID must be a type that can be compared with IDENTITY, such as INTEGER. The data types of primary and foreign keys must be compatible. You can have as many foreign keys as you need in order to enforce your desired referential integrity scheme. Multiple foreign keys can reference the same primary key.
The table with the primary key can be referred to as the parent table, while the table with the foreign key is called the child table. Once the keys are defined, we have a range of behaviors to choose from.
Update Restrict
Continuing with the example, setting an update restrict rule ensures that the value of B.stud_ID in any new or updated row must first
Table A Table B
"student_ID "Name "stud_ID "Class
20543 John 20543 ENG-101
20577 Mary 20543 AST-202
Table 6-1 Choices for RI Rules
If you want this behavior ... ... define this rule:
Do not allow a row to be inserted or updated in Table B unless the proposed value of B.stud_ID matches any value in A.student_ID.
Update Restrict
Do not allow a row to be deleted from Table A if any value of B.stud_ID matches that row.
Delete Restrict
If a row is deleted from Table A, delete all rows from Table B in which B.stud_ID matches the value of A.student_ID in the deleted row.
Delete Cascade

6-5
Concepts of Referential Integrity
exist in A.student_ID. It follows, then, that you must have rows in Table A before you can add any rows in Table B. Stated another way, you must create at least one parent row before you can create a child row.
Delete Restrict
In the example, setting a delete restrict rule ensures that a row from Table A cannot be deleted if any rows in Table B reference that row. You cannot delete the row with Name value “John” because John’s student ID is referenced in Table B.
Once all rows from Table B that reference John’s student ID are deleted, then John’s row can be deleted from Table A.
Delete Cascade
In the example, setting a delete cascade rule ensures that both records in Table B are deleted if the row with Name value “John” is deleted.

6-6
Setting Up Referential Integrity
Setting up Primary Keys
You must create primary keys using SQL statements. Pervasive Control Center does not provide this ability in the user interface, unless you wish to modify by hand the SQL statement created by Create Table Wizard before you generate the table.
Creating a Pri-mary Key Dur-ing Table Creation
You can create a primary key when you create a table, by using the PRIMARY KEY keywords in your CREATE TABLE statement. A primary key can consist of one or more columns. The example below shows the column named id being created then being designated the primary key:
CREATE TABLE mytable (id INTEGER, myname CHAR(20), PRIMARY KEY(id))
The example below shows how to create a primary key using more than one column as the unique key value:
CREATE TABLE mytable (id INTEGER, myname CHAR(20), PRIMARY KEY(id, myname))
If you do not specify the UNIQUE attribute on the column or columns that you designate as a primary key, the database engine automatically creates an index on the designated columns that does not allow duplicate values or null values in the columns. Null values are never allowed in a key column.
For more examples, see CREATE TABLE in SQL Engine Reference.
Adding a Pri-mary Key to an Existing Table
You can add a primary key to an existing table, by using the ALTER TABLE statement with ADD PRIMARY KEY key words. You must create the primary key on a column or columns that do not allow duplicate values or null values.
If necessary, you can modify the column attributes and make the column the primary key at the same time:
ALTER TABLE mytable MODIFY id INTEGER UNIQUE NOT NULL PRIMARY KEY
If you want to add a primary key consisting of more than one column, you must add the key separately:
ALTER TABLE ADD PRIMARY KEY(id, myname)

6-7
Setting up Primary Keys
For more examples, see ALTER TABLE in SQL Engine Reference.

6-8
Setting Up Referential Integrity
Setting up Foreign Keys
You must create foreign keys using SQL statements. Pervasive Control Center does not provide this ability in the user interface.
When you create a foreign key, you must define the associated rule at the same time. You can define multiple rules on the same key.
Creating a For-eign Key During Table Creation
You can create a foreign key when you create a table, by using the REFERENCES keyword in your column definition. A foreign key can consist of one or more columns. The data types of the column(s) must be the same as the primary key that this foreign key references. The example below shows the column named your_id being created then being designated the foreign key, referencing mytable.id:
CREATE TABLE yourtable (your_id INTEGER REFERENCES mytable(id) ON DELETE CASCADE, yourname CHAR(20))
You can also add the foreign key designation at the end of the statement. You must use this technique if you wish to use multiple columns in the key:
CREATE TABLE yourtable (your_id INTEGER, yourname CHAR(20), FOREIGN KEY(your_id, yourname) REFERENCES
mytable(id, myname) ON DELETE CASCADE)
When you create a foreign key, the database engine adds an index on the designated columns.
For more examples, see CREATE TABLE in SQL Engine Reference.
Adding a For-eign Key to an Existing Table
You can add a foreign key to an existing table, by using the ALTER TABLE statement with ADD FOREIGN KEY key words. In the example below, two rules are defined for this foreign key, both a delete rule and an update rule:
ALTER TABLE yourtable ADD FOREIGN KEY (your_id,yourname) REFERENCES mytable(id,myname) ON DELETE CASCADE ON UPDATE RESTRICT
For more examples, see ALTER TABLE in SQL Engine Reference.

7-1
c h a p t e r
7Owner Names and Relational Security
How to Work with Btrieve Owner Names and Relational Security
Pervasive.SQL provides support for Btrieve owner names as well as a full implementation of relational database security. This chapter explains the relationship between the two, and how to work with both.
If you are looking for information about securing the database engine and/or administrative access to the database engine, see Chapter 2 of Pervasive.SQL User’s Guide.
! “Owner Names” on page 7-2
! “Relational Security” on page 7-4
! “Owner Names and Relational Security” on page 7-6
! “Data Encryption” on page 7-7
7-2
Owner Names and Relational Security
Owner Names
An owner name is a password required to gain access to a Btrieve file. There is no relation between an owner name and any system user name or database user name. You should think of an owner name as a simple file password.
For information on how to set or clear an owner name, see “Setting or Clearing an Owner Name” on page 13-20
You can use Maintenance Utility to set or clear an owner name on a file. An owner name can have several attributes, as shown in Table 7-1.
Remarks
When you first set an owner name with encryption on a file, the database engine encrypts the entire file. The larger the file is, the longer this procedure takes.
For information about how owner names interact with relational security, see “Owner Names and Relational Security” on page 7-6.
Data access operations to an encrypted file are slower than to a normal file. The database engine must decrypt each page as it reads it from disk, and encrypt it again before writing it back to disk.
Caution Do not forget or lose a file’s owner name, especially with encryption turned on. There is no way to find out the owner name, and no way to get access to the data without it.
Table 7-1 Owner Name Options
Option Description
Read-only Without specifying the password, users can perform data access operations that do not modify the data file.
Read-only encrypted
Without specifying the password, users can perform data access operations that do not modify the data file. When you set this option, the database engine encrypts every record in the file using the owner name as a key. Records added later are also encrypted.
Normal Without specifying the password, users cannot perform any file access operations.
Normal encrypted
Without specifying the password, users cannot perform any file access operations. Any records inserted or updated are encrypted using the password. When you set this option, the database engine encrypts every record in the file using the owner name as a key. Records added later are also encrypted.

7-3
Owner Names
If you attempt to access a file that has an owner name declared without supplying the owner name, you receive the message, “You are not authorized to perform the operation.”

7-4
Owner Names and Relational Security
Relational Security
This section explains the basic concepts of Pervasive.SQL security.
Securing a Da-tabase
A database can be secured in one of two ways:
! In Pervasive Control Center (PCC), right-click on the database, select Properties, then click on the Security tab. Enter and confirm the password for the Master user in the boxes provided. When you click OK or Apply, security is enabled. For detailed instructions on this procedure, see Pervasive.SQL User’s Guide.
For information about how Btrieve owner names interact with relational security, see “Owner Names and Relational Security” on page 7-6.
! From an ODBC application connected to the database, issue the SQL statement SET SECURITY= ‘password’ where password is the text string you want to use as the password for the Master user. For more information on SET SECURITY, refer to SQL Engine Reference.
When turning security on or off, the Master user must have only one connection open and must be the only user connected.
As soon as you turn security on for the first time, only the Master user can access the database. The Master user password, as with all Pervasive.SQL passwords, is case sensitive.
Note You cannot use SQL Data Manager in PCC to issue a SET SECURITY statement. Attempting to do so generates an error because both SQL Data Manager and PCC keep an open connection to the database.
Setting up Us-ers and Groups
Relational security is based on the existence of a default user named “Master” who has full access to the database when security is first turned on. Initially, no password is required for the Master user.
Caution If you turn on security, be sure to specify a password with a significant length, at least five characters. Do not leave the password field blank because doing so creates a major security risk for your database.
The Master user can create groups and other users and define sets of data access privileges for these groups and users.

7-5
Relational Security
If you want to grant the same level of access to all users and avoid having to set up individual groups and users, you can grant the desired level of access to PUBLIC. The default user PUBLIC represents any user connecting with or without a password.
Note If you wish to use groups, you must set up the groups before creating users. You cannot add a user to a group after you have already created the user.
You can use the Users node in PCC to perform these tasks. You can also use GRANT and REVOKE statements in SQL to perform these tasks. Keep in mind that passwords are case sensitive.
See Pervasive.SQL User’s Guide for information on performing these tasks within PCC.
Restrictions
A given user cannot be a member of more than one group.
All users in a group have exactly the permissions defined for that group. You cannot grant or revoke individual permissions for a user who is a member of a group.
Assigning a user to a group overrides and erases any individual permissions that were granted to the user beforehand.
You cannot add an existing user to a group. To do so, you must delete the user and re-create the user as a member of the group.
You cannot add a group to another group.

7-6
Owner Names and Relational Security
Owner Names and Relational Security
If you have a Btrieve owner name set on a file that is a table in a secure ODBC database, the Master user of the ODBC database must use the owner name in any GRANT statement to grant privileges on the given table to any user, including the Master user.
After the GRANT statement containing the owner name has been issued for a given user, that user can access the specified table by logging into the database, without specifying the owner name each time.
If a user tries to access a table through ODBC that has a Btrieve owner name, the access will not be allowed unless the Master user has granted privileges on the table to the user, with the correct owner name in the GRANT statement.
If a table has an owner name with the Read-Only attribute, the Master user automatically has SELECT rights on this table without specifically granting himself/herself the SELECT rights with the owner name.
Examples
To grant himself/herself full access to a table with an owner name, the Master user must enter the following SQL statement:
GRANT ALL ON table-name owner-name TO Master
To grant SELECT rights on a table named mytable with an owner name of jim56, the Master user must enter the following SQL statement:
GRANT SELECT ON mytable jim56 to bob_smith

7-7
Data Encryption
Data Encryption
Pervasive.SQL offers encryption of data files on disk. To require that your data files be encrypted when written to disk, you must set an owner name on each file.
See “Owner Names” on page 7-2 for more information.

7-8
Owner Names and Relational Security

8-1
c h a p t e r
8Backup and Restore
Understanding and Using the Backup Features of Pervasive.SQL
Pervasive.SQL 2000i provides two powerful features to support online backups and disaster recovery.
! “Understanding Archival Logging and Continuous Operations” on page 8-2
! “Using Archival Logging” on page 8-4
! “Using Continuous Operations” on page 8-14

8-2
Backup and Restore
Understanding Archival Logging and Continuous Operations
The product offers two mutually exclusive features to support online backups and disaster recovery.
Archival Logging allows you to keep a log of all database operations since your last backup. In case of a system failure, you can restore the data files from backup then roll forward the changes from the log file to return the system to the state it was in prior to the system failure.
Continuous Operations allows you to backup database files while the database engine is running and users are connected. After starting Continuous Operations, the database engine closes the active data files and stores all changes in temporary data files (called delta files). While Continuous Operations are in effect, you perform a backup of the data files. The delta files record any changes made to the data files while the backup is taking place. When the backup is complete, you turn off Continuous Operations. The database engine then reads the delta file and applies all the changes to the original data files. The temporary delta file may surpass the size of the original data file if users make extensive changes to the file during continuous operation.
Note You cannot turn on Continuous Operations if Archival Logging is in operation. Likewise, you cannot turn on Archival Logging if Continuous Operations are in effect. These two features are mutually exclusive and cannot be used at the same time.
Archival Log-ging and Trans-action Durability
Transaction Durability is another feature designed to protect the integrity of your data in the event of a system failure. Transaction Durability is not directly related to Archival Logging. You can have Transaction Durability in effect at the same time as either Archival
If your situation is like this ... ... use this feature:
You must keep your database applications running while performing backups.
Continuous operations
You are able to shut down the database engine to perform backups
Archival logging

8-3
Understanding Archival Logging and Continuous Operations
Logging or Continuous Operations. Transaction Durability uses a short-term log file to ensure that transactions are written to disk before a successful status code is returned. The transaction log is reset frequently as completed client transactions are rolled into the physical data files by way of system transactions. In the event of a system failure, when the database engine starts up again, it reads the transaction log and flushes to disk the transactions that were completed prior to the system failure.
The archival log is written to at the conclusion of each system transaction, so the archival log and the transaction log should remain properly synchronized unless a system failure occurs exactly during the system transaction.
For more information on Transaction Durability, see “Transaction Durability” on page 4-12.
What if a File Restore is Needed
In the event of a system crash that requires restoring data files from backup, Archival Logging allows you to restore from backup and then recover database activity up to the moment of the crash.
If you experience a similar crash without Archival Logging (for example if you use Continuous Operations to perform backups), then you will not be able to recover database activity that took place between the last backup and the system crash.
The remainder of this chapter describes the options and procedures associated with Archival Logging and Continuous Operations.
Table 8-1 Data Restore Limits After Crash
If Archival Logging is ... ... this much data will be unrecoverable after a crash:
On Unfinished transactions at the moment of failure.
Off All database operations that have occurred after the last backup of the data files.

8-4
Backup and Restore
Using Archival Logging
This section explains the procedures you must follow to set up Archival Logging, make backups, and restore data files.
General Proce-dures
For Archival Logging to work properly, you must follow a clearly defined procedure to set it up, and another procedure in the event that a restore from backup is necessary.
Caution If any steps of the procedures are omitted or compromised, you may not be able to restore your data to its pre-crash state.
➤ To use Archival Logging properly
1 Turn on Archival Logging, if it is not already in effect. See “Setting up Archival Logging” on page 8-5 for the detailed set-up procedure.
2 Shut down the database engine.
3 Backup the data files.
4 After a successful backup, delete all existing archival logs.
Caution Delete the corresponding log files before you resume working with the data files. Synchronizing the backup data files and the corresponding log files is a critical factor of successful recovery.
5 Restart the database engine.
➤ To restore data files from backup and apply changes from the archival log
Note You cannot use this procedure to roll forward the archival log if you experienced a hard disk crash and your archival log and data files were both located on the lost hard disk.
1 When the computer re-starts after the system failure, ensure that the database engine is not running, and ensure no other database engine is accessing the data files you wish to restore.

8-5
Using Archival Logging
2 Restore the data files from backup.
3 Start the database engine, ensuring that no applications of any kind are connected to the engine.
Caution It is crucial that no database access occurs before the archival log has been applied to the data files. Make sure no other database engine accesses the files. You must roll forward the archival log using the same engine that encountered the system failure.
4 Issue the Roll Forward command as described in “Roll Forward Command” on page 8-8.
5 After the Roll Forward completes successfully, stop the database engine and make a new backup of the data files.
6 After you have successfully backed up the data files, delete the archival log files. You may now re-start the database engine and allow applications to access the data files.
Setting up Ar-chival Logging
Setting up Archival Logging requires two steps:
! turning on the Archival Logging feature
! specifying the files to archive
Note To perform these procedures, you must have administrative permissions or be a member of the Pervasive_Admin group on the computer where the target database engine is running.
➤ To turn on Archival Logging
1 Start up PCC. Click Start and choose Programs | Pervasive | Pervasive.SQL 2000i | Pervasive Control Center.
2 Double-click Pervasive.SQL 2000i Engines. Double-click the engine icon representing the target database engine.
If you don’t see the engine you want to work with, see Pervasive.SQL User’s Guide for information on how to register a remote server engine.
3 Double-click Configuration. Double-click Server. Click Data Integrity.

8-6
Backup and Restore
4 Right-click Archival Logging Selected Files. From the pop-up menu, click Properties. In the dialog box that appears, click On.
5 Click OK.
➤ To specify files to archive
You specify the files for which you want the MicroKernel to perform Archival Logging by adding entries to an archival log configuration file you create on the volume that contains the files. To set up the configuration file, follow these steps:
1 Create the directory \BLOG in a real root directory of the physical drive that contains data files you want to log. (That is, do not use a mapped root directory.) If your files are on multiple volumes, create a \BLOG directory on each volume.
For example, if you have data files located on C:\ and D:\, and both drives are physical drives located on the same computer as the database engine, then you would create two BLOG directories, as below:
C:\BLOG\
D:\BLOG
2 In each \BLOG directory, create an empty BLOG.CFG file. You can use any text editor, such as NotePad, to create the BLOG.CFG file.
3 In each BLOG.CFG file, create entries for the data files on that drive for which you want to perform Archival Logging. Use the following format to create each entry:
\path1\dataFile[=\path2\logFile]
path1 The path to the data file to be logged. The path cannot include a drive letter.
dataFile The name of the data file to be logged.
path2 The path to the log file. Because the log file and the data file can be on different drives, the path can include a drive letter.
logFile The name of the log file. If you do not specify a name, the default value is the same directory and file name prefix as the data file, but replace the file name suffix with “.log”. You may specify a different physical drive, so that the log and the data files are not on the same drive.

8-7
Using Archival Logging
A single entry cannot contain spaces and must fit completely on one line. Each line can contain up to 256 characters. If you have room, you can place multiple entries on the same line. Entries must be separated by white space. You must terminate the end of the line with a Return character.
If you do not provide a name for the log file, the MicroKernel assigns the original file name plus a .LOG extension to the log file when you first open it. For example, for the file B.BTR, the MicroKernel assigns the name B.LOG to the log file.
Caution You are not required to log every file in your database. However, if your database has referential integrity (RI) rules defined, you must log all or none of the files involved in each RI relationship. If you log only a sub-set of the files involved in a given RI relationship, rolling the archival log forward after a system crash may result in violations of your RI rules.
Examples
The following examples show three sample entries in the BLOG.CFG file on drive C. All three entries produce the same result: activity in the file C:\DATA\B.BTI is logged to the file C:\DATA\B.LOG.
\data\b.bti
\data\b.bti=\data\b.log
\data\b.bti=c:\data\b.log
The next example directs the engine to log activity in the file C:\DATA\B.BTI to the log file D:\DATA\B.LGF. This example shows that archival log files do not have to reside on the same drive as the data file and do not require a .LOG extension. (The .LOG extension is the default.)
\data\b.bti=d:\data\b.lgf
Tip Writing the log to a different physical drive on the same computer is recommended. If you experience a hard disk crash, having the log file on a different physical disk protects you from losing your log file and your data file at the same time.

8-8
Backup and Restore
Roll Forward Command
The Btrieve Maintenance utility (GUI or BUTIL command line) provides a command allowing you to roll forward archival log files into the data files. The BUTIL -ROLLFWD command recovers changes made to a data file between the time of the last backup and a system failure. If a system failure occurs, you can restore the backup copy of your data file and then use the BUTIL -ROLLFWD command, which applies all changes stored in the archival log to your restored data files. Do not use this command unless you have restored data files from backup.
Note You cannot take advantage of the ROLLFWD command unless you both enable the MicroKernel’s Archival Logging Selected Files option and back up your files before a system failure occurs.
You can also use the ROLLFWD command to produce an output file of logged operations. The ROLLFWD command can produce the output file either before you roll changes forward or at the same time as the roll forward.
You can roll forward a single file, all data files on a volume, all data files on a drive, or a list of files, volumes, and/or drives.
Using the GUI
1 From the Start menu, choose Programs | Pervasive | Pervasive.SQL 2000i | Utilities | Maintenance.
2 Within the Maintenance window, choose Data | Roll Forward... The Roll Forward dialog box (Figure 8-1) appears.

8-9
Using Archival Logging
Figure 8-1 Roll Forward Dialog
3 Select the specific operation type: single file, list of files, volume name, or drive letter. When you select either volume name or drive letter, you must insert a back slash (\) or forward slash (/) at the end (for example, \\server\vol1\ or D:\).
4 You can generate a log file, called a dump file, of all the Btrieve operations required to perform the roll forward tasks.
By default, this file is not created. Select the Generate Dump File check box to generate a file. You can also specify the following options.
Table 8-2 Roll Forward GUI Options
Only Create Dump File Indicates that only the dump file is to be created, and the roll forward operation is not to be performed.
Dump File Name Contains the name of the dump file, which must begin with a slash and not contain a drive letter or server/volume name.
Data Buffer Length Indicates the number of data buffer bytes to write to the dump file for each Btrieve operation.
Key Buffer Length Indicates the number of key buffer bytes to write to the dump file for each Btrieve operation.

8-10
Backup and Restore
Note If the key buffer or the data buffer is not an input parameter for the particular Btrieve operation, nothing is written to the dump file.
5 Click Execute to generate the dump file and/or perform the roll forward operation. If the data is valid, the Roll Forward Status dialog box (Figure 8-2) appears.
Figure 8-2 Roll Forward Status Dialog
As files are processed, they are added to the scrolling list box which displays the file name and the Pervasive.SQL status code returned from the roll forward operation.
If an error occurs during processing, the Roll Forward Continue on Error dialog box appears. This dialog box allows you to continue without being prompted again, to continue and be prompted again, or to stop processing files.
Display Numbers as HEX If you select this option, the numbers in the dump file output are formatted as hexadecimal. If you do not select this check box, the numbers are displayed in ASCII format.
Verbose Includes additional information like user name, network address, and time stamp in the dump file.
Table 8-2 Roll Forward GUI Options

8-11
Using Archival Logging
Figure 8-3 Roll Forward Continue on Error Dialog
Using the Command Line
This section explains the syntax for the command line usage of Roll Forward.
BUTIL -ROLLFWD <sourceFile | volume | drive | @listFile> [</L[dumpFile] | /W[dumpFile]> [/T<dataLength>] [/E<keyLength>] [/H] [/V] [/O<ownerList | owner>|*]][/A] [/S]
sourceFile The fully qualified name of a data file for which to roll forward changes. For Windows NT, you do not need to specify the name of the path if the data file resides in the same directory as your current directory.
volume A volume for which to roll forward changes. End the volume name with a backslash or forward slash, as in SYS:\, //SERVER/SYS/, or \\SERVER\SYS:\.
drive A drive letter for which to roll forward changes. End the volume name with a backslash (\) or forward slash (/), as in F:\ or F:/.
listFile The fully qualified name of a text file containing the paths of files, volumes, or drives for which to roll forward changes. Separate these paths with a carriage return/line feed. If the Maintenance utility encounters an error, the utility stops rolling forward the current file, but does not roll back the changes already made. If you specify the /A option, the utility continues rolling forward with the next file.
/LdumpFile Produces an output file, but does not roll forward.
/WdumpFile Rolls forward and produces an output file.

8-12
Backup and Restore
dumpFile The file name of the output file to which the Maintenance utility writes a list of logged operations. The default is \BLOG\BROLL.LST, relative to the root of the physical drive. The file name cannot contain a drive letter or volume name and must start with a forward slash (/) or backslash (\). The Maintenance utility places the file on the same volume as the BLOG.CFG file.
/TdataLength Specifies the length of the operation’s data buffer to write to the output file. If you do not specify this option, the utility does not include data buffer contents in the output file.
/EkeyLength Specifies the length of the operation’s key buffer to write to the output file. If you do not specify this option, the utility does not include key buffer contents in the output file.
/H Instructs the utility to show numbers in the output file in hexadecimal notation. If you do not specify this option, numbers in the output file are in ASCII format. This option affects the format of the Entry Count, Op Code, Key Number, and Data Length fields.
/V Instructs the utility to include additional information (such as the user name, network address, and time stamp) in the output file.
/O Specifies the owner name of the data file, if required. An owner name is required if you request an output file of logged operations and the backup copy of the data file has an owner name for read-only access.
If more than one file has an owner name, the respective owner names must be separated by commas. See “Owner Names” on page 13-37 for more information.
/A Specifies that if you are rolling back more than one file and the Maintenance utility encounters an error, the utility continues rolling forward with the next file.
When you do not specify this option, the utility stops rolling forward if it encounters an error. The utility does not roll back the changes already made.
Note: When you use the /A option, you might want to redirect output to a file, as described in “Redirecting Error Messages” on page 13-37 and “Command Files” on page 13-35.
/S (NetWare only)
By default, the Maintenance utility stops at each full screen of output and waits for a keystroke before continuing. With the /S option, the utility continuously scrolls output on the screen. You cannot use /S on the command line if you specify a command file, but you can specify /S with a command inside a command file.

8-13
Using Archival Logging
Note If the key buffer or the data buffer is not an input parameter for the particular Btrieve operation, nothing is written to the dump file.
Examples
Example A The following example recovers changes to the CLASS.MKD file from the default archival log and log location.
butil -rollfwd sys:\pvsw\demodata\class.mkd
Example B This example recovers changes and outputs them to all files on the sys: volume with the following options:
! use default dump file
! dump 32 bytes of the data buffer
! dump 4 bytes of the key buffer
! dump in hex mode
butil -rollfwd sys:\ /W /H /T32 /E4
Example C The following example does not perform roll forward but only outputs the changes to the files listed in files.txt with the following dump options:
! use sys:\temp\files.lst as the dump file
! use verbose mode
! data files have owner names: own123 and own321
! do not dump data or key buffer
butil -rollfwd @sys:\temp\files.txt /L\temp\files.lst /V /Oown123,own321

8-14
Backup and Restore
Using Continuous Operations
Continuous Operations provides the ability to backup data files while database applications are running and users are connected. However, if you use Continuous Operations to make backups, you cannot use Archival Logging and the Maintenance utility Roll Forward command to restore changes to your data files that occurred after the last backup.
Pervasive.SQL provides two backup commands for Continuous Operations: BUTIL and SQLUTIL. The commands are similar. SQLUTIL supports data source names (DSNs) as a parameter; BUTIL requires file paths. In addition, SQLUTIL runs only on Windows-based platforms and NetWare.
Starting and Ending Contin-uous Opera-tions
This section provides detailed information on the commands: STARTBU and ENDBU.
Note The temporary delta files created by Continuous Operations mode have the same name as the corresponding data files but use a .^^^ extension instead. Therefore, do not create multiple data files with the same names but different extensions. For example, do not use a naming scheme such as INVOICE.HDR and INVOICE.DET for your data files.
Continuous operation mode does not significantly affect MicroKernel performance; however, using a server to back up files can affect performance.
Table 8-3 Commands to Start and Stop Continuous Operation
Command Description
STARTBU Starts continuous operation on files defined for backup (BUTIL).Starts continuous operation on data source names defined for backup (SQLUTIL).
ENDBU Ends continuous operation on data files defined for backup. (BUTIL).Ends continuous operation on data source names defined for backup (SQLUTIL).

8-15
Using Continuous Operations
➤ To protect against data loss using Continuous Operation
1 Use the -STARTBU command to put your files in continuous operation. See “STARTBU” on page 8-15 for an explanation of the command syntax with BUTIL and on page 8-18 for an explanation with SQLUTIL.
2 Back up your data files.
3 Use the -ENDBU command to take your files out of continuous operation. See “ENDBU” on page 8-17 for an explanation of the command syntax with BUTIL and on page 8-20 for an explanation with SQLUTIL.
Backing Up a Database with BUTIL
This section provides detailed information on backing up a database using the following BUTIL commands: STARTBU and ENDBU.
STARTBU
The BUTIL -STARTBU command places a file or set of files into continuous operation for backup purposes.
Format
BUTIL -STARTBU <sourceFile | @listFile> [/S]
sourceFile The fully qualified name of the data file (including the drive specification for Windows NT/2000 and volume specification for NetWare) on which to begin continuous operation for backup.

8-16
Backup and Restore
Note This command begins continuous operation only on the files you specify. You cannot use wildcard characters with the STARTBU command.
Examples for Windows Server
Example A The first example starts continuous operation on the COURSE.MKD file.
For Windows Server:
butil -startbu f:\pvsw\demodata\course.mkd
Example B The following example starts continuous operation on all files listed in the STARTLST.FIL file.
butil -startbu @startlst.fil
The STARTLST.FIL file might consist of the following entries:
f:\pvsw\demodata\course.mkdf:\pvsw\demodata\tuition.mkdf:\pvsw\demodata\dept.mkd
Examples for NetWare Server
Example A The first example starts continuous operation on the COURSE.MKD file.
butil -startbu sys:\pvsw\demodata\course.mkd
listFile The name of a text file containing the fully qualified names of files on which to begin continuous operation. Separate these file names with a carriage return/line feed. (Although the utility accepts a blank space separator as well, future versions of Pervasive.SQL may accept blank characters in file names. For compatibility with future versions of Pervasive.SQL, use the carriage return/line feed separator.)
If the Maintenance utility cannot put all of the specified files in continuous operation, the utility does not put any of the files in continuous operation.
/S (NetWare only) By default, the Maintenance utility stops at each full screen of output and waits for a keystroke before continuing. With the /S option, the utility continuously scrolls output on the screen. You cannot use /S on the command line if you specify a command file, but you can specify /S with a command inside a command file.

8-17
Using Continuous Operations
Example B The following example starts continuous operation on all files listed in the STARTLST.FIL file.
butil -startbu @sys:\test\startlst.fil
The STARTLST.FIL file might consist of the following entries:
sys:\pvsw\demodata\course.mkdsys:\pvsw\demodata\tuition.mkdsys:\pvsw\demodata\dept.mkd
ENDBU
The ENDBU command ends continuous operation on a data file or set of data files previously defined for backup. Issue this command after using the STARTBU command to begin continuous operation and after performing your backup.
Format
BUTIL -ENDBU </A | sourceFile | @listFile> [/S]
/A If you specify /A, the utility stops continuous operation on all data files initialized by BUTIL –STARTBU and currently running in continuous operation mode.
sourceFile The fully qualified name of the data file (including the drive specification for Windows NT/2000 and volume specification for NetWare) for which to end continuous operation.
@listFile The name of a text file containing a list of data files for which to end continuous operation. The text file must contain the fully qualified file name for each data file, and you must separate these file names with a carriage return/line feed. (Although the utility accepts a blank space separator as well, future versions of Pervasive.SQL may accept blank characters in file names. For compatibility with future versions of Pervasive.SQL, use the carriage return/line feed separator.)
Typically, this list of data files is the same as the list used with the STARTBU command.
/S (NetWare only) By default, the Maintenance utility stops at each full screen of output and waits for a keystroke before continuing. With the /S option, the utility continuously scrolls output on the screen. You cannot use /S on the command line if you specify a command file, but you can specify /S with a command inside a command file.

8-18
Backup and Restore
Example for Windows Server
The following example ends continuous operation on the COURSE.MKD file.
butil -endbu f:\pvsw\demodata\course.mkd
However, you can also just enter butil -endbu course.mkd instead of the full path if your current directory is f:\demodata.
Example for NetWare Server
The following example ends continuous operation on the COURSE.MKD file.
butil -endbu sys:\pvsw\demodata\course.mkd
Backing Up a Database with SQLUTIL
SQLUTIL is a command-line utility that runs only on Windows-based platforms and NetWare. You can execute SQLUTIL commands from the command line or through a command file. SQLUTIL works locally on the Pervasive.SQL server or workstation product (as an NLM on NetWare or from a command prompt on Windows-based platforms).
This section provides detailed information on backing up a database using the following SQLUTIL commands: STARTBU and ENDBU.
STARTBU
The SQLUTIL -STARTBU command places a file or set of files into continuous operation for backup purposes.

8-19
Using Continuous Operations
Format
SQLUTIL –STARTBU < datasourceName | @listFile > [ /S ]
Examples
The following example starts continuous operation on the university data source name:
sqlutil -startbu university
datasourceName The data source name on which to begin continuous operation for backup. This name must match a data source name previously defined using the Pervasive.SQL ODBC DSN Setup utility in the ODBC Data Source Administrator.
@listFile The name of a text file containing a list of the data source names on which to begin continuous operation. Separate these names with a carriage return/line feed.
If SQLUTIL cannot put all of the files that make up the data source name in continuous operation, the utility does not put any of the files in continuous operation.
/S By default, the SQL Maintenance utility stops at each full screen of output and waits for a keystroke before continuing. With the /S option, the utility continuously scrolls output on the screen. You cannot use /S on the command line if you specify a command file, but you can specify /S with a command inside a command file.

8-20
Backup and Restore
The following example starts continuous operation on all databases listed in the DBBACKUP.TXT file.
sqlutil -startbu @dbbackup.txt
ENDBU
The ENDBU command ends continuous operation on a data source name previously defined for backup. Execute this command after you have issued the STARTBU command and your backup utility has finished running.
Format
SQLUTIL –ENDBU < datasourceName | @listFile > [ /S ]
Examples
The following example ends continuous operation on the university data source name:
sqlutil -endbu university
The following example ends continuous operation on all databases listed in the DBBACKUP.TXT file.
sqlutil -endbu @dbbackup.txt
datasourceName The data source name for which to end continuous operation.
@listFile The name of a text file containing the list of data source names for which to end continuous operation. The text file must contain the data source names separated with a carriage return/line feed.
Typically, this list of data files is the same as the list used with the STARTBU command.
/S By default, the SQL Maintenance utility stops at each full screen of output and waits for a keystroke before continuing. With the /S option, the utility continuously scrolls output on the screen. You cannot use /S on the command line if you specify a command file, but you can specify /S with a command inside a command file.

9-1
c h a p t e r
9Workgroup Engine in Depth
Technical Details and Advanced Procedures for the Workgroup Engine
This chapter explains how to get the most out of your Workgroup engine.
! “Networking” on page 9-2
! “Technical Differences Server vs. Workgroup” on page 9-4
! “Troubleshooting Workgroup Issues” on page 9-6
! “Re-directing Locator Files” on page 9-8

9-2
Workgroup Engine in Depth
Networking
Both the server and workgroup products are shipped with the same networking components. So you can upgrade a workgroup engine to a server engine. The client side requestors can connect to either type of engine.
NetBIOS The Pervasive Network Services Layer searches for an engine on the network using NetBIOS as well as the other protocols previously supported; WinCE, Named Pipe, DNS, and NDS, and NetWare Bindery. The NetBIOS and DNS protocols can be used to contact a workgroup engine. Server engines on Windows advertise themselves with Named Pipes, so NetBIOS is not needed. NetWare servers are advertised using DNS, NDS, and NetWare Bindery.
Even though SPX can be used on Windows 95/98/ME, it cannot be used by itself since these platforms do not use it as a connection protocol, it is only a transfer protocol. On Windows, NetBIOS must be bound to SPX/IPX in order to resolve the SPX address.
Once the client requestor has found an IP, SPX or NetBEUI address, it will try to establish a connection to a MicroKernel engine using that transfer protocol.
MicroKernel Router Deci-sion Algorithm
The client side MicroKernel router discovers Gateway ownership of files by following a well-established algorithm.
The first thing the client-side router always tries is to connect to an engine on the same computer as the data. Because of this procedure, it is always more efficient to have an engine running where the data is.
Table 9-1 Gateway Discovery Priorities
Priority Procedure
1 Try to connect to a database engine on the same computer as the data files.
2 Try to open the data files using the local engine (on the client machine).
3 Find and connect to the Gateway engine that owns the files.

9-3
Networking
Because the Pervasive Network Services layer uses so many different methods to find and connect to a remote database engine, there may be a time delay on the first attempt to open a file on a file server that does not have a database engine running. If Gateway Durability on page 4-31 is turned on, that connection will not be attempted thereafter because the router remembers each machine on which it fails to locate an engine.
If the router cannot connect to an engine on the remote file server, the router then allows the local engine to attempt to open the remote files. The local engine first attempts to create a new locator file and take ownership of the remote directory. If the directory is already owned by another MicroKernel, the local engine returns Status Code 116 to the router.
Finally, the router attempts to discover the Gateway computer. It opens the locator file and reads the name of the Gateway engine. Then it sends the request to that engine. Notice that the router never tries to read a locator file unless it has received Status Code 116 from a MicroKernel first. This behavior means that in order to use the Gateway feature, you must have a local workgroup engine installed. If the attempt to open the remote files with the local engine fails because there is no local engine, the router does not try to read the locator file and no Gateway engine is found.

9-4
Workgroup Engine in Depth
Technical Differences Server vs. Workgroup
There are a few significant differences between a server engine and a Workgroup engine. This section explains the differences.
Platforms
The NetWare engine is a server engine only. Our Windows server engine requires Windows NT or Windows 2000. The Workgroup engine runs on any 32 bit Windows platform.
User Interface
While the Windows server engine runs as a service, the Workgroup engine is started as a regular process that has a tray icon for an interface. It must be put into the startup folder if there is local data to be shared.
Network Connections
The Windows server engine can use Named Pipes for operating system level file security and establishing connections. Since Windows 95/98/ME do not allow the creation of named pipes, the workgroup engine uses NetBIOS as a connection protocol.
Authentication
The server engine enforces file permissions set up in the operating system. As described earlier, the Workgroup engine does not authenticate users on its own. With the workgroup engine, if you can see the computer on the network, you can get to the data. This relaxed security is intended for small offices where security is not an issue and ease of use is.
Gateway Support
The Windows server engine creates locator files in remote directories where it opens files. This behavior allows it to be a designated gateway for remote files. The workgroup engine creates locator files everywhere it opens files, allowing the workgroup engine to dynamically adjust gateway ownership on a day-to-day basis.

9-5
Technical Differences Server vs. Workgroup
User Counts
The server engines start at 10 concurrent connections and the workgroup engine starts at 3.
Asynchronous I/O
Starting with Service Pack 2 of Pervasive.SQL 2000, the server engine for Windows NT/2000 makes use of Asynchronous I/O. This feature can provide a significant performance advantage.
ODBC Client/Server
The Workgroup release does not ship with the SQL Manager which allows the server engine to receive requests from a remote ODBC client. In a Workgroup environment, the ODBC driver (SQL Relational Database Engine, or SRDE) always runs on the client. This behavior means that only Btrieve requests are carried over the network. ODBC requests are processed locally and broken down into component Btrieve operations before the remote MicroKernel is contacted.
In contrast, with a Server engine, both Btrieve and ODBC requests are processed at the server.
The Workgroup engine’s thick client approach can be faster than a full client/server approach for simple queries and transactions, but it is slower when resolving complex queries where a lot of records are read and only a few rows are joined and returned as a result set.

9-6
Workgroup Engine in Depth
Troubleshooting Workgroup Issues
This section provides a few tips on troubleshooting problems in a Workgroup environment.
Time delay on first connection
If you are regularly experiencing a delay when the first file-open request is issued, see if these techniques help.
If possible, make sure there is an engine running where the data is
Connecting to an engine on the same machine as the data is the client’s first priority when deciding where to send a file-open request. In order to make sure a workgroup engine is running, put an engine icon into the startup folder with the command
C:\Pvsw\Bin\W3dbsmgr.exe -BTRV
Another option on Windows 95/98 is to add the following registry key:
[HKEY_LOCAL_MACHINE\Software\Microsoft\Windows\CurrentVersion\RunServices] "Pervasive.SQL 2000 Workgroup" = "C:\\Pvsw\\Bin\\W3dbsmgr.exe -BTRV"
This registry key starts the engine before anyone logs on. Note that the engine does not have a tray icon when started this way, because at the time of start-up, the “tray” has not been created.
If you are running a gateway topology
If you cannot run an engine where the data is, then the time delay during the first connection is a more important issue. Here are a few things you can do.
1 Reduce the supported protocols in the client settings so that protocols that are not used in your network are not attempted. For example, if you do not have a NetWare MicroKernel on the network, which is true for most workgroup topologies, you can drop SPX/IPX as a supported client protocol.
2 Use Gateway Durability. Gateway Durability is a client configuration setting that allows you to virtually eliminate the delay in making the first connection in a gateway environment. If Gateway Durability is turned on, it forces the client router to
9-7
Troubleshooting Workgroup Issues
write into the registry the names of computers it finds that do not have an engine running. Once a failure to connect happens, instead of remembering this server name only while the router is running in-process, it saves the name in the registry. The next time the application starts up, it does not try to connect to the engine where the data is. It immediately goes to the next step of determining the identity of the current Gateway.
You can turn this setting on in PCC. Within PCC, double-click the icon representing the client computer. Double-click Configuration. Double-click Client. Click Access. Right-click on Gateway Durability and set it to On.
Note This feature is OFF by default since it fixes the topology. If you add a server engine or a Workgroup engine where the data is, you must turn this setting back to OFF on each of the clients where you turned it ON. Turning the setting off erases the registry of computers without an engine running, so you can turn it back ON immediately and a new list will be generated based on the new topology.
Status Code 116
Status 116 is a new MicroKernel Status Code which means that the file is being used by another MicroKernel engine acting as a Gateway. If your application receives a status code 116, it means that the MicroKernel router can read the locator file but cannot contact the engine running on the gateway computer.
The first thing you need to do is find out who the gateway is. You can perform this task with the Gateway Locator utility.
Next, use PSA network tests to try to connect to that computer. PSA can provide valuable information to isolate the problem.
One situation when this could occur is when the two computers are separated by a router such that they can both see the file server but they cannot see each other.

9-8
Workgroup Engine in Depth
Re-directing Locator Files
This feature of Gateway engine operation guarantees transaction atomicity for multi-directory databases and also makes it easy to change the name of a Gateway engine across multiple data directories.
Limitations of Previous Model
Prior versions of the product supported two modes of Workgroup Gateway operation:
! a permanent Gateway database engine always serves the data files in a given directory—if the specified database engine is not up, then the data in that directory is not available.
! with a dynamic Gateway, whichever database engine opens the data files first serves as the Gateway; this architecture is also referred to as a floating Gateway.
This model was useful but had two limitations. First, if you had data in many different directories, and you wanted to change the permanent Gateway to a different engine, you had to use the Gateway Locator Utility to update the Locator File in every data directory (or update all the Locator Files by hand).
Second, if you had a single database consisting of data files in more than one directory, it became possible for two different engines to handle data access within the same database, thus failing to ensure transaction atomicity. This situation could occur if the Gateway Locator files in the two directories pointed to different Gateway engines. For some users this may not be an issue, but transaction durability can only be guaranteed if a single database engine performs all data access operations on a given database. If transaction durability is important, then you must ensure that the same engine services all data files within the same database, regardless of their directory locations.
New Behavior
First, recall that the Pervasive.SQL client uses the following approach to access remote data files:

9-9
Re-directing Locator Files
! First, attempt to connect to a database engine on the same computer as the data files.
! Second, if no database engine is available on the remote machine, attempt to use a local engine to take ownership of the remote directory and create a Locator File. If a Gateway Locator File already exists, the local engine is not used.
! Third, try to use the specified Gateway engine.
It is important to remember that the Gateway configuration only goes into effect when there is no database engine available on the same computer as the data files.
This feature allows a dynamic (floating) Gateway engine while at the same time preserving transaction durability for multi-directory databases on the same volume. This benefit is provided by a new type of Gateway Locator File that points to another Gateway Locator File. The new type is called a Redirecting Locator File. By having Redirecting Locator Files in directories A, B, and C that point to the Locator File in directory D, you can ensure that the Gateway engine specified by the Locator File in directory D services data files in the other directories as well.
Regardless of whether the Locator file in directory D specifies a permanent Gateway or is dynamically created by the first engine to open those files, this architecture ensures that all the specified directories use the same Gateway engine. Likewise, if you decide to change the permanently assigned Gateway engine for several directories, Redirecting Locator Files allow you to do so by changing only one Locator File, rather than all of them. Thus, it is possible to specify that all data files on a given hard drive must use the same Gateway engine, with or without designating a permanent Gateway.
Redirecting Locator File Requirements
The first line of a Redirecting Locator File must start with “=>” and be followed by a path specifying another Locator File, which must be on the same drive. You can use any combination of forward slash and back slash in the path name. All slashes are converted to the type of separator used by the local operating system.
If your specified path ends with a slash, the database engine assumes the default Locator File name (~PVSW~.LOC) and appends it to the path. If the specified path does not end with a slash, the database engine assumes that the path already contains the file name.

9-10
Workgroup Engine in Depth
The table below lists the ways a Redirecting Locator File path can be specified:
You can assign multiple levels of redirection to these Locator Files. For example, you can have the first Locator File pointing to a second Locator File, the second Locator File pointing to a third Locator File, and so on. Each workgroup engine opens each Locator File sequentially, looking for the actual Gateway name. It stops searching once it has found the locator file that does not start with “=>”. The engine then assumes this Locator File specifies the Gateway engine.
Creating Redirecting Locator Files
As with any Locator File, a Redirecting Locator File is a plain text file. You can create Redirecting Locator Files by hand or programmatically. A Redirecting Locator File must be flagged as read-only, or it will be overwritten by the first engine to attempt to access the data files in that directory.
➤ To Create a Redirecting Locator File
1 Open Notepad or a text editor, and open a new text file.
2 Decide where you are going to save the file when you are finished. You will save the file in the same directory as the data files which you want to redirect to another locator file.
For example, if you want to ensure that the data files in C:\data are accessed by the same Gateway engine as other data files, then you will want to keep in mind the folder C:\data.
Table 9-2 Redirecting Locator File Path Descriptions
Path Meaning
=>\path_name Specifies the path from the root of the drive where the current Locator File is stored.
=>.\path_name Specifies the path relative to the current directory.
=>..\path_name Specifies the path relative to the parent directory of the current directory.

9-11
Re-directing Locator Files
3 Type in => and the path name of the next Locator File. Continuing the example from the previous step, if you want the current data files in C:\data to be owned by the Gateway engine specified in the Locator File located in c:\moredata, then you would type the following:
=>..\moredata\ (recommended) or
=>\moredata\ (not recommended)
In the first case, you are specifying a relative path from the current directory. In the second case, you are specifying an absolute path from the root of the current drive. In this particular example, both cases resolve to the same target directory.
Note Pervasive strongly recommends that you use relative path names (starting with ./ or ../) in your Redirecting Locator Files, and that you use the same sharenames on all workstations to access the same data. Following these two recommendations can prevent errors that may occur with network path name resolution over mapped drives.
4 Save the file as ~PVSW~.LOC in the directory where the data files exist that you want to specify a Gateway engine for.
5 Close Notepad or the text editor.
6 Flag the text file as read-only.
To mark the file as read-only on Windows, you can use the Properties dialog box (right-click on the file icon) in Windows Explorer, or you can use the ATTRIB command in a DOS session or in a program:
ATTRIB +R ~PVSW~.LOC
➤ To synchronize many data directories on a permanent Gateway
1 Either by hand or by using the Gateway Locator program, create a read-only (permanent) Locator File that does not redirect. It must specify a Workgroup engine to use as the Gateway.
For example, your locator file may specify the computer named “workgroup1” as the Gateway engine, and the file may be located in C:\DATA\DB1.

9-12
Workgroup Engine in Depth
2 For each of the other data directories that you want to use the Gateway engine specified in the previous step, you need to create a Redirecting Locator File in that directory. Each Redirecting Locator File must point to the file you created in the previous step.
Continuing the example, each Redirecting Locator File in C:\DATA\DB2 and C:\DATA\DB3 would then contain the following text:
=>..\DB1\
This causes any engine reading this file to follow the relative path and search the specified directory C:\DATA\DB1 for another Locator File. In this case, the specified directory contains a Locator File that names “workgroup1” as the Gateway computer.
➤ To synchronize many data directories on a dynamic Gateway
1 Follow the steps above, only in step #1, ensure that the Locator File is writable, not permanently-assigned.
In this case, remember that if no engines are accessing any data files in the redirecting hierarchy, then there will be no Locator File in the target directory. This is normal. The dynamic Locator File is created each session by the first engine to access the data, and the file is deleted when the last user session ends. It is permissible to have Redirecting Locator Files that point to a data directory that has no Locator File in it. In this case, the first engine to open those data files creates the Locator File.
Example
Using the example Locator Files shown in Figure 9-1, the Redirecting Locator File on the left forces the database engine to go up one directory, then look in the sub-directory newdir for another Locator File with the default name (~PVSW~.LOC). This Locator File, in turn, specifies that the Workgroup engine on the computer named ntserver1 is the correct Gateway engine. As a result, the database engine on ntserver1 is used to access the data files in the directory mydir.

9-13
Re-directing Locator Files
Figure 9-1 Redirecting Locator File Example
mydir/~pvsw~.loc
=>../newdir/ ntserver1
newdir/~pvsw~.loc

9-14
Workgroup Engine in Depth

10-1
c h a p t e r
10Monitoring Database Resources
Using Monitor to Oversee Database Resources
This chapter includes the following sections:
! “Monitor Utility Overview” on page 10-2
! “Setting Monitor Utility Options” on page 10-5
! “Monitoring MicroKernel Resources” on page 10-6
! “Monitoring SQL Interface Resources” on page 10-18

10-2
Monitoring Database Resources
Monitor Utility Overview
The Monitor utility allows you to monitor Pervasive.SQL activities on a server. It provides information that is useful for both database administration and application programming diagnostics. In Pervasive.SQL 2000i, it has been enhanced to support monitoring of the ODBC communications server. Related enhancements include:
! Display users (connected via ODBC Client), client info (host name, IP address, application), data source name, connection info (status, connection time, active/idle period)
! Auto-refresh of user/connection info
Note These features require authentication to view remotely.
The following table shows the versions of the Monitor utility and the supported platforms.
Starting the Monitor Utility
The Monitor utility provides a “snapshot” of server activity at a recent point in time. How recent the snapshot is depends on the polling interval. For information on how to set the polling interval, see “Setting Monitor Utility Options” on page 10-5.
➤ To start Monitor from 32-bit Windows
1 From the Start menu, select Pervasive, then arrow to Pervasive.SQL 2000i, then Utilities, then Monitor. You can also select the Monitor from the Pervasive Control Center Tools menu.
➤ To start Monitor from Windows 3.x
1 Choose Monitor in the Pervasive.SQL 2000i program group.
The Pervasive.SQL Monitor Utility main dialog box is displayed.
Monitor Utility Supported Platforms
Win16 Windows 3.x clients
Win32 Windows NT servers
Windows 95/98 and Windows NT clients

10-3
Monitor Utility Overview
Figure 10-1 Monitor Utility Main Dialog Box
When you start the Monitor utility, it connects to the local engine by default. However, you can also monitor remote server engine resources by connecting to the remote server.
Note If dialog boxes are currently open in the Monitor utility window, you cannot connect to or disconnect from a remote server. Close the open dialog boxes before proceeding.
➤ To connect to a remote server
1 Choose Connect on the Options menu. The Connect to Remote Server dialog box appears, as shown in Figure 10-2 on page 10-4.

10-4
Monitoring Database Resources
Figure 10-2 Connect to Remote Server Dialog Box
2 Enter the server name in the Server Name box, along with your user name and password for that server. To be authenticated, you must be a user with administrative rights on the remote server or in the domain if you are logged into the domain, or a member of Pervasive_Admin on the remote server or domain server.
3 To disconnect from a server, choose Disconnect on the Options menu.

10-5
Setting Monitor Utility Options
Setting Monitor Utility Options
➤ To configure the Monitor utility options
1 Choose Settings from the Options menu. The Monitor Settings dialog box appears, displaying the current settings.
Figure 10-3 Monitor Settings Dialog Box
2 You can specify the following options:
3 Click OK to save the settings or Cancel to close the dialog box without saving changes.
Save Settings on Exit Select this check box to save all configuration settings when you close the Monitor utility. The Monitor utility saves both the settings in this dialog box and the automatic-refresh option in the various dialog boxes.
Save Window Layout on Exit
Select this check box to save the state (open or closed) and screen location of all open windows. When you start the Monitor utility again, these windows are automatically opened and positioned for local file server monitoring. This enables you to easily reproduce your preferred layout.
NOTE: A user connecting to a remote system must first close all windows which are open.
Refresh Rate (Seconds)
Specifies the time interval with which the Monitor utility’s display refreshes itself. The refresh rate is measured in seconds. The default setting is 4. You can enter integer numbers only.
It is important not to set this number too low, or the monitor utility will refresh itself frequently, affecting the performance of your database engine. This is especially true if you are running the Monitor utility local to your engine.
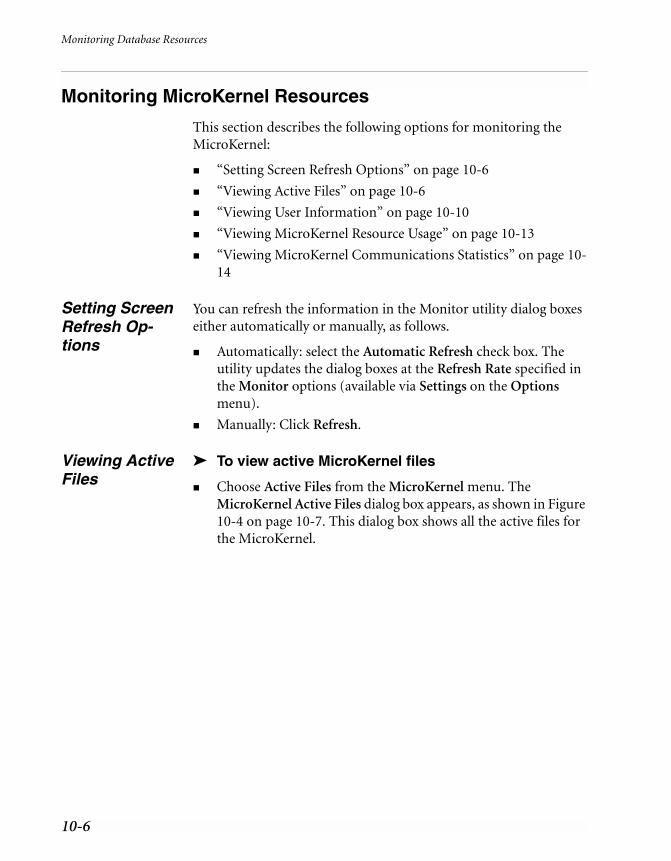
10-6
Monitoring Database Resources
Monitoring MicroKernel Resources
This section describes the following options for monitoring the MicroKernel:
! “Setting Screen Refresh Options” on page 10-6
! “Viewing Active Files” on page 10-6
! “Viewing User Information” on page 10-10
! “Viewing MicroKernel Resource Usage” on page 10-13
! “Viewing MicroKernel Communications Statistics” on page 10-14
Setting Screen Refresh Op-tions
You can refresh the information in the Monitor utility dialog boxes either automatically or manually, as follows.
! Automatically: select the Automatic Refresh check box. The utility updates the dialog boxes at the Refresh Rate specified in the Monitor options (available via Settings on the Options menu).
! Manually: Click Refresh.
Viewing Active Files
➤ To view active MicroKernel files
! Choose Active Files from the MicroKernel menu. The MicroKernel Active Files dialog box appears, as shown in Figure 10-4 on page 10-7. This dialog box shows all the active files for the MicroKernel.

10-7
Monitoring MicroKernel Resources
Figure 10-4 MicroKernel Active Files Dialog Box
In the upper left of the dialog box, the Monitor utility displays the Active MicroKernel Files list. This scrollable list contains the complete path of all open files in alphabetic order.
➤ To view more information about a particular file
! Select the desired file in the list. View the information in the lower left corner of the window.
In the upper right of the MicroKernel Active Files dialog box, the Monitor utility displays the Selected File’s Handles list. This scrollable list contains the active handles (users) associated with the selected file. Each handle is represented by a user name (typically the login ID of the user), or by an index into the engine’s client (user) list.
➤ To view more information about a particular user
! Select the desired user in the Selected File’s Handles list.
Some handles have an agent identifier, a two letter code that specifies the application that initiated the session.

10-8
Monitoring Database Resources
Table 10-1 lists the agent IDs used by Pervasive.SQL components.
The File Information box displays detailed information about the selected file. The Handle Information box displays detailed information about the selected handle.
Table 10-1 Agent IDs
Agent ID Application or Component
BT Maintenance utility for the Btrieve Interface (BUTIL)
DE Database Services client
DC Database Services login
DR DOS client Requester
ML MicroKernel logging and roll forward
NR Windows 95 and Windows NT client Requester
NX Maintenance utility for the SQL Interface (SQLUTIL)
PU Pervasive.SQL utilities
SC SQL Interface login
SE SQL Interface
WR Windows client Requester

10-9
Monitoring MicroKernel Resources
File Information
The File Information box displays the following information about each file:
Handle Information
The Handle Information box displays the following information about each file:
Page Size Indicates the size in bytes of each page in the file.
Read-Only Flag Indicates whether the file is flagged as read-only by the operating system.
Record Locks Indicates whether any of the active handles for the selected file have record locks. Any application can read a locked record, but only the application that placed the lock can modify or delete the record. A record lock exists only as long as the application that opened the file is updating a record. Yes indicates that one or more record locks are applied to the file; No indicates that no records are locked.
Transaction Lock Indicates whether any of the active handles for the selected file have a transaction lock. A transactional file lock exists only as long as the application that opened the file is processing a transaction.
Connection Number
Displays the network connection number of the client. If the client does not have a network connection, this field displays NA (for not applicable).
Task Number Displays the process-supplied task number for processes originating at the server, or a Windows client. If the process originates at a DOS client, this field contains the communications protocol socket number.
Site Specifies the location of the user process (local or remote).
Network Address
Identifies the location of the calling process on the network. If the calling process is SPX, then network node/network address is preceded by S: such as S: 65666768 00000000001. If the calling process is TCP/IP, the dotted-decimal notation of the IP number is preceded by T: such as T: 180.150.1.24.

10-10
Monitoring Database Resources
Viewing User Information
You can view a list of current users and files, as well as file handles for each user.
➤ To view MicroKernel user information
! Choose Active Users on the MicroKernel menu. The MicroKernel Active Users dialog box appears, as shown in Figure 10-5.
Open Mode Indicates the method the application uses to open the specified handle of the file. Valid open modes are:
Normal—The application that opened the file has normal shared, read/write access to it.
Accelerated—The application that opened the file has shared read/write access.
Read-only—The application that opened the file has read-only access; it cannot modify the file.
Exclusive—The application that opened the file has exclusive access. Other applications cannot open the file until the calling application closes it.
The Monitor utility also specifies all open modes as non-transactional or shared locking when applicable.
Record Lock Type
Displays the type of record lock(s) currently held by the handle. The possible record lock types are Single, Multiple, and None.
Single-record locks enable a user to lock only one record at a time. Multiple-record locks enable a user to lock more than one record at a time.
Wait State Indicates whether the user is waiting due to some type of lock on this handle: Waits for Record Lock, Waits for File Lock, or None.
Transaction State
Displays the state of the transaction lock currently held by the handle. The possible transaction types are Exclusive, Concurrent, or None.

10-11
Monitoring MicroKernel Resources
Figure 10-5 MicroKernel Active Users Dialog Box
In the upper left of the dialog box, the Monitor utility displays the Active MicroKernel Users list. This scrollable list contains the names of active users in alphabetic order. Each user is represented by a user name (typically the login ID of the user) or by an index into the engine’s client (user) list.
➤ To receive more information about a particular user
! Highlight the desired user in the list.
Each client is represented by either a user name (typically the login ID of the user) or an index into the engine’s client (user) list. Table 10-1 on page 10-8 lists the agent IDs used by Pervasive.SQL components. See“User Information” on page 10-12 for specific details about the information available.
In the upper right of the MicroKernel Active Users dialog box, the Monitor utility displays the Selected User’s Handles list. This scrollable list contains the active handles (files) associated with the selected user. The MicroKernel creates a handle each time a user opens a file; therefore, a single user can have several handles for the same file.

10-12
Monitoring Database Resources
➤ To view more information about a particular file handle
! Highlight the desired handle in the list. See“Handle Information” on page 10-13 for specific details about the information available.
User Information
The User Information box displays the following detailed information for the selected user handle:
Connection Number
See “Connection Number” on page 10-9.
Task Number See “Task Number” on page 10-9.
Site See “Site” on page 10-9.
Network Address See “Network Address” on page 10-9.
Locks Used Indicates the number of locks the user is currently using.
Transaction State Displays the type of transaction lock the user currently holds. The possible transaction types are Exclusive, Concurrent, or None.
Records Read Displays the number of records read since the user first opened a file.
Records Inserted Displays the number of records the user has inserted.
Records Deleted Displays the number of records the user has deleted.
Records Updated Displays the number of records the user has updated.
Disk Accesses Indicates the number of times the user required a disk access. You will not see any information for disk accesses for files that have just been opened.
Cache Accesses Displays the number of times the user required a cache access.

10-13
Monitoring MicroKernel Resources
Handle Information
When you click on a specific file handle, the following information about that handle is displayed in the lower right corner of the window:
Deleting Current Users
➤ To delete a user
! Highlight the user name and click Delete Current User button. Deleting the current user removes the user from the list of active users of the MicroKernel and terminates the user’s connection to the Communications Server. All open files for the user are closed and all allocated resources are freed.
! You can also click Delete All Users which deletes all of the current MicroKernel users.
Viewing Micro-Kernel Re-source Usage
➤ To view MicroKernel resource usage
1 Choose Resource Usage from the MicroKernel menu. The MicroKernel Resource Usage dialog box appears, as shown in Figure 10-6 on page 10-13.
Figure 10-6 MicroKernel Resource Usage Dialog Box
Open Mode See “Open Mode” on page 10-10.
Record Lock Type See “Record Lock Type” on page 10-10.
Wait State See “Wait State” on page 10-10.
Transaction State See “Transaction State” on page 10-10.

10-14
Monitoring Database Resources
This dialog box allows you to view the total resources in use by the MicroKernel since it was loaded.The MicroKernel Resource Usage dialog box shows the following statistics for each resource:
# Current – Shows the present value for the field.
# Peak – Shows the highest value for the field since the MicroKernel was started.
# Maximum – Shows the highest value allowed for the field.
Viewing Micro-Kernel Commu-nications Statistics
➤ To view MicroKernel communications statistics
1 Choose Communications from the MicroKernel menu. The MicroKernel Communications Statistics dialog box appears, as shown in Figure 10-7. This dialog box shows you the network requests, worker threads, and sessions in use by the Communications Server since it was loaded.
Files Indicates the number of active files.
Handles Indicates the number of active handles. The MicroKernel creates a handle each time a user opens a file; therefore, a single user can have several handles for the same file.
Clients Indicates the number of clients accessing the MicroKernel. A workstation can have multiple clients accessing the engine simultaneously. You set the maximum for this field with the Configuration utility (see “Active Clients” on page 4-2).
Worker Threads Indicates the number of concurrent MicroKernel processes.
Licenses in Use Indicates the number of connected client licenses in use as defined by your licensing agreement. In this case, the maximum shows the number of users your licensing agreement allows.
Transactions Indicates the number of transactions. The maximum for this field is unlimited.
Locks Indicates the number of record locks. The maximum for this field is unlimited.

10-15
Monitoring MicroKernel Resources
Figure 10-7 MicroKernel Communications Statistics Dialog Box
The MicroKernel Communications Statistics dialog box shows the following statistics for several of the communications resources:
# Current – Shows the most recent value for each field.
# Peak – Shows the highest value for the field since the Communications Manager was started.
# Maximum – Shows the highest value allowed for the field.

10-16
Monitoring Database Resources
You can monitor the activity of the following communications resources in the MicroKernel Communications Statistics dialog box:
Total Requests Processed
Indicates the number of requests the Communications Manager has handled from workstations or remote, server-based applications.
Total – Indicates the number of requests processed since the Communications server was loaded.
Delta – Indicates the number of requests since you first invoked the Communications Statistics dialog box. To reset this number to zero, click Reset Delta.
SPX Requests Processed
Indicates the number of SPX requests the Communications Manager has handled from clients or remote, server-based applications.
Total – Indicates the number of requests processed since the Communications server was loaded.
Delta – Indicates the number of requests since you first invoked the Communications Statistics dialog box. To reset this number to zero, click Reset Delta.
TCP/IP Requests Processed
Indicates the number of TCP/IP requests the Communications Manager has handled from clients or remote, server-based applications.
Total – Indicates the number of requests processed since the Communications server was loaded.
Delta – Indicates the number of requests since you first invoked the Communications Statistics dialog box. To reset this number to zero, click Reset Delta.
NetBIOS Requests Processed
Indicates the number of NetBIOS requests the Communications Manager has handled from clients or remote, server-based applications.
Total – Indicates the number of requests processed since the Communications server was loaded.
Delta – Indicates the number of requests since you first invoked the Communications Statistics dialog box. To reset this number to zero, click Reset Delta.

10-17
Monitoring MicroKernel Resources
Connection Timeouts Indicates the number of times the AutoReconnect feature has timed out when attempting to reconnect to clients.
Total – Indicates the number of requests processed since the Communications server was loaded.
Delta – Indicates the number of requests since you first invoked the Communications Statistics dialog box. To reset this number to zero, click Reset Delta.
Connection Recoveries Indicates the number of times the AutoReconnect feature has successfully recovered from a connection timeout.
Total – Indicates the number of requests processed since the Communications server was loaded.
Delta – Indicates the number of requests since you first invoked the Communications Statistics dialog box. To reset this number to zero, click Reset Delta.
Communication Threads
Indicates the number of remote requests that the MicroKernel is currently processing. Local requests are not included in this statistic. For the total number of remote and local threads being processed, see the Resource Usage dialog box. You set the maximum for this field with the Configuration utility (the Communications Threads option on page 4-22).
Worker threads are also used to process Monitor utility requests, so you may not see the number of current worker threads drop below one. This is normal.
Total Remote Sessions Indicates the number of remote clients connected to the Communications Manager. You set the maximum for this field with the Configuration utility (the Number of Sessions option on page 4-4).
SPX Remote Sessions Indicates the number of remote clients connected via SPX to the Communications Manager.
TCP/IP Remote Sessions
Indicates the number of remote clients connected via TCP/IP to the Communications Manager.
NetBIOS Remote Sessions
Indicates the number of remote clients connected via NetBIOS to the Communications Manager.
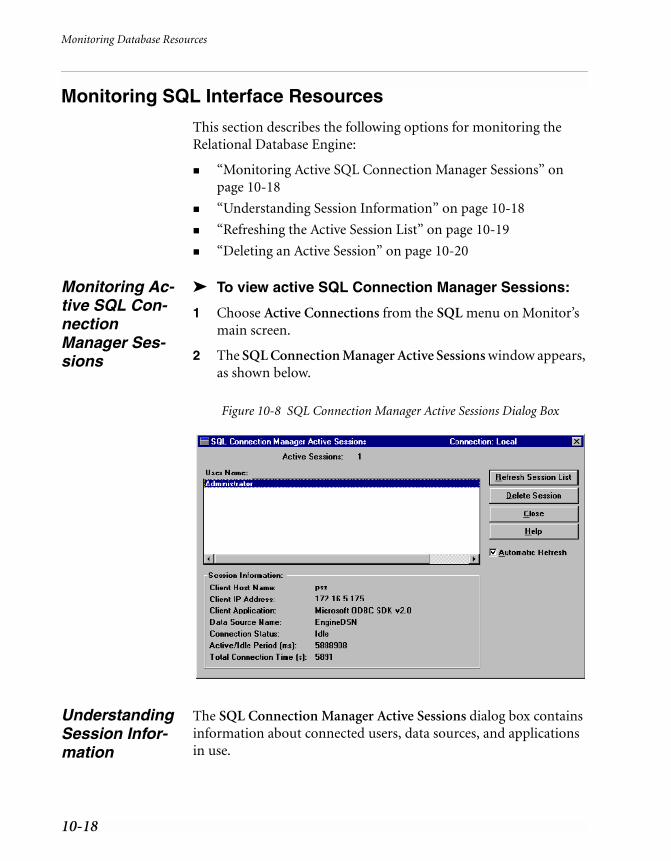
10-18
Monitoring Database Resources
Monitoring SQL Interface Resources
This section describes the following options for monitoring the Relational Database Engine:
! “Monitoring Active SQL Connection Manager Sessions” on page 10-18
! “Understanding Session Information” on page 10-18
! “Refreshing the Active Session List” on page 10-19
! “Deleting an Active Session” on page 10-20
Monitoring Ac-tive SQL Con-nection Manager Ses-sions
➤ To view active SQL Connection Manager Sessions:
1 Choose Active Connections from the SQL menu on Monitor’s main screen.
2 The SQL Connection Manager Active Sessions window appears, as shown below.
Figure 10-8 SQL Connection Manager Active Sessions Dialog Box
Understanding Session Infor-mation
The SQL Connection Manager Active Sessions dialog box contains information about connected users, data sources, and applications in use.

10-19
Monitoring SQL Interface Resources
The top Active Sessions label displays the number of active SQL Connection Manager sessions. The User Name list box displays the list of connected user names. User Name is set by default to the Windows login ID. If this is unavailable, User Name is set to “unknown”.
More information about the selected User Name is displayed in the Session Information group box. By default, it displays the following information about the user:
Refreshing the Active Session List
1 Click Refresh Session List or enable the Automatic Refresh checkbox.
2 To change the Automatic Refresh rate, choose Settings from the Options menu on Monitor’s main dialog box. The Monitor Settings dialog box appears, as shown below. The default refresh rate is 4 seconds.
Client Host Name This is the client’s machine or host name of the selected User Name. If unavailable, this is set to “Unknown.”
Network Address This is the client’s IP or NetWare address for the selected User Name. If unavailable, this is set to “Unknown.”
Client Application This is the connected application or module. If unavailable, this is set to “Unknown.”
Data Source Name This is the name of the engine DSN referenced by the client application.
Connection Status This is the connection status for the selected User Name. A possible status may be “Active”, “Idle”, “Dying”, or “Unknown” if status is unavailable.
Active/Idle Period This refers to the duration of time, in milliseconds, since the connection has been active or idle.
Total Connection Time This refers to the duration of time, in seconds, since the connection has been established.

10-20
Monitoring Database Resources
Figure 10-9 Monitor Settings Dialog Box
Deleting an Ac-tive Session
1 Select the session to be deleted by clicking on the desired user name in the User Name list box.
2 Click Delete Session and the SQL Connection Manager deletes the selected session.

11-1
c h a p t e r
11Testing Btrieve Operations Using the Function Executor
Btrieve Operations Performed with the Function Executor Utility
This chapter discusses the following topics:
! “Function Executor Overview” on page 11-2
! “Starting the 32-bit Function Executor Utility” on page 11-3
! “Overview of the Function Executor Main Window” on page 11-10
! “Performing Operations” on page 11-13

11-2
Testing Btrieve Operations Using the Function Executor
Function Executor Overview
The 16-bit and 32-bit Function Executors run on Win16 and Win32 platforms for Pervasive.SQL 2000i server and workstation products. With this interactive utility, you can learn how Btrieve operations work. By allowing you to execute Btrieve operations one at a time, the Function Executor enables application developers to simulate the operations of a Btrieve application, which can help in testing and debugging your program.
The Function Executor is primarily a tool for application developers; this chapter assumes a basic knowledge of Btrieve operations. For more information about Btrieve operations, refer to the API Programmer’s Reference that is available with the Pervasive.SQL Software Developer’s Kit (SDK).

11-3
Starting the 32-bit Function Executor Utility
Starting the 32-bit Function Executor Utility
➤ To start the Win32 Function Executor utility:
1 Click the Start button, and point to Programs. Point to Pervasive, then Pervasive.SQL 2000i, and then Utilities. Select Function Executor from the list of Utilities.
# Alternatively, you can access the Function Executor from within the Pervasive Control Center. Click on Tools and select Function Executor.
2 The main window (Figure 11-1) appears.
Figure 11-1 32-bit Function Executor Main Window
Features of the Win32 Function Executor
The Win32 version of the Function Executor includes all the functionality of the Win16 utility as well as some new features. Many ways of performing familiar Win16 operations are different in the Win32 version. These include the features listed below.

11-4
Testing Btrieve Operations Using the Function Executor
Editor Status Bar
The last/current status code is shown in the editor window’s status bar at the bottom of the window for the open file, and appears red if the last status was not zero.
Placing the mouse cursor over the status code shows a description of the status and what operation caused it.
When your cursor is in the input area on the main window of the Function Executor, the status bar displays the offset within the buffer: the hex, the decimal, and the ASCII value of the byte you are presently on.
The status bar also indicates how many operations have been performed when there are multiple items in the queue. Normally this displays 1 of 1, but if you are executing multiple operations, it will display the count as the operations are executed.
The status bar also displays when you are in a transaction.
Statistics
Clicking on the File Statistics icon displays a dialog box listing the currently-open file’s statistics. You can print these statistics to a text file or save them to a description file usable by BUtil create (you may also create a new blank file with the same characteristics.) Previously,

11-5
Starting the 32-bit Function Executor Utility
these items had to be manually picked out of the data buffer after executing a Btrieve operation 15.
Get and GetExt
From the Get menu, you can retrieve the First, Next, Previous, and Last records in the table. The GetExt menu includes the Goto Percent, Get Position, and Find Percent commands.
The Get and GetExt commands are available from both the menu bar and toolbar. The toolbar offers Step (Physical) and Get (Logical), allowing you to move either through the natural order of the file (Physical) or in a specific order (Logical).
Goto Percent allows you to choose whether to jump to a point within the physical layout of the file, or down any key path, limited to the keys defined in the file. You can also set lock biases using the option buttons in the Locks group box.

11-6
Testing Btrieve Operations Using the Function Executor
Find Percentage is the opposite of Goto Percent. It tells you how far into the data you are, depending on whether you are stepping through the file logically or physically.
Reset Client ID
Clicking on the Reset Client ID icon resets the current client connection (Btrieve operation 28) and closes all files open by the Function Executor.
Btrieve Stop
Clicking on the Btrieve Stop icon terminates transactional services (Btrieve operation 25) and closes all open files.
Version Call
Clicking on the Version Call icon displays information about the version of Pervasive.SQL (Btrieve operation 26) that you are running. If no file is open, you will see information only about the requester .dlls. On a server, or if a file is open, you will see information about the server and requester .dlls.

11-7
Starting the 32-bit Function Executor Utility
Transaction Toolbar
The Transaction toolbar lets you start, stop, and abort transactions extremely fast. You can set all aspects of the Transaction API through this toolbar, and the operation is executed immediately. The Transaction status also appears on the main window status bar, since it affects all open files for the client ID.
Viewing as Any Data Type
When a file is open, you can right-click on any position in the buffer and select Show As. A dialog appears in which you can view the bytes at the chosen buffer position as any data type.
Table lists controls available only in the Win32 version of the Function Executor. The Win32 Function Executor includes all of the controls available in the Win16 version as well as these controls.
Table 11-1 Win32-Only Function Executor Controls
Control Description
Repeat Allows you to repeat commands.
Create Allows you to create a new file.

11-8
Testing Btrieve Operations Using the Function Executor
File Statistics
Gives information from the BSTAT function. You can print these statistics.
MDI The Multiple Document Interface permits the opening of multiple files.
Table 11-1 Win32-Only Function Executor Controls
Control Description

11-9
Starting the 16-bit Function Executor Utility
Starting the 16-bit Function Executor Utility
➤ To start the Win16 Function Executor utility
1 Open the Pervasive.SQL 2000 program group.
2 Choose Function Executor (Win16).
3 The main window (Figure 11-2) appears.
Figure 11-2 16-bit Function Executor Main Window

11-10
Testing Btrieve Operations Using the Function Executor
Overview of the Function Executor Main Window
Table 11-2 lists the controls available in the Win16 version of the Function Executor. Some of the controls correspond to Btrieve Interface function parameters.
Table 11-2 Win16 Function Executor Controls
Control Description
File Lists the full path of all open data files and displays the current open file. You can move among open files, but you cannot open a file using this box. To open a file, refer to “Opening a File” on page 11-13.
This control corresponds with the Position Block parameter. Because each file name represents a position block, a file name can appear more than once in the list if the file has been opened more than once.
Transaction Indicates whether the current operation occurs inside a transaction and the type of transaction, as follows:
Exclusive – Exclusive transaction.Concurrent – Concurrent transaction.Conc+ModLk – Concurrent transaction with Modify Lock (+500) bias.
Operation
Current Specifies the current operation code plus its bias (if any). The default is 0. If you are familiar with Btrieve operation codes, you can enter the desired code. Otherwise, use the List box to specify an operation. This control corresponds with the Operation Code parameter.
Last Displays the code of the last operation that was executed on the current file.
List Lists all Btrieve operations and their codes. The default is Open (0). You can move quickly through the list by entering the first letter of the operation you want to perform.
Get Key Bias (+50)
Instructs the MicroKernel to return only a key value, not a data record, on the current Get operation.
Modify Lock Bias (+500)
Instructs the MicroKernel to set a no-wait lock bias on an insert, update, or delete operation executed within a concurrent transaction.

11-11
Overview of the Function Executor Main Window
Read Lock Bias
Adds one of five biases to the current operation, as follows. For files in exclusive transactions, the MicroKernel ignores any lock bias values you specify explicitly.
No Lock – Performs no locking. (Default)Single Wait (+100) – Attempts to lock a single record; if the record is already locked, it waits until the record is free.Single No Wait (+200) – Attempts to lock a single record and returns control if the record is already locked.Multiple Wait (+300) – Attempts to lock multiple records in the same file; if the records are already locked, it waits until the records are free.Multiple No Wait (+400) – Attempts to lock multiple records in the same file and returns control if the records are already locked.
Key
Number For most Get operations, specifies a key number, or index path, to follow for the current operation. For other operations, specifies such information as file open mode, encryption, or logical disk drive. This control corresponds with the Key Number parameter.
Buffer Specify the path for the data file for which you want to perform a Btrieve operation.
Position Indicates the position of the cursor within the Key buffer.
Hex Display Click this check box to view the data in Hex format.
Clear Click this button to clear the buffer field so that you can enter another data file.
Data
Length Specifies the length (in bytes) of the Data Buffer. The default is 1024. For every operation that requires a data buffer, you must specify a buffer length. On many operations, the MicroKernel returns a value to the Data Length. Generally, you should always specify a Data Length before you execute an operation. This control corresponds with the Data Buffer Length parameter.
Buffer Specifies a data value. For read and write operations, the Data Buffer contains records. For other operations, the Data Buffer contains file specifications, filtering conditions, and other information the MicroKernel needs for processing the operation. This control corresponds with the Data Buffer parameter.
Position Indicates the position of the cursor within the Key or Data Buffer.
Hex Display Click this check box to view the data in Hex format.
Table 11-2 Win16 Function Executor Controls
Control Description

11-12
Testing Btrieve Operations Using the Function Executor
Note The Win16 version of the utility performs wait lock simulation. Win16 applications cannot go into a wait loop. If you ask for a record lock using a Wait Bias and the record is locked by someone else, the engine returns Status Code 84 or 85 immediately to the application.
The Win16 Function Executor utility retries the operation until it gets the record or you click Abort which is displayed in the lower right corner of the Main window.
Clear Click this button to clear the buffer field so that you can enter another data file.
Status Displays a numeric status code returned by the MicroKernel and a brief message explaining the result of a Btrieve operation. For detailed information about these status codes and messages, refer to the Status Codes and Messages manual.
Execute Performs the currently specified operation.
Table 11-2 Win16 Function Executor Controls
Control Description

11-13
Performing Operations
Performing Operations
Because Btrieve provides many operations, this chapter cannot explain them all. The following sections discuss some common operations as well as some new ways of performing them with the Win32 Function Executor.
Note In the Win16 Function Executor, to perform an operation, specify values for the appropriate controls and click Execute. In the Win32 Function Executor, selecting options from all menus performs the intended operation immediately. It does not fill in the grid and wait for you to execute the command as the Win16 Function Executor does. Also, closing the form in the Win32 Function Executor does a B_Close for each open file. This is new; the Win16 Function Executor forces you to do the close operation manually.
Opening a File ➤ To open a data file with the Win16 Function Executor:
1 Select Open (0) from the List box or enter 0 in the Current box.
2 Enter the path of a data file in the Key buffer.
3 [Optional] Enter the owner name into the Data buffer.
4 [Optional] Enter the Open Mode into the key number.
5 Click Execute or press Enter.
➤ To open a data file with the Win32 Function Executor:
1 From the File menu, select Open. The following dialog box appears:

11-14
Testing Btrieve Operations Using the Function Executor
Figure 11-3 Open Btrieve File Dialog Box.
Note Client ID: If you have Use disabled, the Function Executor will use a BTRV() function call. If Use is enabled, it will use a BTRVID() function call for each operation you execute on this file. With Auto enabled, the Function Executor will generate a client ID for you. If you have Auto disabled, then you may enter values manually.
2 Click Browse.
3 Double-click on the desired filename.
Creating a Btrieve File
➤ There are two options in creating a Btrieve file with the Win32 Function Executor. If a file is already open, you can clone it; otherwise you can start from scratch.
Method 1: Using a current file as a template
1 From the File menu, select New. The following dialog box will appear:

11-15
Performing Operations
Figure 11-4 Modify File Definition Dialog Box
2 You can manipulate keys from this dialog as well. You can Add, Create, or Insert Segments from the Key menu. You can also save the new file as a description for use with BUtil create. Select Save As Desc and indicate the name and location where you would like the file saved.
3 To create the file, click Create. This will open the file and display a message indicating success.
Method 2: Creating a new file from scratch
1 Click the Create icon on the main toolbar; or, if no file is open yet, you may click File and then New, as before.
2 If a file is already open on screen, a drop down box will appear. Choose Create New File from Scratch.
3 The same dialog as before will appear, but it will be blank - allowing you to input brand new values.
4 Start by adding a new Key using the Key menu - or press Ctrl-A.

11-16
Testing Btrieve Operations Using the Function Executor
5 Fill in the attributes for the key in the lower section of the dialog.
6 Continue adding or removing new keys and segments as desired, using the menus or right-clicking on the key in the list.
7 Now click the Create button to execute the B_Create (14) operation. This will automatically open the file on screen as well.

12-1
c h a p t e r
12Adding Relational Access to Btrieve Files
How to Create Table Definitions for Existing Btrieve Files
This chapter explains how to make an existing Btrieve data file available to relational (SQL or ODBC) applications.
If you have an existing application that uses the transactional Btrieve interface to access data, and you would like to be able to access the same data using Pervasive Replication, Microsoft ODBC Bridge for ADO, Microsoft Access, or other ODBC-based applications, then this chapter provides the information you need.
This chapter consists of the following sections:
! “How to Use this Chapter” on page 12-2
! “Creating a Database” on page 12-4
! “Associating a Data File with a Database” on page 12-5
! “Building a Table Definition” on page 12-7

12-2
Adding Relational Access to Btrieve Files
How to Use this Chapter
Although this chapter is broken into several sections, it is designed to be read from front to back sequentially.
Note Depending on the complexity of your application, this chapter may require that you have substantial knowledge of the internal record structure of your Btrieve data file.
Before you Be-gin
Make Sure it’s Necessary
Before you follow the instructions provided in the remainder of this chapter, you must determine whether your data file is already enabled for ODBC/relational access.
➤ To determine whether your data file is ODBC-enabled
1 Inspect the folder or directory where your Btrieve file is currently located. If you see files named FIELD.DDF, FILE.DDF, and INDEX.DDF in this folder, then most likely your data file can already be accessed with ODBC.
Note While most applications keep the DDFs in the same directory as the data files, storing them in the same location is not required. You may wish to search the same physical volume as the data files for one of the above mentioned DDF files, to be sure that you do not have DDF files available.
If this is the case, then you need only set up access to the database. Follow the instructions provided in Chapter 2 of Pervasive.SQL User’s Guide.
Decide on Your Goal
Next, you must decide what you want to do. Do you want to build a brand new Pervasive.SQL database around an existing Btrieve file (or

12-3
How to Use this Chapter
files), or do you want to add an existing Btrieve file as a new table in an existing Pervasive.SQL database?
If you want to do this ... ... follow these instructions:
Create a brand new database around my Btrieve file
“Creating a Database” on page 12-4
Add your Btrieve file to an existing database
“Associating a Data File with a Database” on page 12-5

12-4
Adding Relational Access to Btrieve Files
Creating a Database
This section explains how to create a new database for one or more existing Btrieve files.
If you wish to add a Btrieve data file to an existing relational database, please skip to the next section of this chapter, “Associating a Data File with a Database.”
➤ To create a new database
1 Follow the detailed instructions in Pervasive.SQL User’s Guide Chapter 2, “Setting Up Database Access.”
During the above-mentioned procedure, you will be asked to specify the location of the database. You should specify the location of the existing Btrieve file(s) around which you wish to build a database.
2 After creating the database, there are three DDF files in the same directory as your Btrieve files. These newly created DDFs are empty. You must now populate the DDFs with table definitions for your existing Btrieve files. The steps that follow will show you how to perform this task. Proceed to the next section of this chapter, “Associating a Data File with a Database.”

12-5
Associating a Data File with a Database
Associating a Data File with a Database
To add a Btrieve data file to a Pervasive.SQL database, you must associate the data file with a table definition in the database.
Tip Moving your Btrieve file to the same directory as the other data files in the database can make database maintenance tasks easier. Do not move the file unless you can re-configure your existing Btrieve applications to be aware of the file’s new location.
➤ To create a table definition for a data file
1 If you do not have Pervasive Control Center (PCC) open, start it now by choosing Start | Programs | Pervasive | Pervasive Control Center.
2 Double-click Pervasive.SQL 2000i Engines to show a list of engines registered with PCC. Next, double-click the icon representing your target engine, to show a list of the databases serviced by that engine.
3 Right click on the database to which you want to add the Btrieve file. Choose New | Table. This step brings up the Create Table Wizard.
Figure 12-1 Create Table Wizard—Advanced Settings

12-6
Adding Relational Access to Btrieve Files
4 In the Create Table Wizard, enter the name you want to assign to the new table and click Use advanced settings, as shown in Figure 12-1, “Create Table Wizard—Advanced Settings.” The table name must be no more than 20 characters. It does not have to correspond to the data file name, although that is a good idea to help you remember which file corresponds to which table definition. Click Next.
Figure 12-2 Create Table Wizard—Specify Btrieve File
5 In the next window, specify the Btrieve file for which you are creating a table definition. If you don’t want to type the path, you may click ... to select the file. See Figure 12-2 “Create Table Wizard—Specify Btrieve File.” In the example screen, we are creating a table definition for the file person.mkd.
6 Click Next to display “Columns and Indexes found in the Btrieve file” window, as shown in Figure 12-3.
Your table name is now associated with the data file, but the table definition is still empty, except for any index definitions that were found. Do not exit the Create Table Wizard. Continue to the next section of this chapter, “Building a Table Definition,” for detailed instructions on using the remaining screens of the wizard to build a table definition for the specified data file.

12-7
Building a Table Definition
Building a Table Definition
The table definition you have created is “empty”—it does not contain any information about the structure of the data file. You must now populate the table definition with specific information about the record structure of the data file. The Create Table Wizard guides you through this task by detecting certain structures within the data file, and helping you define the remaining field characteristics.
This section uses the Btrieve file PERSON.MKD as an example. This file is provided in the product as part of the “demodata” sample database.
Determining background in-formation
Records in a Btrieve file can consist of any mixture of fixed-length and variable-length fields. In the physical file on disk, all the fixed-length fields and the pointer values for the variable-length fields are stored together. This is called the fixed-length portion of the record. The data contained in the variable-length fields is stored at the end of the fixed-length portion of the record, as a single large block of data.
You can determine whether the data file has at least one variable-length field by obtaining the file statistics on the Btrieve file using the Btrieve Maintenance Utility. Pervasive Software offers both a command-line and graphical version of the Btrieve Maintenance Utility. For the examples in this section, we chose to use the command-line Btrieve Maintenance Utility (BUTIL).
The following is an excerpt of the output produced by running the command BUTIL -stat on the PERSON.MKD file.
Total Number of Records = 1500Record Length = 333 Data Compression = NoVariable Records = Yes Variable-Tail Allocation Tables = No Blank Truncation = NoFree Space Threshold = 5%...
From this output, we can determine that at least one variable-length field is defined. From the Record Length specified, we can also determine the size of the fixed length portion of the record. You will use this information later.

12-8
Adding Relational Access to Btrieve Files
Naming Known Fields
Btrieve files contain some information about field lengths and data types, indexes, and overall record length that must match the corresponding table definition. The Create Table Wizard analyzes this information to come up with definitions of the indexed fields in the file, as shown in Figure 12-3.
➤ To name the indexed columns
1 Continuing the Create Table Wizard steps from the previous section, the next window displays the columns and indexes that the wizard was able to discover in the file. See Figure 12-3 “Create Table Wizard—Columns and Indexes Detected.”
Note In most cases, not all columns are displayed. The wizard can only detect columns that have indexes defined on them. This is the only method the wizard can use to gain information about the internal record structure of the file. As explained in the following steps, you must supply most of the information about the record structure.
Figure 12-3 Create Table Wizard—Columns and Indexes Detected
Name the columns appropriately according to your knowledge of the record structure. The maximum length for a column name is 20 characters. Click Next when you are finished.

12-9
Building a Table Definition
Note If you are inspecting a Btrieve file that was created with Pervasive.SQL 2000 or later, each column that is allowed to have NULL values is preceded by a one-byte space that contains a NULL indicator value. You should not explicitly define these spaces as columns, however, you must allow for this extra byte when specifying the column offset. You should count this space as part of the column.
Note If you use Btrieve Maintenance Utility to display field data about a Btrieve file, you must mentally subtract one (1) from the position values shown in Btrieve Maintenance Utility output to generate comparable offset values, as shown in the Create Table Wizard. This is because byte position one (1) in the record, as shown in Btrieve Maintenance Utility, corresponds to an offset of zero (0), as shown in the Create Table Wizard.
Caution If there are any field overlaps in your indexed columns, you cannot create a valid table definition for your Btrieve file without modifying the file. For example, in the sample definition, you would have a field overlap if there were an indexed field at offset 5 with length of 1 or more. This would overlap the bytes in the ID field, and possibly the First_Name field as well.
If you have overlapping field definitions and you want to have relational access to the data, then you must:(1) remove any indexes from your Btrieve file that refer to overlapping fields, and(2) modify your Btrieve application program logic to reflect the newly changed index definitions.
Typically you must separate the overlapping fields into multiple fields that do not overlap, and define an index (or segmented index) on these fields.
Defining Re-maining Col-umns
➤ To define the non-indexed columns
1 The next screen is shown in Figure 12-4 “Create Table Wizard—Specify Columns.” This window shows you both the indexed columns as well as the gaps in the record structure that exist between the known columns. These gaps are named “unnamed_X” and their data type is currently “unknown.”

12-10
Adding Relational Access to Btrieve Files
Figure 12-4 Create Table Wizard—Specify Columns
The task now is to define the structure of the data in these undefined areas. Each area may contain one or more fields.
2 In order to determine how to define these areas, you can inspect the actual contents of an undefined area by selecting the area and clicking the Split button:
Figure 12-5 Create Table Wizard—Split Columns
3 The next window to appear is the Split Column window. This window allows you to view the data in an undefined area and determine where it should be split into separate fields.
By default, the window shows hex codes for each byte of data in several rows of the data file. Click Ascii view to switch to a view that shows the hex codes as ASCII characters.

12-11
Building a Table Definition
4 Visually inspect the data in the Split Column window to determine where fields begin and end.
5 Click in zero or more Split At checkboxes to specify where the additional columns should begin. Keep in mind it is possible that the space is all one field, so you may not click any checkboxes. See Figure 12-5 for an example. The first field appears to be zip code information, while the next field appears to be country information.
If you know that you are defining columns that are nullable, split the columns by checking the box immediately prior to where the data starts. In the example shown, box 13 is checked because it is the null indicator position for the nullable “Country” information that begins in the next byte.
Later, when you go back to the main window, remember to check the Null box for this field. Doing so creates the null indicator byte corresponding to box 13, and specifies that the actual data starts at the next position, as is correct.
Click OK when you are ready to execute the split and go back to the main window.
6 You may need to visit the Split Column window several times. You can also use the Merge button to undo a split, if you split a column in the wrong place. You merge two or more adjacent columns into a single field by selecting the ones you want to merge and clicking the Merge button.
7 Return to the main window and specify different data types if necessary, to achieve the desired display of column data in the main window.
Remember, nullable fields have a one-byte null indicator at the beginning of the field. When you click Null to make a field nullable, the field’s start position increases by one (allowing for the null indicator byte) and the field’s length decreases by one byte (because the next field must still begin at the appropriate location). If you find that you have a number of fields that are off by one byte, check that you have the Null attribute set correctly for all the columns in question.
Non-character columns may be difficult to interpret accurately. Columns of type BIT and LOGICAL may require a detailed knowledge of the record structure to define them properly.

12-12
Adding Relational Access to Btrieve Files
If you create a column of type BIT, eight columns are created automatically, one for each bit in the byte selected. If you do not have eight bit columns to be defined, simply select the extra columns and click the Delete button:
Note If you are working through the fields sequentially from front to back and you reach a point where the Wizard won't allow you to define the columns correctly, you can try a couple other approaches:1) Work through the remaining fields from back to front.2) Define all the non-indexed fields in a gap area with a single use of the Split Column window. Do not define a few of the columns, return to the main window, then split again.
When you are satisfied that your entire column structure is correct, click Next in the main window.
Variable length fields
Variable-length fields require special mention. These must be specified as a blob data type, with a size of 8 bytes. The 8 bytes are actually a pointer value into an offset location in the variable-length portion of the record that comes after the fixed-length columns.
Summary of Sample
The table below summarizes the full contents of the PERSON.MKD example file, as deduced by the Create Table Wizard:
Table 12-1 Complete Field Definition for PERSON.MKD file
Field Name Position Size Data Type
Student_ID 1 8 Unsigned
FirstName 10 16 Zstring
LastName 27 26 Zstring
PermStreet 54 31 Zstring
PermCity 86 31 Zstring
PermState 118 3 Zstring
Perm_Zip 122 11 Zstring
Perm_Country 134 21 Zstring

12-13
Building a Table Definition
Generating a Table Definition
This section explains how to complete the task of creating a table definition, once you have finished creating definitions for all the columns in your Btrieve file.
➤ To complete the task of creating a table definition
1 After you complete all the field definitions and click Next, a new screen appears listing the SQL statement that creates the table structure you have defined. See Figure 12-6. Click Save... to save the SQL statement to a text file.
Street 156 31 Zstring
City 188 31 Zstring
State 220 3 Zstring
Zip 224 11 Zstring
Phone 236 6 Numeric
EmergencyPhone 243 20 Character
Unlisted 263 1 Bit
BirthDate 265 4 Date
EmailAddress 270 31 Zstring
Sex 301 1 Logical
Citizenship 303 21 Zstring
Survey 324 1 Bit
Smoker 324 1 Bit
Married 324 1 Bit
Children 324 1 Bit
Disability 324 1 Bit
Scholarship 324 1 Bit
Comment 326 8 blob
Table 12-1 Complete Field Definition for PERSON.MKD file continued
Field Name Position Size Data Type

12-14
Adding Relational Access to Btrieve Files
Figure 12-6 Create Table Wizard—Save SQL Script
It is recommended that you save the statement in case you need to reconstruct the table definition later, or in case you want to make minor changes to the table definition and then re-create it.
Click Next.
Figure 12-7 Create Table Wizard—Finish
2 In the next screen, you must confirm whether you want the table definition to be created, as shown in Figure 12-7. Click Finish.

12-15
Building a Table Definition
Verifying a Ta-ble Definition
You should verify the table definition after generating it. The verification process performs two tasks:
! Verifies that the index definitions in the table match the index definitions in the Btrieve file.
! Verifies that the field definitions match what you expect for your data.
➤ To verify the database definition
In PCC, right-click the database to which you have just added the table definition, then choose Tasks | Check Database. The Check Database Wizard guides you through the steps to check your database definitions.
Conclusion As you can see, creating a table definition for an existing Btrieve file can be a time-consuming, highly detailed task. However, when the task is complete, the result is a Btrieve file that can be accessed concurrently by both ODBC-based applications and Btrieve applications.

12-16
Adding Relational Access to Btrieve Files

13-1
c h a p t e r
13Manipulating Btrieve Data Files with Maintenance
Handling Btrieve Files with the Maintenance Utility
This chapter discusses the following topics:
! “Maintenance Utilities Overview” on page 13-2
! “Btrieve Interactive Maintenance Utility” on page 13-3
! “Btrieve Command-Line Maintenance Utility (BUTIL)” on page 13-32

13-2
Manipulating Btrieve Data Files with Maintenance
Maintenance Utilities Overview
Pervasive.SQL provides both an interactive Maintenance utility and a command-line Maintenance utility. Both Maintenance utilities perform the following common file and data manipulations:
! Create new data files based on file and key specifications you define.
! Provide file and key specifications for existing data files.
! Set and clear owner names for data files.
! Create and drop indexes on data files.
! Import and export ASCII sequential data.
! Copy data between Pervasive.SQL data files.
! Recover changes made to a file between the time of the last backup and a system failure.
While both utilities provide the same core functionality, minor differences exist. For example, the interactive Maintenance utility allows you to create description files based on file and key specifications you define. The command-line Maintenance utility allows you to start and stop continuous operation on a file or set of files locally on the server.
Before you use either Maintenance utility, you should be familiar with Btrieve fundamentals, such as files, records, keys, and segments. For information about these topics, refer to the Pervasive.SQL Programmer’s Guide.
Note The Pervasive.SQL product provides two categories of maintenance utilities: Btrieve and SQL. The SQL Maintenance Utility supports data source names (DSNs), which are used for relational access through ODBC. See “Backing Up a Database with SQLUTIL” on page 8-18 for a discussion of the SQL Maintenance Utility.

13-3
Btrieve Interactive Maintenance Utility
Btrieve Interactive Maintenance Utility
The Interactive Maintenance utility runs on Win16 (client/server only), and Win32 (Pervasive.SQL client/server and workstation products). Use this utility if you prefer a graphical interface or if you want to create a description file. This section contains the following major topics:
! “File Information Editor” on page 13-7
! “Owner Names” on page 13-20
! “Statistics Report” on page 13-22
! “Indexes” on page 13-24
! “Data” on page 13-27
Each major topic contains tasks specific to that topic.
Extended File Support
The size of a MicroKernel data file can be larger than the operating system file size limit. When you export data from an extended MicroKernel file to an unformatted file, the size of the unformatted file can exceed the MicroKernel file size limit because of the differences in the physical format.
The Interactive Maintenance utility detects that the unformatted file has exceeded the file size limit (2 GB) and starts creating extension files. This process is transparent. Extension files and the original unformatted file must reside on the same volume. The extension file uses a naming scheme in which the file names are similar to the base file name. The first extension file is the same base file name with ‘.^01’ extension. The second extension file is ‘.^02,’ and so on. These numbers are printed in hex. While the naming convention supports up to 255 extension files, the current maximum number of extension files is 32. The maximum file size is dependent on the page size. The maximum number of pages is 16 million. If your page size is 4096 bytes, then the file can grow to 64 GB. If your page size is 512 bytes, then the maximum file size is 8 GB.
Additionally, when you import data from an unformatted file, the utility detects if the file has extensions and loads the data from the extension file.
Long File Name Support
Long file name support, including support for embedded spaces, has been added in the Pervasive.SQL Service Pack 3 for both the NetWare
13-4
Manipulating Btrieve Data Files with Maintenance
and Windows 32 environments. All references to files can contain embedded spaces and be longer than 8 bytes.
Previous versions of Btrieve allowed spaces to be added at the end of a file name in path-based operations such as Open and Create. This is still the default behavior. Existing applications will not break. However, if you want to take advantage of file and directory names with embedded spaces, change the Embedded Spaces setting for the Btrieve Requester to “Yes.” In the registry, you can locate this setting under:
HKEY_LOCAL_MACHINE\SOFTWARE\Pervasive Software\BtrieveRequester\Version 7.0\Settings\Embedded Spaces.
Even when you turn the option “Off,” an application that accesses a file having a name with embedded spaces can enclose that name in double quotes while making the BTRV/BTRVID/BTRCALL/BTRCALLID call to open or create the file.
Note On NetWare, long file name support is available only in the MicroKernel and not in any of the other NLM utilities such as BUTIL.NLM. This means that Btrieve data files may be accessed using long names but long names cannot be used for any other kind of files. For example, in the NLM command:
BUTIL -CREATE <outputFile> <descriptionFile>
The <outputFile> being a Btrieve data file manipulated by the MKDE can have a long name but the <descriptionFile> must have only a short name as BUTIL.NLM does not understand long names.
The Btrieve Maintenance Utility Interface
You start the Btrieve Maintenance Utility by clicking Start | Programs | Pervasive.SQL 2000i | Utilities | Maintenance. The utility’s main window displays as illustrated in Figure 13-1.

13-5
Btrieve Interactive Maintenance Utility
Figure 13-1 Btrieve Maintenance Utility Main Window
Menu Options
The interactive Maintenance utility provides the following menus:
Getting Help
To access the Maintenance utility help system, choose a command from the Help menu, as follows:
Options Allows you to display the File Information Editor, set and clear owner names, generate statistics reports, and exit the utility.
Index Allows you to create and drop indexes.
Data Allows you to load data from ASCII files, save data to ASCII files, copy records between data files, and perform a roll forward operation to recover changes made to a data file between the time of the last backup and a system failure.
Help Provides access to the Maintenance utility help system.
Getting Help Explains how to use the Maintenance utility help system.
Index Provides a list of Maintenance utility help topics.

13-6
Manipulating Btrieve Data Files with Maintenance
In addition, you can display help for a particular dialog box by clicking the Help button contained in that dialog box.
Help on Help Explains how to use the help system.
About Displays copyright information and the version number. It also provides the version number of the MicroKernel Database Engine and Btrieve client Requester, if they are loaded.

13-7
File Information Editor
File Information Editor
This section provides general information about the File Information Editor with which you can create new files based on file and key specifications you construct. Because this Editor allows you to load information based on an existing file, it is also useful for viewing file and key specifications on existing data files. You can also create a new file based on the file and key specifications of an existing file (similar to CLONE in the command-line Maintenance utility on page 13-47).
You open the File Information Editor by clicking Options | Show Information Editor.
Figure 13-2 File Information Editor
File Information Editor Dialog Elements
At the top of the Editor, the following buttons appear:
Load Information Loads information based on an existing file. When you load information, you are not editing the existing file. Instead, you are loading a copy of the information about that file.
Create File Creates a new file based on current information in the dialog box.
Set to Defaults Sets the controls to default values.

13-8
Manipulating Btrieve Data Files with Maintenance
The Data File Info box, also at the top of the File Information Editor, contains the following controls:
The File Specification box is in the middle of the File Information Editor. Table 13-1 describes the controls in this box.
Description Comments
If you are creating a description file, allows you to enter notes about the file.
Show 6.x Attributes
Displays controls specific to 6.x and later files, which are unavailable when you load information based on a pre-6.0 file. (This button is unavailable unless you load information based on a pre-6.x file.)
Help Displays help for the File Information Editor dialog box.
Owner Name Provides a text box you can use to specify the owner name, if applicable, for an existing file.
Version Earliest version of the MicroKernel that can read all the attributes of the file. For example, if you created a file using the 6.15 MicroKernel but did not use any attributes specific to 6.15, the Maintenance utility displays 6.0 as the version number. See “File Version Notes” on page 13-60 for additional information about file format versions.
Total Records Total number of records in the file.
Table 13-1 File Specification Controls
Control Description Range Default
Record Length
Specifies the logical data record length (in bytes) of the fixed-length records in a file.
4–4,088 100
Page Size Specifies the physical page size (in bytes) for the file.
512–4,096
4,096
# Keys Indicates the number of distinct keys (as opposed to key segments) currently defined in the Editor. Reflects the number of keys in the Key list.
0–119 0
# Segments Indicates the number of key segments currently defined in the Editor. Reflects the number of segments in the Segment list.
0–119 0

13-9
File Information Editor
Available Linked Keys
Specifies how many 8-byte place holders you want to reserve for future linked-duplicatable keys. If you are loading information based on an existing data file, this value reflects the number of place holders currently available in that file. (The number of originally reserved place holders is not stored in the file.)
0–119 3
Key-Only Indicates whether the file is key-only. Not applicable if you turn Data Compression on, if you turn Variable Records on, or if you define more than one key for the file.
On or Off Off
Balanced Indexing
Specifies that the file uses the balanced indexing method of managing key pages.
On or Off Off
Pre-allocation
Specifies that the file uses preallocated pages.
On or Off Off
# Pages Specifies the number of pages you want preallocated when you create the file. Applicable only if Pre-allocation is turned on. If you are loading information based on an existing data file, this value reflects the number of unused, preallocated pages left in that file. (The number of originally preallocated pages is not stored in the file.)
1–65,535 0
Data Compression
Specifies that the file uses data compression. Not applicable for key-only files or files that use blank truncation.
On or Off Off
Variable Records
Specifies that the file can contain variable-length records.
On or Off Off
Blank Truncation
Specifies whether the file uses blank truncation on variable records to conserve disk space. Applicable only if Variable Records is turned on.
On or Off Off
Table 13-1 File Specification Controls continued
Control Description Range Default

13-10
Manipulating Btrieve Data Files with Maintenance
At the bottom middle of the dialog box, the Key list shows the key numbers defined in a file. (For 6.x and later files, these key numbers do not have to be consecutive; they can have gaps between them.) The Maintenance utility displays the highlighted key’s specifications in the Key box at the bottom left of the dialog box.
Also at the bottom middle of the dialog box, the Segment list shows the key segment numbers defined for the key highlighted in the Key list. The Maintenance utility displays the highlighted segment’s specifications in the Segment box at the bottom right of the dialog box.
In addition, the following buttons appear under the Key and Segment lists:
Note Because these buttons control key specifications for a file you want to create, you cannot use them to operate on keys in an existing file. If you want to create or drop an index on an existing file, refer to “Index Tasks” on page 13-24.
Include VATs Specifies whether the file supports Variable-tail Allocation Tables for faster access to data in very long records. Applicable only if Variable Records is turned on.
On or Off Off
% Free Space
Specifies the amount of unused space a file’s variable pages must have available before the MicroKernel creates a new variable page. Applicable only if Data Compression or Variable Records are turned on.
5, 10, 20, or 30
5
Insert Defines a new key or segment.
Delete Removes the highlighted key or segment specification.
Compress Renumbers the keys consecutively. You can use this button to remove gaps that result from deleting a key specification.
Table 13-1 File Specification Controls continued
Control Description Range Default

13-11
File Information Editor
At the bottom left in the dialog box is the Key group box. Table 13-2 describes the controls in this area. These controls are specific to the designated key (that is, the key highlighted in the Key list), not just to the current key segment. When you change the setting for one of these controls, the change affects all segments of the specified key.
At the bottom right in the dialog box is the Key Segment group box. Table 13-3 describes the controls in this area. These controls are
Table 13-2 Key Specification Controls
Control Description Default
Duplicates Specifies that the key can have duplicate values. On
Modifiable Specifies that the key value can be modified after creation.
On
Repeating Duplicates
Specifies that the MicroKernel uses the repeating-duplicatable method of storing duplicate key values.
Off
Sparse Key A sparse key does not contain a key value for each record in the file. The records with NULL values for the indexed field are not included in the index. Key flag 0x0200 is used for this purpose.
Off
Null Key Specifies that the key has a null value. Off
All Segments (Null)
Specifies that if all key segments in the record contain the null value, the MicroKernel does not include that record in the key path. Applicable only if Null Key is turned on.
Off
Any Segment (Manual)
Specifies that if one or more key segments contain the null value, the MicroKernel does not include that record in the key path. Applicable only if Null Key is turned on.
Off
ACS Information
Allows you to specify an alternate collating sequence (ACS) for the key. Applicable only if the Use ACS check box is selected for a segment of the key.
Off
Unique Values
Indicates the number of unique key values in the file. Applicable only if you are loading information based on an existing data file.
N/A

13-12
Manipulating Btrieve Data Files with Maintenance
specific to the designated key segment (that is, the segment highlighted in the Segment list),
Table 13-3 Key Segment Specification Controls
Control Description Default
Data Type Specifies a data type for the key segment.
The NULL data type indicates that the index is one byte Null indicator segment. It must be in a multi-segment key and it must precede another key segment that is not a NULL type. The number used in the Btrieve API for this key type is 255.
String
Position Specifies by number the relative starting position of the beginning of this key segment in the record. The value cannot exceed the record length.
1
Length Specifies the length (in bytes) of the key segment. This value cannot exceed the limit dictated by the data type for the segment. The total of key position and key length cannot exceed the record length.
10
Null Value Specifies the null character value (in hexadecimal) for the key segment. Applicable only if the Null Key check box is selected for the key.
Binary zero
Case Insensitive
Specifies whether the segment is sensitive to case. Applicable only for STRING, LSTRING, and ZSTRING data types or for keys that do not use an ACS.
On
Descending Specifies that the MicroKernel sort the key segment values in descending order (that is, from highest to lowest).
Off
Use ACS Specifies that the segment uses the alternate collating sequence defined for the key. Applicable only for string, lstring and zstring data types that are case sensitive.
Off
Null Value Discrete Ordering
NULL Value Discrete Ordering is used for the null indicator segment (NIS) to determine whether the MKDE should treat the NIS as a boolean value, where any non-zero value is considered NULL, or as a one byte integer, where zero is considered non-null and all other values are considered different types of null. In this case they are sorted as discrete values. The Btrieve API uses the NO_CASE flag, 0x0400, to indicate discrete ordering should be performed, because that flag was previously unused for integer values.
Off
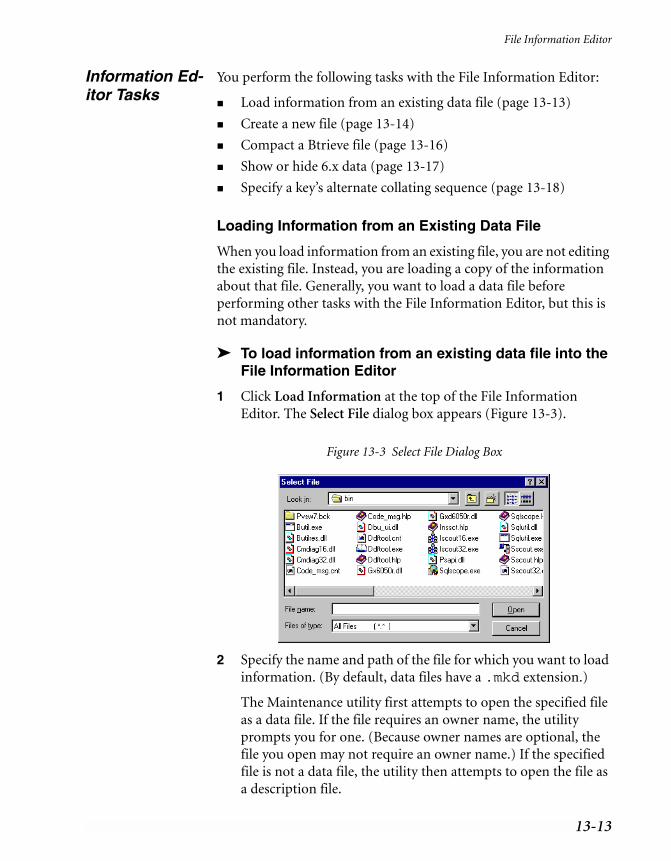
13-13
File Information Editor
Information Ed-itor Tasks
You perform the following tasks with the File Information Editor:
! Load information from an existing data file (page 13-13)
! Create a new file (page 13-14)
! Compact a Btrieve file (page 13-16)
! Show or hide 6.x data (page 13-17)
! Specify a key’s alternate collating sequence (page 13-18)
Loading Information from an Existing Data File
When you load information from an existing file, you are not editing the existing file. Instead, you are loading a copy of the information about that file. Generally, you want to load a data file before performing other tasks with the File Information Editor, but this is not mandatory.
➤ To load information from an existing data file into the File Information Editor
1 Click Load Information at the top of the File Information Editor. The Select File dialog box appears (Figure 13-3).
Figure 13-3 Select File Dialog Box
2 Specify the name and path of the file for which you want to load information. (By default, data files have a .mkd extension.)
The Maintenance utility first attempts to open the specified file as a data file. If the file requires an owner name, the utility prompts you for one. (Because owner names are optional, the file you open may not require an owner name.) If the specified file is not a data file, the utility then attempts to open the file as a description file.

13-14
Manipulating Btrieve Data Files with Maintenance
Creating a New File
You can create a new file based on the current information in the File Information Editor or on new information you provide.
➤ To create a new file based on the current information in the File Information Editor
1 Click Create File at the top of the File Information Editor dialog box. The Create File dialog box (Figure 13-4) appears.
Figure 13-4 Create File Dialog Box

13-15
File Information Editor
2 Specify the controls in the Create File dialog box, which are described in Table 13-4.
Adding Comments to a Description File
The comments are written to the top of the description file when you create the description file. For example, the comment, “This is my file,” appears at the top of the description files as /* This is my file */. If you add additional comments after creating the description file, you need to create the file again to include the additional comments.
➤ To add comments to a description file
1 Click Description Comments. The Description File Comments dialog box (Figure 13-5) appears.
Table 13-4 Create File Dialog Controls
Control Description Default
File Name Specifies a name and path for the file. By default, data files have a .mkd extension.
N/A
File Type Specifies the type of file to create. If you are creating a description file, you can use the Index Only option, which creates a description file you can use with the BUTIL utility to add an index to an existing data file. (For more information, refer to “Creating Indexes” on page 13-24.)
MicroKernel-compatible
System Data
Determines whether the utility includes system data in the file. If you choose Use Engine Setting, the utility uses the setting for the System Data configuration option described on page 4-11. If you choose No System Data, the utility does not create system data, regardless of the engine configuration. If you choose Force System Data, the utility creates system data, regardless of the engine configuration.
This is applicable only if the file type is MicroKernel-compatible.
Use Engine Setting

13-16
Manipulating Btrieve Data Files with Maintenance
Figure 13-5 Description File Comments Dialog Box
2 Enter a block of comments up to 5,120 characters long.
3 Click OK when you are finished entering comments.
Compacting Btrieve Data Files
You can compact a Btrieve data file to remove unused space in it, which ultimately decreases the file’s size. You can also perform this procedure using the command-line Maintenance utility (page 13-56).
➤ To compact a Btrieve file
1 Click Load Information in the File Information Editor and select the file you want to compact.
2 Click Create File, give the file a new name (which creates a clone) in the Create File dialog box, and click OK.
3 From the Data menu on the main window, select Save. In the Save Data dialog box, enter the name of the original file in the From MicroKernel File box and then specify a name for the output file (for example, <original file>.out) in the To Sequential File box.
4 Click Execute. The Save Data dialog box displays the results of the save. Click Close.
5 From the Data menu, select Load. In the Load Data dialog box, enter the name of the sequential data file you just saved in the From Sequential File box. Then enter the name of the clone file you created in Step 2 in the To MicroKernel File box.

13-17
File Information Editor
6 Click Execute. The Loading Data dialog box displays the results of the load. Click Close.
You can now compare the size of the original file to the clone file to verify the reduction in size.
Showing and Hiding 6.x Data
When you load a pre-6.0 file, all the controls in the File Information Editor that are specific to 6.x and later are unavailable unless you click the Show 6.x Data button. For example, one feature that is specific to 6.x and later is the use of variable-tail allocation tables, or VATs.
This button is useful for users working in environments that use both pre-6.0 and 6.x and later MicroKernels. By hiding the 6.x-specific controls, you can avoid unintentionally creating a 6.x file. (Pre-6.0 MicroKernels cannot access 6.x files.)
➤ To display the 6.x-specific controls
! Click Show 6.x Data.
The Show 6.x Data button is unavailable unless you are working with pre-6.0 files.
Specifying a Key’s Alternate Collating Sequence
You can use an alternate collating sequence (ACS) to sort string keys (types STRING, LSTRING, and ZSTRING) differently from the standard ASCII collating sequence. By using one or more ACSs, you can sort keys as follows:
! By your own user-defined sorting order, which may require a sorting sequence that mixes alphanumeric characters (A-Z, a-z, and 0-9) with non-alphanumeric characters (such as #).
! By an international sorting rule (ISR) that accommodates language-specific collations, including multi-byte collating elements, diacritics, and character expansions and contractions.
Files can have a different ACS for each key in the file, but only one ACS per key. Therefore, if the key is segmented, each segment must use either the key’s specified ACS or no ACS at all. For a file in which a key has an ACS designated for some segments but not for others, Btrieve sorts only the segments that specify the ACS.

13-18
Manipulating Btrieve Data Files with Maintenance
The ISR tables are provided with Pervasive.SQL and are based on ISO-standard locale tables. ISR tables are stored in the COLLATE.CFG file, which is a Pervasive.SQL system file. This means that multiple data files can share a single ISR.
➤ To specify a key’s alternate collating sequence
1 Click ACS Information.
The Maintenance utility displays the Specify ACS Information dialog box (Figure 13-6).
Figure 13-6 Specify ACS Information Dialog Box
2 You can specify either a country ID and code page, an ACS file name, or an International Sorting Rule (ISR) as follows:
Table 13-5 ACS Information Controls
Control Description Default
ACS Country/Code
Country ID An Intel-format number that identifies your country. Refer to your operating system’s documentation for specific information.
-1
Code Page An Intel-format number that identifies the code page you want to use. Refer to your operating system’s documentation for specific information.
-1
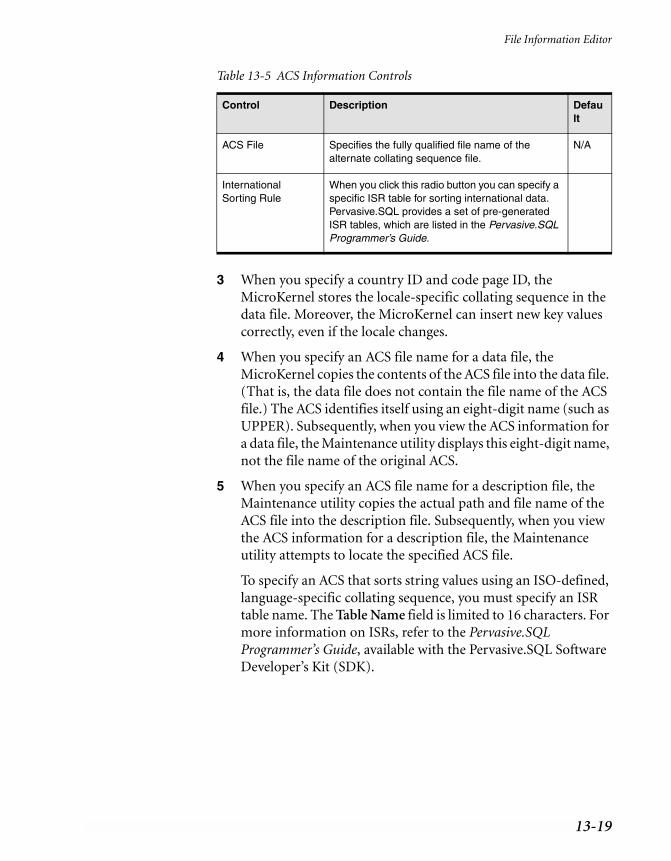
13-19
File Information Editor
3 When you specify a country ID and code page ID, the MicroKernel stores the locale-specific collating sequence in the data file. Moreover, the MicroKernel can insert new key values correctly, even if the locale changes.
4 When you specify an ACS file name for a data file, the MicroKernel copies the contents of the ACS file into the data file. (That is, the data file does not contain the file name of the ACS file.) The ACS identifies itself using an eight-digit name (such as UPPER). Subsequently, when you view the ACS information for a data file, the Maintenance utility displays this eight-digit name, not the file name of the original ACS.
5 When you specify an ACS file name for a description file, the Maintenance utility copies the actual path and file name of the ACS file into the description file. Subsequently, when you view the ACS information for a description file, the Maintenance utility attempts to locate the specified ACS file.
To specify an ACS that sorts string values using an ISO-defined, language-specific collating sequence, you must specify an ISR table name. The Table Name field is limited to 16 characters. For more information on ISRs, refer to the Pervasive.SQL Programmer’s Guide, available with the Pervasive.SQL Software Developer’s Kit (SDK).
ACS File Specifies the fully qualified file name of the alternate collating sequence file.
N/A
International Sorting Rule
When you click this radio button you can specify a specific ISR table for sorting international data. Pervasive.SQL provides a set of pre-generated ISR tables, which are listed in the Pervasive.SQL Programmer’s Guide.
Table 13-5 ACS Information Controls
Control Description Default

13-20
Manipulating Btrieve Data Files with Maintenance
Owner Names
The MicroKernel allows you to restrict access to files by specifying an owner name. Because owner names are optional, the files you use with the utility may or may not require an owner name. Owner names are case-sensitive.
Conceptually, owner names are like passwords. They are not the same as user or group names, which you can set in the PCC. For example, an owner name of “Master” is not the same as the default user Master.
For more information on owner names, see “Owner Names” on page 7-2.
With relational access, an ODBC error results if you attempt to manipulate a table that is restricted by an owner name. (For example in the PCC, if you double-click the table name or attempt to delete the table.) You can use the GRANT statement to grant access to a particular user or group, and then manipulate the table via relational access through ODBC. The Master user must supply the GRANT statement with the correct owner name.
Owner Names Tasks
You perform the following tasks pertaining to owner names:
! Set or clear an owner name (page 13-20)
Setting or Clearing an Owner Name
You set an owner name to restrict access to a file. You clear an owner name to remove the access restriction.
➤ To set or clear an owner name
1 Click Options | Set - Clear Owner from the menu on the main window. The Set - Clear Owner Name dialog box appears (Figure 13-7).

13-21
Owner Names
Figure 13-7 Set/Clear Owner Name Dialog Box
2 In the MicroKernel File box, specify the file for which you want to set or clear an owner name. Then, to clear the owner name, click Clear Owner and specify the file’s owner name in the Current Owner box.
3 To set the owner name, click Set Owner and specify the file’s new owner name in the New Owner box. Select the Permit read-only access without an owner name check box to allow anyone to read-only access to the records.
Select the Encrypt data in file check box to ensure that unauthorized users do not examine your data using a debugger or a file dump utility. Only select this option if data security is important to your environment as this requires additional processing time.
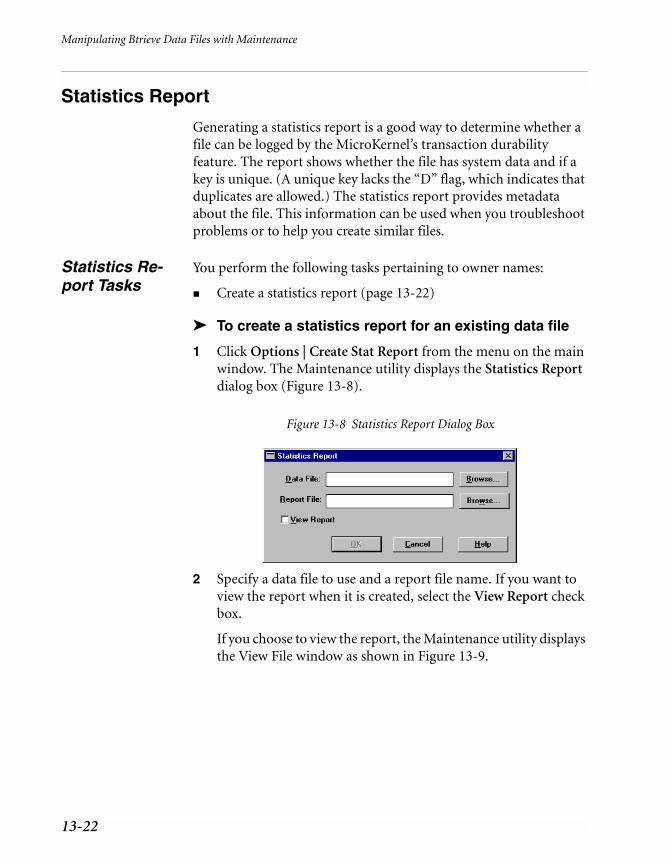
13-22
Manipulating Btrieve Data Files with Maintenance
Statistics Report
Generating a statistics report is a good way to determine whether a file can be logged by the MicroKernel’s transaction durability feature. The report shows whether the file has system data and if a key is unique. (A unique key lacks the “D” flag, which indicates that duplicates are allowed.) The statistics report provides metadata about the file. This information can be used when you troubleshoot problems or to help you create similar files.
Statistics Re-port Tasks
You perform the following tasks pertaining to owner names:
! Create a statistics report (page 13-22)
➤ To create a statistics report for an existing data file
1 Click Options | Create Stat Report from the menu on the main window. The Maintenance utility displays the Statistics Report dialog box (Figure 13-8).
Figure 13-8 Statistics Report Dialog Box
2 Specify a data file to use and a report file name. If you want to view the report when it is created, select the View Report check box.
If you choose to view the report, the Maintenance utility displays the View File window as shown in Figure 13-9.

13-23
Statistics Report
Figure 13-9 Statistics Report Example
The informational headings in a status report correspond to the controls in the File Information Editor, which is described in “File Information Editor” on page 13-7.
The legend at the bottom of the statistics report explains the symbols used in the key/segment portion of the report. This information includes items such as the number of keys and key segments, the position of the key in the file, and the length of the key:
Legend:
< = Descending OrderD = Duplicates AllowedI = Case InsensitiveM = ModifiableR = Repeat DuplicateA = Any Segment (Manual)L = All Segments (Null)* = The values in this column are hexadecimal.?? = Unknown-- = Not Specified

13-24
Manipulating Btrieve Data Files with Maintenance
Indexes
An index is a structure that sorts all the key values for a specific key. Btrieve access permits overlapping indexes (an index that includes a partial column). Relational access through ODBC does not permit overlapping indexes. (You can create an overlapping index with the File Information Editor, which you can display by clicking the Goto Editor button.)
Index Tasks You perform the following tasks pertaining to indexes:
! Create an index (page 13-24)
! Drop an index (page 13-26)
Creating Indexes
You cannot create an index for a file unless the file has at least one key defined. You can create a key with the File Information Editor (page 13-7).
➤ To create an index
1 Click Index | Create from the main menu, which opens the Create Index dialog box (Figure 13-10).
Figure 13-10 Create Index Dialog Box
2 Complete the following data boxes in the Create Index dialog box.

13-25
Indexes
3 You can click Go To Editor to display the File Information Editor dialog box, which shows more complete information about the key. You can click Refresh Lists to read key information from the data file and refresh the Existing Key Numbers in Data File and Key Number to Use For Create lists. You must click Refresh Lists before you can create an index.
4 When you have completed the Create Index dialog box, click Execute to create the index. The amount of time required to create the index depends on how much data the file contains.
Index Type Specify whether to create an internal or external index. Internal indexes are dynamically maintained as part of the data file. External indexes are separate files you generate as needed.
An external index file is a standard data file that contains records sorted by the key you specify. Each record consists of the following:
" A 4-byte address identifying the physical position of the record in the original data file
" A key value
Data File Specify the name of the data file for which you want to create the index.
External Index File Specify the name of the file to generate for an external index. Not applicable for internal indexes.
Key Specification Number in Information Editor to Use
Lists the key numbers defined in the File Information Editor. If the file contains a system-defined log key (also called system data) but the key has been dropped, this list includes SYSKEY, which you can select to re-add the system-defined log key to the file.
Existing Key Numbers in Data File Click Refresh Lists to display the key number defined for the file. If the file contains a system-defined log key, this list includes SYSKEY.
Key Number to Use For Create Click Refresh Lists to display the key numbers available (that is, not defined for the file). Highlight the key number you want to use when creating the index.
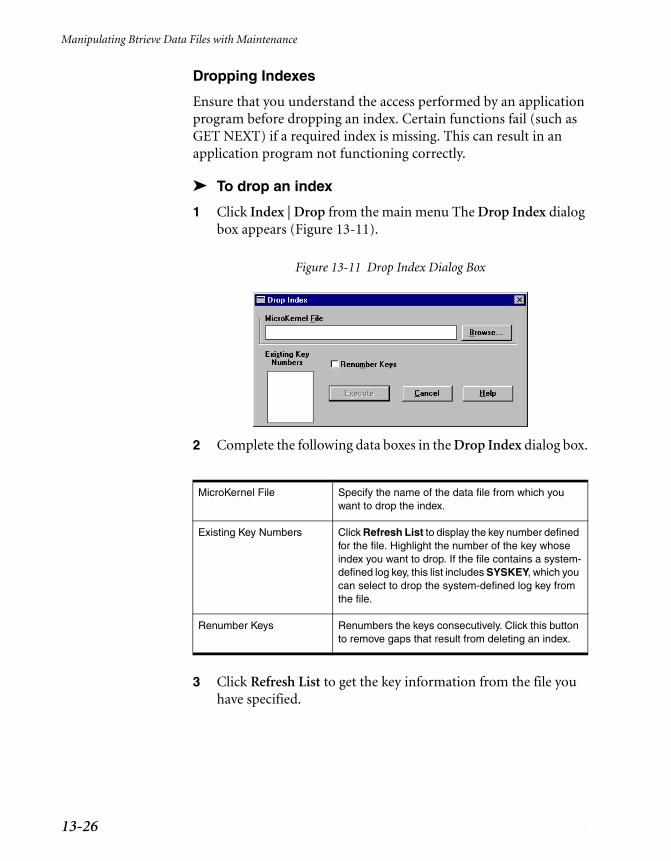
13-26
Manipulating Btrieve Data Files with Maintenance
Dropping Indexes
Ensure that you understand the access performed by an application program before dropping an index. Certain functions fail (such as GET NEXT) if a required index is missing. This can result in an application program not functioning correctly.
➤ To drop an index
1 Click Index | Drop from the main menu The Drop Index dialog box appears (Figure 13-11).
Figure 13-11 Drop Index Dialog Box
2 Complete the following data boxes in the Drop Index dialog box.
3 Click Refresh List to get the key information from the file you have specified.
MicroKernel File Specify the name of the data file from which you want to drop the index.
Existing Key Numbers Click Refresh List to display the key number defined for the file. Highlight the number of the key whose index you want to drop. If the file contains a system-defined log key, this list includes SYSKEY, which you can select to drop the system-defined log key from the file.
Renumber Keys Renumbers the keys consecutively. Click this button to remove gaps that result from deleting an index.

13-27
Data
Data
The commands in the Data menu allow you to import, export, and copy records in data files. You can also recover data after a system failure with the Roll Forward feature. See “Roll Forward Command” on page 8-8 for a discussion of Roll Forward.
Importing and Exporting ASCII File For-mat
When you save data, records in the ASCII file have the following format. You can use an ASCII text editor to create files that you can load, as long as they adhere to these specifications. Note that most text editors do not support editing binary data.
! The first field is a left-adjusted integer (in ASCII) that specifies the length of the record. (When calculating this value, ignore the carriage return/line feed that terminates each line.) The value in this first field matches the record length specified in the data file.
# For files with fixed-length records, the length you specify should equal the record length of the data file.
# For files with variable-length records, the length you specify must be at least as long as the fixed-record length of the data file.
! A separator (a comma or a blank) follows the length field.
! The record data follows the separator. The length of the data is the exact number of bytes specified by the length field. If you are creating an import ASCII file using a text editor, pad each record with blank spaces as necessary to fill the record to the appropriate length.
! A carriage return/line feed (0D0A hexadecimal) terminates each line. The Maintenance utility does not insert the carriage return/line feed into the data file.
! The last line in the file must be the end-of-file character (CTRL+Z or 1A hexadecimal). Most text editors automatically insert this character at the end of a file.
Figure 13-12 shows the correct format for records in the input ASCII file. For this example, the data file has a defined record length of 40 bytes.

13-28
Manipulating Btrieve Data Files with Maintenance
Figure 13-12 Format for Records in Input Sequential Files
Data Tasks You perform the following tasks pertaining to data:
! Import (Load) data records (page 13-24)
! Export (Save) data records (page 13-26)
! Copy data records from one MicroKernel file to another (page 13-26)
! Recover (Roll Forward) changes made to a data file between the time of the last backup and a system failure. See the “Backup and Restore” chapter on page 8-1.
Importing Records From an ASCII File
You can use the Maintenance utility to import records from an ASCII file to a standard data file. This operation does not perform any conversions on the data. You can create an import file using a text editor or the Maintenance utility (see “Exporting Records to an ASCII File” on page 13-29).
➤ To import ASCII data
1 Click Data | Load from the main menu. The Load dialog box appears (Figure 13-13).
Figure 13-13 Load Dialog Box
40, The record follows the comma delimiter <CR/LF>
Record Length
Comma Delimiter
Data
Blank Padfor Proper Length
Carriage Returnor Line Feed

13-29
Data
The ASCII file you specify must adhere to the specifications explained in “Importing Records From an ASCII File” on page 13-28. The record length of the standard data file you specify must be compatible with the records in the ASCII file.
2 Click Execute to import the records.
While importing data, the Maintenance utility shows the number of records being imported, the percentage of records imported, and a status message. You can continue working in the Maintenance utility (for example, you can open another Load dialog box).
Exporting Records to an ASCII File
You can use the Maintenance utility to export records from a data file to an ASCII file.
➤ To export ASCII records
1 Click Data | Save from the main menu. The Save Data dialog box appears (Figure 13-14).
Figure 13-14 Save Data Dialog Box

13-30
Manipulating Btrieve Data Files with Maintenance
2 In the Save Data dialog box, specify the following options.
3 Click Execute to export the data. The Maintenance utility creates the specified ASCII file using the format described in “Importing Records From an ASCII File” on page 13-28. You can then edit the ASCII file and use the Load command to import the edited text to another standard data file, as described in “Importing Records From an ASCII File” on page 13-28.
From MicroKernel File Specifies the name of the existing MicroKernel-compatible file you want to save.
To Sequential File Specifies the name of the sequential file to create.
Use An Index Uses a specified index when sorting the records for export. By default, the Maintenance utility does not use an index, meaning that records are exported according to their physical position in the data file.
Internal Index #:Uses the specified key number. Click Refresh Index List to update the available indexes if you change file in the From MicroKernel File box.
External Index File:Uses the specified external index. (To create an external index, refer to “Creating Indexes” on page 13-24.)
Direction Forward: This is the default setting and indicates the utility recovers the file from the beginning.
Backward: This option recovers data from the end of the file.
Forward and Backward: This option reads the file forward until it fails. Then it starts at the end of the file and reads the file backward until it reaches the record that failed previously or encounters another failure.
Backward and Forward: Indicates the utility reads the file backward until it fails. Then it starts at the beginning of the file and reads the file forward until it reaches the record that failed previously or encounters another failure.

13-31
Data
Copying Records Between Data Files
You can use the Maintenance utility to copy data from one Microkernel data file to another. The record lengths for both data files you specify must be the same.
➤ To copy data
1 Click Data | Copy from the main menu. The Copy Data dialog box appears (Figure 13-15).
Figure 13-15 Copy Data Dialog Box
2 Enter the name of the file you want to copy in the From MicroKernel File box and then specify the path where you want to copy the file in the To MicroKernel File box.
The record lengths for both data files you specify must be the same.
Recovering (Roll Forward) Changes to a Data File
See the “Backup and Restore” chapter on page 8-1.

13-32
Manipulating Btrieve Data Files with Maintenance
Btrieve Command-Line Maintenance Utility (BUTIL)
Use this utility if you prefer a command-line interface or if you want to start or stop continuous operation. The Btrieve Maintenance utility is also available in a command-line format that runs on the server (as an NLM on NetWare or from a DOS command prompt on Windows NT) or locally on DOS, and Win32 clients. You can execute Maintenance utility commands from the command line or through a command file you create. Before you perform commands in the Btrieve Maintenance utility, also referred to as BUTIL, it is important you understand some concepts and elements addressed in the Commands.
The Btrieve Command-Line Maintenance utility performs the following common file and data manipulations:
! “Importing and Exporting Data” on page 13-39
! “Creating and Modifying Data Files” on page 13-47
! “Viewing Data File Statistics” on page 13-58
! “Displaying Btrieve Interface Module Version” on page 13-62
! “Unloading the Btrieve Interface and Requester (DOS only)” on page 13-63
! “Performing Continuous Operations” on page 13-64
Commands Table 13-6 lists the commands that you can use with the Command-line Maintenance Utility.
Table 13-6 Command-Line Maintenance Utility Commands
Command Description
CLONE Creates a new, empty data file using an existing file’s specifications.
CLROWNER Clears the owner name of a data file.
COPY Copies the contents of one data file to another.
CREATE Creates a data file.
DROP Drops an index.
ENDBU Ends continuous operation on data files defined for backup in Win32 and NLM versions only.

13-33
Btrieve Command-Line Maintenance Utility (BUTIL)
Viewing Com-mand Usage Syntax
To view a summary of each command usage, enter the following command at the file server:
butil
Note Unless otherwise shown, all command syntax is lowercase on UNIX platforms. Windows-based platforms are case insensitive. NetWare can be configured to be case sensitive or insensitive, but for purposes of discussion, this section assumes case insensitive.
INDEX Creates an external index file.
LOAD Loads the contents of an unformatted file into a data file.
RECOVER Reads data sequentially from a data file and writes the results to an unformatted file. (The DOS version does not support ROLLFWD.) Use this command if you have a damaged file.
ROLLFWD Recovers changes made to a data file between the time of the last backup and a system failure.
SAVE Reads data along a key path and writes the results to a sequential file.
SETOWNER Assigns an owner name to a data file.
SINDEX Creates an index.
STARTBU Starts continuous operation on files defined for backup in Win32 and NLM versions only.
STAT Reports statistics about file attributes and current sizes of data files.
(DOS only) Unloads the Btrieve Interface and requester.
VER Displays the version of the MicroKernel Database Engine and Btrieve Interface Module that is loaded at the server.
Table 13-6 Command-Line Maintenance Utility Commands continued
Command Description
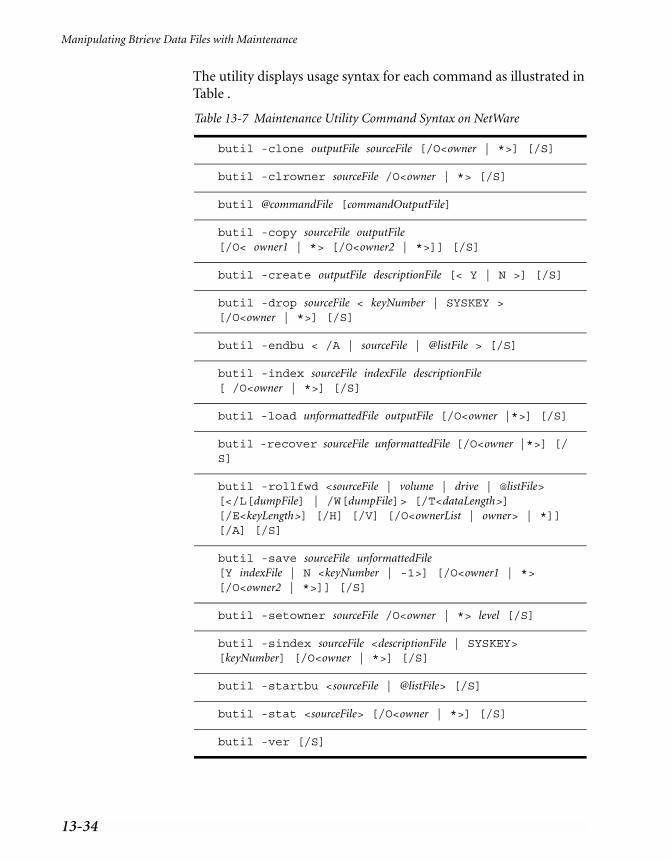
13-34
Manipulating Btrieve Data Files with Maintenance
The utility displays usage syntax for each command as illustrated in Table .
Table 13-7 Maintenance Utility Command Syntax on NetWare
butil -clone outputFile sourceFile [/O<owner | *>] [/S]
butil -clrowner sourceFile /O<owner | *> [/S]
butil @commandFile [commandOutputFile]
butil -copy sourceFile outputFile [/O< owner1 | *> [/O<owner2 | *>]] [/S]
butil -create outputFile descriptionFile [< Y | N >] [/S]
butil -drop sourceFile < keyNumber | SYSKEY > [/O<owner | *>] [/S]
butil -endbu < /A | sourceFile | @listFile > [/S]
butil -index sourceFile indexFile descriptionFile [ /O<owner | *>] [/S]
butil -load unformattedFile outputFile [/O<owner |*>] [/S]
butil -recover sourceFile unformattedFile [/O<owner |*>] [/S]
butil -rollfwd <sourceFile | volume | drive | @listFile> [</L[dumpFile] | /W[dumpFile]> [/T<dataLength>] [/E<keyLength>] [/H] [/V] [/O<ownerList | owner> | *]][/A] [/S]
butil -save sourceFile unformattedFile [Y indexFile | N <keyNumber | -1>] [/O<owner1 | *> [/O<owner2 | *>]] [/S]
butil -setowner sourceFile /O<owner | *> level [/S]
butil -sindex sourceFile <descriptionFile | SYSKEY> [keyNumber] [/O<owner | *>] [/S]
butil -startbu <sourceFile | @listFile> [/S]
butil -stat <sourceFile> [/O<owner | *>] [/S]
butil -ver [/S]

13-35
Btrieve Command-Line Maintenance Utility (BUTIL)
Note The /S option applies only to the NetWare version of the command-line utility. Also, on NetWare you always have to specify the full path of the file name such as sys:\pvsw\demodata\tuition.mkd.
Command For-mat
The format for the Maintenance utility command line is as follows:
butil [-command [parameter ...]] | @commandFile
Command Files You can use a command file to do the following:
! Execute a command that is too long to fit on the command line.
! Execute a command that you use often (by entering the command once in the command file and then executing the command file as often as you want).
! Execute a command and write the output to a file, using the following command format:
BUTIL @commandFile [commandOutputFile]
For each command executed, the resulting output file shows the command followed by its results. All messages appear on the server console screen, as well.
! Execute multiple commands sequentially.
Command files contain the same information as that required on the command line.
Rules for Command Files
Observe the following rules when creating a Maintenance utility command file:
! You cannot split a single parameter across two lines.
–command A Maintenance utility command, such as COPY. You must precede the command with a dash (–), and you must enter a space before the dash. Table 13-6 lists the commands.
parameter Information that the command may require. Discussions of the individual commands provide details when applicable.
@commandFile Fully qualified file name of a command file.

13-36
Manipulating Btrieve Data Files with Maintenance
You must end each command with <end> or [end]. You must also end each command with an <end> when trying to execute multiple commands. The <end> or [end] must be lowercase.
Command File Example
The following is an example command file, COPYCRS.CMD. The file calls the BUTIL -CLONE command to create the NEWCRS.MKD file by cloning the COURSE.MKD file, and the -CREATE command to create the NEWFILE.DTA file by using the description provided in the NEWFILES.DES description file.
-clone newcrs.mkd course.mkd <end>-create newfile.dta newfiles.des <end>
The following command uses the COPYPATS.CMD file and writes the output to the COPYPATS.OUT file:
butil @copypats.cmd copypats.out
Description Files
Description files are ASCII text files that contain descriptions of file and key specifications that the Maintenance utility can use to create data files and indexes. Some users employ description files as a vehicle for archiving information about the data files they have created. For more information about the description file format, see Appendix A“Description Files.”
Extended File Support
The size of the MicroKernel data file can be larger than the operating system file size limit. When you export data from an extended MicroKernel file to an unformatted file, the size of the unformatted file can exceed the MicroKernel file size limit because of the differences in the physical format.
Maintenance detects that the unformatted file has exceeded the file size limit (2 GB) and starts creating extension files. This process is transparent. Extension files and the original unformatted file must reside on the same volume. The extension file uses a naming scheme similar to the MicroKernel Database Engine. The first extension file is the same base file name with ‘.^01’ extension. The second extension file is ‘.^02,’ and so on. These numbers are printed in hex. While the naming convention supports up to 255 extension files, the current maximum number of extension files is 32. The maximum file size is dependent on the page size. The maximum number of pages is 16 million. If your page size is 4096 bytes, then the file can

13-37
Btrieve Command-Line Maintenance Utility (BUTIL)
grow to 64 GB. If your page size is 512 bytes, then the maximum file size is 8 GB.
To SAVE or RECOVER huge files to unformatted files, see the respective command. Also, when you import data from an unformatted file, the utility detects if the file has extensions and loads the data from the extension file.
Owner Names The MicroKernel allows you to restrict access to files by specifying an owner name. Because owner names are optional, the files you use with the utility may or may not require an owner name. If the file requires an owner name, you must specify it using the /O option. You can specify one of the following:
! Single owner name.
! List of up to eight owner names. Separate the owner names with commas.
! Asterisk (*). The utility prompts you for the owner name. With the ROLLFWD command, the utility prompts you for a list of owner names separated by commas.
Owner names are case-sensitive. If you enter owner names on the command line, the utility discards leading blanks. If you specify an asterisk, the utility does not discard leading blanks.
Redirecting Er-ror Messages
Be sure that you specify a fully qualified file name (including a drive letter or UNC path) when redirecting error messages.
➤ To redirect error messages to a file on a Windows NT or UNIX server
! Use the following command format.
butil -command commandParameters > filePath
➤ To redirect error messages to a file on a NetWare server
! Use the following command format.
load butil -command commandParameters (CLIB_OPT)/>filepath
ASCII File For-mat
See “Importing Records From an ASCII File” on page 13-28 in the Interactive Maintenance utility section.

13-38
Manipulating Btrieve Data Files with Maintenance
Rules for Speci-fying File Names on Dif-ferent Plat-forms
When you run butil on a Windows-based platform or a UNIX-based platform, you do not need to specify the name of the path if the data file resides in the same directory as your current directory.

13-39
Importing and Exporting Data
Importing and Exporting Data
This section provides detailed information on importing and exporting data using the following BUTIL commands: COPY, LOAD, RECOVER, and SAVE.
COPY The COPY command copies the contents of one MicroKernel file to another. COPY retrieves each record in the input data file and inserts it into the output data file. The record size must be the same in both files. After copying the records, COPY displays the total number of records inserted into the new data file.
Note COPY performs in a single step the same function as a RECOVER command followed by a LOAD command.
Using the COPY command, you can create a data file that contains data from an old file, but has new key characteristics.
➤ To copy a MicroKernel data file
1 Use the CREATE command to create an empty data file with the desired key characteristics (key position, key length, or duplicate key values).
or
Use CLONE to create an empty data file using the characteristics of an existing file.
2 Use the COPY command to copy the contents of the existing data file into the newly created data file.
Table 13-8 Commands to Import and Export Data
Command Description
COPY Copies the contents of one data file to another.
LOAD Loads the contents of a sequential file into a data file.
RECOVER Reads data sequentially from a data file and writes the results to a sequential file.
SAVE Reads data along a key path and writes the results to a sequential file.

13-40
Manipulating Btrieve Data Files with Maintenance
Format
BUTIL -COPY sourceFile outputFile [/O< owner1 | *> [/O<owner2 | *>]] [/S]
Example
The following command copies the records in COURSE.MKD to NEWCRS.MKD. The COURSE.MKD input file does not require an owner name, but the NEWCRS.MKD output file uses the owner name Pam.
butil -copy course.mkd newcrs.mkd /O /OPam
If you omit the first /O from this example, the utility assumes that the owner name Pam belongs to the input data file, not the output data file.
LOAD The LOAD command inserts records from an input ASCII file into a file. The input ASCII file can be a single file or an extended file (the base file plus several extension files). LOAD performs no conversion on the data in the input ASCII file. After the utility transfers the records to the data file, it displays the total number of records loaded.
sourceFile The fully qualified name of the data file from which to transfer records. When you run BUTIL for Windows NT/95/98, you do not need to specify the name of the path if the data file resides in the same directory as your current directory.
outputFile The fully qualified name of the data file into which to insert records. The output data file can contain data or be empty. When you run BUTIL for Windows NT/95/98, you do not need to specify the name of the path if the data file resides in the same directory as your current directory.
/Oowner1 The owner name of the source data file, if required. If only the output data file requires an owner name, specify /O followed by a blank for owner1 (as illustrated in the example).
/Oowner2 The owner name of the output data file, if required.
/S (NetWare only) By default, the Maintenance utility stops at each full screen of output and waits for a keystroke before continuing. With the /S option, the utility continuously scrolls output on the screen. You cannot use /S on the command line if you specify a command file, but you can specify /S with a command inside a command file.

13-41
Importing and Exporting Data
Note The LOAD command opens the output file in Accelerated mode; during a LOAD operation, the MicroKernel does not log the file. If you are using archival logging, back up your data files again after using the LOAD command.
Extended files: If the utility finds the next extension file, it continues the load process. Do not delete any extension file created earlier by the SAVE and RECOVER commands. If the file has three extensions and the user deletes the second one, LOAD stops loading records after processing the first extension file.
If SAVE or RECOVER created three extension files and a fourth one exists from a previous SAVE or RECOVER, LOAD reads the records from the fourth extension and inserts them into the MicroKernel file. If a fourth file exists, then you need to delete it before starting the LOAD process.
Before running the LOAD command, you must create the input ASCII file and the data file. You can create the input ASCII file using a standard text editor or an application; the input ASCII file must have the required file format (as explained in “Importing Records From an ASCII File” on page 13-28). You can create the data file using either the CREATE or the CLONE command.
Format
butil -load unformattedFile outputFile [/O<owner |*>] [/S]
unformattedFile The fully qualified name of the ASCII file containing the records to load into a data file. For Windows NT, you do not need to specify the name of the path if the data file resides in the same directory as your current directory.
outputFile The fully qualified name of the data file into which to insert the records. When you run BUTIL for Windows NT/95/98, you do not need to specify the name of the path if the data file resides in the same directory as your current directory.

13-42
Manipulating Btrieve Data Files with Maintenance
Example
The following example loads sequential records from the COURSE.TXT file into the COURSE.MKD file. The owner name of the COURSE.MKD file is Sandy.
butil -load course.txt course.mkd /OSandy
RECOVER The RECOVER command extracts data from a MicroKernel file and places it in an ASCII file that has the same format as the input ASCII file that the LOAD command uses. This is often useful for extracting some or all of the data from a damaged MicroKernel file. The RECOVER command may be able to retrieve many, if not all, of the file’s records. You can then use the LOAD command to insert the recovered records into a new, undamaged MicroKernel file.
Note The Maintenance utility performs no conversion on the data in the records. Therefore, if you use a text editor to modify an output file containing binary data, be aware that some text editors may change the binary data, causing the results to be unpredictable.
Format
butil -recover sourceFile unformattedFile [/O<owner |*>] [/S] [/Q] [/J] [/I]
/Oowner The owner name for the data file, if required.
/S (NetWare only) By default, the Maintenance utility stops at each full screen of output and waits for a keystroke before continuing. With the /S option, the utility continuously scrolls output on the screen. You cannot use /S on the command line if you specify a command file, but you can specify /S with a command inside a command file.
sourceFile The fully qualified name of the data file from which to recover data. When you run BUTIL for Windows NT/95/98, you do not need to specify the name of the path if the data file resides in the same directory as your current directory.
unformattedFile The fully qualified name of the ASCII file where the utility should store the recovered records.
/Oowner The owner name for the data file, if required.

13-43
Importing and Exporting Data
For each record in the source file, if the RECOVER command receives a variable page error (Status Code 54), it places all the data it can obtain from the current record in the unformatted file and continues the recovery process.
The utility produces the following messages:
! informs you about the name of the last extension file created
! checks if the next extension file exists, and if so, tells you to delete it
! if you move the extended unformatted files to a different location, you are prompted to move the base file and all of its extension files
/S (NetWare only) By default, the Maintenance utility stops at each full screen of output and waits for a keystroke before continuing. With the /S option, the utility continuously scrolls output on the screen. You cannot use /S on the command line if you specify a command file, but you can specify /S with a command inside a command file.
/Q Indicates whether to replace an existing unformatted file. By default, the Maintenance utility overwrites the existing files. If you specify this option and a file with the same name exists, the utility returns an error message.
The utility also checks whether the MicroKernel file to be recovered is extended. If the file is extended, the utility checks for files with the same name as the potential unformatted extension file. If one of those files exists, the utility returns an error message.
/J Indicates BACKWARD reading of the file. If you specify this option, the utility recovers data from the MicroKernel file using STEP LAST and PREVIOUS operations. The default is forward reading, using STEP FIRST and NEXT operations.
/I Indicates FORWARD reading of the file. Although the default is forward reading, you can use this option to indicate FORWARD and BACKWARD reading. This means that if you specify both /I and /J, respectively, the utility reads the file forward until it fails. Then it starts at the end of the file and reads backwards until it reaches the record that failed previously or encounters another failure.
If you specify /J first, the utility reads backwards and then reads forward.

13-44
Manipulating Btrieve Data Files with Maintenance
Example
The following example extracts records from the COURSE.MKD file and writes them into the COURSE.TXT file.
butil -recover course.mkd course.txt
SAVE The SAVE command retrieves records from a MicroKernel file using a specified index path and places them in an ASCII file that is compatible with the required format for the LOAD command. You can then edit the ASCII file and use the LOAD command to store the edited data in another data file. (See “Importing Records From an ASCII File” on page 13-28 for more information about the ASCII file format.)
SAVE generates a single record in the output ASCII file for each record in the input data file. Upon completion, SAVE displays the total number of records saved.
Note The Maintenance utility performs no conversion on the data in the records. Therefore, if you use a text editor to modify an output file containing binary data, be aware that some text editors may change the binary data, causing the results to be unpredictable.
Format
butil -save sourceFile unformattedFile [Y indexFile | N <keyNumber | -1>] [/O<owner1 | *> [/O<owner2 | *>]] [/S] [/Q] [/J] [/I]
sourceFile The fully qualified name of the data file containing the records to save. When you run BUTIL for Windows NT/95/98, you do not need to specify the name of the path if the data file resides in the same directory as your current directory.
unformattedFile The fully qualified name of the ASCII file where you want the utility to store the records.
indexFile The fully qualified name of an external index file by which to save records if you do not want to save records using the default of the lowest key number.
keyNumber The key number (other than 0) by which to save records if you do not want to save records using the default of the lowest key number.

13-45
Importing and Exporting Data
The utility produces the following messages:
! informs you about the name of the last extension file created
! checks if the next extension file exists, and if so, tells you to delete it
-1 The specification for saving the records in physical order using the Btrieve Step operations.
/Oowner1 The owner name for the source file, if required. If only the index file requires an owner name, specify /O followed by a blank for owner1.
/Oowner2 The owner name for the index file, if required.
/S (NetWare only) By default, the Maintenance utility stops at each full screen of output and waits for a keystroke before continuing. With the /S option, the utility continuously scrolls output on the screen. You cannot use /S on the command line if you specify a command file, but you can specify /S with a command inside a command file.
/Q Indicates whether to replace an existing unformatted file. By default, the Maintenance utility overwrites the existing files. If you specify this option and a file with the same name exists, the utility returns an error message.
The utility also checks whether the MicroKernel file to be saved is extended. If the file is extended, the utility checks for files with the same name as the potential unformatted extension files. If one of those files exists, the utility returns an error message.
/J Indicates BACKWARD reading of the file. If you specify this option, the utility recovers data from the MicroKernel file using GET LAST and PREVIOUS operations. The default is forward reading, using GET FIRST and NEXT operations.
/I Indicates FORWARD reading of the file. Although the default is forward reading, you can use this option to indicate FORWARD and BACKWARD reading. This means that if you specify both /I and /J, respectively, the utility reads the file forward until it fails. Then it starts at the end of the file and reads backwards until it reaches the record that failed previously or encounters another failure.
If you specify /J first, the utility reads backwards and then reads forward.

13-46
Manipulating Btrieve Data Files with Maintenance
! if you move the extended unformatted files to a different location, you are prompted to move the base file and all of its extension files
Examples
The following two examples illustrate how to use the SAVE command to retrieve records from a data file.
This example uses a NEWCRS.IDX external index file to retrieve records from the COURSE.MKD file and store them in an unformatted text file called COURSE.TXT:
butil save course.mkd course.txt newcrs.idx
The following example retrieves records from the COURSE.MKD file using key number 3 and stores them in an unformatted text file called COURSE.TXT:
butil -save course.mkd course.txt n 3

13-47
Creating and Modifying Data Files
Creating and Modifying Data Files
This section includes detailed information on creating and modifying data files using the following BUTIL commands: CLONE, CLROWNER, CREATE, DROP, INDEX, SETOWNER, and SINDEX. This section also includes information about removing unused space in a Btrieve data file, which is discussed in “Compacting Btrieve Data Files” on page 13-56.
CLONE The CLONE command creates a new, empty file with the same file specifications as an existing file (including any supplemental indexes, but excluding the owner name). The new data file includes all the defined key characteristics (such as key position, key length, or duplicate key values) contained in the existing file.
The CLONE command ignores all MicroKernel configuration options that affect file statistics (such as “System Data” on page 4-11) except file version. The CLONE command creates a new file using the MicroKernel file version you specify with the Create File Version option.
Table 13-9 Commands to Create and Modify Data Files
Command Description
CLONE Creates a new, empty data file using an existing file’s specifications.
CLROWNER Clears the owner name of a data file.
CREATE Creates a data file.
DROP Drops an index.
INDEX Creates an external index file.
SETOWNER Assigns an owner name to a data file.
SINDEX Creates an index.

13-48
Manipulating Btrieve Data Files with Maintenance
Format
butil -clone outputFile sourceFile [/O<owner | *>] [/S]
Remarks
Btrieve 6.0 and later allows a maximum of 23 key segments in a data file with a page size of 1,024 bytes. Therefore, the CLONE command sets the page size in the new data file to 2,048 bytes if the existing data file contains 24 key segments and has a page size of 1,024 bytes. This occurs if the existing data file has a format earlier than 6.0 and the MicroKernel was not loaded with the Create File Version option (page 4-10) set to 5.x or 6.x.
If you are cloning a pre-7.x file, ensure that the MicroKernel is configured to create the file format version that you want the new file to be. For example, if you want to clone a 6.15 file in 7.x format, ensure that the MicroKernel File Format Version option is set to 7.x.
Note If your source file is in 7.x format and it does not contain system data, your output file will not contain system data, regardless of the MicroKernel configuration. To add system data to an existing file, refer to Getting Started with Pervasive.SQL.
outputFile The fully qualified file name to use for the new, empty data file. When you run BUTIL for Windows NT/95/98, you do not need to specify the name of the path if the data file resides in the same directory as your current directory.
sourceFile The fully qualified file name of the existing data file to replicate.When you run BUTIL for Windows NT/95/98, you do not need to specify the name of the path if the data file resides in the same directory as your current directory.
/Oowner The owner name, if any, for the source data file. The new data file does not have an owner name. See “Owner Names” on page 13-37 for more information.
/S (NetWare only) By default, the Maintenance utility stops at each full screen of output and waits for a keystroke before continuing. With the /S option, the utility continuously scrolls output on the screen. You cannot use /S on the command line if you specify a command file, but you can specify /S with a command inside a command file.

13-49
Creating and Modifying Data Files
If you are trying to recover from receiving Status Code 30 (The file specified is not a MicroKernel file) and you suspect that the header page of the source file might be damaged, try creating the new MicroKernel file using the CREATE command with a description file.
Example
The following command creates the NEWCRS.MKD file by cloning the COURSE.MKD file.
butil -clone newcrs.mkd course.mkd
CLROWNER The CLROWNER command clears the owner name of a MicroKernel file.
Format
butil -clrowner sourceFile </O<owner | *> [/S]
Example
The following command clears the owner name for the TUITION.MKD file. The owner name for the file is Sandy.
butil -clrowner tuition.mkd /OSandy
CREATE The CREATE command generates an empty MicroKernel file using the characteristics you specify in a description file. Before you can use the CREATE command, you must create a description file to specify the new key characteristics. For more information, see Appendix A “Description Files.”
sourceFile The fully qualified file name of the data file. When you run BUTIL for Windows NT/95/98, you do not need to specify the name of the path if the data file resides in the same directory as your current directory.
/Oowner The owner name to clear. See “Owner Names” on page 13-37 for more information.
/S (NetWare only) By default, the Maintenance utility stops at each full screen of output and waits for a keystroke before continuing. With the /S option, the utility continuously scrolls output on the screen. You cannot use /S on the command line if you specify a command file, but you can specify /S with a command inside a command file.
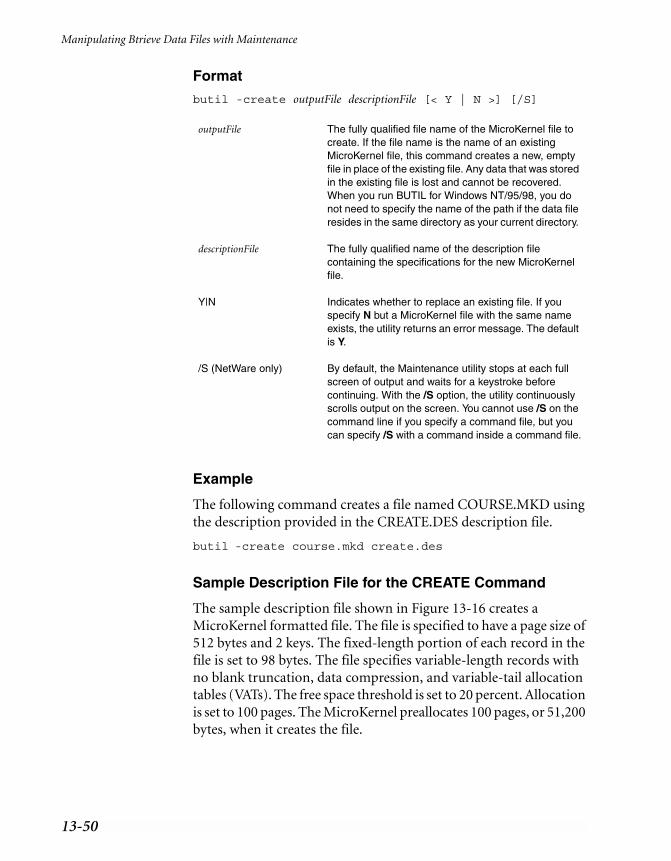
13-50
Manipulating Btrieve Data Files with Maintenance
Format
butil -create outputFile descriptionFile [< Y | N >] [/S]
Example
The following command creates a file named COURSE.MKD using the description provided in the CREATE.DES description file.
butil -create course.mkd create.des
Sample Description File for the CREATE Command
The sample description file shown in Figure 13-16 creates a MicroKernel formatted file. The file is specified to have a page size of 512 bytes and 2 keys. The fixed-length portion of each record in the file is set to 98 bytes. The file specifies variable-length records with no blank truncation, data compression, and variable-tail allocation tables (VATs). The free space threshold is set to 20 percent. Allocation is set to 100 pages. The MicroKernel preallocates 100 pages, or 51,200 bytes, when it creates the file.
outputFile The fully qualified file name of the MicroKernel file to create. If the file name is the name of an existing MicroKernel file, this command creates a new, empty file in place of the existing file. Any data that was stored in the existing file is lost and cannot be recovered. When you run BUTIL for Windows NT/95/98, you do not need to specify the name of the path if the data file resides in the same directory as your current directory.
descriptionFile The fully qualified name of the description file containing the specifications for the new MicroKernel file.
Y|N Indicates whether to replace an existing file. If you specify N but a MicroKernel file with the same name exists, the utility returns an error message. The default is Y.
/S (NetWare only) By default, the Maintenance utility stops at each full screen of output and waits for a keystroke before continuing. With the /S option, the utility continuously scrolls output on the screen. You cannot use /S on the command line if you specify a command file, but you can specify /S with a command inside a command file.
13-51
Creating and Modifying Data Files
Figure 13-16 Sample Description File for the CREATE Command
Key 0 is a segmented key with two duplicatable, nonmodifiable string segments and a null value of 20 hexadecimal (space) specified for both segments. Key 0 uses the collating sequence UPPER.ALT.
Key 1 is a numeric, nonsegmented key that does not allow duplicates but permits modification. It is sorted in descending order.
DROP The DROP command removes an index from a file and adjusts the key numbers of any remaining indexes, subtracting 1 from each subsequent key number. If you do not want to renumber the keys, you can add 128 to the key number you specify to be dropped. This renumbering feature is available only for 6.0 and later files.
Format
butil -drop sourceFile < keyNumber | SYSKEY > [/O<owner | *>] [/S]
record=98 variable=y truncation compress=ykey=2 pate=512 allocation=100 replace=nfthreashold=20 vats=y
position=1 length=5 duplicates=ymodifiable=n type=string alternate=ymullkey=allsegs value=20 segment=y
position=6 length=10 duplicates=ymodifiable=n type=string alternate=ynullkey=allsegs value=20 segment=n
position=16 length=2 duplicates=nmodifiable=y type=numeric descending=yalternate=y nullkey=n segment=n
name=sys:\pvsw\demodata\upper.alt
File Specifications
Key 0Segment 1
Key 0Segment 2
Key 1
sourceFile The fully qualified name of the file from which you are dropping the index. When you run BUTIL for Windows NT/95/98, you do not need to specify the name of the path if the data file resides in the same directory as your current directory.
keyNumber The number of the key to remove. To preserve the original key numbers, add a 128 bias to the key number you specify.

13-52
Manipulating Btrieve Data Files with Maintenance
Examples
In both of the following examples, COURSE.MKD has three keys. The original keys in the file are numbered 0, 1, and 2.
In the first example, the BUTIL -DROP command drops key number 1 from the COURSE.MKD file and renumbers the remaining key numbers as 0 and 1.
butil -drop course.mkd 1
In the following example, the BUTIL –DROP command drops key number 1, but does not renumber the keys. The key numbers remain 0 and 2.
butil -drop course.mkd 129
INDEX The INDEX command builds an external index file for an existing MicroKernel file, based on a field not previously specified as a key in the existing file. Before you can use the INDEX command, you must create a description file to specify the new key characteristics. For more information about description files, see Appendix A “Description Files.”
SYSKEY Instructs the utility to drop the system-defined log key (also called system data). Dropping the system-defined log key does not delete values from the records; the MicroKernel still assigns unique system-defined log key values to newly inserted records.
However, the MicroKernel cannot perform logging for a file from which the system-defined log key is dropped, if no user-defined unique keys exist. For this reason, you should use this option only if you suspect that the system-defined log key is corrupt and you intend to re-add it.
The SINDEX command allows you to re-use the system-defined log key once you have dropped it.
/Oowner The owner name for the file, if required.
/S (NetWare only) By default, the Maintenance utility stops at each full screen of output and waits for a keystroke before continuing. With the /S option, the utility continuously scrolls output on the screen. You cannot use /S on the command line if you specify a command file, but you can specify /S with a command inside a command file.

13-53
Creating and Modifying Data Files
The records in the new file consist of the following:
! The 4-byte address of each record in the existing data file.
! The new key value on which to sort.
Note If the key length you specify in the description file is 10 bytes, the record length of the external index file is 14 bytes (10 plus the 4-byte address).
Format
butil -index sourceFile indexFile descriptionFile [ /O<owner | *>] [/S]
Remarks
The INDEX command creates the external index file and then displays the number of records that were indexed. To retrieve the data file’s records using the external index file, use the SAVE command.
sourceFile The fully qualified name of the existing file for which to build an external index. When you run BUTIL for Windows NT/95/98, you do not need to specify the name of the path if the data file resides in the same directory as your current directory.
indexFile The fully qualified name of the index file in which the MicroKernel should store the external index.
descriptionFile The fully qualified name of the description file you have created containing the new key definition. The description file should contain a definition for each segment of the new key.
/Oowner The owner name for the data file, if required.
/S (NetWare only) By default, the Maintenance utility stops at each full screen of output and waits for a keystroke before continuing. With the /S option, the utility continuously scrolls output on the screen. You cannot use /S on the command line if you specify a command file, but you can specify /S with a command inside a command file.
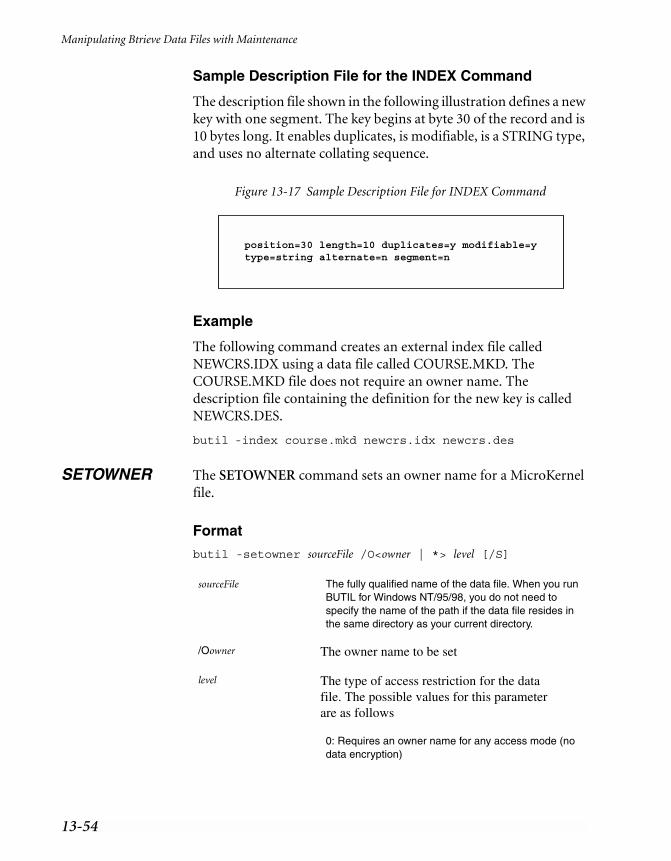
13-54
Manipulating Btrieve Data Files with Maintenance
Sample Description File for the INDEX Command
The description file shown in the following illustration defines a new key with one segment. The key begins at byte 30 of the record and is 10 bytes long. It enables duplicates, is modifiable, is a STRING type, and uses no alternate collating sequence.
Figure 13-17 Sample Description File for INDEX Command
Example
The following command creates an external index file called NEWCRS.IDX using a data file called COURSE.MKD. The COURSE.MKD file does not require an owner name. The description file containing the definition for the new key is called NEWCRS.DES.
butil -index course.mkd newcrs.idx newcrs.des
SETOWNER The SETOWNER command sets an owner name for a MicroKernel file.
Format
butil -setowner sourceFile /O<owner | *> level [/S]
position=30 length=10 duplicates=y modifiable=ytype=string alternate=n segment=n
sourceFile The fully qualified name of the data file. When you run BUTIL for Windows NT/95/98, you do not need to specify the name of the path if the data file resides in the same directory as your current directory.
/Oowner The owner name to be set
level The type of access restriction for the data file. The possible values for this parameter are as follows
0: Requires an owner name for any access mode (no data encryption)

13-55
Creating and Modifying Data Files
Example
The following example creates an owner for the COURSE.MKD file. The owner name is Sandy, and the restriction level is 1.
butil -setowner course.mkd /OSandy 1
SINDEX The SINDEX command creates an additional index for an existing MicroKernel file. By default, the key number of the new index is one higher than the previous highest key number for the data file, or you can instruct the MicroKernel to use a specific key number. An exception is if a DROP command previously removed an index without renumbering the remaining keys, thus producing an unused key number; in this case, the new index receives the first unused number.
You can instruct the MicroKernel to use a specific key number for the new index with the key number option. The key number you specify must be a valid key number that is not yet used in the file. If you specify an invalid key number, you receive Status Code 6.
If you do not use the SYSKEY option with this command, you must create a description file that defines key specifications for the index before you can use the SINDEX command. For more information about description files, see Appendix A “Description Files.”
1: Permits read access without an owner name (no data encryption)
2: Requires an owner name for any access mode (with data encryption)
3: Permits read access without an owner name (with data encryption)
/S (NetWare only) By default, the Maintenance utility stops at each full screen of output and waits for a keystroke before continuing. With the /S option, the utility continuously scrolls output on the screen. You cannot use /S on the command line if you specify a command file, but you can specify /S with a command inside a command file.
13-56
Manipulating Btrieve Data Files with Maintenance
Format
butil -sindex sourceFile <descriptionFile | SYSKEY> [keyNumber] [/O<owner | *>] [/S]
Examples
The following example adds an index to the COURSE.MKD file. The name of the description file is NEWIDX.DES.
butil -sindex course.mkd newidx.des
The following example adds the system-defined key to the COURSE.MKD file. The system-defined key was dropped.
butil -sindex course.mkd syskey
Compacting Btrieve Data Files
You can use several commands in the BUTIL (CLONE, RECOVER, and LOAD, respectively) to remove unused space in a data file to decrease its size.
➤ To compact a Btrieve data file
1 Rename your data file and then use the CLONE option to create a blank data file using the original file name.
2 Use RECOVER to save the data from the clone file to an unformatted text file in sequential order.
sourceFile The fully qualified name of the existing file for which to build an external index. When you run BUTIL for Windows NT/95/98, you do not need to specify the name of the path if the data file resides in the same directory as your current directory.
descriptionFile The fully qualified name of the description file you have created containing the new key definition. The description file should contain a definition for each segment of the new key.
SYSKEY Instructs the utility to re-add the system key on a file in which the system key was dropped.
/Oowner The owner name for the data file, if required.
/S (NetWare only) By default, the Maintenance utility stops at each full screen of output and waits for a keystroke before continuing. With the /S option, the utility continuously scrolls output on the screen. You cannot use /S on the command line if you specify a command file, but you can specify /S with a command inside a command file.

13-57
Creating and Modifying Data Files
3 Use LOAD to load the recovered data into the clone.
Every record containing data will load into the newly created data file without blank records.
Note You can also perform this operation in the Btrieve Interactive Maintenance utility.

13-58
Manipulating Btrieve Data Files with Maintenance
Viewing Data File Statistics
This section includes information about generating a report that contains a data file’s characteristics and statistics using STAT.
STAT The STAT command generates a report that contains defined characteristics of a data file and statistics about the file’s contents. Using the STAT command is a good way to determine if a file can be logged by the MicroKernel’s transaction durability feature. The STAT command reports indexes the same whether they were created by the Create Supplemental Index operation (in Btrieve 6.0 and later) or the Create operation.
Format
butil -stat <sourceFile> [/O<owner | *>] [/S]
Example
The following example reports file statistics for the PATIENTS.DTA file. The data file does not have an owner name.
butil -stat patients.dta
However for NetWare, you must specify the full path such as:
butil -stat sys:\pvsw\demodata\patients.dta.
The following example shows the resulting report:
**************************************************File Statistics for PATIENTS.DTA
File Version = 7.00
sourceFile The fully qualified name of the data file for which to report statistics. For Windows NT, you do not need to specify the name of the path if the data file resides in the same directory as your current directory.
/Oowner The owner name for the data file, if required.
/S (NetWare only) By default, the Maintenance utility stops at each full screen of output and waits for a keystroke before continuing. With the/S option, the utility continuously scrolls output on the screen. You cannot use /S on the command line if you specify a command file, but you can specify /S with a command inside a command file.

13-59
Viewing Data File Statistics
Page Size = 2048Page Preallocation = NoKey Only = NoExtended = No
Total Number of Records = 16Record Length = 104Data Compression = NoVariable Records = No
Available Linked Duplicate Keys = 0Balanced Key = NoLog Key = 1 System Data = NoTotal Number of Keys = 3Total Number of Segments = 4
Key Segment Position Length Type FlagsNull Values* Unique ACS Values0 1 21 20 String MD-- 16 00 2 7 12 String MD-- 16 01 1 1 6 String M-- 16 02 1 83 10 String MD-- 7 0
Alternate Collating Sequence (ACS) List: 0 UPPER
Legend: < = Descending Order D = Duplicates Allowed I = Case Insensitive M = Modifiable R = Repeat Duplicate A = Any Segment (Manual) L = All Segments (Null) * = The values in this column are hexadecimal.?? = Unknown-- = Not Specified
This example shows that the file called PATIENTS.DTA is a 7.0 file. (The version number indicates the earliest Btrieve version that can read the file format.) The file has a page size of 2,048 bytes and has no preallocated pages. This is not a key-only file, nor is it an extended file.

13-60
Manipulating Btrieve Data Files with Maintenance
Sixteen records have been inserted into the file. The file was defined with a record length of 104 bytes, does not use data compression, and does not allow variable-length records.
There are no linked duplicate keys available in the file. The file does not use balanced indexing. The MicroKernel performs logging using Key 1, and the file contains no system-defined data. The file has three keys comprised of four key segments.
Note Indexes created with SINDEX are designated with the letter R by default unless you specified the Reserved Duplicate Pointer element.
The STAT report also provides information about specific keys. For example, the report shows that Key 0 allows duplicates, is modifiable, and consists of two segments:
! The first segment starts in position 21, is 20 characters long, allows duplicates, is modifiable, and will be sorted as a STRING type. The dashes indicate that a null value was not defined. The Unique Values column indicates that 16 unique values were inserted for this segment. This segment uses the UPPER.ALT alternate collating sequence file.
! The second segment starts in position 7, is 12 characters long, allows duplicates, is modifiable, and will be sorted as a STRING type. Sixteen unique values were inserted for this segment. This segment uses the UPPER.ALT alternate collating sequence file.
Key 1 is the key the MicroKernel uses in logging this file. Key 1 consists of one segment. It starts in position 1, is six characters long, does not allow duplicates, is modifiable, and will be sorted as a STRING type. Sixteen unique values were inserted for this key. This key uses the UPPER.ALT alternate collating sequence file.
Key 2 consists of one segment. It starts in position 83, is 10 characters long, allows duplicates, is modifiable, and will be sorted as a STRING type. Seven unique key values were inserted for this key. This key uses the UPPER.ALT alternate collating sequence file.
File Version Notes
When reporting the file format version for a file, the MicroKernel reports the earliest engine version that can read the specified file. For example, you may have a file that was created in Btrieve 5.x format,
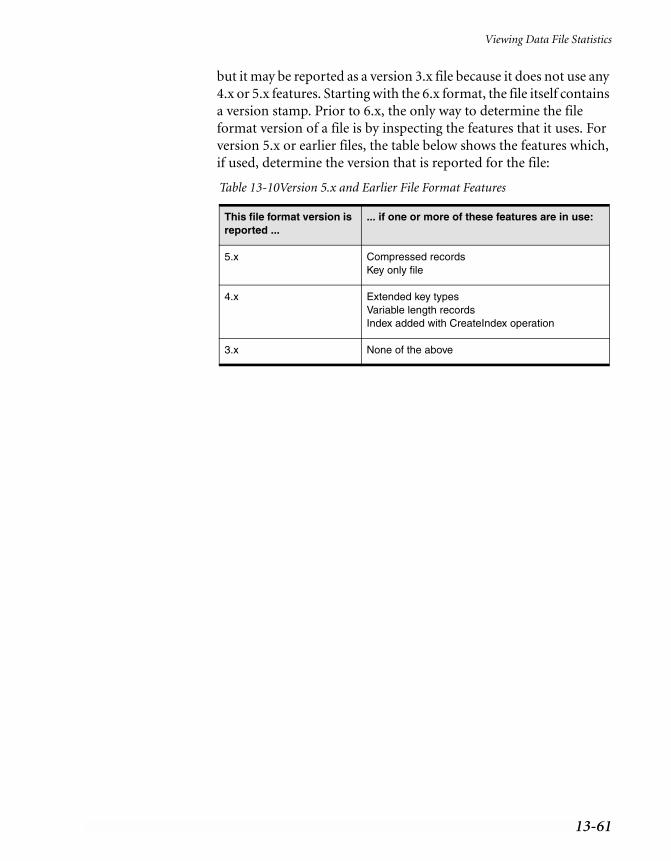
13-61
Viewing Data File Statistics
but it may be reported as a version 3.x file because it does not use any 4.x or 5.x features. Starting with the 6.x format, the file itself contains a version stamp. Prior to 6.x, the only way to determine the file format version of a file is by inspecting the features that it uses. For version 5.x or earlier files, the table below shows the features which, if used, determine the version that is reported for the file:
Table 13-10Version 5.x and Earlier File Format Features
This file format version is reported ...
... if one or more of these features are in use:
5.x Compressed recordsKey only file
4.x Extended key typesVariable length recordsIndex added with CreateIndex operation
3.x None of the above
13-62
Manipulating Btrieve Data Files with Maintenance
Displaying Btrieve Interface Module Version
This section includes detailed information about displaying the version of the Btrieve Interface module using the VER command.
VER The VER command returns the version number of both the MicroKernel and the Btrieve Access Module.
Format
butil -ver [/S]
Remarks
When you run the VER command, the utility displays messages similar to the following:
The Btrieve Requester version is 7.50.The Btrieve Version is 7.50.
/S (NetWare only) By default, the Maintenance utility stops at each full screen of output and waits for a keystroke before continuing. With the /S option, the utility continuously scrolls output on the screen. You cannot use /S on the command line if you specify a command file, but you can specify /S with a command inside a command file.
13-63
Unloading the Btrieve Interface and Requester (DOS only)
Unloading the Btrieve Interface and Requester (DOS only)
STOP Use the STOP command to unload the Btrieve Interface and, if applicable, the requester.
Format
butil -stop

13-64
Manipulating Btrieve Data Files with Maintenance
Performing Continuous Operations
The commands pertaining to continuous operations, startbu and endbu, are discussed in the chapter “Backup and Restore” on page 8-1.

14-1
c h a p t e r
14Converting Pervasive.SQL 2000i Data
Maintaining Pervasive.SQL File Compatibility
Pervasive.SQL 2000i includes several tools that convert old Btrieve and Pervasive.SQL files to be compatible with the latest versions of the Pervasive.SQL engines. This chapter describes those tools, why you might need to use them and how to do so. This chapter includes the following sections:
! “Null Conversion” on page 14-2
! “Converting MicroKernel Data Files” on page 14-5

14-2
Converting Pervasive.SQL 2000i Data
Null Conversion
The Null Conversion Utility adds or removes support for nullable columns in Pervasive.SQL tables. The utility allows users to:
! Convert legacy tables into Pervasive.SQL 2000i format
! Change not-nullable columns to nullable
! Change nullable columns to not-nullable
In Pervasive.SQL 2000i, null values are added as an extra byte to the default record. If you set this extra byte as any value other than zero, it is designated as null. This extra byte can be used to define the index. If a field is not defined as nullable, no extra bytes are added.
Note There are a maximum number of segments allowed per file. In Pervasive.SQL 2000i, true null columns contain two segments per index. Therefore, it is important to keep in mind that defining null values doubles the number of segments used. See the Pervasive.SQL Programmer’s Guide for more information about maximum Btrieve segment sizes.
Note In a case where a user converts an existing table with legacy nulls and the null values differ from the defaults, the Null Conversion utility will allow the user to specify which value(s) should be considered null for each column.
The Null Conversion utility is implemented as a wizard with the Pervasive.SQL Control Center framework.
➤ To convert a table's nullable fields:
1 Open on the Databases namespace node under a machine in the Control Center namespace tree.
2 Right-click on the desired database in the namespace.
3 Select Tasks, then Null Conversion in the shortcut menu.
4 The wizard presents a dialog box in which the user can specify which tables in the database are to undergo null conversion.

14-3
Null Conversion
Figure 14-1 Null Conversion Wizard Dialog Box
Click the check box under the Convert column for those tables that are to be converted. Click Next when done.
5 Next, the wizard presents a dialog box allowing the indication of which fields are currently nullable. These values may be changed at this time.
Figure 14-2 Null Conversion Wizard - Specify Columns for Conversion Dialog Box

14-4
Converting Pervasive.SQL 2000i Data
Note Some data types are not nullable, such as BIT and AUTOINC.
6 Before changes are committed to the database the following dialog box displays the actions that are to be taken.
Figure 14-3 Null Conversion Wizard - Completing Dialog Box
To stop the operation, click Cancel. To continue, click Convert.
7 Finally, the Null Conversion Wizard indicates that the selected tables were converted successfully (not shown).

14-5
Converting MicroKernel Data Files
Converting MicroKernel Data Files
The Rebuild utility is a tool that can convert older Btrieve data files to the current Pervasive.SQL format. While the current engines remain compatible with the older files, there are several reasons for converting the files including support for nullable columns and performance improvements.
The Rebuild utility comes in three forms with Pervasive.SQL 2000i: a 32-bit GUI version for Windows 95/98/NT, a 16-bit GUI version for Windows 3.x and a command-line version that runs as an NLM on NetWare.
The file format that results from the conversion depends on the value set for the MicroKernel's Create File Version configuration option. For example, if the Create File Version value is 7.x then running the Rebuild utility on version 6.x files will result in the rebuilt files being converted to version 7.x format.
Note If your files are already in 7.x format, you do not need to rebuild. Pervasive.SQL 2000i has the same file format as Pervasive.SQL 7.
Before running the Rebuild utility, back up all the data files you plan to convert. Having backup copies ensures against data loss if a power interruption occurs while the utility is running. To ensure that the backup is successful, perform one or more of the following operations:
! Close all data files before running the backup utility.
Table 14-1 Rebuild Utility Conversions
Original File Format
Converted File Format
Reason for Conversion
Pre-7.x 7.x Take advantage of 7.x features and improve general performance.
7.x 7.x Original file does not have a system key.
Pre-6.0 6.x Take advantage of 6.x features and improve general performance. Use this option only if you are still running the 7.x engine with other 6.x engines.
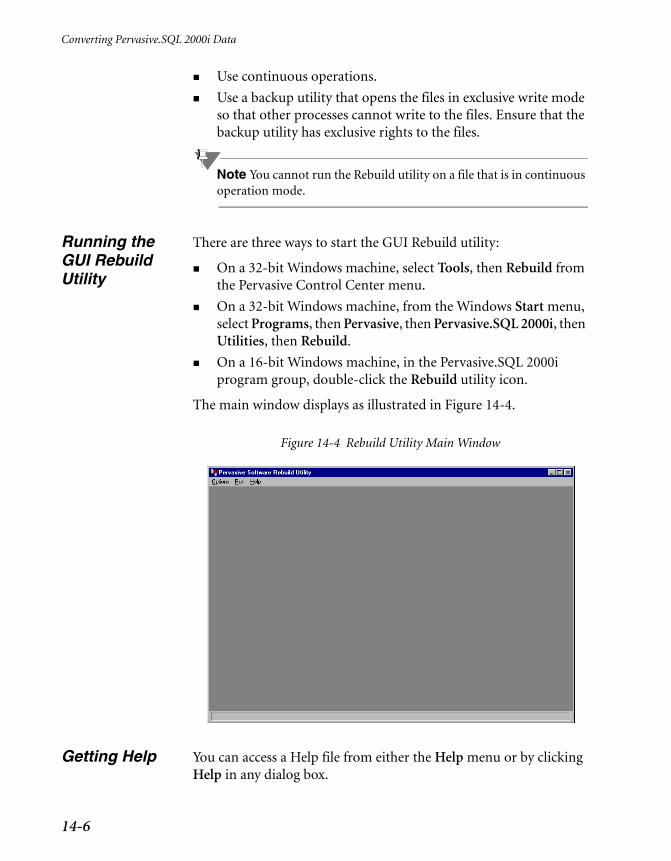
14-6
Converting Pervasive.SQL 2000i Data
! Use continuous operations.
! Use a backup utility that opens the files in exclusive write mode so that other processes cannot write to the files. Ensure that the backup utility has exclusive rights to the files.
Note You cannot run the Rebuild utility on a file that is in continuous operation mode.
Running the GUI Rebuild Utility
There are three ways to start the GUI Rebuild utility:
! On a 32-bit Windows machine, select Tools, then Rebuild from the Pervasive Control Center menu.
! On a 32-bit Windows machine, from the Windows Start menu, select Programs, then Pervasive, then Pervasive.SQL 2000i, then Utilities, then Rebuild.
! On a 16-bit Windows machine, in the Pervasive.SQL 2000i program group, double-click the Rebuild utility icon.
The main window displays as illustrated in Figure 14-4.
Figure 14-4 Rebuild Utility Main Window
Getting Help You can access a Help file from either the Help menu or by clicking Help in any dialog box.

14-7
Converting MicroKernel Data Files
Converting a Data File
➤ To convert a data file:
1 Choose Select Files from the Options menu. The Select Files dialog box appears (Figure 14-5.)
Figure 14-5 Select Files Dialog Box
2 Click Add and select the file you want to rebuild. You can select more than one file to rebuild at a time. Click OK when you have finished adding files to rebuild.
The Rebuild utility deletes the original file after rebuilding it if the file is being rebuilt in the same directory. If the new file is in a different directory, the original file is not deleted.
3 Before you rebuild the file(s), you may want to specify settings. Choose Settings from the Options menu. The Settings dialog box displays as illustrated in Figure 14-6.

14-8
Converting Pervasive.SQL 2000i Data
Figure 14-6 Settings Dialog Box
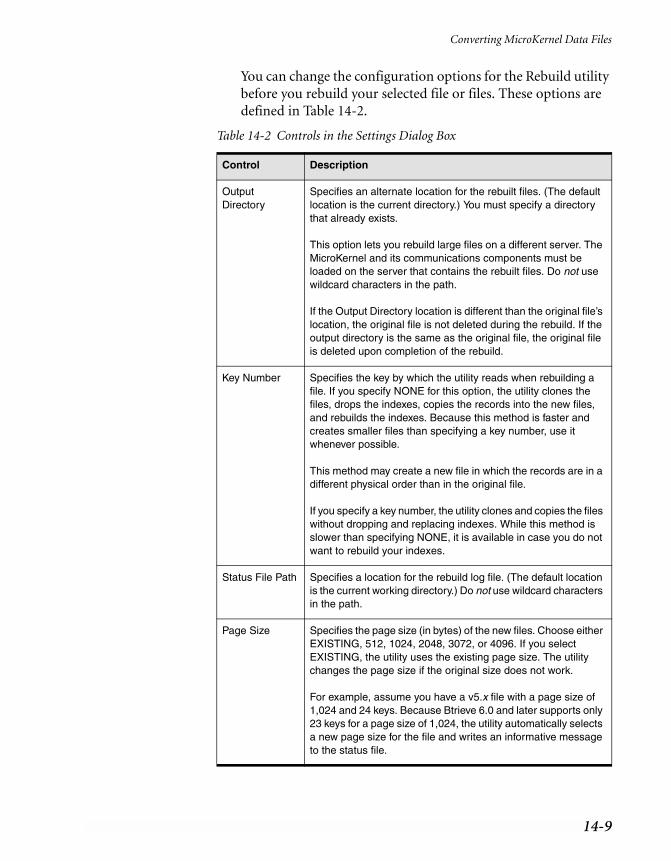
14-9
Converting MicroKernel Data Files
You can change the configuration options for the Rebuild utility before you rebuild your selected file or files. These options are defined in Table 14-2.
Table 14-2 Controls in the Settings Dialog Box
Control Description
Output Directory
Specifies an alternate location for the rebuilt files. (The default location is the current directory.) You must specify a directory that already exists.
This option lets you rebuild large files on a different server. The MicroKernel and its communications components must be loaded on the server that contains the rebuilt files. Do not use wildcard characters in the path.
If the Output Directory location is different than the original file’s location, the original file is not deleted during the rebuild. If the output directory is the same as the original file, the original file is deleted upon completion of the rebuild.
Key Number Specifies the key by which the utility reads when rebuilding a file. If you specify NONE for this option, the utility clones the files, drops the indexes, copies the records into the new files, and rebuilds the indexes. Because this method is faster and creates smaller files than specifying a key number, use it whenever possible.
This method may create a new file in which the records are in a different physical order than in the original file.
If you specify a key number, the utility clones and copies the files without dropping and replacing indexes. While this method is slower than specifying NONE, it is available in case you do not want to rebuild your indexes.
Status File Path Specifies a location for the rebuild log file. (The default location is the current working directory.) Do not use wildcard characters in the path.
Page Size Specifies the page size (in bytes) of the new files. Choose either EXISTING, 512, 1024, 2048, 3072, or 4096. If you select EXISTING, the utility uses the existing page size. The utility changes the page size if the original size does not work.
For example, assume you have a v5.x file with a page size of 1,024 and 24 keys. Because Btrieve 6.0 and later supports only 23 keys for a page size of 1,024, the utility automatically selects a new page size for the file and writes an informative message to the status file.

14-10
Converting Pervasive.SQL 2000i Data
4 After you specify the settings, you need to start the file conversion process. Select Start Rebuild from the Run menu. The Start Rebuild dialog box displays as indicated in Figure 14-7.
Figure 14-7 Start Rebuild Dialog Box
5 Click Start to begin the rebuild process, which converts all of the listed files.
When the process completes, a message dialog box informs of the success or failure of the conversion and prompts you to view the results.
6 Click Close when you have finished converting files.
Continue on Error
Determines whether the Rebuild utility continues if it encounters an error during the rebuild process. If you select Yes, the utility continues with the next file even if an error occurs. The utility notifies you of non-MicroKernel data files or other errors but continues rebuilding data files. If you select No, the utility halts the rebuild if it encounters an error.
This option is useful if you have specified wildcard characters for the rebuilt files.
Save Settings Upon Exit
Saves the current values in this dialog box for use in subsequent Rebuild sessions.
Choose System Data and Key
Specifies whether the file is rebuilt with System Data or System and Key Data. The MicroKernel cannot perform logging for a file without system data when no user-defined unique key exists.
Table 14-2 Controls in the Settings Dialog Box continued
Control Description

14-11
Converting MicroKernel Data Files
7 To display the results, select View Status File from the Run menu. The REBUILD.LOG file is displayed as illustrated in Figure 14-8.
Figure 14-8 Rebuild Log Display
The Rebuild utility writes to the status file for every file it attempts to convert. The log file (REBUILD.LOG by default) is an ASCII text file that is placed by default in the directory in which you run the Rebuild utility from.
You can examine the log file by selecting the View Status File command from the Run menu. The rebuild settings are listed for every file. If you disabled the Continue on Error setting, the status file contains the information up to the point of the error. If the rebuild was not successful, the status file contains error messages explaining why the rebuild failed.

14-12
Converting Pervasive.SQL 2000i Data
Command-Line Rebuild Utility
This section provides detailed instructions for using the command-line Rebuild utility which runs only as an NLM on NetWare.
Note When rebuilding a data file larger than 10MB, BREBUILD.NLM can hog CPU on the NetWare platform. Pervasive recommends that you perform such tasks directly at the file server console when server usage is low.
Running the Rebuild Utility on NetWare
➤ To run the Rebuild utility for NetWare:
1 Run RCONSOLE from a workstation, or go to the server’s console.
2 Enter one of the following commands at the prompt:
LOAD BREBUILD [–option ...] file
or
LOAD BREBUILD @command_file

14-13
Command-Line Rebuild Utility
Changing Con-figuration Op-tions
➤ To change the configuration options for the Rebuild utility for NetWare:
The Option command specifies the configuration options for the utility. Precede each option letter with a dash (–). Do not place a space between the dash and the option letter or between the option letter and its value. You can enter the option letter in either uppercase or lowercase.
–B[path] Specifies an alternate location for the rebuilt files. (The default location is the current directory.) You can also specify a different server with this option. On your local server, you must have the MicroKernel Database Engine and the Message Router loaded. On a remote server, you need the MicroKernel Database Engine and communications components loaded. Do not use wildcard characters in the path you specify.
–C Instructs the utility to continue with the next file even if an error occurs. The utility notifies you of non-MicroKernel data files or other errors but continues rebuilding data files.
This option is useful if you have specified wildcard characters for the rebuilt files.
–D Converts pre-6.0 supplemental indexes (which allow duplicates) to 6.x or 7.x indexes with linked-duplicatable keys. (By default, the utility preserves the indexes as repeating-duplicatable keys.) If you access your data files only through Btrieve and your files have a relatively large number of duplicate keys, you can use this option to enhance the performance of the Get Next and Get Previous operations.
If you are using Scalable SQL to access your data files, do not use the –D option.
–M0 | –M2 Specifies the conversion method, as follows:
–M0 Clones and copies the files without dropping and replacing indexes. While this method is slower than M2, it is available in case you do not want to rebuild your indexes.

14-14
Converting Pervasive.SQL 2000i Data
–M2 (Default) Clones the files, drops the indexes, copies the records into the new files, and rebuilds the indexes. Since this method is faster and creates smaller files than the M0 method, use it whenever possible.
The M2 method may create a new file in which the records are in a different physical order than in the original file.
–P[nnn] Specifies the page size (in bytes) of the new files. If you specify –P with no page size, the utility chooses the optimum page size for your file.
If you do not specify the –P parameter, the utility changes the page size if the original size does not work.
For example, assume you have a v5.x file with a page size of 1024 and 24 keys. Since Btrieve 6.0 and later supports only 23 keys for a page size of 1024, the utility automatically selects a new page size for the file and displays an informative message on the screen.
–K[nn] Specifies the key by which the utility reads when rebuilding a file. If you do not specify this option, the utility reads the file in physical order.
–T Does not preserve the Transaction Tracking System (TTS) bit during conversion. If you specify this option, the utility clears the TTS bit if it was set. If you do not specify this option, the utility sets the TTS bit when creating the new file if the original file had the TTS bit set.

14-15
Command-Line Rebuild Utility
File and @command_file are defined as follows:
The following example places the rebuilt files in a different directory on the server:
LOAD BREBUILD –Bsys:\newfiles –C –P4096 sys:\oldfiles\*.mkd
Viewing the BRE-BUILD.LOG File
After rebuilding your files, check the utility’s log file to see if any errors occurred during the conversion. The BREBUILD.LOG is an ASCII text file, which is placed in the SYS:\SYSTEM directory. You can examine the log file using a text editor.
file Specifies the set of files to convert. Use full directory names, including the volume name. You may use wildcard characters (* and ?) in these file names. The Rebuild utility applies the original file’s owner name and level to the new file.
@command_file Specifies a command file for the utility to execute. You can include multiple entries in one command file. Each entry in the command file contains the utility options (if any) and the set of files to convert, followed by <end> or [end]. When specifying the files to convert, be sure to use full directory names, including the volume name. You can use wildcard characters (* and ?) in these file names.
The following is an example of a Rebuild utility command file:
–C sys:\mydir\*.* <end>–C –P1024 dta:\dir\*.* <end>–M0 –K0 sys:\ssql\*.* <end>

14-16
Converting Pervasive.SQL 2000i Data
Deleting Temporary Files
By default, the Rebuild utility creates temporary files in the same directory in which the conversion takes place. Therefore, you need enough disk space in that directory (while the Rebuild utility is running) to accommodate both the original file and the new file. You can specify a different directory for storing these files using the Output Directory option in the interactive version of the utility or using /B option in the NetWare version.
Normally, the Rebuild utility deletes temporary files when the conversion is complete. However, if a power failure or other serious interruption occurs, the Rebuild utility may not delete the temporary files. If this occurs, look for file names such as _T-xxxxx.TMP and delete them.

A-1
A p p e n d i x
ADescription Files
Using Description Files to Store Btrieve File Information
A description file is an ASCII text file that contains descriptions of file and key specifications that the Maintenance utility can use to create data files and indexes. Some users employ description files as a vehicle for archiving information about the data files they have created. Description files are not the same as DDFs, or Data Dictionary Files, which are used with the SQL Interface and the ODBC Interface.
Description files contain one or more elements. An element consists of a keyword, followed by an equal sign (=), followed by a value (with no space). Each element in a description file corresponds to a particular characteristic of a data file or key specification.
Note Before using description files, you should be familiar with Btrieve fundamentals, such as data compression and index balancing. For information about these topics, refer to the Pervasive.SQL Programmer’s Guide.
This appendix discusses the following topics:
! “Rules for Description Files” on page A-2
! “Description File Examples” on page A-4
! “Description File Elements” on page A-7

A-2
Description Files
Rules for Description Files
Use the following rules when creating a description file.
! Enter elements in either uppercase or lowercase.
! Separate elements from each other with a separator (blank space, tab, or carriage return/line feed), as in the following example:
record=4000
key=24
! Specify the description file elements in the proper order. Table A-1 on page A-7 presents the elements in the appropriate order.
! Address all element dependencies. For example, if you specify nullkey=allsegs in your description file, you must also specify a value for the value= element.
! Define as many keys as you specify with the Key Count element. For example, if you specify key=12, you must define 12 keys in the description file.
! For a key that consists of multiple segments, you must define the following elements for each key segment:
# Key Position
# Key Length
# Duplicate Key Values
# Modifiable Key Values
# Key Type
The Descending Sort Order element is optional for each segment.
! If any key in the file uses an ACS, you must specify an ACS file name, a country ID and code page ID, or an ISR table name. You can include this information as either the last element of the key (applies to current key only) or the last element in the description file (applies to entire data file).
# You can specify only one ACS per key, and you must provide an ACS file name, country ID and code page ID, or an ISR table name. Different keys in the same file can use different types of ACSs; for example, Key 0 can use an ACS file name, and Key 1 can use a country ID and code page ID.

A-3
Rules for Description Files
# Different segments of the same key cannot have different ACSs.
# If you specify an ACS at the end of a description file, it is used as the default ACS. That is, if you specify alternate=y for a given key but do not include an ACS file name, country ID and code page ID, or an ISR table name for that key, the MicroKernel uses the ACS file name, country ID and code page ID, or ISR table name specified at the end of the file.
# If you are creating a new key and you specify alternate=y but you omit the ACS file name, country ID and code page ID, or ISR table name, the MicroKernel does not create the key.
! If a Description File element is optional, you can omit it.
! Make sure the description file contains no text formatting characters. Some word processors embed formatting characters in a text file.

A-4
Description Files
Description File Examples
The sample description files shown in this section describe a data file. This data file has a page size of 512 bytes and 2 keys. The fixed-length portion of the record is 98 bytes long. The file allows variable-length records but does not use blank truncation.
The file uses data compression, allows for Variable-tail Allocation Tables (VATs), and has the free space threshold set to 20 percent. The MicroKernel Database Engine preallocates 100 pages, or 51,200 bytes, when it creates the file. The file has two keys: Key 0 and Key 1. Key 0 is a segmented key with two segments.
In Figure A-1 on page A-4, both keys use the same ACS file name (UPPER.ALT). In Figure A-2 on page A-5, both keys use the same country ID (–1) and code page ID (–1). In Figure A-3 on page A-5, Key 0 and Key 1 use different ACS file names (LOWER.ALT and UPPER.ALT, respectively). In Figure A-4 on page A-5, the file has no keys except the system-defined key used for logging.
Figure A-1 Sample Description File Using Alternate Collating Sequence File Name
record=98 variable=y truncate=n compress=ykey=2 page=512 allocation=100 replace=nfthreshold=20 vats=y
position=1 length=5 duplicates=ymodifiable=n type=string alternate=ynullkey=allsegs value=20 segment=y
position=6 length=10 duplicates=ymodifiable=n type=string alternate=ynullkey=allsegs value=20 segment=n
position=16 length=2 duplicates=nmodifiable=y type=numeric descending=yalternate=y nullkey=n segment=n
name=sys:\pvsw\demodata\upper.alt
FileSpecifications
Key 0Segment 1
Key 0Segment 2
Key 1

A-5
Description File Examples
Figure A-2 Sample Description File Using Alternate Collating Sequence ID
Figure A-3 Sample Description File Using Alternate Collating Sequence File Name
on a Key Segment
Figure A-4 Sample Description File Using System-Defined Key for Logging
record=98 variable=y truncate=n compress=ykey=2 page=512 allocation=100 replace=nfthreshold=20 vats=y
position=1 length=5 duplicates=ymodifiable=n type=string alternate=ynullkey=allsegs value=20 segment=y
position=6 length=10 duplicates=ymodifiable=n type=string alternate=ynullkey=allsegs value=20 segment=n
position=16 length=2 duplicates=nmodifiable=y type=numeric descending=yalternate=y nullkey=n segment=n
countryid=-1 codepageid=-1
FileSpecifications
Key 0Segment 1
Key 0Segment 2
Key 1
record=98 variable=y truncate=n compress=ykey=2 page=512 allocation=100 replace=nfthreshold=20 vats=y
position=1 length=5 duplicates=ymodifiable=n type=string alternate=ynullkey=allsegs value=20 segment=y
position=6 length=10 duplicates=ymodifiable=n type=string alternate=ynullkey=allsegs value=20 segment=n
position=16 length=2 duplicates=nmodifiable=y type=numeric descending=yalternate=y nullkey=n segment=nname=sys:\pvsw\demodata\upper.alt
FileSpecifications
Key 0Segment 1
Key 0Segment 2
Key 1
name=sys:\pvsw\demodata\lower.alt
name=sys:\pvsw\demodata\lower.alt

A-6
Description Files
record=98 variable=y truncate=n compress=ykey=2 page=512 allocation=100 replace=nfthreshold=20 vats=y sysdataonrecord=loggable

A-7
Description File Elements
Description File Elements
Description file elements must appear in a particular order. Table A-1 on page A-7 lists the description file elements in the appropriate order. For each element, the table specifies the required format and the range of acceptable values.
! An asterisk (*) indicates that the element is optional.
! A pound sign (#) indicates that it is not applicable in the current MicroKernel version but is retained for backward compatibility with previous MicroKernel versions.
! A percent sign (%) indicates that the element is applicable only to the current MicroKernel version.
Table A-1 Summary of Description File Elements
Element Keyword and Format Range Comments
File Specification Information
Comment Block* /*. . . . . . . . . . . . */ 5,120 bytes
None.
Record Length record=nnnn 4–4,088 None.
Variable-Length Records
variable=<y|n> N/A Not applicable to key-only files.
Reserved Duplicate Pointer*
dupkey=<nnn> 0–119 Applicable only to files for which you plan to add linked-duplicatable keys.
Blank Truncation*
truncate=<y|n> N/A Not applicable for files that use data compression.
Data Compression*
compress=<y|n> N/A Not applicable to key-only files.
Key Count key=nnn 0–119 Specify 0 to create a data-only file.
Page Size page=nnnn 512–4,096 Must be a multiple of 512.

A-8
Description Files
Page Preallocation*
allocation=nnnnn 1–65,535 None.
Replace Existing File*#
replace=<y|n> N/A None.
Include Data* data=<y|n> N/A Specify n to create a key-only file. Cannot create a key-only file that both allows duplicates and uses a system-defined key.
Free Space Threshold*
fthreshold=<5|10|20|30> N/A Applicable only for files that have variable-length records. The default is 5.
Variable-Tail Allocation Tables (VATs)
huge=<y|n> #vats=<y|n>
N/A Applicable only for files that have variable-length records.
Balanced Index* balance=<y|n> N/A None.
Use Key Number *
usekeynum=<y|n> N/A Used with the Key Number element.
1Use System Data*%
sysdataonrecord=<n|loggable>
N/A If no element specified, MicroKernel configuration is used. If creating a key-only file, MicroKernel configuration is used and this element is ignored. Also, you cannot create a key-only file that both allows duplicates and uses a system-defined key.
Table A-1 Summary of Description File Elements continued
Element Keyword and Format Range Comments

A-9
Description File Elements
Key Specification Information
Key Number * keynum=nnnn 0–118 Must be unique to the file, specified in ascending order, and valid for the file’s Page Size. Applicable only when creating a file.
Key Position position=nnnn 1–4,088 Cannot exceed the Record Length.
Key Length length=nnn key type limit
Cannot exceed the limit dictated by the Key Type. For binary keys, the key length must be an even number. The total of the Key Position and Key Length cannot exceed the file’s Record Length.
Duplicate Key Values
duplicates=<y|n> N/A Cannot create a key-only file that allows duplicates and uses a system-defined key.
Modifiable Key Values
modifiable=<y|n> N/A None.
Key Type type=validMKDEKeyType
N/A Can enter the entire word (as in float) or just the first three letters (as in flo).
Descending Sort Order*
descending=<y|n> N/A None.
Table A-1 Summary of Description File Elements continued
Element Keyword and Format Range Comments

A-10
Description Files
Alternate Collating Sequence
alternate=<y|n> N/A Applicable only for case sensitive STRING, LSTRING, or ZSTRING keys. When creating an additional index for an existing file, if you want the index to use an ACS other than the first one in the data file, use with caseinsensitive=y.
Case-Insensitive Key*
caseinsensitive=<y|n> N/A Applicable only for STRING, LSTRING, or ZSTRING keys that do not use an ACS.
Repeating Duplicates*
repeatdup=<y|n> N/A If creating a key-only file, use repeating duplicates. If using this element, you must use duplicates=y.
Null Segments* nullkey=<allsegs | n | anyseg |>
N/A None.
Null Key Value value=nn 1-byte hex Used with the Null Segments element.
Segmented Key segment=<y|n> N/A None.
Alternate Collating Sequence File Name/ID
name=sequenceFile or countryid=nnn and codepageid=nnnisr=table name (%)
valid path or values valid to operating system or –1
Used with the Alternate Collating Sequence element.
1 When the MicroKernel adds a system key, the resulting records may be toolarge to fit in the file’s existing page size. In such cases, the MicroKernel auto-matically increases the file’s page size to the next accommodating size.
Table A-1 Summary of Description File Elements continued
Element Keyword and Format Range Comments

Index 1
Index
Symbols~PVSW~.LOG file 9-9
Numerics116 9-76.x attributes, showing in File Information Editor
13-8
AAccelerated
DSN open mode 5-6file open mode used by LOAD command 13-41
Accept Remote Request 4-2Active
files, monitoring 10-6Active Clients configuration parameter 4-2Adding
a new engine
turn off Gateway Durability 9-7Address space, common 2-2Allocate Resources at Startup configuration
parameter 3-13, 4-19All-segment null keys
Btrieve Maintenance utility and 13-11description files and A-10
Alternate collating sequence
Btrieve Maintenance utility and 13-11, 13-12, 13-17
description files and A-2, A-4Any-segment null keys
Btrieve Maintenance utility and 13-11description files and A-10
Applications
configuration scenarios 9-1Architecture of Smart Components 2-1, 2-2Archival logging
definition of 1-9, 8-2disk I/O and 3-18file backups and 8-4referential integrity and 8-7transaction durability and 8-2
Archival Logging Selected Files configuration
parameter 4-11Array fetch 5-7ArrayBufferSize connection string 5-10ArrayFetchOn connection string 5-10ASCII data file format
Btrieve Maintenance utility and 13-27BUTIL and 13-27
Asynchronous I/O 2-5Atomicity, transaction
not guaranteed with multiple engines 4-14Authentication 4-2
Server engine vs. Workgroup 9-4Auto Reconnect Timeout configuration parameter
4-7Auto-reconnect, see Pervasive auto-reconnect
Available Linked Keys
Btrieve Maintenance utility and 13-9
BBack to Minimal State if Inactive configuration
parameter 3-14, 4-20Backing up
a database, and BUTIL 8-15data files 8-1
Backup and restore 8-1Binding
rule in Smart Components 2-16to Smart Components 2-16
Blank truncation
Btrieve Maintenance utility and 13-9description files and A-7
Bound Database Names, creating 5-13Brebuild.nlm
may hog CPU 14-12Brouter Communication Buffer Size configuration
parameter 4-5Btrieve Command-Line Maintenance utility. See
BUTIL
Btrieve Interface Module, displaying version 13-62

2 Index
Btrieve Maintenance utility
about 13-3creating a file 13-14extended files and 13-7menu options 13-5online help 13-5starting 13-4
Btrieve owner names, see Owner names
Buffers
editing key and data 11-13Building external index files, and BUTIL 13-52BUTIL 12-7
about 13-32ASCII files 13-27backing up databases 8-14command files 13-35command files rules 13-35commands
CLONE 13-47CLROWNER 13-49COPY 13-39CREATE 13-49DROP 13-51ENDBU 8-17, 13-64INDEX 13-52LOAD 13-40overview 13-32RECOVER 13-42ROLLFWD 8-8, 13-27SAVE 13-44SETOWNER 13-54SINDEX 13-55STARTBU 8-15, 13-64STAT 13-58STOP 13-63VER 13-62
creating and modifying data files 13-47displaying Btrieve interface module version 13-
62extended file support 13-36importing and exporting data 13-39, 13-64overview 13-32owner names 13-37recovering changes after system failure 8-4redirecting error messages 13-37
starting and stopping continuous operation 8-14, 8-15
syntax 13-35unloading the Btrieve engine 13-63viewing command syntax 13-33
Byte offset versus byte position 12-9
CCache
database
data pages and 3-16how to calculate ideal size 3-15
physical memory and 3-15Cache Allocation Size configuration parameter 3-16Cascade rule 6-3Case sensitivity in keys
Btrieve Maintenance utility and 13-12description files and A-10
Changing
gateway engine across multiple data directories 9-8
named databases 5-12, 5-15Character translation
OEM to ANSI 5-8Characters
valid in object names 5-2Check database function 12-15Checking
client and server versions at load time 2-2Clearing owner names
and BUTIL 13-49Btrieve Maintenance utility and 13-20
Client DSN
options 5-7Client version
server and, checking compatibility 2-2Clients
optimizing support for multiple 3-19CLONE command 13-47CLROWNER command 13-49COLLATE.CFG file 13-18Collating sequence 13-17Column definitions
deducing from data file 12-1Column name
limits 5-2

Index 3
maximum length 5-2valid characters 5-2
Command files
BUTIL and 13-35rules 13-35
Command-line utilities, see BUTIL and SQLUTIL
Comments
in description files A-7Common address space 2-2Communication Buffer Size configuration
parameter 4-5Communications
auto-reconnect feature 2-23monitoring
MicroKernel 10-14Communications Threads configuration parameter
3-19, 4-22Monitor and 3-10
Compacting data files
and Btrieve Maintenance utility 13-16and BUTIL 13-56
Component IDs 2-13Components
load order of engine components 2-16Components, Smart See Smart Components
Compress IDS Data configuration parameter 4-34Compressing data files
Btrieve Maintenance utility and 13-9description files and A-7
Configuration
client and restricted users 3-7client and Windows 2000 3-7delay in, eliminating 3-5local and remote connections 3-4named databases 5-12optimizing 3-9overview 3-5settings ordered by default view 3-8
Configuration file 4-3Configuration parameters
client
Compress IDS Data 4-34Embedded Spaces 4-35Enable Auto Reconnect 4-33Gateway Durability 4-31IDS Password 4-34
IDS Username 4-35Number of Load Retries 4-31Runtime Server Support 4-35Splash Screen 4-36Supported Protocols 4-33Target Engine 4-31TCP/IP Timeout for Communication
Requester 4-34Use IDS 4-32Use Local MicroKernel Engine 4-32Use Remote MicroKernel Engine 4-32
Monitor and 3-9server
Access 4-2Active Clients 4-2Allocate Resources at Startup 4-19Archival Logging Selected Files 4-11Authentication 4-2Auto Reconnect Timeout 4-7Back to Minimal State if Inactive 4-20Brouter Communication Buffer Size 4-5Cache Allocation Size 4-22Communication Buffer Size 4-5Communications Threads 4-22Create File Version 4-10DBNames Configuration Location 4-18Enable Auto Reconnect 4-7Extended Operations Buffer Size 4-20Index Balancing 4-23Initiation Time Limit 4-12Largest Compressed Record Size 4-23Listen IP Address 4-8Load Brouter 4-3Log Buffer Size 4-24Logical File Handles 4-3Maximum Databases 4-4Maximum Open Files 4-4Minimal State of Delay 4-20MKDE Communication Buffer Size 4-6NetBIOS Port 4-8Number of Bytes from Data Buffer 4-15Number of Bytes from Key Buffer 4-16Number of I/O Threads 4-24Number of Sessions 4-4Number of Worker Threads 4-25

4 Index
ODBC Connection Manager Supported
Protocol 4-8Operation Bundle Limit 4-12Read Buffer Size 4-6Receive Packet Size 4-7Runtime Server Support 4-26Select Operations 4-16Sort Buffer Size 4-21Supported Protocols 4-8System Cache 4-21System Data 4-11TCP/IP Multihomed 4-9TCP/IP Port 4-10Trace File Location 4-17Trace Operation 4-18Transaction Durability 4-12Transaction Log Directory 4-19Transaction Log Size 4-25Use SAP 4-10Wait Lock Timeout 4-15Working Directory 4-19
Configuration Utility 3-2Configuring
application scenarios 9-1Connecting
to workgroup, eliminating delay 9-6Connection delay
how to minimize 3-11troubleshooting for Workgroup 9-6
Connection strings 5-9OPENMODE 5-5TRANSLATIONDLL 5-8
Connection timeout 4-34Continuous Operations
definition of 1-9, 8-2ending 8-14SQLUTIL and 8-20starting 8-14starting with BUTIL 8-15stopping with ENDBU 8-17transaction durability and 8-2
Conversion
OEM/ANSI 5-8Converting
data files 14-5with command-line Rebuild utility 14-13
with interactive Rebuild utility 14-7COPY command
BUTIL and 13-39Copying records between files 13-31CREATE command 13-49Create File Version 4-10Creating
Bound Database names 5-13DDFs for Btrieve files 12-1files
Btrieve Maintenance utility and 13-14BUTIL and 13-49
indexes
about 13-24additional with BUTIL 13-55
primary key 6-6, 6-8redirecting Gateway Locator File 9-10table definitions for Btrieve files 12-1users and groups 7-4
DDamaged files, recovering
BUTIL and 13-42Data
copying data from one MicroKernel file to
another 13-31encryption on disk 7-7exporting ASCII data 13-29importing ASCII data 13-28recovering changes to a data file 13-31
Data buffer
editing 11-13Data compression
Btrieve Maintenance utility and 13-9description files and A-7
Data files
adding relational access to Btrieve 12-1byte offset versus byte position 12-9compacting with Btrieve Maintenance utility 13-
16compacting with BUTIL 13-56converting
with command-line Rebuild utility 14-13with interactive Rebuild utility 14-7
copying with BUTIL 13-39creating 13-47

Index 5
creating with BUTIL 13-47decreasing size of with Btrieve Maintenance
utility 13-16decreasing size of with BUTIL 13-56generate statistics report 13-22
Data integrity
not guaranteed with multiple engines 4-14Data manipulation
exporting data 14-16Data pages
cache and 3-16Data types
description files and A-9NULL 13-12
Database cache
data pages and 3-16how to calculate ideal size 3-15physical memory and 3-15
Database definition
how to verify 12-15Database name
adding 5-13changing 5-15deleting 5-16limits 5-2maximum length 5-2modifying 5-15valid characters 5-2
Database names
deleting 5-16Databases
maintaining named 5-12Data-only files A-7DBNames Configuration Location 4-18DBQ connection string 5-9Decreasing data file size
with Btrieve Maintenance utility 13-16with BUTIL 13-56
Delay
in Configuration, eliminating 3-5Delay, connection
how to minimize
3-11troubleshooting for Workgroup 9-6
Delete rule 6-2
Deleting
named databases 5-12, 5-16Delimited identifier
definition of 5-2Delta files 1-9, 8-2Descending sort order in keys 13-12, A-9Description files
adding comments to 13-15Btrieve Maintenance utility and 13-14BUTIL and 13-36format A-1
Diagnosing module load errors 2-21Discrete ordering
null value 13-12Disk I/O
archival logging and 3-18how to minimize 3-17transaction durability and 3-18
DLLs
load order of engine components 2-16Double quote
representing within a delimited name 5-2required for some identifiers 5-2
DROP command 13-51Dropping indexes
Btrieve Maintenance utility and 13-26BUTIL and 13-51
DSN
client options 5-7open modes 5-5
DTI, and Pervasive auto-reconnect 2-24DTO, and Pervasive auto-reconnect 2-24Duplicate keys 13-11, A-9Durability
gateway
eliminating delay upon connection to
Workgroup 9-6Dynamic binding 2-16
EEditor
File Information 13-7Elements in description files A-7Embedded spaces
Registry setting for 13-4Embedded Spaces configuration parameter 4-35

6 Index
Enable array fetch 5-7Enable Auto Reconnect configuration parameter 4-
7, 4-33Enabling
security 7-4Encryption
of data files 7-7ENDBU command 13-64
and continuous operation 8-15, 8-18BUTIL and 8-17SQLUTIL and 8-20
Ending Continuous Operations 8-14Engine
Pervasive.SQL 2-2Engine components
version is different than clients - message 2-2Engine DSN
open modes 5-5Engine options, configuring
overview 3-8Error Code Clarification, about 2-20Error messages, redirecting with BUTIL 13-37Errors, load 2-21Event logging 2-18Exclusive
DSN open mode 5-6Exporting data 14-16
and BUTIL 13-39, 13-44, 13-64ASCII file format 13-27Btrieve Maintenance utility and 13-29
Extended files
Btrieve Maintenance utility and 13-7BUTIL and 13-36
Extended Operations Buffer Size configuration
parameter 4-20External
index files
Btrieve Maintenance utility and 13-25BUTIL and 13-52
FFile Information Editor 13-7
Data File Info
Owner Name 13-8Total Records 13-8Version 13-8
Elements
Create File 13-7Description Comments 13-8File Specification 13-8
13-8Help 13-8Load Information 13-7Set to Default 13-7Show 6.x Attributes 13-8
File Specification
13-8# Pages 13-9% Free Space 13-10Available Linked Keys 13-9Balanced Indexing 13-9Blank Truncation 13-9Data Compression 13-9Include VATs 13-10Key-Only 13-9Preallocation 13-9Record Length 13-8Variable Records 13-9
Key
ACS Information 13-11All Segments 13-11Any Segment 13-11Duplicates 13-11Modifiable 13-11Null Key 13-11Repeating Duplicates 13-11Sparse Key 13-11Unique Values 13-11
Key Segment
Case Insensitive 13-12Data Types 13-12Descending 13-12Length 13-12Null Value 13-12Position 13-12Use ACS 13-12
Tasks
Add comments to a description file 13-15Compact a Btrieve file 13-16Create a new file 13-14Display 6.x-specific controls 13-17Load information from an existing file 13-13

Index 7
Specify a key’s alternate collating sequence 13-18
File size, maximum 13-3Files
ASCII 13-27backing up 8-4creating 13-14deleting temporary 14-16delta 1-9, 8-2description 13-14, A-1extended
Btrieve Maintenance utility and 13-7BUTIL and 13-36
external index 13-25, 13-52optimizing support for multiple 3-19rebuilding
may hog CPU on NetWare 14-12specifications
Btrieve Maintenance utility and 13-8description files and A-7
Files names, long 13-4Foreign key
adding to existing table 6-8creating in a table 6-8definition of 6-3
Free space threshold
Btrieve Maintenance utility and 13-10description files and A-8
Function Executor utility
overview 11-1performing operations 11-13starting 11-3starting the 16-bit utility 11-9
GGateway durability 9-6
restricted users and 3-7turn off when adding a new engine 9-7Windows 2000 and 3-7
Gateway Durability configuration parameter 4-31Gateway engine
changing for multiple directories at once 9-8see also Workgroup engine
Gateway Locator File 9-8redirecting 9-9
creating a 9-10
GRANT
Master user must grant self access if owner name
set on file 7-6owner names and 7-6
Group
cannot be a member of another group 7-5Groups and users
restrictions 7-5
HHandles
monitoring 10-9How
to add or remove network protocol support 4-8, 4-33
to allow or prohibit embedded spaces in data file
names 4-35to calculate ideal size of database cache 3-15to change
amount of memory used for database cache 4-22
amount of memory used for sorting during
creation of indexes 4-21amount of time a client and server try to re-
connect 4-7amount of time the engine waits for a lock to
release 4-15directory where the engine stores temporary
files 4-19how long the engine waits before returning to
minimal state 4-20location of DBNames configuration file 4-18location of transaction log 4-19NetBIOS port used by the server 4-8number of operations required to start a
system transaction 4-12number of threads available for client requests
4-22number of times the client attempts to
connect 4-31number of worker threads 4-24size of the log buffer 4-24time limit for starting a system transaction 4-
12to decrease time required to find a Gateway
engine using gateway durability 4-31

8 Index
to determine amount of physical memory needed 3-16
to ensure
transaction atomicity 4-12transaction durability 4-12
to find performance bottlenecks with Monitor 3-9
to increase performance on read operations by
using index balancing 4-23to limit
number of client sessions allowed 4-4size of transaction log segments 4-25
to make the client use a remote database engine 4-32
to make the client use the local engine 4-32to make the engine release resources if inactive 4-
20to minimize
disk I/O 3-17to minimize client/server connection delay 3-11to prevent
a Server or Workgroup engine from accepting
remote requests 4-2the Pervasive splash screen from appearing 4-
36to set default file format version for file creation
4-10to specify
the TCP/IP port that the ODBC
Communications Manager uses 4-10whether a client and server attempt to
reconnect after a network interruption 4-7
whether the engine should use the system
cache 4-21to turn on Archival Logging 4-11
II/O
asynchronous 2-5Identifier
definition of 5-2delimited 5-2limits and restrictions 5-2regular 5-2uniqueness requirements 5-3
Identifying Smart Components 2-13IDS Password configuration parameter 4-34IDS Username configuration parameter 4-35Importing data
and BUTIL 13-39, 13-40, 13-64ASCII file format 13-27
Index balancing
Btrieve Maintenance utility and 13-9description files and A-8
Index Balancing configuration parameter 3-18, 4-23INDEX command
BUTIL and 13-52Indexes
creating 13-24creating and dropping 13-24creating with BUTIL 13-55dropping 13-26primary keys and 6-6viewing in the Btrieve Maintenance utility 13-8
Initiation Time Limit configuration parameter 4-12Integrity
not guaranteed with multiple engines 4-14Interactive Btrieve Maintenance utility. See Btrieve
Maintenance utility
KKey
attributes 13-11, A-9buffer
editing 11-13cannot contain a null column 6-6foreign
adding to existing table 6-8creating in a table 6-8definition of 6-3
numbers A-9primary
adding to existing table 6-6creating in a table 6-6definition of 6-2
segment specifications 13-12, A-10Key-only files
Btrieve Maintenance utility and 13-9description files and A-8

Index 9
LLarge files. See Extended files
Largest Compressed Record Size configuration
parameter 4-23Length
max length of names 5-2Limitations
users and groups 7-5Linked-duplicatable keys. See Duplicate keys 13-11Load brouter configuration parameter 4-3LOAD command
accelerated file open mode and 13-41BUTIL and 13-40
Load errors, diagnosing 2-21Load order of engine DLLs 2-16Loading Smart Components 2-16Local configuration setting
see Use Local MicroKernel Engine
Local connection, configuring 3-4Locator Files, see Gateway Locator Files
Locking
row level 2-2Locks, see Locking
Log Buffer Size
transaction durability and 4-14Log Buffer Size configuration parameter 3-18, 4-24Logging
archival
referential integrity and 8-7performance and 3-17Pervasive.SQL events 2-18transaction durability and archival logging 8-2
Logical File Handles configuration parameter 4-3Long file names 13-4
Registry setting for embedded spaces 13-4
MMaintain Named Databases 5-12Maintenance utility. See Btrieve Maintenance utility,
BUTIL, and SQLUTIL
Master user 7-4must grant self access if owner name set on file 7-
6MaxCache, definition of 3-16Maximum
file size 13-3
length of column or table names 5-2Maximum Databases configuration parameter 4-4Maximum Open Files configuration parameter 4-4Memory
common address space architecture 2-2database cache and 3-15determining amount needed 3-16
MicroKernel
common address space with SRDE 2-2monitoring 10-13monitoring resources 10-6overview of 2-3
MicroKernel message log. See Pervasive.SQL event
log.
MicroKernel tracing
performance and 3-19Minimal State of Delay configuration parameter 4-
20Minimizing
disk I/O 3-17MKDE Communication Buffer Size configuration
parameter 4-6Modes
DSN open 5-5Modifiable keys 13-11, A-9Modifying
named databases 5-12Module load errors, diagnosing 2-21Monitor
Communications Threads and 3-10configuration parameters and 3-9finding performance bottlenecks with 3-9how to identify performance problems 3-10Number of Sessions and 3-10Number of Worker Threads and 3-10overview 10-2terminating a user connection 10-13
Monitor utility
See Monitoring
Monitoring 10-18active files 10-6handles 10-9MicroKernel communications 10-14MicroKernel resources 10-6, 10-13SQL interface resources 10-18user information 10-10

10 Index
Multiple clients
optimizing support for 3-19Multiple files
optimizing support for 3-19
NNamed databases
adding 5-13deleting 5-16modifying 5-15, 5-16
Names
case-insensitivity of 5-2limits and restrictions for object names 5-2maximum length 5-2uniqueness requirements 5-3valid characters 5-2
Naming
extended file 13-3Naming of Smart Components 2-14NetBIOS
not used by Server engine 9-4NetBIOS Port configuration parameter 4-8NetWare
brebuild.nlm may hog CPU 14-12Network
auto-reconnect feature 2-23ports used 4-10, 5-7
Network connection timeout 4-34Normal
DSN open mode 5-5NULL
data type 13-12Null
conversion 14-2indicator byte 12-9keys 13-11, A-10not allowed in a key column 6-6
Null value discrete ordering 13-12Number of Bytes from Data Buffer configuration
parameter 4-15Number of Bytes from Key Buffer configuration
parameter 4-16Number of Input/Output Threads configuration
parameter 3-20, 4-24Number of Load Retries configuration parameter 4-
31
Number of Sessions configuration parameter 4-4Monitor and 3-10
Number of Worker Threads configuration parameter 4-25
Monitor and 3-10
OODBC
Connection strings 5-9security 7-4TCP/IP port number 5-7Workgroup cannot receive remote ODBC
requests 9-5ODBC Connection Mgr Supported Protocol 4-8ODBC tracing
performance and 3-19OEM to ANSI
character translation 5-8connection string 5-8
Open modes 5-5OPENMODE connection string 5-10Operation Bundle Limit 4-12Operations, performing with Function Executor 11-
13Optimizing
database configuration 3-9read-heavy databases 3-18
Options
client DSN 5-7configuration, ordered by default view 3-8
Owner names
BUTIL and 13-20, 13-37, 13-54clearing with BUTIL 13-49GRANT syntax and 7-6Master user must grant self access 7-6relational security and 7-6REVOKE syntax and 7-6setting and clearing 13-20setting with BUTIL 13-54Tasks
Set or clear an owner name 13-20
PPage
preallocation
Btrieve Maintenance utility and 13-9

Index 11
description files and A-8sizes
Btrieve Maintenance utility and 13-8description files and A-7
PAR file 2-23PARC, see Pervasive auto-reconnect
Password
for Master user 7-4Performance
logging and 3-17tuning 3-9
Permissions
user permissions overriden by group permissions 7-5
Pervasive 2-2Pervasive auto-reconnect
defined 2-23Pervasive Control Center
OEM characters and 5-8Pervasive.SQL
engine 2-2event log
field descriptions 2-18file location 2-18overview 2-18
Platform codes in Smart Component naming 2-15Port number
TCP/IP ODBC 5-7Ports
TCP/IP 4-10, 5-7Primary key
adding to existing table 6-6creating in a table 6-6definition of 6-2
PVSW.LOG
client and server compatibility 2-2file 2-18
PWD connection string 5-10
RRead Buffer Size configuration parameter 4-6Read-only
DSN open mode 5-6Rebuild
may hog CPU on NetWare 14-12
Rebuild utility
command line options 14-13deleting temporary files 14-16examples for NetWare 14-15running on NetWare 14-12settings 14-9
Rebuilding files
may hog CPU on NetWare 14-12Receive Packet Size configuration parameter 4-7Record length
Btrieve Maintenance utility and 13-8description files and A-7
Records
building a table definition 12-1byte offset versus byte position 12-9copying between data files 13-31exporting
Btrieve Maintenance utility and 13-29BUTIL and 13-44
importing
Btrieve Maintenance utility and 13-28BUTIL and 13-40
variable-length
Btrieve Maintenance utility and 13-9description files and A-7structure 12-12
RECOVER command 13-42Recovering
changes
and BUTIL 8-4damaged files
Btrieve 13-42data 13-31
Redirecting Locator File, see Gateway Locator File
Referential integrity
archival logging and 8-7cascade 6-3definition of 6-2delete rule 6-2foreign key 6-3primary key 6-2restrict 6-3rule, definition of 6-2update rule 6-2
Registry setting for embedded spaces 13-4

12 Index
Regular identifier
definition of 5-2Relational architecture
client 2-8server 2-7 to 2-8workstation 2-9
Relational security 7-4owner names and 7-6
Remote
connection, configuring 3-4Repeating-duplicatable keys
Btrieve Maintenance utility and 13-11description files and A-10
Requester configuration parameter, see Use Remote
MicroKernel Engine
Resources, monitoring
MicroKernel 10-13Restore and backup 8-1Restoring data files 8-1Restrict rule 6-3Restricted users
client configuration and 3-7Restrictions
users and groups 7-5REVOKE
owner names and 7-6ROLLFWD command 13-27
BUTIL and 8-8file backups and 8-4
Row level locking 2-2Rules
cascade 6-3delete 6-2restrict 6-3update 6-2
Runtime Server Support configuration parameter 4-26, 4-35
SSAR file 2-23SAVE command
BUTIL and 13-44Scope
unique object names, of 5-3Search algorithm for Smart Components 2-16
Security
enabling 7-4encryption of data files 7-7password of Master user 7-4relational 7-4turning on 7-4
Segments in keys 13-12, A-10Select Operations configuration parameter 4-16Server
differences from Workgroup 9-4Server engine
asynchronous I/O and 2-5optimizing performance 3-9
Server version
client and, checking compatibility 2-2ServerDSN connection string 5-10ServerName connection string 5-10Services DLL in Smart Components 2-16SET SECURITY
cannot use in PCC 7-4SETOWNER command 13-54Setting
Monitor Utility Options 10-5owner names
about 13-54Btrieve Maintenance utility and 13-20BUTIL and 13-54
Settings
ordered by default view 3-8Setup utility. See Configuration
SINDEX command 13-55Size
maximum for data files 13-3Smart Components
dynamic binding 2-16identifying 2-13naming 2-14
component type codes 2-15platform codes 2-15
search algorithm 2-16Services DLL 2-16
Sort Buffer Size configuration parameter 4-21Sort order in keys
Btrieve Maintenance utility and 13-12description files and A-9
Sparse key 13-11

Index 13
Splash Screen 4-36SPX connection timeout 4-34SQL
security 7-4SQL Data Manager
check database function 12-15OEM characters and 5-8
SQL Interface Resources
Monitoring 10-18SQL Relational Database Engine
common address space with MicroKernel 2-2overview of 2-5
SQLUTIL
ENDBU command 8-20overview 8-18starting and stopping continuous operation 8-14stopping continuous operation 8-20
SRDE. See SQL Relational Database Engine.
STARTBU command 13-64and BUTIL 8-15and continuous operation 8-15, 8-18
Starting 11-3, 11-9continuous operation 8-14
and BUTIL 8-15Rebuild utility on NetWare 14-12
STAT command 13-58Statistics report 13-22
Tasks
Create a statistics report 13-22Status codes
116 9-7STOP command 13-63Stopping continuous operation 8-17, 8-20Strings
connection 5-9Support for long file names 13-4Supported Protocols configuration parameter 3-12,
3-13, 4-33System
data
including in description files A-8failures, and recovering changes 8-4
System cache
asychronous I/O and 2-5System Cache configuration parameter 4-21
TTable
adding foreign key to 6-8adding primary key to 6-6creating with a foreign key 6-8creating with a primary key 6-6
Table name
limits 5-2maximum length 5-2valid characters 5-2
Target Engine configuration parameter 4-31TCP/IP
port number
ODBC 5-7ports used 4-10, 5-7
TCP/IP Multihomed configuration parameter 4-9TCP/IP Port configuration parameter 4-10TCP/IP Timeout for Communication Requester
configuration parameter 4-34TCPPort connection string 5-10Technology overview
relational architecture
client 2-8server 2-7 to 2-8workstation 2-9
Temporary files, deleting 14-16Terminating a user connection
Connection
terminating user 10-13Trace File Location configuration parameter 4-17Trace Operation configuration parameter 3-19, 4-18Tracing
performance and 3-19Transaction
logging and BUTIL 13-41Transaction atomicity
not guaranteed with multiple engines 4-14Transaction Durability 4-12
archival logging and 8-2continuous operations and 8-2ensuring 4-11, 13-22, 13-58Log Buffer Size and 4-14transaction log size and 4-14
Transaction durability
disk I/O and 3-18

14 Index
Transaction Log Directory configuration parameter 4-19
Transaction Log Size
transaction durability and 4-14Transaction Log Size configuration parameter 3-18,
4-25TRANSLATION DLL connection string 5-10TRANSLATIONDLL connection string 5-8TransportHint connection string 5-10Troubleshooting load errors 2-21Tuning
performance 3-9Type codes in Smart Component naming 2-15
UUID connection string 5-9UNIQUE
primary keys and 6-6Unique Component Naming 2-14Unloading the Btrieve engine 13-63Update rule 6-2Use IDS configuration parameter 4-32Use Local MicroKernel Engine configuration
parameter 3-12, 4-32Use Remote MicroKernel Engine configuration
parameter 3-12, 4-32Use SAP configuration parameter 4-10User
cannot add existing to group 7-5cannot be in more than one group 7-5Master 7-4terminating a connection 10-13
User information, monitoring 10-10Users
restricted Win2000
client configuration and 3-7Users and groups
restrictions 7-5
VValid characters in names 5-2Variable-length records A-7Variable-tail Allocation Tables
control setting 13-10in description files A-8
VER command
and BUTIL 13-62Verifying a database definition 12-15Version
client and server compatibility 2-2Version checking, automatic 2-2
WW32BTXLT 5-8Wait Lock Timeout 4-15Windows
system cache 2-5Windows 2000
gateway durability and 3-7restricted users and client configuration 3-7
Workgroup engine
and transaction durability 9-8cannot receive remote ODBC requests 9-5differences from server 9-4eliminating connection delay 9-6floating Gateway 9-8new Gateway behavior 9-8syncronizing multiple data directories under one
Gateway 9-11troubleshooting 9-6
Working Directory configuration parameter 4-19