Embed Size (px)
Citation preview

PERPETUAL INNOVATION
2013
Advanced Installation Topics

Lenel OnGuard® 2013 Advanced Installation Topics, product version 6.6This guide is item number DOC-100, revision 3.034, July 2012
Copyright © 1995-2012 Lenel Systems International, Inc. Information in this document is subject to change without notice. No part of this document may be reproduced or transmitted in any form or by any means, electronic or mechanical, for any purpose, without the express written permission of Lenel Systems International, Inc.
Non-English versions of Lenel documents are offered as a service to our global audiences. We have attempted to provide an accurate translation of the text, but the official text is the English text, and any differences in the translation are not binding and have no legal effect.
The software described in this document is furnished under a license agreement and may only be used in accordance with the terms of that agreement. Lenel and OnGuard are registered trademarks of Lenel Systems International, Inc.
Microsoft, Windows, and Windows Server are either registered trademarks or trademarks of Microsoft Corporation in the United States and/or other countries. Integral and FlashPoint are trademarks of Integral Technologies, Inc. Crystal Reports for Windows is a trademark of Crystal Computer Services, Inc. Oracle is a registered trademark of Oracle Corporation. Other product names mentioned in this User Guide may be trademarks or registered trademarks of their respective companies and are hereby acknowledged.
Portions of this product were created using LEADTOOLS © 1991-2012 LEAD Technologies, Inc. ALL RIGHTS RESERVED.
OnGuard includes ImageStream® Graphic Filters. Copyright © 1991-2012 Inso Corporation. All rights reserved. ImageStream Graphic Filters and ImageStream are registered trademarks of Inso Corporation.
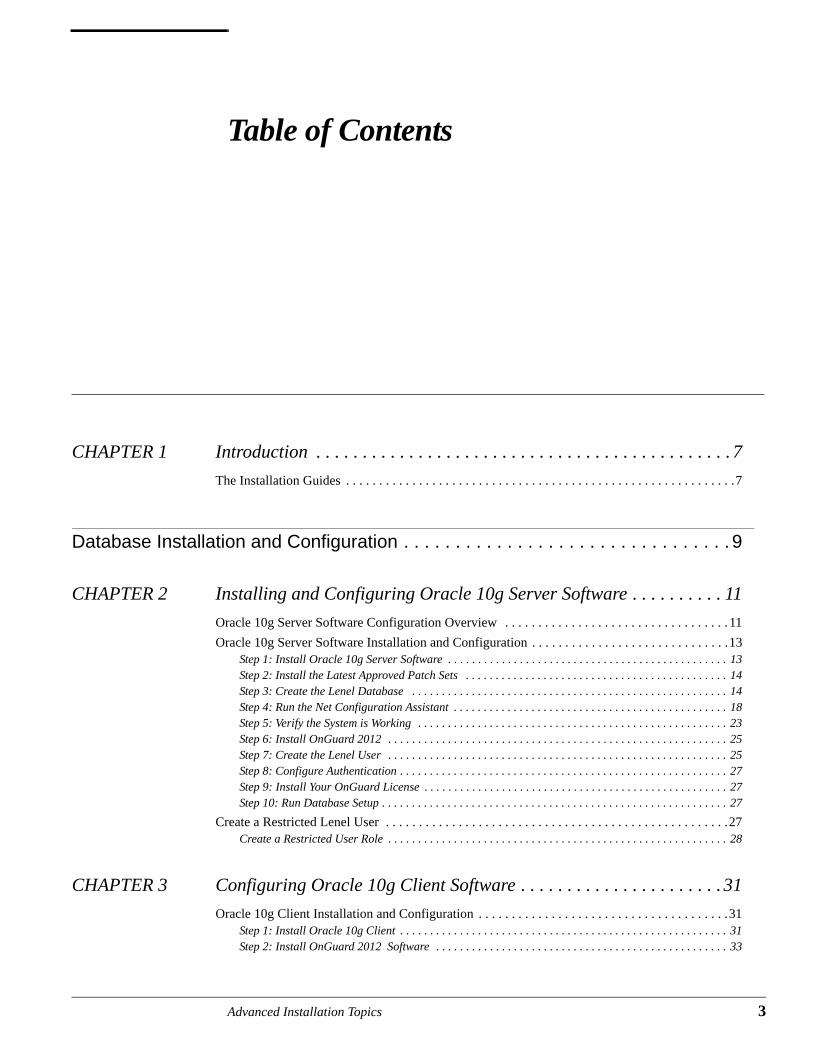
Table of Contents
CHAPTER 1 Introduction . . . . . . . . . . . . . . . . . . . . . . . . . . . . . . . . . . . . . . . . . . . . . 7
The Installation Guides . . . . . . . . . . . . . . . . . . . . . . . . . . . . . . . . . . . . . . . . . . . . . . . . . . . . . . . . . . .7
Database Installation and Configuration . . . . . . . . . . . . . . . . . . . . . . . . . . . . . . . . 9
CHAPTER 2 Installing and Configuring Oracle 10g Server Software . . . . . . . . . . 11
Oracle 10g Server Software Configuration Overview . . . . . . . . . . . . . . . . . . . . . . . . . . . . . . . . . . 11
Oracle 10g Server Software Installation and Configuration . . . . . . . . . . . . . . . . . . . . . . . . . . . . . .13Step 1: Install Oracle 10g Server Software . . . . . . . . . . . . . . . . . . . . . . . . . . . . . . . . . . . . . . . . . . . . . . . 13Step 2: Install the Latest Approved Patch Sets . . . . . . . . . . . . . . . . . . . . . . . . . . . . . . . . . . . . . . . . . . . . 14Step 3: Create the Lenel Database . . . . . . . . . . . . . . . . . . . . . . . . . . . . . . . . . . . . . . . . . . . . . . . . . . . . . 14Step 4: Run the Net Configuration Assistant . . . . . . . . . . . . . . . . . . . . . . . . . . . . . . . . . . . . . . . . . . . . . . 18Step 5: Verify the System is Working . . . . . . . . . . . . . . . . . . . . . . . . . . . . . . . . . . . . . . . . . . . . . . . . . . . . 23Step 6: Install OnGuard 2012 . . . . . . . . . . . . . . . . . . . . . . . . . . . . . . . . . . . . . . . . . . . . . . . . . . . . . . . . . 25Step 7: Create the Lenel User . . . . . . . . . . . . . . . . . . . . . . . . . . . . . . . . . . . . . . . . . . . . . . . . . . . . . . . . . 25Step 8: Configure Authentication . . . . . . . . . . . . . . . . . . . . . . . . . . . . . . . . . . . . . . . . . . . . . . . . . . . . . . . 27Step 9: Install Your OnGuard License . . . . . . . . . . . . . . . . . . . . . . . . . . . . . . . . . . . . . . . . . . . . . . . . . . . 27Step 10: Run Database Setup . . . . . . . . . . . . . . . . . . . . . . . . . . . . . . . . . . . . . . . . . . . . . . . . . . . . . . . . . . 27
Create a Restricted Lenel User . . . . . . . . . . . . . . . . . . . . . . . . . . . . . . . . . . . . . . . . . . . . . . . . . . . .27Create a Restricted User Role . . . . . . . . . . . . . . . . . . . . . . . . . . . . . . . . . . . . . . . . . . . . . . . . . . . . . . . . . 28
CHAPTER 3 Configuring Oracle 10g Client Software . . . . . . . . . . . . . . . . . . . . . . 31
Oracle 10g Client Installation and Configuration . . . . . . . . . . . . . . . . . . . . . . . . . . . . . . . . . . . . . .31Step 1: Install Oracle 10g Client . . . . . . . . . . . . . . . . . . . . . . . . . . . . . . . . . . . . . . . . . . . . . . . . . . . . . . . 31Step 2: Install OnGuard 2012 Software . . . . . . . . . . . . . . . . . . . . . . . . . . . . . . . . . . . . . . . . . . . . . . . . . 33
Advanced Installation Topics 3
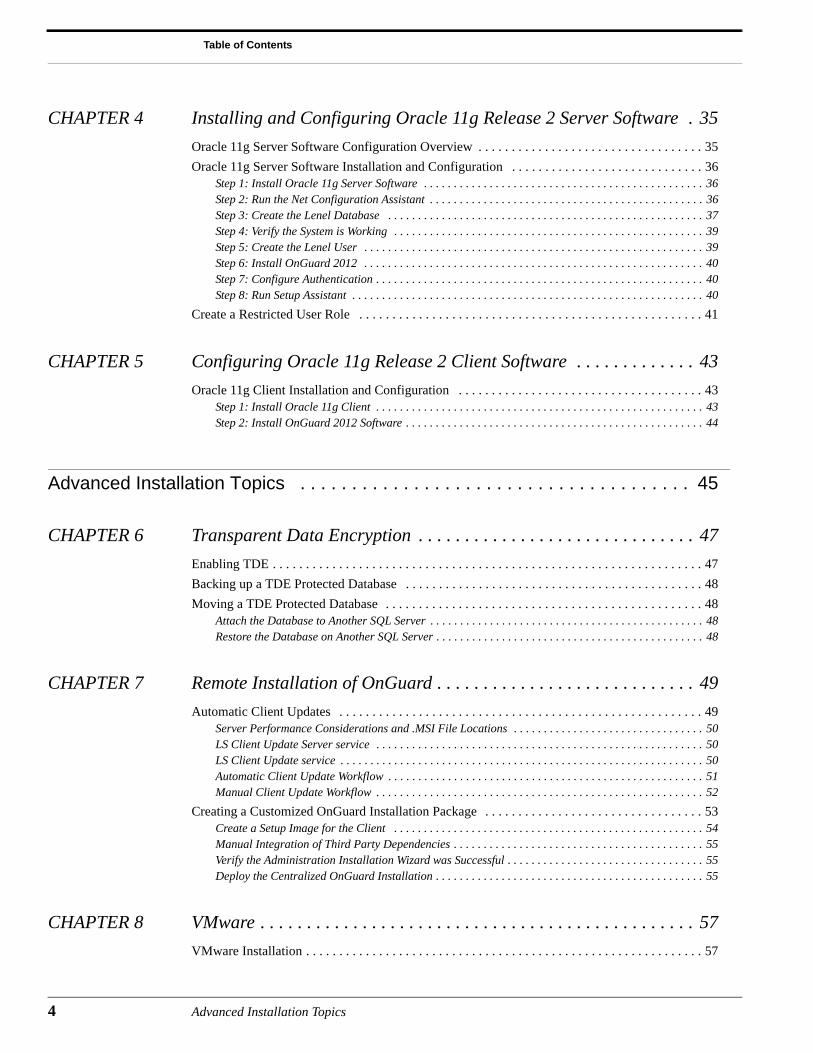
Table of Contents
CHAPTER 4 Installing and Configuring Oracle 11g Release 2 Server Software . 35
Oracle 11g Server Software Configuration Overview . . . . . . . . . . . . . . . . . . . . . . . . . . . . . . . . . . 35
Oracle 11g Server Software Installation and Configuration . . . . . . . . . . . . . . . . . . . . . . . . . . . . . 36Step 1: Install Oracle 11g Server Software . . . . . . . . . . . . . . . . . . . . . . . . . . . . . . . . . . . . . . . . . . . . . . . 36Step 2: Run the Net Configuration Assistant . . . . . . . . . . . . . . . . . . . . . . . . . . . . . . . . . . . . . . . . . . . . . . 36Step 3: Create the Lenel Database . . . . . . . . . . . . . . . . . . . . . . . . . . . . . . . . . . . . . . . . . . . . . . . . . . . . . 37Step 4: Verify the System is Working . . . . . . . . . . . . . . . . . . . . . . . . . . . . . . . . . . . . . . . . . . . . . . . . . . . . 39Step 5: Create the Lenel User . . . . . . . . . . . . . . . . . . . . . . . . . . . . . . . . . . . . . . . . . . . . . . . . . . . . . . . . . 39Step 6: Install OnGuard 2012 . . . . . . . . . . . . . . . . . . . . . . . . . . . . . . . . . . . . . . . . . . . . . . . . . . . . . . . . . 40Step 7: Configure Authentication . . . . . . . . . . . . . . . . . . . . . . . . . . . . . . . . . . . . . . . . . . . . . . . . . . . . . . . 40Step 8: Run Setup Assistant . . . . . . . . . . . . . . . . . . . . . . . . . . . . . . . . . . . . . . . . . . . . . . . . . . . . . . . . . . . 40
Create a Restricted User Role . . . . . . . . . . . . . . . . . . . . . . . . . . . . . . . . . . . . . . . . . . . . . . . . . . . . 41
CHAPTER 5 Configuring Oracle 11g Release 2 Client Software . . . . . . . . . . . . . 43
Oracle 11g Client Installation and Configuration . . . . . . . . . . . . . . . . . . . . . . . . . . . . . . . . . . . . . 43Step 1: Install Oracle 11g Client . . . . . . . . . . . . . . . . . . . . . . . . . . . . . . . . . . . . . . . . . . . . . . . . . . . . . . . 43Step 2: Install OnGuard 2012 Software . . . . . . . . . . . . . . . . . . . . . . . . . . . . . . . . . . . . . . . . . . . . . . . . . . 44
Advanced Installation Topics . . . . . . . . . . . . . . . . . . . . . . . . . . . . . . . . . . . . . . 45
CHAPTER 6 Transparent Data Encryption . . . . . . . . . . . . . . . . . . . . . . . . . . . . . . 47
Enabling TDE . . . . . . . . . . . . . . . . . . . . . . . . . . . . . . . . . . . . . . . . . . . . . . . . . . . . . . . . . . . . . . . . . 47
Backing up a TDE Protected Database . . . . . . . . . . . . . . . . . . . . . . . . . . . . . . . . . . . . . . . . . . . . . 48
Moving a TDE Protected Database . . . . . . . . . . . . . . . . . . . . . . . . . . . . . . . . . . . . . . . . . . . . . . . . 48Attach the Database to Another SQL Server . . . . . . . . . . . . . . . . . . . . . . . . . . . . . . . . . . . . . . . . . . . . . . 48Restore the Database on Another SQL Server . . . . . . . . . . . . . . . . . . . . . . . . . . . . . . . . . . . . . . . . . . . . . 48
CHAPTER 7 Remote Installation of OnGuard . . . . . . . . . . . . . . . . . . . . . . . . . . . . 49
Automatic Client Updates . . . . . . . . . . . . . . . . . . . . . . . . . . . . . . . . . . . . . . . . . . . . . . . . . . . . . . . 49Server Performance Considerations and .MSI File Locations . . . . . . . . . . . . . . . . . . . . . . . . . . . . . . . . 50LS Client Update Server service . . . . . . . . . . . . . . . . . . . . . . . . . . . . . . . . . . . . . . . . . . . . . . . . . . . . . . . 50LS Client Update service . . . . . . . . . . . . . . . . . . . . . . . . . . . . . . . . . . . . . . . . . . . . . . . . . . . . . . . . . . . . . 50Automatic Client Update Workflow . . . . . . . . . . . . . . . . . . . . . . . . . . . . . . . . . . . . . . . . . . . . . . . . . . . . . 51Manual Client Update Workflow . . . . . . . . . . . . . . . . . . . . . . . . . . . . . . . . . . . . . . . . . . . . . . . . . . . . . . . 52
Creating a Customized OnGuard Installation Package . . . . . . . . . . . . . . . . . . . . . . . . . . . . . . . . . 53Create a Setup Image for the Client . . . . . . . . . . . . . . . . . . . . . . . . . . . . . . . . . . . . . . . . . . . . . . . . . . . . 54Manual Integration of Third Party Dependencies . . . . . . . . . . . . . . . . . . . . . . . . . . . . . . . . . . . . . . . . . . 55Verify the Administration Installation Wizard was Successful . . . . . . . . . . . . . . . . . . . . . . . . . . . . . . . . . 55Deploy the Centralized OnGuard Installation . . . . . . . . . . . . . . . . . . . . . . . . . . . . . . . . . . . . . . . . . . . . . 55
CHAPTER 8 VMware . . . . . . . . . . . . . . . . . . . . . . . . . . . . . . . . . . . . . . . . . . . . . . . 57
VMware Installation . . . . . . . . . . . . . . . . . . . . . . . . . . . . . . . . . . . . . . . . . . . . . . . . . . . . . . . . . . . . 57
4 Advanced Installation Topics

Table of Contents
Virtual Machine Setup . . . . . . . . . . . . . . . . . . . . . . . . . . . . . . . . . . . . . . . . . . . . . . . . . . . . . . . . . .57Creating a New Virtual Machine . . . . . . . . . . . . . . . . . . . . . . . . . . . . . . . . . . . . . . . . . . . . . . . . . . . . . . . 57Recommended Hardware Configurations . . . . . . . . . . . . . . . . . . . . . . . . . . . . . . . . . . . . . . . . . . . . . . . . 58
CHAPTER 9 Using SNMP with OnGuard . . . . . . . . . . . . . . . . . . . . . . . . . . . . . . . 59
OnGuard as an SNMP Manager . . . . . . . . . . . . . . . . . . . . . . . . . . . . . . . . . . . . . . . . . . . . . . . . . . .61
OnGuard as an SNMP Agent . . . . . . . . . . . . . . . . . . . . . . . . . . . . . . . . . . . . . . . . . . . . . . . . . . . . .61
Configuring SNMP . . . . . . . . . . . . . . . . . . . . . . . . . . . . . . . . . . . . . . . . . . . . . . . . . . . . . . . . . . . . .61Install the Windows SNMP Components . . . . . . . . . . . . . . . . . . . . . . . . . . . . . . . . . . . . . . . . . . . . . . . . . 62Install a License with SNMP Support . . . . . . . . . . . . . . . . . . . . . . . . . . . . . . . . . . . . . . . . . . . . . . . . . . . 64
Configuring OnGuard as an SNMP Manager . . . . . . . . . . . . . . . . . . . . . . . . . . . . . . . . . . . . . . . . .64Add an SNMP Manager . . . . . . . . . . . . . . . . . . . . . . . . . . . . . . . . . . . . . . . . . . . . . . . . . . . . . . . . . . . . . . 64Add Agents . . . . . . . . . . . . . . . . . . . . . . . . . . . . . . . . . . . . . . . . . . . . . . . . . . . . . . . . . . . . . . . . . . . . . . . . 65MIB File Overview . . . . . . . . . . . . . . . . . . . . . . . . . . . . . . . . . . . . . . . . . . . . . . . . . . . . . . . . . . . . . . . . . . 65Load the MIB File(s) . . . . . . . . . . . . . . . . . . . . . . . . . . . . . . . . . . . . . . . . . . . . . . . . . . . . . . . . . . . . . . . . 66Modify an SNMP Management Information Base Variable . . . . . . . . . . . . . . . . . . . . . . . . . . . . . . . . . . 67SNMP Reports . . . . . . . . . . . . . . . . . . . . . . . . . . . . . . . . . . . . . . . . . . . . . . . . . . . . . . . . . . . . . . . . . . . . . 68
Configuring OnGuard as an SNMP Agent . . . . . . . . . . . . . . . . . . . . . . . . . . . . . . . . . . . . . . . . . . .68Add a DataConduIT Message Queue of Type “SNMP Trap Messages” . . . . . . . . . . . . . . . . . . . . . . . . . 69Load the Lenel.MIB File . . . . . . . . . . . . . . . . . . . . . . . . . . . . . . . . . . . . . . . . . . . . . . . . . . . . . . . . . . . . . 70
SNMP Manager Copyright Information . . . . . . . . . . . . . . . . . . . . . . . . . . . . . . . . . . . . . . . . . . . . .70
CHAPTER 10 Integrating OnGuard with Citrix XenApp . . . . . . . . . . . . . . . . . . . . . 73
Citrix XenApp Overview . . . . . . . . . . . . . . . . . . . . . . . . . . . . . . . . . . . . . . . . . . . . . . . . . . . . . . . .73
Procedures . . . . . . . . . . . . . . . . . . . . . . . . . . . . . . . . . . . . . . . . . . . . . . . . . . . . . . . . . . . . . . . . . . . .73Step 1: Perform the Pre-Installation Set-up Procedures . . . . . . . . . . . . . . . . . . . . . . . . . . . . . . . . . . . . . 74Step 2: Create the Citrix Database . . . . . . . . . . . . . . . . . . . . . . . . . . . . . . . . . . . . . . . . . . . . . . . . . . . . . 74Step 3: Install Citrix on the Server . . . . . . . . . . . . . . . . . . . . . . . . . . . . . . . . . . . . . . . . . . . . . . . . . . . . . 75Step 4: Configure the License Server . . . . . . . . . . . . . . . . . . . . . . . . . . . . . . . . . . . . . . . . . . . . . . . . . . . . 75Step 5: Configure XenApp . . . . . . . . . . . . . . . . . . . . . . . . . . . . . . . . . . . . . . . . . . . . . . . . . . . . . . . . . . . . 76Step 6: Configure the Web Interface . . . . . . . . . . . . . . . . . . . . . . . . . . . . . . . . . . . . . . . . . . . . . . . . . . . . 77Step 7: Publish the OnGuard Applications . . . . . . . . . . . . . . . . . . . . . . . . . . . . . . . . . . . . . . . . . . . . . . . 78Step 8: Install the Citrix Clients . . . . . . . . . . . . . . . . . . . . . . . . . . . . . . . . . . . . . . . . . . . . . . . . . . . . . . . . 78Step 9: Install OnGuard . . . . . . . . . . . . . . . . . . . . . . . . . . . . . . . . . . . . . . . . . . . . . . . . . . . . . . . . . . . . . . 78Step 10: Access the Applications from a Client Workstation . . . . . . . . . . . . . . . . . . . . . . . . . . . . . . . . . . 79
Reference . . . . . . . . . . . . . . . . . . . . . . . . . . . . . . . . . . . . . . . . . . . . . . . . . . . . . .81
CHAPTER 11 Ports Used by OnGuard . . . . . . . . . . . . . . . . . . . . . . . . . . . . . . . . . . 83
Digital Video Ports . . . . . . . . . . . . . . . . . . . . . . . . . . . . . . . . . . . . . . . . . . . . . . . . . . . . . . . . . . . . .89
Advanced Installation Topics 5

Table of Contents
CHAPTER 12 OnGuard Services . . . . . . . . . . . . . . . . . . . . . . . . . . . . . . . . . . . . . . . 93
Appendices . . . . . . . . . . . . . . . . . . . . . . . . . . . . . . . . . . . . . . . . . . . . . . . . . . . . 99
APPENDIX A Database Installation Utility . . . . . . . . . . . . . . . . . . . . . . . . . . . . . 101
Database Installation Utility Window . . . . . . . . . . . . . . . . . . . . . . . . . . . . . . . . . . . . . . . . . . . . . 101Database Installation Utility Window Fields . . . . . . . . . . . . . . . . . . . . . . . . . . . . . . . . . . . . . . . . . . . . . 101
Database Installation Utility Procedures . . . . . . . . . . . . . . . . . . . . . . . . . . . . . . . . . . . . . . . . . . . 102Attach an SQL Server Express Database . . . . . . . . . . . . . . . . . . . . . . . . . . . . . . . . . . . . . . . . . . . . . . . . 102
APPENDIX B Change the Database Owner in SQL Server Express . . . . . . . . . . . 105
APPENDIX C Manually Creating an ODBC Connection for SQL . . . . . . . . . . . . 107
Creating an ODBC Connection for SQL . . . . . . . . . . . . . . . . . . . . . . . . . . . . . . . . . . . . . . . . . . . 107
Updating the DSN in the OnGuard Configuration Files . . . . . . . . . . . . . . . . . . . . . . . . . . . . . . . 108
Troubleshooting . . . . . . . . . . . . . . . . . . . . . . . . . . . . . . . . . . . . . . . . . . . . . . . . . . . . . . . . . . . . . . 108
APPENDIX D Setting Up & Configuring a Capture Station . . . . . . . . . . . . . . . . . 111
Environmental Considerations Affecting Flash & Camera Capture Quality . . . . . . . . . . . . . . . . 111
Setting Up the OnGuard Capture Dialog . . . . . . . . . . . . . . . . . . . . . . . . . . . . . . . . . . . . . . . . . . . 111
Capture Station Setup Specifications . . . . . . . . . . . . . . . . . . . . . . . . . . . . . . . . . . . . . . . . . . . . . . 112
Basic Camera Setup (CAM-CCP-500K) . . . . . . . . . . . . . . . . . . . . . . . . . . . . . . . . . . . . . . . . . . . 115CCP-500 (Back View) . . . . . . . . . . . . . . . . . . . . . . . . . . . . . . . . . . . . . . . . . . . . . . . . . . . . . . . . . . . . . . 115
Basic Camera Setup (CAM-24Z704-USB/CAM-20Z704-USB) . . . . . . . . . . . . . . . . . . . . . . . . . 116Installation of CAM-24Z704-USB/CAM-20Z704-USB . . . . . . . . . . . . . . . . . . . . . . . . . . . . . . . . . . . . . 116Configuration of CAM-24Z704-USB/CAM-20Z704-USB . . . . . . . . . . . . . . . . . . . . . . . . . . . . . . . . . . . 116Using CAM-24Z704-USB/CAM-20Z704-USB . . . . . . . . . . . . . . . . . . . . . . . . . . . . . . . . . . . . . . . . . . . 117
Lighting Setup . . . . . . . . . . . . . . . . . . . . . . . . . . . . . . . . . . . . . . . . . . . . . . . . . . . . . . . . . . . . . . . 118Professional Continuous Lighting Setup (EHK-K42U-A) . . . . . . . . . . . . . . . . . . . . . . . . . . . . . . . . . . . 118Advanced Setup . . . . . . . . . . . . . . . . . . . . . . . . . . . . . . . . . . . . . . . . . . . . . . . . . . . . . . . . . . . . . . . . . . . 118Environmental Considerations and Factors Leading to Poor Lighting . . . . . . . . . . . . . . . . . . . . . . . . 119
6 Advanced Installation Topics

CHAPTER 1 Introduction
The Advanced Installation Topics Guide focuses on those aspects of the OnGuard installation that are not part of normal procedures. Topics covered include:
• Installing Oracle and SQL Server databases
• How to perform a remote installation
• How to use SNMP with OnGuard
• Ports used by OnGuard
• OnGuard Services
The Installation Guides
Advanced Topic Installation User Guide. DOC-100. A guide that encompasses a variety of advanced topics including Oracle installation and configuration.
Installation Guide. DOC-110. A comprehensive guide that includes instructions for installing the OnGuard software. This guide also includes information on the current SQL Server version and the browser-based client applications
Upgrade Guide. DOC-120. A short and sequential guide on upgrading and configuring an access control system that utilizes SQL or SQL Server Express system.
Enterprise Setup & Configuration User Guide. DOC-500. A guide that includes instructions for installing database software, the access control system Enterprise software, and how to setup complex Enterprise systems.
Advanced Installation Topics 7

Introduction
8
Advanced Installation Topics
Database Installation and Configuration

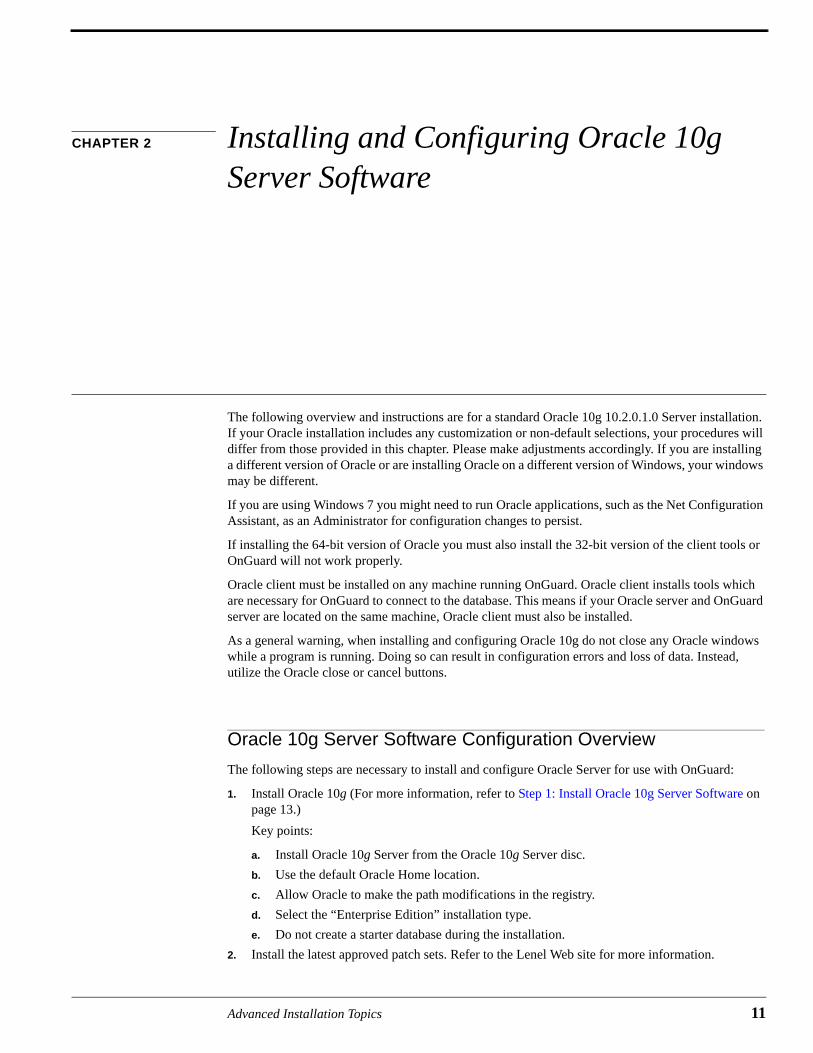
CHAPTER 2 Installing and Configuring Oracle 10g Server Software
The following overview and instructions are for a standard Oracle 10g 10.2.0.1.0 Server installation. If your Oracle installation includes any customization or non-default selections, your procedures will differ from those provided in this chapter. Please make adjustments accordingly. If you are installing a different version of Oracle or are installing Oracle on a different version of Windows, your windows may be different.
If you are using Windows 7 you might need to run Oracle applications, such as the Net Configuration Assistant, as an Administrator for configuration changes to persist.
If installing the 64-bit version of Oracle you must also install the 32-bit version of the client tools or OnGuard will not work properly.
Oracle client must be installed on any machine running OnGuard. Oracle client installs tools which are necessary for OnGuard to connect to the database. This means if your Oracle server and OnGuard server are located on the same machine, Oracle client must also be installed.
As a general warning, when installing and configuring Oracle 10g do not close any Oracle windows while a program is running. Doing so can result in configuration errors and loss of data. Instead, utilize the Oracle close or cancel buttons.
Oracle 10g Server Software Configuration Overview
The following steps are necessary to install and configure Oracle Server for use with OnGuard:
1. Install Oracle 10g (For more information, refer to Step 1: Install Oracle 10g Server Software on page 13.)
Key points:
a. Install Oracle 10g Server from the Oracle 10g Server disc.
b. Use the default Oracle Home location.
c. Allow Oracle to make the path modifications in the registry.
d. Select the “Enterprise Edition” installation type.
e. Do not create a starter database during the installation.
2. Install the latest approved patch sets. Refer to the Lenel Web site for more information.
Advanced Installation Topics 11
Installing and Configuring Oracle 10g Server Software
12
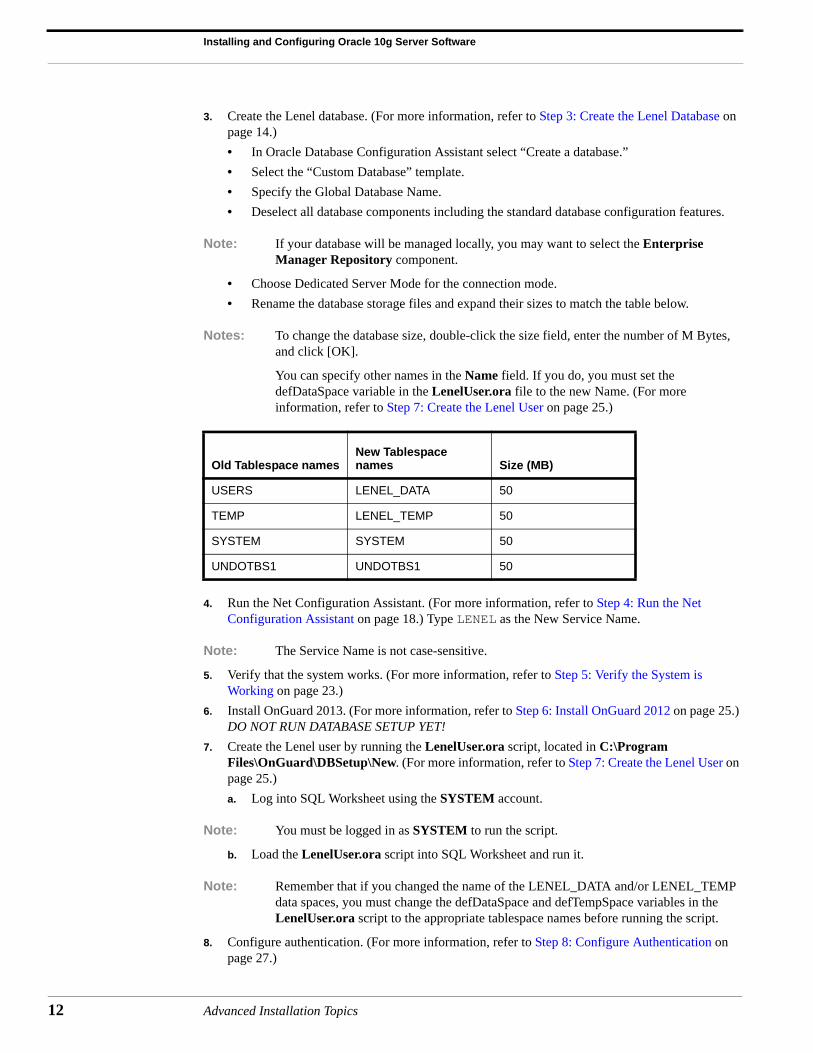
3. Create the Lenel database. (For more information, refer to Step 3: Create the Lenel Database on page 14.)
• In Oracle Database Configuration Assistant select “Create a database.”
• Select the “Custom Database” template.
• Specify the Global Database Name.
• Deselect all database components including the standard database configuration features.
Note: If your database will be managed locally, you may want to select the Enterprise Manager Repository component.
• Choose Dedicated Server Mode for the connection mode.
• Rename the database storage files and expand their sizes to match the table below.
Notes: To change the database size, double-click the size field, enter the number of M Bytes, and click [OK].
You can specify other names in the Name field. If you do, you must set the defDataSpace variable in the LenelUser.ora file to the new Name. (For more information, refer to Step 7: Create the Lenel User on page 25.)
4. Run the Net Configuration Assistant. (For more information, refer to Step 4: Run the Net Configuration Assistant on page 18.) Type LENEL as the New Service Name.
Note: The Service Name is not case-sensitive.
5. Verify that the system works. (For more information, refer to Step 5: Verify the System is Working on page 23.)
6. Install OnGuard 2013. (For more information, refer to Step 6: Install OnGuard 2012 on page 25.) DO NOT RUN DATABASE SETUP YET!
7. Create the Lenel user by running the LenelUser.ora script, located in C:\Program Files\OnGuard\DBSetup\New. (For more information, refer to Step 7: Create the Lenel User on page 25.)
a. Log into SQL Worksheet using the SYSTEM account.
Note: You must be logged in as SYSTEM to run the script.
b. Load the LenelUser.ora script into SQL Worksheet and run it.
Note: Remember that if you changed the name of the LENEL_DATA and/or LENEL_TEMP data spaces, you must change the defDataSpace and defTempSpace variables in the LenelUser.ora script to the appropriate tablespace names before running the script.
8. Configure authentication. (For more information, refer to Step 8: Configure Authentication on page 27.)
Old Tablespace namesNew Tablespace names Size (MB)
USERS LENEL_DATA 50
TEMP LENEL_TEMP 50
SYSTEM SYSTEM 50
UNDOTBS1 UNDOTBS1 50
Advanced Installation Topics
Oracle 10g Server Software Installation and Configuration
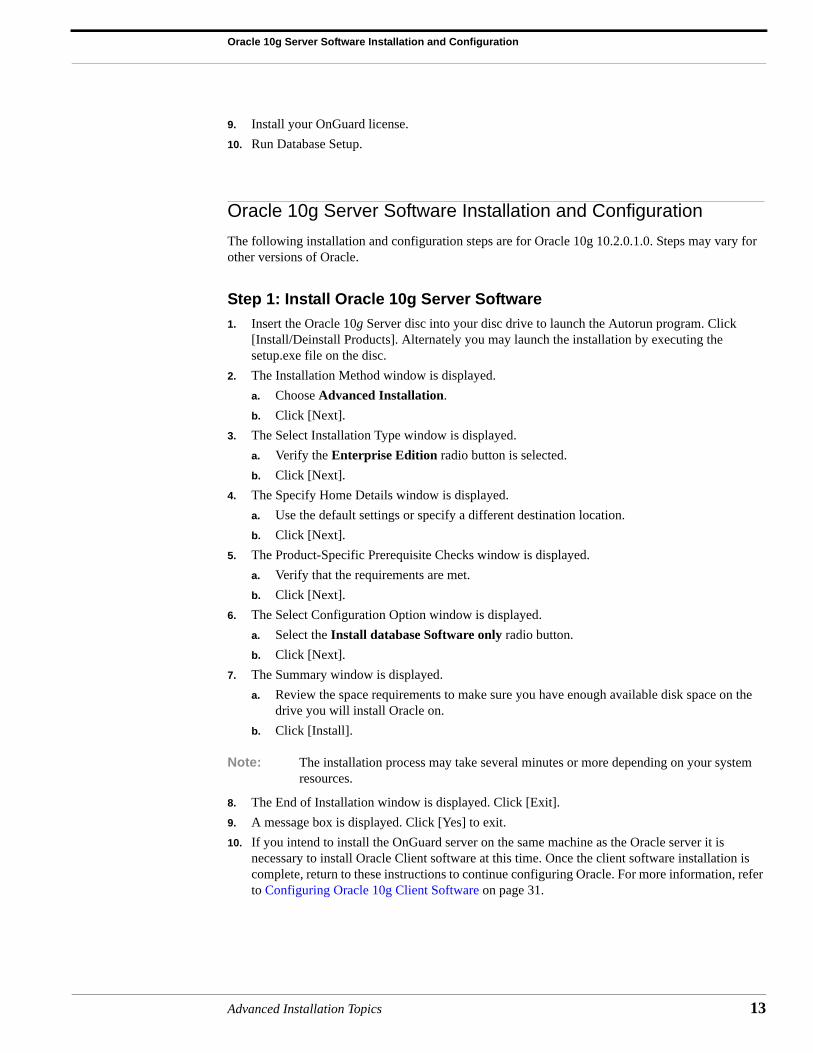
9. Install your OnGuard license.
10. Run Database Setup.
Oracle 10g Server Software Installation and Configuration
The following installation and configuration steps are for Oracle 10g 10.2.0.1.0. Steps may vary for other versions of Oracle.
Step 1: Install Oracle 10g Server Software
1. Insert the Oracle 10g Server disc into your disc drive to launch the Autorun program. Click [Install/Deinstall Products]. Alternately you may launch the installation by executing the setup.exe file on the disc.
2. The Installation Method window is displayed.
a. Choose Advanced Installation.
b. Click [Next].
3. The Select Installation Type window is displayed.
a. Verify the Enterprise Edition radio button is selected.
b. Click [Next].
4. The Specify Home Details window is displayed.
a. Use the default settings or specify a different destination location.
b. Click [Next].
5. The Product-Specific Prerequisite Checks window is displayed.
a. Verify that the requirements are met.
b. Click [Next].
6. The Select Configuration Option window is displayed.
a. Select the Install database Software only radio button.
b. Click [Next].
7. The Summary window is displayed.
a. Review the space requirements to make sure you have enough available disk space on the drive you will install Oracle on.
b. Click [Install].
Note: The installation process may take several minutes or more depending on your system resources.
8. The End of Installation window is displayed. Click [Exit].
9. A message box is displayed. Click [Yes] to exit.
10. If you intend to install the OnGuard server on the same machine as the Oracle server it is necessary to install Oracle Client software at this time. Once the client software installation is complete, return to these instructions to continue configuring Oracle. For more information, refer to Configuring Oracle 10g Client Software on page 31.
Advanced Installation Topics 13
Installing and Configuring Oracle 10g Server Software
14
Step 2: Install the Latest Approved Patch Sets
Install the latest approved patch sets. The list of approved patch sets can be found on the Lenel Web site at: http://www.lenel.com/support/downloads/onguard#compatibility-charts.
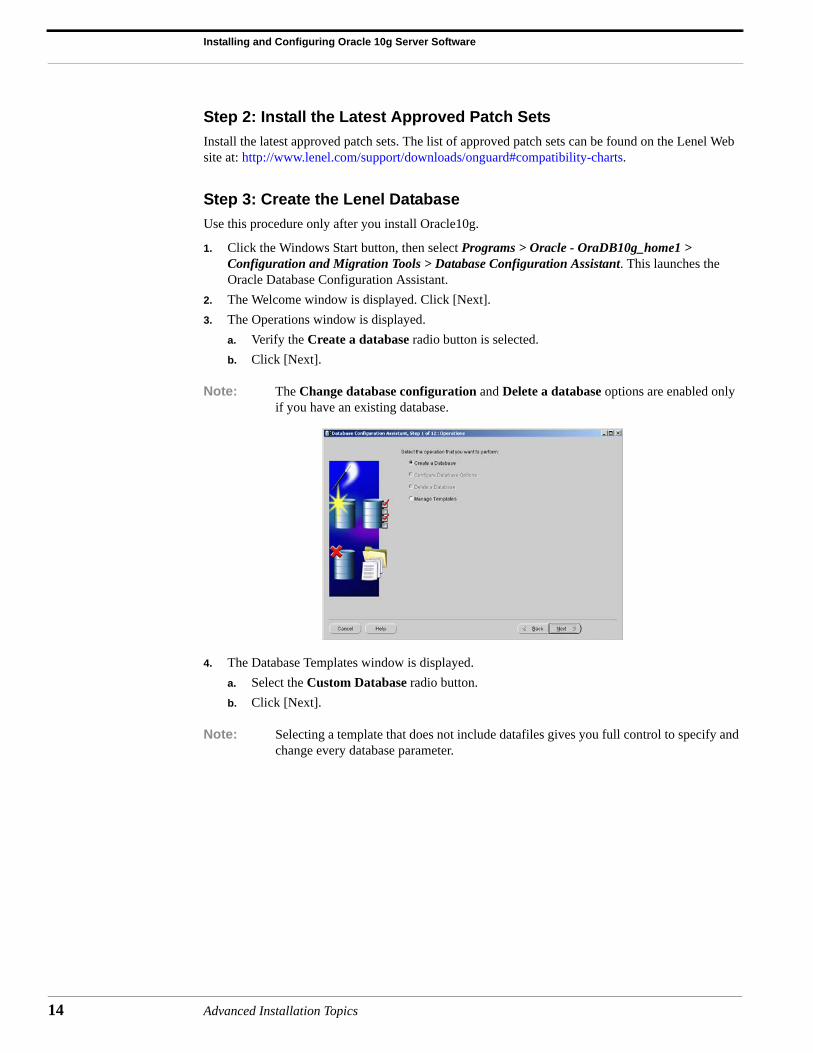
Step 3: Create the Lenel Database
Use this procedure only after you install Oracle10g.
1. Click the Windows Start button, then select Programs > Oracle - OraDB10g_home1 > Configuration and Migration Tools > Database Configuration Assistant. This launches the Oracle Database Configuration Assistant.
2. The Welcome window is displayed. Click [Next].
3. The Operations window is displayed.
a. Verify the Create a database radio button is selected.
b. Click [Next].
Note: The Change database configuration and Delete a database options are enabled only if you have an existing database.
4. The Database Templates window is displayed.
a. Select the Custom Database radio button.
b. Click [Next].
Note: Selecting a template that does not include datafiles gives you full control to specify and change every database parameter.
Advanced Installation Topics

Oracle 10g Server Software Installation and Configuration
5. Specify a Global Database Name.
a. Type LENEL in the Global Database Name field.
Note: The Global Database Name is not case-sensitive.
b. Click [Next].
Note: The Oracle System Identifier (SID) automatically populates.
6. The Oracle Database Assistant continues. Select the management options that best suit your needs. Click [Next].
7. Next choose the passwords you would like to use for the different accounts. Click [Next].
8. Next choose the storage options that best suit your needs. Click [Next].
9. Next choose the database file location. Click [Next].
10. Choose a recovery option. Click [Next].
11. The Database Content window is displayed.
a. Deselect all database components.
b. Click [Standard Database Components...]
c. Deselect each component and click [OK].
Note: If your database will be managed locally, you may want to select the Enterprise Manager Repository component.
Advanced Installation Topics 15

Installing and Configuring Oracle 10g Server Software
16
d. Click [Next].
12. The Initialization Parameters window is displayed.
a. Choose memory allocation settings that best suit your needs.
b. Select the Connection Mode tab.
c. Select the Dedicated Server Mode radio button.
d. Click [Next].
13. The Database Storage window is displayed.
a. Expand the tablespace tree.
b. Highlight any tablespace name.
14. Rename the tablespaces and specify a reasonable size for holding the OnGuard information.
a. Enter the new tablespace name in the Name field.
b. Double-click the Size field.
The following table suggests appropriate tablespace names and minimum sizes.
Note: You can specify other names in the Name field. If you do, you must set the defDataSpace variable in the LenelUser.ora file to the new Name. (For more information, refer to Step 7: Create the Lenel User on page 25.)
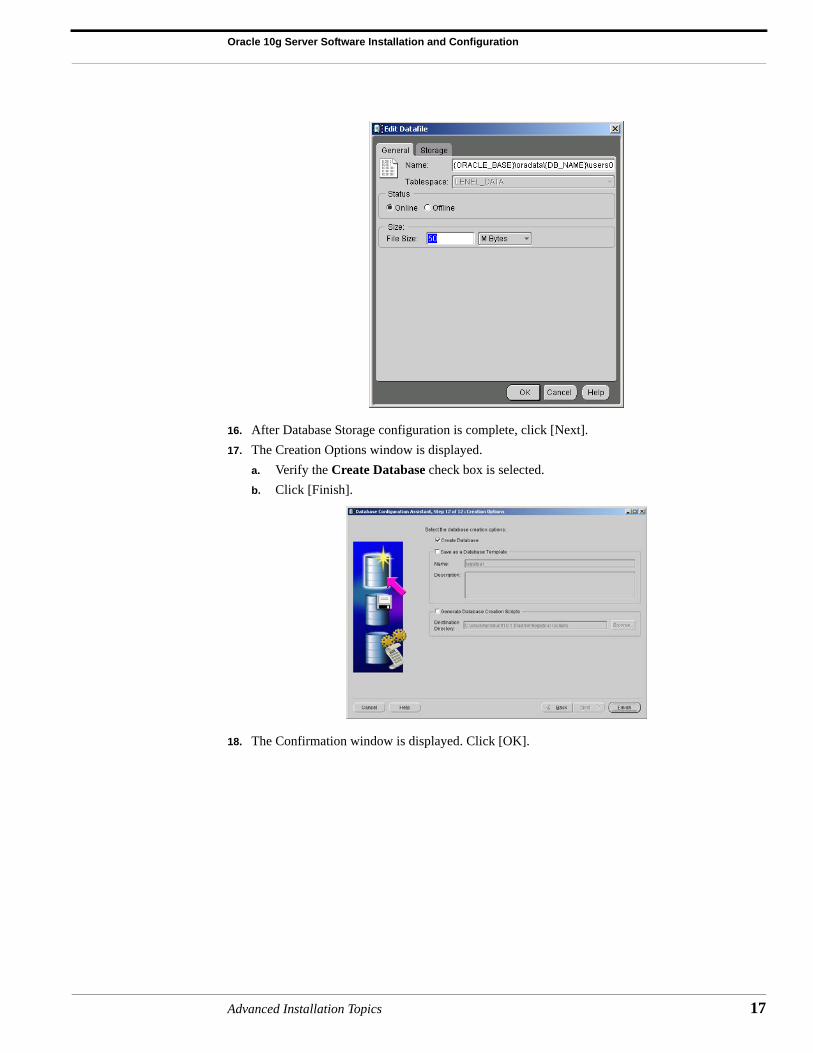
15. When you double-click the Size field, the Edit Datafile window is displayed. To continue changing the tablespace size:
a. Enter the new size.
b. Click [OK].
Old Tablespace names
New Tablespace names New size (MB)
USERS LENEL_DATA 50
TEMP LENEL_TEMP 50
SYSTEM SYSTEM 50
UNDOTBS1 UNDOTBS1 50
Advanced Installation Topics
Oracle 10g Server Software Installation and Configuration
16. After Database Storage configuration is complete, click [Next].
17. The Creation Options window is displayed.
a. Verify the Create Database check box is selected.
b. Click [Finish].
18. The Confirmation window is displayed. Click [OK].
Advanced Installation Topics 17

Installing and Configuring Oracle 10g Server Software
18
19. The Database Configuration Assistant window is displayed.
a. Click [Password Management] to manage your passwords.
b. Click [Exit], and the database will be created.
Step 4: Run the Net Configuration Assistant
1. Click the Start button, then select Programs > Oracle - OraDB10g_home1> Configuration and Migration Tools > Net Configuration Assistant. This launches the Net Configuration Assistant.
2. The Net Configuration Assistant Welcome window is displayed.
a. Verify the Listener configuration radio button is selected.
b. Click [Next].
Advanced Installation Topics

Oracle 10g Server Software Installation and Configuration
3. Add an Oracle Net listener.
a. Select the Add radio button.
b. Click [Next].
4. The Listener Name window is displayed.
a. Verify the Listener name is “LISTENER.”
b. Click [Next].
5. The Select Protocols window is displayed.
a. Verify TCP is a selected protocol.
b. Click [Next].
Advanced Installation Topics 19
Installing and Configuring Oracle 10g Server Software
20
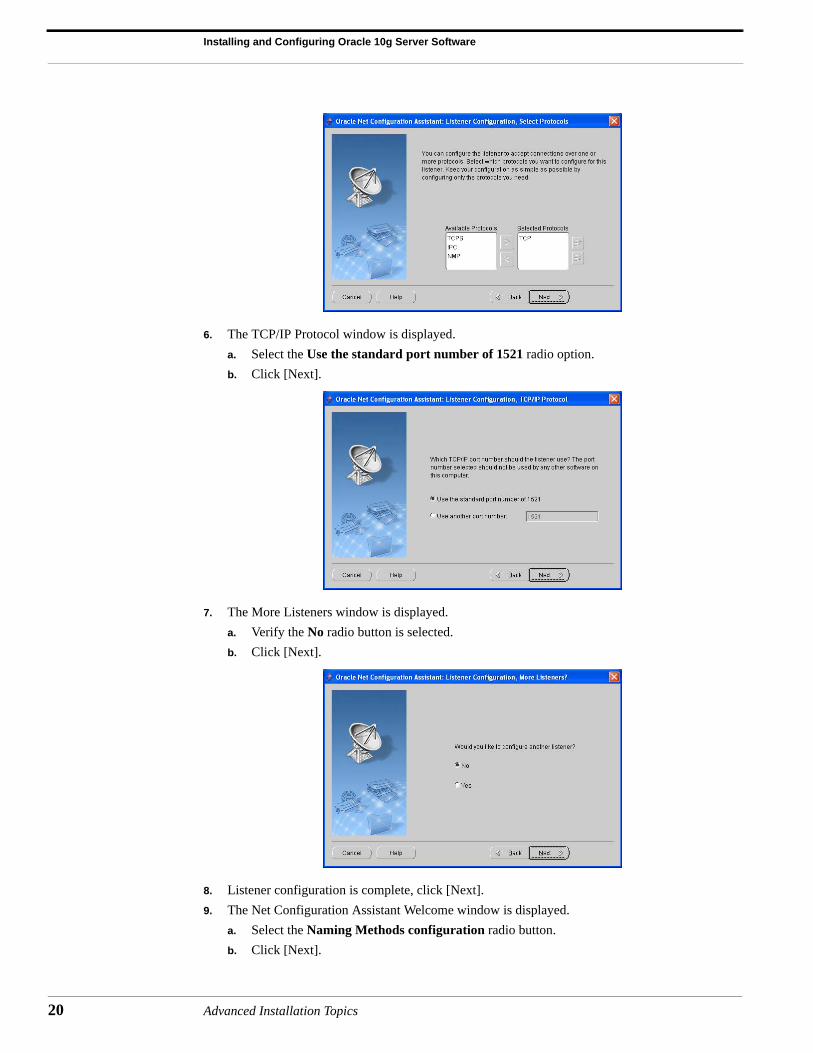
6. The TCP/IP Protocol window is displayed.
a. Select the Use the standard port number of 1521 radio option.
b. Click [Next].
7. The More Listeners window is displayed.
a. Verify the No radio button is selected.
b. Click [Next].
8. Listener configuration is complete, click [Next].
9. The Net Configuration Assistant Welcome window is displayed.
a. Select the Naming Methods configuration radio button.
b. Click [Next].
Advanced Installation Topics
Oracle 10g Server Software Installation and Configuration
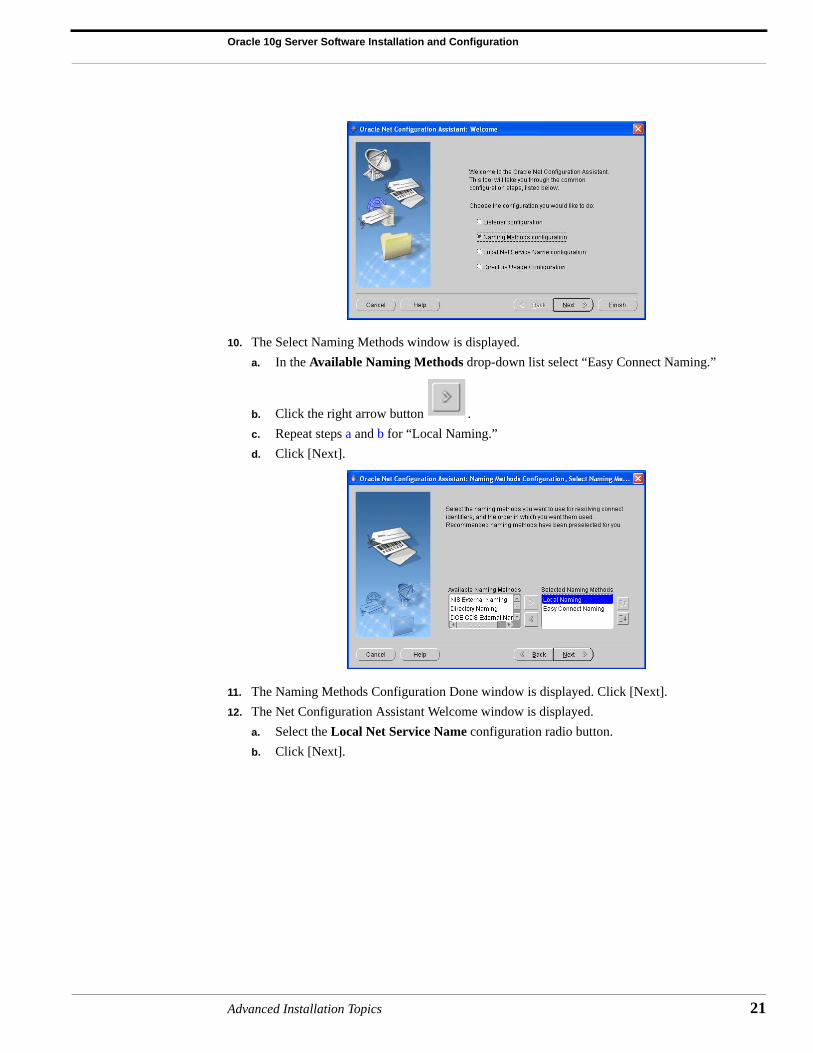
10. The Select Naming Methods window is displayed.
a. In the Available Naming Methods drop-down list select “Easy Connect Naming.”
b. Click the right arrow button .
c. Repeat steps a and b for “Local Naming.”
d. Click [Next].
11. The Naming Methods Configuration Done window is displayed. Click [Next].
12. The Net Configuration Assistant Welcome window is displayed.
a. Select the Local Net Service Name configuration radio button.
b. Click [Next].
Advanced Installation Topics 21

Installing and Configuring Oracle 10g Server Software
22
13. The Net Service Name Configuration window is displayed.
a. Select the Add radio button.
b. Click [Next].
14. Identify the service name for the database.
a. Type LENEL in the Service Name field.
b. Click [Next].
Note: The Service Name is not case-sensitive.
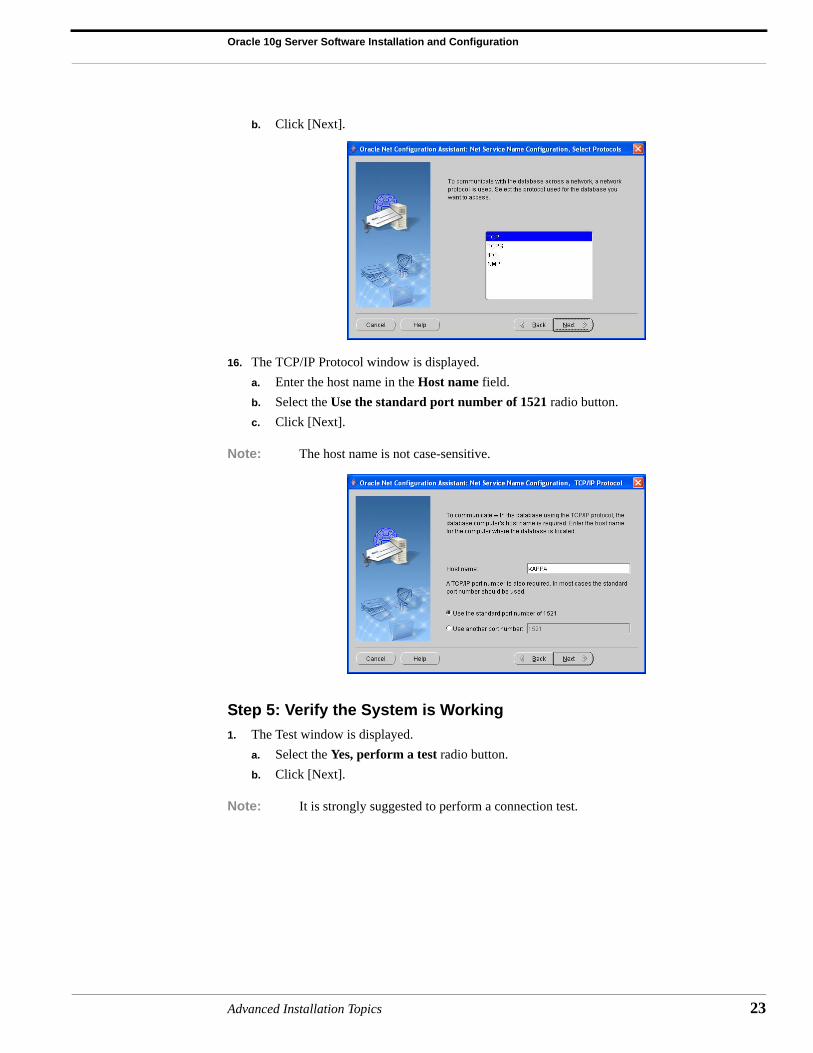
15. The Select Protocols window is displayed.
a. Verify TCP is highlighted.
Advanced Installation Topics
Oracle 10g Server Software Installation and Configuration
b. Click [Next].
16. The TCP/IP Protocol window is displayed.
a. Enter the host name in the Host name field.
b. Select the Use the standard port number of 1521 radio button.
c. Click [Next].
Note: The host name is not case-sensitive.
Step 5: Verify the System is Working
1. The Test window is displayed.
a. Select the Yes, perform a test radio button.
b. Click [Next].
Note: It is strongly suggested to perform a connection test.
Advanced Installation Topics 23
Installing and Configuring Oracle 10g Server Software
24
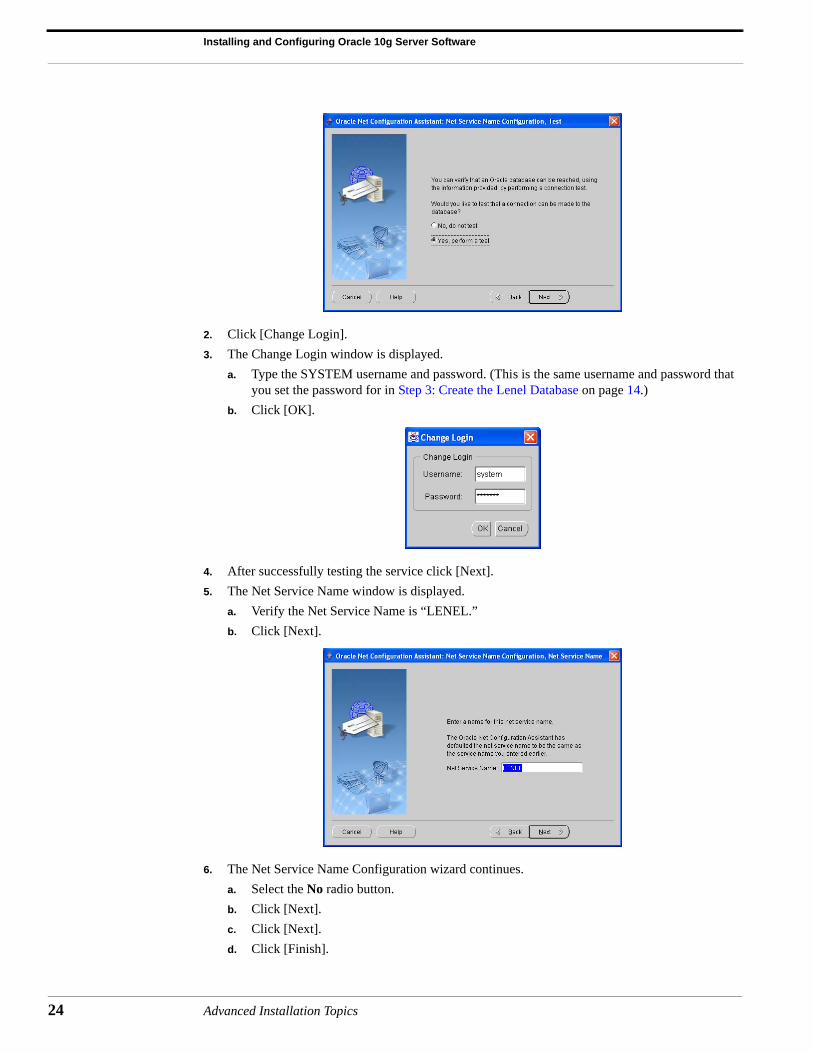
2. Click [Change Login].
3. The Change Login window is displayed.
a. Type the SYSTEM username and password. (This is the same username and password that you set the password for in Step 3: Create the Lenel Database on page 14.)
b. Click [OK].
4. After successfully testing the service click [Next].
5. The Net Service Name window is displayed.
a. Verify the Net Service Name is “LENEL.”
b. Click [Next].
6. The Net Service Name Configuration wizard continues.
a. Select the No radio button.
b. Click [Next].
c. Click [Next].
d. Click [Finish].
Advanced Installation Topics

Oracle 10g Server Software Installation and Configuration
Step 6: Install OnGuard 2013
Install the OnGuard 2013 software next. DO NOT RUN DATABASE SETUP YET.
Step 7: Create the Lenel User
The following instructions are for creating the Lenel user with the SQLPlus Worksheet. If you do not have SQLPlus Worksheet on the Oracle server, you can perform a custom install of the Oracle Client software and select the Enterprise Manager 10g Java Console.
Note: Advanced Oracle users, who do not want to use the LenelUser.ora script, can create a custom user. For more information, refer to Create a Restricted Lenel User on page 27.
1. Click the Windows Start button, then select Programs > Oracle - OraDB10g_home1 > Application Development > SQLPlus Worksheet.
2. Log in using the system account.
IMPORTANT: You must be logged in as SYSTEM to run the script.
a. Type the SYSTEM username and password. (This is the same username and password that you set the password for in Step 3: Create the Lenel Database on page 14.)
b. Verify Normal is selected for Connect As.
c. Click [Close].
3. Verify Oracle connects properly. You should see “Connected” in the display box, as shown.
Advanced Installation Topics 25

Installing and Configuring Oracle 10g Server Software
26
4. Run the script.
Note: Remember that if you changed the name of the LENEL_DATA and/or LENEL_TEMP data spaces, you must change the defDataSpace and defTempSpace variables in the LenelUser.ora script to the appropriate tablespace names before running the script.
a. Select the File > Open menu option. The script loads into Oracle SQLPlus Worksheet.
b. Navigate to C:\ Program Files\OnGuard\DBSetup\New.
c. Select LenelUser.ora.
Note: If the file is not displayed, type *.ora in the Filename field and click [Open].
d. Click [Open]. Click the button to run the script.
5. Verify there were no errors. You should see the following text:
Advanced Installation Topics

Create a Restricted Lenel User
“User created.”
“Grant succeeded.”
“Commit complete.”
Step 8: Configure Authentication
Oracle requires the configuration of an authentication method for Database Setup to run successfully. There are two options for authentication:
• Create a new Oracle user with Windows authentication credentials for single sign-on.
• Provide the Lenel user credentials in the application.config file.
For more information, refer to Chapter 8: Database Authentication for Web Applications on page 63.
Step 9: Install Your OnGuard License
A license is required to run the OnGuard software. The license file comes from Lenel, and has the extension *.xml, *.lic, or *.lic.xml. Install only one license per system, usually on the server. For more information, refer to the Installation Guide.
Step 10: Run Database Setup
After installing OnGuard 2013 and creating the default Lenel user, run Database Setup.
Note: If Windows single sign-on is used for database authentication, log in as the domain user specified during the Oracle user creation.
Create a Restricted Lenel User
Advanced Oracle users who do not want to grant the DBA role to the Lenel user should create a restricted Lenel user. Refer to @@<Path to OnGuard Install Disc>\program files\OnGuard\DBSetup\New\LenelUser.ora for more details.
Advanced Installation Topics 27

Installing and Configuring Oracle 10g Server Software
28
Alternatively, if the LENEL_RESTRICTEDUSER_ROLE has not been created, enter the commands described in Create a Restricted User Role on page 28.
Then run the following commands:
CREATE USER LENEL IDENTIFIED BY "MULTIMEDIA" DEFAULT TABLESPACE LENEL_DATA TEMPORARY TABLESPACE LENEL_TEMP;
GRANT CONNECT, RESOURCE, LENEL_RESTRICTEDUSER_ROLE TO LENEL;
Commit;
Note: The Lenel user provides OnGuard functionality only. Any database level administration, such as backups and restores, must be performed by a different user with those permissions.
Create a Restricted User Role
Assign this role to users providing the minimum system privileges OnGuard requires instead of providing a DBA role. The role can then be assigned to the Lenel or Windows Authenticated users (for example, domain user). Enter the following commands in SQL Plus or SQL Plus Worksheet, and then run as the SYSTEM user connected to the Oracle <SID>:
CREATE ROLE "LENEL_RESTRICTEDUSER_ROLE" NOT IDENTIFIED;
GRANT ALTER ANY INDEX TO "LENEL_RESTRICTEDUSER_ROLE";
GRANT ALTER ANY PROCEDURE TO "LENEL_RESTRICTEDUSER_ROLE";
GRANT ALTER ANY SEQUENCE TO "LENEL_RESTRICTEDUSER_ROLE";
GRANT ALTER ANY TABLE TO "LENEL_RESTRICTEDUSER_ROLE";
GRANT ALTER ANY TRIGGER TO "LENEL_RESTRICTEDUSER_ROLE";
GRANT CREATE ANY INDEX TO "LENEL_RESTRICTEDUSER_ROLE";
GRANT CREATE ANY PROCEDURE TO "LENEL_RESTRICTEDUSER_ROLE";
GRANT CREATE ANY SEQUENCE TO "LENEL_RESTRICTEDUSER_ROLE";
GRANT CREATE ANY TABLE TO "LENEL_RESTRICTEDUSER_ROLE";
GRANT CREATE ANY TRIGGER TO "LENEL_RESTRICTEDUSER_ROLE";
GRANT DELETE ANY TABLE TO "LENEL_RESTRICTEDUSER_ROLE";
GRANT DROP ANY INDEX TO "LENEL_RESTRICTEDUSER_ROLE";
GRANT DROP ANY PROCEDURE TO "LENEL_RESTRICTEDUSER_ROLE";
GRANT DROP ANY SEQUENCE TO "LENEL_RESTRICTEDUSER_ROLE";
GRANT DROP ANY TABLE TO "LENEL_RESTRICTEDUSER_ROLE";
GRANT DROP ANY TRIGGER TO "LENEL_RESTRICTEDUSER_ROLE";
GRANT EXECUTE ANY PROCEDURE TO "LENEL_RESTRICTEDUSER_ROLE";
GRANT INSERT ANY TABLE TO "LENEL_RESTRICTEDUSER_ROLE";
GRANT SELECT ANY DICTIONARY TO "LENEL_RESTRICTEDUSER_ROLE";
GRANT SELECT ANY SEQUENCE TO "LENEL_RESTRICTEDUSER_ROLE";
GRANT SELECT ANY TABLE TO "LENEL_RESTRICTEDUSER_ROLE";
Advanced Installation Topics

Create a Restricted Lenel User
GRANT UPDATE ANY TABLE TO "LENEL_RESTRICTEDUSER_ROLE";
COMMIT;
Advanced Installation Topics 29

Installing and Configuring Oracle 10g Server Software
30
Advanced Installation Topics
CHAPTER 3 Configuring Oracle 10g Client Software
IMPORTANT: If you are using Windows 7, you might need to run Oracle applications, such as the Net Configuration Assistant, as an Administrator for configuration changes to persist.
Oracle 10g Client Installation and Configuration
Step 1: Install Oracle 10g Client
1. Insert the Oracle 10g Client disc in your disc drive. This will launch the Autorun program. Alternately you may launch the installation by executing the setup.exe file on the disc.
2. Click [Install/Deinstall Products].
3. The Welcome window is displayed. Click [Next].
4. The Select Installation Type window is displayed.
a. Select the Administrator radio button.
b. Click [Next].
5. The Specify Home Details window is displayed.
a. Use the default settings or specify a different destination location.
b. Click [Next].
6. The Product-Specific Prerequisite Checks window is displayed.
a. Verify that the requirements are met.
b. Click [Next].
7. Review the summary and click [Install].
Note: The installation process may take several minutes or more depending on your system resources.
8. After the installation is complete, the Net Configuration Assistant Welcome window is displayed.
Advanced Installation Topics 31

Configuring Oracle 10g Client Software
32
Note: If you are installing Oracle Client as part of the Oracle Server installation instructions, you may click cancel and return to step Step 2: Install the Latest Approved Patch Sets on page 14.
a. Verify that Perform typical configuration is NOT selected.
b. Click [Next].
9. The Select Naming Methods window is displayed.
a. Verify that “Local Naming” is listed under Selected Naming Methods.
b. Select “Easy Connect Naming” from the Available Naming Methods list and click [>].
c. Click [Next].
10. In the Service Name window, enter the global database name and click [Next].
Advanced Installation Topics

Oracle 10g Client Installation and Configuration
11. In the Select Protocols window, verify that TCP is highlighted and click [Next].
12. In the Host name field, type the name of the computer that Oracle is installed on, and then click [Next].
13. Select the Yes, perform a test radio button and click [Next].
14. The [Change Login] button window is displayed.
a. Click [Change Login].
b. Enter the LENEL user credentials for the Oracle database.
c. Click [OK].
15. After successfully testing the service, click [Next].
16. Verify the Net Service Name is “LENEL”, and then click [Next].
17. Select the No radio button, and click [Next].
18. Click [Next] through the remaining messages and then click [Finish].
19. The original installation window displays a completed message. Click [Exit].
20. Install the latest approved Patch Set. The list of approved patch sets can be found on the Lenel Web site at: http://www.lenel.com/support/downloads/onguard#compatibility-charts.
Step 2: Install OnGuard 2013 Software
You may now install OnGuard. For more information, refer to the “Installing OnGuard 2013 Enterprise” chapter in the Enterprise Setup & Configuration User Guide.
Advanced Installation Topics 33

Configuring Oracle 10g Client Software
34
Advanced Installation Topics
CHAPTER 4 Installing and Configuring Oracle 11g Release 2 Server Software
The following overview and instructions are for a standard Oracle 11g Server installation. If your Oracle installation includes any customization or non-default selections, your procedures will differ from those provided in this chapter. Make adjustments accordingly. If you are installing a different version of Oracle or are installing Oracle on a different version of Windows, your windows might be different.
If installing the 64-bit version of Oracle you must also install the 32-bit version of the client tools or OnGuard will not work properly.
If you are using Windows 7, you might need to run Oracle applications, such as the Net Configuration Assistant, as an Administrator for configuration changes to persist.
You cannot install Oracle 11g on a server with the IP address set to DHCP.
When installing and configuring Oracle 11g, do not close any Oracle windows while a program is running. Doing so can result in configuration errors and loss of data. Instead, utilize the Oracle close or cancel buttons.
If the OnGuard server is not located on the same computer as Oracle 11g Server, then Oracle 11g Client must be installed on the OnGuard server to allow it to connect to the database. Oracle 11g Client must also be installed on all OnGuard clients.
Oracle 11g Server Software Configuration Overview
The following steps are necessary to install and configure Oracle Server for use with OnGuard:
1. Install Oracle 11g. For more information, refer to Step 1: Install Oracle 11g Server Software on page 36.
2. Run the Net Configuration Assistant. For more information, refer to Step 2: Run the Net Configuration Assistant on page 36.
3. Create the Lenel database. For more information, refer to Step 3: Create the Lenel Database on page 37.
4. Verify that the system works. For more information, refer to Step 4: Verify the System is Working on page 39.
Advanced Installation Topics 35

Installing and Configuring Oracle 11g Release 2 Server Software
36
5. Create the Lenel user. For more information, refer to Step 5: Create the Lenel User on page 39.
6. Install OnGuard 2013.
7. Configure authentication. For more information, refer to Step 7: Configure Authentication on page 40.
8. Run Setup Assistant. For more information, refer to Step 8: Run Setup Assistant on page 40.
Oracle 11g Server Software Installation and Configuration
The following installation and configuration steps are for Oracle 11g. Steps may vary for other versions of Oracle.
Step 1: Install Oracle 11g Server Software
1. Insert the Oracle 11g Server disc into your disc drive to launch the Autorun program. Click [Install/Deinstall Products]. Alternately, launch the installation by double-clicking the setup.exe file on the disc.
2. The Configure Security Updates window opens. Complete the email and password fields as desired, and then click [Next].
3. The Select Installation Option window opens. Select Install database software only, and then click [Next].
4. The Grid Installation Options window opens. Select Single instance database installation, and then click [Next].
5. The Select Product Languages window opens. Move the desired languages to the right pane using the arrow buttons, and then click [Next].
6. The Select Database Edition window opens. Select Enterprise Edition, and then click [Next].
7. The Specify Installation Location window opens. Either leave the fields at their default values, or modify the field values as desired, and then click [Next].
8. The Prerequisite Checks window opens, followed by the Summary window.
a. Verify that the requirements are met, as shown in the Summary window.
b. Click [Install]. The installation progress is shown in the Install Product window.
Note: The installation process may take several minutes or more depending on your system resources.
9. The Finish window opens. Click [Close].
10. Install the latest approved Patch Set. The list of approved patch sets can be found on the Lenel Web site at: http://www.lenel.com/support/downloads/onguard#compatibility-charts.
Step 2: Run the Net Configuration Assistant
1. Click the Start button, then select Programs > Oracle - OraDB11g_home1> Configuration and Migration Tools > Net Configuration Assistant. This launches the Net Configuration Assistant.
2. The Net Configuration Assistant Welcome window opens.
a. Confirm that the Listener configuration radio button is selected.
b. Click [Next].
3. The Listener window opens.
a. Select the Add radio button.
Advanced Installation Topics
Oracle 11g Server Software Installation and Configuration
b. Click [Next].
4. The Listener Name window opens.
a. Confirm that the Listener name is LISTENER.
b. Click [Next].
5. The Select Protocols window opens.
a. Confirm that TCP is a selected protocol.
b. Click [Next].
6. The TCP/IP Protocol window opens.
a. Select the Use the standard port number of 1521 radio option.
b. Click [Next].
7. The More Listeners window opens.
a. Confirm that the No radio button is selected.
b. Click [Next].
8. The Listener Configuration Done window opens. Click [Next].
9. The Oracle Net Configuration Assistant: Welcome window opens.
a. Select the Naming Methods configuration radio button.
b. Click [Next].
10. The Select Naming Methods window opens.
a. In the Available Naming Methods list, select Easy Connect Naming.
b. Click the right arrow button.
c. Repeat steps a and b for Local Naming.
d. Click [Next].
11. The Naming Methods Configuration Done window opens. Click [Next].
12. Click [Finish].
Step 3: Create the Lenel Database
1. Click the Windows Start button, and then select Programs > Oracle - OraDB11g_home1 > Configuration and Migration Tools > Database Configuration Assistant. This launches the Database Configuration Assistant.
2. The Welcome window opens. Click [Next].
3. The Operations window opens.
a. Verify that the Create a database radio button is selected.
b. Click [Next].
Note: The Change database configuration and Delete a database options are enabled only if you have an existing database.
4. The Database Templates window opens.
a. Select the Custom Database radio button.
b. Click [Next].
Note: Selecting a template that does not include datafiles gives you full control to specify and change every database parameter.
5. Specify a Global Database Name.
Advanced Installation Topics 37

Installing and Configuring Oracle 11g Release 2 Server Software
38
a. Type LENEL in the Global Database Name field.
Note: The Global Database Name is not case-sensitive.
b. Click [Next].
Note: The Oracle System Identifier (SID) automatically populates.
6. The Management Options window opens. Select the management options that best suit your needs, and then click [Next].
7. The Database Credentials window opens. Type the passwords you would like for the different accounts, and then click [Next].
8. The Database File Locations window opens. Choose the storage options and file locations that best suit your needs, and then click [Next].
9. The Recovery Configuration window opens. Choose and configure a recovery option, and then click [Next].
10. The Database Content window opens.
a. Deselect all database components.
b. Click [Standard Database Components].
c. Deselect each component, and then click [OK].
Note: If your database will be managed locally, you might want to select the Enterprise Manager Repository component.
d. Click [Next].
11. The Initialization Parameters window opens. Leave the default settings on the Memory, Sizing, Character Sets, and Connection Mode tabs, and then click [Next].
12. The Database Storage window opens.
13. Rename the tablespaces and specify a reasonable size for holding the OnGuard information.
a. Enter the new tablespace name in the Name field.
b. Double-click the Size field, enter the new size, and then click [OK].
The following table identifies the necessary tablespace names and minimum sizes.
Note: You can specify other names in the Name field. If you do, you must set the defDataSpace variable to the new Name. For more information, refer to Step 5: Create the Lenel User on page 39.
14. After Database Storage configuration is complete, click [Next].
15. The Creation Options window opens.
a. Confirm that the Create Database check box is selected.
Old Tablespace names
New Tablespace names New size (MB)
USERS LENEL_DATA 50
TEMP LENEL_TEMP 50
SYSTEM SYSTEM 50
UNDOTBS1 UNDOTBS1 50
Advanced Installation Topics

Oracle 11g Server Software Installation and Configuration
b. Click [Finish].
16. The Confirmation window opens. Confirm the configuration, and then click [OK].
17. The Database Configuration Assistant window opens and shows the database creation progress.
a. When the dialog opens, click [Password Management] and then configure each user’s password and whether the account is locked.
b. Click [OK], and then click [Exit]. The database creation finishes.
Step 4: Verify the System is Working
1. Click the Windows Start button, and then select Programs > Oracle - OraDB11g_home1> Configuration and Migration Tools > Net Configuration Assistant. This launches the Net Configuration Assistant.
2. The Net Configuration Assistant: Welcome window opens.
a. Select the Local Net Service Name configuration radio button.
b. Click [Next].
3. The Net Service Name Configuration window opens.
a. Select the Test radio button.
b. Click [Next].
4. The Select Net Service Name window opens.
a. Select the local net service name from the drop-down.
b. Click [Next].
5. The Connecting window opens. Click [Change Login].
6. The Change Login dialog opens.
a. Type the SYSTEM username and password (this is the same username and password that you set the password for in Step 3: Create the Lenel Database on page 37).
b. Click [Next].
7. After successfully testing the service, click [Next].
8. Click [Finish].
Step 5: Create the Lenel User
The following instructions are for creating the Lenel user with the SQLPlus.
1. Click the Windows Start button, and then select Programs > Oracle - OraDB11g_home1 > Application Development > SQLPlus.
2. Log in using the system account.
IMPORTANT: You must be logged in as SYSTEM to run the script.
• Type the SYSTEM@<SID> username and password. This is the same username and password that you set the password for in Step 3: Create the Lenel Database on page 37.
3. Verify Oracle connects properly. You should see “Connected to” in the console.
IMPORTANT: Advanced Oracle users who do not want to grant the Lenel user the DBA role can restrict the Lenel users’ roles and system privileges by following step 4. If the LENEL user is restricted, then it provides OnGuard functionality only. Any database level administration, such as backups and restores, must be performed by a different user with higher database roles and system privileges.
Advanced Installation Topics 39
Installing and Configuring Oracle 11g Release 2 Server Software
40
4. To create the Lenel user with the desired level of roles and system privileges, at the SQL prompt, run the following command(s):
a. @@<Path to OnGuard Install Disc>\program files\OnGuard\DBSetup\New\LenelUser.ora or
b. If the LENEL_RESTRICTEDUSER_ROLE has not been created, enter the commands described in Create a Restricted User Role on page 41.
Then run the following commands:
CREATE USER LENEL IDENTIFIED BY "MULTIMEDIA" DEFAULT TABLESPACE LENEL_DATA TEMPORARY TABLESPACE LENEL_TEMP;
GRANT CONNECT, RESOURCE, LENEL_RESTRICTEDUSER_ROLE TO LENEL;
Commit;
Note: If you are not using the LENEL_DATA and LENEL_TEMP data spaces, you must change the LENEL_DATA and LENEL_TEMP references on the CREATE USER line to the desired table spaces you want to use. Contact your database administrator for details.
5. Verify there were no errors. You should see the following text:
“User created.”
“Grant succeeded.”
“Commit complete.”
6. Exit SQL.
Step 6: Install OnGuard 2013
Install the OnGuard 2013 software.
Step 7: Configure Authentication
Oracle requires the configuration of an authentication method for Database Setup to run successfully. There are two options for authentication:
• Create a new Oracle user with Windows authentication credentials for single sign-on.
• Provide the Lenel user credentials in the application.config file.
Step 8: Run Setup Assistant
Setup Assistant runs automatically after the OnGuard installation completes. Setup Assistant includes
the OnGuard License and Database Setup processes.
A license is required to run the OnGuard software. The license file comes from Lenel, and has the extension *.xml, *.lic, or *.lic.xml. Install only one license per system, usually on the server. For more information, refer to the Installation Guide.
Note: If Windows single sign-on is used for database authentication, log in as the domain user specified during the Oracle user creation.
Advanced Installation Topics

Create a Restricted User Role
Create a Restricted User Role
Assign this role to users providing the minimum system privileges OnGuard requires instead of providing a DBA role. The role can then be assigned to the Lenel or Windows Authenticated users (for example, domain user). Enter the following commands in SQL Plus or SQL Plus Worksheet, and then run as the SYSTEM user connected to the Oracle <SID>:
CREATE ROLE "LENEL_RESTRICTEDUSER_ROLE" NOT IDENTIFIED;
GRANT ALTER ANY INDEX TO "LENEL_RESTRICTEDUSER_ROLE";
GRANT ALTER ANY PROCEDURE TO "LENEL_RESTRICTEDUSER_ROLE";
GRANT ALTER ANY SEQUENCE TO "LENEL_RESTRICTEDUSER_ROLE";
GRANT ALTER ANY TABLE TO "LENEL_RESTRICTEDUSER_ROLE";
GRANT ALTER ANY TRIGGER TO "LENEL_RESTRICTEDUSER_ROLE";
GRANT CREATE ANY INDEX TO "LENEL_RESTRICTEDUSER_ROLE";
GRANT CREATE ANY PROCEDURE TO "LENEL_RESTRICTEDUSER_ROLE";
GRANT CREATE ANY SEQUENCE TO "LENEL_RESTRICTEDUSER_ROLE";
GRANT CREATE ANY TABLE TO "LENEL_RESTRICTEDUSER_ROLE";
GRANT CREATE ANY TRIGGER TO "LENEL_RESTRICTEDUSER_ROLE";
GRANT DELETE ANY TABLE TO "LENEL_RESTRICTEDUSER_ROLE";
GRANT DROP ANY INDEX TO "LENEL_RESTRICTEDUSER_ROLE";
GRANT DROP ANY PROCEDURE TO "LENEL_RESTRICTEDUSER_ROLE";
GRANT DROP ANY SEQUENCE TO "LENEL_RESTRICTEDUSER_ROLE";
GRANT DROP ANY TABLE TO "LENEL_RESTRICTEDUSER_ROLE";
GRANT DROP ANY TRIGGER TO "LENEL_RESTRICTEDUSER_ROLE";
GRANT EXECUTE ANY PROCEDURE TO "LENEL_RESTRICTEDUSER_ROLE";
GRANT INSERT ANY TABLE TO "LENEL_RESTRICTEDUSER_ROLE";
GRANT SELECT ANY DICTIONARY TO "LENEL_RESTRICTEDUSER_ROLE";
GRANT SELECT ANY SEQUENCE TO "LENEL_RESTRICTEDUSER_ROLE";
GRANT SELECT ANY TABLE TO "LENEL_RESTRICTEDUSER_ROLE";
GRANT UPDATE ANY TABLE TO "LENEL_RESTRICTEDUSER_ROLE";
COMMIT;
Advanced Installation Topics 41

Installing and Configuring Oracle 11g Release 2 Server Software
42
Advanced Installation Topics
CHAPTER 5 Configuring Oracle 11g Release 2 Client Software
IMPORTANT: If you are using Windows 7, you might need to run Oracle applications, such as the Net Configuration Assistant, as an Administrator for configuration changes to persist.
Oracle 11g Client Installation and Configuration
Step 1: Install Oracle 11g Client
IMPORTANT: If installing the 64-bit version of Oracle, you must also install the 32-bit version of the client tools or OnGuard will not work properly.
1. Insert the Oracle 11g Client disc in your disc drive. This will launch the Autorun program. Alternately, you can launch the installation by executing the setup.exe file on the disc.
2. The Select Installation Type window opens.
a. Select the Administrator radio button.
b. Click [Next].
3. The Select Product Languages window opens. Move the desired languages to the right pane using the arrow buttons, and then click [Next].
4. The Specify Installation Location window opens.
a. Verify the Oracle Base and Software Location information is correct.
b. Click [Next].
5. The Perform Prerequisite Checks window opens, followed by the Summary window.
a. Verify that the requirements are met.
b. Click [Finish].
The installation process may take several minutes or more depending on your system resources.
6. The Finish window opens. Click [Close].
7. Install the latest approved Patch Set. The list of approved patch sets can be found on the Lenel Web site at: http://www.lenel.com/support/downloads/onguard#compatibility-charts.
Advanced Installation Topics 43

Configuring Oracle 11g Release 2 Client Software
44
Step 2: Install OnGuard 2013 Software
You may now install OnGuard. For more information, refer to the “Installing OnGuard 2012 Enterprise” chapter in the Enterprise Setup & Configuration User Guide.
Advanced Installation Topics

Advanced Installation Topics


CHAPTER 6 Transparent Data Encryption
Transparent data encryption (TDE) performs real-time I/O encryption and decryption of the database and database log files. (Standard OnGuard log files are not encrypted.)
The encryption uses a database encryption key (DEK), which is stored in the database boot record for availability during recovery. The DEK is a symmetric key secured by using a certificate stored in the master database of the server or an asymmetric key protected by an EKM module. TDE protects data “at rest,” meaning the data and log files. It provides the ability to comply with many laws, regulations, and guidelines established in various industries.
For detailed information, refer to “Understanding Transparent Data Encryption” http://msdn.microsoft.com/en-us/library/bb934049.aspx.
IMPORTANT: TDE does not provide encryption across communication channels. For more information about how to encrypt data across communication channels, refer to “Encrypting Connections to SQL Server” http://msdn.microsoft.com/en-us/library/ms189067.aspx.
Enabling TDE
To utilize TDE for the OnGuard database, the system should have Windows Server 2008 and SQL Server 2008 R2 installed.
To enable TDE, refer to the section, “Using Transparent Database Encryption” in the article, “Understanding Transparent Data Encryption” http://msdn.microsoft.com/en-us/library/bb934049.aspx.
Note: Encryption is CPU intensive. Therefore, servers with high CPU usage will suffer performance loss.
Advanced Installation Topics 47

Transparent Data Encryption
48
Backing up a TDE Protected Database
To back up a TDE protected database, refer to step 2 of the section, “Creating a TDE protected database” in the article, “Moving a TDE Protected Database to Another SQL Server” http://msdn.microsoft.com/en-us/library/ff773063.aspx
When enabling TDE, you should immediately back up the certificate and the private key associated with the certificate. If the certificate ever becomes unavailable or if you must restore or attach the database on another server, you must have backups of both the certificate and the private key or you will not be able to open the database.
Moving a TDE Protected Database
For information on moving a TDE protected database to another SQL server, refer to http://msdn.microsoft.com/en-us/library/ff773063.aspx.
If you need to move the database, the database can be attached or restored on another SQL server.
Attach the Database to Another SQL Server
1. Detach the TDE protected database by using Management Studio. In Object Explorer, right-click the database, point to tasks, and then select Detach.
2. Move or copy the detached database files from the source server to the same location on the destination server.
3. Move or copy the backup of the server certificate and the private key file from the source server to the same location on the destination server.
4. Create a database master key on the destination instance of SQL Server.
5. Recreate the server certificate by using the original server certificate backup file. The password must be the same as the password that was used when the backup was created.
6. Attach the database that is being moved by using Management Studio. In Object Explorer, right-click the database, and then select Attach.
Restore the Database on Another SQL Server
1. Back up the TDE protected database by using Management Studio. In Object Explorer, right-click the database, point to tasks, and then select Backup.
2. Move or copy the backup database file from the source server to the same location on the destination server.
3. Move or copy the backup of the server certificate and the private key file from the source server to the same location on the destination server.
4. Create a database master key on the destination instance of SQL Server.
5. Recreate the server certificate by using the original server certificate backup file. The password must be the same as the password that was used when the backup was created.
6. Restore the database that is being moved by using Management Studio. In Object Explorer, right-click the database, and then select Restore.
Advanced Installation Topics

CHAPTER 7 Remote Installation of OnGuard
• WARNING! • These features should only be used for client installations. Lenel does not recommend or support centralized installation or upgrading of servers because servers require additional care and attention.
Automatic Client Updates
The Client Update Server allows the OnGuard server workstation to automatically update client workstations. When a client workstation opens an OnGuard application, the application detects that the software version does not match the database. The application then allows the user to either cancel the login or update the client software. This functionality only exists for applications that are part of the OnGuard installation suite.
Two services enable this functionality, one installed on the server workstation (LS Client Update Server service) and another installed on each client workstation (LS Client Update service). These services are only used to update client workstations. Server workstations must still be updated manually. The LS Client Update Server service is not running by default, but the LS Client Update service starts automatically.
IMPORTANT: After enabling the automatic client updates feature, all Security Utility system modifications and license terms are accepted automatically on the client workstation being updated.
Notes: At startup, Client Update application checks to see if server components are installed on the client workstation. If the application finds any server component other than the Communication Server, then the client update is cancelled and the user sees an error message.
For information on troubleshooting automatic client update functionality, refer to Client Update Troubleshooting in the System Administration User Guide.
This functionality only applies to new releases and cumulative hotfixes; incremental updates are not distributed by this service. This is because incremental updates are
Advanced Installation Topics 49

Remote Installation of OnGuard
50
typically applied to a subset of client workstations, and therefore should not be forced onto all client workstations.
Hotfix packages always contain the base installation plus the hotfix. This would allow, for example, a client workstation with OnGuard 6.4 to update directly to OnGuard 6.5 Hotfix 1.
Server Performance Considerations and .MSI File Locations
Remember the following when deciding which workstation should host the LS Client Update Server service:
• The LS Client Update Server service can only be installed on one workstation in the system. Select the server that provides the best download performance to all client workstations in the system.
• The server must download the client installation package in less than 30 minutes, or the download will time out. A network speed of 70 ms or less (round trip), with a packet loss of 5% or less, will allow the client installation package to download in the required time.
• Ping the client workstations from the server workstation you are considering to confirm these performance specifications. If the performance is not adequate, select a different server location, or push the client installation package to the client workstations to prepare for the upgrade.
• The client installation package (.MSI file) is located on the server workstation at the root level of the installed OnGuard directory. On the client workstations, the installation package is placed in the \ClientUpdate subdirectory of each client’s installed OnGuard directory.
• If using the Automatic Client Update process to install OnGuard on a workstation that does not already have OnGuard, or on a client workstation running a version of OnGuard earlier than 6.5, place the client installation package into the same directory as the other required LS Client Update service application files. For more information, refer to Manual Client Update Workflow on page 52.
Note: When the OnGuard update installation completes, the client installation package (.MSI file) is deleted from the client workstation automatically.
LS Client Update Server service
This server workstation function is configured and enabled using the Client Update form in System Administration > Administration > System Options. For Enterprise or Distributed ID installations, these settings are configured on a per-system basis and the information is not replicated. For more information on configuring the LS Client Update Server service, refer to Client Update Form Procedures in the System Administration User Guide.
LS Client Update service
This client workstation service is responsible for installing OnGuard so that users do not need Administrator privileges. The application also communicates with the server-side LS Client Update Server service when downloading and installing update packages.
The LS Client Update service is installed automatically with OnGuard 6.5 or later, but the application can be run manually on workstations with versions of OnGuard earlier than 6.5, or workstations with no installed versions of OnGuard. Manually running this application requires Administrator privileges.
Advanced Installation Topics

Automatic Client Updates
Automatic Client Update Workflow
The workflow between the LS Client Update Server service and the LS Client Update service is as follows:
Notes: This workflow assumes that the OnGuard server workstation is already installed and configured to run the LS Client Update Server service, as described in Client Update Form Procedures in the System Administration User Guide.
This workflow also assumes that the server and client are version 6.5 or later.
1. The client user attempts to login to an OnGuard application, and then receives a message that the OnGuard installation is out of date, and asks if the user wants to upgrade now or later. If user selects later, the OnGuard application closes.If the user selects now, the OnGuard application closes and the LS Client Update service application launches.
Notes: The user always has the option to cancel a client update that is in progress.
If the user cancels while in the download queue (refer to Step 4) and then initiates a client update again, the user is placed at the back of the queue.
If the user cancels while the installation package is downloading and then initiates a client update again, the download continues from where it left off (download is queued if the maximum concurrent downloads is reached, as described in Step 4).
If the user cancels an installation that is in progress, the user can run the installation package again.
2. The LS Client Update service application attempts to reach the LS Client Update Server service location, and displays an error message if unsuccessful.
3. Once the connection is made, the LS Client Update service application requests a download of the OnGuard installation package.
Notes: Before requesting the download, the LS Client Update service checks to see if the installation package already exists on the client workstation. If it does, the process skips to Step 7.
If the download begins but fails (due to timeout, network outage, cancelled by client, and so on), the download will resume from where it left off when the user restarts the download.
4. The LS Client Update Server service either starts downloading the OnGuard installation package and logs a Download Started transaction in the User Transaction Log, or places the client in the download queue.
If the maximum number of concurrent client downloads is reached, the LS Client Update service application informs the user of the position in the queue. The server logs a Queued for Download transaction in the User Transaction Log.
5. The LS Client Update service application receives the installation package, and verifies it was not corrupted during transfer.
6. The LS Client Update service application notifies the LS Client Update Server service that the download was successful. The server logs a Download Finished transaction in the User Transaction Log.
Advanced Installation Topics 51
Remote Installation of OnGuard
52
7. The LS Client Update service application starts installing the OnGuard client update with no user prompts (unattended installation mode). The client also notifies the LS Client Update Server service to log an Installation Started transaction in the User Transaction Log.
Note: If the installation fails, the user can retry the installation. Users are notified that the installation has failed. After fixing the cause of the failure, the user clicks [Retry].
8. Once the installation is complete, the LS Client Update service application notifies the LS Client Update Server service to log an Installation Finished transaction in the User Transaction Log.
9. The LS Client Update service application deletes the installation package from the client workstation.
10. The LS Client Update service application notifies the user that the installation is complete. The user then closes the application.
Note: To run a detailed report of the client update statistics, refer to Running a Client Update Report in the System Administration User Guide.
Manual Client Update Workflow
The workflow between the LS Client Update Server service and the LS Client Update service is as follows:
Notes: This workflow assumes that the OnGuard server workstation is already installed and configured to run the LS Client Update Server service, as described in Client Update Form Procedures in the System Administration User Guide.
This workflow also assumes that the required LS Client Update service application file was placed manually on client workstations with versions of OnGuard earlier than 6.5, or on workstations that do not have OnGuard installed at all. The required file is: Lnl.OG.AutoUpgrade.Client.exe.
This file can be found on the OnGuard disc, in the \program files\OnGuard directory. This same directory also contains the installation package.txt file, which describes the purpose and process for using the application file, and which can be distributed to the client workstations along with the application file.
In addition, Microsoft .NET Framework 4.0 must be installed before running the LS Client Update Service application manually.
The application file is small enough that it can be easily distributed as an e-mail attachment.
1. The user launches the Lnl.OG.AutoUpgrade.Client.exe application.
Note: The application prompts users who do not have Administrator privileges to provide an administrator’s user name and password. The Client Update workflow will not proceed without an administrator’s login information.
2. The LS Client Update service application asks the user for the LS Client Update Server service location, and the port to use. For client workstations that do not already have OnGuard installed, the application allows the user to select the Installation type:
• Typical client (all features)
• Monitoring client
• Badging and credential client
Advanced Installation Topics

Creating a Customized OnGuard Installation Package
3. The LS Client Update service application attempts to reach the LS Client Update Server service location, and displays an error message if unsuccessful.
4. Once the connection is made, the LS Client Update service application requests a download of the OnGuard installation package.
Notes: Before requesting the download, the LS Client Update service checks to see if the installation package already exists on the client workstation. If it does, the process skips to Step 8.
If the download begins but fails (due to timeout, network outage, cancelled by client, and so on), the download will resume from where it left off when the user restarts the download.
5. The LS Client Update Server service either starts downloading the OnGuard installation package and logs a Download Started transaction in the User Transaction Log, or informs the user of the position in the download queue.
6. The LS Client Update service application receives the installation package, and verifies it was not corrupted during the transfer.
7. The LS Client Update service application notifies the LS Client Update Server service that the download was successful. The server logs a Download Finished transaction in the User Transaction Log.
8. The LS Client Update service application starts installing the OnGuard client update with the normal user prompts. The client also notifies the LS Client Update Server service to log an Installation Started transaction in the User Transaction Log.
Note: If the installation fails, the user can retry the installation. Users are notified that the installation has failed. After fixing the cause of the failure, the user clicks [Retry].
9. Once the installation is complete, the LS Client Update service application notifies the LS Client Update Server service to log an Installation Finished transaction in the User Transaction Log.
10. The LS Client Update service application deletes the installation package from the client workstation.
11. The LS Client Update service application notifies the user that the installation is complete. The user then closes the application.
Note: To run a detailed report of the client update statistics, refer to “Running a Client Update Report” in the System Administration User Guide.
Creating a Customized OnGuard Installation Package
• WARNING! • Computers that will use the custom .MSI to install OnGuard must have all OnGuard prerequisites items installed manually. The normal check that the OnGuard installation performs to make sure your system has these prerequisites does not occur when installing with the .MSI. For information on the prerequisites needed see the Installation User Guide.
The general steps for performing a remote installation of OnGuard include:
1. Run the Administration Installation Wizard to create a setup image tailored for the client installation. For more information, refer to Create a Setup Image for the Client on page 54.
Advanced Installation Topics 53

Remote Installation of OnGuard
54
2. Verify the Administration Installation Wizard was successful. For more information, refer to Verify the Administration Installation Wizard was Successful on page 55.
3. Perform a pilot rollout of the software with a group of users.
4. Mass deploy the OnGuard package on client machines. For more information, refer to Deploy the Centralized OnGuard Installation on page 55.
Create a Setup Image for the Client
The Administration Installation Wizard is used to create a setup image for the client. The setup image will be a file with a .MSI extension. The Administration Installation Wizard can be run multiple times to create multiple configurations (customized *.MSI files). To use the .msi file, copy the file along with the full OnGuard disk image to the target machine.
Note: You will need to know the type and location of the database, the location of the License Server, and which OnGuard components you wish to install to complete this wizard.
To create a setup image for the client:
1. Insert the OnGuard 2012 disc. Depending on whether autorun is enabled a splashscreen may appear. If a splashscreen appears, exit out of it.
2. Click the Start button, then select Run.
3. In the Open field, type:
D:/setup.exe /a
Substitute your CD/DVD-ROM drive letter for D:.
4. The Administration Wizard starts. Click [Next].
5. The Client Information window is displayed.
a. Select whether the system database will be SQL or Oracle.
b. Specify the workstation name where the system database that clients will use resides.
c. Specify the workstation name that hosts the system’s License Server.
d. Click [Next].
6. The Client Application Selection window is displayed.
a. Select or deselect the check boxes to select which client applications will be included in the custom package.
b. Click [Next].
7. The Network Information window is displayed.
a. Select the Network location for this image by clicking [Change].
b. The Change Current Destination Folder window is displayed. Specify the location where you would like to save the package, then click [OK].
c. Click [Create].
8. The Installation Wizard Progress window is displayed. A window is displayed that indicates that the installation was successful. Click [Finish].
9. You can repeat steps 1-8 for each additional configuration you wish to create. Each time the Administration Installation Wizard is run, a configuration (customized *.MSI file) will be created. Be sure to use a unique, descriptive name for each configuration so that you can easily distinguish one from another.
Advanced Installation Topics

Creating a Customized OnGuard Installation Package
Manual Integration of Third Party Dependencies
Because of limitations with the centralized client package you must manually integrate several third party dependencies. These include:
• .NET Framework (located on the Supplemental Materials disc at: \Prerequisite Software\Microsoft .NET Framework 4.0).
• INTEL (located on the OnGuard Installation disc at: \Temp\INTEL).
• VCPP8 Runtime (located on the OnGuard Installation disc at: \Temp\VCPP8Runtime).
• VCPP9 Runtime (located on the OnGuard Installation disc at: \Temp\VCPP9Runtime).
• XML 6.0 (located on the OnGuard Installation disc at: ISSetupPrerequisites\{726F97A8-63B9-4A58-ACFB-B8A56B383740}).
Verify the Administration Installation Wizard was Successful
1. Navigate to the installation package, which is saved in the location that you specified in step 7.
2. Verify that the .MSI file(s) that you created (with the name that you specified in step 7) are listed. There will be other folders as well. These contain the OnGuard files that will be installed.
Deploy the Centralized OnGuard Installation
There are two types of installations that can be done: advertised and forced. Both of these installations require a transform to be applied to the Windows Installer package created for the OnGuard software.
• In an advertised installation (also referred to as “install on demand”), the person doing the installation advertises out what program features can be installed on a machine. Shortcuts for those features (i.e., Alarm Monitoring, FormsDesigner, MapDesigner, etc.) appear in the OnGuard start menu. Once a shortcut is clicked on, the application will then install.
• In a forced installation (also referred to as “assign and publish”), the person administering the installation can choose what applications are going to be installed on the machines on the network and send this information along with other required system information in the transform. The setup can then get assigned out to the computers and when they boot up, OnGuard will get installed.
An advertised installation is limited by the fact that the contents of the source installation disc need to be available over the network at any time where someone tries to use a new advertised feature (because you won’t know when someone will click on the application, triggering it to install). In a forced installation the image only needs to be available at the time of installation.
You should do a pilot deployment with a small group of clients to determine and address any problems prior to mass deployment.
Advanced Installation Topics 55

Remote Installation of OnGuard
56
Advanced Installation Topics
CHAPTER 8 VMware
VMware provides a way to create a virtual machine. OnGuard server software and the Communication Server are certified to run on VMware ESXi.
VMware Installation
Installation of VMware ESXi should be performed according to the manufacturer documentation. Be sure the physical server (host) and storage array are listed on the hardware compatibility list for ESXi to meet the minimum requirements.
Also, take into consideration the minimum requirements of the applications that will be installed on the virtual machine (guest).
Virtual Machine Setup
Once installation of ESXi is complete, start the vSphere Client. Using the vSphere Client, connect to the ESXi server and create a new virtual machine.
Creating a New Virtual Machine
1. From the vSphere Client, click File > New > New Virtual Machine. Doing so launches the Create New Virtual Machine wizard.
2. Select the configuration for the virtual machine by defining the operating system, machine name, disk capacity, etc. If needed, some of these settings (for example, memory) may be modified after the virtual machine has been created.
3. Install the operating system.
4. Install VMware Tools.
Note: For more detailed information, refer to the VMware documentation.
Advanced Installation Topics 57

VMware
58
5. Once the virtual machine has been created, install OnGuard according to the instructions in the Installation Guide.
Recommended Hardware Configurations
The following are general recommendations and may change depending on the size and scope of the system.
OnGuard VMware configurations
System TypeOperating systems with versions 32-bit 64-bit
ADV and ENTREGLT Servers with database on same computer
Windows Server 2008 SP2/SQL 2008 SP1 Std.
3 GB RAM
40 GB drive space
4 GB RAM
40 GB drive space
Windows 7/SQL 2008 SP1 Std.
2 GB RAM
36 GB drive space
3 GB RAM
36 GB drive space
ADV and ENTREGLT Servers with database on separate computer
Windows 2008 Server SP2
3 GB RAM
40 GB drive space
4 GB RAM
40 GB drive space
Windows 7 2 GB RAM
36 GB drive space
3 GB RAM
36 GB drive space
PRO and ENTREG Servers with database on same computer
Windows Server 2008 SP2/SQL 2008 SP1 Std.
3 GB RAM
40 GB drive space
4 GB RAM
40 GB drive space
PRO and ENTREG Servers with database on separate computer
Windows Server 2008 SP2
3 GB RAM
40 GB drive space
4 GB RAM
40 GB drive space
Advanced Installation Topics
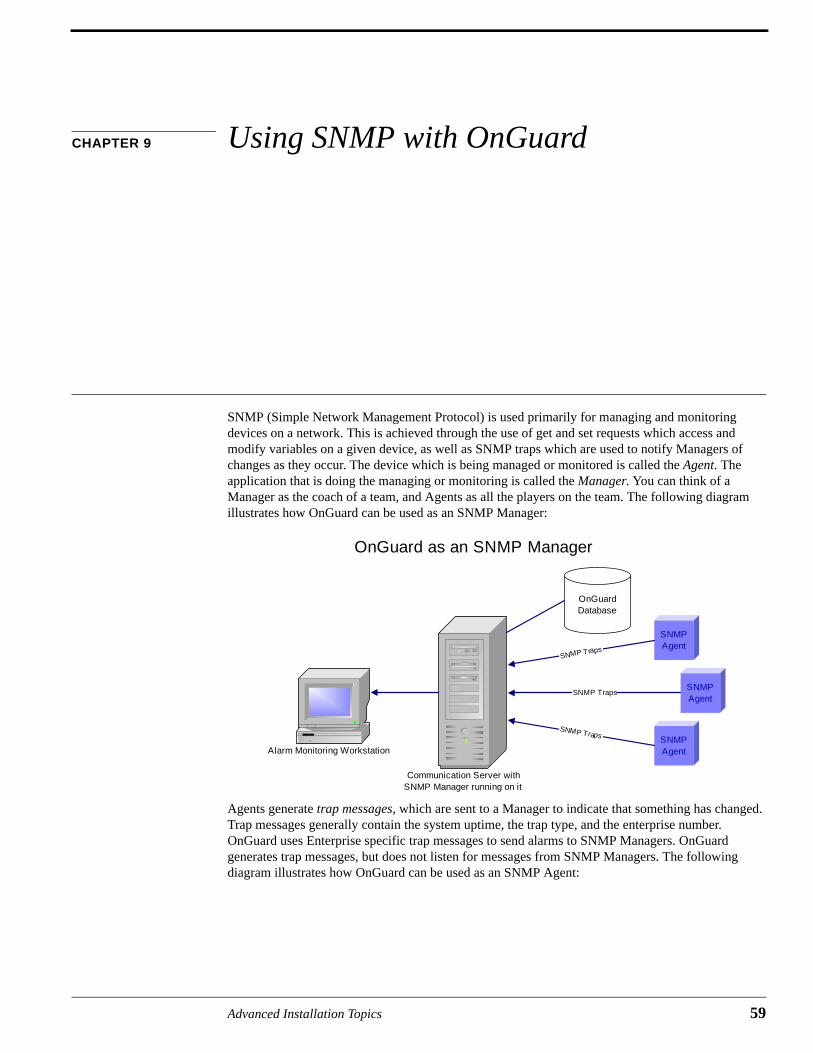
CHAPTER 9 Using SNMP with OnGuard
SNMP (Simple Network Management Protocol) is used primarily for managing and monitoring devices on a network. This is achieved through the use of get and set requests which access and modify variables on a given device, as well as SNMP traps which are used to notify Managers of changes as they occur. The device which is being managed or monitored is called the Agent. The application that is doing the managing or monitoring is called the Manager. You can think of a Manager as the coach of a team, and Agents as all the players on the team. The following diagram illustrates how OnGuard can be used as an SNMP Manager:
Agents generate trap messages, which are sent to a Manager to indicate that something has changed. Trap messages generally contain the system uptime, the trap type, and the enterprise number. OnGuard uses Enterprise specific trap messages to send alarms to SNMP Managers. OnGuard generates trap messages, but does not listen for messages from SNMP Managers. The following diagram illustrates how OnGuard can be used as an SNMP Agent:
OnGuardDatabase
Alarm Monitoring Workstation
Communication Server withSNMP Manager running on it
SNMPAgent
SNMPAgent
SNMPAgent
SNMP Traps
SNMP Traps
SNMP Traps
OnGuard as an SNMP Manager
Advanced Installation Topics 59

Using SNMP with OnGuard
60
Configuring OnGuard as an SNMP Agent requires the use of DataConduIT and the DataConduIT Queue Server, as shown in the diagram that follows.
SNMP Manager OnGuardsystem
SNMPAgent
SNMPAgent
SNMP Traps
SNMP Traps
SNMP Traps
OnGuard as an SNMP Agent
Third-partySNMP Manager
OnGuard as an SNMP Agent
OnGuard Database
DataConduIT
SNMP
Linkage Server
DataConduIT Queue Server
SNMP Agent
SNMP Agent
Internal architecture of OnGuard system
OnGuard system
(Internal Architecture)
Advanced Installation Topics

OnGuard as an SNMP Manager
Why use SNMP with OnGuard? This depends on whether you are using OnGuard as an SNMP Manager or as an SNMP Agent.
OnGuard as an SNMP Manager
When OnGuard is used as an SNMP Manager:
• You can monitor hardware or software applications in OnGuard that you couldn’t monitor before without a specific integration.
• If you already have OnGuard installed and are using a third-party application to monitor SNMP traps, you can now move that functionality over to OnGuard and monitor everything in a central location.
• By loading into OnGuard the MIB file for the SNMP Agents you are monitoring, you can customize how the information from the SNMP Agent is displayed in Alarm Monitoring
• Based on the information received and displayed in OnGuard, you can create custom alarm and Global I/O linkages for the trap, as well as take advantage of other existing OnGuard functionality.
To set up OnGuard to function as an SNMP Manager, you must configure an SNMP Manager on a workstation. This is done through System Administration. In addition to configuring the SNMP Manager, you can also load up third party MIB files into OnGuard, which will allow you to customize how SNMP Traps are handled and displayed in OnGuard. For more information, refer to the SNMP Managers Folder chapter in the System Administration User Guide.
OnGuard as an SNMP Agent
OnGuard hardware and software events can be reported as SNMP traps to third-party applications with SNMP trap support.
To configure OnGuard as an SNMP Agent, you must configure an SNMP Trap Message queue within the DataConduIT Message Queue configuration in System Administration. You can specify what events you want sent out through this queue (as SNMP Traps) and where you want them sent. For more information, refer to the DataConduIT Message Queues Folder chapter in the System Administration User Guide.
After setting this up, you must load the Lenel MIB file (located in the SNMP folder on the OnGuard Supplemental Materials disc) into your SNMP Manager application. For more information, refer to the SNMP Managers Folder chapter in the System Administration User Guide.
Configuring SNMP
The following steps must be completed before you configure OnGuard as either an SNMP Manager or an SNMP Agent:
1. Install the Windows SNMP components. You will need your Windows CD to complete this procedure. For more information, refer to Install the Windows SNMP Components on page 62.
2. Install a license with SNMP support.
Advanced Installation Topics 61

Using SNMP with OnGuard
62
To configure OnGuard as an SNMP Manager, please refer to Configuring OnGuard as an SNMP Manager on page 64.
To configure OnGuard as an SNMP Agent, please refer to Configuring OnGuard as an SNMP Agent on page 68.
Install the Windows SNMP Components
Before configuring an SNMP Manager to run on a Communication Server, the Windows SNMP components must be installed on the Communication Server machine.
IMPORTANT: You will need your Windows CD to complete this procedure.
1. Click the Windows Start button and navigate to the Control Panel.
2. Double-click “Add or Remove Programs”.
3. The Add or Remove Programs window opens. Click “Add/Remove Windows Components”.
4. The Windows Components Wizard window opens. Select the Management and Monitoring Tools check box.
5. Click [Details].
6. The Management and Monitoring Tools window opens. Verify that the Simple Network Management Protocol check box is selected, and then click [OK].
Advanced Installation Topics

Configuring SNMP
7. Click [Next].
8. The Configuring Components window opens. The status bar is updated as the installation proceeds.
9. When prompted, insert the Windows CD-ROM.
a. If the Windows autorun screen opens, close it.
b. If your CD-ROM is the D drive, click [OK].
c. If your CD-ROM is not the D drive by default, navigate to the correct drive letter of your CD-ROM. Select the I386 folder, and then click [OK].
10. A message indicating that you have successfully completed the Windows Components Wizard is displayed. Click [Finish].
Advanced Installation Topics 63

Using SNMP with OnGuard
64
Install a License with SNMP Support
The following SNMP features in OnGuard are licensed:
• Support for SNMP Managers. If you are licensed to use this feature, “SNMP Managers Support” in the Access Control Options section is set to “true”.
• Number of SNMP trap message queues. The number of queues you are licensed to use is displayed in the “Maximum Number of SNMP Trap Message Queues” setting in the General section of the license.
Configuring OnGuard as an SNMP Manager
Prerequisites:
1. Install the Windows SNMP components. You will need your Windows CD to complete this procedure. For more information, refer to Install the Windows SNMP Components on page 62.
2. Install a license with SNMP support.
To configure OnGuard as an SNMP Manager:
1. Add an SNMP Manager using System Administration. For more information, refer to Add an SNMP Manager on page 64.
2. Add Agents using System Administration. For more information, refer to Add Agents on page 65.
3. Load the MIB file(s). For more information, refer to Load the MIB File(s) on page 66.
Add an SNMP Manager
1. In System Administration, select SNMP Managers from the Additional Hardware menu. The SNMP Managers folder opens.
2. On the SNMP Managers tab, click [Add].
3. If segmentation is not enabled, skip this step. If segmentation is enabled:
a. The Segment Membership window opens. Select the segment that this SNMP Manager will be assigned to.
Advanced Installation Topics

Configuring OnGuard as an SNMP Manager
b. Click [OK].
4. In the Name field, type a name for the SNMP Manager.
5. Select whether the SNMP Manager will be online.
a. Allow the Online check box to remain selected if you want the SNMP Manager to be ready for use. When an SNMP Manager is online, the Communication Server listens for trap messages from SNMP Agents.
b. Deselect the Online check box if the SNMP Manager is not ready for use. When an SNMP Manager is not online, the Communication Server does not listen for trap messages from SNMP Agents.
6. On the Location sub-tab, select the Workstation (or server) that the SNMP Manager is or will be running on in order to receive events. The Communication Server must be present on the specified workstation. You can either type the name in the field, or use the [Browse] button to view a list of available workstations.
Notes: You are required to enter the workstation’s NetBIOS name. (The NetBIOS name is specified when Windows networking is installed/configured.)
Only one SNMP Manager is allowed to run on each Communication Server. You can have several Communication Servers running with an SNMP Manager on each one and have all Agents in that part of the network configured to report to the local Manager. This would help localize network traffic.
7. Click [OK].
Add Agents
If OnGuard receives an event from an Agent that has not been defined, it will automatically add an Agent for it and have the default name set to the IP address of the Agent. You can then go in and modify the Name to whatever you want. On a segmented system, Agents are added to the Manager’s segment by default, but they can also be assigned to different segments as well.
To add an Agent manually:
1. In System Administration, select SNMP Managers from the Additional Hardware menu. The SNMP Managers folder opens.
2. Click the SNMP Agents tab.
3. Click [Add].
4. In the Name field, type a name for the SNMP Agent.
5. In the IP address field, enter the IP address of the SNMP Agent.
6. (Optional) In the Location field, enter the location of the SNMP Agent.
7. (Optional) In the Description field, enter a description of the SNMP Agent.
8. Click [OK].
9. Repeat steps 1-8 for all Agents you wish to add.
MIB File Overview
SNMP reports its information through the use of variables with name/value combinations. Many of the SNMP variables are designed for network applications or hardware. MIB (Management Information Base) files describe an enterprise’s variable structure and allow a user to report hardware-specific information. Inside a MIB file, an enterprise number is specified. Nearly every
Advanced Installation Topics 65
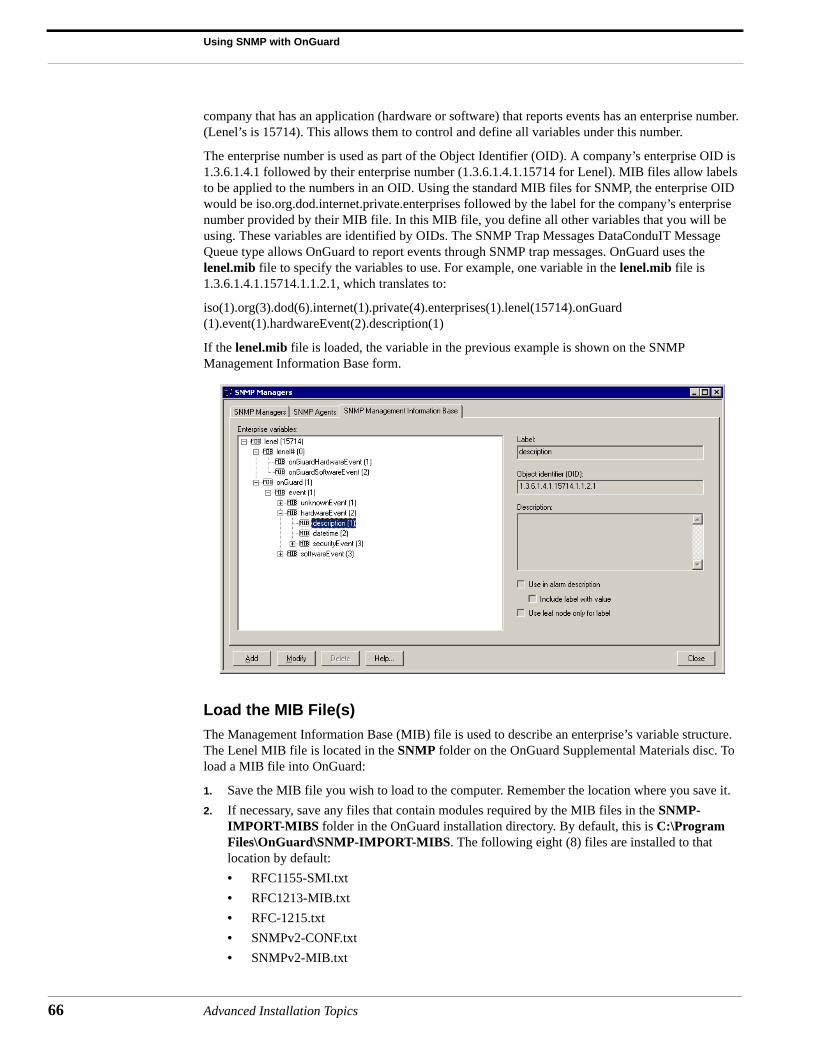
Using SNMP with OnGuard
66
company that has an application (hardware or software) that reports events has an enterprise number. (Lenel’s is 15714). This allows them to control and define all variables under this number.
The enterprise number is used as part of the Object Identifier (OID). A company’s enterprise OID is 1.3.6.1.4.1 followed by their enterprise number (1.3.6.1.4.1.15714 for Lenel). MIB files allow labels to be applied to the numbers in an OID. Using the standard MIB files for SNMP, the enterprise OID would be iso.org.dod.internet.private.enterprises followed by the label for the company’s enterprise number provided by their MIB file. In this MIB file, you define all other variables that you will be using. These variables are identified by OIDs. The SNMP Trap Messages DataConduIT Message Queue type allows OnGuard to report events through SNMP trap messages. OnGuard uses the lenel.mib file to specify the variables to use. For example, one variable in the lenel.mib file is 1.3.6.1.4.1.15714.1.1.2.1, which translates to:
iso(1).org(3).dod(6).internet(1).private(4).enterprises(1).lenel(15714).onGuard(1).event(1).hardwareEvent(2).description(1)
If the lenel.mib file is loaded, the variable in the previous example is shown on the SNMP Management Information Base form.
Load the MIB File(s)
The Management Information Base (MIB) file is used to describe an enterprise’s variable structure. The Lenel MIB file is located in the SNMP folder on the OnGuard Supplemental Materials disc. To load a MIB file into OnGuard:
1. Save the MIB file you wish to load to the computer. Remember the location where you save it.
2. If necessary, save any files that contain modules required by the MIB files in the SNMP-IMPORT-MIBS folder in the OnGuard installation directory. By default, this is C:\Program Files\OnGuard\SNMP-IMPORT-MIBS. The following eight (8) files are installed to that location by default:
• RFC1155-SMI.txt
• RFC1213-MIB.txt
• RFC-1215.txt
• SNMPv2-CONF.txt
• SNMPv2-MIB.txt
Advanced Installation Topics

Configuring OnGuard as an SNMP Manager
• SNMPv2-SMI.txt
• SNMPv2-TC.txt
• SNMPv2-TM.txt
Notes: This location can be changed in the ACS.INI file by adding the following setting:
[SNMPManager]
MIBDir=“drive:\absolute\path\to\MIB\directory”
To make changes in the ACS.INI file on a Windows 7 computer, you must right-click on the ACS.INI file and run it as an Administrator.
This directory is processed when a MIB file is loaded in order to load modules that may be imported into the MIB file being loaded. Only files containing imported modules should be saved in this directory. In most cases, the default files in this directory are sufficient. If additional files are required, determine which additional files define the modules imported by the MIB file and place them in this directory.
If a MIB file for an imported module is not present in this directory and the processor encounters an undefined identifier in the MIB file it’s parsing, it will log an error to MIBProcessor.log in the OnGuard logs directory.
3. In System Administration, select SNMP Managers from the Additional Hardware menu. The SNMP Managers folder opens.
4. Click the SNMP Management Information Base tab.
5. Click [Add].
6. The Open window is displayed. Navigate to the MIB file you wish to load, and then click [Open]. In this example, the lenel.mib file is being loaded.
7. The MIB file will be processed.
• If the MIB file is successfully parsed, the results will be displayed in the Enterprise variables listing window. You can expand the items in the tree and look at the defined variables.
• If the MIB file cannot be parsed, an error will be generated, which is written to the MIBProcessor.log file. An error is most likely due to a malformed MIB file or a lack of certain MIB files that are imported by the MIB file you are trying to parse.
Note: After a MIB file has been loaded into OnGuard, the actual file is no longer needed.
Modify an SNMP Management Information Base Variable
1. In System Administration, select SNMP Managers from the Additional Hardware menu. The SNMP Managers folder opens.
Advanced Installation Topics 67
Using SNMP with OnGuard
68
2. Click the SNMP Management Information Base tab.
3. Expand the items in the Enterprise variables listing window.
4. Click on the variable you wish to modify, then click [Modify].
5. Change the Label if you wish.
6. Enter a Description for the variable if you wish.
7. Select the Use in alarm description check box if the node’s information will be used in the alarm description column of Alarm Monitoring. You can have this option set on multiple nodes and for each one that appears in the trap message as a variable, it will be included in the alarm description. The variable name will be discarded.
8. Select the Include label with value check box if you selected the Use in alarm description check box and if you want to see the variable name with the value.
9. Select the Use leaf node only check box if you want the SNMP Manager to ignore anything “higher” than this node in the OID.
10. Click [OK].
SNMP Reports
Reports are run from System Administration or ID CredentialCenter. For more information, please refer to the Reports Folder chapter in the System Administration or ID CredentialCenter User Guide. There are two SNMP-related reports that can be run:
• SNMP Agents - lists all SNMP Agents sorted by segment and name
• SNMP Management Information Base Configuration - lists all MIB data grouped by enterprise
The SNMP Management Information Base Configuration report lists each node’s label and OID (Object ID) description. If configured, the following additional options will also be listed:
• Use in alarm description
• Include label with value
• Use leaf node only for label
Configuring OnGuard as an SNMP Agent
Prerequisites:
1. Install the Windows SNMP components. You will need your Windows CD to complete this procedure. For more information, refer to Install the Windows SNMP Components on page 62.
2. Install a license with SNMP support.
To configure OnGuard as an SNMP Agent:
1. Add a new DataConduIT Message Queue of the type “SNMP Trap Messages” in System Administration. For more information, refer to Add a DataConduIT Message Queue of Type “SNMP Trap Messages” on page 69.
2. Load the Lenel.MIB file. For more information, refer to Load the Lenel.MIB File on page 70.
Note: For more information, please refer to the DataConduIT Message Queues Folder in the System Administration User Guide.
Advanced Installation Topics

Configuring OnGuard as an SNMP Agent
Add a DataConduIT Message Queue of Type “SNMP Trap Messages”
1. From the Administration menu, select DataConduIT Message Queues.
2. On the DataConduIT Message Queues form, click [Add].
3. The Add DataConduIT Message Queue window opens.
a. Select the “SNMP Trap Messages” Queue type.
b. Click [OK].
4. On the General sub-tab:
a. In the Queue name field, type the name of the queue. The name is case-sensitive.
b. In the SNMP manager field, type the name of the queue manager.
c. Note that the Queue type and Operation that you selected are displayed, but cannot be modified.
5. On the Settings sub-tab:
a. If you wish to have photo, signature, and fingerprint information sent in messages, select the Include photos and signature in messages check box.
Note: Including photo information in the messages makes the size of the message sent much larger.
b. Select whether a message will be sent when cardholder, badge, visitor, and linked accounts are added, modified, or deleted.
c. If you wish to have a message sent when an access event occurs, select the Send a message when access events occur check box.
d. If you wish to have a message sent when a security event occurs, select the Send a message when security events occur check box.
6. Using the Advanced sub-tab is optional and for advanced users. On the Advanced sub-tab you may:
a. Type an object event WMI query directly into the Object event WMI query textbox.
b. Type an access and security event WMI query directly into the Access and security event WMI query textbox.
7. Click [OK].
Advanced Installation Topics 69

Using SNMP with OnGuard
70
Load the Lenel.MIB File
After configuring the SNMP Trap Messages queue, load the lenel.mib file into the SNMP Manager so that it knows how to handle and display the variables it receives. The Lenel MIB file is located in the Support Center\SNMP folder on the OnGuard Supplemental Materials disc.
If you are using OnGuard as an SNMP agent please refer to the documentation for the third-party SNMP Manager you are using to monitor OnGuard.
SNMP Manager Copyright Information
---- Part 1: CMU/UCD copyright notice: (BSD like) -----
Copyright 1989, 1991, 1992 by Carnegie Mellon University
Derivative Work - 1996, 1998-2000
Copyright 1996, 1998-2000 The Regents of the University of California
All Rights Reserved
Permission to use, copy, modify and distribute this software and its documentation for any purpose and without fee is hereby granted, provided that the above copyright notice appears in all copies and that both that copyright notice and this permission notice appear in supporting documentation, and that the name of CMU and The Regents of the University of California not be used in advertising or publicity pertaining to distribution of the software without specific written permission.
CMU AND THE REGENTS OF THE UNIVERSITY OF CALIFORNIA DISCLAIM ALL WARRANTIES WITH REGARD TO THIS SOFTWARE, INCLUDING ALL IMPLIED WARRANTIES OF MERCHANTABILITY AND FITNESS. IN NO EVENT SHALL CMU OR THE REGENTS OF THE UNIVERSITY OF CALIFORNIA BE LIABLE FOR ANY SPECIAL, INDIRECT OR CONSEQUENTIAL DAMAGES OR ANY DAMAGES WHATSOEVER RESULTING FROM THE LOSS OF USE, DATA OR PROFITS, WHETHER IN AN ACTION OF CONTRACT, NEGLIGENCE OR OTHER TORTIOUS ACTION, ARISING OUT OF OR IN CONNECTION WITH THE USE OR PERFORMANCE OF THIS SOFTWARE.
---- Part 2: Networks Associates Technology, Inc copyright notice (BSD) -----
Copyright (c) 2001-2002, Networks Associates Technology, Inc
All rights reserved.
Redistribution and use in source and binary forms, with or without modification, are permitted provided that the following conditions are met:
• Redistributions of source code must retain the above copyright notice, this list of conditions and the following disclaimer.
• Redistributions in binary form must reproduce the above copyright notice, this list of conditions and the following disclaimer in the documentation and/or other materials provided with the distribution.
• Neither the name of the Networks Associates Technology, Inc nor the names of its contributors may be used to endorse or promote products derived from this software without specific prior written permission.
THIS SOFTWARE IS PROVIDED BY THE COPYRIGHT HOLDERS AND CONTRIBUTORS “AS IS” AND ANY EXPRESS OR IMPLIED WARRANTIES, INCLUDING, BUT NOT LIMITED TO, THE IMPLIED WARRANTIES OF MERCHANTABILITY AND FITNESS FOR A PARTICULAR PURPOSE ARE DISCLAIMED. IN NO EVENT SHALL THE COPYRIGHT
Advanced Installation Topics
SNMP Manager Copyright Information
HOLDERS OR CONTRIBUTORS BE LIABLE FOR ANY DIRECT, INDIRECT, INCIDENTAL, SPECIAL, EXEMPLARY, OR CONSEQUENTIAL DAMAGES (INCLUDING, BUT NOT LIMITED TO, PROCUREMENT OF SUBSTITUTE GOODS OR SERVICES; LOSS OF USE, DATA, OR PROFITS; OR BUSINESS INTERRUPTION) HOWEVER CAUSED AND ON ANY THEORY OF LIABILITY, WHETHER IN CONTRACT, STRICT LIABILITY, OR TORT (INCLUDING NEGLIGENCE OR OTHERWISE) ARISING IN ANY WAY OUT OF THE USE OF THIS SOFTWARE, EVEN IF ADVISED OF THE POSSIBILITY OF SUCH DAMAGE.
---- Part 3: Cambridge Broadband Ltd. copyright notice (BSD) -----
Portions of this code are copyright (c) 2001-2002, Cambridge Broadband Ltd.
All rights reserved.
Redistribution and use in source and binary forms, with or without modification, are permitted provided that the following conditions are met:
• Redistributions of source code must retain the above copyright notice, this list of conditions and the following disclaimer.
• Redistributions in binary form must reproduce the above copyright notice, this list of conditions and the following disclaimer in the documentation and/or other materials provided with the distribution.
• The name of Cambridge Broadband Ltd. may not be used to endorse or promote products derived from this software without specific prior written permission.
THIS SOFTWARE IS PROVIDED BY THE COPYRIGHT HOLDER “AS IS” AND ANY EXPRESS OR IMPLIED WARRANTIES, INCLUDING, BUT NOT LIMITED TO, THE IMPLIED WARRANTIES OF MERCHANTABILITY AND FITNESS FOR A PARTICULAR PURPOSE ARE DISCLAIMED. IN NO EVENT SHALL THE COPYRIGHT HOLDER BE LIABLE FOR ANY DIRECT, INDIRECT, INCIDENTAL, SPECIAL, EXEMPLARY, OR CONSEQUENTIAL DAMAGES (INCLUDING, BUT NOT LIMITED TO, PROCUREMENT OF SUBSTITUTE GOODS OR SERVICES; LOSS OF USE, DATA, OR PROFITS; OR BUSINESS INTERRUPTION) HOWEVER CAUSED AND ON ANY THEORY OF LIABILITY, WHETHER IN CONTRACT, STRICT LIABILITY, OR TORT (INCLUDING NEGLIGENCE OR OTHERWISE) ARISING IN ANY WAY OUT OF THE USE OF THIS SOFTWARE, EVEN IF ADVISED OF THE POSSIBILITY OF SUCH DAMAGE.
Advanced Installation Topics 71

Using SNMP with OnGuard
72
Advanced Installation Topics
CHAPTER 10 Integrating OnGuard with Citrix XenApp
IMPORTANT: To use OnGuard over the Internet, you must have purchased the optional
Citrix XenApp application.
Citrix XenApp Overview
Citrix XenApp provides support in conjunction with Windows Terminal Server for complete access to configure and operate your OnGuard system through a simple Web browser interface.
OnGuard allows for the installation of web server software and, once the server is configured, unlimited clients (based on licensing connections) can attach to the server and run any of the OnGuard applications over the Internet. Virtually any desktop operating system that supports a Web browser can run OnGuard over the Internet. This includes Windows, Macintosh, Unix, Solaris and Linux.
Procedures
The basic procedure for installing Citrix XenApp on a Windows 2008 R2 Server is:
1. Perform the pre-installation procedures. For more information, refer to Step 1: Perform the Pre-Installation Set-up Procedures on page 74.
2. Create the Citrix database. For more information, refer to Step 2: Create the Citrix Database on page 74.
3. Install Citrix. For more information, refer to Step 3: Install Citrix on the Server on page 75.
4. Configure the License Server. For more information, refer to Step 4: Configure the License Server on page 75.
5. Configure XenApp. For more information, refer to Step 5: Configure XenApp on page 76.
6. Configure the Web interface. For more information, refer to Step 6: Configure the Web Interface on page 77.
7. Publish the OnGuard applications. For more information, refer to Step 7: Publish the OnGuard Applications on page 78.
Advanced Installation Topics 73

Integrating OnGuard with Citrix XenApp
74
8. Install the Citrix clients. For more information, refer to Step 8: Install the Citrix Clients on page 78.
9. Install OnGuard. For more information, refer to Step 9: Install OnGuard on page 78.
10. Access the applications from a client workstation. For more information, refer to Step 10: Access the Applications from a Client Workstation on page 79.
Step 1: Perform the Pre-Installation Set-up Procedures
Note: Do not install any Windows updates, which might cause compatibility issues, especially with Service Pack 1.
1. Use a Microsoft SQL Server 2008 R2 clean install as your starting point.
2. Select Start > Administrative Tools > Server Manager, click [Roles], scroll to Role Services, and then confirm that Web Server, Health and Diagnostics, Logging Tools, and Tracing are installed. If not, contact your System Administrator.
3. Open Administrative Tools > Roles > Add Roles. The Add Roles Wizard opens. Click [Next].
4. Select Remote Desktop Services, then click [Next], and then click [Next] again. Then select:
a. Remote Desktop Session Host
b. Remote Desktop Licensing
c. Remote Desktop Web Access, then click [Next], and then click [Next] again.
i. Select Do not require Network Level Authentication, and then click [Next].
ii. Select the Licensing Mode, and then click [Next].
iii. Administrators is the group allowed to Remote Desktop. Click [Next]
iv. Select Audio and video playback and Audio recording redirection during the Configure Client Experience section of the wizard, and then click [Next].
v. Do not Configure a discovery scope for this license server. Click [Next], and then click [Install].
vi. Restart the server.
5. Under Roles Summary, click [Add Roles].
a. Click [Next] on the Select Server Roles page.
b. Select Application Server, and then click [Add Required Features].
c. Click [Next], and then click [Next] again.
d. Click [Install]
e. Click [Close].
6. Under Web Services (IIS), click [Add Role Services].
a. In the Select Role Services dialog, confirm that all options under IIS 6 Management Compatibility are selected. If they are not, select them and then click [Next].
b. Click [Install].
c. Click [Close].
7. In the Server Manager, click [Configure IE ESC] (located in the Security Information area of Server Manager). Select Off for both Administrators and Users, and then click [OK].
Step 2: Create the Citrix Database
1. Click [Start] and then select All Programs > Microsoft SQL Server 2008 R2 > SQL Server Management Studio.
Advanced Installation Topics
Procedures
2. Enter the Server name, and select <Windows Authentication>. Click [Connect].
3. In the Object Explorer pane, expand the Databases folder.
4. Right-click the Databases folder and select New Database.
5. Name the database CitrixMetaFrame.
6. Click [OK].
Refer to the OnGuard Installation Guide for more information about installing a SQL Server data-base.
Step 3: Install Citrix on the Server
Notes: When installing Citrix, you might need an ISO mounting application.
Ensure that your Remote Desktop services license is current.
Make sure your Citrix license is current. When you obtain this license, make sure your server name is exact as you specify. It is case sensitive.
1. Run the Citrix installer.
2. Click [Install XenApp Server].
3. Click [Add server roles].
4. Click [Enterprise Edition] (or another edition, if desired).
5. Accept the license agreement, and then click [Next].
6. Under Common Roles, select License Server, XenApp, and Web Interface, and then click [Next].
7. Ensure that XML Service IIS Integration is selected. Click [Next], and then click [Next] again.
8. Click [Install]. When the installation finishes, click [Finish].
Note: Now that the server roles are configured, first configure the License Server, followed by the XenApp and Web Interface. This ensures you have a proper license.
Step 4: Configure the License Server
1. Click [Configure] under License Server in the XenApp Server Role Manager.
2. Leave the License Server Port at the default value (27000).
3. Enter a password and then click [OK].
4. Click Start > All Programs > Citrix > Management Consoles > License Administration Console.
5. On the top-right area of the window, click [Administration].
6. Log in with admin and the password entered in step 3, and then click [Submit].
7. In the left tab, click [Vendor Daemon Configuration].
8. Click [Import License], select the Citrix License File, and then click [Import License].
Note: Disregard the Inconsistent Server Host ID message, if shown. This issue will be corrected in a later step.
9. Restart the Citrix Licensing Service.
a. Click Start > Administrative Tools > Services.
b. Right-click Citrix Licensing and then click Restart.
Advanced Installation Topics 75

Integrating OnGuard with Citrix XenApp
76
10. Go back to the License Administration Console and click [Dashboard] next to Administration on the top-right area of the window. If everything is correct, you will see your Citrix license along with a Citrix startup license. It should look similar to this:
• Citrix Start-up License | Server
• Citrix XenApp (Presentation Server) Advanced | Concurrent User
• Citrix XenApp (Presentation Server) Enterprise | Concurrent User
• Citrix XenApp (Presentation Server) Platinum | Concurrent User
• Citrix XenApp (Presentation Server) Standard | Concurrent User
Step 5: Configure XenApp
1. In the XenApp Server Role Manger, under XenApp, click [Configure].
2. Click [Create a new server farm].
3. Name the new farm, and then click [Next].
4. Select <Use an existing license server>, enter the server’s name, and then click [Next].
5. Select <Existing Microsoft SQL Server database>.
6. Enter the database server name, and then enter the database name (which should be CitrixMetaFrame, as configured in Step 2: Create the Citrix Database on page 74).
7. Click [Next].
8. Test for a successful connection, and then click [Next].
9. Ignore the Shadowing information and click [Next].
10. Click [Next].
11. Click [Apply].
12. Click [Finish].
13. Reboot the server.
a. When the server reboots, two screens are shown:
• Change Server - Citrix Online Plug in screen
• Citrix XenApp Server Role Manager screen
b. Click [Cancel] to close both screens.
14. Select Start > All Programs > Citrix > Management Consoles > Citrix Delivery Services Console.
15. In the dialog that opens, click [Disable].
16. The Configure and Run Discovery screen is shown. If not, select Action > Configure and run discovery in the top, next to File.
• Make sure the following are selected:
Citrix Resources
XenApp
Single Sign-on
17. Click [Next].
18. Uncheck Single Sign-on, and then click [Next].
19. Click [Add Local Computer], and then click [Next].
20. Click [Next].
21. Click [Finish].
22. Under XenApp in the Citrix Delivery Services Console, expand the farm you created.
Advanced Installation Topics

Procedures
23. Click [Policies].
24. Select the Computer tab.
25. Select Unfiltered and then click [Edit].
26. Click [Next].
27. In the categories, select Licensing.
28. Click [Add] next to License Server Host Name.
29. Enter the server name and then click [OK].
30. Click [Add] next to the license server port, confirm that the value is still the default of 27000, and then click [OK].
31. Under categories, select Server settings.
32. Click [Add] next to the XenApp product edition and select Enterprise or whatever edition used as the value. Click [OK].
33. Click [Save].
34. Click Start > Run and then type cmd <Enter>.
• If the workstation does not have the Run command on the Start menu, press <Windows key> + R to open the Run command.
35. Type gpupdate /force <Enter>.
36. If you entered the wrong details during the previous steps, you will get an error stating that the required license is not present.
If the previous details were completed correctly, you will see:
• User Policy update has completed successfully
• Computer Policy update has completed successfully
37. Reboot the workstation to make sure these policies take effect.
38. Open the cmd prompt again and enter qfarm /load.
• If your server load is 20000 you have a licensing problem.
• The value should be less than 10000.
Step 6: Configure the Web Interface
1. Select Start > All Programs > Citrix > XenApp Server Role Manager.
2. In the XenApp Server Role Manager, under Citrix Web Interface, click [Configure].
3. In the Citrix Web Interface Management window, under Citrix Web Interface, right-click XenApp Web Sites and select <Create Site>.
4. Select Set as default page for the IIS site and then click [Next].
5. Click [Next].
6. Click [Next].
7. Confirm that Configure this site now is selected and then click [Next].
8. Type the farm name. If you do not remember the Farm name, open the Citrix Delivery Services Console.
9. Click [Add] and then enter the server name.
10. Confirm that the server is listed under Servers, and then click [Next].
11. Click [Next].
12. Click [Next].
13. Check either minimal or full, and then click [Next].
Advanced Installation Topics 77
Integrating OnGuard with Citrix XenApp
78
14. Confirm that Online is selected, and then click [Next].
15. Click [Finish]. The system is now ready to publish applications.
Step 7: Publish the OnGuard Applications
Note: Before installing OnGuard, try publishing Notepad or Calculator to confirm that publishing works correctly.
1. Select Start > All Programs > Citrix > Management Consoles > Citrix Delivery Services Console.
2. Under Actions on the right side, configure and run discovery.
a. Click Next.
b. Uncheck Single Sign-on.
c. Click Next.
d. Click Next.
e. Click Finish.
3. Expand the farm name in the Object Explorer pane, right-click Applications, and then select Publish Application.
4. Click [Next].
5. Enter the Display name and click [Next].
6. Click [Next].
7. Click Browse under the command line, find the application you want to publish, and then click next.
8. Click [Add], double-click servers, double-click the servers you want to add, and then make sure they are listed in Selected Items. Click [OK] and then click [Next].
9. Select Allow anonymous users and click [Next].
10. Click [Next].
11. Click [Finish].
To access your site, enter the server name in Internet Explorer and then log in. You should see and be able to launch the applications.
Step 8: Install the Citrix Clients
To work with applications in Citrix, you must download and install the Citrix Online Plug in.
1. When authenticating to the Citrix server for the first time, you are instructed to download the Citrix client.
2. Click [Client Center].
3. Select For Web Access > Citrix Online Plug-in > Web.
4. Select Download File Manually.
5. Install the Citrix Client.
Step 9: Install OnGuard
1. Install OnGuard. Refer to the OnGuard Installation Guide.
Note: You must choose the Existing SQL option during installation. You must set up the database yourself using the SQL 2008 Studio Manager.
Advanced Installation Topics
Procedures
2. Publish your OnGuard applications as described in Step 7: Publish the OnGuard Applications on page 78. However, before clicking [Finish], click [Configure advanced application settings now].
3. Click [Next] four times.
4. Deselect Enable legacy audio and then click [Next].
5. Change the maximum color quality to 16-bit and then click [Finish].
6. Repeat steps 2 through 5 for each OnGuard application you install.
Step 10: Access the Applications from a Client Workstation
1. In your browser, type your servername, and then log in and launch your applications.
2. If you are a client on another machine, you must install a plugin. Citrix XenApp will prompt you to download the plugin.
Advanced Installation Topics 79

Integrating OnGuard with Citrix XenApp
80
Advanced Installation Topics
Reference

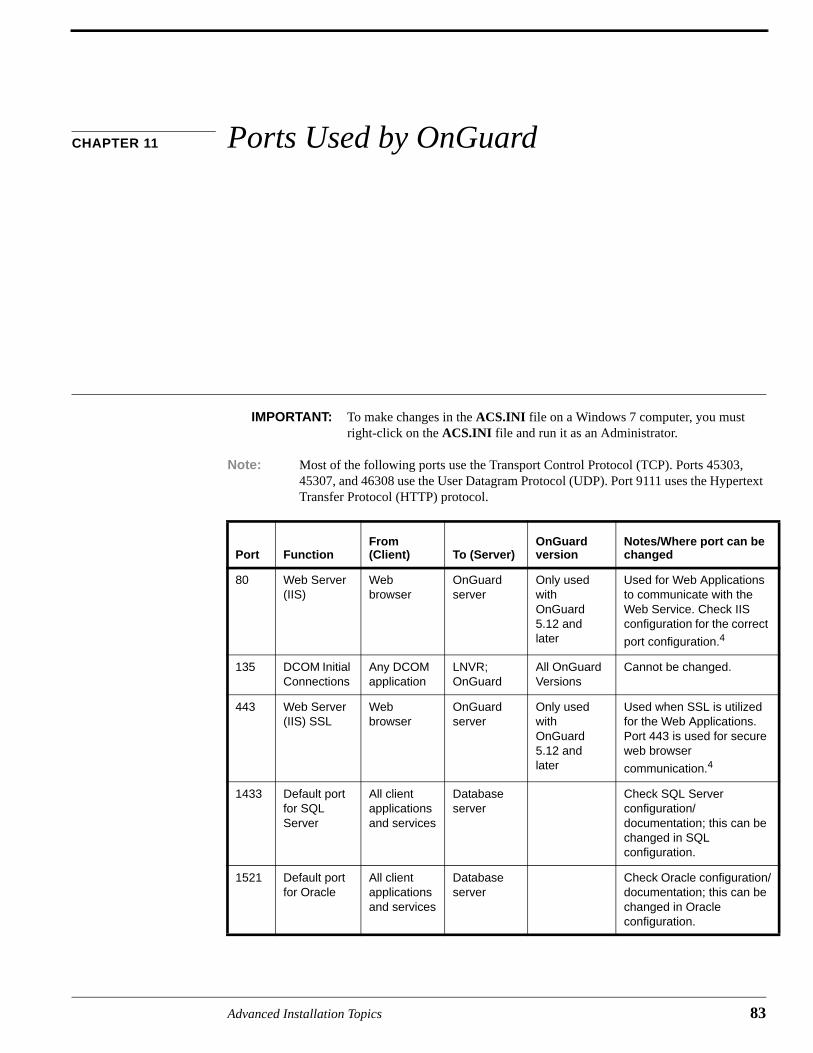
CHAPTER 11 Ports Used by OnGuard
IMPORTANT: To make changes in the ACS.INI file on a Windows 7 computer, you must right-click on the ACS.INI file and run it as an Administrator.
Note: Most of the following ports use the Transport Control Protocol (TCP). Ports 45303, 45307, and 46308 use the User Datagram Protocol (UDP). Port 9111 uses the Hypertext Transfer Protocol (HTTP) protocol.
Port FunctionFrom (Client) To (Server)
OnGuard version
Notes/Where port can be changed
80 Web Server (IIS)
Web browser
OnGuard server
Only used with OnGuard 5.12 and later
Used for Web Applications to communicate with the Web Service. Check IIS configuration for the correct
port configuration.4
135 DCOM Initial Connections
Any DCOM application
LNVR; OnGuard
All OnGuard Versions
Cannot be changed.
443 Web Server (IIS) SSL
Web browser
OnGuard server
Only used with OnGuard 5.12 and later
Used when SSL is utilized for the Web Applications. Port 443 is used for secure web browser
communication.4
1433 Default port for SQL Server
All client applications and services
Database server
Check SQL Server configuration/ documentation; this can be changed in SQL configuration.
1521 Default port for Oracle
All client applications and services
Database server
Check Oracle configuration/documentation; this can be changed in Oracle configuration.
Advanced Installation Topics 83

Ports Used by OnGuard
84
2000 Digital Video - live video streams
Web Video Viewer; Alarm Monitoring; Video Viewer; Remote Monitoring; Intelligent Video Server; Area Access Manager
LNVR OnGuard 5.7 and later
To change, update Registry Setting on Video Recorder HKEY_CLASSES_ROOT\Spider\Resources\Spider\TCPSHAREPARAM.
3001 Connected controllers
Comm Server
Connected controllers
OnGuard 5.0 and later
The default port the Communications Server uses to communicate with controllers. Configurable within System Administration.
4001 Communication Server RPC
System Admin; Alarm Monitoring; Area Access Manager; Data Conduit; Data Exchange; Replicator; Config Download Service; Linkage Server
Comm Server
All OnGuard versions
Can be changed in ACS.INI [Service] section
DriverRpcPort1
4002 Global Output Server RPC
Linkage Server
Global Output Server
OnGuard 5.0 and later
Can be changed in ACS.INI [Service] section
GosRpcPort1
4003 Login Driver RPC
Apps and services that login to the OnGuard database
Login driver OnGuard 5.0 and later
Can be changed in ACS.INI [Service] section
LoginRpcPort1
4004 Communication Server Socket (event reporting)
Alarm Monitoring; Linkage Server
Comm Server
All OnGuard versions
Can be changed in ACS.INI [Service] section
DriverSocketPort1
Port FunctionFrom (Client) To (Server)
OnGuard version
Notes/Where port can be changed
Advanced Installation Topics

4005 Linkage Server RPC
System Admin
Linkage Server
OnGuard 5.7 and later
Can be changed in ACS.INI [Service] section
LinkageServerRpcPort1
4006 Video Server RPC
System Admin; Linkage Server
Archive Server
OnGuard 5.7 and later
Can be changed in ACS.INI [Service] section
VideoServerRpcPort1
4009-4057
Alarm Monitoring RPC
Comm Server
Alarm Monitoring
OnGuard 5.9 and later
Used for the Guard Tour, Grant-Deny Popup and Failure to Acknowledge/Forward Alarm features only. One port used per Monitoring instance on a given machine (typically 4009). Can be changed in ACS.INI [Service] section AcsmntrRpcMinPort,
AcsmntrRpcMaxPort2,3
4059 Replicator Replicator Admin; Replicator Service
Replicator Service
OnGuard 5.9 and later
Can be changed in ACS.INI [Service] section
ReplicatorSocketPort1
4060 Replicator Replicator Admin; Replicator Service
Replicator Service
OnGuard 5.9 and later
Can be changed in ACS.INI [Service] section
ReplicatorRpcPort1
4061 DataExchange
Linkage Server
Data Exchange
OnGuard 5.9 and later
Can be changed in ACS.INI [Service] section
DESocketPort1
4062 DataExchange
Linkage Server
Data Exchange
OnGuard 5.9 and later
Can be changed in ACS.INI [Service] section
DERpcPort1
4065 Replicator Replicator ID Allocation Service
OnGuard 6.3 and later
Port used by Replicator and/or Replication Administration to communicate with the ID Allocation Service to allocate additional IDs for pre-allocated objects
4070 HID Edge device communication
Comm Server
HID Edge devices
OnGuard 6.1 and later
Used for bi-directional communication between OnGuard Communication Server and HID Edge devices. Can be changed in the ACS.INI file under the [HID VertX] section
Listening Port1
Port FunctionFrom (Client) To (Server)
OnGuard version
Notes/Where port can be changed
Advanced Installation Topics 85
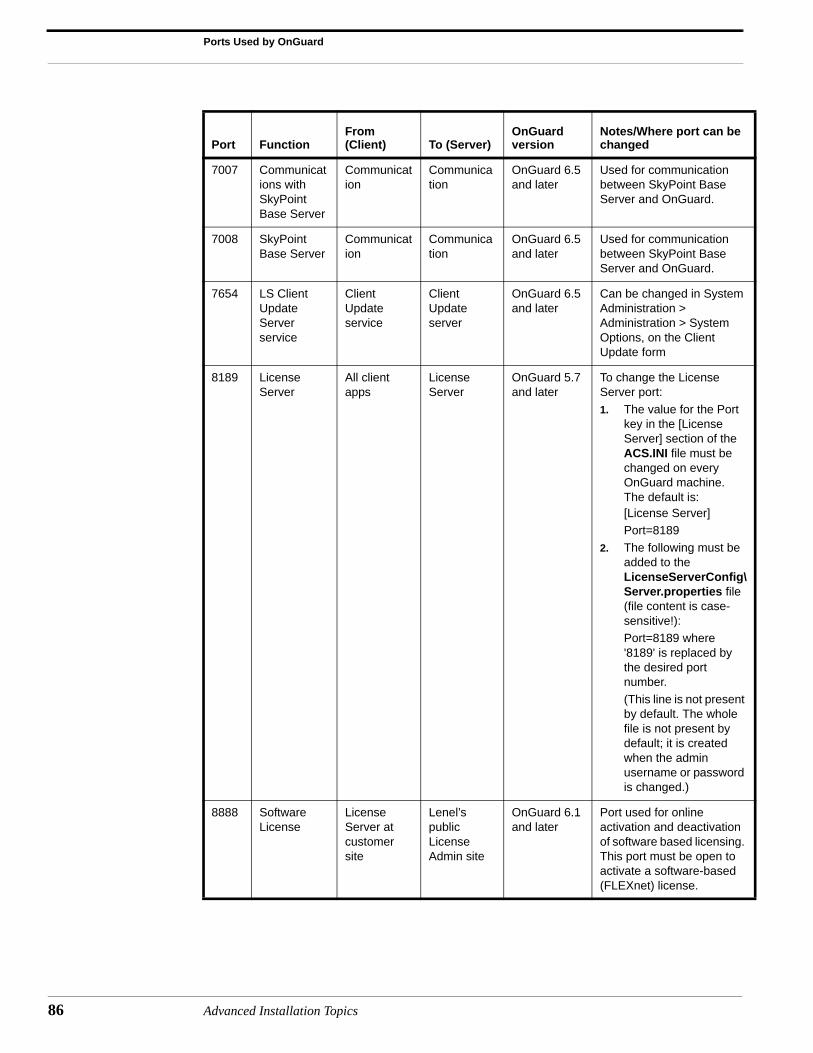
Ports Used by OnGuard
86
7007 Communications with SkyPoint Base Server
Communication
Communication
OnGuard 6.5 and later
Used for communication between SkyPoint Base Server and OnGuard.
7008 SkyPoint Base Server
Communication
Communication
OnGuard 6.5 and later
Used for communication between SkyPoint Base Server and OnGuard.
7654 LS Client Update Server service
Client Update service
Client Update server
OnGuard 6.5 and later
Can be changed in System Administration > Administration > System Options, on the Client Update form
8189 License Server
All client apps
License Server
OnGuard 5.7 and later
To change the License Server port:
1. The value for the Port key in the [License Server] section of the ACS.INI file must be changed on every OnGuard machine. The default is: [License Server]
Port=8189
2. The following must be added to the LicenseServerConfig\Server.properties file (file content is case-sensitive!):
Port=8189 where '8189' is replaced by the desired port number.
(This line is not present by default. The whole file is not present by default; it is created when the admin username or password is changed.)
8888 Software License
License Server at customer site
Lenel’s public License Admin site
OnGuard 6.1 and later
Port used for online activation and deactivation of software based licensing. This port must be open to activate a software-based (FLEXnet) license.
Port FunctionFrom (Client) To (Server)
OnGuard version
Notes/Where port can be changed
Advanced Installation Topics

9111 Application Server (as a Windows Service)
Web hosted apps
App Server OnGuard 5.12 and later
Used for communication with the Application Server service. Lnl.OG.ApplicationServer.Service.exe.config contains the Application Server port configuration. The Web Service web.confg file indicates to the Web Service how to connect to the Application Server (including which port). Uses the HTTP protocol.
Port FunctionFrom (Client) To (Server)
OnGuard version
Notes/Where port can be changed
Advanced Installation Topics 87

Ports Used by OnGuard
88
9999 License Administration
Web browser
License Server
OnGuard 5.7 and later
To change the License Administration port, the following must be added to the LicenseServerConfig\Server.properties file (file content is case sensitive!):
AdminPort=9999 where '9999' is replaced by the desired port number.
(This line is not present by default. The whole file is not present by default; it is created when the admin username or password is changed.)
Note: The License Administration shortcut installed by OnGuard can’t be used if the License Administration port has been changed. To access the License Administration after the port has been changed, simply point the browser to http://licenseserver:9999 (where ‘licenseserver’ is the name of the machine running Licenser Server and ‘9999’ is the port number for License Administration).
10001
Galaxy Ethernet Module
Comm Server
Galaxy panels
OnGuard 5.11 and later
Cannot be changed.
45303
Elevator Terminal Online Status Port
Comm Server
Otis elevator dispatching system
OnGuard 5.12 and later
Acs.ini [Otis] section SSOnlineStatusPort. If changed, must be done on workstation running Communication Server. Uses UDP.
Port FunctionFrom (Client) To (Server)
OnGuard version
Notes/Where port can be changed
Advanced Installation Topics

Digital Video Ports
1 To change these ports, the ACS.INI settings must be changed on all machines (server and clients).
2 To change these ports for a given monitoring station, the ACS.INI settings only need to be changed on that machine.
3 Each port in this range is used for the same purpose, and most of these ports are usually unused. This port range is reserved so that multiple instances of Alarm Monitoring can run on one PC in a terminal services environment. Because each instance of Alarm Monitoring running on one PC requires a unique port, the next available port in this range is used.
4 These ports are used by the LNL-2220 and LNL-3300 when connected to the network.
Digital Video Ports
Access to live and recorded digital video is done through a combination of DCOM and network socket connections.
Abbreviations:
• LNVR - Lenel Network Video Recorder
• LDVR - Lenel Digital Video Recorder
• IVS - IntelligentVideo Server
• IVAS - IntelligentVideo Application Server
• LSVS - Lenel Streaming Video Server
• RM - Remote Monitor
• VV(web) - VideoViewer browser-based client
45307
Elevator Dispatching Heartbeat Port
Otis elevator dispatching system
Comm Server
OnGuard 5.12 and later
Acs.ini [Otis] section SSHeartbeatPort. If changed, must be done on workstation running Communication Server. Uses UDP.
46308
Elevator Terminal Command Port
Comm Server
Otis elevator dispatching system
OnGuard 5.12 and later
Acs.ini [Otis] section SSDECCommandPort. If changed, must be done on workstation running Communication Server. Uses UDP.
Port Function From (Client) To (Server) Protocol
2000a Live video OnGuard, IVS, VV(web), RM
LDVR TCP/IP
DCOM Setting configuration, querying status, playback control, and recorded video
OnGuard, IVS, VV(web), RM
LDVR DCOM
Port FunctionFrom (Client) To (Server)
OnGuard version
Notes/Where port can be changed
Advanced Installation Topics 89

Ports Used by OnGuard
90
<User>b Live video LNVR, RM OnGuard, IVS, VV(web)
UDP/IP or
multicastc
<User>d Live video OnGuard, IVS, VV(web), RM
LNVR TCP/IP
DCOM Setting configuration, querying status, playback control, and recorded video
OnGuard, IVS, VV(web), RM
LNVR DCOM
DCOM Setting configuration, querying status
OnGuard IVS, IVAS DCOM
<User>e Video processing metadata stream
OnGuard, IVAS
IVS TCP/IP
DCOM Video processing event subscription
IVAS IVS DCOM
<User>f Streamed RTP live video LSVS Any RTP client
UDP/IP or multicast
DCOM LSVS configurationg LSVS config tool
LSVS DCOM
6000h Control commands OnGuard RM UDP/IP
6001-7000i Control command response notifications
RM OnGuard UDP/IP
80j Live video retrieval and camera control
LNVR IP Cameras TCP/IP
21 and ####k In-Camera Storage retrieval LNVR IP Cameras TCP/IP
a. This port can be changed through LDVR configuration tools.
b. If live video is transmitted in UDP/IP mode, the OnGuard client determines which port should be used. The range of ports can be limited by launching LnrNI utility on the OnGuard client machine and specifying the port range to use under the Use UDP/IP check box. If live video is transmitted in multicast mode, the LNVR will choose which port should be used by each channel. The range of ports can be specified by launching the LnrNI utility on the LNVR machine, selecting the “Recorder Network Settings” tab and entering the first multicast port. The actual port number for each channel is defined by adding the first multicast port and the channel number. For example, if the first multicast port is 2000, then channel 1 will use port 2001, channel 2 will be 2002, etc.
c. When LNVR starts for the first time, it will randomly choose a multicast address for use with live video and stores this address in the LNR.XML file. If a different address is desired, this value can be changed by editing the LNR/Recorder/Settings/MulticastIP element in the LNR.XML file.
This multicast address becomes the base number and similarly to the multicast port actual address for a channel is determined by adding the channel number to this base value. It is important to remember that if multicast video is used in the system, all channels on all LNVRs should be assigned unique multicast port and address values.
d. This port number can be specified by launching the LnrNI utility on the LNVR machine, selecting the “Recorder Network Settings” tab and entering a value for Recorder TCP/IP Port.
e. This port number can be specified by launching the LnrNI utility on the LNVR machine, selecting the “IVS Network Settings page and entering a value for IntelligentVideo Server TCP/IP Port.
f. The port and multicast address for each channel is chosen by the user through the configuration utility when channels are added to the LSVS.
Port Function From (Client) To (Server) Protocol
Advanced Installation Topics
Digital Video Ports
DCOM uses TCP port 135 to establish new connections. TCP port 135 must be open on the server. Once a client connects to that port, the Windows DCOM/RPC subsystem determines the type of the actual communications. This type can be either TCP/IP or UDP/IP based on the machine settings. These settings can be changed with the following steps:
1. Run dcomcnfg from the command line.
2. Expand to Console Root > Component Services > Computers > My Computer.
3. Right-click on My Computer and select Properties.
4. Select the Default Protocols tab.
5. Select UDP/IP or TCP/IP or both. For each option, the port range can also be limited. If the port range is not limited, DCOM will use any random port between 1024 and 65000. It is recommended to limit the port range for systems using firewalls.
The following Microsoft Knowledge Base article provides background information for configuring DCOM: http://msdn2.microsoft.com/en-us/library/ms809327.aspx
For additional information about DCOM, refer to the Microsoft Windows documentation.
The LnrNI utility is used to configure the ports that should be used for each type of communication. When launched on a client, the LnrNI utility defines the mode that will be used to receive live video from the LNVR. It attempts each type of connection in the order they are listed on the Client Network Settings tab. If the connection is unsuccessful after 3 seconds it will move to the next connection type until all three have been tried: multicast, UDP/IP, and TCP/IP. TCP/IP is the fallback mechanism and cannot be disabled.
The LnrNI utility also determines which network card should be used by the video software if the machine is multihomed, meaning it has different IP addresses due to multiple active network adapters.
g. This setting is only required if the user wishes to configure the LSVS from a remote machine. This step is not necessary if the configuration application is launched from the host where the streaming server is installed.
h. This port number must be the same on all remote monitoring and OnGuard client machines in the system. If the user wishes to use a different value, all machines must be updated at the same time. On the OnGuard client, this can be changed by editing the “MonitorUDPPort” registry value under HKEY_LOCAL_MACHINE\Software\Lenel\OnGuard. On RM machines, the same value must be updated in the registry under HKEY_LOCAL_MACHINE\Software\Lenel\RemoteMonitor.
i. This port range can be changed by launching the LnrNI utility on the OnGuard client machine, selecting the “Remote Monitor Network Settings” tab and entering a different port range.
j. Cameras have built-in web servers. Typically they use HTTP port 80, but the user can configure it to use any arbitrary port number. The camera tab in the digital video folder in System Administration allows you to specify which port LNVR will connect to. For more information, refer to the Digital Video Folder chapter in the System Administration User Guide for more information.
k. Currently this is only supported for Sony cameras. FTP protocol is used to retrieve video from In-Camera Storage. By default this protocol uses TCP port 21 to establish the connection. This port can be changed in the camera configuration. FTP protocol also uses a separate TCP/IP connection for actual data transfer and this connection can be established on just about any port. Therefore, using In-Camera Storage through firewalls might cause problems.
Advanced Installation Topics 91

Ports Used by OnGuard
92
Advanced Installation Topics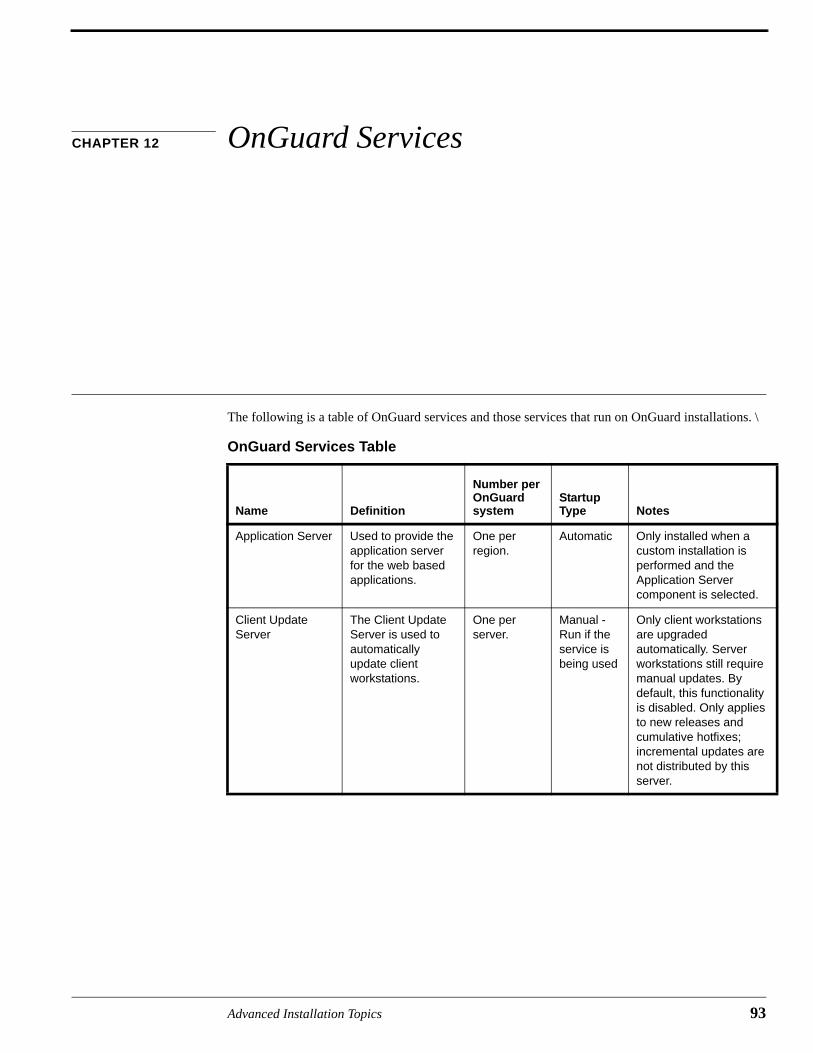
CHAPTER 12 OnGuard Services
The following is a table of OnGuard services and those services that run on OnGuard installations. \
OnGuard Services Table
Name Definition
Number per OnGuard system
Startup Type Notes
Application Server Used to provide the application server for the web based applications.
One per region.
Automatic Only installed when a custom installation is performed and the Application Server component is selected.
Client Update Server
The Client Update Server is used to automatically update client workstations.
One per server.
Manual - Run if the service is being used
Only client workstations are upgraded automatically. Server workstations still require manual updates. By default, this functionality is disabled. Only applies to new releases and cumulative hotfixes; incremental updates are not distributed by this server.
Advanced Installation Topics 93
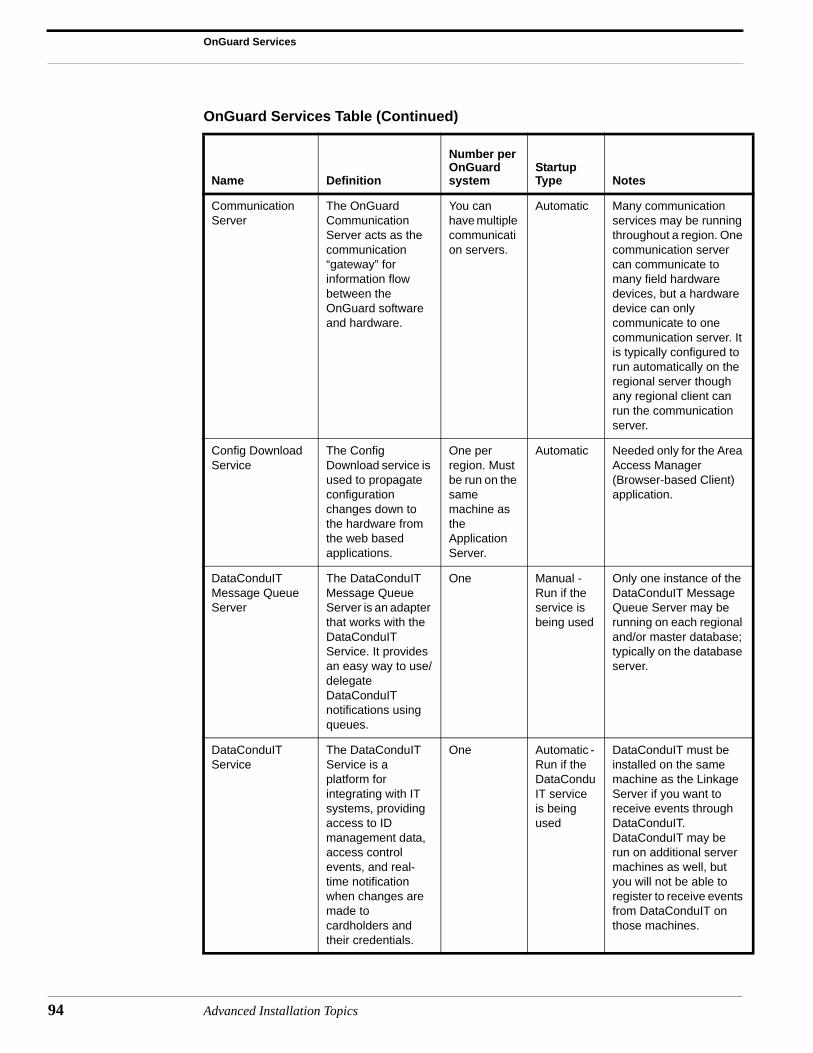
OnGuard Services
94
Communication Server
The OnGuard Communication Server acts as the communication “gateway” for information flow between the OnGuard software and hardware.
You can have multiple communication servers.
Automatic Many communication services may be running throughout a region. One communication server can communicate to many field hardware devices, but a hardware device can only communicate to one communication server. It is typically configured to run automatically on the regional server though any regional client can run the communication server.
Config Download Service
The Config Download service is used to propagate configuration changes down to the hardware from the web based applications.
One per region. Must be run on the same machine as the Application Server.
Automatic Needed only for the Area Access Manager (Browser-based Client) application.
DataConduIT Message Queue Server
The DataConduIT Message Queue Server is an adapter that works with the DataConduIT Service. It provides an easy way to use/delegate DataConduIT notifications using queues.
One Manual - Run if the service is being used
Only one instance of the DataConduIT Message Queue Server may be running on each regional and/or master database; typically on the database server.
DataConduIT Service
The DataConduIT Service is a platform for integrating with IT systems, providing access to ID management data, access control events, and real-time notification when changes are made to cardholders and their credentials.
One Automatic - Run if the DataConduIT service is being used
DataConduIT must be installed on the same machine as the Linkage Server if you want to receive events through DataConduIT. DataConduIT may be run on additional server machines as well, but you will not be able to register to receive events from DataConduIT on those machines.
OnGuard Services Table (Continued)
Name Definition
Number per OnGuard system
Startup Type Notes
Advanced Installation Topics

DataExchange Server
The DataExchange Server is used to exchange database information with third party applications.
One Automatic Only one DataExchange server may be running on each regional database and/or master database. It only needs to be running when scheduling to run a DataExchange script.
Device Discovery Service
The Device Discovery Service is used as a proxy service for running remotely (systems in other subnets) all services that the Device Discovery Console cannot otherwise access.
One Automatic if installed
You must perform a custom installation and select “Device Discovery Service” in the Standard Applications section.
Global Output Server
The OnGuard Global Output Server (GOS) is used to send output to any supported output system (including electronic mail and paging) connected to the computer on which the GOS is installed.
For e-mail, the GOS communicates to the SMTP Server and for paging it outputs the file to a specified location.
As many as needed.
Automatic - Run if paging or e-mail is being used
As many instance of Global Output Server (GOS) can be running on each regional and/or master database; typically it is run on the database server.
ID Allocation Used to manage pre-allocated IDs across an enterprise installation.
One Automatic
License Server The License server controls which features the computer is licensed to use.
One Automatic The OnGuard License Server is typically run on OnGuard servers but can be configured on a separate machine.
OnGuard Services Table (Continued)
Name Definition
Number per OnGuard system
Startup Type Notes
Advanced Installation Topics 95

OnGuard Services
96
Linkage Server The Linkage Server is responsible for directing automatic email/paging messages in response to specific alarms, as well as linking “marked” video segments on a video recorder with the associated alarm/event logged in the Database.
One Automatic Only one instance of Linkage Server may be running on each regional and/or master database; typically on the database server.
Login Driver The login driver allows OnGuard to log in and access the database.
One - The service is run on the computer on which the database resides.
Automatic The Lenel Login Driver is a service that is used to change the OnGuard database password (NOT the user passwords). The service is run on the computer on which the database resides.
LnrCapSvc Records video from CCTV devices.
One per LNVR.
Automatic Must be running in order for the LNVR to connect to video sources and to store information to the disk. It also services live video retrieval requests.
LnrRetrSvc Retrieves recorded video requested by client.
One per LNVR.
Automatic Manages stored video and stored video retrieval requests. If your storage fills up this service finds which files should be deleted so the capture service has space for new video.
LnrRTPServer Streams video to RTP clients.
One per LNVR.
Automatic This services is a translation layer between the proprietary LNVR video retrieval interfaces and the standard way of transmitting streaming media data.
OnGuard Services Table (Continued)
Name Definition
Number per OnGuard system
Startup Type Notes
Advanced Installation Topics
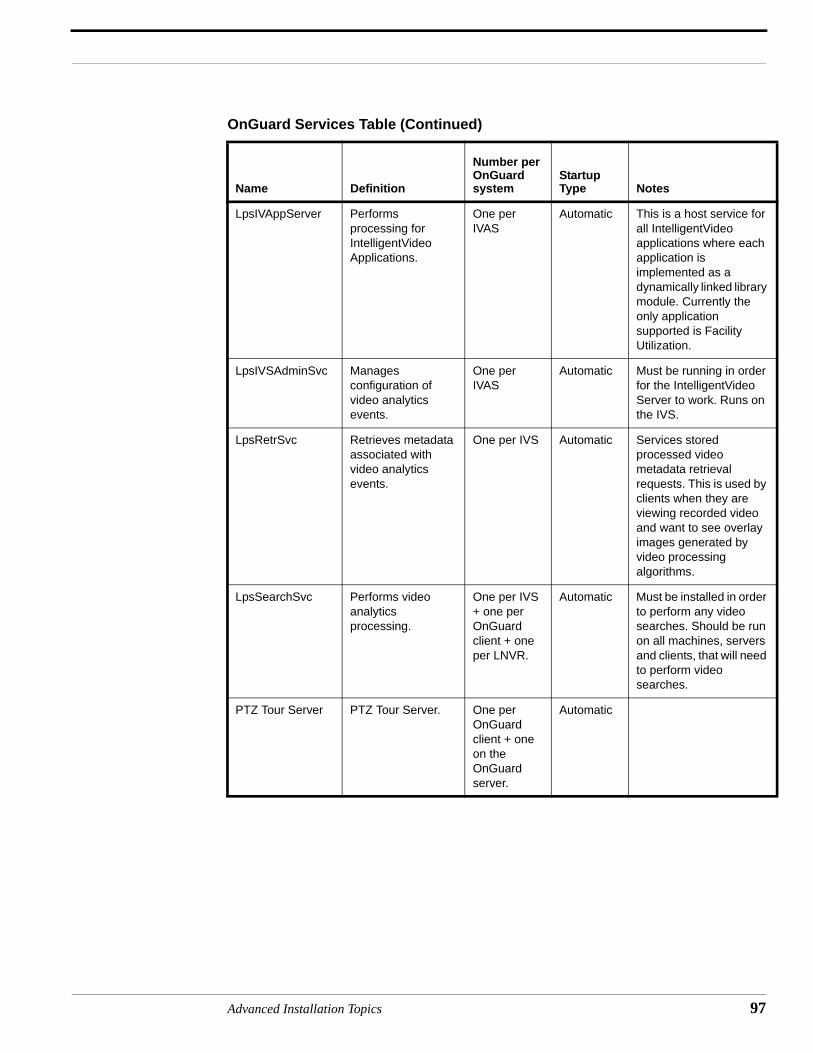
LpsIVAppServer Performs processing for IntelligentVideo Applications.
One per IVAS
Automatic This is a host service for all IntelligentVideo applications where each application is implemented as a dynamically linked library module. Currently the only application supported is Facility Utilization.
LpsIVSAdminSvc Manages configuration of video analytics events.
One per IVAS
Automatic Must be running in order for the IntelligentVideo Server to work. Runs on the IVS.
LpsRetrSvc Retrieves metadata associated with video analytics events.
One per IVS Automatic Services stored processed video metadata retrieval requests. This is used by clients when they are viewing recorded video and want to see overlay images generated by video processing algorithms.
LpsSearchSvc Performs video analytics processing.
One per IVS + one per OnGuard client + one per LNVR.
Automatic Must be installed in order to perform any video searches. Should be run on all machines, servers and clients, that will need to perform video searches.
PTZ Tour Server PTZ Tour Server. One per OnGuard client + one on the OnGuard server.
Automatic
OnGuard Services Table (Continued)
Name Definition
Number per OnGuard system
Startup Type Notes
Advanced Installation Topics 97
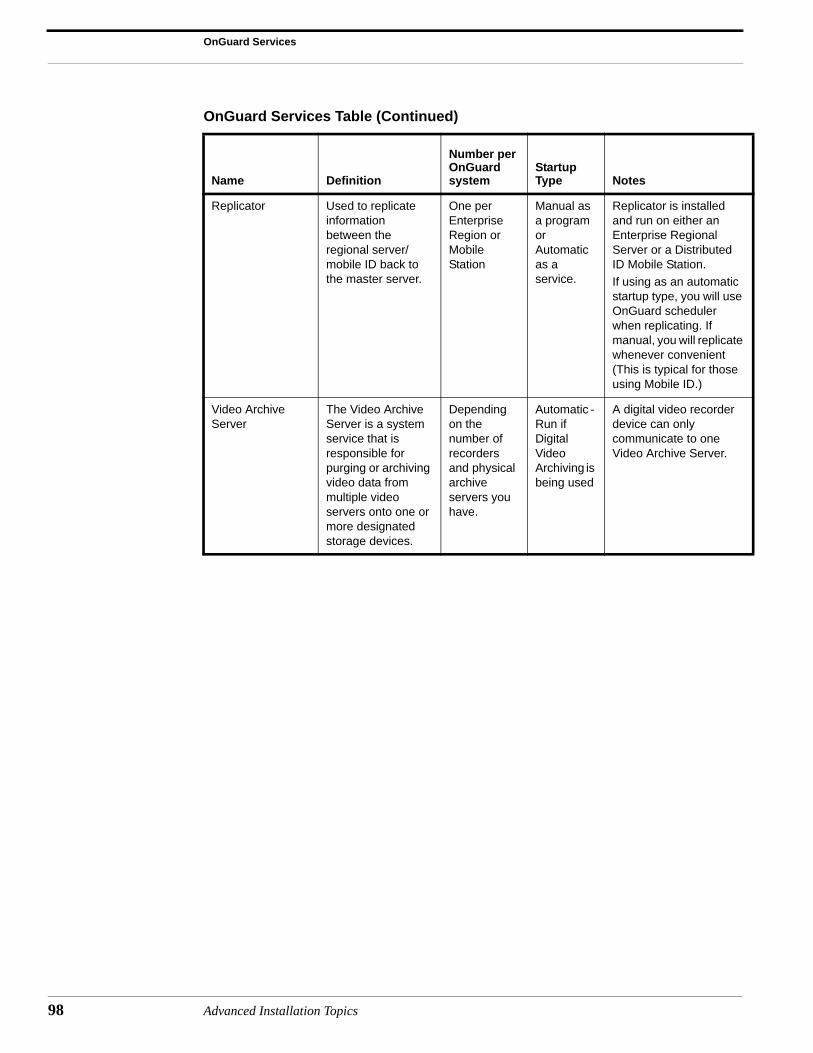
OnGuard Services
98
Replicator Used to replicate information between the regional server/ mobile ID back to the master server.
One per Enterprise Region or Mobile Station
Manual as a program or Automatic as a service.
Replicator is installed and run on either an Enterprise Regional Server or a Distributed ID Mobile Station.
If using as an automatic startup type, you will use OnGuard scheduler when replicating. If manual, you will replicate whenever convenient (This is typical for those using Mobile ID.)
Video Archive Server
The Video Archive Server is a system service that is responsible for purging or archiving video data from multiple video servers onto one or more designated storage devices.
Depending on the number of recorders and physical archive servers you have.
Automatic - Run if Digital Video Archiving is being used
A digital video recorder device can only communicate to one Video Archive Server.
OnGuard Services Table (Continued)
Name Definition
Number per OnGuard system
Startup Type Notes
Advanced Installation Topics

Appendices


APPENDIX A Database Installation Utility
The Database Installation Utility is used to attach an SQL Server Express/SQL Server database for use with the OnGuard software. The Database Installation Utility copies the existing database data files (MDF and LDF), attaches the database, and updates the Lenel Data Source Name (DSN) to point to the correct database. It does not create the tables in a new database - Database Setup must be run.
The Database Installation Utility is run automatically at the end of the OnGuard installation when either a new SQL Server Express database or a demo database has been selected. It is also installed on the local machine in the OnGuard installation directory so that it can be run manually after the installation has completed.
Database Installation Utility Window
Database Installation Utility Window Fields
Path to database filesThe source data file (MDF) name. When the Database Installation Utility is run automatically during the OnGuard installation, the Path to database files and the Database name are determined based on the choice of the SQL Server Express or Demo database.
Advanced Installation Topics 101

102
The default empty SQL Server Express database is AccessControl_Data.mdf. The OnGuard demo database is AccessControlDemo_Data.mdf.
BrowseClick to select the Path to database files.
Database nameThe name of the database that will be used with the OnGuard software. When the Database Installation Utility is run automatically during the OnGuard installation, the Database name and the Path to database files are determined based on the choice of the SQL Server Express or Demo database.
Path to copy database files toThe destination directory. The destination directory will always default to the SQL Server Express/SQL Server default data directory, as configured in SQL Server Express/SQL Server and stored in the registry.
BrowseClick to select the Path to copy database files to.
ConnectWhen the Database Installation Utility opens, it attempts to connect to the database for the DSN that is currently specified in the [Database] section in the ACS.INI file. For example, if the following is specified in the [Database] section:
Connect=“ODBC;DSN=Lenel” then the Database Installation Utility will attempt to connect to the database associated with the Lenel DSN.
If the database connection succeeds, the [Connect] button is grayed out. If the database connection fails, an error message that says, “The DSN selected in your ACS.INI is invalid. Please check your ODBC configuration.” is displayed and the [Connect] button is enabled. If this message is displayed, open the ACS.INI file and specify the correct DSN, save and close the ACS.INI file, and click the [Connect] button. If the connection is successful, the [Connect] button will become grayed out.
OKCreated or attaches the specified database.
CloseCloses the Database Installation Utility without performing any function.
Database Installation Utility Procedures
Attach an SQL Server Express Database
Run the Database Installation Utility by doing the following:
IMPORTANT: To make changes in the ACS.INI file on a Windows 7 computer, you must right-click on the ACS.INI file and run it as an Administrator.
1. In Windows Explorer, navigate to the OnGuard installation directory (C:\Program Files\OnGuard by default), and then double-click on the DatabaseInstallationUtility.exe file to run it.
Advanced Installation Topics
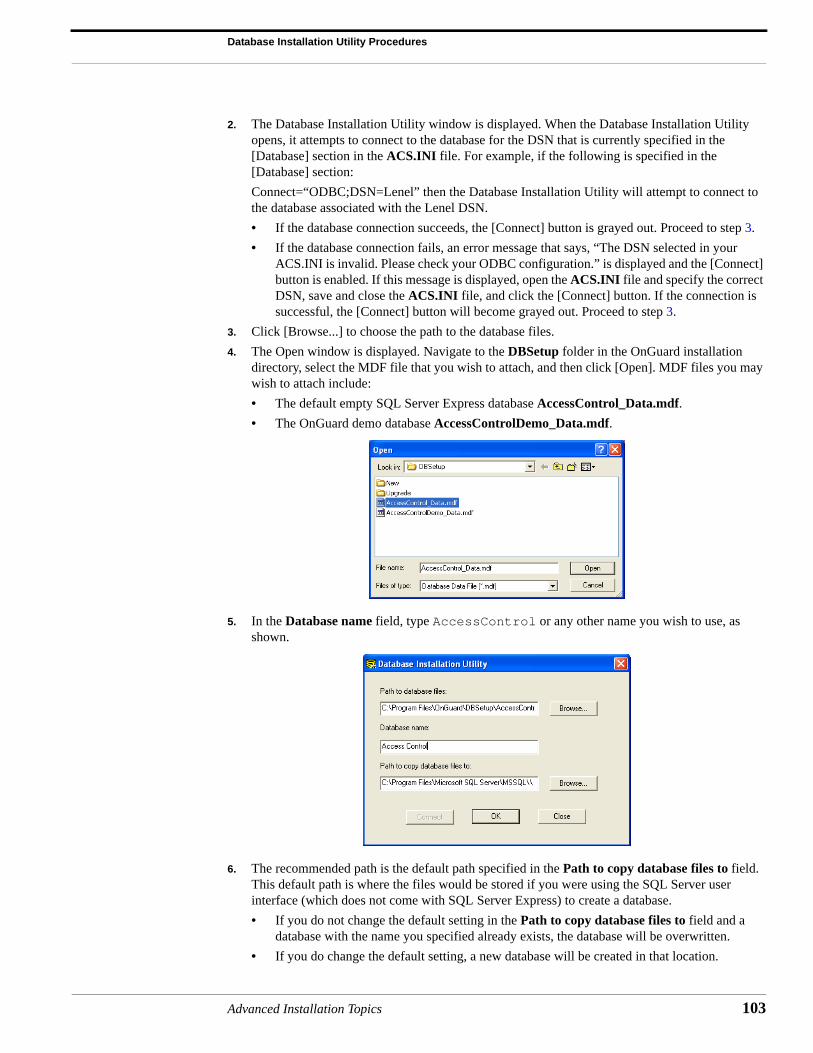
Database Installation Utility Procedures
2. The Database Installation Utility window is displayed. When the Database Installation Utility opens, it attempts to connect to the database for the DSN that is currently specified in the [Database] section in the ACS.INI file. For example, if the following is specified in the [Database] section:
Connect=“ODBC;DSN=Lenel” then the Database Installation Utility will attempt to connect to the database associated with the Lenel DSN.
• If the database connection succeeds, the [Connect] button is grayed out. Proceed to step 3.
• If the database connection fails, an error message that says, “The DSN selected in your ACS.INI is invalid. Please check your ODBC configuration.” is displayed and the [Connect] button is enabled. If this message is displayed, open the ACS.INI file and specify the correct DSN, save and close the ACS.INI file, and click the [Connect] button. If the connection is successful, the [Connect] button will become grayed out. Proceed to step 3.
3. Click [Browse...] to choose the path to the database files.
4. The Open window is displayed. Navigate to the DBSetup folder in the OnGuard installation directory, select the MDF file that you wish to attach, and then click [Open]. MDF files you may wish to attach include:
• The default empty SQL Server Express database AccessControl_Data.mdf.
• The OnGuard demo database AccessControlDemo_Data.mdf.
5. In the Database name field, type AccessControl or any other name you wish to use, as shown.
6. The recommended path is the default path specified in the Path to copy database files to field. This default path is where the files would be stored if you were using the SQL Server user interface (which does not come with SQL Server Express) to create a database.
• If you do not change the default setting in the Path to copy database files to field and a database with the name you specified already exists, the database will be overwritten.
• If you do change the default setting, a new database will be created in that location.
Advanced Installation Topics 103
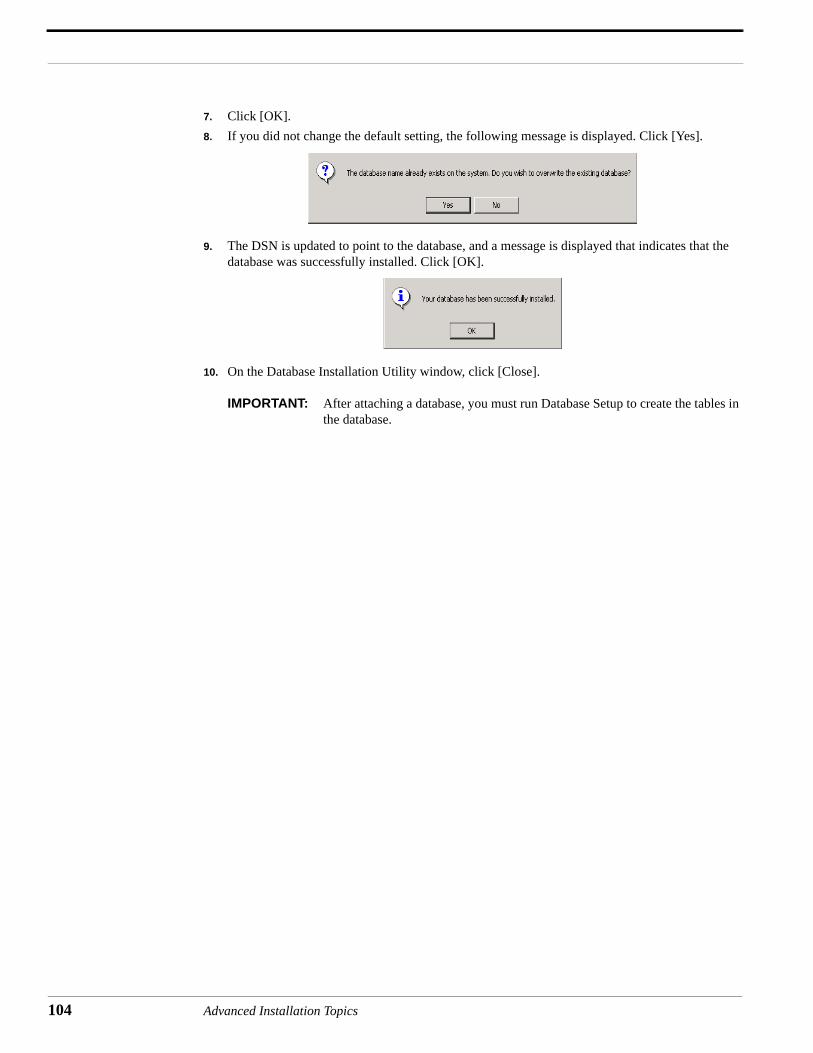
104
7. Click [OK].
8. If you did not change the default setting, the following message is displayed. Click [Yes].
9. The DSN is updated to point to the database, and a message is displayed that indicates that the database was successfully installed. Click [OK].
10. On the Database Installation Utility window, click [Close].
IMPORTANT: After attaching a database, you must run Database Setup to create the tables in the database.
Advanced Installation Topics
APPENDIX B Change the Database Owner in SQL Server Express
Since SQL Server Express doesn’t provide an interface for accessing the database engine, use the following procedure to log into the database directly using the ODBC connection created for OnGuard:
11. From the Start menu, select Run. Click [Browse…]. Browse to the OnGuard folder and select the ‘ACCESSDB.exe’ application. Click [Open] and then [OK] to run this application.
12. From the Management menu, select Datasource > Connect.
a. On the Machine DataSource tab, select “Lenel”. Click [OK].
b. You will be prompted for the database “sa” login ID and password. Enter the credentials and click [OK].
c. The screen will return to the main window.
d. From the SQL menu, select Statement. Enter the following statement in the text box:
sp_changedbowner lenel
Click [OK] when you are ready to execute the statement.
e. If the command returns highlighted, then it completed without error.
13. Log into any OnGuard application and verify that the change was successful.
Advanced Installation Topics 105

106
Advanced Installation Topics
APPENDIX C Manually Creating an ODBC Connection for SQL
The following appendix will detail the manual creation of an ODBC connection for SQL. These instructions are primarily for reference purposes because the OnGuard installation automatically creates the necessary ODBC connection to the database.
If using Windows 7 with UAC turned on, you might receive an error when creating an ODBC with OnGuard applications. This error occurs when you are not running the application as an Administrator. To work around this issue, run the application as Administrator or create the ODBC manually as described in this appendix.
IMPORTANT: When manually creating an ODBC connection you must use the SQL Native Client driver.
Creating an ODBC Connection for SQL
1. Open the ODBC Data Source Administrator window. To do this:
a. For 32-bit operating systems: From Administrative Tools in Windows, open Data Sources (ODBC).
b. For 64-bit operating systems: Navigate to C:\windows\SysWOW64 and run the odbcad32.exe file.
2. The ODBC Data Source Administrator window is displayed. Select the System DSN tab.
3. Click [Add].
4. The Create New Data Source dialog is displayed.
a. Select SQL Native Client from the list view.
b. Click [Finish].
5. The Create a New Data Source to SQL Server dialog is displayed.
a. Enter a descriptive Name for the data source.
b. Enter the name of the machine or virtual machine hosting the database in the Server field.
c. Click [Next].
6. Select SQL Server authentication and enter the Login ID and Password.
Advanced Installation Topics 107
108
Note: If you select Windows NT authentication it may impact your ability to store credentials in a file as a means of authentication. Selecting SQL Server authentication does not impact your ability to use Windows authentication with the Web applications. Refer to the Installation Guide for more information about database authentication with the Web applications.
7. Click [Next].
8. Select the Change the default database to check box and choose the OnGuard database from the drop-down list.
9. Click [Next].
10. Click [Finish].
11. The ODBC Microsoft SQL Server Setup dialog is displayed.
a. Click [Test Data Source]. A success message should be displayed.
b. Click [OK] to exit each of the dialogs.
Updating the DSN in the OnGuard Configuration Files
The name of the ODBC connection that OnGuard uses to connect to the database is stored in two configuration files. If you have manually created your ODBC connection you may need to update these files with the new DSN.
Note: File locations may vary depending on your operating system and configuration.
IMPORTANT: To make changes in the ACS.INI file on a Windows 7 computer, you must right-click on the ACS.INI file and run it as an Administrator.
1. Edit the ACS.INI file. The ACS.INI file is located at C:\WINDOWS\ACS.INI.
2. Update the following line in the [DataBase] section:
Connect=”ODBC;DSN=<DSNName>”
Change <DSNName> to the name of the new DSN for the ODBC connection to the OnGuard database.
3. Save and close the ACS.INI file.
Note: Steps 4 and 5 are necessary only for systems using the web applications.
4. Edit the C:\Inetpub\wwwroot\lnl.og.webservice\web.config file.
5. Find and update the following line:
<add key="reportDSN" value="<DSNName">
Change <DSNName> to the name of the new DSN for the ODBC connection to the OnGuard database.
Troubleshooting
If you experience problems connecting to the OnGuard database, check the ODBC connection to be sure that it is configured correctly.
1. From Administrative Tools in Windows, open Data Sources (ODBC).
2. The ODBC Data Source Administrator window is displayed. Select the System DSN tab.
Advanced Installation Topics

Troubleshooting
3. Select the DSN used to connect to the OnGuard database from the list view.
4. Verify in the System Data Sources listing window that the DSN driver is SQL Native Client.
Note: If the DSN driver is not SQL Native Client, delete the System DSNand create a new ODBC connection using the SQL Native Client driver. For more information, refer to Creating an ODBC Connection for SQL on page 107.
5. Click [Configure].
6. Verify that the name of the Server is correct in the drop-down.
7. Click [Next].
8. Check that the correct method of authentication is selected and verify the credentials if using SQL Server authentication.
Note: If you select Windows NT authentication it may impact your ability to store credentials in a file as a means of authentication. Selecting SQL Server authentication does not impact your ability to use Windows authentication with the Web applications. Refer to the Installation Guide for more information about database authentication with the Web applications.
9. Click [Next].
10. Verify that Change the default database to check box is selected and that the OnGuard database is selected in the drop-down.
11. Click [Next].
12. Click [Finish].
13. The ODBC Microsoft SQL Server Setup dialog is displayed.
a. Click [Test Data Source]. A success message should be displayed.
b. Click [OK] to exit each of the dialogs.
Advanced Installation Topics 109

110
Advanced Installation Topics
APPENDIX D Setting Up & Configuring a Capture Station
The following appendix will show you how to set up and configure a capture station.
Environmental Considerations Affecting Flash & Camera Capture Quality
There are several factors to consider when selecting your capture station environment. Lighting is the most important factor and the most difficult to provide setup instructions for, because every site’s capture environment is unique. OnGuard ships with the optimal hardware setting defaults already set. The important items to consider when setting up the capture environment are the flash and camera settings based on environmental considerations.
Setting Up the OnGuard Capture Dialog
You will initially need to set up the OnGuard capture dialog with factory default settings that are appropriate for your capture hardware. Once that is done, you can make minor adjustments to accommodate your specific capture devices and capture environments.
1. Launch the application you’ll be using to capture photos/signatures/badge layout graphics.
2. Launch the capture dialog from within that application by selecting the [Capture] button on a form that accesses the Multimedia Capture module.
3. Repeat the following procedure for each outer capture form:
a. If configuring cardholder photo capture, select the Photo tab. If configuring cardholder signature capture, select the Signature tab. If you are using the BadgeDesigner application, you only have the Graphic tab.
b. Configuring the capture dialog with settings that are appropriate for your capture hardware is easily done via the factory defaults profile procedure. Use the following procedure to configure capture from sources other than the File Import capture source:
i. Click [Load Factory Defaults]. The “Load Factory Defaults” dialog will open.
Advanced Installation Topics 111

112
ii. Select the factory defaults profile that most closely matched your capture device. The default capture source (configured on the General Settings form) will be automatically set to the capture source associated with that device. The crop window (configured on the General Settings form) will be automatically set to a size appropriate for the profile you select.
iii. Click [OK].
c. If you want to capture images with the “File Import” capture source:
i. From the capture source drop-down list, select File Import.
ii. Click on the File I/O Settings tab.
iii. Set the file import directory to the directory where you store all of your photo files.
iv. Click [Save User Defaults].
d. If you want to capture images with a USB camera or any WDM or TWAIN compliant camera, configure the multimedia capture module for the following settings instead of loading the default settings. If you are using the CAM-24Z704-USB/CAM-20Z704-USB USB camera skip these steps and refer to Basic Camera Setup (CAM-24Z704-USB/CAM-20Z704-USB) on page 116.
1) From the capture source drop-down list, select WDM Video.
2) Click the WDM Video Settings Device tab.
3) Select USB Video Bus II, Video from the Device drop-down box.
4) Click [Video Input].
5) The Video Input Properties window displays.
6) Select 1:VideoSVideo In from the Input drop-down menu.
Capture Station Setup Specifications
For every capture station the equipment should be setup as close as possible to the following specifications:
The backdrop should be approximately 1.5 feet behind the subject. The camera and flash apparatus should be at least 4.5 feet in front of the subject at an average height (the height should be adjustable for obvious reasons). The capture area requires approximately 10 to 12 feet of floor space with appropriate width.
Advanced Installation Topics
Capture Station Setup Specifications
Recommended Badging Room Layout
10 ft.
BadgePrinter
BadgingWorkstation
Backdrop
Subject
12ft.
Entrance
Exit
1.5 ft.4.5 ft.Camera
Bounce Back Umbrella
Bounce Back Umbrella
Advanced Installation Topics 113

114
LE
E
Final Adjustments for Fixed Diffused Lighting
Final Adjustments for Continuous Lighting
4.5 FEET
CAMERA
TAB(1.5 feet recommended)
BACKDROP
Distance Variable
FIXED DIFFUSED LIGHT
TRIPOD
4.5 FEET
CAMERA
TABL
(1.5 feet recommended)
BACKDROP
Distance Variable
TRIPOD
BOUNCE BACK UMBRELLA
LIGHT
STAND
Advanced Installation Topics

Basic Camera Setup (CAM-CCP-500K)
Basic Camera Setup (CAM-CCP-500K)
For complete installation setup, see the instruction manual that came with the CAM-CCP-500K.
CCP-500 (Back View)
1. Tele Button – (Telephoto) Press this button to zoom in.
2. Wide Button – (Wide Angle) Press this button to zoom out.
3. BLC – (Back Light Compensation) If you press this button while viewing a backlight subject, the camera will adjust itself to the high contrast lighting.
• BLC mode is switched between ON and OFF by pressing this button.
• If you hold the button down for more than 2 seconds and then release, the BLC will change to AUTO BLC mode.
4. Menu – Press to display OSD
• If you hold the button for more than 2 seconds and then release, OSD will shut off.
5. Power In and Control – Insert the DC power cable here to connect the camera to the DC power source (DC 12V). You can control the Zoom and Focus Lens to use Controller.
6. Video Out terminal - Connect this terminal to the video input terminal or an external input, such as a monitor, TV or VCR.
7. S-Video Out terminal – This is an output terminal for separate Y/C video signals.
The CAM-CCP-500K camera zooms to X32, but the recommended zoom area should be less than X16. This is because the zoom past X16 is digital and the picture captured becomes rough (pixilated). The subject should be within X1 to X12 zoom for optimal results. The subject should nominally fill the pre-sized crop window if adjusted properly. Always leave on “Maintain Aspect Ratio”
Advanced Installation Topics 115

116
To adjust the zoom, set the selector switch to zoom (all the way to the right). Adjust the camera apparatus for the center of the subject. With the arrows located to the bottom left of the rear of the camera, zoom in all the way and then zoom back to determine the approximate center point of the zoom (remember: you do not want to zoom past X12, the halfway point). Then, zoom into the subject until the desired capture frame is attained. The arrows located at the bottom of the camera can be use in one of two manors. If you push and hold the arrow, it will zoom all the way in or out. If you push the arrow button momentarily, it will move in and out incrementally.
Note: Optimally the subject should fill the pre-sized crop window, so no additional cropping adjustments need be made.
Why manual white balance? With light or gray colors the Auto White Balance adjusts incorrectly. That is why the CAM-CCP-500K should be setup for Manual White Balance. It is necessary to White balance the camera to obtain a default white balance setting and is maintained for consistent picture quality.
Basic Camera Setup (CAM-24Z704-USB/CAM-20Z704-USB)
IMPORTANT: The following cameras are meant for client machines and not servers. Windows Server 2008 and Windows Server 2003 are not supported.
Installation of CAM-24Z704-USB/CAM-20Z704-USB
To install the USB camera simply plug it in, connect the USB cord to the workstation, and install the drivers that come with the camera. For more information refer to the Badging Image Capture Camera User Guide that came with the camera.
Note: Though there is a connection for S-video Out it is strongly recommended that you use the USB connection.
Configuration of CAM-24Z704-USB/CAM-20Z704-USB
1. Start the application you will be using to capture photos/signatures/badge layout graphics.
2. Launch the capture dialog from within that application by selecting the [Capture] button on a form that accesses the Multimedia Capture module.
3. On the Photo sub-tab of the Multimedia Capture module, select Digital Camera from the Capture Source dropdown box.
4. On the Digital Camera Settings sub-tab, select AF Imaging Grabber 1 from the Twain Source dropdown box.
Advanced Installation Topics
Basic Camera Setup (CAM-24Z704-USB/CAM-20Z704-USB)
IMPORTANT: Make sure that the Show User Interface check box IS selected.
Using CAM-24Z704-USB/CAM-20Z704-USB
1. To use, click Get Photo on the Multimedia Capture module. The AF Image Grabber 1 control box opens.
2. Click Take Picture to take the picture. The AF Image Grabber 1 control box closes and you see the picture on the Multimedia Capture Module screen.
3. Click [OK] and the picture is added to the Cardholder screen.
AF Image Grabber 1
TELEZooms in. The camera has a 16:1 optical zoom range along with an 8x digital zoom.
WIDEZooms out.
Advanced Installation Topics 117

118
Take PictureTakes a picture for use in the Multimedia Capture module. When selected the camera image freezes, the LED illuminator turns on, and the image is captured.
Calibrate CameraAutomatically adjusts the camera settings to provide the best quality image under certain lighting conditions. For more information refer to the Badging Image Capture Camera User Guide that came with the camera.
Show Control PanelActivates the on screen control panel for making adjustments to the captured video image.
Lighting Setup
Professional Continuous Lighting Setup (EHK-K42U-A)
The EHK-K42U-A kit is designed to help eliminate shadows that may appear behind the subject that you are capturing, or under the subject’s chin (known as bearding). Most capture environments have adequate light to capture a subject with the CAM-CCP-500K capture kit, but to enhance the colors (more real life), and to eliminate shadows, the capture kit is necessary.
Advanced Setup
After the capture station has been setup, some testing must be performed to determine the optimal illumination settings for image capture. You may have to adjust the lights, drapes, or other elements in the capture environment.
With a test subject, view the live image on the screen with all the room lights on. Set the selector switch on the back of the camera to iris (all the way to the left). With the arrows on back of the camera adjust the iris all the way down, the live image on the screen should become dark if not black. The arrows located at the bottom of the camera can be use in one of two manners. If you push and hold the arrow, it will zoom all the way in or out. If you push the arrow button momentarily, it will move in and out incrementally. While viewing the screen, increase the iris until the subject is visible. Increase the iris a little more, until the screen image is about the same brightness as the real view of the subject. Take a test picture. Label this “test 1, all lights”. From here we will adjust the room environments lighting and make minor adjustments to the iris if needed while continuing to save the sample captures at (test 2, test 3 etc.).
Steps to improving capture quality:
1. Turn on all the lights in the room.
2. Open the Capture dialog and center on a test subject with the camera.
3. Adjust the iris all the way down, and then adjust it until the screen image is about the same brightness as the real viewable image.
4. Set the White Balance. (Set the selector switch on the back of the camera to WB. Hold a white piece of paper in front of the camera so there is only white showing on the screen. Using the arrows on the back of the camera adjust the white balance until the image in the capture window is white.)
5. Take a test picture. Save this as a cardholder labeled “Test1: all lights”.
6. Turn off all the lights.
7. Take another picture. Save this as a cardholder labeled “Test2: no lights”.
Advanced Installation Topics

Lighting Setup
8. Continue testing until a desired lighting quality is captured on the screen. Be sure to label each test with a number and a description of what you did. Adjust your environments based on the environmental considerations below. Continue to take pictures, save them, and use them as references until the best conditions are determined.
Environmental Considerations and Factors Leading to Poor Lighting
Environmental factors to consider when setting up a capture station include:
• Is there a different amount of sunlight entering the area through out the day?
• Is the station next to a window or under a skylight?
• Are the wall colors dark or light or bright colors? If they are light they will reflect more light or change your white balance setup.
• Is the ceiling low or cathedral like? The lower the ceiling the more light will reflect.
• What types of lights are used in the room? Incandescent or florescent (cool white or colored) or direct spots?
• Is there any direct lighting of the subject? Is the room evenly illuminated? Direct lighting will over expose the subject.
• What is the color of reflective shields around the lights? For example, gold reflective surface shields illuminate the subject in yellow highlights.
This is just a partial list of possible factors leading to poor image lighting quality. There may be other features of your site that will affect the image capture that may need to be considered.
Advanced Installation Topics 119

120
Advanced Installation Topics
Index
AAccessControl_Data.mdf file ..................... 103AccessControlDemo_Data.mdf file .......... 103ACS.INI file
updating the DSN ................................. 108Attach
SQL Server Express database ............. 102
BBadging room layout .................................... 113Basic camera setup (CAM-CCP-500K) .... 115
CCAM-20Z704-USB/CAM-21Z704-USBP
using ........................................................ 117CAM-24Z704-USB/CAM-20Z704-USB
configuration ......................................... 116CAM-CCP-500K image capture kit .......... 115Camera
capture quality ....................................... 111setting up a CAM-CCP-500K ............ 115
Capture stationconfigure ................................................ 111set up ....................................................... 111setup specifications .............................. 112
CCP-500 (back view) ................................... 115Citrix
creating database and DSN ................... 74installing Citrix MetaFrame on the
server ........................................ 75installing required applications ............ 74overview ................................................... 73publishing OnGuard as a web
application ................................ 76
ClientOracle 10g ................................................ 31Oracle 11g ................................................ 43
Configurecapture station ....................................... 111Oracle 10g client software .................... 31Oracle 10g server software ................... 11Oracle 11g client software .................... 43Oracle 11g server software ................... 35
Continuous lighting diagram ...................... 114
DDatabase Installation Utility
field table ............................................... 101overview ................................................. 101procedures .............................................. 102window ................................................... 101
Database ownerchange in SQL Server Express ........... 105
Database Setuprunning on an Oracle 10g server .......... 27running on an Oracle 11g server .......... 40
Demo database .............................................. 103Diffused lighting ........................................... 114
EEnvironmental considerations affecting flash &
camera capture quality ................. 111Environmental considerations and factors
leading to poor lighting ............... 119
FFinal adjustments for continuous lighting 114Final adjustments for fixed diffused
lighting ........................................... 114
Advanced Installation Topics 121

Index
122
Flash capture quality .................................... 111
IInstall
Citrix MetaFrame on the server ........... 75OnGuard on an Oracle 10g server ....... 25Oracle 10g client software .................... 31Oracle 10g server software ................... 13Oracle 11g client software .................... 43Oracle 11g server software .................... 36
LLayout of room recommended for badging 113Lenel database
configure for Oracle 10g server ........... 14configure for Oracle 11g server ........... 37
Lenel usercreate on Oracle 10g server .................. 25create on Oracle 11g server ................... 39
Lightingenvironmental considerations ............. 119final adjustments for continuous
lighting .................................... 114final adjustments for fixed diffused
lighting .................................... 114
NNet Configuration Assistant
running on Oracle 10g server ............... 18running on Oracle 11g server ............... 36
OODBC connection
manual DSN creation ........................... 107troubleshooting ..................................... 108
OnGuardinstalling on Oracle 10g client .............. 33installing on Oracle 10g server ............. 25installing on Oracle 11g client .............. 44publishing as a web application using
Citrix ......................................... 76remote installation .................................. 49setting up the OnGuard Capture dialog 111
Oracle 10g clientconfigure software .................................. 31install OnGuard software ...................... 33install software ........................................ 31
Oracle 10g serverconfigure the Lenel database ................ 14create the Lenel user .............................. 25install OnGuard ....................................... 25install software ........................................ 13installing ................................................... 11run Database Setup ................................. 27run the Net Configuration Assistant .... 18software configuration overview ......... 11verify that the system works ................. 23
Oracle 11g clientconfigure software .................................. 43install OnGuard software ...................... 44install software ........................................ 43
Oracle 11g serverconfigure the Lenel database ................ 37create the Lenel user .............................. 39install software ........................................ 36installing ................................................... 35run Database Setup ................................. 40run the Net Configuration Assistant .... 36software configuration overview ......... 35verify that the system works ................. 39
PPoor lighting .................................................. 119Ports .................................................................. 83
RRecommended badging room layout ........ 113Room layout recommended for badging .. 113
SServices ............................................................ 93Setting up
capture station ....................................... 111OnGuard Capture dialog ..................... 111
SQL Server Expresschange database owner ........................ 105
Advanced Installation Topics

Index
VVMware ............................................................ 57
WWindows Terminal Services/Citrix
overview ........................................... 73
Advanced Installation Topics 123

Index
124
Advanced Installation Topics
Lenel Systems International, Inc.1212 Pittsford-Victor RoadPittsford, New York 14534 USATel 585.248.9720 Fax [email protected]