Embed Size (px)
Citation preview

Adobe® Experience Cloud
Adobe Dynamic Media Classic (Scene7) ImageQuality and Sharpening Best Practices
Contents
Contact and Legal Information........................................................................................3
About image sharpening.................................................................................................4Adding an image preset to save frequently used sharpening options..........................................................6
Manually creating a URL that contains all the image modifier commands..................................................8
Adding sharpening to a viewer preset....................................................................................................................10
Setting company wide image sharpening options............................................................................................11
Creating image-specific sharpening overrides.....................................................................................................12
Adobe Dynamic Media Classic (Scene7) ImageQuality and Sharpening Best Practices
Last updated 7/24/2017

Contact and Legal InformationInformation to help you contact Adobe and to understand the legal issues concerning your use of this product and documentation.
Help & Technical Support
The Adobe Experience Cloud Customer Care team is here to assist you and provides a number of mechanisms by which theycan be engaged:
• Check the Experience Cloud help pages for advice, tips, and FAQs• Ask us a quick question on Twitter @AdobeMktgCare• Log an incident in our customer portal• Contact the Customer Care team directly• Check availability and status of Experience Cloud Solutions
Service, Capability & Billing
Depending on your solution configuration, some options described in this documentation are not available to you. As eachaccount is unique, refer to your contract for pricing, due dates, terms, and conditions. If you would like to add to or otherwisechange your service level, or if you have questions regarding your current service, contact your Account Manager.
Feedback
We welcome any suggestions or feedback regarding this solution. Enhancement ideas and suggestions for the Analytics suitecan be added to our Customer Idea Exchange.
Legal
© 2017 Adobe Systems Incorporated. All Rights Reserved.Published by Adobe Systems Incorporated.
Terms of Use | Privacy Center
Adobe and the Adobe logo are either registered trademarks or trademarks of Adobe Systems Incorporated in the United States,other countries, or both. A trademark symbol, such as ® or ™ denotes an Adobe trademark.
All third-party trademarks are the property of their respective owners. Updated Information/Additional Third-Party CodeInformation available at http://www.adobe.com/go/thirdparty.
11012013 cjmr
3Contact and Legal Information

About image sharpeningThis document shows you several methods you can use in Adobe Dynamic Media Classic (Scene7) and on Image Serving tosharpen an image, and also control image sharpening.
How dynamic image serving works
Using Dynamic Media Classic (Scene7) and Image Serving you can create multiple derivative images based on one, high-resolutionsource file. You can upload one image with a large pixel count. For example, 2000 pixels in the long dimension is the recommendedsize for an image that you can leverage across multiple uses. You can also create multiple different size product images anddisplay the image in a zoom viewer. With dynamic image serving, you get many images from one source file.
On upload, images are converted to P-TIFF (Pyramid TIFF) files. The P-TIFF contains built-in zoom states based on the powerof 2x.
4About image sharpening
The Image Server uses these built-in zoom states in different ways. When serving a stand-alone image, based on the sizeinformation passed on the URL string, the Image Server finds the next largest zoom state and downsamples from there. Whena P-TIFF image is served in a Scene7 viewer, the viewers are configured by default to serve one of the 2x layers and only showa tile of the image, insuring a fast zoom experience.
Regardless of how an image is used, when an image is downsampled, image degradation occurs. Because of this problem, DynamicMedia Classic and Image Server offer several methods to enhance an image, including three sharpening options.
Sharpening options are found throughout Dynamic Media Classic and are used in different ways with Image Server products.Options include the following:
• Using Image Presets with sharpening.• Using sharpening modifiers in the URL string.• Adding image modifiers to a Viewer Preset and apply it to a Scene7 viewer, such as a Zoom, eCatalog, or Spin).• Creating image-specific overrides to global image sharpening values.
How image sharpening works
Image sharpening is a necessary process when working with computer graphics. Dynamic Media Classic and Image Servers letyou take advantage of sharpening by offering several options, as described below. However, it is important to understand exactlywhat sharpening does to an image and when you have sharpened enough. While all images need some sharpening, differenttypes of images need more sharpening and others need less sharpening. It is helpful to learn when you have applied too muchsharpening, too little sharpening, and when it is optimally sharpened.
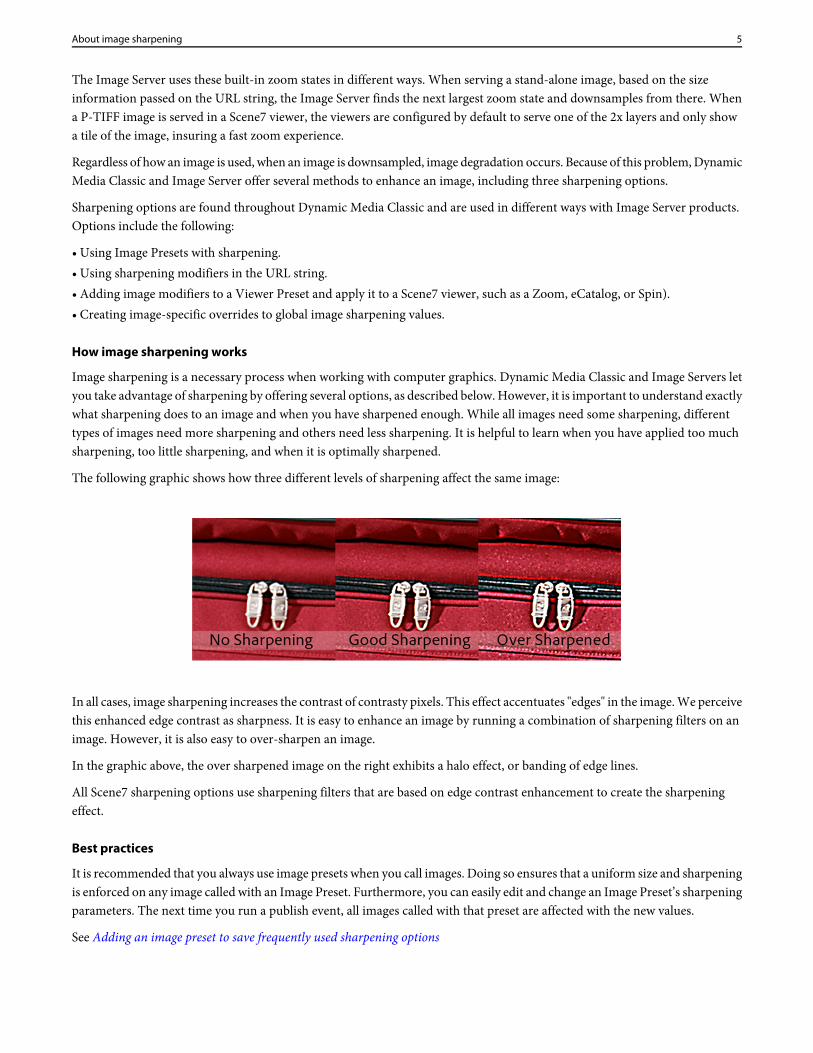
The following graphic shows how three different levels of sharpening affect the same image:
In all cases, image sharpening increases the contrast of contrasty pixels. This effect accentuates "edges" in the image. We perceivethis enhanced edge contrast as sharpness. It is easy to enhance an image by running a combination of sharpening filters on animage. However, it is also easy to over-sharpen an image.
In the graphic above, the over sharpened image on the right exhibits a halo effect, or banding of edge lines.
All Scene7 sharpening options use sharpening filters that are based on edge contrast enhancement to create the sharpeningeffect.
Best practices
It is recommended that you always use image presets when you call images. Doing so ensures that a uniform size and sharpeningis enforced on any image called with an Image Preset. Furthermore, you can easily edit and change an Image Preset’s sharpeningparameters. The next time you run a publish event, all images called with that preset are affected with the new values.
See Adding an image preset to save frequently used sharpening options
5About image sharpening

It is also recommended that you add sharpening to Viewer Presets, and then call a viewer with that preset. This order ensuresthat images within your viewers are crisp and appealing.
See Adding sharpening to a viewer preset.
However, whether you use Image Presets and Viewer Presets, or some alternate method of sharpening, the bottom line is thatyou must sharpen your images. If you do not, your images and website can soft and fuzzy. This kind of presentation can leadweb visitors to question or wonder about the accuracy of your images.
Link to additional documentation
Adobe Scene7 Image Serving and Image Rendering API
Adding an image preset to save frequently used sharpening options
Image presets let you package the various image modifiers most often used to create a dynamically resized image into a smalltext string.
An image preset basically contains values for the file format (usually JPEG for the web), pixel count, and image sharpening.Instead of appending the URL with each image modifier to create a specific type of image size, you create an image preset. Forexample, you could create an image preset called thumbnail. You configure the thumbnail image preset with the size, fileformat, and sharpening options that you want. And finally, you call to the image using the image preset name.
The following two URLs produce the same 350 x 350 JPEG image with image sharpening. Can you tell which URL is using animage preset?
http://sample.scene7.com/is/image/S7train/Backpack_A?$!_s7product$
and
http://sample.scene7.com/is/image/S7train/Backpack_A?wid=350&hei=350&fmt=jpeg&qlt=85,0&resMode=sharp&op_usm=0.9,1.0,8,0
The first—and shorter—URL, clearly demonstrates the efficiency of using an image preset. In this case, the preset is named!_s7product.
See Adding an image preset to save frequently used sharpening options.
The second—and longer— URL is an alternate method to using an image preset. In this case, you manually create a URL thatcontains all the sharpening commands. See
You change and update an Image Preset any time. You see the results of any change you make to a preset after you publish andafter you clear the URL cache and refresh. However, the real benefit of using image presets is that if you use one preset for everyimage in a particular size category, any Company Administrator can update the settings of that Image Preset in Dynamic MediaClassic, republish, and affect every image using that format, all without the need to change any web code.
As a best practice, it is recommended that you use Image Presets. That is, one Image Preset per unique image size on yourwebsite.
To add an image preset
1. Near the upper-right corner of Dynamic Media Classic, click Setup > Application Settings > Image Presets.
6About image sharpening

2. In the Image Presets list box, do one of the following:
• Click Add.
• Select an existing preset name in the list, and then click Edit.
The following graphic shows the settings that were used for the $!_s7product$ preset name (350 x 350 pixel) used inthe URL example above.
3. Set the options that you want. Preset Name is the only required field. However, it would not make sense to create a presetthat does not include some level of sharpening.
See also Manually creating a URL that contains all the image modifier commands
7About image sharpening

Manually creating a URL that contains all the image modifier commands
An alternate to using Image Presets is to manually create a URL that contains all the sharpening commands. While this methodof sharpening is possible, it is not considered a best practice because it makes the URL longer and it is challenging to update.
Images served from Adobe Scene7 Image Server come from a URL string. Each image is generated from a P-TIFF (PyramidTIFF) master image. The syntax looks like the following (note the image modifiers at the end of the URL path):
Essentially, the URL contains a reference to the image and any Image Server protocols—instructions that tell the Image Serverhow to act on the image—to create the final image.
Individual Image Server protocols are concatenated together with an ampersand (&) to create a string of effects. Each protocol‘argument’ contains the name of the Image Server effect and the value of the effect. For example, wid=250 resizes the image to250 pixels wide, and resMode=sharp tells the Image Server to resample the image using a Lanczos interpolation algorithmwhich basically sharpens the image as it is resized.
Image sharpening options
While Scene7 Image Server contains many modifiers, the following are just the sharpening options:
ParametersDescriptionImagesharpeningname
0|1URL modifier: op_sharpen=1
This filter runs a sharpening pass on thesource file after it is resized
SimpleSharpening
(downsampled, made smaller). Thisfilter is similar to the sharpen filter inAdobe Photoshop and does not allowfor the use of any user parameters.
Normally, you use this filter or UnsharpMask but not both. As a best practice,this sharpening type is notrecommended.
Example: op_sharpen=1
bilin|bicub|sharp2|trilinURL modifier: resMode=sharp2Resample Mode
The Resampling Mode filter is a way inwhich image pixels are intelligently
• bilin
8About image sharpening

ParametersDescriptionImagesharpeningname
Selects standard bi-linear interpolation. Fastest resamplingmethod; some aliasing artifacts may be noticeable.
deleted to resize an image, in a visuallypleasing way, to a desired pixeldimension. This method sharpens the • bicub
Selects bi-cubic interpolation. More CPU-intensive than bilin,but yields sharper images with less noticeable aliasing artifacts.
image when it is downsampled to resizeit.
The other resample methods do notsharpen the image when it downsamples.The setting is called sharp2.
• sharp2
Selects a modified Lanczos Window function as an interpolationalgorithm. Can produce slightly sharper results than bicub at ahigher CPU cost.Note: The Resample Mode of
sharp2 replaces sharp because• trilin
Selects a modified tri-linear interpolation, which uses both higherand lower resolutions, if available. This parameter is recommended
sharp2 is least likely to causealiasing artifacts, known as Moiré.
Example: resMode=sharp2 only when aliasing is an issue. It reduces JPEG sizes due to reducedhigh frequency data.
amount, radius, threshold, monochromeURL modifier:op_usm=1,1,10,0Unsharp Mask
This filter lets you fine-tune asharpening filter effect on the final
• amount
Controls the amount of contrast that is applied to edge pixels.downsampled image, controlling the
Think of it as the intensity of the effect. The main differencebetween the amount values of Unsharp Mask in Dynamic Media
intensity of the effect, the radius of theeffect (as measured in pixels), and athreshold of contrast that is ignored. Classic and the amount values in Adobe Photoshop, is that
Photoshop has an amount range of 1% to 500%. Whereas, inThis effect uses the same options asPhotoshop’s Unsharp Mask filter.
Dynamic Media Classic, the range is 0.0 to 5.0. A value of 5.0 inDynamic Media Classic is the rough equivalent of 500% inPhotoshop; a value of 0.9 is the equivalent of 90%, and so on.Contrary to what the name suggests,
Unsharp Mask is a sharpening filter.• radius
Controls the radius of the effect.Example: op_usm=1,1,10,0
The effect is run on all pixels in an image and radiates out fromall pixels in all directions. The radius is measured in pixels. Settinga correct radius value depends on the size of the image.
For example, to get a similar sharpening effect for a 2000 x 2000pixel image and 500 x 500 pixel image, you would set a radiusvalue of two pixels on the 200 x 200 pixel image and a radius valueof one pixel on the 500 x 500 pixel image. A larger value is usedfor an image that has more pixels.
• threshold
9About image sharpening

ParametersDescriptionImagesharpeningname
Threshold is a range of contrast that is ignored when the UnsharpMask filter is applied. This is important so that no "noise" isintroduced to an image when this filter is used. The value rangeis 0-255, which is the number of brightness steps in a grayscaleimage. 0=black, 128=50% gray and 255=white.
For example, a threshold value of 12 ignores slight variations isskin tone brightness to avoid adding noise, but still add edgecontrast to contrasty areas such as where eyelashes meet skin.
For example, if you have a photo of someone’s face, the UnsharpMask affects the contrasty parts of the image, such as whereeyelashes and skin meet to create an obvious area of contrast, andthe smooth skin itself. Even the smoothest skin exhibits subtlechanges in brightness values. If you do not use a threshold value,the filter accentuates these subtle changes in skin pixels. In turn,a noisy and undesirable effect is created while contrast on theeyelashes is increased, enhancing sharpness.
To avoid this issue, a threshold value is introduced that tells thefilter to ignore pixels that do not change contrast dramatically,like smooth skin.
In the zipper graphic shown earlier, notice the texture next to thezippers. Image noise is exhibited because the threshold valueswere too low to suppress the noise. See How image sharpeningworks.
• monochrome
Set to 0 to unsharp-mask each color component separately; set to1 to unsharp-mask image brightness (intensity).
While it is not recommended, you could mix all three image sharpening types to achieve your final result. Regardless, it isrecommended that you save these options in Dynamic Media Classic as part of an image preset.
Adding sharpening to a viewer preset
While image presets have a dialog box for choosing sharpening options, viewer presets do not have the same user interface.However, unless you add sharpening image modifiers to the preset, the small ‘initial load’ image can look overly soft because itis being downsampled to fit into the viewer window, without being sharpened.
In Dynamic Media Classic, viewer presets, like image presets, let you centralize many options into one location, including thechoice of skin and viewer options, such as including a Print button or controlling the speed of the zoom animation.
To add sharpening to a viewer preset
10About image sharpening

1. In Dynamic Media Classic, click Setup > Application Setup > Viewer Presets.
2. One of the options is Modifiers, and is found under the Core Settings section of all eCatalog, Spin, and Custom Zoom ViewerPresets. By adding the URL sharpening commands to the Modifiers text field, that adds sharpening every time that vieweris called with that viewer preset.
Setting company wide image sharpening options
If you do not use an Image Preset or pass specific Image Server sharpening protocols along the URL string, then your image isnot sharpened when downsampled. However, you can set default sharpening values if this occurs and then any image alwayshas some sharpening.
To set your company’s default sharpening options
1. In Dynamic Media Classic, click Setup > Application Setup > Publish Setup > Image Server.
You can set the Default Resampling Mode to Sharp2. This setting always sharpens the image when downsampling.
11About image sharpening

Creating image-specific sharpening overrides
The least recommended image sharpening method is to create sharpening overrides on an image-by-image basis. This methodlets you override the sharpening in an Image Preset with its own specific values. However, realize this method also overrides allother sharpening methods at any image size. The best use case for this method is if some of your images are not high resolution,and the values in the Image Presets are too high for these small images. In this case, some per-image sharpening might be needed.
Note: Per-image sharpening negates the effects of sharpening in an image preset or a viewer preset. Use only if your workflowrequires it.
To create image-specific sharpening overrides
1. In Dynamic Media Classic, select any image.
2. Click Detail View, and then click Sharpen.
12About image sharpening

3. In the Sharpness Editor page, set the Sharpening parameters that you want, and then click Save near the lower-right corner.
13About image sharpening

The Image Server uses these sharpening parameters rather than any command you call in the URL, such as a sharpeningmodifier or an image preset.
Be sure that you publish to see the sharpening changes come through in the image.
14About image sharpening