Embed Size (px)
Citation preview

CERNER MILLENNIUM Admission From Office
This demonstration illustrates the steps to take when admitting a patient to the hospital during a clinic encounter.
This has been prepared using Millennium base code level 2015.01.13 & mPage 6.0; various package updates & aspects of mPage 6.3 have also been installed. Subsequent updates may display cosmetic & functional changes.
Use the keyboard or mouse to advance.
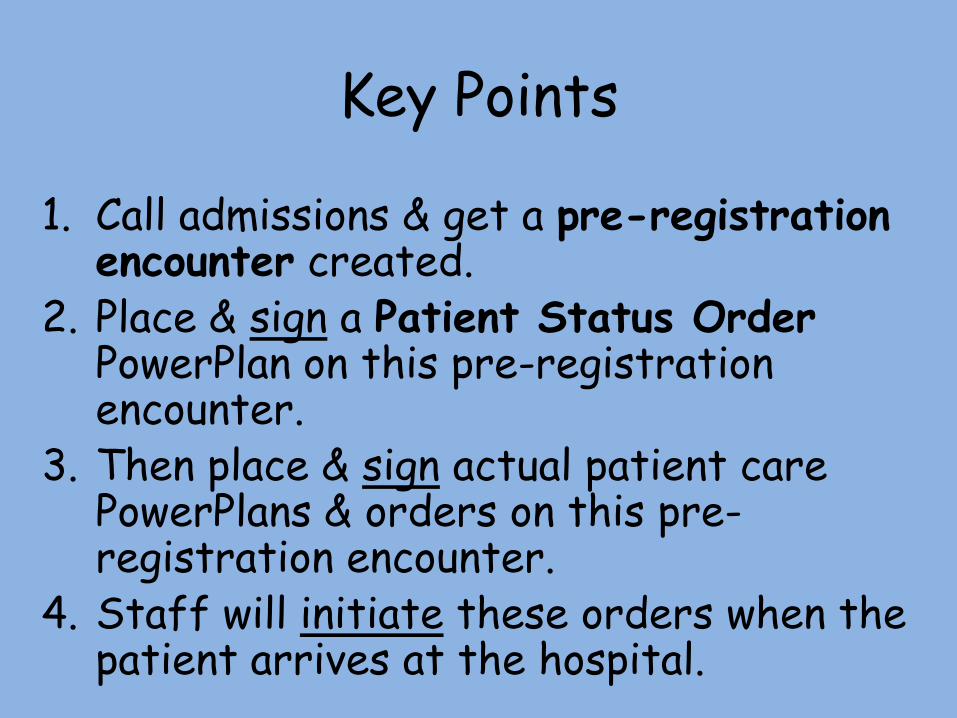
Key Points
1. Call admissions & get a pre-registration encounter created.
2. Place & sign a Patient Status Order PowerPlan on this pre-registration encounter.
3. Then place & sign actual patient care PowerPlans & orders on this pre-registration encounter.
4. Staff will initiate these orders when the patient arrives at the hospital.

Suppose you see a patient in the clinic & determine that he needs admission. Your initial response might be to start writing orders, but if you do this on the outpatient encounter, hospital staff will not be able to initiate these orders upon the patient’s arrival.
Instead, you or your staff should call the hospital so that the admissions office can create a pre-admission encounter, sometimes called a pre-reg encounter. This is a hospital encounter that can be created quickly, allowing you to place inpatient orders for an upcoming admission.

After the pre-admission encounter has been created, change to that encounter. The quickest way to do that is to click on Clinic FIN in the Banner Bar.
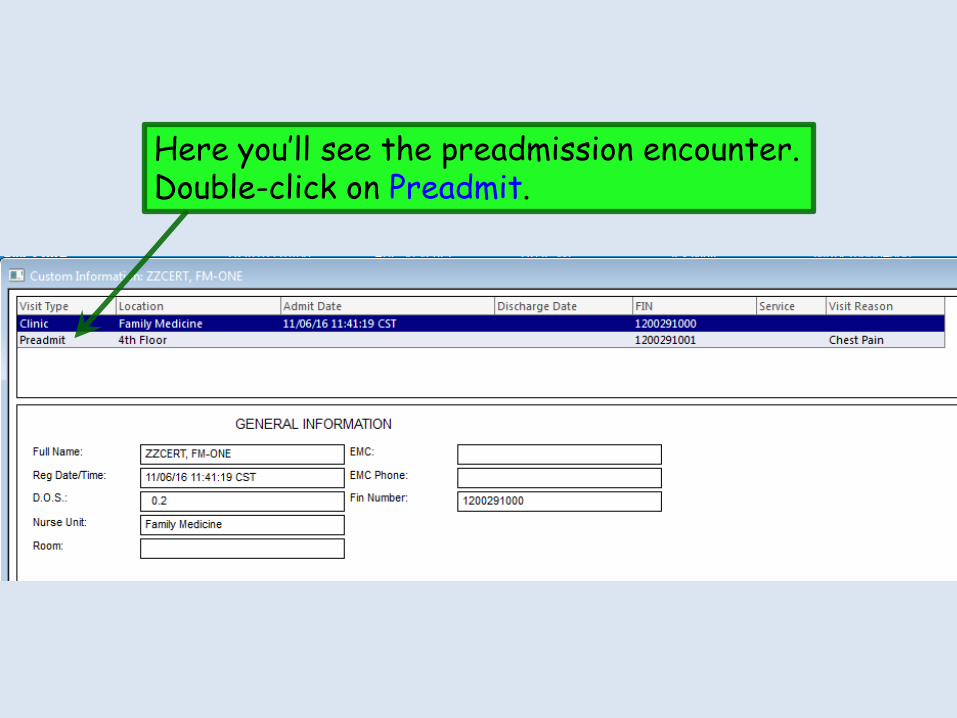
Here you’ll see the preadmission encounter. Double-click on Preadmit.

You’re alerted that you’re about to change encounters. Click Yes.

Different specialties have different appearances of their workflow tabs, or mPages. But if available, a good place to start is the HOSP Quick Orders workflow tab, or the equivalent for your specialty.
If you don’t have a Quick Orders mPage that provides easy access to the orders described in the following slides, they’re easy to find with a manual search.

There are PowerPlans, or order sets, for many scenarios. The first one you want is Patient Status Order, which begins the hospitalization.

Now look for appropriate clinical PowerPlans. For this example we’ll select IM General Admission & IM Pneumonia Limited.

With these selected, click the checkout cart.

Since we’re on a new encounter, there are no diagnoses showing yet (though you’d see them if you chose to populate them before placing orders). Click Modify.

First, click on the Patient Status Order.
Then select the individual order you want. Here we want Admit to Inpatient.
Then select the order sentence. In this case, there is actually only one: T;N.
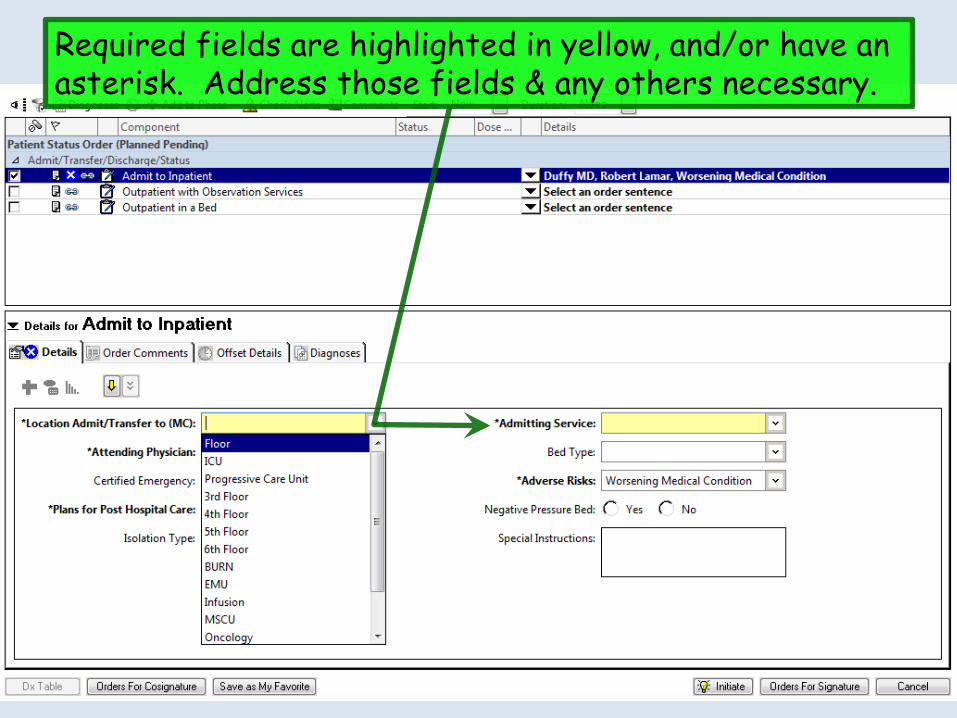
Required fields are highlighted in yellow, and/or have an asterisk. Address those fields & any others necessary.

Now click on IM General Admission.

Work your way down the orders, selecting the ones you want, & modifying the order details as necessary.
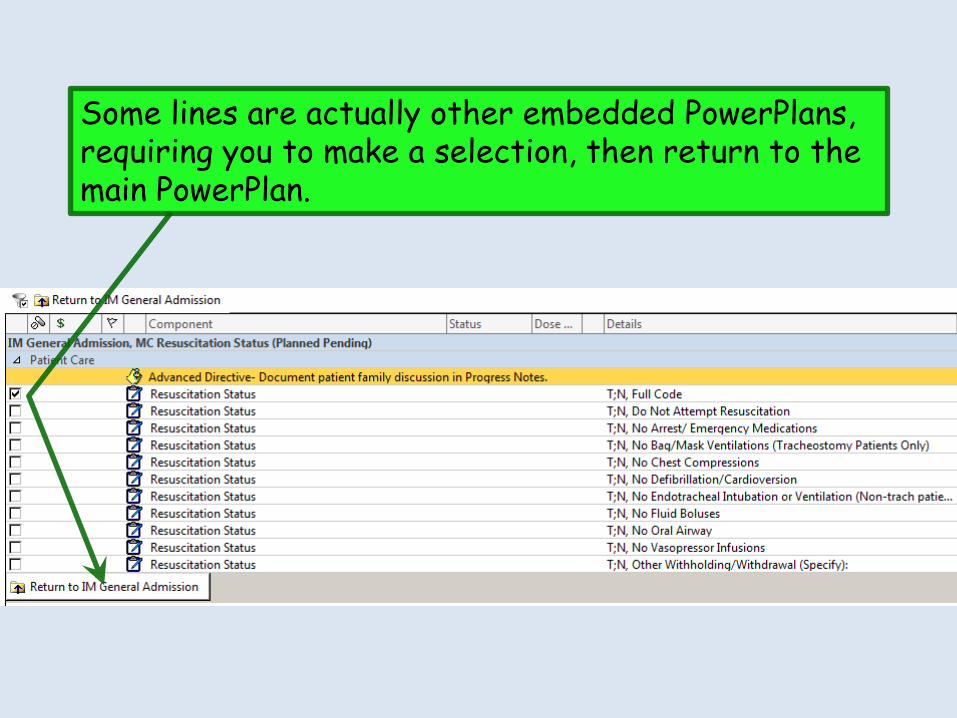
Some lines are actually other embedded PowerPlans, requiring you to make a selection, then return to the main PowerPlan.

You’ll often have a few individual orders to add that aren’t in the PowerPlan. For example, back on the main PowerPlan, click Add to Phase, then Add Order, to add the patient’s home losartan.

Search for losartan & select your desired order.
That’s the only additional order we’ll add, so click Done.

Now click on IM Pneumonia Limited.

As before, make selections as desired. When done click Orders For Signature.
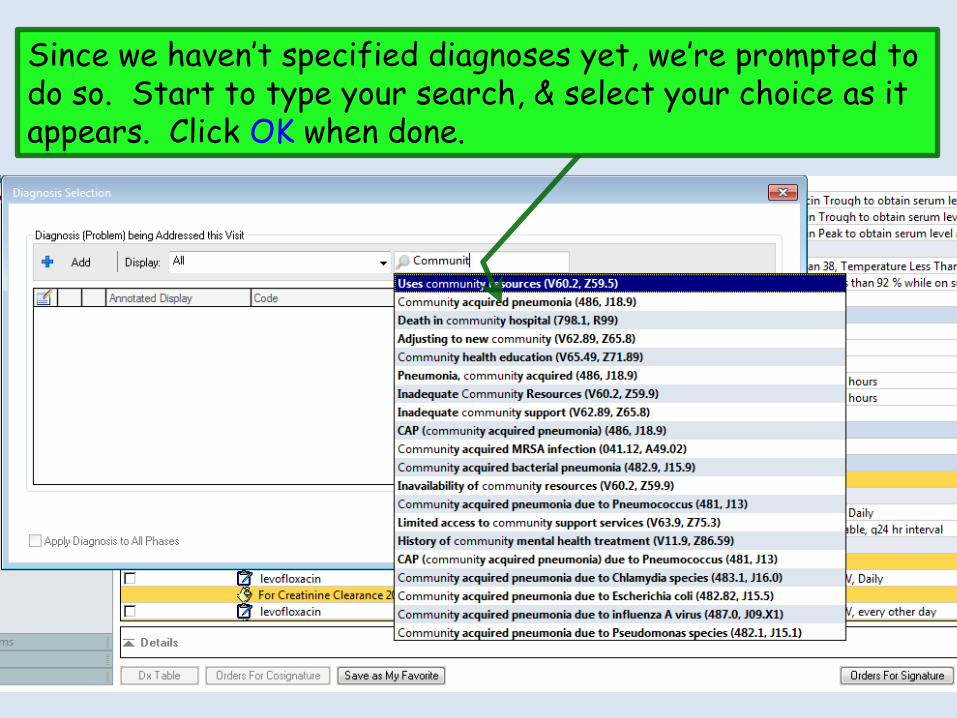
Since we haven’t specified diagnoses yet, we’re prompted to do so. Start to type your search, & select your choice as it appears. Click OK when done.

Because the patient hasn’t arrived at the hospital yet, you may see alerts about missing height & weight. Since you’re aware of these from the outpatient encounter, you can click OK to acknowledge & dismiss them.

You’re taken to other missing order details. Complete them & specify other order details as required.
Click Missing Required Details to move through any other missing order details.

When all details have been completed, click Sign.

If you haven’t addressed it already, you’ll see the VTE Prophylaxis Advisor. At this point you have a few approaches. If you recall the patient’s weight from the clinic encounter, you could enter it, but from this screen there is no way to see it. If you recall that it is pretty close to 70 kg, you could go with that. You could also just cancel, knowing that the alert will trigger again when the patient actually arrives at the hospital & orders are initiated. So that’s what we’ll do here.
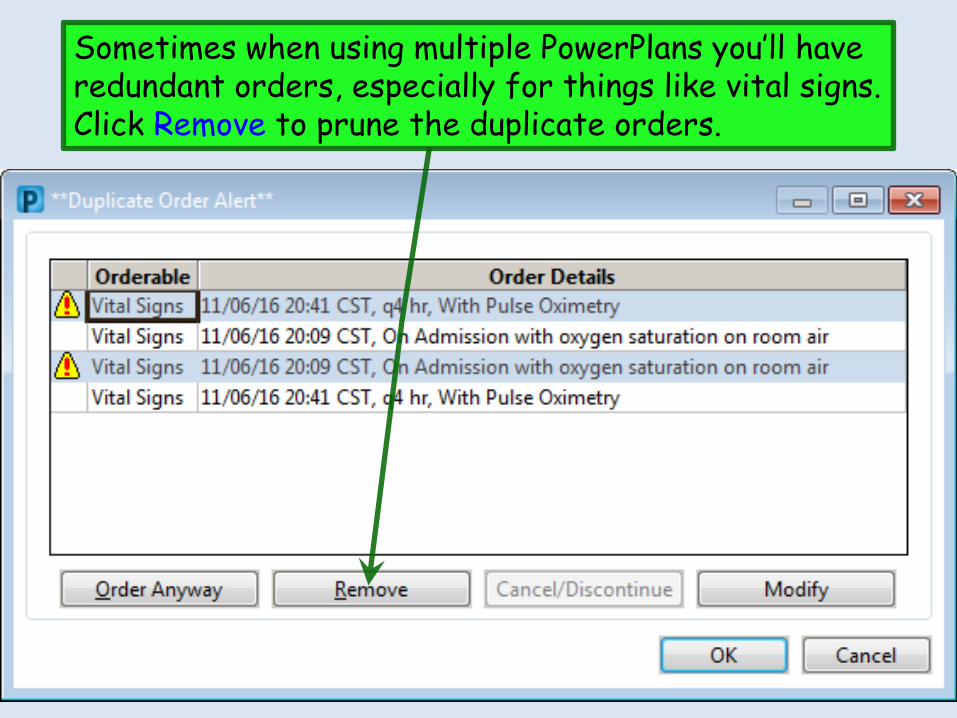
Sometimes when using multiple PowerPlans you’ll have redundant orders, especially for things like vital signs. Click Remove to prune the duplicate orders.

Admission orders have been completed, & may be initiated by the staff when the patient arrives at the hospital.
Note that, if it isn’t going to be done by someone else on the wards, you could also complete your admission H&P here. Go to the INPT Admit Workflow tab.

If you’ve already done your office visit note, you can use that to add many key elements, like HPI, ROS, physical exam, & assessment/plan, to the admission H&P. Click on the Office Visit Note.
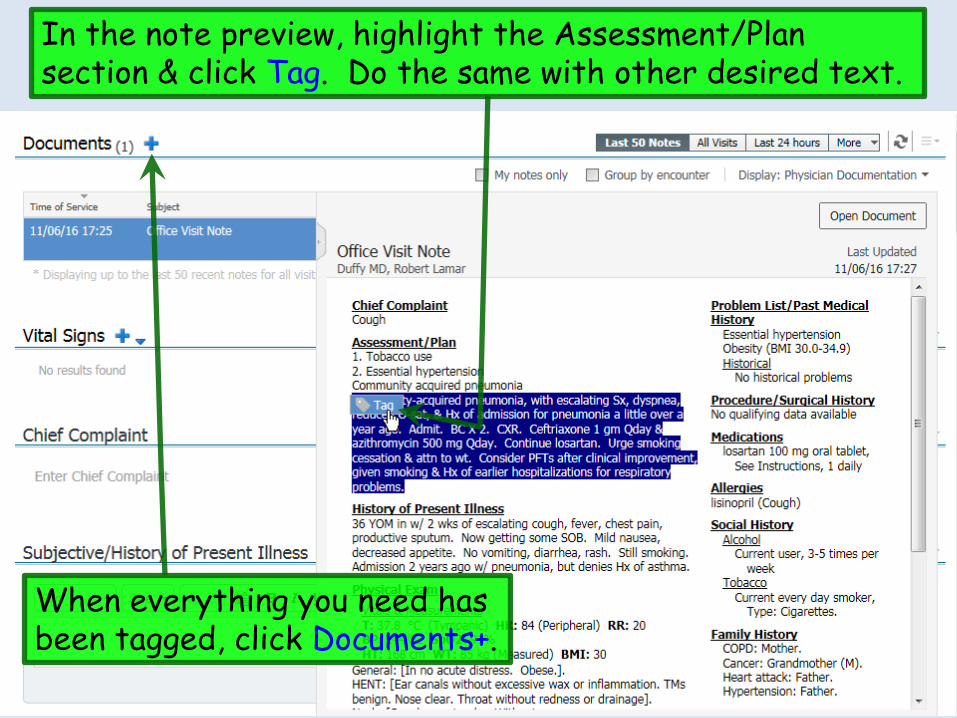
In the note preview, highlight the Assessment/Plan section & click Tag. Do the same with other desired text.
When everything you need has been tagged, click Documents+.

Select Note Type of History and Physical, then double-click the Admission H&P Note template.

Your H&P is generated. Click & drag each piece of tagged text to the appropriate area of the note.
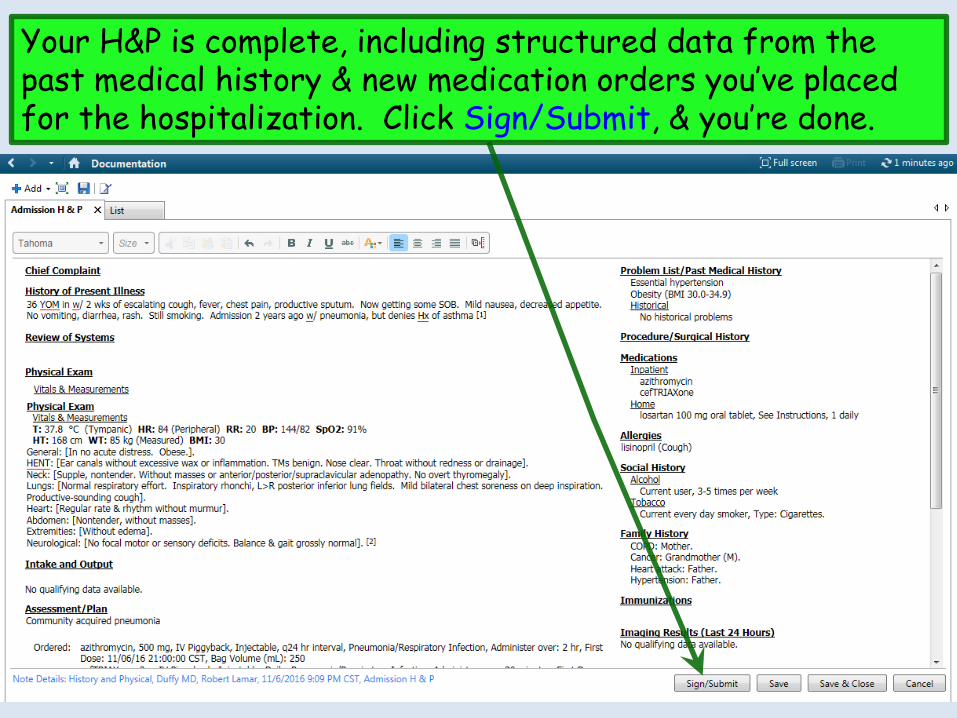
Your H&P is complete, including structured data from the past medical history & new medication orders you’ve placed for the hospitalization. Click Sign/Submit, & you’re done.


![[TOP OF THE LIST (FOR ADMISSION)] [ORDERS … · nair, sushil balwada, surya kant, sunil kumar ... shiv sai bahuudeshiya shiksha prachar ... amol shankar nagare aniruddha p. mayee](https://img.dokumen.tips/doc/110x75/5b8605497f8b9af12d8c08ef/top-of-the-list-for-admission-orders-nair-sushil-balwada-surya-kant.jpg)