Embed Size (px)
Citation preview
Oracle8i
Administrator’s Reference
Release 3 (8.1.7) for IBM DYNIX/ptx
November 2000
Part No. A87392-01

Oracle8i Administrator’s Reference Release 3 (8.1.7) for IBM DYNIX/ptx
Part No. A87392-01
Copyright © 1996,2000, Oracle Corporation. All rights reserved.
The programs are not intended for use in any nuclear, aviation, mass transit, medical, or other inherently dangerous applications. It shall be the licensee’s responsibility to take all appropriate fail-safe, backup, redundancy, and other measures to ensure the safe use of such applications if the programs are used for such purposes, and Oracle Corporation disclaims liability for any damages caused by such use of the programs.
The programs (which include both the software and documentation) contain proprietary information of Oracle Corporation; they are provided under a license agreement containing restrictions on use and disclosure and are also protected by copyright, patent, and other intellectual and industrial property laws. Reverse engineering, disassembly, or decompilation of the programs is prohibited.
The information contained in this document is subject to change without notice. If you find any problems in the documentation, please report them to us in writing. Oracle Corporation does not warrant that this document is error free. Except as may be expressly permitted in your license agreement for these programs, no part of these programs may be reproduced or transmitted in any form or by any means, electronic or mechanical, for any purpose, without the express written permission of Oracle Corporation.
If the programs are delivered to the U.S. Government or anyone licensing or using the programs on behalf of the U.S. Government, the following notice is applicable:
Restricted Rights Notice Programs delivered subject to the DOD FAR Supplement are " commercial computer software" and use, duplication, and disclosure of the programs, including documentation, shall be subject to the licensing restrictions set forth in the applicable Oracle license agreement. Otherwise, programs delivered subject to the Federal Acquisition Regulations are " restricted computer software" and use, duplication, and disclosure of the programs shall be subject to the restrictions in FAR 52.227-19, Commercial Computer Software - Restricted Rights (June, 1987). Oracle Corporation, 500 Oracle Parkway, Redwood City, CA 94065.
Oracle is a registered trademark, and ConText, interMedia, JDeveloper, Net8, Oracle Call Interface, Oracle Database Configuration Assistant, Oracle Data Migration Assistant, Oracle Developer, Oracle Names, Oracle Spatial, Oracle Time Series, Oracle Video Information Retrieval, Oracle7, Oracle8i, PL/SQL, Pro*C/C++, Pro*COBOL, SQL*Loader, and SQL*Plus are trademarks or registered trademarks of Oracle Corporation. All other company or product names mentioned are used for identification purposes only and may be trademarks of their respective owners.
Contents
Send Us Your Comments ................................................................................................................... ix
Preface............................................................................................................................................................ xi
Oracle Information Navigator ...................................................................................................... xiii
1 Administering Oracle8i
Overview .............................................................................................................................................. 1-2Environment Variables ...................................................................................................................... 1-2
Oracle8i Environment Variables ................................................................................................ 1-2UNIX Environment Variables..................................................................................................... 1-5Setting a Common Environment................................................................................................ 1-7Setting and Exporting the Value of a Variable in a Current Session .................................... 1-8Setting the System Time .............................................................................................................. 1-8
Relink Executables ............................................................................................................................. 1-8System Global Area............................................................................................................................ 1-9
Calculating the Size of the SGA................................................................................................ 1-10Oracle8i Memory Requirements and Usage................................................................................ 1-12Server Resource Limits .................................................................................................................... 1-13Database Limits................................................................................................................................. 1-13Special Accounts and Groups ........................................................................................................ 1-14Security ............................................................................................................................................... 1-15
Groups and Security................................................................................................................... 1-15Security for Server Manager Commands................................................................................ 1-16Security for Database Files ........................................................................................................ 1-16
iii

Remote Passwords...................................................................................................................... 1-16Customizing the initsid.ora File ............................................................................................... 1-18
Demonstrations Files ....................................................................................................................... 1-20SQL*Loader Demonstrations .................................................................................................... 1-20Administering SQL*Loader....................................................................................................... 1-21PL/SQL Demonstrations ........................................................................................................... 1-23Database Examples..................................................................................................................... 1-24
2 Tuning Oracle8i
Importance of Tuning ......................................................................................................................... 2-2IBM DYNIX/ptx Tools ....................................................................................................................... 2-2
sar .................................................................................................................................................... 2-2swap................................................................................................................................................ 2-3
SQL Scripts .......................................................................................................................................... 2-5Tuning Memory Management ......................................................................................................... 2-5
Allocate Sufficient Swap Space .................................................................................................. 2-5Control Paging ............................................................................................................................. 2-6Lock the SGA in Physical Memory ............................................................................................ 2-6Optimize Number of Database Buffers ..................................................................................... 2-7Use Indirect Database Buffers..................................................................................................... 2-8Optimize Number of Redo Buffers ............................................................................................ 2-8Optimize the Shared Pool Size.................................................................................................... 2-8Verify Data Dictionary Cache Effectiveness ............................................................................. 2-9Allocate Adequate Library Cache Space ................................................................................... 2-9Lock Large PL/SQL Blocks into the Shared Pool .................................................................. 2-10
Tuning Disk I/O ............................................................................................................................... 2-11Tune the Database Writer to Increase Write Bandwidth ..................................................... 2-11Use Logical Volumes.................................................................................................................. 2-13Choose the Appropriate File System Type ............................................................................ 2-13
Monitoring Disk Performance ...................................................................................................... 2-14Disk Performance Issues ........................................................................................................... 2-15
Tuning CPU Usage ........................................................................................................................... 2-15Keep All Oracle Users and Processes at the Same Priority .................................................. 2-15Use Processor Affinity and Binding on Multi-Processor Systems....................................... 2-15
Tuning Oracle Resource Contention ............................................................................................. 2-16
iv

Tuning UNIX Kernel Parameters ............................................................................................. 2-16Using V$ Tables to Isolate Contention .................................................................................... 2-16Isolating the Segment Causing Contention ............................................................................ 2-17Reducing Latch Free Contention.............................................................................................. 2-18Reducing Rollback Segment Contention................................................................................. 2-19Reducing Redo Log Buffer Latch Contention ........................................................................ 2-19Reducing Parallel Query/Parallel DML Contention ............................................................ 2-20Tuning Spin Count ..................................................................................................................... 2-21
Tuning Block Size and File Size .................................................................................................... 2-22Specifying Oracle Block Size..................................................................................................... 2-22
Tuning the Buffer Cache Size ........................................................................................................ 2-22Tuning Resource Contention for Oracle Parallel Server ........................................................... 2-23
Avoid Index Contention............................................................................................................ 2-23Avoid Free List Contention....................................................................................................... 2-23Avoid Lock Contention ............................................................................................................. 2-23Localize Disk I/O ....................................................................................................................... 2-24Monitor Contention.................................................................................................................... 2-25
Using Trace and Alert Files ............................................................................................................ 2-25Trace File Names ....................................................................................................................... 2-25Alert Files .................................................................................................................................... 2-25
Raw Devices and Volumes.............................................................................................................. 2-26Disadvantages of Raw Devices and Volumes ....................................................................... 2-26Guidelines for Using Raw Devices and Volumes ................................................................. 2-27Raw Device Setup....................................................................................................................... 2-28
3 Administering SQL*Plus
Administering SQL*Plus .................................................................................................................. 3-2Using Setup Files ......................................................................................................................... 3-2Using the PRODUCT_USER_PROFILE Table ......................................................................... 3-2Using Demonstration Tables ..................................................................................................... 3-3Using the Help Facility ................................................................................................................ 3-4
Using SQL*Plus ................................................................................................................................. 3-5Using a System Editor from SQL*Plus ..................................................................................... 3-5Running Operating System Commands from SQL*Plus........................................................ 3-6Interrupting SQL*Plus ................................................................................................................ 3-6
v

Using the SPOOL Command ..................................................................................................... 3-6Restrictions of SQL*Plus ................................................................................................................... 3-6
Resizing Windows ....................................................................................................................... 3-6Return Codes ................................................................................................................................ 3-6
4 Using Oracle Precompilers and the Oracle Call Interface
Overview of Oracle Precompilers.................................................................................................... 4-2Relinking Precompiler Executables ........................................................................................... 4-2Precompiler Configuration Files ............................................................................................... 4-3Issues Common to All Precompilers.......................................................................................... 4-3Static and Dynamic Linking........................................................................................................ 4-4Oracle Shared Library .................................................................................................................. 4-4
Pro*C/C++ Precompiler ..................................................................................................................... 4-5Pro*C/C++ Demonstration Programs ...................................................................................... 4-5Pro*C/C++ User Programs ......................................................................................................... 4-6
Pro*COBOL Precompiler................................................................................................................... 4-7Pro*COBOL Environment Variables............................................................................................... 4-7
Environment Variables ............................................................................................................... 4-7Using Pro*COBOL........................................................................................................................ 4-9Pro*COBOL User Programs ..................................................................................................... 4-10FORMAT Precompiler Option.................................................................................................. 4-11
Oracle Call Interface ........................................................................................................................ 4-11OCI Demonstration Programs ................................................................................................. 4-11OCI Linking Errors ..................................................................................................................... 4-12OCI User Programs .................................................................................................................... 4-12
Custom Makefiles ............................................................................................................................ 4-13Correcting Undefined Symbols .................................................................................................... 4-14Multi-Threaded Applications......................................................................................................... 4-15
Using Signal Handlers .............................................................................................................. 4-15XA Functionality .............................................................................................................................. 4-18
5 Configuring Net8
Core Net8 Products and Features .................................................................................................... 5-2Net8 Files and Utilities ................................................................................................................ 5-2Oracle Connection Manager ....................................................................................................... 5-3
vi
Server Models ............................................................................................................................... 5-4Oracle Names ................................................................................................................................ 5-5
Net8 Protocol Support ....................................................................................................................... 5-5ADDRESS Specification............................................................................................................... 5-5
The BEQ Protocol ............................................................................................................................... 5-6The IPC Protocol ................................................................................................................................ 5-8The RAW Protocol ............................................................................................................................. 5-9The TCP/IP Protocol .......................................................................................................................... 5-9
Specifying a TCP/IP ADDRESS ................................................................................................ 5-9Oracle Enterprise Manager ............................................................................................................. 5-10Configuring Oracle Intelligent Agent for Oracle SNMP.......................................................... 5-11Oracle Advanced Security .............................................................................................................. 5-13Supplementary Documentation..................................................................................................... 5-13
6 Running Oracle Data Option Demos
Oracle8i interMedia............................................................................................................................ 6-2Text ................................................................................................................................................. 6-2Audio, Video, and Image ............................................................................................................ 6-2Locator............................................................................................................................................ 6-6Web Agent and Clipboard .......................................................................................................... 6-8
Oracle8i Time Series Demos............................................................................................................. 6-8Oracle8i Visual Information Retrieval ........................................................................................... 6-9Oracle8i Spatial ................................................................................................................................. 6-10
A Optimal Flexible Architecture
Optimal Flexible Architecture (OFA).............................................................................................. A-2Characteristics of OFA-Compliant Database ........................................................................... A-2
OFA Implemented on UNIX ............................................................................................................. A-4Mount Points ................................................................................................................................. A-4Naming Directories ...................................................................................................................... A-5Naming Files ................................................................................................................................. A-6Naming Tablespaces .................................................................................................................... A-8Exploiting OFA Structure for Oracle Files ................................................................................ A-8OFA File Mapping........................................................................................................................ A-9Raw Device Sizes ........................................................................................................................ A-10
vii

File Mapping for Multiple-Instance OFA Database .............................................................. A-11Directory Structure ..................................................................................................................... A-12
Index
viii

Send Us Your Comments
Oracle8i Administrator’s Reference Release 3 (8.1.7) for IBM DYNIX/ptx
Part No. A87392-01
Oracle Corporation welcomes your comments and suggestions on the quality and usefulness of this publication. Your input is an important part of the information used for revision.
■ Did you find any errors?■ Is the information clearly presented?■ Do you need more information? If so, where?■ Are the examples correct? Do you need more examples?■ What features did you like most about this manual?
If you find any errors or have any other suggestions for improvement, please indicate the chapter, section, and page number (if available). You can send comments to us in the following ways:
■ Email - [email protected]■ FAX - 650.413.0176 Attn: Corinne Arne■ Postal service:
Corinne ArneOracle Corporation 500 Oracle Parkway, Mailstop 501IP4Redwood Shores, CA 94065USA
If you would like a reply, please provide your name, address, and telephone number.
If you have problems with the software, please contact your local Oracle Support Services Center.
ix

x
Preface
PurposeThis guide and the Oracle8i Installation Guide for IBM DYNIX/ptx provide instructions for installing and configuring Oracle8i Release 3 (8.1.7) on IBM DYNIX/ptx systems. Product-specific documentation is in the Oracle8i Generic Documentation Set.
AudienceThis document is intended for anyone responsible for installing Oracle8i Release 3 (8.1.7) on IBM DYNIX/ptx systems.
Oracle8i and Oracle8i Enterprise EditionUnless noted otherwise, features and functionality described in this document are common to both Oracle8i and Oracle8i Enterprise Edition.
xi
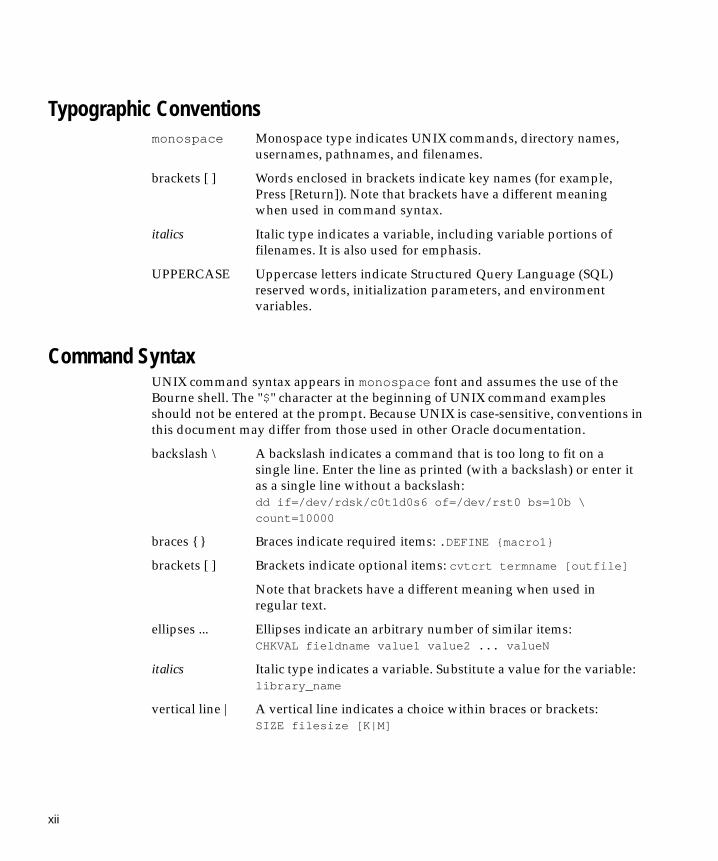
Typographic Conventions
Command SyntaxUNIX command syntax appears in monospace font and assumes the use of the Bourne shell. The "$" character at the beginning of UNIX command examples should not be entered at the prompt. Because UNIX is case-sensitive, conventions in this document may differ from those used in other Oracle documentation.
monospace Monospace type indicates UNIX commands, directory names, usernames, pathnames, and filenames.
brackets [ ] Words enclosed in brackets indicate key names (for example, Press [Return]). Note that brackets have a different meaning when used in command syntax.
italics Italic type indicates a variable, including variable portions of filenames. It is also used for emphasis.
UPPERCASE Uppercase letters indicate Structured Query Language (SQL) reserved words, initialization parameters, and environment variables.
backslash \ A backslash indicates a command that is too long to fit on a single line. Enter the line as printed (with a backslash) or enter it as a single line without a backslash:dd if=/dev/rdsk/c0t1d0s6 of=/dev/rst0 bs=10b \
count=10000
braces { } Braces indicate required items: .DEFINE {macro1}
brackets [ ] Brackets indicate optional items: cvtcrt termname [outfile]
Note that brackets have a different meaning when used in regular text.
ellipses ... Ellipses indicate an arbitrary number of similar items:CHKVAL fieldname value1 value2 ... valueN
italics Italic type indicates a variable. Substitute a value for the variable: library_name
vertical line | A vertical line indicates a choice within braces or brackets:SIZE filesize [K|M]
xii

Accessing Installed DocumentationOracle8i for IBM DYNIX/ptx documentation includes this guide and the Oracle8i Installation Guide for IBM DYNIX/ptx. You can install documentation in HTML and PDF (Adobe Portable Document Format, which requires Acrobat Reader) formats. IBM DYNIX/ptx-specific documentation files are installed from the Oracle8i CD-ROM. Generic documentation files are installed from the Online Generic Documentation CD-ROM. The location of the documentation files is determined according to the following rules:
■ If ORACLE_DOC is defined in the environment, the files are installed in that directory.
■ If ORACLE_DOC is not defined but ORACLE_BASE is defined, the files are installed under the $ORACLE_BASE/doc directory.
■ If neither ORACLE_DOC nor ORACLE_BASE are defined in the environment, the files are installed under the $ORACLE_HOME/doc directory.
To access the documentation, point your browser to either index.htm or products.htm (the latter does not a require a frames-enabled browser). If you prefer paper documentation, you can print the PDF files.
Oracle Product DocumentationOracle8i product documentation is on the Oracle8i Generic Documentation CD-ROM. Instructions for accessing and installing the documents on the CD-ROM are found in the README file on the top level directory of the CD-ROM.
Oracle Information NavigatorOracle Information Navigator is a Java-based search and navigation utility provided with Oracle online documentation. If you are using a Java-enabled browser, Information Navigator is launched automatically when you open the index.htm file at the top level of the CD-ROM. Information Navigator can be used with Oracle documentation, whether you are reading from the CD-ROM or from installed files.
xiii
Related DocumentationIf you are unfamiliar with the concepts or terminology associated with relational database management systems, read Chapter 1 in Oracle8i Concepts before beginning your installation.
Information about system administration and tuning for a production database system is provided in these documents:
■ Oracle8i Installation Guide for IBM DYNIX/ptx
■ Oracle8i System Administrator’s Guide
■ Net8 Administrator’s Guide
■ Oracle8i Designing and Tuning for Performance
Information about migrating or upgrading from a previous release of the Oracle Server is provided in Oracle8i Migration.
Oracle Services and SupportOracle corporation offers a wide range of services to help facilitate corporate system solutions, including Oracle Education courses, Oracle Consulting services, and Oracle Worldwide Customer Support. Information about Oracle products and global services is available on the Internet, from:
http://www.oracle.com
The sections below provide URLs for selected services.
Oracle Support ServicesTechnical Support contact information worldwide is listed at:
http://www.oracle.com/support
Templates are provided to help you prepare information about your problem before you call. You will also need your CSI number (if applicable) or complete contact details, including any special project information.
Products and DocumentationFor U.S.A. customers, Oracle Store is at:
http://store.oracle.com
xiv

Links to Stores in other countries are provided from this site.
Product documentation can be found at:
http://docs.oracle.com
Customer ServiceGlobal Customer Service contacts are listed at:
http://www.oracle.com/support/
Education and TrainingTraining information and worldwide schedules are available from:
http://education.oracle.com
Oracle Technology NetworkRegister with the Oracle Technology Network (OTN) at:
http://technet.oracle.com
OTN delivers technical papers, code samples, product documentation, self-service developer support, and Oracle’s key developer products to enable rapid development and deployment of applications built on Oracle technology.
Support for the Hearing-ImpairedOracle Corporation provides TTY access to Oracle Support Services within the United States of America at the following number:
1-800-446-2398
xv

xvi

Administering Or
1
Administering Oracle8iThis chapter provides information about Oracle8i administration for IBM DYNIX/ptx. It contains the following sections:
■ Overview
■ Environment Variables
■ Relink Executables
■ System Global Area
■ Oracle8i Memory Requirements and Usage
■ Server Resource Limits
■ Database Limits
■ Special Accounts and Groups
■ Security
■ Demonstrations Files
acle8i 1-1

Overview
OverviewOracle8i needs environment variables, parameters, memory and user settings established in order to work. This chapter describes the various settings for IBM DYNIX/ptx.
In Oracle8i files and programs, a question mark (?) represents the value of ORACLE_HOME. For example, Oracle8i expands the question mark in the following SQL statement to the full pathname of ORACLE_HOME:
alter tablespace TEMP add datafile ’?/dbs/dbs2.dbf’ size 2M
The @ sign represents $ORACLE_SID. For example, to indicate a file belonging to the current instance, enter:
alter tablespace tablespace_name add datafile ’[email protected]’
Environment VariablesThis section describes the most commonly-used Oracle8i and UNIX environment variables.
To display the current value of an environment variable, use the env command. For example, to display the value of ORACLE_SID, enter:
$ env | grep ORACLE_SID
Some of these variables must be defined before installing Oracle8i. They are listed in your Oracle8i Installation Guide Release 3 (8.1.7) for IBM DYNIX/ptx .
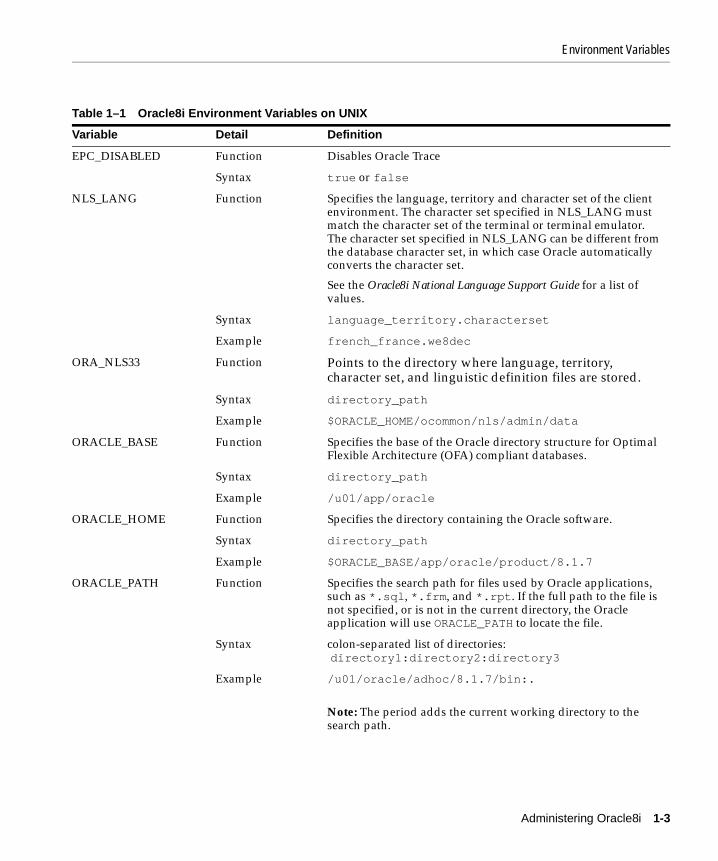
Oracle8i Environment VariablesTable 1–1 provides the syntax and examples for Oracle8i variables.
Note: The command env should be used to show what has been exported to the environment. Bourne shell and Korn shell can set values without exporting.
1-2 Oracle8i Administrator’s Reference Release 3 (8.1.7) for IBM DYNIX/ptx
Environment Variables
Table 1–1 Oracle8i Environment Variables on UNIX
Variable Detail Definition
EPC_DISABLED Function Disables Oracle Trace
Syntax true or false
NLS_LANG Function Specifies the language, territory and character set of the client environment. The character set specified in NLS_LANG must match the character set of the terminal or terminal emulator. The character set specified in NLS_LANG can be different from the database character set, in which case Oracle automatically converts the character set.
See the Oracle8i National Language Support Guide for a list of values.
Syntax language_territory.characterset
Example french_france.we8dec
ORA_NLS33 Function Points to the directory where language, territory, character set, and linguistic definition files are stored.
Syntax directory_path
Example $ORACLE_HOME/ocommon/nls/admin/data
ORACLE_BASE Function Specifies the base of the Oracle directory structure for Optimal Flexible Architecture (OFA) compliant databases.
Syntax directory_path
Example /u01/app/oracle
ORACLE_HOME Function Specifies the directory containing the Oracle software.
Syntax directory_path
Example $ORACLE_BASE/app/oracle/product/8.1.7
ORACLE_PATH Function Specifies the search path for files used by Oracle applications, such as *.sql, *.frm, and *.rpt. If the full path to the file is not specified, or is not in the current directory, the Oracle application will use ORACLE_PATH to locate the file.
Syntax colon-separated list of directories: directory1:directory2:directory3
Example /u01/oracle/adhoc/8.1.7/bin:.
Note: The period adds the current working directory to the search path.
Administering Oracle8i 1-3
Environment Variables
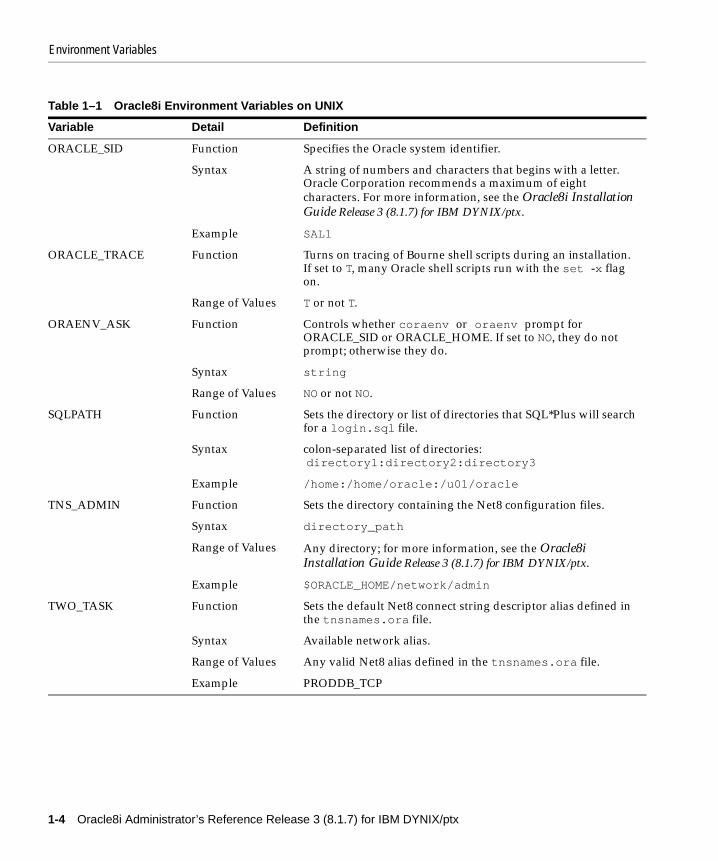
ORACLE_SID Function Specifies the Oracle system identifier.
Syntax A string of numbers and characters that begins with a letter. Oracle Corporation recommends a maximum of eight characters. For more information, see the Oracle8i Installation Guide Release 3 (8.1.7) for IBM DYNIX/ptx.
Example SAL1
ORACLE_TRACE Function Turns on tracing of Bourne shell scripts during an installation. If set to T, many Oracle shell scripts run with the set -x flag on.
Range of Values T or not T.
ORAENV_ASK Function Controls whether coraenv or oraenv prompt for ORACLE_SID or ORACLE_HOME. If set to NO, they do not prompt; otherwise they do.
Syntax string
Range of Values NO or not NO.
SQLPATH Function Sets the directory or list of directories that SQL*Plus will search for a login.sql file.
Syntax colon-separated list of directories: directory1:directory2:directory3
Example /home:/home/oracle:/u01/oracle
TNS_ADMIN Function Sets the directory containing the Net8 configuration files.
Syntax directory_path
Range of Values Any directory; for more information, see the Oracle8i Installation Guide Release 3 (8.1.7) for IBM DYNIX/ptx.
Example $ORACLE_HOME/network/admin
TWO_TASK Function Sets the default Net8 connect string descriptor alias defined in the tnsnames.ora file.
Syntax Available network alias.
Range of Values Any valid Net8 alias defined in the tnsnames.ora file.
Example PRODDB_TCP
Table 1–1 Oracle8i Environment Variables on UNIX
Variable Detail Definition
1-4 Oracle8i Administrator’s Reference Release 3 (8.1.7) for IBM DYNIX/ptx
Environment Variables
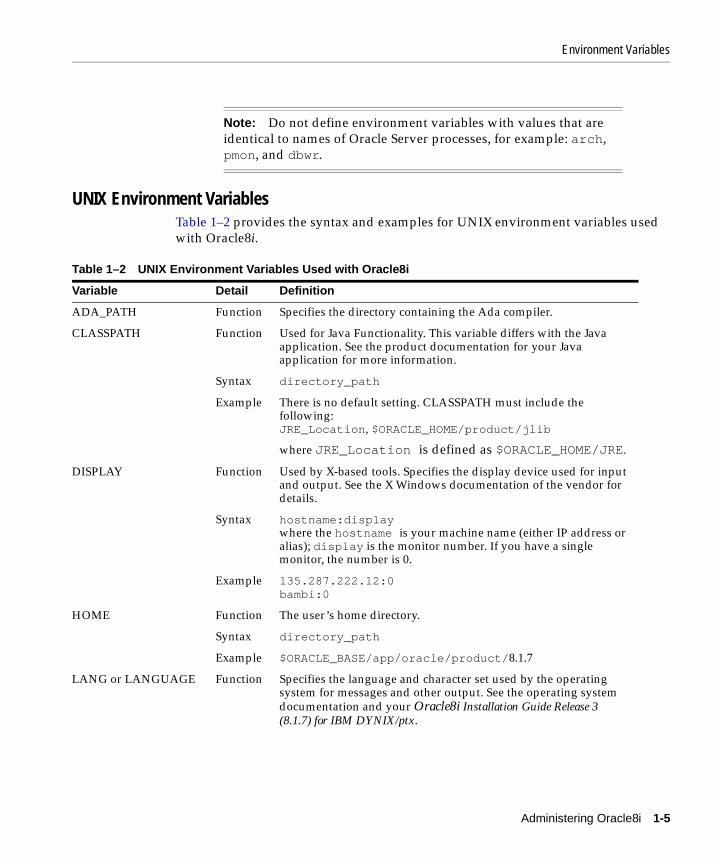
UNIX Environment VariablesTable 1–2 provides the syntax and examples for UNIX environment variables used with Oracle8i.
Note: Do not define environment variables with values that are identical to names of Oracle Server processes, for example: arch, pmon, and dbwr.
Table 1–2 UNIX Environment Variables Used with Oracle8i
Variable Detail Definition
ADA_PATH Function Specifies the directory containing the Ada compiler.
CLASSPATH Function Used for Java Functionality. This variable differs with the Java application. See the product documentation for your Java application for more information.
Syntax directory_path
Example There is no default setting. CLASSPATH must include the following:JRE_Location, $ORACLE_HOME/product/jlib
where JRE_Location is defined as $ORACLE_HOME/JRE.
DISPLAY Function Used by X-based tools. Specifies the display device used for input and output. See the X Windows documentation of the vendor for details.
Syntax hostname:displaywhere the hostname is your machine name (either IP address or alias); display is the monitor number. If you have a single monitor, the number is 0.
Example 135.287.222.12:0bambi:0
HOME Function The user’s home directory.
Syntax directory_path
Example $ORACLE_BASE/app/oracle/product/8.1.7
LANG or LANGUAGE Function Specifies the language and character set used by the operating system for messages and other output. See the operating system documentation and your Oracle8i Installation Guide Release 3 (8.1.7) for IBM DYNIX/ptx.
Administering Oracle8i 1-5

Environment Variables
LPDEST Function Specifies the user’s default printer.
Syntax printer_name
Example docqms
LDPATH Function Default directories used by the linker to find shared object libraries. See the ld man pages for details.
LD_LIBRARY_PATH Function Used by the shared library loader (ld) at runtime to find shared object libraries. See the ld man pages for details.
Syntax Colon-separated list of directories:directory1:directory2:directory3
Example /usr/dt/lib:$ORACLE_HOME/lib:$ORACLE_HOME/javavm/admin
PATH Function Used by the shell to locate executable programs; must include $ORACLE_HOME/bin.
Syntax Colon-separated list of directories:directory1:directory2:directory3
Example /bin:/usr/bin:/usr/local/bin: /usr/bin/X11:$ORACLE_HOME/bin:$HOME/bin:.Note: The period adds the current working directory to the search path.
PRINTER Function Selects the default printer.
Syntax printer_name
Example docqms
SHELL Function Specifies the command interpreter used during a host command.
Syntax shell_path
Range of Values
/sbin/sh or /sbin/csh or /sbin/ksh or any other command interpreter supplied with IBM DYNIX/ptx.
Example /sbin/sh
TERM Function Used by Oracle Toolkit II character mode tools and other UNIX tools to determine terminal types.
Example vt100
TMPDIR Function Specifies the default directory for temporary disk files; if set, tools that create a temporary files do so in this directory.
Table 1–2 UNIX Environment Variables Used with Oracle8i
Variable Detail Definition
1-6 Oracle8i Administrator’s Reference Release 3 (8.1.7) for IBM DYNIX/ptx

Environment Variables
Setting a Common EnvironmentOracle8i allows a DBA to set a common environment for all users. A common environment makes it easier for system administrators and database administrators to make changes to the physical Oracle8i system.
The oraenv Command FileThe oraenv command file is created during installation. It contains values for Oracle environment variables and provides:
■ a central means of updating all user accounts with database changes
■ a mechanism for switching between Oracle8i databases
For example, you may find yourself frequently adding and removing databases from your development system or your users may be switching between several different Oracle databases installed on the same system. With oraenv, each user profile calls the oraenv command file.
Local bin Directory Placing oraenv and dbhome in a local bin directory, separate from the Oracle software home directory, ensures that these files are accessible to all users. It also ensures that oraenv continues to work even if you change the path to point to a different ORACLE_HOME. The local bin directory is specified by the root.sh script, which is run following installation. The default location for the local bin directory on IBM DYNIX/ptx is /usr/local/bin.
Syntax directory_path
Example /u02/oracle/tmp
XENVIRONMENT Function Specifies a file containing X-Windows system resource definitions. See your X-Windows documentation for more information.
Note: The C shell uses the coraenv command instead of the oraenv command.
Table 1–2 UNIX Environment Variables Used with Oracle8i
Variable Detail Definition
Administering Oracle8i 1-7
Relink Executables
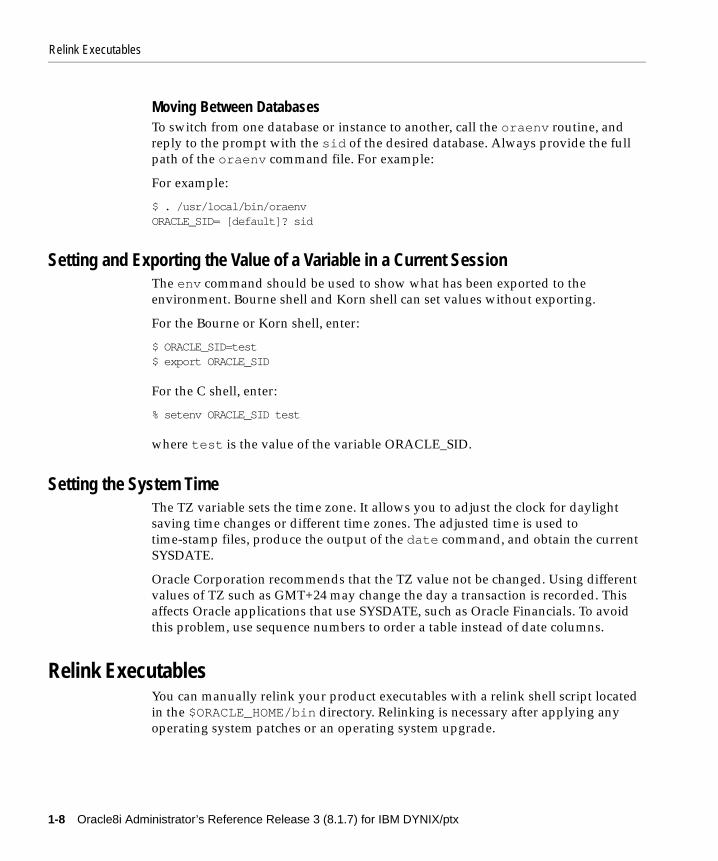
Moving Between DatabasesTo switch from one database or instance to another, call the oraenv routine, and reply to the prompt with the sid of the desired database. Always provide the full path of the oraenv command file. For example:
For example:
$ . /usr/local/bin/oraenvORACLE_SID= [default]? sid
Setting and Exporting the Value of a Variable in a Current SessionThe env command should be used to show what has been exported to the environment. Bourne shell and Korn shell can set values without exporting.
For the Bourne or Korn shell, enter:
$ ORACLE_SID=test$ export ORACLE_SID
For the C shell, enter:
% setenv ORACLE_SID test
where test is the value of the variable ORACLE_SID.
Setting the System TimeThe TZ variable sets the time zone. It allows you to adjust the clock for daylight saving time changes or different time zones. The adjusted time is used to time-stamp files, produce the output of the date command, and obtain the current SYSDATE.
Oracle Corporation recommends that the TZ value not be changed. Using different values of TZ such as GMT+24 may change the day a transaction is recorded. This affects Oracle applications that use SYSDATE, such as Oracle Financials. To avoid this problem, use sequence numbers to order a table instead of date columns.
Relink ExecutablesYou can manually relink your product executables with a relink shell script located in the $ORACLE_HOME/bin directory. Relinking is necessary after applying any operating system patches or an operating system upgrade.
1-8 Oracle8i Administrator’s Reference Release 3 (8.1.7) for IBM DYNIX/ptx

System Global Area
The relink script performs manual relinking of Oracle product executables based on what has been installed in the ORACLE_HOME.
To relink, enter the following:
$ relink parameter
System Global AreaThe System Global Area (SGA) is the Oracle structure that resides in shared memory. It contains static data structures, locks, and data buffers. Sufficient shared memory must be available to each oracle process to address the entire SGA.
If the size of the SGA exceeds the maximum size of a shared memory segment (SHMMAX), Oracle8i attempts to attach more contiguous segments to fulfill the requested SGA size. SHMSEG is the maximum number of segments that can be attached by a process.
The following initsid.ora parameters control the size of the SGA:
■ DB_BLOCK_BUFFERS
■ DB_BLOCK_SIZE
■ SORT_AREA_SIZE
Table 1–3 Relink Script Parameters
Parameter Value
all everything installed
oracle Oracle database executable only
network net_client, net_server, nau, cman, cnames
client net_client, otrace, plsql, client_sharedlib
interMedia ctx, ordimg, ordaud, ordvir, md
precomp all precompilers which have been installed
utilities utilities
oemagent oemagent, odg
Note: Shut down Oracle Intelligent Agent, and other Oracle programs under this ORACLE_HOME when relinking databases.
Administering Oracle8i 1-9

System Global Area
■ SHARED_POOL_SIZE
■ JAVA_POOL_SIZE
Use caution when setting values for these parameters. When values are set too high, too much of the machine’s physical memory is devoted to shared memory, resulting in poor performance.
Calculating the Size of the SGAYou can determine the SGA size in one of these ways:
■ Calculate the approximate size of an SGA per instance:
(DB_BLOCK_BUFFERS × DB_BLOCK_SIZE) + SORT_AREA_SIZE + SHARED_POOL_SIZE + LOG_BUFFER + JAVA_POOL_SIZE
■ Display the size of the SGA for a running database using the SQL*Plus show sga command. The result is shown in bytes.
■ Determine the size of the SGA when you start your database system. The SGA size is displayed next to the heading Total System Global Area.
The address at which the SGA is attached affects the amount of virtual address space available for database buffers in the SGA, and cursors in the user’s application data area To relocate the SGA:
1. Determine the valid virtual address range for attaching shared memory segments. Use the tstshm executable included in this release of Oracle8i by entering:
$ tstshmIn the output from tstshm, the lines "Lowest shared memory address" and "Highest shared memory address" indicate the valid address range.
2. Check the "segment boundaries" output of tstshm to determine the valid virtual address boundaries at which a shared memory segment can attach.
3. Move to the $ORACLE_HOME/rdbms/lib directory and make a backup copy of the libserver8.a file:
$ cd $ORACLE_HOME/lib$ cp libserve8.a libserver8.a orig
1-10 Oracle8i Administrator’s Reference Release 3 (8.1.7) for IBM DYNIX/ptx

System Global Area
4. Move to the $ORACLE_HOME/rdbms/lib directory, and run genksms to generate the ksms.s file by entering:
$ cd $ORACLE_HOME/rdbms/lib$ $ORACLE_HOME/bin/genksms -b sgabeg > ksms.s
where sgabeg is the starting address of the SGA (which defaults to 0x20000000) and should fall within the range determined in step 2.
Never set sgabeg below 0x01000000. On most systems, this leaves about 7 MB for data segments. This amount must allow enough memory for SORT_AREA_SIZE and similar items.
With a start address of 0x1000000 you can achieve an overall SGA size of about 3.5GB.
You can receive the following error messages if you reduced the value of sgabeg:
ORA-4030: out of process memory when trying to allocate %s bytes (%s,%s)
or
ORA-7324: smpall: malloc error while allocating pga.
If you receive one of these messages, you probably lowered the start address into an area which the PGA needs. Raise sgabeg, and try again.
5. Shut down the existing Oracle database.
6. Create the ksms.o file and archive it into the libserver8.a file.
$ cd $ORACLE_HOME/rdbms/lib$ make -f ins_rdbms.mk ksms.o$ ar r $ORACLE_HOME/lib/libserver8.a ksms.o
7. Rebuild the oracle executable in the $ORACLE_HOME/rdbms/lib directory by entering:
$ make -f ins_rdbms.mk ioracle
Using ioracle:
■ Backs up the old executable (oracle0).
■ Assigns the correct privileges to the new oracle executable.
■ Moves the new executable into the $ORACLE_HOME/bin directory.
Administering Oracle8i 1-11

Oracle8i Memory Requirements and Usage
The result is a new Oracle kernel that loads the SGA at the address specified by sgabeg.
Oracle8i Memory Requirements and UsageCalculate memory usage requirements to determine the number of users that can be on the system. This will also help in determining the physical memory and swap space requirements. To calculate the memory requirements, use the following formula:
<size of the oracle executable text>+ <size of the SGA>+ n * ( <size of tool executables private data section>
+ <size of oracle executables uninitialized data section>+ <8192 bytes for the stack> + <2048 bytes for the processes user area>)
where n = number of background processes.
For each client-server connection, use the following formula to estimate virtual memory requirements:
<size of oracle executable data section>+ <size of oracle executables uninitialized data section>+ <8192 bytes for the stack>+ <2048 bytes for processes user area> + <cursor area needed for the application>
Use the size command to estimate an executable’s text size, private data section size, and uninitialized data section size (or DSS). Program text is only counted once, no matter how many times the program is invoked, because Oracle executable text is shared.
To calculate the Oracle physical memory (background and shadow processes) usage while the database is up and users are connected to it, use the ps -elfF command. For each entry, total the RSS columns. The RSS column displays the real memory (resident set) size of the process. Finally, add the text size for the oracle executable and every other Oracle tool executable running on the system to that subtotal. Remember to count executable sizes only once, regardless of how many times the executable is run.
See Also: For more information about how the use of Java in the database affects SGA calculations, see the README file in $ORACLE_HOME/javavm/doc.
1-12 Oracle8i Administrator’s Reference Release 3 (8.1.7) for IBM DYNIX/ptx

Database Limits
Server Resource LimitsIBM DYNIX/ptx inherits resource limits from the parent process (see getrlimit(2) in your operating system documentation). These limits apply to the Oracle8i shadow process that executes for user processes. The IBM DYNIX/ptx default resource limits are high enough for any Oracle8i shadow or background process. However, if these limits are lowered, the Oracle8i system could be affected. Discuss this with your IBM DYNIX/ptx system manager.
Disk quotas established for the oracle user can hinder the operation of the Oracle8i system. Confer with your Oracle8i DBA and the IBM DYNIX/ptx system manager before establishing disk quotas.
Database LimitsTable 1–4 lists the maximum and default values for parameters in a CREATE DATABASE or CREATE CONTROL FILE statement.
See Also: See your operating system man pages or documentation for a list of available switches for the ps command.
Note: Interdependencies among these parameters may affect allowable values.
Table 1–4 Create Control File Parameters
Parameter Default Value Maximum Value
MAXDATAFILES 30 65534
MAXINSTANCES 1 63
MAXLOGFILES 16 255
MAXLOGHISTORY 100 65534
MAXLOGMEMBERS 2 5
Table 1–5 Oracle-Specific File Size Limits
File Type Maximum Size
datafiles db_block_size = 2048 8,589,932,544
Administering Oracle8i 1-13

Special Accounts and Groups
Special Accounts and GroupsSpecial accounts are required by the Oracle server. The special UNIX accounts are described in Table 1–6. The special Oracle server accounts are described in Table 1–7. Special group accounts are described in Table 1–8.
datafiles db_block_size = 4096 17,179,865,088
datafiles db_block_size = 8192 34,359,730,176
datafiles db_block_size = 16384 68,719,460,352
Import/Export file 2,147,483,647
SQL*Loader 2,147,483,647
Table 1–6 UNIX Accounts
oracle The oracle software owner represents the account that owns the Oracle8i software. This maintenance account requires DBA privileges in order to CREATE, STARTUP, SHUTDOWN, and CONNECT as INTERNAL to the database. The oracle software owner must never be the superuser.
root The root user is a special UNIX account with maximum privileges (superuser). This account is used to configure the UNIX kernel, configure and install networking software, and create user accounts and groups.
Table 1–7 Oracle Server Accounts
SYS This is a standard Oracle8i account with DBA privileges automatically created during installation. The SYS account owns all the base tables for the data dictionary. This account is used by the DBA.
SYSTEM This is a standard Oracle8i account with DBA privileges automatically created during installation. Additional tables or views can be created by the SYSTEM user. DBAs may log in as SYSTEM to monitor or maintain databases.
Table 1–5 Oracle-Specific File Size Limits
File Type Maximum Size
1-14 Oracle8i Administrator’s Reference Release 3 (8.1.7) for IBM DYNIX/ptx

Security
SecurityOracle8i uses several features of the UNIX operating system to provide a secure environment for users. These features include file ownership, group accounts, and the ability of a program to change its user ID upon execution.
The two-task architecture of Oracle8i improves security by dividing work (and address space) between the user program and the oracle program. All database access is achieved through the shadow process and special authorizations in the oracle program.
Groups and SecurityOracle programs are divided into two sets for security purposes: those executable by all (other, in UNIX terms), and those executable by DBAs only. A recommended approach to security is:
The primary group for the oracle account should be the oinstall group. The oracle account must have the dba group as a secondary group. Although any user account which requires dba privileges can belong to the dba group,
Table 1–8 Special Group Accounts
dba group The oracle software owner is the only required member of the dba group. You can add any other UNIX user to the dba group. Members of this group have access to SQL*Plus specially privileged functions. If your account is not a member of the dba group, you must enter a password in order to connect as INTERNAL or gain access to the other administrative functions of SQL*Plus. The default OSDBA group is dba.
oinstall group All users installing Oracle8i in any ORACLE_HOME must belong to the same UNIX group. The OUI inventory is shared by all ORACLE_HOMEs on a machine and is group writable. Oracle recommends installing with oinstall as the primary group.
oper group This is an optional UNIX group. Members have database OPERATOR privileges. OPERATOR privileges are a restricted set of dba privileges.
root group Only the root user should be a member of the root group.
See Also: For more information on security issues, see the Oracle8i Administrator’s Guide.
Administering Oracle8i 1-15
Security
the only user account which should belong to the oinstall group is the oracle account.
Security for Server Manager CommandsOracle Corporation recommends that you restrict access to Server Manager. Only the oracle software owner and dba group members should have access to the system privileges for STARTUP, SHUTDOWN, and CONNECT INTERNAL.
Security for Database FilesThe user ID used to install Oracle8i should own the database files. The default user ID is the oracle software owner. Set the authorizations on these files to read/write by owner, and read-only for group or other users.
The oracle software owner should own the directories containing the database files. For added security, revoke read permission from group and other users.
To access the protected database files, the oracle program must have its set user ID, setuid, bit on.
The Oracle Universal Installer automatically sets the permissions of the oracle executable to:
-rwsr-s--x 1 oracle dba 443578 Mar 10 23:03 oracle
The s in the user execute field means that when you execute the oracle program, it has an effective user ID of oracle, regardless of the actual user ID of the person invoking it.
If you need to set this manually, enter:
$ chmod 6751 $ORACLE_HOME/bin/oracle
Remote PasswordsYou can administer a database from a remote machine, such as a PC without having an operating system account. In this case, users are validated by using an Oracle8i password file, created and managed by the orapwd utility. You can also use password file validation on systems that support operating system accounts.
WARNING: System-privileged statements can damage your database if used incorrectly. Note that non-dba group users can connect as INTERNAL if they have the password.
1-16 Oracle8i Administrator’s Reference Release 3 (8.1.7) for IBM DYNIX/ptx

Security
Local password files are in the $ORACLE_HOME/dbs directory and contain the username and password information for a single database. If there are multiple $ORACLE_HOME directories on a machine, each has a separate password file. To allow the database to use the password file, set the initsid.ora parameter remote_login_passwordfile to exclusive.
Access to a Database from a Remote PCWhen there is an Oracle8i password file, networked PC users with DBA privileges can access the database as INTERNAL. Privileged users, who want to perform DBA functions on the database, can enter the appropriate SQL*Plus command from their computer, appending the dba user password to the command. For example:
SQL> connect internal/dba_password@alias as {sysdba|sysoper}
Remote AuthenticationThe initsid.ora parameters shown in Table 1–9 control the behavior of remote connections through non-secure protocols:
Running orapwdThe orapwd utility exists in $ORACLE_HOME/bin and is run by the oracle software owner. The command syntax for orapwd is
$ orapwd file=filename password=password entries=max_users
This syntax is described in Table 1–10:
Table 1–9 Parameters for Controlling Remote Connections
REMOTE_OS_AUTHENT enables or disables ops$ connection
OS_AUTHENT_PREFIX used by ops$ accounts
REMOTE_OS_ROLES enables or disables roles through remote connections
See Also: For information on resource limits, see getrlimit(2) in your operating system documentation.
Administering Oracle8i 1-17

Security
Example of orapwd$ orapwd file=/u01/app/oracle/product/8.1.7/dbs/orapwV817password=V817pw entries=30
Customizing the initsid.ora FileThe default initsid.ora file is provided with the Oracle8i software. The Oracle Universal Installer (OUI) creates it in the $ORACLE_BASE/admin/sid/pfile directory. It can be modified to customize the Oracle8i installation. A sample of the initsid.ora file is located in the $ORACLE_HOME/dbs directory.
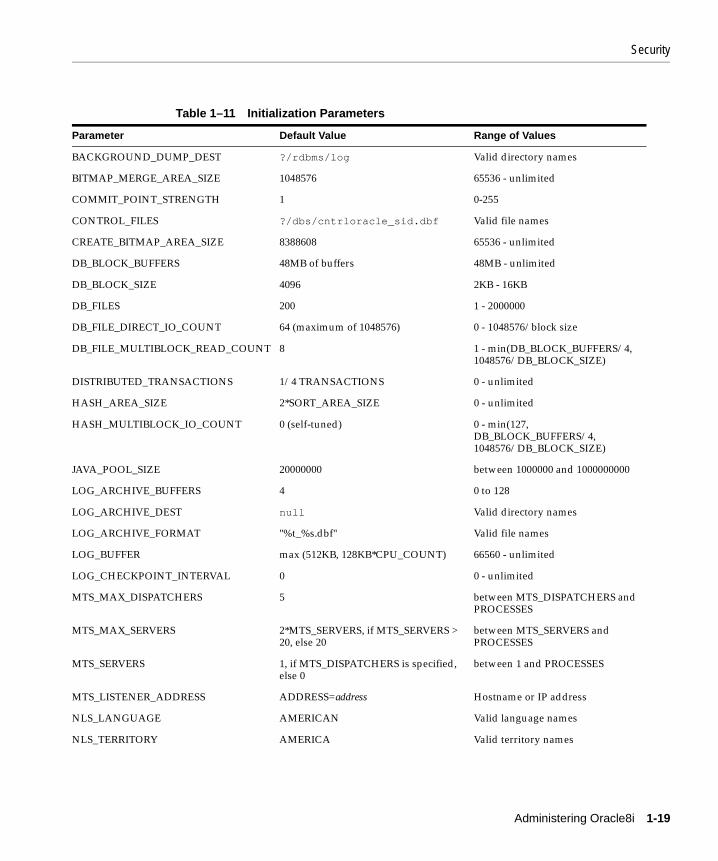
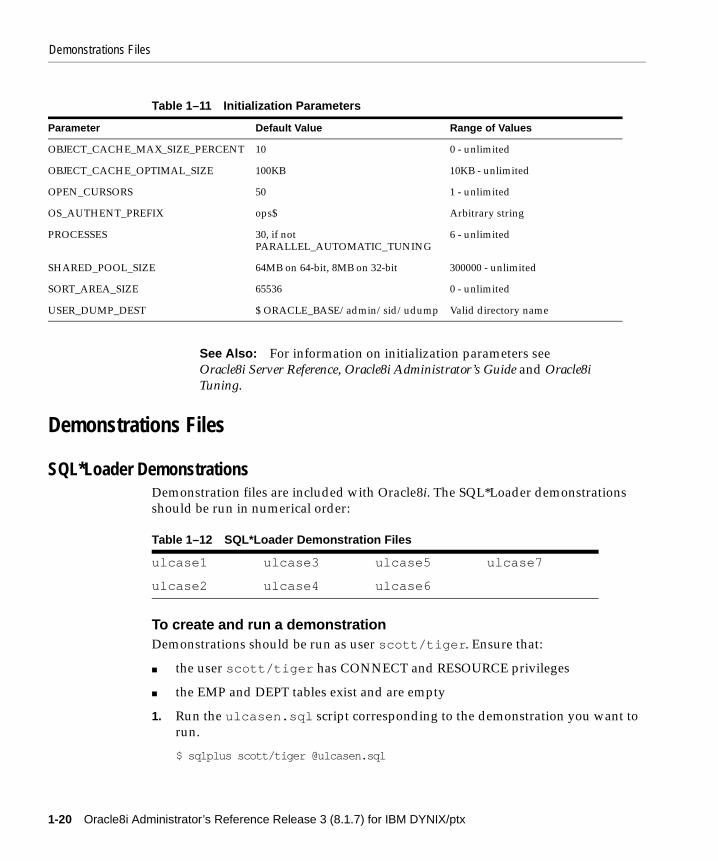
Table 1–11 lists default initialization parameter values on IBM DYNIX/ptx. All Oracle8i instances assume these values if you do not specify different values for them in the initsid.ora file. Oracle Corporation recommends that you include in the initsid.ora file only those parameters that differ from the default initialization parameter values.
Use the SQL*Plus command SHOW PARAMETERS to display the current values of these parameters on the system.
Table 1–10 Syntax for Executing orapwd
filename Name of the file where password information is written. The name of the file must be orapwsid, and you must supply the full pathname. Its contents are encrypted and not user-readable. This parameter is mandatory.
password Initial password you selected for INTERNAL and SYS. Change this password after you create the database using an ALTER USER statement. This parameter is mandatory.
max_users Maximum number of users allowed to connect to the database as SYSDBA or SYSOPER. This parameter is mandatory only if you want this password file to be EXCLUSIVE. Set max_users to a higher number than you expect to require because if you need to exceed this value, you must create a new password file.
See Also: Oracle8i Administrator’s Guide for information about security and passwords.
1-18 Oracle8i Administrator’s Reference Release 3 (8.1.7) for IBM DYNIX/ptx
Security
Table 1–11 Initialization Parameters
Parameter Default Value Range of Values
BACKGROUND_DUMP_DEST ?/rdbms/log Valid directory names
BITMAP_MERGE_AREA_SIZE 1048576 65536 - unlimited
COMMIT_POINT_STRENGTH 1 0-255
CONTROL_FILES ?/dbs/cntrloracle_sid.dbf Valid file names
CREATE_BITMAP_AREA_SIZE 8388608 65536 - unlimited
DB_BLOCK_BUFFERS 48MB of buffers 48MB - unlimited
DB_BLOCK_SIZE 4096 2KB - 16KB
DB_FILES 200 1 - 2000000
DB_FILE_DIRECT_IO_COUNT 64 (maximum of 1048576) 0 - 1048576/block size
DB_FILE_MULTIBLOCK_READ_COUNT 8 1 - min(DB_BLOCK_BUFFERS/4, 1048576/DB_BLOCK_SIZE)
DISTRIBUTED_TRANSACTIONS 1/4 TRANSACTIONS 0 - unlimited
HASH_AREA_SIZE 2*SORT_AREA_SIZE 0 - unlimited
HASH_MULTIBLOCK_IO_COUNT 0 (self-tuned) 0 - min(127, DB_BLOCK_BUFFERS/4, 1048576/DB_BLOCK_SIZE)
JAVA_POOL_SIZE 20000000 between 1000000 and 1000000000
LOG_ARCHIVE_BUFFERS 4 0 to 128
LOG_ARCHIVE_DEST null Valid directory names
LOG_ARCHIVE_FORMAT "%t_%s.dbf" Valid file names
LOG_BUFFER max (512KB, 128KB*CPU_COUNT) 66560 - unlimited
LOG_CHECKPOINT_INTERVAL 0 0 - unlimited
MTS_MAX_DISPATCHERS 5 between MTS_DISPATCHERS and PROCESSES
MTS_MAX_SERVERS 2*MTS_SERVERS, if MTS_SERVERS > 20, else 20
between MTS_SERVERS and PROCESSES
MTS_SERVERS 1, if MTS_DISPATCHERS is specified, else 0
between 1 and PROCESSES
MTS_LISTENER_ADDRESS ADDRESS=address Hostname or IP address
NLS_LANGUAGE AMERICAN Valid language names
NLS_TERRITORY AMERICA Valid territory names
Administering Oracle8i 1-19
Demonstrations Files
Demonstrations Files
SQL*Loader DemonstrationsDemonstration files are included with Oracle8i. The SQL*Loader demonstrations should be run in numerical order:
To create and run a demonstrationDemonstrations should be run as user scott/tiger. Ensure that:
■ the user scott/tiger has CONNECT and RESOURCE privileges
■ the EMP and DEPT tables exist and are empty
1. Run the ulcasen.sql script corresponding to the demonstration you want to run.
$ sqlplus scott/tiger @ulcasen.sql
OBJECT_CACHE_MAX_SIZE_PERCENT 10 0 - unlimited
OBJECT_CACHE_OPTIMAL_SIZE 100KB 10KB - unlimited
OPEN_CURSORS 50 1 - unlimited
OS_AUTHENT_PREFIX ops$ Arbitrary string
PROCESSES 30, if not PARALLEL_AUTOMATIC_TUNING
6 - unlimited
SHARED_POOL_SIZE 64MB on 64-bit, 8MB on 32-bit 300000 - unlimited
SORT_AREA_SIZE 65536 0 - unlimited
USER_DUMP_DEST $ ORACLE_BASE/admin/sid/udump Valid directory name
See Also: For information on initialization parameters see Oracle8i Server Reference, Oracle8i Administrator’s Guide and Oracle8i Tuning.
Table 1–12 SQL*Loader Demonstration Files
ulcase1 ulcase3 ulcase5 ulcase7
ulcase2 ulcase4 ulcase6
Table 1–11 Initialization Parameters
Parameter Default Value Range of Values
1-20 Oracle8i Administrator’s Reference Release 3 (8.1.7) for IBM DYNIX/ptx

Demonstrations Files
2. Load the demonstration data into the objects:
$ sqlldr scott/tiger ulcasen.ctl
■ For the ulcase2 demonstration, you do not have to run the ulcase2.sql script.
■ For the ulcase6 demonstration, run the ulcase6.sql script, then enter the following at the command line:
$ sqlldr scott/tiger ulcase6 DIRECT=true
■ For the ulcase7 demonstration, run the ulcase7s.sql script, then enter the following at the command line:
$ sqlldr scott/tiger ulcase7
After running the demonstration, run ulcase7e.sql to drop the insert trigger and global variable package.
Administering SQL*LoaderOracle8i incorporates SQL*Loader functionality. Demonstration and message files are in the rdbms directory.
The SQL*Loader control file includes the following additional file processing option strings, the default being str, which takes no argument:
[ "str" | "fix n" | "var n" ]
If the file processing options are not selected, the information is processed by default as a stream of records (str). You might find that fix mode yields faster
Table 1–13 File Processing Option
str Specifies a stream of records, each terminated by a newline character, which are read in one record at a time. This is the default.
fix Indicates that the file consists of fixed-length records, each of which is n bytes long, where n is an integer value.
var Indicates that the file consists of variable-length records, each of which is n bytes long, where n is an integer value specified in the first five characters of the record.
Administering Oracle8i 1-21

Demonstrations Files
performance than the default str mode because it does not need to scan for record terminators.
Newline Characters in Fixed Length RecordsWhen using the fix option to read a file containing fixed-length records, where each record is terminated by a newline character, include the length of the newline (one character) when specifying the record length to SQL *Loader.
For example, to read the following file:
AAA newlineBBB newlineCCC newline
specify fix 4 instead of fix 3 to account for the additional newline character.
If you do not terminate the last record in a file of fixed records with a newline character, do not terminate the other records with a newline character either. Similarly, if you terminate the last record with a newline, terminate all records with a newline.
Removing Newline CharactersUse the position(x:y) function in the control file to discard the newline characters from fixed length records rather than loading them. For example, enter the following to discard newline characters from the fourth position:
load datainfile xyz.dat "fix 4"into table abc( dept position(01:03) char )
When this is done, newline characters are discarded because they are in the fourth position in each fixed-length record.
Caution: Certain text editors, such as vi, automatically terminate the last record of a file with a newline character. This leads to inconsistencies if the other records in the file are not terminated with newline characters.
1-22 Oracle8i Administrator’s Reference Release 3 (8.1.7) for IBM DYNIX/ptx

Demonstrations Files
PL/SQL DemonstrationsPL/SQL includes a number of sample programs you can load. Demonstration and message files are in the demo directory. The Oracle8i database must be open and mounted to work with the sample programs:
1. Invoke SQL*Plus and connect with the user/password scott/tiger:
$ cd $ORACLE_HOME/plsql/demo$ sqlplus scott/tiger
2. To load the demonstrations, invoke exampbld.sql from SQL*Plus:
SQL> @exampbld
Table 1–14 lists the kernel demonstrations.
To run the PL/SQL demonstrations, invoke SQL*Plus to connect to the database, using the same user/password used to create the demonstrations. Start the demonstration by typing an @ sign or the word start before the demonstration name. For example, to start the examp1 demonstration, enter:
$ sqlplus scott/tigerSQL> @examp1
To build the precompiler PL/SQL demonstrations, enter:
$ cd $ORACLE_HOME/plsql/demo$ make -f demo_plsql.mk demos
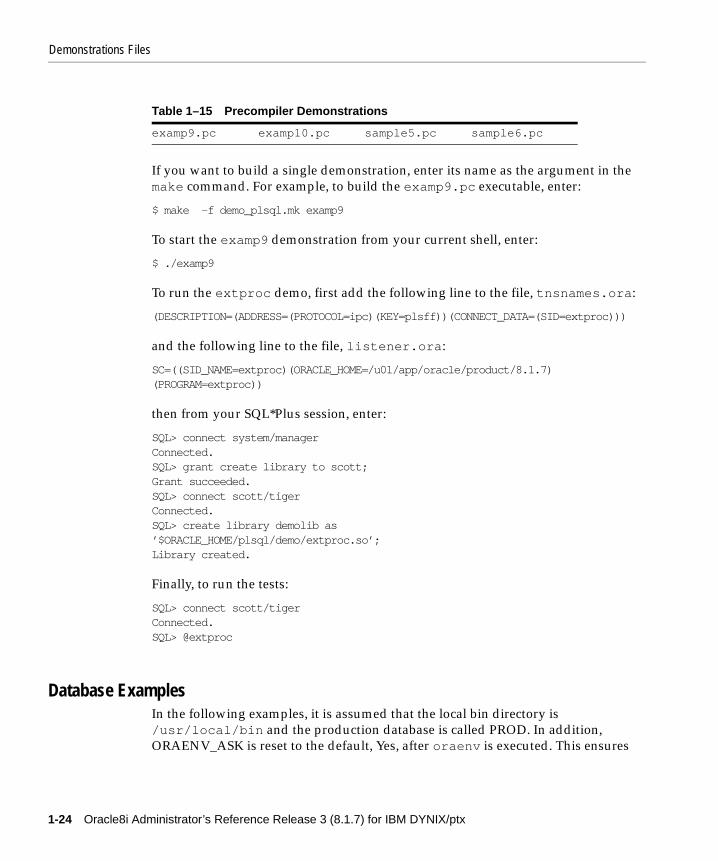
Table 1–15 lists the precompiler demonstrations.
Note: Build the demonstrations under any Oracle account with sufficient permissions. Run the demonstrations under the same account as they were built.
Table 1–14 Kernel Demonstrations
examp1.sql examp5.sql examp11.sql sample1.sql
examp2.sql examp6.sql examp12.sql sample2.sql
examp3.sql examp7.sql examp13.sql sample3.sql
examp4.sql examp8.sql examp14.sql sample4.sql
extproc.sql
Administering Oracle8i 1-23
Demonstrations Files
If you want to build a single demonstration, enter its name as the argument in the make command. For example, to build the examp9.pc executable, enter:
$ make -f demo_plsql.mk examp9
To start the examp9 demonstration from your current shell, enter:
$ ./examp9
To run the extproc demo, first add the following line to the file, tnsnames.ora:
(DESCRIPTION=(ADDRESS=(PROTOCOL=ipc)(KEY=plsff))(CONNECT_DATA=(SID=extproc)))
and the following line to the file, listener.ora:
SC=((SID_NAME=extproc)(ORACLE_HOME=/u01/app/oracle/product/8.1.7) (PROGRAM=extproc))
then from your SQL*Plus session, enter:
SQL> connect system/managerConnected.SQL> grant create library to scott;Grant succeeded.SQL> connect scott/tigerConnected.SQL> create library demolib as’$ORACLE_HOME/plsql/demo/extproc.so’;Library created.
Finally, to run the tests:
SQL> connect scott/tigerConnected.SQL> @extproc
Database ExamplesIn the following examples, it is assumed that the local bin directory is /usr/local/bin and the production database is called PROD. In addition, ORAENV_ASK is reset to the default, Yes, after oraenv is executed. This ensures
Table 1–15 Precompiler Demonstrations
examp9.pc examp10.pc sample5.pc sample6.pc
1-24 Oracle8i Administrator’s Reference Release 3 (8.1.7) for IBM DYNIX/ptx
Demonstrations Files
that the system prompts for a different ORACLE_SID the next time oraenv is executed.
If a database has been created manually instead of using Oracle Database Configuration Assistant, ensure the system configuration is reflected in the /etc/oratab file.
For each server instance, add an entry in the following format:
ORACLE_SID:ORACLE_HOME:{Y|N}
where Y or N indicates whether you want to activate the dbstart and dbshut scripts. The Oracle Database Configuration Assistant automatically adds an entry for each database it creates.
Example of Single InstanceFor the Bourne or Korn shell, add or replace the following line in the.profile file:
. local_bin_directory/oraenv
with the lines:
PATH=${PATH}:/usr/local/binORACLE_SID=PRODexport PATH ORACLE_SIDORAENV_ASK=NOexport ORAENV_ASK. oraenvORAENV_ASK=unset ORAENV ASK
For the C shell, add or replace the following line in the.cshrc file:
source local_bin_directory/coraenv
with the lines:
setenv PATH ${PATH}:/usr/local/binsetenv ORACLE_SID PRODsetenv ORAENV_ASK NOsource /usr/local/bin/coraenv
Note: Set the ORAENV_ASK environment variable to no to not prompted for the ORACLE_SID at startup.
Administering Oracle8i 1-25

Demonstrations Files
unset ORAENV_ASK
Example of Multiple InstancesFor multiple instances, define the sid at startup.
For the Bourne or Korn shell:
#!/usr/bin/sh echo "The SIDs on this machine are:" cat /etc/oratab | awk -F: ’{print $1}’ | grep -v "#" ORAENV_ASK="YES" . /usr/local/bin/oraenv
For the C shell:
#!/usr/bin/csh echo "The SIDs on this machine are:" cat /etc/oratab | awk -F: ’{print $1}’ | grep -v "#" set ORAENV_ASK="YES" source /usr/local/bin/coraenv
1-26 Oracle8i Administrator’s Reference Release 3 (8.1.7) for IBM DYNIX/ptx
Tuning Or
2
Tuning Oracle8iThe more your Oracle8i applications increase in complexity, the more you need to tune the system to optimize performance and prevent data bottlenecks. This chapter describes how to configure your Oracle8i installation to optimize its performance. It contains the following sections:
■ Importance of Tuning
■ IBM DYNIX/ptx Tools
■ SQL Scripts
■ Tuning Memory Management
■ Tuning Disk I/O
■ Monitoring Disk Performance
■ Tuning CPU Usage
■ Tuning Oracle Resource Contention
■ Tuning Block Size and File Size
■ Tuning the Buffer Cache Size
■ Tuning Resource Contention for Oracle Parallel Server
■ Using Trace and Alert Files
■ Raw Devices and Volumes
acle8i 2-1

Importance of Tuning
Importance of TuningOracle8i is a highly optimizable software product. Frequent tuning optimizes system performance and prevents data bottlenecks. Although this chapter is written from the perspective of single-processor systems, most of the performance tuning tips provided here are also valid when using the parallel options and features available with Oracle8i.
Before tuning the system, observe its normal behavior using the tools described in in the next section..
IBM DYNIX/ptx Tools IBM DYNIX/ptx provides performance monitoring tools that you can use to assess database performance and determine database requirements. In addition to providing statistics for Oracle processes, these tools provide statistics for CPU usage, interrupts, swapping, paging, and context switching for the entire system.
sarUse the sar command to monitor swapping, paging, disk, and CPU activity, depending on the switches that you supply with the command.
Use the sar command to determine which buffer caches you need to increase or decrease. The options of the sar command are shown in Table 2–1.
See Also: For more information on parallel options, see Oracle8i Parallel Server Concepts and Administration and Oracle8i Designing and Tuning for Performance.
See Also: For more information on tuning, see Oracle8i Tuning. IBM DYNIX/ptx tools are described in the operating system documentation.
Table 2–1 Useful sar Command options
Option Description
-b Reports the IBM DYNIX/ptx buffer cache activity
-w Reports the IBM DYNIX/ptx swapping activity
-u Reports CPU utilization
-r Reports memory utilization
-p Reports the IBM DYNIX/ptx paging activity
2-2 Oracle8i Administrator’s Reference Release 3 (8.1.7) for IBM DYNIX/ptx

IBM DYNIX/ptx Tools
Increase the Oracle8i buffer cache size until the increase causes the cache hit ratio to increase.
If swapping or paging activity becomes very high, decrease the Oracle8i buffer cache size.
The following statement displays a summary of paging activity ten times, at 10 second intervals:
$ sar -p 10 10
The following example shows output from the sar -p command:00:00:01 vflt/s pflt/s pgfil/s rclm/s 01:00:00 28.91 0.00 0.00 0.00 02:00:00 25.84 0.00 0.00 0.00 03:00:00 26.89 0.00 0.00 0.00 04:00:00 26.71 0.00 0.00 0.00 05:00:00 25.52 0.00 0.01 0.00 06:00:01 25.40 0.00 0.00 0.00 07:00:01 27.31 0.00 0.00 0.00 08:00:00 26.02 0.00 0.00 0.00 08:20:00 35.65 0.00 0.00 0.00 08:40:00 22.26 0.00 0.00 0.00 09:00:01 22.51 0.00 0.00 0.00 09:20:00 34.92 0.00 0.00 0.00 09:40:00 21.67 0.00 0.00 0.00 10:00:01 28.86 0.00 0.07 0.00 10:20:00 38.95 0.00 0.00 0.00 10:40:00 23.24 0.00 0.00 0.00 11:00:01 29.21 0.00 0.00 0.00 11:20:00 41.64 0.00 0.01 0.00 11:40:00 41.94 0.00 0.00 0.00 12:00:00 1968.86 0.00 0.06 0.00 12:20:00 49.47 0.00 1.87 0.00
Average 80.99 0.00 0.06 0.00
swapThe swap -l command reports information about swap space usage. A shortage of swap space can cause slow response times or even cause the system to stop responding.
The following example shows output from the swap -l command.
Tuning Oracle8i 2-3
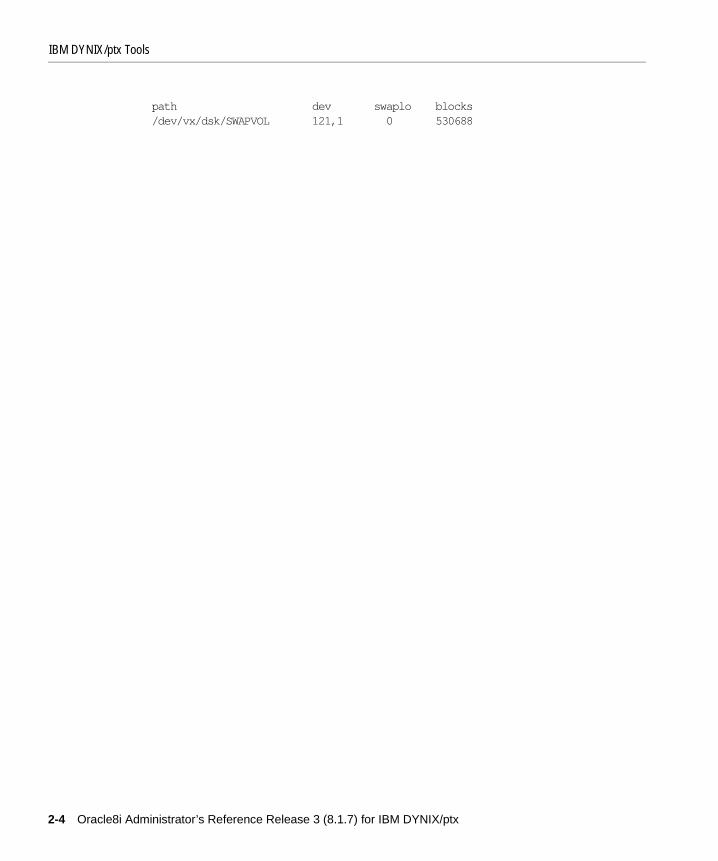
IBM DYNIX/ptx Tools
path dev swaplo blocks /dev/vx/dsk/SWAPVOL 121,1 0 530688
2-4 Oracle8i Administrator’s Reference Release 3 (8.1.7) for IBM DYNIX/ptx
Tuning Memory Management
SQL Scripts Oracle8i includes a set of packages for database tuning called STATPACKS. For more information on STATPACKS, see Oracle8i Designing and Tuning Performance.
The utlbstat.sql and utlestat.sql scripts are used to monitor Oracle database performance and tune the System Global Area (SGA) data structures. On IBM DYNIX/ptx, the scripts are located in:
$ORACLE_HOME/rdbms/admin
Tuning Memory Management Start the memory tuning process by measuring paging and swapping space to determine how much memory is available.
The Oracle buffer manager ensures that the more frequently accessed data is cached for longer periods. Monitoring the buffer manager and tuning the buffer cache can have a significant influence on Oracle performance. The optimal Oracle buffer size for your system depends on the overall system load and the relative priority of Oracle over other applications.
Allocate Sufficient Swap Space Try to minimize swapping because it causes significant UNIX overhead. Use the sar -w command to check for swapping.
If your system is swapping and you must conserve memory:
■ Avoid running unnecessary system daemon processes or application processes
■ Decrease the number of database buffers to free some memory
■ Decrease the number of UNIX file buffers, especially if you are using raw devices
Use swap -l to determine how much swap space is in use. Start with a swap space two to four times the size of your system’s random access memory (RAM). Use a higher value if you plan to use Oracle Developer or Oracle Applications. Monitor the use of swap space and increase it as necessary.
See Also: For information regarding these scripts, see Oracle8i Designing and Tuning for Performance.
Tuning Oracle8i 2-5

Tuning Memory Management
Control Paging Paging might not present as serious a problem as swapping because an entire program does not have to be stored in memory to run. A small number of page-outs might not noticeably affect the performance of your system.
To detect excessive paging, run measurements during periods of fast response or idle time to compare against measurements from periods of slow response.
Use vmstat or sar -p to monitor paging. The following columns from sar -p output are important:
If the system consistently has excessive page-out activity, consider the following solutions:
■ Install more memory
■ Move some of the work to another system
■ Configure your kernel to use less memory
Lock the SGA in Physical MemoryIn DYNIX/ptx, SGA is locked into the physical memory by default. The potential performance benefit of locking the SGA in physical memory is up to 20 percent. Locking the SGA improves performance in two ways:
■ Hard-locking removes the overhead of paging PGA buffers in and out of memory.
■ Each process no longer needs its own page tablespace for the SGA. This is significant because thousands of users attaching to a large SGA previously required page space on the order of a gigabyte.
A disadvantage of hard-locking the SGA is that the locked SGA memory cannot be used by any other processes, even in an emergency. However, the overall memory use reduction and performance benefits outweigh this disadvantage. Carefully consider the size of the SGA, total machine resources, and anticipated usage to determine whether it is safe to lock the SGA into memory. The default is to lock SGA if the operating system is configured to allow it.
vflt/s indicates the number of address translation page faults. Address translation faults occur when a process references a valid page that is not in memory.
rclm/s indicates the number of valid pages that have been reclaimed and added to the free list by page-out activity. This value should be zero.
2-6 Oracle8i Administrator’s Reference Release 3 (8.1.7) for IBM DYNIX/ptx

Tuning Memory Management
To configure the operating system to use this feature:
■ Recompile the DYNIX/ptx kernel with the special tuning parameters which can be set by using the DYNIX/ptx configuration utility, menu.
■ Set SHM_LOCK_OK = 1 to enable hard-locking.
■ Set SHM_LOCK_UID = -1 to allow all users to use the hard-lock feature, or set SHM_LOCK_UID to the oracle software owner user ID to restrict the usage.
Optimize Number of Database BuffersThe DB_BLOCK_SIZE parameter also determines the size of the database buffers in the SGA. The DB_BLOCK_BUFFERS parameter is the memory parameter with the most direct effect on system performance. By altering this parameter value, you can increase performance up to 200 percent.
The hit ratio for the buffer cache is defined as:
Hit Ratio = Logical Reads - Physical Reads Logical Reads
where Logical Reads = db block gets + consistent gets
If your hit ratio is less than 60 or 70 percent, increase the number of buffers in the cache by raising DB_BLOCK_BUFFERS.
Tuning Oracle8i 2-7
Tuning Memory Management
Use Indirect Database Buffers
The maximum SGA size supported by DYNIX/ptx is 3 GB if you use direct database buffers, but you can increase this size to take advantage of large memory systems by using indirect buffers. DYNIX/ptx provides the ability to indirectly map blocks of memory, which can enable the database block buffer section of the SGA to grow up to a theoretical maximum of 63 GB.
Since enabling indirect database buffers involves a slight overhead of mapping and unmapping buffers as they are needed, this feature is disabled by default, and is only recommended when SGA sizes of 3 GB or greater are required for a higher buffer cache hit ratio.
To enable indirect database buffers, set the USE_INDIRECT_DATA_BUFFERS initsid.ora parameter:
USE_INDIRECT_DATA_BUFFERS = true
You must lock the SGA into physical memory in order to use this feature.
Optimize Number of Redo BuffersThe redo log space statistic is the number of times a user process waits for space in the redo buffer.
The size of the redo log buffer is determined by the initsid.ora LOG_BUFFER parameter. The value of this parameter is expressed in bytes.
Optimize the Shared Pool SizeThe initsid.ora SHARED_POOL_SIZE parameter sets the size of the shared pool in bytes. A modified least-recently-used algorithm gives precedence to data dictionary cache entries. This means that tuning the library cache also ensures that enough memory is available for the data dictionary.
Note: Indirect Database Buffers cannot be used in Oracle Parallel Server (OPS) installations.
2-8 Oracle8i Administrator’s Reference Release 3 (8.1.7) for IBM DYNIX/ptx
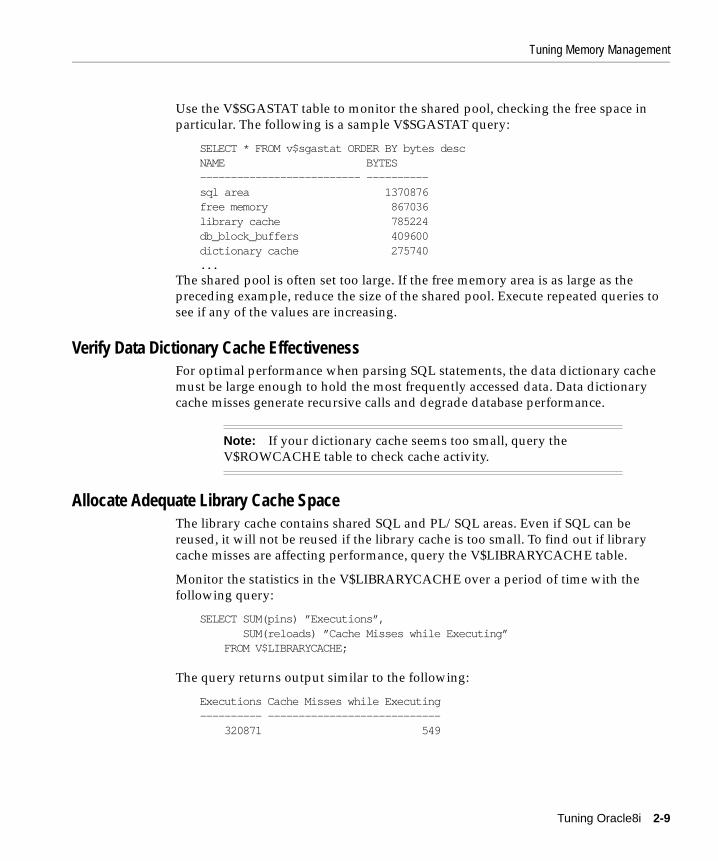
Tuning Memory Management
Use the V$SGASTAT table to monitor the shared pool, checking the free space in particular. The following is a sample V$SGASTAT query:
SELECT * FROM v$sgastat ORDER BY bytes descNAME BYTES-------------------------- ----------sql area 1370876free memory 867036library cache 785224db_block_buffers 409600dictionary cache 275740...
The shared pool is often set too large. If the free memory area is as large as the preceding example, reduce the size of the shared pool. Execute repeated queries to see if any of the values are increasing.
Verify Data Dictionary Cache EffectivenessFor optimal performance when parsing SQL statements, the data dictionary cache must be large enough to hold the most frequently accessed data. Data dictionary cache misses generate recursive calls and degrade database performance.
Allocate Adequate Library Cache SpaceThe library cache contains shared SQL and PL/SQL areas. Even if SQL can be reused, it will not be reused if the library cache is too small. To find out if library cache misses are affecting performance, query the V$LIBRARYCACHE table.
Monitor the statistics in the V$LIBRARYCACHE over a period of time with the following query:
SELECT SUM(pins) ”Executions”, SUM(reloads) ”Cache Misses while Executing” FROM V$LIBRARYCACHE;
The query returns output similar to the following:
Executions Cache Misses while Executing---------- ---------------------------- 320871 549
Note: If your dictionary cache seems too small, query the V$ROWCACHE table to check cache activity.
Tuning Oracle8i 2-9
Tuning Memory Management
The sum of the PINS (first column) indicates that SQL statements, PL/SQL blocks, and object definitions were accessed for execution a total of 320,871 times. The sum of the RELOADS (last column) indicates that 549 of those executions resulted in library cache misses. Total reloads should be near zero, and the ratio should be below 1 percent.
If the ratio of RELOADS to PINS is greater than 1 percent, allocate additional memory to the library cache by increasing the initsid.ora parameter SHARED_POOL_SIZE. Alter the library cache space for a potential performance benefit of up to 50 percent.
Lock Large PL/SQL Blocks into the Shared PoolOccasionally, seldom-used shared objects should be locked into the shared pool. This often helps when the library cache latch is a bottleneck. Use the dbms_shared_pool utility package to determine the size of objects in the shared pool. See the documentation in the comments of the PL/SQL dbmspool.sql script, installed in the $ORACLE_HOME/rdbms/admin directory.
Use the following procedure to install PL/SQL, enable the server output buffer, and run the sizes() procedure:
1. Navigate to the $ORACLE_HOME/rdbms/admin directory.
2. Start SQL*Plus and execute the following sequence of commands:
@dbmspool@prvtpoolset serveroutput on size xxxbeginsys.dbms_shared_pool.sizes (minsize);end;/
A setting of 20000 is sufficient for xxx, and 20 for minsize. After you identify the frequently used shared objects, you can run the procedure (keeping VARCHAR2, flag CHAR DEFAULT ‘P’) as often as necessary to lock objects into the shared pool; dbms_shared_pool.sizes gives a list of objects in the shared pool larger than minsize..
For example, keep (obj_name, "P") pins obj_name in the shared pool.
2-10 Oracle8i Administrator’s Reference Release 3 (8.1.7) for IBM DYNIX/ptx

Tuning Disk I/O
The unkeep procedure unlocks objects.
Tuning Disk I/O I/O bottlenecks are the easiest performance problems to identify. Balance I/O evenly across all available disks to reduce disk access times. For smaller databases and those not using the Parallel Query option, ensure that different data files and tablespaces are distributed across the available disks.
Tune the Database Writer to Increase Write Bandwidth Oracle offers asynchronous I/O and I/O slaves as solutions to prevent database writer (DBWR) activity from becoming a bottleneck.
Asynchronous I/O Asynchronous I/O allows processes to proceed with the next operation without having to wait after issuing a write and therefore improves system performance by minimizing idle time. DYNIX/ptx supports asynchronous I/O to both raw and filesystem datafiles.
I/O Slaves I/O slaves are specialized processes whose only function is to perform I/O. They replace the Oracle7 feature Multiple DBWRs. In fact, they are a generalization of Multiple DBWRs and can be deployed by other processes as well. They can operate whether or not asynchronous I/O is available. They are allocated memory from LARGE_POOL_SIZE, if set, otherwise they are allocated memory from shared memory buffers. I/O slaves include a set of initialization parameters that allow a degree of control over the way they operate.
Note: Oracle recommends that you build a SQL*Plus script to do this as part of database startup.
Tuning Oracle8i 2-11

Tuning Disk I/O
Table 2–2 lists the initialization parameters that control the operation of asynchronous I/O and I/O slaves.
There might be times when the use of asynchronous I/O is not desirable or not possible. The first two parameters in Table 2–2, DISK_ASYNCH_IO and TAPE_ASYNCH_IO, allow asynchronous I/O to be switched off respectively for disk and tape devices. Because the number of I/O slaves for each process type defaults to zero, no I/O slaves are deployed unless set.
Set the DBWR_IO_SLAVES parameter to greater than 0 if DISK_ASYNCH_IO or TAPE_ASYNCH_IO is disabled, otherwise DBWR becomes a bottleneck. In this case, the optimal value on IBM DYNIX/ptx for DBWR_IO_SLAVES is 4.
DB_WRITER_PROCESSES replaces the Oracle7 parameter DB_WRITERS and specifies the initial number of database writer processes for an instance. If you use DBWR_IO_SLAVES, only one database writer process is used, regardless of the setting for DB_WRITER_PROCESSES.
Table 2–2 Initialization Parameters for Asynchronous I/O and I/O Slaves
Parameter Range of Values Default Value
DISK_ASYNCH_IO TRUE/FALSE TRUE
TAPE_ASYNCH_IO TRUE/FALSE TRUE
BACKUP_DISK_IO_SLAVES TRUE/FALSE FALSE
DBWR_IO_SLAVES 0 - 999 0
DB_WRITER_PROCESSES 1-10 1
See Also: See Chapter 1, "Administering Oracle8i" for information on other initialization parameters.
2-12 Oracle8i Administrator’s Reference Release 3 (8.1.7) for IBM DYNIX/ptx

Tuning Disk I/O
Use Logical VolumesYou can use a Logical Volume Manager (LVM) to stripe data across multiple disk drives. The potential performance benefit of using a LVM is up to 50 percent.
While an LVM is preferable, Oracle8 allows data to be striped without an LVM. This is done with the DATAFILE keyword of the CREATE TABLE command. Performance is usually better with an LVM, which uses a smaller stripe size and tends to distribute I/O randomly and automatically.
Choose the Appropriate File System Type IBM DYNIX/ptx allows a choice of file systems. File systems have different characteristics, and the techniques they use to access data can have a substantial impact on database performance. Typical file system choices are:
■ The UNIX File System (UFS)
■ The Enhanced File System (EFS), derived from Veritas
■ The Clustered File System (CFS), an extension to the EFS to support clustered systems
■ Data access through raw device drivers
Using raw partitions or an EFS/CFS instead of a UFS can improve performance because database file I/O bypasses the UNIX buffer cache and eliminates file system overhead, resulting in fewer instructions per I/O. Raw devices, CFS, and EFS also allow use of asynchronous I/O, so they are usually the best choice for high performance requirements.
If ease of administration or use of Veritas features such as caching are the primary considerations, then EFS would be the best choice.
Note: On DYNIX/ptx, Sequent Volume Manager (SVM) is the Logical Volume Manager.
Note: Oracle Corporation discourages the use of the EFS file system. The EFS file system might not be supported in future versions of Oracle software.
Tuning Oracle8i 2-13

Monitoring Disk Performance
Oracle Parallel Server requires either raw devices or CFS.
Monitoring Disk Performance To monitor disk performance, use sar -b and sar -u.
Table 2–3 lists important sar -b columns for disk performance.
An important sar -u column for disk performance is %wio, the percentage of CPU time waiting on blocked I/O.
Key indicators are:
■ The sum of bread, bwrit, pread, and pwrit indicates the state of the disk I/O subsystem. The higher the sum, the greater the potential for disk I/O bottlenecks. This is influenced by the number of physical drives. The larger the number of physical drives, the higher the sum threshold number can be. A good default value is no more than 40 for two drives and no more than 60 for four to eight drives.
■ The %rcache should be greater than 90 and %wcache should be greater than 60. Otherwise, the system can be disk I/O bound.
■ If %wio is consistently greater than 20, the system is I/O bound.
Table 2–3 Output of sar-b Significant for Monitoring Disk Performance
Field Value Shown Database Type
bread/s Blocks read File system
bwrit/s Blocks written File system
pread/s Partition reads Raw device
pwrit/s Partition writes Raw device
2-14 Oracle8i Administrator’s Reference Release 3 (8.1.7) for IBM DYNIX/ptx
Tuning CPU Usage
Disk Performance Issues Oracle block sizes should either match disk block sizes or be a multiple of disk block sizes.
If possible, perform a file system check on the partition before using it for database files, then make a new file system to ensure that it is clean and unfragmented. Distribute disk I/O as evenly as possible, and separate log files from database files.
Tuning CPU Usage The following sections describe how to tune CPU usage.
Keep All Oracle Users and Processes at the Same PriorityOracle applications are designed to operate with all users and background processes operating at the same priority level. Changing priorities causes unexpected effects on contention and response times.
For example, if the log writer process (LGWR) gets a low priority, it is not executed frequently enough and LGWR becomes a bottleneck. On the other hand, if LGWR has a high priority, user processes can suffer poor response time.
Use Processor Affinity and Binding on Multi-Processor SystemsIn a multi-processor environment, use processor affinity and binding if it is available on your system. Processor binding prevents a process from migrating from one CPU to another, allowing the information in the CPU cache to be better utilized. You can bind a server shadow process to make use of the cache as it is always active, and let background processes flow between CPUs.
Tuning Oracle8i 2-15

Tuning Oracle Resource Contention
Tuning Oracle Resource ContentionThis section describes:
■ Tuning UNIX Kernel Parameters
■ Using V$ Tables to Isolate Contention
■ Isolating the Segment Causing Contention
■ Reducing Latch Free Contention
■ Reducing Rollback Segment Contention
■ Reducing Redo Log Buffer Latch Contention
■ Reducing Parallel Query/Parallel DML Contention
■ Tuning Spin Count
Tuning UNIX Kernel ParametersYou can improve performance by keeping the UNIX kernel as small as possible. The UNIX kernel typically pre-allocates physical RAM, leaving less memory available for other processes such as oracle.
Traditionally, kernel parameters such as NBUF, NFILE, and NOFILES were used to adjust kernel size. However, most UNIX implementations dynamically adjust those parameters at run time, even though they are present in the UNIX configuration file.
Look for memory-mapped video drivers, networking drivers, and disk drivers. They can often be de-installed, freeing more memory for other processes.
Using V$ Tables to Isolate ContentionUse the V$SYSTEM_EVENT table for a snapshot of database activity.
The statistics in V$SYSTEM_EVENT table indicate how the Oracle server is using its time, and allows you to identify potential problems. Query the table with the following SQL statement:
SELECT * FROM V$SYSTEM_EVENT ORDER BY TIME_WAITED;
Caution: Remember to make a backup copy of your UNIX kernel. See your IBM DYNIX/ptx documentation for additional information.
2-16 Oracle8i Administrator’s Reference Release 3 (8.1.7) for IBM DYNIX/ptx

Tuning Oracle Resource Contention
A well-tuned database experiences waits, and the presence or absence of an event in this table does not necessarily indicate a problem. It is normal to see events such as client message, pmon timer, smon timer, rdbms ipc message, and rdbms ipc reply. The number of rows in this table changes dynamically. If there is no information to report on an event, the event will not appear in the table.
V$SYSTEM_EVENT is a cumulative table; it is also useful to look at a table measuring events as they occur. Use the V$SESSION_WAIT table by entering:
SELECT sid, event, p1text, p1, p2text, p2 FROM V$SESSION_WAIT;
This query provides a snapshot of the sequence of events. Observing how an event frequency changes with the load on the database provides insight into both the Oracle operation and the nature of the SQL statement being executed.
The sample output from querying V$SESSION_WAIT is:
SID EVENT P1TEXT P1 P2TEXT P21 pmon timer 0 02 buffer busy waits file# 7 block# 79210 latch free address 8.05E08 number 8...
Isolating the Segment Causing ContentionIf you determine that Oracle resource contention is a problem, isolate the segment causing contention. You might decide that the number of buffer busy waits are a problem. Use the block number and file number to determine the type of contention by entering:
SELECT segment_name, segment_type, block_id, blocks FROM dba_extents HERE file_id=7 AND (792 between block_id and block_id+blocks);
The sample output is:
SEGMENT_NAME SEGMENT_TYPE BLOCK_ID BLOCKS--------------- --------------- -------- --------C0T1 TABLE 752 501 row selected.
Tuning Oracle8i 2-17
Tuning Oracle Resource Contention
The output indicates that the contention is occurring in a table segment, rather than an index, cluster, or rollback segment. Because you have the file number and block number, you can obtain additional information from the X$BH table by entering:
SELECT class FROM X$BH WHERE dbafile=7 AND dbablk=792;
This query provides the class number of the block, which can be interpreted using the following table:
Reducing Latch Free ContentionIf the output from the V$SYSTEM_EVENT table indicates that the value of latch free is causing contention, use the output from the V$SESSION_WAIT table to determine the source of the contention. The latch number is given in the P2 field, and can be identified by entering:
SELECT latch#, name FROM V$LATCH WHERE latch#=8;
Table 2-4 Block Type and Class
Class Block Type
0 System rollback segment
1 Data block
2 Sort block
3 Save Undo block
4 Segment header block
5 Save Undo segment header block
6 Free List block
7 Extent map block
8 Bitmap block
9 Bitmap Index block
10 + (n*2) Undo segment header block
11 + ((n*2) +1) Undo segment block
2-18 Oracle8i Administrator’s Reference Release 3 (8.1.7) for IBM DYNIX/ptx
Tuning Oracle Resource Contention
Sample output is:
LATCH# NAME-------- -------------------------8 cache buffers chains 1 row selected.
The cache buffer chains latch often experiences contention, as do the cache buffer lru chain latch and the cache buffer handles latch. These latches typically indicate that raising the number of SGA buffers is necessary.
Reducing Rollback Segment ContentionDatabase data files have segments allocated for rollback information. Because the database blocks that make up rollback segments are accessed frequently, rollback segments might be subject to contention.
Use this SQL statement to determine how often requests for space in a rollback segment cause delays.
SELECT name, gets, waits, ((gets-waits)*100)/gets hits FROM v$rollstat s, v$rollname n WHERE s.usn = n.usn;
A common symptom of insufficient rollback space is the error message:
Snapshot too old
The hit rate should be more than 95 percent. To improve the hit rate:
■ When there are too few rollback segments, add more.
■ When users are not properly assigned, assign users who run large transactions to large rollback segments.
Reducing Redo Log Buffer Latch ContentionHeavy access to the redo log buffer can cause contention for the redo log buffer latches. Examine the activity of the redo log buffer latches through the Server Manager Latch Display.
Tuning Oracle8i 2-19
Tuning Oracle Resource Contention
If the ratio of misses to gets for a particular latch exceeds 10 percent, contention for that latch might affect performance. Each Sleep indicates a delay for the process requesting the latch.
You can reduce contention for the redo allocation latch. Minimize the time that any single process holds the latch by decreasing the value of the initsid.ora LOG_SMALL_ENTRY_MAX_SIZE parameter.
To reduce contention for redo copy latches in multi-processor environments:
■ Add more latches by increasing the value of LOG_SIMULTANEOUS_COPIES
■ Use twice as many redo copy latches as CPUs available to your Oracle8i instance
Reducing Parallel Query/Parallel DML ContentionTune parallel queries to avoid excessive CPU usage and prevent exhausting the supply of available query servers. Use the V$Q_SYSSTAT view to determine the number of active query servers by entering:
SELECT * FROM V$PQ_SYSSTAT WHERE statistic = ”Servers Busy”:STATISTIC
The sample output is:
VALUE--------------------- -----------Servers Busy 70
If the value of Servers Busy reaches the value set for the PARALLEL_MAX_SERVERS parameters, the cause may be that some parallel queries are being processed sequentially.
Note: Systems with multiple CPUs might be able to tolerate more contention without performance reduction.
2-20 Oracle8i Administrator’s Reference Release 3 (8.1.7) for IBM DYNIX/ptx

Tuning Oracle Resource Contention
Run the sar -u command along with the previous query to observe CPU loading. Observe these measurements over a significant period of time. The following table summarizes tuning actions based on the ratio of servers busy to the value of the PARALLEL_MAX_SERVERS parameter compared to CPU utilization.
Tuning Spin CountIn multi-processor environments, you can improve performance by tuning the SPIN_COUNT initialization parameter.
A process continues to request a latch until it obtains one. When the number of requests reaches the value of the $SPIN_COUNT parameter, the process fails to acquire the latch, sleeps, then tries to acquire the latch again. Because a latch is a low-level lock, a process does not hold it long. It is less expensive to use CPU time by spinning a process than it is to make a process sleep.
To check the contention level of the latch, monitor the miss rate and sleep rate from the utlbstat and utlestat scripts. Try reducing the sleep rate by tuning the spin count. If the contention level is high, increase the spin count to allow processes to spin more before acquiring latches. However, since increasing the spin count increases CPU usage, system throughput may decline at some point.
Busy/MaxServers
CPU use heavy(95 - 100%)
CPU use OK(60 - 80%)
CPU use light(0 - 30%)
1.0 often Aggressively decrease parallelism in tables and queries; tune system
Decrease parallelism in tables and queries
Increase MAX servers; tune system
1.0 rarely Identify queries when maximized; tune system
Increase MAX Servers - watch; decrease parallelism in tables and queries
Increase MAX servers
.3 - .7 If Query Servers using >40% CPU, decrease MAX servers; tune system
Tuned Increase parallelism in tables and queries; increase MAX servers
0 - .2 Tune system; consider adding processors
Consider lowering MAX servers
Increase parallelism in tables and queries
Tuning Oracle8i 2-21

Tuning Block Size and File Size
Tuning Block Size and File SizeThis section describes how you can improve the performance of Oracle8i by optimizing the size of Oracle blocks for the files in your database.
Specifying Oracle Block SizeOn IBM DYNIX/ptx, the default Oracle block size is 4 KB and the maximum block size is 16 KB. You can set the actual block size to any multiple of 2 KB up to 16 KB.
The optimal block size is typically the default, but varies with the applications. To create a database with a different Oracle block size, add the following line to the initsid.ora file before creating the database:
DB_BLOCK_SIZE=new_block_size
Tuning the Buffer Cache Size To take full advantage of raw devices, adjust the size of the Oracle8i buffer cache and, if memory is limited, the IBM DYNIX/ptx buffer cache.
The IBM DYNIX/ptx buffer cache is provided by the operating system. It holds blocks of data in memory while they are being transferred between memory and disk.
The Oracle8i buffer cache is the area in memory that stores the Oracle database buffers. Since Oracle8i can use raw devices, it does not need to use the IBM DYNIX/ptx buffer cache.
If you decide to change to raw devices, you must increase the size of the Oracle8i buffer cache. If the amount of memory on the system is limited, reduce the size of the IBM DYNIX/ptx buffer cache correspondingly. It is possible to increase or decrease the Oracle8i buffer cache by modifying the db_block_buffers parameter in the initsid.ora file and restarting the instance.
Note: To change block size, you must re-create the existing database or create a new database. To determine the most efficient configuration, experiment with block size before transferring your data to the new database.
2-22 Oracle8i Administrator’s Reference Release 3 (8.1.7) for IBM DYNIX/ptx
Tuning Resource Contention for Oracle Parallel Server
Tuning Resource Contention for Oracle Parallel ServerThis section describes optimization techniques designed to minimize Distributed Lock Manager (DLM) bottlenecks.
Database concurrence in an Oracle Parallel Server (OPS) system is maintained across the processors using a DLM. Managing resources using the DLM is less efficient than using the shared memory model within a single database instance.
Avoid Index ContentionIndex tables are used extensively and may be a source of contention in your database if a sequence generator is used to create primary keys for database records. The sequence numbers are typically consecutive and, when used as keys to add data, cause entries in the same index blocks. This can result in contention for the index blocks. Solve this problem by pre-pending a value to the sequence. Select a value to distribute indexes to different blocks.
Avoid Free List ContentionBlocks available for insert operations are kept on a list in the table header. Insert-intensive applications experience contention for the table header block. Solve this problem by creating multiple free lists and multiple free list groups. Free list headers are kept in different blocks.
Avoid Lock ContentionAn application will not scale well if there is excessive lock contention. Lock contention can be measured by fields from the V$SYSSTAT table (CLASS=32). CLASS is a column in the V$SYSSTAT table, and the’32’ identifies global locks.
Lock Conversion Ratio = Consistent Gets - Async Lock Converts Consistent Gets
The lock conversion ratio should be 95 percent or higher for the application to scale well. If there is excessive lock contention, the application must be re-evaluated and possibly re-designed for OPS.
Note: Index contention can be a problem for Oracle8i running on a Symmetric Multi-Processor (SMP), but is more likely to become a bottleneck on Oracle Parallel Server.
Tuning Oracle8i 2-23

Tuning Resource Contention for Oracle Parallel Server
Although the application being executed by oracle is the most common source of lock contention, sometimes insufficient locks have been allocated, or were poorly allocated. For example, an OLTP application requires more locks than a decision support application. Allocate locks appropriately with the initsid.ora parameters.
Localize Disk I/OKeep the rollback segments and redo logs for an instance on the disks connected to that node. This should be part of your overall strategy of partitioning data so each node uses data without contention.
2-24 Oracle8i Administrator’s Reference Release 3 (8.1.7) for IBM DYNIX/ptx
Using Trace and Alert Files
Monitor ContentionMany statistics can indicate OPS contention. Examine the following tables to determine OPS contention:
■ V$SESSION_WAIT
■ V$SESSION_EVENT
■ V$SYSTEM_EVENT
■ V$SQL_AREA
■ V$CACHE
■ V$PING
Generally, lock conversions are the most important factor. Lock conversions imply disk I/O and delays while the lock is acquired and converted. Proper application partitioning is the only way to avoid lock conversions.
Using Trace and Alert Files This section describes the trace (or dump) and alert files Oracle8i creates to diagnose and resolve operating problems.
Trace File Names The file name format of a trace file is processname_sid_unixpid.trc, where:
A sample trace file name is dbwr_TEST_1237.trc. The default directory is $ORACLE_HOME/rdbms/log.
Alert Files The alert_sid.log file is associated with a database and is located in the directory specified by the initsid.ora parameter BACKGROUND_DUMP_DEST. The default directory is $ORACLE_HOME/rdbms/log.
processname is a three- or four-character process name showing which Oracle8i process the trace file is from (for example, pmon, dbwr, ora, or reco)
sid is the instance system identifier
unixpid is the UNIX process ID number
Tuning Oracle8i 2-25

Raw Devices and Volumes
Raw Devices and VolumesThis section describes the use of raw devices on Oracle8i.
Disadvantages of Raw Devices and Volumes Raw devices and volumes have the following disadvantages when used on IBM DYNIX/ptx:
■ They might not solve problems with ULIMIT that can arise when exporting tables larger than 1 MB (such as another disk partition).
■ When raw devices and operating system files are mixed within an Oracle8i database, the operating system files must still be within the value of the ULIMIT parameter.
■ They might not solve problems with ULIMIT that can arise when reading the contents of the Oracle distribution media onto the disk.
■ Small client systems usually cannot use sufficiently large raw device and volume partitions. Disk partitions usually come in odd sizes that do not lend themselves to good database architecture.
■ If a particular disk drive has intense I/O activity and performance would benefit from movement of an Oracle data file to another drive, it is likely that no acceptably sized section exists on a drive with less I/O activity. Moving data files around, a common advantage of UNIX, might not be possible with raw devices and volumes.
■ Adding space to a tablespace can be a difficult process in a raw device and volume environment. Occasionally, all raw partitions are assigned data files at initial configuration time, leaving no raw storage to accommodate normal tablespace growth.
2-26 Oracle8i Administrator’s Reference Release 3 (8.1.7) for IBM DYNIX/ptx

Raw Devices and Volumes
Guidelines for Using Raw Devices and Volumes In addition to the disadvantages described in the preceding section, "Disadvantages of Raw Devices and Volumes", you should consider the following issues when deciding whether to use raw devices and volumes:
■ Oracle8i Parallel Server Installation
■ Raw Disk Partition Availability
■ Logical Volume Manager
■ Dynamic Performance Tuning
■ Mirroring and Online Disk Replacement
Oracle8i Parallel Server Installation Each instance of Oracle Parallel Server (OPS) has individual log files. Therefore, in addition to the partitions required for the tablespaces and control files, each instance requires a minimum of three partitions for the log files. All of the files must be on disks that can be shared by all nodes of a IBM DYNIX/ptx cluster.
IBM DYNIX/ptx clusters provide access to shared file system between all nodes of a cluster. However, to improve performance, all files associated with a database must be built on raw devices/volumes.
Raw Disk Partition Availability Use raw devices and volumes for Oracle files only if your site has at least as many raw disk partitions as Oracle files, including data files, log files, and control files. If the raw disk partitions are already formatted, match data file size to partition size as closely as possible to avoid wasting space.
Logical Volume Manager With logical volumes, you can create logical disks based on raw partition availability. Because logical disks can be moved to more than one disk, the disk drives do not have to be reformatted to obtain logical disk sizes.
Dynamic Performance TuningDisk performance can be optimized when the database is online by moving hot spots to cooler drives. Some hardware vendors who provide the logical disk facility also provide a graphical user interface that can be used for tuning.
Tuning Oracle8i 2-27
Raw Devices and Volumes
Mirroring and Online Disk ReplacementYou can mirror logical volumes to protect against loss of data. If one copy of a mirror fails, dynamic re-synchronization is possible. Some vendors also provide the ability to replace drives online in conjunction with the mirroring facility.
For Oracle Parallel Server, you can use logical volumes for drives associated with a single UNIX machine, as well as those that can be shared with more than one machine of a UNIX cluster. The latter allows for all files associated with the Oracle Parallel Server to be placed on these shared logical volumes.
Raw Device SetupKeep in mind the following items when creating raw devices:
■ When creating the volumes, ensure that the owner and group are oracle and oinstall, respectively.
■ The size of an Oracle data file created in a raw partition must be at least two Oracle block sizes smaller than the size of the raw partition.
2-28 Oracle8i Administrator’s Reference Release 3 (8.1.7) for IBM DYNIX/ptx

Administering SQL
3
Administering SQL*PlusThis chapter describes the following features of SQL*Plus:
■ Administering SQL*Plus
■ Using SQL*Plus
■ Restrictions of SQL*Plus
*Plus 3-1

Administering SQL*Plus
Administering SQL*PlusThis section describes how to administer SQL*Plus.
Using Setup Files When you invoke SQL*Plus, it executes the glogin.sql site profile setup file and then executes the login.sql user profile setup file.
Using the Site Profile FileThe global site profile file is $ORACLE_HOME/sqlplus/admin/glogin.sql. The default site profile is placed in $ORACLE_HOME/sqlplus/admin when SQL*Plus is installed. If a site profile already exists, it is overwritten. If SQL*Plus is de-installed, the site profile file is deleted.
Using the User Profile FileThe user profile file is login.sql. SQL*Plus looks in the current directory, and then in the directories you specify until it finds login.sql. You can specify the directories to search by setting the SQLPATH environment variable to a colon-separated list of directories.
For example, if the current directory is /u02/oracle and SQLPATH is set to /home:/home/oracle:/u01/oracle, SQL*Plus looks for login.sql in the following order:
1. /u02/oracle (the current directory)
2. /home
3. /home/oracle
4. /u01/oracle
The options set in login.sql override those set in glogin.sql.
Using the PRODUCT_USER_PROFILE Table During a typical installation, the PRODUCT_USER_PROFILE table is created automatically. This table is used to disable the SQL and SQL*Plus commands you specify. To recreate this table, run the $ORACLE_HOME/sqlplus/admin/pupbld.sql script in the SYSTEM schema.
See Also: For more information about profile files, see the SQL*Plus User’s Guide and Reference.
3-2 Oracle8i Administrator’s Reference Release 3 (8.1.7) for IBM DYNIX/ptx
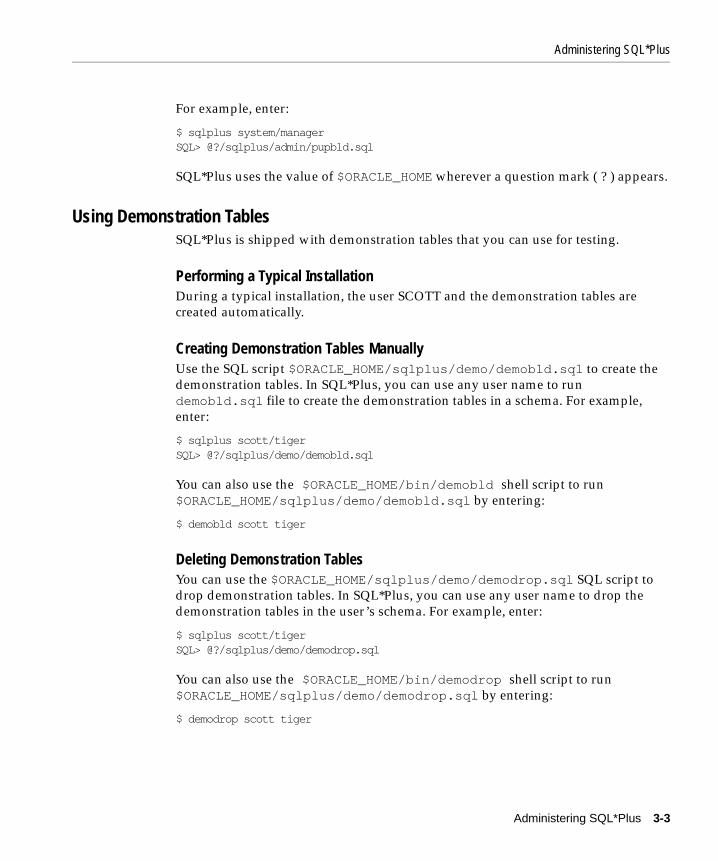
Administering SQL*Plus
For example, enter:
$ sqlplus system/managerSQL> @?/sqlplus/admin/pupbld.sql
SQL*Plus uses the value of $ORACLE_HOME wherever a question mark ( ? ) appears.
Using Demonstration Tables SQL*Plus is shipped with demonstration tables that you can use for testing.
Performing a Typical InstallationDuring a typical installation, the user SCOTT and the demonstration tables are created automatically.
Creating Demonstration Tables Manually Use the SQL script $ORACLE_HOME/sqlplus/demo/demobld.sql to create the demonstration tables. In SQL*Plus, you can use any user name to run demobld.sql file to create the demonstration tables in a schema. For example, enter:
$ sqlplus scott/tiger SQL> @?/sqlplus/demo/demobld.sql
You can also use the $ORACLE_HOME/bin/demobld shell script to run $ORACLE_HOME/sqlplus/demo/demobld.sql by entering:
$ demobld scott tiger
Deleting Demonstration Tables You can use the $ORACLE_HOME/sqlplus/demo/demodrop.sql SQL script to drop demonstration tables. In SQL*Plus, you can use any user name to drop the demonstration tables in the user’s schema. For example, enter:
$ sqlplus scott/tiger SQL> @?/sqlplus/demo/demodrop.sql
You can also use the $ORACLE_HOME/bin/demodrop shell script to run $ORACLE_HOME/sqlplus/demo/demodrop.sql by entering:
$ demodrop scott tiger
Administering SQL*Plus 3-3

Administering SQL*Plus
Using the Help Facility This section describes how to use the help facility.
Performing a Typical InstallationWhen you copy a starter database with pre-built datafiles as part of the typical installation or as an option in Oracle Database Configuration Assistant, SQL*Plus automatically installs the Help Facility.
Using the Database Configuration AssistantYou can use the Oracle Database Configuration Assistant to create help tables when creating a database.
Installing the Help Facility ManuallyYou can use the $ORACLE_HOME/bin/helpins shell script to manually install the Help facility. Before you run the script, set the SYSTEM_PASS environment variable to the SYSTEM schema name and password. For example, enter:
$ setenv SYSTEM_PASS SYSTEM/MANAGER$ helpins
If the SYSTEM_PASS variable is not set, helpins prompts you for the SYSTEM password and loads the help data into the SYSTEM schema. You can also run $ORACLE_HOME/sqlplus/help/helpbld.sql helpus.sql to install the Help facility. In SQL*Plus, the system user can run the helpbld.sql file and its argument, helpus.sql, to create Help facility tables. For example, enter:
$ sqlplus system/managerSQL> @?/sqlplus/admin/help/helpbld.sql helpus.sql
Note: Both the demobld.sql and demodrop.sql scripts drop the EMP, DEPT, BONUS, SALGRADE, and DUMMY. tables. Prior to running either script, make sure that no table with one of these names exists in the desired schema, or the table data is lost.
3-4 Oracle8i Administrator’s Reference Release 3 (8.1.7) for IBM DYNIX/ptx

Using SQL*Plus
You can also run $ORACLE_HOME/sqlplus/help/helpdrop.sql in SQL*Plus to manually drop the Help facility tables in a schema. For example, enter:
$ sqlplus system/managerSQL> @?/sqlplus/admin/help/helpdrop.sql
Using SQL*Plus This section describes how to use SQL*Plus.
Using a System Editor from SQL*Plus If you enter an ed or edit command at the SQL*Plus prompt, the system invokes an operating system editor, such as ed, emacs, ned, or vi. Your PATH variable must include the directory of the editor.
When you invoke the editor, the current SQL buffer is placed in the editor. When you exit the editor, the changed SQL buffer is returned to SQL*Plus.
You can specify which editor will be invoked by defining the SQL*Plus _editor variable. This variable can be set in glogin.sql, in login.sql, or entered during a SQL*Plus session. For example, to set the default editor to vi, enter:
SQL> DEFINE _editor=vi
If you do not set the _editor variable, the value of either the EDITOR or VISUAL environment variable is used. If both are set, the EDITOR variable value is used. When _editor, EDITOR, and VISUAL are not specified, the default editor is ed.
If you invoke the editor, SQL*Plus uses the afiedt.buf temporary file to pass text to the editor. You can use SET EDITFILE to rename this file. For example, enter:
SQL> SET EDITFILE /tmp/myfile.sql
SQL*Plus does not delete the temporary file.
Note: Both the helpins shell script and the helpbld.sql SQL*Plus script drop existing Help facility tables before creating new tables.
See Also: For more information about the help facility, see the SQL*Plus User’s Guide and Reference.
Administering SQL*Plus 3-5
Restrictions of SQL*Plus
Running Operating System Commands from SQL*PlusUsing the HOST command or an exclamation point (!) as the first character after the SQL*Plus prompts indicates subsequent characters are passed to a sub-shell. The SHELL environment variable sets the shell used to execute operating system commands. The default shell is /bin/sh(sh). If the shell cannot be executed, an error message is displayed.
You can perform operating system commands without leaving SQL*Plus by entering the HOST or ! command. For example, to enter one command, enter:
SQL>! command
where command represents the operating system command you want to execute.
To execute more than one operating system command, press [Enter] after the HOST or ! command. After the command executes, control returns to SQL*Plus.
Interrupting SQL*Plus While running SQL*Plus, you can stop the scrolling record display and terminate a SQL statement by pressing [Ctrl]+[c].
Using the SPOOL Command The default extension name of files generated by the SPOOL command is .lst. To change an extension, specify a spool file containing a period (.). For example, enter:
SQL> SPOOL query.lis
Restrictions of SQL*PlusThis section describes SQL*Plus restrictions.
Resizing Windows The default values for SQL*Plus LINESIZE and PAGESIZE do not automatically adjust for window size.
Return Codes UNIX return codes use only one byte, which is not enough space to return an Oracle error code. The range for a return code is 0 to 255.
3-6 Oracle8i Administrator’s Reference Release 3 (8.1.7) for IBM DYNIX/ptx

Using Oracle Precompilers and the Oracle Call Inte
4
Using Oracle Precompilers and the OracleCall Interface
This chapter describes the following Oracle Precompiler and Oracle Call Interface features:
■ Overview of Oracle Precompilers
■ Pro*C/C++ Precompiler
■ Pro*COBOL Environment Variables
■ Oracle Call Interface
■ Custom Makefiles
■ Correcting Undefined Symbols
■ Multi-Threaded Applications
■ XA Functionality
rface 4-1

Overview of Oracle Precompilers
Overview of Oracle PrecompilersOracle precompilers are application design tools used to combine SQL statements from an Oracle database with programs written in a high-level language. Oracle precompilers are compatible with ANSI SQL and are used to develop open, customized applications that run with Oracle8i or any other ANSI SQL database management system. In order to run the Oracle precompiler demonstrations, you must have already installed Oracle8i.
Relinking Precompiler Executables All precompiler executables are relinked using the following makefile:
$ORACLE_HOME/precomp/lib/ins_precomp.mk
The make command uses the following convention:
$ make -f ins_precomp.mk relink EXENAME=executable
This command creates the new executable in the $ORACLE_HOME/precomp/lib directory, and then moves it to the $ORACLE_HOME/bin directory. In order to create the new executable without it being moved to $ORACLE_HOME/bin, use the following command:
$ make -f ins_precomp.mk executable
In the preceding example, use Table 4–1 to determine the value of executable for the product you are using.
For example, to relink the Pro*C/C++ executable, use the following command:
$ cd $ORACLE_HOME/precomp/lib
See Also: For general information on Oracle precompilers and interface features, see Oracle8i Server Application Developer’s Guide
Table 4–1 Products and Their Corresponding Executable Names
Product Executable
Pro*C/C++ 8.1.7 proc
Pro*COBOL 1.8.52 procob18, or rtsora
Pro*COBOL 8.1.7 procob, or rtsora
Object Type Translator 8.1.7 ott
4-2 Oracle8i Administrator’s Reference Release 3 (8.1.7) for IBM DYNIX/ptx

Overview of Oracle Precompilers
$ make -f ins_precomp.mk relink EXENAME=proc
Precompiler Configuration Files Precompiler system configuration files located in the $ORACLE_HOME/precomp/admin/ directory. Table 4–2 lists the precompiler system configuration files.
Table 4–3 lists the location of precompiler README files. The README files describe changes since the last release.
Issues Common to All Precompilers
Uppercase to Lowercase Conversion In languages other than C, the compiler converts an uppercase function or subprogram name to lowercase. This can cause an “No such user exit” error message. If you receive this error message, verify that the function or subprogram name in your option file matches the case used in the iapxtb table.
Table 4–2 System Configuration Files
Product Configuration File
Pro*C/C++ 8.1.7 pcscfg.cfg
Pro*COBOL 8.1.7 pcbcfg.cfg
Pro*COBOL 1.8.52 pcccob.cfg
Object Type Translator 8.1.7 ottcfg.cfg
Table 4–3 Location of README Files for Oracle Products
Product README File
Pro*C/C++ $ORACLE_HOME/precomp/doc/proc2/readme.doc
Pro*COBOL 8.1.7 $ORACLE_HOME/precomp/doc/procob2/readme.doc
Pro*COBOL 1.8.52 $ORACLE_HOME/precomp/doc/pro1x/readme.txt
Using Oracle Precompilers and the Oracle Call Interface 4-3
Overview of Oracle Precompilers
Vendor Debugger Programs Precompilers and vendor-supplied debuggers can be incompatible. Oracle Corporation does not guarantee that a program run under a debugger will run the same way under an operating system.
Value of ireclen and oreclen The ireclen and oreclen parameters do not have maximum values.
Static and Dynamic LinkingYou can link precompiler and OCI applications with Oracle libraries either statically or dynamically. With static linking, the libraries and objects of the whole application are linked together into a single executable program. As a result, application executables can become fairly large.
With dynamic linking, the executing code partly resides in the executable program and partly resides in libraries that are linked by the application dynamically at run time. Libraries that are linked at run time are called dynamic or shared libraries. Benefits of dynamic linking are:
■ Smaller disk requirements: More than one application or invocation of the same application can use the same dynamic library.
■ Smaller main memory requirements: The same dynamic library image is loaded into main memory only one time and an be shared by more than one application.
Oracle Shared LibraryThe Oracle shared library is libclntsh.so located in the $ORACLE_HOME/lib/ directory. If you use the Oracle provided demo_product.mk makefile to link an application, the Oracle shared library is used by default.
You may receive the following error message when starting an executable:
% sample1dynamic_linker:sample1:open libclntsh.so.1.0: No such file or directory killed.If you receive this error message, set LD_LIBRARY_PATH by entering:
$ set LD_LIBRARY_PATH=$ORACLE_HOME/lib
The Oracle shared library is created automatically during installation. If you need to re-create the Oracle shared library, exit all client applications using the Oracle
4-4 Oracle8i Administrator’s Reference Release 3 (8.1.7) for IBM DYNIX/ptx

Pro*C/C++ Precompiler
shared library, including all Oracle client applications such as SQL*Plus and Recovery Manager. Then log in as the oracle user and enter:
$ cd $ORACLE_HOME/rdbms/lib$ make -f ins_rdbms.mk libclntsh.so
Pro*C/C++ PrecompilerBefore you use Pro*C/C++, verify that the correct version of the operating system compiler is properly installed.
Pro*C/C++ Demonstration Programs Demonstration programs are provided to show the various functionality of the Pro*C/C++ precompiler. There are three types of demonstration programs: C, C++, and Object programs. Object programs demonstrate the new Oracle8i Object features. All the demonstration programs are located in the $ORACLE_HOME/precomp/demo/proc directory. The programs assume that the demonstration tables created by $ORACLE_HOME/sqlplus/demo/demobld.sql exist in the SCOTT schema with the password TIGER. By default, all programs are dynamically linked with the client shared library $ORACLE_HOME/lib/libclntsh.so.
The makefile, demo_proc.mk located in $ORACLE_HOME/precomp/demo/proc/ directory should be used to create the demonstration programs.
For example, to precompile, compile, and link the sample1 demonstration program, enter the following command.
$ make -f demo_proc.mk sample1
To create the C demonstration programs for Pro*C/C++, enter:
$ make -f demo_proc.mk samples
To create the C++ demonstration programs for Pro*C/C++, enter:
$ make -f demo_proc.mk cppsamples
To create the Object demonstration programs for Pro*C/C++, enter:
$ make -f demo_proc.mk object_samples
For additional information about precompiler and interface features, see Programmer’s Guide to the Pro*C/C++ Precompiler.
Using Oracle Precompilers and the Oracle Call Interface 4-5

Pro*C/C++ Precompiler
Some demonstration programs require a SQL script, found in $ORACLE_HOME/precomp/demo/sql, to be run. If you do not run the script, a message will be displayed requesting you to run it. To build such a demonstration program and run the corresponding SQL script, the make macro argument RUNSQL=run must be included on the command line. For example, to create the calldemo demonstration program and run the required $ORACLE_HOME/precomp/demo/sql/calldemo.sql script, enter:
$ make -f demo_proc.mk calldemo RUNSQL=run
To create all Object demonstration programs and run all corresponding required SQL scripts, enter:
$ make -f demo_proc.mk object_samples RUNSQL=run
Pro*C/C++ User ProgramsYou can use the makefile demo_proc.mk located in the $ORACLE_HOME/precomp/demo/proc/ directory to create programs. The syntax for linking a program with demo_proc.mk is:
$ make -f demo_proc.mk target OBJS="objfile1 objfile2 ..." EXE=exename
where
■ target is the makefile target that will be used (example, build)
■ objfilen is the object file to link the program
■ EXE is the executable program
For example, to create the program myprog from the Pro*C/C++ source myprog.pc, enter one of the following command, depending on the source and the type of executable.
For C source, dynamically linked with a client shared library, enter:
$ make -f demo_proc.mk build OBJS=myprog.o EXE=myprog
Note: The ORA_CLIENT_LIB environment variable is no longer used by the demo_proc.mk makefile.
See Also: For information about using SQL*Plus to build demonstration programs, see "Using Demonstration Tables" on page 3-3.
4-6 Oracle8i Administrator’s Reference Release 3 (8.1.7) for IBM DYNIX/ptx

Pro*COBOL Environment Variables
For C source, statically linked, enter:
$ make -f demo_proc.mk build_static OBJS=myprog.o EXE=myprog
For C++ source, dynamically linked with a client shared library, enter:
$ make -f demo_proc.mk cppbuild OBJS=myprog.o EXE=myprog
For C++ source, statically linked, enter:
$ make -f demo_proc.mk cppbuild_static OBJS=myprog.o EXE=myprog
Pro*COBOL PrecompilerThere are two versions of Pro*COBOL included with this release. Table 4–4 shows the naming conventions for these versions.
Pro*COBOL supports statically linked, dynamically linked, or dynamically loadable programs. Dynamically linked programs use the client shared library $ORACLE_HOME/lib/libclntsh.so. Dynamically loadable programs use the rtsora executable located in the $ORACLE_HOME/bin directory.
Pro*COBOL Environment Variables
Environment Variables The following sections describes environment variable settings for the MicroFocus COBOL compiler.
Note: In the above examples, the file myprog.o is the object file generated by the compiler.
Table 4–4 Pro*COBOL Naming Differences
Feature Pro*COBOL Release 3 (8.1.7) Pro*COBOL 1.8.52
Executable procob procob18
Demo Directory procob2 procob
Using Oracle Precompilers and the Oracle Call Interface 4-7
Pro*COBOL Environment Variables
MicroFocus COBOL Compiler The MicroFocus COBOL Compiler requires the COBDIR and LD_LIBRARY_PATH environment variables. The COBDIR variable must be set to the directory where the compiler is installed. For example:
$ COBDIR=/opt/cobol$ export COBDIR
The LD_LIBRARY_PATH variable must include the $COBDIR/coblib directory. For example:
$ LD_LIBRARY_PATH=${LD_LIBRARY_PATH}:$COBDIR/coblib$ export COBDIR
If the LD_LIBRARY_PATH variable does not contain the $COBDIR/coblib directory, you will receive the following error when compiling a program:
dynamic linker: procob: open libwtc8.so: No such file or directory procob: 19882 Killed cob: environment variable LD_LIBRARY_PATH not set
4-8 Oracle8i Administrator’s Reference Release 3 (8.1.7) for IBM DYNIX/ptx

Pro*COBOL Environment Variables
Using Pro*COBOLBefore you use Pro*COBOL, verify that the correct version of the COBOL compiler is properly installed. The required version for your operating system is specified in the Oracle8i Installation Guide Release 3 (8.1.7) for IBM DYNIX/ptx.
The Oracle Runtime System Oracle provides its own complete runtime system, called rtsora. To run dynamically loadable Pro*COBOL programs, use the rtsora runtime system in place of the MicroFocus provided cobrun runtime system. If you attempt to run a Pro*COBOL program with cobrun, you receive the following error:
$ cobrun sample1.gntLoad error : file ’SQLADR’error code: 173, pc=0, call=1, seg=0173 Called program file not found in drive/directory
Demonstration Programs Demonstration programs have been provided that show various functionality of the Pro*COBOL precompiler. All programs are located in either $ORACLE_HOME/precomp/demo/procob or $ORACLE_HOME/precomp/demo/procob2, depending on the Pro*COBOL version. All programs assume that the demonstration tables created by $ORACLE_HOME/sqlplus/demo/demobld.sql exist in the SCOTT schema with the password TIGER. By default, the demonstration programs are dynamically linked with the $ORACLE_HOME/lib/libclntsh.so client shared library.
The demonstration makefile should be used to create the sample programs. The demonstration makefile for Pro*COBOL 8.1.7 is demo_procob.mk located in the $ORACLE_HOME/precomp/demo/procob2 directory. The demonstration makefile for Pro*COBOL 1.8.52 is demo_procob18.mk located in the $ORACLE_HOME/precomp/demo/procob directory.
For example, to precompile, compile, and link the sample1 demonstration program for Pro*COBOL 8.1.7, use the following command:
$ cd $ORACLE_HOME/precomp/demo/procob2$ make -f demo_procob.mk sample1
To create the Pro*COBOL demonstration programs, enter:
$ make -f demo_procob.mk samples
Using Oracle Precompilers and the Oracle Call Interface 4-9
Pro*COBOL Environment Variables
To create and run a dynamically loadable sample1.gnt program to be used with rtsora, enter:
$ make -f demo_procob.mk sample1.gnt$ rtsora sample1.gnt
Some demonstration programs require you to run a SQL script found in $ORACLE_HOME/precomp/demo/sql. If you do not run the script, a message will be displayed requesting you to run it. To build a demonstration program and run the corresponding SQL script, include the make macro argument RUNSQL=run on the command line. For example, to create the sample9 demonstration program and run the required calldemo.sql script located in the $ORACLE_HOME/precomp/demo/sql directory, enter:
$ make -f demo_procob.mk sample9 RUNSQL=run
Pro*COBOL User Programs You can use demo_procob.mk located in the /ORACLE_HOME/precomp/demo/proc/ directory to create user programs. Be sure to use the appropriate makefile depending on the Pro*COBOL version and COBOL compiler used. The syntax for linking a user program with the demonstration makefile is:
$ make -f demo_procob.mk target COBS="cobfile1 cobfile2 ..." EXE=exename
where
■ target is the makefile target that will be used (for example, build)
■ cobfilen is the object file to link the program
■ EXE is the executable program
For example, to create the myprog program from the Pro*COBOL source myprog.pco, enter one of the following lines, depending on the type of executable and the use of shared library resources.
For a dynamically linked executable with client shared library, enter:
See Also: For information about using SQL*Plus to build demonstration programs, see "Using Demonstration Tables" on page 3-3.
For further information on the demonstration programs see the Programmer’s Guide to the Pro*COBOL Precompiler.
4-10 Oracle8i Administrator’s Reference Release 3 (8.1.7) for IBM DYNIX/ptx

Oracle Call Interface
$ make -f demo_procob.mk build COBS=myprog.cob EXE=myprog
For a statically linked executable without client shared library, enter:
$ make -f demo_procob.mk build_static COBS=myprog.cob EXE=myprog
For a dynamically loadable module usable with rtsora, enter:
$ make -f demo_procob.mk myprog.gnt
FORMAT Precompiler OptionThe FORMAT precompiler option specifies the format of input lines for COBOL. If you specify FORMAT=ANSI (the default), columns 1 to 6 contain an optional sequence number, column 7 indicates comments or continuation lines, paragraph names begin in columns 8 to 11, and statements begin in columns 12 to 72.
If you specify FORMAT=TERMINAL, columns 1 to 6 are dropped, making column 7 the leftmost column.
Oracle Call Interface Before using Oracle Call Interface (OCI), verify that the correct version of Pro*C/C++ is properly installed.
OCI Demonstration Programs Demonstration programs have been provided that show various functionality of the OCI. There are two types of demonstration programs: C and C++. All the demonstration programs are located in $ORACLE_HOME/rdbms/demo. By default, all programs are dynamically linked with the client shared library $ORACLE_HOME/lib/libclntsh.so.
Many of the demonstration programs assume that the demonstration tables created by $ORACLE_HOME/sqlplus/demo/demobld.sql exist in the SCOTT schema with the password TIGER.
Note: In the above examples, the file myprog.cob is the object file generated by the compiler.
Using Oracle Precompilers and the Oracle Call Interface 4-11

Oracle Call Interface
Use the makefile demo_rdbms.mk located in the $ORACLE_HOME/rdbms/demo directory to create the demonstration programs. For example, to compile and link cdemo1, enter:
$ make -f demo_rdbms.mk cdemo1
To create the OCI C demonstration programs, enter:
$ make -f demo_rdbms.mk demos
To create the OCI C++ demonstration programs, enter:
$ make -f demo_rdbms.mk cppdemos
Some demonstration programs require you to run a SQL script found in $ORACLE_HOME/rbdms/demo. If you do not run the script, a message will be displayed requesting you to run the script. In most cases, the SQL script name is the same as the program name with a.sql extension.
OCI Linking ErrorsThe following error messages can appear when you link to a C++ program:
ld: fatal: library -lsunmath: not foundld: fatal: library -lC: not foundld: fatal: library -lC_mtstubs: not foundld: fatal: library -lcx: not found
If you receive these error messages, include the directory in which the specified libraries exist in the LD_LIBRARY_PATH.
OCI User ProgramsYou can use the demo_rdbms.mk makefile located in the $ORACLE_HOME/rdbms/demo directory to create programs. The syntax for linking a user program with demo_rdbms.mk is:
$ make -f demo_rdbms.mk target OBJS="objfile1 objfile2 ..." EXE=exename
See Also: For information about using SQL*Plus to build demonstration programs, see “Using Demonstration Tables” on page 3-3.
For further information on the demonstration programs see the Programmer’s Guide to the Oracle Call Interface and the program source for details of each program.
4-12 Oracle8i Administrator’s Reference Release 3 (8.1.7) for IBM DYNIX/ptx

Custom Makefiles
where
■ target is the makefile target that will be used (example, build)
■ objfilen is the object file to link the program
■ EXE is the executable program
For example, to create the myprog program from the C/C++ source myprog.c, enter one of the following lines, depending on the type of executable:
To create the myprog program from the C source, dynamically linked with a client shared library, enter:
$ make -f demo_rdbms.mk build OBJS=myprog.o EXE=myprog
To create the myprog program from the C source, statically linked, enter:
$ make -f demo_rdbms.mk build_static OBJS=myprog.o EXE=myprog
To create the myprog program from the C++ source, dynamically linked with client shared library, enter:
$ make -f demo_rdbms.mk buildcpp OBJS=myprog.o EXE=myprog
To create the myprog program from the C++ source, statically linked, enter:
$ make -f demo_rdbms.mk buildcpp_static OBJS=myprog.o EXE=myprog
Custom Makefiles Oracle Corporation recommends that you use the provided demo_product.mk makefiles to link user programs. If you modify the provided makefile, or if you use a custom-written makefile, the following restrictions apply:
■ Do not modify the ordering of the Oracle libraries. Oracle libraries are included on the link line more than once so that all the symbols are resolved during linking. The order of the Oracle libraries is essential for the following reasons:
– Oracle libraries are mutually referential. Functions in library A call functions in library B, and functions in library B call functions in library A.
Note: In the above examples, the file myprog.o is the object file generated by the compiler.
Using Oracle Precompilers and the Oracle Call Interface 4-13
Correcting Undefined Symbols
– The IBM DYNIX/ptx linker is a one-pass linker. The linker searches a library exactly once at the point it is encountered in the link line.
■ If you add your own library to the link line, add it to the beginning or to the end of the link line. User libraries should not be placed between the Oracle libraries.
■ If you use a make utility such as nmake or GNU make, be aware of how macro and suffix processing differs from the make utility provided with the IBM DYNIX/ptx make utility. Oracle makefiles have been tested and are supported with the IBM DYNIX/ptx make utility.
■ Oracle library names and the contents of Oracle libraries are subject to change between releases. Always use the demo_product.mk makefile that ships with the current release as a guide to determine which libraries are necessary.
Correcting Undefined Symbols Oracle provides the symfind utility to assist in locating a library or object file where a symbol is defined. A common error when linking a program is undefined symbols which produces an error message similar to the following:
$ make -f demo_proc.mk sample1Undefined first referenced symbol in filesqlcex sample1.osqlglm sample1.old: fatal: Symbol referencing errors. No output written to sample1
The error occurs when the linker cannot find a definition for a referenced symbol. If this error message occurs, ensure that the library or object file containing the definition exists on the link line and that the linker is searching the correct directories for the file.
Following is an example of the output from the symfind utility which located the sqlcex symbol:
$ symfind sqlcex
SymFind - Find Symbol <sqlcex> in <**>.a, .o, .so------------------------------------------------------Command: /u01/app/oracle/product/8.1.7/bin/symfind sqlcexLocal Directory: /u01/app/oracle/product/8.1.7Output File: (none)
4-14 Oracle8i Administrator’s Reference Release 3 (8.1.7) for IBM DYNIX/ptx

Multi-Threaded Applications
Note: I do not traverse symbolic links Use ’-v’ option to show any symbolic links
Locating Archive and Object files ...[11645] | 467572| 44|FUNC |GLOB |0 |8 |sqlcex^̂ ^^̂ ^^̂ ^^̂ ^̂ ^^̂ ^^̂ ^^̂ ^̂ ^^̂ ^^̂ ^^̂ ^ ̂./lib/libclntsh.so[35] | 0| 44|FUNC |GLOB |0 |5 |sqlcex^̂ ^^̂ ^^̂ ^^̂ ^̂ ^^̂ ^^̂ ^^̂ ^̂ ^^̂ ^^̂ ^^̂ ^ ̂./lib/libsql.a
Multi-Threaded ApplicationsThe Oracle libraries provided with this release are thread safe, allowing support for multi-threaded applications.
Using Signal Handlers Signals can be used by Oracle8i for two-task communication. Signals are installed in a user process when you connect to the database and are de-installed when you disconnect.
Table 4–5 describes the signals Oracle8i uses for two-task communications.
Table 4–5 Signals for Two-Task Communications
Signal Description
SIGCLD The pipe driver uses SIGCLD, also referred to as SIGCHLD, when an oracle process dies. The UNIX kernel sends a SIGCLD signal to the user process. The signal handler uses the wait() routine to see if a server process died. The oracle process does not catch SIGCLD; the user process catches it.
SIGCONT The pipe two-task driver uses SIGCONT to send out-of-band breaks from the user process to the oracle process.
SIGINT Two-task drivers use SIGINT to detect user interrupt requests. The oracle process does not catch SIGINT; the user process catches it.
SIGIO Net8 protocols use SIGIO to indicate incoming networking events.
Using Oracle Precompilers and the Oracle Call Interface 4-15

Multi-Threaded Applications
The signals affect Pro*C or other precompiler applications. You can install one signal handler for SIGCLD (or SIGCHLD) and SIGPIPE when connected to the oracle process. If you call the osnsui() routine to set it up, you can have more than one signal handle for SIGINT. For SIGINT, use osnsui() and osncui() to register and delete signal-catching routines. You can also install signal handlers for other signals. If you are not connected to the oracle process, you can have more than one signal handler.
Sample Signal RoutineThe following example shows how to set up a signal routine and a catching routine.
/* user side interrupt set */
word osnsui( /*_ word *handlp, void (*astp), char * ctx, _*/)/*** osnsui: Operating System dependent Network Set User-side Interrupt. Add an interrupt handling procedure astp. Whenever a user interrupt(such as a ̂ C) occurs,call astp with argument ctx. Put in *handlp handle for this handler so that it may be cleared with osncui.** Note that there may be many handlers; each should be cleared using osncui. An error code is returned if an error occurs.*/
/* user side interrupt clear */word osncui( /*_ word handle _*/ );/*** osncui: Operating System dependent Clear User-side Interrupt.
SIGPIPE The pipe driver uses SIGPIPE to detect end-of-file on the communications channel. When writing to the pipe, if no reading process exists, a SIGPIPE signal is sent to the writing process. Both the oracle process and the user process catch SIGPIPE. SIGCLD is similar to SIGPIPE, but only applies to user processes, not to oracle processes.
SIGTERM The pipe driver uses SIGTERM to signal interrupts from the user to the oracle process. This occurs when the user presses the interrupt key [Ctrl]+[c]. The user process does not catch SIGTERM; the oracle process catches it.
SIGURG Net8 TCP/IP drivers use SIGURG to send out-of-band breaks from the user process to the oracle process.
Table 4–5 Signals for Two-Task Communications
Signal Description
4-16 Oracle8i Administrator’s Reference Release 3 (8.1.7) for IBM DYNIX/ptx

Multi-Threaded Applications
** Clear the specified handler. The argument is the handle obtained from osnsui. An error code is ** returned if an error occurs.*/
The following is a template for using osnsui() and osncui() in an application program:
/*** User interrupt handler template.*/void sig_handler(){...}
main(argc, argv)int arc;char **argv; {
int handle, err; ... /* set up user interrupt handler */ if (err = osnsui(&handle, sig_handler, (char *) 0)) { /* if the return value is non-zero, an error has occurred Take appropriate action for the error. */ ... } ... /* clear interrupt handler */ if (err = osncui(handle)) { /* if the return value is non-zero, an error has occurred Take appropriate action for the error*/ ... } ... }
Using Oracle Precompilers and the Oracle Call Interface 4-17
XA Functionality
XA Functionality Oracle Call Interface has XA functionality. When building a TP-monitor XA application, ensure that the TP-monitors libraries (that define the symbols ax_reg and ax_unreg) are placed in the link line before Oracle’s client shared library. This link restriction is required only when using the XA dynamic registration (Oracle XA switch xaoswd).
Because Oracle8i does not support Oracle7 release 7.1.6 XA calls (although it does support Oracle7 7.3 XA calls), TP-monitor XA applications using Oracle7 release 7.1.6 XA calls must be relinked with the Oracle8i XA library. The Oracle8i XA calls are defined in both the $ORACLE_HOME/lib/libclntsh.so shared library and the $ORACLE_HOME/lib/libclient8.a static library.
4-18 Oracle8i Administrator’s Reference Release 3 (8.1.7) for IBM DYNIX/ptx

Configuring
5
Configuring Net8■ This chapter describes the following Net8 features for IBM DYNIX/ptx:
■ Core Net8 Products and Features
■ Net8 Protocol Support
■ The BEQ Protocol
■ The IPC Protocol
■ The RAW Protocol
■ The TCP/IP Protocol
■ Oracle Enterprise Manager
■ Configuring Oracle Intelligent Agent for Oracle SNMP
■ Oracle Advanced Security
■ Supplementary Documentation
Net8 5-1
Core Net8 Products and Features
Core Net8 Products and Features This section describes core Net8 products and features. Table Table 5–1 lists sources of information on additional Net8 products:
Net8 Files and Utilities
Location of Net8 Configuration Files The default directory for Net8 configuration files is /etc on IBM DYNIX/ptx.
Net8 searches for global files in the following order:
1. The directory specified by the environment variable, TNS_ADMIN, if set.
2. The /etc directory.
3. $ORACLE_HOME/network/admin.
To set the TNS_ADMIN environment variable in the startup files of all network users to specify the directory, enter:
For Bourne or Korn shell:
$ TNS_ADMIN=directory_path $ export TNS_ADMIN
For the C shell, enter:
% setenv TNS_ADMIN directory_name
For each system level configuration file, users may have a corresponding local private configuration file (stored in the user’s home directory). The settings in the private file override the settings in the system level file. The private configuration file for sqlnet.ora is $HOME/.sqlnet.ora. The private configuration file for
Table 5–1 Additional Net8 Product Information
Product Documentation
Sample Net8 configuration files Net8 Administrator’s Guide
Oracle Connection Manager Net8 Administrator’s Guide
Multi-Threaded Server Net8 Administrator’s Guide and Oracle8i Administrator's Guide
Oracle Names Net8 Administrator’s Guide
5-2 Oracle8i Administrator’s Reference Release 3 (8.1.7) for IBM DYNIX/ptx

Core Net8 Products and Features
tnsnames.ora is $HOME/.tnsnames.ora. Syntax for these files is identical to that of the corresponding system files.
Sample Configuration FilesExamples of the cman.ora, listener.ora, names.ora, sqlnet.ora, and tnsnames.ora configuration files are located in $ORACLE_HOME/network/admin/samples.
The adapters Utility Net8 provides support for various network protocols and naming methods. They are linked into particular executables and provide the interface between network protocols and Net8. To display installed Net8 protocols, enter:
$ adapters
To display adapters linked with a specific executable, enter:
$ adapters executable
For example, to display the Net8 protocols linked with the oracle executable, enter:
$ adapters oracle
Net8 displays the following:
Net8 Protocol Adapters linked with oracle are:BEQ Protocol AdapterIPC Protocol AdapterTCP/IP Protocol AdapterRAW Protocol AdapterNet8 Naming Adapters linked with oracle are:Oracle TNS Naming AdapterOracle Naming Adapter
Oracle Connection Manager Oracle Connection Manager (OCM) is a router through which a client connection request may be sent either to its next hop or directly to the database server. Clients who route their connection requests through a Connection Manager can then take advantage of the connection concentration, Net8 access control, or multi-protocol support features configured on that Connection Manager.
Configuring Net8 5-3

Core Net8 Products and Features
Oracle Connection Manager listens for incoming requests from clients and initiates connect requests to destination services. Oracle Connection Manager performs these tasks with the help of Oracle Connection Gateway Process and Oracle Connection Manager Administrative Process.
OCM also includes a feature which you can use to control client access to designated servers in a TCP/IP environment. By specifying certain filtering rules you may allow or restrict specific clients access to a server based on the following criteria:
■ Source host name(s) or IP address(es) for clients
■ Destination host name(s) or IP address(es) for servers
■ Destination database service name
Net8 Firewall ProxySome firewall vendors also offer Net8 Firewall Proxy, which is installed on firewalls requiring an application proxy. Net8 Firewall Proxy has the same access control functionality as Oracle Connection Manager.
Server Models Net8 connections between clients and servers are established using two different models:
■ Multi-Threaded Server Model—The listener passes the connection to the dispatcher or redirects the clients to connect through a dispatcher.
In a multi-threaded server (MTS) configuration, client user processes connect to a dispatcher. A dispatcher can support multiple client connections concurrently. Each client connection is bound to a virtual circuit. A virtual circuit is a piece of shared memory used by the dispatcher for client database connection requests and replies. This approach enables a small pool of server processes to serve a large number of clients. A significant advantage of the MTS model over the dedicated server model is the reduction of the use of system resources, enabling the support of an increased number of users.
■ Dedicated Server Model—The listener starts a dedicated server and passes the connection to the dedicated server or redirects the clients to the dedicated.
See Also: For information about the Oracle Connection Manager, see the Net8 Administrator’s Guide.
5-4 Oracle8i Administrator’s Reference Release 3 (8.1.7) for IBM DYNIX/ptx

Net8 Protocol Support
In the dedicated server model, there is one server process for each client. In order for clients to connect to dedicated servers, the listener and the instance must be running on the same machine. Dedicated server processes require more memory than MTS.
Oracle Names Oracle Names uses Oracle proprietary software to store the names and addresses of all database services on a network. Clients wishing to connect to a server direct their connect requests to an Oracle Names server. Oracle Names servers resolve the name to a network address and return that information to the client.
Much like a caller who uses directory assistance to locate a telephone number, clients configured to use Oracle Names refer their connection requests to an Oracle Names server. The Oracle Names server attempts to resolve the service name provided by the client to a network address. If the Oracle Names server finds the network address, it then returns that information to the client. The client can then use that address to connect to the service.
Net8 Protocol Support The supported protocols for Net8 version Release 3 (8.1.7) on IBM DYNIX/ptx are BEQ protocol, IPC protocol, RAW protocol and TCP/IP protocol.
Before installing the TCP/IP protocol, the appropriate operating system software must be installed and configured. The BEQ and IPC Net8 protocols do not have any specific operating system requirements.
ADDRESS SpecificationThe IPC and TCP/IP Net8 protocols each have a protocol-specific ADDRESS specification that is used for Net8 configuration files and for the MTS_LISTENER_ADDRESS database initialization parameter in the initsid.ora file. See the
See Also: For more information about the Multi-Threaded Server, see the Net8 Administrator’s Guide.
See Also: For information about Oracle Names, see the Net8 Administrator’s Guide.
See Also: Refer to Oracle8i Installation Guide Release 3 (8.1.7) for IBM DYNIX/ptx for requirements details.
Configuring Net8 5-5

The BEQ Protocol
ADDRESS specification heading under each protocol section in this chapter for details.
Table 5–2 shows a summary of ADDRESS specifications for each protocol.
The BEQ Protocol The BEQ protocol is both a communications mechanism and a process-spawning mechanism. It requires that the client and server be on the same machine. If a net service name is not specified, either directly by the user on the command line or the Login screen or indirectly through an environment variable such as TWO_TASK, then the BEQ protocol is used. In which case, a dedicated server will always be used, and the multi-threaded server is never used. This dedicated server is started automatically by the BEQ protocol, which waits for the server process to start and attach to an existing SGA. If the startup of the server process is successful, the BEQ protocol then provides inter-process communication via UNIX pipes.
An important feature of the BEQ protocol is that no listener is required for its operation, since the protocol is linked into the client tools and directly starts its own server process with no outside interaction. However, the BEQ protocol can only be
Table 5–2 ADDRESS Specification Summary
Supported Protocol ADDRESS Specification
BEQ (ADDRESS =(PROTOCOL = BEQ)(PROGRAM = ORACLE_HOME/bin/oracle)(ARGV0 = oracleORACLE_SID)(ARGS = ’(DESCRIPTION=(LOCAL=YES)(ADDRESS=(PROTOCOL=BEQ)))’)(ENVS = ’ORACLE_HOME=ORACLE_HOME,ORACLE_SID=ORACLE_SID’)
)
IPC (ADDRESS =(PROTOCOL=IPC)(KEY=key)
)
RAW N/A
TCP/IP (ADDRESS =(PROTOCOL=TCP) (HOST=hostname) (PORT=port_id)
)
5-6 Oracle8i Administrator’s Reference Release 3 (8.1.7) for IBM DYNIX/ptx

The BEQ Protocol
used when the client program and Oracle8i reside on the same machine. The BEQ protocol is always installed and always linked to all client tools and to the Oracle8i server.
The BEQ protocol connection parameters are part of the ADDRESS keyword-value pair. The ADDRESS is commonly part of a larger construct such as a connect descriptor or configuration file. You can enter the parameters in any order.
(ADDRESS =(PROTOCOL = BEQ)(PROGRAM = ORACLE_HOME/bin/oracle)(ARGV0 = oracleORACLE_SID)(ARGS = ’(DESCRIPTION=(LOCAL=YES)(ADDRESS=(PROTOCOL=BEQ)))’)(ENVS = ’ORACLE_HOME=ORACLE_HOME,ORACLE_SID=ORACLE_SID’)
)
Syntax for BEQ protocol connection parameters is described in Table 5–3.
Example of a BEQ ADDRESS:
(ADDRESS =(PROTOCOL = BEQ)(PROGRAM = /u01/app/oracle/product/8.1.7/bin/oracle)(ARGV0 = oracleV817)(ARGS = ’(DESCRIPTION=(LOCAL=YES)(ADDRESS=(PROTOCOL=BEQ)))’)(ENVS = 'ORACLE_HOME=/u01/app/oracle/product/8.1.7,ORACLE_SID=V817’)
)
Table 5–3 Syntax for BEQ Protocol Connection Parameters
PROTOCOL Specifies the protocol to be usedThe value is beq and may be specified in either uppercase or lowercase.
PROGRAM The full path to the oracle executable
ARGV0 The name of the process as it appears in a ps listing. The recommended value is oracleORACLE_SID.
ARGS ’(DESCRIPTION=(LOCAL=YES)(ADDRESS=(PROTOCOL=BEQ)))’
ENVS Environment specification where ORACLE_HOME is the full path to the ORACLE_HOME directory of the database to connect, and ORACLE_SID is the system identifier of the database to connect.
Configuring Net8 5-7

The IPC Protocol
The IPC Protocol The IPC protocol is similar to the BEQ protocol in that it can only be used when the client program and the Oracle8i server reside on the same machine. The IPC protocol differs from the BEQ protocol in that it can be used with dedicated server and multi-threaded server configurations. The IPC protocol requires a listener for its operation. The IPC protocol is always installed and always linked to all client tools and to Oracle8i.
For the IPC protocol, the location of the UNIX Domain Socket file on UNIX systems changed after Oracle7 r7.1. Thus, if you have Oracle7 r7.1 installed on the same machine as Oracle8i and you attempt to make an IPC connection between the two instances, the connection may fail. The solution to this problem is to make a symbolic link between the directory where the IPC file used to be (/var/tmp/o) and where it now resides (/var/tmp/.oracle).
The IPC protocol connection parameters are part of the ADDRESS keyword-value pair. The ADDRESS is commonly part of a larger construct such as a connect descriptor or configuration file. You can enter the parameters in any order.
(ADDRESS=(PROTOCOL=IPC)(KEY=key)
)
Syntax for IPC protocol connection parameters is described in Table 5–4.
Example of an IPC ADDRESS:
(ADDRESS=(PROTOCOL=IPC)(KEY=PROD)
)
Table 5–4 Syntax for IPC Protocol Connection Parameters
PROTOCOL Specifies that the IPC protocol is to be usedThe value is ipc and may be specified in either uppercase or lowercase.
KEY Service name of database or database identifier (ORACLE_SID).
5-8 Oracle8i Administrator’s Reference Release 3 (8.1.7) for IBM DYNIX/ptx

The TCP/IP Protocol
The RAW Protocol When data is transferred between a client and a server, Net8 adds its own header information to every network packet. Through the Raw Transport feature, Net8 can now minimize header information on each packet going over the network.
After a connection is established, two types of information flow over the network: data and break handling. The connection packets need the Net8 header information to establish the connection correctly. However, after the connection is established, all data packets are stripped of their Net8 header information and passed directly to the operating system, bypassing Net8’s network and protocol layers. The performance of the connection is increased because of fewer protocol stack layers for the data to flow through and fewer bytes that are transmitted over the network.
This feature is transparently turned on when it is appropriate. That is, if no existing features require that header information be transmitted, the headers are stripped off. In the case of encryption and authentication which require certain information to be sent along with each packet of information, Raw Transport would not be enabled.
This feature requires no configuration. Net8 determines if the conditions are met and then transparently switches to Raw Transport mode.
The TCP/IP Protocol Oracle Corporation recommends that you reserve a port for your listener in the /etc/services file of each node on the network that defines the listener port. The port is commonly 1521. The entry list and the listener name and the port number; for example:
listener 1521/tcp
where listener is the name of the listener, as defined in listener.ora. Reserve more than one port to start more than one listener.
Specifying a TCP/IP ADDRESS The TCP/IP protocol connection parameters are part of the ADDRESS keyword-value pair. The ADDRESS is commonly part of a larger construct such as a connect descriptor or configuration file. You can enter the three parameters in any order.
(ADDRESS=(PROTOCOL=TCP)
Configuring Net8 5-9

Oracle Enterprise Manager
(HOST=hostname)(PORT=port_id)
)
Syntax for TCP/IP protocol connection parameters is described in Table 5–5.
Example of the TCP/IP address specifying a client on the MADRID host:
(ADDRESS=(PROTOCOL=TCP)(HOST=MADRID)(PORT=1521)
)
The last field could be specified by name, for example, (PORT=listener).
Oracle Enterprise Manager
Agent Service Discovery and Auto-Configuration The Oracle Intelligent Agent requires no configuration, unless you want to integrate it with a Simple Network Management Protocol (SNMP) system (see "Configuring Oracle Intelligent Agent for Oracle SNMP".)
Debugging Tcl Scripts The executable oratclsh is provided for debugging your Tcl scripts. Before executing oratclsh, set the environment variable TCL_LIBRARY to point to $ORACLE_HOME/network/agent/tcl.
Table 5–5 Syntax for TCP/IP Protocol Connection Parameters
PROTOCOL Specifies the protocol to be usedThe value can be uppercase or lowercase. The default is tcp.
HOST The host name or the host IP address
PORT The TCP/IP port. Either a number or the name specified in the /etc/services file. Oracle Corporation recommends a value of 1521.
See Also: For information on Oracle Names and the Net8 Assistant, see the Net8 Administrator’s Guide.
5-10 Oracle8i Administrator’s Reference Release 3 (8.1.7) for IBM DYNIX/ptx
Configuring Oracle Intelligent Agent for Oracle SNMP
Configuring Oracle Intelligent Agent for Oracle SNMPAlthough Oracle Intelligent Agent does not require Simple Network Management Protocol (SNMP) to work, Oracle SNMP support can be configured before starting the Intelligent Agent. Note that all the configuration files for the following steps are located in the $ORACLE_HOME/network/snmp/peer directory.
Configure Master Agent In the CONFIG.master file, make the following change:
1. Search for the line beginning with MANAGER.
2. Change the ipaddr or localhost field, coded as 130.35.10.210 or "localhost" to the IP address or hostname of the machine where you want SNMP trap messages sent.
You can also make other changes to the CONFIG.master file as documented within the file.
Configure the Encapsulator1. Add the following line to the snmpd.conf file:
trap hostname_or_IP_address
where hostname_or_IP_address represents the local machine’s IP address.
2. In the CONFIG.encap file, you can optionally modify the port number, which is set to 1161 in the default file. If you modify the port number, you must also modify the port number for NEW_SNMPD_PORT in the start_peer script.
NEW_SNMPD_PORT is the port on which the snmpd agent (the native IBM DYNIX/ptx SNMP agent) listens. Make sure this is the same port as specified in the CONFIG.encap file. NEW_TRAPD_PORT is the PEER encapsulator port to which the snmpd agent sends traps.
NEW_SNMPD_PORT and NEW_TRAPD_PORT in the start_peer script must have different port numbers. You may also modify the NEW_TRAPD_PORT port number.
See Also: The Oracle Enterprise Manager Application Developer’s Guide for additional details.
Configuring Net8 5-11

Configuring Oracle Intelligent Agent for Oracle SNMP
Verify start_peer Script The start_peer script contains a line like the following:
SNMPD = snmpd_executable_path
If the snmpd executable on your system is not in the location indicated by the start_peer script, edit snmpd_executable_path to the correct location of the snmpd executable.
Start the SNMP ComponentsPerform the following steps to start the SNMP components:
1. Verify that the SNMP components, master_peer, encap_peer, and snmpd, are not running:
$ ps -aef | grep peer$ ps -aef | grep snmp
If any of the components are running, log in as the root user and use the kill command to terminate the processes before proceeding.
2. As the root user, run the start_peer script to start the PEER master agent, PEER encapsulator, and native IBM DYNIX/ptx SNMP agent:
# cd $ORACLE_HOME/network/snmp/peer # ./start_peer -a
3. Verify that the SNMP components are running:
# ps -aef | grep peer
# ps -aef | grep snmp
Configure and Start the Database SubagentConfiguration and startup of the database subagent (the Oracle Intelligent Agent) is described in the Oracle Enterprise Manager Configuration Guide.
Note: If you do not have the native IBM DYNIX/ptx SNMP agent on your system, you must not use the PEER encapsulator. To start the master agent only, run start_peer -m.
5-12 Oracle8i Administrator’s Reference Release 3 (8.1.7) for IBM DYNIX/ptx

Supplementary Documentation
Oracle Advanced Security
.bak Files During Oracle Advanced Security installation, three.bak files are created: naeet.o.bak, naect.o.bak, and naedhs.o.bak. They are located in $ORACLE_HOME/lib. These files are required for relinking during Oracle Advanced Security de-install and should not be deleted.
Security and Single Sign-On For more information about details on configuring Security and Single Sign-On, see the Oracle Advanced Security Administrator’s Guide.
Supplementary DocumentationTable 5–6 shows the location of README files for various bundled products. The README files describe changes since the last release.
Table 5–6 Location of README Files for Oracle Products
Product README File
Net8 $ORACLE_HOME/network/doc/README.Net8
Advanced Security Option $ORACLE_HOME/network/doc/README.ASO
Oracle Intelligent Agent $ORACLE_HOME/network/doc/README.oemagent
Configuring Net8 5-13

Supplementary Documentation
5-14 Oracle8i Administrator’s Reference Release 3 (8.1.7) for IBM DYNIX/ptx

Running Oracle Data Option D
6
Running Oracle Data Option Demos■ Oracle8i interMedia
■ Oracle8i Time Series Demos
■ Oracle8i Visual Information Retrieval
■ Oracle8i Spatial
emos 6-1

Oracle8i interMedia
Oracle8i interMediaOracle8i interMedia includes the following components:
■ Text
■ Audio, Video, and Image
■ Locator
■ Web Agent and Clipboard
TextThere are no demos for Text in Oracle8i. However, interMedia Text now includes code samples. Point your browser at the following URL:
$ORACLE_HOME/ctx/sample/api/index.html
Audio, Video, and ImageOracle8i interMedia includes a number of scripts and sample programs in the following directories:
$ORACLE_HOME/ord/aud/demo/$ORACLE_HOME/ord/img/demo/$ORACLE_HOME/ord/vid/demo/
Sample Audio ScriptsThe audio scripts consist of the following files:
■ auddemo.sql - audio demonstration that shows features of the audio object including:
– checking interMedia objects
– creating a sample table with audio in it
– inserting NULL rows into the audio table
– checking the rows out
– checking all the audio attributes directly
– checking all the audio attributes by calling methods
See Also: Oracle8i interMedia Text Reference, and Oracle8i ConText interMedia Text Migration.
6-2 Oracle8i Administrator’s Reference Release 3 (8.1.7) for IBM DYNIX/ptx

Oracle8i interMedia
– installing your own format plug-in using the two files, fplugins.sql and fpluginb.sql.
■ fplugins.sql - demo format plug-in specification that you can use as a guideline to write any format plug-in you want to support.
■ fpluginb.sql - demo format plug-in body that you can use as a guideline to write any format plug-in you want to support.
See the README.txt file in the $ORACLE_HOME/ord/aud/demo directory for requirements and instructions on running this SQL demo.
Sample Program for Modifying Images or Testing the Image InstallationOnce you have installed Oracle8i interMedia Image, you can run the Oracle8i interMedia Image demonstration program. This program can also be used as a test to confirm successful installation.
This section contains the steps required to build and run the interMedia image demo.
The interMedia Image demo files are located in $ORACLE_HOME/ord/img/demo, where $ORACLE_HOME is the ORACLE_HOME directory.
Demonstration (Demo) Installation Steps1. The Oracle8i interMedia Image demo uses the SCOTT/TIGER database user. If
this user does not exist, you must create it:
% svrmgr SVRMGR> connect internal; SVRMGR> create user SCOTT identified by tiger; SVRMGR> grant connect,resource to SCOTT;
2. Create the image demo directory where $ORACLE_HOME is the $ORACLE_HOME directory.
% svrmgr SVRMGR> connect internal; SVRMGR> create or replace directory imgdemodir as ‘$ORACLE_HOME/ord/img/ demo’;
3. Grant privileges on the directory to PUBLIC:
SVRMGR> grant read on directory imgdemodir to public with grant option;
4. If needed, make the imgdemo program.
Running Oracle Data Option Demos 6-3

Oracle8i interMedia
% cd $ORACLE_HOME/ord/img/demo % make -f demo_ordimg.mk imgdemo
Running the DemoThe imgdemo file is a sample program that shows how Oracle8i interMedia Image can be used from within a program. The demo is written in C and uses OCI (Oracle Call Interface) to access the database and exercise Oracle8i interMedia Image.
The program operates on imgdemo.dat, which is a bitmap (BMP) image in the demo directory. Optionally, you can supply an image file name on the command line, provided the file resides in the same directory as the demo. In either case, once the image has been manipulated by Oracle8i interMedia Image, the resulting image is written to the file imgdemo.out and can then be viewed with common rendering tools that you supply.
When the demo is run, it deletes and re-creates a table named IMGDEMOTAB in the SCOTT/TIGER schema of the default database. This table is used to hold the demo data. Once the table is created, a reference to the image file is inserted into the table. The data is then loaded into the table and converted to JFIF using the processCopy( ) method of ORDImage.
The image properties are extracted within the database using the setProperties( ) method. An UPDATE command is issued after the setProperties( ) invocation. This is required because the setProperties( ) invocation has only updated a local copy of the type attributes.
Next, the Oracle8i interMedia Image process( ) method is used to cut and scale the image within the database. This is followed by an update that commits the change. The program cuts a portion of the image 100 pixels wide by 100 pixels high starting from pixel location (100,100). This sub-image is scaled to twice its original size and the resulting image is written to a file named imgdemo.out in the current directory.
Example of Execute the Demo from the Command LineExecute the demo by typing imgdemo on the command line. Optionally, you can use a different image in the demo by first copying the file to the directory in which the demo resides and then specifying its file name on the command line as an argument to imgdemo.
Use the following command:
$ imgdemo optional-image-filename
6-4 Oracle8i Administrator’s Reference Release 3 (8.1.7) for IBM DYNIX/ptx
Oracle8i interMedia
The demo displays a number of messages describing its progress, along with any errors encountered if something was not set up correctly. Expect to see the following messages:
Dropping table IMGDEMOTAB... Creating and populating table IMGDEMOTAB... Loading data into cartridge... Modifying image characteristics... Writing image to file imgdemo.out... Disconnecting from database... Logged off and detached from server. Demo completed successfully.
If the program encounters any errors, it is likely that either Oracle8i interMedia software has not been installed correctly or the database has not been started. If the program completes successfully, the original image and the resultant image, which has undergone the cutting and scaling described earlier, can be viewed with common image rendering tools.
Sample Video ScriptsThe Video scripts consist of the following files:
■ viddemo.sql - video demo that shows features of the video object including:
– checking interMedia objects
– creating a sample table with video in it
– inserting NULL rows into the video table
– checking the rows out
– checking all the video attributes directly
– checking all the video attributes by calling methods
– installing your own format plug-in using the two files, fplugins.sql and fpluginb.sql
■ fplugins.sql - demo format plug-in specification that you can use as a guideline to write any format plug-in you want to support
■ fpluginb.sql - demo format plug-in body that you can use as a guideline to write any format plug-in you want to support
Running Oracle Data Option Demos 6-5
Oracle8i interMedia
Java DemoA Java demo has been provided to help you learn to use both the audio and video client-side Java classes so you can build your own applications. In these two demos, the audio and video object is instantiated at the client side and a number of accessor methods are invoked. The audio Java demo files are located in the ORACLE_HOME/ord/aud/demo directory and the video Java demo files are located in the $ORACLE_HOME/ord/vid/demo directory. See the README.txt file in each directory for requirements and instructions on how to run each respective Java demo.
MediaAnnotatorThe MediaAnnotator program is not contained on the Oracle8i interMedia CD. It (along with other free Oracle software) can be found at the following URL:
http://technet.oracle.com/software/products/intermedia/software_index.htm
LocatorOracle8i interMedia Locator includes a number of scripts that you can modify and run.
Sample ScriptsSample Oracle8i interMedia Locator scripts are available in the following directory after you install this product:
$ORACLE_HOME/md/demo/geocoder
These scripts consist of the following files:
■ geohttp.sql
See Also: See the README.txt file in the $ORACLE_HOME/ord/vid/demo directory for requirements and instructions on how to run this SQL demo.
See Also: Oracle8i interMedia Audio, Image, and Video User’s Guide and Reference and Oracle8i interMedia Audio, Image, and Video Java Client User’s Guide and Reference.
See Also: Oracle8i interMedia Locator User’s Guide and Reference.
6-6 Oracle8i Administrator’s Reference Release 3 (8.1.7) for IBM DYNIX/ptx
Oracle8i interMedia
This file contains two parts. One part is for running a geocode function in interactive mode and the other is for running the geocode function in batch mode.
– Interactive mode.
See Example 1 in "GEOCODE1 Function (with lastline field)" in the Oracle8i interMedia Locator User’s Guide and Reference for a listing of this part of the file.
– Batch mode.
You must update the setup tables in the nh_cs.sql file before you run the geohttp.sql in batch mode. See the Oracle8i interMedia Locator User’s Guide and Reference for Example 2 in "GEOCODE1 Function (with lastline field)" or Example 3 in "GEOCODE1 Function (with lastline field)" for a listing of this part of the file.
■ geoindex.sql
This file contains:
– A function named ESTIMATE_LEVEL to better estimate the index level for use with the spatial locator index for within-distance queries that use a radius distance greater than 100 miles. For a listing of this file, see the example in "ESTIMATE_LEVEL" in the Oracle8i interMedia Locator User’s Guide and Reference.
– A procedure statement named SETUP_LOCATOR_INDEX that builds a setup spatial locator index on the location column that contains the spatial information within the cust_table table where the spatial information is stored. For a listing of this file, see the example in "SETUP_LOCATOR_INDEX", Chapter 2 in Oracle8i interMedia Locator User’s Guide and Reference.
■ geolocate.sql
This file contains a routine that dynamically creates a geometry of interest and then queries against the NH_COMPUTER_STORES table to find out how many stores are within a 10-mile radius of the office. For a listing of this file, see Example 2 in "LOCATOR_WITHIN_DISTANCE" the Oracle8i interMedia Locator User’s Guide and Reference.
Running Oracle Data Option Demos 6-7
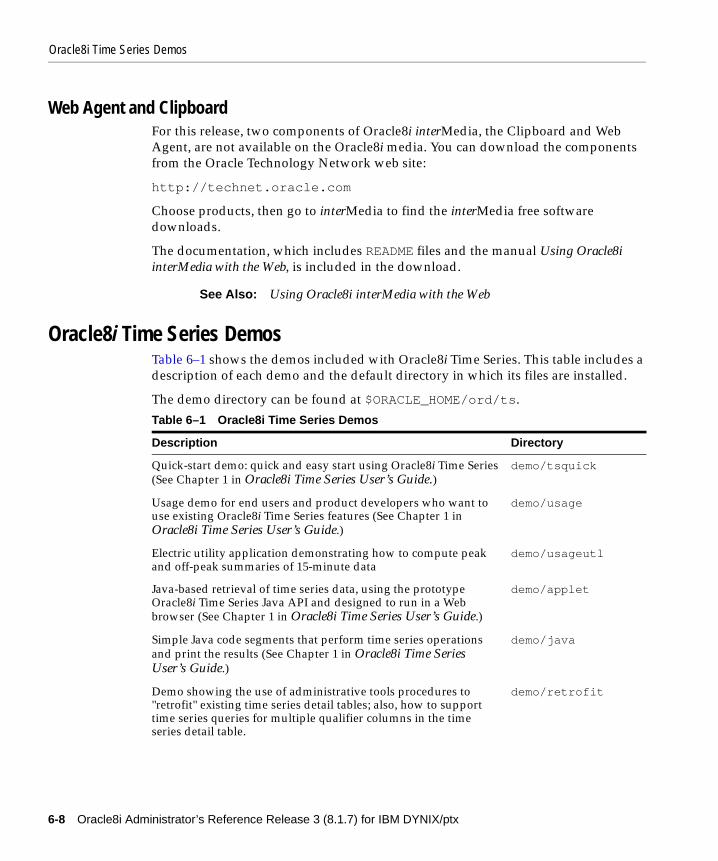
Oracle8i Time Series Demos
Web Agent and ClipboardFor this release, two components of Oracle8i interMedia, the Clipboard and Web Agent, are not available on the Oracle8i media. You can download the components from the Oracle Technology Network web site:
http://technet.oracle.com
Choose products, then go to interMedia to find the interMedia free software downloads.
The documentation, which includes README files and the manual Using Oracle8i interMedia with the Web, is included in the download.
Oracle8i Time Series DemosTable 6–1 shows the demos included with Oracle8i Time Series. This table includes a description of each demo and the default directory in which its files are installed.
The demo directory can be found at $ORACLE_HOME/ord/ts.
See Also: Using Oracle8i interMedia with the Web
Table 6–1 Oracle8i Time Series Demos
Description Directory
Quick-start demo: quick and easy start using Oracle8i Time Series (See Chapter 1 in Oracle8i Time Series User’s Guide.)
demo/tsquick
Usage demo for end users and product developers who want to use existing Oracle8i Time Series features (See Chapter 1 in Oracle8i Time Series User’s Guide.)
demo/usage
Electric utility application demonstrating how to compute peak and off-peak summaries of 15-minute data
demo/usageutl
Java-based retrieval of time series data, using the prototype Oracle8i Time Series Java API and designed to run in a Web browser (See Chapter 1 in Oracle8i Time Series User’s Guide.)
demo/applet
Simple Java code segments that perform time series operations and print the results (See Chapter 1 in Oracle8i Time Series User’s Guide.)
demo/java
Demo showing the use of administrative tools procedures to "retrofit" existing time series detail tables; also, how to support time series queries for multiple qualifier columns in the time series detail table.
demo/retrofit
6-8 Oracle8i Administrator’s Reference Release 3 (8.1.7) for IBM DYNIX/ptx
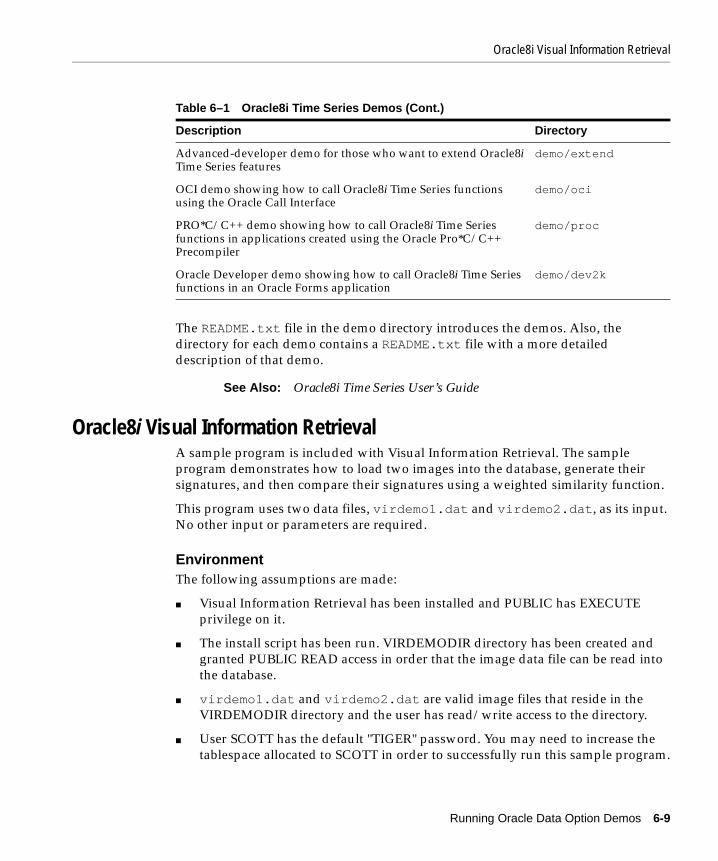
Oracle8i Visual Information Retrieval
The README.txt file in the demo directory introduces the demos. Also, the directory for each demo contains a README.txt file with a more detailed description of that demo.
Oracle8i Visual Information RetrievalA sample program is included with Visual Information Retrieval. The sample program demonstrates how to load two images into the database, generate their signatures, and then compare their signatures using a weighted similarity function.
This program uses two data files, virdemo1.dat and virdemo2.dat, as its input. No other input or parameters are required.
EnvironmentThe following assumptions are made:
■ Visual Information Retrieval has been installed and PUBLIC has EXECUTE privilege on it.
■ The install script has been run. VIRDEMODIR directory has been created and granted PUBLIC READ access in order that the image data file can be read into the database.
■ virdemo1.dat and virdemo2.dat are valid image files that reside in the VIRDEMODIR directory and the user has read/write access to the directory.
■ User SCOTT has the default "TIGER" password. You may need to increase the tablespace allocated to SCOTT in order to successfully run this sample program.
Advanced-developer demo for those who want to extend Oracle8i Time Series features
demo/extend
OCI demo showing how to call Oracle8i Time Series functions using the Oracle Call Interface
demo/oci
PRO*C/C++ demo showing how to call Oracle8i Time Series functions in applications created using the Oracle Pro*C/C++ Precompiler
demo/proc
Oracle Developer demo showing how to call Oracle8i Time Series functions in an Oracle Forms application
demo/dev2k
See Also: Oracle8i Time Series User’s Guide
Table 6–1 Oracle8i Time Series Demos (Cont.)
Description Directory
Running Oracle Data Option Demos 6-9

Oracle8i Spatial
Running the Sample Program There are two ways to run the sample program: using the included sample images, or using your own images.
Example runs the sample program using the included image files. The images are compared using equal attribute weights:
■ Globalcolor = 1.0
■ Localcolor = 1.0
■ Texture = 1.0
■ Structure = 1.0
Example of Run the Sample Program with Included Images% virdemoImage 1 and 2 have a similarity score of 0.0
Example shows how to specify your own images on the command line. The images must reside in the $ORACLE_HOME/ord/vir/demo directory.
Example of Run the Sample Program with Your Own Images% virdemo image1 image2 global_color local_color texture structure
You must specify all six parameters, the 2 file names and 4 attribute weights (ranging from 0.0 to 1.0) in this sample program. Note that when using the VIRScore( ) operator in your own applications, it is only necessary to provide at least one attribute weight.
The VIRDEMODIR directory provides several other sample image files to demonstrate the effects of emphasizing the different visual attributes. You can use an image viewer (such as xv) to display the images, and then compare them using the sample program, experimenting with different weights.
Oracle8i SpatialThe reader should refer to $ORACLE_HOME/md/demo/readme.txt to find more information.
See Also: Oracle8i Visual Information Retrieval User’s Guide and Reference and Oracle8i Visual Information Retrieval Java Client User’s Guide and Reference
6-10 Oracle8i Administrator’s Reference Release 3 (8.1.7) for IBM DYNIX/ptx

Oracle8i Spatial
See Also: Oracle8i Spatial User’s Guide and Reference
Running Oracle Data Option Demos 6-11

Oracle8i Spatial
6-12 Oracle8i Administrator’s Reference Release 3 (8.1.7) for IBM DYNIX/ptx

Optimal Flexible Architec
A
Optimal Flexible Architecture■ Optimal Flexible Architecture (OFA)
■ OFA Implemented on UNIX
ture A-1

Optimal Flexible Architecture (OFA)
Optimal Flexible Architecture (OFA)Oracle Corporation recommends that the Optimal Flexible Architecture (OFA) standard be implemented when installing and configuring Oracle8i. The OFA standard is a set of configuration guidelines for fast, reliable Oracle databases that require little maintenance.
OFA is designed to:
■ organize large amounts of complicated software and data on disk to avoid device bottlenecks and poor performance
■ facilitate routine administrative tasks such as software and data backup functions, which are often vulnerable to data corruption
■ alleviate switching among multiple Oracle databases
■ adequately manage and administer database growth
■ help eliminate fragmentation of free space in the data dictionary, isolate other fragmentation, and minimize resource contention
Characteristics of OFA-Compliant DatabaseAn OFA-compliant database provides the following benefits.
File System OrganizationThe file system is organized to allow easy administration and accommodate scalability for issues such as:
■ adding data into existing databases
■ adding users
■ creating databases
■ adding hardware
Distributed I/O LoadsI/O loads are distributed across enough disk drives to prevent performance bottlenecks.
Hardware SupportIn most cases, investment in new hardware is not required to take advantage of the Optimal Flexible Architecture (OFA) standard.
A-2 Oracle8i Administrator’s Reference Release 3 (8.1.7) for IBM DYNIX/ptx
Optimal Flexible Architecture (OFA)
Safeguards Against Drive FailuresBy spreading applications across more than one drive, drive failures impact as few applications as possible.
Distribution of Home DirectoriesThe following items can be distributed across more than one disk drive:
■ the collection of home directories
■ the contents of an individual home directory
Integrity of Login Home DirectoriesIt is possible to add, move, or delete login home directories without having to revise programs that refer to them.
Independence of UNIX Directory SubtreesCategories of files are separated into independent UNIX directory subtrees so that files in one category are minimally affected by operations on files in other categories.
Supports Concurrent Execution of Application SoftwareYou can execute multiple versions of applications software simultaneously, allowing the user to test and use a new release of an application before abandoning the previous version. Transferring to a new version after an upgrade is simple for the administrator and transparent for the user.
Distinguishes Administrative Information for each DatabaseThe ability to separate administrative information about one database from that of another ensures a reasonable structure for the organization and storage of administrative data.
Uses Consistent Database File NamingDatabase files are named so that:
■ database files are easily distinguishable from all other files
■ files of one database are easily distinguishable from files of another database
■ control files, redo log files, and data files are identifiable as such
Optimal Flexible Architecture A-3

OFA Implemented on UNIX
■ the association of data file to tablespace is clearly indicated
Separation of Tablespace ContentsTablespace contents are separated to:
■ minimize tablespace free space fragmentation
■ minimize I/O request contention
■ maximize administrative flexibility
I/O Loads Tuning across all DrivesI/O loads are tuned across all drives, including drives storing Oracle data in raw devices.
OFA Implemented on UNIXA careful naming strategy for database files eliminates data administration problems. The OFA rules provided here correspond to the original OFA recommendations published in The OFA Standard: Oracle8 for Open Systems.
Mount Points
Create Mount PointsAn installation of Oracle8i requires at least two mount points: one for the software and at least one for the database files. If implementing the recommended Optimal Flexible Architecture (OFA), at least four mount points are required: one for the software and at least three for database files.
Mount Point SyntaxName all mount points using the syntax /pm, where p is a string constant and m is a unique fixed-length key (typically a two-digit number) used to distinguish each mount point. For example: /u01 and /u02, or /disk01 and /disk02.
Naming Mount Points for Very Large Databases (VLDBs) If each disk drive contains database files from one application and there are enough drives for each database to ensure no I/O bottleneck, then use the syntax /q/dm for naming mount points, as explained in Table A–1.
A-4 Oracle8i Administrator’s Reference Release 3 (8.1.7) for IBM DYNIX/ptx
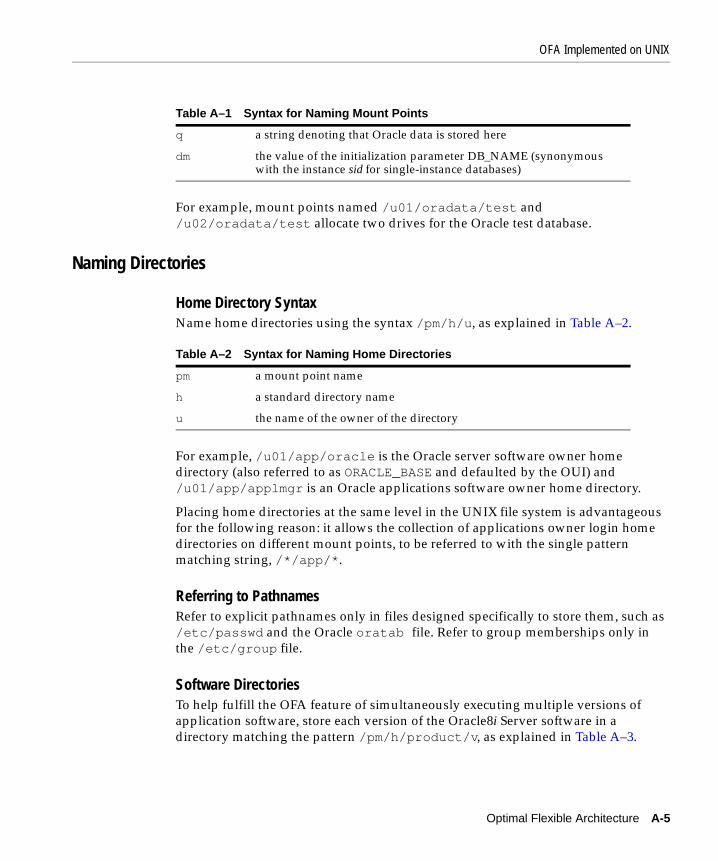
OFA Implemented on UNIX
For example, mount points named /u01/oradata/test and /u02/oradata/test allocate two drives for the Oracle test database.
Naming Directories
Home Directory SyntaxName home directories using the syntax /pm/h/u, as explained in Table A–2.
For example, /u01/app/oracle is the Oracle server software owner home directory (also referred to as ORACLE_BASE and defaulted by the OUI) and /u01/app/applmgr is an Oracle applications software owner home directory.
Placing home directories at the same level in the UNIX file system is advantageous for the following reason: it allows the collection of applications owner login home directories on different mount points, to be referred to with the single pattern matching string, /*/app/*.
Referring to PathnamesRefer to explicit pathnames only in files designed specifically to store them, such as /etc/passwd and the Oracle oratab file. Refer to group memberships only in the /etc/group file.
Software DirectoriesTo help fulfill the OFA feature of simultaneously executing multiple versions of application software, store each version of the Oracle8i Server software in a directory matching the pattern /pm/h/product/v, as explained in Table A–3.
Table A–1 Syntax for Naming Mount Points
q a string denoting that Oracle data is stored here
dm the value of the initialization parameter DB_NAME (synonymous with the instance sid for single-instance databases)
Table A–2 Syntax for Naming Home Directories
pm a mount point name
h a standard directory name
u the name of the owner of the directory
Optimal Flexible Architecture A-5

OFA Implemented on UNIX
For example: /u01/app/oracle/product/Release 3 (8.1.7) indicates the start of the directory structure where the Oracle8i Server files are located. Set the ORACLE_HOME environment variable to this directory.
Naming Files
Administration FilesTo facilitate the organization of administrative data, it is recommended that you store database-specific administration files in subdirectories according to h/admin/d/a/, where h is the Oracle software owner’s home directory, d is the database name (DB_NAME), and a is a subdirectory for each of the following database administration files described in Table A–4:
As an example, the subdirectory adhoc would have the following pathname, /u01/app/oracle/admin/sab/adhoc/ if it were part of the database named sab.
Table A–3 Syntax for Naming Oracle8i Server Software Directories
h a standard directory name
v the version of the software
Table A–4 Subdirectories for Database Administration Files
adhoc ad hoc SQL scripts for a given database
arch archived redo log files
adump audit files(Set AUDIT_FILE_DEST in configdb_name.ora to point here. Clean out this subdirectory periodically).
bdump background process trace files
cdump core dump files
create programs used to create the database
exp database export files
logbook files recording the status and history of the database
pfile instance parameter files
udump user SQL trace files
A-6 Oracle8i Administrator’s Reference Release 3 (8.1.7) for IBM DYNIX/ptx
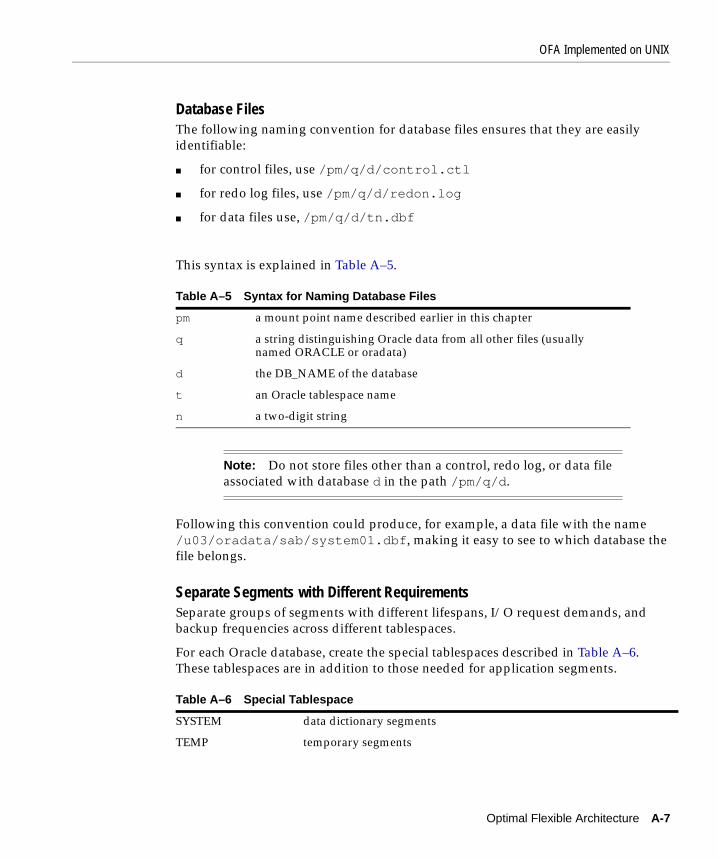
OFA Implemented on UNIX
Database FilesThe following naming convention for database files ensures that they are easily identifiable:
■ for control files, use /pm/q/d/control.ctl
■ for redo log files, use /pm/q/d/redon.log
■ for data files use, /pm/q/d/tn.dbf
This syntax is explained in Table A–5.
Following this convention could produce, for example, a data file with the name /u03/oradata/sab/system01.dbf, making it easy to see to which database the file belongs.
Separate Segments with Different RequirementsSeparate groups of segments with different lifespans, I/O request demands, and backup frequencies across different tablespaces.
For each Oracle database, create the special tablespaces described in Table A–6. These tablespaces are in addition to those needed for application segments.
Table A–5 Syntax for Naming Database Files
pm a mount point name described earlier in this chapter
q a string distinguishing Oracle data from all other files (usually named ORACLE or oradata)
d the DB_NAME of the database
t an Oracle tablespace name
n a two-digit string
Note: Do not store files other than a control, redo log, or data file associated with database d in the path /pm/q/d.
Table A–6 Special Tablespace
SYSTEM data dictionary segments
TEMP temporary segments
Optimal Flexible Architecture A-7

OFA Implemented on UNIX
This method is effective because dictionary segments are never dropped, and no other segments that can be dropped are allowed in the SYSTEM tablespace. This ensures that the SYSTEM tablespace does not require a rebuild due to tablespace free space fragmentation.
Because rollback segments are not stored in tablespaces holding applications data, the administrator is not blocked from taking an application’s tablespace offline for maintenance. The segments are partitioned physically by type, and the administrator can record and predict data growth rates without complicated tools.
Naming TablespacesName tablespaces descriptively using a maximum of eight characters. Although Oracle8i tablespace names can be 30 characters long, portable UNIX file names are restricted to 14 characters. The recommended standard for a data file basename is tn.dbf, where t is a descriptive tablespace name and n is a two-digit string. Because the extension plus the two-digit string occupy a total of six characters, only eight characters remain for the tablespace name.
Descriptive names allow the name of a data file to be associated with the tablespace that uses it. For example, the names GLD and GLX might be used for the tablespaces storing General Ledger data and indices, respectively.
Exploiting OFA Structure for Oracle Files Table A–7 shows the syntax used for identifying classes of files.
RBS rollback segments
USERS miscellaneous user segments
INDX index associated with data in USERS tablespace
DRSYS Oracle interMedia segment
Note: Do not embed reminders of the word "tablespace" in your tablespace names. Tablespaces are distinguishable by context, and names do not need to convey information about type.
Table A–7 Directory Structure Syntax for Identifying Classes of Files
/u[0-9][0-9] user data directories
Table A–6 Special Tablespace
A-8 Oracle8i Administrator’s Reference Release 3 (8.1.7) for IBM DYNIX/ptx

OFA Implemented on UNIX
e
e
OFA File MappingTable A–8 shows an hierarchical file mapping of a sample OFA-compliant database, including each file’s mount point, application, database, and tablespace. The file names indicate the file type (control, log, or data).
/*/home/* user home directories
/*/app/* user application software directories
/*/app/applmgr Oracle apps software subtrees
/*/app/oracle/product Oracle Server software subtrees
/*/app/oracle/product/Release 3 (8.1.7)
Oracle Server Release 3 (8.1.7) distribution files
/*/app/oracle/admin/sab sab database administrative subtrees
/*/app/oracle/admin/sab/arch/* sab database archived log files
/*/oradata Oracle data directories
/*/oradata/sab/* sab database files
/*/oradata/sab/*.log sab database redo log files
Table A–8 Hierarchical File Mapping for OFA Installation/ root mount point
u01/ ’Oracle software’ mount point #1
app/ subtree for app software
oracle/ home for oracle software owner
admin/ subtree for database admin files
TAR/ subtree for Support logs
db_name1/ admin subtree for db_name1 databas
bdump/ background_dump_dest
cdump/ core_dump_dest
udump/ user_dump_dest
create/ database creation SQL scripts
pfile/ database init parameter file
db_name2/ admin subtree for db_name2 databas
doc/ online documentation
local/ subtree for local Oracle software
aps6/ an Oracle6 admin package
aps7/ an Oracle7 admin package
Table A–7 Directory Structure Syntax for Identifying Classes of Files
Optimal Flexible Architecture A-9

OFA Implemented on UNIX
Raw Device SizesChoose a small set of standard sizes for all raw devices that can be used to store Oracle database files. In general, standardizing on a single size is recommended. If a single size is used, raw files can be moved from one partition to another safely. The size should be small enough so that a fairly large number can be created but large enough to be convenient.
product/ distribution files
7.3.3/ ORACLE_HOME for 7.3.3 instances
8.0.6/ ORACLE_HOME for 8.0.6 instances
8.1.7/ ORACLE_HOME for 8.1.7 instances
oraInventory subtree for Oracle8i inventory
logs installation log files
home subtree for login home directories
ltb/ home for a user
sbm/ home for a user
u02/ ’user data’ mount point #2
home/ subtree for login home directories
cvm/ home for a user
vrm home for a user
oradata/ subtree for Oracle data
db_name1/ subtree for db_name1 database files
db_name2/ subtree for db_name2 database files
u03/ ’user data’ mount point #3
oradata/ subtree for Oracle data
db_name1/ subtree for db_name1 database files
db_name2/ subtree for db_name2 database files
u04/ ’user data’ mount point #4
oradata/ subtree for Oracle data
db_name1/ subtree for db_name1 database files
db_name2/ subtree for db_name2 database files
/var
opt/
oracle/ location of oratab and oraInst.loc
/usr
local/
bin/ oraenv/coraenv/dbhome scripts
Table A–8 Hierarchical File Mapping for OFA Installation
A-10 Oracle8i Administrator’s Reference Release 3 (8.1.7) for IBM DYNIX/ptx

OFA Implemented on UNIX
For example, a 2 GB drive could be divided into 10 partitions of 200 MB each—a good balance between size and number. Any tablespace using raw devices should stripe them across several drives. If possible, do the striping should be done with a logical volume manager.
File Mapping for Multiple-Instance OFA DatabaseWhen using the Oracle Parallel Server, select one node to act as the Oracle administrative home for the cluster. The administrative home contains the administrative subtree. Create subdirectories for each instance accessing the database within the bdump, cdump, logbook, pfile, and udump directories of ~/admin/d/. Mount the admin directory for the administrative home as the admin directory for every instance. An example is shown in Table A–9.
Optimal Flexible Architecture A-11
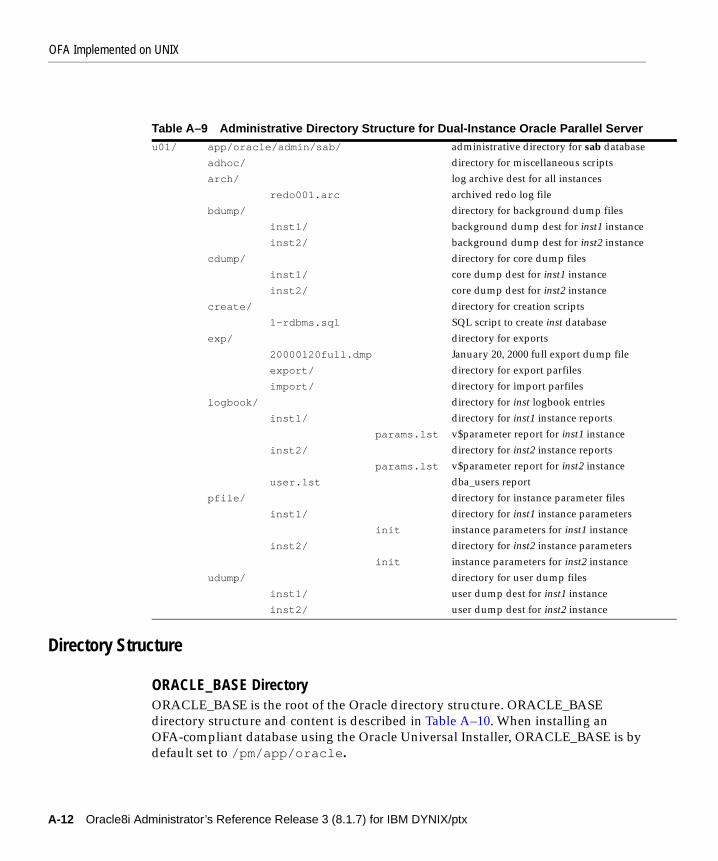
OFA Implemented on UNIX
Directory Structure
ORACLE_BASE DirectoryORACLE_BASE is the root of the Oracle directory structure. ORACLE_BASE directory structure and content is described in Table A–10. When installing an OFA-compliant database using the Oracle Universal Installer, ORACLE_BASE is by default set to /pm/app/oracle.
Table A–9 Administrative Directory Structure for Dual-Instance Oracle Parallel Serveru01/ app/oracle/admin/sab/ administrative directory for sab database
adhoc/ directory for miscellaneous scripts
arch/ log archive dest for all instances
redo001.arc archived redo log file
bdump/ directory for background dump files
inst1/ background dump dest for inst1 instance
inst2/ background dump dest for inst2 instance
cdump/ directory for core dump files
inst1/ core dump dest for inst1 instance
inst2/ core dump dest for inst2 instance
create/ directory for creation scripts
1-rdbms.sql SQL script to create inst database
exp/ directory for exports
20000120full.dmp January 20, 2000 full export dump file
export/ directory for export parfiles
import/ directory for import parfiles
logbook/ directory for inst logbook entries
inst1/ directory for inst1 instance reports
params.lst v$parameter report for inst1 instance
inst2/ directory for inst2 instance reports
params.lst v$parameter report for inst2 instance
user.lst dba_users report
pfile/ directory for instance parameter files
inst1/ directory for inst1 instance parameters
init instance parameters for inst1 instance
inst2/ directory for inst2 instance parameters
init instance parameters for inst2 instance
udump/ directory for user dump files
inst1/ user dump dest for inst1 instance
inst2/ user dump dest for inst2 instance
A-12 Oracle8i Administrator’s Reference Release 3 (8.1.7) for IBM DYNIX/ptx
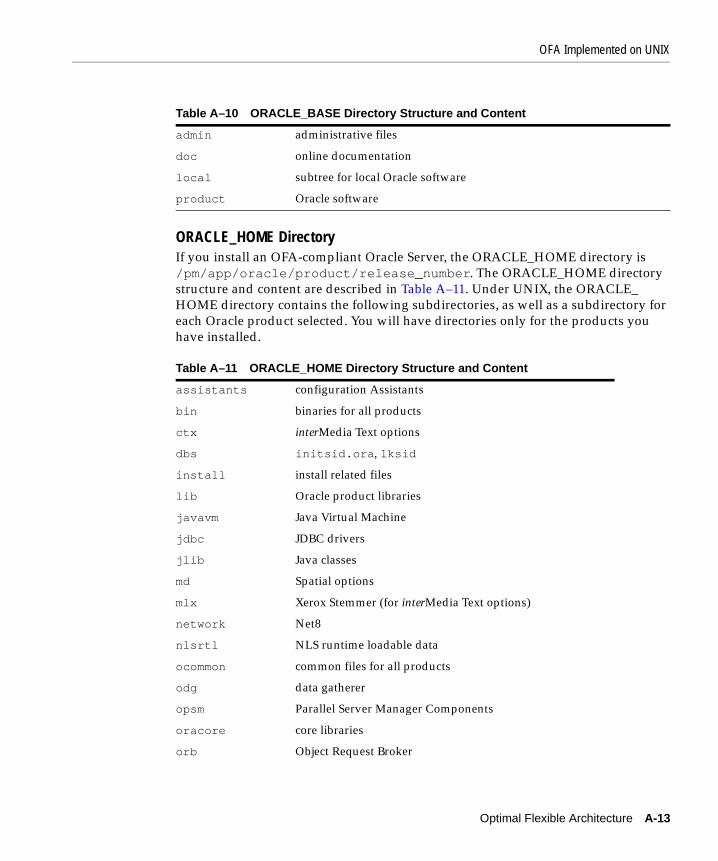
OFA Implemented on UNIX
ORACLE_HOME DirectoryIf you install an OFA-compliant Oracle Server, the ORACLE_HOME directory is /pm/app/oracle/product/release_number. The ORACLE_HOME directory structure and content are described in Table A–11. Under UNIX, the ORACLE_HOME directory contains the following subdirectories, as well as a subdirectory for each Oracle product selected. You will have directories only for the products you have installed.
Table A–10 ORACLE_BASE Directory Structure and Content
admin administrative files
doc online documentation
local subtree for local Oracle software
product Oracle software
Table A–11 ORACLE_HOME Directory Structure and Content
assistants configuration Assistants
bin binaries for all products
ctx interMedia Text options
dbs initsid.ora, lksid
install install related files
lib Oracle product libraries
javavm Java Virtual Machine
jdbc JDBC drivers
jlib Java classes
md Spatial options
mlx Xerox Stemmer (for interMedia Text options)
network Net8
nlsrtl NLS runtime loadable data
ocommon common files for all products
odg data gatherer
opsm Parallel Server Manager Components
oracore core libraries
orb Object Request Broker
Optimal Flexible Architecture A-13

OFA Implemented on UNIX
Contents of Product SubdirectoriesEach product subdirectory contains the subdirectories described in Table A–12:
ord data options
otrace Oracle TRACE
plsql PL/SQL
precomp precompilers
rdbms server files and libraries required for the database
slax SLAX parser
sqlplus SQL*Plus
svrmgr Server Manager
sysman System Management
Table A–12 Contents of Product Subdirectories
admin administrative SQL and shell scripts (for example, catalog.sql, catexp.sql, and demo.sql)
admin/* special directories for other products
admin/resource resource files
admin/terminal runtime terminal files
demo demonstration scripts and datafiles
doc README files (for example, readmeunix.doc)
install product installation scripts
jlib product Java classes
lib product libraries and distributed makefiles
log trace files and log files (for example, orasrv.log and *.trc files)
mesg U.S. message files and Multilingual Option (formerly National Language Support) message text and binary files (for example, oraus.msg and oraus.msb)
Table A–11 ORACLE_HOME Directory Structure and Content
A-14 Oracle8i Administrator’s Reference Release 3 (8.1.7) for IBM DYNIX/ptx

OFA Implemented on UNIX
Examples of Product SubdirectoriesExamples of product subdirectories and their contents are shown in Table A–13.
File Naming Conventions in the admin DirectoryThe rdbms/admin directory contains the SQL scripts shown in Table A–14.
Filename ExtensionsA description of filename extensions is shown in Table A–15.
Table A–13 Examples of Product Subdirectories
rdbms install, lib, admin, doc, mesg, log
sqlplus install, demo, lib, admin, doc, mesg
Table A–14 admin Directory, File Naming Conventions
cat*.sql Creates catalog and data dictionary tables and views. The following files are run automatically during installation:catalog.sql (for all installations)catproc.sql (for all installations)catparr.sql (for Parallel Server option installations)catrep.sql (for all installations)
catproc.sql in turn runs the scripts for creating the standard PL/SQL packages, such as DBMS_SQL and DBMS_OUTPUT.
d*.sql downgrade scripts
dbms*.sql additional database packages
u*.sql upgrade scripts
utl*.sql creates tables and views for database utilities
Table A–15 Filename Extensions
.a object file libraries; Ada runtime libraries
.aud Oracle audit file
.bdf X11 font description file
.bmp X11 bitmap file
.c C source file
.ctl SQL*Loader control file; Oracle Server control file
.dat SQL*Loader datafile
Optimal Flexible Architecture A-15

OFA Implemented on UNIX
.dbf Oracle Server tablespace file
.dmp Export file
.doc ASCII text file
.env shell script file for setting environment
.h C header file; also, sr.h is a SQL*Report Writer help file
.jar Java class archive
.l UNIX manual page
.lis output of SQL*Plus scripts
.log installation log files; Oracle Server redo log files
.mk make files
.msb NLS message file (binary)
.msg NLS message file (text)
.o object module
.ora Oracle configuration files
.orc installation prototype files
.pc Pro*C source file
.pco Pro*COBOL source file
.ppd printer driver file
.sh Bourne shell script file
.sql SQL* script files
.sys Bourne shell script file
.tab SQL* script file
.trc trace files
.tut Bourne shell script file
.utd Uniform Terminal Definitions
.zip Zip file
Table A–15 Filename Extensions
A-16 Oracle8i Administrator’s Reference Release 3 (8.1.7) for IBM DYNIX/ptx
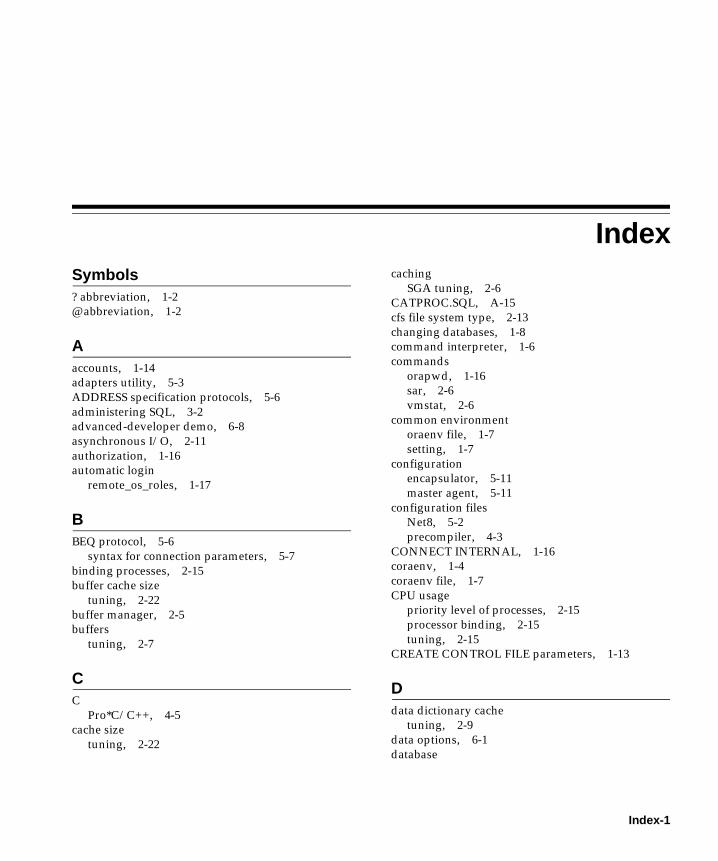
Index
Symbols? abbreviation, 1-2@ abbreviation, 1-2Aaccounts, 1-14adapters utility, 5-3ADDRESS specification protocols, 5-6administering SQL, 3-2advanced-developer demo, 6-8asynchronous I/O, 2-11authorization, 1-16automatic login
remote_os_roles, 1-17
BBEQ protocol, 5-6
syntax for connection parameters, 5-7binding processes, 2-15buffer cache size
tuning, 2-22buffer manager, 2-5buffers
tuning, 2-7
CC
Pro*C/C++, 4-5cache size
tuning, 2-22
cachingSGA tuning, 2-6
CATPROC.SQL, A-15cfs file system type, 2-13changing databases, 1-8command interpreter, 1-6commands
orapwd, 1-16sar, 2-6vmstat, 2-6
common environmentoraenv file, 1-7setting, 1-7
configurationencapsulator, 5-11master agent, 5-11
configuration filesNet8, 5-2precompiler, 4-3
CONNECT INTERNAL, 1-16coraenv, 1-4coraenv file, 1-7CPU usage
priority level of processes, 2-15processor binding, 2-15tuning, 2-15
CREATE CONTROL FILE parameters, 1-13
Ddata dictionary cache
tuning, 2-9data options, 6-1database
Index-1
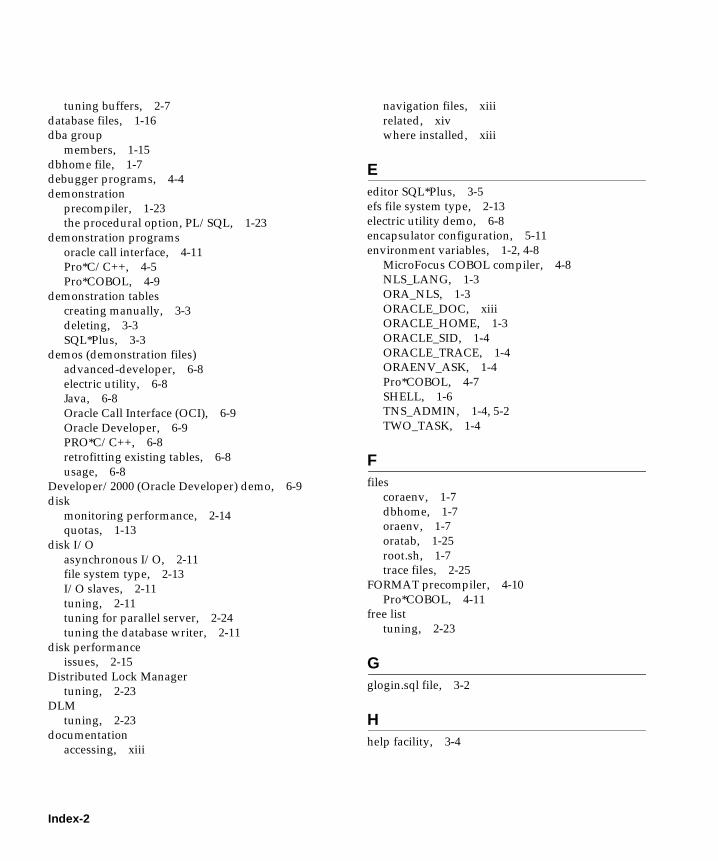
tuning buffers, 2-7database files, 1-16dba group
members, 1-15dbhome file, 1-7debugger programs, 4-4demonstration
precompiler, 1-23the procedural option, PL/SQL, 1-23
demonstration programsoracle call interface, 4-11Pro*C/C++, 4-5Pro*COBOL, 4-9
demonstration tablescreating manually, 3-3deleting, 3-3SQL*Plus, 3-3
demos (demonstration files)advanced-developer, 6-8electric utility, 6-8Java, 6-8Oracle Call Interface (OCI), 6-9Oracle Developer, 6-9PRO*C/C++, 6-8retrofitting existing tables, 6-8usage, 6-8
Developer/2000 (Oracle Developer) demo, 6-9disk
monitoring performance, 2-14quotas, 1-13
disk I/Oasynchronous I/O, 2-11file system type, 2-13I/O slaves, 2-11tuning, 2-11tuning for parallel server, 2-24tuning the database writer, 2-11
disk performanceissues, 2-15
Distributed Lock Managertuning, 2-23
DLMtuning, 2-23
documentationaccessing, xiii
navigation files, xiiirelated, xivwhere installed, xiii
Eeditor SQL*Plus, 3-5efs file system type, 2-13electric utility demo, 6-8encapsulator configuration, 5-11environment variables, 1-2, 4-8
MicroFocus COBOL compiler, 4-8NLS_LANG, 1-3ORA_NLS, 1-3ORACLE_DOC, xiiiORACLE_HOME, 1-3ORACLE_SID, 1-4ORACLE_TRACE, 1-4ORAENV_ASK, 1-4Pro*COBOL, 4-7SHELL, 1-6TNS_ADMIN, 1-4, 5-2TWO_TASK, 1-4
Ffiles
coraenv, 1-7dbhome, 1-7oraenv, 1-7oratab, 1-25root.sh, 1-7trace files, 2-25
FORMAT precompiler, 4-10Pro*COBOL, 4-11
free listtuning, 2-23
Gglogin.sql file, 3-2
Hhelp facility, 3-4
Index-2

hit ratiofor buffer cache, 2-7
Iindexes
tuning, 2-23initialization parameters
BACKGROUND_DUMP_DEST, 1-19BITMAP_MERGE_AREA_SIZE, 1-19COMMIT_POINT_STRENGTH, 1-19CONTROL_FILES, 1-19CREATE_BITMAP_AREA_SIZE, 1-19DB_BLOCK_BUFFERS, 1-19DB_BLOCK_SIZE, 1-19DB_FILE_DIRECT_IO_COUNT, 1-19DB_FILE_MULTIBLOCK_READ_COUNT, 1-19DB_FILES, 1-19DISTRIBUTED_TRANSACTIONS, 1-19HASH_AREA_SIZE, 1-19HASH_MULTIBLOCK_IO_COUNT, 1-19JAVA_POOL_SIZE, 1-19LOG_ARCHIVE_DEST, 1-19LOG_ARCHIVE_FORMAT, 1-19LOG_BUFFER, 1-19LOG_CHECKPOINT_INTERVAL, 1-19MTS_LISTENER_ADDRESS, 1-19MTS_MAX_DISPATCHERS, 1-19MTS_MAX_SERVERS, 1-19MTS_SERVERS, 1-19NLS_LANGUAGE, 1-19NLS_TERRITORY, 1-19OBJECT_CACHE_MAX_SIZE_PERCENT, 1-20OBJECT_CACHE_OPTIMAL_SIZE, 1-20OPEN_CURSORS, 1-20OS_AUTHENT_PREFIX, 1-20PROCESSES, 1-20SHARED_POOL_SIZE, 1-20SORT_AREA_SIZE, 1-20
initsid.ora file, 1-18Intelligent Agent
configuration on SNMP, 5-11interMedia
Java demo, 6-6MediaAnnotator, 6-6
sample audio scripts, 6-2sample programs, 6-3sample video scripts, 6-5Web Agent and Clipboard, 6-8
interMedia Audio, Video, and Image, 6-2interMedia Locator, 6-6interMedia Text, 6-2interrupting SQL*Plus, 3-6I/O
tuning, 2-11tuning for parallel server, 2-24
I/O slaves, 2-11IPC protocol, 5-8ireclen, 4-4
JJava demos, 6-8
Kkernel
tuning UNIX parameters, 2-16
Llanguage, 1-3latches
contention, 2-18library cache
tuning, 2-9limits, 1-13locks
tuning for parallel server, 2-23log writer process (LGWR), 2-15login.sql file, 3-2
Mmaster agent configuration, 5-11MAXDATAFILES parameter, 1-13MAXINSTANCES parameter, 1-13MAXLOGFILES parameter, 1-13MAXLOGHISTORY parameter, 1-13MAXLOGMEMBERS parameter, 1-13
Index-3

memoryestimating usage, 1-12tuning, 2-5virtual, 1-12
memory management, 2-5control paging, 2-6swap space, 2-5
MicroFocus COBOL compiler, 4-8multiple signal handlers, 4-16multi-thread server, 5-4
NNational Language Support (NLS) variable, 1-3Net8
adapters utility, 5-3ADDRESS specification, 5-5BEQ protocol, 5-6files and utilities, 5-2IPC protocol, 5-8multi-thread server, 5-4oracle advanced security, 5-13oracle connection manager, 5-3oracle enterprise manager intelligent agent, 5-10products and features, 5-2protocol support, 5-5protocols, 5-5RAW protocol, 5-9TCP/IP protocol, 5-9
Net8 configuration files, 5-2NLS_LANG variable, 1-3
OOCI demo, 6-9OFA
See also Optimal Flexible ArchitectureOptimal Flexible Architecture, A-1
characteristics of OFA, A-2directory structure, A-12file mapping, A-2, A-9implementation on Oracle8 for Unix, A-2
ORA_NLS variable, 1-3oracle advanced security, 5-13
.bak files, 5-13
security and single sign-on, 5-13oracle call interface, 4-11
demonstration programs, 4-11Oracle Call Interface (OCI) demo, 6-9oracle connection manager, 5-3Oracle Data Option Demos, 6-1Oracle Developer demo, 6-9oracle enterprise manager intelligent agent, 5-10
agent service discovery and auto-configuration, 5-10
debugging tcl scripts, 5-10Oracle environment variables
EPC_DISABLED, 1-3NLS_LANG, 1-3ORA_NLS33, 1-3ORACLE_BASE, 1-3ORACLE_HOME, 1-3ORACLE_PATH, 1-3ORACLE_SID, 1-4ORACLE_TRACE, 1-4ORAENV_ASK, 1-4TNS_ADMIN, 1-4TWO_TASK, 1-4UNIX variables, 1-5
Oracle Forms demo, 6-9Oracle Information Navigator, xiiiOracle Parallel Server
monitoring, 2-25tuning, 2-23
oracle precompiler and OCI linking and makefilescustom makefiles, 4-13undefined symbols, 4-14
oracle run time system, 4-9Oracle Server accounts, 1-14oracle software owner, 1-14
special accounts, 1-14Oracle System Identifier, 1-4Oracle TCP/IP protocol, 5-9ORACLE_DOC variable, xiiiORACLE_HOME environment variable, 1-3ORACLE_HOME variable, 1-2ORACLE_SID
environment variable, 1-4ORACLE_SID variable, 1-2Oracle8i Spatial, 6-10
Index-4
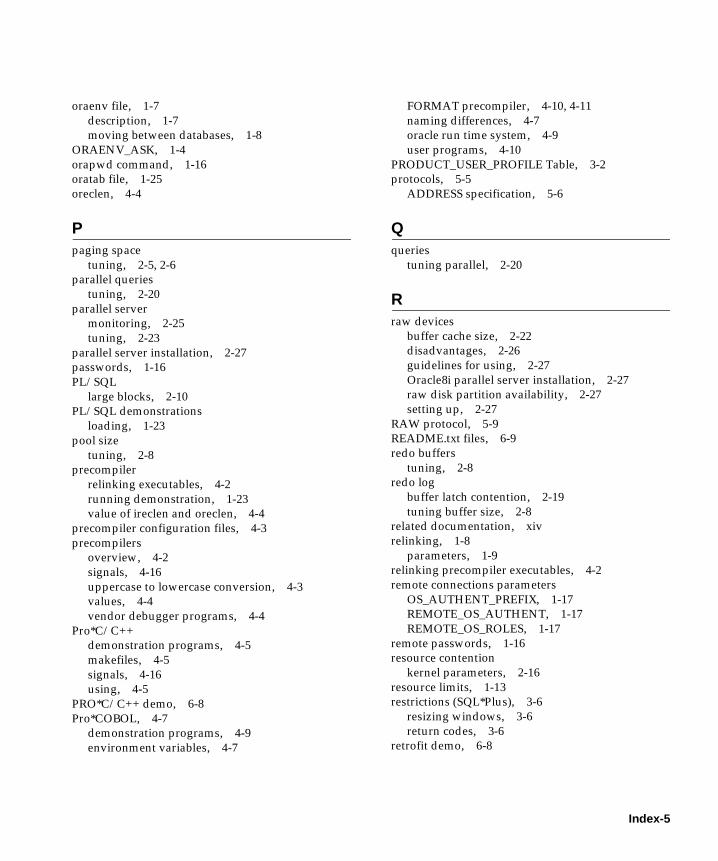
oraenv file, 1-7description, 1-7moving between databases, 1-8
ORAENV_ASK, 1-4orapwd command, 1-16oratab file, 1-25oreclen, 4-4
Ppaging space
tuning, 2-5, 2-6parallel queries
tuning, 2-20parallel server
monitoring, 2-25tuning, 2-23
parallel server installation, 2-27passwords, 1-16PL/SQL
large blocks, 2-10PL/SQL demonstrations
loading, 1-23pool size
tuning, 2-8precompiler
relinking executables, 4-2running demonstration, 1-23value of ireclen and oreclen, 4-4
precompiler configuration files, 4-3precompilers
overview, 4-2signals, 4-16uppercase to lowercase conversion, 4-3values, 4-4vendor debugger programs, 4-4
Pro*C/C++demonstration programs, 4-5makefiles, 4-5signals, 4-16using, 4-5
PRO*C/C++ demo, 6-8Pro*COBOL, 4-7
demonstration programs, 4-9environment variables, 4-7
FORMAT precompiler, 4-10, 4-11naming differences, 4-7oracle run time system, 4-9user programs, 4-10
PRODUCT_USER_PROFILE Table, 3-2protocols, 5-5
ADDRESS specification, 5-6
Qqueries
tuning parallel, 2-20
Rraw devices
buffer cache size, 2-22disadvantages, 2-26guidelines for using, 2-27Oracle8i parallel server installation, 2-27raw disk partition availability, 2-27setting up, 2-27
RAW protocol, 5-9README.txt files, 6-9redo buffers
tuning, 2-8redo log
buffer latch contention, 2-19tuning buffer size, 2-8
related documentation, xivrelinking, 1-8
parameters, 1-9relinking precompiler executables, 4-2remote connections parameters
OS_AUTHENT_PREFIX, 1-17REMOTE_OS_AUTHENT, 1-17REMOTE_OS_ROLES, 1-17
remote passwords, 1-16resource contention
kernel parameters, 2-16resource limits, 1-13restrictions (SQL*Plus), 3-6
resizing windows, 3-6return codes, 3-6
retrofit demo, 6-8
Index-5

rollback segmentscontention, 2-19
root user, 1-14root.sh script, 1-7running operating system commands, 3-6
Ssar, 2-2sar command, 2-2, 2-6scripts
start_peer, 5-12security, 1-15, 1-16
CONNECT INTERNAL, 1-16features of UNIX, 1-15file ownership, 1-15group accounts, 1-15Server Manager access, 1-16SHUTDOWN command, 1-16STARTUP command, 1-16two-task architecture, 1-15
Server Managercommands, 1-16security, 1-16
setting up raw devices, 2-27setup files
SQL*Plus, 3-2SGA
calculating, 1-10locking in physical memory, 2-6relocating, 1-10
shadow process, 1-15shared pool size
tuning, 2-8SHELL, 1-6SHUTDOWN command, 1-16
security, 1-16SIGCLD two-task signal, 4-16SIGINT two-task signal, 4-15SIGIO two-task signal, 4-15signal handlers
using, 4-15signals
two-task, 4-15SIGPIPE two-task signal, 4-16
SIGTERM two-task signal, 4-16SIGURG two-task signal, 4-16Simple Network Management Protocol
(SNMP), 5-11site profile SQL*Plus, 3-2SNMP and Intelligent Agent, 5-11snmpd executable, 5-12software distribution, 1-3Spatial demonstrations, 6-10special accounts, 1-14SPOOL command
SQL*Plus, 3-6using, 3-6
SQL scripts, 2-5SQL*Plus
default editor, 3-5demonstration tables, 3-3editor, 3-5help facility, 3-4interrupting, 3-6PRODUCT_USER_PROFILE Table, 3-2restrictions, 3-6running operating system commands, 3-6setup files, 3-2site profile, 3-2SPOOL command, 3-6system editor, 3-5user profile, 3-2using, 3-5
start_peer script, 5-12STARTUP command, 1-16superuser, 1-14swap, 2-3swap space
tuning, 2-5SYS account, 1-14
privileges, 1-14SYSDATE, 1-8SYSTEM account, 1-14
privileges, 1-14system editor
SQL*Plus, 3-5System Global Area or Shared Global Area (SGA)
relocating, 1-10system time, 1-8
Index-6

TTCP/IP protocol, 5-9
ADDRESS, 5-9thread support, 4-15TNS listener, 5-9TNS_ADMIN environment variable, 1-4tools, 2-2
sar, 2-2swap, 2-3
trace and alert filesalert files, 2-25trace file names, 2-25using, 2-22, 2-25
tracing Bourne shell scripts, 1-4tuning
avoiding index contention, 2-23buffer cache size, 2-22CPU usage, 2-15disk I/O, 2-11I/O bottlenecks, 2-11isolating contention, 2-16localizing disk I/O, 2-24memory management, 2-5multi-processor systems, 2-21parallel server, 2-23trace and alert files, 2-22, 2-25
TWO_TASK environment variable, 1-4two-task, 1-15
signals, 4-15
UUNIX Environment Variables Used with
Oracle8i, 1-5UNIX file system type, 2-13UNIX kernel
tuning, 2-16usage demo, 6-8user profile
SQL*Plus, 3-2user programs
Pro*COBOL, 4-10using SQL*Plus, 3-5utility (electric) demo, 6-8
VV$SESSION_WAIT table, 2-17V$SGASTAT table, 2-9V$SYSTEM_EVENT table, 2-16vmstat command, 2-6
XXA functionality, 4-18
Index-7

Index-8