Embed Size (px)
Citation preview
Americas HeadquartersCisco Systems, Inc.170 West Tasman DriveSan Jose, CA 95134-1706 USAhttp://www.cisco.comTel: 408 526-4000
800 553-NETS (6387)Fax: 408 527-0883
Administrator Guide for Cisco Show and Share 5.2.xIncluding Show and Share Reports 5.2.x May 31, 2011
Text Part Number: OL-21595-04

THE SPECIFICATIONS AND INFORMATION REGARDING THE PRODUCTS IN THIS MANUAL ARE SUBJECT TO CHANGE WITHOUT NOTICE. ALL STATEMENTS, INFORMATION, AND RECOMMENDATIONS IN THIS MANUAL ARE BELIEVED TO BE ACCURATE BUT ARE PRESENTED WITHOUT WARRANTY OF ANY KIND, EXPRESS OR IMPLIED. USERS MUST TAKE FULL RESPONSIBILITY FOR THEIR APPLICATION OF ANY PRODUCTS.
THE SOFTWARE LICENSE AND LIMITED WARRANTY FOR THE ACCOMPANYING PRODUCT ARE SET FORTH IN THE INFORMATION PACKET THAT SHIPPED WITH THE PRODUCT AND ARE INCORPORATED HEREIN BY THIS REFERENCE. IF YOU ARE UNABLE TO LOCATE THE SOFTWARE LICENSE OR LIMITED WARRANTY, CONTACT YOUR CISCO REPRESENTATIVE FOR A COPY.
The Cisco implementation of TCP header compression is an adaptation of a program developed by the University of California, Berkeley (UCB) as part of UCB’s public domain version of the UNIX operating system. All rights reserved. Copyright © 1981, Regents of the University of California.
NOTWITHSTANDING ANY OTHER WARRANTY HEREIN, ALL DOCUMENT FILES AND SOFTWARE OF THESE SUPPLIERS ARE PROVIDED “AS IS” WITH ALL FAULTS. CISCO AND THE ABOVE-NAMED SUPPLIERS DISCLAIM ALL WARRANTIES, EXPRESSED OR IMPLIED, INCLUDING, WITHOUT LIMITATION, THOSE OF MERCHANTABILITY, FITNESS FOR A PARTICULAR PURPOSE AND NONINFRINGEMENT OR ARISING FROM A COURSE OF DEALING, USAGE, OR TRADE PRACTICE.
IN NO EVENT SHALL CISCO OR ITS SUPPLIERS BE LIABLE FOR ANY INDIRECT, SPECIAL, CONSEQUENTIAL, OR INCIDENTAL DAMAGES, INCLUDING, WITHOUT LIMITATION, LOST PROFITS OR LOSS OR DAMAGE TO DATA ARISING OUT OF THE USE OR INABILITY TO USE THIS MANUAL, EVEN IF CISCO OR ITS SUPPLIERS HAVE BEEN ADVISED OF THE POSSIBILITY OF SUCH DAMAGES.
Cisco and the Cisco logo are trademarks or registered trademarks of Cisco and/or its affiliates in the U.S. and other countries. To view a list of Cisco trademarks, go to this URL: www.cisco.com/go/trademarks. Third-party trademarks mentioned are the property of their respective owners. The use of the word partner does not imply a partnership relationship between Cisco and any other company. (1110R)
Wowza Media Server Pro Unlimited © 2006-2009 Wowza Media Systems, Inc. All rights reserved. WOWZA and related logos are registered trademarks of Wowza Media Systems, Inc. Cisco Digital Media Systems are powered by Wowza Media Server Software.
Administrator Guide for Cisco Show and Share 5.2.x
© 2002 – 2011 Cisco Systems, Inc. All rights reserved.

OL-21595-04
C O N T E N T S
Preface ix
About Cisco Show and Share ixWhat Is Cisco Show and Share? ixWhat is a Cisco Show and Share Community? ix
Change History xNew in 5.2.3 xNew in 5.2.2 xi
New in 5.2.1 xi
C H A P T E R 1 Start Here 1-1
Access Cisco Show and Share and Cisco Show and Share Reports 1-1
Prerequisites 1-1
Configuration Note for Microsoft Internet Explorer 1-2
Access Cisco Show and Share 1-2
Sign In to Cisco Show and Share 1-4
Access the Administration Area 1-5
What to Do Next 1-5
C H A P T E R 2 Understand Your DMS-Admin Dependencies 2-1
Reference 2-1
Health and Activity Dashboard 2-2
User Authentication 2-2
Alert Reports 2-3
Services Monitor 2-3
Feature Licenses and Author Packs 2-4
Verify Which Licenses are Installed 2-4
Install New Licenses 2-4
C H A P T E R 3 Set Up File Hosting Locations 3-1
Concepts 3-1
What Is a File Hosting Location? 3-1
What Happens When I Publish Locally on a Show and Share Appliance? 3-1
Which File Host Location Values Are Mandatory? 3-2
Which File Host Settings Are Optional? 3-2
iiiAdministrator Guide for Cisco Show and Share 5.2.x
Contents
Which External Server Types Are Most Appropriate? 3-2
Which Server Type Should Host FLV Files? 3-3
Which Server Type Should Host MP4 and H.264 Files? 3-3
Which Server Type Should Host WMV Files? 3-3
Which Server Type Should Host MP3 3-3
Other Files 3-4
Limitations and Restrictions 3-4
Procedures 3-5
Configure Local File Hosting 3-5
Define External File Hosting Locations 3-6
Prepare a Web Server for Externally-Hosted Transcript Files 3-8
Troubleshooting 3-8
C H A P T E R 4 Manage User Access and Permissions 4-1
Concepts 4-1
Understand Factors That Influence User Access 4-2
Understand User Roles in DMS-Admin 4-2
Understand User Roles in Show and Share Administration 4-3
Procedures 4-4
Prerequisites 4-4
Assign or Remove User Roles 4-4
Search for Users by Their Role Assignments 4-6
C H A P T E R 5 Manage the Publishing Workflow 5-1
Concepts 5-1
Understand the Publishing Workflow without Approvers 5-1
Understand the Publishing Workflow with Approvers 5-2
Procedures 5-2
Choose a Publishing Workflow 5-2
Assign Approvers to Authors 5-3
C H A P T E R 6 Manage Categories 6-1
Concepts 6-1
Understand Categories 6-1
Category Permissions 6-2
Procedures 6-2
Create Categories 6-3
Rename a Category 6-3
ivAdministrator Guide for Cisco Show and Share 5.2.x
OL-21595-04

Contents
Move a Category 6-4
Change Category Owner 6-4
Delete a Category 6-5
C H A P T E R 7 Manage System-Wide Settings 7-1
Concepts 7-1
Understand Which Features You Can Disable Site Wide 7-1
Procedures 7-2
Disable General and Timeline Comments 7-2
Disable Anonymous Comments 7-3
Disable Video Ratings 7-3
Disable Tags 7-4
Disable Supplemental File Downloads 7-4
Disable Video Embedding 7-5
Disable Video Editing 7-5
Enable Image Smoothing for Attached Slides 7-6
Configure a Custom Help Link 7-7
Change the “Contact Your Administrator” Link 7-8
C H A P T E R 8 Manage Content 8-1
Procedures 8-1
Find and Remove Comments 8-1
Find and Remove Videos 8-2
C H A P T E R 9 Manage Featured Videos 9-1
Concepts 9-1
Understand What It Means to Feature a Video 9-1
Procedures 9-2
Add Videos to the Featured Videos Browser 9-2
Reorder Videos in the Featured Video Browser 9-4
Delete Videos from the Featured Video Browser 9-4
C H A P T E R 10 Manage Tickers 10-1
Procedures 10-1
Create a Ticker for Your Site 10-2
Define a Default Ticker 10-3
Edit a Ticker 10-4
Delete a Ticker 10-4
vAdministrator Guide for Cisco Show and Share 5.2.x
OL-21595-04

Contents
C H A P T E R 11 Localize and Reskin Show and Share 11-1
About Customizations 11-1
Procedures 11-2
Choose a Language for the User Interface 11-2
Select A Theme 11-3
Change the Background Image 11-3
Change the Site Logo 11-4
C H A P T E R 12 Configure a Cisco MXE for Video Transcoding 12-1
About Cisco MXE Integration with Cisco Show and Share 12-1
Limitations and Restrictions 12-2
Procedures 12-2
Integrate a Cisco MXE 3500 with Cisco Show and Share 12-2
Register the Cisco MXE in the Cisco DMM 12-3
Configure Cisco Show and Share to use the MXE for Transcoding Videos 12-4
Verify the Configuration 12-4
Reference 12-5
C H A P T E R 13 Configure Digital Media Encoders 13-1
Concepts 13-1
What Are Encoding Formats (Presets)? 13-2
What Are Encoder Profiles? 13-3
Procedures 13-3
Create Encoder Profiles 13-3
Create the Encoder Profile for a Pull Configuration 13-3
Create the Encoder Profile for a Push Configuration 13-5
Create and Edit Encoding Formats (Presets) 13-7
Reference 13-8
UI Reference: Encoding Formats (Presets) 13-9
C H A P T E R 14 Use a Cisco DME to Transcode Video 14-1
Concepts 14-1
Understand Transcoding 14-1
Procedures 14-2
Copy a Video File to Your DME for Transcoding 14-2
Transcode a Video File 14-2
Copy Transcoded Video Output from Your DME 14-3
Reference 14-4
viAdministrator Guide for Cisco Show and Share 5.2.x
OL-21595-04

Contents
UI Reference: Transcoding 14-4
Color-code Reference for the Status of a Transcoding Job 14-5
C H A P T E R 15 Use Cisco Show and Share Reports 15-1
Concepts 15-1
Understand the Values That Reports Count, Measure, and Correlate 15-1
What Are Page Views? 15-1
What Are Video Streams? 15-2
What Are Unique Visitors? 15-2
What Are Referrers? 15-2
Understand Filtering 15-2
Procedures 15-3
Populate and View Reports 15-4
Maintain the Reports Database 15-6
C H A P T E R 16 Configure Failover 16-1
A P P E N D I X A Ports Used by Digital Media Suite A-1
viiAdministrator Guide for Cisco Show and Share 5.2.x
OL-21595-04

Contents
viiiAdministrator Guide for Cisco Show and Share 5.2.x
OL-21595-04

Preface
Revised: May 31, 2011
This guide is for Cisco Show and Share administrators that have one or more of the following roles:
• Category Administrator
• Reports Administrator
• Administrator
• superuser
This section contains the following topics:
• About Cisco Show and Share, page -ix
• Change History, page -x
About Cisco Show and Share • What Is Cisco Show and Share? page -ix
• What is a Cisco Show and Share Community? page -ix
What Is Cisco Show and Share?Cisco Show and Share is a secured social network for collaboration, communication, learning, and pleasure — unlimited by time and place. People use Cisco Show and Share to improve information, communities, themselves, and each other.
Although user-generated video is central to the Cisco Show and Share experience, we also support text, pictures, audio, and other media. Each community of Cisco Show and Share users builds, shares, and improves upon its own information according to its needs and priorities.
What is a Cisco Show and Share Community?Users of a Cisco Show and Share site become its community. As the site grows and flourishes over time, its community builds a collaborative society and culture. Users whose contributions are the most useful and widely respected will emerge naturally as trusted experts and leaders. Although the community is
ixAdministrator Guide for Cisco Show and Share 5.2.x
OL-21595-04

Preface
self-regulating in many ways, site administrators can set and enforce customization and security policies to optimize the site for a broad or narrow purpose. Some such policies might have more of an effect than others do.
For example, if your customized site asks users to log in for full access, then your community might include a combination of registered users and unregistered visitors. In this case, visitors probably can see and do less than registered users can.
Change HistoryThis change history contains only those updates that apply to Cisco Show and Share administrators. For the complete list of changes, see the Release Notes for Cisco Digital Media Suite 5.2.x on Cisco.com.
• New in 5.2.3
• New in 5.2.2
• New in 5.2.1
New in 5.2.3
Bulk User Role Editing
You can select multiple users and assign or remove roles for them as a group. See Manage User Access and Permissions, page 4-1, for more information.
Customizable Help Link
You can change the destination of the Cisco Show and Share help link, allowing you to point to your own organization’s policies, procedures, standards, and support area. See Manage System-Wide Settings, page 7-1, for more information.
Localization
The Cisco Show and Share interface is available in the following languages:
• English
• Spanish
• French
See Manage System-Wide Settings, page 7-1, for more information.
Improved Slide Fidelity
You can enable image smoothing for synchronized slides to improve slide quality when played back in the Slides tab. See Manage System-Wide Settings, page 7-1, for more information.
Active/Standby Failover
You can configure Cisco Show and Share for stateless, active/standby failover. See the Failover Configuration Guide for Cisco Digital Media Suite 5.2.x for more information:
http://www.cisco.com/en/US/docs/video/digital_media_systems/5_x/5_2/dms/failover_guide/dmsfailover.html
xAdministrator Guide for Cisco Show and Share 5.2.x
OL-21595-04

Preface
New in 5.2.2For a video tour of these features, see the What’s New in Cisco Show and Share 5.2.2 video on Cisco.com.
Anonymous Comments
System administrators can globally prevent viewers from anonymously commenting on videos. If anonymous comments are prevented globally, authors cannot enable it for individual videos.
See Manage System-Wide Settings, page 7-1, for more information.
New Themes
Administrators have three additional themes, Earth, Stone, and Grass, to choose from when customizing the look and feel of Cisco Show and Share. The original themes, Fire and Ocean, are still available.
See Localize and Reskin Show and Share, page 11-1, for more information.
Category Ownership Assignment
The “superuser” user now has the ability to change the owner of a category.
See Manage Categories, page 6-1, for more information.
New in 5.2.1
Private Category Removal
Private categories are removed from Cisco Show and Share 5.2.1.
In Cisco Show and Share 5.2, you could assign user groups to categories to limit who could view the video listing. The restriction applied only to viewing the list of videos within the category. The viewing restrictions did not apply to the videos themselves. Site visitors could still see videos assigned to private categories if they found them through some other method, such as through a search or using the tag filter.
When you upgrade to Cisco Show and Share 5.2.1, you have the option of making existing private categories public or of removing the category. If you make a private category public, all site visitors will be able to view the list of videos in that category. Removing the private category does not cause the videos to be removed; the videos remain in the system and are available to site visitors. It is just the category that lists the videos that is removed.
In both cases the videos in the category are viewable by all site visitors unless you had previously assigned user group viewing restrictions to the videos themselves.
Cisco Media Experience Engine Integration
Administrators can configure a Cisco Media Experience Engine (MXE) to automatically transcode videos that users upload into a common format. This allows the system to support a greater number of video source formats and converts them to a format that is can be edited in the Cisco Show and Share video editor.
For more information about configuring this feature, see the User Guide for Show and Share Administration 5.2.x.
Active Directory Group Import
In Cisco DMM 5.2, administrators could import users from an Active Directory database. In Cisco DMM 5.2.1, administrators can import user groups from Active Directory.
xiAdministrator Guide for Cisco Show and Share 5.2.x
OL-21595-04

Preface
For more information about configuring this feature, see the User Guide for Cisco Digital Media Manager 5.2.x.
Certificate Import
Cisco DMM 5.2 and Cisco Show and Share 5.2 ship with a self-signed certificate. Because the certificate is self-signed, users receive a security warning when they visit the site.
For Cisco Show and Share 5.2.1, administrators can import signed certificates and prevent users from seeing the warning. Administrators cannot import signed certificates into Cisco DMM 5.2.1.
For more information about this feature, see the Administration Guide for Cisco Digital Media Suite 5.2.x Appliances.
URL Change
You can now access Cisco Show and Share without having to specify the port number in the URL. For example, instead of typing https://show_and_share.example.com:8443, you can access the Cisco Show and Share server by typing http://show_and_share.example.com. The browser is automatically redirected to the correct port.
xiiAdministrator Guide for Cisco Show and Share 5.2.x
OL-21595-04

AOL-21595-04
C H A P T E R 1
Start HereRevised: May 31, 2011 OL-21595-04
• Access Cisco Show and Share and Cisco Show and Share Reports, page 1-1
• Sign In to Cisco Show and Share, page 1-4
• Access the Administration Area, page 1-5
• What to Do Next, page 1-5
Access Cisco Show and Share and Cisco Show and Share Reports
• Prerequisites, page 1-1
• Configuration Note for Microsoft Internet Explorer, page 1-2
• Access Cisco Show and Share, page 1-2
PrerequisitesBefore you access Cisco Show and Share, you need:
• A network connection that is fast enough to play a video stream. A dialup connection may result in choppy video playback.
• One of the following web browsers:
– Microsoft Internet Explorer version 7 or 8 for Windows (see also Configuration Note for Microsoft Internet Explorer, page 1-2).
– Mozilla Firefox version 3.x for Windows or OS X.
– Apple Safari 3.1.2 for OS X.
• A computer that supports screen resolution settings for 1024x768 and greater.
• The HTTP address of your community’s Cisco Show and Share server.
• Access to the Internet from the client computer. Cisco Show and Share attempts to contact the Internet to download the plugins needed to play Flash, Windows, or Quicktime media in your browser if they have not been installed previously.
1-1dministrator Guide for Cisco Show and Share 5.2.x

Chapter 1 Start Here Access Cisco Show and Share and Cisco Show and Share Reports
Configuration Note for Microsoft Internet ExplorerFor Cisco Show and Share to display properly in Microsoft Internet Explorer, you must configure Internet Explorer to check for changes each time that it loads any page from Cisco Show and Share.
Procedure
Step 1 Choose Tools > Internet Options.
Step 2 Click Settings in the Browsing history area.
Step 3 Click the option to check for changes each time.
Step 4 Click OK twice.
Step 5 Stop. You have completed this procedure.
Access Cisco Show and ShareTo access Cisco Show and Share, point your web browser to one of the following URLs, depending upon which version of Cisco Show and Share you are running:
In the above URLs, replace server_name with the name of your Cisco Show and Share server, for example http://video.example.com. Do not use an IP address.
For Cisco Show and Share Version Use this URL
5.2 http://server_name:8080
or
https://server_name:8443
5.2.1 and later http://server_name
1-2Administrator Guide for Cisco Show and Share 5.2.x
OL-21595-04

Chapter 1 Start Here Access Cisco Show and Share and Cisco Show and Share Reports
Tip If you are not sure which version of Cisco Show and Share you are using, try using the URL for 5.2.1 first. If you receive an error, then you are running 5.2 and should use one of the two URLs for that version.
Note You may receive a security warning to accept the site security certificate when you first access your Cisco Show and Share site. Confirm the security exception to proceed to the site.
When Cisco Show and Share loads, you see a page similar to the one shown in Figure 1-1.
Figure 1-1 The Cisco Show and Share Home Page
When you first access Cisco Show and Share, you access the site as a visitor.
1-3Administrator Guide for Cisco Show and Share 5.2.x
OL-21595-04

Chapter 1 Start Here Sign In to Cisco Show and Share
Sign In to Cisco Show and ShareYou must be signed-in to Cisco Show and Share to access specific features, such as uploading videos, the My Account page, and the My Preferences page.
To sign-in to Cisco Show and Share, follow these steps:
Step 1 Click the Sign In link in the global navigation area at the top of the page.
You will see one of the following sign-in screens, or your own corporate sign-in screen, depending upon your version of Cisco Show and Share and if the sign-in process has been tied into your corporate authentication system:
Step 2 Enter your username and password.
Step 3 Click Log In.
You are returned to the Videos page.
Step 4 Stop. You have completed this procedure.
1-4Administrator Guide for Cisco Show and Share 5.2.x
OL-21595-04

Chapter 1 Start Here Access the Administration Area
Access the Administration AreaProcedure
Step 1 To access the administration area of Cisco Show and Share, click the Show and Share link in the global navigation area at the top of the page.
Step 2 Click Administration.
The Cisco Show and Share administration area appears.
Step 3 Stop. You have completed this procedure.
What to Do NextSee the following sections to manage your Cisco Show and Share implementation:
• Learn about DSM-Admin dependencies? See the “Understand Your DMS-Admin Dependencies” section on page 2-1.
• Configure file host settings for published files? See the “Set Up File Hosting Locations” section on page 3-1.
• Assign user roles? See the “Manage User Access and Permissions” section on page 4-1.
• Set up a publishing workflow? See the “Manage the Publishing Workflow” section on page 5-1.
• Create categories? See the “Manage Categories” section on page 6-1.
• Manage site-wide settings? See the “Manage System-Wide Settings” section on page 7-1.
• Choose featured videos? See the “Manage Featured Videos” section on page 9-1.
• Create or load a ticker? See the “Manage Tickers” section on page 10-1.
• Change the user interface? See the “Localize and Reskin Show and Share” section on page 11-1.
• Configure an MXE for automatic video encoding? See the “Configure a Cisco MXE for Video Transcoding” section on page 12-1.
1-5Administrator Guide for Cisco Show and Share 5.2.x
OL-21595-04

Chapter 1 Start Here What to Do Next
• Learn to configure encoders? See the “Configure Digital Media Encoders” section on page 13-1.
• Transcode video using a Cisco Digital Media encoder? See the “Use a Cisco DME to Transcode Video” section on page 14-1.
• Populate and view reports? See the “Use Cisco Show and Share Reports” section on page 15-1.
• Configure failover? See the “Configure Failover” section on page 16-1.
1-6Administrator Guide for Cisco Show and Share 5.2.x
OL-21595-04

AOL-21595-04
C H A P T E R 2
Understand Your DMS-Admin DependenciesRevised: May 31, 2011 OL-21595-04
Your management of Cisco Show and Share hardware and software depends in part on software features and services that run on your Cisco Digital Media Manager (DMM) appliance, not your Cisco Show and Share appliance. The software that provides these additional features and services is called Cisco DMS Administration (DMS-Admin).
Because of these dependencies, your Cisco Digital Media Manager must always be reachable from Cisco Show and Share for Cisco Show and Share to function properly. See Ports Used by Digital Media Suite, page A-1 for information about communication between the components of the Cisco Digital Media Suite.
• Reference, page 2-1
Reference
Note Topics in this section list the features of DMS-Admin that you will use as an administrator for Cisco Show and Share. To understand these features, see the DMM user guide on Cisco.com.
• Health and Activity Dashboard, page 2-2
• User Authentication, page 2-2
• Alert Reports, page 2-3
• Services Monitor, page 2-3
• Feature Licenses and Author Packs, page 2-4
2-1dministrator Guide for Cisco Show and Share 5.2.x

Chapter 2 Understand Your DMS-Admin Dependencies Reference
Health and Activity Dashboard
Navigation Path (in DMM)
Administration > Dashboard
User Authentication
Navigation Path (in DMM)
Administration > Security > Authentication
2-2Administrator Guide for Cisco Show and Share 5.2.x
OL-21595-04

Chapter 2 Understand Your DMS-Admin Dependencies Reference
Alert Reports
Navigation Path (in DMM)
Administration > Alerts > Alert Reports
Services Monitor
Navigation Path (in DMM)
Administration > Services > Show and Share
2-3Administrator Guide for Cisco Show and Share 5.2.x
OL-21595-04
Chapter 2 Understand Your DMS-Admin Dependencies Reference
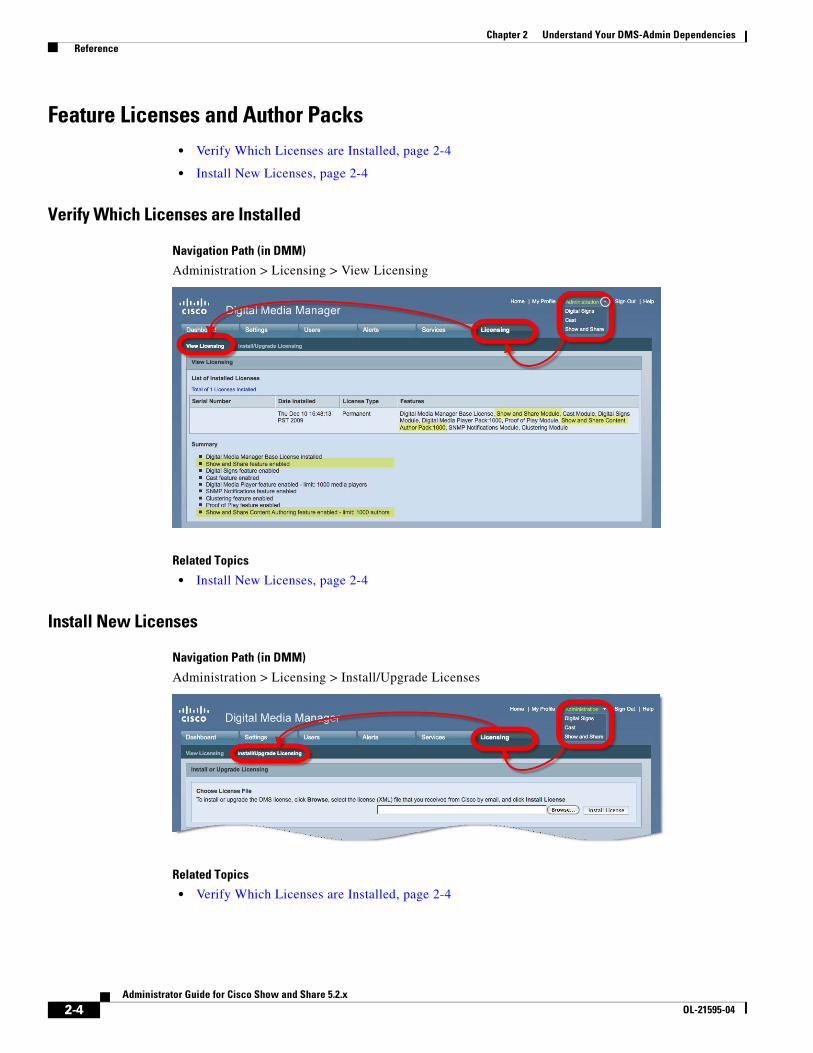
Feature Licenses and Author Packs • Verify Which Licenses are Installed, page 2-4
• Install New Licenses, page 2-4
Verify Which Licenses are Installed
Navigation Path (in DMM)
Administration > Licensing > View Licensing
Related Topics
• Install New Licenses, page 2-4
Install New Licenses
Navigation Path (in DMM)
Administration > Licensing > Install/Upgrade Licenses
Related Topics
• Verify Which Licenses are Installed, page 2-4
2-4Administrator Guide for Cisco Show and Share 5.2.x
OL-21595-04

AOL-21595-04
C H A P T E R3
Set Up File Hosting LocationsRevised: May 31, 2011 OL-21595-04
• Concepts, page 3-1
• Procedures, page 3-5
ConceptsUnderstand the Basics
• What Is a File Hosting Location? page 3-1
• What Happens When I Publish Locally on a Show and Share Appliance? page 3-1
Understand Mandatory and Optional Settings
• Which File Host Location Values Are Mandatory? page 3-2
• Which File Host Settings Are Optional? page 3-2
Learn How to Choose Among Server Types
• Which External Server Types Are Most Appropriate? page 3-2
What Is a File Hosting Location?A file hosting location is where Cisco Show and Share stores its published files. By default, Cisco Show and Share stores uploaded videos, transcripts, files, and slides locally on the appliance. However, you can designate external servers to store and serve the files based on file type. We recommend as a best practice that you always store files externally.
What Happens When I Publish Locally on a Show and Share Appliance?When you publish all files locally, Cisco Show and Share deliver files directly from the appliance, the following methods:
• RTMP for FLV, H.264, and MP4.
• HTTP for WMV, MP3, and all non-streaming assets.
3-1dministrator Guide for Cisco Show and Share 5.2.x

Chapter 3 Set Up File Hosting Locations Concepts
Alternatively, we also support hybrid deployments, in which you publish only some files locally. You might do this, for example, until you can provision additional servers in your network. In this case, we publish everything locally except the file types for which you have defined external hosts.
Which File Host Location Values Are Mandatory?If you publish some or all files to an external hosting location, you must define a Default Hosting Location. The Default Hosting Location is the location used for file types that you have not defined specifically (see Which File Host Settings Are Optional?, page 3-2).
The following table provides guidelines for the Default Hosting Location:
Which File Host Settings Are Optional?Elements within these drawers help you to specify distinct, external file hosting locations for each asset type that you plan to host.
• H.264 Hosting Locations
• MP3 Hosting Location
• Windows Media Hosting Location
• FLV Hosting Location
You only need to define these locations if they are differ from your Default Hosting Location. When you define a hosting location for a specific file type, that location is used instead of the Default Hosting Location.
Which External Server Types Are Most Appropriate? • Which Server Type Should Host FLV Files? page 3-3
• Which Server Type Should Host MP4 and H.264 Files? page 3-3
• Which Server Type Should Host WMV Files? page 3-3
• Which Server Type Should Host MP3 page 3-3
Mandatory Values Exceptions
You must always define the values in the Default Hosting Location drawer...
... unless you will publish all files locally on your Cisco Show and Share appliance.
The Default Hosting Location must be a streaming server and not merely a web server...
... unless you will define streaming server host locations in the optional drawers.1
1. Otherwise, video editing features, slides, and transitions for .FLV and .MP4 videos will not work as designed.
3-2Administrator Guide for Cisco Show and Share 5.2.x
OL-21595-04
Chapter 3 Set Up File Hosting Locations Concepts
Which Server Type Should Host FLV Files?
It is recommended that you use a Flash streaming server as the external file hosting location for FLV videos.
You can use an ordinary webserver if your site will have very few users. However, if you host FLV videos on a web server, note the following:
• You should disable the video editor (see Disable Video Editing, page 7-5). The Cisco Show and Share video editor uses non-destructive editing. This means that the original video remains intact and pointers and markers are used to create the edited version. This type of editing requires a streaming server to play correctly. If you publish an edited file to a non-streaming server, the file will play back in its unedited form.
• Trying to replay an FLV video right after it finishes can result in a 20-40 second delay before it starts again.
The following Flash streaming servers passed our tests:
• Wowza Media Server Pro 1.7.2 http://www.wowzamedia.com
• Adobe Flash Media Server http://www.adobe.com/products/flashmediaserver/
• Cisco ECDS 2.5.x http://www.cisco.com/go/ecds
Which Server Type Should Host MP4 and H.264 Files?
The external file hosting location for MP4 and H.264 videos should be a streaming server, ideally, and not merely a webserver.
These servers passed our tests:
• Wowza Media Server Pro 1.7.2 http://www.wowzamedia.com
• Cisco ACNS for MP4 Streaming http://www.cisco.com/go/acns
Which Server Type Should Host WMV Files?
We recommend that you use a Windows Media streaming server. These servers passed our tests:
• Webserver
• Microsoft Windows Media Services http://www.microsoft.com/windows/windowsmedia/forpros/server/server.aspx
• Cisco ACNS for WMV Streaming http://www.cisco.com/go/acns
Which Server Type Should Host MP3
You can use the following types of serverst to host MP3 files:
• Webserver
3-3Administrator Guide for Cisco Show and Share 5.2.x
OL-21595-04
Chapter 3 Set Up File Hosting Locations Limitations and Restrictions
• Wowza Media Server Pro 1.7.2 http://www.wowzamedia.com
• Adobe Flash Media Server http://www.adobe.com/products/flashmediaserver/
Other Files
Use a webserver for other files, such as .zip files uploaded as attachments.
Limitations and RestrictionsEven if you specify and external server for Flash and MPEG-4 (.flv, .mp4, .m4v) videos, Cisco Show and Share maintains a local copy of that video to allow for future editing of the video. In high volume deployments, this can cause the Cisco Show and Share drive to become full. To avoid this, you can upload videos directly to the external server and then refer to the video using a URL when adding it to Cisco Show and Share. You will not be able to edit videos uploaded with this method.
Note Cisco Show and Share also maintains two copies of Flash and MPEG-4 videos published videos when set to local storage—the published version and a copy for future editing.
If you change file hosting locations when you have existing content in Cisco Show and Share, the content will still appear in the video lists, the system will report that the videos cannot be found. This is because Cisco Show and Share is looking for the videos in the new hosting location. You must migrate your videos to the new location before changing hosting locations. It is strongly recommended that you set up your final hosting location before deploying Cisco Show and Share to your organization.
3-4Administrator Guide for Cisco Show and Share 5.2.x
OL-21595-04
Chapter 3 Set Up File Hosting Locations Procedures
Procedures • Define External File Hosting Locations, page 3-6
• Prepare a Web Server for Externally-Hosted Transcript Files, page 3-8
Configure Local File HostingBy default, Cisco Show and Share uses local file hosting. Typically you will not need to perform this procedure unless you are using local file hosting and you change the AAI password. This procedure shows you how to reenable local file hosting.
Procedure
Step 1 Log in to Cisco Show and Share using an administrator account.
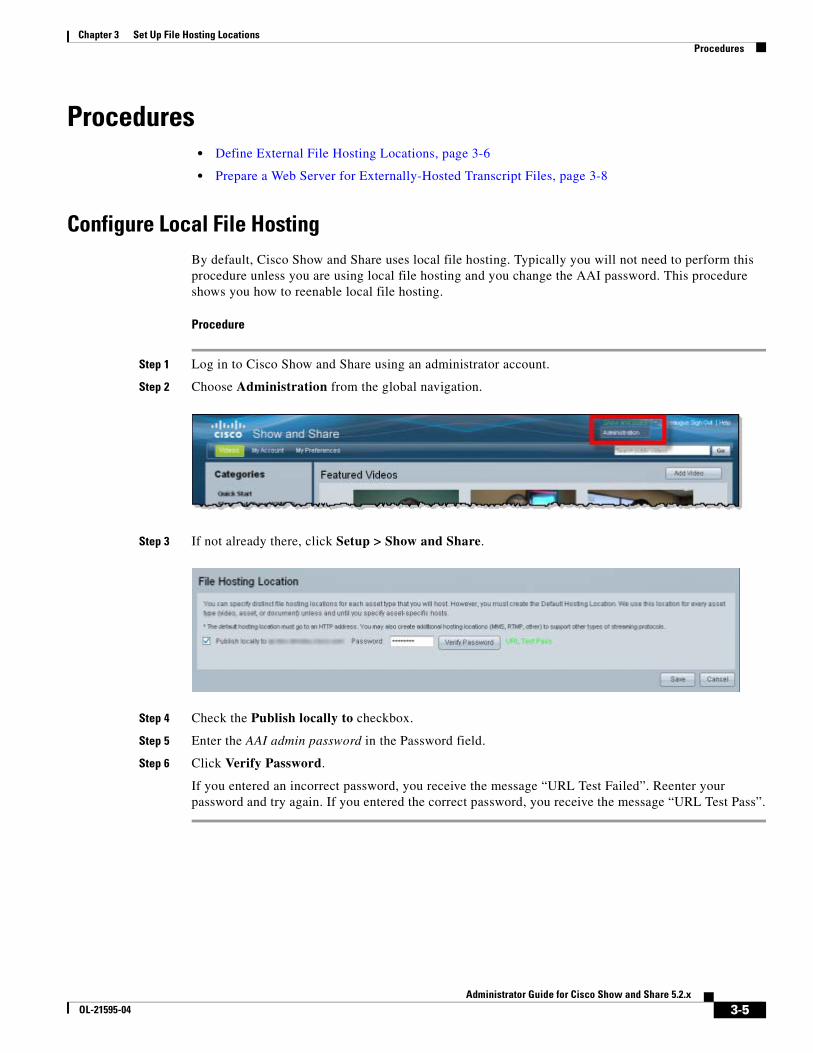
Step 2 Choose Administration from the global navigation.
Step 3 If not already there, click Setup > Show and Share.
Step 4 Check the Publish locally to checkbox.
Step 5 Enter the AAI admin password in the Password field.
Step 6 Click Verify Password.
If you entered an incorrect password, you receive the message “URL Test Failed”. Reenter your password and try again. If you entered the correct password, you receive the message “URL Test Pass”.
3-5Administrator Guide for Cisco Show and Share 5.2.x
OL-21595-04
Chapter 3 Set Up File Hosting Locations Procedures
Define External File Hosting Locations
Note The DeployLocalConfig Hosting Location drawer contains the Default Hosting location settings.
Procedure
Step 1 Use your browser to log in to your Cisco Show and Share appliance as its superuser.
Step 2 Choose Administration from the global navigation.
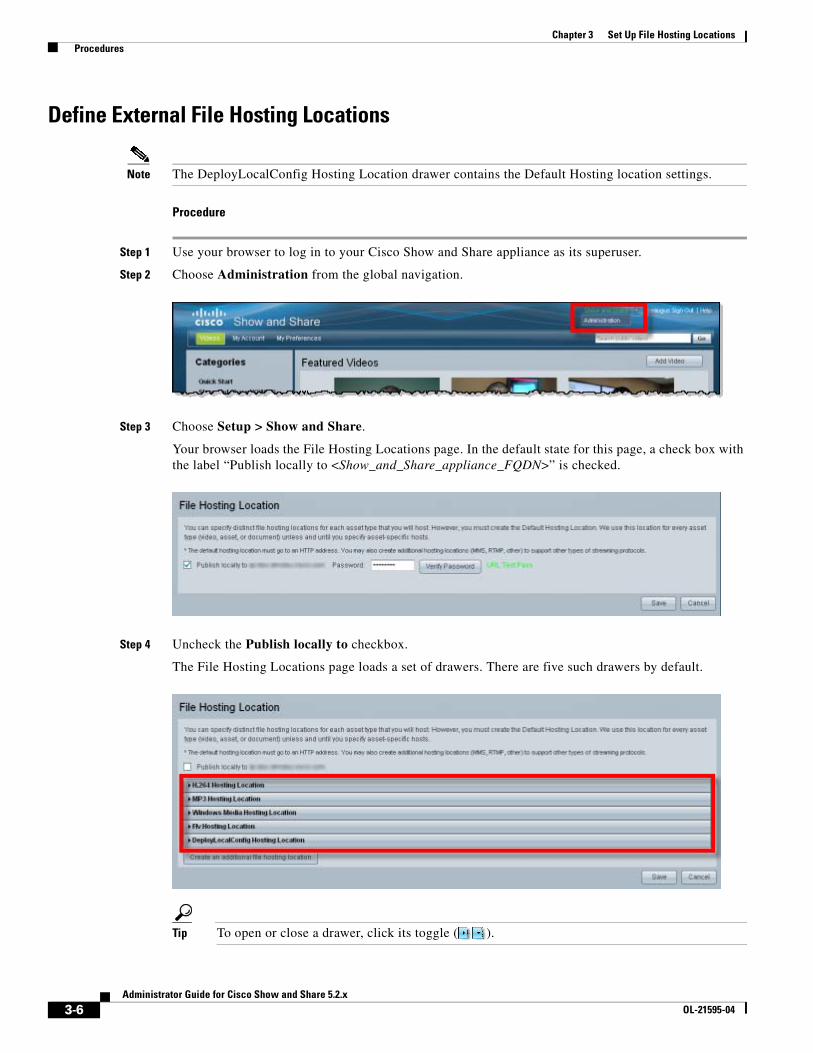
Step 3 Choose Setup > Show and Share.
Your browser loads the File Hosting Locations page. In the default state for this page, a check box with the label “Publish locally to <Show_and_Share_appliance_FQDN>” is checked.
Step 4 Uncheck the Publish locally to checkbox.
The File Hosting Locations page loads a set of drawers. There are five such drawers by default.
Tip To open or close a drawer, click its toggle ( ).
3-6Administrator Guide for Cisco Show and Share 5.2.x
OL-21595-04
Chapter 3 Set Up File Hosting Locations Procedures
Step 5 To define a file hosting location for the specified file type, do the following:
a. Open the drawer.
b. Fill in the following fields for each hosting location:
Step 6 To add an additional file hosting location, click Create an additional file hosting location.
Step 7 To remove an existing file hosting location, expand the location drawer and click Delete.
Step 8 Click Save at the bottom of the page.
Step 9 Stop. You have completed this procedure.
Table 3-1 Elements to Configure File Storage Settings
Setting Description
File Hosting Location Name A human-readable name. It might be the same as the relevant file type.
File Hosting Server Settings
Accepts files with extensions The filename extensions that identify particular file types. This information tells us where we should store various files and how we should retrieve them for playback. These are the default values:
• H.264 Hosting Location — *.mp4, *.m4v, and *.mpv4
• MP3 Hosting Location — *.mp3
• Windows Media Hosting Location — *.wmv, *.asf, *.asx, *.wma
• FLV Hosting Location — *.flv
File upload protocol The protocol or method for file transfer. Either FTP or SFTP. We recommend using SFTP.
Host address The DNS-resolvable FQDN or routable IP address of the remote server where you will deploy files of the relevant file type. Using an FQDN is recommended.
Login name A user account with sufficient privileges to use the remote server.
Login password The assigned password for the login name that you specified.
Directory root location The relative directory path to files that you will deploy. For example, if the root directory on the server is configured to be /data/ftproot and the absolute path for the deployment site ends with /data/ftproot/vp/flash, then the relative value to enter here would be /vp/flash.
Directory root URL path The absolute URL where Cisco Show and Share will host and reference your files. This includes the protocol, the FQDN, the port number, and the path.
3-7Administrator Guide for Cisco Show and Share 5.2.x
OL-21595-04
Chapter 3 Set Up File Hosting Locations Troubleshooting
Prepare a Web Server for Externally-Hosted Transcript FilesYou must configure and use a web server for your text transcripts whenever they are stored externally from the Cisco Show and Share server. Your transcript files will be hosted externally when the default file location (*.*) points to an external server or if you define an external server for *.txt files.
In the root directory on your web server, you must save an XML file with the filename CROSSDOMAIN.XML.
Example File Syntax<?xml version="1.0"?> <!DOCTYPE cross-domain-policy SYSTEM "http://www.adobe.com/xml/dtds/cross-domain-policy.dtd">
<cross-domain-policy> <site-control permitted-cross-domain-policies="master-only"/> <allow-access-from domain="*"/> <allow-http-request-headers-from domain="*" headers="SOAPAction"/>
</cross-domain-policy>
If you do not use a web server with the crossdomain.xml file, Cisco Show and Share will not be able to retrieve the transcripts.
Note To understand the CROSSDOMAIN.XML file and its purpose, see: http://www.adobe.com/devnet/flashplayer/articles/fplayer9_security.html http://www.adobe.com/devnet/articles/crossdomain_policy_file_spec.html http://developer.yahoo.com/javascript/howto-proxy.html
TroubleshootingPublishing for a specific file type fails
When publishing works for one file type and fails for another, it typically indicates a mis-configuration of the file hosting location. Check the file hosting location settings for the file type that is failing. Also check the network connectivity between Cisco Show and Share and the file hosting location.
All video uploads fail
If you are using FQDNs for the file hosting locations, verify that you do not have multiple FQDNs associated with the same IP address on the DNS server.
3-8Administrator Guide for Cisco Show and Share 5.2.x
OL-21595-04
AOL-21595-04
C H A P T E R4
Manage User Access and PermissionsRevised: May 31, 2011 OL-21595-04
• Concepts, page 4-1
• Procedures, page 4-4
Concepts • Understand Factors That Influence User Access, page 4-2
• Understand User Roles in DMS-Admin, page 4-2
• Understand User Roles in Show and Share Administration, page 4-3
4-1dministrator Guide for Cisco Show and Share 5.2.x

Chapter 4 Manage User Access and Permissions Concepts
Understand Factors That Influence User AccessMany products interoperate to form Cisco DMS. This is why you will use Show and Share Administration in combination with software called DMS-Admin to manage a range of settings that influence Cisco Show and Share user access and permissions.
Note DMS-Admin software is external to Cisco Show and Share. It runs on your DMM appliance.
Understand User Roles in DMS-AdminYou cannot use DMS-Admin to assign a user role directly to any user. The user role that DMS-Admin shows for a user is based on all of that user’s combined privileges and access settings, across all Cisco DMS products that you have licensed and installed.
Table 4-1 Tasks Related to User Access
Use When You Must Notes
DMS-Admin Choose a framework to provide user directory services and authentication for all Cisco DMS products.
We support three such frameworks and you must choose one1.
• Import and synchronize query-filtered user account records from a Microsoft Active Directory (LDAP) server. Later, when anyone tries to log in to Cisco Show and Share, Active Directory checks that the username exists and authenticates that the password is valid.
• Use native features of DMS-Admin to create and edit user account records manually. Later, when anyone tries to log in to Cisco Show and Share, DMS-Admin checks that the username exists and authenticates that the password is valid.
• Integrate with your SAML v. 2.0 compatible federation IDP server (SSO server).
Create user groups. —
Assign users to user groups. —
Show and Share Administration
Assign roles to users. See the “Assign or Remove User Roles” section on page 4-4.
Search for users who match a particular role.
See the “Search for Users by Their Role Assignments” section on page 4-6.
Turn an approvals workflow On or Off for publishing.
When you turn On the approvals workflow, each author is forbidden to publish his or her own files. Instead, the author must submit all drafts to a designated “author approver,” who then decides whether to publish what the author submitted.
Assign approvers to authors.
Choose sitewide which social features authors may turn on for their own videos.
Users cannot see or use any features that you disable sitewide and cannot expose disabled features to any other users.
1. See the “User Authentication” section on page 2-2.
4-2Administrator Guide for Cisco Show and Share 5.2.x
OL-21595-04

Chapter 4 Manage User Access and Permissions Concepts
Understand User Roles in Show and Share AdministrationThere are six Cisco Show and Share user roles that you can assign explicitly, while two additional user roles are implicit. Each role assignment supposes that its members share a set of rights and responsibilities in common. However, you can assign multiple roles to any given user.
Table 4-2 describes the effect that each role imposes on its constituent users.
Key
• Green tint — Yes.
• Red tint — No.
• Yellow tint — Limited or conditional.
Table 4-2 User Roles
Roles
Levels of Access
Basic Navigation
Categories Playback Content Creation Comments, Tags, Ratings Accountability
Use
Crea
te
Drafts PublishedA
rchi
ved
VoD Live
Tran
scod
e
Use
Allow Forbid
Com
mun
ity S
tand
ards
Site
Cus
tom
izat
ion
Reports
Bro
wse
Sear
ch
Filte
r
Publ
ic
Priv
ate
Self
Oth
ers
Publ
ic
Lim
ited
Priv
ate
Upl
oad
Reco
rd
Edit
Publ
ish
Prep
are
Hos
t
Self
Ass
igne
d Su
bmitt
ers
Site
wid
e
Self
Ass
igne
d Su
bmitt
ers
Site
wid
e
Self
Site
wid
e
Administration Roles
Administrator Y Y ? N Y N Y ? Y Y Y Y
Category Administrator
Y Y N Y ? N N Y N ? N
Reports Administrator
Y Y N No Y ? N N Y N N Y
Media Roles
Video Publisher Y Y ? N Y N Y ? N N Y N Y N Y N N Y N
Video Author Y Y ? N Y N Y ? N Y ? N Y N Y N N Y N
Live Event User Y Y ? N Y N Y ? N N Y N Y N N
Implicit Roles1
1. You cannot assign these roles. The superuser role is a default administrator role that you configure when you first set up Cisco Show and Share. The visitor role is the default role assigned to users who are not logged in.
Superuser Y Yes Y Y Y Y
Visitor ? ? No N ? N N ? N N
4-3Administrator Guide for Cisco Show and Share 5.2.x
OL-21595-04

Chapter 4 Manage User Access and Permissions Procedures
Procedures • Prerequisites, page 4-4
• Assign or Remove User Roles, page 4-4
• Search for Users by Their Role Assignments, page 4-6
Prerequisites • Create or import user accounts in DMS-Admin.
• Log in to Cisco Show and Share with administrative privileges.
Assign or Remove User RolesYou can assign one or more roles to Cisco Show and Share users according to their responsibilities. If you do not assign a specific role to a user, the user is give the visitor role by default.
You can assign roles individually or you can select multiple users to assign the same set of roles to.
Procedure
Step 1 Access the user role management screen:
a. Choose Administration from the global navigation.
b. Choose Manage > User Roles.
The Show and Share User Roles table appears.
4-4Administrator Guide for Cisco Show and Share 5.2.x
OL-21595-04
Chapter 4 Manage User Access and Permissions Procedures
Step 2 Select one or more users:
a. To navigate the table:
– Browse — Use the pagination controls at the bottom of the table to browse through the list.
– Sort—Click on the User Name, User ID, or User E-mail column heading to sort the table by that column. Clicking on the column again reverses the search.
– Search — Use the search field to match a partial name, ID, or e-mail address. Do not use phrases with spaces.
– Filter—Filter the table by role, group, or both.
b. If using the search or filters, click Go to apply your filter or search. You can combine filtering and searching. To clear the filter or the search, clear the search field and filter lists and click Go again.
c. For each user you want to select, check the checkbox to the left of the user name. You can select multiple users and assign them the same set of roles as a batch.
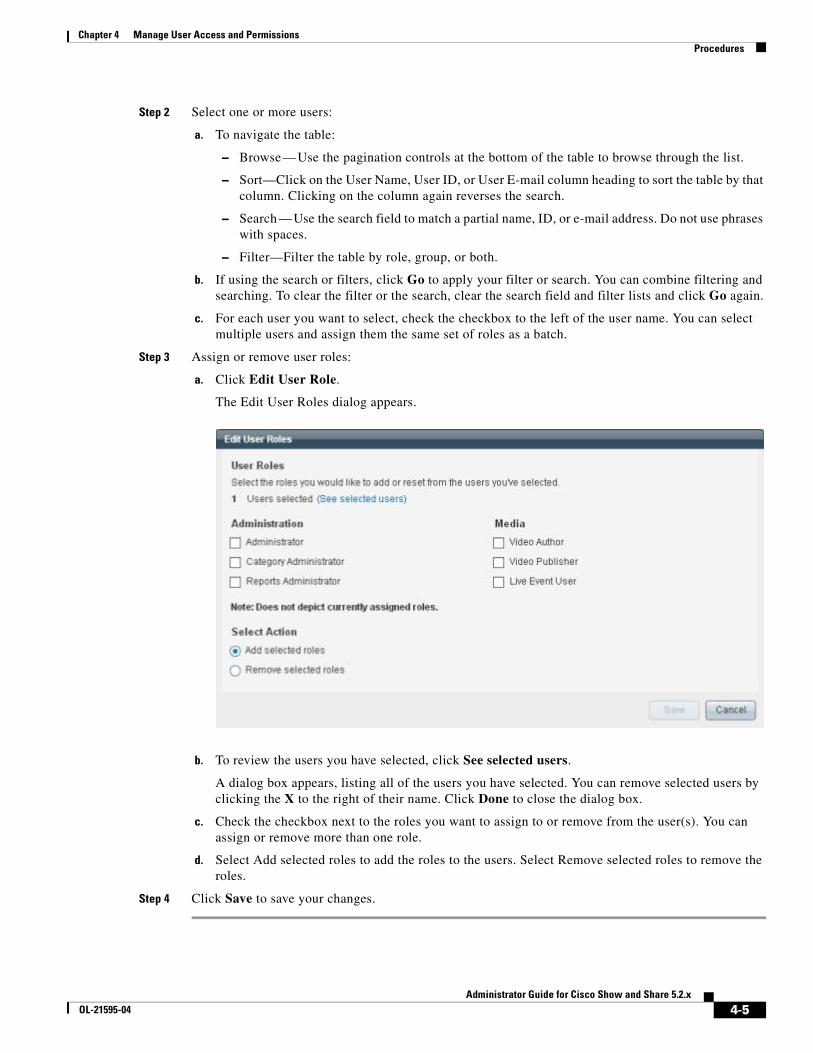
Step 3 Assign or remove user roles:
a. Click Edit User Role.
The Edit User Roles dialog appears.
b. To review the users you have selected, click See selected users.
A dialog box appears, listing all of the users you have selected. You can remove selected users by clicking the X to the right of their name. Click Done to close the dialog box.
c. Check the checkbox next to the roles you want to assign to or remove from the user(s). You can assign or remove more than one role.
d. Select Add selected roles to add the roles to the users. Select Remove selected roles to remove the roles.
Step 4 Click Save to save your changes.
4-5Administrator Guide for Cisco Show and Share 5.2.x
OL-21595-04

Chapter 4 Manage User Access and Permissions Procedures
Search for Users by Their Role AssignmentsYou can quickly identify all users who share a user role in common.
Procedure
Step 1 Choose Administration from the global navigation.
Step 2 Choose Manage > User Roles.
Step 3 Choose an option from the Filter By list.
Step 4 (Optional) Enter all or part of a username in the Find a User field.
Step 5 Click Go.
4-6Administrator Guide for Cisco Show and Share 5.2.x
OL-21595-04

AOL-21595-04
C H A P T E R5
Manage the Publishing WorkflowRevised: May 31, 2011 OL-21595-04
• Concepts, page 5-1
• Procedures, page 5-2
Concepts • Understand the Publishing Workflow without Approvers, page 5-1
• Understand the Publishing Workflow with Approvers, page 5-2
Understand the Publishing Workflow without ApproversThe simplest workflow to manage is one in which Show and Share assigns the Video Publisher role implicitly and automatically to every Video Author. This workflow does not impose any process to request or grant permission to publish. Instead, authors can publish anything at their own discretion.
While this workflow does not impose much administrative overhead at first, your responsibilities as an administrator might grow quickly and unpredictably if even a few authors are confused, careless, or malicious.
5-1dministrator Guide for Cisco Show and Share 5.2.x

Chapter 5 Manage the Publishing Workflow Procedures
Understand the Publishing Workflow with ApproversAn alternative workflow does not assign the Video Publisher role to anyone automatically and does not bind it automatically to the Video Author role. Instead. it imposes this framework:
• Administrators must assign the Video Publisher role manually.
• Administrators must assign approvers manually to authors who are not publishers.
• Author and publisher role assignments might share users in common, or might not.
– Authors who are also publishers Can create, edit, and publish their own work.
– Authors who are not publishers Can create and edit their own work but are not authorized to publish it. They must submit a request to their assigned approver — an intermediary who has the publisher role.
– Publishers who are not authors Cannot create or edit anything. However, if they are the designated approver for one or more authors, they can receive publishing requests, review drafts that are submitted to them, and allow or deny an author’s requests to publish.
Procedures • Choose a Publishing Workflow, page 5-2
• Assign Approvers to Authors, page 5-3
Choose a Publishing Workflow
Procedure
Step 1 Choose Administration from the global navigation.
Step 2 Choose Manage > Permissions and Settings.
Step 3 Click an option in the Publishing Rights area, and then click Apply.
Your options are to allow anyone with the Author role to publish their own videos or to require the Publisher role to publish videos (either by Authors with Publisher privileges or by an approver with Publisher privileges assigned to the author).
Step 4 Stop. You have completed this procedure.
5-2Administrator Guide for Cisco Show and Share 5.2.x
OL-21595-04
Chapter 5 Manage the Publishing Workflow Procedures
What To Do Next
• Assign Approvers to Authors, page 5-3
Assign Approvers to AuthorsYou can assign approvers to authors and revoke approver assignments that are already in effect.
Note Each author can only have one approver; you cannot assign multiple approvers to an author.
Procedure
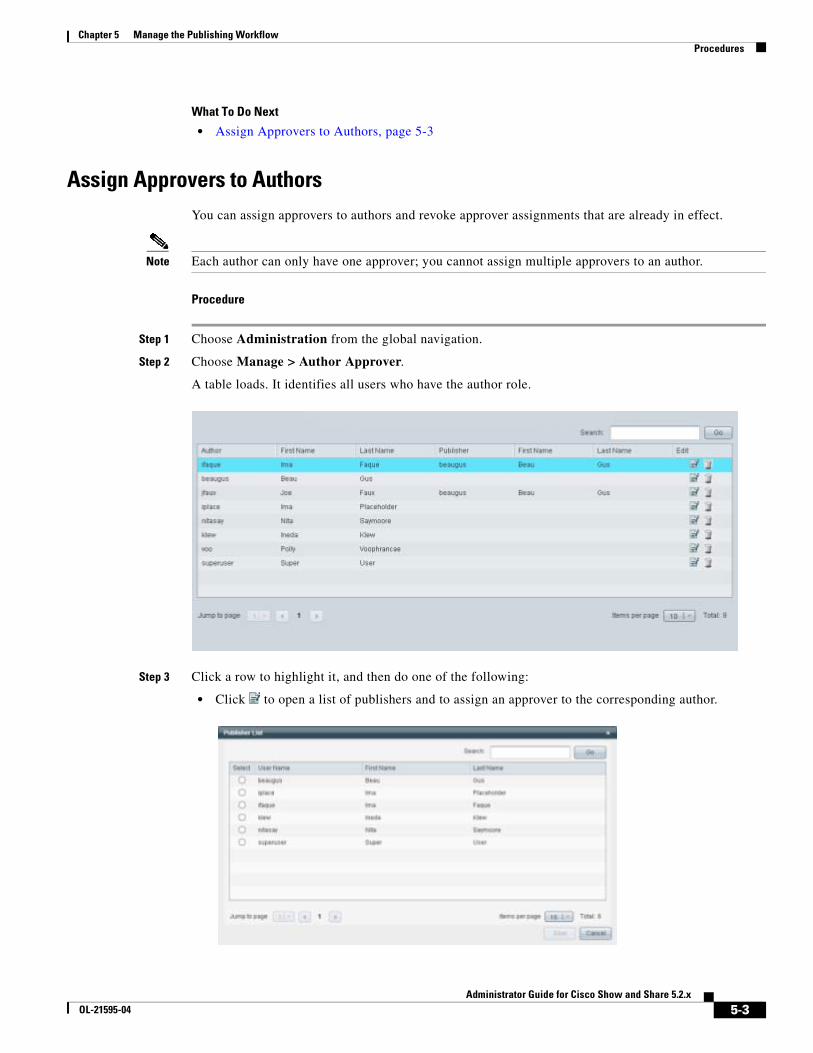
Step 1 Choose Administration from the global navigation.
Step 2 Choose Manage > Author Approver.
A table loads. It identifies all users who have the author role.
Step 3 Click a row to highlight it, and then do one of the following:
• Click to open a list of publishers and to assign an approver to the corresponding author.
5-3Administrator Guide for Cisco Show and Share 5.2.x
OL-21595-04

Chapter 5 Manage the Publishing Workflow Procedures
Note Although the interface allows you to select more than one publisher from the list, only one publisher can be assigned to an author. If you select multiple publishers, only the last one selected will be applied to the author.
• Click to revoke the corresponding author-approver relationship.
Step 4 Stop. You have completed this procedure.
5-4Administrator Guide for Cisco Show and Share 5.2.x
OL-21595-04

AOL-21595-04
C H A P T E R6
Manage CategoriesRevised: May 31, 2011 OL-21595-04
• Concepts, page 6-1
• Procedures, page 6-2
Concepts • Understand Categories, page 6-1
• Category Permissions, page 6-2
Understand CategoriesYou can create subject categories that apply organizational logic to your growing collection of videos. Authors and publishers can assign one or more categories to their videos. Later, viewers can use these categories to filter their video listing.
After you create categories, Show and Share lists them next to the Featured Videos browser.
• Categories might use a flat organizational structure or be nested inside other categories.
6-1dministrator Guide for Cisco Show and Share 5.2.x

Chapter 6 Manage Categories Procedures
• Some categories are public while others are private (5.2 only). All private categories are hidden from users except the ones that they are authorized to see. Private categories are not available in Cisco Show and Share 5.2.1 and later. Even though a category is private, it may contain videos that are public.
Category PermissionsYou must have the Category Administrator role to create and manage categories. You can only manage categories that you create. You can not see categories created by other category administrators.
The superuser user can move, rename, and delete any category—even those created by other category administrators. Additionally, the superuser user can reassign category ownership from one user to another.
Procedures • Create Categories, page 6-3
• Rename a Category, page 6-3
• Move a Category, page 6-4
• Change Category Owner, page 6-4
• Delete a Category, page 6-5
Example: Flat categories
Example: Nested categories.
Example: Public and private categories.
6-2Administrator Guide for Cisco Show and Share 5.2.x
OL-21595-04

Chapter 6 Manage Categories Procedures
Create Categories
Note Private categories were removed from Cisco Show and Share 5.2.1. During the upgrade, the categories were either converted to public categories or they were removed from the system (but the videos belonging to the categories were not removed). See the Release Notes for Cisco Digital Media Suite 5.2.x for more information.
Procedure
Step 1 Choose Administration from the global navigation.
Step 2 Choose Customize > Main Categories.
Step 3 Click Create Category.
The Create Category dialog box opens.
Step 4 Enter a unique and descriptive name for this category.
Step 5 (5.2 only) Choose whether this category should be Public or Private.
Step 6 Choose whether this category should be located at the Root level or inside another category that you already defined.
Step 7 Click OK.
Step 8 Stop. You have completed this procedure.
Rename a CategoryYou must be the category owner to rename a category.
Procedure
Step 1 Choose Administration from the global navigation.
Step 2 Choose Customize > Main Categories.
Step 3 Select the category you want to rename. Click the triangle button ( ) to expand categories that contain subcategories.
Step 4 Click Options.
Step 5 Choose Rename Category.
The Rename Category dialog box appears.
Step 6 Type the new category name in the New Category Name field.
Step 7 Click OK.
Step 8 Stop. You have completed this procedure.
6-3Administrator Guide for Cisco Show and Share 5.2.x
OL-21595-04
Chapter 6 Manage Categories Procedures
Move a CategoryYou must be the category owner to move a category.
Procedure
Step 1 Choose Administration from the global navigation.
Step 2 Choose Customize > Main Categories.
Step 3 Select the category you want to move. Click the triangle button ( ) to expand categories that contain subcategories.
Step 4 Click Options.
Step 5 Choose Move Category.
The Move Category dialog box appears.
Step 6 Choose a new location from the New Location list.
Step 7 Click OK.
Step 8 Stop. You have completed this procedure.
Change Category OwnerCategories are “owned” by the user who created them. Category owners can rename, move, and delete their own categories. This procedure allows you to change the ownership of a category.
Procedure
Step 1 Log into Cisco Show and Share as superuser.
Step 2 Choose Administration from the global navigation.
Step 3 Choose Customize > Main Categories.
Step 4 Select the category for which you want to change ownership.
Note You can only change category ownership for top-level categories.
Step 5 Click Options.
Step 6 Choose Change Owner.
The Change Category Owner dialog box appears.
Step 7 Click Select.
Step 8 Choose a new category owner from the list.
Step 9 Click Save.
Step 10 Stop. You have completed this procedure.
6-4Administrator Guide for Cisco Show and Share 5.2.x
OL-21595-04

Chapter 6 Manage Categories Procedures
Delete a CategoryYou must be the category owner to delete a category. If you delete a category that has sub-categories, the sub-categories are also deleted.
Deleting a category does not delete videos that belong to that category; it removes that category from those videos.
Procedure
Step 1 Choose Administration from the global navigation.
Step 2 Choose Customize > Main Categories.
Step 3 Select the category you want to rename. Click the triangle button ( ) to expand categories that contain subcategories.
Step 4 Click Options.
Step 5 Choose Delete Category.
The Delete Category dialog box appears.
Step 6 Click OK to delete the category.
Step 7 Stop. You have completed this procedure.
6-5Administrator Guide for Cisco Show and Share 5.2.x
OL-21595-04

Chapter 6 Manage Categories Procedures
6-6Administrator Guide for Cisco Show and Share 5.2.x
OL-21595-04
AOL-21595-04
C H A P T E R7
Manage System-Wide SettingsRevised: May 31, 2011 OL-21595-04
• Concepts, page 7-1
• Procedures, page 7-2
Concepts • Understand Which Features You Can Disable Site Wide, page 7-1
Understand Which Features You Can Disable Site WideYou can disable several features system wide if you choose not to use them. As soon as you disable a feature, it is hidden throughout your site. Visitors and registered users cannot see or use any feature while it is hidden. Later, you can reenable any feature at your discretion. Except where indicated, you can disable any combination of these features:
• General and Timeline Comments
• Anonymous Comments
• Video Ratings
• Tags
• Supplemental File Downloads
• Video Embedding
• Video Editing
• Slide Smoothing
Note This topic does not address any features that you might license and activate separately. Unlicensed features are hidden even from superusers. Unlicensed features are never active or available until you purchase and install the license to activate them.
Individual authors and publishers can disable some of the features that are enabled globally on a video by video basis. Their doing so has no effect on other videos in the site.
7-1dministrator Guide for Cisco Show and Share 5.2.x

Chapter 7 Manage System-Wide Settings Procedures
Procedures • Disable General and Timeline Comments, page 7-2
• Disable Anonymous Comments, page 7-3
• Disable Video Ratings, page 7-3
• Disable Tags, page 7-4
• Disable Supplemental File Downloads, page 7-4
• Disable Video Embedding, page 7-5
• Disable Video Editing, page 7-5
• Enable Image Smoothing for Attached Slides, page 7-6
• Configure a Custom Help Link, page 7-7
• Change the “Contact Your Administrator” Link, page 7-8
Disable General and Timeline CommentsBy default, viewers are allowed to enter general or timeline comments. You can disable this option globally.
If comments are allowed globally, authors can disable the ability to comment on a specific video when they publish the video. The setting configured during the video publishing applies to the video being published only. Authors cannot enable commenting for specific videos if comments are disabled globally.
By default, commenting is allowed.
Procedure
Step 1 Choose Administration from the global navigation.
Step 2 Choose Manage > Permissions and Settings.
Step 3 In the System-Wide Settings area, click Do not allow under Comments (general and timeline).
To enable general and timeline comments, click Yes, allow commenting.
Step 4 Click Apply to save your changes and make them active for site visitors.
7-2Administrator Guide for Cisco Show and Share 5.2.x
OL-21595-04
Chapter 7 Manage System-Wide Settings Procedures
Disable Anonymous CommentsBy default, viewers do not have to log in to leave general or timeline comments (if comments are allowed). If a viewer leaves a comment without being logged in, the comment is attributed to “Anonymous”. You can require users to log in before they can leave comments so that the comment author is known.
If anonymous comments are allowed globally, authors can disable the ability to comment anonymously on a specific video when they publish the video. Authors cannot allow anonymous comments if the anonymous comments have been disabled globally.
By default, anonymous comments are allowed.
Procedure
Step 1 Choose Administration from the global navigation.
Step 2 Choose Manage > Permissions and Settings.
Step 3 In the System-Wide Settings area, click Do not allow under Anonymous Comments.
To enable anonymous comments, click Yes, allow anonymous users to comment.
Step 4 Click Apply to save your changes and make them active for site visitors.
Disable Video RatingsBy default, viewers can rate videos.
If video ratings are allowed globally, authors can disable the ability to rate a specific video when they publish the video. Authors cannot enable rating for a video if rating has been disabled globally.
By default, video rating is allowed.
Procedure
Step 1 Choose Administration from the global navigation.
Step 2 Choose Manage > Permissions and Settings.
Step 3 In the System-Wide Settings area, click Do not allow under Ratings.
To enable rating, click Yes, allow video ratings.
Step 4 Click Apply to save your changes and make them active for site visitors.
7-3Administrator Guide for Cisco Show and Share 5.2.x
OL-21595-04

Chapter 7 Manage System-Wide Settings Procedures
Disable TagsBy default, viewers can add tags to videos. These tags appear in the tag cloud on the Cisco Show and Share home page.
If tags are allowed globally, authors can disable the ability for viewers to enter tags for a specific video when they publish the video. Authors cannot enable tags for a video if tags have been disabled globally.
By default, entering tags is allowed.
Procedure
Step 1 Choose Administration from the global navigation.
Step 2 Choose Manage > Permissions and Settings.
Step 3 In the System-Wide Settings area, click Do not allow under Tags.
To enable video tags, click Yes, allow tags.
Step 4 Click Apply to save your changes and make them active for site visitors.
Disable Supplemental File DownloadsBy default, viewers can download any supplemental files that video authors publish with their videos. You can disable this capability.
Disabling video downloads does not remove the supplement files from the system. Instead, the Files tab is hidden for videos that have associated downloadable files. If you reenable supplemental file downloads, any content that was previously uploaded becomes available again.
Also, authors can still upload supplemental files with their videos when video downloading is disabled. The files will not be available until file downloading is reenabled.
Procedure
Step 1 Choose Administration from the global navigation.
Step 2 Choose Manage > Permissions and Settings.
Step 3 To disable file downloading, click Do not allow under Yes, allow downloading in the Video Sharing and Download group of the Video Player Features area.
To enable file downloading, click Yes, allow downloading.
Step 4 Click Apply to save your changes and make them active for site visitors.
7-4Administrator Guide for Cisco Show and Share 5.2.x
OL-21595-04

Chapter 7 Manage System-Wide Settings Procedures
Disable Video EmbeddingBy default, viewers can copy an embed code to embed the video into their own web pages. Disabling video embedding removes this option.
By default, the video embed code is available to viewers.
Procedure
Step 1 Choose Administration from the global navigation.
Step 2 Choose Manage > Permissions and Settings.
Step 3 In the System-Wide Settings area, click Do not allow under Video Sharing.
To enable video embedding, click Yes, allow embedded video.
Step 4 Click Apply to save your changes and make them active for site visitors.
Disable Video EditingBy default, authors can edit videos that are in the draft state. The video editor allow authors to crop videos, create chapters, synchronize slides, and change the video thumbnail.
If you disable the video editor, authors can still upload slides with their video. However, they will not be able to synchronize the slide to the vide and the Slides tab will not be available to viewers.
You should disable video editing if your flash video files are not being served from a flash streaming server. Cisco Show and Share uses nondestructive editing. This means that instead of changing the actual video, Cisco Show and Share inserts markers and pointers to indicate the changes. This type of editing requires the video to be served from a Flash streaming server. If the video is being served from another type of server, such as a simple web server, then the edits that authors make will not appear during playback.
If the videos are stored on the Cisco Show and Share server itself, they will be served from a Flash streaming server.
Procedure
Step 1 Choose Administration from the global navigation.
Step 2 Choose Manage > Permissions and Settings.
Step 3 In the System-Wide Settings area, click Do not allow under Video Editing.
To enable video editing, click Yes, allow video editing.
Step 4 Click Apply to save your changes and make them active for site visitors.
7-5Administrator Guide for Cisco Show and Share 5.2.x
OL-21595-04

Chapter 7 Manage System-Wide Settings Procedures
Enable Image Smoothing for Attached SlidesSlide quality may be diminished when they are viewed in the Slides tab. This is caused by the resizing of the slide .jpg file. You can enable image smoothing to enhance the quality of the slides displayed in the slides tab.
By default, image smoothing is disabled.
Limitations and Restrictions
If you are hosting the slides on an external server:
• You must have a crossdomain.xml file in place on the web server that hosts. See Prepare a Web Server for Externally-Hosted Transcript Files, page 3-8, for information about crossdomain.xml files.
• Do not enable this feature if you are using a content delivery system, such as Cisco ACNS or Cisco ECDS, that uses redirects to server content.
If you are hosting the slides (.jpg files) on the Cisco Show and Share appliance, there are no restrictions.
Procedure
Step 1 Choose Administration from the global navigation.
Step 2 Choose Manage > Permissions and Settings.
Step 3 In the System-Wide Settings area, click Allow under Image Smoothing.
To disable image smoothing, click Do not allow.
Step 4 Click Apply to save your changes and make them active for site visitors.
7-6Administrator Guide for Cisco Show and Share 5.2.x
OL-21595-04

Chapter 7 Manage System-Wide Settings Procedures
Configure a Custom Help LinkBy default, the help link in Cisco Show and Share points to information on Cisco.com. You can change the target of this help link, allowing you to point to your own standards, policies, and procedures for using Cisco Show and Share.
Procedure
Step 1 Choose Administration from the global navigation.
Step 2 Choose Manage > Permissions and Settings.
Step 3 Type the URL of your help information in the System help link field.
Step 4 Click Apply.
7-7Administrator Guide for Cisco Show and Share 5.2.x
OL-21595-04

Chapter 7 Manage System-Wide Settings Procedures
Change the “Contact Your Administrator” LinkThe Contact your administrator link appears on the Cisco Show and Share login page. It is associated with the superuser account.
Clicking this link opens up an e-mail message with the subject “DMM:: Forgotten Password” and the superuser e-mail address in the To field.
To change this e-mail address, you must change the e-mail address associated with the superuser account. See the Users and Groups chapter in the User Guide for Cisco Digital Media Manager 5.2.x for information about how to change the e-mail address:
http://www.cisco.com/en/US/docs/video/digital_media_systems/5_x/5_2/dmm/user/guide/admin/users.html
7-8Administrator Guide for Cisco Show and Share 5.2.x
OL-21595-04
AOL-21595-04
C H A P T E R8
Manage ContentRevised: May 31, 2011 OL-21595-04
Administrators can remove unwanted comments or videos from the system.
• Procedures, page 8-1
Procedures • Find and Remove Comments, page 8-1
• Find and Remove Videos, page 8-2
Find and Remove Comments
Procedure
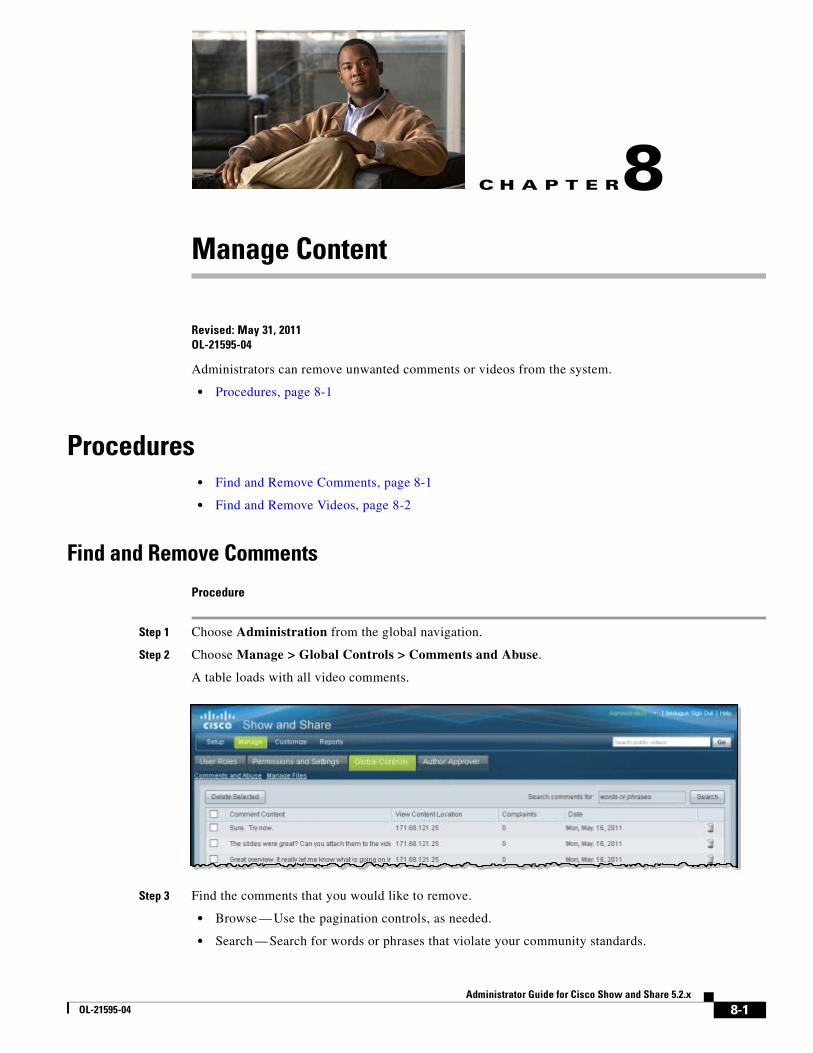
Step 1 Choose Administration from the global navigation.
Step 2 Choose Manage > Global Controls > Comments and Abuse.
A table loads with all video comments.
Step 3 Find the comments that you would like to remove.
• Browse — Use the pagination controls, as needed.
• Search — Search for words or phrases that violate your community standards.
8-1dministrator Guide for Cisco Show and Share 5.2.x

Chapter 8 Manage Content Procedures
Step 4 To remove a single comment, do the following:
a. Click the trash can icon in the corresponding row.
b. Click OK.
Step 5 To remove multiple comments, do the following:
a. Check the check boxes to choose multiple comments.
b. Click .
c. Click OK.
Step 6 Stop. You have completed this procedure.
Find and Remove VideosYou might need to remove a video because it is obsolete or contains inappropriate or confidential material.
Procedure
Step 1 Choose Administration from the global navigation.
Step 2 Choose Manage > Global Controls > Manage Files.
A table of existing videos appears.
8-2Administrator Guide for Cisco Show and Share 5.2.x
OL-21595-04

Chapter 8 Manage Content Procedures
Step 3 Find the videos that you would like to remove.
• Browse — Use the pagination controls, as needed.
• Text Search — Search for videos that contain the search term in the title.
• Age Search—Search for videos that are older than the specified number of days.
Step 4 To remove a single video:
a. Click the trash can icon in the corresponding row.
b. Click OK.
Step 5 To remove multiple videos:
a. Use the check boxes to choose multiple files.
b. Click .
c. Click OK.
Step 6 Stop. You have completed this procedure.
8-3Administrator Guide for Cisco Show and Share 5.2.x
OL-21595-04

Chapter 8 Manage Content Procedures
8-4Administrator Guide for Cisco Show and Share 5.2.x
OL-21595-04

AOL-21595-04
C H A P T E R9
Manage Featured VideosRevised: May 31, 2011 OL-21595-04
• Concepts, page 9-1
• Procedures, page 9-2
Concepts • Understand What It Means to Feature a Video, page 9-1
Understand What It Means to Feature a VideoYou can encourage your Cisco Show and Share community to watch particular videos that you emphasize and make prominent. For example, you might spotlight videos that:
• Announce important information, including opportunities and deadlines.
• Spread exciting or joyous news, or reveal the outcome of a vote or contest.
• Introduce new tools, concepts, or policies, or explain something clearly that was confusing.
• Replay a significant or relevant event or meeting.
Cisco Show and Share then spotlights these videos in its Featured Videos browser, which all users see.
Until you populate the Featured Videos browser for your site, it remains empty. But whenever the Featured Videos browser is populated, thumbnail preview images for spotlighted videos are visible to all community members under the Featured Videos heading.
9-1dministrator Guide for Cisco Show and Share 5.2.x
Chapter 9 Manage Featured Videos Procedures
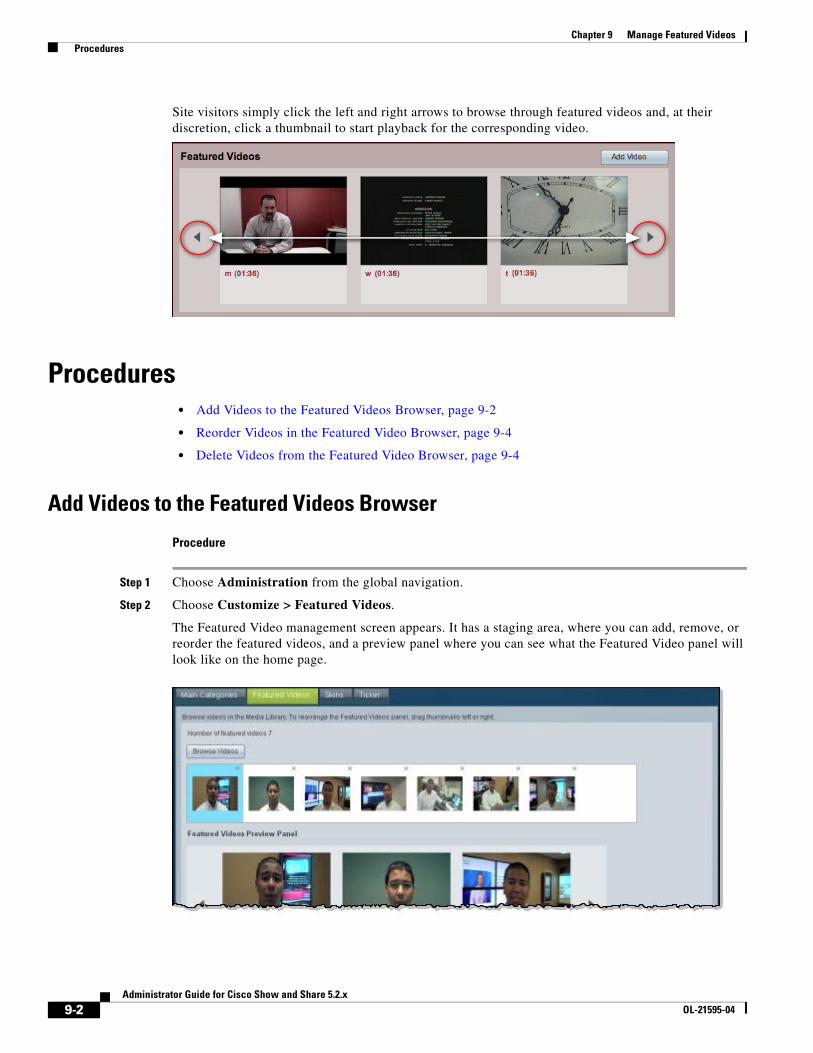
Site visitors simply click the left and right arrows to browse through featured videos and, at their discretion, click a thumbnail to start playback for the corresponding video.
Procedures • Add Videos to the Featured Videos Browser, page 9-2
• Reorder Videos in the Featured Video Browser, page 9-4
• Delete Videos from the Featured Video Browser, page 9-4
Add Videos to the Featured Videos Browser
Procedure
Step 1 Choose Administration from the global navigation.
Step 2 Choose Customize > Featured Videos.
The Featured Video management screen appears. It has a staging area, where you can add, remove, or reorder the featured videos, and a preview panel where you can see what the Featured Video panel will look like on the home page.
9-2Administrator Guide for Cisco Show and Share 5.2.x
OL-21595-04

Chapter 9 Manage Featured Videos Procedures
Step 3 Click Browse Videos to open the Video Browser.
The Video Browser dialog opens.
Step 4 Check the check box in the Title column to select a video to appear in the featured video list. You can select multiple videos. Clear the checkboxes of videos that you do not want to appear. You can page through the videos or search for videos with specific words in their titles or descriptions.
Step 5 Click OK to close the Video Browser.
The selected videos appear in the Featured Video staging area.
Step 6 (Optional) Reorder the videos. See Reorder Videos in the Featured Video Browser, page 9-4.
Step 7 Click Apply.
Step 8 Stop. You have completed this procedure.
9-3Administrator Guide for Cisco Show and Share 5.2.x
OL-21595-04
Chapter 9 Manage Featured Videos Procedures
Reorder Videos in the Featured Video Browser
Procedure
Step 1 Choose Administration from the global navigation.
Step 2 Choose Customize > Featured Videos.
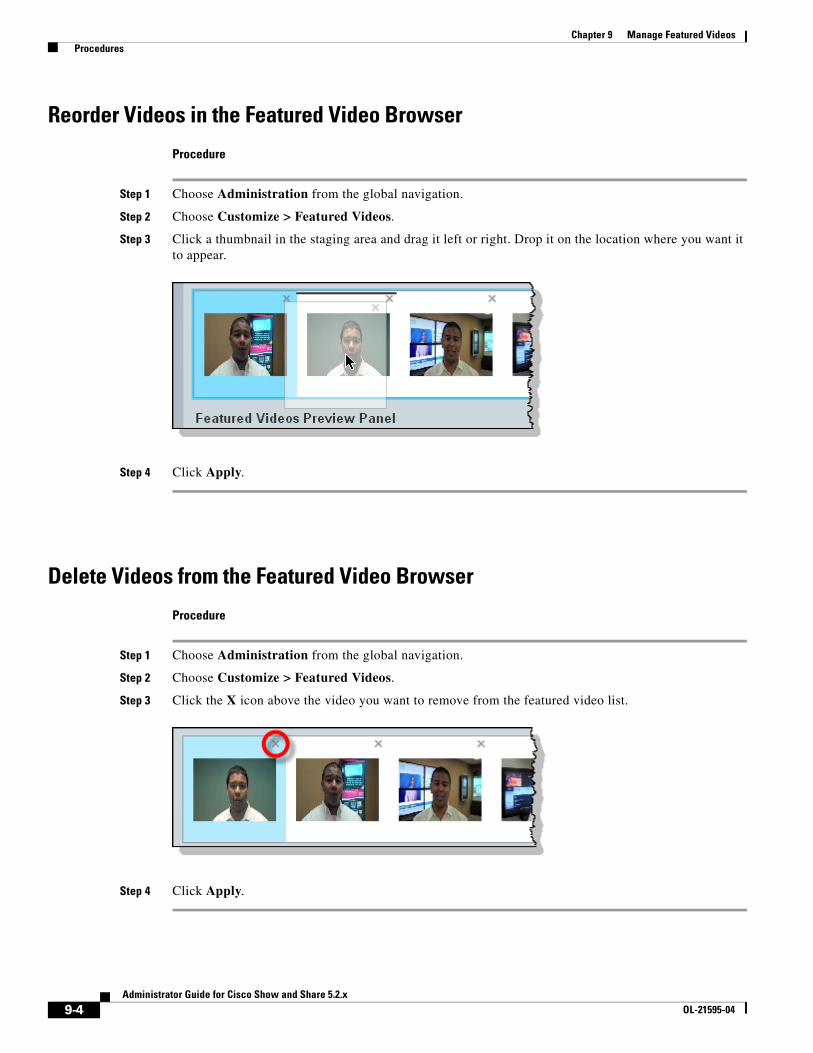
Step 3 Click a thumbnail in the staging area and drag it left or right. Drop it on the location where you want it to appear.
Step 4 Click Apply.
Delete Videos from the Featured Video Browser
Procedure
Step 1 Choose Administration from the global navigation.
Step 2 Choose Customize > Featured Videos.
Step 3 Click the X icon above the video you want to remove from the featured video list.
Step 4 Click Apply.
9-4Administrator Guide for Cisco Show and Share 5.2.x
OL-21595-04
AOL-21595-04
C H A P T E R10
Manage TickersRevised: May 31, 2011 OL-21595-04
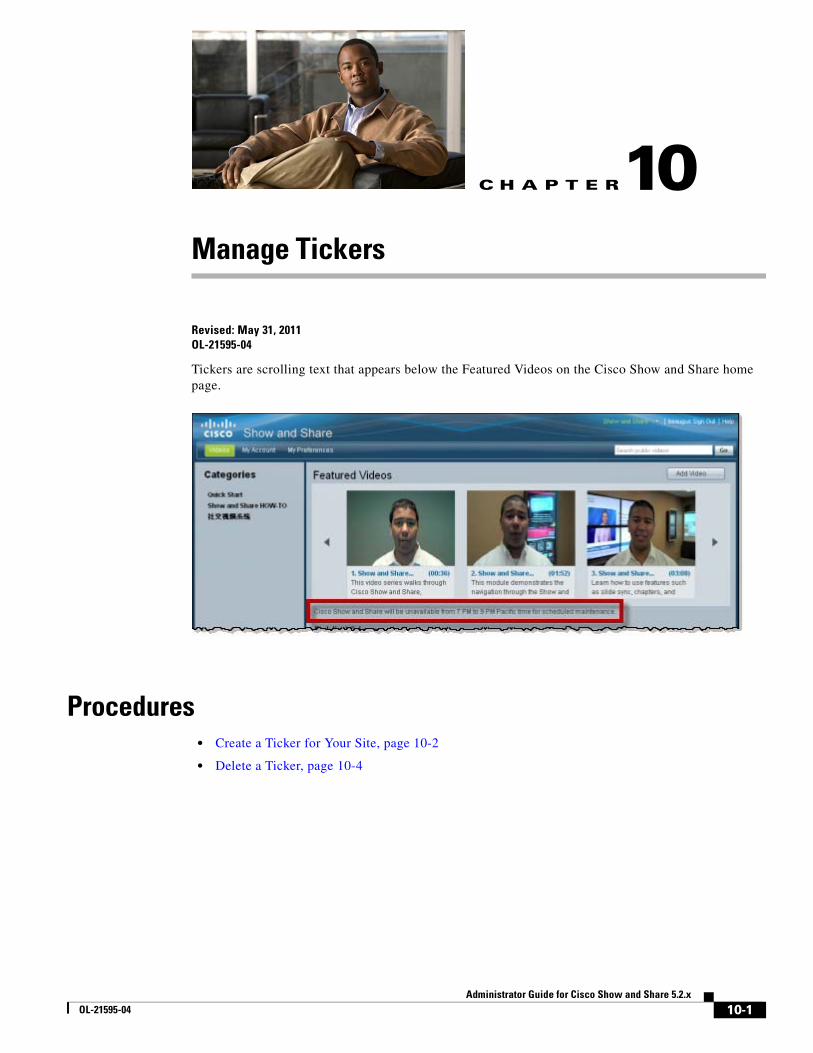
Tickers are scrolling text that appears below the Featured Videos on the Cisco Show and Share home page.
Procedures • Create a Ticker for Your Site, page 10-2
• Delete a Ticker, page 10-4
10-1dministrator Guide for Cisco Show and Share 5.2.x
Chapter 10 Manage Tickers Procedures
Create a Ticker for Your Site
Procedure
Step 1 Choose Administration from the global navigation.
Step 2 Choose Customize > Ticker.
Step 3 Click Create Ticker.
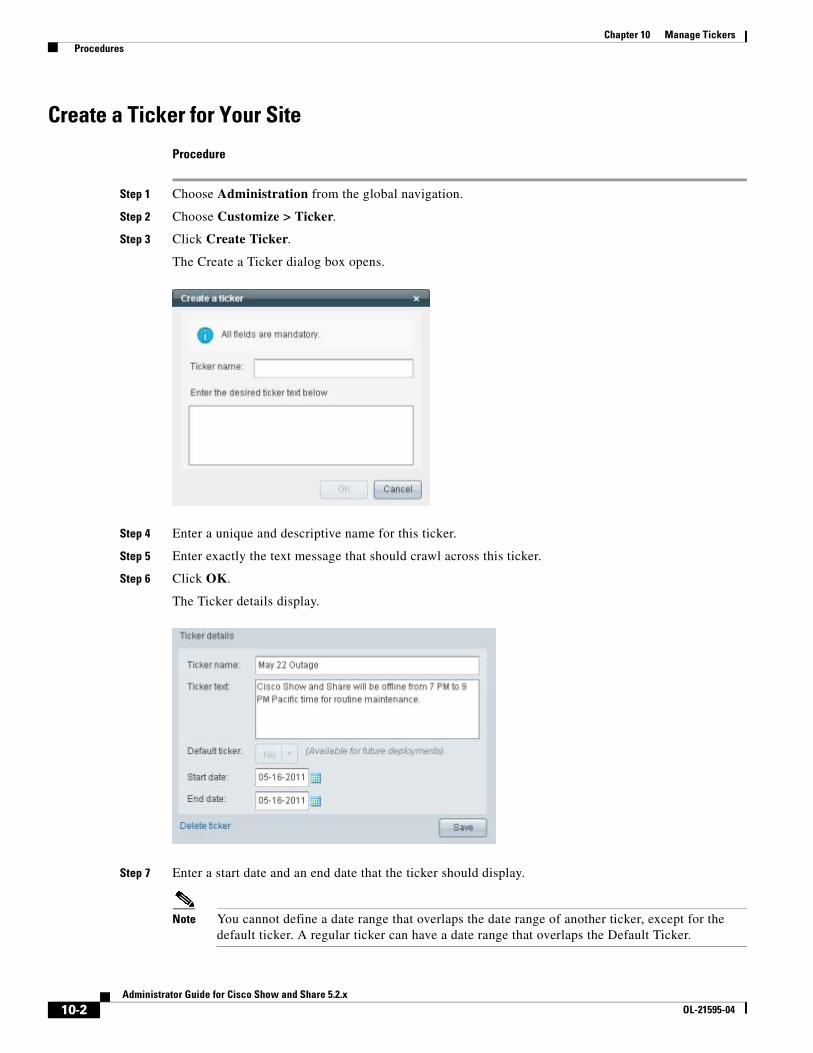
The Create a Ticker dialog box opens.
Step 4 Enter a unique and descriptive name for this ticker.
Step 5 Enter exactly the text message that should crawl across this ticker.
Step 6 Click OK.
The Ticker details display.
Step 7 Enter a start date and an end date that the ticker should display.
Note You cannot define a date range that overlaps the date range of another ticker, except for the default ticker. A regular ticker can have a date range that overlaps the Default Ticker.
10-2Administrator Guide for Cisco Show and Share 5.2.x
OL-21595-04

Chapter 10 Manage Tickers Procedures
Step 8 Click Save.
Define a Default TickerA default ticker is a ticker that plays when no other ticker is defined. If another ticker has a date range that overlaps the Default Ticker date range, the other ticker plays.
Step 1 Choose Administration from the global navigation.
Step 2 Choose Customize > Ticker.
Step 3 Choose a Ticker from the Select a ticker list.
Step 4 Select Yes from the Default ticker list.
Step 5 Enter a start date and an end date that the ticker should display.
Note The date range for a default ticker can overlap the date range of non-default tickers.
Step 6 (Optional) Click No end date to create a default ticker that does not expire.
Step 7 Click Save.
10-3Administrator Guide for Cisco Show and Share 5.2.x
OL-21595-04

Chapter 10 Manage Tickers Procedures
Edit a Ticker
Procedure
Step 1 Choose Administration from the global navigation.
Step 2 Choose Customize > Ticker.
Step 3 Choose a Ticker from the Select a ticker list.
Step 4 Change the ticker information.
Step 5 Click Save.
Delete a Ticker
Procedure
Step 1 Choose Administration from the global navigation.
Step 2 Choose Customize > Ticker.
Step 3 Choose a Ticker from the Select a ticker list.
Step 4 Click Delete Ticker.
A confirmation dialog appears.
10-4Administrator Guide for Cisco Show and Share 5.2.x
OL-21595-04

Chapter 10 Manage Tickers Procedures
Step 5 Click OK to confirm the deletion.
Step 6 Click Apply.
10-5Administrator Guide for Cisco Show and Share 5.2.x
OL-21595-04

Chapter 10 Manage Tickers Procedures
10-6Administrator Guide for Cisco Show and Share 5.2.x
OL-21595-04

AOL-21595-04
C H A P T E R11
Localize and Reskin Show and ShareRevised: May 31, 2011 OL-21595-04
• About Customizations, page 11-1
• Procedures, page 11-2
About CustomizationsThere are several ways that you can customize your Cisco Show and Share site. This chapter covers the following interface customizations:
• You can reskin your site. Doing this entails any combination of:
– Setting or resetting the theme.
– Setting or resetting the site logo.
– Setting or resetting the background image.
• You can choose the language in which Cisco Show and Share renders its system messages and field labels.
See the following chapters for information about other types of customization:
• If you would like to define and organize categories, please see the “Manage Categories” section on page 6-1.
• If you would like to choose featured videos, please see the “Manage Featured Videos” section on page 9-1.
11-1dministrator Guide for Cisco Show and Share 5.2.x

Chapter 11 Localize and Reskin Show and Share Procedures
Procedures • Choose a Language for the User Interface, page 11-2
• Select A Theme, page 11-3
• Change the Background Image, page 11-3
• Change the Site Logo, page 11-4
Choose a Language for the User InterfaceThe system language preference defines the language that visitors see when they first log in to Cisco Show and Share. Logged-in users can override this setting on an individual basis in their My Preferences area.
Procedure
Step 1 Choose Administration from the global navigation.
Step 2 Choose Manage > Permissions and Settings.
Step 3 Choose a language from the System Language Preference list.
The following languages are available:
• English
• Spanish
• French
Step 4 Click Apply.
11-2Administrator Guide for Cisco Show and Share 5.2.x
OL-21595-04

Chapter 11 Localize and Reskin Show and Share Procedures
Select A ThemeThe Theme applies an overall look and feel to your Cisco Show and Share site. There are five themes available:
After choosing a theme, you can still change the site logo and background image.
Procedure
Step 1 Choose Administration from the global navigation.
Step 2 Choose Customize > Skins.
Step 3 Choose a theme from the Select a Theme list.
A preview of your selection appears on the right.
Step 4 Click Apply to make your selection active for all users.
Change the Background ImageYou can use the default theme background image or choose a custom background image that is shown behind the Cisco Show and Share page.
The background image that you upload must be a nonprogressive JPG. The image must be 1260 x 1024 pixels.
Step 1 Choose Administration from the global navigation.
Step 2 Choose Customize > Skins.
Step 3 Choose an option from the Background Image list.
• Choose Use Theme Image to use the default background image for the theme.
• Choose Use My Image to upload a custom image. Click Upload New Image to choose a .JPG image from your computer.
A preview of your selection appears on the right.
Step 4 Click Apply to make your selection active for all users.
Ocean Fire Grass Stone Earth
11-3Administrator Guide for Cisco Show and Share 5.2.x
OL-21595-04
Chapter 11 Localize and Reskin Show and Share Procedures
Change the Site LogoYou can use the default Cisco Show and Share logo or choose a custom logo that is shown at the top of each Cisco Show and Share page.
Any logo image that you upload must be a nonprogressive JPG, a GIF, or a PNG file. The logo must be 398 x 46 pixels.
Step 1 Choose Administration from the global navigation.
Step 2 Choose Customize > Skins.
Step 3 Choose an option from the Header Logo list.
• Choose Use Default Header to use the default Cisco Show and Share logo.
• Choose Use My Header to upload a custom image. Click Upload a new header logo to choose a .JPG, .GIF, or .PNG image from your computer.
A preview of your selection appears on the right.
Step 4 Click Apply to make your selection active for all users.
11-4Administrator Guide for Cisco Show and Share 5.2.x
OL-21595-04

AOL-21595-04
C H A P T E R 12
Configure a Cisco MXE for Video TranscodingRevised: May 31, 2011 OL-21595-04
This chapter describes how to integrate a Cisco Media Experience Engine (MXE) 3500 with Cisco Show and Share to automatically transcode videos to a common format.
This chapter contains the following sections:
• About Cisco MXE Integration with Cisco Show and Share, page 12-1
• Limitations and Restrictions, page 12-2
• Procedures, page 12-2
• Reference, page 12-5
About Cisco MXE Integration with Cisco Show and ShareWhen Cisco MXE integration is enabled in Cisco Show and Share, videos uploaded to Cisco Show and Share are delivered to the Cisco MXE for transcoding. When the transcoding is complete, the transcoded videos are returned to Cisco Show and Share. Videos are transcoded to the following format:
• Format: Flash video 8 (.flv)
• Bitrate: 400 bps
• Frame rate: 30 fps
• Maximum height: 268 pixels
• Maximum width: 480 (for 16x9 ratio), 360 (for 4:3 ratio)
Transcoded videos are editable in the Cisco Show and Share video editor. Windows media may contain embedded closed captioning or slides. These will be lost if those videos are transcoded. You can give users the option of not trancoding Windows media files so that the embedded information does not get lost. However, those files will not be editable in the video editor.
12-1dministrator Guide for Cisco Show and Share 5.2.x
Chapter 12 Configure a Cisco MXE for Video Transcoding Limitations and Restrictions
Limitations and RestrictionsThe following limitations apply to Cisco MXE integration with Cisco Show and Share:
• You can only configure one Cisco MXE or Cisco MXE cluster in Cisco Show and Share.
• Transcoding is not available for the Record a Video option in Cisco Show and Share.
• On a Cisco MXE with a Standalone license, the only profile space available is the default profile space. During the integration procedure, you point the default profile space to the transcoding profile created specifically for Cisco Show and Share integration. All transcoding jobs submitted to the Cisco MXE with a Standalone license will be transcoded with the Cisco Show and Share profile. A Cisco MXE with a Resource Manager license does not have this restriction; you can create a dedicated user and profile space for Cisco Show and Share, and other users and profile spaces for other applications.
Procedures1. Integrate a Cisco MXE 3500 with Cisco Show and Share, page 12-2
2. Register the Cisco MXE in the Cisco DMM, page 12-3
3. Configure Cisco Show and Share to use the MXE for Transcoding Videos, page 12-4
4. Verify the Configuration, page 12-4
Integrate a Cisco MXE 3500 with Cisco Show and ShareTo integrate the Cisco MXE 3500 with Cisco Show and Share, see the appropriate Integration Note for your release verision on Cisco.com:
http://www.cisco.com/en/US/products/ps12130/products_installation_and_configuration_guides_list.html
12-2Administrator Guide for Cisco Show and Share 5.2.x
OL-21595-04
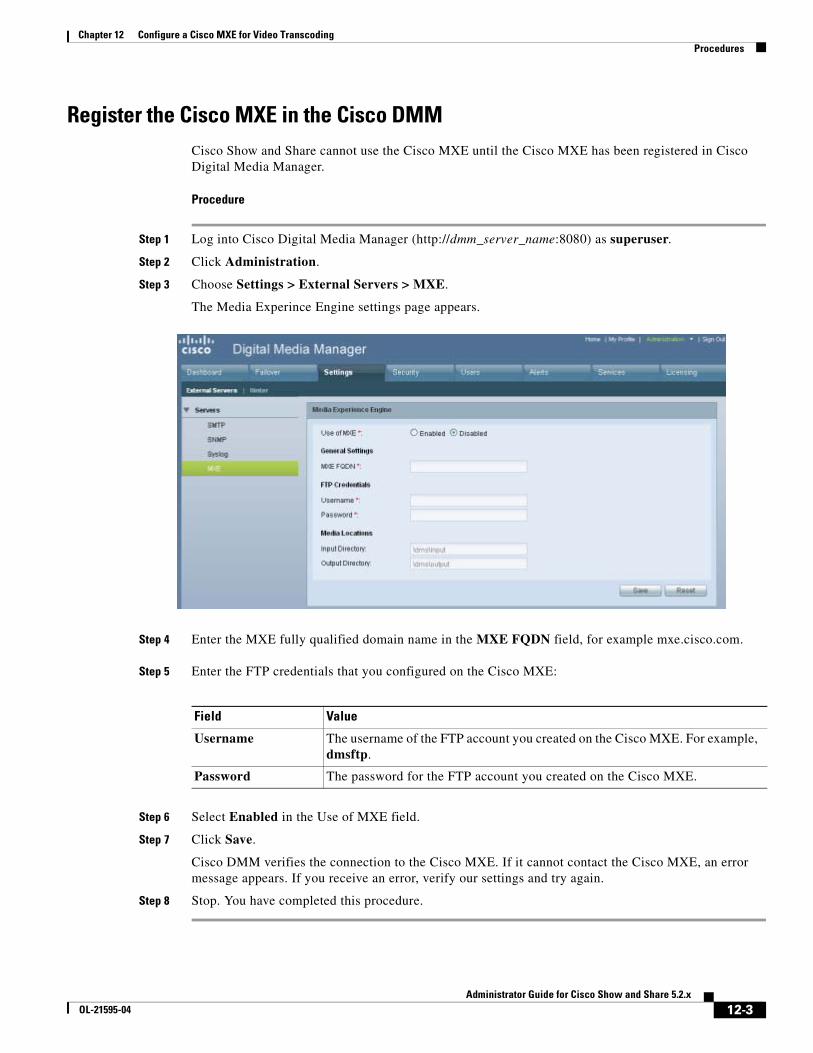
Chapter 12 Configure a Cisco MXE for Video Transcoding Procedures
Register the Cisco MXE in the Cisco DMMCisco Show and Share cannot use the Cisco MXE until the Cisco MXE has been registered in Cisco Digital Media Manager.
Procedure
Step 1 Log into Cisco Digital Media Manager (http://dmm_server_name:8080) as superuser.
Step 2 Click Administration.
Step 3 Choose Settings > External Servers > MXE.
The Media Experince Engine settings page appears.
Step 4 Enter the MXE fully qualified domain name in the MXE FQDN field, for example mxe.cisco.com.
Step 5 Enter the FTP credentials that you configured on the Cisco MXE:
Step 6 Select Enabled in the Use of MXE field.
Step 7 Click Save.
Cisco DMM verifies the connection to the Cisco MXE. If it cannot contact the Cisco MXE, an error message appears. If you receive an error, verify our settings and try again.
Step 8 Stop. You have completed this procedure.
Field Value
Username The username of the FTP account you created on the Cisco MXE. For example, dmsftp.
Password The password for the FTP account you created on the Cisco MXE.
12-3Administrator Guide for Cisco Show and Share 5.2.x
OL-21595-04
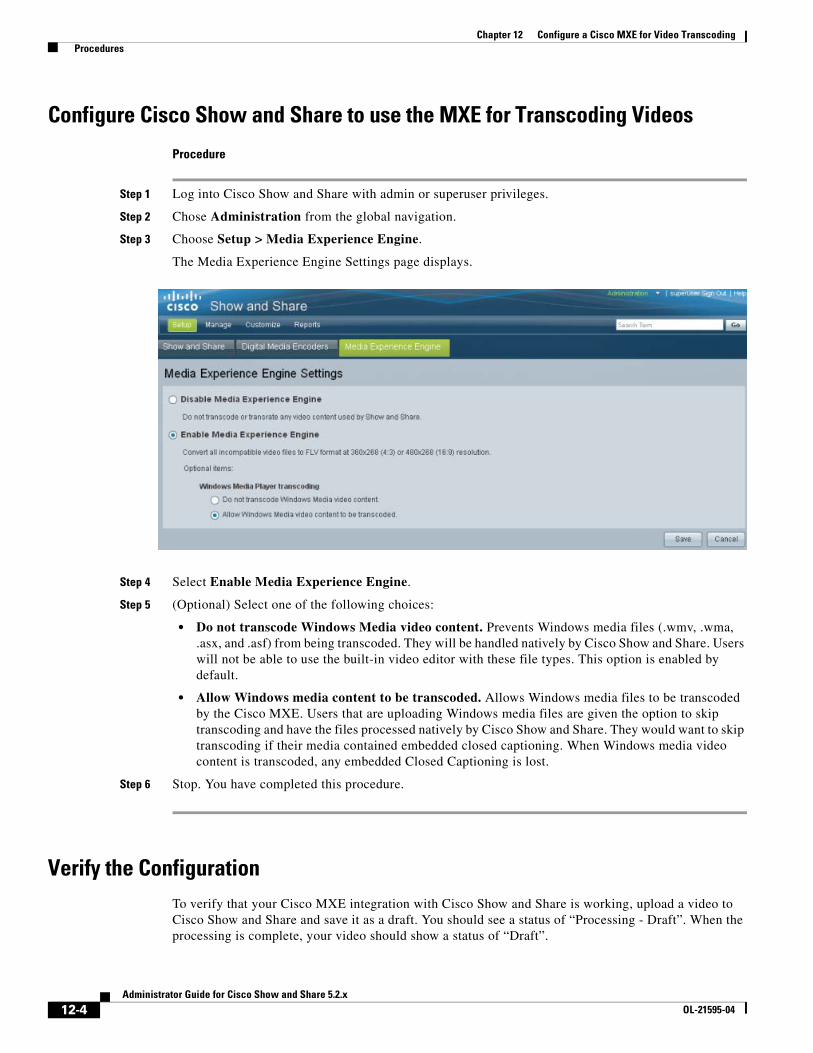
Chapter 12 Configure a Cisco MXE for Video Transcoding Procedures
Configure Cisco Show and Share to use the MXE for Transcoding Videos
Procedure
Step 1 Log into Cisco Show and Share with admin or superuser privileges.
Step 2 Chose Administration from the global navigation.
Step 3 Choose Setup > Media Experience Engine.
The Media Experience Engine Settings page displays.
Step 4 Select Enable Media Experience Engine.
Step 5 (Optional) Select one of the following choices:
• Do not transcode Windows Media video content. Prevents Windows media files (.wmv, .wma, .asx, and .asf) from being transcoded. They will be handled natively by Cisco Show and Share. Users will not be able to use the built-in video editor with these file types. This option is enabled by default.
• Allow Windows media content to be transcoded. Allows Windows media files to be transcoded by the Cisco MXE. Users that are uploading Windows media files are given the option to skip transcoding and have the files processed natively by Cisco Show and Share. They would want to skip transcoding if their media contained embedded closed captioning. When Windows media video content is transcoded, any embedded Closed Captioning is lost.
Step 6 Stop. You have completed this procedure.
Verify the ConfigurationTo verify that your Cisco MXE integration with Cisco Show and Share is working, upload a video to Cisco Show and Share and save it as a draft. You should see a status of “Processing - Draft”. When the processing is complete, your video should show a status of “Draft”.
12-4Administrator Guide for Cisco Show and Share 5.2.x
OL-21595-04
Chapter 12 Configure a Cisco MXE for Video Transcoding Reference
ReferenceFor more information about customizing transcoder profiles, see the Cisco MXE 3500 documentation: http://www.cisco.com/en/US/docs/video/mxe/3500/sw/3_x/3_0/roadmap/mxe3500_30map.html.
12-5Administrator Guide for Cisco Show and Share 5.2.x
OL-21595-04

Chapter 12 Configure a Cisco MXE for Video Transcoding Reference
12-6Administrator Guide for Cisco Show and Share 5.2.x
OL-21595-04

AOL-21595-04
C H A P T E R13
Configure Digital Media EncodersRevised: May 31, 2011 OL-21595-04
Features on the Digital Media Encoders tab help you to manage what — if anything — your Cisco Show and Share live event users can do with your DMEs.
• Concepts, page 13-1
• Procedures, page 13-3
• Reference, page 13-8
Concepts • What Are Encoding Formats (Presets)?, page 13-2
• What Are Encoder Profiles?, page 13-3
Tip See the “Live Events” chapter from User Guide for Cisco Show and Share 5.2.x. on Cisco.com to understand concepts that resolve these questions:
• How does live video differ from video-on-demand?
• How do pull and push encoder profiles differ?
13-1dministrator Guide for Cisco Show and Share 5.2.x

Chapter 13 Configure Digital Media Encoders Concepts
What Are Encoding Formats (Presets)?Show and Share Administration is preconfigured with the recommended encoding formats for DMEs. Encoding formats are named collections of settings — think of them as presets — for DMEs that authorized live event users operate from within Cisco Show and Share.
Each encoding format specifies:
• A media output type, such as FLV or WMV.
• Dimensions, such as 640x480, that are suitable for a particular type of playback device.
• A bandwidth consumption rate that is optimized for the expected network capacity.
• The overall quality (bitrate, frame rate, and more).
“Default” Encoding Formats
When you first start to use Show and Share Administration, you can easily recognize the predefined and preferred formats in the Encoding Formats list. We append the word “default” to their names.
Note • There can be only one default at a time for Windows Media.
• There can be only one default at a time for Flash Video.
You can create new encoding formats, edit the currently defined formats, and delete formats. You can also change which two encoding formats your DME should use as its defaults. Therefore, after you change (even one time) which encoding formats are your defaults, the “default” label no longer signifies that Cisco defined any encoding format in this list.
13-2Administrator Guide for Cisco Show and Share 5.2.x
OL-21595-04
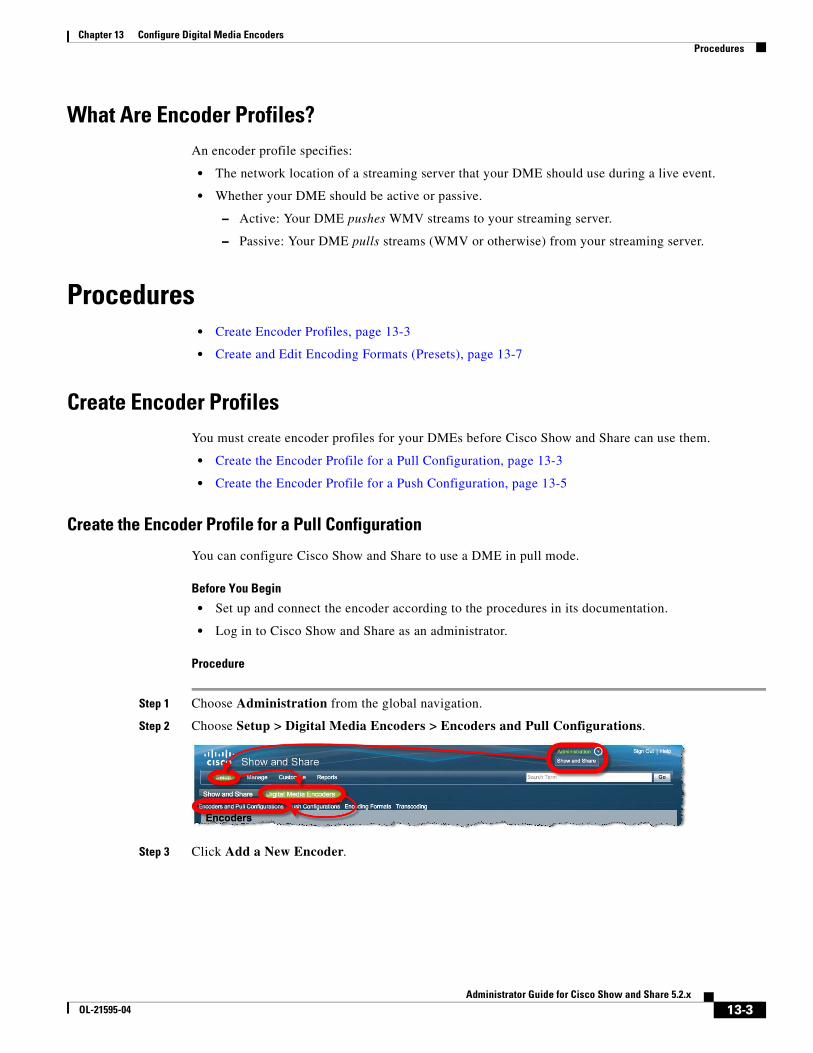
Chapter 13 Configure Digital Media Encoders Procedures
What Are Encoder Profiles?An encoder profile specifies:
• The network location of a streaming server that your DME should use during a live event.
• Whether your DME should be active or passive.
– Active: Your DME pushes WMV streams to your streaming server.
– Passive: Your DME pulls streams (WMV or otherwise) from your streaming server.
Procedures • Create Encoder Profiles, page 13-3
• Create and Edit Encoding Formats (Presets), page 13-7
Create Encoder ProfilesYou must create encoder profiles for your DMEs before Cisco Show and Share can use them.
• Create the Encoder Profile for a Pull Configuration, page 13-3
• Create the Encoder Profile for a Push Configuration, page 13-5
Create the Encoder Profile for a Pull Configuration
You can configure Cisco Show and Share to use a DME in pull mode.
Before You Begin
• Set up and connect the encoder according to the procedures in its documentation.
• Log in to Cisco Show and Share as an administrator.
Procedure
Step 1 Choose Administration from the global navigation.
Step 2 Choose Setup > Digital Media Encoders > Encoders and Pull Configurations.
Step 3 Click Add a New Encoder.
13-3Administrator Guide for Cisco Show and Share 5.2.x
OL-21595-04

Chapter 13 Configure Digital Media Encoders Procedures
Step 4 Enter the encoder IP address or hostname in the Encoder IP Address/Hostname field.
Tip If you do not know the encoder’s routable IP address or DNS-resolvable hostname, go to the DME front panel, and then choose Menu > Setup System > Network > 100 Mbit (or 1,000 Mbit) > View Settings > IP Address(es).
Step 5 Click Discover Encoder, and then wait a moment, until the discovery process is finished.
Step 6 Enter a name and description for this encoder profile.
For example, you might identify or describe the owner, location, or purpose of this encoder profile, or enter exactly the serial number text from a sticker on the encoder chassis.
Tip We will add this encoder profile as an option in a list. You — and any other live event users in your Cisco Show and Share community — can then choose and use it.
Step 7 Choose options in the Default Encoder Input Settings area to identify the input settings that you will use most often.
Step 8 Choose Pull mode as your most common method to publish live events from this encoder profile.
13-4Administrator Guide for Cisco Show and Share 5.2.x
OL-21595-04

Chapter 13 Configure Digital Media Encoders Procedures
Step 9 Click Add a Pull Configuration to add the streaming server pull configurations for this encoder profile.
We recommend that you use a port number in the range from 6000 to 7000. The default is 6990.
Tip When you use pull mode, we automatically create a configuration called “test only (encoder-direct, port 6990),” which you can use to test streams that use this encoder profile.
Step 10 Click Save Pull Configuration.
Step 11 Click Save this Encoder.
A message in your browser confirms that Cisco Show and Share saved the profile.
Step 12 Stop. You have completed this procedure.
Related Topics
• What Are Encoder Profiles?, page 13-3
• Create the Encoder Profile for a Push Configuration, page 13-5
Create the Encoder Profile for a Push Configuration
You can configure Cisco Show and Share to use a DME in push mode.
Note We support push mode with Windows Media only.
Before You Begin
• Set up and connect the DME according to the procedures in its documentation.
• Log in to Cisco Show and Share as an administrator.
13-5Administrator Guide for Cisco Show and Share 5.2.x
OL-21595-04

Chapter 13 Configure Digital Media Encoders Procedures
Procedure
Step 1 Choose Administration from the global navigation.
Step 2 Choose Setup > Digital Media Encoders > Push Configurations.
Step 3 Click Add a New Encoder.
Step 4 Enter a name and description for this encoder profile.
Tip We will add this encoder profile as an option in a list. You — and any other live event users in your Cisco Show and Share community — can then choose and use it.
Step 5 Create an entry for your streaming server.
a. Enter the streaming server’s base URL and port number.
b. Enter the name of the streaming server’s publishing point.
Note DO NOT USE your encoder’s URL unless you are conducting a brief test with no more than two viewers.
c. (Optional) If the streaming server authenticates its users, enter a valid username and password.
Step 6 Click Save.
13-6Administrator Guide for Cisco Show and Share 5.2.x
OL-21595-04

Chapter 13 Configure Digital Media Encoders Procedures
A message in your browser confirms that Cisco Show and Share saved this encoder profile.
Step 7 Stop. You have completed this procedure.
Related Topics
• What Are Encoder Profiles?, page 13-3
• Create the Encoder Profile for a Pull Configuration, page 13-3
Create and Edit Encoding Formats (Presets)You can add or edit an encoding format.
Procedure
Step 1 Choose Administration from the global navigation.
Step 2 Choose Setup > Digital Media Encoders > Encoding Formats.
Step 3 Do one of the following.
• To define a new encoding format, click Add a new Encoding Format.
• To edit an encoding format that is already defined and saved, click its name in the list.
13-7Administrator Guide for Cisco Show and Share 5.2.x
OL-21595-04

Chapter 13 Configure Digital Media Encoders Reference
Step 4 Enter or choose the required values.
Tip Some options and settings differ between Windows Media and Flash.
Step 5 Click Save.
Step 6 Stop. You have completed this procedure.
Related Topics
• What Are Encoding Formats (Presets)?, page 13-2
• UI Reference: Encoding Formats (Presets), page 13-9
Reference • UI Reference: Encoding Formats (Presets), page 13-9
Tip See the “Live Events” chapter from User Guide for Cisco Show and Share 5.2.x. on Cisco.com to learn about our supported:
• Dimensions for encoded video
• Encoding bitrates for Flash video
• Encoding capture profiles for WMV
13-8Administrator Guide for Cisco Show and Share 5.2.x
OL-21595-04

Chapter 13 Configure Digital Media Encoders Reference
UI Reference: Encoding Formats (Presets)
Navigation Path
Administration > Setup > Digital Media Encoders > Encoding Formats
Related Topics
• What Are Encoding Formats (Presets)?, page 13-2
• Create and Edit Encoding Formats (Presets), page 13-7
Table 13-1 Encoding Formats Page
Element Description
Encoding Format Name
Enter a unique and meaningful name for this encoding format.
Profile Description Enter a description.
Set as a Default Format
Check the check box if Cisco Show and Share should use this encoding format automatically when live event users choose the Use Default Streaming Settings option.
Format Click a radio button to choose its corresponding media format as the one that this encoding format should use.
Video Settings
Dimensions Choose an option from the list or choose Custom to use dimensions that the list does not contain.
Pixel Proportion Standard (square pixel) is the correct choice for most applications.
Frame Rate Choose an option to set the frame rate.
Note This element is visible only when you choose Flash as the format.
Video Bitrate kbps Choose an option to set the bitrate. See the “Live Events” chapter from User Guide for Cisco Show and Share 5.2.x. on Cisco.com to learn which bitrates we support for Flash video.
Note This element is visible only when you choose Flash as the format.
Audio Settings
Audio Capture {On | Off} — Enable or disable audio capture.
Windows Media Capture Profiles
Windows Media Capture Profiles
Choose an option to limit bandwidth usage. See the “Live Events” chapter from User Guide for Cisco Show and Share 5.2.x. on Cisco.com to learn about our supported capture profiles for WMV.
Note This element is visible only when you choose Windows Media as the format.
13-9Administrator Guide for Cisco Show and Share 5.2.x
OL-21595-04

Chapter 13 Configure Digital Media Encoders Reference
13-10Administrator Guide for Cisco Show and Share 5.2.x
OL-21595-04

AOL-21595-04
C H A P T E R14
Use a Cisco DME to Transcode VideoRevised: May 31, 2011 OL-21595-04
Features on the Digital Media Encoders tab help you to transcode AVI and MPEG2 files into WMV files. This transcoding makes such video files compatible with — and reuseable on — your Cisco Show and Share site.
• Concepts, page 14-1
• Procedures, page 14-2
• Reference, page 14-4
Concepts • Understand Transcoding, page 14-1
Understand TranscodingTranscoding is a process of deriving digital media files that use one codec from digital media files that use a different codec; the source file is not changed or destroyed. Because codecs are typically lossy, you might notice that the fidelity of the transcoded output file is not as high as the fidelity of the source file.
A transcoding job might take as long as, or possibly longer than, the duration of the source file, depending on multiple factors that include which codecs you use.
Related Topics
• Transcode a Video File, page 14-2
• UI Reference: Transcoding, page 14-4
• Color-code Reference for the Status of a Transcoding Job, page 14-5
14-1dministrator Guide for Cisco Show and Share 5.2.x

Chapter 14 Use a Cisco DME to Transcode Video Procedures
Procedures • Copy a Video File to Your DME for Transcoding, page 14-2
• Transcode a Video File, page 14-2
• Copy Transcoded Video Output from Your DME, page 14-3
Copy a Video File to Your DME for TranscodingYou can copy to your DME a video file that you will transcode through Cisco Show and Share.
Procedure
Step 1 Plug a keyboard, mouse, and monitor into your DME.
Step 2 Stage the source file for transcoding.
a. Add the source file to a USB 2.0 hard drive or flash drive.
b. Connect the USB drive to your DME.
c. Use Windows Explorer on your DME to copy the source file from the USB drive to D:\AVFiles\In.
Step 3 Stop. You have completed this procedure.
What to Do Next
• Would you like to transcode the source file now? See the “Transcode a Video File” section on page 14-2.
Related Topics
• Understand Transcoding, page 14-1
• UI Reference: Transcoding, page 14-4
• Color-code Reference for the Status of a Transcoding Job, page 14-5
• Copy Transcoded Video Output from Your DME, page 14-3
Transcode a Video FileYou can use your DME to transcode an AVI or MPEG2 video source file.
Before You Begin
• Copy the source file to your encoder.
• Log in to Cisco Show and Share as an administrator.
Tip We recommend that you schedule your transcoding jobs so that they do not run at the same time as any other encoder tasks, such as encoding live video or saving a live stream to a file.
14-2Administrator Guide for Cisco Show and Share 5.2.x
OL-21595-04

Chapter 14 Use a Cisco DME to Transcode Video Procedures
Procedure
Step 1 Choose Administration from the global navigation.
Step 2 Choose Setup > Digital Media Encoders > Transcoding.
Step 3 Click Add a New Transcoding Task.
Step 4 Enter or choose the required values to define the transcoding job. See UI Reference: Transcoding, page 14-4 for information about the transcoding task fields.
Step 5 Click Save.
Step 6 Stop. You have completed this procedure.
What to Do Next
• Would you like to obtain a copy of your transcoded video, so you can upload it to Cisco Show and Share? See the “Copy Transcoded Video Output from Your DME” section on page 14-3.
Related Topics
• Understand Transcoding, page 14-1
• UI Reference: Transcoding, page 14-4
• Color-code Reference for the Status of a Transcoding Job, page 14-5
Copy Transcoded Video Output from Your DMEYou can copy the output file from your DME after you transcode a video. Later, you can upload this file to Cisco Show and Share.
Before You Begin
• Copy a video file to your DME for transcoding.
• Transcode the video.
14-3Administrator Guide for Cisco Show and Share 5.2.x
OL-21595-04

Chapter 14 Use a Cisco DME to Transcode Video Reference
Procedure
Step 1 Do one of the following.
Step 2 Stop. You have completed this procedure.
What to Do Next
• Would you like to upload this output file to Cisco Show and Share? See the User Guide for Cisco Show and Share 5.2.x on Cisco.com.
Related Topics
• Understand Transcoding, page 14-1
• UI Reference: Transcoding, page 14-4
• Color-code Reference for the Status of a Transcoding Job, page 14-5
Reference • UI Reference: Transcoding, page 14-4
• Color-code Reference for the Status of a Transcoding Job, page 14-5
UI Reference: Transcoding
Navigation Path
Administration > Settings > Digital Media Encoders > Transcoding
• Are you in the same room with your DME?
When you work with your DME directly
a. Use the keyboard, mouse, and monitor that you attached to your encoder and open Windows Explorer.
b. Copy the output file from D:\AVFiles\Out to the USB drive.
• Are you and your DME in separate locations?
When you work with your DME remotely
a. Point your web browser to ftp://<encoder_IP_address>/AVFiles/Out.
b. Right-click the filename in the directory listing.
c. Choose the option to download the file.
Table 14-1 Transcoding Page
Element Description
Transcoding Task Name
Enter a unique and meaningful name.
Encoder Name Choose the encoder that will transcode the source file.
Start Date/Time Choose the date and time when the transcoding job should start.
14-4Administrator Guide for Cisco Show and Share 5.2.x
OL-21595-04

Chapter 14 Use a Cisco DME to Transcode Video Reference
Related Topics
• Understand Transcoding, page 14-1
• Transcode a Video File, page 14-2
• Color-code Reference for the Status of a Transcoding Job, page 14-5
Color-code Reference for the Status of a Transcoding JobIn the list of transcoding tasks, a color-coded icon next to a task’s name helps you to track its status. The icon color is:
• Blue, when trancoding is scheduled or postponed.
• Animated green, when transcoding is in progress.
• Solid green, when transcoding is completed.
• Red, when an error has interfered with transcoding.
Tip To learn more, mouseover the icon.
Related Topics
• Understand Transcoding, page 14-1
• Transcode a Video File, page 14-2
• UI Reference: Transcoding, page 14-4
Input
Input Encoding Format
Choose the media format that the source file uses (AVI or MPEG2).
Input File Name Enter the source filename. Do not include a path.
Input Directory Path Choose Input - Local Encoder Drive. Use these buttons, as needed:
• Edit—Modifies the input directory path.
• Clone—Copies the input directory path so that you can modify and add it to the list.
• Add a Path—Adds a new input directory path to the list.
Output
Output Encoding Format
Choose a format that includes the word “transcode” in its title.
Output Directory Path
Choose Output - Local Encoder Drive.
Output File Name Enter the output filename, which must use WMV as its extension. Do not include a path.
Table 14-1 Transcoding Page (continued)
Element Description
14-5Administrator Guide for Cisco Show and Share 5.2.x
OL-21595-04

Chapter 14 Use a Cisco DME to Transcode Video Reference
14-6Administrator Guide for Cisco Show and Share 5.2.x
OL-21595-04
AOL-21595-04
C H A P T E R 15
Use Cisco Show and Share ReportsRevised: May 31, 2011 OL-21595-04
Cisco Show and Share Reports includes extensive features to learn who uses your Cisco Show and Share site and understand how they use it.
• Concepts, page 15-1
• Procedures, page 15-3
ConceptsTopics in this section help you to understand and benefit from Cisco Show and Share Reports.
• Understand the Values That Reports Count, Measure, and Correlate, page 15-1
• Understand Filtering, page 15-2
Understand the Values That Reports Count, Measure, and Correlate • What Are Page Views? page 15-1
• What Are Video Streams? page 15-2
• What Are Unique Visitors? page 15-2
• What Are Referrers? page 15-2
What Are Page Views?
The page view value counts each click in Cisco Show and Share that:
• Changes visible information, such as which tab is active.
• Does not play any video.
This measurement indicates how many users loaded the page for a video but did not watch it.
15-1dministrator Guide for Cisco Show and Share 5.2.x

Chapter 15 Use Cisco Show and Share Reports Concepts
What Are Video Streams?
The video stream value counts each click of the Play button in Cisco Show and Share.
What Are Unique Visitors?
Each browser that loads Cisco Show and Share receives a browser cookie for tracking purposes. The unique visitors value counts the total number of browser cookies in use on any particular day.
Any day when a browser connects to Cisco Show and Share, we count it is one unique visitor on that day. (Even when a browser reconnects multiple times in one day, Cisco Show and Share Reports counts it as only one unique visitor for that day.)
What Are Referrers?
The referrer is exactly the HTTP URL for whatever page was active in a browser immediately before that browser loaded Cisco Show and Share.
Understand FilteringMany of our reports are filterable. Other reports are not.
• The basis for filtering might be a username.
• Or, the filtering basis might be a video title.
15-2Administrator Guide for Cisco Show and Share 5.2.x
OL-21595-04

Chapter 15 Use Cisco Show and Share Reports Procedures
Any report that supports filtering by video title also includes related user interface elements, including a list of all published videos. In this case, you can do any or all of the following, in any order.
• Click a video’s title in the list to load a report for just that video.
• Sort the list by video publication date or by title.
• Expand the list or collapse it.
Procedures • Populate and View Reports, page 15-4
• Maintain the Reports Database, page 15-6
15-3Administrator Guide for Cisco Show and Share 5.2.x
OL-21595-04

Chapter 15 Use Cisco Show and Share Reports Procedures
Populate and View Reports
Note We do not begin to measure viewership for a video until someone watches it in Show and Share.
Before You Begin
• This software uses scalable vector graphics in its charting. For browser requirements, see Release Notes for Cisco Digital Media System 5.2.x on Cisco.com.
• Log in to Cisco Show and Share as an administrator.
Procedure
Step 1 Choose Administration from the global navigation, and then click Reports.
The first four subtabs load reports that you can refine and filter. The fifth tab helps you to administer the reports database that Cisco Show and Share Reports uses.
Step 2 Do any of the following.
Choose... To...
Site Wide Traffic >...
Summary Correlate all page views, unique visitors, and video streams, sitewide.
Page Views Measure total traffic, sitewide, per day.
Unique Visitors Count the number of unique visitors, sitewide, per day.
Video Views Measure video viewership, sitewide, per day.
Video Downloads Count all video downloads, sitewide.
Referrers List all URLs that were active in browsers immediately before they loaded Cisco Show and Share. We sort this list by the number of users that each page delivered. Click a URL to load the corresponding page.
User System Info Count how many visitors used particular browsers, operating systems, and plugins when they used Cisco Show and Share.
Per Viewer Traffic >...
Videos per Viewer Identify which videos one viewer watched.
Viewers per Video Identify all viewers of one video.
15-4Administrator Guide for Cisco Show and Share 5.2.x
OL-21595-04

Chapter 15 Use Cisco Show and Share Reports Procedures
Step 3 Do one of the following.
• Enter the start date and end date manually or click to choose either date from a calendar. Then, click Go to refresh the report.
• Choose an option from the Select a Time Span list. The report is refreshed automatically.
Step 4 (Optional) Enter a value to filter what the report includes, and then click Go (or Filter) to refresh the report.
In many cases, you can mouse over a graph point to see an exact count of one measured unit or another.
Step 5 (Optional) Use the “Export to Excel” feature to save exported data to a local file.
Step 6 Stop. You have completed this procedure.
Per Video Traffic >...
Video Views Measure video viewership by date. This is the count of users who clicked Play.
Page Views Correlate dates with traffic levels.
Video Downloads Count the number of downloads per video.
More Info See how many viewers clicked More Info. You can filter the results per video.
Per Author Traffic > Videos per Author
Measure the viewership of all videos that share one author.
Choose... To...
15-5Administrator Guide for Cisco Show and Share 5.2.x
OL-21595-04

Chapter 15 Use Cisco Show and Share Reports Procedures
Related Topics:
• Concepts, page 15-1
• Maintain the Reports Database, page 15-6
Maintain the Reports DatabaseWe recommend that you check the integrity and stability from time to time of your reports database.
Tip If your site has a lot of activity, you should perform this check every 60 days. If your site has very little activity, years might pass before there is any need to perform this check.
Before You Begin
• Log in to Cisco Show and Share as an administrator.
Procedure
Step 1 Choose Administration from the global navigation, and then click Reports > Administration.
Step 2 Verify that the Current Database Status indicator shows that the status is Green.
The status should be Green.
When it is any other color than Green, you must trim older records from the database. Otherwise, when you allow the database to keep growing, Cisco Show and Share Reports becomes progressively slower. In addition, the processes that add new records to your database might not operate quickly enough to record all Cisco Show and Share activity during periods of heavy use.
Step 3 Click Archive Prior Months as soon as possible when you see that the status is not Green.
15-6Administrator Guide for Cisco Show and Share 5.2.x
OL-21595-04

Chapter 15 Use Cisco Show and Share Reports Procedures
Step 4 Respond to the confirmation prompt, and then click OK.
Warning Do not close your browser or navigate to any other page until the operation is finished. It might take as long as 10 minutes.
Caution New activity on your Cisco Show and Share site might occur while we are generating an archive. In this case, new rows and records are appended to the live database but we exclude them from the new archive. The archive’s scope was predetermined when you clicked the Archive Prior Months link.
• The generated archive contains your entire database, in exactly its state at the moment when you clicked the Archive Prior Months link.
• We export the database archive as an ordinary text file so that you can import it elsewhere, and then we compress it.
• After the archive is generated, we trim some records from the database to reduce its size. The records that we delete are older than the date that you specified when you clicked the Archive Prior Months link. For example, this link would delete all records that predate January 2010:
Step 5 Stop. You have completed this procedure.
Related Topics
• Concepts, page 15-1
• Procedures, page 15-3
15-7Administrator Guide for Cisco Show and Share 5.2.x
OL-21595-04

Chapter 15 Use Cisco Show and Share Reports Procedures
15-8Administrator Guide for Cisco Show and Share 5.2.x
OL-21595-04
AOL-21595-04
C H A P T E R16
Configure FailoverRevised: May 31, 2011 OL-21595-04
To configure failover for Cisco Show and Share, refer to the Failover Configuration Guide for Cisco Digital Media Suite 5.2.x:
http://www.cisco.com/en/US/docs/video/digital_media_systems/5_x/5_2/dms/failover_guide/dmsfailover.html
16-1dministrator Guide for Cisco Show and Share 5.2.x

Chapter 16 Configure Failover
16-2Administrator Guide for Cisco Show and Share 5.2.x
OL-21595-04

AdminiOL-21595-04
A
P P E N D I X A Ports Used by Digital Media SuiteRevised: May 31, 2011OL-21595-04
It is best to deploy your Cisco Show and Share and Cisco Digital Media Manager appliances on the same subnet. If they are deployed on different subnets, you need to make sure that the following ports are opened between the various components of your DMS installation.
Port # From To Bidir? Protocol Description
20 Show and Share Deploy Server N FTP Show and Share server deploying content to content hosting location using FTP
20 DMM DMP N FTP DMM server deploying content to DMP using FTP
20 DMP FTP Server Y FTP Transfer of content files
21 Show and Share Deploy Server N FTP Show and Share server deploying content to content hosting location using FTP
21 DMM DMP N FTP DMM server deploying content to DMP using FTP
21 DMP FTP Server Y FTP Transfer of content files
22 Show and Share Deploy Server N SFTP Show and Share server deploying content to content hosting location using SFTP
22 DMM DMP N SFTP DMM server deploying content to DMP using SFTP
53 DMP DNS Server Y DNS DNS Services
80 DME Show and Share N HTTP Communication between Show and Share and DME
80 End User Show and Share N HTTP End User requesting content from Show and Share
80 End User Deploy Server N HTTP End User requesting content from external server
80 DMP Content Server N HTTP
123 DMP NTP Server Y NTP NTP Services
139 DMP Content Server N CIFS CIFS Services
161 Y SNMP SNMP Services
389 DMM AD/LDAP N LDAP User Database Creation or Updates
443 Admin Client DMP N SSL
443 End User Show and Share N HTTPS
A-1strator Guide for Cisco Show and Share 5.2.x

Appendix A Ports Used by Digital Media Suite
443 End User DMM N HTTPS
445 DMP Content Server N CIFS CIFS Services
514 DMM Show and Share N SYSLOG SYSLOG Services
514 DMP SYSLOG Server N SYSLOG SYSLOG Services
554 End User Deploy Server N RTSP End User requesting WMV streaming from external Windows Media Streaming Server
554 DMP Content Server N RTSP DMP requesting WMV streaming from external Windows Media Streaming Server
636 DMM AD/LDAPS N LDAPS User Database Creation or Updates
694 DMM DMM Y (UDP) Heartbeat for failover health monitoring
695 Show and Share Show and Share Y (UDP) Heartbeat for failover health monitoring
843 End User DMM N Proof of Play
1935 End User Show and Share N RTMP End User requesting flash or H.264 streaming from Show and Share
1935 End User Deploy Server N RTMP End User requesting flash or H.264 streaming from external flash or H.264 Streaming Server
5432 DMM Show and Share Y PostGres PostGres between DMM & Show and Share
7777 Admin Client DMP N SSL
7777 DMM DMP Y SSL
7849 DMM DMM Y DRBD (failover)
7850 Show and Share Show and Share Y DRBD (failover)
8080 End User Show and Share N HTTP End User uploading content to Show and Share
8443 DMM Show and Share Y HTTPS DMM <--> Show and Share Peering
8443 End User Show and Share N HTTPS Access to the Show and Share Secured GUI
9161 Y SNMP SNMP Services
9999 DMM Show and Share Y JMX communication
30865 All four nodes (Failover)
All four nodes (Failover)
Y CSYNC Synchronize config files between nodes in a cluster (failover).
45001 DMM Show and Share Y Inventory/Deployment
46001 DMM Show and Share Y Inventory/Deployment
61616 Show and Share DMM Y Activemq
User Config
End User Deploy Server N HTTP End User requesting content from external server
User Config
DME Media Server Y HTTP Signaling between DME and Media Server
User Config
DMP Content Server N HTTP
Port # From To Bidir? Protocol Description
A-2Administrator Guide for Cisco Show and Share 5.2.x
OL-21595-04

Appendix A Ports Used by Digital Media Suite
Legend
DME=Digital Media Encoder DMM=Digital Media Manager DMP=Digital Media Player
A-3Administrator Guide for Cisco Show and Share 5.2.x
OL-21595-04

Appendix A Ports Used by Digital Media Suite
A-4Administrator Guide for Cisco Show and Share 5.2.x
OL-21595-04