Embed Size (px)
Citation preview

C:\Program Files\Adobe\FrameMaker8\UniVerse 10.3\apisupp\Front.fmFebruary 3, 2009 10:24 am
Beta Beta Beta Beta Beta
IBM
Administrative Supplement
for Client APIs
Version 10.3February, 2009

ii Administrative Sup
C:\Program Files\Adobe\FrameMaker8\UniVerse 10.3\apisupp\Front.fmFebruary 3, 2009 10:24 am
Beta Beta Beta Beta Beta Beta Beta Beta Beta Beta Beta Beta Beta Beta
IBM Corporation 555 Bailey Avenue San Jose, CA 95141
Licensed Materials – Property of IBM
© Copyright International Business Machines Corporation 2008, 2009. All rights reserved.
AIX, DB2, DB2 Universal Database, Distributed Relational Database Architecture, NUMA-Q, OS/2, OS/390, and OS/400, IBM Informix®, C-ISAM®, Foundation.2000 ™, IBM Informix® 4GL, IBM Informix® DataBlade® module, Client SDK™, Cloudscape™, Cloudsync™, IBM Informix® Connect, IBM Informix® Driver for JDBC, Dynamic Connect™, IBM Informix® Dynamic Scalable Architecture™ (DSA), IBM Informix® Dynamic Server™, IBM Informix® Enterprise Gateway Manager (Enterprise Gateway Manager), IBM Informix® Extended Parallel Server™, i.Financial Services™, J/Foundation™, MaxConnect™, Object Translator™, Red Brick® Decision Server™, IBM Informix® SE, IBM Informix® SQL, InformiXML™, RedBack®, SystemBuilder™, U2™, UniData®, UniVerse®, wIntegrate® are trademarks or registered trademarks of International Business Machines Corporation.
Java and all Java-based trademarks and logos are trademarks or registered trademarks of Sun Microsystems, Inc. in the United States and other countries.
Windows, Windows NT, and Excel are either registered trademarks or trademarks of Microsoft Corporation in the United States and/or other countries.
UNIX is a registered trademark in the United States and other countries licensed exclusively through X/Open Company Limited.
Other company, product, and service names used in this publication may be trademarks or service marks of others.
This product includes cryptographic software written by Eric Young ([email protected]).
This product includes software written by Tim Hudson ([email protected]).
Documentation Team: Claire Gustafson, Shelley Thompson, Anne Waite
US GOVERNMENT USERS RESTRICTED RIGHTS
Use, duplication or disclosure restricted by GSA ADP Schedule Contract with IBM Corp.
plement for Client APIs

Table of Contents
:\Progebrua
Table of Contents
Beta Beta Beta Beta Beta Beta Beta Beta Beta Beta Beta Beta Beta Beta Beta Beta Beta
PrefaceOrganization of This Manual . . . . . . . . . . . . . . . viDocumentation Conventions. . . . . . . . . . . . . . . . vii
Chapter 1 IntroductionWhat Are the Client APIs? . . . . . . . . . . . . . . . . 1-2
UCI . . . . . . . . . . . . . . . . . . . . . . 1-2UniOLEDB . . . . . . . . . . . . . . . . . . . 1-2InterCall . . . . . . . . . . . . . . . . . . . . 1-3UniObjects . . . . . . . . . . . . . . . . . . . 1-3UniObjects for Java . . . . . . . . . . . . . . . . . 1-3UniObjects for .NET . . . . . . . . . . . . . . . . 1-3UniJDBC (IBM JDBC Driver for UniData and UniVerse) . . . . . 1-4
Chapter 2 Maintaining the UniRPCSystem Requirements . . . . . . . . . . . . . . . . . . 2-3How the UniRPC Works . . . . . . . . . . . . . . . . . 2-4Maintaining the UniRPC . . . . . . . . . . . . . . . . . 2-5
UniRPC Maintenance on UniVerse Systems . . . . . . . . . 2-5UniRPC Maintenance on UniData Servers. . . . . . . . . . 2-11
About the unirpcservices File . . . . . . . . . . . . . . . 2-12
Chapter 3 The UCI Config EditorUCI Configuration File . . . . . . . . . . . . . . . . . 3-3Starting the UCI Config Editor . . . . . . . . . . . . . . . 3-4Adding a Data Source . . . . . . . . . . . . . . . . . . 3-5
Data Source Parameters . . . . . . . . . . . . . . . 3-8New Data Source Parameters and Comments . . . . . . . . . 3-12Comments . . . . . . . . . . . . . . . . . . . . 3-13
Modifying a Data Source. . . . . . . . . . . . . . . . . 3-14
ram Files\Adobe\FrameMaker8\UniVerse 10.3\apisupp\apisuppTOC.fm (bookTOC.template)ry 3 2009 10:26 am

iv Adm
Deleting a Data Source . . . . . . . . . . . . . . . . . 3-16Working with Multiple Data Sources. . . . . . . . . . . . . 3-17Creating a UCI Configuration File . . . . . . . . . . . . . 3-18Setting the UciCfgFile Key in the Registry . . . . . . . . . . . 3-19Opening an Alternative UCI Configuration File . . . . . . . . . 3-20Enabling and Disabling Logging . . . . . . . . . . . . . . 3-21Logging Client Connections . . . . . . . . . . . . . . . 3-22
Chapter 4 Accessing UniData AccountsRunning Concurrent UniData Versions . . . . . . . . . . . . 4-3
Running UCI, UniData ODBC, or UniOLEDB Concurrently . . . 4-3Running InterCall, UniObjects, or UniObjects for Java Concurrently . 4-4
Tracing Events. . . . . . . . . . . . . . . . . . . . 4-5
Chapter 5 Device LicensingLicensing Modes . . . . . . . . . . . . . . . . . . . 5-4Why Do I Need Device Licensing? . . . . . . . . . . . . . 5-5
Device Licensing Requirements . . . . . . . . . . . . 5-5Connection Types. . . . . . . . . . . . . . . . . . . 5-6
Direct Connections. . . . . . . . . . . . . . . . . 5-6Two-Tier Connections. . . . . . . . . . . . . . . . 5-6Multiple-Tier Connections . . . . . . . . . . . . . . 5-6Using Device Subkeys . . . . . . . . . . . . . . . 5-7
inistrative Supplement for Client APIs

C:\Program Files\Adobe\FrameMaker8\UniVerse
PrefaceThis manual introduces IBM’s seven common APIs. It also provides important information that developers using any of the common APIs will need. It includes information about the UniRPC, the UCI Config Editor, the ud_database file, and device licensing.
v

C:\Program Files\Adobe\FrameMaker8\UniVerse 10.3\apisupp\Preface2/3/09
Organization of This ManualThis manual contains the following:
Chapter 1, “Introduction,” introduces the six common APIs.Chapter 2, “Maintaining the UniRPC,” describes the UniRPC daemon (unirpcd) or service (unirpc), and the unirpcservices file.Chapter 3, “The UCI Config Editor,” describes how to use the UCI Config Editor to create and maintain data source definitions in the UCI configu-ration file.Chapter 4, “Accessing UniData Accounts,” describes UniData’s ud_database file.Chapter 5, “Device Licensing,” describes how device licensing on UniVerse and UniData servers works with multiple client connections.
vi Administrative Supplement for Client APIs

C:\Program Files\Adobe\FrameMaker8\UniVerse
Documentation ConventionsThis manual uses the following conventions:
Documentation Conventions
Convention Usage
Bold In syntax, bold indicates commands, function names, and options. In text, bold indicates keys to press, function names, menu selections, and MS-DOS commands.
UPPERCASE In syntax, uppercase indicates database commands, keywords, and options; BASIC statements and functions; and SQL state-ments and keywords. In text, uppercase also indicates database identifiers such as file names, account names, schema names, and Windows file names and paths.
Italic In syntax, italic indicates information that you supply. In text, italic also indicates UNIX commands and options, file names, and paths.
Courier Courier indicates examples of source code and system output.
Courier Bold In examples, courier bold indicates characters that the user types or keys the user presses (for example, <Return>).
[ ] Brackets enclose optional items. Do not type the brackets unless indicated.
{ } Braces enclose nonoptional items from which you must select at least one. Do not type the braces.
itemA | itemB A vertical bar separating items indicates that you can choose only one item. Do not type the vertical bar.
... Three periods indicate that more of the same type of item can optionally follow.
ä A right arrow between menu options indicates you should choose each option in sequence. For example, “Choose File ä Exit” means you should choose File from the menu bar, then choose Exit from the File menu.
vii

C:\Program Files\Adobe\FrameMaker8\UniVerse 10.3\apisupp\Preface2/3/09
The following are also used:
Syntax definitions and examples are indented for ease in reading.All punctuation marks included in the syntax—for example, commas, parentheses, or quotation marks—are required unless otherwise indicated.Syntax lines that do not fit on one line in this manual are continued on subse-quent lines. The continuation lines are indented. When entering syntax, type the entire syntax entry, including the continuation lines, on the same input line.
API DocumentationThe following books document application programming interfaces (APIs) used for developing client applications that connect to UniVerse and UniData servers.
Administrative Supplement for Client APIs: Introduces IBM’s seven common APIs, and provides important information that developers using any of the common APIs will need. It includes information about the UniRPC, the UCI Config Editor, the ud_database file, and device licensing.
UCI Developer’s Guide: Describes how to use UCI (UniCall Interface), an interface to UniVerse and UniData databases from C-based client programs. UCI uses ODBC-like function calls to execute SQL statements on local or remote UniVerse and UniData servers. This book is for experienced SQL programmers.
IBM JDBC Driver for UniData and UniVerse: Describes UniJDBC, an interface to UniData and UniVerse databases from JDBC applications. This book is for experi-enced programmers and application developers who are familiar with UniData and UniVerse, Java, JDBC, and who want to write JDBC applications that access these databases.
InterCall Developer’s Guide: Describes how to use the InterCall API to access data on UniVerse and UniData systems from external programs. This book is for experi-enced programmers who are familiar with UniVerse or UniData.
UniObjects Developer’s Guide: Describes UniObjects, an interface to UniVerse and UniData systems from Visual Basic. This book is for experienced programmers and application developers who are familiar with UniVerse or UniData, and with Visual Basic, and who want to write Visual Basic programs that access these databases.
viii Administrative Supplement for Client APIs

C:\Program Files\Adobe\FrameMaker8\UniVerse
UniObjects for Java Developer’s Guide: Describes UniObjects for Java, an interface to UniVerse and UniData systems from Java. This book is for experienced programmers and application developers who are familiar with UniVerse or UniData, and with Java, and who want to write Java programs that access these databases.
UniObjects for .NET Developer’s Guide: Describes UniObjects, an interface to UniVerse and UniData systems from .NET. This book is for experienced programmers and application developers who are familiar with UniVerse or UniData, and with .NET, and who want to write .NET programs that access these databases.
Using UniOLEDB: Describes how to use UniOLEDB, an interface to UniVerse and UniData systems for OLE DB consumers. This book is for experienced programmers and application developers who are familiar with UniVerse or UniData, and with OLE DB, and who want to write OLE DB programs that access these databases.
ix
:\Progebrua
1
1Chapter
ram Firy 3 20
Beta Beta Beta Beta Beta Beta Beta Beta Beta Beta Beta Beta Beta Beta Beta Beta Beta Beta Beta
Introduction
What Are the Client APIs?. . . . . . . . . . . . . . . . 1-2 UCI . . . . . . . . . . . . . . . . . . . . . 1-2 UniOLEDB . . . . . . . . . . . . . . . . . . . 1-2 InterCall . . . . . . . . . . . . . . . . . . . . 1-3 UniObjects . . . . . . . . . . . . . . . . . . . 1-3 UniObjects for Java . . . . . . . . . . . . . . . . 1-3 UniObjects for .NET . . . . . . . . . . . . . . . . 1-3 UniJDBC (IBM JDBC Driver for UniData and UniVerse) . . . . 1-4
les\Adobe\FrameMaker8\UniVerse 10.3\apisupp\Ch1TOC.fm09 10:26 am
C:\Program Files\Adobe\FrameMaker8\UniVerse
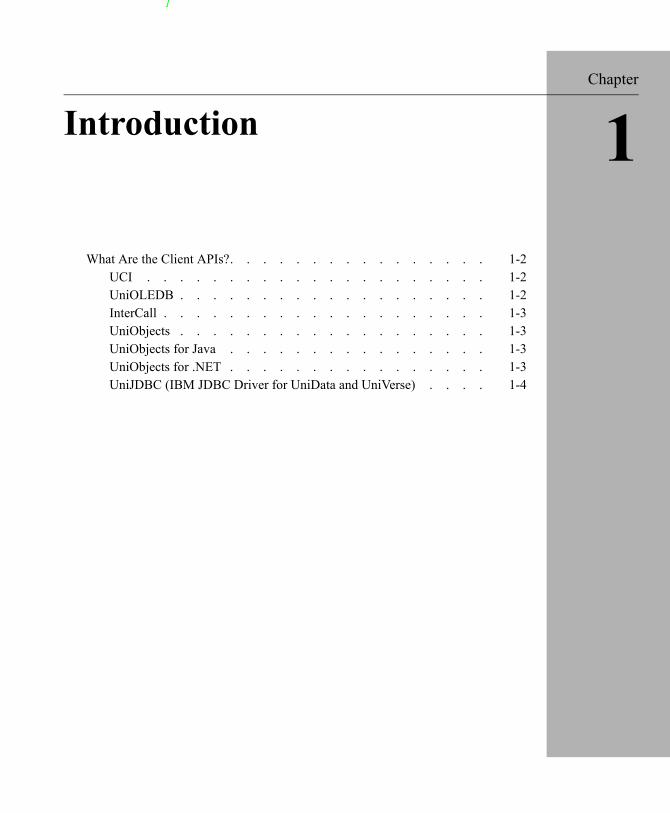
What Are the Client APIs?IBM provides seven common APIs for writing client application programs that connect to UniVerse and UniData databases. We call them common APIs because programs written in them can access data in both databases.
The seven Client APIs are:
UCI (Uni Call Interface)UniOLEDBInterCallUniObjectsUniObjects for JavaUniObjects for .NETUniJDBC (IBM JDBC Driver for UniData and UniVerse)
UCIUCI is a C-language API. It lets developers write UNIX and Windows client programs that use SQL statements to access and manipulate data in UniVerse and UniData databases. UCI is modelled on the ODBC standard as defined in the Microsoft ODBC 2.0 specification. It models only the API side of the ODBC standard, not the driver/transport side. Unlike the standard ODBC interface, UCI is more closely integrated with the extended relational database model used by UniVerse and UniData, with their nested tables, transaction processing support, and so forth.
UniOLEDBUniOLEDB is IBM’s OLE DB provider for UniData and UniVerse. It uses Microsoft’s Universal Data Access (UDA) technology to provide applications in an enterprise network with direct access to UniData and UniVerse databases.
1-2

C:\Program Files\Adobe\FrameMaker8\UniVerse 10.3\apisupp\Ch12/3/09
InterCallInterCall is an open API that lets client application programs developed on UNIX or Windows systems access data on UniVerse or UniData servers. On UNIX systems, developers can write client programs using any tool that accesses static libraries, typically a C compiler. On Windows platforms, developers can write client programs using any tool that accesses DLLs, for example, Visual Basic, C, or Visual C/C++.
Note: InterCall replaces and supersedes ICI (Integrated Calling Interface).
UniObjectsUniObjects is an API to UniVerse or UniData from Visual Basic, or from any other program development environment that uses the Microsoft ActiveX interface. It is fully integrated with the Microsoft environment.
UniObjects for JavaUniObjects for Java is an API that lets developers create Java-based applications that access UniVerse and UniData databases. UniObjects for Java, based on the UniOb-jects model, is a 100% Pure Java™ Class Library whose objects can take full advantage of any Java-based IDE (Integrated Development Environment).
UniObjects for .NETUniObjects for .NET is an API that lets developers create .NET-based applications that access UniVerse and UniData databases. UniObjects for .NET is fully integrated with the Microsoft environment.
UniJDBC (IBM JDBC Driver for UniData and UniVerse)UniJDBC is an interface to UniData and UniVerse databases from JDBC applica-tions. This book is for experienced programmers and application developers who are familiar with UniData and UniVerse, Java, JDBC, and who want to write JDBC applications that access these databases.
1-3 Administrative Supplement for Client APIs

C:\Program Files\Adobe\FrameMaker8\UniVerse
Note: UniJDBC does not require any configuration for UCI and will not need an entry within the UCI configuration file.
1-4

:\Progebrua
1Administering UniData on Windows NT or Windows 20000
2Chapter
ram Firy 3 20
Beta Beta Beta Beta Beta Beta Beta Beta Beta Beta Beta Beta Beta Beta Beta Beta Beta Beta Beta
Maintaining the UniRPC
System Requirements . . . . . . . . . . . . . . . . . 2-3How the UniRPC Works . . . . . . . . . . . . . . . . 2-4Maintaining the UniRPC . . . . . . . . . . . . . . . . 2-5 UniRPC Maintenance on UniVerse Systems . . . . . . . . . 2-5 UniRPC Maintenance on UniData Servers . . . . . . . . . 2-11About the unirpcservices File . . . . . . . . . . . . . . . 2-12
les\Adobe\FrameMaker8\UniVerse 10.3\apisupp\Ch2TOC.fm09 10:26 am Administering UniData on Windows NT or Windows 2000

C:\Program Files\Adobe\FrameMaker8\UniVerse 10.3\apisupp\Ch22/3/09
The UniRPC lets local UniVerse and UniData systems communicate with remote systems. The communicating systems must use TCP/IP networking software to make connections.
Note: In this chapter the terms local and remote refer to client and server programs or systems. However, because client programs can connect to server programs running on the same computer, remote does not necessarily imply that the server is on another physical computer system.
This chapter describes:
The UniRPC daemon (on UNIX servers) The UniRPC service (on Windows servers)The contents of the unirpcservices file
The UniRPC on UniData servers requires little maintenance, other than starting and stopping the UniRPC daemon or service. On UniVerse servers, you can also do the following:
Change the port numberAdd entries to a UNIX hosts file
2-2 Administrative Supplement for Client APIs

C:\Program Files\Adobe\FrameMaker8\UniVerse
System RequirementsBefore installing layered or third-party products that use the UniRPC, such as the UniDK, UniOLEDB, UniJDBC, or UniAdmin, you must install and configure TCP/IP using the instructions supplied by the TCP/IP facility vendor. On UniVerse systems, you should then identify the systems to be networked with the database by defining them in the /etc/hosts file. See “Maintaining the hosts File (UniVerse Only)” on page 6 for more information.
2-3

C:\Program Files\Adobe\FrameMaker8\UniVerse 10.3\apisupp\Ch22/3/09
How the UniRPC WorksThe UniRPC daemon unirpcd (or the UniRPC service unirpc) waits for a request from a client system to connect to a server process. When it receives a connection request, it checks the unirpcservices files to verify that the client system is allowed to request a particular service. If it can, the UniRPC starts the requested service, then returns to the listening state. Each client process connects to its own server process. Each server process uses the same amount of system resources as a local database user.
2-4 Administrative Supplement for Client APIs

C:\Program Files\Adobe\FrameMaker8\UniVerse
Maintaining the UniRPCThis section describes the following:
How to change the UniRPC port number (UniVerse only)How to maintain a UNIX server’s hosts file (UniVerse only)How to start and stop the UniRPC daemon (unirpcd)
UniRPC Maintenance on UniVerse SystemsUse UniAdmin to:
Define the UniRPC port numberMaintain the hosts file on a UNIX server
Choose Network Services from the UniAdmin menu. The Network Services window appears, as shown in the following example:
This window has the following components:
Port # field. The current port number for the UniRPC daemon.
2-5

C:\Program Files\Adobe\FrameMaker8\UniVerse 10.3\apisupp\Ch22/3/09
Hosts list. Displays the machine name and IP address for each node in the /etc/hosts file.
Note: If you are using the Network Information Services (NIS, also known as Yellow Pages), you do not need to use the /etc/hosts file to define, change, and delete network nodes. See the UNIX networking documentation provided with your system for more information.
Defining the UniRPC Port Number (UniVerse Only)
Before you can use the UniRPC, you must specify the number of the port that the UniRPC is to use. You specify the port number on the client and the server systems.
Note: If you specify a port number other than the default, it must be the same on all systems that communicate via the UniRPC.
The current UniRPC daemon port number is displayed in the Port # field in the Network Services window. To change the number, do the following:
1. Click Change. The Change Port Number dialog box appears. Enter a new number in the Enter new Port number field.
2. Click OK. The new port number is saved and the Network Services window is updated with the new setting.
Note: To use the new port number, you must restart the UniRPC daemon (see “Starting the UniRPC Daemon” on page 10).
Maintaining the hosts File (UniVerse Only)
Use the Network Services option of UniAdmin to add, modify, and remove nodes in the hosts file. These tasks are performed from the Network Services window.
Adding a Node
To add a new node to the hosts file:
1. Click Add… on the Network Services window. The Add Node dialog box appears.
2. Enter the node name in the Machine Name field.3. Enter the node address in the IP Address field.
2-6 Administrative Supplement for Client APIs
C:\Program Files\Adobe\FrameMaker8\UniVerse
4. Click OK. The new node’s machine name and IP address are checked against existing entries in the hosts file. If the new node matches an existing entry, a message box appears. You must acknowledge the message before you can enter alternative values. If the new node details are unique, the new node definition is added to the hosts file and the Network Services window is updated.
Modifying a Node
To modify the name or IP address of an existing entry in the hosts file:
1. Choose the node to modify by doing one of the following:Double-click the node in the Hosts list.Choose the node and click Modify… .
The Modify Node dialog box appears.2. Edit the entries in the Machine Name and IP Address fields.3. Click OK. The node’s machine name and IP address are checked against
existing entries in the hosts file. If the node details match an existing entry, a message box appears. You must acknowledge the message before you can enter alternative values. If the node details are unique, the node definition is added to the hosts file and the Network Services window is updated.
Removing a Node
To remove a node definition from the hosts file:
1. Select the node from the Hosts list.2. Click Remove. A message box appears.3. Click Yes. The node definition is removed from the hosts file and the
Network Services window is updated.
Starting and Stopping the UniRPC on Windows Platforms
On UniVerse systems you cannot use UniAdmin to start or stop the UniRPC daemon because it uses the UniRPC daemon to connect to the UniVerse server. On Windows platforms, you can start the UniRPC daemon or service in one of three ways:
From the Windows Control Panel
2-7

C:\Program Files\Adobe\FrameMaker8\UniVerse 10.3\apisupp\Ch22/3/09
From the UniVerse Control PanelAt the MS-DOS prompt
From the Windows Control Panel
To start the UniRPC:
1. Double-click the Services icon.2. Scroll down the list of services until you find three entries for UniVerse:
UniVerse Resource Service, UniRPC Service, and UniVerse Telnet Service.3. Choose UniRPC Service, then choose Start.4. Click Startup, then Click Automatic. This ensures that UniVerse starts
automatically when the server is rebooted.
From the UniVerse Control Panel
To start the UniRPC:
1. Choose Start -> Programs -> IBM U2 -> UniVerse Control.2. Click the Start All Services button to start all UniVerse services.
At the MS-DOS Prompt
Enter the following command:
D:\users>net start unirpc
The system reports the name of the service it is starting and whether the startup is successful.
Note: The UniVerse services are started automatically when the operating system is loaded unless you clear the automatic startup boxes during UniVerse installation.
Stopping the UniRPC on Windows Systems
You can shut down the UniRPC daemon or service in one of three ways:
From the Windows Control PanelFrom the UniVerse Control PanelAt the MS-DOS prompt
2-8 Administrative Supplement for Client APIs

C:\Program Files\Adobe\FrameMaker8\UniVerse
Note: If users are connected to the services when they are shut down, the users do not lose their connections; the connections remain active until the users terminate them. However, it is not possible for new users to connect to UniVerse.
If you want to do a complete shutdown of UniVerse to restart the services, be sure that all connections are terminated first.
From the Windows Control Panel
To stop the UniRPC:
1. Double-click the Services icon.2. Scroll down the list of services until you find three entries for UniVerse:
UniVerse Resource ServiceUniRPC ServiceUniVerse Telnet Service
3. Choose UniRPC Service, then choose Stop.4. Click OK. The UniRPC daemon or service is shut down.
From the UniVerse Control Panel
To stop the UniRPC:
1. Choose Start -> Programs -> IBM U2 -> UniVerse Control.2. Click Stop All Services to stop all UniVerse services. Wait for all services
to stop.3. Click OK to exit the UniVerse Control Panel. All four services are shut
down.
At the MS-DOS Prompt
To stop the UniRPC:
1. Enter the following command at the MS-DOS prompt:D:\users>net stop unirpcA message appears prompting you to confirm that you want to stop the UniRPC.
2. Enter Y to stop the UniRPC daemon or service.
2-9

C:\Program Files\Adobe\FrameMaker8\UniVerse 10.3\apisupp\Ch22/3/09
Starting and Stopping the UniRPC Daemon on UNIX Systems
Use the UniVerse System Administration menus on the UniVerse server to start and stop the UniRPC daemon. See Administering UniVerse for more information.
Starting the UniRPC Daemon
To start the UniRPC daemon:
1. Choose Rpc administration from the Package menu, then choose Start the rpc daemon.
2. At the prompt, do one of the following to handle any error messages:Enter the name of the file to send all error and system messages to.Enter a space to display messages on your screen.Press Return if you do not want to display or save messages.
3. At the next prompt, click Yes to start the UniRPC daemon or No to return to the Rpc administration menu.
Note: The file that receives all error and system messages can grow unchecked unless you monitor it periodically.
Once you start the UniRPC daemon, it automatically restarts whenever you boot UniVerse.
Stopping the UniRPC Daemon
To stop the UniRPC daemon:
1. Choose Rpc administration from the Package menu, then choose Halt the rpc daemon.
2. At the prompt, click Yes to stop the UniRPC daemon or No to return to the Rpc administration menu.
Note: Stopping the UniRPC daemon does not interrupt active UniRPC processes.
UniRPC Maintenance on UniData ServersOn UniData servers, UniRPC maintenance is minimal. You cannot change the port number of the UniRPC, and there is no need to maintain a hosts file.
2-10 Administrative Supplement for Client APIs

C:\Program Files\Adobe\FrameMaker8\UniVerse
Use the stopud command to stop the UniRPC daemon or service. Use the startud command to start the UniRPC.
2-11

C:\Program Files\Adobe\FrameMaker8\UniVerse 10.3\apisupp\Ch22/3/09
About the unirpcservices FileEach process that uses the UniRPC automatically configures the unirpcservices file when it first starts up. If no unirpcservices file exists, it is created in the unishared directory.
On UNIX systems the default location of this file is /usr/ibm/unishared/unirpc.On Windows platforms the default location is <drive>:\ibm\unishared\unirpc.
To determine the location of the unirpcservices file on your system, do the following:
On UNIX systems, execute the command:$ cat /.unisharedOn Windows platforms, find the registry entry under the subkey \HKEY_LOCAL_MACHINE\SOFTWARE\ibm\unishared.
When a client system requests a connection to a service on a server system, the UniRPC daemon (unirpcd) on the server uses the unirpcservices file to verify that the client system can start the requested service.
The UniRPC software uses field 3 of the unirpcservices file to verify that a machine making a request for a service is allowed to do so. The following table lists the fields in the unirpcservices file:
unirpcservices File Fields
Field Contents
1 The name of the UniRPC service (for example, uvserver).
2 The full path of the service engine executed by the UniRPC daemon.
3 The names of nodes allowed to execute this service. This field is multivalued, with values separated by commas (no spaces). If the field contains * (asterisk), all hosts defined in /etc/hosts can execute this service.
4 The network transport mechanism for the service (TCP/IP).
5 Reserved for future use.
6 The value (in seconds) specifying how long an open connection can be idle before automatic closure from the remote connection. The default is 3600, or 60 minutes.
2-12 Administrative Supplement for Client APIs

C:\Program Files\Adobe\FrameMaker8\UniVerse
UniVerse Systems
On UniVerse systems the unirpcservices file might contain entries such as the following:
uvnet /usr/ibm/uv/bin/uvnetd host1,host2,host3 TCP/IP 3 3600 uvdrsrv /usr/ibm/uv/bin/uvdrsrvd * TCP/IP 0 3600 uvcs /usr/ibm/uv/bin/uvapi_server * TCP/IP 0 3600 uvfilefix /usr/ibm/uv/bin/uvfilefix_server * TCP/IP 0 3600 uvserver /usr/ibm/uv/bin/uvsrvd * TCP/IP 0 3600
The version of uv.rc shipped with UniVerse systems (/usr/ibm/uv/sample/uv.rc) contains commands that:
Check for the existence of the unirpcservices fileVerify that services are defined in itStart the UniRPC daemon if the file contains services
The UniRPC daemon is executed as part of the UniVerse reboot procedure.
UniData Systems
On UniData systems the unirpcservices file might contain:
udcs /usr/ud71/bin/udapi_server * TCP/IP 0 3600 udserver /usr/ud71/bin/udsrvd * TCP/IP 0 3600
2-13

:\Progebrua
2Administering UniData on Windows NT or Windows 20000
3Chapter
ram Firy 3 20
Beta Beta Beta Beta Beta Beta Beta Beta Beta Beta Beta Beta Beta Beta Beta Beta Beta Beta Beta
The UCI Config Editor
UCI Configuration File . . . . . . . . . . . . . . . . . 3-3Starting the UCI Config Editor . . . . . . . . . . . . . . 3-4Adding a Data Source . . . . . . . . . . . . . . . . . 3-5 Data Source Parameters . . . . . . . . . . . . . . . 3-8 New Data Source Parameters and Comments . . . . . . . . 3-12 Comments . . . . . . . . . . . . . . . . . . . 3-13Modifying a Data Source . . . . . . . . . . . . . . . . 3-14Deleting a Data Source . . . . . . . . . . . . . . . . . 3-16Working with Multiple Data Sources . . . . . . . . . . . . 3-17Creating a UCI Configuration File . . . . . . . . . . . . . 3-18Setting the UciCfgFile Key in the Registry . . . . . . . . . . 3-19Opening an Alternative UCI Configuration File . . . . . . . . . 3-20Enabling and Disabling Logging . . . . . . . . . . . . . . 3-21Logging Client Connections . . . . . . . . . . . . . . . 3-22
les\Adobe\FrameMaker8\UniVerse 10.3\apisupp\Ch3TOC.fm09 10:26 am Administering UniData on Windows NT or Windows 2000

C:\Program Files\Adobe\FrameMaker8\UniVerse
The UCI Config Editor lets you define and configure data sources. When an application requests a connection to a data source, UCI uses the information in the UCI configuration file (uci.config or another UCI configuration file you create) to connect to the data source.
The UCI Config Editor lets you:
Add, modify, or delete data sources.Create your own UCI configuration file.Set up your system registry to access a particular UCI configuration file.Open a UCI configuration file different from the one that currently appears in the UCI Config Editor window.Enable or disable logging for the UCI Config Editor.
3-2

C:\Program Files\Adobe\FrameMaker8\UniVerse 10.3\apisupp\Ch32/3/09
UCI Configuration FileApplications access data sources through entries in the UCI configuration file. This file contains connection parameters needed to route connection requests to the appropriate UniData or UniVerse server.
When an application tries to connect to a data source, the UCI configuration file on the client machine is read to determine the name of the host system, the DBMS type, and other information.
The UCI configuration file that UCI uses is specified in the UciCfgFile key in the system registry under HKEY_LOCAL_MACHINE \SOFTWARE\IBM\UCI.
Each entry in the UCI configuration file describes the physical attributes of a connection in sufficient detail to perform three tasks:
Establish communicationsStart a UniData or UniVerse server processRoute query and update requests
In the UCI configuration file on the client machine, you must define the UCI data sources to which you want applications to connect. Use the UCI Config Editor to define and modify data source definitions.
Note: Entries in the UCI configuration file are case-sensitive. For example, if the entry for a server is defined as myhostuv, the name of the server must be myhostuv, not MYHOSTUV.
For more information about the UCI configuration file, see UCI Developer’s Guide.
3-3 Administrative Supplement for Client APIs

C:\Program Files\Adobe\FrameMaker8\UniVerse
Starting the UCI Config EditorTo start the UCI Config Editor, from the Windows Start menu choose Programs -> IBM U2 -> UniDK -> UCI Editor. The UCI Config Editor window appears:
The data source information in this example represents the default settings in uci.config as shipped with the client product.
3-4
C:\Program Files\Adobe\FrameMaker8\UniVerse 10.3\apisupp\Ch32/3/09
Adding a Data SourceTo add a data source:
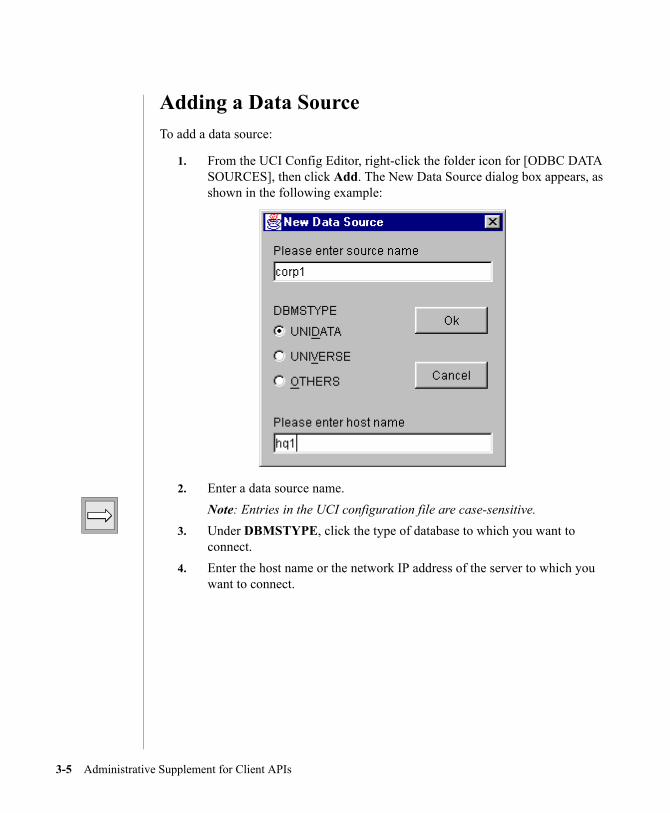
1. From the UCI Config Editor, right-click the folder icon for [ODBC DATA SOURCES], then click Add. The New Data Source dialog box appears, as shown in the following example:
2. Enter a data source name.Note: Entries in the UCI configuration file are case-sensitive.
3. Under DBMSTYPE, click the type of database to which you want to connect.
4. Enter the host name or the network IP address of the server to which you want to connect.
3-5 Administrative Supplement for Client APIs
C:\Program Files\Adobe\FrameMaker8\UniVerse
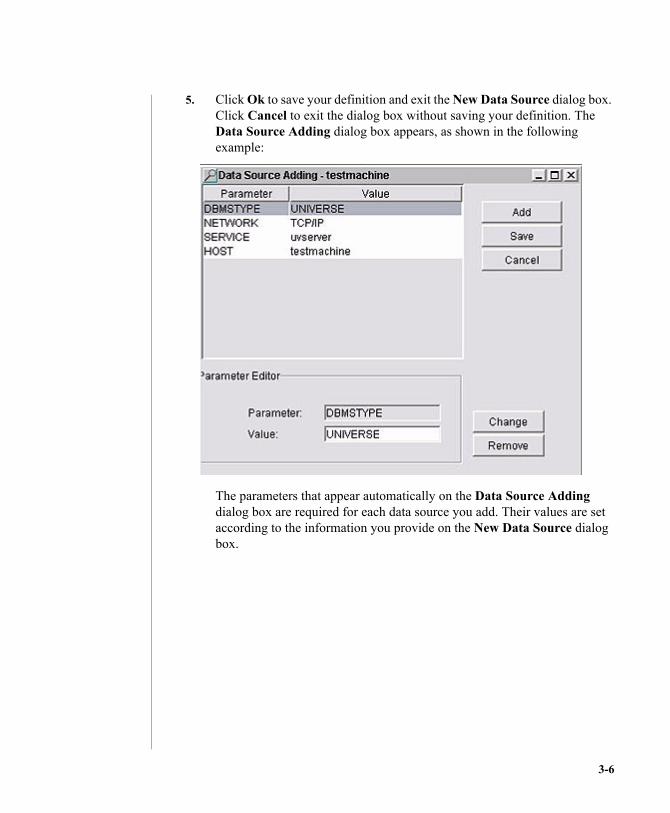
5. Click Ok to save your definition and exit the New Data Source dialog box. Click Cancel to exit the dialog box without saving your definition. The Data Source Adding dialog box appears, as shown in the following example:
The parameters that appear automatically on the Data Source Adding dialog box are required for each data source you add. Their values are set according to the information you provide on the New Data Source dialog box.
3-6
C:\Program Files\Adobe\FrameMaker8\UniVerse 10.3\apisupp\Ch32/3/09
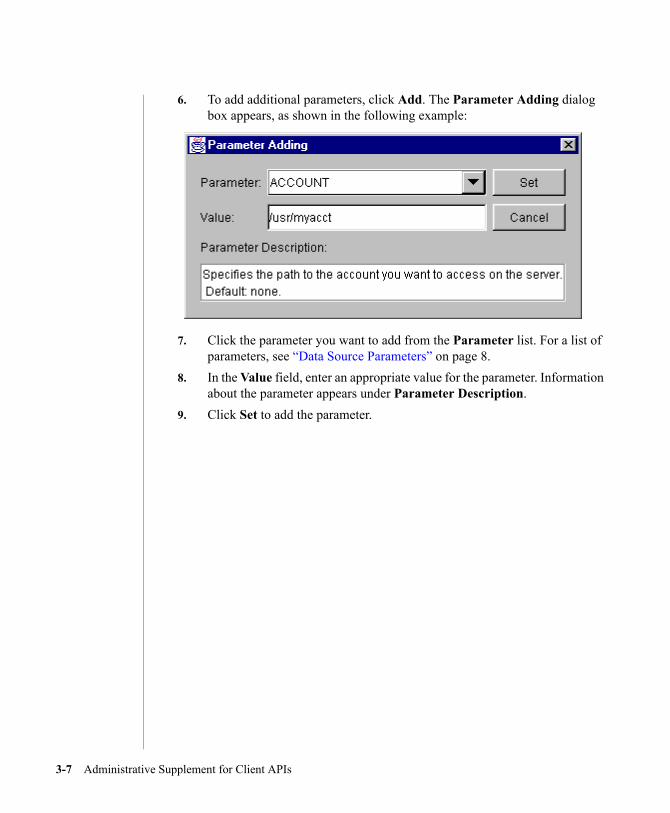
6. To add additional parameters, click Add. The Parameter Adding dialog box appears, as shown in the following example:
7. Click the parameter you want to add from the Parameter list. For a list of parameters, see “Data Source Parameters” on page 8.
8. In the Value field, enter an appropriate value for the parameter. Information about the parameter appears under Parameter Description.
9. Click Set to add the parameter.
3-7 Administrative Supplement for Client APIs

C:\Program Files\Adobe\FrameMaker8\UniVerse
10. After you finish adding parameters, click Cancel. The Data Source Adding dialog box displays all parameters associated with the data source:
Note: To edit parameters, see “Modifying a Data Source” on page 14.
11. After you finish adding parameters for the data source, click Save.12. When you finish adding data sources, choose File -> Save disk file to save
your changes.
Data Source ParametersEach data source definition in the UCI configuration must include the following parameters:
DBMSTYPENETWORKSERVICEHOST
You also should include the ACCOUNT and USERNAME parameters for each entry.
3-8
C:\Program Files\Adobe\FrameMaker8\UniVerse 10.3\apisupp\Ch32/3/09
Two parameters you might want to change are MAXFETCHBUFF and MAXFETCHCOLS. Use these parameters to increase the amount of data in each buffer sent from the server to the client. This will improve performance by reducing the number of data transfers between server and client. For more information about these two parameters, see the UCI Developer’s Guide.
If the UniVerse server you are connecting to has NLS enabled, you also can add or change the NLS parameters. For information about setting the NLS parameters, see the UCI Developer’s Guide.
Warning: Adding or changing other parameters can make UCI unusable.
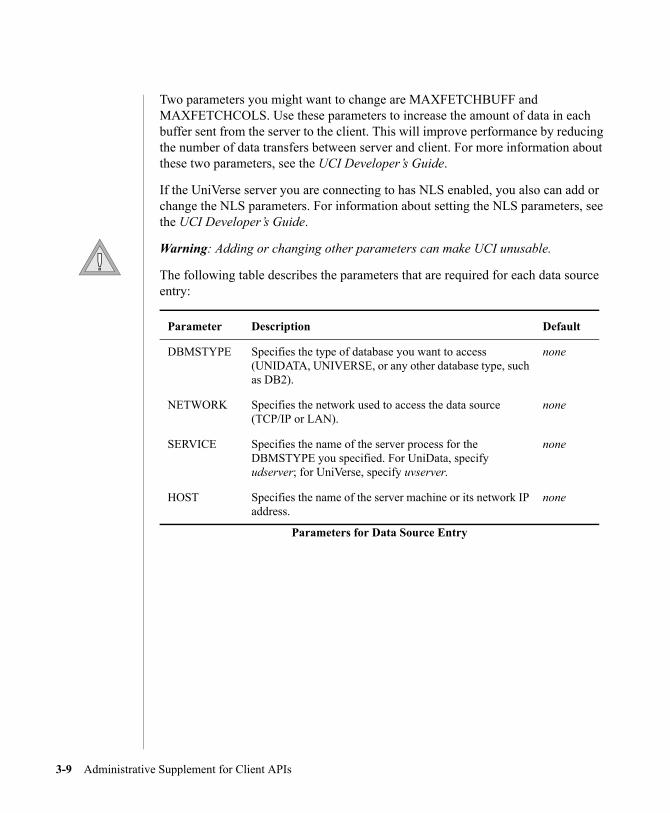
The following table describes the parameters that are required for each data source entry:
Parameters for Data Source Entry
Parameter Description Default
DBMSTYPE Specifies the type of database you want to access (UNIDATA, UNIVERSE, or any other database type, such as DB2).
none
NETWORK Specifies the network used to access the data source (TCP/IP or LAN).
none
SERVICE Specifies the name of the server process for the DBMSTYPE you specified. For UniData, specify udserver; for UniVerse, specify uvserver.
none
HOST Specifies the name of the server machine or its network IP address.
none
3-9 Administrative Supplement for Client APIs

C:\Program Files\Adobe\FrameMaker8\UniVerse
The following table describes other parameters in the Parameters list that you may want to add or change:
Parameter Description Default
ACCOUNT Specifies one of the following:n The full path of a UniData or UniVerse account
directory
n A valid UniVerse schema name
n A valid UniData database name
A UniData database name is valid if it appears as an entry in the ud_database file. For UNIX systems, this file is located in the /usr/ud71/include path. For Windows systems, it is located in \udthome\include.
none
AUTOINC Produces an SQLColAttributes report if the column is an auto-increment column.
No
CASE Produces an SQLColAttributes report if the column is case-sensitive.
Yes
DESCB4EXEC (For internal use only) Indicates if the database’s describe operation is legal before executing the SQL statement.
Yes
DSPSIZE Produces an SQLColAttributes report showing the column display size.
Yes
MAPERROR Maps UniVerse error codes to standard ODBC SQLSTATE error codes. Whenever the server returns one of the mapped codes as an error condition, UCI sets the SQLSTATE variable equal to the five-character code defined in the ODBC standard.
List
MARKERNAME Indicates if the database uses names for parameter markers. If not, the ? (question mark) is the marker character.
No
Other Parameters for Data Source Entry
3-10
C:\Program Files\Adobe\FrameMaker8\UniVerse 10.3\apisupp\Ch32/3/09
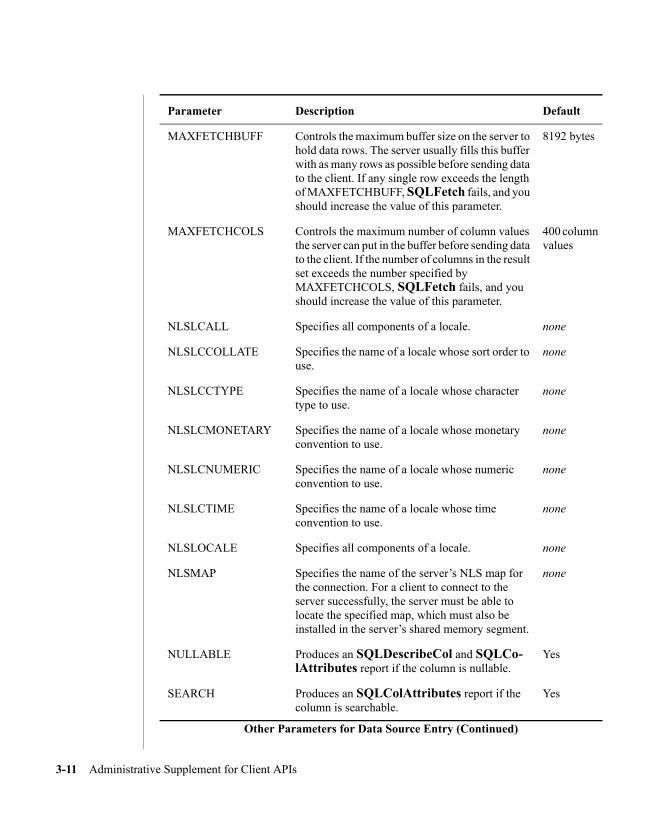
MAXFETCHBUFF Controls the maximum buffer size on the server to hold data rows. The server usually fills this buffer with as many rows as possible before sending data to the client. If any single row exceeds the length of MAXFETCHBUFF, SQLFetch fails, and you should increase the value of this parameter.
8192 bytes
MAXFETCHCOLS Controls the maximum number of column values the server can put in the buffer before sending data to the client. If the number of columns in the result set exceeds the number specified by MAXFETCHCOLS, SQLFetch fails, and you should increase the value of this parameter.
400 column values
NLSLCALL Specifies all components of a locale. none
NLSLCCOLLATE Specifies the name of a locale whose sort order to use.
none
NLSLCCTYPE Specifies the name of a locale whose character type to use.
none
NLSLCMONETARY Specifies the name of a locale whose monetary convention to use.
none
NLSLCNUMERIC Specifies the name of a locale whose numeric convention to use.
none
NLSLCTIME Specifies the name of a locale whose time convention to use.
none
NLSLOCALE Specifies all components of a locale. none
NLSMAP Specifies the name of the server’s NLS map for the connection. For a client to connect to the server successfully, the server must be able to locate the specified map, which must also be installed in the server’s shared memory segment.
none
NULLABLE Produces an SQLDescribeCol and SQLCo-lAttributes report if the column is nullable.
Yes
SEARCH Produces an SQLColAttributes report if the column is searchable.
Yes
Parameter Description Default
Other Parameters for Data Source Entry (Continued)
3-11 Administrative Supplement for Client APIs
C:\Program Files\Adobe\FrameMaker8\UniVerse
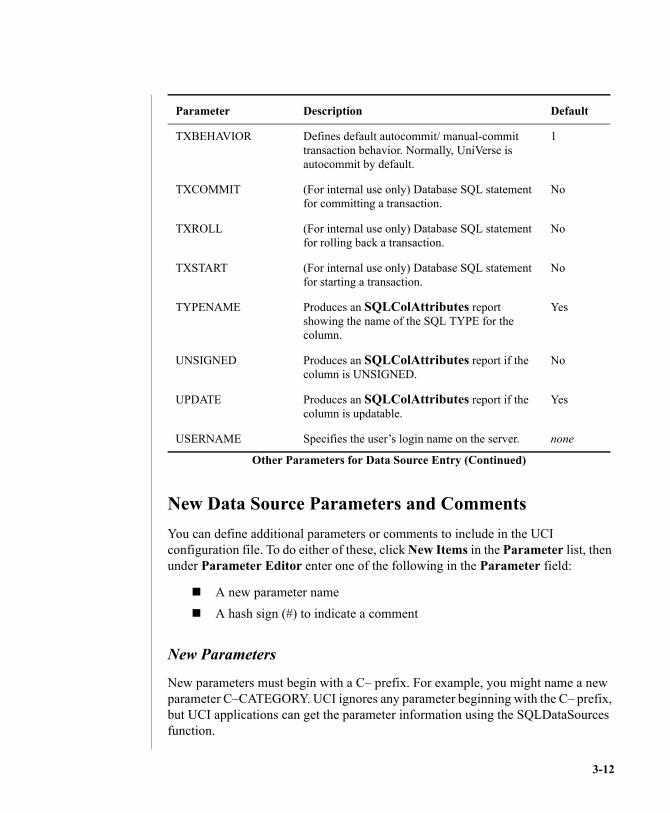
New Data Source Parameters and CommentsYou can define additional parameters or comments to include in the UCI configuration file. To do either of these, click New Items in the Parameter list, then under Parameter Editor enter one of the following in the Parameter field:
A new parameter nameA hash sign (#) to indicate a comment
New Parameters
New parameters must begin with a C– prefix. For example, you might name a new parameter C–CATEGORY. UCI ignores any parameter beginning with the C– prefix, but UCI applications can get the parameter information using the SQLDataSources function.
TXBEHAVIOR Defines default autocommit/ manual-commit transaction behavior. Normally, UniVerse is autocommit by default.
1
TXCOMMIT (For internal use only) Database SQL statement for committing a transaction.
No
TXROLL (For internal use only) Database SQL statement for rolling back a transaction.
No
TXSTART (For internal use only) Database SQL statement for starting a transaction.
No
TYPENAME Produces an SQLColAttributes report showing the name of the SQL TYPE for the column.
Yes
UNSIGNED Produces an SQLColAttributes report if the column is UNSIGNED.
No
UPDATE Produces an SQLColAttributes report if the column is updatable.
Yes
USERNAME Specifies the user’s login name on the server. none
Parameter Description Default
Other Parameters for Data Source Entry (Continued)
3-12

C:\Program Files\Adobe\FrameMaker8\UniVerse 10.3\apisupp\Ch32/3/09
CommentsTo include a comment in a data source definition, enter a hash sign (#) in the Parameter field, then enter your comment in the Value field. Comments appear before parameters in the data source definition.
3-13 Administrative Supplement for Client APIs

C:\Program Files\Adobe\FrameMaker8\UniVerse
Modifying a Data SourceTo modify a data source:
1. From the UCI Config Editor, right-click the data source you want to modify, then click Edit. The Data Source Editing dialog box appears, as shown in the following example:
2. You can add new parameters or edit existing ones. To add new parameters, see “Adding a Data Source” on page 5. To edit parameters, continue with the following steps.
3. Click the parameter you want to modify. The parameter name and current value appear under Parameter Editor.
4. To remove the parameter, click Remove. To modify the parameter value, enter a new value in the Value field, then click Change.Note: You also can modify a parameter value by double-clicking the value at the top of the dialog box, then entering the new value.
5. After you finish modifying parameters for the data source, click Save.
3-14

C:\Program Files\Adobe\FrameMaker8\UniVerse 10.3\apisupp\Ch32/3/09
6. When you finish modifying data source information, choose File ä Save disk file to save your changes.
3-15 Administrative Supplement for Client APIs

C:\Program Files\Adobe\FrameMaker8\UniVerse
Deleting a Data SourceTo delete a data source:
1. From the UCI Config Editor, right-click the data source you want to delete, then click Delete.
2. When you finish deleting data sources, choose File -> Save disk file to save your changes.
3-16
C:\Program Files\Adobe\FrameMaker8\UniVerse 10.3\apisupp\Ch32/3/09
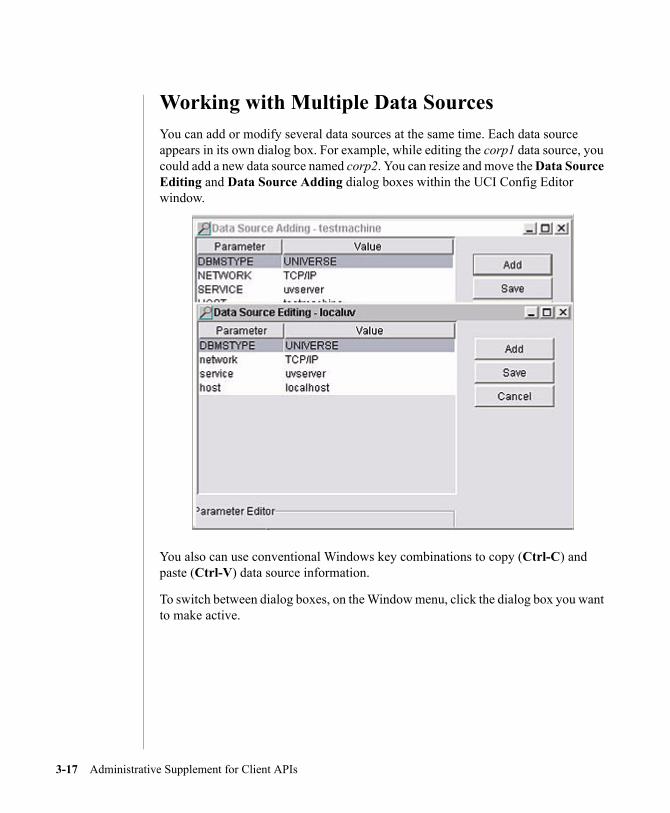
Working with Multiple Data SourcesYou can add or modify several data sources at the same time. Each data source appears in its own dialog box. For example, while editing the corp1 data source, you could add a new data source named corp2. You can resize and move the Data Source Editing and Data Source Adding dialog boxes within the UCI Config Editor window.
You also can use conventional Windows key combinations to copy (Ctrl-C) and paste (Ctrl-V) data source information.
To switch between dialog boxes, on the Window menu, click the dialog box you want to make active.
3-17 Administrative Supplement for Client APIs

C:\Program Files\Adobe\FrameMaker8\UniVerse
Creating a UCI Configuration FileComplete the following steps to create your own UCI configuration file:
1. From the UCI Config Editor, open a UCI configuration file you want to use as a base for the new UCI configuration file. To open a file, see “Opening an Alternative UCI Configuration File” on page 20.
2. Choose File -> Save As.3. From the Save As dialog box, navigate to the folder to which you want to
save the new UCI configuration file, specify a file name with the extension .config, then click Save.
4. Modify the new UCI configuration file with the appropriate data source information.
3-18

C:\Program Files\Adobe\FrameMaker8\UniVerse 10.3\apisupp\Ch32/3/09
Setting the UciCfgFile Key in the RegistryThe UCI configuration file that the client uses is specified in the UciCfgFile key in the system registry under HKEY_LOCAL_MACHINE \SOFTWARE\IBM\UCI. Initially this is set to uci.config, the UCI configuration file IBM ships to you.
To change this setting to point to a different UCI configuration file:
1. From the UCI Config Editor, make sure the data source information in the left pane of the UCI Config Editor window represents the UCI configuration file you want to set in the UciCfgFile registry key.
2. Choose File -> Reset Registry.
3-19 Administrative Supplement for Client APIs

C:\Program Files\Adobe\FrameMaker8\UniVerse
Opening an Alternative UCI Configuration FileTo open the UCI configuration file that is set in the UciCfgFile registry key, choose File ä Get Registry.
To open a UCI configuration file that is different from the one set in the UciCfgFile registry key:
1. From the UCI Config Editor, choose File -> Open disk file.2. From the Open File dialog box, choose the appropriate UCI configuration
file (the file should have the extension .config), then click Open.3. If you try to open a file with an extension other than .config, the following
dialog box appears:
In this case, indicate whether you want to continue working on this file.
3-20
C:\Program Files\Adobe\FrameMaker8\UniVerse 10.3\apisupp\Ch32/3/09
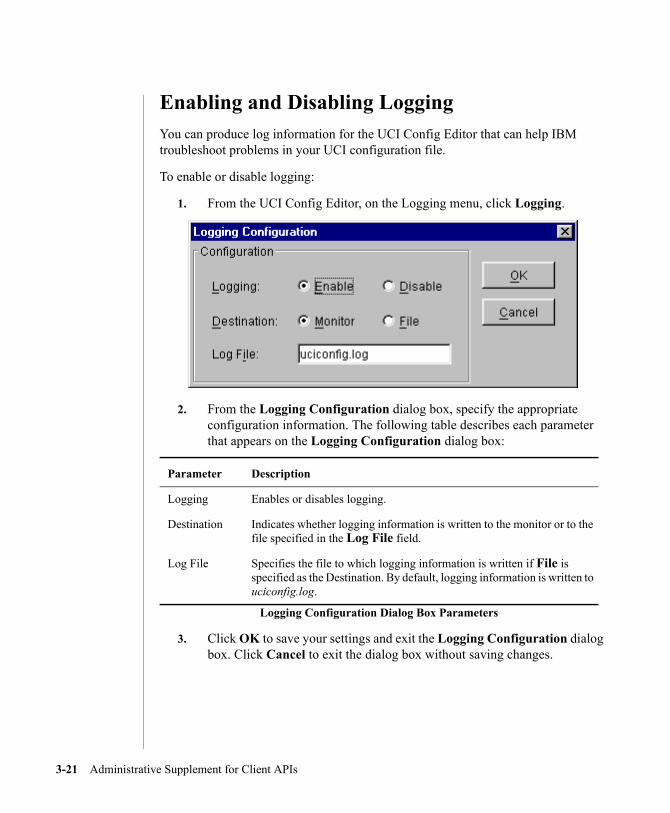
Enabling and Disabling LoggingYou can produce log information for the UCI Config Editor that can help IBM troubleshoot problems in your UCI configuration file.
To enable or disable logging:
1. From the UCI Config Editor, on the Logging menu, click Logging.
2. From the Logging Configuration dialog box, specify the appropriate configuration information. The following table describes each parameter that appears on the Logging Configuration dialog box:
Logging Configuration Dialog Box Parameters
Parameter Description
Logging Enables or disables logging.
Destination Indicates whether logging information is written to the monitor or to the file specified in the Log File field.
Log File Specifies the file to which logging information is written if File is specified as the Destination. By default, logging information is written to uciconfig.log.
3. Click OK to save your settings and exit the Logging Configuration dialog box. Click Cancel to exit the dialog box without saving changes.
3-21 Administrative Supplement for Client APIs

C:\Program Files\Adobe\FrameMaker8\UniVerse
Logging Client ConnectionsBeginning at UniVerse 10.0, a server-side debugging log is available for tracking client connections.
The debugging log is located in the /tmp/ directory on UNIX, or C:\tmp on Windows platforms, by default.
Complete the following steps to set up the debugging log:
1. Edit the serverdebug file in the UVHOME directory.2. In the first column, enter uvcs, indicating that you want to log the
connection progress for both uvapi_server and uvapi_slave.3. In the next column, enter an integer indicating the level of logging infor-
mation you want to maintain. The valid integers are:0 – No debugging.1 – Captures information about the startup connection only.9 – Captures information about every call.
4. In the third column, enter the full path for the log file location. If this value does not exist, the logs are written to /tmp/uvapiserver_###.log as the default on UNIX systems, or C:\tmp\uvapiserver####.log as the default on Windows systems. #### is the uvapi_server process ID.
3-22
:\Progebrua
3Administering UniData on Windows NT or Windows 20000
4Chapter
ram Firy 3 20
Beta Beta Beta Beta Beta Beta Beta Beta Beta Beta Beta Beta Beta Beta Beta Beta Beta Beta Beta
Accessing UniData Accounts
Running Concurrent UniData Versions . . . . . . . . . . . . 4-3 Running UCI, UniData ODBC, or UniOLEDB Concurrently . . . 4-3 Running InterCall, UniObjects, or UniObjects for Java Concurrently . 4-4Tracing Events . . . . . . . . . . . . . . . . . . . 4-5
les\Adobe\FrameMaker8\UniVerse 10.3\apisupp\Ch4TOC.fm09 10:26 am Administering UniData on Windows NT or Windows 2000

C:\Program Files\Adobe\FrameMaker8\UniVerse
UniData databases are organized into accounts. A consumer connects to a UniData account and can access the files there. You optionally can define the account as a database in the ud_database file on the server. You can also include the account path or database name in the UCI data source definition in the UCI configuration file. For information about setting up the UCI Configuration file, see Chapter 3, “The UCI Config Editor.”
You can also specify the account path or database name each time you try to connect to the account. In this case you need not include the account path or database name in the UCI configuration file. When you try to connect, you are prompted to specify either the full path to the account or the database name.
If you want to access an account that has a UDTHOME directory different from the default UDTHOME directory, you must include a definition for that account in the ud_database file on the server. On UNIX systems this file is located in the /usr/ud71/include path. On Windows platforms it is located in \udthome\include. You can find the path for udthome by looking in the registry under HKEY_LOCAL_MACHINE\SOFTWARE\IBM\UniData\7.1. Use any text editor to modify the ud_database file.
To determine your default UniData home directory, use the UNIX env command. Output from this command includes the default setting for the UDTHOME environment variable.
The following Windows example shows an entry in the ud_database file for a database named db2:
DATABASE=db2 UDTHOME=d:\disk2\test71 UDTACCT=d:\disk2\test71\testacct
In the ud_database file entry the UDTHOME parameter is optional. You should include it only when the UDTHOME directory is different from the default UDTHOME directory.
4-2

C:\Program Files\Adobe\FrameMaker8\UniVerse 10.3\apisupp\Ch42/3/09
Running Concurrent UniData VersionsWhen you install UniData 7.1 on a machine where a previous version of UniData was installed, the unirpcservices file is overwritten with UniData 7.1 information. If you want to run a previous version concurrently with UniData 7.1, you must edit certain files to enter the definitions for the previous version.
Running UCI, UniData ODBC, or UniOLEDB ConcurrentlyIf you are running UCI, UniData ODBC, or UniOLEDB with concurrent versions of UniData, you must edit the unirpcservices file and the uci.config file to define locations of executables from the previous version of UniData.
The following example illustrates unirpcservices file entries when running UniData 5.2 concurrently with UniData 7.1:
udserver_52 d:\Informix\ud52\bin\udsrvd.exe * TCP/IP 0 3600udserver_71 c:\IBM\ud71\bin\udsrvd.exe * TCP/IP 0 3600
Make sure the uci.config file contains an entry for the server for each version of UniData, as shown in the following example:
<unidata52> DBMSTYPE = UNIDATA network = TCP/IP service = udserver_52 host = server1
<unidata71> DBMSTYPE = UNIDATA network = TCP/IP service = udserver_71 host = server2
4-3 Administrative Supplement for Client APIs
C:\Program Files\Adobe\FrameMaker8\UniVerse
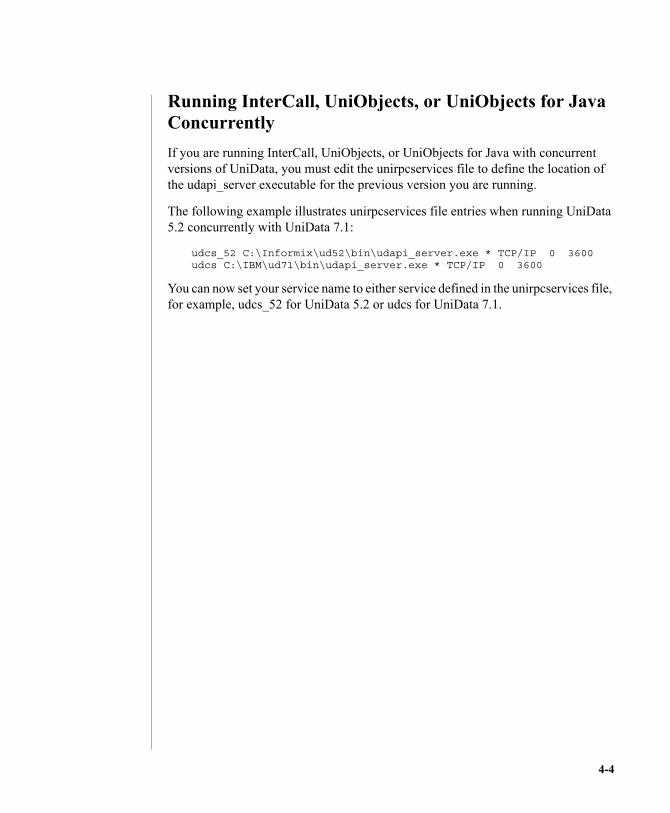
Running InterCall, UniObjects, or UniObjects for Java ConcurrentlyIf you are running InterCall, UniObjects, or UniObjects for Java with concurrent versions of UniData, you must edit the unirpcservices file to define the location of the udapi_server executable for the previous version you are running.
The following example illustrates unirpcservices file entries when running UniData 5.2 concurrently with UniData 7.1:
udcs_52 C:\Informix\ud52\bin\udapi_server.exe * TCP/IP 0 3600udcs C:\IBM\ud71\bin\udapi_server.exe * TCP/IP 0 3600
You can now set your service name to either service defined in the unirpcservices file, for example, udcs_52 for UniData 5.2 or udcs for UniData 7.1.
4-4
C:\Program Files\Adobe\FrameMaker8\UniVerse 10.3\apisupp\Ch42/3/09
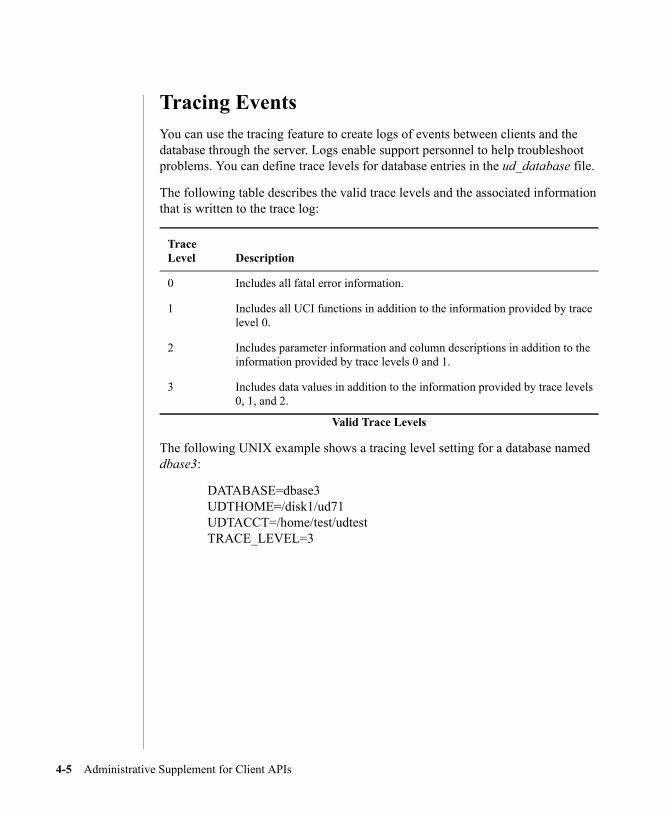
Tracing EventsYou can use the tracing feature to create logs of events between clients and the database through the server. Logs enable support personnel to help troubleshoot problems. You can define trace levels for database entries in the ud_database file.
The following table describes the valid trace levels and the associated information that is written to the trace log:
Valid Trace Levels
Trace Level Description
0 Includes all fatal error information.
1 Includes all UCI functions in addition to the information provided by trace level 0.
2 Includes parameter information and column descriptions in addition to the information provided by trace levels 0 and 1.
3 Includes data values in addition to the information provided by trace levels 0, 1, and 2.
The following UNIX example shows a tracing level setting for a database named dbase3:
DATABASE=dbase3 UDTHOME=/disk1/ud71 UDTACCT=/home/test/udtest TRACE_LEVEL=3
4-5 Administrative Supplement for Client APIs

:\Progebrua
4Administering UniData on Windows NT or Windows 20000
5Chapter
ram Firy 3 20
Beta Beta Beta Beta Beta Beta Beta Beta Beta Beta Beta Beta Beta Beta Beta Beta Beta Beta Beta
Device Licensing
Licensing Modes . . . . . . . . . . . . . . . . . . . 5-4Why Do I Need Device Licensing? . . . . . . . . . . . . . 5-5 Device Licensing Requirements . . . . . . . . . . . . 5-5Connection Types . . . . . . . . . . . . . . . . . . 5-6 Direct Connections. . . . . . . . . . . . . . . . . 5-6 Two-Tier Connections. . . . . . . . . . . . . . . . 5-6 Multiple-Tier Connections . . . . . . . . . . . . . . 5-6 Using Device Subkeys . . . . . . . . . . . . . . . 5-7
les\Adobe\FrameMaker8\UniVerse 10.3\apisupp\Ch5TOC.fm09 10:26 am Administering UniData on Windows NT or Windows 2000

C:\Program Files\Adobe\FrameMaker8\UniVerse
This chapter describes how device licensing works. For more information about device licensing, see Installing and Licensing UniData Products and Administering UniVerse.
2-3

C:\Program Files\Adobe\FrameMaker8\UniVerse 10.3\apisupp\Ch52/3/09
Licensing ModesUniVerse and UniData provide two licensing modes:
Session licensingDevice licensing
Session Licensing
Session licensing is like the licensing system used before Release 9.5 of UniVerse and Release 5.1 of UniData. Every connection from telnet or an API, even from the same PC, consumes one database license. On UniVerse systems, session licensing has been enhanced to include a new licensing tool, uvlictool, that reports on the current licensing state and cleans up current licensing.
Device Licensing
Device licensing, sometimes called client-side licensing, tries to combine all remote connections from a single device to a database server at both the database license level and the package level.
Device licensing works with the following connection types (among others):
UCIUniObjectsUniObjects for JavaUniObjects for .NETInterCallUniOLEDB
2-4 Administrative Supplement for Client APIs

C:\Program Files\Adobe\FrameMaker8\UniVerse
Why Do I Need Device Licensing?Users accessing a database server through one or more client application programs may want to put their licensing scheme on a one-license-per-device basis. Such applications often open multiple connections to a database server. For example, an application might use one connection to browse, another connection to check data, yet another connection to update the database, and so forth.
Before UniVerse Release 9.5 and UniData Release 5.1, each connection to the server consumed its own separate license, even though only one user was using all those connections from one PC. Device licensing lets such users consume one database license and one license for all the connections to the server from a single PC.
Device Licensing RequirementsDevice licensing has the following requirements:
Clients must run on a Windows platform.Clients must run on a LAN or TCP/IP with an Ethernet card.
2-5

C:\Program Files\Adobe\FrameMaker8\UniVerse 10.3\apisupp\Ch52/3/09
Connection TypesThere are three ways to connect to a database server:
Direct connection. This is not a client/server connection.Two-tier client/server connection.Multiple-tier client/server connection.
Each PC can have up to ten connections to the server, but not all connections from a PC can be combined.
Direct ConnectionsDirect connections are not really client/server connections because there is no real client. Examples of direct connections are:
Directly invoking the database on a systemTTY serial line
Two-Tier ConnectionsTwo-tier connections are typical client/server connections where a client application connects to a database server either on the same machine or on a different machine. Telnet connections to the database are an example of a two-tier connection.
Client applications running on PCs different from the database server appear to the server with unique identifiers.
Multiple-Tier ConnectionsMultiple-tier connections are client applications that connect from a PC to a database server either through one or more different PCs, or through an application server component. Examples of multiple-tier connections are:
An HTTP server running scripts that use UniObjects or UniObjects for Java.An application that connects first to an application server either on a different PC or on the server system. The application server connects to the database server.
2-6 Administrative Supplement for Client APIs

C:\Program Files\Adobe\FrameMaker8\UniVerse
Using Device SubkeysEach PC that connects immediately to the database server can have up to ten connections.
Using multiple-tier connections, each PC that connects to an intermediate application component consumes a separate license. But each of these PCs, at one or more removes from the server, can have up to ten connections.
In order for a PC to have multiple connections to the database server and still consume only one license, users must ensure that each PC connecting to the server through another system specify a unique device subkey before requesting a connection to the server. This subkey is a string of up to 24 characters. All client applications on a given device that connect to one database server must use the same unique subkey.
2-7

@
:\Program Files\Adobe\Fram0 3\apisupp\apisuppIX fm
Index
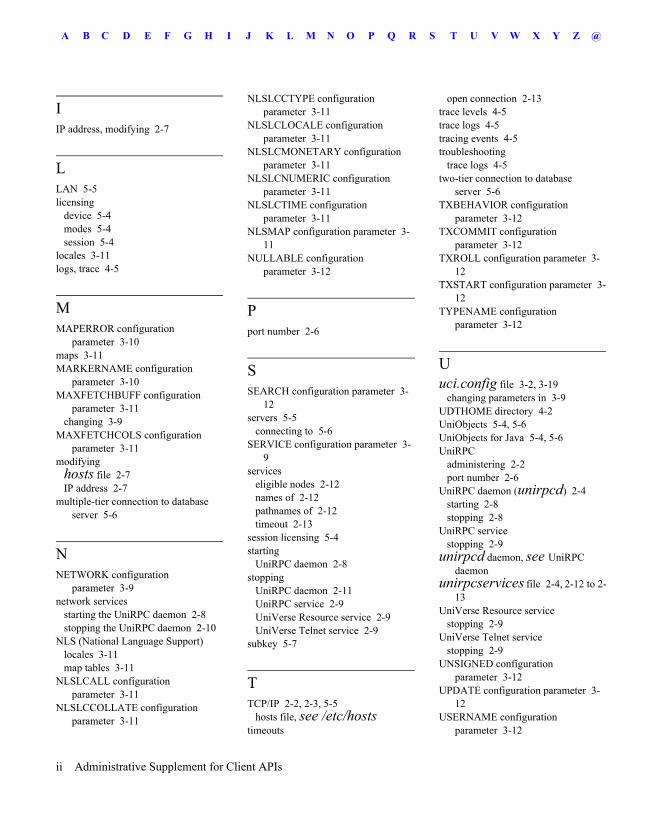
O Q C A B D E F G H I J K L M N P R S T U V W X Y Z
Index
AACCOUNT configuration
parameter 3-10administering UniRPC 2-2AUTOINC configuration parameter 3-
10
CCASE configuration parameter 3-10client-side licensing, see device
licensingconfigurations
defining 4-2connecting to a database server 5-6
directly 5-6multiple-tier 5-6two-tier 5-6
connection timeout 2-13Control Panel (UniVerse)
starting services 2-8stopping services 2-9
Control Panel (Windows NT)starting services 2-8
Ddaemons
unirpcd 2-4database servers 5-5DBMSTYPE configuration
parameter 3-9db_database file
trace log settings 4-5defining configurations 4-2
DESCB4EXEC configuration parameter 3-10
device licensing 5-4modes 5-4requirements 5-5
device subkey 5-7direct connection to database server 5-
6DSPSIZE configuration parameter 3-
10
Eerrors
trace logs 4-5events, tracing 4-5
Ffiles
hosts 2-6uci.config 3-2, 3-19unirpcservices 2-4, 2-12 to 2-
13/etc/hosts 2-3
HHOST configuration parameter 3-9hosts file
adding a new node 2-6modifying a node 2-7
eMaker8\UniVerse
@
g10.3\apisupp\apisuppIX.fm
O Q C A B D E F G H I J K L M N P R S T U V W X Y Z
IIP address, modifying 2-7
LLAN 5-5licensing
device 5-4modes 5-4session 5-4
locales 3-11logs, trace 4-5
MMAPERROR configuration
parameter 3-10maps 3-11MARKERNAME configuration
parameter 3-10MAXFETCHBUFF configuration
parameter 3-11changing 3-9
MAXFETCHCOLS configuration parameter 3-11
modifyinghosts file 2-7IP address 2-7
multiple-tier connection to database server 5-6
NNETWORK configuration
parameter 3-9network services
starting the UniRPC daemon 2-8stopping the UniRPC daemon 2-10
NLS (National Language Support)locales 3-11map tables 3-11
NLSLCALL configuration parameter 3-11
NLSLCCOLLATE configuration parameter 3-11
NLSLCCTYPE configuration parameter 3-11
NLSLCLOCALE configuration parameter 3-11
NLSLCMONETARY configuration parameter 3-11
NLSLCNUMERIC configuration parameter 3-11
NLSLCTIME configuration parameter 3-11
NLSMAP configuration parameter 3-11
NULLABLE configuration parameter 3-12
Pport number 2-6
SSEARCH configuration parameter 3-
12servers 5-5
connecting to 5-6SERVICE configuration parameter 3-
9services
eligible nodes 2-12names of 2-12pathnames of 2-12timeout 2-13
session licensing 5-4starting
UniRPC daemon 2-8stopping
UniRPC daemon 2-11UniRPC service 2-9UniVerse Resource service 2-9UniVerse Telnet service 2-9
subkey 5-7
TTCP/IP 2-2, 2-3, 5-5
hosts file, see /etc/hoststimeouts
open connection 2-13trace levels 4-5trace logs 4-5tracing events 4-5troubleshooting
trace logs 4-5two-tier connection to database
server 5-6TXBEHAVIOR configuration
parameter 3-12TXCOMMIT configuration
parameter 3-12TXROLL configuration parameter 3-
12TXSTART configuration parameter 3-
12TYPENAME configuration
parameter 3-12
Uuci.config file 3-2, 3-19
changing parameters in 3-9UDTHOME directory 4-2UniObjects 5-4, 5-6UniObjects for Java 5-4, 5-6UniRPC
administering 2-2port number 2-6
UniRPC daemon (unirpcd) 2-4starting 2-8stopping 2-8
UniRPC servicestopping 2-9
unirpcd daemon, see UniRPC daemon
unirpcservices file 2-4, 2-12 to 2-13
UniVerse Resource servicestopping 2-9
UniVerse Telnet servicestopping 2-9
UNSIGNED configuration parameter 3-12
UPDATE configuration parameter 3-12
USERNAME configuration parameter 3-12
ii Administrative Supplement for Client APIs
g10.3\apisupp\apisuppIX.fm
O Q C A B D E F G H I J K L M N P R S T U V W X Y Z @
uvlictool 5-4UV/Net timeout 2-13
Wwell-known port number, see port
number
Symbols/etc/hosts 2-3
Index iii