Embed Size (px)
Citation preview

ADMINISTRATION HANDS-ON

Page 2
About the Hands-On
This hands-on section is structured in a way, that it allows you to
work independently, but still giving you the possibility to consult
step-by-step instructions.
Each given task will be divided into two sections
• Actual Task
• Conditions, goals and short instructions
• Allowing you to work independently
• Detailed instructions (step-by-step walk through)
• In case you can not come up with own solutions

Page 3
Real Infrastructure
Environment
• Policy Manager and Console on single computer
• One managed host (AVCS 6)
F-SecureAVCS 6 F-Secure
PMS / PMC
Root Update Server

Page 4
Imaginary Infrastructure
During this hands-on we will create an imaginary infrastructure
• 2 offices (Helsinki and Munich)
• 3 imaginary workstations (Helsinki: wks02 / Munich: wks03 and wks04)
• 1 real workstation in Helsinki (wks01)
• 1 file server in each office (Helsinki: filesrv01 / Munich: filesrv02)
• 1 DNS server in each office (Helsinki: dnssrv01 / Munich: dnssrv02)
Subsidiary Munich
Headquarters Helsinki
wks03 wks04 wksXX wks02
AVCS 6
filesrv02 dnssrv02 filesrv01 dnssrv01 PMS/PMC

Page 5
Task Overview
Task 1: Create a new security level
Task 2: Testing dynamic rules
Task 3: Managing Application Control
Task 4: Testing Network Quarantine

Page 6
Task 1: Create your own Security Level
Create a new security level with the name ”CustomTest”
• Activate it on sub-domain level ”Development/HEL”
• Configure the ruleset described below
Allow rules
• 1st Rule: Web access (HTTP and DNS over UDP, to all hosts)
• 2nd Rule: Ping outbound (to all hosts)
Deny rules
• 3rd Rule: Ping inbound (from all hosts, with alerting, type: security alert)
• 4rd Rule: Catch rule (deny all bi-directional, from/to all hosts)
=> Task continues on next page

Page 7
Task 1: Create your own Security Level
Test your rules
• Check the DNS resolution (use nslookup)
• Define application control access types for prompted applications
• Make sure the same application are not prompted at next launch!
• Open Internet Explorer. Does the web access work?
• Apply same access types as above
• Check your rules with the local web interface (http://localhost:58581)
• Ping your host from the console. Does the ping work?
• Also monitor your policy domain (both console and host). Anything unusual?
=> After you finished the testing, and everything works, continue on page 28

Page 8
Creating a new Security LevelWalk Through
Creating a new security level
• Open Firewall Security Settings
• Click ”Add” (name it ”Custom Test”)

Page 9
Creating a new Security LevelWalk Through
Make ”CustomTest” the active level for the ”Development/HEL” sub-
domain
• Lock the setting

Page 10
Creating a new Security LevelWalk Through
Create the first new rule
• Select the policy root domain (F-Secure)
• Open Firewall Rules, there are no rules in the new rule set
• Create a rule

Page 11
Creating a new Security LevelWalk Through
The first rule will be an allow rule

Page 12
The rule will be applied to connections created to any remote host
Creating a new Security LevelWalk Through

Page 13
Creating a new Security LevelWalk Through
Specify outbound DNS and HTTP
• Use the predefined “HTTP” and “DNS” service (DNS over UDP!)

Page 14
Creating a new Security LevelWalk Through
No flags or alerts needed for this rule
• Click “Next”
• Name the rule “Web Access” and click “Finish”

Page 15
Creating a new Security LevelWalk Through
Create a catch rule as the last security level rule (on root level!)
• Deny all traffic in both directions (inbound and outbound)
• Distribute policies

Page 16
Creating a new Security LevelWalk Through
Check that the policy has arrived on your host
• Active security level should be ”CustomTest” and it should be locked

Page 17
Creating a new Security LevelWalk Through
Check that DNS works
• Open command prompt
nslookup www.f-secure.com

Page 18
Creating a new Security LevelWalk Through
You are running nslookup for the first
time. Application Control has
intercepted the server listen connection
(UDP)
• Choose “Do not show this dialogue for this program again” and click “Allow”

Page 19
Creating a new Security LevelWalk Through
Open the web interface
• Open Internet Explorer (allow the outbound connection)
• WebUI URL: http://127.0.0.1:58581/

Page 20
Use the web interface to check the rules you created with the PMC
Creating a new Security LevelWalk Through

Page 21
Creating a new Security LevelWalk Through
Ping test
• First try to ping your PMC computer from the your managed host and then the other way around
• Neither ping should work, as your current rules do not allow this
Page 22
Creating a new Security LevelWalk Through
Create a rule allowing outbound ping
• Apply the rule to the sub-domain “Finland”
• Use the pre-configured service “Ping”
• No alerting needed (accept default)
• Name the rule “Ping outbound”

Page 23
Creating a new Security LevelWalk Through
Create a rule denying inbound ping
• Apply the rule to the sub-domain “Finland”
• Use the pre-configured service “Ping”
• Activate alerting
• Alert type: “Security Alert”
• Alert trap: “Network Event: Inbound Service Denied”
• Name the rule “Ping inbound”

Page 24
Creating a new Security LevelWalk Through
Check the new rules
• Select the sub-domain “Finland”
• “Web Access” and “Deny rest” rule should be grayed out (inherited from the root domain!)
• Distribute policies
Page 25
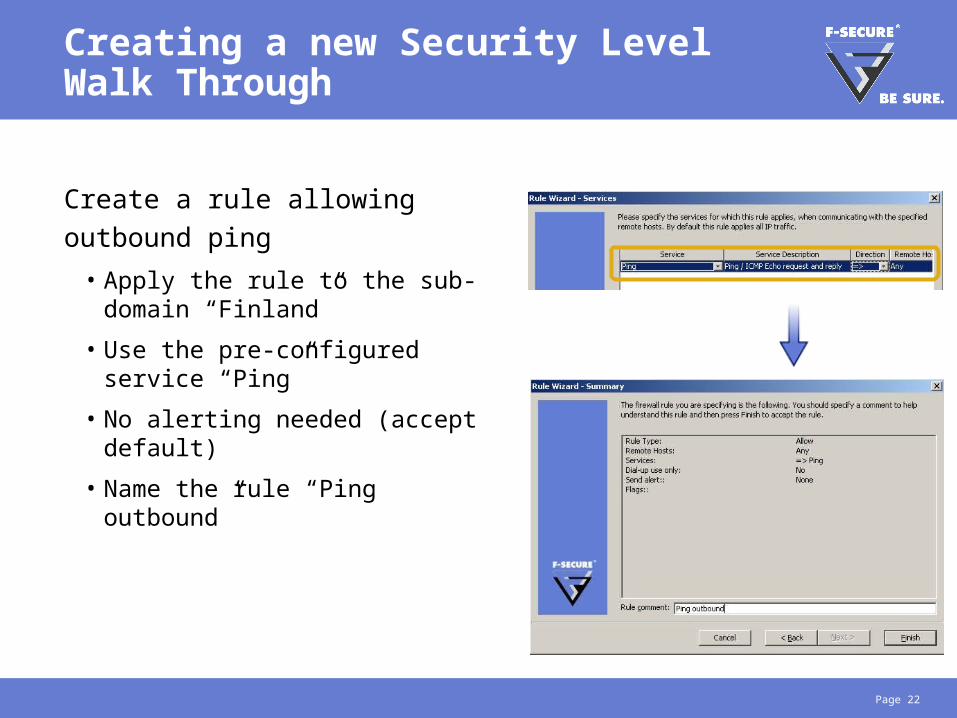
Creating a new Security LevelWalk Through
Ping your host from the Policy Manager computer
• Ping still shouldn’t go through

Page 26
Creating a new Security LevelWalk Through
The echo request has created a security alert
• Check alerts from Policy Manger Console
Page 27
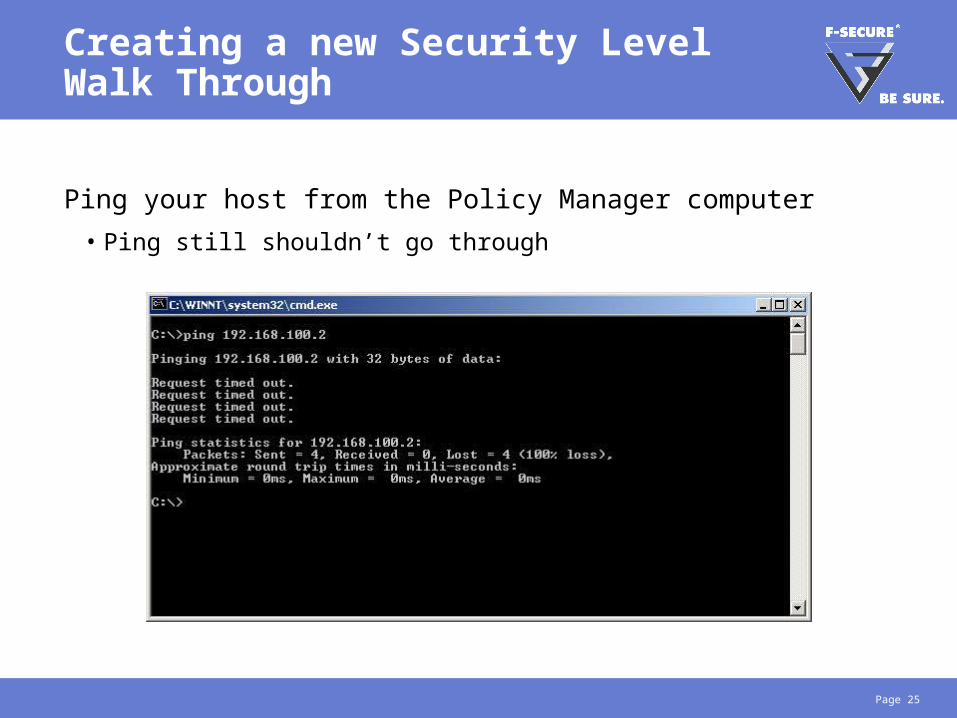
Creating a new Security LevelWalk Through
A pop-up alert should be visible on the workstation
• Click “Show All” for an alert summary

Page 28
Creating a new Security LevelTask Summary
You have now created your own security level, and added firewall
rules which allow the host to
• Connect to the internet (using HTTP only)
• Resolve DNS names (using DNS over UDP)
• Generate outbound ping requests
Page 29
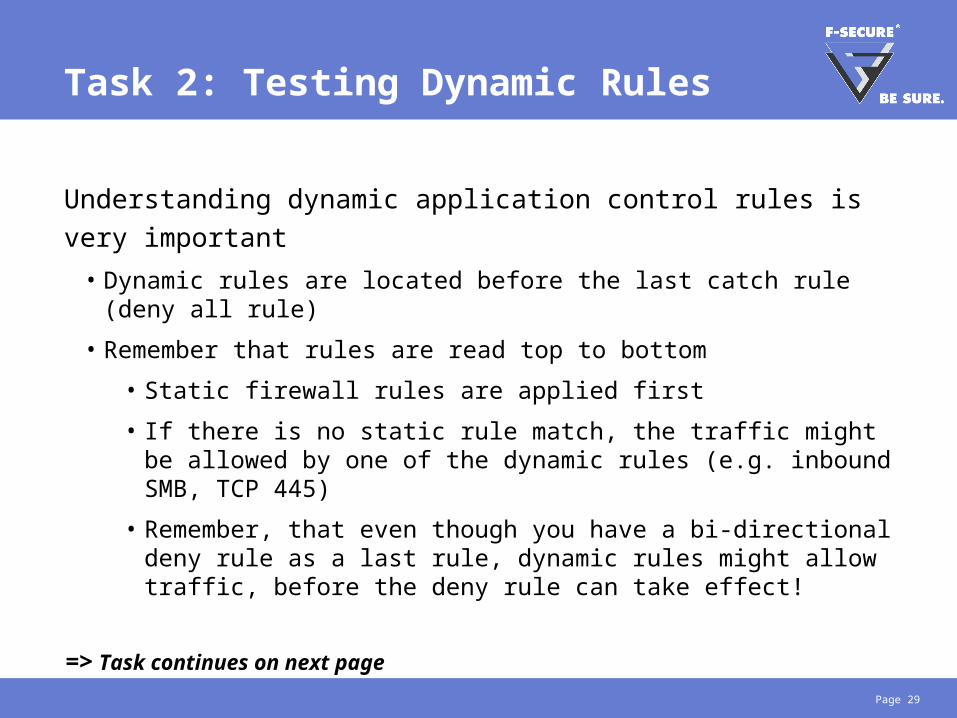
Task 2: Testing Dynamic Rules
Understanding dynamic application control rules is very important
• Dynamic rules are located before the last catch rule (deny all rule)
• Remember that rules are read top to bottom
• Static firewall rules are applied first
• If there is no static rule match, the traffic might be allowed by one of the dynamic rules (e.g. inbound SMB, TCP 445)
• Remember, that even though you have a bi-directional deny rule as a last rule, dynamic rules might allow traffic, before the deny rule can take effect!
=> Task continues on next page

Page 30
Task 2: Testing Dynamic Rules
A good example to show the function of dynamic rules is, to enable
remote access to the host’s local web interface
• Change the current policy in a way, that remote connections from both local host and remote hosts are accepted
• No static firewall rule is needed
• Search the policy setting in the MIB tree (Advanced Mode)
=> Task continues on next page
?

Page 31
Task 2: Testing Dynamic Rules
As next step, allow connections to the local host’s web interface only
from the Policy Manager Console
• Change the current ruleset so, that unauthorized hosts connecting to the web interface generate a security alert
• Distribute policies
• Try to connect to your host’s web interface (from the console)
• The connection should work!
• Now, ask your neighbour to establish a connection to your host
• The connection should be refused!
• You should get a security alert, both on your host and on the console
=> After you finished the whole task, continue on page 46

Page 32
Testing Dynamic RulesWalk Through
Activate remote access to the local web user interface
• Setting only available in Advanced more (View/Advanced Mode)
• F-Secure Internet Shield/Settings/Firewall Service/HTTP
• Mode = For Both Local and Remote Hosts
• Distribute policies!

Page 33
Testing Dynamic RulesWalk Through
Connect to your client’s local web interface (from the console)
• Open Internet Explorer, http://<wks ip address>:58581/

Page 34
Testing Dynamic RulesWalk Through
Create a new service
• Open Firewall Services and click “Add”

Page 35
Testing Dynamic RulesWalk Through
Name the service “HTTP58581”
• Use a comment field for a short description

Page 36
Testing Dynamic RulesWalk Through
Set the IP-Protocol as TCP
Page 37
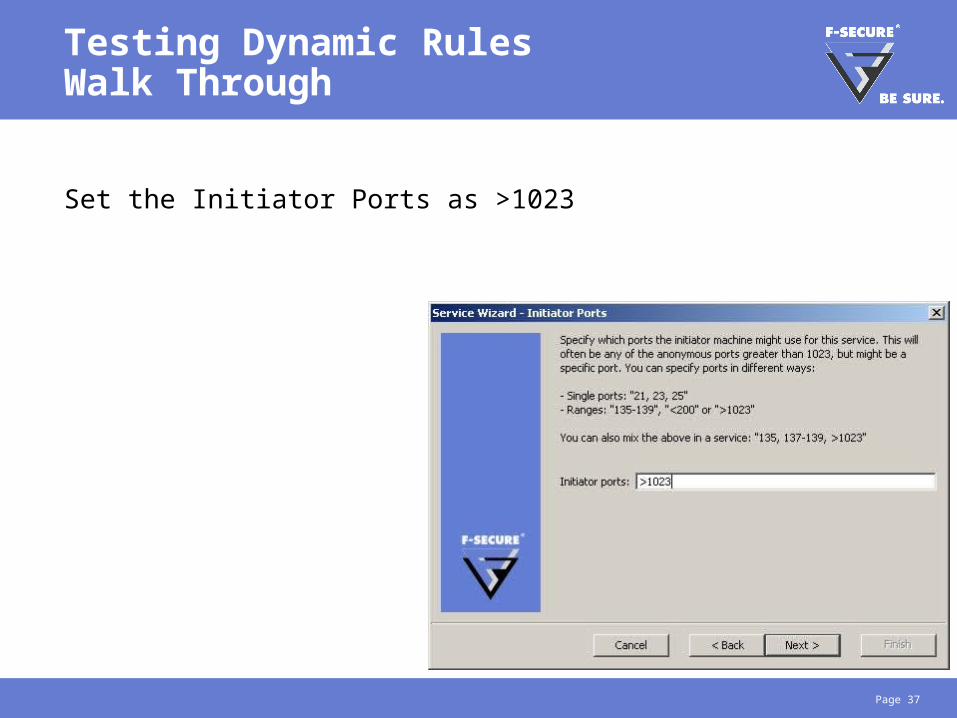
Testing Dynamic RulesWalk Through
Set the Initiator Ports as >1023

Page 38
Testing Dynamic RulesWalk Through
Set the Responder Port as 58581

Page 39
Testing Dynamic RulesWalk Through
Set the classification number
• Choose “Other well-known TCP services (6000)”

Page 40
Testing Dynamic RulesWalk Through
No need to enable extra filtering

Page 41
Testing Dynamic RulesWalk Through
Review the service summary
• Click “Finish”

Page 42
Testing Dynamic RulesWalk Through
Create a rule, using the created
service (HTTP58581)
• Select sub-domain “Development/HEL”
• Define an inbound rule, allowing web interface remote access only from the console.

Page 43
Testing Dynamic RulesWalk Through
Create a second rule, using the same service
• Select sub-domain “Development/HEL”
• Define an inbound deny rule, restricting connections to the local web interface from all remote hosts
• Enable alerting (type: security alert)
• Name the rule “Restrict access to WebUI (inbound)”
Important: This rule has to be placed after the rule created on the previous page!

Page 44
Testing Dynamic RulesWalk Through
Open Internet Explorer on your console
• Connect to http://<wks ip address>:58581/
• Why does it work?
• Ask your neighbour to establish a connection to the host’s web interface
• Monitor the console and host alerts
• Anything unusual?
• Disable the “Restrict access to WebUI (inbound)” rule (distribute policies)
• Ask your neighbour to connect again. Why does it work now?

Page 45
Testing Dynamic RulesWalk Through
1. Static rules are enabled, only
connections from the console are
allowed. Why?
• Static rules are applied before dynamic rules
• The 3rd static rule blocks all remote web interface connections from hosts other than the console
2. With disabled static rules, the
connection works from everywhere!
Why?
• The firewall daemon (fsdfwd.exe) is listening by default to port 58581
1
2

Page 46
Task 3: Managing Application Control
Goal: Configure a safe Application Control environment
Select sub-domain ”Development/HEL”
• Create rules for the following applications
• Internet Explorer (allow establishing of outbound connections only!)
• Nslookup (allow inbound connection listen only!)
• Restrict all new (unknown) applications from establishing connections
• Both client and server applications
• Create a custom message, applied when unknown applications try to establish connections.
=> After you completed this task, continue on page 54

Page 47
Managing Application ControlWalk Through
Create an Application Control list
• Select the root policy domain (F-Secure)
• Start your list with the Internet Explorer (IEXPLORE.EXE)
• Click “Create Rule(s)”

Page 48
Managing Application ControlWalk Through
Choose the application control rule type
• Allow IEXPLORE.EXE acting as client (outbound)
• Deny IEXPLORE.EXE acting as server (inbound)
Page 49
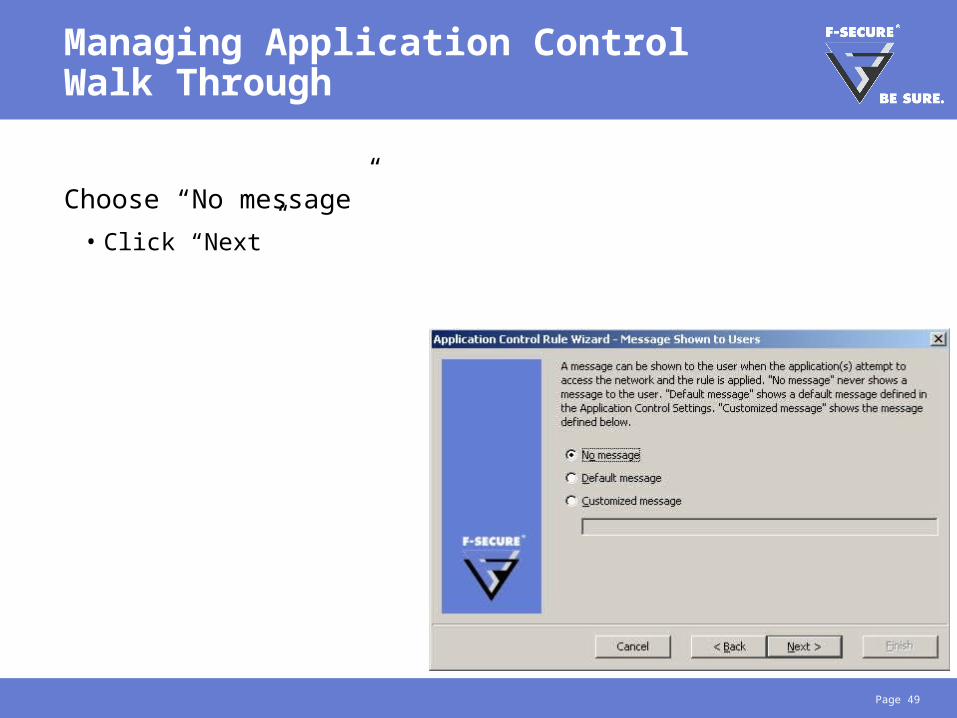
Managing Application ControlWalk Through
Choose “No message”
• Click “Next”

Page 50
Managing Application ControlWalk Through
Apply this rule to the whole policy domain
• Choose “F-Secure” and click “Finish”
Page 51
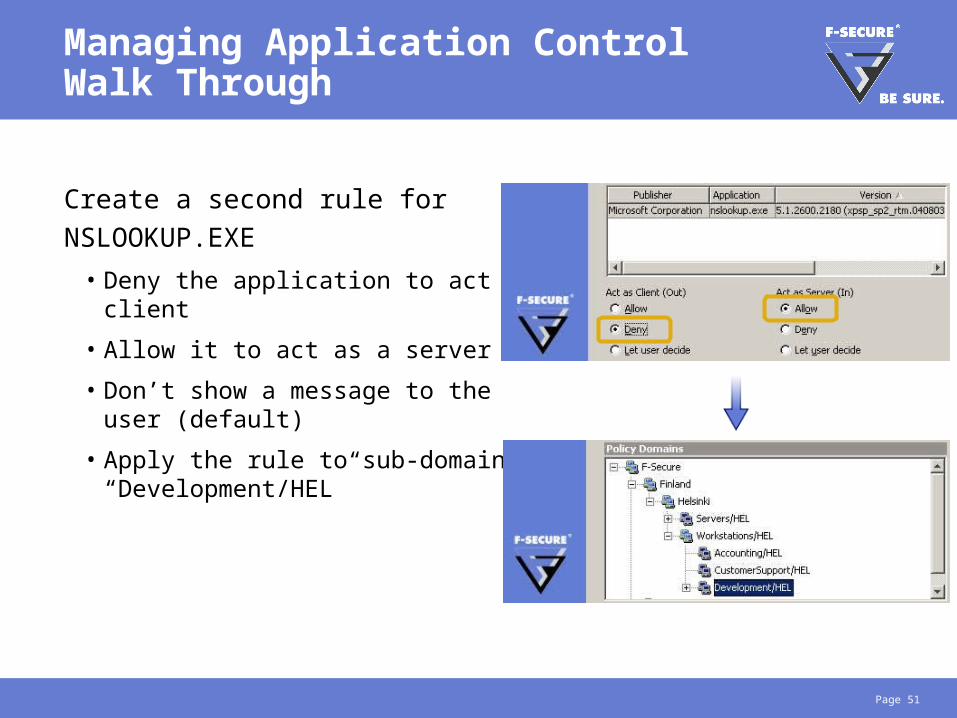
Managing Application ControlWalk Through
Create a second rule for
NSLOOKUP.EXE
• Deny the application to act as client
• Allow it to act as a server
• Don’t show a message to the user (default)
• Apply the rule to sub-domain “Development/HEL”

Page 52
Managing Application ControlWalk Through
Check your Application Control rule list
• Activate sub-domain “Development/HEL”

Page 53
Managing Application ControlWalk Through
As a next step, you deny all new,
unknown applications
• Activate sub-domain “Development/HEL”
• Deny both unknown client and server applications
• Enable default messages for unknown applications (define a custom message)
• Distribute policies

Page 54
Managing Application ControlSystem Testing
Test your Application Control list
• Open Internet Explorer
• Client application should be allowed
• Open the command prompt (run => cmd)
• Type in: “nslookup www.f-secure.com”
• Server application should be allowed
• Type in: “ping <some IP address>”
• Client application will generate a connection prompt
• What is the reason for this behaviour?

Page 55
Managing Application ControlSystem Testing
Ping.exe was rejected, because the current
policy denies all new, unknown application
connections
• Ping.exe has been automatically added to the application control list
• This is the recommended behaviour for real environments!
For the remaining hands-on tasks, it is more
convenient to restore the default settings
• Select sub-domain “Development/HEL”
• Clear “default action for client/server applications”
• Distribute policies

Page 56
Task 4: Testing Network Quarantine
Before you start testing, check the current policy for sub-domain
”Development/HEL”
• Will it allow you to test the feature?
• Check the Network Quarantine default configuration
• What network connections will be possible, once the host access is restricted?
Test Network Quarantine
• Try to quarantine your host without disabling real-time scanning!
=> Congratulations, you completed the Internet Shield Hands-On

Page 57
Testing Network QuarantineWalk Through
Network Quarantine doesn’t need any special configuration
• Default settings are OK
• Lower the virus definitions age time value (e.g. 1 minute)
• Distribute policies

Page 58
Testing Network QuarantineWalk Through
Change to your host
• Monitor your Internet Shield security level (it will change to: “Access restricted”)

Page 59
Testing Network QuarantineWalk Through
Allowed network connections
• F-Secure updates from
• F-Secure Root Update Server
• Automatic Update Server (AUS)
• Automatic Update Proxy (AUP)
• Inbound restricted ICMP allowed (e.g. destination unreachable)
• All other traffic (inbound & outbound) is denied

Page 60
Internet Shield Hands-On
That’s it! You have now completed the Internet Shield Administration
Hands-On.