Embed Size (px)
Citation preview

UNIT 3
ADDITIONAL CONTROLS AND
MENUS OF WINDOWS
1

SYLLABUS
3.1 Working with other controls of toolbox :
3.1.1 Date Time Picker
3.1.2 List Box
3.1.2.1 Item collection
3.1.3 Combo Box
3.1.4 Picture Box
3.15 Rich textbox
3.1.6 Progress Bar
3.1.7 Masked Text Box
2

SYLLABUS
3.1.8 Link Label
3.1.9 Checked list box
3.1.10 Scroll bar
3.1.11 Timer
3.2 Working with menu
3.2.1 Menu strip
3.2.2 Context Menu
3.3.3 Toolstrip
3

3.1 WORKING WITH OTHER CONTROLS
OF TOOLBOX :
3.1.1 Date Time Picker:
The Date Time Picker control allows selecting a dateand time by editing the displayed values in the control.
If you click the arrow in the Date Time Picker control,
it displays a month calendar, like a combo box control.
The user can make selection by clicking the requireddate. The new selected value appears in the text boxpart of the control.
4

CONT….
5
Properties:

CONT….
6
Method:
Event:

EXAMPLE
In this example, let us create a small application
for calculating days of leave.
Let us add two Date Time Picker controls on the
form, where the user will enter the date of going
on leave and the date of joining.
7

CONT…
8

The List Box represents a Windows control to display a
list of items to a user.
A user can select an item from the list.
It allows the programmer to add items at design time
by using the properties window or at the runtime.
9
3.1.2 List Box:

CONT….
10
Properties:

CONT….
11
Method:
Event:

EXAMPLE
Drag and drop two labels, a button and a List
Box control on the form.
Set the Text property of the first label to provide
the caption "Choose your favorites destination for
higher studies".
Set the Text property of the second label to
provide the caption "Destination". The text on
this label will change at runtime when the user
selects an item on the list.
12

CONT…
13

EXAMPLE
14

The Combo Box control is used to display a drop-
down list of various items.
It is a combination of a text box in which the user
enters an item and a dropdown list from which the
user selects an item
15
3.1.3 Combo Box:

CONT….
16
Properties:

CONT….
17
Method:

CONT….
18
Event:

CONT..
In this example, let us fill a combo box with
various items, get the selected items in the combo
box and show them in a list box and sort the
items.
Drag and drop a combo box to store the items, a
list box to display the selected items, four button
controls to add to the list box with selected items,
to fill the combo box, to sort the items and to
clear the combo box list, respectively.
19

EXAMPLE
20

The Picture box is used for displaying images on the
form.
The image property of the control allow you to set an
image at run time or at design time.
21
3.1.4 Picture Box:

CONT….
22
Properties:

CONT….
23
Method:
Event:

EXAMPLE
24

The Rich Textbox control is the core of a full-blown
word processor.
It provides all the functionality of a Textbox control.
It can handle multiple typefaces, sizes, and attributes,
and offers precise control over the margins of the text.
25
3.1.5 Rich Text Box:

CONT….
26
Properties:

CONT….
27
Method:

CONT….
28
Event:

EXAMPLE
29

It represents a Windows progress bar control.
It is used to provide visual feedback to your users
about the status of some task.
It shows a bar that fills in from left to right as the
operation progresses.
The Progress Bar control is typically used when an
application performs tasks such as copying files or
printing documents
30
3.1.6 Progress bar:

CONT….
31
Properties:

CONT….
32
Method:
Event:

EXAMPLE
33

A Masked Textbox control provides validation
mechanism for user input on a Form.
To create a Masked Textbox control at design-time,
you simply drag and drop a Masked Textbox control
from Toolbox to a Form in Visual Studio.
34
3.1.7 Masked Text Box:

CONT….
35
Properties:

EXAMPLE
36

CONT…
37

Link Label Control is an extension of Label control to
display one or more hyperlinks.
This Class is inherited from the Label Class so all the
functions of the label control can be used with the link
label control.
38
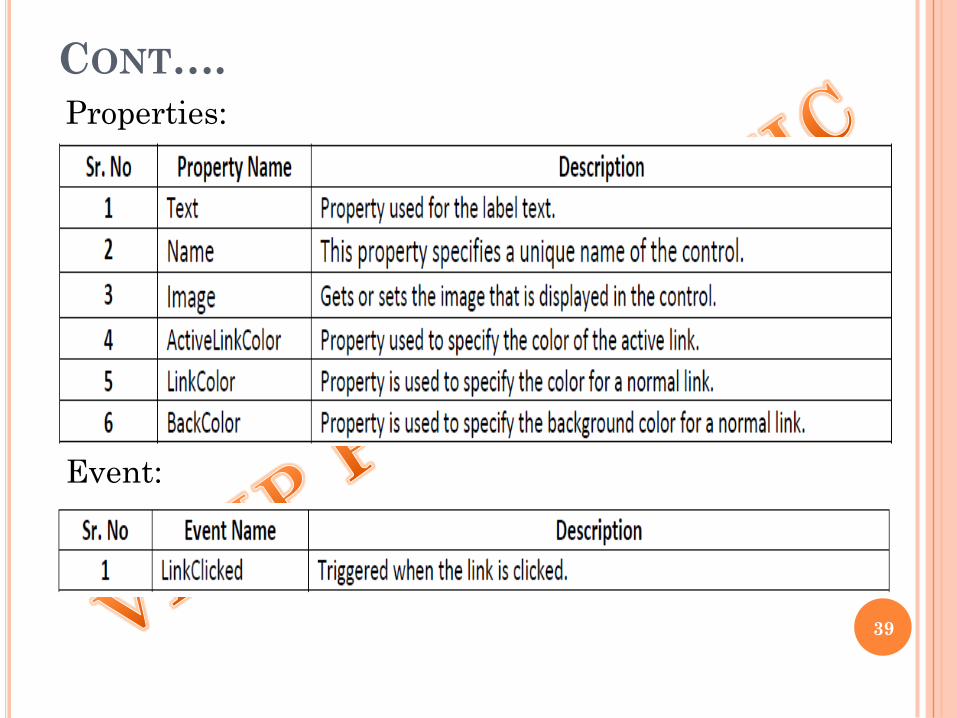
3.1.8 Link Label:
CONT….
39
Properties:
Event:

LINK LABEL EXAMPLE
40

A CheckedListBox control is a List Box control with
Checkbox displayed in the left side where user can
select a single or multiple items.
41
3.1.9 Check List Box:
Properties:

CONT….
42
Method:
Event:

EXAMPLE
43

The Scrollbar controls display vertical and horizontal
scroll bars on the form.
This is used for navigating through large amount of
information.
There are two types of scroll bar controls:
1) HScrollBar for horizontal scroll bars and
2) VScrollBar for vertical scroll bars.
44
3.1.10 Scroll Bars:

CONT….
45
Properties:

CONT…
46
Event:

EXAMPLE
47

Timer Control is used to set time intervals, this
control is visible only at design time and not in the
runtime.
48
3.1.11 Timer:
Properties:

CONT….
49
Event:
Method:

EXAMPLE
50

EXAMPLE
51

3.2 WORKING WITH MENU:
First of all click on the Microsoft Visual Studio click on
the new project ,now select windows application give
title “Working_With_Menus”
Now from the toolbox of drag and drop the menu strip
control on the form, which is shown in next slide,
52

CONT….
53

CONT….
54
After adding this control to the form, we have to
create menu, so for that take your cursor on to
the menu strip control on the form, now write the
name of the menus which you have to create.

3.2.1 MENU STRIP
55
We had created menu strip which contains menu
like Sign In, Student, Faculty, Admin,HR,
Nontechnical.
Now if we want to create sub menu of the
Student menu, then keep your mouse on the
Student menu and then click on that menu, it
will automatically create a submenu of student
menu, then you can create submenu

CONT….
56
If we want to create a sub option in the sub
menu, then also we can do that, just go to the sub
menu name and click there, we can create that
also, which is shown below

CONT….
57
If you want delete a menu then just go that menu
and press DELETE button , then it will be
deleted from the menu bar.
If you want to assign any kind of short cut to
menu, then go to that menu , for example, we
want to assign short cut menu to the New
Student menu, than click on the New Student
menu and click on the properties of that menu.
In this menu we assigning short cut keys like
CTRL + N

CONT….
58

CONT….
59
PopUp Menu
In VB.NET we have the functionality of the
context menu strip.
So firstly drag and drop the control context menu
strip on the form

CONT….
60

CONT….
61
3.2.2 Context Menu Strip
Now add one button on the form, after that click
on the button, in the button properties there will
be one property called Context Menu Strip, select
there our context menu strip.

CONT….
62
Now for the popup menu, run the project then,
after execute the project, and right click on the
button, so at that time you can see the context
menu (popup) menu.

3.2.3 TOOL STRIP
Tool Strip control provides functionality of a
Windows toolbar controls in Visual Studio 2010.
Tool Strip class represents a Tool Strip control in
Windows Forms and serves as a base class of
Menu Strip, Status Strip, and Context Menu
Strip classes.
63

EXAMPLE
64